


 Loading...
Contents |
Connections |
Playback |
Settings |
Tips |
Appendix |
|
|
|
|
|
|
AVR-S500BT
AV SURROUND RECEIVER
Owner’s Manual
Front panel |
Display |
Rear panel |
1 |
Remote |
Index |

Contents |
Connections |
Playback |
Settings |
Tips |
Appendix |
Accessories |
5 |
|
|
|
Inserting the batteries |
6 |
|
|
Operating range of the remote control unit |
6 |
|
|
Features |
7 |
|
|
High quality sound |
7 |
|
|
High performance |
7 |
|
|
Easy operation |
9 |
|
|
|
|
|
Part names and functions |
10 |
|
|
|
Front panel |
10 |
|
|
Display |
13 |
|
|
Rear panel |
14 |
|
|
Remote control unit |
16 |
|
Connections |
|
|
|
Connecting speakers |
20 |
|
|
|
Speaker installation |
20 |
|
|
Speaker connection |
22 |
|
|
Standard speaker configuration and connection |
24 |
|
|
Connecting a TV |
25 |
|
|
Connection 1 : TV equipped with an HDMI connector |
26 |
|
|
Connection 2 : TV equipped without an HDMI connector |
27 |
|
Connecting a playback device |
28 |
|
|
|
Connecting a DVD player or Blu-ray Disc player |
29 |
|
|
Connecting a set-top box (Satellite tuner/cable TV) |
30 |
|
|
Connecting a video camcorder or game console |
31 |
|
|
Connecting a USB memory device to the USB port |
32 |
|
Connecting an FM/AM antenna |
33 |
||
Connecting the power cord |
35 |
||
Playback |
|
|
|
Basic operation |
37 |
||
|
Turning the power on |
37 |
|
|
Selecting the input source |
37 |
|
|
Adjusting the volume |
38 |
|
|
Turning off the sound temporarily (Muting) |
38 |
|
|
Playback a DVD player/Blu-ray Disc player |
38 |
|
Playing a USB memory device |
39 |
|
|
|
Playing files stored on USB memory devices |
40 |
|
|
Listening to music on a Bluetooth device |
41 |
|
|
Pairing with a Bluetooth device |
42 |
|
|
Playing a Bluetooth device |
43 |
|
|
Pairing with the Pairing Mode |
44 |
|
Front panel |
Display |
Rear panel |
2 |
Remote |
Index |
Contents |
Connections |
Playback |
Settings |
Tips |
Appendix |
Listening to FM/AM broadcasts |
45 |
|
|
|
Listening to FM/AM broadcasts |
46 |
|
|
Tuning in to stations and presetting them automatically (Auto |
47 |
|
|
Preset) |
|
|
|
Presetting the current broadcast station (Preset Memory) |
48 |
|
|
Listening to preset stations |
48 |
|
|
Skipping preset broadcast stations (Preset Skip) |
49 |
|
|
Cancelling Preset Skip |
49 |
|
|
Convenience functions |
50 |
|
|
Performing repeat playback (Repeat) |
51 |
|
|
Performing random playback (Random) |
51 |
|
|
Adjusting the tone (Tone) |
52 |
|
|
Optimizing the night time listening volume (Night Mode) |
53 |
|
|
Displaying your desired video during audio playback (Video |
54 |
|
|
Select) |
|
|
|
Selecting a sound mode |
55 |
|
|
Selecting a sound mode |
55 |
|
|
Adjusting the volume of each channel to match the input |
59 |
|
source (Ch Level Adjust) |
|
||
Sleep timer function |
60 |
|
|
|
Using the sleep timer |
60 |
|
Quick select plus function |
61 |
||
|
Calling up the settings |
62 |
|
|
Changing the settings |
62 |
|
|
|
|
|
Settings |
|
|
|
Menu map |
63 |
|
|
|
Menu operations |
66 |
|
Audio |
67 |
||
|
Surr.Parameter |
67 |
|
|
Restorer |
70 |
|
|
Audio Delay |
71 |
|
|
Volume |
71 |
|
|
Room EQ |
72 |
|
Video |
73 |
|
|
|
HDMI Audio Out |
73 |
|
|
HDMI PassThrough |
73 |
|
|
Pass Source |
74 |
|
Inputs |
75 |
||
|
Input Assign |
75 |
|
|
Source Level |
75 |
|
|
Input Select |
76 |
|
Front panel |
Display |
Rear panel |
3 |
Remote |
Index |

Contents |
Connections |
Playback |
Settings |
Tips |
Appendix |
Speakers |
77 |
|
|
Auto Setup |
77 |
|
|
|
Procedure for speaker settings (Auto Setup) |
79 |
|
|
Error messages |
81 |
|
Manual Setup |
82 |
|
|
|
Speaker Config. |
82 |
|
|
Distances |
83 |
|
|
Levels |
84 |
|
|
Crossovers |
84 |
|
|
Bass |
85 |
|
General |
86 |
|
|
|
Language |
86 |
|
|
ECO |
86 |
|
|
Front Display |
88 |
|
|
Firmware |
88 |
|
|
Setup Lock |
88 |
|
|
Checking the information |
89 |
|
Tips
|
Tips |
91 |
|
|
Troubleshooting |
92 |
|
|
Resetting factory settings |
103 |
|
Appendix |
|
|
|
About HDMI |
104 |
|
|
Playing back a USB memory devices |
106 |
|
|
Playing back a Bluetooth device |
107 |
|
|
Personal memory plus function |
108 |
|
|
Last function memory |
108 |
||
Sound modes and channel output |
109 |
|
|
Sound modes and surround parameters |
110 |
|
|
Types of input signals, and corresponding sound modes |
111 |
|
|
Explanation of terms |
112 |
|
|
Trademark information |
117 |
||
Specifications |
118 |
||
Index |
122 |
|
|
Front panel |
Display |
Rear panel |
4 |
Remote |
Index |

Contents |
Connections |
Playback |
Settings |
Tips |
Appendix |
Thank you for purchasing this Denon product.
To ensure proper operation, please read this owner’s manual carefully before using the product.
After reading this manual, be sure to keep it for future reference.
Accessories
Check that the following parts are supplied with the product.
Quick Start Guide |
Safety Instructions |
Notes on radio |
Warranty |
|
|
|
|
(for North America model |
|
|
|
|
only) |
|
FM indoor antenna |
AM loop antenna |
Sound calibration |
Remote control unit |
R03/AAA batteries |
|
|
microphone |
(RC-1196) |
|
Front panel |
Display |
Rear panel |
5 |
Remote |
Index |

Contents |
Connections |
Playback |
Settings |
Tips |
Appendix |
|
|
|
|
|
|
Inserting the batteries
1Remove the rear lid in the direction of the arrow and remove it.
2Insert two batteries correctly into the battery compartment as indicated.
R03/AAA batteries
NOTE
0 To prevent damage or leakage of battery fluid:
0Do not use a new battery together with an old one.
0Do not use two different types of batteries.
0Remove the batteries from the remote control unit if it will not be in use for long periods.
0If the battery fluid should leak, carefully wipe the fluid off the inside of the battery compartment and insert new batteries.
Operating range of the remote control unit
Point the remote control unit at the remote sensor when operating it.
Approx. 23 ft/7 m 
 30° 30°
3Put the rear cover back on.
Front panel |
Display |
Rear panel |
6 |
Remote |
Index |
Contents |
Connections |
Playback |
Settings |
Tips |
Appendix |
Features
High quality sound
0With discrete circuit technology, the power amplifier provides identical quality for all 5-channels (90 Watts x 5-channels)
For optimum realism and stunning dynamic range, the power amplifier section features discrete power devices (not integrated circuitry).
By using high current, high power discrete power devices, the amplifier is able to easily drive high quality speakers.
High performance
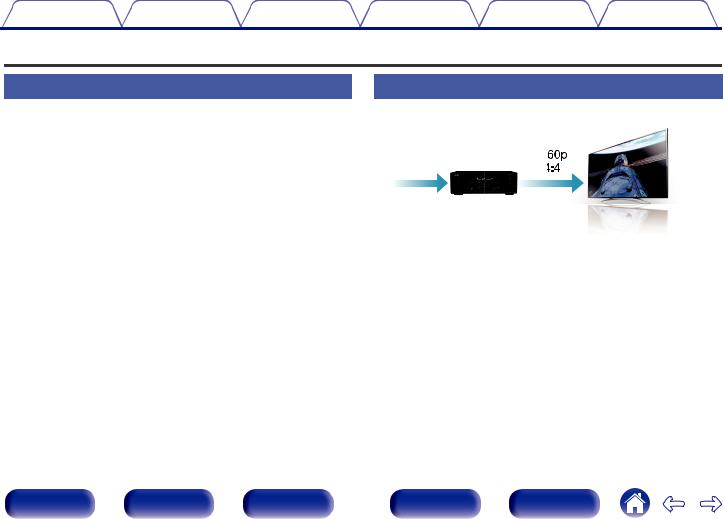
0 4K 60Hz input/output supported
4K 60p |
4K |
4:4:4 |
|
When 4K Ultra HD (High Definition) is used, an input/output speed of 60 frames per second (60p) is achieved for video signals. When connected to 4K Ultra HD and 60p video signal input compatible TV, you can enjoy the sense of realism only available from high-definition images, even when viewing fast-moving video.
This unit also supports image processing for 4K 60p, 4:4:4 and 24-bit videos. By processing the video at the original resolution, this unit lets you enjoy flawless, high-definition picture quality.
Front panel |
Display |
Rear panel |
7 |
Remote |
Index |

Contents |
Connections |
Playback |
Settings |
Tips |
Appendix |
0HDMI connections enable connection to various digital AV devices (5 inputs, 1 output)
5In /Out1
This unit is equipped with 5 HDMI inputs and 1 HDMI output enabling connection to various HDMI compatible devices such as Blu-ray Disc players, game consoles and HD video camcorders.
0Wireless connection with Bluetooth devices can be carried out easily (v p. 41)
You can enjoy music simply by connecting wirelessly with your smartphone, tablet, PC, etc.
0Energy-saving design
This unit is equipped with an ECO Mode function that allows you to enjoy music and movies while reducing the power consumption during use, and also an auto-standby function that automatically turns off the power supply when the unit is not in use. This helps reduce unnecessary power use.
Front panel |
Display |
Rear panel |
8 |
Remote |
Index |

Contents |
Connections |
Playback |
Settings |
Tips |
Appendix |
|
|
|
|
|
|
Easy operation
0“Setup Assistant” provides easy-to-follow setup instructions
First select the language when prompted. Then simply follow the instructions displayed on the TV screen to set up the speakers etc.
0Easy to use Graphical User Interface
This unit is equipped with a Graphical User Interface for improved operability.
Front panel |
Display |
Rear panel |
9 |
Remote |
Index |

Contents |
Connections |
Playback |
Settings |
Tips |
Appendix |
Part names and functions
Front panel
Aq wB |
SOURCE SELECT |
eC Dr |
tE |
Gu |
Hi |
Io |
JQ0KQ1 LQ2 MQ3 |
SOUND MODE |
TUNER |
TUNE |
BAND |
MODE |
DIMMER |
STATUS |
|
PRESET CH |
|||||||
|
|
|
|
|
|
|
|
1 CBL/SAT |
2 DVD/Blu-ray |
3 GAME |
4 Bluetooth |
|
|
|
QUICK SELECT |
|
|
PHONES |
ON / OFF |
BASS / |
ADJUST |
|
SETUP MIC |
|
TREBLE |
|
|
||
|
|
|
|
|
|
|
|
TONE CONTROL |
|
5V/1A |
|
yF |
MASTER VOLUME |
NQ4 OQ5Q6P Q7 RQ8 SQ9 W0T
Front panel |
Display |
Rear panel |
10 |
Remote |
Index |
Contents |
Connections |
Playback |
Settings |
Tips |
Appendix |
|
|
|
|
|
|
qw |
|
e r |
|
|
t |
|
|
|
y |
|
|
|
|
|
|
|
|
|
MASTER VOLUME |
|
SOURCE SELECT |
u |
|
i |
o |
Q0Q1Q2Q3 |
|||
|
|
|
|||||||
|
|
SOUND MODE |
|
TUNER |
TUNE |
BAND |
MODE |
DIMMER |
STATUS |
|
|
|
PRESET CH |
||||||
|
|
|
|
1 CBL/SAT |
2 DVD/Blu-ray 3 GAME |
4 Bluetooth |
|
|
|
|
|
|
|
|
QUICK SELECT |
|
|
|
|
|
|
PHONES |
ON / OFF |
BASS / |
ADJUST |
|
|
|
SETUP MIC |
|
|
|
TREBLE |
|
|
|
|
||
|
|
|
|
TONE CONTROL |
|
5V/1A |
|
|
|
A Power operation button (X)
Used to turn the power on/off (standby). (v p. 37)
B Power indicator
This is lit as follows according to the power status:
0Green : Power on
0Off: Normal standby
0Red:
0 When “HDMI PassThrough” (v p. 73) is set to “On” 0 When “BluetoothStandby” (v p. 87) is set to “On”
C SOURCE SELECT knob
This selects the input source. (v p. 37)
D Remote control sensor
This receives signals from the remote control unit. (v p. 6)
EDisplay
This displays various pieces of information. (v p. 13)
F MASTER VOLUME knob
This adjusts the volume level. (v p. 38)
G SOUND MODE buttons (0 1)
These select the sound mode. (v p. 55)
H Tuner preset channel buttons
(TUNER PRESET CH +, –)
These select preset broadcast stations. (v p. 48)
I Tuning buttons (TUNE +, –)
Select either FM broadcast or AM broadcast. (v p. 46)
J Reception band select button (BAND)
This switches the reception band.
K Tuning mode select button (MODE)
This switches the tuning mode. (v p. 46)
L DIMMER button
Each press of this switches the brightness of the display. (v p. 88)
M STATUS button
Each press of this switches the status information that is shown on the display. (v p. 43)
Front panel |
Display |
Rear panel |
11 |
Remote |
Index |

Contents |
Connections |
Playback |
Settings |
Tips |
Appendix |
|
|
|
|
|
|
MASTER VOLUME
SOURCE SELECT
SOUND MODE |
|
TUNER |
TUNE |
BAND |
MODE |
DIMMER |
STATUS |
|
PRESET CH |
||||||
|
|
1 CBL/SAT |
2 DVD/Blu-ray 3 GAME |
4 Bluetooth |
|
|
|
|
|
|
QUICK SELECT |
|
|
|
|
PHONES |
ON / OFF |
BASS / |
ADJUST |
|
|
|
SETUP MIC |
|
TREBLE |
|
|
|
|
||
|
|
TONE CONTROL |
|
5V/1A |
|
|
|
Q4Q5Q6Q7Q8Q9W0
N Headphones jack (PHONES)
This is used to connect headphones.
When the headphones are plugged into this jack, audio will no longer be output from the connected speakers or from the SUBWOOFER connectors.
NOTE
To prevent hearing loss, do not raise the volume level excessively when using headphones.
O TONE CONTROL ON/OFF button
Set the tone control function to on/off. (v p. 52)
P BASS/TREBLE button
Selects the range for which to adjust the tone. (v p. 52)
QTone adjustment buttons (ADJUST0 1)
Adjusts the tonal quality of the sound. (v p. 52)
R QUICK SELECT buttons
With a single press of any of these buttons, you can call up various settings you’ve registered to each button such as the input source, volume level and sound mode settings. (v p. 61)
S USB port
This is used to connect USB storages (such as USB memory devices) and the USB cable supplied. (v p. 32)
T SETUP MIC jack
This is used to connect the supplied Sound calibration microphone. (v p. 79)
BASS/TREBLE button and ADJUST 0 1 buttons can be operated when the “Tone” (v p. 52) setting is “On”.
Front panel |
Display |
Rear panel |
12 |
Remote |
Index |
Contents |
Connections |
Playback |
Settings |
Tips |
Appendix |
|
|
|
|
|
|
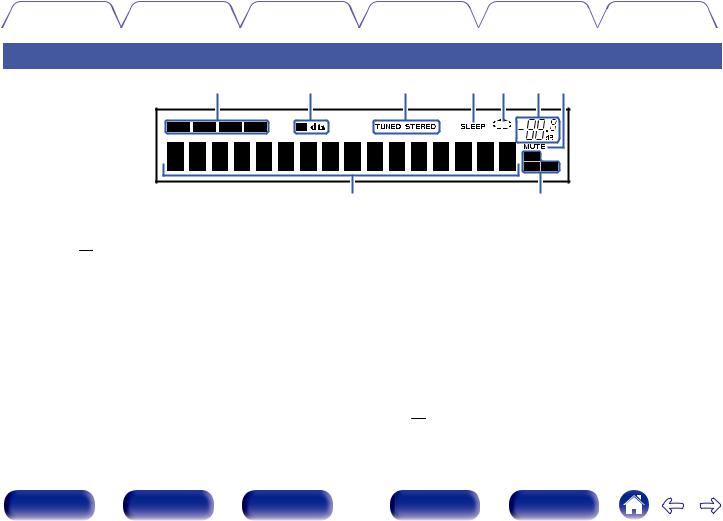
Display
q |
w |
e |
r |
t |
y u |
|
i |
|
|
|
o |
A Input mode indicators
These light according to the audio input mode settings of each input source. (v p. 76)
B Decoder indicators
These light when Dolby or DTS signals are input or when the Dolby or DTS decoder is running.
C Tuner reception mode indicators
These light up according to the reception conditions when the input source is set to “Tuner”.
TUNED: Lights up when the broadcast is properly tuned in. STEREO: Lights up when receiving FM stereo broadcasts.
D Sleep timer indicator
This lights when the sleep mode is selected. (v p. 60)
E Circle indicator
This is displayed when the input source is “USB” when you are playing back music.
F Volume indicator
G MUTE indicator
This blinks while the sound is muted. (v p. 38)
H Information display
The input source name, sound mode, setting values and other information are displayed here.
I Input signal indicators
The respective indicator will light corresponding to the input signal. (v p. 76)
Front panel |
Display |
Rear panel |
13 |
Remote |
Index |
Contents |
Connections |
Playback |
Settings |
Tips |
Appendix |
|
|
|
|
|
|
Rear panel
|
Aq |
|
wB |
|
|
|
|
Ce |
|
|
||
VIDEO |
IN |
VIDEO OUT |
OPTICAL |
|
|
HDMI IN |
|
|
|
HDMI OUT |
||
|
|
MONITOR |
1 |
2 |
|
|
|
|
|
|
|
|
CBL/SAT |
MEDIA |
SUBWOOFER |
TV AUDIO |
MEDIA |
|
|
|
|
|
|
|
|
PLAYER |
PLAYER |
2 |
DVD/ |
3 |
MEDIA |
|
4 Blu-ray |
5 GAME |
|
|||
|
|
|
|
1 CBL/SAT |
|
MONITOR |
||||||
|
|
1 |
|
|
|
Blu-ray |
|
PLAYER |
(4K) |
(4K) |
|
|
|
|
|
|
|
|
|
|
|
|
|||
|
|
|
|
COAXIAL |
|
|
|
|
|
|
|
|
|
|
2 |
|
CBL/SAT |
|
|
|
|
|
|
|
|
|
|
|
(ASSIGNABLE) |
|
|
|
|
|
|
|
|
|
AUDIO |
IN |
PRE OUT |
DIGITAL AUDIO IN |
|
|
|
|
|
|
|
|
|
ANTENNA |
|
|
SPEAKERS |
IMPEDANCE : 6 |
16 |
|
|
|
|
|
||
|
FRONT |
CENTER |
SURROUND |
AM |
FM |
|
|
|
75 |
|
|
CLASS 2 WIRING
tE Fy Gu |
iH |
Dr |
Front panel |
Display |
Rear panel |
14 |
Remote |
Index |

Contents |
Connections |
Playback |
Settings |
Tips |
Appendix |
|
|
|
|
|
|
|
q |
w |
|
|
|
e |
|
r |
|||
VIDEO |
IN |
VIDEO OUT |
OPTICAL |
|
|
HDMI IN |
|
|
HDMI OUT |
||
|
|
MONITOR |
1 |
2 |
|
|
|
|
|
|
|
CBL/SAT |
MEDIA |
SUBWOOFER |
TV AUDIO |
MEDIA |
|
|
|
|
|
|
|
PLAYER |
PLAYER |
|
DVD/ |
|
MEDIA |
|
|
|
|||
|
|
1 |
|
1 CBL/SAT |
2 |
Blu-ray |
3 |
PLAYER |
4 Blu-ray |
5 GAME |
MONITOR |
|
|
|
|
|
|
|
|
(4K) |
(4K) |
|
|
|
|
|
|
COAXIAL |
|
|
|
|
|
|
|
|
|
2 |
|
CBL/SAT |
|
|
|
|
|
|
|
|
|
|
|
) |
|
|
|
|
|
|
|
AUDIO |
IN |
PRE OUT |
DIGITAL AUDIO IN |
|
|
|
|
|
|
|
|
ANTENNA |
|
|
SPEAKERS |
IMPEDANCE : 6 |
16 |
|
|
|
|
||
|
FRONT |
CENTER |
SURROUND |
AM |
FM |
|
|
|
75 |
|
|
CLASS 2 WIRING
t y u i
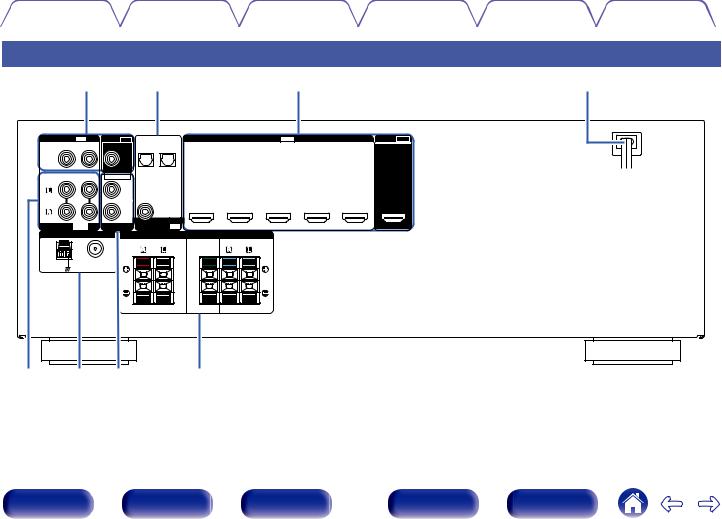
A Video connectors (VIDEO)
Used to connect devices equipped with video connectors. (v p. 30)
B Digital audio connectors (DIGITAL AUDIO)
Used to connect devices equipped with digital audio connectors. (v p. 27, 30)
C HDMI connectors
Used to connect devices equipped with HDMI connectors. (v p. 26, 29, 30, 31)
D Power cord (v p. 35)
E Analog audio connectors (AUDIO)
Used to connect devices equipped with analog audio connectors. (v p. 30)
F FM/AM antenna terminals (ANTENNA)
Used to connect FM antennas and AM loop antennas. (v p. 33)
G PRE OUT connectors
Used to connect a subwoofer with a built-in amplifier. (v p. 23)
H Speaker terminals (SPEAKERS)
Used to connect speakers. (v p. 22)
Front panel |
Display |
Rear panel |
15 |
Remote |
Index |

Contents |
Connections |
Playback |
Settings |
Tips |
Appendix |
|
|
|
|
|
|
Remote control unit
q |
ECO |
|
|
POWER |
Q |
|
|
|
|
||
w |
|
QUICK SELECT |
|
|
|
1 |
2 |
3 |
4 |
|
|
|
|
DVD/ |
FM |
MEMORY |
|
|
CBL/SAT Blu-ray |
|
|||
|
Blu-ray GAME |
AM |
MODE |
|
|
e |
MEDIA |
USB |
|
|
|
PLAYER |
|
|
|
||
|
TVAUDIO Bluetooth CHANNEL |
TUNE |
|
||
r |
CH LEVEL RESTORER |
SLEEP |
SEARCH |
|
|
t |
INFO |
|
OPTION |
|
|
y |
|
|
|
|
|
u |
|
ENTER |
|
VOLUME |
|
|
BACK |
|
SETUP |
|
|
|
|
|
|
MUTE |
|
SOUND MODE |
AUDIO DELAY |
A ECO Mode button
This switches to ECO Mode. (v p. 86)
B QUICK SELECT buttons (1 – 4)
These call up settings registered to each button, such as input source, volume level and sound mode settings. (v p. 61)
C Input source select buttons
These select the input source. (v p. 37)
D Channel level button (CH LEVEL)
Adjusting the volume of the speakers. (v p. 59)
E RESTORER button
Expands the low and high frequency components of compressed audio content such as MP3 files to enable richer audio playback.
(v p. 70)
F Information button (INFO)
This displays the status information on the TV screen. (v p. 89)
G Cursor buttons (uio p)
These select items. (v p. 66)
Front panel |
Display |
Rear panel |
16 |
Remote |
Index |
Contents |
Connections |
Playback |
Settings |
Tips |
Appendix |
|
|
|
|
|
|
Q2
|
|
|
POWER |
Q3 |
ECO |
|
|
|
|
|
QUICK SELECT |
|
|
|
1 |
2 |
3 |
4 |
|
DVD/
CBL/SAT Blu-ray FM MEMORY
 Q4
Q4
Blu-ray GAME AM MODE
MEDIA
PLAYER USB
TVAUDIO Bluetooth CHANNEL TUNE
|
CH LEVEL RESTORER |
SLEEP SEARCH |
|
INFO |
OPTION |
|
ENTER |
VOLUME |
i |
|
|
o |
BACK |
SETUP |
MUTE
Q0
Q1 |
|
SOUND MODE |
AUDIO DELAY |
H ENTER button
This determines the selection. (v p. 66)
I BACK button
This returns to the previous screen. (v p. 66)
J System buttons
These perform playback related operations. (v p. 40)
0Skip buttons (8, 9)
0Play/pause button (1/3)
K SOUND MODE buttons (0 1)
These select the sound mode. (v p. 55)
L Remote control signal transmitter
This transmits signals from the remote control unit. (v p. 6)
M POWER button (X)
This turns the power on/off. (v p. 37)
N Preset memory button (MEMORY)
The current broadcast station that is preset. (v p. 48)
Front panel |
Display |
Rear panel |
17 |
Remote |
Index |
Contents |
Connections |
Playback |
Settings |
Tips |
Appendix |
|
|
|
|
|
|
POWER
ECO
QUICK SELECT
1 |
2 |
3 |
4 |
DVD/
CBL/SAT Blu-ray FM MEMORY
Blu-ray GAME AM MODE
 Q5
Q5
MEDIA
PLAYER USB
TVAUDIO Bluetooth CHANNEL TUNE  Q6
Q6
CH LEVEL RESTORER SLEEP SEARCH |
Q7 |
|
Q8 |
||
INFO |
OPTION |
Q9 |
ENTER |
VOLUME |
W0 |
BACK |
SETUP |
W1 |
MUTE

 W2
W2
|
W3 |
SOUND MODE |
AUDIO DELAY |
O Tuning mode select button (MODE)
This switches the tune mode. (v p. 46)
P Tuning buttons (TUNE +, –)
These select either FM broadcast or AM broadcast. (v p. 46)
Q Channel buttons (CHANNEL +, –)
These select preset radio stations. (v p. 48)
R SLEEP button
This sets the sleep timer. (v p. 60)
S OPTION button
This displays the option menu on the TV screen. (v p. 50)
T VOLUME buttons (df)
These adjust the volume level. (v p. 38)
U SETUP button
This displays the menu on the TV screen. (v p. 66)
V MUTE button (:)
This mutes the output audio. (v p. 38)
W AUDIO DELAY buttons (+, ])
Compensates for incorrect timing between video and audio. (v p. 71)
The SEARCH button on this unit cannot be used.
Front panel |
Display |
Rear panel |
18 |
Remote |
Index |

Contents |
Connections |
Playback |
Settings |
Tips |
Appendix |
o Contents
Connecting speakers |
20 |
Connecting a TV |
25 |
Connecting a playback device |
28 |
Connecting a USB memory device to the USB port |
|
Connecting an FM/AM antenna |
33 |
Connecting the power cord |
35 |
NOTE
0Do not plug in the power cord until all connections have been completed. However, when the “Setup Assistant”is running, follow the instructions in the “Setup Assistant” (page 8 in the separate “Quick Start Guide”) screen for making connections. (During “Setup Assistant” operation, the input/output connectors do not conduct current.)
0Do not bundle power cords together with connection cables. Doing so can result in noise.
o Cables used for connections
Provide necessary cables according to the devices you want to connect.
Speaker cable
Subwoofer cable
HDMI cable
Video cable
Coaxial digital cable
Optical cable
Audio cable |
L |
L |
|
R |
R |
||
|
Front panel |
Display |
Rear panel |
19 |
Remote |
Index |

Contents |
Connections |
Playback |
Settings |
Tips |
Appendix |
Connecting speakers
Install speakers and connect them to this unit. (v p. 20, 22)
Speaker installation
Determine the speaker system depending on the number of speakers you are using and install each speaker and subwoofer in the room.
Speaker installation is explained using this example of a typical installation.
FL |
FR |
SW1 C |
SW2 |
FL/FR (Front |
Place the FRONT left and right speakers an |
|
equal distance from the main listening position. |
||
speaker left/right): |
The distance between each speaker and your TV |
|
|
should also be the same. |
|
C (Center |
Place the CENTER speaker in front of and at the |
|
center of the TV, between the front left and right |
||
speaker): |
||
speakers. |
||
|
||
SL/SR (Surround |
Place the SURROUND left and right speakers an |
|
equal distance to the left and right sides of the |
||
speaker left/right): |
||
main listening position. |
||
|
||
SW 1/2 (Subwoofer) : |
Place the SUBWOOFER at a convenient location |
|
near the front speakers. |
SL |
SR |
Front panel |
Display |
Rear panel |
20 |
Remote |
Index |
Contents |
Connections |
Playback |
Settings |
Tips |
Appendix |
Use the illustration below as a guide for how high each speaker should be installed. The height does not need to be exactly the same.
Surround speaker
Front speaker
GViewed from the sideH
o When 5.1-channel speakers are installed
FL |
|
FR |
SW |
C |
z1 |
z2 |
|
|
SL |
SR |
z1:22° - 30° z2:120°
Front panel |
Display |
Rear panel |
21 |
Remote |
Index |

Contents |
Connections |
Playback |
Settings |
Tips |
Appendix |
Speaker connection
Here we connect the speakers in the room to this unit.
This section explains how to connect them using typical examples.
NOTE
0Disconnect this unit’s power plug from the power outlet before connecting the speakers. Also, turn off the subwoofer.
0Connect so that the speaker cable core wires do not protrude from the speaker terminal. The protection circuit may be activated if the core wires touch the rear panel or if the + and - sides touch each other. (“Protection circuit” (v p. 116))
0Never touch the speaker terminals while the power cord is connected. Doing so could result in electric shock. When the “Setup Assistant” (page 8 in the separate “Quick Start Guide”) is running, follow the instructions in the “Setup Assistant” screen for making connections. (Power is not supplied to the speaker terminals while the “Setup Assistant” is running.)
0Use speakers with an impedance of 6 – 16 Ω/ohms.
o Connecting the speaker cables
Carefully check the left (L) and right (R) channels and + (red) and – (black) polarities on the speakers being connected to this unit, and be sure to connect the channels and polarities correctly.
1Peel off about 3/8 inch (10 mm) of sheathing from the tip of the speaker cable, then either twist the core wire tightly or terminate it.
2Press the lever on the speaker terminal.
3Holding the lever on the speaker terminal, insert the core wire of the speaker cable all the way into the speaker terminal.
4Releaseterminal.your finger from the lever on the speaker
Front panel |
Display |
Rear panel |
22 |
Remote |
Index |

Contents |
Connections |
Playback |
Settings |
Tips |
Appendix |
o Connecting the subwoofer
Use a subwoofer cable to connect the subwoofer. Two subwoofers can be connected to this unit.
The same signal is output from the respective subwoofer terminals.
VIDEO |
IN |
VIDEO OUT |
OPTICAL |
|
|
|
MONITOR |
1 |
2 |
CBL/SAT |
MEDIA |
SUBWOOFER |
TV AUDIO |
MEDIA |
PLAYER |
PLAYER |
|||
|
|
1 |
|
|
|
|
|
|
COAXIAL |
|
|
2 |
|
CBL/SAT |
|
|
|
(ASSIGNABLE) |
|
AUDIO |
IN |
PRE OUT |
DIGITAL AUDIO IN |
|
|
ANTENNA |
|
FRONT |
AM |
FM |
|
75 |
SPEAKERS |
IMPEDANCE : 6 |
16 |
CENTER |
SURROUND |
|
SW1 |
SW2 |
Front panel |
Display |
Rear panel |
23 |
Remote |
Index |

Contents |
Connections |
Playback |
Settings |
Tips |
Appendix |
|
|
|
|
|
|
Standard speaker configuration and connection
This serves as a basic 5.1-channel surround system. Sound modes such as Dolby Pro Logic g are supported.
FL |
FR |
SW |
C |
SL  SR
SR
VIDEO |
IN |
VIDEO OUT |
OPTICAL |
|
|
|
|
MONITOR |
1 |
2 |
|
CBL/SAT |
MEDIA |
SUBWOOFER |
TV AUDIO |
MEDIA |
|
PLAYER |
PLAYER |
|
|||
|
|
1 |
|
|
|
|
|
|
|
COAXIAL |
|
|
|
2 |
|
CBL/SAT |
|
|
|
|
(ASSIGNABLE) |
|
|
AUDIO |
IN |
PRE OUT |
DIGITAL AUDIO IN |
|
|
ANTENNA |
|
|
SPEAKERS |
IMPEDANCE : 6 16 |
|
|
FRONT |
CENTER |
SURROUND |
AM |
FM |
|
|
|
75 |
|
|
SW |
FR |
FL |
C |
SR |
SL |
Front panel |
Display |
Rear panel |
24 |
Remote |
Index |

Contents |
Connections |
Playback |
Settings |
Tips |
Appendix |
Connecting a TV
Connect a TV to this unit so that the input video is output to the TV. You can also enjoy audio from the TV on this unit. How to connect a TV depends on the connectors and functions equipped on the TV.
Is the TV equipped with an HDMI connector?
Yes |
No |
“Connection 1 : TV equipped with an HDMI connector” (v p. 26)
“Connection 2 : TV equipped without an HDMI connector” (v p. 27)
Front panel |
Display |
Rear panel |
25 |
Remote |
Index |

Contents |
Connections |
Playback |
Settings |
Tips |
Appendix |
|
|
|
|
|
|
Connection 1 : TV equipped with an HDMI connector
Use an HDMI cable to connect the TV to this unit.
To listen to audio from TV on this unit, use an optical cable to connect the TV to this unit.
OUT |
TV |
IN |
|
OPTICAL |
HDMI |
OUT |
IN |
VIDEO |
IN |
VIDEO OUT |
OPTICAL |
|
|
HDMI |
IN |
|
||
|
|
MONITOR |
1 |
2 |
|
|
|
|
|
|
CBL/SAT |
MEDIA |
SUBWOOFER |
TV AUDIO |
MEDIA |
|
|
|
|
|
|
|
PLAYER |
PLAYER |
2 |
DVD/ |
3 |
MEDIA |
4 Blu-ray |
|||
|
|
1 |
|
1 CBL/SAT |
Blu-ray |
PLAYER |
||||
|
|
|
|
|
|
|
|
|
(4K) |
|
|
|
|
|
COAXIAL |
|
|
|
|
|
|
|
|
2 |
|
CBL/SAT |
|
|
|
|
|
|
|
|
|
(ASSIGNABLE) |
|
|
|
|
|
|
|
AUDIO |
IN |
PRE OUT |
DIGITAL AUDIO IN |
|
|
|
|
|
|
|
ANTENNA |
|
|
SPEAKERS |
IMPEDANCE : 6 |
16 |
|
|
|
||
|
FRONT |
CENTER |
SURROUND |
AM |
FM |
|
|
|
75 |
|
|
HDMI OUT
5 GAME |
MONITOR |
(4K)
CLASS 2 WIRING
Front panel |
Display |
Rear panel |
26 |
Remote |
Index |
Contents |
Connections |
Playback |
Settings |
Tips |
Appendix |
|
|
|
|
|
|
Connection 2 : TV equipped without an HDMI connector
Use a video cable to connect the TV to this unit.
To listen to audio from TV on this unit, use an optical cable to connect the TV to this unit.
|
|
|
|
|
|
|
||||||||
|
|
|
|
|
TV |
|||||||||
|
|
|
|
|
|
|
|
|
|
|
|
|
|
|
|
|
IN |
|
|
|
|
OUT |
|
||||||
VIDEO |
|
|
OPTICAL |
|||||||||||
|
|
IN |
|
|
|
|
OUT |
|||||||
|
|
|
|
|
|
|
|
|
|
|
|
|
|
|
|
|
|
|
|
|
|
|
|
|
|
|
|
|
|
|
|
|
|
|
|
|
|
|
|
|
|
|
|
|
|
|
|
|
|
|
|
|
|
|
|
|
|
|
|
|
|
|
|
|
|
|
|
|
|
|
|
|
|
|
VIDEO |
IN |
VIDEO OUT |
|
|
MONITOR |
OPTICAL |
HDMI |
IN |
1 |
2 |
|
CBL/SAT |
MEDIA |
SUBWOOFER |
TV AUDIO |
MEDIA |
|
|
|
|
|
|
PLAYER |
PLAYER |
2 |
DVD/ |
3 |
MEDIA |
4 Blu-ray |
||
|
|
1 |
|
1 CBL/SAT |
Blu-ray |
PLAYER |
|||
|
|
|
|
|
|
|
|
(4K) |
|
|
|
|
|
COAXIAL |
|
|
|
|
|
|
|
2 |
|
CBL/SAT |
|
|
|
|
|
|
|
|
(ASSIGNABLE) |
|
|
|
|
|
|
AUDIO |
IN |
PRE OUT |
DIGITAL AUDIO IN |
|
|
|
|
|
|
ANTENNA |
|
|
SPEAKERS |
IMPEDANCE : 6 |
16 |
|
|
||
|
FRONT |
CENTER |
SURROUND |
AM |
FM |
|
|
|
75 |
|
|
HDMI OUT
5 GAME |
MONITOR |
(4K)
CLASS 2 WIRING
Front panel |
Display |
Rear panel |
27 |
Remote |
Index |

Contents |
Connections |
Playback |
Settings |
Tips |
Appendix |
Connecting a playback device
This unit is equipped with two types of video input connectors (HDMI and composite video) and two types of audio input connectors (digital audio, audio). Select input connectors on this unit according to the connectors equipped on the device you want to connect.
If the device connected to this unit is equipped with an HDMI connector, it is recommended to use HDMI connections. In the HDMI connection, audio and video signals can be transmitted through a single HDMI cable.
0“Connecting a DVD player or Blu-ray Disc player” (v p. 29)
0“Connecting a set-top box (Satellite tuner/cable TV)” (v p. 30)
0“Connecting a video camcorder or game console” (v p. 31)
0Connect devices to this unit as indicated by the input sources printed on the audio/video input connectors of this unit.
0The source that is assigned to the HDMI IN, DIGITAL AUDIO IN, VIDEO IN and AUDIO IN connectors can be changed. See “Input Assign” (v p. 75) on how to change the input source assigned to the input connectors.
0To play back audio signals that are input to this unit on a TV connected via HDMI, set “HDMI Audio Out” (v p. 73) to “TV”.
Front panel |
Display |
Rear panel |
28 |
Remote |
Index |

Contents |
Connections |
Playback |
Settings |
Tips |
Appendix |
|
|
|
|
|
|
Connecting a DVD player or Blu-ray Disc player
This explanation uses the connection with a DVD player or Blu-ray disc player as an example.
When connecting a 4K compatible player, connect to either the HDMI 4 or HDMI 5 input connector.
DVD player/
Blu-ray Disc player
HDMI
OUT
VIDEO |
IN |
VIDEO OUT |
OPTICAL |
|
|
HDMI |
IN |
|
||
|
|
MONITOR |
1 |
2 |
|
|
|
|
|
|
CBL/SAT |
MEDIA |
SUBWOOFER |
TV AUDIO |
MEDIA |
|
|
|
|
|
|
|
PLAYER |
PLAYER |
2 |
DVD/ |
3 |
MEDIA |
4 Blu-ray |
|||
|
|
1 |
|
1 CBL/SAT |
Blu-ray |
PLAYER |
||||
|
|
|
|
|
|
(4K) |
||||
|
|
|
|
|
|
|
|
|
||
|
|
|
|
COAXIAL |
|
|
|
|
|
|
|
|
2 |
|
CBL/SAT |
|
|
|
|
|
|
|
|
|
(ASSIGNABLE) |
|
|
|
|
|
|
|
AUDIO |
IN |
PRE OUT |
DIGITAL AUDIO IN |
|
|
|
|
|
|
|
ANTENNA |
|
|
SPEAKERS |
IMPEDANCE : 6 |
16 |
|
|
|
||
|
FRONT |
CENTER |
SURROUND |
AM |
FM |
|
|
|
75 |
|
|
HDMI OUT
5 GAME |
MONITOR |
(4K)
CLASS 2 WIRING
Front panel |
Display |
Rear panel |
29 |
Remote |
Index |

Contents |
Connections |
Playback |
Settings |
Tips |
Appendix |
|
|
|
|
|
|
Connecting a set-top box (Satellite tuner/cable TV)
This explanation uses the connection with a satellite tuner/cable TV STB as an example.
Select the input connectors on this unit to match the connectors on the device that you want to connect to.
(HDMI incompatible device) |
Satellite tuner/Cable |
|||
Satellite tuner/Cable TV |
TV |
|||
|
|
AUDIO |
VIDEO |
|
AUDIO |
COAXIAL |
VIDEO |
|
|
OUT |
OUT |
OUT |
HDMI |
|
R |
L |
|
|
OUT |
R |
L |
|
|
|
|
|
or |
|
|
R |
L |
|
|
|
VIDEO |
IN |
VIDEO OUT |
OPTICAL |
HDMI |
IN |
|
|
MONITOR |
1 |
2 |
|
CBL/SAT |
MEDIA |
TV AUDIO |
MEDIA |
|
|
|
|
|
|
PLAYER SUBWOOFER |
PLAYER |
2 |
DVD/ |
3 |
MEDIA |
4 Blu-ray |
|
|
1 |
|
1 CBL/SAT |
Blu-ray |
PLAYER |
|||
|
|
|
|
|
|
|
(4K) |
COAXIAL
|
|
2 |
CBL/SAT |
|
|
|
|
|
|
(ASSIGNABLE) |
|
|
|
AUDIO |
IN |
PRE OUT |
DIGITAL AUDIO IN |
|
|
|
ANTENNA |
|
SPEAKERS |
IMPEDANCE : 6 |
16 |
||
|
|
|
FRONT |
CENTER |
SURROUND |
|
AM |
|
FM |
|
|
|
|
|
|
75 |
|
|
|
|
HDMI OUT
5 GAME |
MONITOR |
(4K)
CLASS 2 WIRING
Front panel |
Display |
Rear panel |
30 |
Remote |
Index |
Loading...