


|
|
English (3–10) |
User Guide |
||
Guía del usuario |
Español (11–19) |
|
Guide d’utilisation |
Français (20–28) |
|
Guida per l’uso |
Italiano (29–37) |
|
Benutzerhandbuch |
Deutsch (38–46) |
|
Appendix |
English (47) |
|

2

User Guide (English)
Introduction
Please see this guide’s Setup chapter to see an example of how to use Audio Commander and its accessories, and then refer to the Operation chapter to start using Audio Commander.
Box Contents
Audio Commander
Wireless Handheld Microphone
Headset Microphone
Wireless Beltpack Transmitter
Power Cable
User Guide
Safety & Warranty Manual
Support
For the latest information about this product (documentation, technical specifications, system requirements, compatibility information, etc.) and product registration, visit denonpro.com.
For additional product support, visit denonpro.com/support.
The accessories can be stored in the side panel compartments.
Rechargeable Batteries
Rechargeable lead-acid batteries are the same type used in automobiles. As with your car battery, how you use this battery has a significant impact on its lifespan. With proper use and treatment, a lead-acid battery can last for years. Here are some recommendations for getting the longest life from the internal battery.
General Usage |
Charge fully before use. |
|
Charge fully before storing. |
Storage |
For best product longevity, do not store at exceedingly hot (greater than |
|
90°F / 32°C) or exceedingly cold (less than 32°F / 0°C) temperatures. |
|
It is acceptable to leave your sound system plugged in. This will not |
|
overcharge the battery. |
|
If you leave the battery level low and do not charge it for 6 months, it may |
|
permanently lose capacity. |
Repair |
If the battery fails to charge, check the fuse near the power cable input. If |
|
the fuse is not intact, please replace it. |
|
The battery can be replaced (details in the Technical Specifications). |
|
For Warranty and Parts, contact the Parts Dept. at 401-658-3743 or by |
|
visiting denonpro.com/support. |
Disposal |
Bring the unit to a recycling center or dispose of in accordance with local |
|
ordinances. |
|
3 |
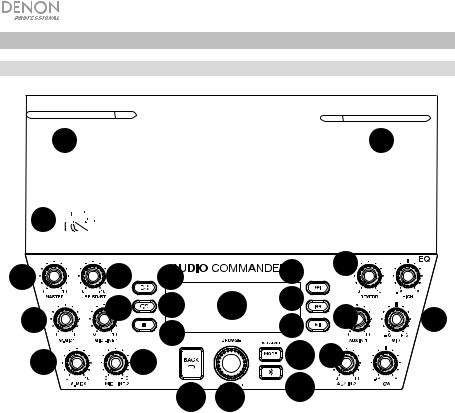
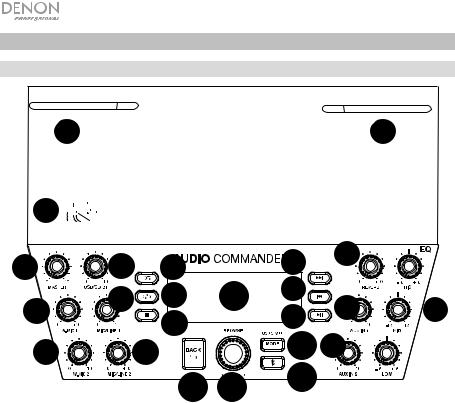
Features
Front Panel
23 |
23 |
22 


1 |
4 |
AUDIO |
7 |
|
15 |
18 |
|
2 |
5 |
|
8 |
10 |
16 |
19 |
21 |
|
|
9 |
|
17 |
|||
|
|
|
|
|
|||
3 |
|
6 |
|
|
13 20 |
|
|
|
|
|
11 12 |
14 |
|
|
|
|
|
|
|
|
|
||
1. Master Volume: A d j u s t |
t h i s |
k n o b t o control the level for the master volume going |
|||||
to the Line Output. |
|
|
|
|
|
|
|
2.Wireless Mic Volume 1: Adjust this knob to control the level for the wireless mic receiver 1.
3.Wireless Mic Volume 2: Adjust this knob to control the level for the wireless mic receiver 2.
4.USB/SD/BT Volume: Adjust this knob to control the level for the USB, SD, and Bluetooth sources.
5.Mic/Line 1 Volume: Adjust this knob to control the mic/line input level.
6.Mic/Line 2 Volume: Adjust this knob to control the mic/line input level.
7.Random: Press this button to have USB or SD card tracks play in a random order.
8.Repeat: Press this button to repeat a track from a USB or SD card source.
9.Stop: Press this button to stop audio track playback from a Bluetooth, USB, or SD card source.
10.LCD Display: This shows the battery level, charging status, Bluetooth connection, input sources, and track playback information.
11.Back: Press this button to exit out of a folder or menu.
12.Browse: Press in this knob and scroll to select to use W. Mic 1 or W. Mic 2 (if you want to use the beltpack transmitter and headset microphone). Also, use this knob to select a track or folder when playing SD card or USB sources.
13.Mode: Press to cycle through USB, SD, and Bluetooth source modes.
14.Bluetooth Disconnect: Press this button to disconnect from a paired Bluetooth device.
4
15.Next Track: Press this button to go to the next audio track from a Bluetooth, USB, or SD card source.
Note: When listening to Bluetooth sources, pressing this button may go to another playlist or music genre in some apps.
16.Previous Track: Press this button to go to the previous audio track from a Bluetooth, USB, or SD card source.
Note: When listening to Bluetooth sources, pressing this button may go to another playlist or music genre in some apps.
17.Play/Pause: Press this button to play/pause an audio track from a Bluetooth, USB, or SD card source.
18.Reverb: Adjust this knob to control the amount of reverb applied to the wired and wireless mic channels.
19.Aux In 1 Volume: Adjust this knob to control the volume for the Aux 1 input.
20.Aux In 2 Volume: Adjust this knob to control the volume for the Aux 2 input.
21.3-Band EQ: Adjust these knobs to control the treble, mid-range, and bass frequencies for the input signal.
22.NFC (near-field communication): Touch and briefly hold your supported and enabled device to the NFC logo to pair the device.
23.Wireless Antennas: Adjust the antennas to get the best wireless mic reception.
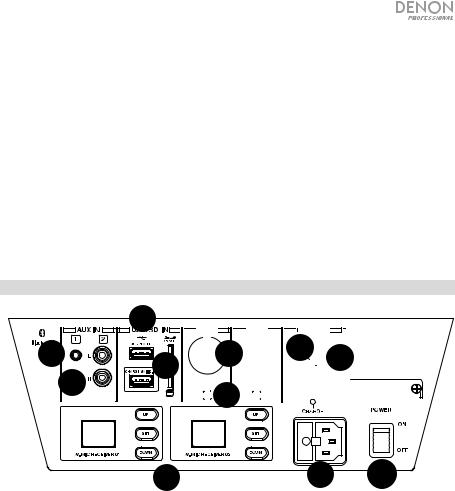
Rear Panel
|
|
3 |
1 |
2 |
4 |
|
||
|
|


 5
5


 1
1


 7
7


 6
6


8 |
9 |
10 |
1.Aux Input 1: Connect a line-level device, such as a CD player, laptop, smartphone, or media device, to this 1/8” (3.5 mm) input.
2.Aux Input 2: Connect a line-level device, such as a CD player, tablet, smartphone, or media device to these coaxial inputs.
3.USB Ports: Both USB ports are capable of 2.1A charging. The top USB port also supports USB flash drive playback of MP3 and WMA files.
4.SD Card Slot: Connect a SD card here to play your MP3 and WMA files.
5.XLR+1/4”: Connect dynamic microphones to these mic inputs.
6.Mic/Line Switch: Press this switch in to have the gain set for mic level sources. Have the switch in the outward position for line-level sources.
7.Line Output: Connect this 1/4” TRS (6.35 mm) output to another Audio Commander.
8.Wireless Receivers: Select the wireless mic channel using the Up/Down buttons and press the Set button to link the channel to the wireless mic. See Operation > Wireless Microphone Setup for more details.
9.Power Input: Connect the included power cable here.
10.Power Switch: Adjust this switch to power Audio Commander on/off.
5

Display |
|
|
|
|
1. |
Input Sources |
1 |
4 |
5 |
2. |
Power Charging Indicator |
|
|
|
3. |
Battery Level |
|
|
|
4. |
USB/SD Card Folder |
|
|
|
5. |
USB/SD Card Track |
|
|
|
6. |
Track Playback Time |
|
|
|
|
|
2 |
3 |
6 |
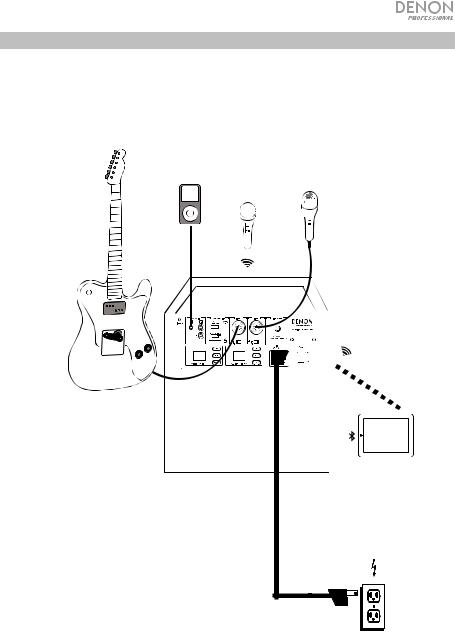
Setup
Items not listed under Introduction > Box Contents are sold separately.
Media
Player
Wireless Microphone
Microphone
Guitar
Tablet
Power
6
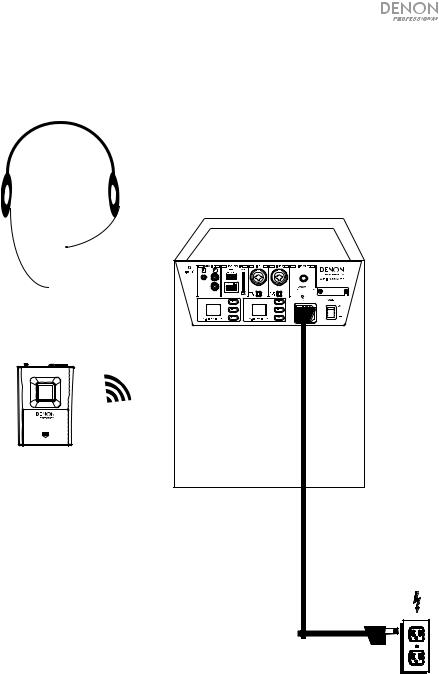
Headset Microphone Setup
Headset
Microphone
Beltpack
Transmitter
Power
7
Operation
Wireless Microphone Setup
To use a wireless microphone, follow these setup steps:
1.Ensure 2 new AA alkaline batteries are installed in the wireless microphone.
2.Pair the wireless microphone (found in the side compartment) to W. Mic Receiver 01 on Audio Commander.
a.Turn on Audio Commander and the wireless microphone.
b.Select a channel with the best reception using the Up/Down buttons on the receiver.
c.Place the wireless microphone IR sensor (found above the power button) near the receiver’s IR LED and press the Set button on the receiver. Wait for about 3 seconds until the IR LED stops flashing. When it finds an interference-free channel, the RF LED will illuminate on the receiver showing the mic is matched to that channel.
3.Adjust the wireless microphone gain using the W. Mic 1 knob on Audio Commander.
4.As you speak, watch the AF indicator on W. Mic Receiver 01 to make sure a signal is being received.
Note: Make sure to turn the Browse knob and select the appropriate W.Mic source in order to output a signal.
To set up the second wireless microphone, follow the same steps above for pairing to W. Mic Receiver 02.
Headset Microphone Setup
To use the included headset microphone, follow these setup steps:
1.Ensure new batteries are installed in the beltpack transmitter.
2.Connect the headset microphone to the beltpack transmitter.
3.Pair the beltpack transmitter to the wireless receiver on Audio Commander.
a.Turn on Audio Commander.
b.Turn on the beltpack transmitter.
c.Select a channel with the best reception using the Up/Down buttons on the Audio Commander receiver.
d.Lift the cover from the compartment and place the beltpack transmitter IR sensor near the receiver’s IR LED. Press the Set button on the receiver. Wait for about 3 seconds until the IR LED stops flashing. When it finds an interference-free channel, the RF LED will illuminate on the receiver to show that the beltpack transmitter is matched to that channel.
4.Adjust the microphone gain using the W. Mic knob on Audio Commander.
5.As you speak, watch the AF indicator on the receiver to make sure a signal is being received.
Note: Make sure to turn the Browse knob and select the appropriate W.Mic source in order to output a signal.
8

Playing Music from a USB Flash Drive
1.Connect your USB flash drive to the top USB port on the rear panel.
2.Press and release the Mode button until the USB device appears on the display screen.
3.Use the |<< and >>| buttons to scroll through your files and press Play to select the track to play.
Playing Music from a SD Card
1.Insert a SD card into the card slot.
2.Press and release the Mode button until the SD card appears on the display screen.
3.Use the |<< and >>| buttons to scroll through your tracks and press Play when a file is selected to play.
Playing Music from the Aux Input
1.Connect your media device’s output to one of the Aux inputs on Audio Commander.
2.Play your music device and adjust the source volume if needed.
Note: A source played through the Aux inputs will be blended along with the USB, SD, Bluetooth, Mic/Line inputs, and W.Mic 1/2 sources. Adjust the Aux In volume as needed.
Pairing a Bluetooth Device
1.Turn on your Bluetooth device.
2.Navigate to your Bluetooth device’s setup screen, find “Audio Commander” and connect.
Note: If your Bluetooth device prompts for a pairing code, enter “0000”. Note: Use the Mode button to select Bluetooth as the source.
To disconnect pairing while the Bluetooth icon is lit solid, press and release the
Bluetooth button.
To connect to another Bluetooth device, repeat step 3.
9

Pairing a Bluetooth Device Using NFC
NFC (near-field communication) allows data exchange from devices, such as pairing, by gently bumping them together. Check in your device’s manual to see if this feature is supported.
To use NFC to pair with Audio Commander:
1.In order to use NFC, your device must be turned on and unlocked.
2.Enter your device’s Settings menu and check that NFC is turned On.
3.Power on Audio Commander.
4.Press and release the Bluetooth button on Audio Commander.
5.Touch and briefly hold your device to the NFC logo.
6.Follow the pairing instructions that appear on your phone. If a passcode is required, enter ‘0000’.
Note: Use the Mode button to select Bluetooth as the source.
To unpair, gently bump your device against the NFC logo located on top of Audio Commander.
Linking Two Audio Commanders
1.Power on each Audio Commander.
2.Connect a 1/4” (6.35 mm) audio cable from the Line Out of the first Audio Commander to the Line In of the second Audio Commander.
3.Ensure the Line/Mic switch is set to Line.
4.Play your music on the first Audio Commander.
5.Adjust the Master volume knob on the first Audio Commander and then adjust the Mic/Line volume on the second Audio Commander.
10
Guía del usuario (Español)
Introducción
Lea el capítulo Instalación de esta guía para ver un ejemplo de cómo utilizar Audio Commander y sus accesorios y luego consulte el capítulo Funcionamiento para comenzar a utilizar Audio Commander.
Contenido de la caja
Audio Commander
Micrófono inalámbrico de mano
Micrófono con auriculares
Transmisor inalámbrico para cinturón
Cable de corriente
Guía del usuario
Manual sobre la seguridad y garantía
Soporte
Para obtener la información más reciente acerca de este producto (documentación, especificaciones técnicas, requisitos de sistema, información de compatibilidad, etc.) y registrarlo, visite denonpro.com.
Para soporte adicional del producto, visite denonpro.com/support.
Los accesorios se pueden guardar en los compartimientos del panel lateral.
Baterías recargables
Las baterías de plomo-ácido recargables son del mismo tipo que se usa en los automóviles. Como sucede con la batería del auto, la manera en que use esta batería tiene gran influencia sobre la duración de su vida útil. Con un uso y tratamiento correctos, una batería de plomo-ácido puede durar varios años. He aquí algunas recomendaciones para prolongar la vida útil de la batería interna.
Utilización |
Cargue completamente la batería antes de utilizarla. |
general |
Cargue completamente la batería antes de almacenarla. |
|
|
Almacenamiento |
Para lograr la mayor longevidad del producto, no lo almacene a temperaturas muy altas |
|
(superiores a 90 °F / 32 °C) o muy frías (inferiores a 32 °F / 0°C). |
|
Es aceptable dejar su sistema de sonido enchufado. No sobrecargará la batería. |
|
Si deja que el nivel de la batería baje y no la carga durante 6 meses, puede perder |
|
permanentemente su capacidad. |
Reparación |
Si la batería no se carga, compruebe el fusible cerca de la entrada del cable de |
|
alimentación. Si el fusible no está intacto, reemplácelo. |
|
La batería puede remplazarse (consulte los detalles en la sección Especificaciones |
|
técnicas). |
|
Por la garantía y las piezas de repuesto, contacte al Depto. de piezas al 401-658-3743 |
|
o visitando denonpro.com/support. |
Disposición final |
Lleve la unidad a un centro de reciclaje o deséchela de acuerdo a las ordenanzas |
|
locales. |
|
11 |
Características
Panel frontal
23 |
23 |
22 


1 |
4 |
AUDIO |
7 |
|
15 |
18 |
|
2 |
5 |
|
8 |
10 |
16 |
19 |
21 |
|
|
9 |
|
17 |
|||
|
|
|
|
|
|||
3 |
|
6 |
|
|
13 20 |
|
|
|
|
|
11 12 |
14 |
|
|
|
|
|
|
|
|
|
||
1.Volumen Master : Ajuste esta perilla para controlar el nivel del volumen maestro que se aplica a la salida LINE OUT (de línea)
2.Volumen del micrófono inalámbrico 1: Ajuste esta perilla para controlar el nivel del receptor del micrófono inalámbrico 1.
3.Volumen del micrófono inalámbrico 2: Ajuste esta perilla para controlar el nivel del receptor del micrófono inalámbrico 2.
4.Volumen de USB/SD/BT: Ajuste esta perilla para controlar el nivel de las fuentes USB, SD y Bluetooth.
5.Volumen de Mic/Line 1: Ajuste esta perilla para controlar el nivel de la entrada de micrófono/línea.
6.Volumen de Mic/Line 2: Ajuste esta perilla para controlar el nivel de la entrada de micrófono/línea.
7.Modo aleatorio: Pulse este botón para que las pistas de una fuente USB o tarjeta SD se reproduzcan en orden aleatorio.
8.Repetición: Pulse este botón para repetir una pista de una fuente USB o tarjeta SD.
9.Parar: Pulse este botón para detener la reproducción de la pista de una fuente Bluetooth, USB o tarjeta SD.
10.Pantalla LCD: Esta pantalla muestra el nivel de batería el estado de carga, la conexión Bluetooth, las fuentes de entrada y la información de reproducción de pistas.
11.Back (Volver): Pulse este botón para salir de una carpeta o menú.
12

12.Browse (Explorar): Pulse esta perilla y desplácese para seleccionar utilizar W. Mic 1 o W. Mic 2 (si desea utilizar el transmisor para cinturón y el micrófono con auriculares). Utilice también esta perilla para seleccionar una pista o carpeta cuando reproduce fuentes de tarjeta SD o USB.
13.Mode (Modo): Pulse esta tecla para recorrer los modos de fuente USB, SD y Bluetooth.
14.Desconexión de Bluetooth: Pulse este botón para desconectarse de un dispositivo Bluetooth apareado.
15.Pista siguiente: Pulse este botón para pasar a la pista de audio siguiente de una fuente Bluetooth, USB o tarjeta SD.
Nota: Cuando escucha fuentes Bluetooth, al pulsar este botón puede pasar a otra lista de reproducción o género musical en algunas aplicaciones.
16.Pista anterior: Pulse este botón para pasar a la pista de audio anterior de una fuente Bluetooth, USB o tarjeta SD.
Nota: Cuando escucha fuentes Bluetooth, al pulsar este botón puede pasar a otra lista de reproducción o género musical en algunas aplicaciones.
17.Reproducir/Pausa: Pulse este botón para reproducir/poner en pasa una pista de audio de una fuente Bluetooth, USB o tarjeta SD.
18.Reverb (Reverberación): Ajuste esta perilla para controlar la magnitud de la reverberación aplicada a los canales de micrófono alámbrico e inalámbrico.
19.Volumen de Aux In 1: Ajuste esta perilla para controlar el volumen de la entrada Aux 1.
20.Volumen de Aux In 2: Ajuste esta perilla para controlar el volumen de la entrada Aux 2.
21.Ecualizador de 3 bandas: Ajuste estas perillas para controlar las frecuencias agudas, medias y graves de la señal de entrada.
22.NFC (comunicación de campo cercano): Toque y acerque brevemente su dispositivo habilitado y soportado al logo de NFC para aparearlo.
23.Antenas inalámbricas: Ajuste las antenas para obtener la mejor recepción del micrófono inalámbrico.
13

Panel trasero
|
|
3 |
1 |
2 |
4 |
|
||
|
|


 5
5


 1
1


 7
7


 6
6


8 |
9 |
10 |
1.Entrada auxiliar 1: Conecte a esta entrada de 3,5 mm (1/8 pulg.) un dispositivo de nivel de línea, tal como un reproductor de CD, laptop, teléfono inteligente o dispositivo de medios.
2.Entrada auxiliar 2: Conecte a estas entradas coaxiales un dispositivo de nivel de línea, tal como un reproductor de CD, laptop, teléfono inteligente o dispositivo de medios.
3.Puertos USB: Ambos puertos USB tienen capacidad de carga de 2,1 A. El puerto USB superior es compatible también con la reproducción de archivos MP3 y WMA de unidades de memoria USB.
4.Ranura SD Card: Conecte aquí una tarjeta SD para reproducir sus archivos MP3 y WMA.
5.XLR y +1/4 pulg. Conecte micrófonos dinámicos a estas entradas de micrófono.
6.Entrada de micrófono/línea Pulse este interruptor a fin de ajustar la ganancia para fuentes de nivel de micrófono. Ponga el interruptor en posición hacia afuera para fuentes de nivel de línea.
7.Salida de línea: Conecte esta salida TRS de 6,35 mm (1/4 pulg.) a otro Audio Commander.
8.Receptores inalámbricos: Seleccione el canal de micrófono inalámbrico mediante los botones Up/Down (Subir/Bajar) y pulse el botón Set para enlazar el canal al micrófono inalámbrico. Consulte Funcionamiento > Instalación del micrófono inalámbrico para conocer más detalles.
9.Entrada de corriente: Conecte aquí el cable de alimentación incluido.
10.Interruptor de encendido: Ajuste este interruptor para encender y apagar el Audio Commander.
Pantalla
1. |
Fuentes de entrada |
1 |
4 |
5 |
|
2. |
Indicador de carga |
|
|
|
|
3. |
Nivel de batería |
|
|
|
|
4. |
Carpeta de USB/tarjeta SD |
|
|
|
|
5. |
Pista de USB/tarjeta SD |
2 |
3 |
6 |
|
6. |
Tiempo de reproducción de la cinta |
||||
|
|
|
|||
14 |
|
|
|
|
Instalación
Los elementos que no se enumeran en Introducción > Contenido de la caja se venden por separado.
Reproductor
de medios
Micrófono Micrófono inalámbrico
Guitarra
Tableta
Suministro
eléctrico
15
 Loading...