

Page 1
FR GUIDE D'UTILISATION
CS NÁVOD K POUŽITÍ
DA BRUGERVEJLEDNING
DE BETRIEBSANLEITUNG
EN USER GUIDE
ES MANUAL DE UTILIZACIÓN
IT MANUALE D'USO
NL GEBRUIKSAANWIJZING
PT MANUAL DE UTILIZAÇÃO
Four
Trouba
Ovn
Backofen
Oven
Horno
Forno
Oven
Forno
99641441_A_ML.qxp 12/04/2007 10:55 Page 1
Page 2
2
FR
02
DE
41
EN
54
ES
67
IT
80
NL
93
PT
106
DA
28
CS
15
Chère Cliente, Cher Client,
Vous venez d'acquérir un four
DDEE DDIIEETTRRIICCHH
et nous vous en remer-
cions.
Nos équipes de recherche ont conçu pour vous cette nouvelle génération d’appareils, qui par leur qualité, leur esthétique, leurs fonctions
et leurs évolutions technologiques en font des produits d’exception,
révélateurs de notre savoir-faire.
Votre nouveau four
DDEE DDIIEETTRRIICCHH
s’intégrera harmonieusement dans
votre cuisine et alliera parfaitement les performances de cuisson, et la
facilité d’utilisation. Nous avons voulu vous offrir un produit d’excellence.
Vous trouverez également dans la gamme des produits
DDEE DDIIEETTRRIICCHH
,
un vaste choix de cuisinières, de tables de cuisson, de hottes aspirantes, de lave-vaisselle, et de réfrigérateurs intégrables, que vous
pourrez coordonner à votre nouveau four
DDEE DDIIEETTRRIICCHH
.
Bien entendu, dans un souci permanent de satisfaire le mieux possible
vos exigences vis-à-vis de nos produits, notre service consommateurs
est à votre disposition et à votre écoute pour répondre à toutes vos
questions ou suggestions (coordonnées à la fin de ce livret).
Et connectez-vous aussi sur notre site:
wwwwww..ddeeddiieettrriicchh--eelleeccttrroommeennaag
geerr..ccoomm
sur lequel vous trouverez nos
dernières innovations ainsi que des informations utiles et complémentaires.
DDEE DDIIEETTRRIICCHH
LLeess nnoouuvveeaauuxx oobbjjeettss ddee vvaalleeuurr
Dans le souci d'une amélioration constante de nos produits, nous nous réservons le droit d'apporter à leurs caractéristiques techniques, fonctionnelles ou esthétiques toutes modifications
liées à leur évolution.
Important :
Avant de mettre votre appareil en marche, veuillez lire attentivement ce guide d'installa-
tion et d'utilisation afin de vous familiariser plus rapidement avec son fonctionnement.
99641441_A_ML.qxp 12/04/2007 10:55 Page 2
Page 3

54
FR
02
DE
41
EN
54
ES
67
IT
80
NL
93
PT
106
DA
28
CS
15
Dear Customer,
You have just acquired a
DDEE DDIIEETTRRIICCHH
oven and we would like to
thank you.
Our research teams have created this new generation of appliances
for you. Their quality, appearance, functions and technological
advances make them exceptional products, showcases of our unique
know-how.
Your new
DDEE DDIIEETTRRIICCHH
oven will blend harmoniously into your
kitchen and perfectly combine cooking performance and ease of use.
We wanted to offer you a product of excellence.
In the line of
DDEE DDIIEETTRRIICCHH
products, you will also find a wide range of
cookers, hobs, ventilation hoods, dishwashers, and refrigerators, all of
which can be built in and coordinated with your new
DDEE DDIIEETTRRIICCHH
oven.
Of course, in an ongoing effort to better satisfy your demands with
regard to our products, our after-sales service department is at your
disposal and ready to listen in order to respond to all of your questions
and suggestions (contact information at the end of this booklet).
You can also log onto our site:
wwwwww..ddeeddiieettrriicchh--eelleeccttrroommeennaaggeerr..ccoomm
where you will find our latest
new ideas and useful additional information.
DDEE DDIIEETTRRIICCHH
SSeettttiinngg NNeeww VVaalluueess
As part of our commitment to constantly improving our products, we reserve the right to make
changes to them based on advances to their technical, functional and/or aesthetic properties.
Important:
Before installing and using your appliance, please read this Installation and Usage
Guide carefully, as it will allow you to quickly familiarise yourself with its operation.
99641441_A_ML.qxp 12/04/2007 10:57 Page 54
Page 4

55
TABLE OF CONTENTS
EN
1 / DESCRIPTION OF YOUR APPLIANCE
••
Introduction to your oven
____________________________________
56
••
Accessories
_______________________________________________
56
••
Introduction to the programmer
______________________________
57
2 / USING YOUR APPLIANCE
••
Using the programmer
º
How to set the time
_____________________________________
58
º
Immediate cooking
_____________________________________
59
••
Programmed cooking
º
Cooking with immediate start and programmed duration
_____
60
º
Cooking with delayed start and chosen cooking end time
_____
61
••
Using the timer function
_____________________________________
62
3 / OVEN COOKING MODES
_______________________________________
63
4 / CARING FOR AND CLEANING YOUR OVEN
_______________________
65
5 / AFTER-SALES SERVICE
••
Service calls
______________________________________________
66
99641441_A_ML.qxp 12/04/2007 10:57 Page 55
Page 5
56
1 / DESCRIPTION OF YOUR APPLIANCE
EN
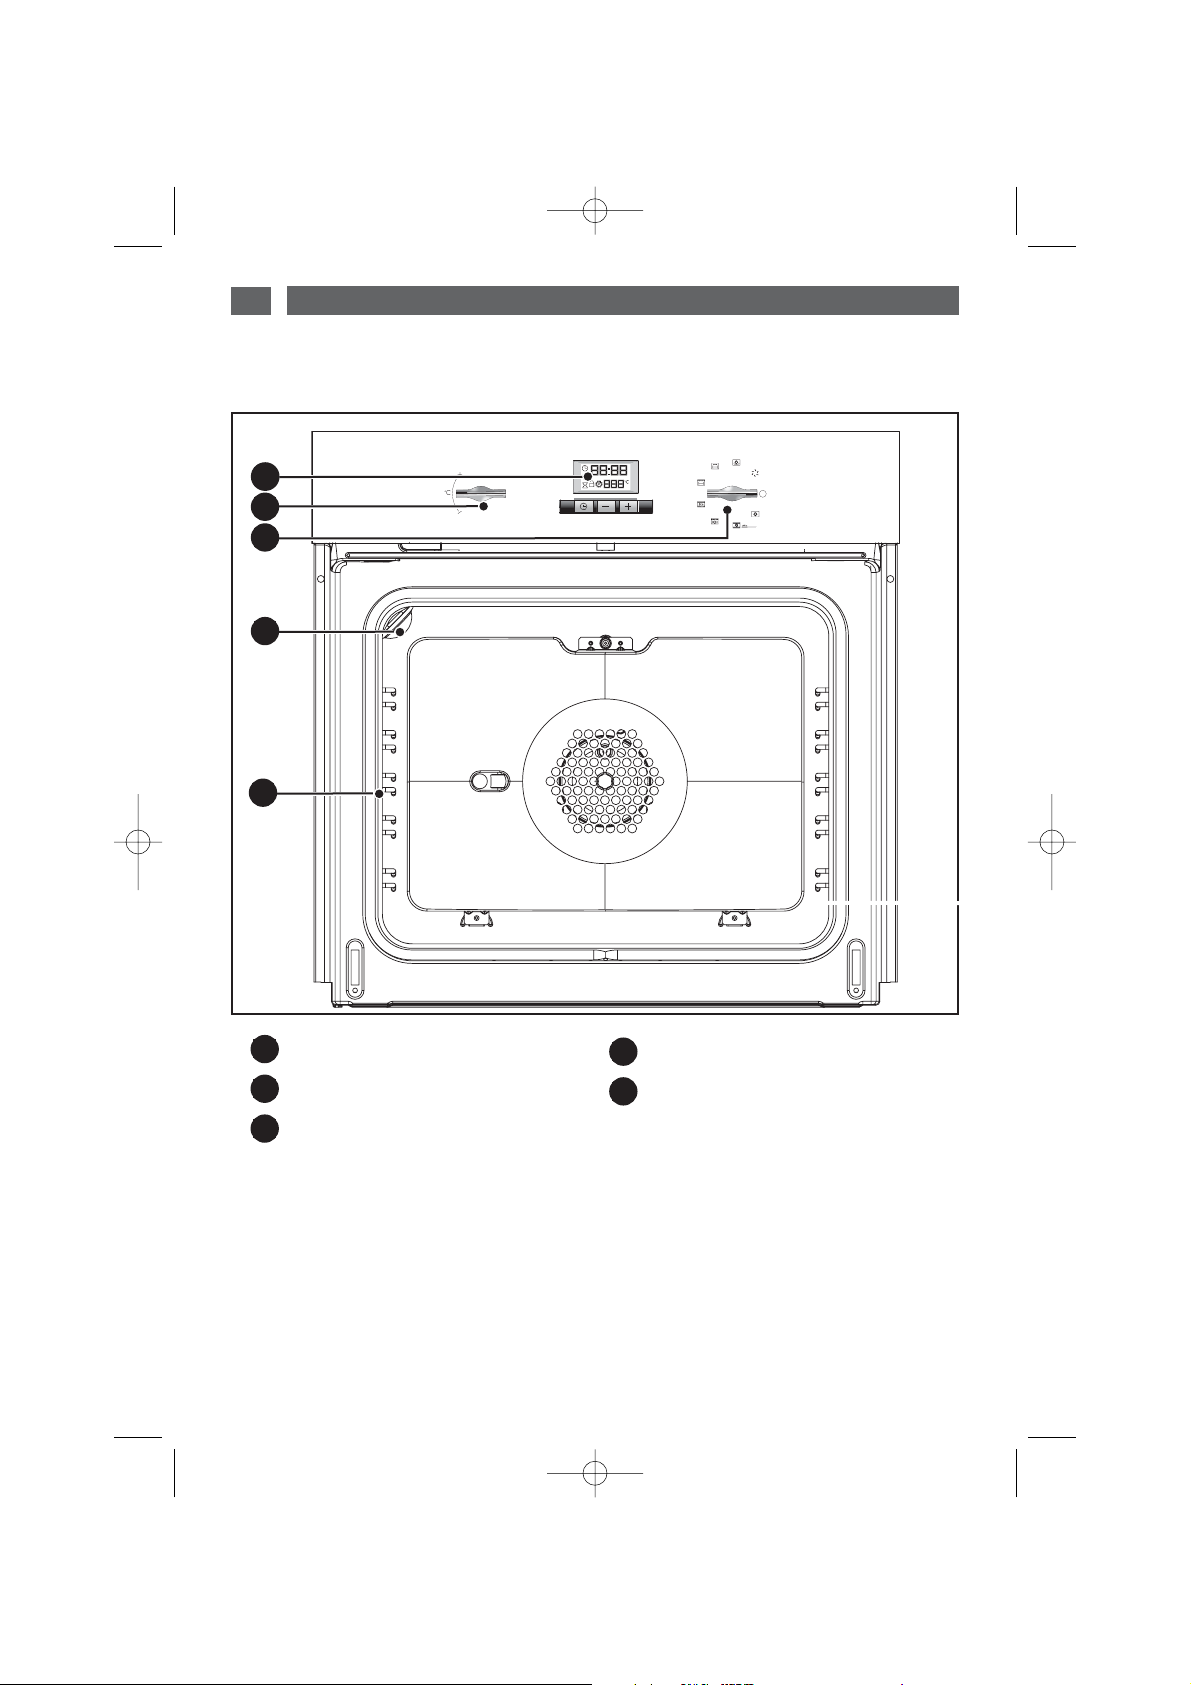
INTRODUCTION TO YOUR OVEN
••
A
B
Programmer
Temperature selector switch
Function selector switch
C
D
E
Light
Wire shelf supports
E
D
B
A
C
•Accessories
Your appliance is equipped with two safety grids with handles, one with handles for a 45 mm
dish, a Lissium pastry dish and a 45 mm dish.
99641441_A_ML.qxp 12/04/2007 10:57 Page 56
Page 6

57
1 / DESCRIPTION OF YOUR APPLIANCE
EN
INTRODUCTION TO THE PROGRAMMER
••
A
D
A
B
Time and cooking time display
Cooking time indicator
Cooking end time indicator
Timer display
C
D
E
Cleaning indicator
Temperature display
Selection button (cooking time and time)
Time setting buttons
F
G
F
H
G
C
B
E
H
99641441_A_ML.qxp 12/04/2007 10:57 Page 57
Page 7

58
2 / USING YOUR APPLIANCE
EN
USING THE PROGRAMMER
•
How to set the time
--
When plugged in
The display flashes 12:00 (fig.1).
Set the time by pressing the + or - buttons
(holding your finger on the button allows you
to scroll through the numbers rapidly) (fig.2).
Example: 12:30
Press the “ ” button to confirm.
The display stops flashing.
- To set the time on the clock
The function selector switch must be in the 0
position (fig.1).
Press and hold the “ ” button for a few
seconds until the display starts flashing (fig.2),
then release. Audible beeps indicate that it is
now possible to set the time.
Adjust the clock setting with the + and buttons (fig.3).
Press the “ ” button to confirm (fig.4).
fig.1
fig.2
fig.2
fig.3
fig.4
fig.1
Warning
If there is no confirmation from the
“ ” button, the time is recorded
automatically after a few seconds.
••
99641441_A_ML.qxp 12/04/2007 10:57 Page 58
Page 8

59
2 / USING YOUR APPLIANCE
EN
•Immediate cooking
— The programmer should display only the
time.
It should not be flashing (fig.1).
Turn the function selector to the position of
your choice.
Example: position (fig.2).
Your oven recommends the optimal
temperature for the chosen cooking mode.
It is, however, possible to adjust the
temperature by pushing the selection lever
towards ++or
--
(fig.3).
PPllaaccee yyoouurr ddiisshh iinn tthhee oovveenn
based on the
recommendations provided by the cook book.
After these steps, the oven heats up and the
temperature indicator flashes.
A series of beeps will sound when the oven
reaches the selected temperature.
The temperature stops flashing.
To stop this heating, return the function
selector to 0.
fig.2
fig.4
Warning
All types of cooking are done with the door closed.
Warning
After a cooking cycle, the cooling fan continues to operate for a period of time in order
to guarantee optimal oven reliability.
fig.1
fig.3
99641441_A_ML.qxp 12/04/2007 10:57 Page 59
Page 9

60
2 / USING YOUR APPLIANCE
EN
--
Cooking with immediate start and
programmed duration
- Select the desired cooking mode and adjust the
temperature (fig.
1).
- Press the “ ” button until the cooking time
indicator starts to flash .
The display flashes 0:00 to indicate that you can
now adjust the setting (fig.
2).
- Press the ++or --buttons to set the desired time.
Example: 30 mins cooking time (fig.
3).
The cooking time is automatically recorded after a
few seconds.
The cooking time display stops flashing.
The countdown of the cooking time begins
immediately after it has been set.
AAfftteerr tthheessee tthhrreeee sstteeppss,, tthhee oovveenn hheeaattss uupp::
A series of beeps will sound when the oven
reaches the selected temperature.
At the end of cooking (end of programmed time),
- the oven turns off,
- the cooking time indicator and 00:00 both flash
(fig.
4),
- a series of beeps sounds for a few minutes.
Press any button to stop the beeping.
The display shows the time once again when the
function selector switch is returned to 0 (fig.
5).
fig.2
fig.3
PROGRAMMED COOKING
••
fig.1
fig.4
fig.5
99641441_A_ML.qxp 12/04/2007 10:57 Page 60
Page 10

61
2 / USING YOUR APPLIANCE
EN
--
Cooking with delayed start and chosen
cooking end time
PPrroocceeeedd aass wwiitthh pprrooggrraammmmeedd ccooookkiinngg..
- After setting the cooking time, press the “ ”
button until the end of cooking indicator flashes
“”.
The display flashes to indicate that you can
now adjust the setting (fig.
1).
- Press the ++or --button to set the desired
cooking end time.
Example: end of cooking at 13:00 (fig.
2).
The cooking end time is automatically
recorded after a few seconds.
The cooking end time display stops flashing.
AAfftteerr tthheessee 33 sstteeppss,, tthhee oovveenn hheeaattiinngg iiss
ddeellaayyeedd ssoo tthhaatt ccooookkiinngg eennddss aatt 1133::0000..
At the end of cooking (end of programmed
time),
- the oven turns off,
- the cooking time indicator and 0:00 both
flash (fig.
3),
- a series of beeps sounds for a few minutes.
Press any button to stop the beeping.
The display shows the time once again when
the function selector switch is returned to 0
(fig.
4).
The light inside the oven turns on when
cooking starts and goes out when cooking
stops.
fig.1
fig.2
fig.3
fig.4
PROGRAMMED COOKING
••
When the cooking is delayed in a
ccoolldd oovveenn
(by pulsed far or combined cooking), the
cavity lights up when cooking starts and stays lit until cooking ends. The fan keeps working
when the cooking has finished, until the oven has cooled down.
When the cooking is delayed in a
hhoott oovveenn
(by pulsed far or combined cooking),
the
cavity lights up when cooking starts and stays lit until cooking ends. The fan starts working
when the programme starts and keeps working until the oven has cooled down.
99641441_A_ML.qxp 12/04/2007 10:57 Page 61
Page 11

62
2 / USING YOUR APPLIANCE
EN
-- YYoouurr oovveenn’’ss pprrooggrraammmmeerr ccaann bbee uusseedd aass aann
iinnddeeppeennddeenntt ttiimmeerr tthhaatt aalllloowwss yyoouu ttoo ccoouunntt
ddoowwnn aa ttiimmee wwiit
thhoouutt ooppeerraattiinngg tthhee oovveenn..
In this case, the timer display has priority over
the clock display.
- Press the “ ” button (fig.1) until the timer
symbol begins flashing.
-> 0.00 and a small hourglass both flash.
- Adjust the chosen time by pressing the
buttons ++or
--
(fig.2).
- Press the button “ ” to confirm, or wait for
a few seconds.
Warning
It is possible to change or cancel the timer at any time.
fig.1
fig.2
USING THE TIMER FUNCTION
••
The display stops flashing after a few seconds and the timer starts working, counting down the
time in seconds.
Once the time has expired, the timer emits a series of beeps to notify you.
Press any button to stop the beeping.
99641441_A_ML.qxp 12/04/2007 10:57 Page 62
Page 12

63
3 / OVEN COOKING MODES
EN
*
Program(s) used to obtain the results indicated on the energy label in accordance with European
standard EN 50304 and European Directive 2002/40/CE.
CCIIRRCCUULLAATTIINNGG HHEEAATT
(recommended temperature
118800°°CC
min 35°C max 235°C)
•
Cooking controlled by the heating element located at the back of the oven by the fan.
•
Rapid temperature increase: Some dishes can be placed in the oven while it is still cold.
•
Recommended for keeping white meat, fish and vegetables moist.
For cooking multiple items on up to.3 levels.
CCOOMMBBIINNEEDD HHEEAATT ((++ BBRREEAADD))
(recommended temperature
220055°°CC
min 35°C max 275°C)
•
Cooking controlled by the upper and lower heating elements and by the fan.
•
Three combined sources of heat: a lot of heat from the bottom, a little circulating heat
and a bit from the grill.
•
Recommended for quiches, pies, wet fruit tarts, placed preferable on an earthenware
dish.
BBRREEAADD
•
Cooking sequence recommended for baking bread.
•
Place the ball of dough on the pasty dish - 2nd shelf.
•
Do not forget to place a ramekin of water on the bottom to get a crispy, shiny crust.
FFAANN GGRRIILLLL ++ RROOTTIISSSSEERRIIEE
(recommended temperature
220000°°CC
min 180°C max 230°C)
•
Cooking controlled, alternately, by the upper element and by the fan.
•
Preheating is unnecessary. Roasts and poultry are juicy and crispy all over.
•
The spit keeps turning until the door is opened.
•
Slide the drip tray onto the bottom shelf support.
•
Recommended for all poultry and roasts on the spit, for cooking leg joints thoroughly,
and cuts of beef. To keep fish steaks moist.
““PPOOUULLTTRRYY”” EECCOO
(recommended temperature
220000°°CC
min 35°C max 275°C)
•
Cooking controlled by the upper and lower heating elements with no fan.
•
This position allows for energy savings while preserving the quality of the cooking.
•
The ECO position is used for energy label performance.
•
All types of cooking are done
wwiitthhoouutt pprreehheeaattiinngg..
•
Place the poulty in a dish on the 1st shelf.
*
*
99641441_A_ML.qxp 12/04/2007 10:57 Page 63
Page 13

64
3 / OVEN COOKING MODES
EN
VVAARRIIAABBLLEE GGRRIILLLL MMEEDDIIUUMM AANNDD HHIIGGHH ++ RROOTTIISSSSEERRIIEE
(recommended positions
22 oorr 44
- min 1 - maxi 4)
•
Cooking done by the upper element.
•
The double grill covers the entire grid surface. The grill is as effective on medium as
on high, for small quantities.
•
They are recommended for grilling chops, sausages, toast or prawns placed on the
grid.
KKEEEEPPIINNGG TTHHIINNGGSS WWAARRMM
(recommended temperature
8800°°CC
min 35°C max 100°C)
•
This position allows you to keep your dishes hot by occasional heating from the
bottom of the oven along with the fan.
•
Recommended for letting dough rise for bread, brioche, kugelhopf... without
exceeding 40°C (plate warming, defrosting).
99641441_A_ML.qxp 12/04/2007 10:57 Page 64
Page 14

65
4 / CARING FOR AND CLEANING YOUR OVEN
EN
SELF-DEGREASING CATALYTIC
(
enamelled oven)
••
- This oven is composed of an enclosure fitted with detachable walls covered with a special
microporous enamel (catalytic enamel), which provides its self-degreasing properties. As soon
as dirt appears, it spreads out and is dispersed into the microporous holes. It is oxidised on both
sides and gradually disappears. The self-degreasing enamel is mainly suited for fatty, rather than
sugary substances. This is why the oven floor, which is more subject to sugary overflow, is not
covered with this enamel.
WWee ssttrroonnggllyy rreeccoommmmeenndd::
- That you do not scrub these catalytic walls with metallic brushes, pointed or sharp instruments.
- That you do not try to clean them with commercial scouring products.
- When grilling food, the temperature of the walls is not always sufficient to eliminate major
spattering of fat.
CCLLEEAANNIINNGG
•
After cooking, select the cleaning sequence.
If traces of spatter remain, they will be reduced during subsequent cooking operations.
99641441_A_ML.qxp 12/04/2007 10:57 Page 65
Page 15

66
5 / AFTER-SALES SERVICE
EN
Any repairs that are made to your appliance
must be handled by a qualified professional
authorised to work on the brand. When you
call, mention your appliance’s complete
reference (model, type, serial number). This
information appears on the manufacturer’s
nameplate
(fig.1).
GENUINE REPLACEMENT PARTS
During maintenance work, request that only
certified genuine replacement parts are
used.
•SERVICE CALLS
BBrraannddtt AApppplliiaanncceess
- simplified shareholder company with capital of 10,000,000 Euros RCS Nanterre 440,302,347.
BRANDT APPLIANCES SAS
7 rue Henri Becquerel
92500 RUEIL MALMAISON
230V ~ 50 Hz
MADE IN FRANCE
fig.1
99641441_A_ML.qxp 12/04/2007 10:57 Page 66
Page 16

NOTES
99641441_A_ML.qxp 12/04/2007 10:59 Page 119
Page 17

9999664411444411
03/07
Translation/DTP by Technicis SAS - Boulogne-Billancourt - France
DDOOCC771100**
99641441_A_ML.qxp 12/04/2007 10:59 Page 120
 Loading...