

Page 1

DOC560*
Le guide d’utilisation de votre four
U
ser Manual for Your Oven
Betriebsanleitung des Backofens
D
e gebruikshandleiding van uw oven
Brugervejledning til ovnen
Guía de utilización del horno
O guia de utilização do seu forno
FR
GB
DE
NL
DK
ES
PT
99636101_ML_A DOC560.qxd 17/03/05 16:07 Page 1
Page 2

32
Throughout the manual,
indicates safety recommendations,
indicates advice and tips
Introduction P.33
What does your oven look like?
Description of the appliance P.34
Accessories P.35
Safety recommendations P.36
How do you install your oven?
Electrical connection P.37
Changing the power cable P.38
Useful dimensions for installing your oven P.39
How does your oven work?
Close-up of your analog programmer P.40
How do you set the clock on the oven? P.41
How do you program for immediate cooking? P.42
How do you set a cooking programme? P.43
How do you use the timer? P.44
How do you program an Economical cooking cycle? P.45
How do you customise the cooking temperature? P.46
How do you put your display in standby mode? P.46
How do you lock the controls (child safety device)? P.46
How do you change the bulb? P.47
Oven cooking modes P.48-49
How do you use the ICS mode? P.50-57
How do you clean the cavity of your oven? P.58
What to do in case of operating malfunctions P.59
Table of Contents
99636101_ML_A DOC560.qxd 17/03/05 16:08 Page 32
Page 3

33
GB
Introduction
Dear Customer,
You have just acquired a DE DIETRICH oven and we would like to thank you.
Our research teams have created a new generation of appliances for you. Their
quality, design and technological advances make them exceptional products
and reveal our unique know-how.
With modern, refined lines, your new DE DIETRICH oven blends harmoniously
into your kitchen and perfectly combines technological expertise, cooking performance and aesthetic luxury.
In the line of DE DIETRICH products, you will also find a wide range of hobs,
ventilation hoods, dishwashers, microwave ovens and refrigerators, all of which
can be built in and all of which can be coordinated with your new DE DIETRICH
oven.
Thanks to these "New Items of Value" that serve as guideposts in our everyday lives, DE DIETRICH, the reference of excellence, is truly an invitation to a
new art of living.
The DE DIETRICH brand.
99636101_ML_A DOC560.qxd 17/03/05 16:08 Page 33
Page 4
1
3
5
34
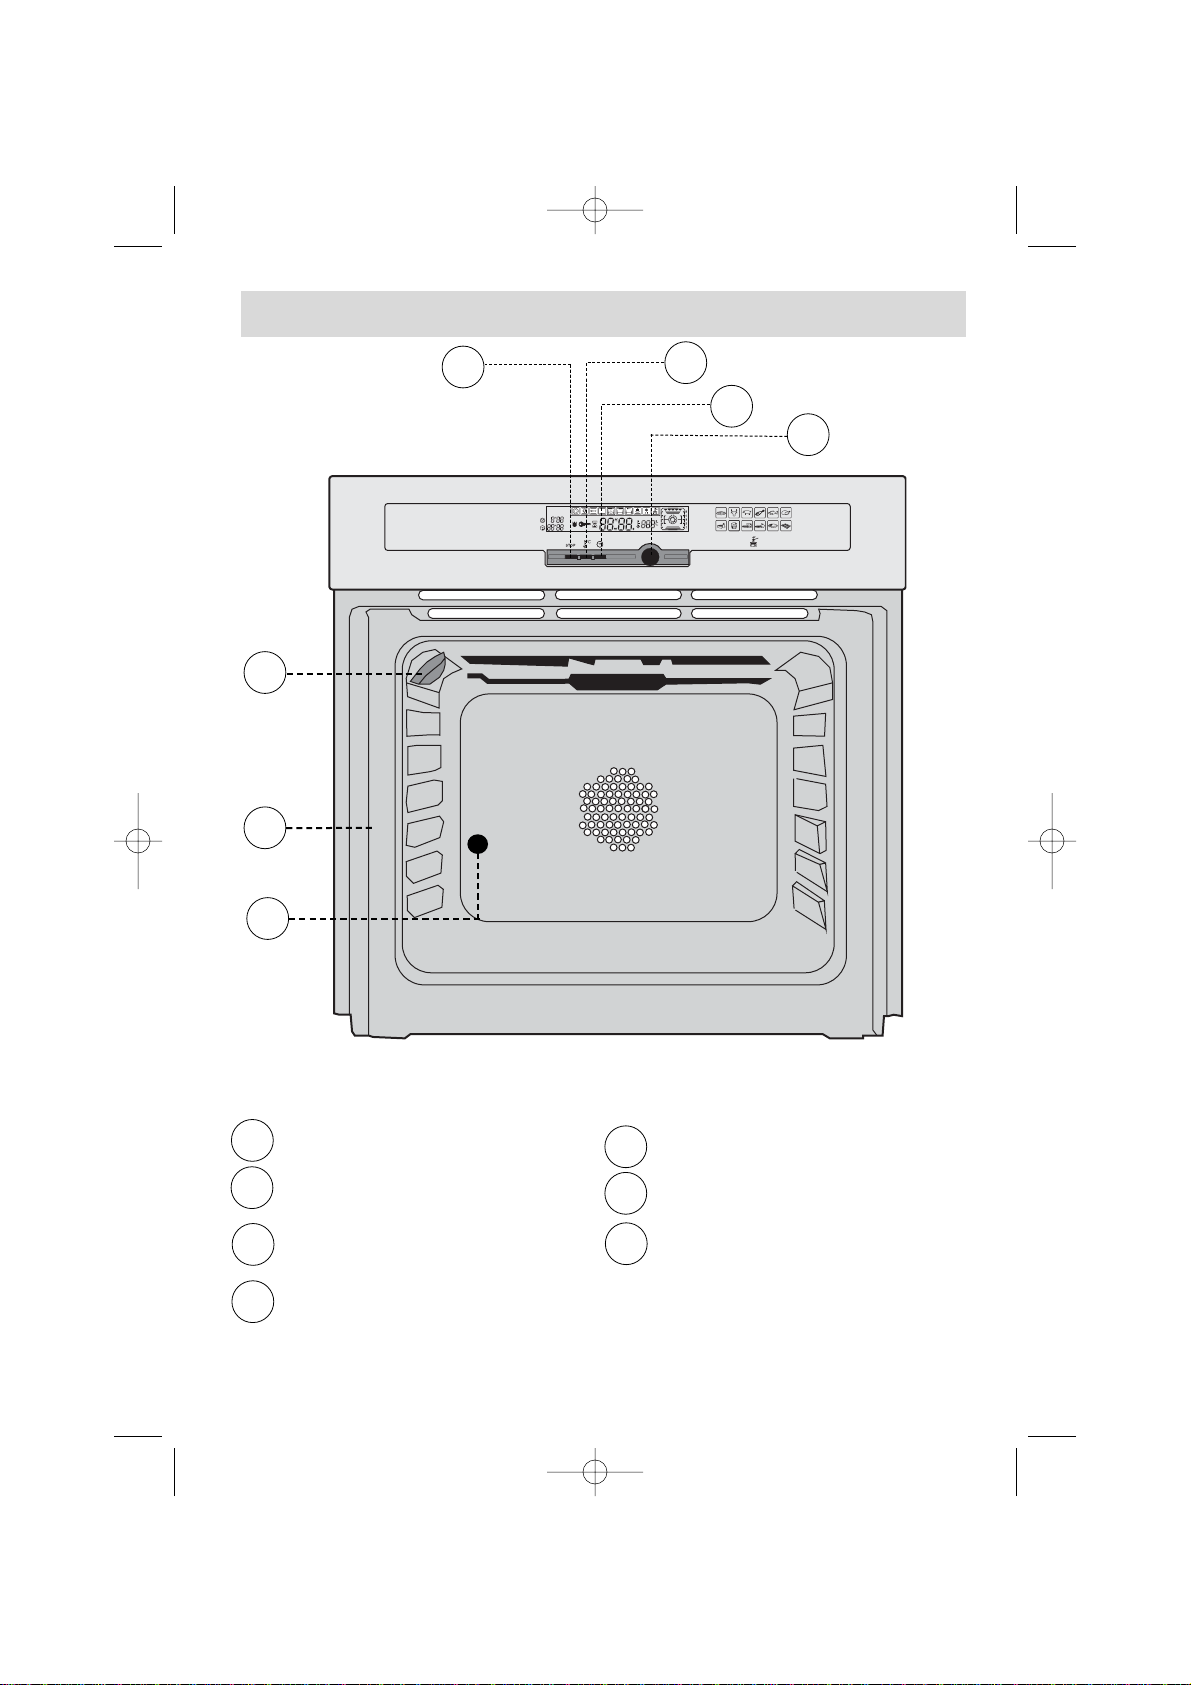
What does your oven look like?
Stop/cancel
Temperature setting
Adjust cooking times/cooking
end time and clock settings
Function selector
DESCRIPTION OF THE APPLIANCE
Hole for rotisserie
Shelf support indicator
Light
1
2
3
4
5
6
7
1
2
3
4
5
6
7
99636101_ML_A DOC560.qxd 17/03/05 16:08 Page 34
Page 5

GB
Accessories
Rear
Front
Curved anti-tipping safety grid
Its shape was designed to allow you to position
your dish between two shelf support levels.
Dish + grid (drip tray)
Inserted under the grid, it catches barbecue
juices and grease. It can also be used half-full
of water for double-boiler cooling methods.
Avoid placing roasts or meats directly in the
dish because you are certain to have major
spattering on the oven walls
Multi-purpose dish (drip tray)
It is used to collect juices and grease from cooking with the high grill or the pulsed grill. It can be
used as a cooking dish when suitable for the size
of the item to be cooked (e.g. whole poultry surrounded with vegetables, at moderate temperature). Inserted under the grid, it catches barbecue juices and grease. It can also be used halffull of water for double-boiler cooking methods.
Rotisserie
• Position the spit support in the notches of the drip
tray dish (see drawing).
• Place the assembly in the oven on the second wire shelf
support (from the bottom). After placing the piece of
meat to be roasted on the rotisserie, place the spit on the
support piece, sliding the whole until the tip of the spit is
inside the motor located at the back of the oven. Remove
the handle by unscrewing it. After cooking, remove the
entire assembly. At the end of the handle, a grip allows
you to unscrew the forks.
Non-stick baking tray
(to be placed on a grid)
Placed on the dish support grid, it can be used for
cooking pastries, pies and pizza.
Its non-stick coating ensures easy removal of
baked items.
Wear oven mitts to protect your hands when
removing it from the oven. Let it cool before
washing it by hand in the kitchen sink with dish soap. Avoid using scouring sponges.
WARNING: Do not cut on it with a knife or a metallic pizza cutter; use plastic or silicone utensils instead.
Do not use the tray at temperatures above 250°.
35
99636101_ML_A DOC560.qxd 17/03/05 16:08 Page 35
Page 6

36
Safety Recommendations
Please become familiar with these recommendations before installing
and using your oven. This oven was designed for household use only. It is
intended solely for cooking foodstuffs. This oven does not contain any asbestosbased components.
FIRST USE:
Before using your oven for the first time, heat it up while empty with the door
closed for approximately 15 minutes using the maximum setting in order to “cure”
the appliance. The rock wool that surrounds the oven cavity may initially release
a particular odour caused by its composition. Similarly, you may notice the release
of some smoke. All of this is normal.
SUBSEQUENT USES:
- Ensure that the door of your oven is completely closed so that the seal
can properly do its job.
- Do not let anyone lean against or sit on the oven door when it is open.
- When using the grill with the door semi-open, exposed parts
and surfaces may become hot. Keep small children away.
- When in use, the appliance becomes hot. Be careful not to touch
the heating elements located inside the oven.
- After cooking, do not use bare hands to touch the dishes or accessories
(grid, rotisserie, drip tray, rotisserie support, etc.); use a potholder or heat-resistant
material.
- Do not use a steam cleaner or high-pressure cleaner.
- Do not line your oven with sheets of aluminium. Otherwise, the result
could be an accumulation of heat that could have an undesirable effect on cooking
and roasting results and could damage the enamel.
- The oven must be turned off for all attempts to clean the cavity.
- If the appliance has an electrical outlet, it must remain accessible
after the appliance has been built in.
99636101_ML_A DOC560.qxd 17/03/05 16:08 Page 36
Page 7
37
GB
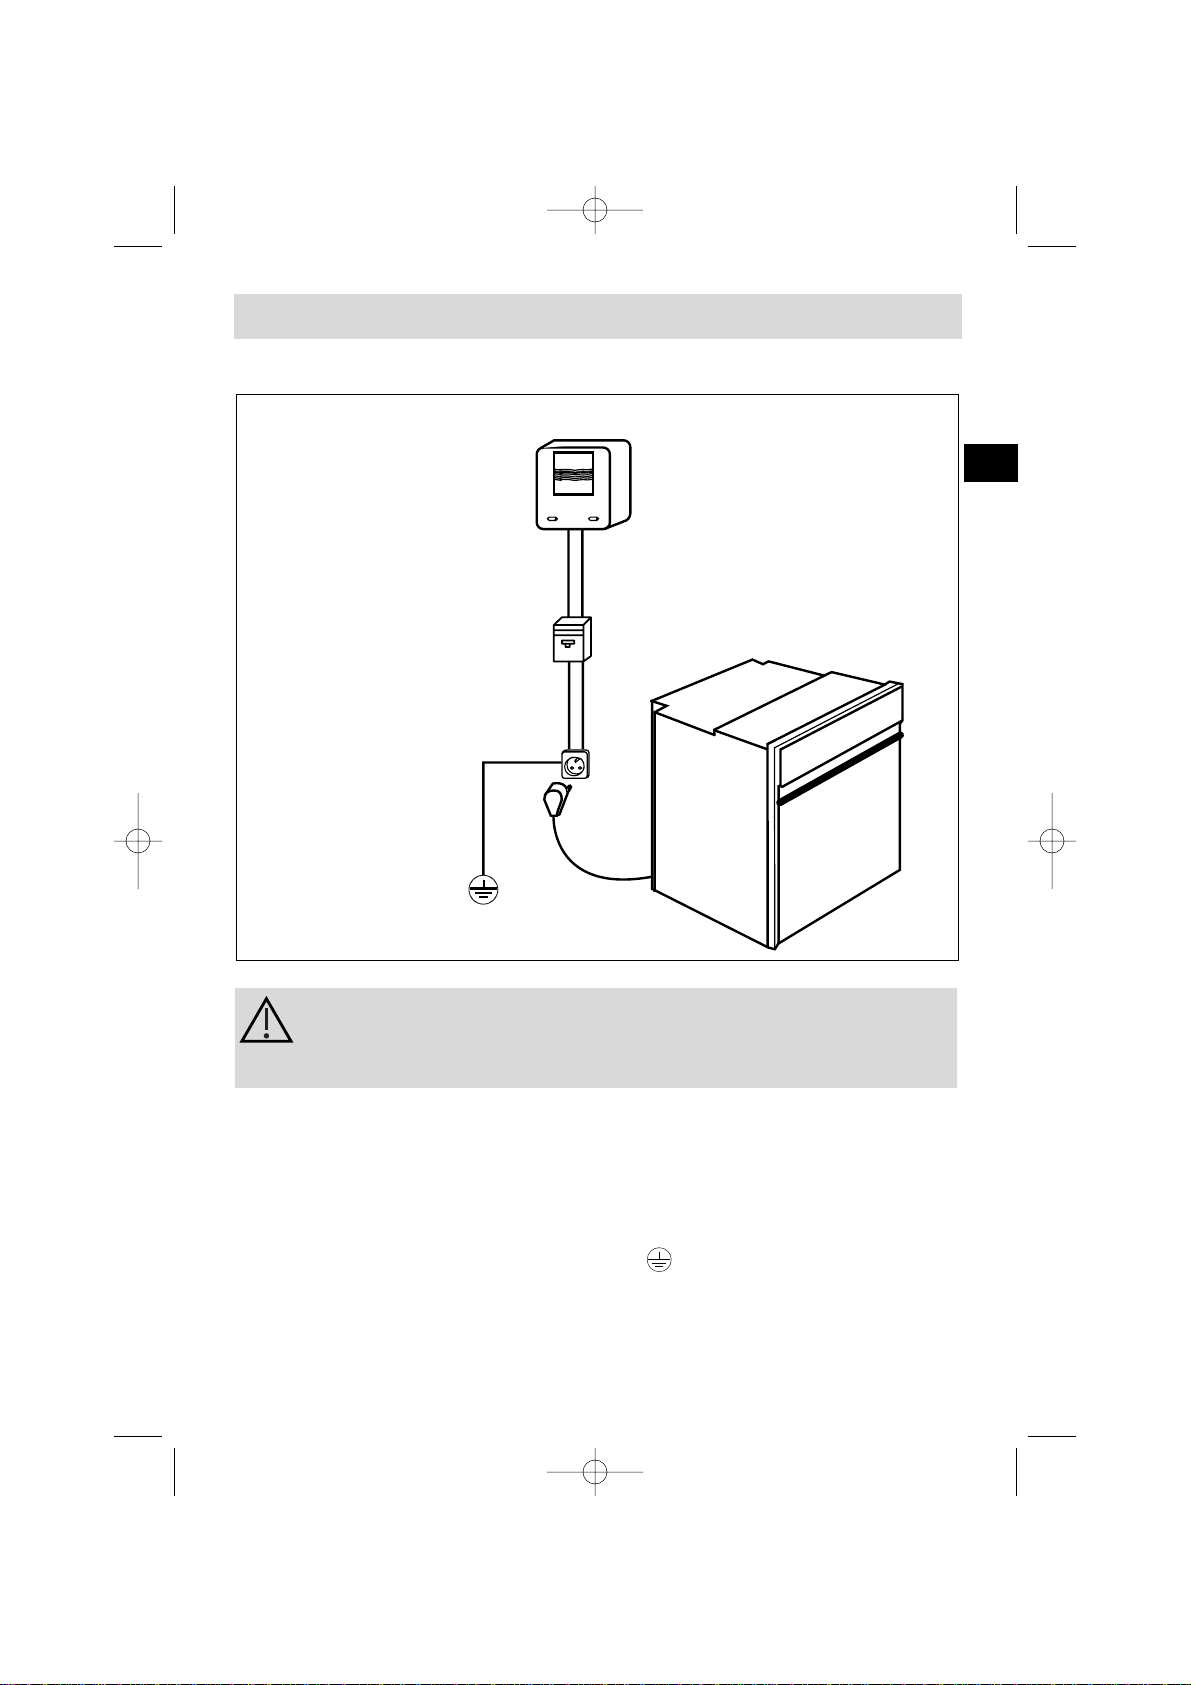
How do you install your oven?
Monophase 20A Counter
220-240 V ~ 50 Hz
Electrical outlet
2-prong receptacle
+ ground lead
CEI Standard 60083
Monophase line 220-240 V ~
Electrical connection
Power cable
approximately
1.5 m in length
16A fuse or differential
circuit breaker
Before making the connection, ensure that the wires in your electrical installation have enough cross-sectional area to properly
supply electricity to the appliance.
The fuse in your set-up must be 16 amperes.
The electrical connection should be performed before the appliance is installed in
the cabinet.
• The oven must be connected with a power cable (standardised) with three
1.5 mm
2
conductors (1 ph +1 N + ground) that must be connected to a
monophase 220-240 V network via a CEI 60083 standardised receptacle (1 ph +1 N
+ ground lead) or in accordance with installation rules. The safety wire (green-yel-
low) is connected to the appliance's terminal and must be connected to the
ground lead of the electrical set-up.
• In the case of connections with an electric receptacle, it must remain accessible
after installation of the appliance.
• The oven's neutral conductor (blue wire) must be connected to the network's
neutral conductor.
99636101_ML_A DOC560.qxd 17/03/05 16:08 Page 37
Page 8

38
• The power cable (H05 RR-F, H05 RN-F or H05 VV-F) must be of sufficient length to
be connected to the build-in oven while it sits on the floor in front of the cabinet.
To do this the appliance must be disconnected from the electrical network:
• Open the inspection flap located at the lower right of the back cover by unscrewing the two screws, then pivot the inspection flap.
• Strip 12 mm along each wire of the new power cable.
• Carefully twist together the strands.
• Loosen the screws from the terminal board and remove the power cord to be replaced.
• Introduce the power cable through the side of the cover in the cable clip located
to the right of the terminal board.
• Connect the power cord wires in accordance with the written markings on the
terminal board.
• All the strands of the electricity wires must be captured under the screws.
• The phase wire on the L terminal.
• The green-yellow coloured ground wire should be connected to the terminal .
• The neutral conductor (blue) on the N terminal.
• Screw down tightly the screws on the terminal board and check the connection
by pulling on each wire.
• Attach the cable with the cable clip located to the right of the terminal board.
o Close the inspection flap using the two screws.
Changing the power cable
We cannot be held responsible for any accident resulting from an
non-existent, defective or incorrect ground lead.
How do you install your oven
99636101_ML_A DOC560.qxd 17/03/05 16:08 Page 38
Page 9
39
How do you install your oven?
To be certain that you have properly installed your appliance,
do not hesitate to call on a household appliance specialist.
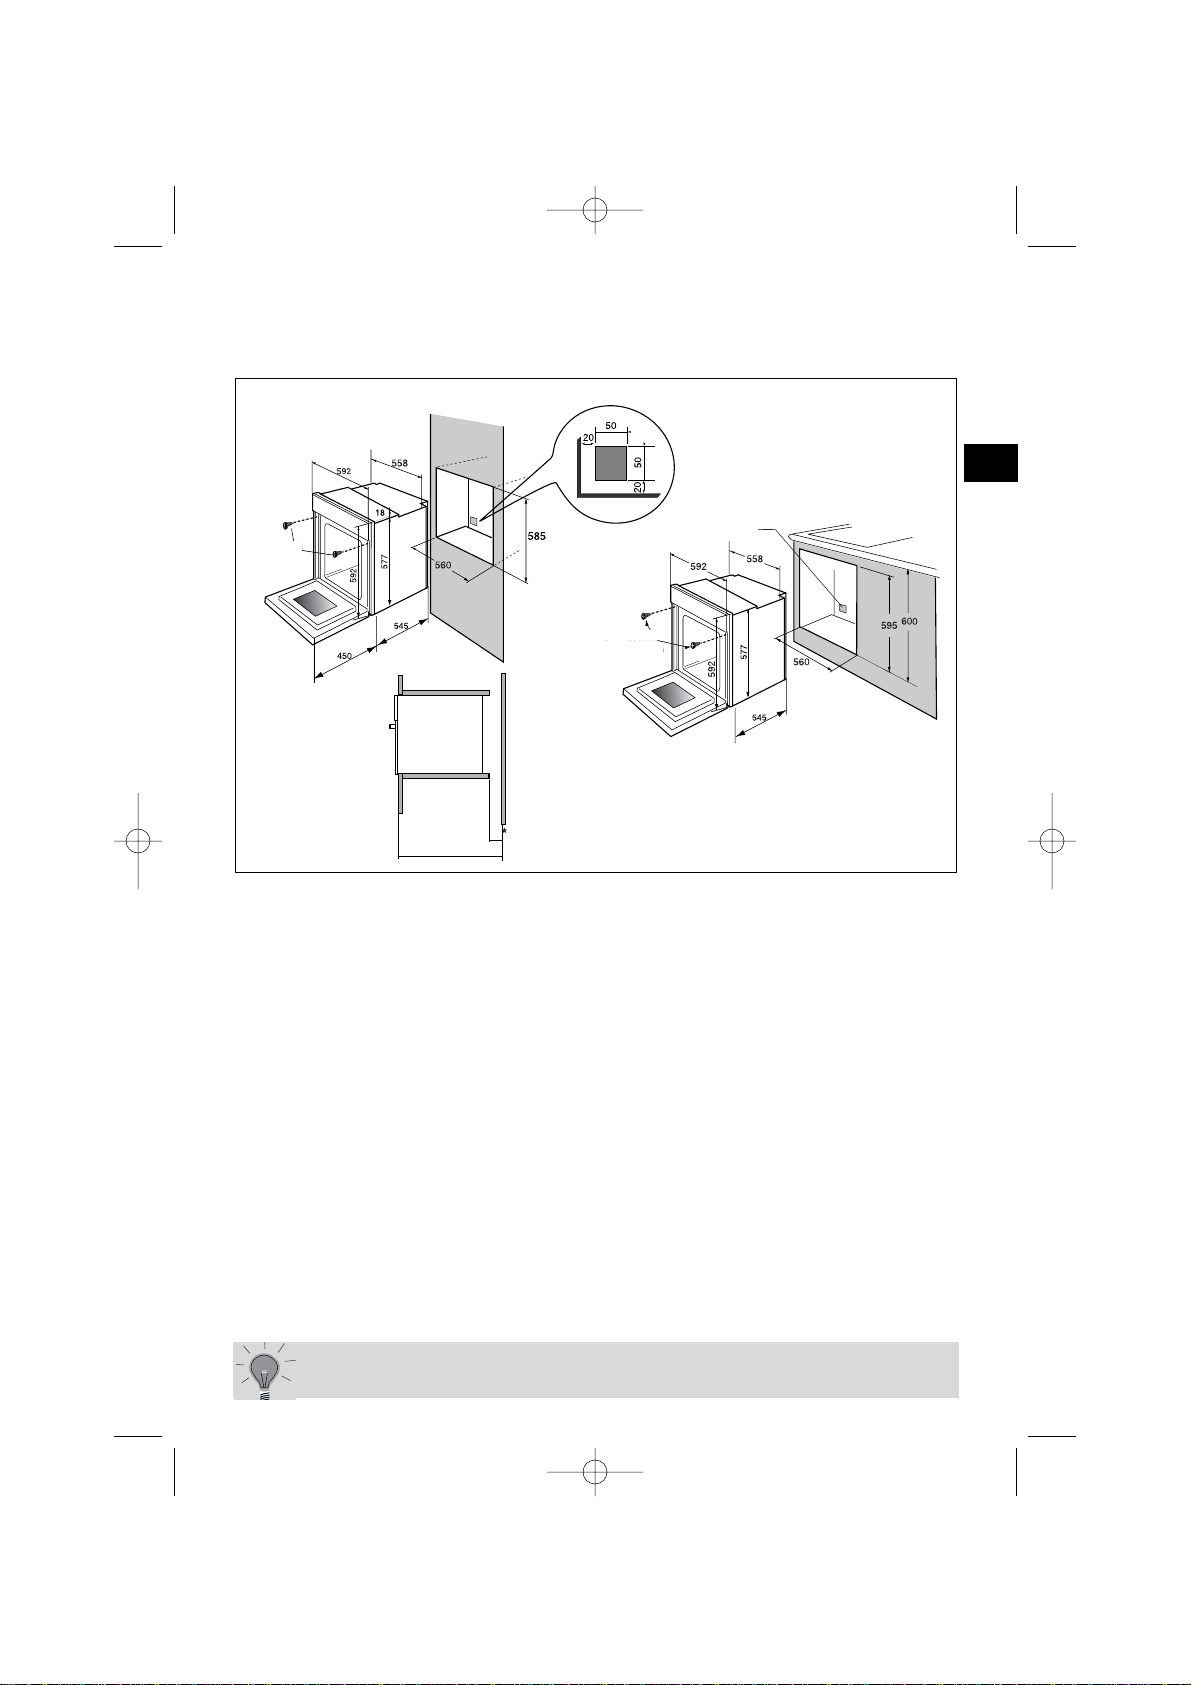
Useful dimensions for installing your oven
The oven can be installed under a work top or in a column of cabinetry
(open* or closed) having the appropriate dimensions for built-in installation (see adjacent diagram).
Your oven has optimised air circulation that allows it to achieve remarkable cooking
and cleaning results if the following guidelines are respected:
• Centre the oven in the cabinet so as to guarantee a minimum distance of 5 mm
between the appliance and the neighbouring cabinet.
• The material of the built-in cabinetry must be heat resistant (or be covered with
such a material).
• For greater stability, attach the oven in the cabinet with two screws through the
holes provided for this purpose on either side of the front inner panel (see diagram).
To do this:
1) Remove the rubber screw covers to access the mounting holes.
2) Drill a Ø 3 mm hole in the cabinet panel to avoid splitting the wood.
3) Attach the oven with the two screws.
4) Replace the rubber screw covers (they also serve to absorb the shock caused
by closing the oven door).
(*) If the cabinet is open, its opening must be 70 mm (maximum).
70
550
Location of
retaining screw
50 x 50 mm cut-out
Location of
retaining screw
GB
99636101_ML_A DOC560.qxd 17/03/05 16:08 Page 39
Page 10

40
How do you use your oven?
1. C
lose-up of your programmer
1
2
3
4
5
7
6
8
Clock or timer display
Cooking mode display
Shelf support indicator and selected cooking mode indicator.
Display of various time adjustment programmes (cooking
times and end times)
Oven temperature display
Rising temperature indicator
Timer indicator
Control lock indicator (child safety device).
“ICS” function indicator
“Eolysis” function indicator
9
10
1
2
3
4
5
8
6
7
9
10
99636101_ML_A DOC560.qxd 17/03/05 16:08 Page 40
Page 11

41
GB
a) When supplied with electricity
• The displays flashes 12:00.
• Program the time by turning the setting
button toward + or - (the speed with which
the button is turned varies the speed with
which the time changes)
Example: 12:30.
Enter the programme by pressing the
selector button.
-> The display stops flashing
b) Resetting the clock time
Press down the button for a
few seconds.
The time display flashes, indicating that
it is now possible to adjust the time.
To set the time, turn the button toward
+ or - so as to advance or turn back the
displayed time.
After entering the time of your choice,
enter it by pushing the button -> the display stops flashing.
The time cannot be set if the oven is in delayed cooking mode.
In the event of a power outage lasting less than 35 hours, when electricity
is restored, a message indicates that your oven will automatically readjust
the time displayed.
2. How do you set the clock on the oven?
How does your oven work?
99636101_ML_A DOC560.qxd 17/03/05 16:08 Page 41
Page 12

42
How does your oven work?
The analogue programmer should display only the time; it should not be flashing.
• Press and turn the button toward the right to select the cooking mode.
The selection function flashes.
• Enter the time by pressing the setting button.
The cooking mode indicator stops flashing and
the recommended temperature begins flashing. When the pre-selected temperature
appears, the shelf support indicator and the
heating elements in use also light up. The oven
begins heating.
Place your dish in the oven based on the suggestion indicated in the display and the recommendations provided in the cooking guide.
Example: “ -> Shelf support 2 or 3
recommended.
As long as the °C symbol is flashing, you can
make changes by turning the temperature
selector button.
Enter the time by pressing the button.
Your oven recommends the optimal temperature for the chosen dish. It is, however, possible to adjust the temperature at any time by
using the “ ” touch control located under
the display.
Example “ ” adjusted to 210°.
After these three steps, the oven heats up:
- These rising temperature indicator symbols indicate the incremental temperature increase inside the oven.
- A series of beeps will indicate that the oven has reached the selected temperature.
To stop cooking, press and hold the STOP touch control for a few seconds.
After a cooking cycle, the circulating fan continues to function for a
period in order to cool the oven.
3. How do you program for immediate cooking?
99636101_ML_A DOC560.qxd 17/03/05 16:08 Page 42
Page 13

43
GB
How does your oven work?
4. H
ow do you set a cooking programme?
b) With delayed start (choose end time)
Proceed as with programmed cooking.
After setting the cooking time, press
two times so that the end time begins flashing.
Turn the selector button toward + or - to
set the desired end of cooking time.
Enter the time by pressing the button.
After these steps, the oven heating is
delayed so that cooking ends at 13:00.
When your cooking programme is finished, a
three-beep pattern will be emitted for a few
minutes. The beeps will stop automatically.
a) With immediate start
Proceed as described in the “Immediate Cooking” section.
Press the button.
The cooking time flashes 0:00 to indicate that
it is now possible to set it.
Turn the button to set the desired time.
Example: 25 min cooking time.
Enter by pressing the button.
The cooking time starts counting down as
soon as the time has been entered. You can
cancel the function at any time by setting
the displayed value to 0 (after having
pressed the touch control ).
99636101_ML_A DOC560.qxd 17/03/05 16:08 Page 43
Page 14

44
How does your oven work?
5. How do you use the timer?
Your oven is equipped with an electronic timer that is independent of the
oven functions, making it possible to measure times.
In this case, the timer display takes priority over the time of day display.
Press the touch control three times.
The hourglass appears and 00
M00S flashes.
Turn the button until you obtain the desired
length of time (max 59 minutes and 59 seconds)
Enter the time by pressing the button.
The display stops flashing and the timer starts working, counting down the time in
seconds. When the cooking time is finished, the timer starts beeping to alert you
and the hourglass begins flashing.
It is possible to change or cancel the timer programme at any time
by turning it to 0 and pressing the button to enter.
99636101_ML_A DOC560.qxd 17/03/05 16:08 Page 44
Page 15

45
6. H
ow do you program for energy-saving cooking?*
After a cooking cycle, the circulating fan continues to function
for a period to ensure the heating elements are properly
cooled down.
The analogue programmer should display only the time; it should not be flashing.
Turn the selector button to the
cooking mode.
Enter the time by pressing the button.
• Place your dish in the oven based on the recommendation indicated in the display.
• Your oven recommends the optimal temperature for the chosen cooking mode:
200°C.
It is, however, possible to adjust the temperature by using the button located
under the display.
Example: "ECO Cooking" position adjusted to 190°C
After these three steps, the oven heats up:
The temperature rise indicator is activated and signals the incremental
temperature increase in the oven.
Three beeps will indicate to you that the set temperature has been reached.
To optimise the ECO cooking mode, do not pre-heat and do not open
the door during cooking.
*This position makes it possible to save up to 20% energy while still
offering identical cooking results.
The ECO position is used for the energy label performance.
How does your oven work?
GB
99636101_ML_A DOC560.qxd 17/03/05 16:08 Page 45
Page 16

46
You can adjust the brightness of your display. To do this:
- Set the time of your programmer to 12:10.
- Depress the “ ” button while rotating it (+ or -) in order to obtain the desired
level of brightness.
- After having adjusted the brightness to your liking, return your programmer to
the current time of day.
8. Adjusting brightness
How does your oven work?
7. C
ustomising the recommended temperature
Select the cooking function:
If you wish to customise the recommended temperature:
- Press the “ ” touch control until the temperature display begins flashing.
- Turn the + or - button until the desired temperature appears.
- Press to enter.
9. Control panel locking (child safety device)
You have the option of preventing access to the oven controls by taking the following steps:
When the oven is off, hold down the STOP
touch control for a few seconds; a “key” will
then be displayed on the screen -> access to
the oven controls is now blocked.
To unlock access, hold down the STOP touch
control for a few seconds.
The oven controls are once again accessible.
You cannot lock the oven if you have programmed a cooking cycle.
99636101_ML_A DOC560.qxd 17/03/05 16:08 Page 46
Page 17

47
• The bulb is located on the ceiling of your oven's cavity.
a) Unscrew the view port (see adjacent
diagram).
b) Remove the bulb.
Bulb specifications:
- 25 W
- 220-240 V
- 300°C
- G9
c) Replace the bulb then reposition the
view port and reconnect your oven.
Disconnect your oven before performing any task on the bulb to
avoid the risk of electric shock and, if necessary, let the appliance
cool down.
How do you change the bulb?
Bulb
Unscrew
View port
GB
99636101_ML_A DOC560.qxd 17/03/05 16:08 Page 47
Page 18

48
Combined cooking
Cooking controlled by the upper
and lower heating elements at the
back of the oven and by the fan.
Turbo grill
Cooking controlled, alternately,
by the upper element and by the
fan.
Double grill
Cooking controlled by the upper
element
Simple grill
Cooking controlled by the upper
element.
This position allows for energy
savings while preserving the
quality of the cooking.
The ECO position is used for the
energy label performance.
Hold warm function
Heat dosages from the element at
the back of the oven combined
with fan.
Stabilisation at low temperatures.
Symbol
Name of cooking mode Description of cooking mo
6. Oven cooking modes
*
* Programme(s) used to obtain the results indicated on the energy label in compliance w
Quick temperature
increase. Some dishes can
be placed in the oven
while it is still cold.
Traditional ECO
Cooking controlled by the upper
and lower heating elements with
no fan.
Three combined sources of
heat: a lot of heat from
the bottom, a little circulating heat and a bit from the
grill.
The double grill covers the
entire grid surface.
As for the simple grill,
it is equally effective for
smaller quantities.
This mode combines the effects
of the fan and the grill; the grill
pulses the food with infrared and
the air movement generated by
the fan attenuates the effect.
Traditional
Cooking controlled by the upper
and lower heating elements with
no fan.
Requires preheating before
placing the dish in the oven.
Circular heating
Cooking controlled by the heating
element located at the back of the
oven and by the fan.
*
Defrosting
99636101_ML_A DOC560.qxd 17/03/05 16:08 Page 48
ECO
ECO
Page 19

Recommended for quiches, potpies
and juicy fruit tarts.
Recommended for grilling chops,
sausages, toast, prawns
placed on the grid.
Recommended for letting dough rise
for bread, buns, cakes, etc. without
exceeding 40° C (plate warming,
defrosting).
Recommendations
Oven cooking modes
Recommended for preserving tenderness in
white meats, fish, vegetables
For cooking multiple items on up to three levels.
Note: All cooking is done without
preheating.
Recommended for sealing and thoroughly
cooking red and white meat.
To slowly cook poultry weighing up to 2
kg.
Recomm. Temp.
mini
recomm.
maxi
35
180
235
mini
recomm.
maxi
35
205
275
mini
recomm.
maxi
200
230
mini
recomm.
maxi
35
275
mini
recomm.
maxi
35
80
100
180
200
Recommended for slow, gentle cooking:
tender game meat, etc.
Sealing red meats
To simmer in a covered stew pan dishes
that were begun on the hob (coq au vin,
stew, etc.)
mini
recomm.
maxi
35
240
275
mini
recomm.
maxi
30
30
50
mini
recomm.
maxi
1
4
4
mini
recomm.
maxi
1
2
4
49
GB
99636101_ML_A DOC560.qxd 17/03/05 16:08 Page 49
Page 20

How does your oven work?
ALL THE COOKING IS DONE WITHOUT PREHEATING THE OVEN.
1. ICS Concept and Advantage
With the “ ” function, you no longer have to select the temperature and
cooking time.
These two parameters are automatically calculated by your oven in order to give
you optimal cooking.
The “ ” cooking mode takes place in two phases:
1) The first phase (acquisition) during which the oven will use its electronic sensors
to record the specific cooking data for your dish.
This phase is represented by an animation in the right portion of the display:
This may take between 5 and 40 minutes depending on the dish.
DO NOT OPEN THE DOOR DURING THIS PHASE or you may disturb the recording
of data.
2) During the second phase, the oven has determined the necessary cooking time.
The animated symbol stops and “Auto” scrolls in the display. The oven then indicates the remaining cooking time as well as the real time at which cooking will
be finished.
Starting at this moment, the oven is finalising cooking information and you can
open the door if you want to tend to the dish (basting, turning, etc.)
2. ICS Cooking Mode
a) Immediate cooking:
Position the cooking selector on
the
“ ” function.
Enter the programme by pressing
the selector button.
he various kinds of dish options flash in the display.
Use the selector button, choose the dish.
Place it in the oven on the shelf support level recommended in the display.
Close the door. Press the selector button to enter. The oven begins cooking.
The data search phase begins, as symbolised by the animation in the display:
the average cooking time for the type of dish selected is displayed. Once the
oven has finished analysing the food, the real cooking time required is displayed
and the animation is replaced by “ICS”.
When cooking is complete, the oven emits several beeps.
50
99636101_ML_A DOC560.qxd 17/03/05 16:08 Page 50
Page 21

How does your oven work?
b) Delayed cooking:
Position the cooking selector at “ ”.
Choose the dish by turning the selector button.
Place your dish in the oven and close the door.
Position the mode selector on “End of
cooking”.
Turn the selector button toward + or - to set
the desired end of cooking time.
e.g. End of cooking 13:00.
Press the selector button to enter your selection.
After these steps, the cooking start time is delayed. “ICS” scrolls in the display until
cooking begins. The cooking end time is estimated based on the average cook time.
Just as for immediate cooking, this time will be optimised during the cooking programme; therefore, the time may vary by a few minutes (more or less) compared to
the initial time selected.
3. Tips
If you open the door during the analysis phase
(except during the first minute) your oven will
emit warning beeps and the dish symbols will
flash.
As soon as the “ICS” symbol stops flashing,
you are free to open the oven door.
Cooking in “ ” mode MUST BEGIN WITH A
COOL OVEN. You must wait for the oven to cool
down completely before beginning a second
cooking programme in the same mode (otherwise the “°C “ and dish symbols will flash in
the display and beeps will be emitted to prevent
you from beginning a cooking programme).
4. What to do in case of malfunctions?
You notice that...
Possible causes What should you do?
Beeps.
• You opened the door during the
first minute: the programme is cancelled.
- Let the oven cool down in order
to start a new cooking programme.
The --- symbol flashes in the
display.
• The oven is searching to determine the ideal cooking time.
- This is a normal step.
“ICS” is displayed.
• The oven has now determined
the appropriate cooking time.
- This is a normal step.
Function selector on “ICS”
symbol + beeps + °C
is flashing.
• The oven is too hot to set an
“ICS” cooking programme.
- Wait for the oven to cool down
or use a traditional cooking
function.
51
GB
99636101_ML_A DOC560.qxd 17/03/05 16:09 Page 51
Page 22

5.
Oven Cooking Modes Pizza
P
izza
• Fresh store-bought pizza
• Ready-to-use pizza dough
• Home-made pizza dough
• Frozen pizza
• Roast beef (rare)
• Place the roast on the grid using the grid +
drip tray assembly.
You can turn the meat when the “ICS” display
stops flashing.
Roast
beef
• Pork roasts
- Loin
- Tenderloin
Pork
roast
L
amb
• Leg of lamb weighing 1 to 2.5 kg
• Place the roast on the grid using the grid +
drip tray assembly.
You can turn the meat when the “ICS” display
stops flashing.
• Whole fish (sea bream, cod, trout, mackerel, etc.)
• Roasted fish
Fish
• Chickens weighing 1 to 1.7 kg
• Duck, guinea fowl, etc.
C
hicken
Stuffed
vegetables
• Stuffed tomatoes, peppers, etc.
• Lasagne (fresh or frozen)
• Shepherd's pie, brandade, etc.
Soufflé
• Use a tall mould with straight edges and a diameter
of 21cm
Savoury
tarts
• Fresh quiches
• Frozen quiches
• Frozen mini-pastry
• Fresh tarts
• Frozen tarts
Sweet
tarts
• Home-style cakes: sweet or savoury loaves,
pound cake
o Ready-to-mix batters in packets.
C
akes
• Small individual pastry: biscuits, wafers, croissants,
rolls, raisin breads, toasted sandwiches.
Small
biscuits
52
99636101_ML_A DOC560.qxd 17/03/05 16:09 Page 52
Page 23

• Place it on the grid for a crispy crust
(you can place a sheet of baking paper between the grid and the pizza to protect the oven
from cheese drippings)
• Place the pizza on the baking tray for a soft crust.
• Take the roast out of the refrigerator at least one hour before starting the cooking programme
• You will get a rare roast beef; If you prefer meat well-done, opt for a traditional cooking
function.
• Trim as much fat as possible: it causes smoke.
• At the end of cooking, allow the meat to sit for 7 to 10 minutes wrapped in a sheet of aluminium foil before carving.
• Take the roast out of the refrigerator at least one hour before starting the cooking programme: the colder the meat is going into the oven, the colder it will be at the end of cooking.
• Use an earthenware dish. Add one to two tablespoons of water.
• At the end of cooking, allow the meat to sit for 7 to 10 minutes wrapped in a sheet of aluminium foil before carving. Add salt when cooking is finished.
• Take the roast out of the refrigerator at least one hour before starting the cooking programme:
• Select a leg of lamb that is round and plump rather than long and lean
• Wrap the lamb in aluminium and let it sit after cooking.
• Please use this function only for whole fish cooked with herbs and white wine.
(grilled fish or papillote preparations require that the oven be preheated).
• Rotisserie cooking: Do not forget to place the drip tray on the first shelf support to catch
drippings.
• Cooking in a dish: Opt for earthenware dishes to avoid splattering.
• Pierce the skin of poultry to avoid splattering.
• Properly adjust the dimensions of the dish to the quantity of food to be cooked to avoid
juices spilling over.
• Butter the mould and do not touch the inside with your fingers or the soufflé will not rise.
• Use a non-stick aluminium mould: the crust will be crispy on the bottom.
• Remove the tray from frozen quiches before placing them on the grid.
• Use a non-stick aluminium mould: the crust will be crispy on the bottom.
• Cakes baked in a loaf pan, cake pan or other dish... and always placed on the grid.
It is possible to place two cake moulds side by side.
• Small individual cakes made on a pastry tray and placed on the grid.
cream puff pastry must be cooked on “CAKES” to achieve good results.
53
GB
99636101_ML_A DOC560.qxd 17/03/05 16:09 Page 53
Page 24

Tips and hints
Pizza
To prevent cheese or tomato sauce from dripping in the oven, you can
place a piece of baking paper between the grid and the pizza.
Tarts / Quiches:
Avoid glass and porcelain dishes: because they are too thick, they
extend the cooking time and the bottom of the crust is not crispy.
With fruit, the bottom of the tart risks becoming soggy: just add a few
spoonfuls of fine semolina, crushed biscuit crumbs, almond powder or
tapioca, which will absorb the juice during cooking.
With high-water content or frozen vegetables (leeks, spinach, broccoli
or tomatoes) you can sprinkle a tablespoon of cornmeal.
Fish:
When buying, the odour should be pleasant and not too "fishy".
The body should be firm and rigid and the scales should be firmly stuck
to the skin; the eye should be bright and rounded and gills will appear
shiny and moist.
Beef/ Pork / Lamb
It is imperative that you remove all meat from the refrigerator well
before cooking it: cold-hot temperature shocks toughen meat; this way you
will produce a roast beef that is golden outside, red inside and warm in the
middle. Do not salt before cooking: salt absorbs the blood and dries out the
meat. Use spatulas to turn the meat: if you pierce the meat the blood drips
out. Always let meat sit after cooking for 5 to 15 minutes: wrap it in a sheet
of aluminium and place it just inside a warm oven. This allows the blood
drawn toward the outside during cooking to return to the heart and moisten
the roast.
Use earthenware roasting dishes: glass promotes grease splattering.
Do not cook in the enamelled drip tray.
Avoid sticking garlic cloves into the leg of lamb, else it will lose its blood;
rather slip the garlic between the meat and the bone or cook unpeeled
cloves alongside the lamb and crush them when cooking is complete to
season the sauce; strain it and serve it piping hot in a gravy boat.
How does your oven work?
54
99636101_ML_A DOC560.qxd 17/03/05 16:09 Page 54
Page 25

Some ICS recipes
Pizza Base: 1 pizza crust
*vegetable topping:
6 tablespoons tomato sauce + 100 g diced zucchini
+ 50 g diced bell peppers + 50 g sliced eggplant +2 small sliced tomatoes + 50 g shredded gruyere + oregano + salt + pepper.
*roquefort and smoked bacon topping:
6 tablespoons tomato sauce +
100 g smoked bacon + 100 g roquefort in small chunks + 50 g walnuts
+ 60 g shredded gruyere.
*sausage and fromage frais topping:
200 g drained farm cheese spread
on the crust + 4 sausages, sliced + 150 g ham, slivered + 5 olives + 50
g shredded gruyere + oregano + salt + pepper.
Quiches: Base: 1 aluminium mould, diameter 27 to 30 cm
1 ready-to-use short crust
3 beaten eggs + 50 cl heavy cream
salt, pepper, nutmeg.
Various fillings:
200 g precooked larding bacon
or - 1 kg cooked endives + 200 g shredded gouda
or - 200 g broccoli + 100 g larding bacon + 50 g blue cheese
or - 200 g salmon + 100 g spinach, cooked and drained
Roast beef PARSLEY-SAUTERNES SAUCE WITH ROQUEFORT:
Cook two tablespoons of snipped shallots in butter until translucent. Add
10 cl Sauternes, let it evaporate. Add 100 g Roquefort, let it melt slowly. Add 20
cl liquid cream, salt, pepper. Bring to a boil.
Pork roast
Pork with prunes
Ask the butcher to carve a hole through the length of the roast. Stuff 20
prunes inside. Serve sliced with its juices or cold with an endive salad.
How does your oven work?
55
GB
99636101_ML_A DOC560.qxd 17/03/05 16:09 Page 55
Page 26

Chicken
Stuff it with a generous bouquet of fresh tarragon or rub it with a blend
of six crushed garlic cloves with a pinch of coarse salt and a few peppercorns.
Lamb
with Anchovy Sauce:
Puree 100 g black olives with 50 g capers and 3 anchovies, 1/2 garlic
clove and 10 cl olive oil. Add 10 cl crème fraîche. Serve with sliced leg of lamb.
Fish
Black sea bream with dry cider: 1 black sea bream weighing 1.5 kg.
500 g button mushrooms.
2 sour apples.
2 shallots.
2 tablespoons heavy cream.
100 g butter.
1/2 litre cider. Salt, pepper.
Gut and scale the fish. Place it in a buttered dish on the finely minced shallots
and sliced mushrooms. Add the cider, salt and pepper and a few dollops of butter.
Place in the oven. Cut the unpeeled apples into quarters and simmer them in the butter. When cooking is complete, transfer the fish to a warm dish, strain the juice and
deglaze the dish with the cream. Add the cream to the juice, serve with apples and
mushrooms.
Stuffed vegetables
Leftovers from pot roast, leg of lamb, pork roasts, and roasted poultry can be
finely chopped for an excellent base.
Flaky praline apple tart:
1 flaky pastry crust rolled and pricked with a fork.
200 ml cream brought to a boil with a vanilla bean.
2 beaten eggs with 30 g sugar, add the cooled cream.
2 apples cut into cubes rolled in 70 g crushed pralines.
Add cream and apples to crust. Place in the oven.
Some ICS recipes
How does your oven work?
56
99636101_ML_A DOC560.qxd 17/03/05 16:09 Page 56
Page 27

Some ICS recipes
Pound cake with citrus fruits
Caramel icing: 20 lumps of sugar (200 g)
Cake: 4 eggs
200 g granulated sugar
200 g flour
200 g good butter
2 teaspoons baking powder
Fruits : 1 small can of citrus fruits in syrup.
Drain the fruit. Prepare a caramel icing. When the colour starts to change, pour
it in a layer cake pan; tilt the pan so that the caramel spreads across the bottom.
Let cool. In the bowl of an electric blender, mix the softened butter with the
sugar. Add the whole eggs one at a time, then the sifted flour. Finish with the
baking powder. Place the citrus sections in a flower pattern on the caramel icing.
Pour in the batter. Place in the oven on the “CAKES” setting. Unmould in a pretty
dish and serve cold.
Other fruits can be used, such as apples, pears or apricots.
Individual chocolate cakes
12 individual aluminium ramekins
60 g butter
200 g bitter chocolate (more than 50% cocoa)
100 g powdered sugar
4 eggs
1 package baking powder
70 g sifted flour.
Melt the chocolate with the butter over very low heat. Work the egg yolks into
the sugar until the mixture becomes smooth. Add the flour, melted chocolate with
butter and finish with the baking powder. Beat the egg whites into stiff peaks and
gently fold them into the mixture. Lightly butter and flour the aluminium ramekins
and pour the batter into them (without dripping any on the edges). Place the
ramekins on the baking tray and choose the “BISCUITS” mode. Unmould and let
cool on a grid. Serve with vanilla crème anglaise or coconut ice cream.
Soufflés
Béchamel sauce base: 1/2 litre milk
60 g flour
100 g butter
4 egg yolks + whites beaten into stiff peaks
salt, pepper, nutmeg.
Depending on the type of soufflé, you will add 150 g shredded gruyere or 1 kg
cooked, chopped spinach or 1 kg cooked, chopped cauliflower or 150 g shredded
leftover cooked fish or 150 g chopped ham.
How does your oven work?
57
GB
99636101_ML_A DOC560.qxd 17/03/05 16:09 Page 57
Page 28

How do you clean the cavity of your oven ?
58
Before disassembling the appliance, let it cool off and check that the
cooking selector is at the OFF position.
Side panels
(1)
Unhook the wire shelf support (2) in front by lifting it
(
diagram A
). Pull the entire shelf support toward you;
lift it in order to unhook the rear fastener (
diagram B
).
Remove it from the two holes (3) in the catalytic panels and from the oven cavity. Then remove the catalytic panel (1). Position
the new items (panels
and/or cavity) by reversing
these steps.
Back panels (4)
Completely unscrew the
screw (5) located at the
top of the back panel. Tilt the panel toward the
front to remove it from the oven cavity. Position the
new panel by reversing these steps.
How do you change the catalytic panels?
(depending on model)
Cleaning the cavity
The continuous cleaning oven is comprised of a cavity equipped with removable panels covered with a special micro porous enamel (catalytic surface) that gives it selfdegreasing properties. As soon as they appear, soil marks spread out and are widely distributed throughout the micro pores. They become oxidized on both sides and
gradually disappear. The self-degreasing enamel is first and foremast adapted to
fats, but not to sugars. This is why the bottom heating element, which is more subject to sugar spills, is not coated with this enamel.
We strongly recommend that:
- You do not scrub with a metallic brush or sharp or cutting instruments.
- You do not try to clean with commercial scouring products.
- When cooking barbecues, grease splatters will be projected onto the walls, whose
temperature is not always sufficient for them to be completely eliminated during
cooking.
In this case, after cooking, continue to heat the oven for 45 minutes at the maximum
temperature setting for the chosen programme.
If there are still spots, they will be eliminated during subsequent cooking programmes.
1
3
4
2
5
The oven must be turned off for all attempts to clean the cavity.
99636101_ML_A DOC560.qxd 17/03/05 16:09 Page 58
B
A
Page 29

59
What do you do in case of operating
malfunctions?
If you have a doubt about the functioning of your oven, this does not ne-
cessarily mean that there is a malfunction.
In any event, check the following items:
You notice that...
Possible causes What should you do?
The oven is not heating.
• The oven is not connected.
• The fuse in your electrical set-up is
not working.
• The selected temperature is too
low.
- Connect the oven.
- Replace the fuse in your electrical
set-up and check its capacity (16A).
- Increase the selected temperature.
The temperature indicator is flashing.
• Problem with the door's locking
mechanism.
- Call the After Sales Service
Department.
The oven light is not working.
• The light is out of order.
• The oven is not connected or the
fuse is not working.
- Replace the light.
- Connect the oven or replace the
fuse.
Your oven starts beeping.
• During cooking.
• At the end of a cooking
programme.
- The recommended temperature
of your choice has been reached.
- Your programmed cooking cycle is
finished.
Your oven displays
Réglages
+
-
• When the touch controls are
pressed.
• Controls are locked for child safety.
- Working normally.
- To cancel the lock, hold down the
Stop touch control until the symbol
disappears.
99636101_ML_A DOC560.qxd 17/03/05 16:09 Page 59
Page 30

99636101 03/05
99636101_ML_A DOC560.qxd 17/03/05 16:14 Page 200
 Loading...