

Page 1

OWNER’S USE AND CARE GUIDE
GUIDE D’UTILISATION ET D'ENTRETIEN
PORTABLE WASHING MACHINE
LAVEUSE À CHARGEMENT SUPERIEUR
MODEL • MODÈLE
DWM060WDB
DANBY PRODUCTS LIMITED, ONTARIO, CANADA N1H 6Z9
DANBY PRODUCTS INC., FINDLAY, OHIO, USA 45840
2017.01.16
Page 2

CONTENTS * TABLE DES MATIÈRES
PORTABLE WASHING MACHINE
Owner’s Use and Care Guide...........................................1-12
• Welcome
• Important Safety Information
• Features
• Installation Instructions
• Operation Instructions
• Care and Maintenance
• T roubleshooting
• Warranty
LAVEUSE À CHARGEMENT SUPERIEUR
Guide d’utilisation et soin...............................................13-24
• Bienvenue
• Consignes de sécurité importantes
• Caractéristiques
• Consignes d’installation
• Consignes d’utilisation
• Soins et entretien
• Dépannage
• Garantie
Page 3

Read and follow all safety rules and operating instructions
before fi rst use of this product.
Veuillez lire attentivement les consignes de sécurité et les
instructions d’utilisation avant l’utilisation initiale
de ce produit.
IMPORTANT - GROUNDING METHOD
This appliance must be grounded. In the event of a malfunction or breakdown, grounding
will reduce the risk of electric shock by providing a path of least resistance for electric
current. This appliance is equipped with a cord having an equipment-grounding conductor
and a grounding plug. The plug must be plugged into an appropriate outlet that is properly
installed and grounded in accordance with all local codes and ordinances.
WARNING - Improper connection of the equipment-grounding conductor can result in a
risk of fi re, electric shock and/or injury to persons associated with the appliance. Check
with a qualifi ed electrician or serviceman if you are in doubt as to whether the appliance is
properly grounded.
IMPORTANT - MÉTHODE POUR LA MISE À LA TERRE
Cet appareil doit être mis à la terre. En cas de dysfonctionnement ou de panne, la mise à
la terre réduira le risque de choc électrique en fournissant un chemin de moindre résistance au courant électrique. Cet appareil est équipé d’un cordon muni d’un conducteur de
mise à la terre et d’une fi che de mise à la terre. La fi che doit être branchée dans une prise
appropriée correctement installée et mise à la terre conformément à tous les codes et ordonnances locaux.
AVERTISSEMENT - Une connexion incorrecte du conducteur de mise à la terre de l’équipement peut entraîner un risque d’incendie, de choc électrique et / ou de blessure pour les
personnes associées à l’appareil. Vérifi ez auprès d’un électricien ou d’un technicien quali-
fi é si vous avez des doutes quant à la mise à la terre de l’appareil.
Page 4
Welcome
Welcome to the Danby family. We are proud of our quality products, and we believe in dependable service. We suggest
that you read this Owner’s Manual before plugging in your new appliance as it contains important operational information,
safety information, troubleshooting and maintenance tips to ensure the reliability and longevity of your appliance.
Visit www.Danby.com to access self-service tools, FAQs and much more. For additional assistance call 1-800-263-2629.
Note the information below; you will need this information to obtain service under warranty.
To receive service, you must provide the original receipt.
Model Number:
Serial Number:
Date of Purchase:
NEED HELP?
Before you call for service, here are a few things you can do to help
us serve you better:
Read this Owner’s Use and Care Guide:
It contains instructions to help you use and maintain your
appliance properly.
If you received a damaged appliance:
Immediately contact the retailer (or builder) that sold you the
appliance.
Save time and money:
Check the Troubleshooting section at the end of the guide before calling. This section helps you solve common problems that may occur.
If you do need service, you can relax, knowing help is only a phone
call away.
1-800-26-
(1-800-263-2629)
1
Page 5

Important Safety Information
READ AND FOLLOW ALL SAFETY INSTRUCTIONS
SAFETY PRECAUTIONS
• Read all instructions before using the appliance.
• Do not wash articles that have been previously cleaned in, washed in, soaked in, or spotted with
gasoline, dry-cleaning solvents, or other fl ammable or explosive substances, as they give off va-
pours that could ignite or explode.
• Do not add gasoline, dry-cleaning solvents, or other fl ammable or explosive substances to the
wash water. These substances give off vapours that could ignite or explode.
• Under certain conditions, hydrogen gas may be produced in a hot-water system that has not been
used for 2 weeks or more. HYDROGEN GAS IS EXPLOSIVE. If the hot-water system has not
been used for such a period, before using a washing machine, turn on all hot-water faucets and let
water fl ow from each for several minutes. This will release any accumulated hydrogen gas. As the
gas is fl ammable, do not smoke or use an open fl ame during this time.
• Before you throw away your old portable washer, remove the lid to reduce the risk of child entrapment.
• Do not allow children to operate, play on or in, or crawl inside the appliance. Close supervision of
children is necessary when the washer is used near children.
• Before the appliance is removed from service or dicarded, remove the lid.
• Do not reach into the washer if the agitator or inner tub are moving.
• Do not tamper with controls.
• Do not repair or replace any part of the washer or attempt any servicing unless specifi cally rec-
ommended in the user-maintenance instructions or in published user-repair instructions that you
understand and have the skills to carry out.
• Do not place the washer in steamy rooms or where the washer is directly exposed to moisture.
Moisture may destroy the electrical insulation causing an electrical shock hazard.
• Do not store, use gasoline, or any other fl ammable vapors and liquids in the vicinity of this or any
other portable washer. The fumes can create a fi re hazard or explosion.
• If the power cord is damaged, it must be replaced by the manufacturer or it’s service agent or a
similar qualifi ed person in order to avoid a hazard.
• Turn off water supply whenever there will be an extended period of non-use.
• Do not operate the washer when the water pressure is lower than 7 PSI or higher than 0.5MPa to
avoid damage of the inlet system.
DANGER: Risk of child entrapment. Children must be supervised around this appliance. Ensure that
the lid is removed before discarding this appliance.
SAVE THESE INSTRUCTIONS!
2
Page 6

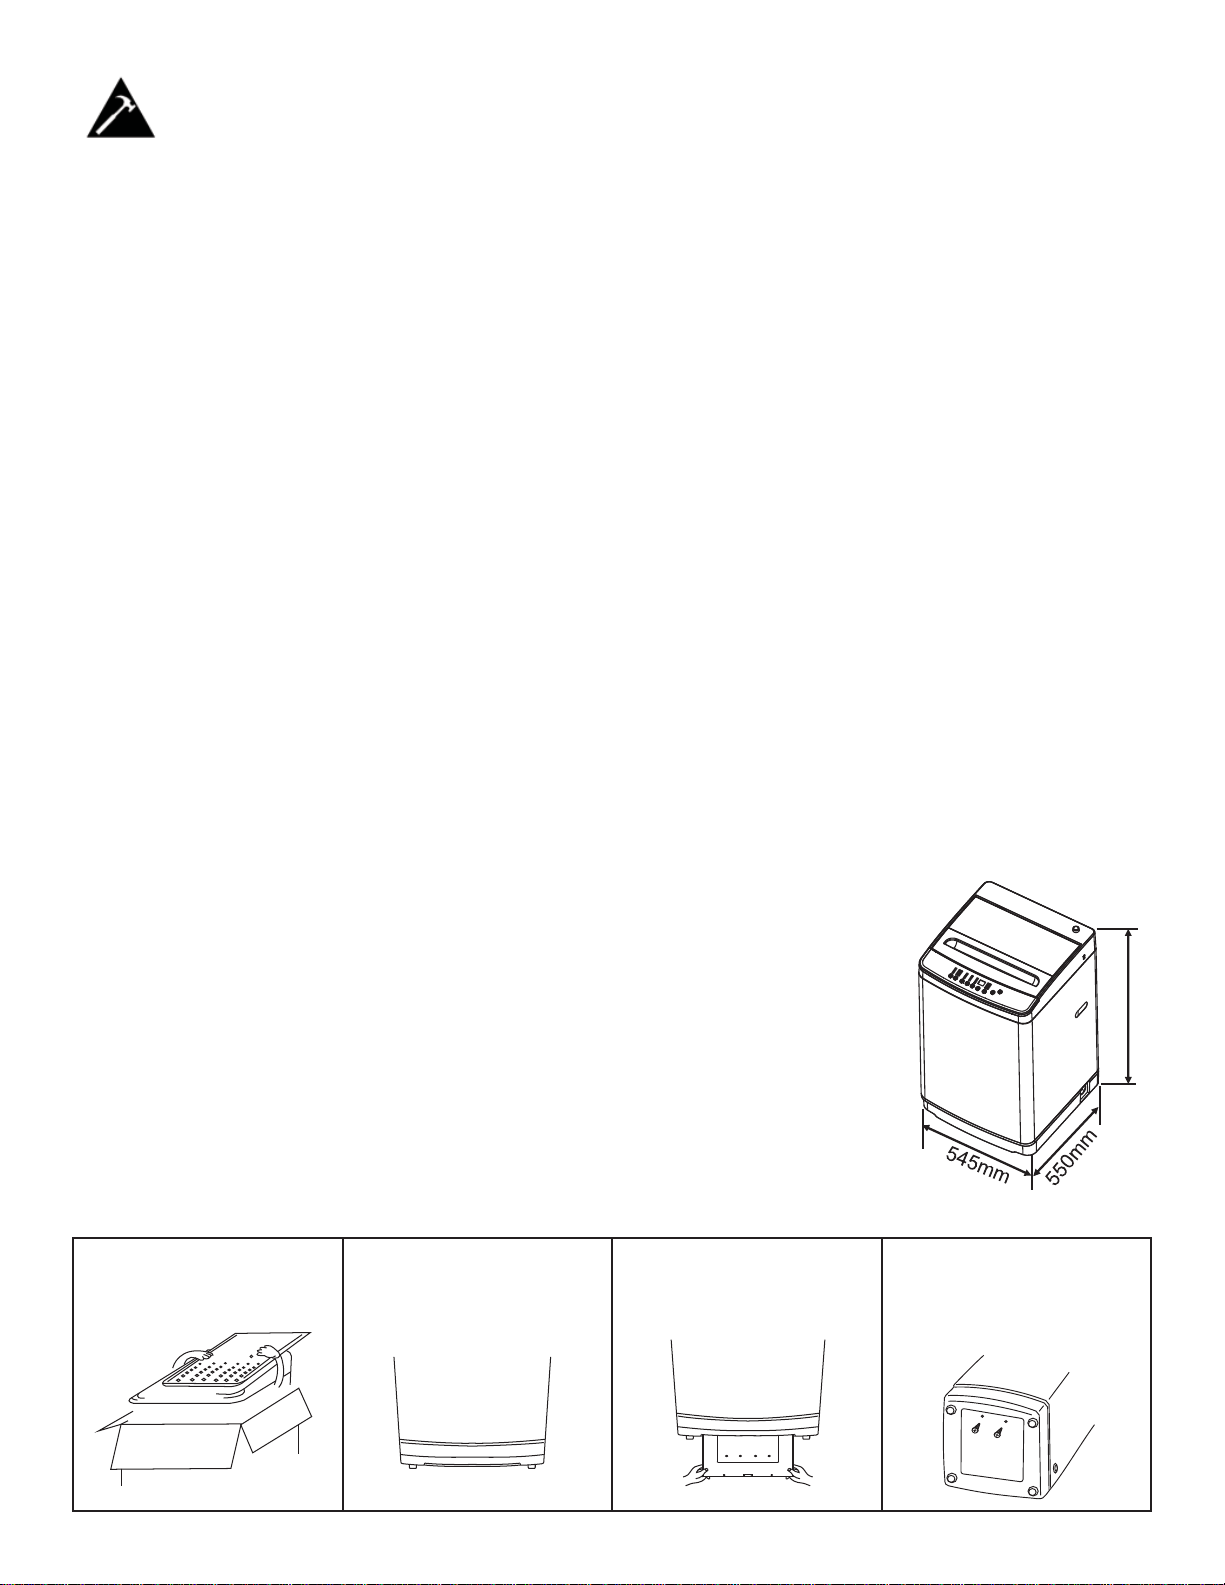
Installation Instructions
FEATURES
1. Detergent Case
2. Inner Tub
3. Control Panel
4. Base
5. Noise Proof Plate
6. Adjustable Foot or Roller
7. Drain Hose
8. Power Supply Cord
9. Pulsator
10. Inlet Hoses
1
10
2
3
9
4
8
7
5
6
LEVELING LEG AND ROLLERS
If the fl oor is uneven, adjust the levelling leg. Do not insert pieces of
wood or any other objects under the foot.
• Turn the nut clockwise to release the screw adjuster on the foot.
• Rotate the foot to raise or lower it until it stands fi rmly on the
ground.
• Lock the foot in position by turning the nut counter-clockwise
until it comes up against the bottom of the machine.
• For portable applications, the washing machine comes with four
North/South rollers that can easily be installed to assist in the
movement of the machine to and from the sink. Carefully (with
the help of another person), lay the unit on its back. Install the
rollers into the bottom of the base as depicted.
• Return the machine to the upright position. When the machine
is positioned for operation set the height of the adjustment foot
slightly higher than the front roller to prevent movement of the
machine during wash and spin operation.
NOTE: Not all movement will be totally eliminated, this is normal.
3
Fixed Foot
Roller
Roller
Fixed Foot
Adjustable foot
Roller
Roller
Fixed Foot
Bottom View
Page 7
Installation Instructions
ACCESSORIES AND PREPARATION
Ensure that all provided accessories are present and accounted for:
• Two inlet hoses
• One Quick Connect faucet adapter
• One noise proof plate and screws
• Four rollers
You will need the following tools to install the washer:
• Wrench
• Pliers
• Screwdriver
1. Remove shipping brace. Save the shipping brace and use it to prevent damage to washer components whenever washer is moved or transported to a new location. The shipping brace is a small
plastic brace that is adhered to the packing styrofoam.
2. Clean the interior surface with lukewarm water using a soft cloth.
3. Allow 2 inches of space between the back and sides of the appliance.
• Do not under any circumstances cut or remove the third (ground) prong from the power cord. Any
questions concerning power and/or grounding should be directed toward a certifi ed electrician.
• Plug the washer into an exclusive, properly installed-grounded wall outlet.
• Don’t use excessively hot water (50°C / 122°F or more). Plastic parts may be deformed or damaged. Also, clothing may be deformed or bleached.
• Before washing, check all pockets. If nails or pins remain in pockets, they may damage the washer or clothes.
• Never splash water on the control panel.
• Put your laundry into the washer evenly. Uneven laundry may cause noise or vibration.
LOCATION
Before you install the portable washer, select a location with the following
characteristics:
• A hard level surface.
• Away from direct sunlight. Direct sunlight may affect the acrylic coating,
plastic and electrical components.
• Adequate ventilation.
• Away from sources of heat such as fi replaces or stoves.
• Make sure that the washing machine does not stand on its power cord.
• Ventilation openings must not be obstructed by carpeting when the portable washer is installed on a carpeted fl oor.
INSTALLING THE NOISE PROOF PLATE
Take the noise proof plate
out of the package.
The opening of the noise
proof plate is at the bottom of the machine.
Insert the noise proof
plate into the washing
machine base.
890 mm
Lay down the machine
and secure the noise
proof plate by fastening
the two (2) screws.
4
Page 8
Installation Instructions
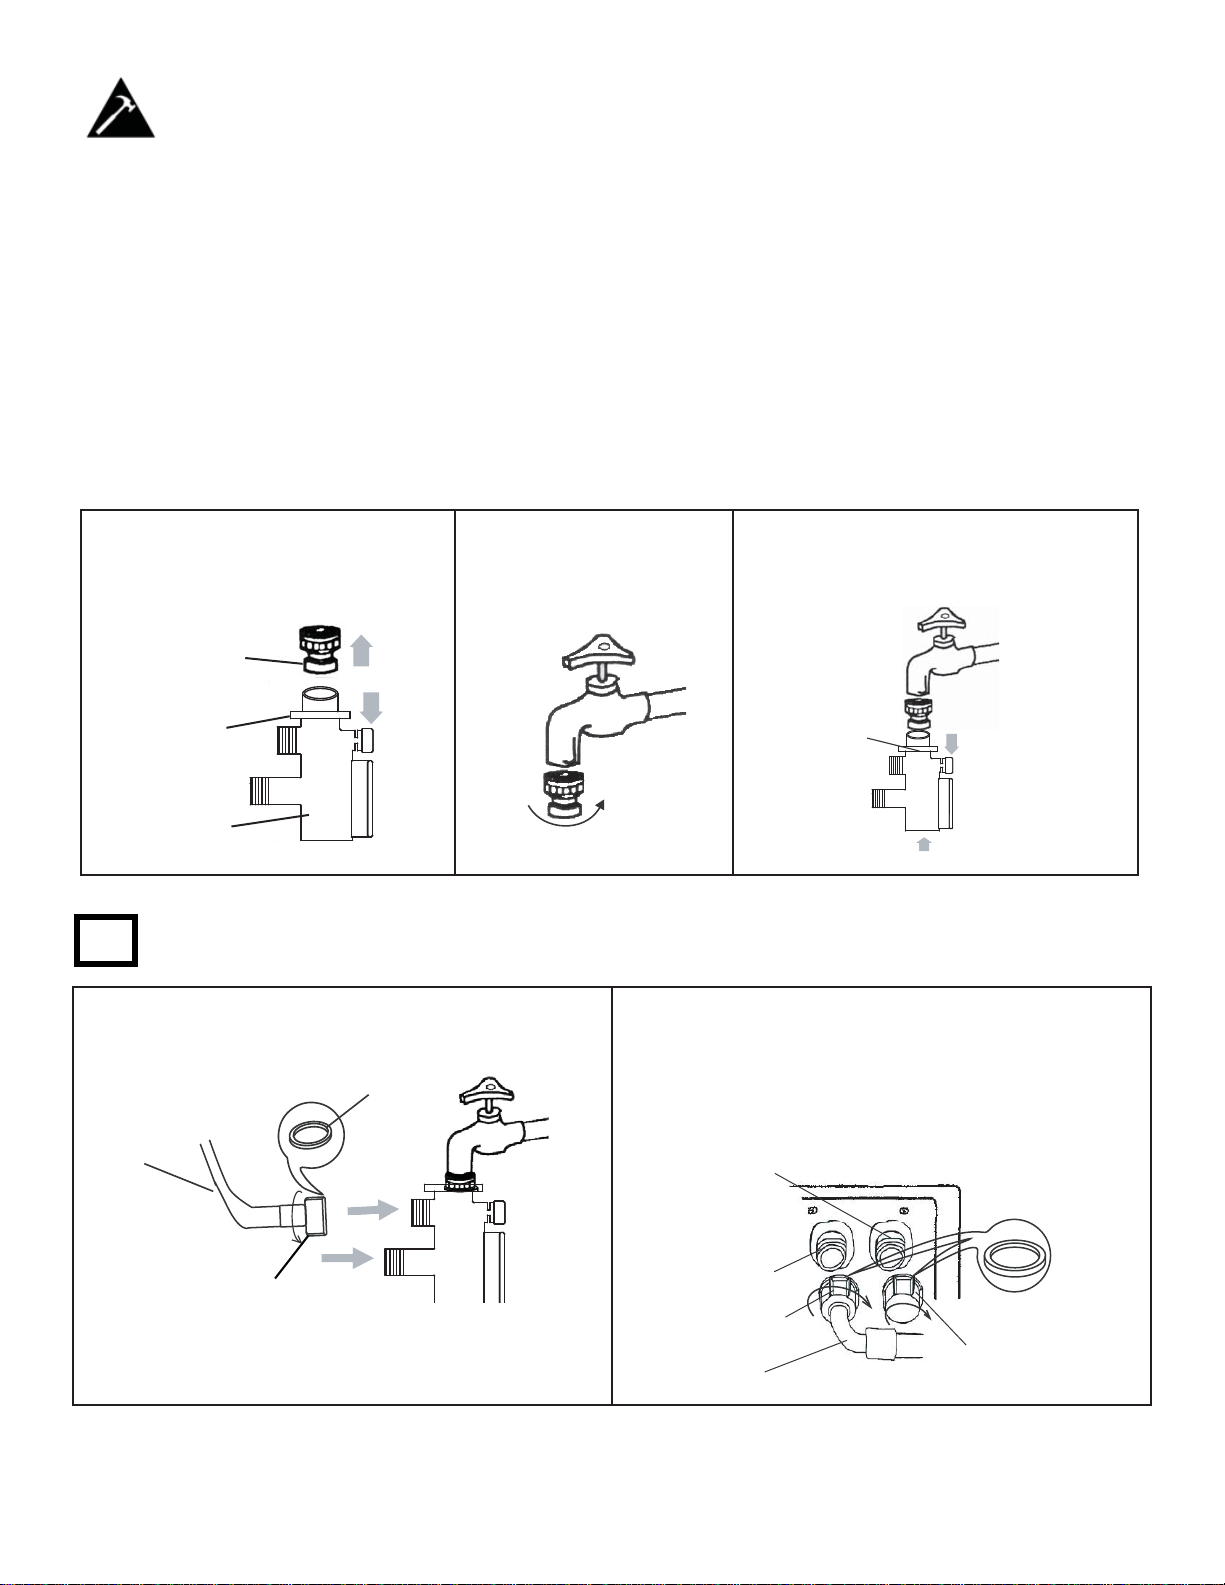
WATER SUPPLY
Water can be supplied to the unit in two different ways depending on what water hook ups are available to use. Water supply faucets must fi t standard 3/4 inch (19.05 mm) female garden hose cou-
plings. Do not use slip-on or clamp-on connections as the water pressue may cause them to leak.
Using the Quick Connect
If there is only one water supply line available you can use the Quick Connect system to provide water to the unit. For a single line installation the Quick Connect should be connected to the cold water
faucet and the inlet hose should be connected to the cold water inlet on the back of the unit.
To attach the Quick Connect to the faucet, follow the steps below:
Hold down the plate of the inlet
hose connector and disconnect
the tap connector from the inlet
Screw the tap connector
counter-clockwise onto
the water faucet.
hose connector.
Tap
connector
Plate
Inlet hose
connector
If you only have one water supply line (cold or warm water), connect the inlet hose to the cold
1
water connector on the unit. In this situation, you cannot set the wash temperature to hot.
Connect the water inlet hose to the connector by
turning the connecting nut. Be sure a rubber ring
is inside the connecting nut.
Rubber ring
Water inlet
hose
Plate Hot water
Release
button
Hold down the plate and connect
the inlet hose connector to the tap
connector.
Plate
Make sure you leave the hot water lid attached.
Do not unscrew the lid of the hot water connector on the water mixing valve and then connect
the other end of the water inlet hoses to the cold
connector in water mixing valve by turning the
connecting nut.
connector
Rubber ring
Connecting nut
To release, turn off the water faucet and press
the release button on the faucet adapter to release the water pressure then press down on the
plate.
Cold water
connector
Connecting
nut
Water inlet hose
5
Lid of hot water
connector
Page 9

Installation Instructions
If you have both cold and hot water supplies, use both supplied inlet hoses to connect the cold
2
water tap to the cold water inlet on the unit and the hot water tap to the hot water inlet on the
unit. In this confi guration you can set the wash temperature to hot or cold.
Connect the water inlet hose to the tap connector by turning the connecting nut.
Water
faucet
Rubber
ring
Connecting nut
Water inlet hose
To release, turn off the water faucet and turn
Unscrew both lids on the water mixing valve, and
then connect the other end of water inlet hoses
to the connectors in water mixing valve by turning the connecting nut.
Cold water
connector
Rubber
ring
Connecting nut
Hot water
connector
Water inlet
hoses
on the washer to run about 5 minutes and then
disconnect the inlet hoses.
Note:
1. Do not over tighten or cross thread the nut; the elbow of the water inlet could become damaged.
2. If water seeps, you should check the nut for damage and make sure there is a rubber ring inside
the connection.
IMPORTANT: Ensure that you turn off the water supply before disconnecting the Quick Connect or
inlet hoses.
POSITIONING THE DRAIN HOSE
Connect the drain hose to the water outlet of the washing machine
then fasten it with a hose clamp. Vertical drainage is available only, the
drain hose can be put in the basin or bathtub, as long as the drain hose
range is 0.7 m (70 cm) low to 1.2 m (120 cm) high.
CONNECTING THE POWER CORD
Make sure the power socket is a grounded socket and a 15 amp fuse. Never attempt to disable or
remove the grounding prong of the power plug.
Warning:
• The plug is a 3 prong grounding plug, do not tamper with or modify the plug. If your electrical outlet is not equipped to take a 3 prong grounded plug, please call a certifi ed technician or electrician
to upgrade your plug outlet.
• Never try and connect the grounding wire of the washing machine with a gas pipe, water pipe, or
any other power cord.
• Do not use if the unit has a damaged power cord.
Note:
• If you open the lid while the machine is running, all operations will be stopped within 7 seconds,
operation will resume when the lid is closed.
• Unplug the power cord if there is a strange noise, smell or smoke coming from the unit. Call for
service.
6
Page 10

Operating Instructions
OPERATING INSTRUCTIONS
Prepare the wash load. Mix large and small articles to get the best washing results. Drop articles
loosely into the inner tub. Do not pack articles in or overload the unit. Articles should move freely
through the wash water for best cleaning results. Articles should rollover, sink and then reappear.
When washing very large articles, do not fi ll inner tub as full as with other loads. The water level in
your washer should fi t the size of your wash load. Small loads will use lower water levels. There must
be enough water in the inner tub to allow articles to move and turn over freely. Overloading the inner
tub can result in poor washing and rinsing or wrinkling and tearing of articles.
1. Connect inlet hose or hoses
to the water faucet. Do not turn
on the power if the water pressure is lower than 7 PSI and
higher than 0.5 Mpa.
2. Turn on the faucet.
5. Put the wash load into the
tub.
3. Plug the unit into the socket.
For safety, make sure the plug
and socket have a grounded
connection.
6. Add an appropriate quantity
of detergent into the detergent
dispenser.
4. Insert the end of the drain
hose into the hook shelf and
hang the drain hose over a
drain outlet. Secure the hose so
it will not fall to the fl oor .
7. Close the lid. If the lid is not
closed the washing machine
will not operate (See E2 error
code).
DETERGENT DISPENSER
1. Pull out the detergent dispenser.
2. Add an appropriate amount of laundry detergent to the dispenser (see chart below).
3. Add an appropriate amount of fabric softener to the softener dispenser (see chart below).
4. Push the detergent dispenser back in place.
5. Set wash cycle as desired.
Note: It is advised that the fabric softener be added to the wash at the last rinse. Do not open the lid
while the cycle is spinning or the softener will be introduced at the wrong time in the cycle.
Water Level Detergent
(grams)
1 47-50
2 39-42
3 31-36
4 25-28
5 16-20
Water Level Softener (Normal - Grams) Softener
(Concentrated - Grams)
114 5
220 7
325 10
430 13
536 16
7
Page 11

Operating Instructions
CONTROL PANEL
1. Water Level Button - Press to select water level.
2. Water Supply Button - Press this button to select water temperature.
3. Program/Delay Button - Press this button to select the program you need, press again to select
the delay time you would like to set.
4. Start/Pause Button - Press this button to start/pause the washing machine.
5. Power Button - Press this button to turn the unit on and off. Do not turn on the unit again until 3
minutes after it was turned off. The unit will turn off automatically once the wash program has fi n-
ished. The unit will turn off 10 minutes after turning on, if a wash cycle has not been activated.
Program Code Cycle Name Cycle Duration
01 Auto Wash 29 minutes
02 Normal 35 minutes
03 Heavy 41 minutes
04 Quick 15 minutes
05 Soak 61 minutes
06 Delicate 41 minutes
07 Wash Only 14 minutes
08 Rinse and Spin 27 minutes
09 Spin Only 9 minutes
10 Super Spin 32 minutes
11 No Spin 32 minutes
Note:
• The total operating time may vary depending on water volume.
• If the load is unbalanced, and the safety switch is triggered during spinning, the
machine will automatically refi ll with water to adjust the balance.
8
Page 12

Operating Instructions
CHOOSING A WASH CYCLE
1. Turn on the power supply. Press the POWER button and the indicator light “00” will illuminate.
2. Choose a program. The selected program code will display. Press the PROGRAM button to
choose the desired function, the corresponding indicator will blink. For example, if you select “Auto
Wash” the unit will indicate cycle “01.” Press the “START/PAUSE” button, the washing machine
will run automatically. Close the lid, or the machine will not operate.
3. Choose the water level. Press the WATER LEVEL button to choose the appropriate water level
according to the wash quantity. The corresponding indicator will blink.
4. DELAY FUNCTION, Choose a program by pressing the PROGRAM/DELAY button, the selected program code will be indicated. Press the “START/PAUSE” button. The washing machine will
chime after 3 seconds. While the unit is chiming, keep pressing the PROGRAM/DELAY button
until you reach your desired delay time, for example, if you want the unit to delay for 5 hours, the
display will show “05.” Close the lid, or the machine will not operate.
5. MUTE FUNCTION, If you do not want the unit to chime while the washing machine is running,
press the POWER button and the indicator will display “00,” press the “START/PAUSE” button for
1-2 seconds. The MUTE function has now been activated. To deactivate the MUTE function press
the “START/PAUSE” button again. Run your washing machine as you normally would.
Note: If you want to change the program while the unit is running, you must press the “START/
PAUSE” button. The water level can be changed when the unit is running. If you change the water
level to a higher setting when the unit is running, the unit will stop running to add more water, once
this is complete, the unit will automatically start running again.
9
Page 13

Care and Maintenance
CLEANING THE FILTER IN THE INLET VALVE
1. Unplug the power cord.
2. Remove the inlet hose and clean the fi lter with a brush.
• Clean the surface of the washing machine with a soft cloth regularly.
• Clean the inner tub regularly, especially after washing starched or bleached laundry.
CLEANING THE LINT FILTER
The lint fi lter is mounted inside the tub of the washer. The lint fi lter must be removed from its holder to
be cleaned.
• Press down on the handle to release the fi lter from its holder.
• Open the back cover of the lint fi lter and discard any lint trapped within.
• Clean and rise the fi lter and then replace it inside the holder.
10
Page 14

Troubleshooting
PROBLEM POSSIBLE CAUSE
Washer does not operate • Not plugged in.
• The circuit breaker tripped or a blown fuse.
• The lid is not closed.
• Make sure the water source is turned on.
No water or insuffi cient water supply • The water source faucet is not turned on.
• The water source hose is frozen.
• The water intake hose is bent.
• The fi lter on the water intake hose is clogged.
The washing machine does not drain • The drain hose is squashed or bent.
• The water hose mesh fi lter is clogged.
Washing machine vibrates or is too noisy • Check to assure that the washer is level.
• The washing machine is touching another object.
• The laundry load is not balanced.
Washing machine does not spin • The lid is not closed.
• The washer is not on a level surface.
ERROR CODES
E1 - Unable to drain - Check the placement of the drain hose or see if the hose or drain are blocked.
E2 - Spin malfunction - Check to see if the lid is closed completely, service may be needed.
E3 - Unable to spin - Uneven load, the machine is on an uneven surface.
E4 - Unit failed to fi ll with water - The water supply may be off, the inlet valve fi lter is blocked, water
pressure is not strong enough.
E0 - The unit beeps for 10 seconds when the START/PAUSE button is pressed - Call for service.
• Never clean portable washer parts with fl ammable fl uids. The fumes can create a fi re hazard or
explosion.
11
Page 15

LIMITED IN-HOME APPLIANCE WARRANTY
LIMITED IN-HOME APPLIANCE WARRANTY
This quality product is warranted to be free from manufacturer’s defects in material and workmanship, provided that the unit is used under the normal operating
This quality product is warranted to be free from manufacturer’s defects in material and workmanship, provided that the unit is
conditions intended by the manufacturer.
used under the normal operating conditions intended by the manufacturer.
This warranty is available only to the person to whom the unit was originally sold by Danby Products Limited (Canada) or Danby Products Inc. (U.S.A.) (hereafter
This warranty is available only to the person to whom the unit was originally sold by Danby Products Limited (Canada) or
“Danby”) or by an authorized distributor of Danby, and is non-transferable.
Danby Products Inc. (U.S.A.) (hereafter “Danby”) or by an authorized distributor of Danby, and is non-transferable.
TERMS OF WARRANTY
Plastic parts, are warranted for thirty (30) days only from purchase date, with no extensions provided.
Plastic parts, are warranted for thirty (30) days only from purchase date, with no extensions provided.
First year
First Year
To obtain
service
To obtain
Service
Boundaries of
Boundaries of
in-home service
In Home Service
During the first twelve (12) months, any functional parts of this product found to be defective, will be
repaired or replaced, at warrantor’s option, at no charge to the ORIGINAL purchaser.
During the rst twelve (12) months, any functional parts of this product found to be defective, will be repaired or replaced, at warrantor’s
option, at no charge to the ORIGINAL purchaser.
Danby reserves the right to limit the boundaries of “In Home Service” to the proximity of an Authorized
Service Depot. Any appliance requiring service outside the limited boundaries of “In Home Service” ,it
Danby reserves the right to limit the boundaries of “In Home Service” to the proximity of an Authorized Service Depot. Any app liance
will be the consumer’s responsibility to transport the appliance (at their own expense) to the original
requiring service outside the limited boundaries of “In Home Service” , it will be the consumer’s responsibility to transport the appliance (at
retailer (point of purchase) or a service depot for repair. See “Boundaries of In Home Service” below.
their own expense) to the original retailer (point of purchase) or a service depot for repair. See “Boundaries of In Home Serv ice” below.
Contact your dealer from whom your unit was purchased, or contact your nearest authorized Danby
Contact your dealer from whom your unit was purchased, or contact your nearest authorized Danby service depot, where service
service depot, where service must be performed by a qualified service technician. If service is performed
must be performed by a qualied service technician.
on the units by anyone other than an authorized service depot, or the unit is used for commercial
If service is performed on the units by anyone other than an authorized service depot, or the unit is used for commercial appli cation, all
application, all obligations of Danby under this warranty shall be void.
obligations of Danby under this warranty shall be void.
If the appliance is installed in a location that is 100 kilometres (62 miles) or more from the nearest
If the appliance is installed in a location that is 100 kilometers (62 miles) or more from the nearest service center your unit must be
service centre your unit must be delivered to the nearest authorized Danby Service Depot, as service
delivered to the nearest authorized Danby Service Depot, as service must only be performed by a technician qualied and certif ied for
must only be performed by a technician qualified and certified for warranty service by Danby. Transpor-
warranty service by Danby. Transportation charges to and from the service location are not protected by this warranty and are t he
tation charges to and from the service location are not protected by this warranty and are the responsi-
responsibility of the purchaser.
bility of the purchaser.
TERMS OF WARRANTY
Nothing within this warranty shall imply that Danby will be responsible or liable for any spoilage or damage to food or other c ontents of this appliance, whether due
Nothing within this warranty shall imply that Danby will be responsible or liable for any spoilage or damage to food or other
to any defect of the appliance, or its use, whether proper or improper.
contents of this appliance, whether due to any defect of the appliance, or its use, whether proper or improper.
EXCLUSIONS
EXCLUSIONS
Save as herein provided, by Danby, there are no other warranties, conditions, representations or guarantees, express or
Save as herein provided, Danby, there are no other warranties, conditions, representations or guarantees, express or implied, m ade or intended by Danby or its
implied, made or intended by Danby or its authorized distributors and all other warranties, conditions, representations or
authorized distributors and all other warranties, conditions, representations or guarantees, including any warranties, conditio ns, representations or guarantees
guarantees, including any warranties, conditions, representations or guarantees under any Sale of Goods Act or like legislation
under any Sale of Goods Act or like legislation or statue is hereby expressly excluded. Save as herein provided, Danby shall no t be responsible for any damages
or statute is hereby expressly excluded. Save as herein provided, Danby shall not be responsible for any damages to persons
to persons or property, including the unit itself, howsoever caused or any consequential damages arising from the malfunction o f the unit and by the purchase of
or property, including the unit itself, howsoever caused or any consequential damages arising from the malfunction of the unit
the unit, the purchaser does hereby agree to indemnify and hold harmless Danby from any claim for damages to persons or propert y caused by the unit.
and by the purchase of the unit, the purchaser does hereby agree to indemnify and hold harmless Danby from any claim for
damages to persons or property caused by the unit.
No warranty or insurance herein contained or set out shall apply when damage or repair is caused by any of the following:
1) Power failure.
No warranty or insurance herein contained or set out shall apply when damage or repair is caused by any of the following:
1) Power failure.
2) Damage in transit or when moving the appliance.
2) Damage in transit or when moving the appliance.
3) Improper power supply such as low voltage, defective house wiring or inadequate fuses.
3) Improper power supply such as low voltage, defective house wiring or inadequate fuses.
4) Accident, alteration, abuse or misuse of the appliance such as inadequate air circulation in the room or abnormal operating con ditions
4) Accident, alteration, abuse or misuse of the appliance such as inadequate air circulation in the room or abnormal operating
conditions (extremely high or low room temperature).
5) Use for commercial or industrial purposes (i.e., If the appliance is not installed in a domestic residence).
6) Fire, water damage, theft, war, riot, hostility, acts of God such as hurricanes, floods etc.
7) Service calls resulting in customer education.
8) Improper Installation (i.e., building-in of a free standing appliance or using an appliance outdoors that is not approved for
outdoor application). Proof of purchase date will be required for warranty claims; so, please retain bills of sale. In the event
Proof of purchase date will be required for warranty claims; so, please retain bills of sale. In the event warranty service is required, present this document to our
warranty service is required, present this document to our AUTHORIZED SERVICE DEPOT.
AUTHORIZED SERVICE DEPOT.
(extremely high or low room temperature).
5) Use for commercial or industrial purposes (ie. If the appliance is not installed in a domestic residence).
6) Fire, water damage, theft, war, riot, hostility, acts of God such as hurricanes, oods etc.
7) Service calls resulting in customer education.
8) Improper Installation (ie. Building-in of a free standing appliance or using an appliance outdoors that is not approved for out door application).
GENERAL PROVISIONS
GENERAL PROVISIONS
Danby Products Limited
Danby Products Limited
PO Box 1778, Guelph, Ontario, Canada N1H 6Z9
PO Box 1778, Guelph, Ontario, Canada N1H 6Z9
Telephone: (519) 837-0920 FAX: (519) 837-0449
Telephone: (519) 837-0920 FAX: (519) 837-0449
Warranty Service
Warranty Service
In-home
In-home
1-800-263-2629
1-800-263-2629
07/14
04/09
Danby Products Inc.
PO Box 669, Findlay, Ohio, U.S.A. 45840
Telephone: (419) 425-8627 FAX: (419) 425-8629
PO Box 669, Findlay, Ohio, U.S.A. 45840
Telephone: (419) 425-8627 FAX: (419) 425-8629
Danby Products Inc.
Page 16

Bienvenue
Bienvenue dans la famille Danby. Nous sommes fiers de la qualité de nos produits et nous croyons en le service fiable.
Nous vous suggérons de lire ce manuel d’utilisation avant de brancher vontre nouvel appareil car il contient des informations
importantes sur l’utilisation, la sécurité, le dépannage at la maintenance, afin d’assurer la fiabilité at la longévité de votre
appareil. Visitez www.Danby.com pour accéder aux outils d’autoservice, aux FAQ et bien plus encore. Pour obtenir de l’aide
supplémentaire, composez le 1-800-263-2629.
Veuillez noter les informations ci-dessous; ces renseignements seront nécessaires si votre appareil a besoin
d’entretien ou pour les demandes de renseignements généraux. Pour bénéficier d’une opération de maintenance ou de dépannage, le reçu original sera exigé.
Numéro de modèle :
Numéro de serie :
Date d’achat :
BESOIN D’ASSISTANCE ?
Veuillez trouver quelques conseils avant de faire appel à nos
services, cela nous aidera à mieux vous servir :
Lisez ce guide :
Il comprend des instructions pour l’utilisation et l’entretien
adapté de votre appareil.
Si votre nouvel appareil est endommagé :
Contactez immédiatement le revendeur (ou le fabricant).
Gagnez du temps et de l’argent :
Avant de faire appel à nos services, consultez à nouveau
la section « Dépannage ». Cette section vous aidera à
résoudre des problèmes courants.
Si une réparation est nécessaire, ne vous inquiétez pas, la
solution est au bout du fil.
1-800-26-
(1-800-263-2629)
13
Page 17

Consignes de sécurité importantes
LIRE ET SUIVRE TOUTES LES INSTRUCTIONS DE SÉCURITÉ
PRÉCAUTIONS DE SÉCURITÉ
• Lire toutes les instructions avant d’utiliser l’appareil.
• Ne pas laver des articles qui ont été nettoyés ou lavés avec de l’essence, des solvants pour nettoyage à sec ou d’autres substances infl ammables ou explosives, ou que l’on a fait tremper dans
ces produits. Ces substances dégagent des vapeurs qui peuvent s’enfl ammer ou exploser.
• Ne pas ajouter d’essence, de solvants pour nettoyage à sec ou d’autres substances infl ammables
ou explosives à l’eau de lavage. Ces substances dégagent des vapeurs qui peuvent s’enfl ammer
ou exploser.
• De l’hydrogène peut être produit dans un système à eau chaude qui n’a pas été utilisé depuis
deux semaines ou plus. L’HYDROGÈNE EST EXPLOSIF. Si le système à eau chaude n’a pas
été utilisé depuis un certain temps, ouvrir tous les robinets d’eau chaude et laisser l’eau couler
pendant plusieurs minutes avant d’utiliser une laveuse, l’hydrogène accumulé, le cas échéant,
s’échappera. L’hydrogène étant infl ammable, ne pas fumer ou utiliser un appareil à fl amme nue
pendant que l’eau coule.
• Ne pas permettre aux enfants de jouer sur ou dans l’appareil. Surveiller étroitement les enfants
lorsqu’ils se trouvent près de l’appareil qui fonctionne.
• Ne pas permettre aux enfants de jouer sur ou dans l’appareil. Surveiller étroitement les enfants
lorsqu’ils se trouvent près de l’appareil qui fonctionne.
• Avant de mettre l’appareil hors service ou de le jeter, retirer le couvercle
• Ne pas mettre la main dans l’appareil lorsque la cuve ou l’agitateur bougent.
• Ne pas trafi quer les commandes.
• Ne pas réparer ou remplacer les pièces de l’appareil ou procéder à l’entretien de celui-ci sauf si
les instructions visant l’entretien et les réparations qui doivent être effectués par l’utilisateur le
spécifi ent, si vous comprenez bien ces instructions et si vous possédez les connaissances néces-
saires.
• Ne placez pas la laveuse dans des salles humides ou où la laveuse est directement exposée à
l’humidité. L’humidité peut détruire l’isolation électrique provoquant un risque d’électrocution.
• Ne pas entreposer, utiliser de l’essence ou tout autre vapeur ou liquide infl ammable à proximité de
cette ou de toute autre machine portative. Les vapeurs peuvent créer un risque d’incendie ou une
explosion.
• Si le cordon d’alimentation est endommagé, il doit être remplacé par le fabricant ou son agent de
service ou une personne qualifi ée similaire afi n d’éviter un danger.
• Arrêter l’alimentation en eau chaque fois qu’il y aura une période prolongée de non-utilisation.
• Ne pas utiliser la laveuse lorsque la pression de l ‘eau est inférieure à 7 PSI ou supérieure à 0,5
MPa pour éviter d’ endommager le système d ‘admission.
DANGER: Risque de piégeage d’enfant. Les enfants doivent être surveillés autour de cet appareil.
Assurez-vous que le couvercle est retiré avant de jeter cet appareil.
GARDE CES INSTRUCTIONS!
14
Page 18

Consignes d’installation
CARACTÉRISTIQUES
1. Compartiments du
détergent
2. Cuve intérieure
3. Panneau de commande
4. Base
5. Plaque insonorisée
6. Pied réglable
7. Tuyau d’évacuation
8. Cordon d’alimentation
9. Pulsateur
10. Tuyaux d’admission
1
2
3
4
5
10
9
8
7
6
4$Y
$&M!!&
&¢&
4$Y
$&M!!& Q$&!!£&
&¢
& !&&
!!
Q
£
&#&&V!&
$&
PIEDS DE NIVELLEMENT ET ROULTETTES
Si le sol est irrégulier, ajustez le pied réglable. N’insérez aucun morceau
de bois, ou tout autre objet sous le pied.
• Tournez l’écrou dans le sens horaire pour libérer l’ajusteur de vis sur
le pied.
• Tournez le pied pour le lever ou le baisser, jusqu’à ce qu’il repose
solidement sur le plancher.
• Verrouillez le pied en place en tournant l’écrou dans le sens antihoraire jusqu’à ce qu’il entre en contact avec le fond de la laveuse.
• Pour les applications portables, la laveuse est munie de quatre roulettes orientées nord/sud qui peuvent être facilement installées pour
aider à déplacer la laveuse vers l’évier et vers son lieu de rangement.
Inclinez la laveuse à la renverse et déposez-la sur le sol. Installez les
roulettes dans la base de la laveuse comme dans l’illustration.
• Remettez la laveuse à l’endroit. Une fois la laveuse positionnée
en vue du fonctionnement, réglez la hauteur du pied réglable à un
niveau légèrement supérieur à la roulette avant afi n d’éviter que la
laveuse se déplace pendant le lavage et l’essorage.
REMARQUE: Il n’est pas possible d’éliminer tous les mouvements de la
laveuse, cela est normal.
##$&&B#
$&#&
¢
&
&
Écrou
Vis de réglage
Pied de nivellement
Pied fixe
Roulette
Roulette
Pied fixe
Vue de dessous
Pied réglable
Roulette
Roulette
Pied fixe
15
Page 19

Consignes d’installation
ACCESSOIRES ET PRÉPARATION
S’assurer que tous les accessoires fournis sont présents et pris en compte:
• Deux tuyaux d’admission
• Un adaptateur de robinet Quick Connect
• Un plaque insonorisée avec vis
• Quatre roulettes
Vous aurez besoin des outils suivants :
• Clé
• Pince
• Tournevis
1. Enlevez l’entretoise d’expédition. Conservez l’attache d’expédition et utilisez-la pour éviter d’endommager les composants de la laveuse lorsque la laveuse est déplacée ou transportée vers un
nouvel emplacement. L’attache d’expédition est une petite attache en plastique qui est collée à
l’emballage styromousse.
2. Nettoyez la surface intérieure à l’eau tiède avec un chiffon doux.
3. Laissez un espace de 2 pouces entre l’arrière et les côtés de l’appareil.
• Ne jamais couper ou retirer la troisième broche (mise à la terre) du cordon d’alimentation. Toute
question concernant l’alimentation et / ou la mise à la terre doit être adressée à un électricien
certifi é.
• Branchez la rondelle dans une prise murale exclusive, correctement mise à la terre.
• N’utilisez pas d’eau trop chaude (50 °C / 122 °F ou plus). Les pièces en plastique peuvent être
déformées ou endommagées. En outre, les vêtements peuvent être déformés ou blanchis.
• Avant de laver, vérifi ez toutes les poches. Si des clous ou des épingles restent dans les poches,
ils peuvent endommager la laveuse ou les vêtements.
• Ne jamais éclabousser l’eau sur le panneau de commande.
• Mettez votre linge dans la laveuse uniformément. Une lessive inégale peut causer des bruits ou
des vibrations.
EMPLACEMENT
Avant d’installer la laveuse portative, choisissez l’emplacement en fonction
des caractéristiques recherchées suivantes :
• Une surface dure à niveau.
• À l’abri des rayons directs du soleil. Les rayons directs du soleil peuvent
affecter le revêtement acrylique ainsi que les composants électriques et en
plastique.
• Une ventilation appropriée.
• À l’abri des sources de chaleur telles que le charbon ou le gaz.
• Assurez-vous que la laveuse ne repose pas sur son cordon d’alimentation.
• Les prises d’air de ventilation ne doivent pas être obstruées par le tapis
lorsque la laveuse est installée sur un tapis.
INSTALLATION D’UNE PLAQUE INSONORISÉE
Retirez la plaque insonorisée de l’emballage.
L’ouverture pour insérer
la plaque insonorisée est
située dans la partie inférieure de la laveuse.
Insérez la plaque
insonorisée dans la
base de la laveuse.
Posez la laveuse à la renverse sur
le sol et fi xez la plaque insonorisée
à l’aide des deux (2) jeux de vis.
890 mm
16
Page 20

Consignes d’installation
APPROVISIONNEMENT EN EAU
L’eau peut être fournie à l’unité de deux façons différentes en fonction de ce que les raccords d’eau
sont disponibles pour l’utilisation. Les robinets d’alimentation en eau doivent être adaptés aux raccords de boyau de jardin femelles standard de 3/4 po (19,05 mm). N’utilisez pas de raccords à
glissière ou à serrage car la pression d’eau peut provoquer une fuite.
Utilisation de la Quick Connect
S’il n’y a qu’une seule ligne d’alimentation en eau disponible, vous pouvez utiliser le système Quick
Connect pour fournir de l’eau à l’appareil. Pour une installation en ligne simple, le Quick Connect doit
être raccordé au robinet d’eau froide et le tuyau d’arrivée doit être raccordé à l’entrée d’eau froide à
l’arrière de l’appareil.
Pour fi xer le Quick Connect au robinet, procédez comme suit:
Tirez vers le bas sur la plaque de
raccord du tuyau d’admission et
débranchez le raccord de robinet
Vissez le raccord du
robinet en le tournant
dans le sens antihoraire.
du raccord de tuyau d’admission.
Raccord du
robinet
Plaque
Raccord du tuyau
d’admission
Si vous ne disposez que d’une conduite d’eau (eau froide ou eau chaude), raccordez le tuyau
1
d’arrivée d’eau au raccord d’eau froide de l’appareil. Dans ce cas, vous ne pouvez pas régler
la température de lavage à chaud.
Branchez le tuyau d’admission au raccord en
tournant l’écrou de raccordement. Assurez-vous
qu’une bague de caoutchouc se trouve à l’intérieur de l’écrou de raccordement.
Bague de
caoutchouc
Tuyau
d’admission
Plaque
Bouton de
dégagement
Tirez la plaque vers le bas et branchez le raccord du tuyau d’admission au raccord de robinet.
Plaque
Ne dévissez pas le capuchon du raccord d’eau
chaude situé sur la soupape de mélange d’eau,
mais raccordez l’autre extrémité des tuyaux d’admission au raccord d’eau froide de la soupape
de mélange d’eau en tournant l’écrou de raccordement.
Raccord
d’eau
chaude
Bague de
caoutchouc
Écrou de raccordement
Pour libérer le raccordement, fermez le robinet
et appuyez sur le bouton de dégagement pour
supprimer la pression de l’eau, puis tirez vers le
bas sur la plaque.
Raccord
d’eau froide
Écrou de raccordement
Tuyau d’admission
17
Capuchon du
raccord d’eau
chaude
Page 21

Consignes d’installation
Si vous avez des réserves d’eau froide et d’eau chaude, utilisez les deux tuyaux d’arrivée four-
2
nis pour raccorder le robinet d’eau froide à l’entrée d’eau froide de l’appareil et le robinet d’eau
chaude à l’entrée d’eau chaude de l’appareil. Dans cette confi guration, vous pouvez régler la
température de lavage à chaud ou à froid.
Branchez le tuyau d’admission au raccord du
robinet en tournant l’écrou de raccordement.
Dévissez les deux bouchons du mitigeur d’eau,
puis raccordez l’autre extrémité des tuyaux d’admission aux raccords de la soupape de mélange
Robinet
Bague de caoutchouc
Écrou de raccordement
Tuyau d’admission
Pour libérer le raccordement, fermez le robinet
et mettez la laveuse sous tension pour qu’elle
d’eau en tournant l’écrou de raccordement.
Raccord
d’eau froid
Bague de
caoutchouc
Écrou de
raccordement
Raccord
d’eau
chaude
Tuyau d’admission
fonctionne pendant 5 minutes, puis débranchez
les tuyaux d’admission.
Remarque :
1. Ne serrez pas trop l’écrou et ne faussez pas le fi letage afi n d’éviter de provoquer la rupture du
coude du tuyau d’admission.
2. En cas de fuites d’eau, vérifi ez l’écrou pour des dommages, et assurez-vous que l’anneau
d’étanchéité en caoutchouc est en place.
IMPORTANT: Veillez à couper l ‘alimentation en eau avant de débrancher les tuyaux Quick Connect
ou d’ arrivée d ‘eau.
POSITIONNEMENT DU TUYAU D’ÉVACUATION
Branchez le tuyau d’évacuation à la sortie d’eau de la laveuse, puis
attacher le avec une pince pression. Le drainage vertical est disponible
seulement. Le tuyau d’évacuation peut être mettre dans une cuve ou
dans la baignoire aussi longtemps que la hauteur à laquelle le tuyau
d’évacuation est assurez-vous que le tuyau d’évacuation ait une longueur de 0,7 m (70 cm) à 1,2 m (120 cm).
RACCORDER LE FIL D’ALIMENTATION
Assurez-vous que la prise d’alimentation soit équipée d’un disjoncteur de fuite à la terre et d’un fusible de 15 ampères.
Avertissement :
• La fi che est une prise de mise à la terre à 3 broches. Ne pas manipuler ni modifi er la fi che. Si
votre prise électrique n’est pas équipée d’une prise de mise à la terre à 3 broches, veuillez contacter un technicien ou un électricien certifi é pour la mettre à niveau.
• Ne jamais tenter de raccorder le fi l de mise à la terre d’une laveuse à un tuyau de gaz, un tuyau
d’eau, ou tout autre fi l d’alimentation.
• Ne pas utiliser l’appareil si le fi l d’alimentation est endommagé.
Remarque :
• Si vous ouvrez le couvercle alors que la laveuse est en marche, toute opération s’arrêtera en 7
secondes, et elle résumera lorsque vous fermez le couvercle.
• Débranchez le fi l d’alimentation si vous entendez un bruit inhabituel, sentez une odeur particu-
lière, ou voyez de la fumée. Appelez votre technicien.
18
Page 22

Consignes d’utilisation
CONSIGNES D’UTILISATION
Préparez la brassée. Mélangez les articles de petite et de grande taille dans une même brassée pour
obtenir des résultats optimaux. Déposez les articles dans la cuve interne sans les tasser. Ne condensez pas les articles et ne les enroulez pas. Les articles devraient pouvoir se déplacer librement dans
l’eau de lavage afi n d’obtenir des résultats optimaux. Les articles devraient culbuter, couler et réappa-
raître à la surface.
Lorsque vous lavez des articles de grande taille, ne remplissez pas la cuve interne au même niveau
que les autres brassées. Le niveau d’eau de votre laveuse doit être adapté à la taille de votre
brassée. Une petite brassée exige des niveaux d’eau moins élevés. La quantité d’eau dans la cuve
interne doit être suffi sante pour permettre aux articles de se déplacer et de culbuter librement. Sur-
charger lacuve interne peut nuire à la qualité du lavage et du rinçage. Le fait de surcharger peut
également occasionner le froissement et le déchirement des articles.
1. Branchez le(s) tuyau(x) d’admission et
ouvrez le robinet. Ne mettez pas sous tension la laveuse si la pression de l’eau est
inférieure à 7 PSI ou supérieure à 0,5 Mpa.
2. Ouvrez le robinet.
3. Mettez la fi che dans la douille.
Pour des raisons de sécurité, la
prise devrait être mise à la terre.
4. Insérez l’extrémité du tuyau d’évacuation dans une pince et suspendez-la
au-dessus d’une sortie d’eau. Sécurisez le tuyau de sorte qu’il n’entre pas
en contact avec le plancher.
5. Mettez la brassée dans la cuve et
fermez le couvercle.
6. Ajoutez la quantité de détergent qui convient dans le distributeur de détergent.
7. Fermez le couvercle. La laveuse ne
fonctionne pas tant que le couvercle
est ouvert (Voir un code d’erreur E2).
COMPARTIMENT DU DÉTERGENT
1. Retirez le distributeur de détergent.
2. Versez une quantité appropriée de détergent de lessive dans le distributeur (voir le tableau).
3. Versez une quantité appropriée d’assouplissant dans le distributeur d’assouplissant.
4. Remettez le distributeur de détergent en place.
5. Choisissez le cycle de lavage désiré.
Remarque : Pour obtenir les meilleurs résultats, l’assouplissant doit être libéré lors du dernier
rinçage. Ne pas ouvrir le couvercle pendant le cycle d’essorage, sinon l’assouplissant sera libéré au
mauvais moment du cycle.
Niveau d’eau Détergent
(grammes)
1 47-50
2 39-42
3 31-36
4 25-28
5 16-20
Niveau d’eau Adoucisseur (Ordi-
naire- Grammes)
114 5
220 7
325 10
430 13
536 16
Adoucisseur (Concentré - Grammes)
19
Page 23

Consignes d’utilisation
PANNEAU DE COMMANDE
1. Bouton du niveau d’eau - Appuyez pour choisir le niveau d’eau.
2. Bouton d’alimentation en eau - Appuyez ce bouton pour choisir la température de l’eau.
3. Bouton PROGRAMME/DÉLAI (PROGRAM/DELAY) - Appuyez ce bouton pour choisir le pro-
gramme, et appuyez une deuxième fois pour choisir le délai.
4. Bouton DÉMARRER/PAUSE (START/PAUSE) - Appuyez ce bouton pour DÉMARRER/METTRE
EN PAUSE la laveuse.
5. Bouton de marche (POWER) - Appuyez ce bouton pour allumer ou éteindre l’appareil. Ne pas
rallumer l’appareil en moins de 3 minutes après qu’il s’éteint. L’appareil s’éteindra automatiquement lorsque le programme de lavage est terminé. Si vous ne choisissez pas un cycle de lavage,
l’appareil s’éteindra 10 minutes après qu’il est allumé.
Nom du cycle La durée du cycle Cycle Duration
Lavage automatique 29 minutes 29 minutes
Normal 35 minutes 35 minutes
Lourd 41 minutes 41 minutes
Rapide 15 minutes 15 minutes
Tremper 61 minutes 61 minutes
Délicat 41 minutes 41 minutes
Lavez seulement 14 minutes 14 minutes
Rincer et essorage 27 minutes 27 minutes
Essorage seulement 9 minutes 9 minutes
Super-essorage 32 minutes 32 minutes
Sans essorage 32 minutes 32 minutes
Remarque :
• Le temps de fonctionnellement total peut varier selon le volume d’eau, puisqu’une marge de
tolérance est appliquée.
• Dans le cas d’une brassée déséquilibrée, et si l’interrupteur de sécurité est appuyé pendant
le cycle d’essorage, la laveuse se remplira automatiquement pour ajuster l’équilibre.
20
Page 24

Consignes d’utilisation
CHOISIR UN CYCLE DE LAVAGE
1. Ouvrez la source d’alimentation. Appuyez le bouton de marche et le voyant « 00 » s’illuminera.
2. Choisissez un program. Le code du programme sélectionné sera affi ché. Appuyez le bouton de
programme pour choisir la fonction désirée, et le voyant correspondant clignotera. Par exemple, si
vous sélectionnez « Lavage automatique » (Auto Wash) l’appareil affi chera « 01 ». Si vous appuy-
ez le bouton « DÉMARRER/PAUSE » (START/PAUSE), la laveuse s’allumera automatiquement.
Fermez le couvercle, sinon la laveuse ne fonctionnera pas.
3. Choisissez le niveau d’eau. Appuyez le bouton NIVEAU D’EAU (WATER LEVEL) pour choisir le
niveau d’eau approprié pour le volume de la brassée. Le voyant correspondant clignotera.
4. FONCTION DÉLAI. Choisissez un programme en appuyant sur le bouton PROGRAMME/DÉLAI
(PROGRAM/DELAY), et le code du programme sélectionné sera affi ché. Appuyez sur le bouton «
START/PAUSE ». La laveuse sonnera après 3 secondes. Alors que l’appareil sonne, appuyez sur
le bouton PROGRAMME/DÉLAI (PROGRAM/DELAY) jusqu’à ce que vous voyez le délai désiré.
Par exemple, si vous souhaitez que l’appareil se démarre en 5 heures, vous devez voir « 05 » à
l’écran. Fermez le couvercle, sinon la laveuse ne fonctionnera pas.
5. FONCTION MUTE, si vous ne voulez pas que l’appareil sonne pendant que la laveuse est en
marche, appuyez sur le bouton « POWER » et l’écran vous montrera « 00 ». Appuyez sur le
bouton « START/PAUSE » pour 1-2 secondes. Le fonction MUTE est maintenant actif. Pour désactivé le fonction MUTE, appuyez le bouton « START / PAUSE » encore une fois. Mettez votre
machine en marche comme normale.
Remarque : Si vous souhaitez modifi er le programme alors que l’appareil est en marche, appuyez le
bouton « DÉMARRER/PAUSE » (START/PAUSE). Vous pouvez modifi er le niveau d’eau alors que
l’appareil est en marche. Si vous augmentez niveau d’eau, l’appareil cessera de fonctionner pendant
qu’il ajoute de d’eau. Une fois terminé, l’appareil résumera automatiquement.
21
Page 25

Soins et entretien
NETTOYER LE FILTRE DE LA VANNE DE PRISE D’EAU
1. Débranchez le cordon d’alimentation.
2. Retirez le tuyau d’admission et nettoyez le fi ltre à l’aide d’une brosse.
• Nettoyez régulièrement la surface de la laveuse avec un chiffon doux.
• Nettoyez régulièrement la cuve intérieure, surtout après avoir utilisé de l’amidon ou de l’eau de
Javel pour le lavage.
NETTOYAGE DU FILTRE DE LINTES
Le fi ltre à charpie est monté à l’intérieur de la cuve de la laveuse. Le fi ltre à charpie doit être retiré de
son support pour être nettoyé.
• Appuyez sur la poignée pour libérer le fi ltre de son support.
• Ouvrez le couvercle arrière du fi ltre à charpie et jetez toutes les peluches emprisonnées.
• Nettoyez et soulevez le fi ltre puis remettez-le à l’intérieur du support.
22
Page 26

Dépannage
PROBLÈME CAUSE POSSIBLE
La laveuse ne fonctionne pas • Appareil débranché.
• Le disjoncteur s’est déclenché ou le fusible a
grillé.
• Le couvercle n’est pas fermé.
• Assurez-vous que l’alimentation en eau est
ouverte.
Aucune alimentation en eau ou la quantité est
insuffi sante
L’évacuation de la laveuse ne fonctionne pas • Le tuyau d’évacuation est écrasé ou forme un
La laveuse vibre ou fait du bruit • Assurez-vous que la laveuse est bien au niveau.
Le cycle d’essorage ne fonctionne pas • Le couvercle n’est pas fermé.
• Le robinet n’est pas ouvert.
• Le tuyau d’admission est gelé.
• Le tuyau de prise d’eau forme un coude.
• Le fi ltre situé sur le tuyau de prise d’eau est
colmaté.
coude.
• Le fi ltre à tamis du tuyau est colmaté.
• La laveuse est en contact avec un autre objet.
• La brassée n’est pas bien répartie.
• La laveuse n’est pas placée sur une surface à
niveau.
CODES D’ERREUR
E1 - Incapable de drainer - Vérifi ez la position du tuyau d’évacuation ou inspectez le tuyau ou le drain
pour des blocages.
E2 - Défaillance du mécanisme d’essorage – Assurez-vous que le couvercle est complètement fermé.
Des réparations peuvent être nécessaires.
E3 - Incapable d’essorer – Brassée déséquilibrée. La laveuse repose sur une surface inégale.
E4 - L’appareil ne se remplit pas d’eau – L’alimentation en eau est fermée. Le fi ltre de la vanne d’ad-
mission est bloqué. La pression de l’eau est trop basse.
E0 - L’appareil sonne pendant 10 seconds lorsque vous appuyez sur le bouton DÉMARRER/PAUSE
(START/PAUSE) – Appelez votre technicien.
• Ne jamais nettoyer les pièces de la rondelle portative avec des fl uides infl ammables. Les vapeurs
peuvent créer un risque d’incendie ou une explosion.
23
Page 27

LIMITED IN-HOME APPLIANCE WARRANTY
This quality product is warranted to be free from manufacturer’s defects in material and workmanship, provided that the unit is used under the normal operating
conditions intended by the manufacturer.
Cet appareil de qualité est garanti exempt de tout vice de matière première et de fabrication, s’il est utilisé dans les conditions
This warranty is available only to the person to whom the unit was originally sold by Danby Products Limited (Canada) or Danby Products Inc. (U.S.A.) (hereafter
normales recommandées par le fabricant.
“Danby”) or by an authorized distributor of Danby, and is non-transferable.
Cette garantie n’est offerte qu’à l’acheteur initial de l’appareil vendu par Danby Products Limited (Canada) ou Danby Products
Inc. (E.- U.A.) (ci-après « Danby ») ou par l’un des ses distributeurs agréés et elle ne peut être transférée.
Plastic parts, are warranted for thirty (30) days only from purchase date, with no extensions provided.
Les pièces en plastique sont garanties pendant trente (30) jours seulement à partir de la date de l’achat, sans aucune prolongation prévue.
First Year
Premiers 12 mois
To obtain
Pour bénéficier
Service
du service
Limites de
Boundaries of
l’entretien à
In Home Service
domicile
APPAREIL ÉLECTROMÉNAGER À DOMICILE
During the rst twelve (12) months, any functional parts of this product found to be defective, will be repaired or replaced, at warrantor’s
Pendant les premiers douze (12) mois, toutes les pièces fonctionnelles de ce produit qui s’avèrent
option, at no charge to the ORIGINAL purchaser.
défectueuses seront réparées ou remplacées, selon le choix du garant, sans frais à l’acheteur INITIAL.
Danby reserves the right to limit the boundaries of “In Home Service” to the proximity of an Authorized Service Depot. Any app liance
Le client sera responsable pour le transport et tous les frais d’expédition de tout appareil exigeant le
requiring service outside the limited boundaries of “In Home Service” , it will be the consumer’s responsibility to transport the appliance (at
service au dépot de service autorisé le plus proche. S’adresser au détaillant qui a vendu l’appareil, ou à
their own expense) to the original retailer (point of purchase) or a service depot for repair. See “Boundaries of In Home Serv ice” below.
la station technique agréée de service la plus proche, où les réparations doivent être effectuées par un
Contact your dealer from whom your unit was purchased, or contact your nearest authorized Danby service depot, where service
technicien qualifié. Si les réparations sont effectuées par quiconque autre que la station de service
must be performed by a qualied service technician.
agréée où à des fins commerciales, toutes les obligations de Danby en vertu de cette garantie seront
If service is performed on the units by anyone other than an authorized service depot, or the unit is used for commercial appli cation, all
annulées.
obligations of Danby under this warranty shall be void.
Si l'appareil est installé à plus de 100 kilomètres (62 milles) du centre de service le plus proche, il doit
If the appliance is installed in a location that is 100 kilometers (62 miles) or more from the nearest service center your unit must be
être livré à l'atelier de réparation autorisé par Danby le plus proche, car l'entretien doit uniquement être
delivered to the nearest authorized Danby Service Depot, as service must only be performed by a technician qualied and certif ied for
réalisé par un technicien qualifié et certifié pour effectuer un entretien couvert par la garantie de Danby.
warranty service by Danby. Transportation charges to and from the service location are not protected by this warranty and are t he
Les frais de transport entre votre domicile et le lieu de l'entretien ne sont pas couverts par la présente
responsibility of the purchaser.
garantie et doivent être acquittés par l'acheteur.
GARANTIE LIMITÉE SUR
TERMS OF WARRANTY
CONDITIONS
Aucune partie de la garantie ne prévoit implicitement que le fabricant sera tenu responsable des dommages subis par les
Nothing within this warranty shall imply that Danby will be responsible or liable for any spoilage or damage to food or other c ontents of this appliance, whether due
aliments ou d’autres types de contenu, qu’ils soient causés par la défectuosité de l’appareil ou par son usage adéquat ou
to any defect of the appliance, or its use, whether proper or improper.
inadéquat.
EXCLUSIONS
Save as herein provided, Danby, there are no other warranties, conditions, representations or guarantees, express or implied, m ade or intended by Danby or its
En vertu de la présente, il n’existe aucune autre garantie, condition ou représentation, qu’elle soit exprimée ou tacite, de façon
authorized distributors and all other warranties, conditions, representations or guarantees, including any warranties, conditio ns, representations or guarantees
manifeste ou intentionnelle, par Danby ou ses distributeurs agréés. De même, sont exclues toutes les autres garanties,
under any Sale of Goods Act or like legislation or statue is hereby expressly excluded. Save as herein provided, Danby shall no t be responsible for any damages
conditions ou représentations, y compris les garanties, conditions ou représentations en vertu de toute loi régissant la vente
to persons or property, including the unit itself, howsoever caused or any consequential damages arising from the malfunction o f the unit and by the purchase of
de produits ou de toute autre législation ou règlement semblables. En vertu de la présente, Danby ne peut être tenue respon-
the unit, the purchaser does hereby agree to indemnify and hold harmless Danby from any claim for damages to persons or propert y caused by the unit.
sable en cas de blessures corporelles ou des dégâts matériels, y compris à l’appareil, quelle qu’en soit les causes. Danby ne
peut pas être tenue responsable des dommages indirects dus au fonctionnement défectueux de l’appareil. En achetant
l’appareil, l’acheteur accepte de mettre à couvert et de dégager Danby de toute responsabilité en cas de réclamation pour
No warranty or insurance herein contained or set out shall apply when damage or repair is caused by any of the following:
toute blessure corporelle ou tout dégât matériel causé par cet appareil.
EXCLUSIONS
GENERAL PROVISIONS
1) Power failure.
CONDITIONS GÉNÉRALES
2) Damage in transit or when moving the appliance.
La garantie ou assurance ci-dessus ne s’applique pas si les dégâts ou réparations sont dus aux cas suivants :
3) Improper power supply such as low voltage, defective house wiring or inadequate fuses.
1) Panne de courant.
4) Accident, alteration, abuse or misuse of the appliance such as inadequate air circulation in the room or abnormal operating con ditions
2) Dommage subis pendant le transport ou le déplacement de l’appareil.
3) Alimentation électrique incorrecte (tension faible, câblage défectueux, fusibles incorrects).
4) Accident, modification, emploi abusif ou incorrect de l’appareil tel qu'une circulation d'air inadéquate dans la pièce ou des
conditions de fonctionnement anormales (température extrêmement élevée ou basse).
5) Utilisation dans un but commercial ou industriel (à savoir, si l'appareil n'est pas installé dans un domicile résidentiel).
6) Incendie, dommages causés par l’eau, vol, guerre, émeute, hostilités, cas de force majeure (ouragan, inondation, etc.).
7) Visites d’un technicien pour expliquer le fonctionnement de l’appareil au propriétaire.
Proof of purchase date will be required for warranty claims; so, please retain bills of sale. In the event warranty service is required, present this document to our
8) Installation inappropriée (par exemple, encastrement d'un appareil autoportant, ou utilisation extérieure d'un appareil non
AUTHORIZED SERVICE DEPOT.
conçu à cet effet). Une preuve d’achat doit être présentée pour toute demande de réparation sous garantie. Prière de garder
le reçu. Pour faire honorer la garantie, présenter ce document à la station technique agréée ou s’adresser à :
(extremely high or low room temperature).
5) Use for commercial or industrial purposes (ie. If the appliance is not installed in a domestic residence).
6) Fire, water damage, theft, war, riot, hostility, acts of God such as hurricanes, oods etc.
7) Service calls resulting in customer education.
8) Improper Installation (ie. Building-in of a free standing appliance or using an appliance outdoors that is not approved for out door application).
Warranty Service
Service sous garantie
In-home
Service au domicile
Danby Products Limited
Danby Products Limited
PO Box 1778, Guelph, Ontario, Canada N1H 6Z9
PO Box 1778, Guelph, Ontario, Canada N1H 6Z9
Téléphone : (519) 837-0920 Télécopieur: (519) 837-0449
Telephone: (519) 837-0920 FAX: (519) 837-0449
1-800-263-2629
1-800-263-2629
03/14
04/09
Danby Products Inc.
PO Box 669, Findlay, Ohio, U.S.A. 45840
Téléphone: (419) 425-8627 Télécopieur: (419) 425-8629
PO Box 669, Findlay, Ohio, U.S.A. 45840
Telephone: (419) 425-8627 FAX: (419) 425-8629
Danby Products Inc.
Page 28

PORTABLE WASHING MACHINE LAVEUSE À CHARGEMENT SUPERIEUR
All repair parts are available for purchase or special
order when you visit your nearest service depot. To
request service and/or the location of the service depot
nearest you, call the TOLL FREE number.
When requesting service or ordering parts, always provide the following information:
• Product Type
• Model Number
• Part Number
• Part Description
Toutes les pièces de rechange ou commandes spéciales sont disponibles à votre centre de service régional
autorisé. Pour obtenir le service et/ou la localité de
votre centre de service régional, signalez le NUMÉRO
D’APPEL SANS FRAIS.
Ayez les renseignements suivants à la portée de la main
lors de la commande de pièce ou service:
• Type de produit
• Numéro de modèle
• Numéro de pièce
• Description de la pièce
1-800-26-
(1-800-263-2629)
MODEL • MODÈLE
DWM060WDB
Printed in China
Imprimé en Chine
Danby Products Limited, Guelph, ON, Canada N1H 6Z9
Danby Products Inc., Findlay, Ohio, USA 45840
 Loading...