


K-Series
© 1999 by Crown International, Inc., P.O. Box 1000, Elkhart, IN 46515-1000 U.S.A. Telephone: 219-294-8000. Fax: 219-294-8329. Trademark Notice: Balanced Current Amplifier™, and BCA™ are trademarks and Crown ® is a registered trademark of Crown International, Inc. Other trademarks are the property of their respective owners.
Watch for these symbols:
Lightning Bolt Symbol:
This symbol is used to alert the user to the presence of dangerous voltages and the possible risk of electric shock.
Exclamation Mark Symbol:
This symbol is used to alert the user to make special note of important operating or maintenance instructions found in the reference manual.
102010-4 9/99

Hi! |
I'm Mick, |
I’ll |
be |
||||
- |
|||||||
|
|||||||
giving |
you the de |
||||||
|
your |
|
|||||
tails |
about |
|
|||||
|
Series Amp!! |
||||||
|
|
|
|||||
new K- |
|
|
|
||||
|
|
|
|
|
|
|
- |
|
Read |
all safety |
and oper |
||||||
|
|
|
e |
|||||
|
uctions |
befor |
||||||
ating |
instr |
the |
K-Series |
|||||
|
||||||||
operating |
||||||||
|
Follow |
all |
||||||
|
. |
|
||||||
|
|
|
||||||
amplifier |
|
carefully |
and |
|||||
uctions |
||||||||
. |
||||||||
instr |
|
|
|
|
|
|
||
|
|
|
nings |
given |
||||
heed any war |
|
|
|
|
||||
K-Series Balanced Current Amplifier™
Friendly Page
of Tips and
Warnings
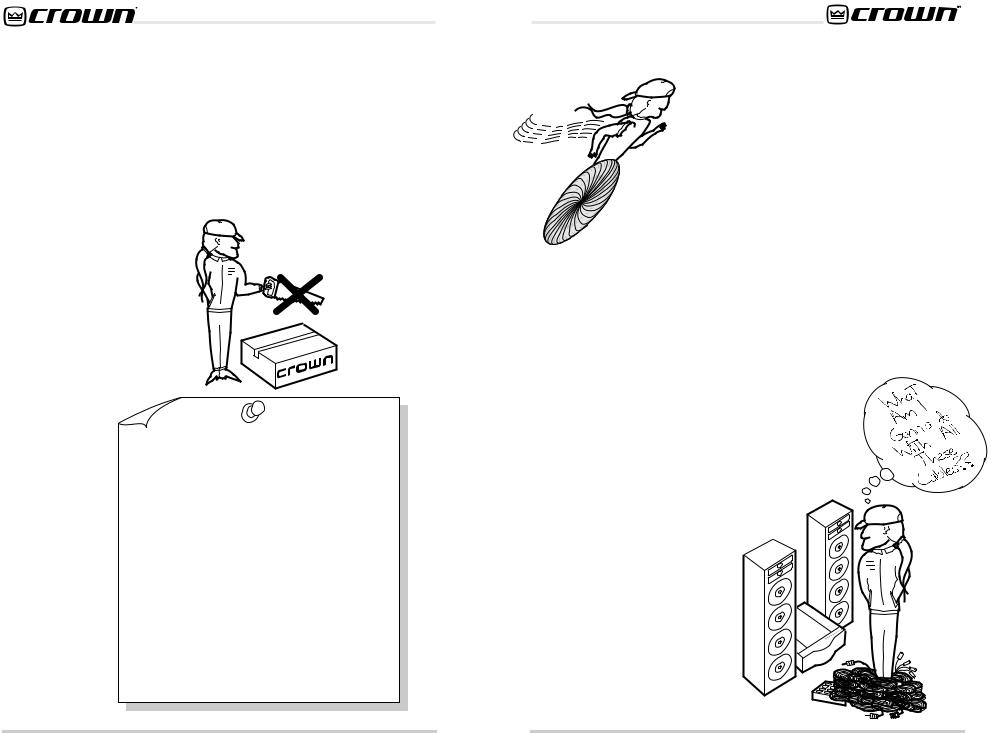
Do not |
CAUTION: |
|
|
|||||||||
locate |
sensitive, |
|||||||||||
|
|
|
||||||||||
high-gain |
|
|
|
|
||||||||
as |
|
|
|
equipment |
such |
|||||||
preamplifiers |
|
|
||||||||||
|
or tape |
|||||||||||
decks |
dir |
|
|
|
|
|
||||||
low the |
ectly |
above |
or be- |
|||||||||
unit. |
|
|||||||||||
If |
|
|
||||||||||
ment |
|
an equip- |
||||||||||
rack |
|
|
|
|||||||||
|
|
is used, |
|
|||||||||
recommend |
we |
|||||||||||
locating |
||||||||||||
amplifier(s) |
|
the |
||||||||||
in the |
|
|
|
|||||||||
the rack |
|
bottom of |
||||||||||
and |
|
|
|
|||||||||
fier |
or |
|
the preampli |
|||||||||
|
|
|
||||||||||
|
other |
|
|
|
|
|
- |
|||||
|
|
|
sensitive |
|||||||||
equipment at |
|
|
||||||||||
|
|
|
|
|
the top. |
|
|
|||||
Obtain assistance |
from qualified |
ser- |
|||||||||||||
|
|
|
|
following |
|||||||||||
vice personnel |
if any of the |
||||||||||||||
|
|
|
|
|
|
|
|
|
|
||||||
occurs: |
|
|
|
cord or plug |
|
has been |
|||||||||
• |
The power |
|
|
||||||||||||
|
|
|
|
|
|
||||||||||
|
damaged |
in any way. |
|
has |
fallen |
||||||||||
|
|
|
|
|
|
or liquid |
|
||||||||
• |
Foreign |
objects |
|
|
|||||||||||
|
e. |
|
|
|
|||||||||||
|
|
|
|
|
|
||||||||||
|
|
|
|
|
|
|
|
|
|
|
|||||
|
|
|
|
|
|
|
|
|
|
|
|
|
|||
|
into the amplifier |
enclosur |
|
|
|
to |
|||||||||
• |
The amplifier |
has been exposed |
|||||||||||||
|
|||||||||||||||
|
|
|
partially |
or |
totally |
||||||||||
|
rain or has been |
||||||||||||||
|
|
|
|
||||||||||||
|
. |
|
|
|
|
|
|||||||||
|
|
|
|
|
|
|
|
|
|
|
|
|
|
||
|
immersed |
in any liquid |
|
|
|
|
or |
||||||||
|
|
|
has been dropped |
||||||||||||
|
|
|
|
|
|
||||||||||
•the chassis has been damaged. -
•You notice a marked change in performance, or your K-Series amp oth erwise does not appear to operate normally.The amplifier
|
Driving |
heavy |
|
|
|
|
|
|
|
|
|
|
|
|
|
||||||||
may |
|
|
|
|
|
|
|
|
forImportant: |
|
|
|
|
|
|||||||||
|
|
|
cause |
|
|
loads |
|
|
|
|
|
||||||||||||
temperatures |
|
|
|
|
|
|
|
|
|
|
|
|
|
|
|||||||||
be |
alarmed. |
|
parts |
|
|
the |
sustained |
|
|
|
|
|
|||||||||||
|
which |
|
|
|
|
|
|
||||||||||||||||
|
|
|
|
|
|
|
|
|
|
|
of |
|
|
amplifier |
|
|
|
|
|
|
|||
circuitry |
|
|
|
The |
|
|
|
|
will |
’s |
periods of |
|
|||||||||||
|
|
|
|
|
|
|
|
|
|
|
|
be |
|
time |
|||||||||
remain |
|
|
ensures amplifier’s |
hot to |
case to |
|
|
||||||||||||||||
|
|
well |
|
|
|
|
|
|
|
|
|
|
|
|
|
|
|
reach |
|||||
harmful to |
|
below maximum internal touch. But |
|
|
|||||||||||||||||||
|
|
|
|
|
|
|
|
amplifier. |
|
|
|
protection |
|
|
|||||||||
|
|
|
|
|
the |
|
thattemperature |
|
|
don’t |
|||||||||||||
|
|
|
|
|
|
|
any |
level |
|
might |
|
levels |
|||||||||||
|
|
|
|
|
|
|
|
|
|
|
|
|
|
|
|
|
|||||||
|
|
|
|
|
|
|
|
|
|
|
|
|
|
|
|
|
be |
will |
|||||
|
|
|
|
|
|
|
|
|
|
|
|
|
|
|
|
|
|
|
|
|
|||
Keep |
your |
K-Series |
amplifier |
||||||||
of heat, |
|||||||||||
|
|
ces |
|||||||||
|
|
|
|
|
|||||||
|
|
|
|
|
|
|
. |
||||
away from sour |
|
|
|
||||||||
such |
as a radiator |
or oven |
|||||||||
|
round |
your |
|||||||||
|
|
|
|
|
|
|
|
||||
Do not cover |
or sur |
may |
|||||||||
|
|
|
which |
||||||||
amp |
with |
material |
|
||||||||
|
such |
as a |
|
||||||||
|
heat, |
|
|||||||||
retain |
|
||||||||||
|
. |
|
|||||||||
|
|
|
|
||||||||
|
|
|
|
|
|
tain |
|
|
|||
blanket |
or cur |
|
|
|
|
||||||
|
|
|
|
|
|
|
|
||||
Page 2
K-Series Balanced Current Amplifier™
Do |
not |
drop |
|
||||
|
|
|
|||||
spill |
|
|
or |
||||
(or |
|
|
any |
|
|||
|
|
|
|
|
|
foreign |
|
|
|
domestic) |
|
||||
object |
or |
|
|
|
|||
into |
|
|
|
|
|
||
|
the |
K liquid |
|||||
amplifier |
- |
|
|
||||
|
|
|
. |
Series |
|||
Clean |
your |
||||
|
amp |
||||
|
Series |
|
|
||
- |
|
|
a |
||
K |
|
with |
|||
only |
|
||||
cloth! |
|||||
damp |
|||||
|
|
|
|||
WARNING: |
|
|
|
|
|
|
|
|
|
|
|
|
|
|
||||
the |
|
|
|
Shock |
|
|
|
|
|
|
|
|
|
|
||||
not |
risk of |
|
hazard. |
|
|
|
|
|
||||||||||
|
|
|
fire or |
|
|
To |
|
|
||||||||||
ture expose |
this |
|
electric |
|
reduce |
|||||||||||||
|
. Do |
not |
|
|
|
|
|
|||||||||||
|
|
|
|
unit to |
|
|
shock, |
|
||||||||||
amplifier in |
|
immerse |
|
rain or |
|
|
do |
|||||||||||
your |
|
|
any |
|
|
|
|
your |
|
|
|
mois- |
||||||
other amplifier |
liquid. Do |
|
|
Series |
||||||||||||||
|
standing |
near a |
|
|
|
|
|
K- |
|
|
|
|
||||||
|
pool, |
not |
|
operate |
||||||||||||||
|
water. |
|
|
|
||||||||||||||
|
|
|
|
|
|
|
|
|
bathtub |
|||||||||
|
|
|
|
|
|
|
|
|
|
|
|
|
|
|
|
|
|
or |
Protect the power cord attached to your K-Series amplifier. Route it to avoid foot traffic or other situations where the cord might be stretched or pinched. Pay special attention to the cord connector and attachment points.
|
|
DO |
NOT |
BYPASS |
|
|
|
|
|
|
|||||||
|
|
|
|
|
|
|
|
|
|
||||||||
|
|
|
|
|
|
|
OR |
|
|
|
|
||||||
|
GROUNDING |
|
|
|
|
|
|
|
|||||||||
|
USED |
|
|
|
|
|
OR |
|
|
|
DEFEA |
|
|||||
|
|
|
ON |
|
|
|
|
|
|
|
|||||||
|
MAKE |
SURE |
|
|
K- |
|
POLARIZATIONTHE |
||||||||||
|
|
|
|
THE |
|
|
|
|
|
|
|
T |
|
||||
POLARIZED |
|
|
ALL SERIES |
|
|
|
|||||||||||
|
|
|
|
|
MEANS |
||||||||||||
FULLY |
|
|
|
POWER |
|
|
|
|
|
|
|
||||||
|
|
|
|
|
|
|
|
|
ONAMPLIFIERS. |
||||||||
CORD, INSERTED |
|
BLADES |
|
|
THE |
|
|||||||||||
|
|
PLUG |
|
|
|
|
|||||||||||
THAT |
RECEPTACLE |
|
|
|
|
CAN |
|
|
|||||||||
WILL |
|
|
|
|
|
|
INTO |
THE |
BE |
|
|||||||
|
BE |
USED |
|
OR |
|
EXTENSION |
|||||||||||
|
|
|
|
||||||||||||||
|
|
|
|
|
|
|
|
|
|
|
OTHER |
OUTLET |
|||||
|
|
|
|
|
|
|
|
WITH THE |
|
|
|||||||
|
|
|
|
|
|
|
|
|
|
|
|
|
UNIT. |
|
|||
Page 3
K-Series Balanced Current Amplifier™
Important Safety Instructions
1)Read these instructions.
2)Keep these instructions.
3)Heed all warnings.
4)Follow all instructions.
5)Do not use this apparatus near water.
6)Clean only with a dry cloth.
7)Do not block any ventilation openings. Install in accordance with the manufacturer’s instructions.
8)Do not install near any heat sources such as radiators, heat registers, stoves, or other apparatus that produce heat.
9)Do not defeat the safety purpose of the polarized or grounding-type plug. A polarized plug has two blades with one wider than the other. A grounding-type plug has two blades and a third grounding prong. The wide blade or the third prong is provided for your safety. If the provided plug does not fit into your outlet, consult an electrician for replacement of the obsolete outlet.
10)Protect the power cord from being walked on or pinched, particularly at plugs, convenience receptacles, and the point where they exit from the apparatus.
11)Only use attachments/accessories specified by the manufacturer.
12)Unplug this apparatus during lightning storms or when unused for long periods of time.
13)Refer all servicing to qualified service personnel. Servicing is required when the apparatus has been damaged in any way, such as power-supply cord or plug is damaged, liquid has been spilled or objects have fallen into the apparatus, the apparatus has been exposed to rain or moisture, does not operate normally, or has been dropped.
Page 4
K-Series Balanced Current Amplifier™
Contents |
|
|
|
Friendly Page of Tips and Warnings |
...................... 2 |
|
Important Safety Instructions ................................. |
4 |
|
Unpacking Your K-Series Amplifier........................ |
6 |
|
Quick Start ............................................................ |
7 |
|
Features ................................................................ |
9 |
1 |
Welcome ............................................................. |
10 |
2 |
Very Detailed Install ............................................. |
14 |
3 |
Operation ............................................................ |
21 |
4 |
Other Issues ........................................................ |
26 |
5 |
Specifications ..................................................... |
31 |
6 |
Service ................................................................ |
36 |
Illustrations |
|
|
|
Typical Stereo Hookup .......................................... |
8 |
1.1 |
The K-Series Amplifier .................................... |
10 - 11 |
1.2The Big Picture: Controls, Indicators and
|
Connectors ................................................... |
12-13 |
2.1 |
Mounting Dimensions.......................................... |
14 |
2.2 |
Mono Mode Switches .......................................... |
15 |
2.3 |
Input Sensitivity Switch ........................................ |
15 |
2.4 |
Typical Input Wiring ............................................. |
16 |
2.5 |
Stereo Output Wiring ........................................... |
17 |
2.6 |
Bridge Mono Output Wiring ................................. |
18 |
2.7 |
Stereo Hookup .................................................... |
19 |
2.8 |
Bridged-Mono Output Hookup ............................ |
19 |
2.9 |
“Y” Mono Input Hookup ....................................... |
20 |
2.10 |
“Y” Mono Input / Bridged Output ......................... |
20 |
3.1 |
Front Panel Indicators & Controls ........................ |
21 |
3.2 |
Back Panel Controls ............................................ |
23 |
3.3 |
Back Panel Fuse Location ................................... |
25 |
4.1 |
Balanced & Unbalanced Input Wiring ................. |
28 |
4.2 |
Balanced Input Wiring ......................................... |
29 |
4.3 |
Unbalanced Input Wiring .................................... |
30 |
5.1 |
Awesome Frequency (Amplitude) Response ...... |
35 |
5.2 |
Superior Damping Factor .................................... |
35 |
Page 5
K-Series Balanced Current Amplifier™
Unpacking Your K-Series Amp
Please unpack and inspect your amplifier for any damage that may have occurred during transit. If damage is found, notify the transportation company immediately. Only you can initiate a claim for shipping damage. Crown will be happy to help as needed. Save the shipping carton as evidence of damage for the shipper’s inspection.
We also recommend that you save all packing materials so you will have them if you ever need to transport the unit.
NEVER SHIP THE UNIT WITHOUT THE FACTORY PACK.
FCC COMPLIANCE NOTICE
This equipment has been tested and found to comply with the limits for a Class A digital Device, pursuant to Part 15 of the FCC Rules. These limits are designed to provide reasonable protection against harmful interference when the equipment is operated in a commercial environment. This equipment generates, uses and can radiate radio frequency energy and, if not installed and used in accordance with the instruction manual, may cause harmful interference to radio communications. Operation of this equipment in a residential area is likely to cause harmful interference in which case the user will be required to correct the interference at his own expense.
“The user is cautioned that any changes or modifications not expressly approved by Crown International could void the user’s authority to operate the equipment.”
Page 6
K-Series Balanced Current Amplifier™
Quick Start!
First things first. We know you just
can’t wait to crank up your new Crown® K-Series amplifier. And the last thing you want to do is dig through
pages of tech-talk to find out where the “ON” switch is. So that’s why we provided you with this quick and simple page to get you up and running right away. Just take a few minutes to read through this—no more than
five or ten, max—you’ll be glad you did.
1.Make sure the K-Series amp and all other equipment is turned OFF before you begin wiring. The amp power switch, which is located on the far right side of the front panel, is “OFF” when pressed downward.
2.Mount your K-Series amp securely in the rack.
3.Connect the left and right inputs coming from your mixer, preamp, or other processor. You can use either bal-
anced 1/4-inch phone or 3-pin XLR connectors. You can also choose to run in MONO mode, with either bridged outputs, “Y” inputs, or both. If so, see the sections starting on page 14 for further instructions.
4. Connect the output wiring (left and right speakers).
5.Connect your K-Series amp and other equip-
ment to the appropriate power source.
6. Turn on your mixer, preamp, signal processor, or any other equipment in your system EXCEPT your K-Series amplifier. (Remember: save the best for last.)
7.Make sure the Channel 1 and Channel 2 level (volume) controls on your K-Series amplifier are turned all the way down (counterclockwise), then flip the power
switch “ON” (press upward).
Page 7

K-Series Balanced Current Amplifier™
Note: After a two-second delay, the “Enable” light will glow a bright green to indicate power is on. If no audio signal is present at the amp, the enable light will then switch to a dim green.
8.(Now comes the fun!) Supply input, adjust amp levels and enjoy.
CAUTION: Excessive output levels may toast your speakers. Crown’s K-Series amplifier has such low distortion, you may not realize the actual level being reached until it’s too late. Please exercise caution and drive your speakers responsibly, or at least warn your neighbors!
9.You may notice that your K-Series amplifier becomes warm to the touch after a few minutes of use. Don’t be alarmed. This is the normal operating condition for your K-Series amplifier. The K-Series of amplifiers are designed to be convection cooled, and therefore radiate heat passively to the enviroment. Refer to page 26 for more details.
Typical Stereo
Hookup
1 2
- 


 -
-
Page 8
K-Series Balanced Current Amplifier™
Page 9
K-Series Balanced Current Amplifier™
1 Welcome
Thank you for choosing Crown! Mick and his team of enthusiastic engineers have worked long hours to craft a totally new kind of amplifier—the K-Series. These are the first amplifiers to incorporate Crown’s patented BCA™ (Balanced Current Amplifier™) technology, and we are all very proud to have invented them. Our Balanced Current Amplifier makes use of a special type of circuitry which allows high levels of power output without all of the associated heat you find in a conventional amplifier. And that’s very good news for you!
How high is the power output? The K1 amplifier produces an impressive 1,500 watts and weighs only 32 pounds, while the K2 produces a whopping 2,500 watts while weighing only 38 pounds; both without using a cooling fan!* Of course, the absence of a cooling fan means your amp runs quieter (no fan noise) and cleaner (no need for filters) and requires very little maintenance (we thought you’d like that).
*1,500 watts and 2,500 watts total from both channels (for the K1 and K2 respectively; 750 and 1,250 watts per channel). See the Specifications section for details.
Page 10
K-Series Balanced Current Amplifier™
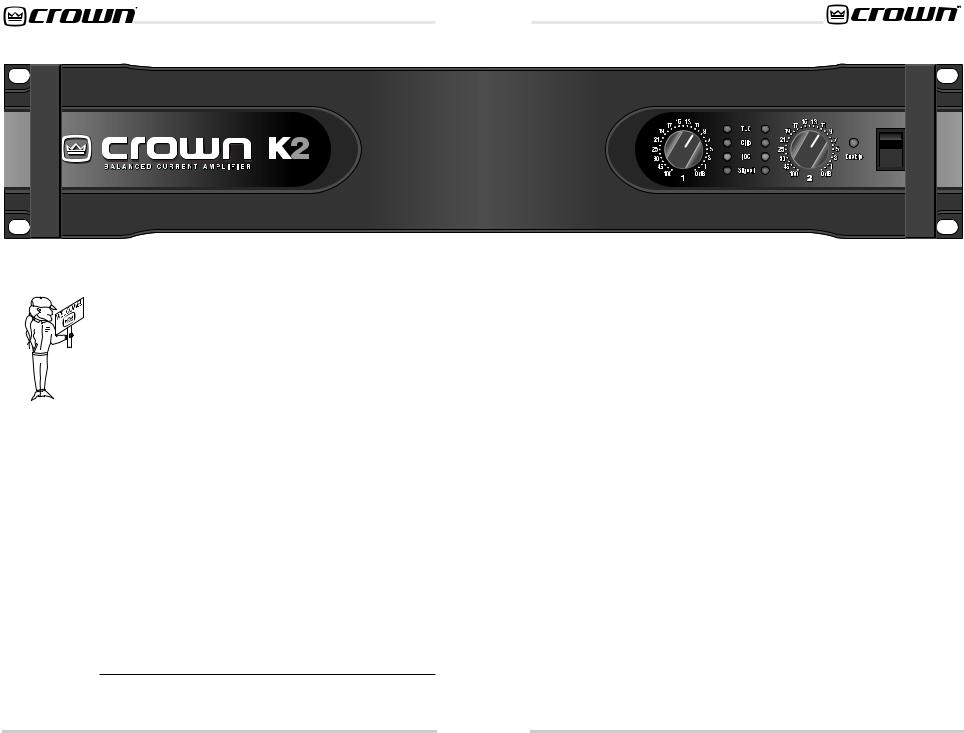
Fig. 1.1
The K-2 Amplifier (K-1 Amplifier appears the same except for nameplate)
The K-Series amplifiers are also highly energy-efficient—some of the World’s first “green” amps. As a result, the K-Series amps use less electricity (reducing your utility bills) and save the precious resources of our environment.
And that’s not all! Your K-Series amp can drive an amazing range of loudspeakers, making it one of the most versatile amplifiers ever. Plus, your K-Series has one of our most sophisticated (and totally automatic) protection systems, so your amplifier will keep working long after other amplifiers have shut down. It’s part of our philosophy: Your show must go on!
This manual will help you correctly set up and use your new amplifier—we strongly recommend you read all instructions, warnings and cautions. Also, for your protection, please send in your warranty registration card today. And save your bill of sale—it’s your official proof of purchase.
Page 11
K-Series Balanced Current Amplifier™ |
K-Series Balanced Current Amplifier™ |
|
|
|
|
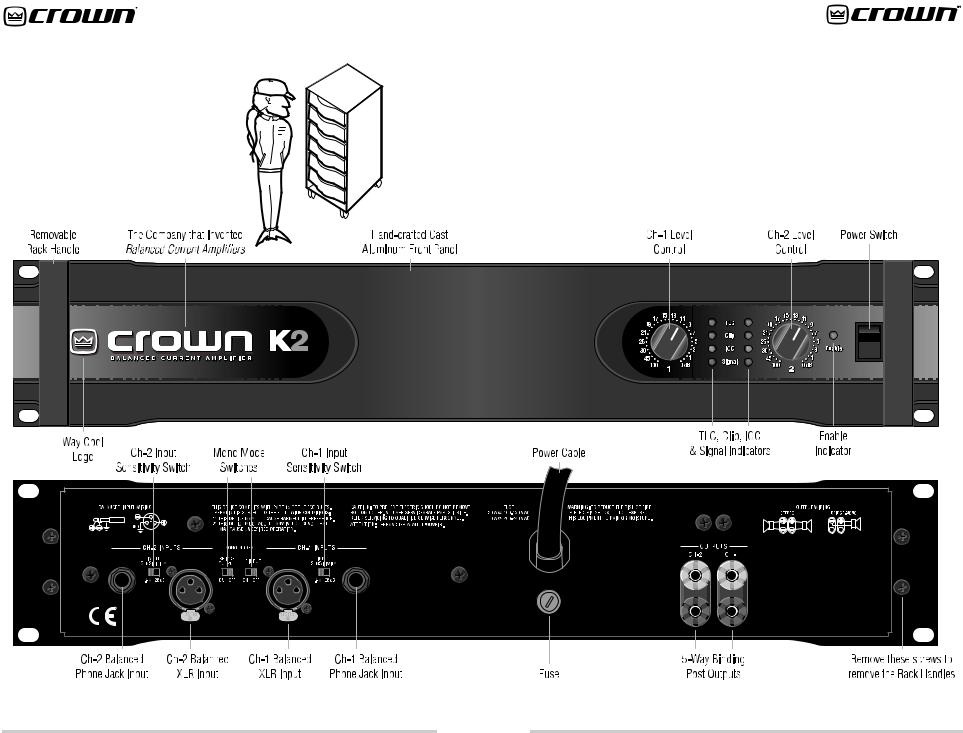
Fig. 1.2
The Big Picture:
Controls,
Indicators &
Connectors
Note: K1 amplifier and CE (European) versions of both amplifiers feature identical front and back panel layouts except for product nameplates and fuse specifications.
Page 12 |
Page 13 |
 Loading...