


XLS Series |
XLS-Serie |
Gamme XLS |
Serie XLS |
|
XLS 202 |
Operation Manual |
XLS 402 |
|
|
Mode d'emploi |
|
Bedienungsanleitung |
XLS 602 |
|
|
Manual de Operación |
|
|
XLS 802 |
Obtaining Other Language Versions: To obtain information in another language about the use of this product, please contact your local Crown Distributor. If you need assistance locating your local distributor, please contact Crown at 574-294-8000.
This manual does not include all of the details of design, production, or variations of the equipment. Nor does it cover every possible situation which may arise during installation, operation or maintenance.
The information provided in this manual was deemed accurate as of the publication date. However, updates to this information may have occurred. To obtain the latest version of this manual, please visit the Crown website at www.crownaudio.com.
Trademark Notice: Crown, Crown Audio and Amcron are registered trademarks of Crown International. Other trademarks are the property of their respective owners.
Some models may be exported under the name Amcron.®
©2006 by Crown Audio® Inc., 1718 W. Mishawaka Rd., Elkhart, Indiana 46517-9439 U.S.A. Telephone: 574-294-8000
Pour obtenir des versions en d'autres langues: Pour obtenir des informations dans une autre langue quant à l'emploi de ce produit, veuillez contacter votre distributeur Crown local. Si vous avez besoin d'aide pour trouver votre distributeur local, veuillez contactez Crown au 574-294-8000.
Ce manuel ne comprend pas tous les détails de conception, production ou variation de l'équipement. Il ne couvre pas non plus toutes les situations possibles pouvant survenir durant l'installation, l'utilisation ou la maintenance.
Les informations fournies dans ce manuel ont été estimées exactes à la date de publication. Toutefois, des mises à jour de ces informations peuvent avoir été faites. Pour obtenir la dernière version de ce manuel, veuillez visiter le site web Crown: www.crownaudio.com.
Note relative aux marques commerciales: Crown, Crown Audio et Amcron sont des marques déposées de Crown International. Les autres marques commerciales sont la propriété de leurs détenteurs respectifs.
Certains modèles peuvent être exportés sous le nom Amcron®.
©2006 par Crown Audio® Inc., 1718 W. Mishawaka Rd., Elkhart, Indiana 46517-9439 U.S.A. Téléphone: 001-574-294-8000
Weitere Sprachversionen: bitte wenden Sie sich an Ihren zuständigen Crown-Vertrieb für eine Bedienungsanleitung in Ihrer Sprache. Telefonische Auskunft über Ihren zuständigen Vertrieb erhalten Sie bei Crown unter 001- 574-294-8000.
Diese Bedienungsanleitung enthält nicht sämtliche Einzelheiten der Konstruktion, Herstellung und Produktvarianten. Sie berücksichtigt auch nicht alle möglichen Situationen, die während der Installation, Bedienung und Wartung auftreten können.
Die Informationen in dieser Bedienungsanleitung wurden zum Zeitpunkt ihrer Veröffentlichung als korrekt erachtet. Sie können jedoch mittlerweile auf einen neueren Stand gebracht worden sein. Für die jeweils jüngste Version dieser Bedienungsanleitung besuchen Sie bitte die Crown-Website unter www.crownaudio.com.
Warenzeichen: Crown, Crown Audio und Amcron sind eingetragene Warenzeichen von Crown International. Andere Warenzeichen sind das Eigentum ihrer jeweiligen Rechteinhaber.
Einige Modelle können unter dem Namen Amcron® vertrieben werden.
©2006 Crown Audio® Inc., 1718 W. Mishawaka Rd., Elkhart, Indiana 46517-9439 U.S.A., Tel. 001-574-294-8000
Obteniendo otras Versiones de Idioma: Para obtener información en otro idioma acerca del uso de este producto, contacte por favor a su Distribuidor Crown local. Si necesita asistencia para localizar a su distribuidor local, favor de contactar a Crown al 574-294-8000.
Este manual no incluye todos los detalles de diseño, producción, o variaciones del equipo. Tampoco cubre cualquier posible situación que pueda surgir durante la instalación, operación o mantenimiento.
La información provista en este manual fue considerada precisa a la fecha de publicación. Sin embargo, pueden haber ocurrido actualizaciones a esta información. Para obtener la última versión de este manual, por favor visite la página de internet de Crown en www.crownaudio.com.
Nota de Marcas Registradas: Crown, Crown Audio y Amcron son marcas registradas de Crown International. Otras marcas son de la propiedad de sus respectivos dueños.
Algunos modelos pueden ser exportados bajo el nombre de
Amcron®
.
Derechos reservados por Crown Audio Inc, ©2006., 1718 W. Mishawaka Rd., Elkhart Indiana 46517-9439 U.S.A®., 001-574-294-8000
139441-3 9/06

XLS Series Power Amplifiers Amplificateurs de puissance |
Leistungsendstufen Amplificadores de potencia |
Important Safety Instructions |
Wichtige Sicherheitsinstruktionen |
|
Importantes Instructions de Sécurité |
Instrucciones de Seguridad Importantes |
|
|
||
|
IMPORTANT
1)Read these instructions.
2)Keep these instructions.
3)Heed all warnings.
4)Follow all instructions.
5)Do not use this apparatus near water.
6)Clean only with a dry cloth.
7)Do not block any ventilation openings. Install in accordance with the manufacturer’s instructions.
8)Do not install near any heat sources such as radiators, heat registers, stoves, or other apparatus (including amplifiers) that produce heat.
9)Do not defeat the safety purpose of the polarized or grounding-type plug. A polarized plug has two blades with one wider than the other. A grounding-type plug has two blades and a third grounding prong. The wide blade or the third prong is provided for your safety. If the provided plug does not fit into your outlet, consult an electrician for replacement of the obsolete outlet.
10)Protect the power cord from being walked on or pinched, particularly at plugs, convenience receptacles, and the point where they exit from the apparatus.
11)Only use attachments/accessories specified by the manufacturer.
12)Use only with a cart, stand, tripod, bracket, or table specified by the manufacturer, or sold with the apparatus. When a cart is used, use caution when moving the cart/ apparatus combination to avoid injury from tip-over.
13)Unplug this apparatus during lightning storms or when unused for long periods of time.
14)Refer all servicing to qualified service personnel. Servicing is required when the apparatus has been damaged in any way, such as power-supply cord or plug is damaged, liquid has been spilled or objects have fallen into the apparatus, the apparatus has been exposed to rain or moisture, does not operate normally, or has been dropped.
15)WARNING: TO REDUCE THE RISK OF FIRE OR ELECTRIC SHOCK, DO NOT EXPOSE THIS APPARATUS TO RAIN OR MOISTURE.
16)DO NOT EXPOSE TO DRIPPING OR SPLASHING. DO NOT PLACE OBJECTS FILLED WITH LIQUID, SUCH AS VASES,ON THIS APPARATUS.
TO PREVENT ELECTRIC SHOCK DO NOT REMOVE TOP OR BOTTOM COVERS. NO USER SERVICEABLE PARTS INSIDE. REFER SERVICING TO QUALIFIED SERVICE PERSONNEL.
À PRÉVENIR LE CHOC ÉLECTRIQUE N’ENLEVEZ PAS LES COUVERCLES. IL N’Y A PAS DES PARTIES SERVICEABLE À L’INTÉRIEUR. TOUS REPARATIONS DOIT ETRE FAIRE PAR PERSONNEL QUALIFIÉ SEULMENT.
PARA PREVENIR UN CHOQUE ELÉCTRICO, NO RETIRE LAS CUBIERTAS SUPERIOR O INFERIOR. NO EXISTEN PARTES QUE PUEDAN SER REPARADAS POR EL USUARIO AL INTERIOR. REMITA EL SERVICICO AL PERSONAL TÉCHNICAL CALIFICADO.
TO COMPLETELY DISCONNECT THIS EQUIPMENT FROM THE AC MAINS, DISCONNECT THE POWER SUPPLY CORD PLUG FROM THE AC RECEPTACLE. THE MAINS PLUG OF THE POWER SUPPLY CORD SHALL REMAIN READILY OPERABLE.
POUR DÉMONTER COMPLÈTEMENT L'ÉQUIPEMENT DE L'ALIMENTATION GÉNÉRALE, DÉMONTER LE CÂBLE D'ALIMENTATION DE SON RÉCEPTACLE. LA PRISE D'ALIMENTATION RESTERA AISÉMENT FONCTIONNELLE.
PARA DESCONECTAR COMPLETAMENTE EL EQUIPO DEL SUMINSTRO ELECTRICO, DESCONECTE EL CABLE DE ALIMENTACION DE LA TOMA DE CA. LAS PATAS DEL CONECTOR DEL CABLE DE ALIMENTACIÓN DEBERAN MANTENERSE EN BUEN ESTADO.
WATCH FOR THESE SYMBOLS:
The lightning bolt triangle is used to alert the user to the risk of electric shock.
The exclamation point triangle is used to alert the user to important operating or maintenance instructions.
REGARDEZ CES SYMBOLES
La triangle avec le sigle ‘’foudre’’ est employée pour alerter l'utilisateur au risque de décharge électrique. Le triangle avec un point d'exclamation est employée pour alerter l'utilisateur d’instruction importantes pour lors opérations de maintenance.
ATENCION CON ESTOS SÍMBOLOS
El triángulo con el símbolo de rayo eléctrico es usado para alertar al usuario de el riesgo de un choque eléctrico.
El triángulo con el signo de admiración es usado para alertar al usuario de instrucciones importantes de operación o mantenimiento.
XLS Series amplifiers require Class 2 output wiring.
Les amplificateurs de série de XLS exigent des câbles de sortie de classe 2.
XLS-Reihe-Verstärker verlangen Klasse die 2 Produktionsverdrahtung.
Los amplificadores de la Serie XLS requieren de un cableado de salida Clase 2.
MAGNETIC FIELD
CAUTION! Do not locate sensitive high-gain equipment such as preamplifiers or tape decks directly above or below the unit. Because this amplifier has a high power density, it has a strong magnetic field which can induce hum into unshielded devices that are located nearby. The field is strongest just above and below the unit.
If an equipment rack is used, we recommend locating the amplifier(s) in the bottom of the rack and the preamplifier or other sensitive equipment at the top.
FCC COMPLIANCE NOTICE
This device complies with part 15 of the FCC rules. Operation is subject to the following two conditions: (1) This device may not cause harmful interference, and (2) this device must accept any interference received, including interference that may cause undesired operation.
CAUTION: Changes or modifications not expressly approved by the party responsible for compliance could void the user’s authority to operate the equipment.
NOTE: This equipment has been tested and found to comply with the limits for a Class B digital device, pursuant to part 15 of the FCC Rules. These limits are designed to provide reasonable protection against harmful interference in a residential installation. This equipment generates, uses, and can radiate radio frequency energy and, if not installed and used in accordance with the instruction manual, may cause harmful interference to radio communications. However, there is no guarantee that interference will not occur in a particular installation. If this equipment does cause harmful interference to radio or television reception, which can be determined by turning the equipment off and on, the user is encouraged to try to correct the interference by one or more of the following measures:
•Reorient or relocate the receiving antenna.
•Increase the separation between the equipment and receiver.
•Connect the equipment into an outlet on a circuit different from that to which the receiver is connected.
•Consult the dealer or an experienced radio/TV technician for help.
page 2 |
Operation Manual Mode d'emploi Bedienungsanleitung Manual de Operación |

XLS Series Power Amplifiers |
Amplificateurs de puissance |
Leistungsendstufen |
Amplificadores de potencia |
Crown International, Inc. |
DECLARATION of CONFORMITY |
|
|
Issued By: Crown International, Inc. |
FOR COMPLIANCE QUESTIONS ONLY: Sue Whitfield |
1718 W. Mishawaka Road |
574-294-8289 |
Elkhart, Indiana 46517 U.S.A. |
swhitfield@crownintl.com |
|
|
European Representative's Name and Address: |
|
Nick Owen |
|
35, Bassets Field |
|
Thornhill |
|
Cardiff. South Glamorgen |
|
CF14 9UG United Kingdom |
|
Equipment Type: Commercial Audio Power Amplifiers |
|
Family Name: XLS Amplifiers |
|
Model Names: XLS 202, XLS 402, XLS 602, XLS 802 |
|
EMC Standards:
EN 55103-1:1997 Electromagnetic Compatibility - Product Family Standard for Audio, Video, Audio-Visual and Entertainment Lighting Control Apparatus for Professional Use, Part 1: Emissions
EN 55103-1:1997 Magnetic Field Emissions-Annex A @ 10 cm and 20 cm
EN 61000-3-2:2001 Limits for Harmonic Current Emissions (equipment input current less than or equal to 16 A per phase)
EN 61000-3-3:2002 Limitation of Voltage Fluctuations and Flicker in Low-Voltage Supply Systems Rated Current less than or equal to16A
EN 55022:2003 Limits and Methods of Measurement of Radio Disturbance Characteristics of ITE: Radiated, Class B Limits; Conducted, Class A
EN 55103-2:1997 Electromagnetic Compatibility - Product Family Standard for Audio, Video, Audio-Visual and Entertainment Lighting Control Apparatus for Professional Use, Part 2: Immunity
EN 61000-4-2:2001 Electrostatic Discharge Immunity (Environment E2-Criteria B, 4k V Contact, 8k V Air Discharge)
EN 61000-4-3:2001 Radiated, Radio-Frequency, Electromagnetic Immunity (Environment E2, criteria A)
EN 61000-4-4:2001 Electrical Fast Transient/Burst Immunity (Criteria B)
EN 61000-4-5:2001 Surge Immunity (Criteria B)
EN 61000-4-6:2003 Immunity to Conducted Disturbances Induced by Radio-Frequency Fields (Criteria A)
EN 61000-4-11:2001 Voltage Dips, Short Interruptions and Voltage Variation
Safety Standard:
IEC 60065: 2001 7th Ed. Safety Requirements - Audio Video and Similar Electronic Apparatus
I certify that the product identified above conforms to the requirements of the EMC Council Directive 89/336/EEC as amended by 92/31/EEC, and the Low Voltage Directive 73/23/EES as amended by 93/68/EEC. Signed
Date of Issue: 12/12/05
Larry Colburn
Operation Manual Mode d'emploi Bedienungsanleitung Manual de Operación |
page 3 |

XLS Series Power Amplifiers Amplificateurs de puissance |
Leistungsendstufen Amplificadores de potencia |
Table of Contents |
|
Table des matières |
|
|||
Important Safety Instructions ................................. |
2 |
Instructions de sécurité importantes .............................. |
2 |
|||
Declaration of Conformity ...................................... |
3 |
Déclaration de conformité .............................................. |
3 |
|||
1 Welcome ......................................................... |
5 |
1 Bienvenue........................................... |
5 |
|||
1.1 Features ..................................................... |
6 |
|
1.1 |
Fonctionnalités .................................................. |
6 |
|
1.2 How to Use This Manual ....................... ... |
6 |
|
1.2 |
Comment utiliser ce manuel ............................. |
6 |
|
2 Setup ................................................................ |
7 |
2 |
Installation ......................................... |
7 |
||
2.1 |
Unpack Your Amplifier .............................. |
7 |
|
2.1 |
Déballez votre amplificateur .............................. |
7 |
2.2 |
Install Your Amplifier ................................ |
8 |
|
2.2 |
Installez votre amplificateur ............................... |
8 |
2.3 |
Ensure Proper Cooling ............................. |
8 |
|
2.3 |
Assurez une bonne ventilation .......................... |
8 |
2.4 |
Choose Input Wire and Connectors .......... |
9 |
|
2.4 |
Choisissez le câble et les connecteurs d'entrée.. 9 |
|
2.5 |
Choose Output Wire and Connectors ....... |
10 |
|
2.5 |
Choisissez le câble et les connecteurs de sortie. 10 |
|
2.6 |
Wire Your System ..................................... |
11 |
|
2.6 |
Câblez votre système ........................................ |
11 |
|
2.6.1 Stereo Mode..................................... |
11 |
|
|
2.6.1 Mode stéréo.............................................. |
11 |
|
2.6.2 Bridge-Mono Mode ......................... |
13 |
|
|
2.6.2 Mode mono-bridgé................................... |
13 |
2.7 |
Connect to AC Mains ............................... |
15 |
|
2.7 Connexion au secteur ...................................... |
15 |
|
2.8 |
Protecting Your Speakers ......................... |
15 |
|
2.8 Protégez vos enceintes...................................... |
15 |
|
2.9 |
Startup Procedure ..................................... |
16 |
|
2.9 Procédure de mise en route .............................. |
16 |
|
3 Operation ....................................................... |
17 |
3 |
Utilisation........................................... |
17 |
||
3.1 Precautions ............................................... |
17 |
|
3.1 |
Précautions........................................................ |
17 |
|
3.2 Front Panel Controls and Indicators .......... |
18 |
|
3.2 |
Commandes et indicateurs de façade................. |
18 |
|
3.3 Back Panel Controls and Connectors ......... |
19 |
|
3.3 |
Commandes et connecteurs de face arrière........ |
19 |
|
4 Advanced Features and Options ................. |
20 |
4 |
Fonctions avancées et options................... |
20 |
||
4.1 |
Protection Systems ................................... |
20 |
|
4.1 |
Systèmes de protection...................................... |
20 |
|
4.1.1 Output Current Limiting.................... |
20 |
|
|
4.1.1 Limiteur de courant en sortie .................... |
20 |
|
4.1.2. DC Protection ................................. |
20 |
|
|
4.1.2. Protection CC .......................................... |
20 |
|
4.1.3 Circuit Breaker.................................. |
21 |
|
|
4.1.3 Disjoncteur ............................................... |
21 |
|
4.1.4 Thermal Protection ........................... |
21 |
|
|
4.1.4 Protection thermique................................. |
21 |
5 Troubleshooting ............................................. |
22 |
5 |
Mauvais fonctionnement ......................... |
22 |
||
6 Specifications ................................................ |
24 |
6 |
Caractéristiques ................................... |
24 |
||
7 Service ..... ....................................................... |
25 |
7 |
Maintenance........................................ |
25 |
||
8 Warranty .. ....................................................... |
27 |
8 |
Garantie ............................................. |
28 |
||
Warranty Registration ............................................. |
31 |
Dépôt de Garantie..................................................... |
31 |
|||
Crown Audio Factory Service Information Form..... |
33 |
Crown Audio Factory Service Information Form ............ |
33 |
|||
Inhalt |
|
Indice |
|
|||
Wichtige Sicherheitshinweise ................................ |
2 |
Instrucciones de Seguridad Importantes ..................... |
2 |
|||
Herstellerbescheinigung ........................................ |
3 |
Declaración de Conformidad....................................... |
3 |
|||
1 Einleitung ..................................... |
5 |
1 |
Bienvenida ....................................... |
5 |
||
1.1 Ausstattungsmerkmale .............................. |
6 |
|
1.1 |
Características................................................. |
6 |
|
1.2 Zu dieser Bedienungsanleitung ................. |
6 |
|
1.2 |
Como usar este manual................................... |
6 |
|
2 Installation ................................... |
7 |
2 |
Instalación ....................................... |
7 |
||
2.1 |
Auspacken der Endstufe ........................... |
7 |
|
2.1 |
Desempaque su Amplificador......................... |
7 |
2.2 |
Einbau der Endstufe .................................. |
8 |
|
2.2 |
Instale su amplificador .................................... |
8 |
2.3 |
Kühlung .................................................... |
8 |
|
2.3 |
Asegure una Ventilación Adecuada ................. |
8 |
2.4 |
Eingangsverbindungen ............................. |
9 |
|
2.4 |
Seleccione el Cableado y Conectores |
|
2.5 |
Ausgangsverbindungen ............................ |
10 |
|
|
de Entrada ........................................................ |
9 |
2.6 |
Verkabelung ............................................. |
11 |
|
2.5 |
Seleccione el Cableado y Conectores |
|
|
2.6.1 Stereo............................................... |
11 |
|
|
de Salid............................................................ |
10 |
|
2.6.2 Mono-Brückenbetrieb....................... |
13 |
|
2.6 |
Cablee Su Sistema .......................................... |
11 |
2.7 |
Netzanschluß ............................................ |
15 |
|
|
2.6.1 Modo Stereo .......................................... |
11 |
2.8 |
Lautsprecherschutz ................................... |
15 |
|
|
2.6.2 Modo Bridge-Mono ............................... |
13 |
2.9 |
Inbetriebnahme ......................................... |
16 |
|
2.7 |
Conecte al suministro eléctrico ....................... |
15 |
3 Bedienung .................................... |
17 |
|
2.8 |
Protegiendo Sus Altavoces.............................. |
15 |
|
3.1 Vorsichtsmaßnahmen ................................ |
17 |
|
2.9 |
Procedimiento de Encendido........................... |
16 |
|
3.2 Vorderseitige Regler und Anzeigen ............ |
18 |
3 |
Operación ........................................ |
17 |
||
3.3 Rückseitige Regler und Anschlüsse............ |
19 |
|
3.1 |
Precauciones................................................... |
17 |
|
4 Fortgeschrittene Ausstattungsmerkmale und |
|
3.2 |
Controles e Indicadores del Panel Frontal....... |
18 |
||
Optionen ......................................... |
20 |
|
3.3 |
Controles y conectores del Panel Trasero....... |
19 |
|
4.1 |
Schutzschaltungen ................................... |
20 |
4 |
Opciones y Características Avanzadas ...... |
20 |
|
|
4.1.1 Ausgangsstrombegrenzung .............. |
20 |
|
4.1 |
Sistemas de Protección................................... |
20 |
|
4.1.2 Gleichstromschutz ........................... |
20 |
|
|
4.1.1 Limitación de la Corriente de Salida....... |
20 |
|
4.1.3 Unterbrecher..................................... |
21 |
|
|
4.1.2 Protección Contra Corriente Directa (DC)20 |
|
|
4.1.4 Thermischer Schutz.......................... |
21 |
|
|
4.1.3 Interruptor Termo Magnético .................. |
21 |
5 Fehlersuche .................................. |
22 |
|
|
4.1.4 Protección Térmica................................. |
21 |
|
6 Technische Daten ............................ |
24 |
5 |
Solución de Problemas ........................ |
22 |
||
7 Wartung ....................................... |
25 |
6 |
Especificaciones ................................ |
24 |
||
8 Garantie ....................................... |
29 |
7 |
Servicio........................................... |
25 |
||
Anmeldeformular ................................................ |
31 |
8 |
Garantía .......................................... |
30 |
||
Crown Audio Factory Service Information Form..... |
33 |
Garantia de Registro.................................................. |
31 |
|||
|
|
|
Crown Audio Factory Service Information Form ......... |
33 |
||
page 4 |
Operation Manual Mode d'emploi Bedienungsanleitung Manual de Operación |

XLS Series Power Amplifiers |
Amplificateurs de puissance |
Leistungsendstufen |
Amplificadores de potencia |
1 Welcome
The XLS Series of power amplifiers from Crown represents a new era in affordable, quality power amplification. The line consists of four models in a uniform, rugged chassis, incorporating the best of tried-and-true design principles and innovative features.
Modern power amplifiers are sophisticated pieces of engineering capable of producing extremely high power levels. They must be treated with respect and correctly installed if they are to provide the many years of reliable service for which they were designed.
In addition, XLS Series amplifiers include a number of features which require some explanation before they can be used to their maximum advantage.
Please take the time to study this manual so that you can obtain the best possible service from your amplifier.
1 Bienvenue
La gamme XLS d'amplificateurs de puissance Crown® représente une nouvelle ère dans l'amplification abordable de qualité. La gamme est constituée de quatre modèles, chacun dans un même châssis robuste. La gamme XLS intègre ce qui se fait de mieux comme principes de conception éprouvés et fonctions innovantes.
Les amplificateurs de puissance modernes sont des pièces d'ingénierie sophistiquées capables de produire des niveaux de puissance extrêmement élevés. Ils doivent être traités avec respect et correctement installés pour fournir les nombreuses années de service fiable pour lesquelles ils ont été conçus.
De plus, les amplificateurs de la gamme XLS comprennent un bon nombre de fonctions qui nécessitent quelques explications avant de pouvoir en tirer le meilleur parti.
Veuillez prendre le temps d'étudier ce manuel pour que vous puissiez obtenir le meilleur rendu possible de votre amplificateur.
1 Einleitung
Crown XLS-Endstufen repräsentieren eine neue Epoche erschwinglicher, hochwertiger Leistungsverstärkung. Die XLS-Reihe besteht aus vier Modellen mit bewährten, vorteilhaften Konstruktionsprinzipien und innovativen Ausstattungsmerkmalen in einem einheitlichen robusten Gehäuse.
Moderne Leistungsendstufen sind technisch ausgereifte, komplexe Konstruktionen, die können extreme Pegel erzeugen können. Sie müssen sorgfältig behandelt und korrekt installiert werden, um ihren vorgesehen Dienst zuverlässig und über Jahre hinaus zu verrichten.
Darüber hinaus bieten XLS-Endstufen einige Austattungsmerkmale, deren Vorzüge einer näheren Erklärung bedürfen.
Bitte nehmen Sie sich Zeit, diese Bedienungsanleitung zu studieren, um die Leistungsfähigkeit Ihrer Endstufe optimal nutzen zu können.
1 Bienvenida
La Serie XLS de amplificadores Crown representa una nueva era en amplificación de potencia de calidad y accesible. La línea consiste de cuatro modelos en un chasis robusto y uniforme, incorporando lo mejor de los principios de diseño de uso comprobado, y características innovadoras.
Los amplificadores de potencia modernos son piezas de ingeniería sofisticadas capaces de producir niveles de potencia extremadamente altos. Deben ser tratados adecuadamente e instalados correctamente si se desea que provean los muchos años de servicio eficiente para los que fueron diseñados.
Además, los amplificadores de la Serie XLS incluyen varias características que requieren de explicación antes de que puedan ser usados con el mayor provecho.
Por favor dedique tiempo al estudio de este manual para que usted pueda obtener el mejor servicio posible de su amplificador.
Operation Manual Mode d'emploi Bedienungsanleitung Manual de Operación |
page 5 |

1Welcome
1.1Features
•Simple, reliable design incorporates many popular features.
•Housed in a rugged, all-steel 2U chassis.
•Efficient forced-air fans prevent excessive thermal buildup.
•Electronically balanced XLR inputs. Touch-proof binding post and Speakon® outputs.
•Features precision detented level controls, power switch, power LED, and six LEDs which indicate signal, clip, and fault for each channel.
1.2 How to Use This Manual
This manual provides you with the necessary information to safely and correctly setup and operate your amplifier. It does not cover every aspect of installation, setup or operation that might occur under every condition. For additional information, please consult Crown’s Amplifier Application Guide
(available online at www.crownaudio.com), Crown Technical Support, your system installer or retailer.
We strongly recommend you read all instructions, warnings and cautions contained in this manual. Also, for your protection, please send in your warranty registration card today. And save your bill of sale — it’s your official proof of purchase.
XLS Series Power Amplifiers |
Amplificateurs de puissance |
Leistungsendstufen Amplificadores de potencia |
1 Bienvenue |
1 Einleitung |
1 Bienvenida |
1.1 Fonctionnalites
•Conception simple et fiable incorporant de nombreuses fonctionnalités appreciées.
•Intégré dans un châssis 2U robuste, tout acier.
•Des ventilateurs efficaces préviennent les hausses de température excessives.
•Entrées XLR symétrisées électroniquement. Sor-
ties par borniers protégés et connecteurs Speakon®.
• Intègre des commandes de niveau crantées de précision, un interrupteur d’alimentation et six diodes témoins d’écretage pour chaque canal, mise sous tension et conditions anormales (défaut).
1.2 Comment utiliser ce manuel
Ce manuel vous donne les informations nécessaires pour installer et faire fonctionner votre amplificateur de façon sûre et correcte. Il ne couvre pas tous les aspects de l'installation, de la configuration ou du fonctionnement qui peuvent se produire dans certaines conditions. Pour des informations supplémentaires, veuillez consulter l'Amplifier Application Guide de Crown (disponible en ligne sur www.crownaudio.com), le service technique Crown, votre installateur ou détaillant.
Nous vous recommandons fortement de lire toutes les instructions, alertes et précautions contenues dans ce manuel. De plus, pour votre protection, veuillez envoyer votre carte d'enregistrement de garantie aujourd'hui. Conservez votre facture d'achat – c'est votre preuve d'achat officielle.
1.1 Ausstattungsmerkmale
•Zuverlässige Konstruktion mit umfangreicher Ausstattung
•Robustes 2HE-Stahlgehäuse
•Wirksame Zwangskühlung verhindert Überhitzung
•Elektronisch symmetrierte XLR-Eingänge,
berührungssichere Schraubklemmen und Spea- kon®-Ausgänge
•Gerasterte Pegelsteller, Netzschalter, Power LED und sechs LED-Anzeigen für Signal, Übersteuerung und Fehlerzustände für jeden Kanal.
1.2 Zu dieser Bedienungsanleitung
Diese Bedienungsanleitung enthält alle nötigen Informationen zur sicheren und korrekten Installation und Bedienung Ihrer Endstufe. Sie deckt jedoch nicht alle Aspekte der Installation und Bedienung ab, die unter sämtlichen möglichen Bedingungen auftreten können. Für weitergehende Informationenen lesen Sie bitte Crown's Endstufen-Ratgeber (unter www.crownaudio.com online erhältlich) oder wenden Sie sich an Ihren zuständigen Vertrieb, Ihren Installateur oder Einzelhändler.
Wir empfehlen, diese Bedienungsanleitung und alle Sicherheitshinweise darin sorgfältig zu lesen. Senden Sie zu Ihrem Schutz die Garantieregistration bitte umgehend ein. Und heben Sie Ihre Quittung als offiziellen Kaufbeleg auf!
1.1 Características
•El diseño simple y eficiente incorpora muchas características populares.
•Alojado en un chasis resistente de 2 Unidades, completamente de acero.
•Ventilador eficiente de aire forzado que previene el calentamiento excesivo.
•Entradas XLR electrónicamente balanceadas. Salidas
de postes de conexión a prueba de contacto accidental y Speakon®.
·• Cuenta con controles de nivel dentados de precisión, interruptor de encendido, LED de encendido y seis LED que indican señal, saturación (clip) y falla para cada canal.
1.2 Como usar este manual
Este manual le proporciona la información necesaria para configurar y operar, segura y correctamente su amplificador. No cubre todos los aspectos de la instalación, configuración u operación que pudieran ocurrir bajo todas las condiciones. Para información adicional, favor de consultar La Guía de Aplicación de Amplificadores de Crown (disponible en línea en www.crownaudio.com) o, contactar al soporte técnico de Crown, a su instalador del sistema o a su tienda local.
Le exhortamos a que lea todas las instrucciones, advertencias y precauciones contenidas en este manual. También, para su protección, envíenos su tarjeta de registro de garantía hoy mismo. Conserve su nota de venta - es su comprobante de compra oficial.
page 6 |
Operation Manual Mode d'emploi Bedienungsanleitung Manual de Operación |
XLS Series Power Amplifiers |
Amplificateurs de puissance |
Leistungsendstufen |
Amplificadores de potencia |
2 Setup
2 Installation
2 Installation
2 Instalación
2.1 Unpack Your Amplifier
Please unpack and inspect your amplifier for any damage that may have occurred during transit. If damage is found, notify the transportation company immediately. Only you can initiate a claim for shipping damage. Crown will be happy to help as needed. Save the shipping carton as evidence of damage for the shipper’s inspection.
We also recommend that you save all packing materials so you will have them if you ever need to transport the unit. Never ship the unit without the factory pack.
YOU WILL NEED (not supplied):
•Input wiring cables
•Output wiring cables
•Rack for mounting amplifier (or a stable surface for stacking)
WARNING: Before you start to set up your amplifier, make sure you read and observe the Important Safety Instructions found at the beginning of this manual.
2.1 Déballez votre amplificateur
Veuillez déballer et inspecter votre amplificateur à
la recherche de tout dommage pouvant s'être produit durant le transport. Si vous constatez un dommage, prévenez immédiatement la société de transport.
Vous êtes le seul à pouvoir déposer une réclamation pour un dommage de transport. Crown sera ravi de vous aider en cas de besoin. Conservez le carton d'emballage comme preuve du dommage pour l'inspection par le transporteur.
Nous vous recommandons aussi de conserver tous les éléments d'emballage à disposition au cas où vous devriez transporter l'unité. N'expédiez jamais l'unité sans son emballage d'usine.
IL VOUS FAUDRA (non fournis):
•Des câbles pour l'entrée,
•Des câbles pour la sortie.
•Un rack pour monter l'amplificateur (ou une surface stable pour le poser)
AVERTISSEMENT: Avant de commencer à installer votre amplificateur, veillez à lire et suivre les instructions de sécurité importantes se trouvant au début de ce manuel.
2.1 Auspacken der Endstufe
Bitte untersuchen Sie Ihre Endstufe nach dem Auspacken auf mögliche Transportschäden. Benachrichtigen Sie den Transporteur im Falle eines Schadens umgehend, denn nur Sie können den Schaden geltend machen. Falls nötig wird Crown Sie dabei unterstützen. Bewahren Sie den Versandkarton zum Schadensbeweis auf.
Wir empfehlen auch, das Verpackungsmaterial zum eventuellen Transport des Geräts aufzubewahren. Bitte verschicken Sie das Gerät immer in der Originalverpackung.
SIE BENÖTIGEN (im Lieferumfang nicht enthalten):
•Lautsprecherkabel
•ein Rack zum Einbau der Endstufe (oder eine stabile Oberfläche zum Stapeln)
WARNUNG: Befolgen Sie in jedem Fall die wichtigen Sicherheitshinweise am Anfang dieser Bedienungsanleitung, bevor Sie mit der Installation Ihrer Endstufe beginnen!
2.1 Desempaque Su Amplificador
Por favor desempaque e inspeccione su amplificador por cualquier daño que pueda haber ocurrido durante el transporte. Si encuentra algún daño, notifique inmediatamente a la compañía transportista. Solamente usted podrá iniciar una reclamación por daños durante el envío. Crown se complacerá en brindar la ayuda necesaria. Conserve el empaque de envío como prueba del daño para la inspección del remitente.
También le recomendamos conservar todos los materiales de empaque para que cuente con ellos en caso de necesitar transportar la unidad. Nunca envíe la unidad sin el empaque de fábrica.
USTED NECESITARA (No provisto):
•Cables para la conexión de entrada
•Cables para la conexión de salida
•Gabinete para montar el amplificador (o una superficie estable para ponerlo encima)
ADVERTENCIA: Antes de empezar a configurar el amplificador, asegúrese de leer y observar las Instrucciones de Seguridad Importantes que se encuentran al principio de este manual.
Operation Manual Mode d'emploi Bedienungsanleitung Manual de Operación |
page 7 |
2 Setup |
2 Installation |
2.2 Install Your Amplifier
CAUTION: Before you begin, make sure your amplifier is disconnected from the power source, with the power switch in the “off” position and all level controls turned completely down (counterclockwise).
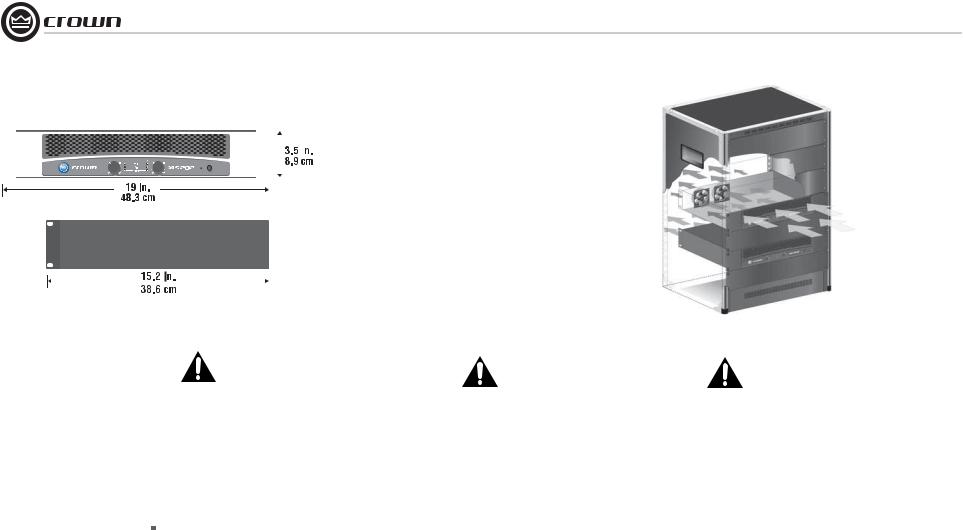
Use a standard 19-inch (48.3 cm) equipment rack (EIA RS-310B). See Figure 2.1 for amplifier dimensions.
NOTE: When transporting, amplifiers should be supported at both front and back.
2.3 Ensure Proper Cooling
When using an equipment rack, leave two rack spaces open above and below the amplifier, covered by rack panels. DO NOT block front or rear air vents. The side walls of the rack should be a minimum of two inches (5.1 cm) away from the amplifier sides, and the back of the rack should be open.
Figure 2.2 illustrates standard amplifier airflow.
|
|
|
|
XLS Series Power Amplifiers Amplificateurs de puissance |
Leistungsendstufen Amplificadores de potencia |
|||
2 Installation |
2 Instalación |
|
|
|||||
|
|
|
|
|
|
|
Figure 2.2 |
Airflow |
|
|
|
|
|
Figure 2.1 |
|
|
|
|
|
|
|
|
|
|
||
|
|
|
|
|
|
|||
|
|
|
|
|
Dimensions |
|
Figure 2.2 |
Flux d’air |
|
|
|
|
|
Figure 2.1 |
|
||
|
|
|
|
|
|
|||
|
|
|
|
|
|
Abb 2.2 Luftstrom |
||
|
|
|
|
|
|
|||
|
|
|
|
|
||||
|
|
|
|
|
||||
|
|
|
|
|
Dimensions |
|
||
|
|
|
|
|
||||
|
|
|
|
|
Abb 2.1 |
|
Figura 2.2 |
|
|
|
|
|
|
|
|
||
|
|
|
|
|
Abmessungen |
Flujo de Aire |
||
|
|
|
|
|
Figura 2.1 |
|
|
|
|
|
|
|
|
|
|
||
|
|
|
|
|
Dimensiones |
|
|
|
2.2 Installez votre amplificateur
ATTENTION: Avant de commencer, assurezvous que votre amplificateur est déconnecté de la source d'alimentation, avec son interrupteur d'alimentation en position "off" et toutes les commandes de niveau totalement abaissées (dans le sens anti-horaire).
Utilisez un rack pour équipement au standard 19" (48,3 cm) (EIA RS-310B). Voir Figure 2.1 pour lesdimensions de l'amplificateur.
NOTE: Lors du transport, les amplificateurs doivent être soutenus à la fois à l'avant et à l'arrière.
2.3 Assurez une bonne ventilation
Quand vous utilisez un rack d'équipement, laissez ouvrent les deux espaces de support au-dessus et au-dessous de l'amplificateur, couvert par des panneaux de rack. NE PAS bloquer les ventilations situées devant ou derrière. Les faces latérales du rack doivent être à au moins 2" (5,1 cm) des côtés de l'amplificateur et le dos du rack devrait être ouvert.
La Figure 2.2 illustre le trajet standard de l'air dans un amplificateur.
2.2 Einbau der Endstufe
ACHTUNG: Vergewissern Sie sich vor dem Einbau, daß Ihre Endstufe vom Netz getrennt ist, der Netzschalter in der "OFF"-Position steht und alle Pegelsteller auf Linksanschlag stehen.
Verwenden Sie ein Standard 19"-Rack (48,3 cm; EIA RS-310B). siehe Abbildung 2.1 Zu den Endstufenabmessungen siehe Abbildung 2.1.
ACHTUNG: Zum Transport sollte die Endstufe an Vorderund Rückseite abgestützt sein.
2.3 Kühlung
Bei der Befestigung, urlaub öffnen zwei Zahnstangenräume über und unter dem Verstärker, bedeckt durch Verkleidungen. Blockieren Sie UNTER KEINEN UMSTÄNDEN die Belüftungsöffnungen. Die Seitenwände des Racks sollten mindestens 5cm Abstand zu den Seiten der Endstufe, die Rückseite der Zahnstange sollte geöffnet sein.
Abbildung 2.2 zeigt den Luftstrom der Endstufe.
2.2 Instale Su Amplificador
PRECAUCION: Antes de empezar, asegúrese que su amplificador esté desconectado del suministro eléctrico, con el interruptor de encendido en la posición de "off " (apagado) y todos los controles de nivel completamente cerrados (en dirección contraria a las manecillas del reloj).
Use un gabinete estándar para equipo (EIA RS-310B) de 19 pulgadas (48.3cm). Véase figura 2.1 para las dimensiones del amplificador.
NOTA: Durante la transportación, los amplificadores deberán estar soportados tanto por el frente como por detrás.
2.3 Asegure una Ventilación Adecuada
Cuando se use un gabinete para equipo, permita dos espacios abiertos del gabinete sobre y por debajo del amplificador, cubierto por los paneles. NO bloquee la ventilación delantera o trasera. Las paredes laterales del gabinete deberán estar separadas de los costados de los amplificadores por lo menos dos pulgadas (5.1cm), y a parte posteriora del gabinete debe estar abierta.
La figura 2.2 ilustra el flujo de aire normal del amplificador.
page 8 |
Operation Manual Mode d'emploi Bedienungsanleitung Manual de Operación |

XLS Series Power Amplifiers |
Amplificateurs de puissance |
Leistungsendstufen |
Amplificadores de potencia |
2 Setup
2 Installation
2 Installation
2 Instalación
GND |
MASSE |
SHIELD |
SCHIRM |
|
MASSE |
TIERRA |
|||
ENTREE |
BLINDAJE |
|||
|
|
|||
|
SOURCE |
|
SOURCE |
|
|
SCHALLQUELLE |
|
||
|
EINGANG |
SCHALLQUELLE |
||
EINGANG |
FUENTE |
|||
FUENTE |
||||
ENTREE ENTRADA |
ENTREE |
ENTRADA |
|
|
|
|
|
Figure 2.3 Balanced Input Connector Wiring
Figure 2.4 Unbalanced Input Connector Wiring
Figure 2.3 Câblage du connecteur pour entrée symétrique
Abb 2.3 Symmetrischer Anschluß |
Figure 2.4 Câblage du connecteur pour entrée asymétrique |
|
|
Figura 2.3 Cableado Balanceado del Conector de Entrada |
Abb 2.4 Unsymmetrischer Anschluß |
|
|
|
Figura 2.4 Cableado Desbalanceado del Conector de Entrada |
2.4 Choose Input Wire and Connectors
Crown recommends using pre-built or professionally wired balanced line (two-conductor plus shield), 22-24 gauge cables and connectors. You should use 3-pin male XLR cable ends at the amplifier inputs. Unbalanced line may also be used but may result in noise over long cable runs.
Figure 2.3 shows connector pin assignments for balanced wiring, and Figure 2.4 shows connector pin assignments for unbalanced wiring.
NOTE: Custom wiring should only be performed by qualified personnel.
2.4 Choisissez le câble et les connecteurs d'entrée
Crown recommande l'emploi de connecteurs et câbles de section 0,2 à 0,35 mm2 préfabriqués ou professionnellement câblés pour une ligne symétrique (2 conducteurs + blindage). Vous devez utiliser des connecteurs XLR mâles 3 broches pour le câble entrant dans l'amplificateur. Des lignes asymétriques peuvent être utilisées mais peuvent entraîner du bruit quand les câbles sont longs.
La Figure 2.3 représente l'affectation des broches du connecteur pour un câblage symétrique et la Figure 2.4 celle pour un câblage asymétrique.
NOTE: Un câblage personnel ne doit être accompli que par un personnel qualifié.
2.4 Eingangsverbindungen
Crown empfiehlt symmetrischen Anschluß (zwei Leiter mit Schirm) über vorgefertigte oder professionell verdrahtete Kabel mit einem Leiterquerschnitt von 0,2 - 0,35mm² und einem 3-poligen männlichen XLR-Eingangsverbinder. Unsymmetrischer Anschluß ist ebenfalls möglich, kann aber bei langen Kabelwegen Störpegel verursachen.
Abbildung 2.3 zeigt die Steckerbelegung für symmetrischen, Abbildung 2.4 für unsymmetrischen Anschluß.
ACHTUNG: Verwenden Sie nur hochwertige, professionell verdrahtete Kabel.
2.4 Seleccione el Cableado y Conectores de Entrada
Crown recomienda el uso de líneas balanceadas ( dos conductores más blindaje) prefabricadas o profesionalmente construidas con cables calibre 22 a 24 y conectores. Se le sugiere usar conectores XLR machos de 3 terminales para las entradas del amplificador. También se pueden usar líneas desbalanceadas pero podrían generar ruido en tramos largos de cable.
La figura 2.3 muestra las asignaciones de las terminales del conector para un cableado balanceado, y la figura 2.4 muestra las asignaciones de las terminales del conector para un cableado desbalanceado.
NOTA: El cableado especial deberá ser realizado solamente por personal calificado.
Operation Manual Mode d'emploi Bedienungsanleitung Manual de Operación |
page 9 |
OUTPUTS AUSGÄNGE
SORTIES SALIDAS
2.5 Choose Output Wire and Connectors
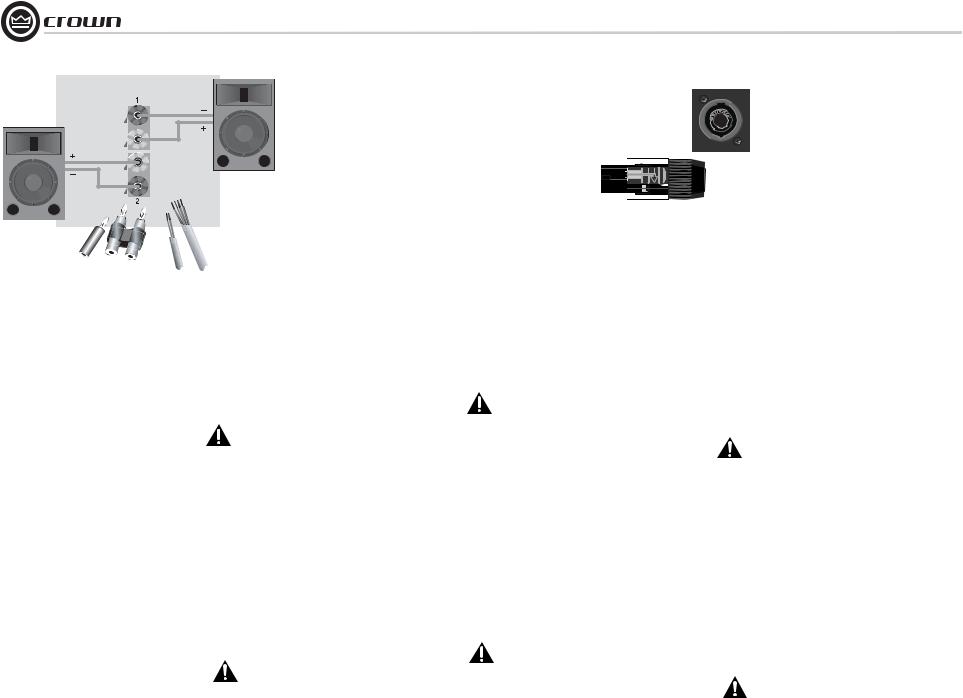
Crown recommends using pre-built or professionally wired, high-quality, two-conductor, heavy gauge speaker wire and connectors. You may use 2-pole or 4- pole Speakon® connectors (Figure 2.5 ), banana plugs, or bare wire for your output connectors (Figure 2.6). To prevent the possibility of short-circuits, wrap or otherwise insulate exposed loudspeaker cable connectors.
Note: Binding post outputs on European models come with safety plugs installed to prevent European power-cord plugs from being inserted. The side entry positions for these connectors should therefore be used with European models.
Using the guidelines below, select the appropriate size ofwirebasedonthedistancefromamplifiertospeaker.
Distance |
Wire Size |
up to 25 ft. |
16 AWG |
|
|
25-40 ft. |
14 AWG |
|
|
41-60 ft. |
12 AWG |
61-100 ft. |
10 AWG |
|
|
101-150 ft. |
8 AWG |
151-250 ft. |
6 AWG |
|
|
CAUTION: Never use shielded cable for output wiring.
XLS Series Power Amplifiers Amplificateurs de puissance |
Leistungsendstufen Amplificadores de potencia |
Figure 2.5 Binding Post Output Wiring for 2-Channel Models
Figure 2.5 Connexions pour borniers sortie
Abb. 2.5 Anschluß an Schraubklemmen, Stereo
Figura 2.5 Cableado de los Postes de Conexión de Salida para Modelos de 2 Canales
2.5 Choisissez le câble et les connecteurs de sortie
Crown recommande des conducteurs et câbles d'enceinte de bon calibre préfabriqués ou câblés professionnellement, de haute qualité à deux ou quatre conducteurs. Vous pouvez utiliser un connecteur Speakon® 4 pôles (Figure 2.5 et tableau 1), des fiches bananes, ou un câble nu pour vos connecteurs de sortie (Figure 2.6). Pour prévenir le risque de court-circuit, emballez ou isolez les connecteurs de câble d'enceinte exposés.
NOTE: Les borniers de sortie des modèles européens sont livrés avec des fiches de sécurité pour empêcherl'insertion d'une fiche d'alimentation européenne. Les positions d'entrée latéral pour ces connecteurs doivent par conséquent être utilisées avec les modèles européens.
A l'aide des références ci-dessous, sélectionnez la taille de câble enfonction de la distance séparant l'amplificateur de l'enceinte.
Distance |
Section du cable |
|
|
Jusqa a 7,5 m |
1,5 mm2 |
7,5 - 12 m |
2 mm2 |
12 - 18 m |
3,5 mm2 |
18 - 30 m |
5 mm2 |
30 - 45 m |
8,5 mm2 |
45 - 75 m |
13 mm2 |
ATTENTION: N'utilisez jamais de câble blindé pour le câblage de sortie.
2.5 Ausgangsverbindungen
Crown empfiehlt vorgefertigte oder professionell verdrahtete hochwertige Lautsprecherkabel mit zwei oder vier Leitern. Sie können 2- oder 4-polige Speakon®- Verbinder (Abbildung 2.5 ), MDP-Stecker, oder blankes Kabel zum Anschluß an die Ausgänge verwenden (Abbildung 2.6). Isolieren Sie blankes Lautsprecherkabel zur Vermeidung von Kurzschlüssen.
ACHTUNG: Um den versehentlichen Anschluß von IEC-Netzkabeln zu verhindern, sind die Schraubklemmenausgänge der europäischen Modelle mit Sicherheitskappen ausgestattet. Daher sollten bei ihnen nur die oberen oder unteren Eingangsöffnungen dieser Anschlüsse verwendet werden.
Wählen Sie die korrekte Leiterstärke entsprechend der Distanz zwischen Endstufe und Lautsprecher:
Kabellänge |
Leiterquerschnitt |
|
|
bis 7,5m |
1,5mm² |
bis 12m |
2mm² |
|
|
bis 18m |
3,5mm² |
bis 30m |
5mm² |
|
|
bis 45m |
8,5mm² |
|
|
bis 75m |
13mm² |
VORSICHT: Verwenden Sie nie abgeschirmte Kabel zum Lautsprecheranschluß.
Figure 2.6
Top: One of Two Speakon®Output Connectors on Back Panel
Bottom: Speakon® Cable Connector
Figure 2.6
Haut: Connecteur de sortie Speakon® Bas: Connecteur de câble Speakon®.
Abb. 2.6
Oben: Speakon®-Ausgang auf der Rückseite Unten: Speakon®-Stecker
Figura 2.6
Superior: Uno de los Dos Conectores Speakon® de Salida en el Panel Trasero. Inferior: Conector Speakon® para Cable
2.5 Seleccione el Cableado y Conectores de Salida
Crown recomienda el uso de conectores y cables de alta calidad para altoparlantes, de dos conductores, de calibre grueso, ya sean prefabricados o construidos profesionalmente. Usted puede usar conectores Speakon® de 2 ó 4 polos (Figura 2.5), conectores tipo Banana, ó cable desnudo para la conexión de salida (Figura 2.6). Para prevenir la posibilidad de corto circuito, cubra o de otra forma, aísle los conectores expuestos del cable para altoparlante.
Nota: Los postes de conexión de salida en modelos Europeos cuentan con tapones de seguridad instalados para prevenir que sean insertados los conectores Europeos de suministro eléctrico. Por lo tanto, deberán ser usadas las posiciones de entrada superior e inferior de estos conectores en los modelos Europeos.
Usando las referencias siguientes, seleccione el calibre apropiado del cable basado en la distancia del amplificador al altoparlante.
Distancia |
Calibre del Cable |
|
|
Hasta 25 pies. |
16 AWG |
26-40 pies |
14 AWG |
|
|
41-60 pies |
12 AWG |
|
|
61-100 pies |
10 AWG |
101-150 pies |
8 AWG |
|
|
151-250 pies |
6 AWG |
PRECAUCION: Nunca use cable blindado para el cableado de salida.
page 10 |
Operation Manual Mode d'emploi Bedienungsanleitung Manual de Operación |
XLS Series Power Amplifiers |
Amplificateurs de puissance |
Leistungsendstufen |
Amplificadores de potencia |
2 Setup
2 Installation
2 Installation
2 Instalación
Figure 2.7 System Wiring,
Stereo Mode Using the 5-way
Binding Posts
Figure 2.7 Câblage du système, mode stéréo, avec les borniersen face arrière
Abb. 2.7 Stereo-Verkabelung an den Fünfweg-Schraubklemmen
Figura 2.7 Cableado del Sistema, Modo Stereo Usando los Postes de Conexión Múltiple
2.6 Wire Your System
2.6.1 Stereo Mode
Typical input and output wiring is shown in Figure 2.7
INPUTS: Connect input wiring for both channels.
OUTPUTS: Maintain proper polarity (+/–) on output connectors.
Connect Channel 1 loudspeaker’s positive (+) lead to Channel 1 positive (red) terminal of amp; repeat for negative (–). Repeat Channel 2 wiring as for Channel 1.
Figure 2.7 shows how to wire stereo speakers to the binding posts.
2.6 Câblez votre système
2.6.1 Mode stéréo par borniers
Le câblage typique d'entrée et de sortie est représenté dans la Figure 2.7.
ENTREES: Branchez le câble d'entrée pour les deux canaux.
SORTIES: Conservez la polarité correcte (+/-) sur les connecteurs de sortie.
Connectez l'entrée positive (+) de l'enceinte du canal 1 au bornier positif (rouge) du canal 1 de l'ampli; répétez cela pour le négatif (-). Faites de même pour le canal 2.
La Figure 2.7 montre comment câbler des enceintes stéréo aux borniers.
2.6 Verkabelung
2.6.1 Stereo
Abbildung 2.7 zeigt die typische Einund Ausgangsverkabelung.
EINGÄNGE: Schließen Sie die Kabel der beiden Eingangskanäle an.
AUSGÄNGE: Achten Sie unbedingt auf korrekte Polarität (+/-) der Anschlüsse.
Verbinden Sie den positiven Leiter (+) eines Lautsprecherkabels mit dem positiven Ausgang (rot) von Kanal 1 der Endstufe und den negativen (-) mit dem negativen Ausgang (schwarz). Schließen Sie das zweite Lautsprecherkabel an Kanal 2 ebenso an.
Abbildung 2.7 zeigt den Lautsprecheranschluß an die Vierfach-Schraubklemmen.
2.6 Cablee Su Sistema
2.6.1 Modo Stereo
El cableado típico de entrada y salida es mostrado en la Figura 2.7
ENTRADAS: Conecte los cables de entrada para ambos canales.
SALIDAS: Mantenga la polaridad adecuada (+/-) en los conectores de salida.
Conecte el cable positivo(+) de el altoparlante del Canal 1 a la terminal positiva (roja) del canal 1 del amplificador; repita para el negativo (-). Repita el proceso completo del Canal 1 para el Canal 2.
La Figura 2.7 muestra como cablear altoparlantes en Stereo a los postes de salida de conexión múltiple.
Operation Manual Mode d'emploi Bedienungsanleitung Manual de Operación |
page 11 |
 Loading...