

Page 1
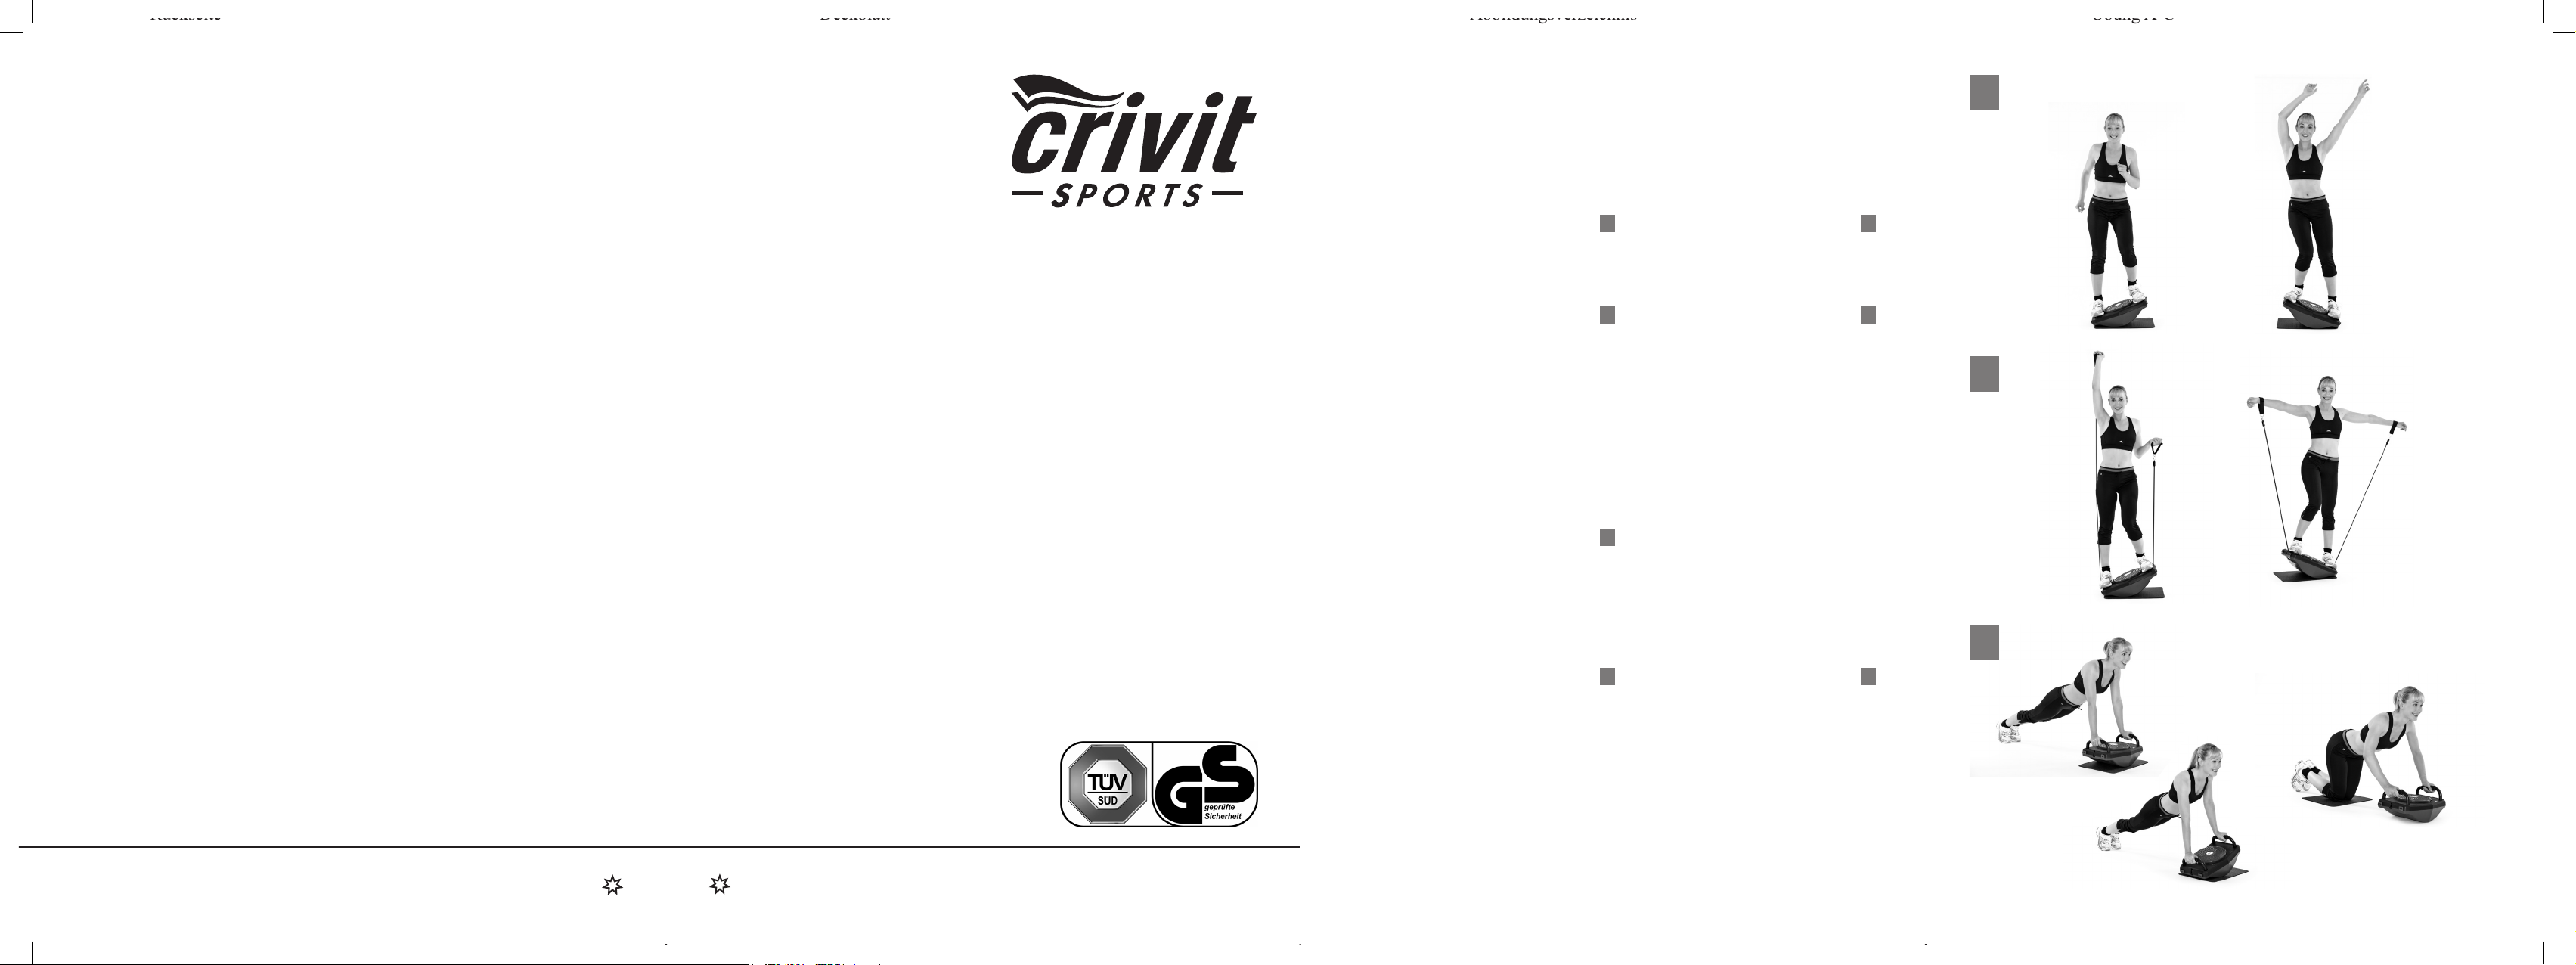
Deckblatt Abbildungsverzeichnis Übung A-C
Rückseite
FITNESSBOARD SP - 348
MODO DE EMPLEO • ISTRUZIONE PER L´USO •
INSTRUÇÕES DE SERVIÇO • OWNER´S MANUAL •
GEBRAUCHSANWEISUNG
ILUSTRACIONES DE ENTRENAMIENTO
FOTOGRAFIE DI ALLENAMENTO • IMAGENS EXEMPLIFICATIVAS DE
EXERCÍCIOS • TRAINING PICTURES • TRAININGS-ABBILDUNGEN
BALANCE-BOARD
BALANCE BOARD CON BANDAS
ELÁSTICAS
Balance-Board con elastici di allenamento • Balance-Board com tubos
elásticos tness • Balance-Board
with exercise bands • Balance-Board
mit Trainingsbändern
BALANCE-BOARD CON
ASAS
Balance-Board con maniglie •
Balance-Board com pegas • Balance-Board with handles • BalanceBoard mit Griffen
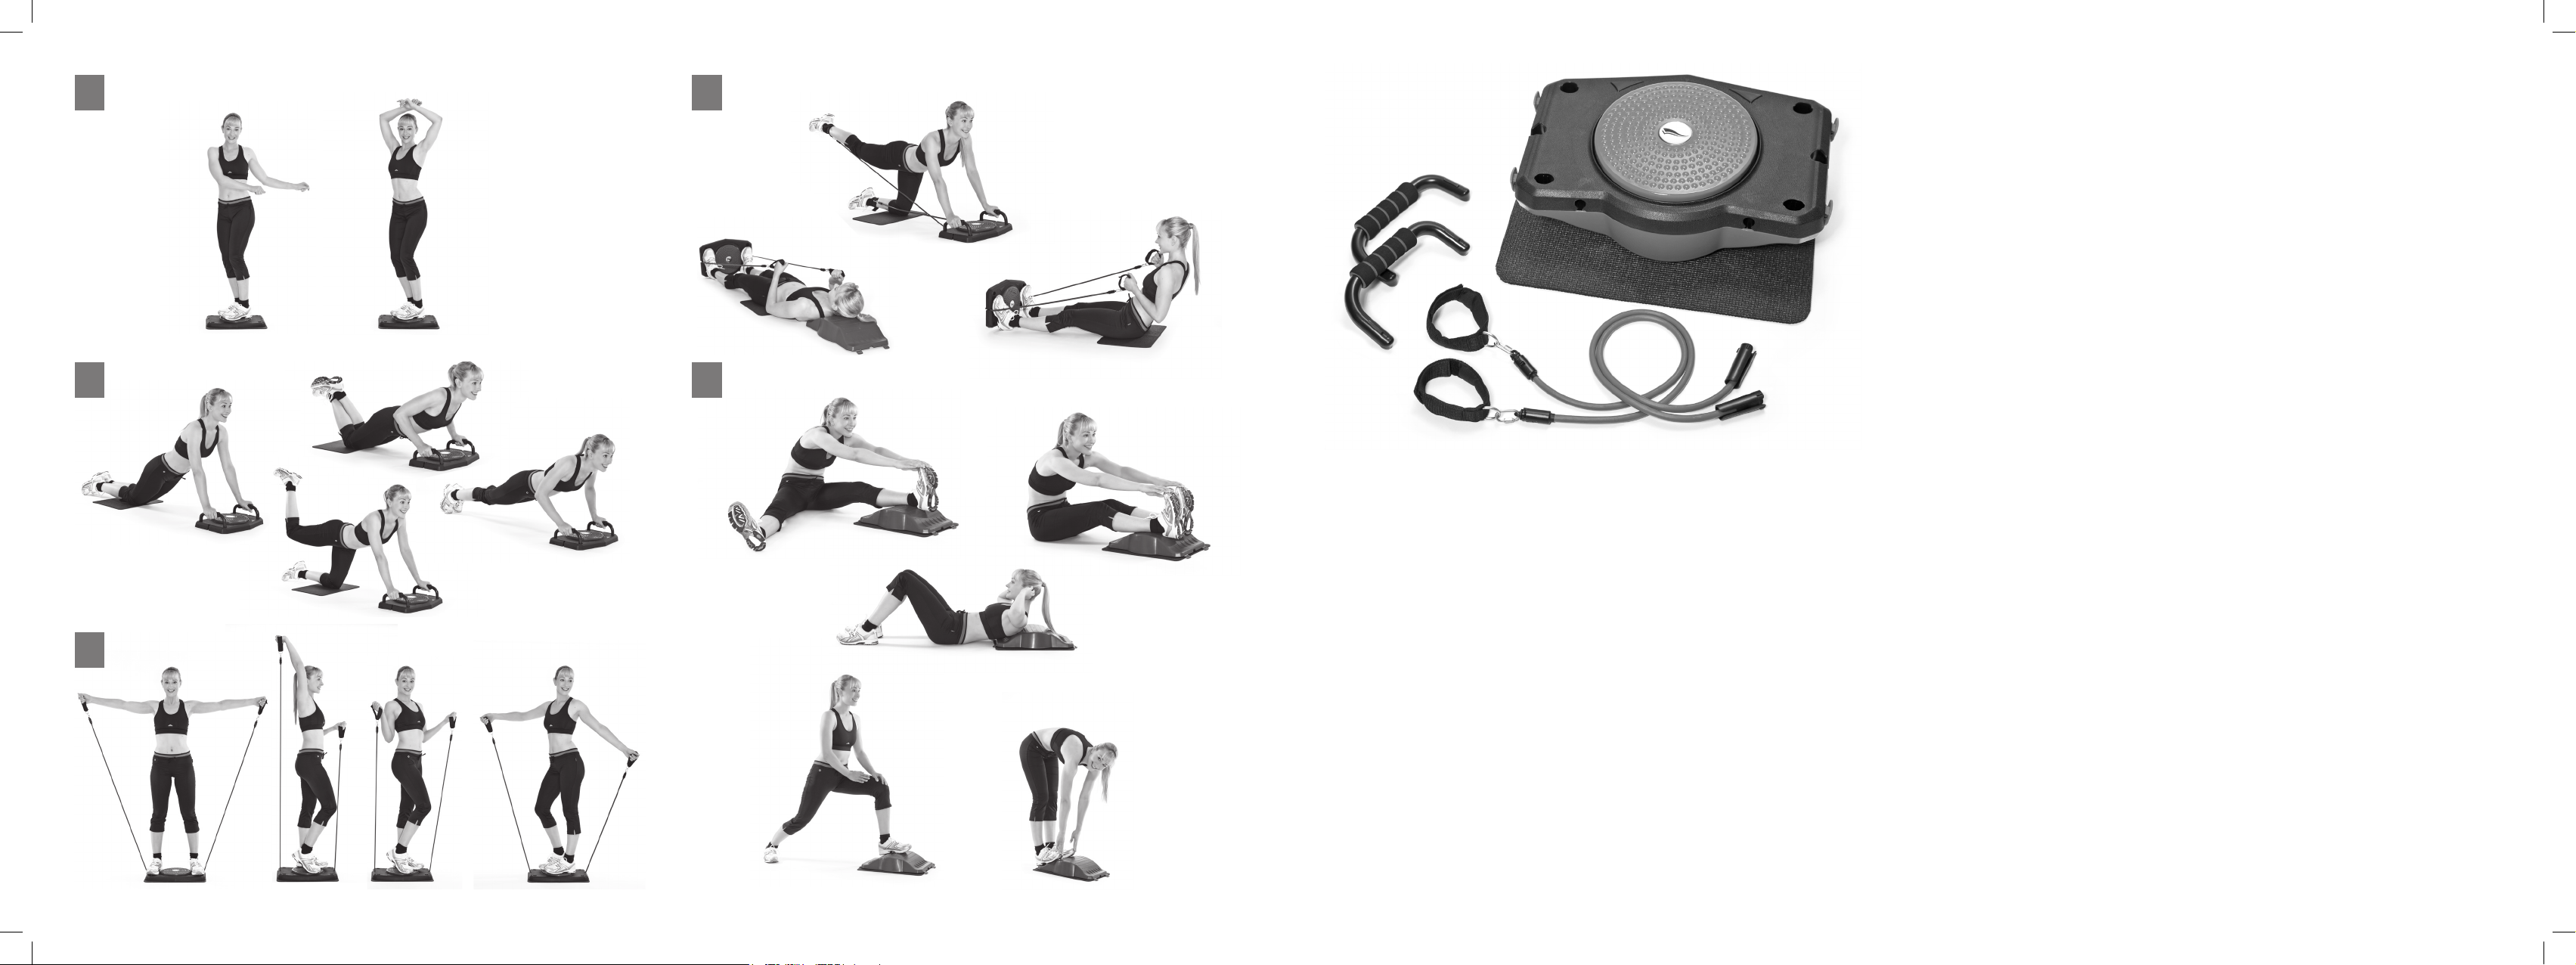
A
PRESS-UP-BOARD
TWIST-BOARD CON BANDAS
B
ELÁSTICAS
Twist-Board con elastici di allenamento • Twist-Board com tubos
elásticos tness • Twist-Board with
exercise bands • Twist-Board mit
Trainingsbändern
PRESS-UP BOARD CON BANDAS
ELÁSTICAS
C
Press-up-Board con elastici di
allenamento • Press-up Board com
tubos elásticos tness • Press-upBoard with exercise bands • PressUp-Board mit Trainingsbändern
A
E
F
B
C
Hergestellt für/ Serviceadresse:
SPEQ GmbH
Tannbachstraße 10
D-73635 Steinenberg
Hotline + 800 30 777 999
info@speq.de
www.speq.de
EN 957-1:2005
EN 957-2:2003 Klasse H
EN 32935
111012_GA29_11_Deckbatt_L5_JL.indd 1 12.10.2011 18:15:34
Oktober 2011
EN 957-1:2005
EN 957-2:2003 Klasse H
EN 32935
TWIST-BOARD
2 3
D
STRETCHING BOARD
H
Page 2
Übungen G-H Lieferumfang NotesÜbungen D-F
D G
E H
F
4 5
VOLUMEN DE SUMINISTRO
VOLUME DELLA FORNITURA • MATERIAL FORNECIDO • DELIVERY
CONTENTS • LIEFERUMFANG
1x Tabla principal • Board principale • Prancha principal • Main-Board •
Haupt-Board
Parte superior (SP-348/1) • Parte superiore • Parte superior •
Upper part • Oberteil
Parte inferior (SP-348/2) • Parte inferiore • Parte inferior •
Lower part • Unterteil
2x Asas push-up (SP-348/3) • Maniglie push-up • Pegas push-up •
Push-up handles • Push-Up-Griffe
2x Bandas elásticas y correas (SP-348/4) • Elastici e fasce di allenamento •
Tubos elásticos de exercício e correias • Exercise bands and straps •
Übungsbänder und Riemen
1x Alfombra protectora (SP-348/5) • Materassino • Esteira de protecção •
Protective mat • Schutzmatte
1x Manual incl. ilustraciones • Guida con fotograe incluse • Instruções
incl. imagens • Instruction manual with pictures • Anleitung incl. Abbildungen
6
111012_GA29_11_Deckbatt_L5_JL.indd 2 12.10.2011 18:16:14
Page 3

ÍNDICE
ILUSTRACIONES DE ENTRENAMIENTO 2-5
VOLUMEN DE SUMINISTRO 6
1. INDICACIONES GENERALES 8-10
2. EJERCICIOS DE CALENTAMIENTO 10-11
3. ENTRENAMIENTO
3.1 BALANCE-BOARD 12
3.2 BALANCE-BOARD CON BANDAS ELÁSTICAS 13-14
3.3 BALANCE-BOARD CON ASAS 14-15
3.4 TWIST-BOARD 15
3.5 PRESS-UP-BOARD 15-16
3.6 TWIST BOARD CON BANDAS ELÁSTICAS 16-17
ESPAÑOL
3.7 PRESS-UP BOARD CON BANDAS ELÁSTICAS 17-18
3.8 STRETCHING-BOARD 18
4. DATOS TÉCNICOS 19
5. NOTA SOBRE ELIMINACIÓN 19
6. SU PLAN DE ENTRENAMIENTO PERSONAL 20
7
111011_GA_29-11_L5_JL.indd 7 12.10.2011 21:06:07
Page 4

ESPAÑOL
8
1. INDICACIONES GENERALES
La tabla Fitness Board es un aparato de entrenamiento nuevo e innovador. Se diferencia de anteriores productos tness por, entre otros, los
siguientes motivos:
• Puede ser utilizado por personas de todas las edades, es fácil de
transportar y su montaje y utilización son muy sencillos.
• Gracias a los accesorios plegables puede guardarse en cualquier
sitio y ocupa poco espacio.
• Este aparato ofrece más de ocho funciones de entrenamiento diferentes que garantizan el ejercicio de todo el cuerpo.
ADVERTENCIAS E INDICACIONES DE SEGURIDAD
• Conserve las instrucciones de uso para poder consultarlas en el
futuro. El incumplimiento de las indicaciones de seguridad puede
conllevar lesiones graves.
• Limpie la tabla Fitness Board únicamente con agua tibia, jabón suave
y un trapo suave. Los adhesivos, lacas y productos químicos pueden dañar la tabla Fitness Board. Las partes sometidas a grandes
esfuerzos, como por ejemplo las asas, debe limpiarse regularmente
con desinfectante.
• La tabla Fitness Board es un aparato deportivo y no debe utilizarse
con nes médicos ni comerciales.
• Consulte a su médico antes de utilizar este aparato en caso de que
tenga problemas de salud o alergias o se esté recuperando de una
lesión.
• Si siente molestias durante los ejercicios, nalice el entrenamiento de
inmediato y consulte a su médico.
• Antes de empezar el entrenamiento con la tabla Fitness Board, es
importante realizar ejercicios de calentamiento y estiramiento para
prevenir lesiones y agujetas.
• La capacidad de carga máxima de la tabla Fitness Board es de 100 kg.
• El aparato debe ser montado cuidadosamente por un adulto para
evitar lesiones posteriores debido a un manejo inadecuado.
111011_GA_29-11_L5_JL.indd 8 12.10.2011 21:06:07
Page 5

• Por favor, tenga en cuenta que el aparato solamente puede utilizarse
una vez ha sido montado completamente para el ejercicio correspondiente.
• Si se utiliza el aparato para entrenar o realizar ejercicios regularmente, los componentes deberán revisarse cada uno o dos meses para
garantizar la seguridad.
• En caso de desgaste de las piezas, el aparato deberá ponerse fuera
de servicio inmediatamente. Si desea pedir piezas de repuesto, póngase en contacto con el fabricante indicado.
• Durante el entrenamiento, lleve ropa y zapatillas de deporte cómodas
para poder moverse con facilidad y tener una buena adherencia con
el suelo.
• La primera semana, las unidades de entrenamiento deben tener una
duración de aprox. 10-15 minutos. Más adelante, podrá entrenar
también durante más tiempo. Sin embargo, no debe sobrepasarse un
tiempo de entrenamiento de 60 minutos para evitar un sobreesfuerzo
físico.
• A continuación mostramos una selección de posibles ejercicios que
pueden realizarse con la tabla Fitness Board. Encontrará más ejercicios en la documentación sobre este tema.
• El aparato no debe considerarse un juguete bajo ningunas circunstancias. Por favor, tenga en cuenta que la utilización del aparato por
parte de niños puede conllevar situaciones y riesgos imprevistos de
los cuales no se responsabiliza el fabricante.
• Los padres deben prohibir a sus hijos la utilización del aparato, ya
que se trata de un aparato deportivo móvil. De lo contrario, existe
riesgo de lesiones y daños materiales.
• Si se permite que niños utilicen el aparato, deberá instruírseles sobre
la correcta utilización y los posibles peligros. Además, por motivos
de seguridad un adulto deberá supervisar a los niños para evitar una
utilización inadecuada.
• Escoja un lugar de instalación que ofrezca suciente espacio para
el montaje y el entrenamiento. La supercie seleccionada debe ser
de al menos 2 x 2 m y ha de estar bien ventilada. El suelo debe ser
ESPAÑOL
9
111011_GA_29-11_L5_JL.indd 9 12.10.2011 21:06:07
Page 6

ESPAÑOL
liso y recto. Asegúrese de que el aparato se coloca sobre una base
segura para evitar que la tabla Fitness Board resbale. Utilice siempre la alfombra de protección suministrada para proteger los suelos
delicados (p. ej. parqué) contra daños.
• Asegúrese de que las piezas no estén dañadas y de que estén montadas correctamente. En caso de montaje incorrecto, existe riesgo
de lesiones. Las piezas dañadas pueden afectar a la seguridad y al
funcionamiento del aparato.
• Antes de utilizar el aparato, compruebe que las piezas no están dañadas y que están en perfecto estado.
• Revise regularmente las jaciones de los pasadores. Asegúrese
de que la rosca del gancho esté bien apretada. En caso necesario,
deberá lubricarse la rosca regularmente.
• Revise periódicamente las bandas elásticas para comprobar si presentan rasgaduras o están dañadas.
2. EJERCICIOS DE CALENTAMIENTO
Por favor, acuérdese de calentar unos minutos antes de comenzar con
los ejercicios. A continuación le presentamos varios ejercicios sencillos
de calentamiento que debe realizar antes del entrenamiento.
2.1 CABEZA / CUELLO
□ Coloque una mano en la cabeza y gírela hacia un lado. De esta forma,
estirará una parte del cuello. Repita el ejercicio hacia el otro lado. Asegúrese de no estirar demasiado el cuello.
□ A continuación, mueva la cabeza lentamente en círculos en una dirección y a continuación en la dirección contraria.
Realice estos ejercicios las veces necesarias hasta tener una sensación
agradable y caliente en el cuello.
10
111011_GA_29-11_L5_JL.indd 10 12.10.2011 21:06:07
Page 7

2.2 BRAZOS / HOMBROS
□ Coloque un brazo estirado hacia el pecho y presiónelo ligeramente
con la otra mano. También en este caso, presione solamente hasta sentir
un ligero tirón. Mantenga el brazo unos segundos en esta posición y a
continuación repita el ejercicio con el otro brazo.
□ Ahora, coloque un brazo detrás de la cabeza y estírelo presionándolo
ligeramente hacia abajo. Éste es un estiramiento excelente para la parte
posterior de los brazos.
□ A continuación, cruce las manos por detrás de la espalda y estírelas
hacia arriba. De esta manera estira los músculos superiores de la espalda y la parte posterior de los brazos. Al realizar este ejericicio, inclínese
ligeramente hacia adelante. Así, calentará todos los músculos.
□ Ahora relaje un poco los hombros. Con cuidado, realice movimientos
circulares con los hombros. Primero varias veces hacia atrás y después
hacia delante. A continuación, levante varias veces los hombros y
después déjelos caer. Repita esto varias veces hasta que sienta una
agradable sensación de relajación en los hombros.
2.3 PIERNAS
ESPAÑOL
□ Flexione una pierna hacia atrás y mantenga este posición unos segundos para estirarla. Repita el ejercicio con la otra pierna.
□ Ahora, estire la parte interior de las piernas. Para ello, dé un paso
hacia un lado y exione esta pierna. De esta forma, estira esta pierna y
al mismo tiempo ayuda a calentar la otra. Repita el ejercicio con la otra
pierna.
□ A continuación, caliente un poco los tobillos. Para ello, realice con
cuidado varios movimientos circulares con un tobillo, primero hacia la
derecha y luego hacia la izquierda. Repita el ejercicio con la otra pierna.
Primero en una dirección y después en la dirección contraria.
Tras realizar estos ejercicios, su cuerpo debería estar caliente. Ya está
preparado para probar los diferentes ejercicios con la tabla Fitness
Board.
11
111011_GA_29-11_L5_JL.indd 11 12.10.2011 21:06:07
Page 8
ESPAÑOL
3. ENTRENAMIENTO
Fig. 1
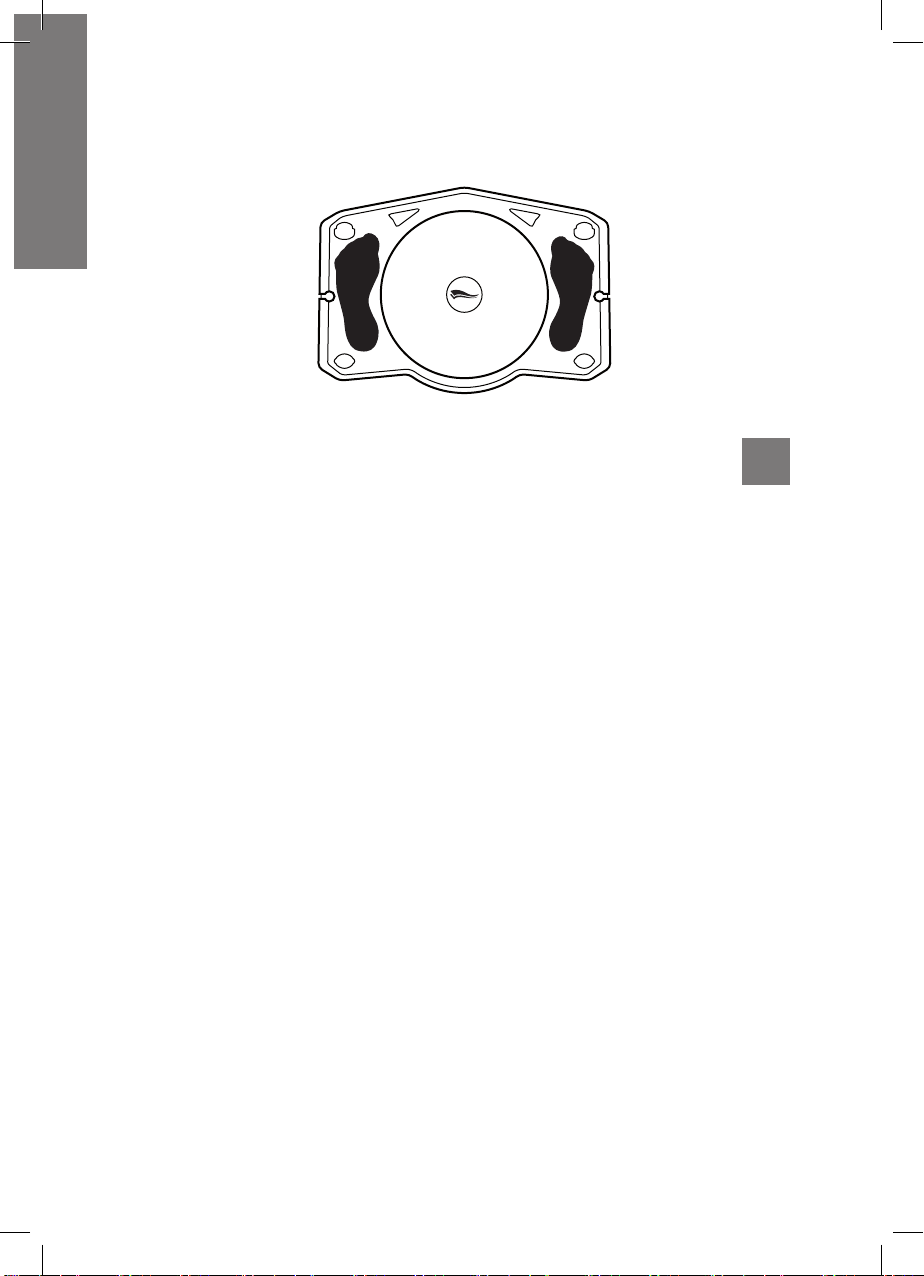
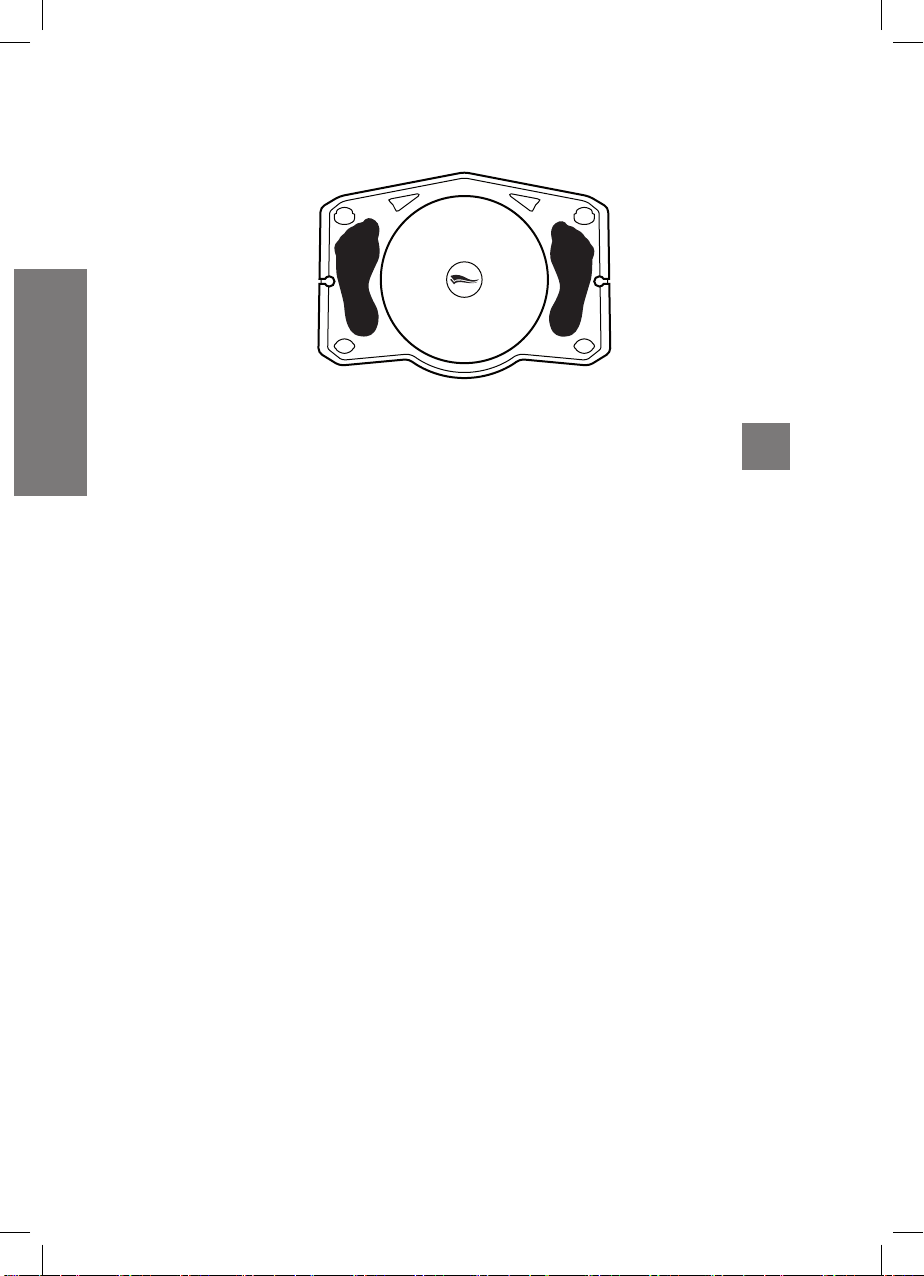
3.1. BALANCE-BOARD
3.1.1 MONTAJE
□ Abra la tabla, retire la parte superior y apártela a un lado un momento.
□ Retire todas las piezas que se encuentran en la parte inferior.
□ Una vez la parte inferior esté vacía, vuelva a colocar encima la parte
superior, ciérrela y ya ha terminado.
3.1.2 EJERCICIOS
Fig.
A
□ En primer lugar, coloque ambos pies sobre la tabla y balancéese con
cuidado de un lado al otro.
□ Si se siente seguro al realizar este movimiento, puede utilizar también
los brazos. Aumente la velocidad hasta alcanzar una marcha suave.
□ Si se encuentra cómodo, puede balancear los brazos sobre la cabeza
para así entrenar todo el cuerpo. Continúe y pruebe diferentes posiciones.
ATENCIÓN
• Realice estos ejercicios únicamente si tiene total movilidad en la articulación del tobillo.
• No se coloque sobre la plataforma giratoria mientras el aparato está siendo utilizado como Balance-Board.
12
111011_GA_29-11_L5_JL.indd 12 12.10.2011 21:06:08
Page 9
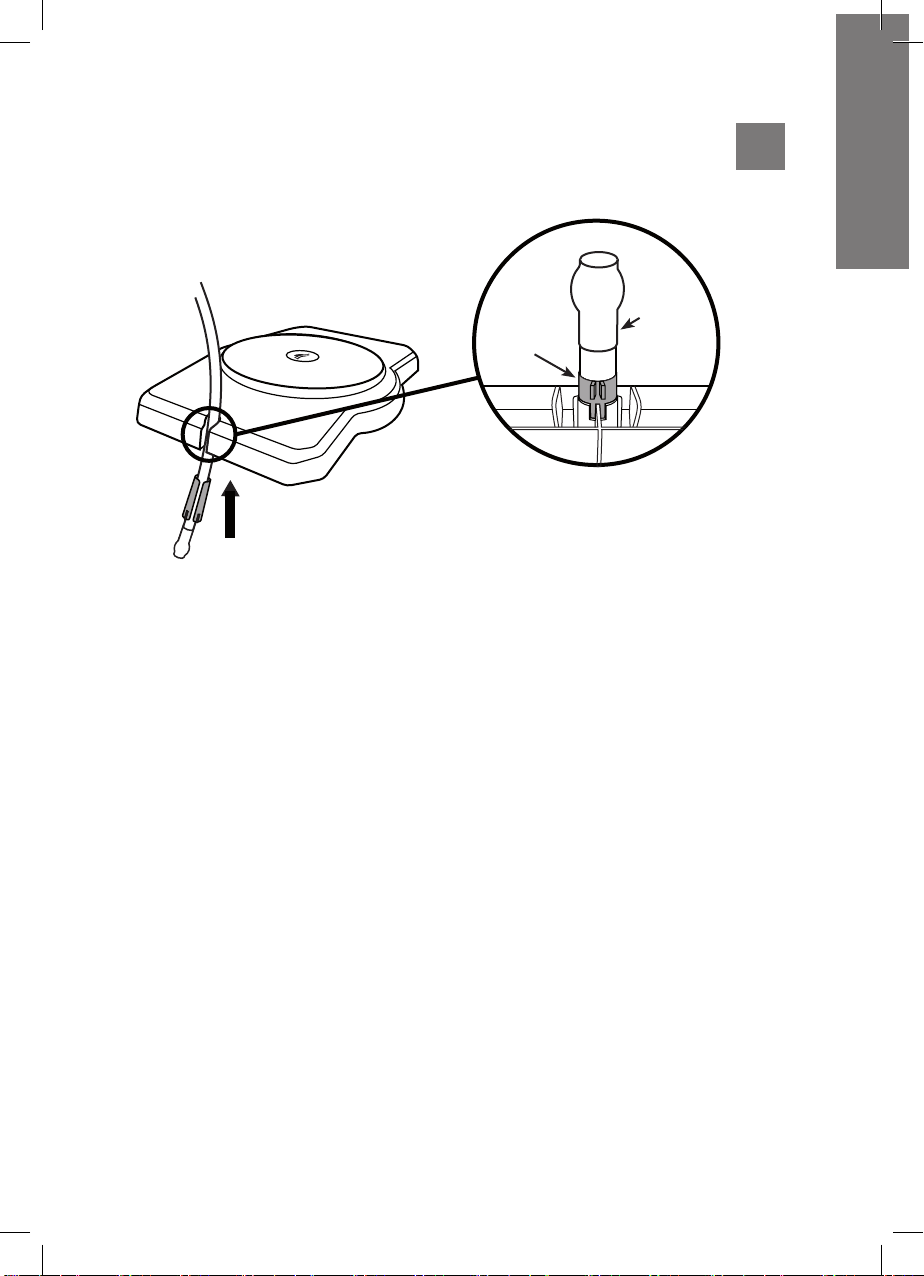
Fig.
3.2 BALANCE BOARD CON BANDAS ELÁSTICAS
B
3.2.1 MONTAJE
Banda
Elástica
Manguito
Fig. 2
□ Abra la tabla, retire la parte superior y aparte a un lado un momento la
parte inferior.
□ A continuación, je las bandas. Introduzca los manguitos de plástico
situados en el extremo de las bandas elásticas en la ranura provista en la
parte superior del aparato. (g. 2)
□ Asegúrese de que las guías salientes estén colocadas en la ranura
guía provista al efecto. (g. 2)
□ Seguidamente, tire de las bandas elásticas para que queden jas en el
carril guía.
□ Después, vuelva a montar la parte superior e inferior de la tabla. Para
volver a retirar las bandas elásticas, saque el manguito de plástico tirando de él hacia abajo.
ESPAÑOL
3.2.2 EJERCICIOS
□ Coja las bandas con las dos manos. Súbase a la tabla con los dos
pies. A continuación, comience a balancearse.
□ Una vez haya alcanzado el equilibrio y se sienta seguro, puede empe-
zar a utilizar los brazos, moviéndolos alternativamente hacia arriba. Este
ejercicio es excelente para entrenar brazos y piernas. Puede cambiar la
13
111011_GA_29-11_L5_JL.indd 13 12.10.2011 21:06:08
Page 10
posición moviendo los brazos hacia los lados. Éste es un ejercicio excelente para entrenar todo el cuerpo y todos los grupos de músculos.
ESPAÑOL
TABLA DE ALARGAMIENTO LONGITUDINAL
Longitud (cm) 120 140 160 185 230
Fuerza (N) 12 19 25 35 49
ATENCIÓN
No estire la banda más de 230 cm. El margen de tolerancia para la fuerza es de aprox. 20 % (+/-).
Fig.
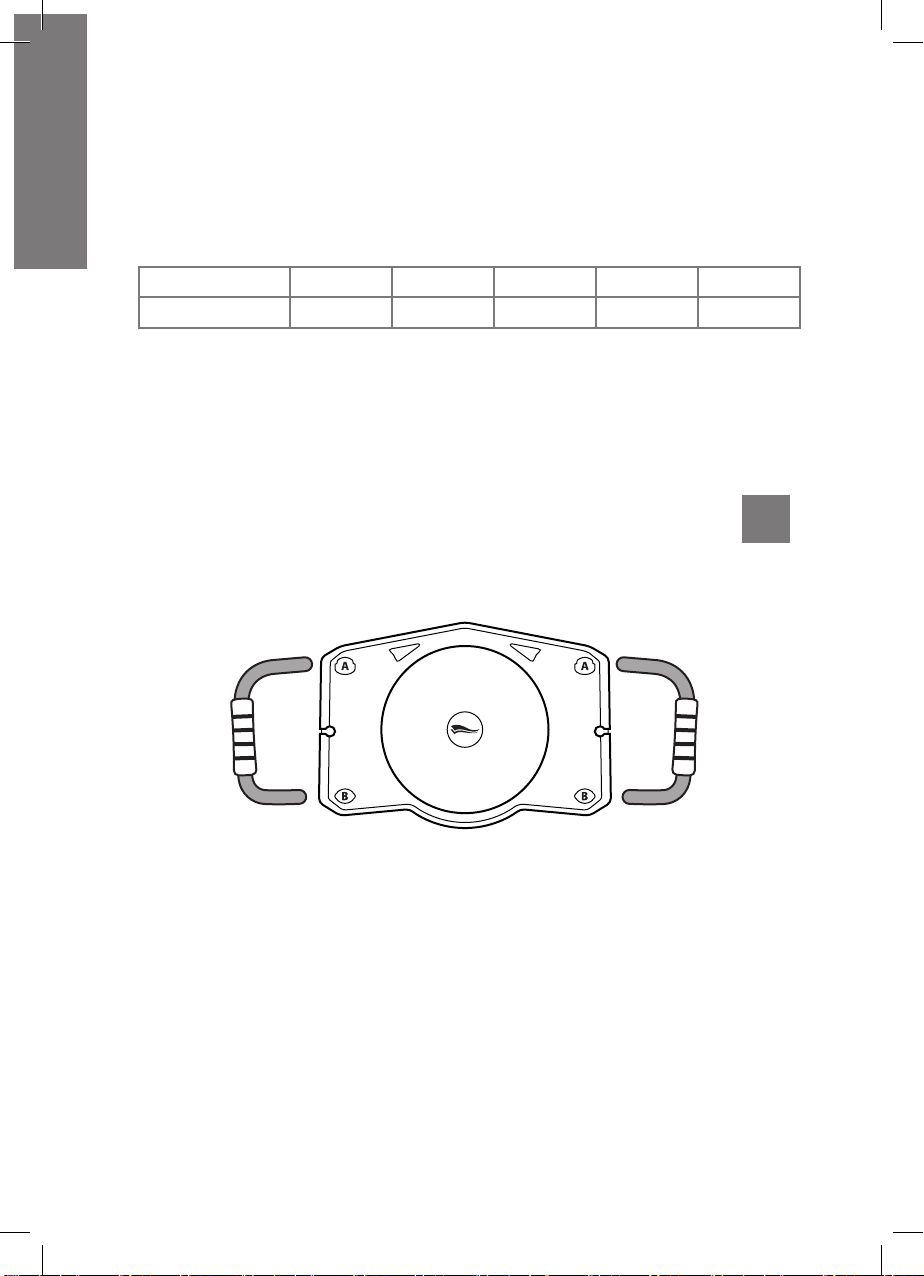
3.3 BALANCE BOARD CON ASAS
3.3.1 MONTAJE
C
Fig.3
□ Deje montadas la parte superior e inferior e introduzca las asas en
las aberturas provistas. Asegúrese de que las introduce en la posición
correcta. El extremo largo del asa (señalado mediante una echa) debe
introducirse en la abertura A y el extremo corto del asa en la abertura B
(g. 3).
□ Para soltar las asas tras terminar el ejercicio, tire de ellas fuertemente
realizando al mismo tiempo movimientos ligeros de sacudida.
14
111011_GA_29-11_L5_JL.indd 14 12.10.2011 21:06:08
Page 11
3.3.2 EJERCICIOS
□ Coja las asas con las manos e inclínese un poco hacia delante. Balan-
céese de un lado al otro.
□ Pruebe este ejercicio varias veces.
□ Si cree que tiene la suciente fuerza, puede levantar la rodilla del
suelo y repetir el ejercicio en la posición de plancha.
Fig.
3.4 TWIST-BOARD
3.4.1 MONTAJE
□ Abra la tabla y retire la parte superior.
□ Coja la parte inferior y apártela a un lado.
□ Coloque la tabla Twist Board en la alfombra protectora.
3.4.2 EJERCICIOS
□ Primero, súbase a la tabla Twist Board y gire de un lado al otro. Con la
tabla Twist Board pueden realizarse giros de hasta 65° en ambas direcciones.
□ Si desea aumentar el nivel de dicultad, puede doblar las rodillas.
También puede intentar cambiar la posición de los brazos e intentar moverlos sobre la cabeza.
3.5 PRESS-UP-BOARD
D
Fig.
E
ESPAÑOL
3.5.1 MONTAJE
□ Abra la tabla, retire la parte superior y aparte a un lado la parte inferior.
□ Coloque la parte inferior en el suelo y monte las asas (montaje de las
asas: véase ejercicio 3.3).
3.5.2 EJERCICIOS
□ Primero, póngase de rodillas en la alfombra protectora. A continuaci-
15
111011_GA_29-11_L5_JL.indd 15 12.10.2011 21:06:08
Page 12
ESPAÑOL
ón, coja las asas con las manos y mueva el cuerpo hacia abajo y hacia
arriba.
□ Si lo desea, puede cruzar las piernas por detrás; ésta es otra variante
de la posición de plancha.
□ Puede volver a aumentar el nivel de dicultad: levante la rodilla del
suelo y estire la pierna. A continuación, haga las exiones.
Fig.
3.6 TWIST-BOARD CON BANDAS ELÁSTICAS
3.6.1 MONTAJE
□ En primer lugar, abra la tabla, retire la parte superior y aparte a un lado
la parte inferior.
□ Coloque la tabla Twist Board en la alfombra de protección y je las ban-
das elásticas (jación de las bandas elásticas: véase ejercicio 3.2).
3.6.2 EJERCICIOS
□ Utilice primero la tabla Twist Board para estabilizar su cuerpo. Para
ello, gire su cuerpo ligeramente en la tabla Twist Board hacia la derecha
y la izquierda (pueden realizarse giros de hasta 65° en ambas direcciones). Si está preparado, puede utilizar también las bandas, rápida o
lentamente, como desee.
□ Ahora, bájese de la tabla Twist Board y colóquese al lado de la plata-
forma giratoria. Entrene los brazos estirándolos sobre su cabeza.
□ A continuación, intente estirar los brazos lateralmente hacia arriba. Si
se siente preparado, puede mover los dos brazos al mismo tiempo. Si es
necesario, repita estos ejercicios.
F
TABLA DE ALARGAMIENTO LONGITUDINAL
Longitud (cm) 120 140 160 185 230
Fuerza (N) 12 19 25 35 49
16
111011_GA_29-11_L5_JL.indd 16 12.10.2011 21:06:08
Page 13
ATENCIÓN
No estire la banda más de 230 cm. El margen de tolerancia para la fuerza es de aprox. 20 % (+/-).
Fig.
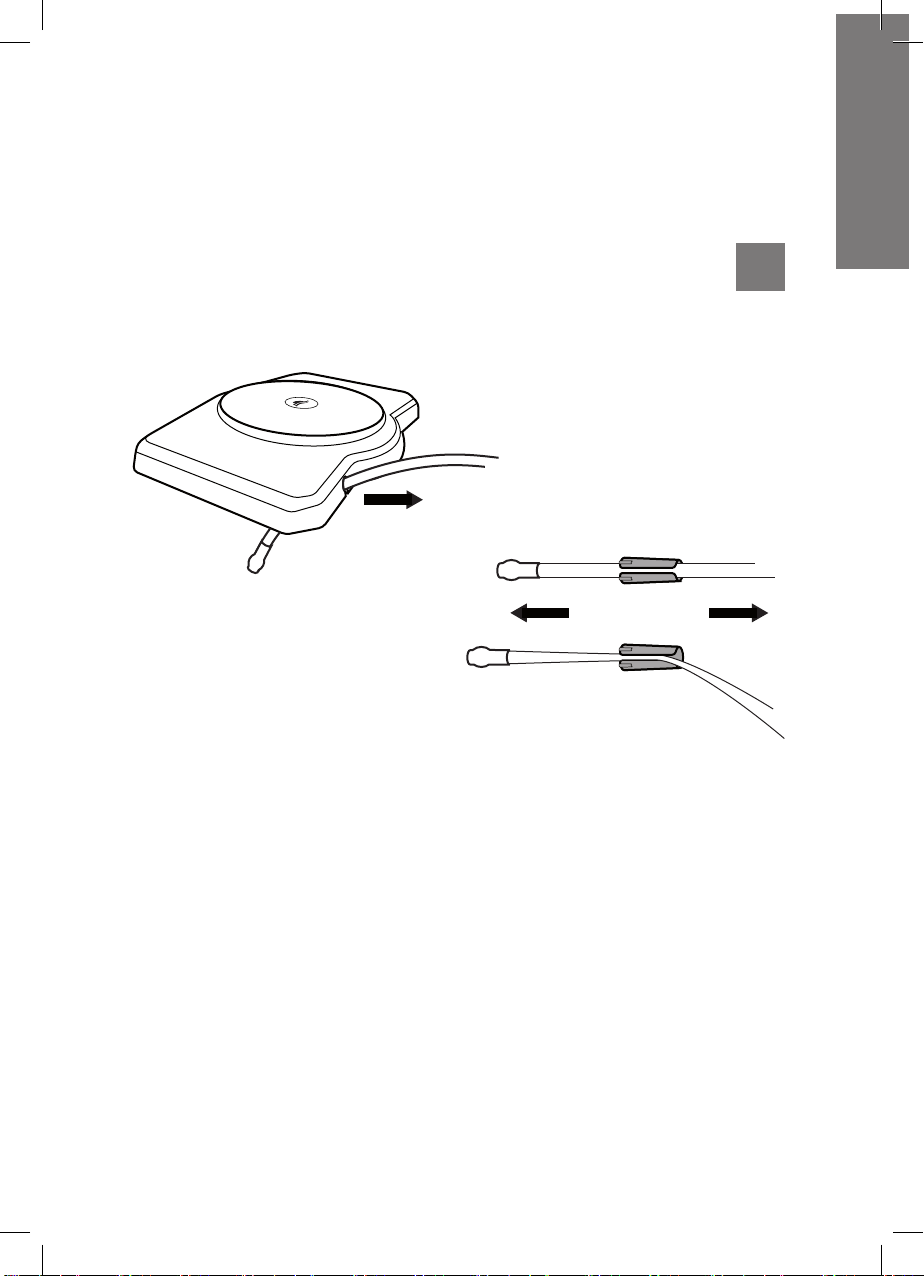
3.7 PRESS-UP-BOARD CON BANDAS ELÁSTICAS
3.7.1 MONTAJE
Fig. 4
G
ESPAÑOL
Fig. 5
□ Primero, abra la tabla, retire la parte superior y aparte a un lado la parte
inferior.
□ Para este ejercicio, las bandas elásticas deben jarse en la parte delantera
(g. 4). Para ello deben retirarse los manguitos de plástico situados en el extremo de las bandas elásticas.
□ Para ello, estire la banda elástica para de esta forma tirar de la banda elástica
cada vez más na a través de la abertura lateral del manguito de plástico (g. 5).
Fije las asas de la forma habitual (véase ejercicio 3.3).
3.7.2 EJERCICIOS
Puede utilizar la tabla Press up Board con las bandas elásticas de la
siguiente manera:
□ Fije las bandas elásticas a sus pies con ayuda de los pasadores y
17
111011_GA_29-11_L5_JL.indd 17 12.10.2011 21:06:08
Page 14

ESPAÑOL
sujételas a las asas.
□ A continuación, simplemente estire una pierna hacia atrás y arriba y
después repita el ejercicio con la otra pierna.
Fig.
3.8 STRETCHING-BOARD
3.8.1 MONTAJE
□ Abra la tabla, retire la parte superior y apártela a un lado.
□ Coja la parte inferior, dele la vuelta y colóquela en la alfombra protectora.
3.8.2 EJERCICIOS
Hay varias posibilidades de utilizar la tabla Stretching Board para estirar
sus músculos antes y después del entrenamiento:
□ Para el primer ejercicio, siéntese delante de la tabla.
□ Coloque las piernas sobre la tabla y mueva la cabeza hacia las rodil-
las. También puede intentar este ejercicio con una sola pierna.
Otro ejercicio:
□ Coloque un pie sobre la tabla y estírese un poco hacia adelante. De
esta forma, estira la parte superior del muslo. Si se siente bien, puede
inclinarse más.
□ Coloque un poco más atrás la pierna de atrás y agáchese. Permanez-
ca en esta posición durante unos segundos y repita el ejercicio con la
otra pierna.
H
Si lo desea, puede probar el siguiente ejercicio con la pierna de atrás:
□ Toque el suelo con la rodilla. De esta forma, también se estira la parte
superior del muslo.
Mediante el siguiente ejercicio puede estirar los músculos de la pantorrilla:
□ Coloque ambos pies en la tabla y estire completamente las piernas.
A continuación, puede intentar tocar los dedos de los pies para seguir
estirando la parte posterior de las piernas.
18
111011_GA_29-11_L5_JL.indd 18 12.10.2011 21:06:08
Page 15
4. DATOS TÉCNICOS
• Capacidad de carga máxima: 100 kg
• Medidas: 510 x 350 x 140 mm
• Peso total: 2400 g
• Tabla de alargamiento longitudinal
•
Longitud (cm) 120 140 160 185 230
Fuerza (N) 12 19 25 35 49
5. NOTA SOBRE ELIMINACIÓN
□ La tabla Fitness Board ha de eliminarse a través de una empresa de
tratamiento de residuos o a través de una instalación de eliminación de
residuos municipal.
□ Observe las normas actuales.
□ En caso de duda, infórmese en la instalación de eliminación de resi-
duos sobre una eliminación respetuosa con el medio ambiente.
ESPAÑOL
19
111011_GA_29-11_L5_JL.indd 19 12.10.2011 21:06:08
Page 16
ESPAÑOL
6. SU PLAN DE ENTRENAMIENTO PERSONAL
Fecha
Ejercicio
Balance-Board
Balance Board con
asas
Balance Board con
bandas elásticas
Twist-Board
Press-up-Board
Twist Board con
bandas elásticas
Press-up Board con
bandas elásticas
Stretching-Board
Fecha
Series Repeticiones Series Repeticiones Series Repeticiones
Ejercicio
Series Repeticiones Series Repeticiones Series Repeticiones
Balance-Board
Balance Board con
asas
Balance Board con
bandas elásticas
Twist-Board
Press-up-Board
Twist Board con
bandas elásticas
Press-up Board con
bandas elásticas
Stretching-Board
20
111011_GA_29-11_L5_JL.indd 20 12.10.2011 21:06:08
Page 17

SOMMARIO
FOTOGRAFIE DI ALLENAMENTO 2-5
VOLUME DELLA FORNITURA 6
1. IN GENERALE 22-24
2. ESERCIZI DI RISCALDAMENTO 24-25
3. ALLENAMENTO
3.1 BALANCE-BOARD 26
3.2 BALANCE-BOARD CON ELASTICI
27-28
DI ALLENAMENTO
3.3 BALANCE-BOARD CON MANIGLIE 28-29
3.4 TWIST-BOARD 29
3.5 PRESS-UP-BOARD 29-30
3.6 TWIST-BOARD CON ELASTICI DI ALLENAMENTO 30-31
3.7 PRESS-UP-BOARD CON ELASTICI
31-32
DI ALLENAMENTO
3.8 STRETCHING-BOARD 32-33
4. DATI TECNICI 33
5. SMALTIMENTO CORRETTO 33
ITALIANO
6. IL VOSTRO PIANO DI ALLENAMENTO PERSONALE 34
21
111011_GA_29-11_L5_JL.indd 21 12.10.2011 21:06:08
Page 18

1. IN GENERALE
La Fitness Board è un attrezzo nuovo ed innovativo di allenamento. Si
distingue dai precedenti articoli tness per i seguenti motivi:
• può essere usato da persone di tutte le fasce d’età, è facile da trasportare e si monta ed utilizza facilmente.
• con i suoi pezzi smontabili, si ripone facilmente ed è di minimo ingombro.
• con questo attrezzo, è possibile ottenere più di otto diverse funzioni
di allenamento, assicurandosi così di allenare proprio tutto il corpo.
ITALIANO
22
PRECAUZIONI E AVVERTENZE
• Conservare assolutamente le istruzioni per l’uso per un futuro riferimento. La mancata osservanza delle precauzioni da seguire può
portare a ferimenti gravi.
• Pulire la Fitness Board solo con acqua tiepida, un sapone delicato e
un panno morbido. Tutti gli adesivi, le vernici e le sostanze chimiche
possono provocare danni la Fitness Board. I punti più usati, come
le maniglie, ad esempio, devono essere puliti regolarmente con un
prodotto disinfettante.
• La Fitness Board è un attrezzo sportivo e non deve essere utilizzato
a scopi medici o commerciali.
• Prima di usare l’attrezzo, contattare il proprio medico di ducia, nel
caso in cui vi siano problemi di salute o reazioni allergiche, o nel caso
di convalescenza successiva ad un infortunio.
• Se ci si sente male durante l’allenamento, interrompere immediatamente l’allenamento e contattare un medico.
• Prima di iniziare l’allenamento con la Fitness Board è importante riscaldarsi bene e eseguire esercizi di stretching agli arti del corpo per
evitare di avere infortuni e stiramenti.
• Il carico massimo della Fitness Board è di 100 kg.
• L’attrezzo deve essere montato con cura da un adulto, per evitare
che incorrano successivamente degli infortuni per uso scorretto.
• Si prega di considerare che l’attrezzo può essere utilizzato solo quan-
111011_GA_29-11_L5_JL.indd 22 12.10.2011 21:06:08
Page 19

do è stato completamente montato per il relativo esercizio.
• Nell’uso per un allenamento/esercizi regolari, i componenti
dell’attrezzo devono essere controllati ogni 1-2 mesi per garantirne la
sicurezza.
• In caso di usura delle parti, l‘attrezzo non deve più essere utilizzato. Per gli ordini di ricambi, vi preghiamo di contattare il produttore
indicato.
• Durante l‘allenamento, indossare degli indumenti comodi e scarpe
da ginnastica, per essere più mobili possibile ed avere una buona
aderenza al terreno.
• Nelle prime settimane, le unità di allenamento dovrebbero durare
circa 10-15 minuti. Successivamente, potete allenarvi anche più a
lungo. Non deve però essere superato un tempo massimo di allenamento di 60 minuti, al ne di evitare uno sforzo eccessivo per il
corpo.
• Qui di seguito sono riportati solo alcuni dei possibili esercizi, eseguibili con la Fitness Board. Altri esercizi possono essere eseguiti,
consultando dei testi specici.
• L‘attrezzo non può essere considerato in alcun caso un giocattolo. Si
prega di considerare che l‘uso dell‘attrezzo da parte di bambini può
causare situazioni e pericoli imprevisti, per i quali il fabbricante non
risponde.
• I genitori devono vietare ai bambini l‘uso dell‘attrezzo, poiché si tratta
di un attrezzo sportivo mobile. Può sussistere anche un pericolo e
rischio di infortuni e danni materiali.
• Se dei bambini sono autorizzati ad usare l‘attrezzo, questi devono essere debitamente istruiti al suo uso corretto e ai possibili pericoli che
possono insorgere. Inoltre, i bambini devono essere sorvegliati da un
adulto, per motivi di sicurezza, al ne di evitare un uso scorretto.
• Scegliere un sito di posizionamento, sufciente per il montaggio e
l‘allenamento. Lo spazio scelto dovrebbe essere almeno di 2 x 2 m e
ben ventilato. Il fondo deve essere diritto e liscio. Controllare che la
posizione sia ben stabile per evitare che la Fitness Board possa scivolare. Utilizzare sempre il materassino compreso nella fornitura, per
ITALIANO
23
111011_GA_29-11_L5_JL.indd 23 12.10.2011 21:06:08
Page 20

ITALIANO
• evitare che si possano rovinare dei pavimenti delicati (es. parquette).
• Assicurarsi che tutte le parti siano montate senza danni e perfettamente integre. In caso di montaggio improprio vi è il rischio di
ferimenti. Le parti danneggiate possono inuire sulla sicurezza e la
funzionalità.
• Accertarsi che tutte le parti della Fitness Board non siano danneggiate e siano in ordine, prima di usare l‘attrezzo.
• Controllare periodicamente i ssaggi degli appositi cappi. Assicurarsi
che la lettatura del gancio sia ben ferma. Se necessario, la lettatura deve essere oliata regolarmente.
• Controllare periodicamente gli elastici tness, perché non presentino
segni di rottura o danni. Eventuali elastici di allenamento difettosi non
devono più essere usati.
2. ESERCIZI DI RISCALDAMENTO
Riscaldare la muscolatura assolutamente, prima di iniziare con gli esercizi. Vi presentiamo solamente alcuni esercizi di riscaldamento tra quelli
possibili, da svolgere prima di iniziare l‘allenamento vero e proprio.
2.1 TESTA/NUCA
□ Appoggiare una mano sulla testa e tirarla leggermente verso un lato.
In questo modo, un lato del collo viene allungato. Ripetere l‘esercizio per
l‘altro lato. Assicurarsi di non tirare eccessivamente il collo.
□ Dopodiché ruotare la propria testa lentamente in senso orario, poi in
senso antiorario.
Ripetere questi esercizi per quanto necessario, no a quando si avverte
una sensazione piacevole di riscaldamento alla nuca.
2.2 BRACCIA/SPALLE
□ Allungare il braccio, tendendolo in avanti e appoggiarlo sopra il petto e
premerlo poi leggermente con l‘altra mano. Premere questa volta in modo
tale, no ad avvertire una lieve trazione. Tenere brevemente il braccio in
questa posizione e ripetere poi l‘esercizio con l‘altro braccio.
24
111011_GA_29-11_L5_JL.indd 24 12.10.2011 21:06:08
Page 21

□ Muovere poi un braccio dietro la testa ed allungarlo, premendolo leg-
germente verso il basso. Questo è un ottimo allungamento per la parte
posteriore delle vostre braccia.
□ Ora muovere le mani dietro la schiena e distenderle verso l‘alto. Ciò
allunga i muscoli superiori della schiena e la parte posteriore delle vostre
braccia. Facendo questo, piegarsi un poco in avanti, riscaldando così tutti
i muscoli.
□ Dopodiché rilassare un poco le spalle. Ruotare con attenzione le spal-
le. Prima un paio di volte indietro, poi altrettante in avanti. Poi muovere
le spalle alcune volte in alto, e farle ricadere dopo alcuni attimi. Ripetere
l‘esercizio un paio di volte, no a che si avverte una sensazione di rilassamento muscolare gradevole.
2.3 GAMBE
□ Piegare una gamba indietro ed allungarla con attenzione, mantenendo
questa posizione per alcuni attimi. Ripetere poi con l‘altra gamba.
□ Allungare poi la parte interna delle gambe. Spostarsi con un passo su
un lato. In questo modo, allungate un lato della vostra gamba e stimolate allo stesso tempo il riscaldamento dell‘altra gamba. Ripetere poi con
l‘altra gamba.
□ Ora riscaldiamo un poco le nostre caviglie. Eseguire alcune rotazioni
con una caviglia, prestando attenzione, prima a destra e poi a sinistra.
Ripetere poi con l‘altra gamba. Prima in un senso e poi nell‘altro.
A questo punto il corpo dovrebbe essere sufcientemente riscaldato. Ora
si è pronti a provare i diversi esercizi con la Fitness Board.
ITALIANO
25
111011_GA_29-11_L5_JL.indd 25 12.10.2011 21:06:08
Page 22
ITALIANO
3. ALLENAMENTO
3.1. BALANCE-BOARD
3.1.1 MONTAGGIO
□ Aprire la Board, prendere la parte superiore ed metterla per un primo
momento da parte.
□ Eliminare poi tutte le parti che si trovano nella parte inferiore.
□ Quando la parte inferiore è vuota, montarvi di nuovo sopra la parte
superiore, chiuderla bene ed ecco che è pronta all‘uso.
Fig. 1
Fig.
A
3.1.2 ESERCIZI
□ Salire con entrambi i piedi sulla Board e ondulare con attenzione prima
da una parte, e poi dall‘altra parte.
□ Se si è sicuri in questo esercizio, allora ondulare anche le braccia.
Aumentare lentamente la velocità, no ad avere una leggera corsa.
□ Se si è sicuri in questo esercizio, allora potete ondeggiare le braccia
sopra la testa ed allenare così tutto il corpo. Continuare l‘esercizio, provando le diverse posizioni possibili.
ATTENZIONE !
• Eseguire questi esercizi, solo se si ha la piena mobilità delle caviglie.
• Non salire sul disco girevole, mentre l‘attrezzo viene usato come
Balance-Board.
26
111011_GA_29-11_L5_JL.indd 26 12.10.2011 21:06:08
Page 23
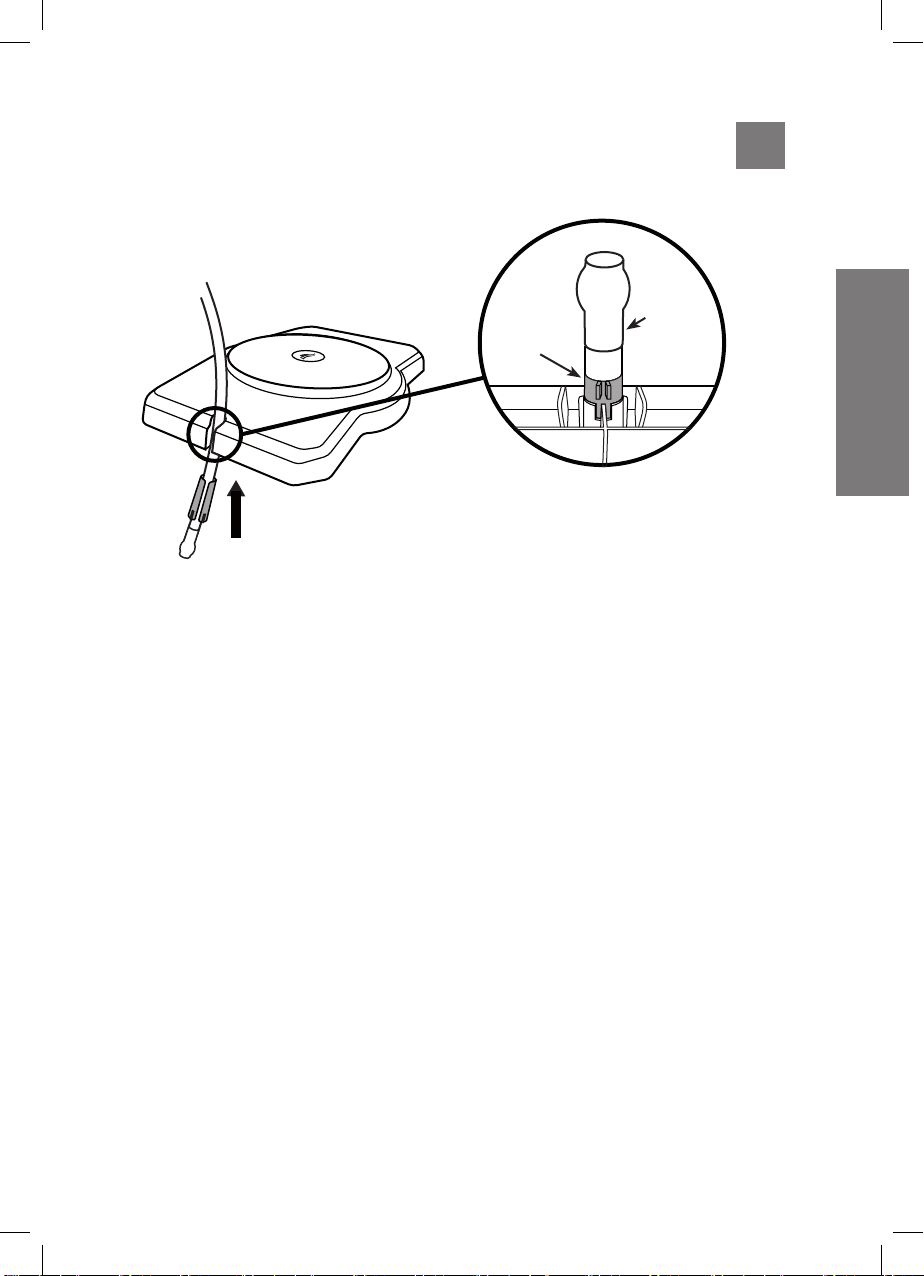
Fig.
3.2 BALANCE-BOARD CON ELASTICI DI ALLENAMENTO
B
3.2.1 MONTAGGIO
elastico di
allenamento
manicotto
Fig. 2
□ Aprile la Board, staccare la parte superiore e mettere temporaneamen-
te da parte la parte inferiore.
□ Ora ssare gli elastici. Inlare i manicotti in plastica alle estremità
degli elastici di allenamento negli interstizi appositi sulla parte superiore
dell‘attrezzo. (Figura 2)
□ Accertarsi che la guida sporgente scorra nell‘apposita scanalatura di
guida. (Figura2)
□ Inne tirare gli elastici di allenamento, in modo che siano ben ssati
nella barra di guida.
□ Ora rimontare insieme la parte superiore e quella inferiore della Board.
Per poter ristaccare gli elastici di allenamento, slare di nuovo verso il
basso i manicotti in plastica.
ITALIANO
3.2.2 ESERCIZI
□ Afferrare con le mani i due elastici. Salire con i piedi sulla Board. Inizia-
re ora ad ondeggiare avanti e indietro.
□ Una volta raggiunto l‘equilibrio e quando ci si sente sicuri, allora si può
esercitare anche le braccia, muovendole alternativamente in alto e in
basso. Questo è un esercizio straordinario per le braccia e le gambe. Si
27
111011_GA_29-11_L5_JL.indd 27 12.10.2011 21:06:08
Page 24

ITALIANO
□ può cambiare posizione, muovendo le braccia lateralmente. Questo è
un esercizio perfetto per allenare tutto il corpo e tutte le muscolature.
TABELLA PER L‘ALLUNGAMENTO LONGITUDINALE
Lunghezza (cm) 120 140 160 185 230
Forza (N) 12 19 25 35 49
ATTENZIONE !
Non allungare l‘elastico oltre i 230 cm. Il campo di tolleranza per la forza
è pari a circa il 20% (+/-).
3.3 BALANCE-BOARD CON MANIGLIE
3.3.1 MONTAGGIO
Fig.
C
Fig.3
□ Lasciare montate insieme la parte inferiore e superiore e inserire le
maniglie negli appositi fori. Controllare qui la giusta direzione. L‘estremità
lunga della maniglia (contrassegnata da una freccia) deve essere inserita
nel foro A, mentre la l‘estremità corta della maniglia deve passare nel foro
B (Figura 3).
□ Per staccare di nuovo le maniglie a ne esercizio, tirarle con forza e
muoverle allo stesso tempo con leggere vibrazioni.
28
111011_GA_29-11_L5_JL.indd 28 12.10.2011 21:06:09
Page 25

3.3.2 ESERCIZI
□ Afferrare con le mani le maniglie e piegarsi un poco in avanti. Ondeggi-
are poi da un lato all‘altro.
Eseguire l‘esercizio un paio di volte.
□ Se ci si sente sicuri, allora sollevare il ginocchio da terra e ripetere
l‘esercizio in posizione prona.
Fig.
3.4 TWIST-BOARD
3.4.1 MONTAGGIO
□ Aprire la Board e staccare la parte superiore.
□ Prendere la parte inferiore e metterla temporaneamente da parte.
□ Posare la Twist-Board poi sul materassino.
3.4.2 ESERCIZI
□ Salire con i piedi sulla Twist-Board e ruotare da un lato e dall‘altro.
Sono possibili rotazioni no a 65° in entrambe le direzioni con la TwistBoard.
□ Per aumentare il grado di difcoltà, allora inginocchiarsi. È possibile
anche cambiare la posizione delle braccia e tentare di muoverle sopra la
testa.
3.5 PRESS-UP-BOARD
D
Fig.
E
ITALIANO
3.5.1 MONTAGGIO
□ Aprire la Board, staccare la parte superiore e mettere la parte inferiore
temporaneamente da parte.
□ Posare la parte superiore a terra e montare le maniglie (per il montag-
gio delle maniglie: vedi Esercizio 3.3).
29
111011_GA_29-11_L5_JL.indd 29 12.10.2011 21:06:09
Page 26

ITALIANO
3.5.2 ESERCIZI
□ Mettersi prima di tutto in ginocchio sul materassino. Afferrare poi con le
mani le maniglie e muovere il corpo verso il basso e verso l‘alto.
□ Se lo si desidera, incrociare le gambe all‘indietro; questa è un‘ulteriore
variante delle essioni.
□ È possibile anche aumentare ulteriormente la difcoltà: sollevare per
questo il ginocchio da terra e allungare le gambe. Eseguire poi in questa
posizione delle essioni.
3.6 TWIST-BOARD CON ELASTICI DI ALLENAMENTO
3.6.1 MONTAGGIO
□ Aprire prima di tutto la Board, staccare poi la parte superiore e mettere
la parte inferiore temporaneamente da parte.
□ Appoggiare quindi la Twist-Board sul materassino e ssare gli elastici di
allenamento (per il ssaggio degli elastici di allenamento: vedi Esercizio 3.2).
3.6.2 ESERCIZI
Fig.
F
□ Utilizzare prima di tutto la Twist-Board per stabilizzare il proprio corpo.
Per questo, ruotare leggermente il corpo sulla Twist-Board leggermente
verso destra, poi verso sinistra (sono possibili rotazioni no a 65° in entrambe le direzioni con la Twist-Board). Una volta pronti, allora aggiungere
anche l‘esercizio con gli elastici, in modo veloce o lento, come si preferisce.
□ Scendere poi dalla Twist-Board e posizionarsi accanto al disco girevo-
le. Ora allenare le braccia, allungandole sopra la testa.
□ Provare quindi ad allungare le braccia lateralmente verso l‘alto. Quan-
do ci si sente pronti, allora muovere anche entrambe le braccia contemporaneamente. Ripetere questi esercizi, secondo la necessità.
30
111011_GA_29-11_L5_JL.indd 30 12.10.2011 21:06:09
Page 27

TABELLA PER L‘ALLUNGAMENTO LONGITUDINALE
Lunghezza (cm) 120 140 160 185 230
Forza (N) 12 19 25 35 49
ATTENZIONE !
Non allungare l‘elastico per più di 230 cm. Il campo di tolleranza per la
forza è pari a circa 20% (+/-).
3.7 PRESS-UP-BOARD CON ELASTICI DI ALLENAMENTO
3.7.1 MONTAGGIO
Fig. 4
ITALIANO
Fig.
G
Fig. 5
□ Aprire prima di tutto la Board, staccare la parte superiore e mettere la parte
inferiore da parte.
□ Gli elastici di allenamento per questo esercizio devono essere ssati al lato
anteriore (gura 4). Per questo, slare i manicotti in plastica che sono alle estremità degli elastici di allenamento.
□ Tirare per questo l‘elastico di allenamento in lunghezza, per inlare quindi
l‘elastico di allenamento reso più sottile tirandolo, attraverso il foro laterale del
31
111011_GA_29-11_L5_JL.indd 31 12.10.2011 21:06:09
Page 28

ITALIANO
□ manicotto in plastica (g. 5).
Fissare inne le maniglie come di consueto (vedi Esercizio 3.3).
3.7.2 ESERCIZI
È possibile utilizzare la Press-up-Board con gli elastici di allenamento nel
modo seguente:
□ ssare gli elastici di allenamento ai piedi, servendosi del cappio e
tenersi ben fermi alle maniglie.
□ allungare quindi la gamba un paio di volte all‘indietro in alto e ripetere
poi l‘esercizio con l‘altra gamba.
Fig.
3.8 STRETCHING-BOARD
3.8.1 MONTAGGIO
□ Aprire la Board, staccare la parte superiore e metterla da parte.
□ Prendere poi la parte inferiore, voltarla e posizionarla sul materassino.
3.8.2 ESERCIZI
H
Qui sono illustrate diversi usi possibili della Stretching-Board, per allungare i muscoli prima e dopo l‘allenamento:
□ nel primo esercizio, mettersi di fronte alla Board.
□ appoggiarvi sopra entrambe le gambe e tirare la testa verso il ginoc-
chio. L‘esercizio è possibile anche solo con una gamba.
Un altro esercizio:
□ appoggiare il piede sulla Board ed allungarsi semplicemente in avanti.
In questo modo si allunga la parte alta dei anchi. Se ci si sente bene, si
può provare ad abbassarsi ulteriormente.
□ allungare la gamba posteriore ancora di più all‘indietro e muoversi
verso il basso. Rimanere per alcuni attimi in questa posizione e passare
poi all‘altra gamba.
32
111011_GA_29-11_L5_JL.indd 32 12.10.2011 21:06:09
Page 29

Se lo si desidera, si può eseguire l‘esercizio seguente con la gamba
piegata indietro:
□ toccare a terra con il ginocchio, con ciò il anco viene ulteriormente
allungato.
Il prossimo esercizio allunga i muscoli dei polpacci:
□ appoggiare entrambi i piedi sulla Board e tendere completamente le
gambe. Ora provare a toccare le dita dei piedi, per allungare così ulteriormente la parte posteriore delle gambe.
4. DATI TECNICI
• Carico massimo: 100 kg
• Misure: 510 x 350 x 140 mm
• Peso complessivo: 2400 g
• Tabella per l’allungamento longitudinale
Lunghezza (cm) 120 140 160 185 230
Forza (N) 12 19 25 35 49
ITALIANO
5. SMALTIMENTO CORRETTO
□ Smaltire la Fitness Board attraverso una ditta specializzata e auto-
rizzata allo smaltimento riuti, oppure attraverso gli enti predisposti allo
smaltimento a livello comunale.
□ Rispettare le normative vigenti in materia.
□ In caso di dubbi riguardo ad una procedura di smaltimento nel rispetto
dell‘ambiente, rivolgersi all‘ ente per lo smaltimento di riuti più vicino.
33
111011_GA_29-11_L5_JL.indd 33 12.10.2011 21:06:09
Page 30

6. IL VOSTRO PIANO DI ALLENAMENTO PERSONALE
Data
ITALIANO
Esercizio
Balance-Board
Balance-Board con
maniglie
Balance-Board con
elastici di allenamento
Twist-Board
Press-up-Board
Twist-Board con elastici
di allenamento
Press-up-Board con
elastici di allenamento
Stretching-Board
Data
Esercizio
Balance-Board
Balance-Board con
maniglie
Balance-Board con
elastici di allenamento
Twist-Board
Serie Ripetizioni Serie Ripetizioni Serie Ripetizioni
Serie Ripetizioni Serie Ripetizioni Serie Ripetizioni
Press-up-Board
Twist-Board con elastici
di allenamento
Press-up-Board con
elastici di allenamento
Stretching-Board
34
111011_GA_29-11_L5_JL.indd 34 12.10.2011 21:06:09
Page 31

ÍNDICE
IMAGENS EXEMPLIFICATIVAS DE EXERCÍCIOS 2-5
MATERIAL FORNECIDO 6
1. INDICAÇÕES GERAIS 36-38
2. EXERCÍCIOS DE AQUECIMENTO 38-39
3. TREINO
3.1 BALANCE-BOARD 40
3.2 BALANCE-BOARD COM TUBOS ELÁSTICOS DE
41-42
FITNESS
3.3 BALANCE-BOARD COM PEGAS 42-43
3.4 TWIST-BOARD 43
3.5 PRESS-UP-BOARD 43-44
3.6 TWIST-BOARD COM TUBOS ELÁSTICOS DE
44-45
FITNESS
3.7 PRESS-UP-BOARD COM TUBOS ELÁSTICOS DE
45-46
FITNESS
3.8 STRETCHING-BOARD 46-47
4. DADOS TÉCNICOS 47
5. INDICAÇÃO PARA ELIMINAÇÃO 47
6. O SEU PLANO DE TREINO PESSOAL 48
PORTUGUỆS
35
111011_GA_29-11_L5_JL.indd 35 12.10.2011 21:06:09
Page 32

1. INDICAÇÕES GERAIS
A Fitness Board é um aparelho de treino novo e inovador. Distingue-se
dos produtos de tness anteriores pelos seguintes motivos:
• Pode ser utilizada por todas as faixas etárias, é fácil de transportar e
• Devido às suas peças de montagem acondicionáveis, é fácil de
• Com este aparelho pode usufruir de mais de oito funções de exercí-
INDICAÇÕES DE SEGURANÇA E AVISOS
• Guarde as instruções de utilização para consulta futura. A inobser-
• Limpe a Fitness Board apenas com água morna, sabão suave e um
PORTUGUỆS
• A Fitness Board é um aparelho desportivo e não deve ser utilizada
• No caso de existirem problemas de saúde, reacções alérgicas ou de
• Caso não se sinta bem durante o exercício, interrompa este imedia-
• Antes de iniciar o treino com a Fitness Board deve fazer exercícios
• O peso máximo suportado pela Fitness Board é de 100 kg.
• O aparelho deve ser cuidadosamente montado por um adulto, para
• Por favor tenha em atenção que o aparelho só deve ser utilizado
36
de fácil montagem e utilização.
armazenar e necessita de pouco espaço.
cio diferentes, que asseguram que exercita todo o corpo.
vância das indicações de segurança pode conduzir a ferimentos
graves.
pano macio. Todos os autocolantes, tintas e produtos químicos podem provocar danos da Fitnessboard. Pontos muito utilizados, como
por ex. as pegas, devem ser regularmente limpos com um desinfectante.
para ns médicos ou comerciais.
estar a recuperar de algum ferimento, por favor consulte o seu médico antes da utilização do aparelho.
tamente e procure a ajuda de um médico.
de aquecimento e alongamento para evitar ferimentos e dores musculares.
evitar ferimentos futuros devidos ao manuseamento inadequado.
111011_GA_29-11_L5_JL.indd 36 12.10.2011 21:06:09
Page 33

quando estiver completamente montado para o respectivo exercício.
• Em caso de utilização do aparelho para treino/exercício regular, os
componentes do mesmo devem ser vericados a cada 1 a 2 meses
com vista a garantir a segurança.
• Em caso de desgaste das peças o aparelho não deve ser utilizado.
Para encomendas de peças de substituição, por favor contacte o
fabricante.
• Durante o treino use roupa desportiva confortável e calçado desportivo, para possuir a maior mobilidade possível e ter uma boa aderência ao solo.
• Na primeira semana as suas unidades de treino deverão ter a
duração aprox. de 10-15 minutos. Mais tarde poderá treinar mais
tempo. No entanto, não deve ser ultrapassado o tempo máximo de
60 minutos para não esforçar demasiado o seu corpo.
• De seguida vê apenas uma selecção de possíveis exercícios que
podem ser executados com a Fitness Board. Poderá consultar outros
exercícios no manual correspondente.
• O aparelho não deve ser nunca considerado um brinquedo. Por favor
tenha em atenção que a utilização do aparelho por crianças pode
conduzir a imprevistos e perigos, pelos quais o fabricante não se
responsabiliza.
• Uma vez que se trata de um aparelho desportivo móvel, os pais
devem proibir a utilização do mesmo pelas crianças. Caso contrário
pode existir perigo de ferimentos e de danos materiais como consequência.
• Quando as crianças estão autorizadas a utilizar o aparelho, devem
ser informadas acerca dos possíveis perigos e instruídas a utilizar
o mesmo de forma correcta. Por razões de segurança e para evitar
uma utilização inadequada, as crianças devem ser vigiadas por um
adulto.
• Seleccione um local de montagem que disponibilize espaço suciente para a montagem e para o treino. A superfície escolhida deverá ter
no mínimo 2 x 2 m e ser bem arejada. A base deve ser plana e recta.
Para evitar que a Fitness Board se desloque, verique se está bem
PORTUGUỆS
37
111011_GA_29-11_L5_JL.indd 37 12.10.2011 21:06:09
Page 34

• Certique-se de que as peças não estão danicadas e de que estão
• Antes da utilização da prancha de Fitness Board, verique se todas
• Verique regularmente os pontos de xação dos nós. Certique-se
• Verique regularmente os tubos elásticos de tness quanto a ras-
2. EXERCÍCIOS DE AQUECIMENTO
Por favor dedique alguns minutos ao aquecimento, antes de iniciar os
exercícios. Agora iremos apresentar-lhe alguns exercícios de aquecimen-
PORTUGUỆS
to simples, que deverá efectuar antes do treino.
apoiada. Utilize sempre a esteira de protecção fornecida no caso de
pisos sensíveis (por ex. parqué), para proteger contra danos.
montadas de forma adequada. A montagem inadequada constitui
perigo de ferimentos. Peças danicadas podem comprometer a segurança e o funcionamento.
as peças estão em bom estado e não danicadas.
de que a rosca do gancho está bem apertada. Se necessário, a rosca deve ser lubricada regularmente.
gões ou danos. Tubos elásticos de tness danicados não devem
continuar a ser utilizados.
2.1 CABEÇA/PESCOÇO
□ Coloque uma mão na cabeça e puxe-a levemente para um lado. Através deste exercício alonga o seu pescoço. Faça o mesmo para o outro
lado. Tenha atenção para não puxar demasiado.
□ Rode lentamente a sua cabeça numa direcção, a seguir, na outra direcção.Repita este exercício as vezes necessárias até ter uma agradável
sensação de calor no pescoço.
2.2 BRAÇOS /OMBROS
□ Alongue o seu braço, colocando-o estendido à frente sobre o peito e
pressionando levemente com a outra mão. Pressione de forma a sentir
um ligeiro puxão. Mantenha o braço nessa posição por um momento e
depois troque de braço.
38
111011_GA_29-11_L5_JL.indd 38 12.10.2011 21:06:09
Page 35

□ Agora coloque um braço atrás da cabeça e alongue-o, pressionando-o
levemente para baixo. Este é um bom alongamento para a parte de trás
dos seus braços.
□ Agora cruze as suas mãos atrás das costas e puxe-as para cima.
Isto alonga os músculos superiores das costas e parte de trás dos seus
braços. Neste exercício incline-se um pouco para a frente, de forma a
aquecer todos os músculos.
□ Agora relaxe um pouco os ombros. Com cuidado faça círculos com os
ombros. Primeiro algumas vezes para a frente e depois algumas vezes
para trás. No m, puxe algumas vezes os ombros para cima e volte a
deixá-los cair. Repita isto algumas vezes até sentir os ombros agradavelmente soltos.
2.3 PERNAS
□ Curve uma perna para trás e alongue-a com cuidado, mantendo essa
posição durante um curto espaço de tempo. Repita o exercício com a
outra perna.
□ Alongue agora os lados de dentro das pernas. Para isso dê um passo
para o lado. Desta forma alonga um lado da sua perna e simultaneamente aquece a outra perna. Troque de perna.
□ Agora vamos fazer ainda um pouco mais de aquecimento aos tornozelos. Para isso, vamos rodar cuidadosamente um tornozelo algumas
vezes para a direita e depois para a esquerda. Agora a outra perna.
Primeiro algumas vezes numa direcção e depois na outra.
Nesta altura o seu corpo deverá estar aquecido. Agora está preparado
para experimentar os diversos exercícios com a Fitnessboard.
PORTUGUỆS
39
111011_GA_29-11_L5_JL.indd 39 12.10.2011 21:06:09
Page 36

3. TREINO
3.1. BALANCE-BOARD
3.1.1 MONTAGEM
□ Abra a prancha, retire a parte superior e coloque-a de lado por um
momento.
□ Retire então todos os elementos que se encontram na peça inferior.
□ Quando a peça inferior estiver vazia, coloque novamente a peça supe-
PORTUGUỆS
rior, encaixe-a até travar e você já estará pronto.
Fig. 1
Fig.
A
3.1.2 EXERCÍCIOS
□ Coloque, em primeiro lugar, os dois pés sobre a prancha e baloice
com cuidado de um lado para o outro.
□ Se se sentir seguro neste movimento pode também adicionar os seus
braços. Aumente a velocidade para um ligeiro movimento.
□ Quando se sentir seguro, pode agitar os braços acima da cabeça e, desta
forma, exercitar todo o corpo. Continue e experimente posições diferentes.
ATENÇÃO
• Execute estes exercícios apenas se a sua mobilidade a nível das
articulações lhe permitir saltar.
• Não se coloque sobre a placa giratória enquanto o aparelho estiver a
ser utilizado como Balance-Board.
40
111011_GA_29-11_L5_JL.indd 40 12.10.2011 21:06:09
Page 37

3.2 BALANCE-BOARD COM TUBOS ELÁSTICOS DE
FITNESS
Fig.
B
3.2.1 MONTAGEM
Tubo
Elástico
Bucha
Fig. 2
□ Abra a prancha, remova a peça superior e coloque a peça inferior, por
um momento, à parte.
□ Agora xe os tubos elásticos. Desloque as buchas de plástico nas
extremidades dos tubos elásticos de tness para os entalhes na parte
superior do aparelho destinados a esse m. (Fig. 2)
□ Tenha em atenção, que as guias salientes encaixem nas respectivas
ranhuras. (Fig.2)
□ No nal, puxe os tubos elásticos de tness para que estes assentem
bem nas guias.
□ Agora montamos novamente a peça superior e inferior da prancha.
Para remover os tubos elásticos de tness, volte a empurrar as buchas
de plástico para baixo.
PORTUGUỆS
3.2.2 EXERCÍCIOS
□ Segure ambos os tubos com as mãos. Suba com ambos os pés para a
prancha. Agora comece a oscilar para trás e para a frente.
□ Quando tiver atingido o equilíbrio e se sentir seguro, pode começar a utili-
zar os braços, movendo-os alternadamente para cima. Este é um excelente
41
111011_GA_29-11_L5_JL.indd 41 12.10.2011 21:06:09
Page 38

treino para os seus braços e para as suas pernas. Pode mudar a sua posição,
movimentando os seus braços para o lado. Este é um óptimo exercício para
treinar todo o corpo e todos os grupos musculares.
TABELA PARA ALONGAMENTOS LONGITUDINAIS
Comprimento (cm) 120 140 160 185 230
Força (N 12 19 25 35 49
ATENÇÃO
Não estique o tubo elástico mais de 230 cm. O limite de tolerância quanto à força ronda os 20% (+/-).
3.3 BALANCE-BOARD COM PEGAS
3.3.1 MONTAGEM
PORTUGUỆS
Fig.
C
Fig.3
□ Mantenha as partes inferior e superior montadas e encaixe as pegas
nas aberturas destinadas a esse m. Aqui tenha em atenção a direcção
correcta. A extremidade comprida da pega (sinalizada com uma seta)
deve ser encaixada na abertura A, a extremidade mais curta da pega
encaixa na abertura B (Fig.3).
□ Para voltar a soltar as pegas depois de terminar o exercício, puxe
vigorosamente, efectuando alguns ligeiros movimentos vibratórios.
42
111011_GA_29-11_L5_JL.indd 42 12.10.2011 21:06:09
Page 39

3.3.2 EXERCÍCIOS
□ Segure as pegas com as mãos e incline-se um pouco para a frente. De-
pois balance de um lado para o outro. Realize o movimento algumas vezes.
□ Quando se sentir sucientemente forte, pode levantar os seus joelhos do
chão e repetir o exercício na posição deitada.
Fig.
3.4 TWIST-BOARD
3.4.1 MONTAGEM
□ Abra a prancha e levante a peça superior.
□ Pegue na peça inferior e pouse-a à parte.
□ Depois basta colocar a Twist-Board na esteira de protecção.
D
3.4.2 EXERCÍCIOS
□ Suba primeiro para a Twist Board e rode para um e outro lado. São
possíveis rotações até 65° em ambas as direcções com a Twist-Board.
□ Se pretender aumentar o grau de diculdade, pode colocar-se de
joelhos. Também pode alterar a posição dos seus braços e tentar movimentá-los acima da cabeça.
3.5 PRESS-UP-BOARD
3.5.1 MONTAGEM
□ Abra a prancha, retire a parte superior e coloque a parte inferior de
lado.
□ Coloque a parte superior no chão e monte as pegas (montagem das
pegas: ver exercício 3.3).
3.5.2 EXERCÍCIOS
□ Primeiro coloque-se de joelhos na esteira de protecção. Agarre as
pegas e movimente o corpo para baixo e para cima.
E
PORTUGUỆS
Fig.
43
111011_GA_29-11_L5_JL.indd 43 12.10.2011 21:06:09
Page 40

□ Se quiser, pode cruzar as pernas atrás; Trata-se de outra variante de
elevações.
□ Pode aumentar ainda mais o grau de diculdade: para isso levante os
joelhos do chão e estique as pernas. Agora coloque-se na posição apoiada sobre as mãos e os pés.
3.6 A TWIST-BOARD COM TUBOS ELÁSTICOS DE
FITNESS
3.6.1 MONTAGEM
□ Primeiro, abra a prancha, levante a peça superior e coloque a peça
inferior à parte.
□ Depois coloque a Twistboard na esteira de protecção e xe os tubos
elásticos de tness (Fixação dos tubos elásticos de tness: ver exercício
3.2).
3.6.2 EXERCÍCIOS
PORTUGUỆS
□ De seguida utilize a Twistboard para estabilizar o seu corpo. Para tal,
rode ligeiramente o corpo na Twistboard para a direita e para a esquerda
(são possíveis rotações até 65° em ambas as direcções). Quando estiver
pronto, pode pegar nos tubos elásticos para rodar tão depressa ou devagar quanto pretender.
□ Desça agora da Twist Board e coloque-se ao lado da placa giratória.
Agora exercite os seus braços, esticando-os sobre acima da cabeça.
□ Agora tente esticar os braços lateralmente para cima. Quando se sentir
preparado, pode também movimentar ambos os braços em simultâneo.
Repita este exercício as vezes necessárias.
Fig.
F
TABELA PARA ALONGAMENTOS LONGITUDINAIS
Comprimento (cm) 120 140 160 185 230
Força (N) 12 19 25 35 49
44
111011_GA_29-11_L5_JL.indd 44 12.10.2011 21:06:10
Page 41

ATENÇÃO
Não estique o tubo elástico mais de 230 cm. O limite de tolerância quanto à força ronda os 20% (+/-).
3.7 PRESS-UP-BOARD COM TUBOS ELÁSTICOS DE
FITNESS
3.7.1 MONTAGEM
Fig. 4
□ Primeiro, abra a prancha, remova a peça superior e coloque a peça inferior à
parte.
□ Para este exercício, os tubos elásticos devem ser cos na parte dianteira (Fig.
4). Para isso é necessário remover as buchas de plástico que se encontram nas
extremidades dos tubos elásticos de tness.
□ Para isso estique um pouco o tubo elástico, para car um pouco mais estreito
e para poder puxar este pelas aberturas laterais das buchas de plástico (Fig.5).
Fixe as pegas como habitualmente (ver exercício 3.3).
Fig.
G
Fig. 5
PORTUGUỆS
45
111011_GA_29-11_L5_JL.indd 45 12.10.2011 21:06:10
Page 42

3.7.2 EXERCÍCIOS
Pode utilizar a Press-up-Board com os tubos elásticos de tness da
seguinte forma:
□ Prenda os tubos elásticos tness, dando nós nos seus pés e apoie-se
nas pegas.
□ Agora estique a perna apenas algumas vezes para trás e para cima e
troque, em seguida, com a outra perna.
3.8 STRETCHING-BOARD
3.8.1 MONTAGEM
□ Abra a prancha, retire a parte superior e coloque-a de lado.
□ Pegue então na peça inferior, vire-a e coloque-a sobre a esteira de
protecção.
3.8.2 EXERCÍCIOS
Fig.
H
PORTUGUỆS
46
111011_GA_29-11_L5_JL.indd 46 12.10.2011 21:06:10
Aqui estão algumas possibilidades de como utilizar a sua StretchingBoard para alongar os músculos antes e depois do treino:
□ No primeiro exercício coloque-se à frente da prancha.
□ Coloque ambas as pernas sobre a mesma e puxe a cabeça em di-
recção aos joelhos. Também pode experimentar só com uma perna.
Outro exercício:
□ Coloque um pé sobre a prancha e estique-se um pouco para a frente.
Com este exercício alonga a parte superior da coxa. Se se sentir bem,
poderá ir mais abaixo.
□ Coloque a perna de trás um pouco mais afastada para trás e baixe-se.
Fique nesta posição por um momento e depois troque de perna.
Se pretender, poderá experimentar o seguinte exercício com a perna
traseira:
□ Toque com o joelho no chão: desta forma alonga adicionalmente a
Page 43

parte superior da coxa.
O próximo exercício alonga os músculos da barriga da perna:
□ Coloque os dois pés sobre a prancha e estique completamente as per-
nas. Agora pode tentar tocar nos dedos dos pés para continuar a alongar
a parte traseira das pernas.
4. DADOS TÉCNICOS
• Capacidade máxima: 100 kg
• Medidas: 510 x 350 x 140 mm
• Peso total: 2400 g
• Tabela para alongamento longitudinal
Comprimento (cm) 120 140 160 185 230
Força (N) 12 19 25 35 49
5. INDICAÇÃO PARA ELIMINAÇÃO
□ A eliminação da Fitness Board deve ser efectuada através de uma
entidade competente ou através da entidade responsável no seu município.
□ Observe as normas actualmente em vigor.
□ Em caso de dúvida, informe-se junto da entidade responsável pela
eliminação acerca de uma eliminação adequada do ponto de vista ambiental.
PORTUGUỆS
47
111011_GA_29-11_L5_JL.indd 47 12.10.2011 21:06:10
Page 44

6. O SEU PLANO DE TREINO PESSOAL
Data
Exercício
Balance-Board
Balance-Board com
pegas
Balance-Board com
tubos elásticos de tness
Twist-Board
Press-up-Board
Twist-Board com
tubos elásticos de tness
Press-up-Board com
tubos elásticos de tness
Stretching-Board
PORTUGUỆS
Data
Exercício
Balance-Board
Balance-Board com
pegas
Balance-Board com
tubos elásticos de tness
Séries Repetições Séries Repetições Séries Repetições
Séries Repetições Séries Repetições Séries Repetições
Twist-Board
Press-up-Board
Twist-Board com
tubos elásticos de tness
Press-up-Board com
tubos elásticos de tness
Stretching-Board
48
111011_GA_29-11_L5_JL.indd 48 12.10.2011 21:06:10
Page 45

TABLE OF CONTENTS
TRAINING PICTURES 2-5
DELIVERY CONTENTS 6
1. GENERAL INFOMATION 50-52
2. WARM-UP EXERCISES 52-53
3. EXERCISE
3.1 BALANCE-BOARD 54
3.2 BALANCE-BOARD WITH EXERCISE BANDS 55-56
3.3 BALANCE-BOARD WITH HANDLES 56-57
3.4 TWIST-BOARD 57
3.5 PRESS-UP-BOARD 57
3.6 TWIST-BOARD WITH EXERCISE BANDS 58
3.7 PRESS-UP-BOARD WITH EXERCISE BANDS 59
3.8 STRETCHING-BOARD 60
4. TECHNICAL DATA 61
ENGLISH
5. INFORMATION REGARDING DISPOSAL 61
6. YOUR PERSONAL TRAINING PLAN 62
49
111011_GA_29-11_L5_JL.indd 49 12.10.2011 21:06:10
Page 46

ENGLISH
50
1. GENERAL INFOMATION
The Fitness Board is a new, innovative work-out product. It differs from
earlier tness products for the following reasons:
• It can be used by people of all ages; it is easy to carry and can be
assembled and used with great ease.
• The stowable elements mean that it is easy to store and it takes up
very little room.
• With this product you can enjoy more than eight different training
functions which ensure that you are able to work out your whole body.
SAFETY AND WARNING NOTICE
• It is imperative that you hold on to the instruction manual so that it
can be referred to at a later date. You could cause yourself serious
injury by not following the safety instructions.
• Only clean the Fitness Board with lukewarm water, mild soap and
a soft cloth. Stickers, paints and chemicals can lead to the Fitness
Board becoming damaged. Areas of the equipment subjected to
stress, such as the handles, must be cleaned regularly with disinfectant.
• The Fitness Board is a piece of sports equipment and should not be
used for medical or commercial purposes.
• Please talk to your doctor before using the product if you suffer from
any health problems or allergies, or are recovering from an injury.
• If you should feel unwell during the exercise, end the work out immediately and seek medical attention.
• Before you start working out with the Fitness Board it is important to
warm up and to stretch your muscles.
• The maximum load of the Fitness Board is 100kg.
• The equipment must be assembled with care by an adult,so that any
injuries as a result of improper use are avoided later on.
• Please ensure that the equipment is only used once it has been fully
assembled for the respective activity.
• When using the equipment for regular exercise/activities, the equip-
111011_GA_29-11_L5_JL.indd 50 12.10.2011 21:06:10
Page 47

ment components must be checked every 1 to 2 months to guarantee
safety.
• If certain parts start to wear, you must stop using the equipment immediately. Please contact the specic manufacturer to order replacement parts.
• Wear comfortable sport clothing and trainers when exercising so that
you are as mobile as possible and you have good traction.
• In the rst week, your work-out sessions should last around 10-15
minutes. Later on, you can extend your sessions, but make sure they
don‘t last longer than 60 minutes as this can lead to the body being
overexerted.
• Below you will nd a selection of possible exercises which can be
carried out using the Fitness Board. Additional exercises can be
found in the corresponding literature.
• Under no circumstances should the equipment be used as a toy.
Please note that use of the equipment by children can lead to unforeseeable situations and dangers for which the manufacturer cannot be
held liable.
• Parents must forbid their children from using the equipment, as it is a
piece of moving sporting equipment. Unauthorised use can otherwise
result in injury and damage to property.
• If children are permitted to use the equipment, they must be instructed in how to use the equipment correctly and be informed of the
possible dangers. For reasons of safety, children must also be supervised by an adult in order to ensure proper use.
• Select a location to set up the equipment which offers sufcient
space for assembly and exercise. The location you select should
measure at least 2 x 2m and be well ventilated. The surface must be
even and at. Check that the equipment is on a solid base to ensure
that the Fitness Board doesn‘t slip during exercise. Always use the
supplied protective mat in order to protect sensitive ooring (such as
parquet) from damage.
• Ensure that all the parts have been assembled properly and without
any damage. There is a risk of injury if the parts are improperly as
ENGLISH
51
111011_GA_29-11_L5_JL.indd 51 12.10.2011 21:06:10
Page 48

• sembled. Damaged parts can inuence the safety and functionality of
the equipment.
• Ensure that all parts of the Fitness Board are in good condition and
are not damaged before using the equipment.
• Check that the loops are secure on a regular basis. Ensure that the
thread of the hook is tightly screwed on. If necessary, the thread has
to be oiled regularly.
• Regularly check the exercise bands for tears or damage. Damaged
exercise bands may no longer be used.
2. WARM-UP EXERCISES
Please don’t forget to take a few minutes to warm up before starting the
exercises. We will now show you a couple of simple warm-up exercises
which you should complete before the work out.
2.1 HEAD/NECK
□ Place one hand on the side of your head and pull it lightly to the side. In
this way, one side of your neck is stretched. Repeat the exercise on the
other side. Make sure that you do not pull too hard.
□ Now circle your head slowly in one direction, then repeat the exercise
in the other direction.
Do these exercises as many times as necessary until you feel a pleasant,
warm feeling in your neck.
ENGLISH
2.2 ARMS/SHOULDERS
□ Stretch your arms by placing an outstretched arm across your chest
and lightly pushing it with the other hand. Only push hard enough so that
you can feel a slight pull. Hold the arm for a short time in this position and
then change to stretch the other arm.
□ Bring one arm behind your head and stretch by lightly pushing down
on it with the other hand. This is a very good stretch for the underside of
your arms.
52
111011_GA_29-11_L5_JL.indd 52 12.10.2011 21:06:10
Page 49

□ Now interlock your ngers behind your back and pull them up. This
stretches the upper back muscles and the underside of your arms. Bend
your body slightly forwards during the exercise to warm up all your muscles.
□ Now loosen the shoulders a bit. Circle the shoulders carefully. Start
with a couple of circles backwards and then a couple of times forwards.
Then pull your shoulders up (like a big shrug) and let them fall again. Repeat this several times until your shoulder muscles feel pleasantly loose.
2.3 LEGS
□ Pull one leg up behind you so the heel of your foot is touching your
bum and stretch carefully by holding this position for a short time. Repeat
the exercise on the other side.
□ Now stretch the inner side of your legs. Do this by lunging to the side
and holding this position for a short time. This stretches the side of your
legs while at the same time supporting the warm-up of the other leg.
Change sides to warm up the other leg.
□ Now warm up your ankles a little bit. To do this, circle the ankle carefully a few times to the right and then to the left. Now repeat on the other
side, rst in one direction and then in the other.
You body should now be sufciently warmed up and you are now ready to
try out the various exercises with the Fitness Board
ENGLISH
53
111011_GA_29-11_L5_JL.indd 53 12.10.2011 21:06:10
Page 50

3. EXERCISE
Fig. 1
3.1. BALANCE-BOARD
3.1.1 ASSEMBLY
□ Simply open the board, take the upper part off and put it to the side for
the time being.
□ Then remove all the components which are situated in the lower part.
□ When the lower part is empty, put the upper part back on, lock it in
place and you are ready to go.
Fig.
A
3.1.2 EXERCISES
□ To start with, put both feet on the board and sway gently from one side
to the other.
□ When you feel secure, you can add your arms into the movement.
Increase your speed to a gentle jogging pace.
ENGLISH
54
111011_GA_29-11_L5_JL.indd 54 12.10.2011 21:06:10
□ When you feel secure with this, you can swing your arms above your
head and work out your whole body. Simply keep doing more and trying
out various positions.
ATTENTION
• Please only perform this exercise if you have full movement in your ankle.
• Please do not stand on the Twister whilst the equipment is being
used as a Balance-Board.
Page 51

Fig.
3.2 BALANCE-BOARD WITH EXERCISE STRAPS
B
3.2.1 ASSEMBLY
Exercise
band
Plastic
Bushing
Fig. 2
□ Open the board, take the upper part off and put the lower part to the
side for the time being.
□ Now attach the bands. Push the plastic bushing at the end of the exer-
cise bands into the matching opening on the upper part of the equipment
(Fig. 2).
□ Ensure that the protruding guide ts into the respective guide notch (Fig. 2).
□ Then, pull on the exercise bands so that they are xed in place in the
guide rails.
□ Now reassemble the upper and lower parts of the board. To remove
the exercise bands, pull the plastic bushing downwards and out.
ENGLISH
3.2.2 EXERCISES
□ Grasp both bands with your hands, step on to the board with both feet
and begin to sway from one side to the other.
□ When you have found your balance and feel secure you can begin to
use your arms by lifting one arm up, then the other. This is excellent training for your arms and legs. You can change your position by lifting your
arms to the side. This is a great exercise for working out your whole body
and all the muscle groups.
55
111011_GA_29-11_L5_JL.indd 55 12.10.2011 21:06:10
Page 52

LATERAL STRETCH TABLE
Length (cm) 120 140 160 185 230
Force (N) 12 19 25 35 49
ATTENTION
Do not stretch the band by more than 230cm. The force tolerance range
is around 20% (+/-).
Fig.
3.3 BALANCE-BOARD WITH HANDLES
3.3.1 ASSEMBLY
C
Fig.3
□ Leave the upper and lower parts assembled and insert the handles into
the holes meant for them. Make sure they are pointed in the right direction. The longer end of the handle (marked with an arrow) belongs in hole
ENGLISH
56
111011_GA_29-11_L5_JL.indd 56 12.10.2011 21:06:10
A, and the shorter end of the handle should be placed in hole B (Fig. 3).
□ To remove the handles after exercising, give each of them a sharp pull
and remove using a shaking motion.
3.3.2 EXERCISES
□ Take hold of the handles with your hands, lean slightly forwards and
rock from one side to the other.Try this several times.
□ When you feel strong enough, you can raise your knees off the oor
Page 53

and repeat the exercise in the press-up position.
Fig.
3.4 TWIST-BOARD
3.4.1 ASSEMBLY
□ Open the board and lift up the upper part.
□ Take the lower part and lay it to the side for the time being.
□ Then simply place the Twist-Board on the protective mat.
3.4.2 EXERCISES
□ To start with, step on to the Twist-Board and turn to and fro. You can
twist up to 65° in either direction using the Twist-Board.
□ If you would like to increase the level of difculty you can go down onto
your knees. You can also change the position of your arms and try to lift
them over your head.
3.5 PRESS-UP-BOARD
D
Fig.
E
3.5.1 ASSEMBLY
□ Open the board, remove the upper part and put the lower part to the
side for the time being
□ Put the upper part on the oor and attach the handles. (See exercise
3.3 for handle assembly).
3.5.2 EXERCISES
□ First, kneel on the protective mat. Then take hold of the handles with
your hands and move up and down with the body.
□ If you want to, you can cross your legs behind you: This is another
variant to the press-up.
□ You can increase the level of difcult even more by raising your knee
off the oor and stretching your legs. Now do a press-up.
111011_GA_29-11_L5_JL.indd 57 12.10.2011 21:06:10
ENGLISH
57
Page 54

Fig.
3.6 TWIST-BOARD WITH EXERCISE BANDS
3.6.1 ASSEMBLY
□ First, open the board, take the cover off and put the lower part to one
side.
□ Place the Twister on the protective mat and attach the exercise bands.
(See exercise 3.2 for instructions on how to attach the bands).
3.6.2 EXERCISES
□ To start with, use the Twist-Board to stabilise your body. To do this,
move your body gently from right to left on the Twist-Board (twists of up
to 65° are possible in either direction). When you are ready, you can then
use the bands as fast or as slowly as you want.
□ Step off the Twist-Board and stand alongside the Twister, working out
your arms by stretching them above your head.
□ Now try to stretch your arms above your head laterally. When you feel
ready for it, you can move both arms at the same time. Repeat these
exercises as many times as you like.
H
LATERAL STRETCH TABLE
Length (cm) 120 140 160 185 230
Force (N) 12 19 25 35 49
ENGLISH
58
111011_GA_29-11_L5_JL.indd 58 12.10.2011 21:06:11
ATTENTION
Do not stretch the band by more than 230cm. The force tolerance range
is around 20% (+/-).
Page 55

Fig.
3.7 PRESS-UP-BOARD WITH EXERCISE BANDS
3.7.1 ASSEMBLY
Fig. 4
□ First, open the board, take the upper part off and lay the lower part to one
side.
□ For this exercise, the exercise bands must be attached to the front side of
the equipment (Fig. 4). To do this, the plastic bushing at the end of the exercise
bands must be removed.
□ To remove these, pull the exercise band lengthways so that the band beco-
mes thinner and can t through the opening on the side of the plastic bushing
(Fig. 5). Attach the handles as normal (see exercise 3.3).
G
Fig. 5
ENGLISH
3.7.2 EXERCISES
You can use the Press-up-Board with the exercise bands in the following
ways:
□ Attach the exercise bands to your feet with the help of the loops and
hold on to the handles.
□ Now simply stretch one leg out behind you and upwards a couple of
times and then swap to the other leg.
59
111011_GA_29-11_L5_JL.indd 59 12.10.2011 21:06:11
Page 56

Fig.
3.8 STRETCHING-BOARD
3.8.1 ASSEMBLY
□ Simply open the board, take off the upper part and lay it to one side.
□ Then take the lower part, turn it over and place it on the mat.
3.8.2 EXERCISES
Here are a few possibilities for using the Stretching-Board to stretch your
muscles before and after the work out:
□ For the rst exercise, sit down in front of the board.
□ Lay both legs on the board and move your head towards your knees.
Afterwards, try this with only one leg.
Another exercise:
□ Place one foot on the board and simply stretch a little bit forwards. In
doing this you will stretch the upper part of your thigh. When you feel ok
with it, you can always go further.
□ Place the leg behind you a little further back and lower your body. Stay
in this position for a short while and then switch to the other leg.
H
If you want to, you can try out the following exercise with the leg behind
you:
□ Touch the oor with your knee. In this way, the upper thigh is stretched
even further.
ENGLISH
60
111011_GA_29-11_L5_JL.indd 60 12.10.2011 21:06:11
The next exercise stretches your calf muscles:
□ Place both feet on the board and simply stretch both legs out. You
can now try to touch your toes to stretch the back side of your legs even
further
Page 57

4. TECHNICAL DATA
• Maximum load: 100kg
• Dimensions: 510 x 350 x 140mm
• Total weight: 2,400g
• Lateral stretch table
Length (cm 120 140 160 185 230
Force (N) 12 19 25 35 49
5. INFORMATION REGARDING DISPOSAL
□ Dispose of the Fitness-Board via an approved waste disposal company
or via the waste disposal facilities of your local council.
□ Pay attention to valid regulations.
□ In case of doubt, ask your local waste disposal facility about environ-
mentally-friendly disposal.
ENGLISH
61
111011_GA_29-11_L5_JL.indd 61 12.10.2011 21:06:11
Page 58

6. YOUR PERSONAL TRAINING PLAN
Date
ENGLISH
Exercise
Balance-Board
Balance-Board with
handles
Balance-Board with
exercise bands
Twist-Board
Press-up-Board
Twist-Board with exercise
bands
Press-up-Board with
training bands
Stretching-Board
Date
Exercise
Balance-Board
Balance-Board with
handles
Balance-Board with
exercise bands
Twist-Board
Sets Repeat Sets Repeat Sets Repeat
Sets Repeat Sets Repeat Sets Repeat
Press-up-Board
Twist-Board with exercise
bands
Press-up-Board with
training bands
Stretching-Board
62
111011_GA_29-11_L5_JL.indd 62 12.10.2011 21:06:11
Page 59

INHALTSVERZEICHNIS
TRAININGS-ABBILDUNGEN 2-5
LIEFERUMFANG 6
1. ALLGEMEINE HINWEISE 64-66
2. AUFWÄRMÜBUNGEN 66-67
3. TRAINING
3.1 BALANCE-BOARD 68-69
3.2 BALANCE-BOARD MIT TRAININGSBÄNDERN 69-70
3.3 BALANCE-BOARD MIT GRIFFEN 70-71
3.4 TWIST-BOARD 71
3.5 PRESS-UP-BOARD 71-72
3.6 TWIST-BOARD MIT TRAININGSBÄNDERN 72-73
3.7 PRESS -UP-BOARD MIT TRAININGSBÄNDERN 73-74
3.8 STRETCHING-BOARD 74-75
4. TECHNISCHE DATEN 75
5. HINWEIS ZUR ENTSORGUNG 75
6. IHR PERSÖNLICHER TRAINIGSPLAN 76
DEUTSCH
63
111011_GA_29-11_L5_JL.indd 63 12.10.2011 21:06:11
Page 60

DEUTSCH
64
1. ALLGEMEINE HINWEISE
Das Fitness Board ist ein neues, innovatives Trainingsgerät. Es unterscheidet sich aus fol genden Gründen von früheren Fitnessprodukten:
• Es kann von allen Altersgruppen verwendet werden, ist leicht zu tragen und lässt sich ganz einfach zusammenbauen und verwenden.
• Mit den verstaubaren Anbauteilen lässt es sich leicht lagern und
benötigt wenig Platz.
• Bei diesem Gerät können Sie sich an mehr als acht verschiedenen
Trainingsfunktionen erfreuen, die sicherstellen, dass Sie Ihren gesamten Körper trainieren.
SICHERHEITS- UND WARNHINWEISE
• Bewahren Sie die Gebrauchsanleitung unbedingt für späteres
Nachlesen auf. Das Nicht befolgen der Sicherheitshinweise kann zu
ernsthaften Verletzungen führen.
• Reinigen Sie das Fitness Board nur mit lauwarmen Wasser, milder
Seife und einem weichen Tuch. Sämtliche Aufkleber, Lacke und Chemikalien können zu einer Beschädigung des Fitnessboards führen.
Stark beanspruchte Stellen, wie zum Beispiel die Griffe, müssen
regelmäßig mit Desinfektionsmittel gereinigt werden.
• Das Fitness Board ist ein Sportgerät und darf nicht für medizinische
oder kommerzielle Zwecke genutzt werden.
• Bitte halten Sie vor der Nutzung des Gerätes Rücksprache mit Ihrem
Arzt, falls bei Ihnen Gesundheitsprobleme oder allergische Reaktionen bestehen oder sie sich gerade von einer Verletzung erholen.
• Sollten Sie sich während der Übungen unwohl fühlen, beenden Sie
das Training umgehend und suchen Sie einen Arzt auf.
• Vor Beginn des Trainings mit dem Fitness Board ist es wichtig, sich
gründlich aufzuwärmen und den Körper zu dehnen, um Verletzungen
und Muskelkater zu vermeiden.
• Die maximale Belastbarkeit des Fitness Boards beträgt 100 kg.
• Das Gerät muss sorgfältig durch einen Erwachsenen montiert werden, um
spätere Verletzungen durch unsachgemäße Handhabung zu vermeiden.
111011_GA_29-11_L5_JL.indd 64 12.10.2011 21:06:11
Page 61

• Bitte achten Sie darauf, dass das Gerät erst verwendet wird, wenn es
vollständig für die jeweilige Übung zusammengebaut wurde.
• Bei der Verwendung für regelmäßiges Training/Übungen müssen die
Komponenten des Gerätes alle 1 bis 2 Monate überprüft werden, um
die Sicherheit zu gewährleisten.
• Beim Verschleiß von Teilen muss das Gerät umgehend außer Betrieb
genommen wer den. Für Ersatzteil-Bestellungen wenden Sie sich
bitte an den angegebenen Hersteller.
• Tragen Sie während des Trainings bequeme Sportbekleidung und
Turnschuhe, um mög lichst beweglich zu sein und eine gute Bodenhaftung zu haben.
• In der ersten Woche sollten Ihre Trainingseinheiten ungefähr 10-15
Minuten andauern. Später können Sie auch länger trainieren. Eine
maximale Trainingszeit von 60 Minuten darf jedoch nicht überschritten werden, um einer Überanstrengung des Körpers vorzubeugen.
• Nachfolgend sehen Sie nur eine Auswahl möglicher Übungen, die mit
dem Fitness Board durchgeführt werden können. Weitere Übungen
können entsprechender Literatur entnom men werden.
• Das Gerät darf unter keinen Umständen als Spielzeug betrachtet
werden. Bitte beach ten Sie, dass die Verwendung des Gerätes durch
Kinder zu unvorhergesehen Situationen und Gefahren führen kann,
für die der Hersteller nicht haftbar gemacht werden kann.
• Eltern müssen ihren Kindern die Verwendung des Gerätes untersagen, da es sich um ein bewegliches Sportgerät handelt.
Gefahr durch Verletzungen und Sachbeschädigung können sonst
die Folgen sein.
• Wenn es Kindern erlaubt ist, das Gerät zu verwenden, müssen Sie in
dessen korrekter Verwendung und den möglichen Gefahren geschult
werden. Außerdem müssen Kinder aus Sicherheitsgrün den von einem Erwachsenen beaufsichtigt werden, um eine nicht sachgemäße
Verwendung zu vermeiden.
• Wählen Sie einen Aufstellort, der ausreichend Platz für Montage und
Training bietet. Die gewählte Fläche sollte mindestens 2 x 2 m groß
und gut belüftet sein. Der Untergrund muss eben und gerade sein.
DEUTSCH
65
111011_GA_29-11_L5_JL.indd 65 12.10.2011 21:06:11
Page 62

• Überprüfen Sie den sicheren Stand, um ein Verrutschen des Fitness
Boards zu vermeiden. Verwenden Sie immer die mitgelieferte Schutzmatte, um empndliche Böden (z.B. Parkett) vor Beschädigungen zu
schützen.
• Stellen Sie sicher, dass alle Teile unbeschädigt und sachgerecht
montiert sind. Bei unsachgemäßer Montage besteht Verletzungsgefahr. Beschädigte Teile können die Sicherheit und Funktion beeinussen.
• Achten Sie darauf, dass alle Teile des Fitnessboards vor Gebrauch in
ordnungsgemäßem Zustand und nicht beschädigt sind.
• Überprüfen Sie regelmäßig die Befestigungen der Schlaufen. Stellen
Sie sicher, dass das Gewinde des Hakens fest verschlossen ist. Gegebenenfalls muss das Gewinde regelmäßig geölt werden.
• Überprüfen Sie regelmäßig die Fitnessbänder auf Risse oder Beschädigungen. Defekte Trainingsbänder dürfen nicht mehr verwendet
werden.
2. AUFWÄRMÜBUNGEN
Bitte denken Sie daran, sich einige Minuten aufzuwärmen, bevor sie mit
den Übungen be ginnen. Wir werden Ihnen nun ein paar einfache Aufwärmübungen vorstellen, die sie vor dem Trai ning absolvieren sollten.
2.1 KOPF/NACKEN
□ Legen sie eine Hand auf Ihren Kopf und ziehen Sie ihn leicht auf
eine Seite. Dadurch wird eine Seite Ihres Halses gedehnt. Machen Sie
dasselbe auf der anderen Seite. Achten Sie darauf, dass sie nicht zu fest
ziehen.
□ Nun kreisen Sie Ihren Kopf langsam in die eine Richtung, anschlie-
ßend in die andere Rich tung.
Machen Sie diese Übungen so oft wie nötig, bis Sie ein angenehmes,
warmes Gefühl im Na cken verspüren.
DEUTSCH
66
111011_GA_29-11_L5_JL.indd 66 12.10.2011 21:06:11
Page 63

2.2 ARME/SCHULTERN
□ Dehnen Sie Ihren Arm, indem Sie ihn vorne gestreckt über Ihre Brust
legen und leicht mit der anderen Hand drücken. Drücken Sie auch diesmal nur so stark, bis Sie ein leichtes Ziehen spüren. Halten Sie den Arm
kurz in dieser Position und wechseln Sie dann zum anderen Arm.
□ Bewegen Sie nun einen Arm hinter Ihren Kopf und dehnen Sie Ihn,
indem Sie ihn leicht nach unten drücken. Dies ist eine sehr gute Dehnung
für die Rückseiten Ihrer Arme.
□ Jetzt verschränken Sie Ihre Hände hinter dem Rücken und ziehen sie
nach oben. Dies dehnt Ihre oberen Rückenmuskeln und die Rückseite
Ihrer Arme. Beugen Sie sich dabei etwas nach vorne, dadurch wärmen
Sie all Ihre Muskeln auf.
□ Jetzt lockern Sie ein wenig die Schultern. Kreisen Sie vorsichtig die
Schultern. Zuerst ein paar Mal zurück und dann nach vorne. Anschließend ziehen Sie die Schultern einige Male nach oben und lassen Sie
wieder fallen. Wiederholen Sie dies ein paar Mal, bis sich Ihre Schultern
angenehm locker anfühlen.
2.3 BEINE
□ Winkeln Sie ein Bein nach hinten ab und dehnen Sie es vorsichtig,
indem Sie diese Position kurze Zeit halten. Wiederholen Sie dies mit dem
anderen Bein.
□ Dehnen Sie jetzt die Innenseiten der Beine. Machen Sie hierfür einen
Ausfallschritt zur Seite. Dadurch dehnen Sie eine Seite Ihres Beines
und unterstützen gleichzeitig auch das Aufwärmen des anderen Beines.
Wechseln Sie auch hier zum anderen Bein.
□ Jetzt wärmen wir unsere Knöchel noch ein wenig auf. Dafür kreisen
Sie ein paar Mal vorsich tig mit einem Knöchel zuerst nach rechts und
dann nach links. Jetzt noch das andere Bein. Zuerst ein paar Mal in die
eine Richtung und dann in die andere Richtung.
DEUTSCH
Jetzt sollte Ihr Körper aufgewärmt sein. Sie sind nun bereit, die verschiedenen Übungen mit dem Fitnessboard auszuprobieren.
67
111011_GA_29-11_L5_JL.indd 67 12.10.2011 21:06:11
Page 64

3. TRAINING
3.1. BALANCE-BOARD
3.1.1 AUFBAU
□ Öffnen Sie das Board, nehmen Sie das Oberteil ab und legen Sie es
für einen Moment zur Seite.
□ Entfernen Sie dann alle Teile, die sich im Unterteil benden.
□ Wenn das Unterteil leer ist, setzen Sie das Oberteil wieder darauf,
verriegeln Sie es und schon sind Sie fertig.
Abb. 1
Abb.
A
3.1.2 ÜBUNGEN
□ Stellen Sie zuerst beide Füße auf das Board und schaukeln Sie vor-
sichtig von einer Seite auf die andere.
□ Wenn Sie sich bei dieser Bewegung sicher fühlen, können Sie Ihre Arme
dazu nehmen. Steigern Sie Ihre Geschwindigkeit zu einem leichten Lauf.
□ Wenn Sie sich dabei sicher fühlen, können Sie Ihre Arme über dem
Kopf schwingen und somit Ihren ganzen Körper trainieren. Machen Sie
einfach weiter und probieren Sie ver schiedene Positionen aus.
ACHTUNG
• Bitte führen Sie diese Übungen nur aus, wenn Ihre Sprunggelenksbe-
DEUTSCH
68
111011_GA_29-11_L5_JL.indd 68 12.10.2011 21:06:11
weglichkeit vollkommen gegeben ist.
Page 65

• Bitte stellen Sie sich nicht auf die Drehscheibe, während das Gerät
als Balance-Board verwendet wird.
Abb.
3.2 BALANCE-BOARD MIT TRAININGSBÄNDERN
B
3.2.1 AUFBAU
Trainingsband
Hülse
Abb. 2
□ Öffnen Sie das Board, nehmen Sie das Oberteil ab und legen Sie das
Unterteil einen Moment lang zur Seite.
□ Jetzt befestigen Sie die Bänder. Schieben Sie die Kunststoffhülsen
am Ende der Trainingsbänder in die dafür vorgesehene Aussparung am
Oberteil des Geräts. (Abb. 2)
□ Achten Sie darauf, dass die hervorstehenden Führungen in der dafür
vorgesehenen Führungsnut verläuft. (Abb.2)
□ Anschließend ziehen Sie an den Trainingsbändern, damit diese fest in
der Führungsschiene sitzen.
□ Jetzt bauen sie das Ober- und Unterteil des Boards wieder zusammen.
Um die Trainingsbänder wieder zu entfernen, schieben Sie die Kunststoffhülse wieder nach unten raus.
3.2.2 ÜBUNGEN
DEUTSCH
□ Fassen Sie die beiden Bänder mit Ihren Händen. Steigen Sie mit bei-
den Füßen auf das Board. Fangen Sie nun an, hin und her zu schaukeln.
69
111011_GA_29-11_L5_JL.indd 69 12.10.2011 21:06:11
Page 66

□ Wenn Sie Ihr Gleichge wicht gefunden haben und sich sicher fühlen,
können Sie anfangen, Ihre Arme einzusetzen, indem Sie sie abwechselnd nach oben bewegen. Dies ist ein hervorragendes Training für Ihre
Arme und Beine. Sie können Ihre Position verändern, indem Sie die Arme
zur Seite bewegen. Das ist eine tolle Übung, um Ihren ganzen Körper
und all Ihre Muskelgruppen zu trainieren.
TABELLE ZUR LÄNGSDEHNUNG
Länge (cm) 120 140 160 185 230
Kraft (N) 12 19 25 35 49
ACHTUNG
Dehnen Sie das Band nicht um mehr als 230 cm. Der Toleranzbereich für
die Kraft beträgt rund 20% (+/-).
3.3 BALANCE-BOARD MIT GRIFFEN
3.3.1 AUFBAU
Abb.
C
Abb.3
□ Lassen Sie das Unter- und das Oberteil zusammengebaut und stecken
Sie die Griffe in die dafür vorgesehenen Öffnungen. Achten Sie hierbei
auf die richtige Richtung. Das lange Ende des Griffes (durch einen Pfeil
gekennzeichnet) gehört in Öffnung A, das kurze Ende des Griffes stecken
DEUTSCH
70
111011_GA_29-11_L5_JL.indd 70 12.10.2011 21:06:11
Sie bitte in Öffnung B (Abb. 3).
Page 67

□ Um die Griffe nach beendeter Übung wieder zu lösen, ziehen Sie kräf-
tig daran und führen Sie dabei leichte Rüttelbewegungen durch.
3.3.2 ÜBUNGEN
□ Greifen Sie die Griffe mit Ihren Händen und lehnen Sie sich einfach ein
Stück nach vorne. Schaukeln Sie dann von einer Seite auf die andere.
Probieren Sie das ein paar Mal.
□ Wenn Sie sich stark genug fühlen, können Sie Ihre Knie vom Boden
abheben und die Übung in der Liegestützposition wiederholen.
Abb.
3.4 TWIST-BOARD
3.4.1 AUFBAU
□ Öffnen Sie das Board und heben Sie das Oberteil ab.
□ Nehmen Sie das Unterteil und legen Sie es zur Seite.
□ Stellen Sie das Twist-Board dann einfach auf die Schutzmatte.
3.4.2 ÜBUNGEN
D
□ Steigen Sie zuerst auf das Twist-Board und drehen Sie sich hin und
her. Drehungen bis zu 65° in beide Richtungen sind mit dem Twist-Board
möglich.
□ Wenn Sie den Schwierigkeitsgrad steigern möchten, können Sie dabei
in die Knie gehen. Sie können auch die Position Ihrer Arme verändern
und versuchen, sie über Ihren Kopf zu bewegen.
3.5 PRESS-UP-BOARD
3.5.1 AUFBAU
□ Öffnen Sie das Board, entfernen Sie das Oberteil und stellen Sie das
Unterteil zur Seite.
□ Stellen Sie das Oberteil auf den Boden und montieren Sie die Griffe
(Montage der Griffe: Siehe Übung 3.3).
111011_GA_29-11_L5_JL.indd 71 12.10.2011 21:06:11
Abb.
E
DEUTSCH
71
Page 68

3.5.2 ÜBUNGEN
□ Knien Sie sich zuerst auf die Schutzmatte. Greifen Sie nun die Griffe
mit Ihren Händen und gehen Sie einfach mit dem Körper nach unten und
nach oben.
□ Wenn Sie möchten, können Sie die Beine hinten kreuzen; dies ist eine
weitere Variante der Liegestütze.
□ Sie können die Schwierigkeit nochmals erhöhen: Heben Sie hierfür die
Knie vom Boden ab und strecken Sie Ihre Beine durch. Machen Sie nun
die Liegestütze.
Abb.
3.6 TWIST-BOARD MIT TRAININGSBÄNDERN
3.6.1 AUFBAU
□ Sie öffnen zuerst das Board, nehmen das Oberteil ab und stellen das
Unterteil zur Seite.
□ Stellen Sie dann das Twist-Board auf die Schutzmatte und befestigen
Sie die Trainingsbänder (Befestigung der Trainingsbänder: Siehe Übung
3.2).
F
3.6.2 ÜBUNGEN
□ Verwenden Sie das Twist-Board zunächst, um Ihren Körper zu sta-
bilisieren. Drehen Sie hierfür Ihren Körper auf dem Twist-Board leicht
nach rechts und links (Drehungen bis zu 65° in beide Richtungen sind
möglich). Wenn Sie bereit sind, können Sie die Bänder dazu nehmen, so
schnell oder langsam wie Sie möchten.
□ Steigen Sie nun vom Twist-Board herunter und stellen Sie sich neben
die Drehscheibe. Nun trainieren Sie Ihre Arme, indem Sie diese über
Ihren Kopf strecken.
□ Versuchen Sie jetzt, die Arme seitlich nach oben zu strecken. Wenn
Sie sich bereit dazu fühlen, können Sie auch beide Arme gleichzeitig
bewegen. Wiederholen Sie diese Übungen je nach Bedarf.
DEUTSCH
72
111011_GA_29-11_L5_JL.indd 72 12.10.2011 21:06:12
Page 69

TABELLE ZUR LÄNGSDEHNUNG
Länge (cm) 120 140 160 185 230
Kraft (N) 12 19 25 35 49
ACHTUNG
Dehnen Sie das Band nicht um mehr als 230 cm. Der Toleranzbereich für
die Kraft beträgt rund 20% (+/-).
Abb.
3.7 PRESS-UP-BOARD MIT TRAININGSBÄNDERN
3.7.1 AUFBAU
Abb. 4
G
Abb. 5
□ Öffnen Sie zuerst das Board, nehmen Sie das Oberteil ab und legen
Sie das Unterteil zur Seite.
□ Die Trainingsbänder müssen für diese Übung an der Vorderseite (Abb.
4) befestigt werden. Hierfür müssen die Kunststoffhülsen, welche sich am
Ende der Trainingsbänder benden, entfernt werden.
□ Ziehen Sie hierzu das Trainingsband etwas in die Länge, um das dadurch
dünner werdende Trainingsband durch die seitliche Öffnung der Kunststoffhülse
zu ziehen (Abb. 5). Die Griffe befestigen Sie wie gewohnt (Siehe Übung 3.3).
111011_GA_29-11_L5_JL.indd 73 12.10.2011 21:06:12
DEUTSCH
73
Page 70

3.7.2 ÜBUNGEN
Sie können das Press-up-Board mit den Trainingsbändern folgendermaßen verwenden:
□ Be festigen Sie die Trainingsbänder mit Hilfe der Schlaufen an Ihren
Füßen und halten Sie sich an den Griffen fest.
□ Strecken Sie nun Ihr Bein einfach ein paar Mal nach hinten oben und
wechseln anschließend zum anderen Bein.
Abb.
3.8 STRETCHING-BOARD
3.8.1 AUFBAU
□ Öffnen Sie das Board, nehmen Sie das Oberteil ab und legen Sie es
zur Seite.
□ Nehmen Sie dann das Unterteil, drehen Sie es um und legen Sie es
auf die Schutzmatte.
3.8.2 ÜBUNGEN
Hier sind einige Möglichkeiten, wie Sie das Stretching-Board verwenden
können, um Ihre Muskeln vor und nach dem Training zu dehnen:
□ Bei der ersten Übung setzen Sie sich vor das Board.
□ Legen Sie beide Beine darauf und ziehen Sie Ihren Kopf Richtung
Knie. Sie können dies auch mit nur einem Bein versuchen.
H
Eine weitere Übung:
□ Stellen Sie einen Fuß auf das Board und strecken Sie sich einfach
etwas nach vorne. Damit dehnen Sie den oberen Teil des Oberschenkels.
Wenn Sie sich gut fühlen, können Sie tiefer gehen.
□ Stellen Sie Ihr hinteres Bein etwas weiter nach hinten und gehen Sie
nach unten. Bleiben Sie kurz in dieser Stellung und wechseln Sie dann
zum anderen Bein.
DEUTSCH
74
111011_GA_29-11_L5_JL.indd 74 12.10.2011 21:06:12
Page 71

Wenn Sie möchten, können Sie folgende Übung mit Ihrem hinteren Bein
probieren:
□ Berühren Sie mit dem Knie den Boden, dadurch wird der obere Ober-
schenkel noch zusätzlich gedehnt.
Die nächste Übung dehnt Ihre Wadenmuskeln:
□ Stellen Sie beide Füße auf das Board und strecken Sie einfach Ihre
Beine ganz durch. Jetzt können Sie versuchen, Ihre Zehen zu berühren,
um die Rückseite Ihrer Beine weiter zu dehnen.
4. TECHNISCHE DATEN
• Maximale Belastbarkeit: 100 kg
• Maße: 510 x 350 x 140 mm
• Gesamt-Gewicht: 2400 g
• Tabelle zur Längsdehnung
Länge (cm) 120 140 160 185 230
Kraft (N) 12 19 25 35 49
5. HINWEIS ZUR ENTSORGUNG
□ Entsorgen Sie das Fitnessboard über einen zugelassenen Entsor-
gungsbetrieb oder über Ihre kommunale Entsorgungseinrichtung.
□ Beachten Sie die aktuellen Vorschriften.
□ Erkundigen Sie sich im Zweifelsfall bei Ihrer Entsorgungseinrichtung
über eine umweltgerechte Entsorgung.
DEUTSCH
75
111011_GA_29-11_L5_JL.indd 75 12.10.2011 21:06:12
Page 72

6. IHR PERSÖNLICHER TRAININGSPLAN
Datum
Übung Sätze Wdh Sätze Wdh Sätze Wdh
Balance-Board
Balance-Board mit Griffen
Balance-Board mit
Trainingsbändern
Twist-Board
Press-up-Board
Twist-Board mit
Trainingsbändern
Press-up-Board mit
Trainingsbändern
Stretching-Board
Datum
Übung Sätze Wdh Sätze Wdh Sätze Wdh
Balance-Board
Balance-Board mit Griffen
Balance-Board mit
Trainingsbändern
Twist-Board
Press-up-Board
Twist-Board mit
Trainingsbändern
Press-up-Board mit
Trainingsbändern
Stretching-Board
DEUTSCH
76
111011_GA_29-11_L5_JL.indd 76 12.10.2011 21:06:12
Page 73

_____________________________________________________________
_____________________________________________________________
_____________________________________________________________
_____________________________________________________________
_____________________________________________________________
_____________________________________________________________
_____________________________________________________________
_____________________________________________________________
_____________________________________________________________
_____________________________________________________________
_____________________________________________________________
_____________________________________________________________
_____________________________________________________________
_____________________________________________________________
_____________________________________________________________
_____________________________________________________________
_____________________________________________________________
_____________________________________________________________
_____________________________________________________________
_____________________________________________________________
_____________________________________________________________
77
111011_GA_29-11_L5_JL.indd 77 12.10.2011 21:06:12
Page 74

_____________________________________________________________
_____________________________________________________________
ESPAÑOL
_____________________________________________________________
_____________________________________________________________
_____________________________________________________________
_____________________________________________________________
_____________________________________________________________
_____________________________________________________________
_____________________________________________________________
_____________________________________________________________
_____________________________________________________________
_____________________________________________________________
_____________________________________________________________
_____________________________________________________________
_____________________________________________________________
_____________________________________________________________
_____________________________________________________________
_____________________________________________________________
_____________________________________________________________
_____________________________________________________________
_____________________________________________________________
78
111011_GA_29-11_L5_JL.indd 78 12.10.2011 21:06:12
 Loading...