

Crivit MR-1442 User Manual [en, cs, de, pl]
MULTIFUNCTIONAL CHIN-UP BAR
MULTIFUNCTIONAL CHIN-UP BAR
Instructions for use
TÖBBFUNKCIÓS EDZŐRÚD
Használati útmutató
MULTIFUNKČNÍ HRAZDA DO DVEŘÍ
Návod k obsluze
MULTIFUNKTIONS-TÜRRECK
Bedienungsanleitung
IAN 93665
WIELOFUNKCYJNY DRĄŻEK
ROZPOROWY
Instrukcja obsługi
MULTIFUNKCIJSKI PODBOJNI DROG
Navodilo za uporabo
MULTIFUNKČNÁ DVEROVÁ HRAZDA
Návod na obsluhu
DE/AT/CH
Contents/Spis treści/Tartalomjegyzék/Kazalo/Obsah/Obsah
List of contents ...................................................... 6
Technical specifications ....................................... 6
Conventional use ................................................. 6
Safety guidelines for mounting in
a door frame ......................................................... 6
Safety instructions for use .............................. 6 - 7
Assembly .............................................................. 7
Overview of parts .................................. 7
Assembling to door frames ................................. 7
General training hints .......................................... 8
General training planning .................................. 8
Exercises ............................................................... 8
Care and storage ................................................ 8
Advice on disposal .............................................. 8
3 Years Warranty ................................................ 9
A csomag tartalma ............................................ 14
Műszaki Adatok ................................................ 14
Rendeltetésszerű használat .............................. 14
Biztonsági tudnivalók az ajtókeretben
való rögzítéshez ................................................. 14
Biztonsági tudnivalók a használathoz ..... 14 - 15
Összeszerelés .................................................... 15
Alkatrészek áttekintése ........................ 15
Felszerelés az ajtókeretbe ........................ 15 - 16
Általános tudnivalók edzéshez ........................ 16
Általános edzésterv ............................................16
Gyakorlatok ....................................................... 16
Tisztítás, tárolás .................................................. 16
Tudnivalók a hulladékkezelésről ...................... 16
3 év garancia .................................................... 17
Zakres dostawy ................................................. 10
Dane techniczne ................................................ 10
Przeznaczone do określonego użytkowania . . 10
Wskazówki bezpieczeństwa, co do
montażu we framudze ....................................... 10
Wskazówki bezpieczeństwa, co
do użycia ..................................................... 10 - 11
Montaż ............................................................... 11
Zarys części ......................................... 11
Montaż we framudze ........................................ 12
Ogólne wskazówki treningowe ....................... 12
Ogólny plan treningowy ................................... 12
Ćwiczenia .................................................. 12 - 13
Pielęgnacja, magazynowanie .......................... 13
Uwagi odnośnie recyklingu .............................. 13
3 lata gwarancji ................................................ 13
Obseg dobave .................................................. 18
Tehnični podatki ................................................. 18
Namen uporabe ................................................ 18
Varnostni napotki za montažo na
vratni podboj .......................................................18
Varnostni napotki za uporabo .................. 18 - 19
Sestavitev ............................................................ 19
Pregled delov ....................................... 19
Montaža med vratni okvir ................................ 19
Splošni napotki za vadbo ................................. 19
Splošni plan treninga ........................................ 20
Vaje ..................................................................... 20
Vzdrževanje, skladiščenje ................................ 20
Napotki za odlaganje v smeti .......................... 20
3 leta garancije ......................................... 20 - 21
Rozsah dodávky ................................................ 22
Technické Údaje ................................................ 22
Použití ke stanovenému účelu ........................... 22
Bezpečnostní upozornění k montáži do
dveřního rámu .................................................... 22
Bezpečnostní upozornění týkající se
používání .................................................... 22 - 23
Montáž ............................................................... 23
Přehled dílů .......................................... 23
Montáž na rám dveří ........................................ 23
Všeobecné pokyny pro cvičení ........................ 24
Všeobecné plánování tréninku ......................... 24
Cviky ................................................................... 24
Údržba, skladování ........................................... 24
Pokyny k likvidaci .............................................. 24
3 roky záruky ..................................................... 25
2
Rozsah dodávky ................................................ 26
Technické Údaje ................................................ 26
Štandardné použitie .......................................... 26
Bezpečnostné pokyny pre montáž na
dverový rám ....................................................... 26
Bezpečnostné pokyny na používanie ...... 26 - 27
Montáž ............................................................... 27
Prehľad častí ........................................ 27
Montáž na dverový rám ........................... 27 - 28
Všeobecné pokyny ohľadom tréningu ............ 28
Všeobecný tréningový plán .............................. 28
Cvičenia ............................................................. 28
Údržba, skladovanie ......................................... 28
Pokyny k likvidácii ............................................. 28
3 roky záruka ..................................................... 29

Lieferumfang ...................................................... 30
Technische Daten .............................................. 30
Bestimmungsgemäße Verwendung ................. 30
Sicherheitshinweise zur Montage
am Türrahmen ....................................................30
Sicherheitshinweise zur Benutzung ......... 30 - 31
Zusammenbau .................................................. 31
Teileübersicht ....................................... 31
Montage am Türrahmen ................................... 32
Allgemeine Trainingshinweise ......................... 32
Allgemeine Trainingsplanung .......................... 32
Übungen .................................................... 32 - 33
Pflege, Lagerung ............................................... 33
Hinweise zur Entsorgung ................................. 33
3 Jahre Garantie .............................................. 33
Inhaltsverzeichnis
3
A
8 8
5
B
D
7 7
6
10 10
1 2
4
9 9
3
6
C
11
E
8
4
6
11 11
5
7
6
10
1/2
F
5
G
9
4
H I
J K
5
Congratulations!
With your purchase you have decided on a
high-quality product. Get to know the product
before you start to use it. Carefully read the
following operating instructions. Use the product
only as described and only for the given areas
of application. Keep these instructions safe.
When passing the product on to a third party,
always make sure that the documentation is
included.
Failure to follow the safety
instructions could lead to serious
injury.
List of contents
1 x Multifunctional Chin-Up Bar
2 x Safety bracket
1 x Instructions for use
1 x Assembly materials for mounting the
safety bracket
1 x Hexagonal spanner
Technical specifications
max.
Max load: 110kg
KG
For door frames of between: 70cm - 86cm
For door frame width (wall thickness):
approx. 12cm - 17cm
Conventional use
This is a sports article for mounting in door
frames with a width of between 70cm - 86cm.
The article is not suitable for professional or
therapeutic training.
Safety guidelines for
mounting in a door frame
- This article is not suitable for children under
14 as children of this age are unable to
judge any potential risks. Apart from this, the
article contains small parts which could be
swallowed by children.
- WARNING! When mounting the article in a
door frame always use the enclosed safety
bracket!
- The enclosed bracket and assembly materials
are solely intended for fixture to a solid con crete wall. Mounting materials must be able to
support the maximum body weight of 110kg.
- Use the correct assembly materials if the door
frame or wall is made from any other material.
- For mounting in door frames with a width of
between 70cm - 86cm.
-- After being mounted in the door frame the
handles of the curved grab bar must be at an
approx. 90° angle to the wall with the door!
- Assembly should be implemented by an adult
and thoroughly checked for stability when
completed.
- Check the suitability of the door frame. If the
door frame is made from plastic, aluminium or
wood, or if the wall thickness is less than 7mm,
please do not assemble as the door frame will
not be stable enough.
- Do not assemble on door frames that are near
stairs.
Safety instructions for use
- Use of this article is at your own risk.
- This article should only be used by persons
that are familiar with the safety instructions.
- Check the door frame position and safety
bracket for stability before every use.
- Do not expose this article to loads over 110kg.
- Check the article for stability by pulling and
shaking it before every use.
- This article is not suitable for the attachment of
dynamic parts, e.g., swings.
- Do not perform any exercises that require you
to hang with your head towards the ground.
- Do not swing!
- This article should only be used by one person
at a time.
- This article is only intended for private use.
- This article should only be used under the
supervision of adults and never used as a toy.
- Check the article for damage or wear and
tear before beginning your training.
Only use product in proper working condition!
Promptly replace defective parts and
discontinue use of the product until fully
repaired.
6 GB

- If you have health problems, consult your
doctor before use of this article. If you feel
unwell during training, stop immediately and
consult your doctor!
- Pregnant women should only use this article
after consultation with a doctor.
- When training, make sure there is enough
space between you and any objects or other
people in order to avoid injury.
- Keep the instructions in the vicinity of the
training apparatus. This could be useful for
reading up on the main exercises.
- Before each use ensure all screwed joints are
tight.
- When using the door bar on the floor, delicate
flooring such as parquet or laminate may be
damaged. Always use non-slip rugs or mats on
delicate or slippery floors.
Assembly
You will need drill and a Phillips head
screwdriver for mounting the safety
bracket (11).
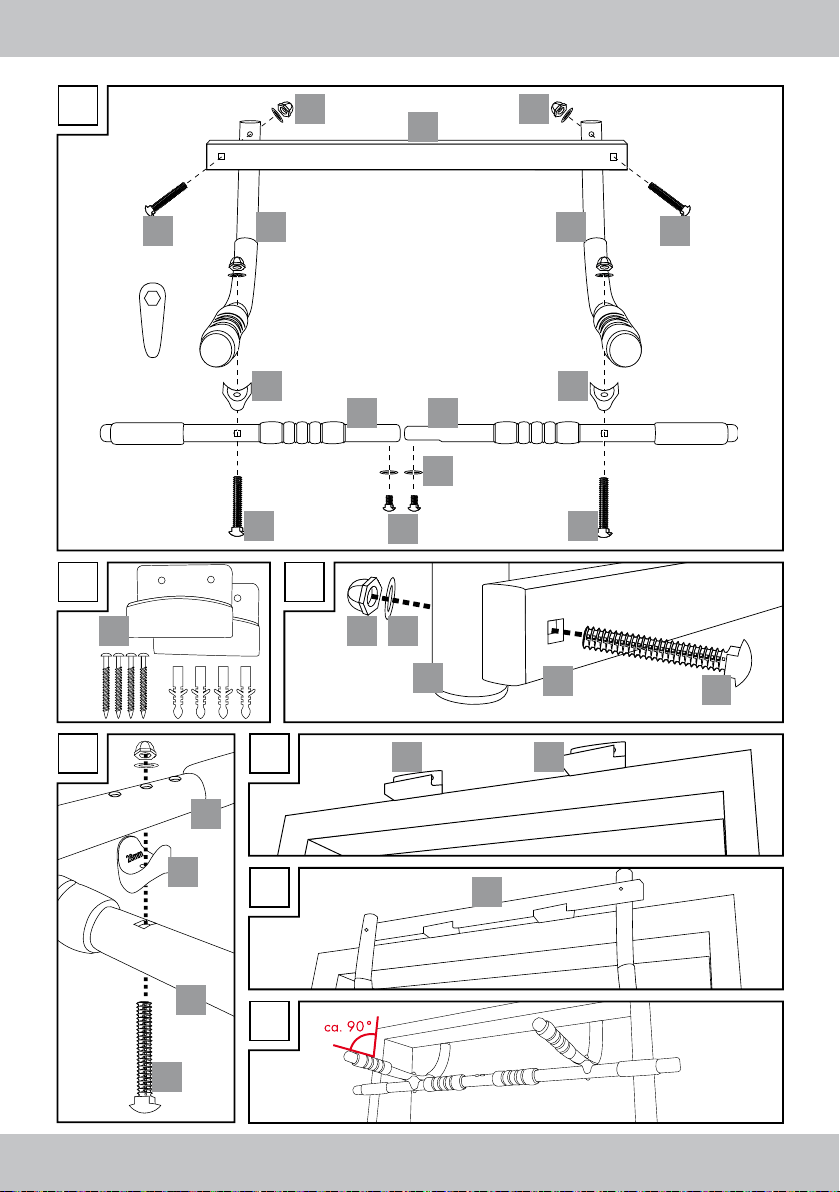
Overview of parts (see Fig. A)
- Interconnect the bars (1) and (2) and secure
with the screws (3) / washers (4).
- Then secure the bars (5) and (6) with screws
(7). Place the washers (4) under the nut (8)
and screw tight (see Fig. C).
Note! The following screw connection
has 3 options for connecting the grab
bar (1/2) with the curved grab bars
(6). First use the centre hole. Be sure
to follow the safety notices in chapter
“Assembling to door frames”!
- Now secure the bars (1/2) and (6) using
screws (9) and spacer (10). Please be sure to
place the 28mm cone on the spacer below
the bar (6) and the 32mm cone onto the bar
(1/2). Place the washers (4) under the nuts (8)
and tighten the screw connection (see Fig. D).
Assembling to door frames
ATTENTION! Make sure you use the correct assembly materials. The assembly
materials enclosed with this article are
suitable for attaching the door bars to
stable concrete walls (see Fig. B).
For attaching to lightweight concrete
walls, please contact your local dealer
and enquire as to the best method of
attachment.
Secure the safety bracket (11) to the back of the
respective door, directly above the door frame
(see Fig. E).
After mounting the safety bracket you may hook
the door bar into the door frame as shown. First
hook the bar (5) into the safety bracket (see Fig.
F). Then press the bar ends (1/2) against the
front door frame (see Fig. G).
Attention!
- Be sure the bar is firmly hooked into
the safety brackets. Verify the
door bar is securely seated by firmly
“pulling” and “jiggling” it.
- With the all-purpose door bar hooked
in, the handles of the curved grab bar
must be at an approx. 90° angle to
the wall with the door (see Fig. G).
If the grips point upwards due to the
wall thickness, change the bolting of
the straight grip bar (1/2) and the
bent grip bar (6).
Use the hole which points to the grip
end.
The grip bar points downwards if the
wall with the door is too thin, use the
third hole from the end of the grip.
7GB
General training hints
- Increase your training intensity gradually and
make sure that you have sufficient breaks
between training sessions.
- Perform all training exercises in a calm,
uniform manner and not a fast, jerky manner.
- Make sure that your breathing remains
regular. During exertion, breathe out and
breathe in when relaxing.
- Always warm up before exercising.
General training planning
- One exercise should consist of between
10-20 repeat movements.
- Each training set can be repeated between
2-4 times.
- A break of between 3-5 mins. should be taken
between training sets.
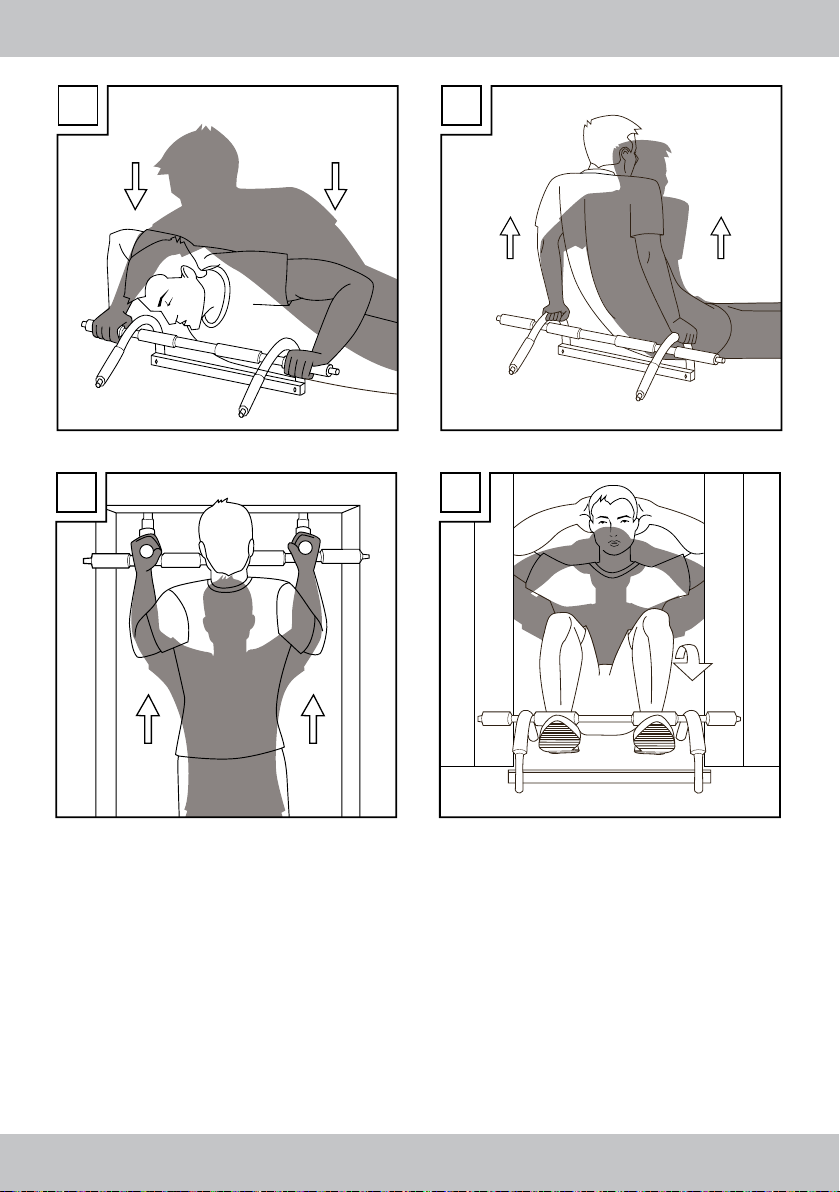
Exercises
Press-ups (see Fig. H)
Lay the all-purpose door bars on a flat surface.
Grip the upper bar and assume the position
shown. Push you upper body up slowly until your
arms are nearly fully extended. Then lower your
upper body to its original position. Keep your
whole body tense during this entire exercise so
that your head is in line with your spine.
Dips (see Fig. I)
Lay the all-purpose door bars on a flat surface.
Grip the upper bar and assume the position
shown. Lower your upper body slowly until it
touches the floor. Then push your body upwards
until your arms are nearly straight.
Pull-ups (see Fig. J)
Mount the door bars onto the door frame as
described on page 7.
Warning! For pull-ups, you should
only hold door frame bar (6) at its
end.
Grip the bar at the end of bar (6) as shown and
pull upwards with the arms so far that you can
peer over the top of the central door frame bar.
Then slowly lower yourself downwards.
Changing the handle position allows you to
change your chin up workout.
Sit-ups (see Fig. K)
Warning! You can injure your
spine if you do not carry out this
exercise correctly.
Place the door frame bars between the door
frames as shown. Lay on your back and clamp
your feet under the central bar. Angle your
legs so that you avoid a hollow back. You may
place your hands sideways on the back of your
head so as to avoid excessive pressure to the
head. Now pull the upper body slowly upwards
with the aid of the stomach muscles. Retain this
position for a few seconds before lowering your
upper body down slowly.
Care and storage
Please don‘t forget that regular servicing and
cleaning contribute to the safety and preservation of the article. Always keep the product clean
and dry in a space unexposed to very hot or
cold temperatures.
IMPORTANT! Clean using water only - never
with harsh cleaning agents. Afterwards, dry with
a cleaning cloth or duster.
8 GB
Advice on disposal
Please dispose of the packaging and the
article in an environmentally-friendly way, and
separated into types of material! Dispose of this
item through an authorised disposal company,
or through your local authority waste disposal
amenity. Be sure to comply with the current, valid
regulations.

3 Years Warranty
The product was produced with great care and
under constant supervision. You receive a threeyear warranty for this product from the date of
purchase. Please retain your receipt.
The warranty applies only to material and
workmanship and does not apply to misuse or
improper handling. Your statutory rights, especially the warranty rights, are not affected by this
warranty.
With regard to complaints, please contact the
following service hotline or contact us by e-mail.
Our service employees will advise as to the
subsequent procedure as quickly as possible.
We will be personally available to discuss the
situation with you.
Any repairs under the warranty, statutory guarantees or through goodwill do not extend the
warranty period. This also applies to replaced
and repaired parts.
Repairs after the warranty are subject to a
charge.
IAN: 93665
Service Great Britain
Tel.: 0871 5000 720
(£ 0.10/Min.)
E-Mail: deltasport@lidl.co.uk
You can also find spare parts for your product at:
www.delta-sport.com, category Service - Lidl Spare
Parts Service
GB
9
Gratulujemy!
Kupując nasz artykuł zdecydowali się Państwo
na produkt o wysokiej jakości. Przed montażem
i pierwszym zastosowaniem należy zapoznać
się z artykułem. W tym celu prosimy o dokładne
przeczytanie poniższej instrukcji dot. montażu
i wskazówek bezpieczeństwa. Produkt należy
stosować, jak opisano w instrukcji i tylko w
podanym zakresie użycia. Instrukcję obsługi
należy dokładnie przechowywać. W przypadku
przekazania artykułu osobom trzecim, należy
również przekazać im wszystkie dokumenty.
Nieprzestrzeganie wskazówek
dotyczących bezpieczeństwa
może być przyczyną poważnych
obrażeń.
Zakres dostawy
1 x wielofunkcyjny drążek rozporowy
2 x uchwyt zabezpieczający
1 x instrukcja obsługi
1 x materiał montażowy do zamontowania
uchwytu bezpieczeństwa
1 x klucz sześciokątny
Dane techniczne
max.
Maksymalne obciążenie: 110 kg
KG
Do framug drzwi: 70 cm - 86 cm
Do framug drzwi o szerokości (grubość ściany):
ok. 12 cm - 17 cm
Przeznaczone do
określonego użytkowania
Artykuł ten jest przyrządem sportowym do
zamontowania we framudze drzwi o szerokości
od 70 cm do 86 cm. Artykuł nie jest przeznaczony do profesjonalnego lub terapeutycznego
treningu.
Wskazówki
bezpieczeństwa, co do
montażu we framudze
- Artykuł nie jest przeznaczony dla dzieci
poniżej 14 lat, ponieważ dzieci nie mogą
oszacować potencjalnych niebezpieczeństw.
Poza tym artykuł zawiera małe elementy, które
mogą być połknięte przez dzieci.
- UWAGA! Przy montażu we framudze należy
zawsze stosować załączony uchwyt
bezpieczeństwa!
- Dołączony materiał montażowy uchwytu
bezpieczeństwa jest przeznaczony jedynie do
stabilnych ścian z betonu. Materiał mocujący
musi być w stanie utrzymać maksymalną
wagę ciała wynoszącą 110 kg.
- Należy stosować odpowiedni materiał
montażowy w przypadku, gdy ściana nad
framugą zrobiona jest z innego materiału.
- Do montaży we framudze drzwi o szerokości
od 70 cm do 86 cm.
- Po dokonanym montażu uchwyty wygiętego
drążka muszą ustawione być pod kątem ok.
90° do ściany drzwi!
- Montaż musi zostać przeprowadzony przez
osobę dorosłą, która na zakończenie sprawd zi stabilność.
- Należy sprawdzić rodzaj framugi. W przy padku, gdy framuga zrobiona jest z twor zywa sztucznego, aluminium lub drewna
o grubości mniejszej niż 7 mm, prosimy nie
montować, ponieważ w tym przypadku ramy
nie są wystarczająco stabilne.
- Nie montować we framugach w pobliżu
schodów.
Wskazówki
bezpieczeństwa,
co do użycia
- Użycie artykułu jest na własne ryzyko.
- Artykuł ten może być stosowany jedynie przez
osoby, które zapoznały się ze wskazówkami
bezpieczeństwa.
10 PL

- Przed każdym użyciem zamontowanego we
framudze artykułu należy sprawdzić zamoco wanie uchwytu zabezpieczającego i
poprawną pozycję drążka rozporowego.
- Artykuł jest przeznaczony jedynie do prywat nego użytku.
- Artykuł może być obciążony maksymalnie
110 kg.
- Przed każdym użyciem sprawdzić jeszcze raz
trwałość artykułu przez „ciągnięcie“ i „szarpa nie“.
- Nieprzeznaczony do zamocowania dynami cznych elementów takich jak np. huśtawki.
- Nie wykonywać żadnych ćwiczeń, przy
których głowa skierowana jest ku podłodze.
- Nie kołysać!
- Artykuł może być stosowany jedynie przez
jedną osobę.
- Artykuł może być stosowany jedynie pod
nadzorem dorosłych i nie jako zabawka.
- Należy skontrolować artykuł przed każdym
rozpoczęciem treningu, czy nie jest uszkod zony. Artykuł można stosować wyłącznie gdy
jest w nienagannym stanie! Uszkodzone
elementy należy natychmiast wymienić i nie
stosować artykułu do całkowitej renowacji.
- Przy problemach zdrowotnych należy zapytać
się lekarza zanim zacznie się używać
przyrząd. W przypadku, gdy podczas
ćwiczeń wystąpią dolegliwości, należy
natychmiast je przerwać i skonsultować się z
lekarzem!
- Kobiety w ciąży powinny wcześniej
skonsultować się z lekarzem zanim zaczną
trening.
- Ćwiczenia należy przeprowadzać w takiej
odległości od przedmiotów lub innych osób
tak, aby nikt nie został poszkodowany.
- Instrukcję obsługi należy przechowywać w
pobliżu przyrządu treningowego. Służy to do
sprawdzania głównych ćwiczeń.
- Przed każdym użyciem należy skontrolować,
czy wszystkie śruby są dokręcone.
- Przy zastosowaniu drążka na podłodze może
dojść do uszkodzenia wrażliwych podłoży
takich jak parkiet czy laminat. Na wrażliwych
lub śliskich wykładzinach podłogowych
należy stosować antypoślizgowe dywany lub
maty.
Montaż
W celu umocowania uchwytu
zabezpieczającego (11) konieczna jest
wiertarka i śrubokręt krzyżowy.
Zarys części (patrz rys. A)
- Włożyć drążki (1) i (2) jeden w drugi i
przykręcić śrubami (3) / podkładkami (4).
- Następnie skręcić drążki (5) i (6) śrubami
(7). Przed nakrętki (8) nałożyć podkładki (4)
i dokręcić (patrz rys. C).
Wskazówka! Przy następnym łączeniu
istnieją 3 możliwości łączenia drążka
(1/2) z wygiętym drążkiem (6). Na
początku należy stosować środkowe
otwory. W tym celu należy koniecznie dostosować się do wskazówek
bezpieczeństwa w rozdziale „Montaż
we framudze”!
- Następnie należy złączyć drążki (1/2) ze
śrubami (9) i z separatorem (10). Należy przy
tym zwrócić uwagę, że na separator należy
nałożyć stożek o 28 mm pod drążek (6) i
stożek o 32 mm na drążek (1/2).
Przed nakrętki (8) należy nałożyć podkładki
(4) i dokręcić (patrz rys. D).
11PL
 Loading...