

Page 1
MULTIFUNCTIONAL CHIN-UP BAR
MULTIFUNCTIONAL CHIN-UP BAR
Instructions for use
DÖRRTRAPETS MED FLERA FUNKTIONER
Bruksanvisning
BARRE DE PORTE POLYVALENTE
Notice d’utilisation
MULTIFUNKTIONS-TÜRRECK
Bedienungsanleitung
IAN 93665
OVIREKKI
Käyttöohje
MULTIFUNKTIONS-DØRRIBBE
Brugervejledning
MULTIFUNCTIONEEL DEURREK
Gebruiksaanwijzing
Page 2
Contents/Sisällysluettelo/Innehållsförteckning/Indholdsfortegnelse/Table des matieres/Inhoudsopgave
List of contents ..................................................... 6
Technical specifications ...................................... 6
Conventional use ................................................ 6
Safety guidelines for mounting in
a door frame ........................................................6
Safety instructions for use ............................. 6 - 7
Assembly ............................................................. 7
Overview of parts ................................. 7
Assembling to door frames ................................ 7
General training hints ......................................... 8
General training planning ................................. 8
Exercises .............................................................. 8
Care and storage ............................................... 8
Advice on disposal ............................................. 8
3 Years Warranty ............................................... 9
Leveransomfattning ........................................... 14
Tekniska Data .................................................... 14
Bestämelser för användning ............................ 14
Säkerhetsanvisningar för montering i
dörrkarm ............................................................. 14
Säkerhetsanvisningar för användning .... 14 - 15
Hopsättning ....................................................... 15
Översikt över delarna ......................... 15
Montering i dörrkarm ....................................... 15
Allmänna träningstips ....................................... 16
Allmän träningsplanering ................................. 16
Övningar ........................................................... 16
Vård, förvaring ................................................... 16
Anvisningar för avfallshantering ...................... 16
3 års garanti ...................................................... 17
Toimituslaajuus .................................................. 10
Tekniset Tiedot ................................................... 10
Määräystenmukainen käyttö ........................... 10
Asennusta koskevat turvallisuusohjeet .............10
Käyttöä koskevat turvallisuusohjeet .......... 10 - 11
Asentaminen ...................................................... 11
Tuotteen osat ....................................... 11
Asennus ovenkehyksen viereen ....................... 11
Yleisiä harjoitteluohjeita ................................... 11
Harjoitusten suorittaminen ............................... 12
Harjoitukset ....................................................... 12
Hoito, säilytys .................................................... 12
Hävittämistä koskevat ohjeet ........................... 12
3 vuoden takuu ................................................. 13
Leveringsomfang ............................................... 18
Tekniske Data .................................................... 18
Formålsbestemt anvendelse ............................. 18
Sikkerhedshenvisninger til montering i
dørkarmen .......................................................... 18
Sikkerhedshenvisninger omkring
anvendelse ................................................. 18 - 19
Samling .............................................................. 19
Översikt av delarna ............................ 19
Montage ved dørrammen ............................... 19
Generelle træningshenvisninger ...................... 20
Generel træningsplanlægning ........................ 20
Øvelser .............................................................. 20
Pleje, opbevaring .............................................. 20
Henvisninger vedr. bortskaffelse ..................... 20
3 års garanti ...................................................... 21
Contenu de livraison ........................................ 22
Caractéristiques ................................................ 22
Utilisation conforme à sa vocation .................. 22
Indications de sécurité relatives au
montage dans le châssis de la porte ...............22
Indications de sécurité relatives à
l‘utilisation .................................................. 22 - 23
Assemblage ....................................................... 23
Aperçu des pièces .............................. 23
Montage dans le châssis de la porte ..... 23 - 24
Indications générales d‘entraînement ............. 24
Planification générale de l‘entraînement ........ 24
Exercices .................................................... 24 - 25
Indications quant à l’élimination ..................... 25
Entretien, stockage ............................................ 25
3 ans de garantie ............................................. 25
2
Leveringsomvang .............................................. 26
Technische gegevens ........................................ 26
Alleen te gebruiken als rekstok ........................ 26
Veiligheidsinstructies voor de montage
tussen het deurkozijn .........................................26
Veiligheidsinstructies voor het gebruik .... 26 - 27
Montage ............................................................ 27
Overzicht van de onderdelen ........... 27
Montage aan het deurkozijn ................... 27 - 28
Algemene trainingsinstructies .......................... 28
Algemene trainingsplan ................................... 28
Oefeningen ............................................... 28 - 29
Afvalverwerking ................................................ 29
Onderhoud, bewaring ..................................... 29
3 jaar garantie .................................................. 29
Page 3

Lieferumfang ...................................................... 30
Technische Daten .............................................. 30
Bestimmungsgemäße Verwendung ................. 30
Sicherheitshinweise zur Montage
am Türrahmen ....................................................30
Sicherheitshinweise zur Benutzung ......... 30 - 31
Zusammenbau .................................................. 31
Teileübersicht ....................................... 31
Montage am Türrahmen ................................... 32
Allgemeine Trainingshinweise ......................... 32
Allgemeine Trainingsplanung .......................... 32
Übungen .................................................... 32 - 33
Pflege, Lagerung ............................................... 33
Hinweise zur Entsorgung ................................. 33
3 Jahre Garantie .............................................. 33
Inhaltsverzeichnis
3
Page 4
A
8 8
5
B
D
7 7
6
10 10
1 2
4
9 9
3
6
C
11
E
8
4
6
11 11
5
7
6
10
1/2
F
5
G
9
4
Page 5
H I
J K
5
Page 6

Congratulations!
With your purchase you have decided on a
high-quality product. Get to know the product
before you start to use it. Carefully read the
following operating instructions. Use the product
only as described and only for the given areas
of application. Keep these instructions safe.
When passing the product on to a third party,
always make sure that the documentation is
included.
Failure to follow the safety
instructions could lead to serious
injury.
List of contents
1 x Multifunctional Chin-Up Bar
2 x Safety bracket
1 x Instructions for use
1 x Assembly materials for mounting the
safety bracket
1 x Hexagonal spanner
Technical specifications
max.
Max load: 110kg
KG
For door frames of between: 70cm - 86cm
For door frame width (wall thickness):
approx. 12cm - 17cm
Conventional use
This is a sports article for mounting in door
frames with a width of between 70cm - 86cm.
The article is not suitable for professional or
therapeutic training.
Safety guidelines for
mounting in a door frame
- This article is not suitable for children under
14 as children of this age are unable to
judge any potential risks. Apart from this, the
article contains small parts which could be
swallowed by children.
- WARNING! When mounting the article in a
door frame always use the enclosed safety
bracket!
- The enclosed bracket and assembly materials
are solely intended for fixture to a solid con crete wall. Mounting materials must be able to
support the maximum body weight of 110kg.
- Use the correct assembly materials if the door
frame or wall is made from any other material.
- For mounting in door frames with a width of
between 70cm - 86cm.
-- After being mounted in the door frame the
handles of the curved grab bar must be at an
approx. 90° angle to the wall with the door!
- Assembly should be implemented by an adult
and thoroughly checked for stability when
completed.
- Check the suitability of the door frame. If the
door frame is made from plastic, aluminium or
wood, or if the wall thickness is less than 7mm,
please do not assemble as the door frame will
not be stable enough.
- Do not assemble on door frames that are near
stairs.
Safety instructions for use
- Use of this article is at your own risk.
- This article should only be used by persons
that are familiar with the safety instructions.
- Check the door frame position and safety
bracket for stability before every use.
- Do not expose this article to loads over 110kg.
- Check the article for stability by pulling and
shaking it before every use.
- This article is not suitable for the attachment of
dynamic parts, e.g., swings.
- Do not perform any exercises that require you
to hang with your head towards the ground.
- Do not swing!
- This article should only be used by one person
at a time.
- This article is only intended for private use.
- This article should only be used under the
supervision of adults and never used as a toy.
- Check the article for damage or wear and
tear before beginning your training.
Only use product in proper working condition!
Promptly replace defective parts and
discontinue use of the product until fully
repaired.
6 GB/IE
Page 7

- If you have health problems, consult your
doctor before use of this article. If you feel
unwell during training, stop immediately and
consult your doctor!
- Pregnant women should only use this article
after consultation with a doctor.
- When training, make sure there is enough
space between you and any objects or other
people in order to avoid injury.
- Keep the instructions in the vicinity of the
training apparatus. This could be useful for
reading up on the main exercises.
- Before each use ensure all screwed joints are
tight.
- When using the door bar on the floor, delicate
flooring such as parquet or laminate may be
damaged. Always use non-slip rugs or mats on
delicate or slippery floors.
Assembly
You will need drill and a Phillips head
screwdriver for mounting the safety
bracket (11).
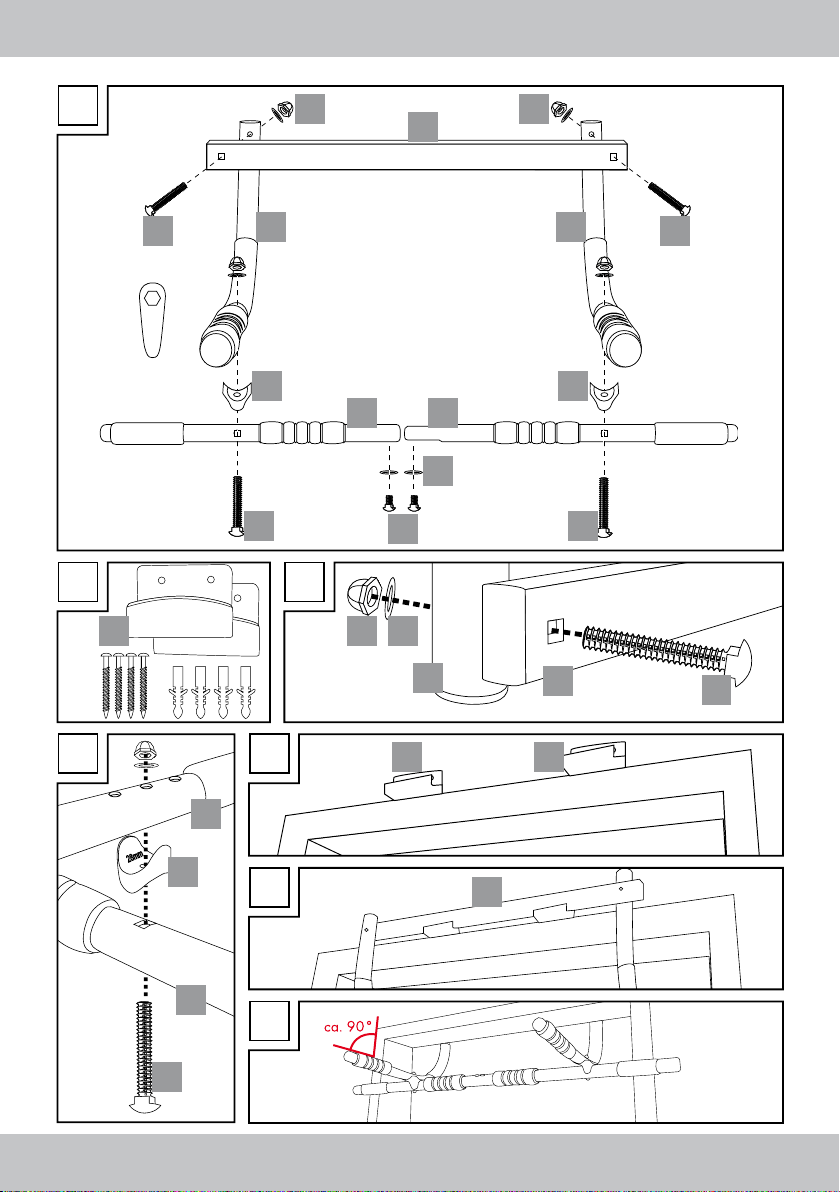
Overview of parts (see Fig. A)
- Interconnect the bars (1) and (2) and secure
with the screws (3) / washers (4).
- Then secure the bars (5) and (6) with screws
(7). Place the washers (4) under the nut (8)
and screw tight (see Fig. C).
Note! The following screw connection
has 3 options for connecting the grab
bar (1/2) with the curved grab bars
(6). First use the centre hole. Be sure
to follow the safety notices in chapter
“Assembling to door frames”!
- Now secure the bars (1/2) and (6) using
screws (9) and spacer (10). Please be sure to
place the 28mm cone on the spacer below
the bar (6) and the 32mm cone onto the bar
(1/2). Place the washers (4) under the nuts (8)
and tighten the screw connection (see Fig. D).
Assembling to door frames
ATTENTION! Make sure you use the correct assembly materials. The assembly
materials enclosed with this article are
suitable for attaching the door bars to
stable concrete walls (see Fig. B).
For attaching to lightweight concrete
walls, please contact your local dealer
and enquire as to the best method of
attachment.
Secure the safety bracket (11) to the back of the
respective door, directly above the door frame
(see Fig. E).
After mounting the safety bracket you may hook
the door bar into the door frame as shown. First
hook the bar (5) into the safety bracket (see Fig.
F). Then press the bar ends (1/2) against the
front door frame (see Fig. G).
Attention!
- Be sure the bar is firmly hooked into
the safety brackets. Verify the
door bar is securely seated by firmly
“pulling” and “jiggling” it.
- With the all-purpose door bar hooked
in, the handles of the curved grab bar
must be at an approx. 90° angle to
the wall with the door (see Fig. G).
If the grips point upwards due to the
wall thickness, change the bolting of
the straight grip bar (1/2) and the
bent grip bar (6).
Use the hole which points to the grip
end.
The grip bar points downwards if the
wall with the door is too thin, use the
third hole from the end of the grip.
7GB/IE
Page 8
General training hints
- Increase your training intensity gradually and
make sure that you have sufficient breaks
between training sessions.
- Perform all training exercises in a calm,
uniform manner and not a fast, jerky manner.
- Make sure that your breathing remains
regular. During exertion, breathe out and
breathe in when relaxing.
- Always warm up before exercising.
General training planning
- One exercise should consist of between
10-20 repeat movements.
- Each training set can be repeated between
2-4 times.
- A break of between 3-5 mins. should be taken
between training sets.
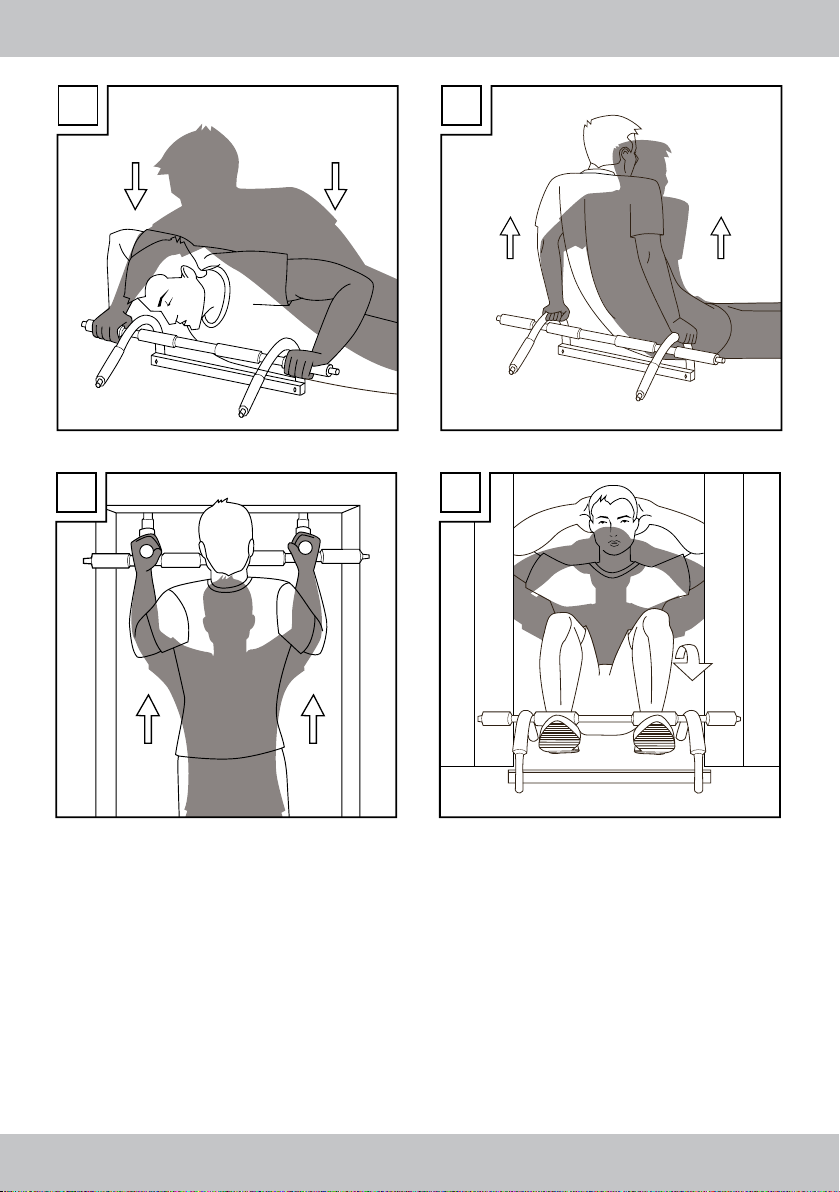
Exercises
Press-ups (see Fig. H)
Lay the all-purpose door bars on a flat surface.
Grip the upper bar and assume the position
shown. Push you upper body up slowly until your
arms are nearly fully extended. Then lower your
upper body to its original position. Keep your
whole body tense during this entire exercise so
that your head is in line with your spine.
Dips (see Fig. I)
Lay the all-purpose door bars on a flat surface.
Grip the upper bar and assume the position
shown. Lower your upper body slowly until it
touches the floor. Then push your body upwards
until your arms are nearly straight.
Pull-ups (see Fig. J)
Mount the door bars onto the door frame as
described on page 7.
Warning! For pull-ups, you should
only hold door frame bar (6) at its
end.
Grip the bar at the end of bar (6) as shown and
pull upwards with the arms so far that you can
peer over the top of the central door frame bar.
Then slowly lower yourself downwards.
Changing the handle position allows you to
change your chin up workout.
Sit-ups (see Fig. K)
Warning! You can injure your
spine if you do not carry out this
exercise correctly.
Place the door frame bars between the door
frames as shown. Lay on your back and clamp
your feet under the central bar. Angle your
legs so that you avoid a hollow back. You may
place your hands sideways on the back of your
head so as to avoid excessive pressure to the
head. Now pull the upper body slowly upwards
with the aid of the stomach muscles. Retain this
position for a few seconds before lowering your
upper body down slowly.
Care and storage
Please don‘t forget that regular servicing and
cleaning contribute to the safety and preservation of the article. Always keep the product clean
and dry in a space unexposed to very hot or
cold temperatures.
IMPORTANT! Clean using water only - never
with harsh cleaning agents. Afterwards, dry with
a cleaning cloth or duster.
8 GB/IE
Advice on disposal
Please dispose of the packaging and the
article in an environmentally-friendly way, and
separated into types of material! Dispose of this
item through an authorised disposal company,
or through your local authority waste disposal
amenity. Be sure to comply with the current, valid
regulations.
Page 9

3 Years Warranty
The product was produced with great care and
under constant supervision. You receive a threeyear warranty for this product from the date of
purchase. Please retain your receipt.
The warranty applies only to material and
workmanship and does not apply to misuse or
improper handling. Your statutory rights, especially the warranty rights, are not affected by this
warranty.
With regard to complaints, please contact the
following service hotline or contact us by e-mail.
Our service employees will advise as to the
subsequent procedure as quickly as possible.
We will be personally available to discuss the
situation with you.
Any repairs under the warranty, statutory guarantees or through goodwill do not extend the
warranty period. This also applies to replaced
and repaired parts.
Repairs after the warranty are subject to a
charge.
IAN: 93665
Service Great Britain
Tel.: 0871 5000 720
(£ 0.10/Min.)
E-Mail: deltasport@lidl.co.uk
Service Ireland
Tel.: 1890 930 034
(0,08 EUR/Min., (peak))
(0,06 EUR/Min., (off peak))
E-Mail: deltasport@lidl.ie
You can also find spare parts for your product at:
www.delta-sport.com, category Service - Lidl Spare Parts
Service
GB/IE
9
Page 10
Onnittelumme!
Olet hankkinut itsellesi laatutuotteen.
Tutustu ostamaasi tuotteeseen ennen asennusta
ja ensimmäistä käyttöä. Lue huolellisesti liitteenä
oleva asennusohje ja turvallisuusohjeet.
Käytä tuotetta vain ohjeessa kuvatulla tavalla ja
mainittuihin käyttötarkoituksiin. Säilytä käyttöohje
huolellisesti. Liitä kaikki tuotteeseen kuuluvat
ohjeet tuotteen mukaan, jos annat sen eteenpäin
uudelle omistajalle.
Turvallisuusohjeiden noudattamat-
ta jättämisestä saattaa seurata
vakava loukkaantuminen.
Toimituslaajuus
1 x ovirekki
2 x turvapidike
1 x käyttöohje
1 x kiinnitystarvikkeet turvapidikkeen
kiinnittämiseen
1 x kuusiokoloavain
Tekniset Tiedot
max.
Maksimikuormitus: 110 kg
KG
Oviaukon leveys: 70 cm – 86 cm
Ovenkehyksen leveys (seinän paksuus):
n. 12 cm - 17 cm
Määräystenmukainen käyttö
Tämä tuote on urheiluväline, joka voidaan
asentaa 70 cm - 86 cm leveään ovenkehykseen.
Tuote ei sovellu ammattimaiseen tai terapeuttiseen harjoitteluun.
Asennusta koskevat
turvallisuusohjeet
- Tuote ei sovellu alle 14-vuotiaille, sillä lapset
eivät osaa vielä arvioida mahdollisia vaarati
lanteita. Tuote sisältää myös pieniä osia, jotka
voivat joutua lapsen nieluun.
- HUOMIO! Käytä vain laitteen mukana
toimitettuja turvapidikkeitä asentaessasi
tuotetta ovenkehykseen.
- Turvapidikkeen mukana toimitetut kiinnitystar vikkeet soveltuvat vain tukeviin betoniseiniin
kiinnittämiseen. Kiinnitysmateriaalin täytyy
kestää 110 kg:n maksimipaino.
- Jos ovenkehyksen yläreunassa oleva seinä on
jostakin muusta materiaalista, käytä siihen
sopivia kiinnitystarvikkeita.
- Sopii 70 cm – 86 cm leveisiin ovenkehyksiin.
- Kaarevien tankojen kahvojen täytyy sijaita n.
90° kulmassa ovenseinään nähden, kun ne on
asennettu ovenkehykseen!
- Asennuksen saa suorittaa vain aikuinen henki lö. Asennuksen jälkeen tulee tarkistaa, että
tuote on kiinnitetty tukevasti ovenkehykseen.
- Tarkista ovenkehyksen materiaali. Jos se on
muovista, alumiinista tai puusta, ja on ohuempi
kuin 7 mm, älä asenna ovirekkiä siinä tapauk sessa, sillä kehykset eivät ole mahdollisesti
tarpeeksi tukevat.
- Älä asenna ovenkehyksiin, jotka sijaitsevat
portaiden läheisyydessä.
Käyttöä koskevat
turvallisuusohjeet
- Tuotteen käyttö tapahtuu henkilön omalla
vastuulla.
- Tuotetta saavat käyttää ainoastaan ne henki löt, jotka ovat perehtyneet turvallisuusohjeisiin.
- Tarkista turvapidikkeen kiinnitys ja ovirekin
oikea asento aina ennen tuotteen käyttöä.
- Tuotteen maksimikuormitus on 110 kg.
- Tarkista tukevuus vetämällä ja ravistamalla
tuotetta aina ennen käyttöä.
- Tuotteeseen ei saa kiinnittää liikkuvia osia
kuten esim. keinua.
- Älä tee sellaisia liikkeitä, joissa roikut pää
alaspäin.
- Älä heiluta tuotetta.
- Tuotetta saa käyttää vain yksi henkilö kerralla an.
- Tuote on tarkoitettu vain kotikäyttöön.
- Tuotetta saa käyttää vain aikuisen valvonnas sa. Tuoteella ei saa leikkiä.
- Tarkista aina ennen harjoittelun alkamista, että
tuotteessa ei ole vaurioita tai kulumia.
10 FI
Page 11

Tuotetta saa käyttää vain moitteettomassa
kunnossa. Vaihda vioittuneet osat välittömästi
uusiin ja ota tuote vasta sitten käyttöön, kun se
on kiinnitetty jälleen kunnolla paikalleen.
- Jos sinulla on terveydellisiä ongelmia kysy
neuvoa lääkäriltä ennen kuin käytät tuotetta.
Jos harjoittelun aikana ilmenee pahoinvointia
tai kipuja, keskeytä harjoittelu välittömästi ja
ota yhteyttä lääkäriin.
- Raskaana olevien tulee ensin kysyä neuvoa
lääkäriltä laitteen sopivuudesta.
- Harjoitellessasi pidä sopiva välimatka esineisi in ja muihin henkilöihin, jotta kukaan ei louk kaannu.
- Säilytä käyttöohje tuotteen läheisyydessä.
Näin voit tarkistaa helposti harjoitusliikkeet.
- Tarkista aina ennen käyttöä, että kaikki ruuvit
ovat kireällä.
- Ovirekin käyttö aroilla lattiapinnoilla kuten
parketilla tai laminaatilla saattaa vaurioittaa
pinnoitetta. Käytä aroilla tai liukkailla lattia pinnoilla liukumatonta mattoa alustana.
Asentaminen
Turvapidikkeen (11) kiinnitystä varten
tarvitset porakoneen ja ristipäisen ruuvimeisselin.
Tuotteen osat (katso kuva A)
- Pistä tangot (1) ja (2) toistensa sisään ja
kiinnitä ne ruuveilla (3) / aluslevyillä (4).
- Kiinnitä sitten tangot (5) ja (6) ruuveilla (7).
Aseta aluslevyt (4) ennen muttereita (8) ja
kiristä ruuvikiinnitystä (katso kuva C).
Huomautus! Seuraavalla ruuvikiinnityksellä sinulla on 3 eri mahdollisuutta
yhdistää tangot (1/2) kaareviin tankoihin (6). Kokeile ensin keskimmäistä poranreikää. Noudata tässä ehdottomasti
kappaleen „Asennus ovenkehyksen
viereen“ turvallisuusohjeita!
- Kiinnitä sitten tangot (1/2) ja (6) ruuveilla (9)
ja välikappaleella (10). Tässä tulee huomioi da, että välikappaleen 28 mm:n kartio ase tetaan tangon (6) alle ja 32 mm:n kartio
tangon (1/2) päälle. Aseta aluslevyt (4)
ennen muttereita (8) ja kiristä ruuvikiinnitystä
(katso kuva D).
Asennus ovenkehyksen
viereen
HUOMIO! Tarkista, että käytät sopivia kiinnitystarvikkeita. Toimitukseen
sisältyvät asennustarvikkeet soveltuvat
tukeville betoniseinille (katso kuva B).
Jos kiinnität tuotteen kevytbetoniin
tai kevytrakenteisiin seiniin, tiedustele
sopivia asennustarvikkeita alan erikoisliikkeestä.
Kiinnitä turvapidikkeet (11) suoraan ovenkehyksen yläpuolelle oven kääntöpuolelle (katso kuva
E). Sen jälkeen kun olet asentanut turvapidikkeet,
voit asentaa ovirekin kuvan osoittamalla tavalla.
Aseta ensin tanko (5) turvapidikkeisiin (katso
kuva F). Paina sitten tangonpäät (1/2) etummaista ovenkehystä vasten (katso kuva G).
Huomio!
- Tarkista, että tanko on asennettu
tiukasti turvapidikkeisiin. Tarkista
sitten ovirekin tukeva kiinnitys
vetämällä ja ravistamalla sitä.
- Sen jälkeen kun olet asentanut moni toimiovirekin, kaarevan tangon kah vat täytyy sijaita n. 90° kulmassa
oven seinään nähden (katso kuva G).
Jos kahvat näyttävät ylöspäin seinän
paksuudesta johtuen, muuta suoran
kahvatangon (1/2) ja kaarevien kah vatankojen (6) ruuvikiinnitystä.
Käytä sitä reikää, joka on kahvan
päässä.
Jos kahvatangot näyttävät alaspäin
liian ohuesta oven seinästä johtuen,
käytä 3. reikää, kahvan päästä
poispäin katsottuna.
Yleisiä harjoitteluohjeita
- Kohota harjoittelun intensiteettiä hitaasti ja
pidä riittävästi taukoja harjoitusten välillä.
- Suorita liikkeet tasaisesti eikä nopeasti nykien.
- Hengitä tasaisesti. Hengitä ponnistusvaiheessa
ulos ja palautusvaiheessa sisään.
- Lämmitä lihakset aina ennen harjoittelua.
11FI
Page 12

Harjoitusten suorittaminen
- Yksi harjoitusjakso koostuu harjoituksen
suorittamisesta 10-20 kertaa.
- Jokainen harjoitusjakso voidaan suorittaa
2-4 kertaa peräkkäin.
- Jokaisen harjoitusjakson välissä tulisi pitää
3-5 min. tauko.
Harjoitukset
Etunojapunnerrukset
(katso kuva H)
Aseta monitoimiovirekki tasaiselle alustalle.
Ota tangonpäistä kiinni ja asetu kuvan mukaiseen asentoon. Työnnä ylävartaloa hitaasti
ylöspäin, niin että käsivarret ojentuvat melkein
suoriksi. Palaa takaisin lähtöasentoon.
Pidä vartalo jännittyneenä harjoituksen aikana.
Pää on suorassa linjassa selkärankaan nähden.
Dipit (katso kuva I)
Aseta monitoimiovirekki tasaiselle alustalle.
Ota tangonpäistä kiinni ja asetu kuvan mukaiseen asentoon. Laske ylävartalo hitaasti alaspäin
kunnes se koskettaa lattianpintaa. Työnnä vartaloa jälleen ylöspäin, kunnes käsivarret ovat
ojentuneet melkein suoriksi.
Leuanveto (katso kuva J)
Kiinnitä ovirekki ovenkehykseen kuten sivulla 11.
Huomio! Suorita leuanvetoharjoi
tukset tarttumalla ovirekkiin vain
tangonpäistä (6).
Tartu ovirekkiin tangonpäistä (6) kuten kuvassa
ja vedä vartalo niin ylös, että silmäsi näkyvät
keskitangon yläpuolelta. Laske vartalo hitaasti
jälleen alaspäin. Muuttamalla kahvojen asentoa
voit harjoitella vaihtoehtoisia leuanvetoliikkeitä.
Vatsalihasharjoitukset
(katso kuva K)
Huomio! Vatsalihasharjoitusten
väärin suorittaminen voi johtaa
selkärangan vioittumiseen.
Aseta ovirekki lattialle ovenkehykseen kuvan
mukaisesti. Asetu selin makuulle lattialle ja aseta
jalkasi ovirekin keskitangon alle. Koukista jalkasi
kevyesti, jotta vältät notkoselän muodostumisen.
Kädet voidaan asettaa pään taakse painamatta
niillä kuitenkaan päätä. Ylävartalo vedetään vatsalihasten avulla hitaasti ylöspäin. Pidä asento
muutaman sekunnin ajan, jonka jälkeen laske
vartalo takaisin lattialle.
Hoito, säilytys
Muista, että säännöllinen huolto ja puhdistus
lisäävät tuotteen turvallisuutta ja elinikää.
Säilytä tuote aina kuivassa ja puhtaassa tilassa,
jossa on tasaisen lämpötila.
TÄRKEÄÄ! Puhdista pelkällä vedellä, älä käytä
teräviä puhdistusvälineitä.
Kuivaa pesun jälkeen pyyhkeellä tai liinalla.
Hävittämistä koskevat ohjeet
Hävitä pakkaus ja tuote ympäristöystävällisesti ja lajiteltuna! Hävitä tuote paikkakuntasi
jätelaitoksen kautta. Noudata voimassa olevia
määräyksiä.
12 FI
Page 13

3 vuoden takuu
Tämä tuote on valmistettu erityistä tarkkuutta
noudattaen ja jatkuvan tarkastuksen alaisena.
Tälle tuotteelle saat kolmen vuoden takuun ostopäivästä lähtien. Säilytä kassakuitti huolellisesti.
Takuu koskee ainoastaan materiaali- ja valmistusvirheitä ja raukeaa, jos tuotetta käytetään
vääränlaisesti tai ei määräysten mukaisesti.
Tämä takuu ei rajoita laissa määrättyjä oikeuksiasi, erikoisesti koskien takuu- ja reklamointioikeuksia.
Mahdollisissa reklamaatiotapauksissa ota meihin
yhteyttä soittamalla allaolevaan asiakaspalvelunumeroon tai lähettämällä viesti sähköpostitse.
Asiakaspalvelijamme sopivat kanssasi tarvittavista toimenpiteistä mitä pikimmin. Palvelemme
sinua joka tapauksessa henkilökohtaisesti.
Mahdolliset korjaukset, jotka on suoritettu
tämän takuun, laillisen reklamointioikeuden tai
harkintaoikeuden perusteella eivät pidennä
takuuaikaa. Tämä koskee myös vaihdettuja ja
korjattuja osia. Takuuajan päätyttyä suoritetut
korjaukset ovat maksullisia.
IAN: 93665
Huolto Suomi
Tel.: 010309 3582
E-Mail: deltasport@lidl.fi
Varaosia tuotteeseesi löydät myös osoitteesta: www.deltasport.com, välilehdestä Palvelu - Lidl varaosapalvelu
13FI
Page 14

Gratulerar!
Du har valt att köpa en kvalitetsprodukt. Gör dig
bekant med produkten innan du monterar den
och tar den i bruk för första gången. Läs igenom
följande monterings- och säkerhetsanvisningar
noga. Använd endast produkten i enlighet med
beskrivningarna och för de angivna användningsområdena. Spara bruksanvisningen.
Låt alla dokument följa med om produkten
lämnas över till tredje person.
Det är viktigt att följa säkerhetsan-
visningarna, i annat fall kan all varliga personskador uppkomma.
Leveransomfattning
1 x dörrtrapets med flera funktioner
2 x säkerhetsbygel
1 x bruksanvisning
1 x fästmaterial för montering av säkerhets bygeln
1 x sexkantnyckel
Tekniska Data
max.
Max belastning: 110 kg
KG
För dörrkarmar med bredd: 70 cm - 86 cm
För dörrkarmar med en bredd (väggtjocklek)
från ca 12 cm - 17 cm
Bestämelser för användning
Denna artikeln är en sportartikel för montering
i dörrkarmar med en bredd från 70 cm -
86 cm. Artikeln är ej avsedd för professionell
eller terapeutisk träning.
Säkerhetsanvisningar för
montering i dörrkarm
- Artikeln är ej avsedd för barn under 14 år
eftersom barn ej kan förutse faror. Artikeln in
nehåller dessutom smådelar som barn kan
svälja eller sätta i halsen.
- OBS! Använd alltid den medföljande säker hetsbygeln vid montering i dörrkarm!
- Det medföljande fästmaterialet för säkerhets
bygeln är endast avsett för montering på
stabila väggar av betong.
Fästmaterialet måste hålla för den maximala
kroppsvikten på 110 kg.
- Om väggen runt dörrkarmen består av ett
annat material måste därför avsedda fästmate rial användas.
- För montering i dörrkarmar med en bredd på
70 cm - 86 cm
- Efter montering i dörrkarmen måste handtagen
på den böjda stången vara riktade i ca 90°
vinkel mot väggen med dörren!
- Monteringen ska utföras av en vuxen person
som därefter kontrollerar hållfastheten.
- Kontrollera dörrkarmens egenskaper. Om dörr
karmen är tillverkad av plast, aluminium trä
med en väggtjocklek på mindre än 7 mm bör
trapetsen ej monteras eftersom dörrkarmen
inte är tillräckligt stabil.
- Montera ej i dörröppningar i närheten av
trappor.
Säkerhetsanvisningar
för användning
- Artikeln används på egen risk.
- Denna artikeln får endast användas av perso ner som tagit del av säkerhetsanvisningarna.
- Kontrollera före varje användning att säker hetsbygeln sitter ordentligt monterad i dörr karmen och att dörrtrapetsen sitter i rätt
position.
- Artikeln får belastas med maximalt 110 kg.
- Kontrollera att artikeln sitter stabilt före varje
användning genom att dra och rycka i den.
- Ej avsedd för montering av rörliga delar som
t.ex. gungor.
- Utför inga övningar där huvudet pekar mot
golvet.
- Gunga inte!
- Artikeln får alltid endast användas av en
person i taget.
- Artikeln är endast avsedd för privat använd ning.
- Artikeln får endast användas under uppsikt av
en vuxen person och får ej användas som
leksak.
14 SE
Page 15

- Kontrollera före varje träningspass att artikeln
ej är skadad eller utsliten. Artikeln får endast
användas i felfritt tillstånd! Byt genast ut
defekta delar och använd ej artikeln mer
förrän den är helt reparerad.
- Konsultera din läkare innan du använder
artikeln ifall du har problem med hälsan.
Om du känner av besvär eller känner dig
konstig under träningen så avbryt genast
övningen och kontakta en läkare!
- Under graviditeten bör träning endast göras i
samråd med din läkare.
- Gör övningarna med så mycket plats till
föremål och andra personer att ingen riskerar
att skada sig.
- Förvara bruksanvisningen i närheten av
träningsredskapet. Den innehåller information
om huvudövningarna.
- Kontrollera före varje användning om alla
skruvförbindningar är ordentligt åtdragna.
- Om du använder dörrtrapetsen på golvet, kan
känsliga underlag som parkett eller laminat
skadas. Använd halkfria mattor som underlag
på känsliga och hala golvytor.
Hopsättning
För montering av säkerhetsbygeln (11)
behöver du en borrmaskin och en
stjärnskruvmejsel.
Översikt över delarna (se bild A)
- För in stängerna (1) och (2) i varandra
och skruva ihop dessa med skruvarna
(3) / brickorna (4).
- Skruva därefter ihop stängerna (5) och (6),
med hjälp av skruvarna (7). Placera brickorna
(4) framför muttern (8) och dra åt skruvkopp lingen hårt (se bild C).
Hänvisning! Vid följande skruvkoppling har du 3 möjligheter, att förbinda
stången med handtagen (1/2) med den
böjda stången (6). Använd till en början
det mellersta hålet. Beakta därvid
under alla omständigheter säkerhetsanvisningarna i kapitel “Montering i
dörrkarm“!
- Skruva avslutningsvis ihop stängerna (1/2)
och (6) med skruvarna (9) och brickan (10).
Därvid måste beaktas, att man vid brickan
måste placera 28 mm konen under stången
(6) och 32 mm konen på stången (1/2). Lägg
brickorna (4) framför muttern (8) och dra åt
skruvkopplingen hårt (se bild D).
Montering i dörrkarm
OBS! Se till, att använda passande monteringsmaterial. Medföljande monteringsmaterial är lämpligt för montering
på stabila betongväggar (se bild B).
Fråga i fackhandeln efter lämpligt
monteringsmaterial om du vill montera
på lättbetongväggar och andra lätta
väggar.
Montera säkerhetsbygeln (11) direkt över dörrkarmen på resp. dörrs baksida (se bild E).
När du monterat säkerhetsbygeln, kan du hänga
upp dörrtrapetsen i dörrkarmen enligt beskrivningen. Placera först stången (5) i säkerhetsbygeln
(se bild F). Därefter trycker du stångändarna
(1/2) mot den främre dörrkarmen (se bild G).
Obs!
- Förvissa dig om, att stången sitter
ordentligt fast i säkerhetsbygeln.
Kontrollera om dörrtrapetsen sitter
ordentligt fast genom att “dra“ och
“skaka“ i den.
- När du satt fast multifunktions-trapet sen, måste den böjda stångens hand tag befinna sig i 90° vinkel till väggen
med dörren (se bild G).
Pekar handtagen uppåt på grund
av väggens tjocklek, ändrar du skruv kopplingen på den raka grepp stången (1/2) och den böjda grepp stången (6).
Använd de borrhål, som pekar mot
handtagsänden.
Pekar greppstängerna i samband
med en tunn dörrvägg nedåt, an vänder du det tredje borrhålet, med
utgående från greppänden.
15SE
Page 16

Allmänna träningstips
- Öka träningens intensitet långsamt och var
noga med att göra tillräckliga pauser mellan
övningarna.
- Utför alltid övningarna i ett jämnt tempo och ej
snabbt och ryckigt.
- Håll en jämn andning. Andas ut vid an strängning och in vid avslappning.
- Det är mycket viktigt att alltid värma upp före
varje övning.
Allmän träningsplanering
- Ett övningsset består av 10-20 repetitioner av
en övning.
- Varje övning kan upprepas 2-4 gånger.
- Mellan varje övningsset bör du göra en paus
på 3-5 minuter.
Övningar
Armhävningar (se bild H)
Lägg dörrtrapetsen på ett jämnt underlag. Ta
tag om det övre röret och inta den avbildade
positionen. Pressa nu upp kroppen långsamt tills
armarna är nästan helt utsträckta. Därefter sänker du ner överkroppen igen. Hål hela kroppen
i spänning under hela övningen. Huvudet bildar
en linje med ryggraden.
Dips (se bild I)
Lägg dörrtrapetsen på ett jämnt underlag. Ta tag
om det övre röret och inta den avbildade positionen. Sänk överkroppen långsamt tills du rör vid
golvet. För upp överkroppen igen tills armarna
är nästan helt sträckta.
Pullups (se bild J)
Montera dörrtrapetsen i dörrkarmen enligt
beskrivningen på s. 15.
OBS! För pullups får endast
handtagen i ändarna av stången
(6) användas.
Fatta dörrtrapetsen i handtagen i ändarna på
stången (6) som på bilden och dra dig upp
med armarna så långt att du precis kan se över
dörrtrapetsens mittenstång. Sänk sedan kroppen
långsamt igen. Genom att förändra greppet kan
man utföra en variantionsrik och omväxlande
träning.
Situps (se bild K)
OBS! Felaktigt utförda situps
kan leda till skador på ryggraden.
Ställ dörrtrapetsen i dörröppningen som på
bilden. Lägg dig på rygg och kläm in fötterna
under dörrtrapetsens mittenstång. Vinkla benen
lätt för att undvika att ryggen svankar. Händerna
kan läggas på sidan av huvudet utan att trycka
på huvudet. Överkroppen dras nu långsamt upp
med hjälp av magmusklerna. Håll positionen i
ett par sekunder och sänk sedan långsamt ner
överkroppen igen.
Vård, förvaring
Glöm inte, att regelbunden skötsel och rengöring
bidrar till artikelns säkerhet och livslängd.
Förvara alltid artikeln torrt och rent i ett tempererat rum.
VIKTIGT! Rengör endast med vatten, aldrig med
starka rengöringsmedel.
Torka därefter torrt med en rengöringstrasa.
16 SE
Anvisningar för
avfallshantering
Sortera förpackning och produkt på ett miljövänligt sätt! Vänd dig till en miljöstation eller din
kommunala avfallshantering. Beakta gällande
föreskrifter.
Page 17

3 års garanti
Produkten är producerad med stor noggrannhet
och under ständig kontroll. Du får tre års garanti
på produkten från och med köpdatumet.
Spara ditt kassakvitto. Garantin gäller endast för
material- och fabrikationsfel och upphör att gälla
vid felaktig eller icke ändamålsenlig användning.
Dina lagliga rättigheter, i synnerhet garantirätter,
begränsas ej av denna garantin.
Vid eventuella reklamationer, vänd dig till nedanstående service-hotline eller maila oss.
Våra servicemedarbetare kommer att i samråd
med dig fastlägga den fortsatta handläggningen. Du erhåller alltid en personlig konsultation.
Garantitiden förlängs ej på grund av reparationer som utförts på grund av garanti, lagstadgad
garanti eller kulans. Detta gäller även för utbytta
och reparerade delar.
Reparationer som måste utföras efter garantins
utgång är kostnadspliktiga.
IAN: 93665
Service Sverige
Tel.: 0770 930739
E-Mail: deltasport@lidl.se
Service Suomi
Tel.: 010309 3582
E-Mail: deltasport@lidl.fi
Reservdelar till din produkt hittar du dessutom på:
www.delta-sport.com, under rubriken service Reservdelsservice Lidl
17SE
Page 18

Tillykke!
Med dit køb har du valgt et kvalitetsprodukt.
Bliv fortrolig med produktet før monteringen og
ibrugtagningen. Læs i denne forbindelse den
efterfølgende monteringsvejledning og sikkerhedshenvisningerne omhyggelig.
Brug kun produktet som beskrevet og til de
oplyste anvendelsesområder. Opbevar denne
vejledning godt. Udlever alle bilag samtidig, hvis
du giver produktet videre til tredje.
En tilsidesættelse af sikkerhe-
dshenvisningerne kan føre til
alvorlige skader.
Leveringsomfang
1 x Multifunktions-dørribbe
2 x Sikkerhedsbøjle
1 x Brugervejledning
1 x Fastgørelsesmateriale til fastgørelse af
sikkerhedsbøjlen
1 x Sekskantsnøgle
Tekniske Data
max.
Maks. belastning: 110 kg
KG
Til dørkarme på mellem: 70 cm - 86 cm
Til dørrammebredde (Vægtykkelse):
ca. 12 cm - 17 cm
Formålsbestemt anvendelse
Denne vare er et sportsapparat til montering i
dørkarme med en bredde på mellem 70 cm 86 cm. Varen er ikke egnet til professionel eller
terapeutisk træning.
Sikkerhedshenvisninger
til montering i dørkarmen
- Varen er ikke egnet til børn under 14 år, idet
børn ikke kan bedømme potentielle farer.
Desuden indeholder varen små dele, der kan
sluges af børn.
- OBS! Ved montering i dørkarmen skal de
medfølgende sikkerhedsbøjler altid anvendes!
- Det medfølgende fastgørelsesmateriale til
sikkerhedsbøjlerne er kun egnet til stabile
vægge af beton.
Monteringsmaterialet skal kunne bære den
maksimale legemsvægt på 110 kg.
- Anvend passende fastgørelsesmateriale hvis
væggen over dørkarmen består af et andet
materiale.
- Til montering i dørkarme med en bredde på
mellem 70 cm - 86 cm.
- De bøjede grebstængers grebsområder skal
efter monteringen i dørrammen være indrettet
i en vinkel på ca. 90°!
- Monteringen skal udføres af en voksen og til
slut skal soliditeten kontrolleres.
- Undersøg dørkarmens beskaffenhed. Hvis
dørkarmen er af kunststof, aluminium eller træ
med en vægtykkelse på mindre en 7 mm,
må ribben ikke monteres, idet rammen i dette
tilfælde ikke er stabil nok.
- Må ikke fastgøres i dørkarme i nærheden af
trapper.
Sikkerhedshenvisninger
omkring anvendelse
- Anvendelse af varen er på eget ansvar.
- Denne vare må kun anvendes af personer, der
er fortrolige med sikkerhedshenvisningerne.
- Før enhver anvendelse af varen, der er monte
ret i dørkarmen, skal det kontrolleres, at sikker hedsbøjlerne sidder godt fast, og at dørribben
sidder i den rigtige position.
- Varen må maksimalt belastes med 110 kg.
- Før enhver anvendelse kontrolleres fastheden
ved at man trækker og rusker godt i varen.
- Ikke egnet til anbringelse af dynamiske dele,
som f.eks. gynger.
- Der må ikke udføres øvelser, hvor hovedet
vender mod gulvet.
- Ikke svinge!
- Varen må altid kun benyttes af en person.
- Varen er kun egnet til privat brug.
- Varen må kun anvendes under voksnes opsyn
og må ikke anvendes som legetøj.
- Undersøg varen for skader og slitage før
enhver påbegyndelse af træningen.
Artiklen må kun bruges, når den er i fejlfri
stand! Udskift straks defekte dele og undlad at
bruge artiklen, til den er sat fuldkommen i
stand igen.
18 DK
Page 19

- Ved sundhedsskadelige problemer bør du
konsultere din læge, før du bruger varen.
Hvis du føler dig utilpas eller udviser sym ptomer under øvelserne, bør du straks afbryde
træningen og kontakte din læge!
- Gravide bør kun udføre træningen efter aftale
med deres læge.
- Udfør øvelserne med så meget afstand til
genstande og andre personer, at ingen kan
komme til skade.
- Opbevar brugervejledningen i nærheden af
træningsapparatet. Derved kan du slå op på
de vigtigste øvelser og se, hvordan de udføres
korrekt.
- Kontroller før enhver anvendelse om alle skrue forbindelser sidder godt fast.
- Hvis du bruger dørribben på gulvet, kan det
beskadige følsomme undergrunde som f.eks.
parketgulve eller laminat. Brug derfor
skridsikre tæpper eller måtter som underlag
på følsomme eller glatte gulvbelægninger.
Samling
Til fastgørelse af sikkerhedsbøjlerne
(11) skal De bruge en boremaskine og
en stjerneskruetrækker.
Översikt av delarna
(se afbildning A)
- Stik stængerne (1) og (2) ind i hinanden og
skru disse sammen med skruerne (3) / under lagsskiverne (4).
- Efterfølgende skruer De stængerne (5) og (6),
sammen med skruerne (7). Læg underlagss kiverne (4) foran møtrikken (8) og spænd
forskruningen fast (se afbildning C).
Henvisning! Ved de følgende fastskruninger har De 3 muligheder til at forbinde gribetangen (1/2) med de bøjede
gribestænger (6). Brug i første omgang
den mellemste hulboring. Bemærk
angående dette absolut sikkerhedshenvisningerne i kapitlet „Montage ved
dørrammen“!
- Til sidst skruer De stængerne (1/2) og (6)
sammen med skruerne (9) og afstandsstykket
(10).
Vær derved opmærksom på, at 28 mm
konussen sættes under stangen ved af standsstykket (6) og 32 mm konussen på
stangen (1/2). Læg underlagsskiverne (4)
foran møtrikken (8) og spænd forskruningen
fast (se afbildning D).
Montage ved dørrammen
ADVARSEL! Vær opmærksom på at anvende passende fastgørelsesmateriale.
Det medleverede fastgørelsesmateriale
er egnet til fastgørelsen på stabile betonvægge (se afbildning B).
Til fastgørelsen på letbeton eller lette
vægge, informer Dem i faghandlen vedrørende egnet fastgørelsesmateriale.
Fastgør sikkerhedsbøjlerne (11) direkte over
dørrammen på bagsiden af den vedkommende
dør (se afbildning E).
Efter at De har monteret sikkerhedsbøjlerne, kan
De hænge dørens reck, som vist, i dørrammen.
Hæng først stangen (5) i sikkerhedsbøjlerne (se
afbildning F). Derefter trykker De enderne af
stængerne (1/2) mod den forreste dørramme
(se afbildning G).
Advarsel!
- Vær opmærksom på at stangen er
hængt fast ind i sikkerhedsbøjlerne.
Kontroller nu fasthængningen af
dørens reck gennem faste „trække-“
og „ruske-“ bevægelser.
- Efter at De har hængt multidørhjørnet
i, så skal det bøjede gribestangsgreb
befinde sig i en vinkel på ca. 90° til
dørvæggen (se afbildning G).
Hvis grebene pga. væggens tykkelse
peger opad, ændres skrueforbindel sen på den lige grebstang (1/2) og på
den bøjede grebstang (6).
Brug det hul, der vender mod grebets
ende.
I tilfælde af en for tynd dør-væg
vendes grebstangen nedad.
Brug det 3. hul fra grebets ende.
19DK
Page 20

Generelle
træningshenvisninger
- Forøg langsom din træningsintenstitet og sørg
for at holde pauser mellem øvelserne.
- Udfør alle øvelser jævnt, uden ryk og hurtigt.
- Vær opmærksom på at du trækker vejret
regelmæssigt. Ved anstrengelse puster du
ud og ved aflastning trækker du vejret ind.
- Du skal altid varme op, før du begynder på
øvelserne.
Generel træningsplanlægning
- Et sæt øvelser består af 10-20 gentagelser af
en øvelse.
- Ethvert sæt øvelser kan gentages 2-4 gange.
- Du bør holde en pause på 3-5 min. mellem
øvelsessættene.
Øvelser
Armbøjninger (se afbildning H)
Anbring multifunktions-dørribben på et jævnt underlag. Tag fat om de øverste rørdele og indtag
den viste position. Tryk overkroppen langsomt
opad, indtil armene er strukket helt ud. Derefter
sænkes overkroppen igen. Hold hele kroppen
spændt under øvelsen. Hovedet danner en linje
med rygsøjlen.
Dips (se afbildning I)
Anbring multifunktions-dørribben på et jævnt underlag. Tag fat om de øverste rørdele og indtag
den viste position. Sænk nu langsomt overkroppen ned, indtil du rører jorden. Derefter trykkes
overkroppen op igen, indtil armene næsten er
strakte.
Klatretag (se afbildning J)
Anbring dørribben i din dørkarm som beskrevet
på side 19.
OBS! Ved klatretag må du kun
tage fat i dørribben i enderne af
stang (6).
Tag fat i enderne af stang (6) på dørribben som
vist på billedet og træk dig op med armene indtil
du lige netop kan se over dørribbens mellemste
stang. Derefter sænker du kroppen langsomt
igen. En ændring af gribepositionen muliggør en
variantrig klatretagstræning.
Sit ups (se afbildning K)
OBS! Ved forkert udføring af Sit
ups kan du risikere at skade din
rygsøjle.
Anbring dørribben mellem dørkarmen som vist
på billedet. Læg dig på ryggen og klem dine
fødder under dørribbens mellemste stang.
Bøj benene let, for at undgå svaj i ryggen.
Hænderne anbringes ved siden af baghovedet
uden at udøve tryk på hovedet. Overkroppen
trækkes nu langsom op ved hjælp af mavemusklerne. Hold positionen i et par sekunder og sænk
derefter overkroppen langsomt igen.
Pleje, opbevaring
Husk, at en regelmæssig pleje og rengøring
bidrager til varens sikkerhed og vedligeholdelse.
Opbevar altid varen tør og ren i et tempereret
rum.
VIGTIGT! Må kun rengøres med vand – aldrig
med skrappe rengøringsmidler.
Derefter skal den tørres af med en tør klud.
Henvisninger vedr.
bortskaffelse
Emballagen og selve produktet bør bortskaffes
miljørigtigt og sorteret! Produktet bortskaffes i
henhold til de kommunale bestemmelser.
Følg de aktuelt gældende forskrifter.
20 DK
Page 21

3 års garanti
Produktet er fremstillet med største omhu og
under vedvarende kontrol. Der ydes en garanti
på tre år fra købsdatoen på dette produkt.
Opbevar venligst kvitteringen fra købet.
Garantien gælder kun for materiale- og
fabrikationsfejl og bortfalder ved misbrug eller
uhensigtsmæssig anvendelse. Deres lovpligtige
rettigheder, særligt garantikrav, begrænses ikke
af denne garanti.
Ved eventuelle klager bedes du henvende
dig til nedenstående service-hotline eller tage
kontakt til os via e-mail. Medarbejderne i vores
kundetjeneste vil så aftale den videre fremgangsmåde med dig. Vi vil under alle omstændigheder
rådgive dig personlig.
Garantiperioden forlænges ikke ved eventuelle reparationer inden for garantien eller ved
kulance. Dette gælder også for udskiftede og
reparerede dele.
Efter udløb af garantien er forefaldende reparationer forbundet med omkostninger.
IAN: 93665
Service Danmark
Tel.: 32 710005
E-Mail: deltasport@lidl.dk
Reservedele til deres produkt finder De også under:
www.delta-sport.com, rubrik service - reservedelservice Lidl
21DK
Page 22

Félicitations !
Vous venez d’acquérir un produit de qualité.
Veuillez vous informer sur le produit avant la première utilisation. Pour cela, lisez soigneusement
les consignes d’utilisation et de sécurité. Utilisez
uniquement le produit suivant les indications et
dans les domaines d’application indiqués.
Conservez soigneusement cette notice.
Transmettez tous les documents en cas de cession du produit à un tiers.
Le non-respect des consignes de
sécurité peut conduire à de graves
blessures.
Contenu de la livraison
1 x barre de porte polyvalente
2 x arceau de sécurité
1 x notice d’utilisation
1 x matériel pour la fixation de l‘arceau
de sécurité
1 x clé à six pans
Caractéristiques
max.
Charge max. : 110 kg
KG
Pour des châssis de porte : 70 cm - 86 cm
Pour les châssis de porte d’une largeur de
( épaisseur du mur ) : env. 12 cm - 17 cm
Utilisation conforme à sa
vocation
Cet article est un appareil de sport à monter
dans le châssis d‘une porte d‘une largeur de
70 cm - 86 cm. Cet article n‘est pas adapté à
l‘entraînement professionnel ou thérapeutique.
Indications de sécurité
relatives au montage
dans le châssis de la porte
- L‘article n‘est pas adapté aux enfants de
moins de 14 ans, car ces derniers ne sont pas
aptes à évaluer les risques potentiels. En plus,
l‘article comprend de petites pièces suscepti bles d‘être avalées par les enfants.
- ATTENTION ! Utilisez toujours l‘arceau de
sécurité fourni pour le montage dans le
châssis d‘une porte !
- Le matériel de fixation fourni pour l‘arceau de
sécurité est uniquement adapté aux murs
stables en béton. Le matériel de fixation
doit pouvoir supporter le poids maximal de
110 kg.
- Veuillez utiliser un matériel de fixation
correspondant, si le mur se trouvant au-dessus
du châssis de la porte devait être composé
d‘un autre matériau.
- Pour le montage dans des châssis de porte
d‘une largeur de 70 cm - 86 cm.
- La zone de prise des barres arquées doit être
orientée selon un angle d’env. 90° vers le mur
de la porte après le montage dans le châssis
de la porte !
- Le montage est à effectuer par une personne
adulte, laquelle doit également contrôler la
solidité du dispositif après le montage.
- Contrôlez la composition du châssis de la
porte. Un montage est déconseillé, si le
châssis devait être en plastique, aluminium ou
bois et présenter une épaisseur murale infé
rieure à 7 mm, étant donné que le châssis ne
présenterait pas une stabilité suffisante.
- À ne pas monter dans des châssis de porte se
trouvant à proximité d‘un escalier.
Indications de sécurité
relatives à l‘utilisation
- L‘utilisation de l‘article se fait aux risques et
périls de chacun.
- Cet article ne peut être utilisé que par des
personnes connaissant les indications de
sécurité.
- Contrôlez avant chaque utilisation la fixation
de l‘arceau de sécurité et la position correcte
de la barre de porte de l‘article monté dans le
châssis de la porte.
- L‘article ne supporte qu‘une charge maximale
de 110 kg.
- Secouez et tirez fermement sur l‘article pour
contrôler sa solidité avant chaque utilisation.
22 FR/BE
Page 23

- N‘est pas adapté à la fixation de pièces
dynamiques, telles que balançoires.
- Ne pas exécuter d‘exercices avec la tête vers
le bas.
- Ne pas balancer !
- L‘article ne peut être utilisé que par une seule
personne à la fois.
- L‘article est uniquement utilisable dans le
domaine privé.
- L‘article ne peut être utilisé que sous la surveil lance d‘une personne adulte, n‘est pas un
jouet.
- Contrôlez l‘article avant chaque entraînement.
L’article est uniquement utilisable s’il se
trouve dans un état impeccable ! Veuillez
immédiatement remplacer des pièces
défectueuses et n’utilisez plus l’article avant
que celui-ci ne soit pas entièrement réparé.
- Veuillez consulter votre médecin traitant avant
de commencer l‘entraînement, si vous avez
des problèmes de santé. Il est impératif
d‘arrêter les exercices, en cas d‘apparition de
malaise ou de douleurs !
- Les femmes enceintes doivent d‘abord
consulter le médecin avant de commencer
les exercices.
- Veillez à conserver une distance suffisante aux
objets et autres personnes, afin de contrecar rer toute blessure.
- Conservez le mode d‘emploi à proximité de
l‘appareil. Celui-ci sert à reconsulter les exer cices principaux.
- Contrôlez avant toute utilisation le serrage
correct de tous les raccords à vis.
- Des revêtements de sol sensibles, tels que du
parquet ou de surfaces stratifiées peuvent éven
tuellement être endommagés lorsque vous uti lisez la barre de porte par terre. Veuillez
utiliser des tapis antidérapants comme support
sur des revêtements de sol sensibles ou glissants.
Assemblage
Vous nécessitez une foreuse et un tournevis à fente pour fixer l’arceau de sécurité
(11).
Aperçu des pièces (voir Ill. A)
- Enfichez les barres (1) et (2) l’une dans l’autre
et vissez-les avec les vis (3) / les rondelles (4).
- Vissez ensuite les barres (5) et (6) avec les
vis (7). Posez les rondelles (4) devant les
écrous (8) et vissez fermement le raccord à
vis (voir Ill. C).
Indication ! Vous avez 3 possibilités de
raccorder la barre de prise (1/2) aux
barres de prise arquées (6). Utilisez tout
d’abord le trou du milieu. Respectez à
cet effet impérativement les consignes
de sécurité du chapitre « Montage dans
le châssis de la porte » !
- Vissez pour terminer les barres (1/2) et (6)
avec les vis (9) et la pièce d’écartement (10).
Veuillez pour cela prendre en considération
que le cône de 28 mm de la pièce
d’écartement est à poser sous la barre (6) et
le cône de 32 mm à poser sur la barre (1/2).
Posez les rondelles (4) devant les écrous (8) et
vissez fermement le raccord à vis (voir Ill. D).
Montage dans le châssis de la
porte
ATTENTION ! Veillez à utiliser le matériel
de fixation correspondant. Le matériel
de fixation fourni est adapté à une fixation à des murs stables en béton (voir
Ill. B).
Veuillez vous renseigner sur le matériel
de fixation approprié pour le béton ou
les murs en béton allégé auprès d’un
magasin spécialisé.
Fixez l’arceau de sécurité (11) directement sur
la face arrière du châssis de la porte correspondante (voir Ill. E).
Vous pouvez suspendre la barre de porte dans
le châssis comme illustré après avoir monté
l’arceau de sécurité. Accrochez tout d’abord
la barre (5) dans l’arceau de sécurité (voir Ill.
F). Appuyez ensuite les bouts de la barre (1/2)
contre la face avant du châssis de la porte
(voir Ill. G).
23FR/BE
Page 24

Attention !
- Veillez à ce que la barre soit accro chée fermement dans l’arceau de
sécurité. Tirez et secouez pour
contrôler la solidité du montage de
la barre de porte.
- Les poignées de la barre de prise
arquée doivent se trouver à un angle
d’env. 90° vers le mur de la porte
(voir Ill. G) après l’accrochage de la
barre de porte multifonctionnelle.
Si les poignées sont orientées vers le
haut en raison de l’épaisseur de
paroi, modifiez le vissage de la barre
de poignée droite (1/2) et des barres
de poignée courbées (6).
Utilisez le perçage pointant vers
l’extrémité de poignée.
Si les barres de poignée sont orien tées vers le bas dans le cas d’une
paroi de porte trop mince, utilisez
le troisième perçage en partant de
l’extrémité de poignée.
Indications générales
d‘entraînement
- Augmentez lentement l‘intensité de
l‘entraînement et veillez à des pauses
suffisantes entre les exercices.
- Exécutez les exercices de manière régulière,
et non de façon brusque et rapide.
- Veillez à une respiration régulière. Expirez en
cas d‘effort et respirer durant le délestage.
- Veuillez toujours vous échauffer avant tout
exercice.
Planification générale de
l‘entraînement
- Une phase d‘entraînement se compose de 10
à 20 répétitions d‘un exercice.
- Chaque phase peut être répétie 2 à 4 fois.
- Veillez à respecter une pause de 3 à 5
minutes entre les différents exercices.
Exercices
Pompes (voir Ill. H)
Posez la barre de porte multifonctionnelle
sur une surface plane. Enlacez les parties
supérieures et prenez la position indiquée.
Pressez à présent le haut du corps lentement
vers le haut, jusqu‘à ce que les bras soient
entièrement tendus. Descendez à nouveau le
haut du corps. Conservez le corps entier tendu
durant cet exercice. La tête forme une ligne avec
la colonne vertébrale.
Dips (voir Ill. I)
Posez la barre de porte multifonctionnelle sur
une surface plane. Enlacez les parties supérieures et prenez la position indiquée. Descendez
le haut du corps jusqu‘à ce que celui-ci touche
le sol. Pressez à présent à nouveau le haut du
corps vers le haut, jusqu‘à ce que les bras soient
presque tendus.
Tractions (voir Ill. J)
Montez la barre de porte dans le châssis de la
porte comme décrit sur la page 23.
Attention ! La barre (6) ne peut
être tenue qu‘aux bouts pour les
exercices de traction.
Tenez la barre de porte comme illustré aux bouts
de la barre (6) et tirez-vous vers le haut avec les
bras, jusqu‘à ce que vous puissiez regarder par
dessus la barre du milieu de la barre de porte.
Redescendez ensuite à nouveau lentement.
Une modification de la position de la prise en
main permet des exercices de traction variés.
Sit-ups (voir Ill. K)
Attention ! Une exécution incor recte des sit-ups peut causer des
blessures au niveau de la colonne
vertébrale.
Posez la barre de porte comme illustré entre le
châssis de la porte.
Couchez-vous sur le dos et coincez vos pieds
sous la barre du milieu de la barre de porte.
Pliez légèrement les jambes afin de contrecarrer
la formation d‘un creux dans le dos. Les mains
peuvent être posées à l‘arrière de la tête sans
exercer de pression sur cette dernière.
24 FR/BE
Page 25

Le haut du corps est lentement poussé vers le
haut à l‘aide de la musculature ventrale.
Conservez cette position pour quelques secondes et redescendez alors le haut du corps.
Entretien, stockage
S. v. p. n‘oubliez jamais qu‘un entretien et
nettoyage réguliers contribuent à la sécurité et
conservation de l‘article.
Veuillez toujours entreposer l’article dans un
endroit sec et propre, dans une pièce tempérée.
IMPORTANT ! Nettoyer uniquement avec de
l’eau et ne jamais utiliser des produits de nettoyage abrasifs. Essuyez ensuite l’article avec un
chiffon de nettoyage sec.
Indications quant à
l’élimination
L’emballage et l’article doivent être éliminés de
manière favorable à l’environnement en fonction
des matériaux. Eliminez l’article via une entreprise de recyclage autorisée, ou via vos services
municipaux compétents. Veuillez tenir compte
des directives actuelles en vigueur.
3 ans de garantie
Le produit a été fabriqué avec le plus grand soin
et sous un contrôle permanent. Vous avez sur ce
produit une garantie de trois ans à partir de la
date d’achat. Conservez le ticket de caisse.
La garantie est uniquement valable pour les
défauts de matériaux et de fabrication, elle perd
sa validité en cas de maniement incorrect ou non
conforme. Vos droits légaux, tout particulièrement les droits relatifs à la garantie, ne sont pas
limitées par cette garantie.
En cas d‘éventuelles réclamations, veuillez vous
adresser à la hotline de garantie indiquée cidessous ou nous contacter par e-mail.
Nos employés du service client vous indiqueront
la marche à suivre le plus rapidement possible.
Nous vous renseignerons personnellement dans
tous les cas.
La période de garantie n‘est pas prolongée par
d’éventuelles réparations sous la garantie, les
garanties implicites ou le remboursement.
Ceci s‘applique également aux pièces remplacées et réparées. Les réparations nécessaires
sont à la charge de l’acheteur à la fin de la
période de garantie.
IAN : 93665
Service Belgique
Tel. : 070 270 171
(0,15 EUR/Min.)
E-Mail : deltasport@lidl.be
Veuillez trouver les pièces de rechange pour votre produit sur :
www.delta-sport.com, rubrique Service - Service des pièces de
rechange Lidl
25FR/BE
Page 26

Hartelijk gefeliciteerd!
Met uw koop hebt u voor een hoogwaardig
product gekozen. Maak u vertrouwd met het
product voor de montage en de eerste ingebruikname. Lees hiervoor de navolgende montageen de veiligheidsinstructies door. Gebruik het
product uitsluitend zoals beschreven en voor het
aangegeven gebruiksdoeleinde. Bewaar deze
gebruiksaanwijzing goed. Overhandig alle
documenten als u het product aan derden geeft.
Indien de veiligheidsadviezen niet
opgevolgd worden, kan dit tot
ernstige blessures leiden.
Leveringsomvang
1 x multifunctioneel deurrek
2 x veiligheidsbeugel
1 x gebruiksaanwijzing
1 x bevestigingsmateriaal ter bevestiging van de
veiligheidsbeugels
1 x zeskantsleutel
Technische gegevens
max.
Max. belasting: 110 kg
KG
Voor deurkozijnen van: 70 cm - 86 cm
Voor deurkozijnbreedte (wanddikte):
ca. 12 cm - 17 cm
Alleen te gebruiken als
rekstok
Dit product is een sporttoestel dat bedoeld is
voor montage tussen het deurkozijn met een
breedte van 70 cm - 86 cm. Het product is niet
geschikt voor een professionele of therapeutische training.
Veiligheidsinstructies voor
de montage tussen het
deurkozijn
- Het product is niet geschikt voor kinderen
beneden 14 jaar, omdat kinderen het
potentiële gevaar niet kunnen inschatten.
Bovendien bevat het product kleine onder delen die door kinderen kunnen worden
ingeslikt.
- ATTENTIE! Bij de montage in het deurkozijn
dient u altijd gebruik te maken van de mee geleverde veiligheidsbeugels!
- Het meegeleverde bevestigingsmateriaal van
de veiligheidsbeugels is alleen geschikt voor
stabiele muren bestaande uit beton. Het
bevestigingsmateriaal moet het maximale
lichaamsgewicht van 110 kg kunnen dragen.
- Gebruik passend bevestigingsmateriaal
indien de muur en het deurkozijn van
ander materiaal zijn gemaakt.
- Ter montage in een deurkozijn met een
breedte van 70 cm - 86 cm.
- Het handgreepgedeelte van de gebogen
greepstangen moet na de montage in het
deurkozijn een hoek van ca. 90° ten opzichte
van de deurwand hebben!
- De montage dient door een volwassen
persoon te worden uitgevoerd en vervolgens
te worden gecontroleerd op stevigheid.
- Controleer de kwaliteit van het deurkozijn. Als
het deurkozijn gemaakt is van kunststof, alumi nium of hout met een muurdikte van minder
dan 7 mm, dan alstublieft niet installeren,
omdat in dit geval het deurkozijn hoogstwaar schijnlijk niet stabiel genoeg is.
- Niet aan deurkozijnen in de buurt van een
trap bevestigen.
Veiligheidsinstructies voor
het gebruik
- Het gebruik van het product is op eigen risico.
- Dit product mag alleen worden gebruikt door
personen, die op de hoogte zijn van de veilig heidsinstructies.
- Voor elk gebruik van het in het deurkozijn
gemonteerde product dient de bevestiging van
de veiligheidsbeugels en de juiste positie van
het deurrek te worden gecontroleerd.
- Het product mag met maximaal 110 kg
worden belast.
- Voor elk gebruik opnieuw de stevigheid door
krachtige „trek“- en „schud“- bewegingen aan
het product controleren.
- Niet geschikt om aan dynamische delen, zoals
b.v. schommels, te bevestigen.
26 NL/BE
Page 27

- Voer geen oefeningen uit waarbij het hoofd
naar beneden is gericht.
- Niet slingeren!
- Het artikel mag altijd slechts door één persoon
gebruikt worden.
- Het artikel is uitsluitend geschikt voor privége bruik.
- Het artikel mag uitsluitend onder toezicht van
een volwassene en niet als speelgoed gebruikt
worden.
- Controleer het product op beschadigingen en
slijtage voordat u begint te trainen.
Het product mag alleen in een feilloze
toestand worden gebruikt! Vervang defecte
onderdelen direct en gebruik het product tot
de volledige reparatie niet meer.
- Als u gezondheidsproblemen hebt dient u
eerst een arts te raadplegen, voordat u het
product gebruikt. Als u tijdens het trainen last
krijgt van onwel bevinden of problemen, dient
u de oefening direct te onderbreken en een
arts te raadplegen!
- Zwangere vrouwen mogen alleen na na
overleg met een arts trainen.
- Voer de oefeningen met voldoende afstand
tot voorwerpen en andere personen uit, zodat
niemand gewond kan raken.
- Bewaar de gebruiksaanwijzing in de buurt
van de trainingstoestel. Dit is handig voor het
nalezen van de belangrijkste oefeningen.
- Controleer voor elk gebruik, of alle schroefver bindingen goed vastzitten.
- Indien u de deurrekstok op de bodem gebruikt,
zouden kwetsbare vloeren zoals parket of
laminaat beschadigd kunnen worden. Gebruik
op gevoelige of gladde vloerbedekkingen anti slip kleden of matten als oefenmat.
Montage
Om de veiligheidsbeugels (11) te bevestigen hebt u een boormachine en een
kruiskop-schroevendraaier nodig.
Overzicht van de onderdelen
(zie afb. A)
- Steek de stangen (1) en (2) in elkaar en
schroef deze met behulp van de schroeven
(3) / onderlegplaatjes (4) vast.
- Vervolgens schroeft u de stangen (5) en (6)
met de schroeven (7) vast. Leg de onderleg
plaatjes (4) voor de moeren (8) en draai de
schroefverbinding stevig vast (zie afb. C).
Opmerking! Bij de volgende schroefverbinding hebt u 3 mogelijkheden
de greepstang (1/2) met de gebogen
greepstangen (6) te verbinden.
Gebruik in eerste instantie de boorgaten in het midden. Let hierbij per sé
op de veiligheidsinstructies in hoofdstuk
„Montage aan het deurkozijn“!
- Als laatste schroeft u de stangen (1/2) en (6)
met de schroeven (9) en de afstandshouder
(10) vast. Hierbij dient u erop te letten, dat bij
de afstandhouder de 28 mm conus onder de
stang (6) en de 32 mm conus op de stang
(1/2) wordt geplaatst. Leg de onderlegplaat jes (4) voor de moeren (8) en draai de schro efverbinding stevig vast (zie afb. D).
Montage aan het deurkozijn
ATTENTIE! Let erop, dat u geschikt
bevestigingsmateriaal gebruikt. Het
meegeleverde bevestigingsmateriaal
is geschikt voor de bevestiging aan stabiele betonnen muren (zie afb. B).
Voor de bevestiging aan poreuze of
dunne wanden dient u zich in een speciaalzaak te informeren over geschikt
bevestigingsmateriaal.
Bevestig de veilgheidsbeugel (11) direct boven
het deurkozijn aan de achterkant van de desbetreffende deur (zie afb. E).
Nadat u de veiligheidsbeugel hebt gemonteerd,
kunt u het deurrek zoals weergegeven in het
deurkozijn hangen. Haak eerst de stang (5) in
de veiligheidsbeugel (zie afb. F). Vervolgens
drukt u het uiteinde van de stangen (1/2) tegen
het voorste kozijn (zie afb. G).
27NL/BE
Page 28

Attentie!
- Let erop, dat de stang stevig in de
veiligheidsbeugel vastgehaakt is.
Controleer of het deurrek stevig zit
door er stevig aan te trekken en
schudden.
- Nadat u het multi-deurrek hebt inge haakt, moeten zich de grepen van de
gebogen greepstang in een hoek van
ca. 90° hoek ten opzichte van de
deurwand bevinden (zie afb. G).
Mochten de grepen vanwege de
wanddikte naar boven wijzen, kunt
u de schroefverbinding van de rechte
greepstang (1/2) en de gebogen
greepstangen (6) veranderen.
Maak gebruik van de voorgeboorde
gaten, die naar het uiteinde van de
grepen wijzen.
Als de greepstangen in geval van
een dunne deurwand naar beneden
wijzen, gebruikt u het 3e voorge boorde gat uitgaande van het ui teinde van de greep.
Algemene trainingsinstructies
- Verhoog de trainingsintensiteit langzaam, let
op voldoende pauzes tussen de oefeningen.
- Voer alle oefeningen gelijkmatig, niet snel en
met schokbewegingen uit.
- Let op een gelijkmatige ademhaling. Uitade men bij inspanning en inademen bij ontspan ning.
- Doe voor begin van elke oefening principieel
een warming- up.
Algemene trainingsplan
- Een trainingsset bestaat uit 10 - 20 herhalin gen van elke oefening.
- Iedere trainingsset kan 2 - 4 keer worden
herhaald.
- Tussen iedere trainingsset dient een pauze van
3 - 5 min. in te lassen.
Oefeningen
Push-ups (zie afb. H)
Plaats het multifunctionele deurrek op een vlakke
ondergrond. Houd de zich aan de bovenkant
bevindende stangen vast en neem de afgebeelde positie in. Druk uw bovenlichaam langzaam omhoog, totdat uw armen bijna gestrekt
zijn. Daarna laat u uw bovenlichaam weer naar
beneden zakken. Houd het hele lichaam tijdens
de oefening onder spanning. Het hoofd is in één
lijn met uw ruggengraat.
Dips (zie afb. I)
Plaats het multifunctionele deurrek op een vlakke
ondergrond. Houd de zich aan de bovenkant
bevindende stangen vast en neem de afgebeelde positie in. Laat uw bovenlichaam langzaam
zakken, totdat uw lichaam de vloer aanraakt.
Druk uw bovenlichaam weer langzaam omhoog, totdat uw armen bijna gestrekt zijn.
Chin-ups (zie afb. J)
Monteer het deurrek in het deurkozijn zoals
beschreven op pagina 27.
Attentie! Voor chin-ups mag het
deurrek alleen aan de uiteinden
van de stang (6) worden vastge houden.
Houd het deurrek zoals afgebeeld aan de
uiteinden van stang (6) vast en trek uzelf met uw
armen zo ver naar boven, dat u over de middelste stang van het deurrek kunt kijken. Daarna
laat u zich weer naar beneden zakken.
Een verandering van de greeppositie maakt een
zeer gevarieerde pull-up-training mogelijk.
Sit-ups (zie afb. K)
Attentie! Als de sit-ups fout
worden uitgevoerd kan dit tot
verwondingen aan de wervel kolom voeren.
Plaats het deurrek zoals afgebeeld in het deurkozijn. Ga op uw rug liggen en klem uw voeten
onder de middelste stang van het deurrek.
Buig uw benen een beetje om een holle rug te
voorkomen. De handen kunnen zijdelings achter
het hoofd worden geplaatst, zonder druk op het
hoofd te oefenen.
28 NL/BE
Page 29

Het bovenlichaam wordt vervolgens langzaam
naar boven getrokken met behulp van de buikspieren. Houd deze positie een paar seconden
vast en laat daarna het bovenlichaam weer
langzaam omlaag zakken.
IAN: 93665
Service België
Tel.: 070 270 171
(0,15 EUR/Min.)
E-Mail: deltasport@lidl.be
Onderhoud, bewaring
Vergeet alstublieft nooit, dat regelmatig onderhoud en reiniging tot de veiligheid en het
behoud van het artikel bijdragen.
Het artikel steeds droog en schoon in een ruimte
met constante matige temperatuur opslaan.
BELANGRIJK! Alleen met water reinigen, nooit
met scherpe schoonmaakmiddelen.
Aansluitend met een afneemdoek droogwrijven.
Afvalverwerking
Gelieve u op een milieuvriendelijke manier van
de verpakking te ontdoen! Doe daarvoor een
beroep op een erkend afvalverwerkingsbedrijf
of op uw gemeenteadministratie. Houd rekening
met de voorschriften die op dat moment gelden.
3 jaar garantie
Het product is geproduceerd met grote zorg en
onder voortdurende controle. U ontvangt een
garantie van drie jaar op dit product, vanaf
de datum van aankoop. Bewaar alstublieft uw
aankoopbewijs.
De garantie geldt alleen voor materiaal- en fabricagefouten en vervalt bij foutief of oneigenlijk
gebruik. Uw wettelijke rechten, met name het
garantierecht, worden niet beïnvloed door deze
garantie.
In geval van reclamaties dient u zich aan de
beneden genoemde service-hotline te wenden of
zich per e-mail met ons in verbinding te zetten.
Onze servicemedewerkers zullen de verdere
handelswijze zo snel mogelijk met u afspreken.
Wij zullen u in ieder geval persoonlijk te woord
staan.
De garantieperiode wordt na eventuele reparaties en op basis van de garantie, wettelijke
garantie of coulance niet verlengd. Dit geldt ook
voor vervangen en gerepareerde delen.
Na afloop van de garantieperiode dienen eventuele reparaties te worden betaald.
Reserve-onderdelen voor uw product vindt u ook via: www.
delta-sport.com, rubriek Service - reserve-onderdelen-service
Lidl
29NL/BE
Page 30

Herzlichen Glückwunsch!
Mit Ihrem Kauf haben Sie sich für ein hochwertiges Produkt entschieden. Machen Sie sich vor
der Montage und der ersten Inbetriebnahme mit
dem Produkt vertraut. Lesen Sie hierzu aufmerksam die nachfolgende Bedienungsanleitung
und die Sicherheitshinweise. Benutzen Sie das
Produkt nur wie beschrieben und für die angegebenen Einsatzbereiche. Bewahren Sie diese
Anleitung gut auf. Händigen Sie alle Unterlagen
bei Weitergabe des Produkts an Dritte ebenfalls
mit aus.
Das Nichtbefolgen der Sicherheits-
hinweise kann zu ernsthaften
Verletzungen führen.
Lieferumfang
1 x Multifunktions-Türreck
2 x Sicherheitsbügel
1 x Bedienungsanleitung
1 x Befestigungsmaterial zur Befestigung des
Sicherheitsbügels
1 x Sechskantschlüssel
Technische Daten
max.
Max. Belastung: 110 kg
KG
Für Türrahmen von: 70 cm - 86 cm
Für Türrahmenbreite (Wandstärke):
ca. 12 - 17 cm
Bestimmungsgemäße
Verwendung
Dieser Artikel ist ein Sportgerät zur Montage
am Türrahmen mit einer Breite von 70 cm -
86 cm.
Der Artikel ist nicht für professionelles oder
therapeutisches Training geeignet.
Sicherheitshinweise zur
Montage am Türrahmen
- Der Artikel ist nicht für Kinder unter 14 Jahren
geeignet, da Kinder die potentiellen Gefahren
nicht einschätzen können. Außerdem enthält
der Artikel Kleinteile, die von Kindern ver schluckt werden können.
- ACHTUNG! Bei der Montage am Türrahmen
verwenden Sie immer die mitgelieferten Sicher heitsbügel!
- Das mitgelieferte Befestigungsmaterial des
Sicherheitsbügels ist nur für stabile Wände aus
Beton geeignet. Das Befestigungsmaterial
muss das maximale Körpergewicht von
110 kg tragen können.
- Verwenden Sie passendes Befestigungs material, falls die Wand über dem Türrahmen
aus anderem Material besteht.
- Zur Montage am Türrahmen mit einer Breite
von 70 cm - 86 cm.
- Die Griffbereiche der gebogenen Griffstangen
müssen nach der Montage im Türrahmen im
ca. 90° Winkel zur Türwand ausgerichtet
sein!
- Die Montage ist durch einen Erwachsenen
durchzuführen und im Anschluss auf Festigkeit
zu kontrollieren.
- Überprüfen Sie die Beschaffenheit des Tür rahmens. Wenn der Türrahmen aus Kunststoff,
Aluminium oder Holz mit einer Wandstärke
von weniger als 7 mm besteht, bitte nicht
montieren, da die Rahmen in diesem Falle
voraussichtlich nicht stabil genug sind.
- Nicht am Türrahmen in der Nähe von Treppen
befestigen.
Sicherheitshinweise zur
Benutzung
- Die Benutzung des Artikels ist auf eigene
Gefahr.
- Dieser Artikel darf nur von Personen ver wendet werden, die mit den Sicherheitshin weisen vertraut sind.
- Der Artikel darf maximal mit 110 kg belastet
werden.
30 DE/AT/CH
Page 31

- Vor jedem Gebrauch des am Türrahmen
montierten Artikels ist die Befestigung der
Sicherheitsbügel und die korrekte Position
des Türrecks zu überprüfen.
- Vor jedem Gebrauch nochmals die Festigkeit
durch feste ,,Zieh-“ und ,,Rüttel-“ Bewegungen
am Artikel kontrollieren.
- Nicht geeignet zum Anbringen dynamischer
Teile, wie z.B. Schaukeln.
- Keine Übungen durchführen, bei denen der
Kopf zum Boden zeigt.
- Nicht schwingen!
- Der Artikel darf nur von einer Person zur Zeit
benutzt werden.
- Der Artikel ist nur für die private Nutzung
geeignet.
- Der Artikel darf nur unter Aufsicht Erwachsener
und nicht als Spielzeug verwendet werden.
- Kontrollieren Sie den Artikel vor jedem
Trainingsbeginn auf Schäden und Verschleiß.
Der Artikel darf nur in einwandfreiem Zustand
verwendet werden! Tauschen Sie defekte Teile
sofort aus und verwenden Sie den Artikel bis
zur völligen Instandsetzung nicht mehr.
- Bei gesundheitlichen Problemen fragen Sie
Ihren Arzt, bevor Sie den Artikel verwenden.
Treten während der Übungen Unwohlsein
oder Beschwerden auf, brechen Sie die
Übungen sofort ab und konsultieren Sie einen
Arzt!
- Schwangere sollten das Training nur nach
Absprache mit ihrem Arzt durchführen.
- Führen Sie Übungen mit so viel Platz zu
Gegenständen und anderen Personen durch,
dass niemand verletzt werden kann.
- Bewahren Sie die Bedienungsanleitung in der
Nähe des Trainingsgerätes auf. Dieses dient
zum Nachschlagen der Hauptübungen.
- Kontrollieren Sie vor jeder Nutzung, ob alle
Schraubverbindungen fest angezogen sind.
- Wenn Sie das Türreck auf dem Boden ver wenden, könnte es auf empfindlichen Unter gründen wie Parkett oder Laminat zu Beschädi gungen des Bodenbelags kommen.
Verwenden Sie auf empfindlichen oder
rutschigen Bodenbelägen rutschsichere
Teppiche oder Matten als Unterlage.
Zusammenbau
Zur Befestigung der Sicherheitsbügel
(11) benötigen Sie eine Bohrmaschine
und einen Kreuzschlitzschraubendreher.
Teileübersicht (siehe Abb. A)
- Stecken Sie die Stangen (1) und (2)
ineinander und verschrauben Sie diese
mit den Schrauben (3) / Unterleg scheiben (4).
- Anschließend verschrauben Sie die Stangen
(5) und (6), mit den Schrauben (7).
Legen Sie die Unterlegscheiben (4) vor die
Mutter (8) und ziehen Sie die Verschraubung
fest an (siehe Abb. C).
Hinweis! Bei der folgenden Verschraubung haben Sie 3 Möglichkeiten die
Griffstange (1/2) mit den gebogenen
Griffstangen (6) zu verbinden.
Benutzen Sie zunächst die mittlere
Lochbohrung. Beachten diesbezüglich
unbedingt die Sicherheitshinweise im
Kapitel „Montage am Türrahmen“!
- Abschließend verschrauben Sie die Stangen
(1/2) und (6) mit den Schrauben (9) und dem
Distanzstück (10).
Dabei ist zu beachten, dass beim Distanzstück
der 28 mm Konus unter die Stange (6) und
der 32 mm Konus auf die Stange (1/2)
gesetzt wird.
Legen Sie die Unterlegscheiben (4) vor die
Mutter (8) und ziehen Sie die Verschraubung
fest an (siehe Abb. D).
31DE/AT/CH
Page 32

Montage am Türrahmen
ACHTUNG! Achten Sie darauf, passendes Befestigungsmaterial zu verwenden. Das mitgelieferte Befestigungsmaterial ist für die Befestigung an
stabilen Betonwänden geeignet
(siehe Abb. B).
Zur Befestigung an Leichtbeton oder
Leichtbauwänden, erkundigen Sie sich
im Fachhandel nach geeignetem Befestigungsmaterial.
Befestigen Sie die Sicherheitsbügel (11) direkt
über dem Türrahmen an der Rückseite der betreffenden Tür (siehe Abb. E).
Nachdem Sie die Sicherheitsbügel montiert
haben, können Sie das Türreck wie dargestellt
in den Türrahmen einhängen. Hängen Sie zuerst
die Stange (5) in die Sicherheitsbügel ein
(siehe Abb. F).
Anschließend drücken Sie die Stangenenden
(1/2) gegen den vorderen Türrahmen
(siehe Abb. G).
Achtung!
- Achten Sie darauf, dass die Stange
fest in den Sicherheitsbügeln einge hängt ist. Überprüfen Sie nun den
festen Sitz des Türrecks durch feste
„Zieh-“ und „Rüttel-“ Bewegungen.
- Nachdem Sie das Multitürreck
eingehängt haben, müssen sich
die Griffe der gebogenen Griff stange im ca. 90° Winkel zur Tür wand befinden (siehe Abb. G).
Falls die Griffe aufgrund der Wand stärke nach oben zeigen, ändern Sie
die Verschraubung der geraden
Griffstange (1/2) und der gebogenen
Griffstangen (6).
Verwenden Sie die Lochbohrung, die
zum Griffende zeigt.
Zeigen die Griffstangen im Fall einer
zu dünnen Türwand nach unten, ver wenden Sie die 3. Lochbohrung, aus gehend vom Griffende.
Allgemeine Trainingshinweise
- Steigern Sie die Trainingsintensität langsam,
achten Sie auf ausreichende Pausen zwischen
den Übungen.
- Führen Sie alle Übungen gleichmäßig, nicht
ruckhaft und schnell durch.
- Achten Sie auf eine gleichmäßige Atmung.
Bei Anstrengung ausatmen und bei Entlastung
einatmen.
- Wärmen Sie sich grundsätzlich vor jeder
Übungsausführung auf.
Allgemeine Trainingsplanung
- Ein Übungssatz besteht aus 10-20 Wieder holungen einer Übung.
- Jeder Übungssatz kann 2-4 Mal wiederholt
werden.
- Zwischen den Übungssätzen sollten Sie jeweils
eine Pause von 3-5 Min. einhalten.
Übungen
Liegestütze (siehe Abb. H)
Legen Sie das Multifunktions-Türreck auf einen
ebenen Untergrund. Umfassen Sie die oben
liegenden Rohrteile und nehmen Sie die dargestellte Haltung ein.
Drücken Sie den Oberkörper nun langsam nach
oben, bis die Arme fast durchgestreckt sind. Anschließende senken Sie den Oberkörper wieder
ab. Halten Sie den gesamten Körper während
der Übung unter Spannung. Der Kopf bildet eine
Linie mit der Wirbelsäule.
Dips (siehe Abb. I)
Legen Sie das Multifunktions-Türreck auf einen
ebenen Untergrund.
Umfassen Sie die oben liegenden Rohrteile und
nehmen Sie die dargestellte Haltung ein. Senken
Sie den Oberkörper nun langsam ab, bis Sie
den Boden berühren. Anschließend drücken
Sie den Oberkörper wieder nach oben, bis die
Arme fast gestreckt sind.
32 DE/AT/CH
Page 33

Klimmzüge (siehe Abb. J)
Montieren Sie das Multifunktions-Türreck wie auf
Seite 32 beschrieben an Ihrem Türrahmen.
Achtung! Für Klimmzüge darf das
Türreck nur an den Enden der
Stangen (6) angefasst werden.
Fassen Sie das Multifunktions-Türreck wie
dargestellt an den Enden der Stangen (6) an
und ziehen Sie sich mit den Armen so weit nach
oben, dass Sie gerade über die Mittelstange des
Türrecks schauen können. Anschließend senken
Sie sich langsam wieder ab.
Eine Veränderung der Griffposition ermöglicht
ein variantenreiches Klimmzugtraining.
Sit-Ups (siehe Abb. K)
Achtung! Bei falscher Ausführung
von Sit-Ups kann es zu Wirbel säulenverletzungen kommen.
Stellen Sie das Türreck wie dargestellt zwischen
den Türrahmen. Legen Sie sich auf den Rücken
und klemmen Sie Ihre Füße unter die Mittelstange des Türrecks. Winkeln Sie die Beine leicht
an, um ein Hohlkreuz zu vermeiden. Die Hände
können seitlich an den Hinterkopf angelegt werden, ohne Druck auf den Kopf auszuüben. Der
Oberkörper wird nun mithilfe der Bauchmuskeln
langsam nach oben gezogen. Halten Sie die
Position für einige Sekunden und senken Sie den
Oberkörper anschließend langsam wieder ab.
Pflege, Lagerung
Bitte vergessen Sie nie, dass eine regelmäßige
Wartung und Reinigung zur Sicherheit und
Erhaltung des Artikels beitragen. Den Artikel
immer trocken und sauber in einem temperierten
Raum lagern.
WICHTIG! Nur mit Wasser reinigen, nie mit
scharfen Pflegemitteln. Anschließend mit einem
Reinigungstuch trockenwischen.
3 Jahre Garantie
Das Produkt wurde mit großer Sorgfalt und unter
ständiger Kontrolle produziert. Sie erhalten auf
dieses Produkt drei Jahre Garantie ab Kaufdatum. Bitte bewahren Sie den Kassenbon auf.
Die Garantie gilt nur für Material- und Fabrikationsfehler und entfällt bei missbräuchlicher oder
unsachgemäßer Behandlung. Ihre gesetzlichen
Rechte, insbesondere die Gewährleistungsrechte, werden durch diese Garantie nicht
eingeschränkt. Bei etwaigen Beanstandungen,
wenden Sie sich bitte an die unten stehende
Service-Hotline oder setzen Sie sich per E-Mail
mit uns in Verbindung. Unsere Servicemitarbeiter
werden das weitere Vorgehen schnellstmöglich
mit Ihnen abstimmen. Wir werden Sie in jedem
Fall persönlich beraten. Die Garantiezeit wird
durch etwaige Reparaturen aufgrund der Garantie, gesetzlicher Gewährleistung oder Kulanz
nicht verlängert. Dies gilt auch für ersetzte und
reparierte Teile. Nach Ablauf der Garantie
anfallende Reparaturen sind kostenpflichtig.
IAN: 93665
Service Deutschland
Tel.: 0800-5435111
E-Mail: deltasport@lidl.de
Service Österreich
Tel.: 0820 201 222 (0,15 EUR/Min.)
E-Mail: deltasport@lidl.at
Service Schweiz
Tel.: 0842 665566 (0,08 CHF/Min.,
Mobilfunk max. 0,40 CHF/Min.)
E-Mail: deltasport@lidl.ch
Ersatzteile zu Ihrem Produkt finden Sie auch unter:
www.delta-sport.com, Rubrik Service - Ersatzteilservice Lidl
Hinweise zur Entsorgung
Verpackung und Artikel bitte umweltgerecht und
sortenrein entsorgen! Entsorgen Sie den Artikel
über einen zugelassenen Entsorgungsbetrieb
oder über Ihre kommunale Gemeindeverwaltung. Beachten Sie die aktuell geltenden
Vorschriften.
33DE/AT/CH
Page 34

34
Page 35

35
Page 36

DELTA-SPORT HANDELSKONTOR GMBH
Wragekamp 6 • D-22397 Hamburg
Version: 01/2014
Delta-Sport-Nr.: MR-1442
IAN 93665
 Loading...