

Page 1

®
Corel PHOTO-PAINT 10
Page 2

Copyright © 2000 COREL CORPORATION and COREL
CORPORATION LIMITED. All rights reserved.
Corel PHOTO-PAINT® 10 User Guide
The contents of this manual and the associated Corel
PHOTO-PAINT® software are the property of Corel Corporation
and Corel Corporation Limited and their respective licensors and
are copyrighted. Any reproduction in whole or in part is strictly
prohibited. For more complete copyright information please
refer to the About section in the Help menu of the software.
Software Credit
This book was designed and created using award-winning Corel®
publishing and graphics software. WordPerfect® and Corel
VENTURA™ were used to produce this book, and the illustrations
were created in CorelDRAW® and Corel PHOTO-PAINT®.
011090
Page 3

Page 4

Table of Contents
Introduction .....................1
Welcome to Corel PHOTO-PAINT ..............3
About Corel Corporation........................3
Corel support and services ......................4
Customer Service .............................6
Installing and uninstalling applications ..............7
Registering Corel PHOTO-PAINT...................8
Starting and quitting Corel PHOTO-PAINT ............8
Exploring the work area .......................10
Fromhere.................................13
Corel PHOTO-PAINT 10 Workspace tour ............14
Input .........................17
Bringing images into Corel PHOTO-PAINT .......19
Opening images .............................19
Importing files ..............................21
Scanning images ............................21
Loading photos from a digital camera..............22
Starting new images ..........................22
Fromhere.................................24
Viewing images..........................25
Viewing images .............................25
Zooming ..................................27
Fromhere.................................27
Image editing ....................29
Cropping and stitching images ...............31
Cropping images ............................31
Stitching images together ......................32
Fromhere.................................33
Changing image size and orientation ..........35
Changing image dimensions and resolution..........35
Changing image orientation.....................37
Retouching Images .......................39
Fixing poorly scanned images ...................39
Removing red eye and dust and scratch marks .......40
Sharpening images ...........................41
Cloning images and objects.....................44
Erasing image areas ..........................45
Fromhere.................................46
Working with lenses ......................47
Creating lenses .............................47
Fromhere.................................48
Masking images .........................49
Distinguishing protected and editable areas .........49
Defining editable areas ........................51
Defining editable areas using color information.......55
Fromhere.................................60
Table of contents i
Page 5

Correcting the color and tone of images ........61
Correcting image color and tone .................61
Fromhere.................................65
Applying special effects to images ............67
Working with special effects ....................67
Types of special effects ........................69
Fromhere.................................79
Undoing, redoing, repeating, and fading ........81
Undoing, redoing, repeating, and fading actions ......81
Reverting to an earlier image state................83
Painting and creating ...............85
Working with color .......................87
Choosing colors .............................87
Fromhere.................................90
Filling images ...........................91
Applying uniform fills .........................91
Applying fountain fills .........................92
Applying bitmap fills..........................93
Applying texture fills..........................94
Applying gradient fills .........................96
Fromhere.................................97
Painting images .........................99
Drawing shapes and lines ......................99
Applying brush strokes .......................101
Spraying images ............................103
Fromhere................................104
Working with objects.....................105
Creating objects ............................105
Selecting objects ...........................106
Moving, copying, and deleting objects ............108
Transforming objects.........................109
Adding drop shadows to objects ................113
Working with object transparency ...............114
Changing color modes ....................117
Changing the color mode of images ..............117
Changing images to the Paletted color mode........120
Fromhere................................123
Working with text .......................125
Adding and editing text ......................125
Formatting text ............................127
Fitting text to a path ........................128
Fromhere................................130
Output .......................131
Printing ..............................133
Printing your work ..........................133
Laying out print jobs ........................134
Fromhere................................135
Saving, exporting, and closing images.........137
Saving images .............................137
Exporting files .............................139
Closing images.............................140
Creating Images for the Web ...............141
ii Table of contents
Page 6

Publishing images to the Internet................141
Creating image maps ........................143
Emailing images ............................145
Fromhere................................145
Table of contents iii
Page 7

Page 8

Introduction
Page 9

Page 10
Welcome to Corel PHOTO-PAINT 1
Corel PHOTO-PAINT is a bitmap-based image-editing program
that lets you retouch existing photos or create original graphics.
Corel PHOTO-PAINT gives you the tools and supplies of a
professional graphic design studio. You can choose from an array
of media and textures; colors and brushes; and a library of
ready-made images. You can also animate your images and
publish your work to the Internet.
In this section, you’ll learn about
Corel Corporation
Installing and uninstalling applications
Registering Corel PHOTO-PAINT
Starting and quitting Corel PHOTO-PAINT
Using Corel PHOTO-PAINT Help
Exploring the work area
Setting options
About Corel Corporation
Corel Corporation is an internationally recognized developer of
award-winning business productivity, graphics, and operating
system solutions on the Windows, Linux, UNIX, Macintosh, and
Java platforms. Corel also develops market-leading, Web-based
solutions, including applications, e-commerce and online
services. For access to these services and more information about
Corel and its products, see www.corel.com/ or
www.corelcity.com/ on the Internet. Corel is headquartered in
CorelDRAW User Guide: Chapter 1 3
Page 11

Ottawa, Canada. Corel’s common stock trades on the NASDAQ
Stock Market (symbol: CORL) and on the Toronto Stock Exchange
(symbol: COR).
Corel wants your feedback
If you have any comments or suggestions about Corel
PHOTO-PAINT documentation, you can send them by email to
drawdoc@corel.com or by regular mail to the following address.
Creative Products Documentation Manager
Corel Corporation
1600 Carling Avenue
Ottawa, Ontario, Canada
K1Z 8R7
Corel can’t respond to your messages individually, but you can
check the Corel PHOTO-PAINT Web site for the latest product
news, tips and tricks, and product upgrade information. You can
access the Corel PHOTO-PAINT Web site at
http://www.corel.com/paint10/index.htm on the Internet.
Corel Training Manuals
Corel training manuals are the fast and easy way to learn about
all of our applications. Corel training manuals include easy to
follow, step-by-step instructions, and are illustrated throughout.
Comprehensive, hands-on exercises provide the opportunity to
practice the new concepts and skills that you have learned. The
modular structure of the course material makes Corel training
manuals easily adaptable to different user groups and learning
needs. Designed for both instructor-led training and self-paced
study, the manuals target various levels of software knowledge,
from new to experienced users.
For more information and pricing details, you can contact us by
telephone at 1-800-77-COREL or visit www.corel.com on the
Internet.
Corel support and services
The Corel product you are using is supported by the Corel Client
Services team. This team is committed to providing quality
customer service and support that is easy to access and
convenient to use, while fostering one-to-one customer
relationships.
If you have a question about the features and functions of Corel
applications or operating systems, see the user guide or online
Help for the product you are using. Updates and technical
information are also available in the Release Notes.
Year 2000 information
Presenting timely solutions to the Year 2000 needs of users is a
critical concern at Corel. For the latest information about new
products and major upgrades of existing products that have been
4 Corel PHOTO-PAINT User Guide: Chapter 1
Page 12

tested for Year 2000 date-related issues, visit Corel Corporation’s
year 2000 policy Web site at http://www.corel.com/year2000 on
the Internet.
Registering Corel products
Registering Corel products is important. Registration provides
you with timely access to the latest product updates, valuable
information about product releases and access to free
downloads, articles, tips and tricks, and special offers.
For more information about registering a Corel product see the
online Help for the product or see
http://www.corel.com/support/register on the Internet.
Technical support
The Web address for Corel is http://www.corel.com on the
Internet. A list of localized Corel Web sites is available at
http://www.corel.com/international/country.htm on the Internet.
Corel LINUX information is available at http://linux.corel.com on
the Internet.
Self-serve technical support options
Several self-serve tools are available to address technical
questions 24 hours a day, seven days a week.
Self-serve option How to access
Support
newsgroups
Knowledge Base
FAQs
AnswerPerfect
File Transfer
Protocol (FTP)
FTP information
Online Help
Interactive Voice
Answering
Network (IVAN)*
Automated Fax
on Demand*
http://www.corel.com/support/newsgroup.htm
http://kb.corel.com
http://www.corel.com/support/faq
http://www.corel.com/support/answerperfect.htm
ftp://ftp.corel.com
http://www.corel.com/support/ftpsite/ftpindex.htm
Type keyword Technical Support
1-877-42-COREL
1-877-42-COREL
*IVAN and Fax on Demand are available only in North America.
Welcome to Corel PHOTO-PAINT 5
Page 13

Telephone technical support options
Corel users can use complimentary and fee-based telephone
technical support options. Three levels of support are available.
Installation and Configuration Service
Installation and Configuration Service is a complimentary, 30-day
service designed to address installation, configuration, and new
feature issues. This service begins on the day of your first
technical support call.
Installation and Configuration Service replaces Classic Service,
however, Corel will honor previously purchased Classic contracts.
For more information see
http://www.corel.com/support/options/telephone.htm on the
Internet.
Installation and Configuration Service is not available for OEM,
“White box,” Jewel Case (CD only), trial, or Academic versions of
Corel products.
Priority Service
Priority Service is a fee-based service for users who require the
help of second-level technicians. Priority Service may be
purchased by the minute, by the incident, or on a term basis.
Options range from core-business-hour access for individual
users to around-the-clock access for multiuser environments.
Premium Service
Premium Service is Corel’s highest level of support. This service
is designed for organizations that want to establish a direct
relationship with Corel and for organizations that employ
dedicated support professionals or have centralized technical
management.
Customer Service
Corel Customer Service can provide you with prompt and
accurate information about Corel product features, specifications,
pricing, availability, and services. Corel Customer Service does
not provide technical support. You can access Customer Service
support through the following avenues.
World Wide Web
You can access general customer service and product information
at http://www.corel.com/support on the Internet.
Mail, fax, email
You can send specific customer-service questions to Corel
Customer Service representatives by mail, fax, and email.
Corel Corporation
Corel Customer Service
1600 Carling Avenue
Ottawa, Ontario
Canada K1Z 8R7
6 Corel PHOTO-PAINT User Guide: Chapter 1
Page 14

Fax: 1-613-761-9176
Email: custserv2@corel.ca
Telephone
You can telephone Corel Customer Service centers with your
questions.
In North America, you can reach Corel Customer Service by
calling the 1-800-772-6735 toll-free line. The hours of operation
are 9:00
Friday, and 10:00
Corel customers residing outside North America can contact
Corel Customer Service representatives in Dublin, Ireland, by
calling the 353-1-213-3912 toll line, or they can call a local
authorized Corel Customer Service Partner.
A.M. to 9:00 P.M., eastern time (ET), Monday through
A.M. to 7:00 P.M. on Saturdays.
Installing and uninstalling applications
The Corel Setup wizard makes it easy to install and uninstall
Corel applications. The Setup wizard lets you:
install any Corel applications included in your software
package
add components to currently installed applications
refresh files and configurations of currently installed
applications
uninstall all or some of the components of Corel applications
To install new components or to update your
current installation
1 Close all applications.
2 Insert Corel DRAW CD#1 into the CD drive.
If the Corel Setup wizard does not start automatically, click
Start on the Windows taskbar, and click Run. Type D:\Setup,
where D is the letter that corresponds to the CD drive.
3 Select one of the following options and follow the
instructions in the Corel setup wizard:
Add New Components — if you want to install
components that are not already installed
Update Current Installation — if you want to refresh your
installation of the application and restore all settings to
their default values
Custom Setup — if you want to specify which
components to include
To uninstall
1 Click Start on the Windows taskbar, and click Programs }
CorelDRAW 10 } Setup and notes } Corel uninstaller.
2 Follow the instructions in the Corel uninstaller wizard.
Welcome to Corel PHOTO-PAINT 7
Page 15

Registering Corel PHOTO-PAINT
You must register Corel PHOTO-PAINT to be eligible for technical
support. Registered users receive our email newsletter, which
contains information about new product releases and updates,
free downloads, articles, tips, and special offers. If you have an
Internet connection, you can register by following the
instructions provided during installation.
Starting and quitting Corel
PHOTO-PAINT
You can start Corel PHOTO-PAINT from the Windows taskbar, and
end your Corel PHOTO-PAINT session from the application.
To start Corel PHOTO-PAINT
From the Windows taskbar, click Start } Programs }
CorelDRAW 10 } Corel PHOTO-PAINT 10.
To quit Corel PHOTO-PAINT
Click File } Exit.
Using Corel PHOTO-PAINT Help
Corel PHOTO-PAINT has a variety of features that help you work
with the application:
Corel PHOTO-PAINT User Guide — paper documentation
explaining Corel PHOTO-PAINT concepts and features and
providing procedures for the basic tasks you will perform.
Online Help — comprehensive online documentation
providing procedures for most of the tasks you will perform.
Information is accessed through the table of contents, index,
or word/phrase search tool.
Context Help — lets you access information about specific
buttons, icons, and sliders on the user-interface.
CorelTUTOR — lets you work through a series of practical
lessons that introduce you to the application’s major
capabilities.
ToolTips — lets you access information about icons and
buttons.
To use online Help
1 Click Help } Help Topics.
2 Click one of the following tabs:
Contents — to browse through topics by category
Index — to see a list of index entries
Find — to search for a particular word or phrase in the
online Help
8 Corel PHOTO-PAINT User Guide: Chapter 1
Page 16

You can also
To access context Help for Do the following
Print an entire section
Print a topic Open a Help topic, and click the
Click a title on the Contents
page, and click Print.
Print button in the Help window.
After you access an online Help topic, you can access
Docker windows
The status bar
Click on the standard
toolbar, and click the item you
want help on.
Click on the standard
toolbar, and click the item you
want help on.
related topics by clicking on the green highlighted
text, the How To buttons, the Related Topics buttons,
or the Overview buttons.
To use context Help
To access context Help for Do the following
Dialog boxes
Menu commands
Tools and controls
Click in the dialog box, and
click the item you want help on.
Click on the standard
toolbar, and click the item you
want help on.
Click on the standard
toolbar, and click the item you
want help on.
Welcome to Corel PHOTO-PAINT 9
Page 17

The status bar at the bottom of the application
window lets you familiarize yourself with work area
elements by displaying brief descriptions of buttons,
controls, and menu commands as you move the
mouse over them.
Toolbars
Toolbars consist of buttons that are shortcuts to many menu
commands. The standard toolbar consists of commonly used
commands. The table below outlines the buttons on the standard
toolbar.
To use CorelTUTOR
Click Help } CorelTUTOR.
Press this button To
Start a new drawing
To display ToolTips
Position the cursor over an icon or a button.
Exploring the work area
An image that you open or create in Corel PHOTO-PAINT appears
in an image window. You can open more than one image window,
but you can apply commands to the active image window only.
Application commands are accessible through the menu bar,
toolbars, and toolbox. The property bar and Docker windows
provide access to commands that are relevant to the active tool
or current task. The property bar, Docker windows, toolbars and
toolbox and can be opened, closed, and moved across your
screen at any time.
Open a drawing
Save a drawing
Print a drawing
Cut selected objects to the
Clipboard
Copy selected objects to the
Clipboard
Paste the Clipboard contents into
a drawing
10 Corel PHOTO-PAINT User Guide: Chapter 1
Page 18

Press this button To
Press this button To
Undo the last action
Redo the last action
Import a drawing
Toolbox
Launch Corel Graphics
Community Web site
Launch What’s This? or context
help
The toolbox consists of flyout toolbars. Flyouts contain a set of
Export a drawing
related Corel PHOTO-PAINT tools. A small arrow in the right-hand
corner of a toolbox button, indicates a flyout.
Expand the work area
Descriptions of Corel PHOTO-PAINT’s flyouts and their tools
appear below.
Show or hide the mask marquee
Show or hide the object marquee
Show the image properties
Launch Corel applications
Flyout Description
The Object tools flyout lets you
access the Object picker tool and
the Transformation tool.
Welcome to Corel PHOTO-PAINT 11
Page 19

Flyout Description
Flyout Description
The Mask tools flyout lets you
access the Rectangular mask
tool, the Circle mask tool, the
Freehand mask tool, the Lasso
mask tool, the Scissors mask
tool, the Magic wand mask tool,
and the Mask brush tool.
The Zoom tools flyout lets you
access the Zoom tool and the
Hand tool.
The Undo tools flyout lets you
access the Local undo tool,
Eraser tool, and Color replacer
tool.
The Shape tools flyout lets you
access the Rectangle tool, the
Ellipse tool, the Polygon tool,
and the Line tool.
The Fill tools flyout lets you
access the Fill tool and the
Interactive fill tool.
Tools Description
The Object transparency tools
flyout lets you access the Object
transparency tool, the Color
transparency tool, and the
Transparency brush tool.
The Brush tools flyout lets you
access the Paint tool, the Effect
tool, the Clone tool, and the
Image sprayer tool.
The Path tool lets you create and
edit paths.
The Deskew crop tool lets you
define a cropping area and
straighten crooked images.
The Eyedropper tool lets you
choose colors from an image.
The Text tool lets you add text to
your image and edit existing
text.
12 Corel PHOTO-PAINT User Guide: Chapter 1
Page 20

Tools Description
The Interactive dropshadow tool
lets you add shadows to objects.
From here
For more information about... In the online Help index, type
Setting options options, setting
Setting the units of measure measure
Welcome to Corel PHOTO-PAINT 13
Page 21
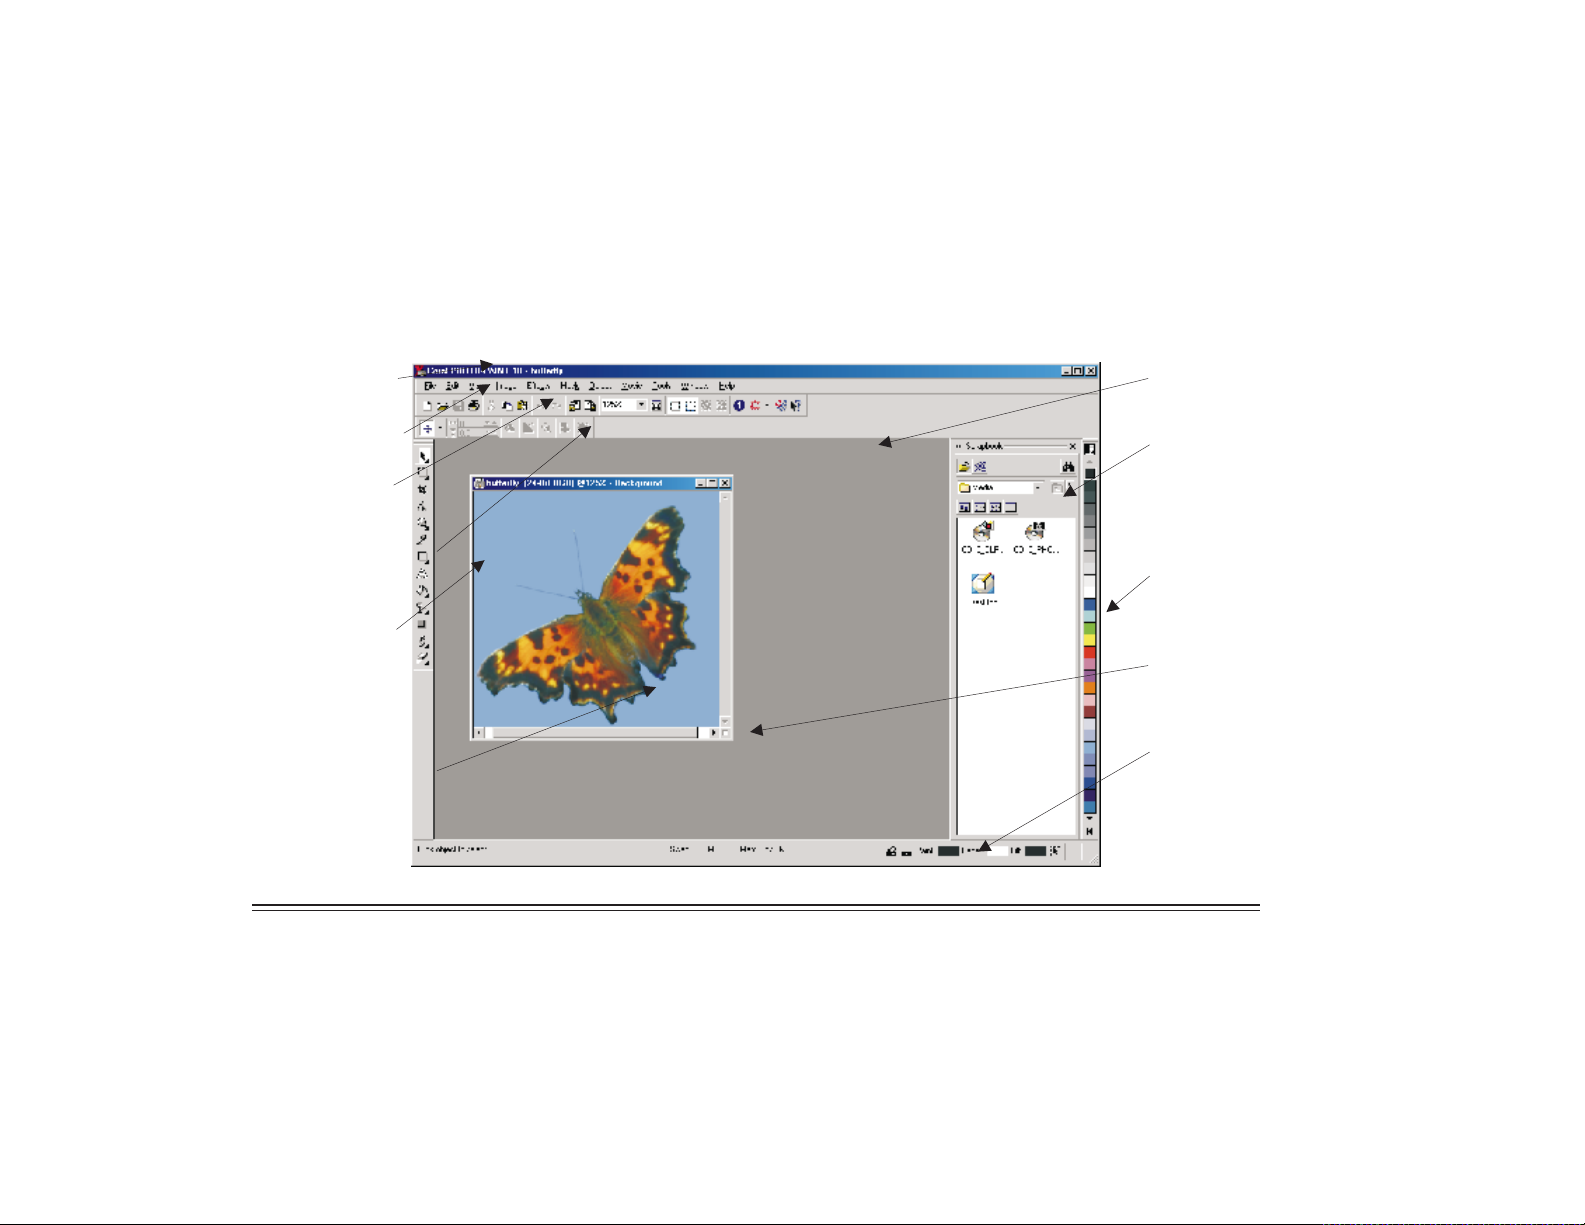
Corel PHOTO-PAINT 10 Workspace tour
Title bar Desktop
Menu bar
Toolbar
Property bar
Toolbox
Image window
Docker window
Color palette
Navigator
Status bar
Welcome to Corel PHOTO-PAINT 14
Page 22

Work area Description
Work area Description
Title bar The area displaying the title of
the active image
Menu bar The area containing menus
Toolbar A dockable bar that contains
shortcuts to menus and
commands
Property bar A detachable bar that contains
commands that relate to the
active tool. For example, when
the Text tool is active, the
property bar displays commands
relevant to creating and editing
text.
Toolbox A dockable bar that contains
tools for creating, filling, and
modifying images
Image window The area in which the image
displays
Desktop The area outside the image
window
Color palette A dockable bar that contains
colors you can use for creating,
filling, and modifying images.
Status bar An area that displays image
information and tips, as well as
the current paint, fill, and paper
color
Navigator A button that displays the entire
image allowing you to focus the
image window on a specific area.
The Navigator is only available if
you have areas that exceed the
image window.
Docker window A dockable window that provides
access to additional commands
and image information. Some
Docker windows provide a visual
display area from which you can
access elements such as objects,
brushes, and scripts.
Welcome to Corel PHOTO-PAINT 15
Page 23

Page 24

Input
Page 25

Page 26

Bringing images into Corel PHOTO-PAINT 2
You can bring images you want to edit or use to create original
artwork into Corel PHOTO-PAINT in a variety of ways.
In this section, you’ll learn about
opening images
importing files
scanning images
loading photos from a digital camera
starting new images
Opening images
You can open most bitmapped images in Corel PHOTO-PAINT. You
can also use clipart and photos that are stored on your computer,
on the Corel PHOTO-PAINT CD, or that are available on the
Content on the Web site, to enhance your images. You can access
these files by browsing or by searching. If you are opening a
vector graphic, you will need to import it. For more information
on importing vector graphics, see “Importing files” on page 21.
To open an image
1 Click File } Open.
2 Choose the drive and folder where the file is stored.
If you want to view a thumbnail of the image, enable the
Preview check box.
3 Double-click the filename.
Corel PHOTO-PAINT User Guide: Chapter 2 19
Page 27

You can decrease the dimensions of an image as you
open it by choosing Resample from the list box to the
right of the Files of type list box.
You can also open an image by clicking the Open
button on the toolbar.
To browse for images
1 Click Window } Dockers } Scrapbook } Browse.
2 Navigate to a file stored on your computer or on the CD
installed in your CD drive.
You can also
Open a file as a new image Drag the file into the application
Add clipart or a photograph to
the active image
Display the folder tree
window.
Drag the clipart object or
photograph onto the image
window.
Click the flyout button at the
top of the Scrapbook Docker
window, and select Show tree.
You can also search the Content on the Web site for
images by clicking the Content on the Web
button .
To search for images
1 Click Window } Dockers } Scrapbook } Search.
2 Type a keyword in the Search for box.
3 In the Using Indices For area, click the check box of each
Corel application you want to search.
4 In the Search in area, click the check box of each category
you want to search.
5 Click Search.
6 Click one of the following buttons to specify how the search
results display:
Large icons
Small icons
List icons
Detail view
You can also
If you are opening a vector graphic, you will need to
import it. For more information on importing vector
Search using a different keyword
Click the New Search button
and type a new keyword.
graphics, see “Importing files” on page 21.
20 Corel PHOTO-PAINT User Guide: Chapter 2
Page 28

You can also
Display the next page of search
results
Click the Forward button .
Importing files
Corel applications let you import files created in other
applications. For example, you can import a JPEG, GIF, or text file.
You can import a file and place it in the active application
window as an object. The imported file becomes part of the
active file. You can also import a file by opening it in a new
application window. While importing a graphic, you can resample
it to change the number of pixels, eliminate unusable detail, and
reduce the file size. You can also crop a graphic to select only the
exact area and size of the image you want to import.
To import a file into an active image
1 Click File } Import } Import.
2 Choose the drive and folder where the file is stored.
3 Choose a file format from the Files of type list box.
4 Click the filename.
5 Enable any of the following check boxes:
Extract embedded ICC profile — lets you save the
embedded International Color Consortium (ICC) profile to
the color directory where the application was installed
Check for watermark — lets you check for an encoding
Digimarc watermark when you import files
Do not show filter dialog — lets you use the filter’s
default settings without opening the dialog box
You can change the sorting order of the file formats
in the Files of type list box by choosing a sorting
method from the Sort type list box.
Scanning images
You can scan photos into Corel PHOTO-PAINT using a
TWAIN-compatible scanner. For information about installing your
scanner’s TWAIN driver and interface, see the manufacturer’s
documentation.
To scan images
1 Click File } Acquire image } Select source.
2 Choose your scanner from the Sources box.
3 Click Select.
4 Click File } Acquire image } Acquire.
Bringing images into Corel PHOTO-PAINT 21
Page 29

To scan additional images during the same session,
click File } Acquire image } Acquire.
Loading photos from a digital camera
You can load photos from a digital camera source into Corel
PHOTO-PAINT using a TWAIN-compatible digital camera. For
information about installing your digital camera’s TWAIN driver,
see the manufacturer’s documentation.
You can also name photos and add notes to them.
To load photos into Corel PHOTO-PAINT
1 Click File } Acquire image } Select source.
2 Choose a digital camera from the Camera list box.
3 Click File } Acquire image } Acquire.
You can also
Open photos in the image
window
Click the thumbnail of each
photo you want to select and
click Open.
You can also
Save photos Click the thumbnail of each
photo you want to select and
click Save to disk. Choose the
drive and folder where you want
to save the photos and click
Save.
Name a photo Double-click a thumbnail and
type a name.
Add a note to a photo Click a thumbnail and type a note
in the Photo note for image box.
To load additional photos during the same session,
click File } Acquire image } Acquire.
You can click Move forward to view photos not
displayed in the image window.
Starting new images
You can produce original artwork by starting an image from
scratch, by using data copied from another image window or
another application to the Clipboard, or by duplicating an
existing image.
22 Corel PHOTO-PAINT User Guide: Chapter 2
Page 30

When you start an image from scratch, you can specify the size of
the image, its background color, and the color mode you want to
use. You can also specify the image’s resolution, or the number of
pixels per unit of measure. The higher the resolution you specify,
the larger the file size of the image.
To start an image from scratch
1 Click File } New.
2 Choose a color mode from the Color mode list box.
3 Choose a size from the Size list box.
4 Enable one of the following options:
Portrait
Landscape
5 Choose a value from the Resolution list box.
6 Open the Paper color picker, and click a color for the
background.
You can specify a custom page size by choosing
Custom from the Size list box and typing values in
the Width and Height boxes.
You can also create an image by clicking the New
button on the standard toolbar.
When you create an image, you can choose either portrait or landscape and
you can choose the color of the background.
To create an image using the Clipboard contents
Click File } New from Clipboard.
To start an image from a duplicate
1 Click Image } Duplicate.
2 Type a filename in the As box.
If you want to combine the objects and background in the
new image, enable the Merge objects with background check
box.
Bringing images into Corel PHOTO-PAINT 23
Page 31

From here
For more information about... In the online Help index type
Importing files importing files
24 Corel PHOTO-PAINT User Guide: Chapter 2
Page 32

Viewing images 3
You can customize the appearance of the windows and the
magnification level of an image. Changing the magnification level
allows you to view specific image areas to make image editing
easier. You can also obtain relevant image information, such as
color model information, as you edit an image.
In this section, you’ll learn about
viewing images
zooming
image lets you view a large representation of an image. The
image is editable when the windows are hidden or when the
work area is maximized, but you cannot change the image while
using the full-screen preview.
You can view image areas that fall outside the image window. For
example, when you are working at a high magnification level or
with large images, you can pan or jump to a different image area
without having to adjust the magnification level.
Viewing images
Images can be viewed in a number of different ways. You can hide
windows to display only the menus and the image window.
Maximizing the work area or viewing a full-screen preview of an
Corel PHOTO-PAINT User Guide: Chapter 3 25
Page 33

To view image areas outside the image window
To Do the following
You can select the image area displayed in the image window using the
Navigator pop-up.
To show or hide image windows
Click Window } Show/hide windows.
Pan to another area of the image
Jump to another area of the
image
Open the Zoom tools flyout
, and click the
Hand tool . Drag the image
until the area you want to view
displays in the image window.
Click the Navigator popup at
the lower-right corner of the
image window. Drag the
rectangle to the area of the
image you want to view.
To maximize or minimize the work area
Click Window } Maximize work area.
If you want to return to normal view, click the Maximize work
area button on the standard toolbar.
To view a full-screen preview of an image
Click View } Full-screen preview.
If you want to return to normal view, press any key or click
the screen.
You can drag image areas that fall outside the image window into view using
the Hand tool.
26 Corel PHOTO-PAINT User Guide: Chapter 3
Page 34

Zooming
By default, images are displayed at 100% magnification; however,
you can zoom in to get a closer look at image detail or zoom out
to view a larger portion of the image. You can also specify the
magnification level at which images open.
To zoom
To Do the following
Zoom in
Open the Zoom tools flyout
, and click the
Zoom tool . Click or drag
across the area that you want to
magnify.
You can also zoom out by holding down SHIFT and
clicking in the image window using the Zoom tool.
To set the magnification level at which images are
opened
1 Click Tools } Options.
2 In the list of categories, double-click Workspace, and click
General.
3 Choose a magnification level from the Opening zoom list box.
The magnification level that you choose is used the
next time you open an image.
From here
Zoom out
Zoom in or out by a preset level
Open the Zoom tools flyout
, and click the
Zoom tool . Right-click in
the image window.
Open the Zoom tools flyout
, and click the
Zoom tool . Choose a
magnification level from the
Zoom level list box on the
property bar.
For more information about… In the online Help Index, type…
Obtaining image information image information, obtaining
Viewing images 27
Page 35

Page 36

Image editing
Page 37

Page 38

Cropping and stitching images 4
You can crop an image to remove unwanted image areas. You can
also stitch images together to create a single image.
In this section, you’ll learn about
cropping images
stitching images together
Cropping images
You can crop an image to remove unwanted image areas and to
reduce its size. Cropping does not affect the resolution of the
remaining areas. Corel PHOTO-PAINT also lets you crop around
the editable area of a mask; however, the resulting image is
always rectangular. For information about masks, see “Masking
images” on page 49.
You can also crop the color border surrounding an image.
To crop an image
1 Click the Deskew crop tool .
2 Drag to select an area on the image.
3 Double-click inside the cropping area.
You can also
Fine-tune the cropping area Drag the cropping handles.
Corel PHOTO-PAINT User Guide: Chapter 4 31
Page 39

You can also
2 Click Image } Crop } To mask.
Straighten the cropped image Click inside the cropping area
and drag the cropping handles to
align the cropping area with the
image area you want to
straighten.
You can also crop an image area by clicking the
Deskew crop tool and typing values in the Crop
size and Crop edges boxes on the property bar.
You can crop to the edges of an editable area.
Stitching images together
You can stitch images together to create a panoramic effect or to
reassemble a large image that was scanned in parts. You can also
specify the sequence in which the images are stitched together
and remove unwanted images from the stitching sequence. You
Cropping lets you remove unwanted image areas.
can stitch images in all color modes except black-and-white. If
the selected images use the same color mode, the new file will
use that color as well. If the selected files use a different color
mode, the new file uses RGB color mode.
To crop to an editable area of a mask
1 Define an editable area on your image.
32 Corel PHOTO-PAINT User Guide: Chapter 4
Page 40

To stitch images together
1 Open the images you want to stitch together.
2 Click Image } Stitch.
3 In the Source files area, click the images you want to stitch
together, and click Add.
4 Click one of the following alignment buttons:
Vertical — aligns images vertically
Horizontal — aligns images horizontally
5 Click OK.
6 Adjust the following sliders:
Vertical — lets you align the images vertically
Horizontal — lets you align the images horizontally
You can also
Remove an image from the
stitching selection
Click Remove.
You can stitch images together to create a panoramic effect.
From here
For more information about… In the online Help Index, type…
Cropping an image removing, image areas
Change the image stitching
sequence
Reverse the image stitching
sequence
Drag an image to a new position.
Click the Reverse order button.
Cropping and stitching images 33
Page 41

Page 42

Changing image size and orientation 5
You can change the dimensions, resolution, and orientation of an
image.
In this section, you’ll learn about
changing image dimensions and resolution
changing image orientation
Changing image dimensions
You can change the dimensions of an image by increasing or
decreasing its height and width. Changing the paper size lets you
modify the dimensions of the printable area, which contains both
the image and the paper. When you resize the paper, you
increase or decrease the paper-colored border, but not the
dimensions of the image.
Changing image dimensions and resolution
Corel PHOTO-PAINT lets you change the physical dimensions and
the resolution of an image.
Corel PHOTO-PAINT User Guide: Chapter 5 35
Changing image resolution
You can change the resolution of an image to increase or
decrease its file size. Upsampling increases resolution of an
image by adding more pixels per unit of measure; however, it
reduces the quality of the image. Downsampling decreases the
resolution of an image by removing a specific number of pixels
Page 43

per unit of measure. This produces better results than
upsampling.
To change the dimensions of an image
1 Click Image } Resample.
2 Enable any of the following check boxes:
Anti-alias — smooths the edges in the image
Maintain aspect ratio — maintains the width-to-height
ratio of the image
3 Type values in one of the following pairs of boxes:
Width and Height — lets you specify the image
dimensions
Width % and Height % — lets you resize the image to a
percentage of its original size
You can change the image dimensions without changing the resolution.
To change the paper size
1 Click Image } Paper Size.
2 Choose a unit of measure from the list box beside the Width
box.
3 Type values in the following boxes:
Width
Height
You can also lock the paper size ratio by clicking the
Lock button .
You can change the paper size without changing the image size.
To change the resolution of an image
1 Click Image } Resample.
2 Enable any of the following check boxes:
36 Corel PHOTO-PAINT User Guide: Chapter 5
Page 44

Identical values — sets the same value in the Horizontal
and Vertical boxes
Anti-alias — smooths the edges in the image
Maintain original size — maintains the size of the file on
your hard drive when you change the resolution of the
image
3 Type values in the following boxes:
Horizontal
Vertical
If you resample an image using pixels as the unit of
measure, the size of the image also changes.
The Identical values check box is not available if the
Maintain aspect ratio check box is enabled.
Changing image orientation
You can change the orientation of images by flipping or rotating
them in the image window. You can flip an image horizontally or
vertically to reposition scanned images or to create unique
effects.
When you rotate an image, you can specify the angle and
direction of rotation, as well as the paper color that is visible
after the image is rotated.
To flip an image
Click Image } Flip, and click one of the following:
Flip horizontally
Flip vertically
You can change the resolution of an image to decrease its size.
You can mirror an image by flipping it.
Changing image size and orientation 37
Page 45

To rotate an image
1 Click Image } Rotate } Custom.
2 Type a value in the Angle box.
3 Enable one of the following options:
Clockwise
Counter-clockwise
4 Enable any of the following check boxes:
Maintain original image size — maintains the size of the
original image
Anti-alias — smooths the edges in the image
5 Open the Paper color picker, and click a color for the
background.
You can rotate an image by clicking Image } Rotate,
and clicking 90° Clockwise, 90° Counterclockwise,or
180°.
You can rotate an image to change its orientation.
38 Corel PHOTO-PAINT User Guide: Chapter 5
Page 46

Retouching Images 6
Corel PHOTO-PAINT lets you retouch images to improve their
quality or modify their contents.
In this section, you’ll learn about
fixing poorly scanned images
removing red eye and dust and scratch marks
sharpening images
cloning images and objects
erasing image areas
Fixing poorly scanned images
You can remove lines from scanned or interlaced video images.
These lines can be filled with copies of adjacent lines of pixels or
with colors derived from surrounding pixels. You can also remove
moiré or noise. Moiré is the wave pattern produced when
halftone screens of two different frequencies are superimposed
on the same image. Noise is the speckled effect produced by
scanning or video-capturing.
To fix poorly scanned images
To Do the following
Remove lines
Click Image } Transform }
Deinterlace and specify the
settings you want.
Corel PHOTO-PAINT User Guide: Chapter 6 39
Page 47

To Do the following
Remove moiré
Remove noise
You can remove lines from a scanned image using the Deinterlace filter.
Click Effects } Noise } Remove
moire and specify the settings
you want.
Click Effects } Noise } Remove
noise and specify the settings
you want.
different color. You can also remove marks from a scanned image
of a dusty or scratched original image or photo.
To remove red eye
1 Click Effects } Color transform } Red eye removal.
2 Click the Eye picker tool .
3 Open the Replace color picker, and click a color.
4 Click the red eye area in the image window.
You can also use a color from the image to replace
the red in the eye area by clicking the Eyedropper
tool and selecting a color in the image.
Removing red eye and dust and scratch
marks
You can remove red eye from scanned photos.
You can remove the red that can appear in the eye area of a
subject in a scanned or digital photo by replacing the red with a
40 Corel PHOTO-PAINT User Guide: Chapter 6
Page 48

To remove dust and scratch marks from an image
1 Open the Brush tools flyout , and click the Effect
tool .
2 On the property bar, open the Effect tool picker, and click the
Undither tool .
3 Choose a brush from the Brush type list box.
4 Choose a nib from the Nib shape list box.
5 Move the Nib size slider.
6 Type a value from 1 to 100 in the Amount box to set the
intensity of the repair.
7 Drag across the damaged area.
You can remove dust and scratch marks from scanned images.
You can remove dust and scratch marks from all areas
of an image by clicking Effects } Noise } Dust and
Scratch and specifying the threshold and radius
settings you want.
Sharpening images
You can sharpen images to increase contrast, enhance image
edges, or reduce shading. You can sharpen part of an image by
applying brush strokes. You can also sharpen images by applying
filters to an entire image or to an editable area you define. For
information about defining an editable area, see “Masking
images” on page 49.
These filters can also be applied using a lens. For more
information about lenses, see “Working with lenses” on page 47.
The following table describes the filters you can use to sharpen
an image.
Retouching Images 41
Page 49

To Use the
To Use the
Sharpen an image
Enhance image edges
Remove shading
Increase contrast
Tune sharpen filter. This filter
provides access to five sharpen
filters at once. The thumbnail
buttons let you preview the
image as you apply any of the
five filters.
Directional sharpen filter. This
filter enhances the edges of an
image without creating a grainy
effect.
High pass filter. This filter
removes image detail and
shading. This filter can give an
image an ethereal, glowing
quality by emphasizing its
highlights and luminous areas.
Sharpen filter. This filter
accentuates the edges of the
image by focusing blurred areas
and increasing the contrast
between neighboring pixels.
Accentuate edge detail
Unsharp mask filter or the
Adaptive unsharp filter. The
Unsharp mask filter accentuates
edge detail and focuses blurred
areas in the image without
removing low-frequency areas.
Only those pixels with a
grayscale value higher than the
threshold value you specify are
affected. The Adaptive unsharp
filter accentuates edge detail by
analyzing the values of
neighboring pixels. This filter
preserves most image detail, but
its effect is most apparent in
high-resolution images.
42 Corel PHOTO-PAINT User Guide: Chapter 6
Page 50

You can sharpen an image by increasing contrast, enhancing image edges or
reducing shading using a filter. The original image at the top has been
sharpened using the following filters, from left to right: Tune sharpen, High
pass, Directional sharpen, Sharpen, and Unsharp mask.
To sharpen selected areas by applying brush strokes
1 Open the Brush tools flyout , and click the Effect
tool .
2 On the property bar, open the Effect tool picker, and click the
Sharpen tool .
3 Choose a brush from the Brush type box.
4 Choose a nib from the Nib shape list box.
5 Move the Nib size slider.
6 Type a value in the Amount box to set the intensity of the
stroke.
7 Drag across an image area.
You can sharpen image areas using the Sharpen tool.
Retouching Images 43
Page 51

To sharpen an image by applying a filter
1 Click Effects } Sharpen, and click a filter.
2 In the filter dialog box, specify the settings you want.
Sharpen filters support all color modes except 48-bit
RGB, 16-bit grayscale, Paletted, and black-and-white,
except the Sharpen filter, which supports all color
modes except Paletted and black-and-white.
You can use this procedure to sharpen an editable
area of an image.
Cloning images and objects
You can duplicate image areas and objects to cover damaged or
unwanted elements in an image. The cloned areas or objects can
be added to the active image or to another image. You can create
realistic-looking cloned images or abstract images based on the
original image.
To clone an image or object
1 Open the Brush tools flyout , and click the Clone
tool .
2 On the property bar, open the Clone tool picker, and click one
of the following tools:
Clone — produces a duplicate of the area at the clone
source
Impressionism clone — produces brush strokes
comprised of several colors, including the single color
found at the clone source
Pointillism clone — produces small dots that
duplicate the colors located underneath the tool as you
clone
3 Choose a brush from the Brush type list box on the property
bar.
4 Click the image to set a source point for the clone (indicated
by a crosshair cursor).
If you want to return the source-point to its original position
when you release the mouse button, hold down SHIFT + ALT.
5 Drag the brush in the image window.
If you want to reset the clone source point, click the right
mouse button.
44 Corel PHOTO-PAINT User Guide: Chapter 6
Page 52

You can also create multiple clones of an object by
clicking Windows } Dockers } Brush settings and
clicking the Cumulative button on the Dab
attributes bar.
You can clone an object and the background by
clicking Windows } Dockers } Brush settings and
clicking the Merge source button on the Stroke
attributes bar.
You can use the Clone tool to repair image areas.
Erasing image areas
You can restore image areas as you edit. For example, you can
undo your most recent action, erase image areas to reveal the
object, image background, or paper color, and replace a selected
paint color in the image with the paper color.
To erase image areas
1 Open the Undo tools flyout , and click the Eraser
tool .
2 Drag across an image area.
The erased areas reveal the object below or the paper
color.
If the Lock object transparency button is disabled
in the Objects Docker window, the object’s marquee
changes to exclude the areas you are erasing.
To erase an object
1 Select an object using the Object picker tool .
2 Open the Undo tools flyout , and click the Eraser
tool .
3 Drag across the object.
To restore parts of an image
1 Open the Undo tools flyout , and click the Local Undo
tool .
2 Drag across the area you want to restore.
Retouching Images 45
Page 53

To replace a paint color with the paper color
1 Open the Undo tools flyout , and click the Color
replacer tool .
2 On the property bar, click one of the following buttons:
Normal — determines the color tolerance based on color
similarity
HSB — determines the color tolerance based on the
similarity of hue, saturation, and brightness levels
between adjacent pixels
3 Click a color on the color palette.
4 Drag in the image window.
From here
For more information about… In the online Help Index, type…
Smearing, smudging and
blending colors
smearing
46 Corel PHOTO-PAINT User Guide: Chapter 6
Page 54

Working with lenses 7
Lenses let you view special effects, corrections, or adjustments
that you want to make to your image before you apply them to
the image pixels.
In this section, you’ll learn about
creating lenses
Creating lenses
Lenses let you preview adjustments and special effects that you
want to apply to an image. When you create a lens, the changes
you make are not applied to the image pixels; instead they are
displayed on screen through the lens. The changes are applied to
the image pixels when you combine the lens with the image
background. Combining the lens with the background makes the
effect a part of the background layer that cannot be edited
individually.
You can create a new lens to cover the entire image, or you can
create a lens from the editable area of a mask. You can create as
many lenses as you want in an image and assign a unique name
to each. You can also use multiple lenses to apply successive
changes to specific area in images.
When you create a lens, you must choose a lens type based on
the change that you want to apply. However, the types of lenses
that you can create are determined by the image’s color mode.
For example, you cannot use a color lens on a grayscale image
because there are no colors to modify. If you want to correct or
adjust image color and tone, choose a lens type that corresponds
to the adjustment and transform filters. For more information
Corel PHOTO-PAINT User Guide: Chapter 7 47
Page 55

about using filters, see “Correcting the color and tone of images”
on page 61. If you want to apply a special effect to improve
image quality or dramatically transform an image, choose a
special effects filter. For more information about special effects,
see “Applying special effects to images” on page 67.
To create a lens
1 Click Object } Create } New lens.
2 Choose a lens from the Lens type list box.
3 Type a name in the Lens name box.
4 Click OK.
5 In the dialog box, specify the lens properties you want.
You can also create a lens by clicking Window }
Dockers } Objects and clicking the New lens
button in the Objects Docker window.
7 Click OK.
8 In the dialog box, specify the lens properties you want.
You can create a lens from the editable area of a mask.
From here
To create a lens from a mask
1 Define an editable area on your image.
3 Click Object } Create } New lens.
4 Enable the Create lens from mask check box.
5 Choose a lens from the Lens type list box.
6 Type a name in the Lens name box.
For more information about… In the online Help Index, type…
Editing lenses editing lenses
Combining lenses combining lenses
48 Corel PHOTO-PAINT User Guide: Chapter 7
Page 56

Masking images 8
You can isolate areas in an image that you want to edit while
protecting the remaining areas from change using masks. Masks,
with their combination of editable and protected areas, let you
modify images with precision.
In this section you’ll learn about
distinguishing protected and editable areas
defining editable areas
defining editable areas using color information
adjusting the transparency of masks
Distinguishing protected and editable
areas
You can use masks to do advanced image editing. Masks function
like a stencil placed over an image: protected areas prevent paint
and effects from affecting the underlying image; whereas editable
areas let paint and effects reach the image. When you define an
editable area for an image, you also define a corresponding mask
for the same image.
Mask marquee
The border separating an editable area and its corresponding
protected area is indicated by a dashed outline, called the mask
marquee. By default, the mask marquee is visible on an image
and is black. You can hide the mask marquee to complete an
Corel PHOTO-PAINT User Guide: Chapter 8 49
Page 57

editing task. You can also change the color of the mask marquee
so that it can be seen clearly against an image’s colors.
To hide the mask marquee
Click Mask } Marquee visible.
Mask overlay
To make it easier to differentiate between protected and editable
areas, you can display the mask overlay. A mask overlay is a
red-tinted, transparent sheet that displays only over masked
areas. If you adjust the transparency of a mask in certain areas,
the degree of red displayed by the mask overlay in those areas
will vary accordingly. You can also change the color of the mask
overlay so that it can be seen clearly against the colors of the
image in the editable areas.
Inverting and removing a mask
You can invert a mask along its mask marquee so that the
protected area becomes editable and the editable area becomes
protected. Inverting a mask is useful when defining the image
area that you want to protect is easier than defining the area that
you want to edit. For example, if you want to edit an intricate
shape in an image that is set against a plain background, it is
easier to select the background, and then invert the mask.
You can remove a mask from an image when you no longer need
it.
To change the color of the mask marquee
1 Click Tools } Options.
2 In the list of categories, double-click Workspace, and click
Display.
3 Open the Mask marquee color picker, and click a color.
The mask marquee does not display when you use a
mask overlay or when you are adjusting the
transparency of a mask.
To display the mask overlay
Click Mask } Mask overlay.
The mask overlay covers the protected area of the mask.
50 Corel PHOTO-PAINT User Guide: Chapter 8
Page 58

To change the color of the mask overlay
1 Click Tools } Options.
2 In the list of categories, double-click Workspace, and click
Display.
3 Open the Mask tint color picker, and click a color.
When you invert a mask, the protected areas become editable, and the
editable areas become protected.
To remove a mask
Click Mask } Remove.
You can change the color of the mask overlay.
To invert a mask
Click Mask } Invert.
If the editable area on your image was floating before
you removed the mask, it is automatically merged
with the background.
Defining editable areas
There are a number of ways to define an editable area in an
image without using color information from the image.
Masking images 51
Page 59

Defining a rectangular or elliptical editable area
You can define rectangular or elliptical editable areas in an image.
When you create circular or elliptical editable areas, anti-aliasing
is enabled by default to produce smooth-looking edges.
Defining an editable area using an object, text, or
the Clipboard contents
You can define an editable area using objects. When you create
an editable area that has the shape of one or more objects, the
mask marquee and the edges of the object coincide; therefore,
you must move the object to another location to edit the area
inside the mask marquee.
You can define editable area using text. The editable area created
when you type has the font and style characteristics you specify.
You can also create an editable area created from existing text.
For information, see “To define an editable area using text,
objects, or the Clipboard contents” on page 53.
You can define an editable area using the Clipboard contents by
pasting the information into the image window as an editable
area. When you paste the Clipboard contents in to the image
window, you create a floating editable area, which you can edit
and move without changing the underlying image pixels.
Defining an editable area by freehand
You can define an editable area by outlining the image area as
you would using a pencil and paper, or by clicking at different
points on the image to anchor straight line segments.
You can also define an editable area by brushing over that area as
if you were painting over it.
To define a rectangular or elliptical editable area
1 Open the Mask tools flyout , and click one
of the following:
Rectangle mask tool
Circle mask tool
2 Click the Normal button on the property bar.
3 On the property bar, choose one of the following from the
Mask style list box:
Normal — lets you manually define a rectangular or
elliptical editable area
Fixed size — lets you specify the width and height of the
rectangular or elliptical editable area you want to define
Row(s) — lets you define a rectangular editable area
across the width of the image. You can specify the height
of the row and the roundness of the rectangle.
52 Corel PHOTO-PAINT User Guide: Chapter 8
Page 60

Column(s) — lets you define a rectangular editable area
along the height of the image. You can specify the width
of the column and the roundness of the rectangle.
4 Drag in the image window to manually define the editable
area, or click to position the editable area whose size or
orientation you’ve specified.
Using the Normal mask style, you can define a square
or circular editable area by holding down CTRL after
you begin to drag in the image window.
Using the Normal mask style, you can define a square
or circular editable area from its center by holding
down SHIFT after you begin to drag in the image
window.
To define an editable area using text, objects, or
the Clipboard contents
To define an area using Do the following
Text
One or more objects Select one or more objects, and
Click the Text tool , and
specify the text attributes on the
property bar. Click the Render
text to mask button on the
property bar, type the text, and
click a different tool in the
toolbox.
click Mask } Create from
object(s).
The Clipboard contents
Click Edit } Paste } As new
selection.
You can also define an editable area using one or
more selected objects by clicking the Create mask
button on the Mask toolbar.
A circular editable area created with the Circle mask tool.
Masking images 53
Page 61

To define an editable area by Do the following
Brushing
An editable area created from an object.
Open the Mask tools flyout
, click
the Mask brush tool , and
specify the tool’s attributes on
the property bar. Click the
Normal button on the
property bar, and drag in the
image window.
You can also define an editable area by dragging the
To define an editable area by freehand
Freehand mask tool in the image window, and
double-clicking to complete the outline.
To define an editable area by Do the following
You can apply a straight, horizontal brush stroke
using the Mask brush tool , by holding down CTRL
Outlining
Open the Mask tools flyout
, and click the
Freehand mask tool .
Click the Normal button on
the property bar, and click where
you want to start and end each
line segment in the image
window. Double-click to
complete the outline.
after you begin to drag in the image window. While
still holding down CTRL, you can press SHIFT to
switch between a straight, horizontal and straight,
vertical brush strokes.
You can change the size of the brush nib of the Mask
brush tool , by holding down ALT and dragging in
the image window. Release ALT when the nib is the
size you want.
54 Corel PHOTO-PAINT User Guide: Chapter 8
Page 62

An editable area created with the Freehand mask tool.
Defining editable areas using color
information
You can define the editable and protected areas of a mask using
the color information in an image. When you use color
information, you must specify seed colors and a color tolerance
value. A seed color is a base color to which you want to add
either protected or editable areas. The color tolerance value
specifies the percentage of variation that is allowed between a
seed color and other colors in the image; a greater tolerance
value adds more pixels to the protected or editable areas. Color
tolerance can be specified based on color similarity or on the
similarity of hue, saturation, and brightness levels.
Defining editable areas using consistent colors
You can define an editable area of uniform color in an image. The
color of the first pixel that you click establishes the seed color; all
adjacent pixels with colors within the specified color tolerance
range are included in the editable area. The editable area
expands until it reaches pixels with colors that exceed the
specified color tolerance.
You can define an editable area surrounded by uniform colors in
an image area by clicking straight line segments around the area
that you want to edit. When you outline the image area that you
want to make editable, you can choose whether only the color of
the first pixel or the color of every pixel you click establishes the
seed color.
When the first pixel that you click establishes the seed color, the
protected area expands until the specified color tolerance is
reached, contracting the completed outline. When every pixel
that you click establishes the seed color, each time you click the
protected area expands until the specified color tolerance is
exceeded. The expansion of the protected area is constrained
within the bounding box surrounding the pointer.
Defining editable areas in a specific color channel
You can define an editable area in specific color channels. Every
color image has a number of color channels, each representing
one component of the image’s color model. For example, an RGB
Masking images 55
Page 63

image is composed of a red channel, a green channel, and a blue
channel. When an image is displayed in its individual color
channels, only part of its color information is displayed.
Displaying only certain color channels lets you define an editable
area with greater precision.
Defining editable areas throughout an image
You can define editable areas throughout an image using a color
mask. A color mask lets you select seed colors throughout the
image instead of in a specific area.
The color threshold lets you further refine the range of colors
that are included in the editable area. The threshold value
evaluates the brightness of each seed color. Pixels with a specific
brightness value can be added to either the protected or editable
areas. Adjusting the color threshold lets you soften or sharpen
the pixels at the edge of the editable area. To adjust the
threshold levels of a color mask, it is recommended you use a
grayscale preview of your image, which displays masked areas in
black and editable areas in white.
To define an editable area of uniform color
1 Open the Mask tools flyout , and click the
Magic wand mask tool .
2 Click the Normal button on the property bar.
3 On the property bar, click one of the following tolerance
mode buttons:
Normal — determines the color tolerance based on
color similarity
HSB — determines the color tolerance based on the
similarity of hue, saturation, and brightness levels
between adjacent pixels
4 Type a tolerance value in the box or boxes beside the
tolerance mode buttons.
5 Click a color in the image.
If there are objects in your image only areas on the
active object are selected. You can select areas on all
visible objects by enabling the Mask visible button
on the property bar.
56 Corel PHOTO-PAINT User Guide: Chapter 8
Page 64

The area is selected by clicking a red pixel with the Magic wand tool.
To define an editable area surrounded by uniform
color
1 Open the Mask tools flyout , and choose one of
the following:
Lasso mask tool — lets you roughly outline an image
area and then contract the mask marquee around that
area. Uses an initial seed color.
Scissors mask tool — lets you establish a mask
marquee along a boundary between colors in an image.
Uses multiple seed colors.
2 Click the Normal button on the property bar.
3 On the property bar, click one of the following tolerance
mode buttons:
Normal — determines the color tolerance based on
color similarity between adjacent pixels
HSB — determines the color tolerance based on the
similarity of hue, saturation, and brightness levels
between adjacent pixels
4 Type a tolerance value in the box or boxes beside the
tolerance mode buttons.
5 In the image window, click a color you want to protect from
changes and click at different points to outline the editable
area.
6 Double-click to complete the outline.
If there are objects in your image, by default only
areas on the active object are masked. You can mask
areas on all visible objects by enabling the Mask
visible button on the property bar.
Masking images 57
Page 65

You can also drag in the image window to outline by
freehand. It is recommended, however, when using
the Scissors mask tool, that you click frequently to
set multiple seed colors and to establish multiple
anchor points.
You can define the range of effect for the Scissors
mask tool by specifying a radius value on the
property bar. The radius value specified is doubled to
establish a square area (in pixels) beyond which edges
are not detected.
2 In the Channels Docker window, click the Eye icon beside a
color channel.
If you want to preview more than one color channel, enable
the Eye icon beside each color channel you want to preview.
3 Open the Mask tools flyout , and click one of the
following:
Lasso mask tool
Magic wand mask tool
4 Define an area in the image.
The area is selected by clicking the colors around it with the Lasso mask tool.
To define editable areas in specific color channels
1 Click Window } Dockers } Channels.
You can use color channels to help you define editable areas.
To define editable areas throughout an image
1 Click Mask } Color mask.
2 Click the Normal button .
58 Corel PHOTO-PAINT User Guide: Chapter 8
Page 66

3 Choose Sampled colors from the top list box.
4 Click the Eyedropper tool , and click each seed color in the
image window.
5 Click the Preview button .
6 From the list box beside the Preview button, choose one of
the following:
Overlay — displays protected areas covered by a
red-tinted transparent sheet
Grayscale — displays protected areas in black and the
editable areas in white
Black matte — displays protected areas covered by a
black-tinted transparent sheet
White matte — displays protected areas covered by a
white-tinted transparent sheet
Marquee — displays a dotted line around the editable
area
7 Click More, and enable one of the following options:
Normal — determines the color tolerance on color
similarity between pixels
HSB mode — determines the color tolerance on the
similarity of hue, saturation, and brightness levels
between pixels
8 In the box beside each seed color, specify the percentage of
color variation permitted between pixels of that color and the
remaining pixels.
9 In the Threshold section, enable one of the following options:
To black — all pixels with a brightness value above the
threshold value are added to the protected area
To white — all pixels with a brightness value above the
threshold value are added to the editable area
10 Adjust the Threshold slider.
If colors from a previous session display in the Color
mask dialog box, click Reset before you create a new
color mask.
The Marquee display style is unavailable if you
disable the Marquee visible command on the
property bar.
You can set a default color tolerance for a color mask
by clicking the flyout button , and clicking Set
tolerance default.
You can also specify predetermined seed colors by
choosing a color preset, such as Greens, from the list
box beside the Eyedropper tool .
Masking images 59
Page 67

For more information about… In the online Help Index, type…
Saving masks and channels channels, saving alpha channels
All red pixels in the image are selected with a color mask.
Loading masks and alpha
channels
Managing alpha channels alpha channels, managing
Creating and editing alpha
channels
Using paths to define image
areas
channels, loading alpha channels
Creating alpha channels
paths
From here
For more information about… In the online Help Index, type…
Transforming editable areas editable areas, transforming
Expanding and reducing editable
areas
Adjusting the edges of editable
areas
Adjusting the transparency of
masks
editable areas, reducing
editable areas, adjusting edges of
masks, transparency
60 Corel PHOTO-PAINT User Guide: Chapter 8
Page 68

Correcting the color and tone of images 9
You can improve the quality of images by correcting the color and
tone.
In this section, you’ll learn about
correcting image color and tone
Correcting image color and tone
Corel PHOTO-PAINT provides you with filters and tools to make
corrections to the color and tone of images. When you adjust the
color and tone, you adjust elements such as hue, saturation,
brightness, contrast, or intensity. If you want to correct the color
and tone of the entire image, you can apply an adjustment filter
directly to the image or apply a lens which exists on a separate
object layer and can be edited at any time. For information about
lenses, see “Working with lenses” on page 47.
You can correct part of an image by editing the size and shape of
a lens or by creating an editable area before applying an
adjustment filter. For information about editable areas, see
“Masking images” on page 49.
The table below shows the filters that can be used to make
corrections to images.
Corel PHOTO-PAINT User Guide: Chapter 9 61
Page 69

To correct Use the following filters
To correct Use the following filters
Exposure and adjust shadows,
midtones and highlights
Overall color
Tone curve, Gamma,
Sample/Target balance, Tone
balance, Histogram equalization
Color hue, Color balance
Specific colors
Contrast
Selective color, Replace color
Color tone,
Brightness-contrast-intensity,
Contrast enhancement, Local
equalization
62 Corel PHOTO-PAINT User Guide: Chapter 9
Page 70

To correct Use the following filters
Saturation
Hue-saturation-lightness,
Desaturate
Correcting the color and tone using brush strokes
You can correct the brightness, contrast, hue or saturation in part
of an image by applying brush strokes. You can use preset
brushes or create a custom brush.
large number of pixels in the shadows (the left side of the
histogram) indicates the presence of image detail in the dark
areas of the image. By adjusting the color and tone of the image,
you can reveal the hidden detail and improve the image quality.
A histogram is also available with the following filters:
Contrast enhancement
Histogram equalization
Sample/Target balance
To correct the color and tone of an image
1 Click Image } Adjust, and click an adjustment filter.
2 In the filter’s dialog box, specify the settings you want.
You can use this procedure to correct the color and
tone in an editable area by defining an editable area
before you click an adjustment filter.
Viewing the tonal range of images
You can view the tonal range of an image using a histogram
which is a horizontal bar chart that plots the brightness values of
the pixels in your image on a scale from 0 (dark) to 255 (light).
The left part of the histogram represents the shadows of an
image, the middle part represents the midtones, and the right
part represents the highlights. The height of the spikes indicates
how many pixels are at each brightness level. For example, a
To correct the color and tone using brush strokes
1 Select an object or image.
2 Open the Brush tools flyout , and click the Effect
tool .
3 On the property bar, open the Effect tool picker, and click one
of the following:
Brightness tool — brightens or darkens the image
Correcting the color and tone of images 63
Page 71

Contrast tool — increases or decreases the contrast
Hue tool — shifts all hues along the Color Wheel by
the number of degrees that you specify in the Amount box
Hue Replacer tool — retains the brightness and
saturation of the original colors, but replaces all hues with
the current paint color
Sponge tool — saturates or desaturates the colors
Dodge/Burn tool — brightens(overexposes) or
darkens(underexposes) the image
Tint tool — tints the image using the current paint
color
4 Choose a preset brush from the Brush type list box on the
property bar.
If you want to customize the brush, specify the settings you
want on the property bar.
5 Drag in the image window.
You can apply brush strokes to all items in the image
window by clicking Window } Dockers } Brush
Settings and clicking the Merged Source
button on the Dab Attributes bar.
If you want to accumulate the effect of the brush
stroke as you drag across an image area, click
Windows } Dockers } Brush Settings, and click the
Cumulative button on the Stroke Attributes bar.
To view the tonal range of an image
1 Click Image } Histogram.
2 Choose a color channel from the Channel list box.
3 Drag in the preview window to select a range of pixels and
display the following information:
Start — the minimum value of the histogram’s range
End — the maximum value of the histogram’s range
Mean — the average distribution of the pixel brightness
Median — the median distribution the pixel brightness
Standard deviation — the standard deviation of the pixel
brightness
Percent — the percentage of image pixels that fall within
the selected range
64 Corel PHOTO-PAINT User Guide: Chapter 9
Page 72

Pixels — the number of pixels that are in the image
4 Move the cursor over the histogram to display the following
information:
Level — the brightness level (between 0 and 255)
Pixels — the number of pixels that are at the specified
brightness level
You can also
Automatically set the clipping
range for the dark and light ends
of the histogram.
Enable the Automatically check
box.
From here
For more information about… In the online Help Index, type…
Working with color channels color channels
Adjustment filters adjustment filters
Correcting the color and tone of images 65
Page 73

Page 74

Applying special effects to images 10
Corel PHOTO-PAINT provides special effects filters that let you
produce a wide range of transformations on images. For
example, you can transform images so that they look like
drawings, paintings, etchings, stereograms, or abstract art.
In this section, you’ll learn about
working with special effects
Working with special effects
Corel PHOTO-PAINT special effects let you enhance the
appearance of an image. You can apply a special effect to the
entire image, or you can use a mask or a lens to transform only
part of an image.
Applying special effects
The following are all the categories of special effects available,
each of which include several different effects that you can apply:
Three-dimensional Contour Noise
Art strokes Creative Render
Blur Custom Texture
Color transform Distort Fancy
Soft
When you apply a special effect, you can adjust its settings to
control how the effect transforms an image. For example, when
you use the Vignette effect to frame an image, you can increase
the offset value and decrease the fade value to decrease the size
and opacity of the frame. With the Watercolor effect, you can
Corel PHOTO-PAINT User Guide: Chapter 10 67
Page 75

decrease the size of the brush to show more image detail or
increase the size of the brush for an abstract effect.
you’ve applied, see “Undoing, redoing, repeating and fading” on
page 81.
Applying special effects to part of an image
You can apply special effects to an image area by defining an
editable area. For information about editable areas, see “Masking
images” on page 49.
When you use a lens, changes are not applied to the image;
instead they are seen on screen through the lens. For information
about lenses, see “Working with lenses” on page 47.
You can also use a lens to apply a special effect to part of an
image. The following special effects are also preset lens types:
Jaggy despeckle Scatter
Smooth Pixelate
Soften Add noise
Psychedelic Remove noise
Solarize Sharpen
Repeating and fading special effects
You can repeat a special effect to intensify its result. You can also
fade an effect to diminish its intensity, and you can define the
degree to which the effect is merged with the image. For
information about repeating and fading a special effect that
To apply a special effect
1 Click Effects, choose a special effect category, and click an
effect.
2 Adjust the settings of the special effect filter.
If the image contains one or more objects, the special
effect is applied only to the background or the
selected object.
You can retain the shape of a object to which you
apply a special effect by enabling the Lock object
transparency button in the Objects Docker
window.
To apply a special effect to an editable area
1 Define an editable area.
2 Click Effects, choose a special effect category, and click an
effect.
3 Adjust the settings of the special effect to get the effect you
want.
To repeat a special effect
Click Effects } Repeat, and click one of the following:
68 Corel PHOTO-PAINT User Guide: Chapter 10
Page 76

Repeat — repeats the last applied effect
To all visible — repeats the last applied effect to all visible
objects in an image
To all selected — repeats the last applied effect to all
selected objects in an image
Types of special effects
3D Effects
3D Effects
Original Rotate
Cylinder Emboss
Glass Page curl
Perspective Pinch punch
Applying special effects to images 69
Page 77

3D Effects
Art Strokes
Sphere The Boss
Zig zag
Original Charcoal
Conte crayon Crayon
Cubist Dabble
70 Corel PHOTO-PAINT User Guide: Chapter 10
Page 78

Art Strokes
Art Strokes
Impressionist Palette knife
Pastels Pen and ink
Pointillist Scraperboard
Sketch pad Watercolor
Water marker Wave paper
Applying special effects to images 71
Page 79

Blur
Blur
Original Tune blur
Directional smooth Gaussian
Jaggy despeckle Low pass
Motion Radial
Smooth Soften
Zoom Smart
72 Corel PHOTO-PAINT User Guide: Chapter 10
Page 80

Blur
Color transform
Special effects
Bit planes Psychedelic
Color transform
Solarize
Original Halftone
Applying special effects to images 73
Page 81

Contour effect
Creative effect
Original Edge detect
Find edges Trace contour
Original Crafts
Crystalize Fabric
Frame Glass block
74 Corel PHOTO-PAINT User Guide: Chapter 10
Page 82

Creative effect
Creative effects
Kid’s play Mosaic
Particles Scatter
Smoked glass Stained glass
Vignette Vortex
Weather
Applying special effects to images 75
Page 83

Distort effects
Distort
Original Blocks
Displace Mesh warp
Offset Pixelate
Ripple Shear
Swirl Tile
Wet paint Whirlpool
76 Corel PHOTO-PAINT User Guide: Chapter 10
Page 84

Distort
Noise effects
Wind
Add noise Diffuse
Noise effects
Maximum Median
Original Tune
Minimum
Applying special effects to images 77
Page 85

Render effects
Texture effects
Original Stereo noise
Lens flare Lighting effects
Original Brick wall
Bubbles Canvas
Cobblestone Elephant skin
78 Corel PHOTO-PAINT User Guide: Chapter 10
Page 86

Texture effects
Texture effects
Etching Plastic
Underpainting
From here
For more information about… In the online Help Index, type…
Applying special effects presets special effects, presets
Plaster wall Relief sculpture
Screen door Stone
Applying special effects to images 79
Using plug-in effects special effects, managing plug-ins
Special effect types special effects, types
Page 87

Page 88

Undoing, redoing, repeating, and fading 11
Corel PHOTO-PAINT lets you undo, redo, repeat, and fade
actions. You can also restore an image, or part of an image, to a
previously saved version.
In this section, you’ll learn about
undoing, redoing, repeating, and fading actions
reverting to an earlier image state
Undoing, redoing, repeating, and fading
actions
Corel PHOTO-PAINT lets you undo actions you apply to an image,
starting with the most recent action. If you don’t like the result of
undoing actions, you can redo them.
Corel PHOTO-PAINT User Guide: Chapter 11 81
The Undo command lets you cancel the last action.
The undo settings can be customized, allowing you to increase or
decrease the number of actions you can undo and redo.
Page 89

You can also repeat or fade actions. When you repeat an action, it
is reapplied to the image, producing a stronger visual effect.
When you fade an action, it is gradually removed. You can also
use a merge mode to modify the fade effects.
To undo, redo, repeat, or fade actions
To Do the following
When you undo a series of actions, the action you
choose and all actions listed below it are undone.
When you redo a series of actions, the action you
choose and all actions listed between it and the last
undone action are redone.
Undo the last action
Redo the last action
Undo or redo a series of actions
Repeat the last action
Fade the last action
Click Edit } Undo.
Click Edit } Redo.
Click Window } Dockers } Undo.
Choose an action from the list in
the Undo Docker window. Apply
a new action to the image.
Click Edit } Repeat.
Click Edit } Fade last command.
Move the Percent slider to set
the fade level. If you want to
modify the fade effect, choose a
merge mode from the Merge list
box.
You can fade the last action by a specified amount.
82 Corel PHOTO-PAINT User Guide: Chapter 11
Page 90

You can repeat the last action to intensif y the effect.
To customize undo settings
1 Click Tools } Options.
2 In the list of categories, double-click Workspace, and click
Memory.
3 Type a value in the Undo levels box.
4 Restart Corel PHOTO-PAINT.
You can specify up to 99 undo levels; however, the
number of undo levels affects the size of the swap
disk. Reduce the number of undo levels if you find
that your computer is not operating at the speed you
want.
If you disable the Enable undo list check box, you
will only be able to undo the number of levels
specified in the Undo levels box.
Reverting to an earlier image state
As you create or edit an image, you can revert to its last-saved
version to remove all the changes you made since you saved the
image. If you want to remove only some changes, you can restore
image areas to the way they look in the last-saved version of the
image.
You can also create a checkpoint to temporarily save an image in
its current state, so that you can return the image to that state if
necessary.
You can also create a workspace that lets you save automatically
using a checkpoint. For more information, see “To specify
autosave settings” on page 138.
To revert to the last-saved version of an image
Click File } Revert.
You can also revert to the last saved image by clicking
Revert to last saved on the Undo Docker window.
Undoing, redoing, repeating, and fading 83
Page 91

To restore image areas
1 Open the Brush tools flyout , and click the
Clone tool .
2 On the property bar, open the Clone tool picker and click the
Clone from saved tool .
3 Choose a brush from the Brush type list box.
4 Drag in the image window.
If you are creating an image from scratch, you must
save it before using the Clone from saved tool.
To create or return to a checkpoint
To Do the following
Create a checkpoint
Return to a checkpoint
Click Edit } Checkpoint.
Click Edit } Restore to
checkpoint.
84 Corel PHOTO-PAINT User Guide: Chapter 11
Page 92

Painting and creating
Page 93

Page 94

Working with color 12
Corel graphics applications let you choose and create colors
using various color models.
In this section, you’ll learn about
choosing colors
working with custom color palettes
Choosing colors
You can choose paint, paper, and fill colors using color palettes,
color viewers, color harmonies, or color blends.
For information about applying the colors you choose, see
“Applying uniform fills” on page 91.
Choosing a color using fixed or custom color
palettes
Fixed color palettes are provided by third-party manufacturers.
Some examples of these are HKS, FOCOLTONE, PANTONE, and
TRUMATCH. It may be useful to have on hand a manufacturer’s
swatch book, which is a collection of color samples that shows
exactly what each color looks like when printed.
The PANTONE Matching System, FOCOLTONE, TOYO COLOR
Finder, HKS, and DIC fixed color palettes are all spot colors. If you
create color separations when you print, each color from these
color palettes requires a separate printing plate. This can
significantly increase the cost of your print job. If you want to use
these colors but you don’t want to use spot colors, convert the
spot colors to process colors when you print.
Corel PHOTO-PAINT User Guide: Chapter 12 87
Page 95

Custom color palettes can include colors from any color model or
fixed color palette. Custom color palettes are saved as a color
palette file (.CPL).
Choosing a color using color viewers
Color viewers give a representation of a range of colors using
either one-dimensional or three-dimensional shapes. The default
color viewer is based on the HSB color model, but you can use
this viewer to choose CMYK, CMY, or RGB colors. For information
about color models, see “Understanding color models” on page .
Choosing a color using color harmonies
Color harmonies work by superimposing a shape, such as a
rectangle or a triangle, over a color wheel. Each vertical row in
the color grid begins with the color located at one of the points
on the superimposed shape.
The colors at each corner of the shape are always
complementary, contrasting, or harmonious, depending on the
shape you choose. The color harmonies allow you to choose the
color model you prefer to use and are most useful when you’re
choosing several colors for a project.
Choosing a color using color blends
When you choose a color using color blends, you combine base
colors to get the color you want. The color blender displays a
grid of colors that it creates from the four base colors you
choose.
To choose a color using a fixed or custom color
palette
1 On the status bar, double-click one of the following swatches:
Paint
Paper
2 Click the Palettes tab.
3 Choose a fixed or custom palette from the Palette list box.
4 Click the color scroll bar to set the range of colors displayed
in the color selection area.
5 Click a color in the color selection area.
Each color swatch on a fixed color palette is marked
with a small white square.
You can use this procedure to choose a fill color by
double-clicking the Fill swatch, clicking the Uniform
fill tool , and clicking Edit.
You can swap the old and new colors by clicking
Options } Swap color.
To choose a color using a color viewer
1 On the status bar, double-click one of the following swatches:
88 Corel PHOTO-PAINT User Guide: Chapter 12
Page 96

Paint
Paper
2 Click the Models tab.
3 Choose a color model from the Model list box.
4 Click Options } Color viewers, and choose a color viewer.
5 Click the color scroll bar to set the range of colors displayed
in the color selection area.
6 Click a color in the color selection area.
If you choose a color that is out of the printer’s
gamut, the color in the smaller swatch next to the
New color swatch is the closest in-gamut color to the
color you choose. You can click this closest in-gamut
color, or you can correct the out-of-gamut color. For
information about color correction, see “Reproducing
colors accurately” on page .
You should use the same color model for all the
colors in a drawing.
You can use this procedure to choose a fill color by
double-clicking the Fill swatch, clicking the Uniform
fill tool , and clicking Edit.
You can swap the old and new colors by clicking
Options } Swap color.
To choose a color using color harmonies
1 On the status bar, double-click one of the following swatches:
Paint
Paper
2 Click the Mixers tab.
3 Click Options } Mixers } Color harmonies.
4 Choose a shape from the Hues list box.
5 Choose an option from the Variation list box.
6 Drag the black dot around the color wheel to the color you
want to use.
7 Click a color swatch on the color palette below the color
wheel.
If you choose a color that is out of the printer’s
gamut, the color in the smaller swatch next to the
New color swatch is the closest in-gamut color to the
color you choose. You can click this closest in-gamut
color, or you can correct the out-of-gamut color.
Working with color 89
Page 97

You can use this procedure to choose a fill color by
double-clicking the Fill swatch, clicking the Uniform
fill tool , and clicking Edit.
You can swap the old and new colors by clicking
Options } Swap color.
You can use this procedure to choose a fill color by
double-clicking the Fill swatch, clicking the Uniform
fill tool , and clicking Edit.
You can swap the old and new colors by clicking
Options } Swap color.
To choose a color using color blends
1 On the status bar, double-click one of the following swatches:
Paint
Paper
2 Click the Mixers tab.
3 Click Options } Mixers } Color blend.
4 Open each color picker, and click a color.
5 Click a color in the color selection area.
You can only blend colors that are in your default
on-screen color palette. If you want to blend other
colors, change the default on-screen color palette.
For information about how to change the default
on-screen color palette, see “To open a custom color
palette” on page .
From here
For more information about… In the online Help Index, type…
Working with custom color
palettes
Reproducing colors accurately colors, reproducing
Understanding color models color models, understanding
color palettes, custom
90 Corel PHOTO-PAINT User Guide: Chapter 12
Page 98

Filling images 13
You can fill objects, image areas, or entire images with solid
colors, color progressions, bitmapped images, and textures.
In this section, you’ll learn about applying
uniform fills
fountain fills
bitmap fills
texture fills
gradient fills
Applying uniform fills
Uniform fills are even-colored, solid fills that you can apply to
selected objects or image areas. When you apply a fill, it spreads
to the areas that are within a specified Color similarity range. For
example, specifying a color similarity value of 100 fills the entire
image area.
A Uniform fill can be applied to the background, an object, or a particular
color. The Color similarity setting determines the range for the fill.
Corel PHOTO-PAINT User Guide: Chapter 13 91
Page 99

To apply a uniform fill
1 Open the Fill tools flyout , and click the Fill tool .
2 Click the Uniform fill button on the property bar, and click
the Edit fill button .
3 In the Uniform fill dialog box, choose a color model from the
Model list box.
4 Click a color in the visual selection area, and click OK.
5 On the property bar, type values in the following boxes:
Transparency — lets you specify a value for the opacity of
the fill. Higher values increase the transparency.
Color similarity — lets you specify how the fill spreads
based on the color similarity of adjacent pixels. A value of
100 fills the entire object or area.
If you want to change the merge mode, click a merge mode
from the Paint mode list box on the property bar.
6 Click where you want to apply the fill in the image.
You can choose the colors for a uniform fill from the
color palette, from an image, or by accessing color
models, mixers, or fixed or custom palettes. For
information about choosing colors, see “Working
with color” on page 87.
You can use this procedure to apply a uniform fill to a
selected object.
You can also select a fill color by right-clicking a color
on the color palette.
Applying fountain fills
Fountain fills let you fill objects or image areas with a
progression of two or more colors that follows a linear, radial,
conical, square, or rectangular pattern.
When you apply a fountain fill, you can choose a preset fill, or
you can create a two-color or a custom fountain fill that contains
up to 99 colors.
You can customize fountain fills by changing the colors, adjusting
the center point around which the colors progress or by changing
the angle of the fill. You can also change the size of the blended
area that lies between the solid colors in the fountain fill. When
you finish creating a fountain fill, you can save it for later use.
92 Corel PHOTO-PAINT User Guide: Chapter 13
Page 100

Linear, radial, conical, and rectangular Fountain fills.
To apply a preset fountain fill
1 Open the Fill tools flyout , and click the Fill tool .
2 Click the Fountain Fill button on the property bar, and click
the Edit fill button .
3 In the Fountain fill dialog box, choose a preset fountain fill
from the Presets list box, and click OK.
4 On the property bar, type values in the following boxes:
Transparency — lets you specify a value for the opacity of
the fill. Higher values increase the transparency.
Color similarity — lets you specify how the fill spreads
based on the color similarity of adjacent pixels. A value of
100 fills the entire object or area.
If you want to change the merge mode, click a merge mode
from the Paint mode list box on the property bar.
5 Click where you want to apply the fill in the image.
You can use this procedure to apply a fountain fill to a
selected object.
Applying bitmap fills
Bitmap fills are bitmapped images that you use to fill an object or
image area. You can tile bitmapped images across an area, or fill
it with a single bitmapped image. Patterned images, such as
stones, coins, or bricks, can be used to create a seamless pattern.
Less complex bitmapped images are suitable for filling areas
because they are require less system memory. The complexity of
a bitmapped image is determined by its size, resolution, and
bit-depth. The area the fill spreads to is determined by the color
similarity value specified for adjacent pixels.
You can fill images with a preset bitmap fill, or you can create
custom bitmap fills from saved images or editable image areas.
You can customize the appearance of a bitmap fill by changing its
width and height, and by adjusting its horizontal and vertical
offset. Offset is determined relative to the top left corner of the
fill area. You can also offset rows or columns of tiles in a bitmap
fill. You can further customize bitmap fills by rotating, and
Filling images 93
 Loading...