

Page 1

Version 1.14
September 2014
Page 2

Contents
Preface . . . . . . . . . . . . . . . . . . . . . . . . . . . . . . . . . . . . . . . . . . . . . . . . . . . . . . . . . . . . . . . . . . . . . . . . . . . 5
What is in this document?
What other information is available?
Font conventions
. . . . . . . . . . . . . . . . . . . . . . . . . . . . . . . . . . . . . . . . . . . . . . . . . . . . . 6
Chapter 1: Introduction . . . . . . . . . . . . . . . . . . . . . . . . . . . . . . . . . . . . . . . . . . . . . . . . . . . . . . . . 7
. . . . . . . . . . . . . . . . . . . . . . . . . . . . . . . . . . . . . . . . . . . . . . 5
. . . . . . . . . . . . . . . . . . . . . . . . . . . . . . . . . . . . . 6
1.1 What is Corel PDF Fusion?
1.2 How to use this manual
. . . . . . . . . . . . . . . . . . . . . . . . . . . . . . . . . . . . . . . . . 7
. . . . . . . . . . . . . . . . . . . . . . . . . . . . . . . . . . . . . . . . . . . . 7
Chapter 2: How to install Corel PDF Fusion . . . . . . . . . . . . . . . . . . . . . . . . . . . . . . . . . 9
2.1 What are the installer options?
2.2 What you need
. . . . . . . . . . . . . . . . . . . . . . . . . . . . . . . . . . . . . . . . . . . . . . . . . .10
2.3 Installing Corel PDF Fusion
2.4 Removing Corel PDF Fusion
2.5 Entering your serial number
2.6 Associating XPS and PDF files with Corel PDF Fusion
2.7 The file system
. . . . . . . . . . . . . . . . . . . . . . . . . . . . . . . . . . . . . . . . . . . . . . . . . . .14
2.8 Open Corel PDF Fusion
2.9 Open Corel PDF Converter
2.10 Product update
. . . . . . . . . . . . . . . . . . . . . . . . . . . . . . . . . . . . . . . . . . . . . . . . .14
. . . . . . . . . . . . . . . . . . . . . . . . . . . . . . . . . . . . . . 9
. . . . . . . . . . . . . . . . . . . . . . . . . . . . . . . . . . . . . . . .11
. . . . . . . . . . . . . . . . . . . . . . . . . . . . . . . . . . . . . . .12
. . . . . . . . . . . . . . . . . . . . . . . . . . . . . . . . . . . . . . .13
. . . . . . . . . . . . . . . .13
. . . . . . . . . . . . . . . . . . . . . . . . . . . . . . . . . . . . . . . . . .14
. . . . . . . . . . . . . . . . . . . . . . . . . . . . . . . . . . . . . . .14
Chapter 3: Getting to know Corel PDF Fusion . . . . . . . . . . . . . . . . . . . . . . . . . . . . . 15
3.1 What can you do with Corel PDF Fusion?
3.2 How do you use Corel PDF Fusion?
3.3 What is a document format or PDL?
3.4 What are the features of Corel PDF Fusion?
3.5 What next?
. . . . . . . . . . . . . . . . . . . . . . . . . . . . . . . . . . . . . . . . . . . . . . . . . . . . . .25
. . . . . . . . . . . . . . . . . . . . . . . . . . . 15
. . . . . . . . . . . . . . . . . . . . . . . . . . . . . . . . 16
. . . . . . . . . . . . . . . . . . . . . . . . . . . . . . . 17
. . . . . . . . . . . . . . . . . . . . . . . . . 18
Chapter 4: The Corel PDF Fusion work area . . . . . . . . . . . . . . . . . . . . . . . . . . . . . . .26
4.1 Open Corel PDF Fusion
4.2 The Page, Assembly, Flick and Presentation View
4.3 The Navigation pane
4.4 Customize your work area
. . . . . . . . . . . . . . . . . . . . . . . . . . . . . . . . . . . . . . . . . .27
. . . . . . . . . . . . . . . . . . . .29
. . . . . . . . . . . . . . . . . . . . . . . . . . . . . . . . . . . . . . . . . . . . .44
. . . . . . . . . . . . . . . . . . . . . . . . . . . . . . . . . . . . . . . .48
Chapter 5: The Corel PDF Batch Converter work area . . . . . . . . . . . . . . . . . . . 56
5.1 Open Corel PDF Batch Converter
INDEX CONTENTS 2
. . . . . . . . . . . . . . . . . . . . . . . . . . . . . . . . . 56
Page 3

C
OREL
PDF F
USION USER GUIDE
CONTENTS INDEX CONTENTS 3
Chapter 6: How do I...? . . . . . . . . . . . . . . . . . . . . . . . . . . . . . . . . . . . . . . . . . . . . . . . . . . . . . . .60
6.1 Convert files
6.2 Create a new document from existing files
6.3 Add empty pages to an existing document
6.4 Add existing pages to an existing document
6.5 Remove pages from an existing document
6.6 Prepare a document for distribution
6.7 Print a document
6.8 Find and Redact text—one or more instances
6.9 Redact text or area—single instance
6.10 Find and replace text—one or more instances
6.11 Add comments/notes
6.12 Add notes containing selected text
6.13 Add text annotations
6.14 Add bookmarks
6.15 Add free text annotations
6.16 Add hyperlinks
6.17 Change the destination of the output file
6.18 Produce more compact PDF files
6.19 Produce PDF files that can be sent by e-mail
6.20 Produce files for fast web viewing
6.21 Launch application to view the file when complete
6.22 Share setups
6.23 E-mail documents
6.24 E-mail comments
6.25 Find the version number of Corel PDF Fusion
. . . . . . . . . . . . . . . . . . . . . . . . . . . . . . . . . . . . . . . . . . . . . . . . . . . . .61
. . . . . . . . . . . . . . . . . . . . . . . . . . 65
. . . . . . . . . . . . . . . . . . . . . . . . . . 70
. . . . . . . . . . . . . . . . . . . . . . . . . 70
. . . . . . . . . . . . . . . . . . . . . . . . . . 71
. . . . . . . . . . . . . . . . . . . . . . . . . . . . . . . . 71
. . . . . . . . . . . . . . . . . . . . . . . . . . . . . . . . . . . . . . . . . . . . . . . .72
. . . . . . . . . . . . . . . . . . . . . . .73
. . . . . . . . . . . . . . . . . . . . . . . . . . . . . . . . 74
. . . . . . . . . . . . . . . . . . . . .74
. . . . . . . . . . . . . . . . . . . . . . . . . . . . . . . . . . . . . . . . . . .74
. . . . . . . . . . . . . . . . . . . . . . . . . . . . . . . . 75
. . . . . . . . . . . . . . . . . . . . . . . . . . . . . . . . . . . . . . . . . . . .76
. . . . . . . . . . . . . . . . . . . . . . . . . . . . . . . . . . . . . . . . . . . . . . . .76
. . . . . . . . . . . . . . . . . . . . . . . . . . . . . . . . . . . . . . . .77
. . . . . . . . . . . . . . . . . . . . . . . . . . . . . . . . . . . . . . . . . . . . . . . . .78
. . . . . . . . . . . . . . . . . . . . . . . . . . 79
. . . . . . . . . . . . . . . . . . . . . . . . . . . . . . . . . 80
. . . . . . . . . . . . . . . . . . . . . . . 81
. . . . . . . . . . . . . . . . . . . . . . . . . . . . . . . . . 82
. . . . . . . . . . . . . . . . . .82
. . . . . . . . . . . . . . . . . . . . . . . . . . . . . . . . . . . . . . . . . . . . . . . . . . .83
. . . . . . . . . . . . . . . . . . . . . . . . . . . . . . . . . . . . . . . . . . . . . . .84
. . . . . . . . . . . . . . . . . . . . . . . . . . . . . . . . . . . . . . . . . . . . . . .85
. . . . . . . . . . . . . . . . . . . . . .85
6.26 Remove tooltips or tool labels from Corel PDF Fusion
6.27 Add security to a document
6.28 Add a watermark to a document
. . . . . . . . . . . . . . . . . . . . . . . . . . . . . . . . . . . . . .85
. . . . . . . . . . . . . . . . . . . . . . . . . . . . . . . . . 86
. . . . . . . . . . . . . .85
Chapter 7: Document settings and security . . . . . . . . . . . . . . . . . . . . . . . . . . . . . . . . .88
7.1 Document Settings
7.2 Security Settings
. . . . . . . . . . . . . . . . . . . . . . . . . . . . . . . . . . . . . . . . . . . . . . .88
. . . . . . . . . . . . . . . . . . . . . . . . . . . . . . . . . . . . . . . . . . . . . . . . .90
Chapter 8: Working with annotations . . . . . . . . . . . . . . . . . . . . . . . . . . . . . . . . . . . . . . . 93
8.1 Working with bookmarks
8.2 Working with comments and annotations
8.3 Free text annotations
8.4 Adding hyperlinks
. . . . . . . . . . . . . . . . . . . . . . . . . . . . . . . . . . . . . . . . . . . . . . .104
8.5 Spell check comments and free text
. . . . . . . . . . . . . . . . . . . . . . . . . . . . . . . . . . . . . . . . .93
. . . . . . . . . . . . . . . . . . . . . . . . . . . 98
. . . . . . . . . . . . . . . . . . . . . . . . . . . . . . . . . . . . . . . . . . . .102
. . . . . . . . . . . . . . . . . . . . . . . . . . . . . . .106
Chapter 9: Setups . . . . . . . . . . . . . . . . . . . . . . . . . . . . . . . . . . . . . . . . . . . . . . . . . . . . . . . . . . . . .108
9.1 What is a setup?
9.2 Managing setups
9.3 Setup manager reference
INDEX CONTENTS 3
. . . . . . . . . . . . . . . . . . . . . . . . . . . . . . . . . . . . . . . . . . . . . . . .108
. . . . . . . . . . . . . . . . . . . . . . . . . . . . . . . . . . . . . . . . . . . . . . . .108
. . . . . . . . . . . . . . . . . . . . . . . . . . . . . . . . . . . . . . . .113
Page 4

C
OREL
PDF F
USION USER GUIDE
CONTENTS INDEX CONTENTS 4
9.4 PDF document setup
9.5 XPS document setup
9.6 Word document setup
. . . . . . . . . . . . . . . . . . . . . . . . . . . . . . . . . . . . . . . . . . . .113
. . . . . . . . . . . . . . . . . . . . . . . . . . . . . . . . . . . . . . . . . . . .123
. . . . . . . . . . . . . . . . . . . . . . . . . . . . . . . . . . . . . . . . . .125
Chapter 10: Add-ins for Microsoft Office . . . . . . . . . . . . . . . . . . . . . . . . . . . . . . . . . .128
10.1 Using Add-ins for Microsoft Office
10.2 Add-in settings for Microsoft Word
10.3 Add-in settings for Microsoft PowerPoint
10.4 Add-in settings for Microsoft Excel
. . . . . . . . . . . . . . . . . . . . . . . . . . . . . . .128
. . . . . . . . . . . . . . . . . . . . . . . . . . . . . .130
. . . . . . . . . . . . . . . . . . . . . . . . .133
. . . . . . . . . . . . . . . . . . . . . . . . . . . . . . .137
Appendix A: Keyboard shortcut reference . . . . . . . . . . . . . . . . . . . . . . . . . . . . . . . . .141
How to use shortcut keys
File menu
Edit menu
View menu
Document menu
Advanced menu
Windows menu
Help menu
. . . . . . . . . . . . . . . . . . . . . . . . . . . . . . . . . . . . . . . . . . . . . . . . . . . . . . . . . .142
. . . . . . . . . . . . . . . . . . . . . . . . . . . . . . . . . . . . . . . . . . . . . . . . . . . . . . . . . .143
. . . . . . . . . . . . . . . . . . . . . . . . . . . . . . . . . . . . . . . . . . . . . . . . . . . . . . . . .144
. . . . . . . . . . . . . . . . . . . . . . . . . . . . . . . . . . . . . . . . . . . . . . . . . . .145
. . . . . . . . . . . . . . . . . . . . . . . . . . . . . . . . . . . . . . . . . . . . . . . . . . . .146
. . . . . . . . . . . . . . . . . . . . . . . . . . . . . . . . . . . . . . . . . . . . . . . . . . . .146
. . . . . . . . . . . . . . . . . . . . . . . . . . . . . . . . . . . . . . . . . . . . . . . . . . . . . . . . .146
. . . . . . . . . . . . . . . . . . . . . . . . . . . . . . . . . . . . . . . . . . . .141
Appendix B: Supported document formats . . . . . . . . . . . . . . . . . . . . . . . . . . . . . . . . .147
Vector image
Presentation
E-mail
. . . . . . . . . . . . . . . . . . . . . . . . . . . . . . . . . . . . . . . . . . . . . . . . . . . . . . . . . . . . .148
Projects
Spreadsheet
Word processing
Text and markup
Notetaking
eBook
. . . . . . . . . . . . . . . . . . . . . . . . . . . . . . . . . . . . . . . . . . . . . . . . . . . . . . . . . . . . .150
Raw image
Raster image
. . . . . . . . . . . . . . . . . . . . . . . . . . . . . . . . . . . . . . . . . . . . . . . . . . . . . . .147
. . . . . . . . . . . . . . . . . . . . . . . . . . . . . . . . . . . . . . . . . . . . . . . . . . . . . . . .148
. . . . . . . . . . . . . . . . . . . . . . . . . . . . . . . . . . . . . . . . . . . . . . . . . . . . . . . . . . . .148
. . . . . . . . . . . . . . . . . . . . . . . . . . . . . . . . . . . . . . . . . . . . . . . . . . . . . . . .149
. . . . . . . . . . . . . . . . . . . . . . . . . . . . . . . . . . . . . . . . . . . . . . . . . . .149
. . . . . . . . . . . . . . . . . . . . . . . . . . . . . . . . . . . . . . . . . . . . . . . . . . .149
. . . . . . . . . . . . . . . . . . . . . . . . . . . . . . . . . . . . . . . . . . . . . . . . . . . . . . . . .149
. . . . . . . . . . . . . . . . . . . . . . . . . . . . . . . . . . . . . . . . . . . . . . . . . . . . . . . . .150
. . . . . . . . . . . . . . . . . . . . . . . . . . . . . . . . . . . . . . . . . . . . . . . . . . . . . . .151
INDEX CONTENTS 4
Page 5

Preface
This document provides all the information you need to install and use Corel® PDF
™
Fusion
NOTE: Not all components are available in all versions of PDF Fusion.
What is in this document?
This document provides the following information:
• Chapter 1, “Introduction” describes what Corel PDF Fusion is, what is supplied, and
what you require.
• Chapter 2, “How to install Corel PDF Fusion” tells you how to install and uninstall Corel
PDF Fusion.
• Chapter 3, “Getting to know Corel PDF Fusion” describes what Corel PDF Fusion can
do, how to use it and provides information on the various features.
• Chapter 4, “The Corel PDF Fusion work area” describes the various views available
along with the Navigation pane.
.
• Chapter 5, “The Corel PDF Batch Converter work area” tells you about the Corel PDF
Converter work area.
• Chapter 6, “How do I...?” answers all your “How do I...?” questions.
• Chapter 7, “Document settings and security” describes the various document settings
and security options.
• Chapter 8, “Working with annotations” describes all you need to know about
bookmarks and comments (annotations).
• Chapter 9, “Setups” provides all the information you need to create, configure and
manage your output setups.
• Chapter 10, “Add-ins for Microsoft Office” describes how to use Corel Fusion from
Microsoft
• Appendix A, “Keyboard shortcut reference” provides various tables listing the Corel
PDF Fusion keyboard shortcuts.
• Appendix B, “Supported document formats” provides various tables listing the input
document formats supported by Corel PDF Fusion.
®
Office applications.
WHAT IS IN THIS DOCUMENT? INDEX CONTENTS 5
Page 6

C
OREL
PDF F
USION USER GUIDE
INDEX CONTENTS 6
What other information is available?
For further information you should consult the following documents:
Release notes
The Release notes cover technical aspects of Corel PDF Fusion, including
installation and any late breaking technical news. As such, it should be
considered the first point of reference with respect to any technical
issues. The information in the release notes is always the most up to date
source.
For the latest version of the release note go to: http://www.corel.com
Font conventions
The following fonts and styles are used throughout this documentation.
1 Paragraphs that are numbered and use this font contain instructions that you should
follow in the order shown.
• Paragraphs that are bulleted contain either a series of points or a list of available options.
Text written in this sans-serif bold face represents a menu title, a menu item, key press,
or a control item in a dialog box. Text including an angle bracket ( > ) indicates both a
menu and the option in that menu. For example: “choose the File > Open... option” is
a shorthand method of referring to the Open... menu option in the File menu.
Text written in smaller
Text written in this
sans-serif-bold face is a file name or path.
typewriter
face represents a piece of code, or text displayed by the
application.
italic
When a term is written in
, it is the first mention of an important concept. This
concept is explained in the text immediately following, in the glossary, or both.
This format
Is used to describe the various menu options. It allows you to quickly
scan the list for the required information.
NOTE: Text indicated by starting with the word “NOTE” in the left margin is important and should be read
carefully. A Note, like this one, is often a suggestion that may save you work, improve performance,
or improve the quality of output.
WHAT OTHER INFORMATION IS AVAILABLE? INDEX CONTENTS 6
Page 7

Chapter 1 Introduction
WELCOME to Corel® PDF Fusion™—the application that lets you convert, view and
make corrections to documents.
1.1 What is Corel PDF Fusion?
Corel PDF Fusion is a ground-breaking tool that lets you create, correct, assemble and
merge different types of document. Corel PDF Fusion is easy to use. You can complete
everyday tasks in seconds, such as pulling together reports or documents from existing
material currently in different formats. You can also create industry-standard PDF, XPS
and DOC files to share, collaborate, archive and print.
In the Trial period, Corel PDF Fusion is fully featured for 30 days. After this period Corel
PDF Fusion remains fully featured and lets you view and print documents. However,
saved documents and changed documents you print or attach to an e-mail are
watermarked.
NOTE: Upon purchasing a serial number, files that were previously saved with a watermark will still have
a watermark.
When you purchase a Serial number, you have access to all the features of Corel PDF
Fusion and Corel PDF Converter and your files are not watermarked.
1.2 How to use this manual
When Corel PDF Fusion is installed, see Chapter 2, “How to install Corel PDF Fusion”,
or go to Chapter 3, “Getting to know Corel PDF Fusion”. This chapter tells you what
you can do with Corel PDF Fusion and provides basic instructions on how it is used. Also
provided in this section is a detailed description of the Corel PDF Fusion features.
For more detailed information on the features available in the various views go to
Chapter 4, “The Corel PDF Fusion work area”.
For more information on Corel PDF Converter see Chapter 5, “The Corel PDF Batch
Converter work area”.
Chapter 6, “How do I...?” provides step-by-step guides on how to use the various Corel
PDF Fusion features and functions.
For more information on Document Security and using annotations (bookmarks and
comments) see Chapter 7, “Document settings and security” and Chapter 8, “Working
with annotations”.
WHAT IS COREL PDF FUSION? INDEX CONTENTS 7
Page 8

C
OREL
PDF F
USION USER GUIDE
INTRODUCTION INDEX CONTENTS 8
Chapter 9, “Setups” describes how to create, configure and manage your output setups.
This is mainly for Corel PDF Converter but you can access these setups from Corel
Fusion.
When Corel PDF Fusion is installed you install the Add-ins for Microsoft Office which
allow one-click document conversion from Word, Excel
®
and PowerPoint® applications.
See Chapter 10, “Add-ins for Microsoft Office”.
Appendix A, “Keyboard shor tcut reference” has lists of all the shortcut and accelerator
keys you can use.
Use Appendix B, “Supported document formats” to find out which document formats
you can use with Corel PDF Fusion.
HOW TO USE THIS MANUAL INDEX CONTENTS 8
Page 9

Chapter 2 How to install Corel
PDF Fusion
This chapter describes the system requirements and how to install Corel PDF Fusion.
• “What are the installer options?” on page 9
• “What you need” on page 10
• “Installing Corel PDF Fusion” on page 11
• “Removing Corel PDF Fusion” on page 12
• “Entering your serial number” on page 13
• “Associating XPS and PDF files with Corel PDF Fusion” on page 13
• “The file system” on page 14
• “Open Corel PDF Fusion” on page 14
• “Product update” on page 14
NOTE: Before installing you should check the system requirements. For more information see
need” on page 10
.
2.1 What are the installer options?
An easy to use installer is provided for Corel PDF Fusion. During the installation you are
provided with various options:
• You can install a Corel PDF Fusion for a trial period of 30 days, and enter a serial number
at a later time without the need to re-install.
• You can associate one or more file types with Corel PDF Fusion making it their default
application.
• You can fully uninstall the Corel PDF Fusion.
The following licensing options are available:
Viewer, conversion, 30 day advanced feature trial period—no serial number
Corel PDF Fusion is installed and fully featured for a trial period of 30
days. After this period, Corel PDF Fusion changes to “viewer mode”. It
remains fully featured, in that you can convert, view and print
documents, However, saved documents and changed documents you
print or attach to an e-mail are watermarked. There is no time limit to
the viewer mode period.
“What you
WHAT ARE THE INSTALLER OPTIONS? INDEX CONTENTS 9
Page 10

C
OREL
PDF F
USION USER GUIDE
HOW TO INSTALL COREL PDF FUSION INDEX CONTENTS 10
Advanced features—full mode
Corel PDF Fusion is installed and fully featured with no watermarks on
any saved output.
NOTE: Upon purchasing a serial number, files that were previously saved with a watermark will still have
a watermark.
2.1.1 Detecting previous installs
The installer detects any previously installed version of a Corel PDF Fusion and, if found,
displays a prompt for you to remove or repair the previous install before continuing the
installation.
The previously installed version must be uninstalled before you can continue with a new
installation. For more information see “Removing Corel PDF Fusion” on page 12.
2.2 What you need
Corel PDF Fusion can be run on the following operating systems:
®
•Microsoft
with .NET 3.5. If .NET 3.5 is not installed you cannot use the Add-ins for Microsoft Office
2003.
•Microsoft
Enterprise with Service Pack 1 or 2 (32-bit or 64-bit).
•Microsoft
•Microsoft
•Microsoft
bit).
Windows XP Home or Professional with Service Pack 3 (32-bit or 64-bit)
®
Windows Vista® Home Basic, Home Premium, Business, Ultimate, or
®
Windows Server® 2003 with Service Pack 2 (32-bit or 64-bit).
®
Windows Server® 2008 (32-bit or 64-bit).
®
Windows 7 Starter, Home Premium, Professional and Ultimate (32-bit or 64-
The following system specifications are required:
• 1.3 GHz or faster processor.
• A minimum of 512 MB of RAM.
• A minimum of 250 MB of available hard-disk space.
• A minimum of 1024 x 768 screen resolution.
The following are recommendations:
• Dual-core processor.
• 1 GB or more of RAM.
Optional items:
®
•Microsoft
WHAT YOU NEED INDEX CONTENTS 10
Office 2003, Office 2007, or Office 2010.
Page 11

C
OREL
PDF F
USION USER GUIDE
HOW TO INSTALL COREL PDF FUSION INDEX CONTENTS 11
2.3 Installing Corel PDF Fusion
This section describes how to install the Corel PDF Fusion.
Before installing Corel PDF Fusion make sure that it and any Microsoft Office applications
are not running.
1Double-click CorelPDFFusionInstaller_x86_EN.exe to start the installer wizard.
NOTE: On Windows 7 the User Access Control message “Do you want to allow the following program to
make changes to this computer” appears. Check that the program is the Corel PDF Fusion Installer
and click Yes.
NOTE: An error message is displayed if you attempt to run a 32-bit installer on a 64-bit platform or a 64-
bit installer on a 32-bit platform.
2 Select Next > to continue, < Back to return to a previous screen or Cancel to abort
the install.
NOTE: If you have a previously installed version of Corel PDF Fusion on your computer, a Modify, Repair
or Remove prompt appears. Select the Remove option to remove the previously installed version,
or Cancel to abort. See
done you must restart the installer.
“Removing Corel PDF Fusion” on page 12
for more details. When this is
3 Read the Software License Agreement and if you agree to it select I accept the terms
in the license agreement and then click Next >. If you do not, select I do not accept
the terms in the license agreement to abort the install.
4 To use the default location for the application click Next > in the Destination Folder
screen. To change the default location for the application select Change... and navigate
to or enter a new location in the Change Current Destination Folder dialog followed by
selecting OK and then Next >.
5 In the Setup Type screen choose Complete to install all required components and then
select Next >. To remove items from the install select Custom followed by Next >. You
are presented with the Custom Setup screen. For each component click the downarrow and select the required option. When the options are selected click Next >.
6 In the Installation Options screen the option to Associate .pdf and .xps file extensions
with this application is selected by default. If you do not want this association, remove
the selections. If you choose to associate PDF and XPS file extensions with Corel PDF
Fusion, all PDF and XPS files are opened by default in Corel PDF Fusion and have Corel
PDF Fusion icons. If you wish, this can be changed later. See “Associating XPS and PDF
files with Corel PDF Fusion” on page 13.
7 If you have a serial number choose I have a serial number for Corel PDF Fusion
advanced features and enter the serial number into the field below. Use copy and paste
for accuracy. If you do not have a serial number select the install free and 30 day trial
option. Click Next > to continue.
8 In the Ready to Install the Program screen click Next > to continue.
INSTALLING COREL PDF FUSION INDEX CONTENTS 11
Page 12

C
OREL
PDF F
USION USER GUIDE
HOW TO INSTALL COREL PDF FUSION INDEX CONTENTS 12
9 If a Windows Security message appears prompting you to allow the installation of the
device software, in particular the Corel Printer, click Always trust software from “Corel
Corporation” followed by Install. If you do not install this printer you will not be able to
print to Corel PDF Fusion from a desktop application.
NOTE: If you are installing on Windows XP and a Windows Security message appears prompting you to
allow the installation of the printer driver software, click
Install
to continue. If you do not install this
printer you will not be able to print to Corel PDF Fusion from a desktop application.
NOTE: If you have Microsoft Office 2003 and the message “you must close all Office applications before
installing” appears, click OK and Finish. Now close any Office applications and re-start the installer.
10 When the Installation Wizard Completed screen appears click Finish to complete the
installation. Corel PDF Fusion is installed and ready for use. To view the installation log
select that option before selecting Finish.
2.4 Removing Corel PDF Fusion
This section describes how to remove Corel PDF Fusion from your computer. Use the
Add or Remove Programs method as described below. Alternatively, you can use the
method described in “Modify, repair or remove the program” on page 12.
1 Make sure that Corel PDF Fusion is not running.
2 Select Control Panel.
3 Select Add or Remove Programs (XP), Programs (Vista) or Programs and Features
(Windows 7).
4 Select Corel PDF Fusion followed by the Remove (XP) or Uninstall (Vista and Windows
7).
5Click Finish and choose whether you want to restart your computer now or later (if
those options appear).
2.4.1 Modify, repair or remove the program
The modify, repair or remove options appear if you run the installer
(CorelPDFFusionInstaller_x86_EN.exe
The Modify option allows you to install or remove par ts of the application such as the
Microsoft Add-ins. The Repair option re-installs the application. This is useful if, for
example, you have accidentally removed an essential part of the application. The
Remove option removes the application.
If you choose Modify you can select a Custom install and then use the drop-down
options in the Custom Setup screen to choose the items to install. To install an option
select This feature, and all subfeatures, will be installed on the local hard drive. To
remove an option select This feature will not be available. Continue the installation as
previously described in “Installing Corel PDF Fusion” on page 11.
) when Corel PDF Fusion is already installed.
The Repair option re-installs the complete application.
REMOVING COREL PDF FUSION INDEX CONTENTS 12
Page 13

C
OREL
PDF F
USION USER GUIDE
HOW TO INSTALL COREL PDF FUSION INDEX CONTENTS 13
Use the Remove option to remove the application from your computer. If a File in use
screen appears select Automatically close and attempt to restart applications followed
by OK.
2.5 Entering your serial number
During the installation procedure you are given the opportunity to enter a serial number
to enable Corel PDF Fusion. Use the following procedure if you did not do enter your
serial number or if you want to upgrade from viewer mode to a full version:
1 Double-click the Corel PDF Fusion icon or select All Programs > Corel PDF Fusion >
Corel PDF Fusion to open the application.
2 Select Help > Enter Serial Number.... This displays the serial number dialog.
3 Enter your serial number, using copy and paste for accuracy, and click OK. If the serial
number is correct and accepted a message appears. If “VIEWER” is displayed on the
Welcome screen it is removed. If the serial number is invalid you are given another
opportunity to enter the correct key.
4 After entering your serial number you must re-start Corel PDF Fusion so that the
watermarks are disabled.
NOTE: To purchase a serial number select Help > Buy or Help > About and the click the Buy button on
the About Corel PDF Fusion dialog.
2.6 Associating XPS and PDF files with Corel PDF Fusion
During the installation procedure you are given the opportunity to associate .pdf and .xps
files with Corel PDF Fusion. This means that all PDF and XPS files are opened, by default,
in Corel PDF Fusion and have Corel PDF Fusion icons. If you decided not to do this and
want to do it now, or, if you want to remove the association between these file types
and Corel PDF Fusion, use the following procedure:
NOTE: Do this procedure once for PDF files and once for XPS document files.
1 Find either a PDF or XPS document file.
2 Right-click the file and select Properties from the pop-up menu.
3 Under the General tab in the “Type of file” “Opens with” section click the Change
button. An “Opens with” dialog appears.
4 If Corel PDF Fusion is displayed select it. Otherwise, use the Browse option and go to
C:\Program Files\Corel\Corel PDF Fusion\ and select CorelFusion.exe and click Open.
5Click OK in the Open with dialog and OK in the Properties dialog to close it. Notice
that all documents of the selected file type now display the chosen application icon.
ENTERING YOUR SERIAL NUMBER INDEX CONTENTS 13
Page 14

C
OREL
PDF F
USION USER GUIDE
HOW TO INSTALL COREL PDF FUSION INDEX CONTENTS 14
2.7 The file system
Corel PDF Fusion, by default, is installed at the following location:
C:\Program Files\Corel\Corel PDF Fusion\
In addition, the Corel PDF Creator printer is installed which can viewed by selecting:
Printer and Faxes (XP), Printer (Vista) or Device and Printers (Windows 7).
2.8 Open Corel PDF Fusion
To open Corel PDF Fusion, perform one of the following actions:
•Double-click the Corel PDF Fusion desktop icon.
• Select All Programs > Corel PDF Fusion > Corel PDF Fusion.
To find out more about Corel PDF Fusion see “Getting to know Corel PDF Fusion” on
page 15.
2.9 Open Corel PDF Converter
To open Corel PDF Converter:
• Select All Programs > Corel PDF Fusion > Corel PDF Batch Converter.
To get star ted with Corel PDF Batch Converter see “Getting to know Corel PDF Fusion”
on page 15.
2.10 Product update
To check for product updates select Help > Check for Updates.
If no update is available a message appears. If an update is available a dialog with a
Download button appears. Select Download to launch your default browser allowing
the latest installer to be downloaded.
NOTE: The product update requires a connection to the internet and your default browser is used. An
attempt is made to automatically determine the proxy settings. However, in some circumstances
they made need to be modified manually. See
“Web tab” on page 54
.
THE FILE SYSTEM INDEX CONTENTS 14
Page 15

Chapter 3 Getting to know Corel
PDF Fusion
This chapter provides you with the following information:
• “What can you do with Corel PDF Fusion?” on page 15
• “How do you use Corel PDF Fusion?” on page 16
• “What is a document format or PDL?” on page 17
• “What are the features of Corel PDF Fusion?” on page 18
• “What next?” on page 25
3.1 What can you do with Corel PDF Fusion?
Corel PDF Fusion lets you open and display various common document file types. When
these files are open you can add, remove or edit bookmarks and comments/annotations;
search for text items and correct them. In addition to this, you can mark page areas or
text for
obliterate or hide the contents. You have full control over the security of your
documents.
redaction.
This is the process of “blacking” out the page content to censor,
One of the best features of Corel PDF Fusion is the ability to drag-and-drop one or more
pages from one document into another. This lets you combine documents, which may
exist in various document formats, into a single coherent document. You can save this
new document in one of the various common file formats. Corel PDF Fusion is used to
convert documents from one document format into another.
You don’t need to convert files to modify them. The output document format is decided
when you save.
Corel PDF Converter lets you create PDF, XPS and Word files from a variety of desktop
document formats. This is done by dragging-and-dropping files onto the application. You
can print to the Corel PDF printer from your desktop applications and create PDF files.
In addition to this, you have a one-click facility that provides direct PDF creation from
your Microsoft Office Word, Excel
control over the format of your created documents.
NOTE: Not all components are available in all versions of PDF Fusion.
®
and PowerPoint® applications. You have complete
WHAT CAN YOU DO WITH COREL PDF FUSION? INDEX CONTENTS 15
Page 16

C
OREL
PDF F
USION USER GUIDE
GETTING TO KNOW COREL PDF FUSION INDEX CONTENTS 16
3.2 How do you use Corel PDF Fusion?
This section gives you an overview of how to use Corel PDF Fusion.
3.2.1 Using Corel PDF Fusion
Corel PDF Fusion is easy to use. You can create a new document or open one or more
existing documents to modify. You can drag and drop pages from one document into
another to combine these documents. For example, you can open PDF or XPS
documents and combine pages from these documents in any way you choose.
When you have finished building your document you can save it in PDF, XPS or Word
formats.
Corel PDF Fusion has four ways of viewing your documents:
• Page View is where you view a single document, correct text, and add bookmarks and
annotations. See “Page View” on page 30.
• Assembly View presents all open documents simultaneously, and provides the ability to
change, combine and assemble pages. See “Assembly View” on page 36.
• Flick View is a specialized view for a single document, is designed for ease of page turning
and lets you view the layout of a whole document. See “Flick View” on page 41.
Presentation View
•
is a full-screen reading mode. See “Presentation View” on page 42.
NOTE: Multiple documents can be opened, each one identified by its own tab. Use drag-and drop to re-
order these tabs.
3.2.1.1 Notes on converting Microsoft Office Word, Excel or PowerPoint documents
If you attempt to open a Microsoft Office document (Word, Excel or PowerPoint) using
drag and drop, but the document is already open in the Microsoft application, a warning
dialog is displayed. To continue, close the document in the Microsoft Office application
and select Retry. This converts the document using the Corel PDF Converter printer
driver. Select Ignore to import the document using Corel Fusion’s own import facility.
3.2.2 Using Corel PDF Converter
With Corel PDF Converter you start the program, choose your desired output format
and then drag and drop files for conversion onto the application. Alternatively, print to
the Corel PDF printer from your Desktop or Office applications.
HOW DO YOU USE COREL PDF FUSION? INDEX CONTENTS 16
Page 17

C
OREL
PDF F
USION USER GUIDE
GETTING TO KNOW COREL PDF FUSION INDEX CONTENTS 17
3.3 What is a document format or PDL?
Corel PDF Fusion supports several document formats sometimes called PDLs (Page
Description Languages). PDLs are the different ways that applications internally describe
the content of documents. Corel PDF Fusion can use the following document formats:
PDF
(Portable Document Format.) A file format created by Adobe Systems
for document exchange. Several versions of PDF are used including v1.3,
v1.4, v1.5, v1.6, and v1.7. PDF files have a file extension of
PDF files can be selected for input to and output from Corel PDF Fusion.
NOTE: Corel PDF Fusion opens documents that are PDF compatible, but not named with a *.pdf
extension. When documents of this type are subsequently saved a .pdf extension is added to the
file name.
PDF/A-1b
A file format designed for the long-term archiving of documents. PDF/A1b is a subset of PDF, omitting those PDF features which are not suited
to archiving.
.pdf.
PS
Microsoft Office
XPS v1.0
PNG
(PostScript language.) A dynamically typed programming language.
PostScript language files are often created in the background when you
“Print to file”. These files have a
.ps file extension. PostScript language files
can be input to Corel PDF Fusion.
Note that
.prn PostScript language files are treated in much the same
way as PostScript language files.
These are the formats you create when using Microsoft Office Word,
PowerPoint and Excel applications and have
and
.xlsx. file extensions. Microsoft Office files are read by Corel PDF
.doc, .docx, .ppt, .pptx, .xls
Fusion. Microsoft Word files can be output from Corel PDF Fusion by
using the Save as or Export option.
A fixed-layout document format designed to preserve document fidelity,
based on XML. XPS documents have a
.xps file extension. XPS
documents can be selected for input to and output from Corel PDF
Fusion.
Portable Network Graphics (PNG) is a bitmapped image format using
lossless data compression. PNG files usually have the extension
.png. PNG files can only be created from Corel PDF Fusion using the
.PNG or
Export option. See “Convert (Expor t) a document to PNG” on
page 64.
WHAT IS A DOCUMENT FORMAT OR PDL? INDEX CONTENTS 17
Page 18

C
OREL
PDF F
USION USER GUIDE
GETTING TO KNOW COREL PDF FUSION INDEX CONTENTS 18
3.4 What are the features of Corel PDF Fusion?
Corel PDF Fusion supports the following features and file formats:
3.4.1 File format support
This section describes the supported document file formats, sometimes called PDLs
(Page Description Languages):
For more information see:
• “Input format support” on page 18
• “Output format support” on page 18
3.4.1.1 Input format support
You can input these file formats to Corel PDF Fusion:
• PDF v1.3, v1.4, v1.5, v1.6, v1.7.
•PDF/A-1b.
• PostScript Language Level 2 and 3.
• Microsoft Office Word, Excel, PowerPoint.
•XPS v1.0.
See Appendix B, “Supported document formats” for various tables listing the input
formats supported by Corel PDF Fusion.
Drag and drop files of these types onto the Corel PDF Fusion Welcome screen and they
appear as PDF files in the selected view.
3.4.1.2 Output format support
You can save or export the following file formats from Corel PDF Fusion:
• PDF v1.3, v1.4, v1.5, v1.6.
• PDF/A-1b (only available when using the Corel PDF Conver ter).
NOTE: PDF files can be saved as linearized PDF for web viewing and interleaving mode for XPS. These file
types are especially suitable for fast web viewing or for more efficient streaming of the XPS data
to an output device. In addition, PDF files can be optimized for efficiency.
• Microsoft Office Word.
•XPS v1.0.
• PNG (only available using the Export option).
When printing to the Corel PDF printer only PDF or XPS documents are created.
When using the Add-ins for Microsoft Office only PDF and XPS documents are created.
WHAT ARE THE FEATURES OF COREL PDF FUSION? INDEX CONTENTS 18
Page 19

C
OREL
PDF F
USION USER GUIDE
GETTING TO KNOW COREL PDF FUSION INDEX CONTENTS 19
3.4.2 Customizable workarea
The Corel PDF Fusion work area can be customized to suit your own personal
preferences. Once you have chosen how you like your work area to be configured—
window size and position, visibility of toolbars, and visibility of the Navigation pane—it
remains until you decide to change it or choose to reset the application back to its
factory settings.
3.4.3 Printing
With Corel PDF Fusion you can print the current document, the current page, or a range
of pages.
For PDF documents, permission to print is always subject to the document’s security
settings.
3.4.4 Multiple Undo/Redo
Multiple Undo and Redo options are provided so you can easily retrace your steps and
return to an earlier iteration of your document. Note that when you save your
document all the undo/redo levels are reset and as such become unavailable.
3.4.5 Text selection
You can select text items (from a single character to all of the document). Text selection
can cross page boundaries and the selected text can be copied to, and pasted from, the
clipboard.
For PDF documents, text extraction is subject to the document's security settings.
3.4.6 Text searching
You can search open documents for specific text or phrases. Search options include case
sensitive search, forward or backward directions, search for whole words only.
3.4.7 Text correction
When text is selected small modifications can be made to that text. The style of any new
text is the same as the selected text and no text reflow (word wrapping) is performed.
If the text you type goes over the edge of the page it is clipped. Adding new lines and
correction of more than a single line is not possible.
Correction of non-horizontal text is not suppor ted.
If you attempt to correct a character that does not exist in the current font, a font
substitution mechanism is used to try and find the best match.
WHAT ARE THE FEATURES OF COREL PDF FUSION? INDEX CONTENTS 19
Page 20

C
OREL
PDF F
USION USER GUIDE
GETTING TO KNOW COREL PDF FUSION INDEX CONTENTS 20
3.4.8 Redact text
Corel PDF Fusion allows the redaction (obliteration) of text found during a search
operation. You can specify whether you want the text redacting on the first occurrence
only or all the text within a document. This action can, when required, be performed on
all open documents.
The redaction function can redact arbitrar y areas of the page. This allows, for example,
all or parts of images to be blacked out.
A “redact all” function is available that is used to redact all instances of a name (for
example). Any redactions applied in this manner cannot be undone.
Once a redaction action has been performed on a page, any object that intersects with
the redacted area is “flattened” into an image with the original objects removed. This
means that any such objects are replaced by images. Therefore, they cannot
subsequently be selected or manipulated. For example , if such an object is text, it will no
longer be available for selection for highlighting or correction.
When an area is selected for redaction any text which is intersected by that area is also
redacted.
NOTE: The search does not find any words which are part of an image such as a photograph or scanned
image.
3.4.9 Page manipulations
The following page manipulations can be performed on documents:
• Insert pages.
Any page can be dragged-and-dropped from any source document to any point within
any target document.
• Extract pages.
You can create a new document from a selection of one or more pages in an existing
document.
• Delete pages.
You can delete pages from any open document.
•Rotate pages.
You can rotate pages by 90, 180 or 270 degrees clockwise or anti-clockwise.
• Create blank pages.
You can add an empty page to the current document or create a new document
containing an empty page.
• Moving and reordering pages.
Pages can be moved and re-ordered through thumbnails. Pages reordered in the
Navigation pane's thumbnail view are immediately reordered in the Assembly View.
WHAT ARE THE FEATURES OF COREL PDF FUSION? INDEX CONTENTS 20
Page 21

C
OREL
PDF F
USION USER GUIDE
GETTING TO KNOW COREL PDF FUSION INDEX CONTENTS 21
• Add watermarks.
Watermarks can be added to a document in a variety of styles, colors, angles, and
opacity.
3.4.10 Bookmark control
The following bookmark controls are possible:
•Add bookmarks.
• Delete bookmarks.
• Edit bookmark properties.
You can change the bookmark properties, either individually or for a whole group of
bookmarks, one property at a time or all of them simultaneously.
• Change bookmark destination.
• Change position and level.
The bookmark’s position and level within a bookmark tree can be changed.
• Expand and collapse by level.
For more information about bookmarks see “Working with annotations” on page 93.
3.4.11 PDF comments/annotations
The following PDF annotation controls are available:
• Add and modify.
Display, add and modify PDF markup annotations.
• Add free text annotations.
Add, format and “flatten” free text annotations.
• Spell check comments.
You can spell check any comments you add to a document.
• Change comment and annotation properties.
• Import comments.
Comments can be imported from FDF documents.
• Export comments.
Annotations can be exported to an FDF document.
• E-mail.
Annotations can be e-mailed as a file attachment (FDF).
For more information on comments and annotations see “Working with annotations”
on page 93.
WHAT ARE THE FEATURES OF COREL PDF FUSION? INDEX CONTENTS 21
Page 22

C
OREL
PDF F
USION USER GUIDE
GETTING TO KNOW COREL PDF FUSION INDEX CONTENTS 22
3.4.12 Hyperlinks
The following hyperlink controls are available:
• Add a link to a page.
When the hyperlink is selected the defined page is displayed.
• Add a link to a web page.
When the hyperlink is selected the defined web page is opened.
• Add a link to a file.
When the hyperlink is selected the chosen file is opened.
For more information on hyperlinks see “Adding hyperlinks” on page 104.
3.4.13 Document settings and properties (PDF)
•Open settings.
You can add or change the PDF open settings.
•General information.
You can read and modify general document information.
•Security settings.
You can view or modify file security.
3.4.14 Page properties and markup manipulation
• Page cropping.
You have the ability to change various pieces of page level information. For example, the
page size.
• Font substitution.
Some documents (with the exception of XPS documents) refer to external fonts, which
might not always be available on the system where Corel PDF Fusion is running. Corel
PDF Fusion can recover from this situation by applying a font substitution from the fonts
stored on the computer.
When font substitutions are performed, they are only applied to render the open
document to the screen. Font substitutions are not written to the file when the
document is saved.
NOTE: The XPS document format requires that all fonts are embedded. In this case Corel PDF Fusion
embeds in the XPS an emulated font that corresponds to the missing font.
3.4.15 Document security
• Open and save encrypted PDF files.
WHAT ARE THE FEATURES OF COREL PDF FUSION? INDEX CONTENTS 22
Page 23

C
OREL
PDF F
USION USER GUIDE
GETTING TO KNOW COREL PDF FUSION INDEX CONTENTS 23
Corel PDF Fusion contains a standard security handler and supports the following
encryption standards:
40-bit RSA
128-bit RSA
128-bit AES (read-only)
3.4.16 Restrict opening, print, copying, commenting functions
Every PDF document operation is subject to a security restriction and could fail due to
the security settings.
3.4.17 Saving options
The following Save options are available:
•Save and Save As.
Save
Overwrites the original input document with the new version in the
same format.
Save As
Lets you save the document under a new name. In addition to this you
can save the document with a new format.
NOTE: Use the cancel icon in the Status bar to abort the save process.
NOTE: If you are using Corel PDF Fusion in viewer mode (after the 30 day trial period), and take an action
that changes the current document, a message appears informing you that you can continue to
view this document but saving, printing or attaching it to an e-mail adds a watermark. Purchase
the full version to remove this restriction.
Save prompts
If you attempt to close a modified document, that has not been saved,
you are presented with a prompt to save the changes before the
document is closed. Select Ye s to save or No. Use Cancel to abor t the
close.
If you attempt to close the Corel PDF Fusion application, a “save”
prompt is presented for every open document that has unsaved
changes. Use the Apply to all files check box to apply your Ye s, No or
Cancel choice to all documents. If this is not selected, a save prompt is
presented for each individual modified document.
NOTE: A new document using pages from an existing document must be saved before you can re-save
the existing document to its current name. You can, however, use the Save as option.
WHAT ARE THE FEATURES OF COREL PDF FUSION? INDEX CONTENTS 23
Page 24

C
OREL
PDF F
USION USER GUIDE
GETTING TO KNOW COREL PDF FUSION INDEX CONTENTS 24
3.4.18 Feature transfer and document compatibility
Corel PDF Fusion supports the conversion of documents between various formats.
While all document formats naturally support a broad spectrum of common features, it
is inevitable that some features that are specific to one format are not available in
another. Annotations, for example, are supported in PDF, but not currently in the XPS
document format. Furthermore, some formats—most importantly PDF—exist in
multiple versions, where new versions have introduced features that are not available in
older versions.
Corel PDF Fusion allows conversion between document formats (and differing versions
of formats). It also allows for the transfer of pages between documents in its workspace,
without requiring those documents to be in the same version of a format, or even in the
same format at all.
The end result is that Corel PDF Fusion needs to deal with various cases where a
document (or page) contains features that cannot be accommodated by the target
document. The following provides some information on how Corel PDF Fusion handles
specific conversions:
PDF to PDF of the same version
All features of the input document are preserved in the output
document.
PDF to PDF of a newer version
All features of the input document are preserved in the output
document.
The destination document dictates the version number of the combined
result. For instance, when a page is dragged from a PDF 1.5 document
into a PDF 1.6 document, the latter stays as a PDF 1.6, rather than being
downgraded to 1.5.
PDF to PDF of an older version
All features of the input document are preserved in the output
document.
When moving pages to a PDF document of an older version, Corel PDF
Fusion performs a check on the page content to determine whether any
features are used that are unavailable in the older version. If such features
are found, a warning is displayed indicating that these features are lost.
PDF to XPS
All features that are common to XPS and PDF are preserved.
Features that are specific to PDF (such as annotations) are dropped.
All non-normal blend modes and complex shading are rendered when
converting from PDF to XPS.
WHAT ARE THE FEATURES OF COREL PDF FUSION? INDEX CONTENTS 24
Page 25

C
OREL
PDF F
USION USER GUIDE
GETTING TO KNOW COREL PDF FUSION INDEX CONTENTS 25
The XPS document format requires that all fonts are embedded, and
they must be in OpenType format. For fonts not embedded in the PDF,
additional font directories can be specified and fonts can optionally be
accessed from those installed on the Windows system. Otherwise, a
substitute is embedded in the XPS.
XPS to PDF
All features common to XPS and PDF are preserved.
Features that are specific to XPS and cannot be converted are dropped.
HDR images are rendered down to sRGB.
All fonts used by XPS documents are embedded in the package. On
conversion they remain embedded in the PDF.
XPS to XPS
All features of the input document are preserved in the output
document.
All resources used by an XPS page are transferred to the destination
document.
•Security.
Any security applied to a PDF document is honored.
3.4.19 Finish document wizard
The Finish Document Wizard prepares the document for publishing or printing.
For more information see “Prepare a document for distribution” on page 71.
3.5 What next?
To find out more about Corel PDF Converter go to Chapter 5, “The Corel PDF Batch
Converter work area”. Alternatively, to star t using Corel PDF Converter to convert
documents go to “Convert files” on page 61.
To f i n d o u t m or e a bo ut Corel PDF Fusion go to Chapter 4, “The Corel PDF Fusion work
area”.
WHAT NEXT? INDEX CONTENTS 25
Page 26

Chapter 4 The Corel PDF Fusion
work area
This chapter describes the Corel PDF Fusion work area, the various views and how you
can use and customize it.
The information provided in the section includes:
• “Open Corel PDF Fusion” on page 27
• “The Page, Assembly, Flick and Presentation View” on page 29
• “The Navigation pane” on page 44
• “Customize your work area” on page 48
NOTE: Not all components are available in all versions of PDF Fusion.
INDEX CONTENTS 26
Page 27

C
1 2 3
5
4
7
6
OREL
PDF F
USION USER GUIDE
THE COREL PDF FUSION WORK AREA INDEX CONTENTS 27
4.1 Open Corel PDF Fusion
To open Corel PDF Fusion:
•Double-click the Corel PDF Fusion icon.
• Select All Programs > Corel PDF Fusion > Corel PDF Fusion.
• Drag and drop a file onto the Corel PDF Fusion icon to open Corel PDF Fusion in the
default view.
• Select the Welc om e screen tab.
Figure 4.1 The Welcome screen
1 Drop documents here to display them in Page View.
2 Drop documents here to display them in Flick View.
3 Drop documents here to display them in Assembly View.
4 Click the down-arrow to display more options.
5 Click-and-drag the dimpled area to move the menu.
6 Go to Launch pad mode. See “The Launch pad” on page 28.
7 This appears after the 30 day trial period when the application changes to viewer mode.
This is removed when a serial number is entered.
OPEN COREL PDF FUSION INDEX CONTENTS 27
Page 28

C
3
4
5
2
1
OREL
PDF F
USION USER GUIDE
THE COREL PDF FUSION WORK AREA INDEX CONTENTS 28
4.1.1 The Launch pad
Click the Launch pad icon to reduce the Welcome screen:
Figure 4.2 The Launch pad
NOTE: If you close Corel PDF Fusion from the Launch pad, it is displayed when you re-start.
1 Click to close the Corel PDF Fusion application. A save prompt appears for any open
modified documents. Select Ye s to save or No. Select Cancel to abort the close. Use
the Apply to all files check box to apply your Ye s , No or Cancel choice to all documents.
If this is not selected, a save prompt is presented for each individual modified document.
2 Click to restore the Welcome screen view.
3 Drop documents here to display them in Page View.
4 Drop documents here to display them in Assembly View.
5 Drop documents here to display them in Flick View.
NOTE: When multiple documents are opened only one is displayed. Click another tab in Page View or use
Assembly View to see all the documents.
File
Click New to open a new document. Use Open and Open Recent to
select a document or recently opened document.
Click Exit to close the application.
Help
Click Contents to display the online help. Click To o l t i p s to display or
remove text tips which appear when the cursor moves over an option.
Click About... to display information about Corel PDF Fusion.
OPEN COREL PDF FUSION INDEX CONTENTS 28
Page 29

C
OREL
PDF F
USION USER GUIDE
THE COREL PDF FUSION WORK AREA INDEX CONTENTS 29
Click Buy... to purchase Corel PDF Fusion.
Click Enter Serial Number... once you have purchased Corel PDF Fusion
and want to enter your serial number. For more information see
“Entering your serial number” on page 13.
Click Check for Updates... to check for the latest updates. For more
information see “Product update” on page 14.
4.2 The Page, Assembly, Flick and Presentation View
There are four ways you can view your documents:
• Page View is where you can read or modify a single document. See “Page View” on
page 30.
• Assembly View presents all open documents simultaneously, and provides the ability to
build new ones. See “Assembly View” on page 36.
• Flick View is a specialized view for a single document, designed for ease of page turning
and for examining the layout of a whole document. See “Flick View” on page 41.
Presentation View
•
is a full-screen view. See “Presentation View” on page 42.
4.2.1 Common controls
The Page, Assembly and Flick Views share a group of controls allowing you to navigate
from one view to another. For example, Page View has controls to navigate to Flick View
and Assembly View.
• Select to display the current document in Assembly View.
• Select to display the current document in Flick View.
• Select to display the Welcome screen.
• Select to display the current document in Page View.
The following icons are common to the Page and Assembly Views:
New
Click New or use File > New to open a new blank document. The new
document appears as “Untitled” and is a PDF unless you have changed
the Edit > Preferences > New file type option.
Open
Click Open or use File > Open to select a document when you are
already in Page View.
Save
Click Save or use File > Save to save your modified document using its
current name.
Use the cancel icon in the Status bar to abort a save.
THE PAGE, ASSEMBLY, FLICK AND PRESENTATION VIEW INDEX CONTENTS 29
Page 30

C
OREL
PDF F
USION USER GUIDE
THE COREL PDF FUSION WORK AREA INDEX CONTENTS 30
Print
Click Print or use File > Print to print your document. This displays a
standard Print dialog.
Undo
Click Undo or use Edit > Undo to undo your last action. Click again to
undo your previous actions. All undo steps are retained until you save
the file. Once saved, all levels of undo are discarded.
Redo
Click Redo or use Edit > Redo to redo your last action. Click again to
redo next steps. All redo steps are retained until you save the file. Once
saved, all levels of redo are discarded.
Copy
Click Copy or use Edit > Copy to copy the selected page or pages onto
the clipboard (Assembly View and Navigation pane).
Paste
Click Paste or use Edit > Paste to paste the selected page or pages from
the clipboard to the current location (Assembly View and Navigation
pane).
Rotate Left / Rotate Right
Click Rotate Left or Rotate Right to rotate the selected page or pages
(Assembly View and Navigation pane).
Find
Click Find or select Edit > Find to search through the document for a
word or phrase. Click Edit > Find Next to search for the next
occurrence. Refine your search by selecting Match case and Whole
words options. If required, click the Search backward option. If you have
previously performed a search select the Find what down-arrow to re-
select it.
NOTE: Occurrences of a word or phrase that form part of an image, such as a photograph or scanned
image, are not found.
Help
Click Help or use Help > Contents to display the online help file.
For more information on the shortcut and accelerator keys see “Keyboard shortcut
reference” on page 141.
4.2.2 Page View
In this view you can view, bookmark, comment or correct a single document. The
Navigation pane is available in Page View. See “The Navigation pane” on page 44 for
more information.
THE PAGE, ASSEMBLY, FLICK AND PRESENTATION VIEW INDEX CONTENTS 30
Page 31

C
1 42 3
5
6
3
OREL
PDF F
USION USER GUIDE
THE COREL PDF FUSION WORK AREA INDEX CONTENTS 31
Use the following methods to open a document in Page View:
• Drag and drop one or more documents onto the Page View area displayed on the
Welcome screen or Launch pad. See “The Launch pad” on page 28.
• Drag and drop one or more documents onto the Page View window.
New
Click New or use File > New to open a new blank document. The new
document appears as “Untitled” and is a PDF unless you have changed
the Edit > Preferences > New file type option.
Open
Click Open or use File > Open when you are already in Page View to
display an Open File(s) dialog. Use the Open File(s) dialog to select one
or more documents.
•Click the Page View icon when you are viewing a document displayed in Assembly or
Flick View.
NOTE: When multiple documents are opened only one is displayed. Click another tab or use Assembly
view to see all the documents.
4.2.2.1 Viewing documents and pages
Figure 4.3 Document selection tabs
1 Click the tab of the document you want to view.
2 Click to close the document. If you have made a change but not saved, a save prompt
appears. Otherwise, the document is removed from the display. Hold Ctrl and click the
close icon to close the document without a confirmation message. That is, the document
is closed and any unsaved changes are lost.
3 Use the left/right scroll arrows when you have more documents open than can be
displayed in the tab window.
4 Click the down-arrow to display a menu with all open documents.
5 A pencil indicates that the page is modified and can be saved. Use Save As to save it
THE PAGE, ASSEMBLY, FLICK AND PRESENTATION VIEW INDEX CONTENTS 31
under a new name.
Page 32

C
OREL
PDF F
USION USER GUIDE
THE COREL PDF FUSION WORK AREA INDEX CONTENTS 32
6 An empty page icon indicates that the page is not modified and cannot be saved. It can
be Saved As a new name.
NOTE: If you are using Corel PDF Fusion in viewer mode and take an action that changes the current
document, a message appears indicating that you can continue to view this document but saving,
printing or attaching it to an e-mail adds a watermark. Purchasing the full version removes this
restriction.
NOTE: All the tabs are color coded for ease of identification.
When you are in Page View and the hand cursor is displayed you can drag and drop
pages within the same document or to another document.
With the hand cursor displayed click the document in the main window and use your
mouse scroll wheel to scroll to the top or bottom of the page (in Single page mode), or
document (in Continuous page mode).
Click-and-drag the horizontal scroll bar to reveal more of the width of document. Clickand-drag the vertical scroll bar to display more of the current page (in Single page mode)
or more of the document (in Continuous page mode).
The following tools are also available:
Figure 4.4 The Page View display options
Scroll icons (upper)
Click the top-most icon to show or remove the Tool icons. Click the
middle icon to display the first page in the document. Click the lowest
icon to scroll to the top of the page or document depending on whether
you are in Single or Continuous page mode.
Scroll icons (lower)
Click the top-most icon to scroll to the bottom of the page or document
depending on whether you are in Single or Continuous page mode. Click
the next icon to display the last page in the document.
Click the last two icons to page up or down through the document.
Scroll icons (left)
Click the left most icon to show or remove the Navigation pane. Click
the next icon to scroll the page to the left.
Go to page
When you click this icon a dialog appears allowing you to enter the page
number you want to display.
THE PAGE, ASSEMBLY, FLICK AND PRESENTATION VIEW INDEX CONTENTS 32
Page 33

C
OREL
PDF F
USION USER GUIDE
THE COREL PDF FUSION WORK AREA INDEX CONTENTS 33
Scroll icons (right)
Click this icon situated at the lower right of the window to scroll the page
to the right.
Continuous page mode
In this mode, click the page and then use the hand icon to scroll the
document. Alternatively, click-and-drag the ver tical scroll bars or use the
mouse wheel to scroll through the document.
Single page mode
In this mode, click the page and use the hand icon to scroll around the
page. Alternatively, click-and-drag the vertical scroll bars or use the
mouse wheel to scroll to the top or bottom of the page.
Actual Size
The document is viewed at actual size.
Fit to Width
The document is zoomed to fit the width of the main document
window.
Fit to Page
Magnification
Zoom levels
Page Zoom
The document is zoomed so that a single page fits into the document
window.
The cursor is changed to a magnifying glass icon and, when clicked on
the page, is used to increase the magnification. Hold Ctrl and click to
reduce the magnification. A marquee zoom option is provided which lets
you choose an area of the page to zoom. Select the Magnifying glass icon
and click-and-drag the area of the page you want to zoom. Holding Ctrl
with click-and-drag reduces the zoom level.
Click the magnifying glass icon again to turn off the zoom option.
Alternatively, use Ctrl + and Ctrl - to change the magnification.
Select from a number of pre-defined magnification options.
Use the slider to increase or reduce the magnification factor of the
whole document (in Continuous page mode), or the current page (in
Single page mode).
Go to
Click View > Go to and select First Page, Previous Page, Next Page or
Last Page. Click View > Go to > Page and enter a page number to view.
THE PAGE, ASSEMBLY, FLICK AND PRESENTATION VIEW INDEX CONTENTS 33
Page 34

C
1
5
9
32 4
78 6 11
A B C
10
OREL
PDF F
USION USER GUIDE
THE COREL PDF FUSION WORK AREA INDEX CONTENTS 34
4.2.2.2 Page View selection options
In Page View the cursor dynamically changes according to the selection context. When
hovering over text it appears as an I-beam (allowing you to make text selections). When
hovering over an empty part of the page it changes to a “hand” icon (allowing you to
click-and-drag the page). Press and hold Shift and left-click to display the cursor as a
crosshair allowing area selections.
• When the hand cursor is displayed you can drag-and drop the page to the limits of the
scroll bars. This depends on the “Continuous page mode” or “Single page mode”
selection.
• When you move the cursor over text on the page it changes to an I-beam which you
can use to click-and-drag to select various amounts of text. On release of the mouse
button the following menu appears:
Figure 4.5 The text and area selection context menus
NOTE: If you prefer you can decide not to show the context sensitive menu bar by changing an option
under Preferences. For more information see
“Set up your preferences” on page 52
.
Menu A appears when text is selected. Menu B appears when an area of text is selected
(press and hold Shift and left-click). Menu B appears when a blank page area is selected
(press and hold Shift and left-click).
1 Copies the selected text onto the clipboard. This text can subsequently be pasted into
the Text Correction dialog (for example).
2 Lets you create a bookmark for the selected text or area. When the button is released
the Bookmark Properties dialog appears. See “Bookmark properties” on page 96 for
more information.
3 Redacts the selected text or area.
4 Displays a Text Correction dialog into which you can enter the text to replace the
selected text. Generally, the new text keeps the same format (font, size and so on) as
the selected text. Some characters may not be available.
Text re-flow is restricted to single lines of text. That is, no “word wrap” is provided. Also,
text shifted off the side of the page will be clipped.
NOTE: Text correction is only possible when the document security allows text editing.
5 Add a hyperlink to the selected text or area. For more information see “Add hyperlinks”
on page 78.
THE PAGE, ASSEMBLY, FLICK AND PRESENTATION VIEW INDEX CONTENTS 34
Page 35

C
OREL
PDF F
USION USER GUIDE
THE COREL PDF FUSION WORK AREA INDEX CONTENTS 35
6 Adds an underline to the selected text. Double-click the underlined text to add a text
comment
. Click the close icon in the top right corner to close the comment box.
7 Adds a strike-out to the selected text. Double-click the strike-out text to add a text
comment
. Click the close icon in the top right corner to close the comment box.
8 Highlights the selected text. Double-click the highlighted text to add a text comment.
Click the close icon in the top right corner to close the comment box.
9 Lets you create a new note for the selected text. When the button is released a note
appears containing the previously selected text. For more information see “Working
with comments and annotations” on page 98.
10 Lets you create a bookmark for an area. When the button is released the Bookmark
Properties dialog appears. See “Bookmark properties” on page 96 for more
information.
11 Allows you to add free text annotations to the selected area. For more information see
“Add free text annotations” on page 77.
4.2.2.3 Page View right-click menu options
Select a page in Page View and right-click to display the following menu:
Figure 4.6 Page View right-click menu
Select All
Selects all items in the document.
Deselect All
Deselects all selected items.
Copy
Copies onto the clipboard text items selected on the page. The copied
text can be pasted into another application such as Notepad.
Add Bookmark / Add Text Bookmark
Lets you apply Bookmark properties to the selected area or selected
text. For more information see “Bookmark properties” on page 96.
THE PAGE, ASSEMBLY, FLICK AND PRESENTATION VIEW INDEX CONTENTS 35
Page 36

C
OREL
PDF F
USION USER GUIDE
THE COREL PDF FUSION WORK AREA INDEX CONTENTS 36
Note
Lets you create a new note on the page. When the button is released a
note appears. For more information see “Working with comments and
annotations” on page 98.
Free Text
Lets you add new text anywhere on the page. This text can remain as
an annotation or can be “flattened” to become part of the page. For
more information see “Free text annotations” on page 102.
Highlight
Applies a highlight to the selected text.
Strike-Out
Applies a strike-out to the selected text.
Underline
Applies an underline to the selected text.
Correct selected text...
This is only available when text is selected. It displays a Text Correction
dialog into which you can enter the text to replace the selected text.
Generally, the new text keeps the same format (font, size and so on) as
the selected text. Some characters may not be available.
Text re-flow is restricted to single lines of text. That is, no “word wrap”
is provided. Also, text shifted off the side of the page will be clipped.
NOTE: Text correction is only possible when the document security allows text editing.
4.2.2.4 Page View menu options
The Crop page option is available from the Document > Pages menu:
Figure 4.7 Document menu options available in Page View
For more information about cropping see “Crop Pages” on page 46.
4.2.3 Assembly View
Assembly View displays your open documents as rows of page thumbnails. One
document is designated the “target” document and occupies a fixed position at the top
of the screen. The “source” documents occupy a scrollable region below the target.
Pages can be freely copied between any of the source documents and the target
THE PAGE, ASSEMBLY, FLICK AND PRESENTATION VIEW INDEX CONTENTS 36
Page 37

C
OREL
PDF F
USION USER GUIDE
THE COREL PDF FUSION WORK AREA INDEX CONTENTS 37
document. It is important to note, however, that pages can be copied in any direction
between any of the visible documents, but the usual requirement is to build the target
document from pages found in the source documents.
In this view you can delete, rotate, reorder, insert pages and merge documents.
If you decide to move another document to the top of the screen, designating it as the
target, a message appears. You can check Don't show me this again so that this message
is not displayed again.
When you first open Assembly View a help screen is displayed containing useful
information on how to use this view. Once you have read this screen click Close to
remove it. To prevent this help screen from appearing again select Do not show me this
again.
Use the following options to display a document in Assembly View:
• Drag and drop one or more documents onto the Assembly View area displayed on the
Welcome screen or Launch pad. See “The Launch pad” on page 28.
• Drag and drop one or more documents onto the Assembly View window.
• Drag and drop pages or page stacks onto the Assembly View window.
New
Click New or use the File > New to open a new blank document. The
new document is “Untitled” and is a PDF unless you have changed the
Edit > Preferences > View > New File Type option.
Open
Click Open or use File > Open when you are already in Assembly View
to display an Open File(s) dialog to select one or more documents.
• When viewing a document displayed in Page or Flick View click the Assembly View icon.
Drag-and drop pages in Assembly View to re-order them within a single document or
add pages from other documents.
If you attempt to drag-and-drop pages in a document containing more pages than can
be displayed, the document automatically scrolls when you reach the left or right side of
the Assembly View window.
When several documents are open, click on the tab of the document you want to view.
4.2.3.1 Viewing documents and pages
In Assembly View click the title bar containing the name of the document you want to
view:
Figure 4.8 Assembly View title bars
THE PAGE, ASSEMBLY, FLICK AND PRESENTATION VIEW INDEX CONTENTS 37
Page 38

C
OREL
PDF F
USION USER GUIDE
THE COREL PDF FUSION WORK AREA INDEX CONTENTS 38
• When a title bar contains an empty page icon it has not been modified and cannot be
saved. You can, however, use Save As to save it under a new name.
• When a title bar contains a pencil it has been modified and can be saved. You can also
use Save As to save it under a new name.
NOTE: All the title bars are color coded for ease of identification.
In Assembly View drag and drop one or move pages to a new position in the current
document or from one document to another.
If you attempt to drag-and-drop pages in a large document, the document automatically
scrolls when you reach the left or right side of the Assembly View window.
Double-click a page within a document to display a magnified preview of the page. Click
again and the preview is removed.
Click-and-drag the horizontal scroll bar to reveal more pages of the document.
The following tools are also available:
Figure 4.9 The Assembly View display options
Close document
Click or select File > Close to close the document. If you have made a
change but not saved, a save prompt appears. Otherwise, the document
is removed from the display. Hold Ctrl and click the close icon to close
the document without a confirmation message. That is, the document is
closed and any unsaved changes are lost.
Title bar
Click to reduce the displayed document to its title bar. Click again to redisplay the document. This tool only appears for source documents. The
target document, displayed at the top of the Assembly View window,
cannot be reduced to only its title bar.
Undo
Click to undo your last action. All undo steps are retained until you save
the file. Once saved, all levels of undo are discarded.
Redo
Click to redo your last action. All redo steps are retained until you save
the file. Once saved, all levels of redo are discarded.
THE PAGE, ASSEMBLY, FLICK AND PRESENTATION VIEW INDEX CONTENTS 38
Page 39

C
OREL
PDF F
USION USER GUIDE
THE COREL PDF FUSION WORK AREA INDEX CONTENTS 39
Stack / Unstack
Click to stack the currently selected pages and unstack the currently
selected stacks or use Ctrl < and Ctrl >. When pages are already
stacked you can select them and add them to another stack. You can
drag and drop, insert, extract, move, delete, rotate and copy and paste
page stacks in exactly the same way as pages.
NOTE: You cannot undo/redo page stacking. Therefore, when a stack is merged into another stack, the
original stack is lost and cannot be recovered, and when a stack is deleted, the stack cannot be
recovered by undo. The pages are recovered but they will be unstacked.
NOTE: Page stacks do not affect the saved file at all. They persist only for the current session, that is, stacks
disappear when the document is saved, reopened or the application is restarted. Page stacks are
maintained when changing views.
Scroll icons
Click to scroll page-by-page, move to the end of the document, scroll 10
pages at a time to the left, and scroll 10 pages at time to the right.
Scroll icons
Click to scroll to the star t of the document, and to scroll page-by-page
to the left.
Page number
Click and enter the page number you want to view.
Go to
Click View > Go to and select First Page or Last Page. Click View > Go
to > Page... and enter a page number to view.
4.2.3.2 Assembly View page selection options
In Assembly View you can:
• Click a page to select it.
•Use Ctrl click to select more pages.
•Use Shift click to select a series of pages.
THE PAGE, ASSEMBLY, FLICK AND PRESENTATION VIEW INDEX CONTENTS 39
Page 40

C
OREL
PDF F
USION USER GUIDE
THE COREL PDF FUSION WORK AREA INDEX CONTENTS 40
4.2.3.3 Assembly View right-click menu options
Select one or more pages in Assembly View and right-click to display the following menu:
Figure 4.10 Assembly View right-click menu
Select All
Select all pages in the current document.
Deselect All
Deselect all pages in the current document.
Copy
Copy the currently selected pages onto the clipboard.
Paste
Paste the currently selected pages.
Delete
Delete the currently selected pages.
Insert New Page
Insert a new empty page to the left of the currently selected page.
Extract Pages
Create a new document containing the extracted pages.
Rotate Left / Rotate Right
Rotate the currently selected pages left or right by 90 degrees.
THE PAGE, ASSEMBLY, FLICK AND PRESENTATION VIEW INDEX CONTENTS 40
Page 41

C
OREL
PDF F
USION USER GUIDE
THE COREL PDF FUSION WORK AREA INDEX CONTENTS 41
Stack / Unstack
Stack the currently selected pages and unstack the currently selected
stacks or use Ctrl < and Ctrl >. When pages are already stacked you
can select them and add them to another stack. You can drag and drop,
insert, extract, move, delete, rotate and copy and paste page stacks in
exactly the same way as pages.
NOTE: You cannot undo/redo page stacking. Therefore, when a stack is merged into another stack, the
original stack is lost and cannot be recovered, and when a stack is deleted, the stack cannot be
recovered by undo. The pages are recovered but they will be unstacked.
NOTE: Page stacks do not affect the saved file at all. They persist only for the current session, that is, stacks
disappear when the document is saved, reopened or the application is restarted. Page stacks are
maintained when changing views.
Crop Pages
For more information see “Crop Pages” on page 46.
4.2.3.4 Assembly View menu options
The following options are available from the Document > Pages menu:
Figure 4.11 Document menu options available in Assembly View
For more information about cropping see “Crop Pages” on page 46.
4.2.4 Flick View
Flick View allows you to explore a single document.
Use the following methods to view a document in Flick View:
• Drag and drop one or more documents onto the Flick View area displayed on the
Welcome screen or Launch pad.
• Drag and drop one or more documents onto the Flick View window.
• When you are already in Flick View use File > Open to display an Open File(s) dialog to
select one or more documents.
Click the
•
NOTE: When multiple documents are opened only one is displayed. Use Assembly view to see all the
documents.
THE PAGE, ASSEMBLY, FLICK AND PRESENTATION VIEW INDEX CONTENTS 41
Flick view
icon
when viewing a document displayed in Page or Assembly View.
Page 42

C
OREL
PDF F
USION USER GUIDE
THE COREL PDF FUSION WORK AREA INDEX CONTENTS 42
4.2.4.1 Flick View controls
The control of the document in Flick View is interactive, that is, when you click-and-drag
a page, the distance you drag determines the speed at which the pages rotate. A small
distance and the pages rotate slowly; a larger distance and the pages rotate more quickly.
When you get to the page you want to view, click to stop.
NOTE: The resources available to the computer determine the amount of interactivity available. A more
powerful computer reacts better than a lower specification computer.
When a document is displayed in Flick View the following controls are available:
• Use the mouse wheel to increase or decrease the magnification. This is the same as using
the Zoom Tool.
• Click-and-drag left or right to flick the document in either direction. The distance you
click-and-drag determines the speed of rotation.
•Click to stop.
• Double-click any page to display it in full screen view. Click it again to return to Flick View.
• Use the icon controls to; display the first page, flick quickly left or flick slowly left.
• Use the icon controls to; flick slowly right, flick quickly right or to display the last page.
• Click to display a dialog allowing you to enter the page number you want to view.
4.2.5 Presentation View
Presentation view allows you to view each page of a single document in full screen mode.
Use the following methods to view a document in Presentation View:
• Select View > Presentation.
• Press F7.
4.2.5.1 Presentation View controls
When a document is displayed in Presentation View the following controls are available:
• Press Esc to return to your previous view.
• Use the mouse wheel to scroll through the document.
•Use Page Up and Page Down to page through the document.
•Use Home and End to go to the first and last page.
•Use Ctrl + and Ctrl - to change the magnification.
NOTE: Comments and annotations are displayed in Presentation View. They cannot, however, be moved
or changed, and Notes cannot be opened.
THE PAGE, ASSEMBLY, FLICK AND PRESENTATION VIEW INDEX CONTENTS 42
Page 43

C
OREL
PDF F
USION USER GUIDE
THE COREL PDF FUSION WORK AREA INDEX CONTENTS 43
4.2.5.2 Presentation View right-click menu options
In Presentation View use right-click to display the following menu:
Figure 4.12 Presentation View right-click menu
Cancel Presentation View
Use this to cancel Presentation View.
Previous / Next / First / Last Page
These options provide navigation through the document.
Go to
When selected, enter the number of the page you want to view.
Indicate Page Number
Use this to remove the page number displayed in the top left corner of
the screen.
Show Comments
Use this to hide or show comments. Redacted text remains obliterated.
Fit Page / Fit Width / Actual Size
You can choose to fit the page to the screen, fit the width of the page to
the screen, or view the page at actual size.
Zoom / Zoom In / Zoom Out
Use these options to magnify the page.
THE PAGE, ASSEMBLY, FLICK AND PRESENTATION VIEW INDEX CONTENTS 43
Page 44

C
OREL
PDF F
USION USER GUIDE
THE COREL PDF FUSION WORK AREA INDEX CONTENTS 44
4.3 The Navigation pane
The Navigation pane is visible only when Page View is selected (see “Page View” on
page 30). Pages, Comments and Bookmarks are viewed in the Navigation pane.
Use the following actions:
• Press F9, select Windows > Show Navigation or click the Navigation pane icon at the
lower left of the Page view window to show or hide the Navigation pane.
• Click the Pages, Bookmarks or Comments tab to view those items. For more information
see “Pages” on page 44, “Bookmarks” on page 48 and “Comments” on page 48.
4.3.1 Common controls
The following options are available when either the Pages, Comments and Bookmarks
tab is selected.
• Drag and drop the Pages, Comments or Bookmarks title bar to re-position the pane.
• Click the icon in the top right corner of the title bar to move the pane to its last
undocked position.
• Use the vertical scroll bar to move to the start or the end of the document.
4.3.2 Pages
When pages are displayed in the Navigation pane you can:
• Click any page to display it in the Page View window.
• Click any page and use your scroll wheel to scroll through the document.
•Use Page Up and Page Dn to page through the document.
•Use Home and End to move to the first or last page.
THE NAVIGATION PANE INDEX CONTENTS 44
Page 45

C
OREL
PDF F
USION USER GUIDE
THE COREL PDF FUSION WORK AREA INDEX CONTENTS 45
• Drag and drop any page to a new position in the document as shown below. Note the
yellow indicator identifying the location of the inserted page.
NOTE: If you attempt to drag-and-drop pages in a document containing more pages than can be
displayed, the document scrolls when you reach the top or bottom of the Navigation pane.
Figure 4.13 Drag and drop pages in the navigation pane
When a page is selected the following tools are also available:
Figure 4.14 Tool options available in Navigation pane Pages tab
When a page is selected the following options are also available from the Document >
Pages menu:
Figure 4.15 Document menu option available in the Navigation pane Pages tab
Insert New Page
Select the Insert New Page icon or Document > Pages > Insert New
Page to insert a blank page above the currently selected page.
THE NAVIGATION PANE INDEX CONTENTS 45
Page 46

C
OREL
PDF F
USION USER GUIDE
THE COREL PDF FUSION WORK AREA INDEX CONTENTS 46
Extract Pages
Select the Extract Pages icon or Document > Pages > Extract Pages to
extract the selected pages and create a new untitled document
containing those pages.
Rotate Left
Select the Rotate Left icon or Document > Pages > Rotate Left to
rotate the selected pages 90 degrees to the left.
Rotate Right
Select the Rotate Right icon or Document > Pages > Rotate Right to
rotate the selected pages 90 degrees to the right.
Crop Pages
Select the Crop Pages icon or Document > Pages > Crop Pages to
display a Crop page(s) dialog. You specify the size of your crop and the
range of pages to which it is applied in this dialog. A fixed size such as
Letter, A4 can be selected. Alternatively, choose a custom crop size. Your
selected crop is applied to the current page, selected pages or all pages.
In the Size panel the following options are available:
Crop to fixed size lets you select a predefined crop size such as A4, A5,
Letter. The crop is normally measured from the top and left side of the
page. Select Centered to apply the crop centrally.
The thumbnail view of the page on the Crop Pages dialog displays the
areas to be cropped as shaded.
Select Static values to apply a custom crop size. Select your preferred
units from the drop-down menu. Constrain values makes all values the
same. Uncheck this to insert different values for the Top, Bottom, Left
and Right.
The values around the thumbnail image define the size of the crop. You
can either directly enter a number or use the up and down arrows.
The Apply To panel determines the pages to be cropped. Select the
Entire document, Selected Pages or a Range of pages. If you have
selected an area on a page you can select the Current page option. You
enter a Range of pages such as 2-4 to only crop pages numbered 2, 3
and 4.
The Crop drop-down menu allows you to apply the crop to All pages
in range, Odd-numbered pages in range and Even-numbered pages in
range. Therefore, if you have selected the whole document or a range
of pages you can apply the crop to the whole range or just the odd or
even numbered pages.
Select OK to accept your crop values or Cancel to abort them.
NOTE: If cropping values that exceed the page size are entered, the values are ignored and no cropping
is performed.
THE NAVIGATION PANE INDEX CONTENTS 46
Page 47

C
OREL
PDF F
USION USER GUIDE
THE COREL PDF FUSION WORK AREA INDEX CONTENTS 47
4.3.2.1 Navigation pane right-click menu options
When you select a page in the navigation pane you can display a right-click menu. The
following options are available:
Figure 4.16 Navigation pane right-click menu
Select All
Select all items on the page.
Deselect All
Copy
Paste
Delete
Insert New Page
Extract Pages
Rotate Left
Rotate Right
Deselect any selected items on the page.
Copy onto the clipboard the selected pages.
Paste the pages previously copied to the clipboard above the currently
selected page.
Select the pages to be deleted and click Delete to remove the pages.
Insert a new blank page into your document. The new page is placed
above the currently selected page.
Extract the selected pages and create a new untitled document
containing those pages.
Rotate the selected pages 90 degrees to the left.
Rotate the selected pages 90 degrees to the right.
Crop Pages
For more information see “Crop Pages” on page 46.
THE NAVIGATION PANE INDEX CONTENTS 47
Page 48

C
OREL
PDF F
USION USER GUIDE
THE COREL PDF FUSION WORK AREA INDEX CONTENTS 48
4.3.3 Bookmarks
For all the information related to bookmarks see “Working with bookmarks” on
page 93.
4.3.4 Comments
For the all the information related to comments and annotations see “Working with
comments and annotations” on page 98.
4.4 Customize your work area
You can customize the work area to suit your own personal preferences.
There are three main aspects to customizing your work area:
• “Customize the Navigation pane” on page 49
• “Drag and drop a pane on top of another pane” on page 51
• “Set up your preferences” on page 52
You don’t have to customize anything—many users are happy with the way the tools and
windows of Corel PDF Fusion are laid out. However, you can use the following methods
to change Corel PDF Fusion to suit your personal preferences.
If you change the size or location of the Welcome screen and re-star t the application, it
reappears in your last selected state.
4.4.1 The Windows menu
You can chose to show or hide various menus and toolbars. A tick in the menu indicates
an item is shown. The following options are available:
Show Navigation (F9)
Display or hide the Navigation pane.
Show Menu (F10)
Display of hide the menu toolbar.
Show Toolbars (F11)
Display or hide the icon toolbars.
Show Statusbar (F12)
Display or hide the message window.
4.4.2 The Help menu
This provides various options to show or hide menus and toolbars. A tick in the menu
indicates an item is shown. The following options are available:
To o l t i p s
Show or hide text tips that appear when the cursor moves over an
option.
CUSTOMIZE YOUR WORK AREA INDEX CONTENTS 48
Page 49

C
OREL
PDF F
USION USER GUIDE
THE COREL PDF FUSION WORK AREA INDEX CONTENTS 49
To o l L a b e l s
Show or hide text associated with icons.
4.4.3 Customize the Navigation pane
You can customize how you want the items in the Navigation pane to be displayed. To
do this:
1 Open a document and click on a single page to view the document in the Page View.
2 The Navigation pane is displayed in its default view:
Figure 4.17 Navigation pane default view
3 Click the tabs to view either the Bookmarks, Comments or Pages panes.
CUSTOMIZE YOUR WORK AREA INDEX CONTENTS 49
Page 50

C
OREL
PDF F
USION USER GUIDE
THE COREL PDF FUSION WORK AREA INDEX CONTENTS 50
4 Select the title bar of a pane to move it. The pane can be moved anywhere; even outside
the application window.
Figure 4.18 Moving a pane
Once you have moved a pane outside of the window another pane takes its place.
NOTE: Notice the icon that appears in the top right-hand corner of the Bookmarks, Comments and Page
panes. Click this icon and the pane detaches itself. If you have previously placed the pane
elsewhere, the pane moves to that position.
5 Drag and drop other panes onto the title bars to arrange the panes within the window.
As you do this the panes shrink allowing space for the new pane.
Figure 4.19 Drag and drop a pane onto a title bar
CUSTOMIZE YOUR WORK AREA INDEX CONTENTS 50
Page 51

C
OREL
PDF F
USION USER GUIDE
THE COREL PDF FUSION WORK AREA INDEX CONTENTS 51
6 Move a pane into the contents of another pane to place the pane on top. The pane upon
which you are moving highlights and your selected pane “clicks” into place.
Figure 4.20 Drag and drop a pane on top of another pane
4.4.4 Position your tools
You can re-position the Corel PDF Fusion tools:
1 Move the cursor over the dimpled area one of the detachable menus. When in the
correct position the cursor changes to a cross-hair.
2 Drag and drop the tool bar into its new position.
Notice how when you move the tool bar near to the top or side of the work area it
opens ready to accept it and it “clicks” into place.
Figure 4.21 Moving toolbars
CUSTOMIZE YOUR WORK AREA INDEX CONTENTS 51
Page 52

C
OREL
PDF F
USION USER GUIDE
THE COREL PDF FUSION WORK AREA INDEX CONTENTS 52
4.4.5 Set up your preferences
To configure the preferences:
1 Select Edit > Preferences... to display the Preferences dialog. There are four tabs to
select: General, View, Flick View, Import, Web , Save and Spelling.
2 Make the relevant changes.
3 Select OK to accept the changes or Cancel to return to your previous settings.
Restore defaults
This button restores all dialog options to their default factory settings.
Reset message dialogs
Some message dialogs appear with a “Don’t show me this message
again” tick box, which, when selected, means the message is never again
displayed. Click the Reset message dialogs option to re-enable all
message dialogs so that they are displayed.
4.4.5.1 General tab
The options in the General panel are:
New file type
This determines the document type (PDL) of any new file you create.
The options are PDF or XPS. PDF is the default setting.
New page size
This determines the default page size of any new page you create.
Page orientation
Choose whether the default page orientation is Portrait or Landscape.
Number of files displayed in Recent files list
Select the number of files you want listed in the File > Open Recent
menu.
The option in the Product Update panel is:
Automatically check for updates
When selected, Corel PDF Fusion automatically checks for updates
every 28 days. For more information see “Product update” on page 14.
4.4.5.2 View tab
The option in the User Interface panel are:
Show file extensions
This shows and hides the extensions of file names in the Page and
Assembly views. When checked, imported files have the initial output
name in a form
name of the file and
when opening a Word file called
appears in Corel PDF Fusion with the name
When this is unchecked, the document is displayed as
<basename><n>(ext).pdf. Where <basename> is the
<n> is an arbitrary unique number. For example,
testmanual.doc the file, for example,
testmanual18(doc).pdf.
testmanual in the
Page and Assembly Views.
CUSTOMIZE YOUR WORK AREA INDEX CONTENTS 52
Page 53

C
OREL
PDF F
USION USER GUIDE
THE COREL PDF FUSION WORK AREA INDEX CONTENTS 53
Animate status bar messages
Status bar messages “pulse” in color to attract your attention. For
example, open a document in Page View and shift-click on the page.
Figure 4.22 Status bar messages
Automatically show selection-sensitive button menus
Uncheck this when you do not want to display the context-sensitive
menu bar when you select text or an area.
Preferred display units
Select your preferred units from the drop-down menu.
Thumbnail size
You can choose to have
Normal
or
Large
thumbnails.
The options in the Rendering panel are:
Anti-alias text / Anti-alias lines
The anti-aliasing options govern how the page is displayed. Enabling
these options produces better screen displayed output, at the expense
of performance.
4.4.5.3 Flick View tab
The options in the Flick View panel are:
Spin pages when zooming
Check to spin pages when you select them for full screen display in Flick
View.
Show page reflections
When checked each page has a reflection generated in Flick View.
Thumbnail quality
Select Normal or High quality thumbnails in Flick View. When changed,
you must exit and re-enter Flick View for it to take effect.
4.4.5.4 Import tab
The options in this tab allow you to configure how office documents, such as
spreadsheets, are imported into Corel PDF Fusion. By default, the page settings in the
document being imported are used. If these settings don’t produce the required results
you can try your own configuration settings. Select the Configure import options button
to open the Import Options dialog.
Use Document Page Settings
When this option is checked (the default) the page settings in the
imported document are used. Click this option to activate and use all the
options in this dialog.
The items in the Spreadsheet Options panel are designed specifically for importing
spreadsheet documents.
CUSTOMIZE YOUR WORK AREA INDEX CONTENTS 53
Page 54

C
OREL
PDF F
USION USER GUIDE
THE COREL PDF FUSION WORK AREA INDEX CONTENTS 54
Show Grid Lines
When checked, grid lines are generated and displayed in the output
document between cells in the spreadsheet.
Show Headings
When checked, the row and column headings in the spreadsheet are
displayed in the output document along with the data.
Fit to Page
Select one of the options in the drop-down menu.
No Scaling means that the spreadsheet is displayed in its original size
onto as many pages as are required to fit the data.
Fit to page automatically scales the document to fit either the page, the
page width (no larger than one page wide), or page height (no larger
than one page high).
Scale to Percent activates the Scale Percent field (below) and allows you
to enter a percentage by which you want to scale the document.
Scale to Pages Specified activates the Scale to X wide by X tall options.
These options scale the spreadsheet to fit the number of pages specified
in the wide and tall fields. Because the aspect ratio of the spreadsheet is
maintained, the lesser of the two dimensions (width or height)
determines the scale factor.
Note that if either value is set to 0, the value in the other option is
ignored.
Printing Direction
These options control the pattern in which the pages are printed, either
across first and then down, or down first and then across. With Across
and Down selected the pages are printed across first and then down.
With Down and Across selected the pages are printed down first and
then across.
The Default Page Margins panel allows you to specify the margins on your document.
These options allow you to specify the top, left, bottom and right
margins (in cm) from the edge of the page. Page margins are applied
when formatting word processing, database and spreadsheet files and
are applied before any scaling.
4.4.5.5 Web tab
When performing updates you need a connection to the internet. Under most
circumstances the default system browser is used along with the proxy settings. If,
however, you are part of a network (in an office for example) and the internet
connection is restricted or requires further configuration, you should contact your
system administrator.
CUSTOMIZE YOUR WORK AREA INDEX CONTENTS 54
Page 55

C
OREL
PDF F
USION USER GUIDE
THE COREL PDF FUSION WORK AREA INDEX CONTENTS 55
The following options are available in the Connection Settings panel:
No proxy
Use this if you don’t want to use a proxy.
Auto-detect proxy settings
This is the default option and should be used when you want Corel PDF
Fusion to automatically detect the proxy settings for your network.
Manual proxy configuration
Use this when you have a list of one or more proxy servers. Ask your
system administrator for the configuration information. Each proxy
requires a hostname and a port number.
The username and password options are optional, but they may be
required by your network.
4.4.5.6 Save tab
By default, backup files are not created. However, you have t he opti on to cr eate a b a ckup
file whenever a document is saved. This file is the same size as the original file.
The following options are available in the Save Options panel:
Always create a backup copy
This is not checked by default. Check this option to create backups of
your saved files. The backups are created in the same location as the
original file. Checking this option makes Corel PDF Fusion use more disk
space.
4.4.5.7 Spelling tab
When comments or notes are added to a document you have the option to spell check
those notes. For more information see “Spell check comments and free text” on
page 106.
The following options are available in the Spelling Options panel:
Allow spell checking
This option is checked by default, and when selected spell checking is
activated for comments.
Active dictionary
Use the drop-down menu to select your preferred language for the spell
checking dictionary.
CUSTOMIZE YOUR WORK AREA INDEX CONTENTS 55
Page 56

Chapter 5 The Corel PDF Batch
1
2 4 5 6 7
6
12
11
10
9
83
Converter work area
This chapter describes the Corel PDF Converter work area and how you use it.
The information provided in the section includes:
• “Open Corel PDF Batch Converter” on page 56
• “The Convert format panel” on page 57
• “The Details panel” on page 58
• “Corel PDF Converter preferences” on page 58
NOTE: Not all components are available in all versions of PDF Fusion.
5.1 Open Corel PDF Batch Converter
To open Corel PDF Converter:
• Select All Programs > Corel PDF Fusion > Corel PDF Batch Converter.
• With Corel PDF Fusion open select Document > Batch Conversion.
The Corel PDF Batch Converter work area opens:
Figure 5.1 Corel PDF Converter work area
1 Drop one or more files onto this area to convert them using the currently selected setup.
2 Displays the Corel PDF Converter preferences dialog. For more information see “Corel
PDF Converter preferences” on page 58.
OPEN COREL PDF BATCH CONVERTER INDEX CONTENTS 56
Page 57

C
OREL
PDF F
USION USER GUIDE
THE COREL PDF BATCH CONVERTER WORK AREA INDEX CONTENTS 57
3Click Open... or use Ctrl + O to display an Open File(s) dialog allowing you to select
one or more files for conversion.
4 Displays the progress of your conversion.
5 Click the cross icon or press Esc to cancel conversion of the current files. A message
appears indicating that conversion of all queued files is cancelled. You can select to
continue or abort.
6 Click to close this window.
7Click View or use Ctrl + i to display the current file in Corel PDF Fusion.
8 Click the down-arrow or use Alt + 1 (one) or Ctrl +1 (one) to open or close the
Convert format panel. This displays more details about the files you are converting. For
more information see “The Details panel” on page 58.
9 Click the down-arrow or use Alt + 2 or Ctrl + 2 to open or close the Details panel.
This allows you to change the output format or setup. For more information see “The
Convert format panel” on page 57.
10 Click to view online help information.
11 Choose your preferred Corel PDF Fusion view.
12 Displays the currently selected output format.
5.1.1 The Convert format panel
This panel lets you choose your preferred output format and setup.
The Convert format panel provides the following options:
Document type
Select the down arrow to choose your preferred document output
format. The options are PDF, XPS or Microsoft Word. The selection you
make here determines which setup names are displayed in the Setup
name option (below). For example, when PDF is selected, only the PDF
setups can be viewed and selected. Similarly, when XPS is selected only
XPS setups can be viewed and selected.
Setup name
Select the down-arrow to display the setups associated with the
currently selected Document type.
Edit...
Click this to edit a setup. The currently selected setup is displayed ready
for editing but you can change that if you wish. You cannot edit any of
the standard setups, but you can make a copy and edit the copy. For
more information on managing and creating setups see Chapter‚
9"Setups".
Description
Displays a brief description of the currently selected setup.
OPEN COREL PDF BATCH CONVERTER INDEX CONTENTS 57
Page 58

C
OREL
PDF F
USION USER GUIDE
THE COREL PDF BATCH CONVERTER WORK AREA INDEX CONTENTS 58
5.1.2 The Details panel
The Details panel provides information about the files being converted with messages
like “Started” and “Completed”. Files which have been previously converted are also
displayed.
Figure 5.2 The Details panel
5.1.3 Corel PDF Converter preferences
The Preferences dialog lets you decide the location for your converted files and whether
you view them in Corel PDF Fusion.
To open the Preferences dialog see item “2” on page 56 or use Ctrl + K.
Click Restore Defaults to return the dialog to its default settings. Click OK or Cancel to
close the information dialog.
5.1.3.1 General tab
Allow “Output options” in Setups to override these settings
When checked most options within this dialog are disabled. This makes
Corel PDF Converter use the choices selected within the setup. For
more information see “Setups” on page 108. If the Setup Output
options are not configured, Corel PDF Converter reverts to its default
behavior of writing the output document to the source folder.
The following options are available in the Save converted documents panel:
Save in same directory as source documents (default)
Click to save your converted files in the same directory as the source
(input) file.
Save in
Lets you choose a different location for your converted files.
Either, type (or copy and paste) a location, for example:
and Settings\User\My Documents
; or click the Browse button to choose
C:\Documents
the location. If required, use the Make New Folder option.
Always prompt for destination directory
Check this to ensure that each time a file is converted a browser dialog
appears allowing you to select an output location.
NOTE: The options in the Save converted documents panel override the Output options panel in the PDF,
XPS and Word setup dialog. See (for example)
OPEN COREL PDF BATCH CONVERTER INDEX CONTENTS 58
“Always output files to” on page 115
.
Page 59

C
OREL
PDF F
USION USER GUIDE
THE COREL PDF BATCH CONVERTER WORK AREA INDEX CONTENTS 59
The following options are available in the View converted documents panel:
Automatically view documents once converted (default)
Click to view your converted documents in Corel PDF Fusion.
Default view
If you have chosen to view your converted documents in Corel PDF
Fusion, select the default view in which you would like them displayed.
When converting several documents at the same time, and you have
selected Assembly View, all the documents are displayed under separate
tabs. If, however, you have selected Flick or Page View, the last document
converted is displayed. Click the other document tabs to display them.
For more information about the various views see
Flick and Presentation View” on page 29
.
“The Page, Assembly,
When a file is successfully converted the system registered sound is used as an audible
indication. Uncheck the Use sound to indicate conversion is complete option to turn
off this notification.
5.1.3.2 Support tab
The Support tab provides a link to the Corel web site. In addition, a debug option is
provided. This should only be used under the direction of Technical Support.
OPEN COREL PDF BATCH CONVERTER INDEX CONTENTS 59
Page 60

Chapter 6 How do I...?
This chapter contains a number of “How do I...” topics:
To find out how to do any particular task, scan the list below and click on the topic that
you think contains the required information.
The information provided in the section describes how to:
• “Convert files” on page 61
• “Create a new document from existing files” on page 65
• “Add empty pages to an existing document” on page 70
• “Add existing pages to an existing document” on page 70
• “Remove pages from an existing document” on page 71
• “Prepare a document for distribution” on page 71
• “Print a document” on page 72
• “Find and Redact text—one or more instances” on page 73
• “Redact text or area—single instance” on page 74
• “Find and replace text—one or more instances” on page 74
• “Add comments/notes” on page 74
• “Add notes containing selected text” on page 75
• “Add text annotations” on page 76
• “Add bookmarks” on page 76
• “Add free text annotations” on page 77
• “Add hyperlinks” on page 78
• “Change the destination of the output file” on page 79
• “Produce more compact PDF files” on page 80
• “Produce PDF files that can be sent by e-mail” on page 81
• “Produce files for fast web viewing” on page 82
• “Launch application to view the file when complete” on page 82
• “Share setups” on page 83
• “E-mail documents” on page 84
INDEX CONTENTS 60
Page 61

C
OREL
PDF F
USION USER GUIDE
HOW DO I...? INDEX CONTENTS 61
• “E-mail comments” on page 85
• “Find the version number of Corel PDF Fusion” on page 85
• “Remove tooltips or tool labels from Corel PDF Fusion” on page 85
• “Add security to a document” on page 85
• “Add a watermark to a document” on page 86
6.1 Convert files
Corel PDF Fusion can take various input files (see “Supported document formats” on
page 147), and convert them into either PDF, PDF/A-1b, XPS document and Microsoft
Office Word output files.
NOTE: To guarantee the fidelity of PDF/A-1b files use the Corel PDF Converter or print to the Corel PDF
printer.
To perform a conversion use one of the following options:
• “Drag and drop” on page 61
• “Printing from a desktop application” on page 62
• “Using Add-ins for Microsoft Office applications” on page 62
• “Save a document in a different format” on page 63
• “Convert (Expor t) a document to Microsoft Word” on page 63
• “Convert (Expor t) a document to PNG” on page 64
6.1.1 Drag and drop
You can use Corel PDF Converter as a drag-and-drop target.
1 Drag and drop the file to be converted onto the Corel PDF Converter application.
NOTE: The last used setup is the default.
Corel PDF Converter opens and converts the file. A progress bar appears and a sound
prompts you when the file has completed. When the “Automatically view documents
once converted (default)” on page 59 option is selected, which it is by default, your
converted document opens in Corel PDF Fusion. You can disable the sound. See “Corel
PDF Converter preferences” on page 58.
To change the output format before converting:
1 From Corel PDF Fusion select Document > Batch Conversion or select All Programs
> Corel PDF Fusion > Corel PDF Batch Converter to open Corel PDF Converter.
2 Select the output Document type (XPS, PDF or Microsoft Word).
CONVERT FILES INDEX CONTENTS 61
Page 62

C
OREL
PDF F
USION USER GUIDE
HOW DO I...? INDEX CONTENTS 62
3 Select the required Setup name.
NOTE: Select one of the PDF/A-1b options as the setup name if you want to create files to that
specification.
4 If required, edit your setup.
5 Drag and drop the file to be converted onto the Corel PDF Converter application.
6.1.2 Printing from a desktop application
When you print to the Corel PDF printer from a desktop application you can create PDF
files:
1 Save the document and select the Print option in your desktop application.
2 Select Corel PDF Converter followed by Print in the Printer name field. The Create
document dialog appears.
3 Select a location for the document using the Create Document dialog.
4 Enter a name for the converted document in the File name field.
5 Select PDF using the Save as type down-arrow.
NOTE: When you print again, the last used location and Save as type option is remembered.
6 If required, use the Setup down-arrow to select a new setup. For more information see
“Setups” on page 108.
7Click Save to complete the process. Click Cancel to abort the printing.
NOTE: When creating a PDF by printing to the Corel PDF printer you are always prompted for a name
and location for the output file. Therefore, the Always output files to and Overwrite an existing
document options in the setup are ignored.
NOTE: If, when printing from Microsoft Office Word, you find that the output print size is either A4 or Letter
even though the page is set to another size, uncheck Tools > Options > Print tab > Allow A4/Letter
paper resizing option in Word and try printing again.
6.1.3 Using Add-ins for Microsoft Office applications
When using Microsoft Office applications you can create PDF documents.
NOTE: PDF/A-1b files cannot be created using this method.
• To create PDF documents from a Microsoft Office 2003 document, click on the Add-in
toolbar icon and select Create > PDF. Alternatively, select Corel PDF Converter >
Create file > PDF from the File menu.
• To create PDF documents from a Microsoft Office 2007 document, click on the Corel
PDF Fusion Ribbon Menu and select the Create PDF from the PDF panels.
A Corel PDF Converter “working” message appears followed by a Create PDF
Document dialog that allows selection of the various security options that can be applied
to a PDF file. These security options are the same as the options provided within the
CONVERT FILES INDEX CONTENTS 62
Page 63

C
OREL
PDF F
USION USER GUIDE
HOW DO I...? INDEX CONTENTS 63
Corel PDF Fusion Setup manager. For more information see “Security tab (PDF)” on
page 120 and “Add-ins for Microsoft Office” on page 128.
NOTE: If you have not previously saved your Microsoft Word or Excel document before attempting to
create a PDF document, a Save As dialog appears prompting you to save it. Once saved, the
conversion continues. If you have not saved your Microsoft PowerPoint document before conversion,
a “Please save your document before printing it” message appears. You must save the document
before conversion using the Add-ins.
6.1.4 Save a document in a different format
Corel PDF Fusion can be used to convert a document from one document format
(PDL) into another. For example, when you have a document in the XPS, PDF or DOC
format you can easily convert it to another format.
NOTE: PDF/A-1b files cannot be created using this method.
NOTE: For more information see
“File format support” on page 18
.
1Use File > Open or drop a file onto the Assembly or Page View to open the document
you wish to conver t.
2 Make any changes to the document.
3Click File > Save As.... This displays the Save As dialog.
4 Enter a new name for the document in the File name option (unless you want to
overwrite the existing document name).
5 Select the new PDL format you want to save the document as (XPS, PDF or DOC) in
the Document type option.
6 Choose the setup, in the Setup name option, that you want to apply to the document
you are about to save.
NOTE: The Edit button provides all the setup options available. For more information see
Chapter 9,
“Setups”
7Click Save to complete the conversion. Select Cancel to abort the process.
See also
“Convert (Expor t) a document to Microsoft Word” on page 63
.
6.1.5 Convert (Export) a document to Microsoft Word
You can expor t an open document to the Microsoft Word format.
1 Open the document you wish to convert to Microsoft Word.
2 Make any changes to the document.
3Click File > Export to display the Export Document... dialog.
4 Use the Export Document options to choose the location for your Microsoft Word
document.
5Use the down-arrow in Files of type to select your preferred option.
CONVERT FILES INDEX CONTENTS 63
Page 64

C
OREL
PDF F
USION USER GUIDE
HOW DO I...? INDEX CONTENTS 64
Microsoft Word [retain page layout] (*.doc)
The text content and the original formatting is retained as much as
possible. Use this option for general purpose conversion of source
documents for reuse in Word.
Microsoft Word [retain text editability] (*.doc)
The layout is retained but text frames are used to make text blocks more
easily editable. Use this option when significant text editing in Word is
required.
Microsoft Word [retain text flow] (*.doc)
The text content is retained, but the original formatting is not retained.
This option produces much smaller file sizes for Microsoft Word
documents, and is ideal for when the text content of the source
document is to be used for another purpose.
6The File name option contains the current document name with a
.doc extension. You
can change the name.
7Click Save to complete the conversion. Select Cancel to abort the process. The process
starts and a progress bar appears. A message is displayed when the conversion is
complete. (You can choose to not display the “Success” message for future conversions.)
6.1.6 Convert (Export) a document to PNG
You can export an open document to the PNG image format.
The generated PNG files use the resolution and color management settings of the
source document.
NOTE: Multiple page documents are exported as single PNG files for every page.
1 Open the document you wish to convert to PNG.
2 Make any changes to the document.
3Click File > Export to display the Export Document... dialog.
4 Use the Export Document options to choose the location for your PNG files.
5 Use the down-arrow to select PNG image format (
*.png) in Files of type.
6The File name option contains the current document name with a
.png extension. You
can change the name.
7 Choose the page range to convert from All pages or Selection. The selected range of
pages should be in the form “1-3”, (but not “1-3,5,10”).
8Click Save to complete the conversion. Select Cancel to abort the process. The process
starts and a progress bar appears. A message is displayed when the conversion is
complete. (You can choose to not display the “Success” message for future conversions.)
CONVERT FILES INDEX CONTENTS 64
Page 65

C
OREL
PDF F
USION USER GUIDE
HOW DO I...? INDEX CONTENTS 65
6.2 Create a new document from existing files
Use the following procedure to create a new document from existing files:
1 Select File > New or click the New icon to open a new target document. A new
“untitled” document appears with the default file type. This file type can be changed see
“New file type” on page 52.
2 Display the new document in Assembly View.
Figure 6.1 New document in Assembly View
CREATE A NEW DOCUMENT FROM EXISTING FILES INDEX CONTENTS 65
Page 66

C
1
OREL
PDF F
USION USER GUIDE
HOW DO I...? INDEX CONTENTS 66
3 Drag and drop, onto the Assembly View, the source files from which you want to create
your new document. Alternatively, select File > Open or click the Open icon and then
navigate to the source document and select it. Repeat this for each source document.
NOTE: If you are using more source documents than can be displayed, use the scroll bar (1) at the right
side of the source document window to display those documents.
Figure 6.2 Multiple documents displayed
CREATE A NEW DOCUMENT FROM EXISTING FILES INDEX CONTENTS 66
Page 67

C
OREL
PDF F
USION USER GUIDE
HOW DO I...? INDEX CONTENTS 67
4 Drag and drop the required pages from the source documents onto the new target
document.
Figure 6.3 Drag and drop single pages
5 You can select more than one page at a time. The number of pages you are moving is
displayed and the yellow bar (next to page 2) indicates where the pages are going to be
dropped.
Figure 6.4 Drag and drop multiple pages
CREATE A NEW DOCUMENT FROM EXISTING FILES INDEX CONTENTS 67
Page 68
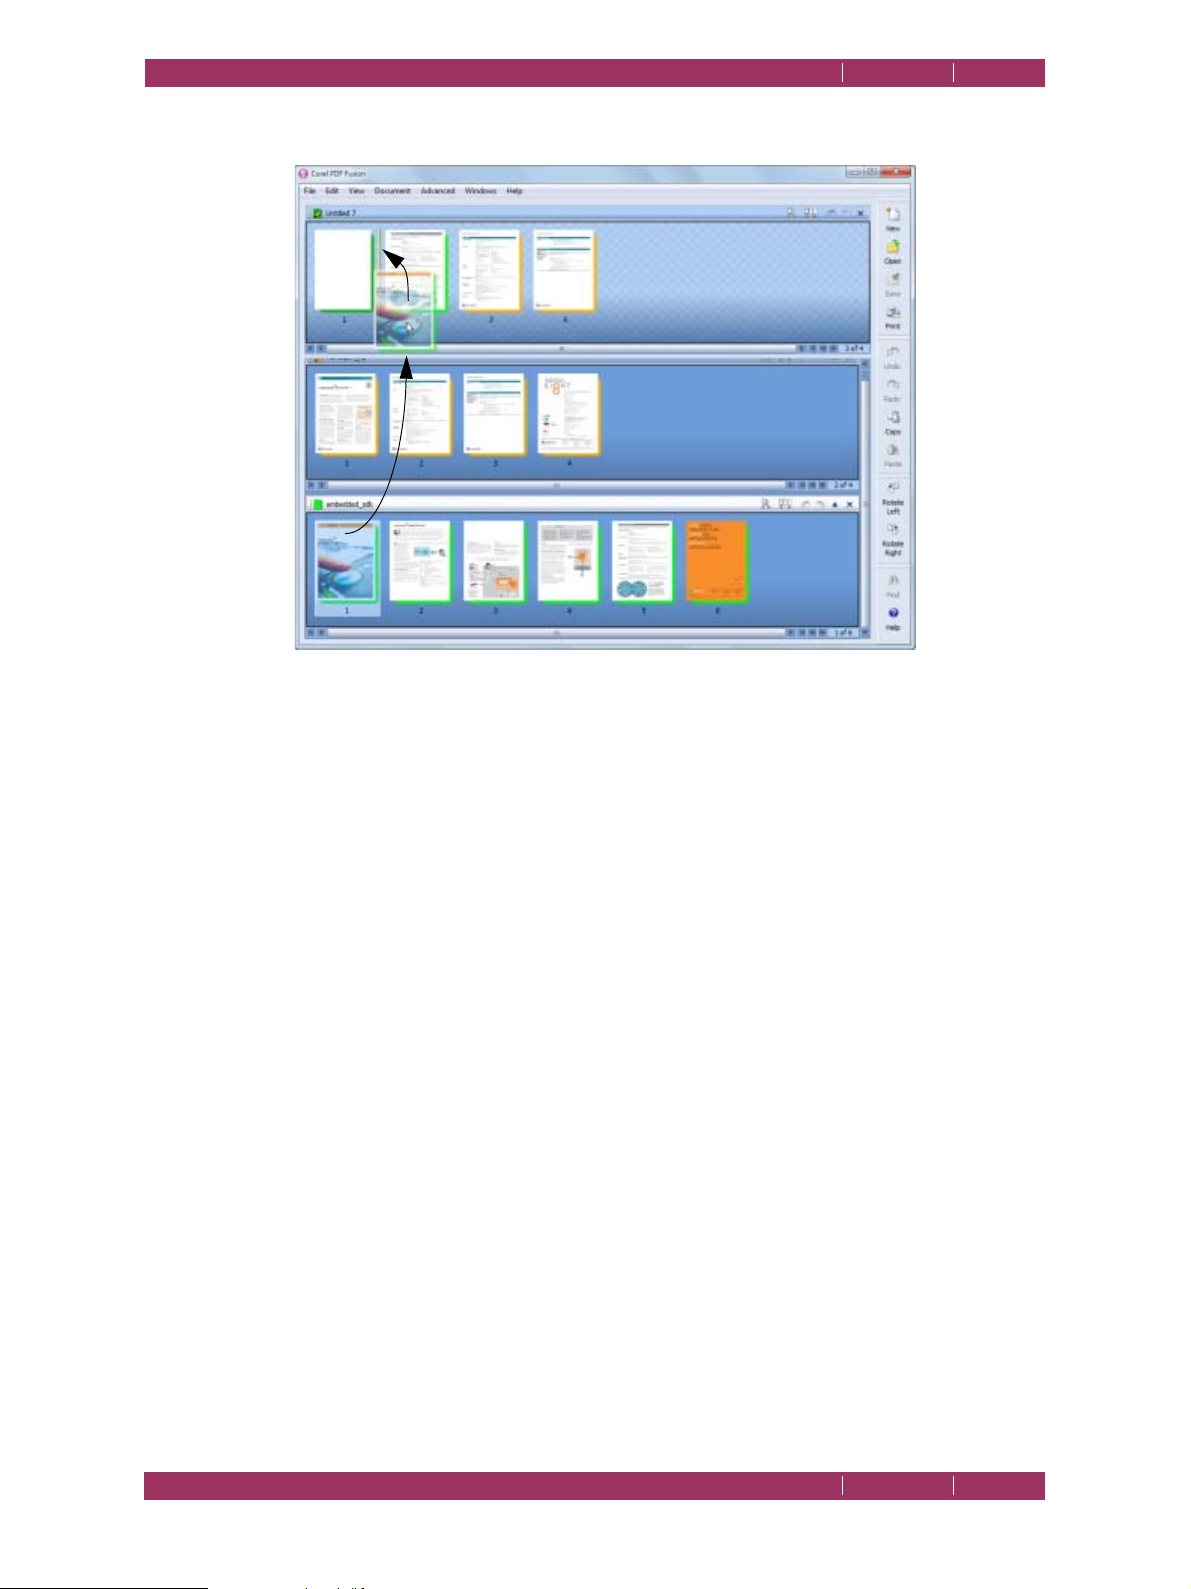
C
OREL
PDF F
USION USER GUIDE
HOW DO I...? INDEX CONTENTS 68
6 You can place pages in between other pages in the target document.
Figure 6.5 Placing pages between other pages
NOTE: When you drag and drop pages from one document to another a yellow bar appears indicating
exactly where the pages are dropped.
CREATE A NEW DOCUMENT FROM EXISTING FILES INDEX CONTENTS 68
Page 69

C
OREL
PDF F
USION USER GUIDE
HOW DO I...? INDEX CONTENTS 69
7 Right-click on the page and select Delete from the pop-up menu to remove the blank
page.
NOTE: Any document must contain at least one page. Therefore, you can delete the pages of a document
only until the last pages remains.
Figure 6.6 Delete a page
8 Here’s the completed new document.
Figure 6.7 The completed document
CREATE A NEW DOCUMENT FROM EXISTING FILES INDEX CONTENTS 69
Page 70

C
OREL
PDF F
USION USER GUIDE
HOW DO I...? INDEX CONTENTS 70
9 Select File > Save when you are happy with the new document. This displays the Save
dialog.
NOTE: If you have created a new document using the pages of an existing document, the new document
must be saved before you can re-save the existing document to its current name. You can, however,
use the Save as option.
10 Enter a name for the document in the File name option.
11 Select the output format for your document in the Files of type option.
12 Click Save to complete the process. Select Cancel to abort the save.
6.3 Add empty pages to an existing document
You may want to add additional blank pages to a document, for example to force a
chapter to start on a right-hand page when printing double-sided.
Use the following procedure to add empty pages to an existing document:
1 Select File > Open or click the Open icon to open the document to which you want to
add the pages.
2 Display the document in Assembly View.
3 Point the cursor to the location in the document where you want the new page to
appear, right-click and select Insert New Page from the pop-up menu.
NOTE: Any folios (page numbers) printed on the existing document are not changed.
NOTE: Before saving the new document consider whether you want to overwrite the existing version or
save the new version under a new name.
4Click Save to overwrite or File > Save As to save the file under a new name.
6.4 Add existing pages to an existing document
Use the following procedure to add pages to an existing document:
1 Select File > Open or click the Open icon to open the document to which you want to
add the pages.
2 Display the document in Assembly View.
3 Drag and drop, onto the Assembly View, the source files from which you want to create
your new document. Alternately, select File > Open or click the Open icon and then
navigate to the source document to open it. Repeat this for each source document.
4 Drag and drop pages from the source documents onto the target document (in exactly
the same way as described under “Create a new document from existing files” on
page 65.
ADD EMPTY PAGES TO AN EXISTING DOCUMENT INDEX CONTENTS 70
Page 71

C
OREL
PDF F
USION USER GUIDE
HOW DO I...? INDEX CONTENTS 71
5Click Save to overwrite the file or use File > Save As to save the file under a new name
when your new document is complete,.
NOTE: Any folios (pages numbers) printed on the existing document are not changed.
NOTE: Before saving the new document consider whether you want to overwrite the existing version or
save the new version under a new name.
6.5 Remove pages from an existing document
Use the following procedure to remove pages from an existing document:
1 Open the document from which you want to remove pages.
2 Right-click one or more pages to be removed and select Delete from the pop-up menu.
NOTE: Any folios (page numbers) printed on the existing document are not changed.
NOTE: Before saving the new document consider whether you want to overwrite the existing version or
save the new version under a new name.
3Click Save to overwrite or File > Save As to save the file under a new name.
6.6 Prepare a document for distribution
The Finish Document Wizard is used to prepare a document for distribution. The choice
of file format determines all subsequent options.
When you have completed your document manipulations:
1 Select File > Finish Document Wizard. The Finish Wizard dialog appears.
2 Select the Document type you want your document to be saved in. The options are
PDF and XPS.
3 Select the setup name you want to use to create your document.
same as those listed in the
Converter. See
“The Convert format panel” on page 57
4 Select the document options you want to open in the wizard. The available options are:
Enter Document Summary Information
These options allow you set the Title, Subject, Author and Keywords.
See “Summary—Enter Document Summary Information” on page 88
for details about these options. When you have selected XPS as the
document type, this is the only option available.
Save As...
dialog and the Convert format panel in Corel PDF
These options are the
for more information.
Set Document Open Actions
Select this check box to access the options for file opening actions. See
“Open Settings—Set Document Open Actions” on page 89 for more
information on the options that are available. This is only available when
PDF is selected as the document type.
REMOVE PAGES FROM AN EXISTING DOCUMENT INDEX CONTENTS 71
Page 72

C
OREL
PDF F
USION USER GUIDE
HOW DO I...? INDEX CONTENTS 72
Set Permissions Options
Select this check box to access the Set Security Permissions Options. See
“Set File Security—Set Security Permission Options” on page 90 for
more information on the options that are available. This is only available
when PDF is selected as the document type.
Set Document Passwords
Select this check box to access the password options that allow you to
enter a password to open the document and to change the security
setting. See “Set Document Passwords” on page 91 for more
information on available options. This is only available when PDF is
selected as the document type.
5 Choose Next > to advance to the next screen in the wizard, and enter the information
as required in the dialog that opens. Repeat this process until you have completed all the
information required by the wizard.
6 In the Save As dialog, choose a location, enter a name and if you wish, change the
document type and setup. Click Save to complete the process when you have made your
choices.
6.7 Print a document
There are several ways to print a document from Corel PDF Fusion.
Before you print you can use the Print Setup options:
• Select File > Print Setup or Ctrl + Shift + P the following options are available:
Print what
Two options are provided:
When
markups and annotations (excluding text markups, such as highlights,
strikeouts, underlines and so on). When
selected the document is printed including any page markups,
annotations and text markups.
Print
Choose all the pages in the range or just the odd or even pages.
Normal Print
This is the default option and offers the fastest printing. See also “Print
to file” on page 73.
Print as Image
If normal printing does not produce the desired results, select this
option. You can set the resolution to 300 or 600 dpi or choose to use
the resolution set on the printer. See also “Print to file” on page 73.
Document
Document
and
Document and comments
.
is selected the document is printed including any page
Document and comments
is
NOTE: When the security of the document allows “low res only” printing, (see
“Printing” on page 122
),
the output resolution is restricted to 150 dpi and the document is printed as an image. A message
stating this is displayed.
PRINT A DOCUMENT INDEX CONTENTS 72
Page 73

C
OREL
PDF F
USION USER GUIDE
HOW DO I...? INDEX CONTENTS 73
Fit to paper size
Scales the output to fit onto the selected paper.
Center on paper
Positions the output centrally on the output media.
Auto-Rotate
When selected, rotation is applied when the orientation of the source
page does not match the orientation of the media.
Make sure the document or pages you want to print is selected then either:
• Choose File > Print... and select the appropriate options for your printer, page range,
number of copies, and so on.
•Click the Print icon.
• Use the keyboard shortcut Ctrl + P and select the appropriate options for printer, page
range, number of copies, and so on. The Selection option becomes available when one
or more pages are selected in Assembly View or the Navigation pane.
NOTE: The selected range of pages should be in the form “1-3”, (but not “1-3,5,10”).
Print to file
This is available when both Normal Print and Print as Image are selected.
When Normal Print is selected you are prompted for a file name in the
default location. When Print as Image is selected you are prompted to
enter a fully qualified path and name. For example:
For more information about
.prn
files see the “PS” listing in “What is a
document format or PDL?” on page 17.
NOTE: If, when printing from Microsoft Office Word, you find that the output print size is either A4 or Letter
even though the page is set to another size, uncheck Tools > Options > Print tab > Allow A4/Letter
paper resizing option in Word and try printing again.
6.8 Find and Redact text—one or more instances
Options to search through the text in a document and redact one or all occurrences of
a word or phrase are available.
1 Display in Page View the document you want to redact.
2Click Advanced > Find and Redact... This displays the Find and Redact dialog:
C:\myfolder\myfile.prn.
3 Enter the word or phrase you want to search for.
4Use Match case, Whole words and Search backward options to refine your search.
5 The first occurrence found is highlighted. Click Redact to obliterate just that occurrence
or click Redact All to obliterate all occurrences within the document.
NOTE: If you have previously performed a search you can select the down-arrow to re-select it.
Occurrences of a word or phrase that form part of an image, such as a photograph or scanned
image, are not found.
FIND AND REDACT TEXT—ONE OR MORE INSTANCES INDEX CONTENTS 73
Page 74

C
OREL
PDF F
USION USER GUIDE
HOW DO I...? INDEX CONTENTS 74
6.9 Redact text or area—single instance
You can redact a single text instance or area.
1 Display in Page View the document you want to redact.
2 Either select the text to be obliterated using the I-beam tool or press Shift and left-click
to display the crosshair and select the area.
3 On release of the mouse button the context sensitive menu appears from which you
can select the Redact option. Alternatively, with the text or area select choose the
Advanced > Redact Selection menu option.
6.10 Find and replace text—one or more instances
Options to search through the text in a document and replace one or all occurrences
of a word or phrase is provided.
NOTE: Text correction text is only possible when the document security allows text editing.
1 Display in Page View the document you want to find and replace text.
2Click Edit > Replace.... This displays the Find and Replace dialog:
3 Enter the word or phrase you want to find in the Find what field.
4Use the Match case, Whole words and Search backward options to refine your search.
5 Enter the word or phrase you want to use in the Replace with field.
6 The first occurrence found is highlighted. Click Replace to replace just the currently
selected instance or click Replace All to replace all instances within the document.
7Use the Find option to search for the next occurrence of the word or phrase (if you
have chosen to replace only a single instance). If you don’t want to replace an instance,
click Find again to go to the next instance.
8 Click the close icon at the top right hand corner of the dialog to close it.
NOTE: If you have previously performed a search or replace, select the down-arrows to re-select your
earlier options. Occurrences of a word or phrase that form part of an image, such as a photograph
or scanned image, are not found. Also, when replacing text you should consider the text flow.
6.11 Add comments/notes
Select the tool followed by the location (or vice-versa) to add notes to a document.
To add a comment/note to a document:
1 Display the document in Page View.
2Click the Comments tab in the Navigation pane.
REDACT TEXT OR AREA—SINGLE INSTANCE INDEX CONTENTS 74
Page 75

C
1
OREL
PDF F
USION USER GUIDE
HOW DO I...? INDEX CONTENTS 75
3 Select Document > Comments > Note or the Note icon i n the Navig a tio n pane tool b ar
followed by the location for the note. Alternatively, right-click the location for the note
and select Note from the pop-up menu.
4 Enter the text for your note.
5 Click the close icon when you have entered the text. The new comment appears in the
Navigation pane.
6 Right-click the note on the page or in the Navigation pane and select Properties to
change the properties of the note.
7 In the Properties dialog you can change the title and color of the note. For more
information see “Annotation properties” on page 101.
NOTE: If you change the title of the Note in the Properties dialog this remains for any other notes you may
create. This is useful when you are marking up a document and want the document’s author to
see who added the note.
8Click OK when you are happy with the note.
6.12 Add notes containing selected text
You can add Notes containing text selected on the page to a document:
1 Select, in Page View, the page onto which you want to place the note.
2 Select the text you want to appear in the note using the I-beam tool or press Shift and
left-click to display the crosshair and select an area.
3 On release of the button the context sensitive menu appears.
Figure 6.8 Context-sensitive text menu
4Click the Note icon (1) in the menu. On release of the button a note is opened
containing the text you previously selected.
5 In the Properties dialog change the title and color of the note. For more information see
“Annotation properties” on page 101.
NOTE: If you change the title of the Note in the Properties dialog this remains for any other notes you may
create. This is useful if you are marking up a document and want the document’s author to see
who added the note.
6 Click OK when you are happy with the note.
ADD NOTES CONTAINING SELECTED TEXT INDEX CONTENTS 75
Page 76

C
1
2 3
OREL
PDF F
USION USER GUIDE
HOW DO I...? INDEX CONTENTS 76
6.13 Add text annotations
Highlights, underlines or strike-out text annotations are added to a document using two
methods. Select the text followed by the tool or vice-versa:
1 Select, in Page View, the page onto which you want to place the annotation.
2 Select the text you want to affect using the I-beam tool or press Shift and left-click to
display the crosshair and select an area.
3 On release of the button the context sensitive menu appears.
Figure 6.9 Context-sensitive menu
4 Click the icon in the menu to add the required highlight (1), strike-out (2) or underline
(3).
Or:
1 Select Document > Comments > then the tool you want to use. Or right-click the page
and select the tool from the pop-up menu.
2 Move the cursor over the text to annotate and select it using the I-beam or press Shift
and left-click to display the crosshair and select an area. The new text annotation appears
in the Navigation pane.
3 Right-click the annotation on the page or in the Navigation pane and select Properties
to change the annotation properties.
4 Change the title and color of the annotation in the Properties dialog. For more
information see “Annotation properties” on page 101.
NOTE: If you change the title of the Note in the Properties dialog this remains for any other notes you
create. This is useful when you are marking up a document and want the document’s author to
see who added the note.
5Click OK when you are happy with the note.
6.14 Add bookmarks
Bookmarks are added to a document using two methods: select the text or area
followed by the tool or vice-versa.
1 Select, in Page View, the page onto which you want to place the bookmark.
2 Select the text using the I-beam tool or hold Shift and select the area you want to
bookmark.
ADD TEXT ANNOTATIONS INDEX CONTENTS 76
Page 77

C
1
2
1
OREL
PDF F
USION USER GUIDE
HOW DO I...? INDEX CONTENTS 77
3 On release of the button the context sensitive menu appears.
Figure 6.10 Context-sensitive text and area icons
4Click the Text Bookmark (1) or Area Bookmark (2) icon to display the Bookmark
Properties dialog.
5 Select the required style of the bookmark. For more information see “Bookmark
properties” on page 96.
6Click OK when you are happy with the bookmark.
Or:
1 Select Document > Comments > then either Add Bookmark, Add Text Bookmark or
Add Area Bookmark.
2 Select the page, text, or select the area (depending on your selection in 2), to display
Bookmark Proper ties dialog.
3 Change the title and color of the bookmark. For more information see “Bookmark
properties” on page 96.
4Click OK when you are happy with the bookmark.
6.15 Add free text annotations
Text can be added to a page as a free annotation. The font, style, justification and color
of the text can be changed to your preference. You can choose to change the properties
of free text annotations. When the text is created you can choose to flatten the text
onto the page so that it is treated in the same way as any other text.
Free text annotations are added to a document using two methods. Select the text
followed by the tool or vice-versa:
1 Select, in Page View, the page onto which you want to place the annotation.
2 Press Shift and left-click to display the crosshair and select an area.
3 On release of the button one of the context sensitive menus appears.
Figure 6.11 Context-sensitive menus
ADD FREE TEXT ANNOTATIONS INDEX CONTENTS 77
Page 78

C
OREL
PDF F
USION USER GUIDE
HOW DO I...? INDEX CONTENTS 78
4 Click the free text icon (1) or select Document > Comments > Free Text or press Alt
+ T.
5 Click within the selected area and then type in your text.
6 When the text is typed you can select the new text and apply formatting by selecting
the from the options available. For more information see “Free text annotations” on
page 102.
Or:
1 Select, in Page View, the page onto which you want to place the free text.
2 Select Document > Comments > Free Text or press Alt + T. The crosshair appears
ready for you to select an area on the page.
3 Select an area on the page.
4 Click within the selected area and then type in your text.
5 When the text is typed you can select the new text and apply formatting by selecting
from the options available. For more information see “Free text annotations” on
page 102.
NOTE: To flatten the free text annotation so that the text becomes part of the underlying page see
“Flatten annotation” on page 104
6.16 Add hyperlinks
You can create and edit hyperlinks to other pages within the document, web pages or
another file.
You can add three types of hyperlinks to a document: a link to a page, a link to a web
page and a link to a file. Once a link is added to a document selecting that link will
automatically display the linked page, web page or file.
1 Select, in Page View, the page onto which you want to place the link.
2 Select some text or press Shift and left-click to display the crosshair and select an area.
.
ADD HYPERLINKS INDEX CONTENTS 78
Page 79
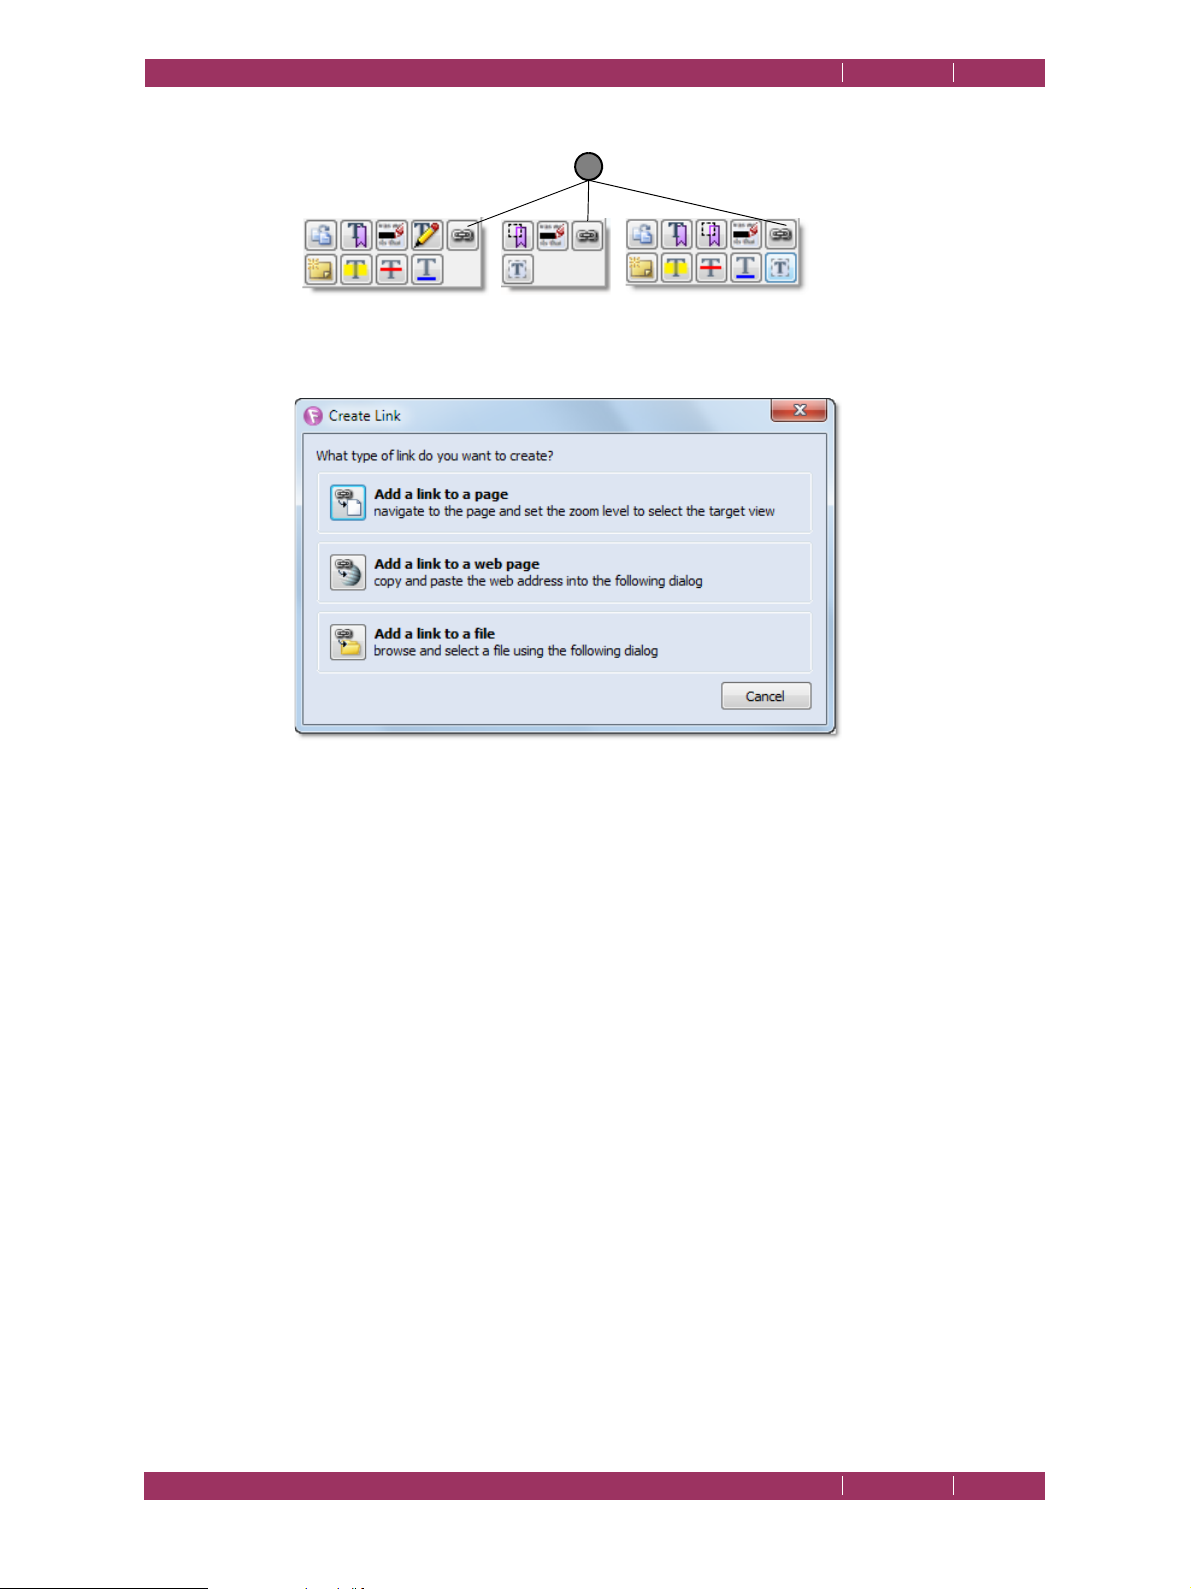
C
1
OREL
PDF F
USION USER GUIDE
HOW DO I...? INDEX CONTENTS 79
3 On release of the button one of the context sensitive menus appears:
Figure 6.12 Context-sensitive menus
NOTE:
Click the hyperlink icon (1) to display the Create Link dialog:
Figure 6.13 Create Link dialog
Add a link to a page
Select this option followed by clicking the page to which you want to
display when the link is selected.
Add a link to a web page
Select this option and enter the URL of the web page you want to
display when the link is selected. You can omit the
is automatically added.
http://
part as that
Add a link to a file
Select this option and use the displayed browser to select the file you
want to open when the link is selected.
NOTE: If you add a link to a PDF which is moved onto another machine, the file and associated application
must exist in the same location on that machine for the link to work.
For more information see “Hyperlink properties, delete and edit” on page 105.
6.17 Change the destination of the output file
By default, output files are created in the same folder as the input file. You can change
the output destination:
1Use File > Open or drop a file onto the Assembly or Page View to open a document.
CHANGE THE DESTINATION OF THE OUTPUT FILE INDEX CONTENTS 79
Page 80

C
OREL
PDF F
USION USER GUIDE
HOW DO I...? INDEX CONTENTS 80
2 Make any changes to the document.
3Click File > Save As.... This displays the Save As dialog.
4 Select the output Document type (XPS, PDF or DOC).
5 Select the required Setup name.
6 Make sure the General tab is selected.
7Check the Always output files to option.
8Either, select the Browse... option to display a Browse For Folder dialog that lets you
select the required location.
9Click OK to accept the change. Click Cancel to abort the change.
6.18 Produce more compact PDF files
The following options have an effect on the size of the output PDF file:
• “Compression” on page 80
• “Subset fonts” on page 81
The default settings after installation are designed to give the maximum lossless
compression for general use.
6.18.1 Compression
The compression options reduce the size of your file by varying amounts. For full details
see “Compression tab (PDF)” on page 117.
1Use File > Open or drop a file onto the Assembly or Page View to open a document.
2 Make any changes to the document.
3Click File > Save As.... This displays the Save As dialog.
4 Select the output Document type as PDF.
5 Select the Setup name you want to edit.
6Click Edit....
NOTE: If you have one of the standard setups selected you cannot edit it.
7 Make sure the Compression tab is selected.
8Check Compress text and line art option to apply zip compression to the PDF
commands in the page descriptions.
9 Make a selection in each of the Compression options:
Zip compression is usually the best overall compromise setting for images as it is efficient
and lossless. If you can tolerate lossy compression, that is, compression that throws some
of the data away never to be retrieved, use JPEG compression.
PRODUCE MORE COMPACT PDF FILES INDEX CONTENTS 80
Page 81

C
OREL
PDF F
USION USER GUIDE
HOW DO I...? INDEX CONTENTS 81
You may find that Zip with Predictor compression sometimes improves the performance
on images where there are lots of similarly colored pixels. Note that the terms Zip and
Flate are interchangeable; they both refer to the same kind of compression.
10 Make a selection in each of the Downsampling options and choose a target resolution.
These options allow you to control whether and how Corel PDF Fusion reduces the
resolution of images in the file input. Remember, when you halve the resolution you
quarter the amount of data.
11 Click OK to accept the changes. Select Cancel to abort the changes.
6.18.2 Subset fonts
The Subset fonts options reduce the size of the output. When you are working in a
controlled environment where you know which fonts are loaded on the destination
computer, choosing not to embed some or all fonts can further reduce the size.
This option is selected by default. Therefore it may not need setting.
1Use File > Open or drop a file onto the Assembly or Page View to open a document.
2 Make any changes to the document.
3Click File > Save As.... This displays the Save As dialog.
4 Select the output Document type as PDF.
5 Select the Setup name you want to edit.
6Click Edit....
7 Make sure the Fonts Embedding tab is selected.
8Check Subset fonts option.
9Click OK to accept the changes. Select Cancel to abort any changes.
6.19 Produce PDF files that can be sent by e-mail
To produce PDF files that can more easily be sent by e-mail:
1Use File > Open or drop a file onto the Assembly or Page View to open a document.
2 Make any changes to the document.
3Click File > Save As.... This displays the Save As dialog.
4 Select the output Document type as PDF.
5 Select the Setup name you want to edit.
6Click Edit....
7 Make sure the General tab is selected.
PRODUCE PDF FILES THAT CAN BE SENT BY E-MAIL INDEX CONTENTS 81
Page 82

C
OREL
PDF F
USION USER GUIDE
HOW DO I...? INDEX CONTENTS 82
If you want to automatically open the default e-mail application when the PDF is created:
8Check Send the PDF as an e-mail attachment in the Output options.
9Click OK to accept the changes. Select Cancel to abort any changes.
To find out how to e-mail documents and comments see “E-mail documents” on
page 84 and “E-mail comments” on page 85.
NOTE: In the Trial period, Corel PDF Fusion is fully featured for 30 days. After this period Corel PDF Fusion
remains fully featured and lets you view and print documents. However, saved documents and
changed documents you print or attach to an e-mail are watermarked.
6.20 Produce files for fast web viewing
If you intend to distribute your PDF files via the web and want to produce a document
that is displayed faster, using page-at-a-time downloading, use the Optimize for fast web
viewing option. When a document is optimized for page-at-a-time downloading, the
web server sends individual pages of information requested by the user, rather than the
whole PDF document:
1Use File > Open or drop a file onto the Assembly or Page View to open a document.
2 Make any changes to the document.
3Click File > Save As.... This displays the Save As dialog.
4 Select the output Document type as PDF.
5 Select the Setup name you want to edit.
6Click Edit....
7 Make sure the General tab is selected.
8Check Optimize for fast web viewing in the File options section.
9Click OK to accept the changes. Select Cancel to abort any changes.
NOTE: Fast web viewing depends on the configuration of the web server and also the capabilities of the
PDF client. This option ensures that the file meets the requirements for Linearized PDF and, under
the right circumstances, it could be delivered and displayed progressively.
6.21 Launch application to view the file when complete
You can configure Corel PDF Fusion to automatically open the default viewing
application on your computer when you create an output file:
1Use File > Open or drop a file onto the Assembly or Page View to open a document.
2 Make any changes to the document.
3Click File > Save As.... This displays the Save As dialog.
4 Select the output Document type (PDF or XPS).
PRODUCE FILES FOR FAST WEB VIEWING INDEX CONTENTS 82
Page 83

C
OREL
PDF F
USION USER GUIDE
HOW DO I...? INDEX CONTENTS 83
5 Select the Setup name you want to edit.
6Click Edit....
7 Make sure the General tab is selected.
8 Check either, View the PDF document after creation or View the XPS document after
creation in the Output options section (depending on whether you are editing a PDF
or XPS setup).
9Click OK to accept the changes. Select Cancel to abort any changes.
6.22 Share setups
All your Setups can be exported and then subsequently imported for use on other
installs of Corel PDF Fusion.
• “Export setups” on page 83
• “Import setups” on page 84
6.22.1 Export setups
Use the Export option to expor t an XML file containing the details o f your setup for use
on another computer or by another person. This XML file can be transferred between
versions of Corel PDF Fusion. Use the Import option to impor t such an XML file,
described in “Importing setups” on page 112. This option is used to ensure that all users
within an organization have the same setups and, therefore, create output documents of
the same type.
NOTE: An XML file is a text file which can be opened and hand edited. However, doing this may cause
your version of Corel PDF Fusion to produce unexpected results or fail.
When a setup file is exported, all setups, default and custom, are saved to the XML file.
When an XML file is subsequently imported you are presented with the option to accept
or reject each individual setup.
To create an XML setup file for distribution to other users of Corel PDF Fusion:
1 Ensure all your setups are correct in all details.
2Use File > Open or drop a file onto the Assembly or Page View to open a document.
3 Make any changes to the document.
4Click File > Save As.... This displays the Save As dialog.
5 Select the output Document type (PDF or XPS).
6 Select the Setup name you want to edit.
7Click the Export option.
8 Use the displayed Export Setup dialog to choose a location and name for your XML file.
.xml
Ensure the file has a
SHARE SETUPS INDEX CONTENTS 83
extension.
Page 84

C
OREL
PDF F
USION USER GUIDE
HOW DO I...? INDEX CONTENTS 84
9Click Save to save the file.
NOTE: When an XML file is exported and subsequently imported the Always output files to and Launch
on job completion locations are not transferred. This is because these locations are system specific
and may not be appropriate on your system.
6.22.2 Import setups
Use the Import option to import an XML file containing the setup from another
computer or user. Use the Export setups option to create an import file, as described
in “Exporting setups” on page 112. This option is used to ensure all users within an
organization have the same setups and, therefore, create output documents of the same
type.
To impor t an XML setup file:
1Use File > Open or drop a file onto the Assembly or Page View to open a document.
2 Make any changes to the document.
3Click File > Save As.... This displays the Save As dialog.
4Click Edit....
5Click the Import option on the XPS, PDF or DOC setups dialog.
6 Use the displayed Import Setup dialog to choose the XML file to be imported. The file
.xml
has a
extension.
7Click Open to import the file.
8 For each individual setup a confirmation prompt appears.
9Click Ye s to import the setup. Click No to cancel the import of the setup.
NOTE: When an XML file is imported, the Always output files to and Launch on job completion locations
are not transferred. This is because these locations are system specific and may not be appropriate
on your system.
6.23 E-mail documents
To add an open document as an attachment to an e-mail as a PDF or XPS file:
1 Make sure the document you want to e-mail is selected.
2 Select File > Email > Document as PDF or Document as XPS.
Your document is converted to the selected format, an e-mail is opened with your
system registered e-mail application, and the document is added as an attachment.
E-MAIL DOCUMENTS INDEX CONTENTS 84
Page 85

C
OREL
PDF F
USION USER GUIDE
HOW DO I...? INDEX CONTENTS 85
To find out how to prepare documents so that they can more easily be sent by e-mail
see “Produce PDF files that can be sent by e-mail” on page 81.
NOTE: In the Trial period, Corel PDF Fusion is fully featured for 30 days. After this period Corel PDF Fusion
remains fully featured and lets you view and print documents. However, saved documents and
changed documents you print or attach to an e-mail are watermarked.
6.24 E-mail comments
When comments are added to a document they can be saved as an FDF file. FDF files
are used when you want to send the comments you have made in a document to
someone who you know has the original PDF file. FDF files are much smaller in size and,
therefore, much more portable.
To add the comments in document as a
1 Make sure the document containing the comments you want to e-mail is selected.
2 Select File > Email > Comments.
The comments are exported to an FDF file, an e-mail is opened with your system
registered e-mail application with the FDF file as an attachment.
See also “Import / Export / Email Comments” on page 101.
.fdf attachment to an e-mail:
6.25 Find the version number of Corel PDF Fusion
To report and issue it is useful if you can find the version number of Corel PDF Fusion:
1 Select Help > About.
The version number and build date is in the lower left corner of the dialog.
6.26 Remove tooltips or tool labels from Corel PDF Fusion
To show or hide the tooltips or tool labels (text below the icon):
1 Select Help > Tooltips or Help > Tool Labels.
Repeat the selection to turn them back on.
6.27 Add security to a document
To add security to a document:
1 Select the document to which you want to add security.
2 Select Document > Set Document Security > Standard.
3 Select the desired Encryption level. For more information see “Encryption level” on
page 90.
E-MAIL COMMENTS INDEX CONTENTS 85
Page 86

C
OREL
PDF F
USION USER GUIDE
HOW DO I...? INDEX CONTENTS 86
4 Select the options you want to protect such as Printing, Copying of text and graphics,
General editing and so on.
5Click Next >.
6Under Requires a password to change security settings enter a password to prevent
unauthorized users from changing the security settings in force in the document.
7Under Requires a password to open document enter a password to prevent
unauthorized users from opening the document.
NOTE: If you forget or do not have the password you are not able to access the document.
8Click Finish to apply the new security settings to your document.
9 Once the document is saved the passwords must be used to open the document as well
as perform any of the restricted options.
6.28 Add a watermark to a document
This section describes how to add a watermark to every page of a document.
NOTE: The watermark added by this procedure is different to the system generated watermark displayed
when Corel PDF Fusion is used in “viewer mode”.
To add a watermark to a document:
1 Open and select the document to which you want to add the watermark.
2 Select Document > Watermark... to display the Watermarking options.
3 Enter the text for your watermark in the Text field.
4In the Font and Style panel you can select the following options:
Font
Make a selection from the three available fonts.
Style
Select either bold or outline text.
Color
Select the color icon to display a color picker. Choose a color from the
set of basic colors, select a color in the picker, or enter specific values.
Click Add to Custom Colors to save it when you have found a color
you like.
Size
Either select a specific point size from the drop-down menu or select
Auto fit. Auto fit automatically expands the text so that it fits the
currently selected paper size.
ADD A WATERMARK TO A DOCUMENT INDEX CONTENTS 86
Page 87

C
OREL
PDF F
USION USER GUIDE
HOW DO I...? INDEX CONTENTS 87
Opacity
Use the slider to choose an opaque value. A low value means that the
text is less opaque, (more transparent). Whereas a high value means
that the text is more opaque (less transparent).
NOTE: The character “A” graphic at the lower right side of the Font and Style panel displays the currently
selected opacity and color values.
In the Position panel you can select the following options:
Offset from center
If you want to move the watermark from the center of the page use the
drop-down menus and value fields to determine its new position.
Rotation
The rotation dial allows you to choose the angle at which the text is
displayed. Alternatively, you can enter a specific value into the field or use
the up/down arrows to make a selection.
5 When you are happy with your watermark selections click Apply. Selecting Cancel
aborts the creation of the watermark.
6 When you apply a watermark, a copy of your document containing the watermark is
opened leaving the original document unaffected. You can then choose to save or
abandon the new document.
NOTE: If you are using the Corel PDF Fusion in “viewer mode” a watermark is applied to saved documents.
This is a system generated watermark and cannot be removed or changed without a serial number.
ADD A WATERMARK TO A DOCUMENT INDEX CONTENTS 87
Page 88

Chapter 7 Document settings and
This chapter contains information on how to view and change the document settings
and security.
The information provided in the section includes:
• “Document Settings” on page 88
• “Security Settings” on page 90
7.1 Document Settings
Details for the current document are viewed in the Document Settings dialog.
NOTE: The Document Settings options can be viewed and changed at any time from the Document >
Document Settings menu. These options are also set when completing a document for publication
using the Finish Document Wizard.
1 Select the document for which you want to view and edit the settings.
security
2 Select Document > Document Settings. The details contained in the associated tabs are
the current security settings, as well as general information about the file, such as title
and subject.
For more information about security see “Security Settings” on page 90.
From the Document Settings dialog you can access the following options:
• “Summary—Enter Document Summary Information” on page 88
• “Open Settings—Set Document Open Actions” on page 89
• “Security Settings” on page 90
• “Set File Security—Set Security Permission Options” on page 90
• “Set Document Passwords” on page 91
• “Removing document security settings” on page 92
7.1.1 Summary—Enter Document Summary Information
This is available for XPS and PDF documents.
NOTE: The Summary options are accessed from the Document > Document Settings menu, or from the
File > Finish Document Wizard > Enter Document Summary Information option.
DOCUMENT SETTINGS INDEX CONTENTS 88
Page 89

C
OREL
PDF F
USION USER GUIDE
DOCUMENT SETTINGS AND SECURITY INDEX CONTENTS 89
The Summary tab provides information about the current document, including the file
generating program, the date when the file was created and the last time it was modified.
It also allows you to enter a title, subject, author, and keywords for the document.
7.1.2 Open Settings—Set Document Open Actions
This is available for PDF documents only.
NOTE: The Open Settings options are accessed from the Document > Document Settings menu, or from
the File > Finish Document Wizard > Set Document Open Actions option.
The options in the Document > Document Settings > Open Settings tab determine
how the file is displayed when it is opened.
The following options are available in the Open Settings tab:
Open to page
Enter the page number you want the document to open at. Keep in
mind that document page numbers are not necessarily the same as the
page numbers printed on your document, which are known as
instance, your folios may not include the title page, contents list and
copyright page. Document page numbering includes every page in a
document, starting at the first page (
1
).
folios
. For
View
Select the default page view to use when the document is opened. The
View options are as follows:
Default
Continuous
Single page
: Displays a default page mode setting for the application;
Zoom level
Select the default zoom level to use when the document is opened.
Navigation
Choose how you want the Navigation pane to appear when the
document is opened. Select from,
to Thumbnails
Open in presentation mode
Select to open the document in full screen mode.
Hide menus
Select to conceal program menus when the document is opened.
Hide toolbar
Select to hide these toolbars when the document is opened.
: Allows pages to be scrolled;
: Pages are displayed one at a time.
Closed, Open to Bookmarks
.
or
Open
DOCUMENT SETTINGS INDEX CONTENTS 89
Page 90

C
OREL
PDF F
USION USER GUIDE
DOCUMENT SETTINGS AND SECURITY INDEX CONTENTS 90
7.2 Security Settings
This is available for PDF documents only.
Select Document > Document Settings > Security Settings to open the Security
Settings tab to see what security measures are currently in force,
This tab displays the security settings for the currently selected document.
Remove File Security
Use this to remove file security. The owner-level password is required to
do this.
Set File Security
Use this to set file security. This opens the Set File Security tab.
For more information see:
• “Set File Security—Set Security Permission Options” on page 90
• “Set Document Passwords” on page 91
• “Removing document security settings” on page 92
7.2.1 Set File Security—Set Security Permission Options
This is available for PDF documents only.
NOTE: The Set File Security options are accessed from the Set File Security button on the Document >
Document Settings menu, or from the File > Finish Document Wizard > Set Permissions Options.
To change the security settings that are currently in force in a document:
1Click the Set File Security button on the Security Settings tab. Alternatively, select
Document > Set Document Security > Standard.
2 If the file is protected by a “Change Security” password, enter it in the tab.
3 Set your required security settings from the following options:
Encryption level
Select either
complies with the PDF 1.3 standard and provides basic PDF file security.
128-bit encryption complies with the PDF 1.4 standard and provides
more advanced security.
Printing
Choose whether to allow or disallow document printing.
40-bit
or
128-bit encryption
. 40-bit encryption
Copying of text and graphics
Choose whether to allow the copying of text and graphics in the
document.
Content access for visually impaired
(128-bit encryption only). Choose the security setting for making text
available to screen readers for the visually impaired and for indexing.
SECURITY SETTINGS INDEX CONTENTS 90
Page 91

C
OREL
PDF F
USION USER GUIDE
DOCUMENT SETTINGS AND SECURITY INDEX CONTENTS 91
General editing
Choose the security setting for general editing. General editing includes
working with pages, bookmarks and document opening properties. See
also Document assembly, below.
Document assembly
Choose the security setting for document assembly (deleting, rotating,
inserting and extracting pages), when general editing is
not
allowed. This
option is not available when 40-bit encryption is selected.
Comment authoring
Choose the security setting for adding and changing comments and form
fields. See also, Form Field Fill-in and Signing.
Form field fill-in and signing
Choose the security setting for form fields and digital signatures when
not
Comment authoring is
allowed. Form fields and digital signatures are
not available in Corel PDF Fusion. This option is not available when 40bit encryption is selected.
Encrypt metadata
When selected, the document metadata (title, subject, author and so
on) are encrypted along with the document content. Uncheck this
option if you want to encrypt the contents of a document but still allow
search engines access to the document metadata.
This option is available only when you select 128-bit security.
7.2.2 Set Document Passwords
This is available for PDF documents only.
NOTE: The Set Document Passwords options are accessed by pressing Next on the Set File Security menu
on the Document > Document Settings menu, or from the File > Finish Document Wizard > Set
Document Passwords options.
To change the document passwords that are currently in force in a document:
1 In the Document Settings dialog (which is opened in “Set File Security—Set Security
Permission Options”) click Next > to advance. The Security Password and Open
password options appear.
NOTE: For the Next > option to appear you must have an encr yption level set. See
2 Set the following options:
“Encryption level”
.
Requires a password to change security settings
Select to enter a password to prevent unauthorized users from changing
the security settings in force in the document.
SECURITY SETTINGS INDEX CONTENTS 91
Page 92

C
OREL
PDF F
USION USER GUIDE
DOCUMENT SETTINGS AND SECURITY INDEX CONTENTS 92
Requires a password to open document
Select this check box and enter a password to prevent unauthorized
users from opening the document.
NOTE: If you forget, or do not have the password you are not able to access the document.
3Click Finish to apply the new security settings to your document.
7.2.3 Removing document security settings
This is available for PDF documents only.
To remove all security settings:
1 Select Document > Set Document Security > None, or click Remove File Security in
the Security Settings tab.
2 Enter the correct password if prompted and click OK.
3Click OK to apply the changes.
SECURITY SETTINGS INDEX CONTENTS 92
Page 93

Chapter 8 Working with
annotations
This chapter provides information on how to use bookmarks, comments, free text and
hyperlinks.
The information provided in the section includes:
• “Working with bookmarks” on page 93
• “Working with comments and annotations” on page 98
• “Free text annotations” on page 102
• “Adding hyperlinks” on page 104
• “Spell check comments and free text” on page 106
8.1 Working with bookmarks
This section provides all the information you might need on bookmarks.
Bookmarks allow you to tag and identify locations, selected text and areas. They are
added in the Page View and displayed on the page and in the Navigation pane when the
Bookmarks tab is selected. If your document does not have any bookmarks see “Add
bookmarks” on page 76 for more information.
The available options are:
• “Bookmarks in the Navigation pane” on page 94
• “Bookmark proper ties” on page 96
WORKING WITH BOOKMARKS INDEX CONTENTS 93
Page 94
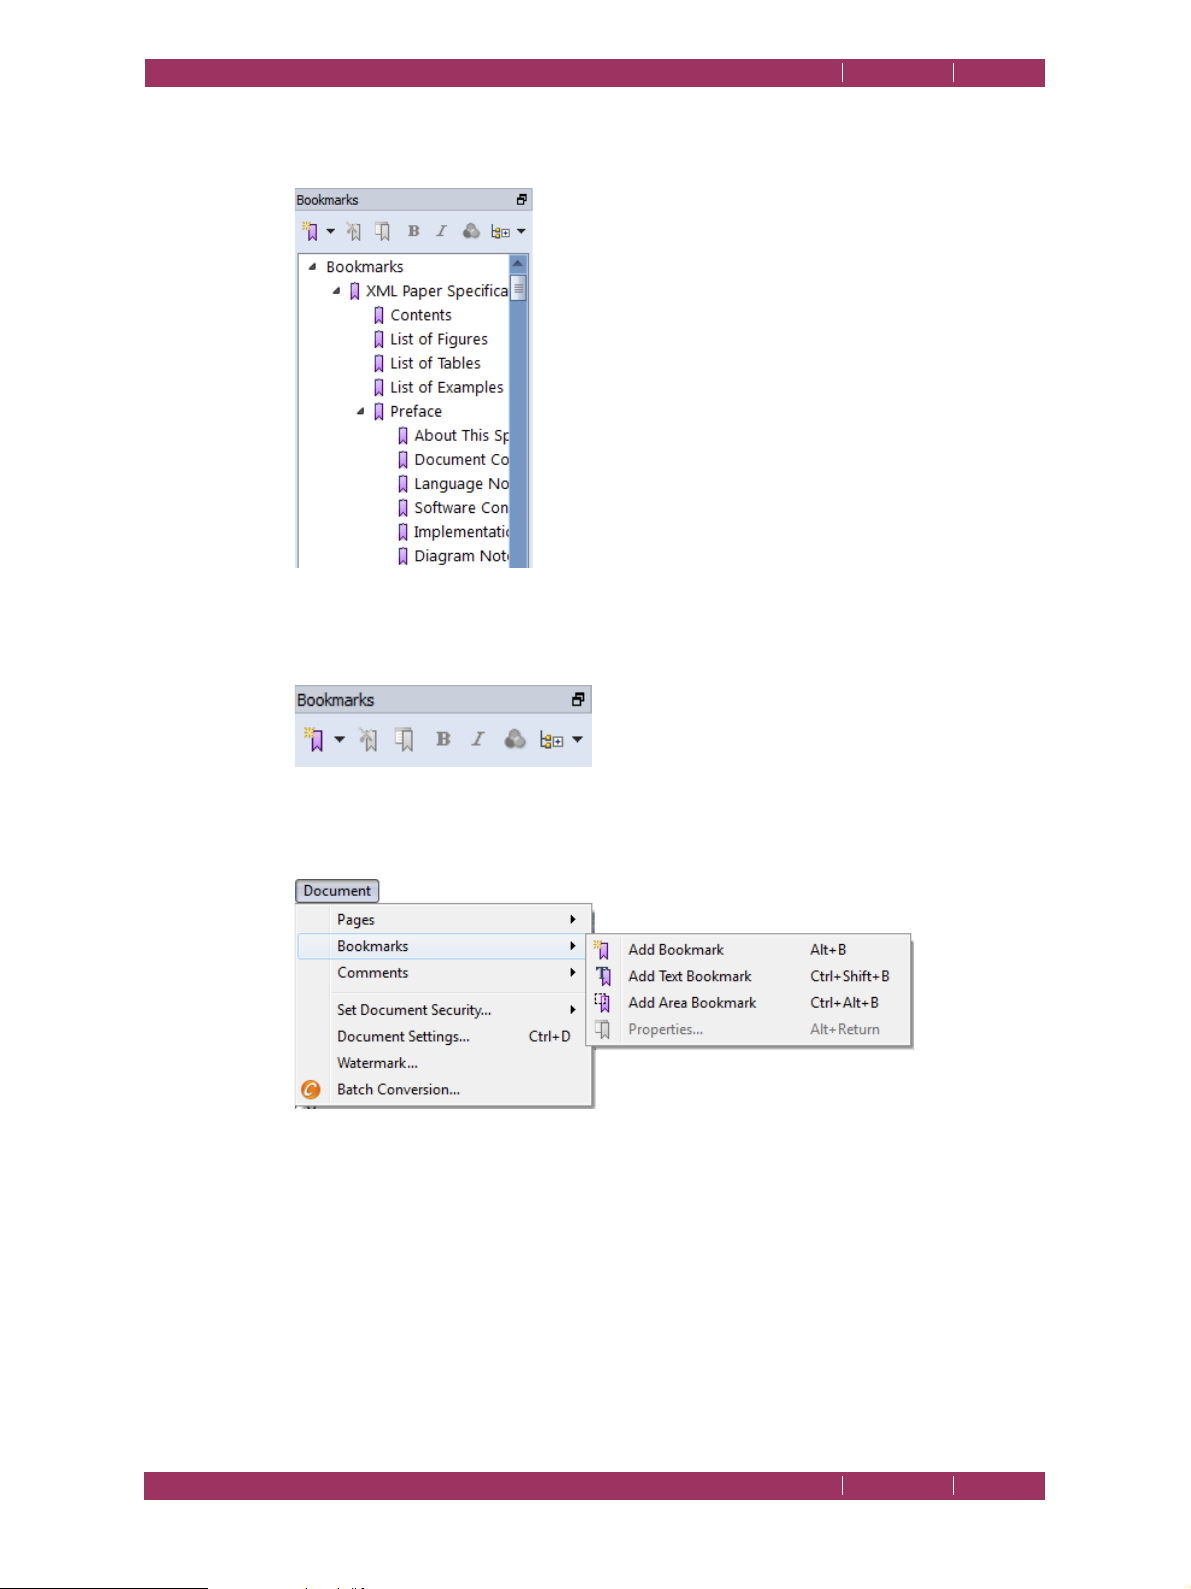
C
OREL
PDF F
USION USER GUIDE
WORKING WITH ANNOTATIONS INDEX CONTENTS 94
8.1.1 Bookmarks in the Navigation pane
Bookmarks are listed in the Navigation pane under the Bookmarks tab.
Figure 8.1 Bookmarks in the Navigation pane
The tools for working with bookmarks are in the Bookmarks toolbar which, by default,
is located in the Bookmarks tab of the Navigation pane.
Figure 8.2 Bookmark tools
You can also select the options from the Document > Bookmarks menu:
Figure 8.3 Document menu bookmark options
When Bookmarks are displayed in the Navigation pane you can:
• Drag and drop bookmarks into a new position in the list.
• Click the bookmarks pane and use your mouse scroll wheel to move to the top or
bottom of the bookmarks list.
• Double-click a bookmark and change its name. After double-clicking you can right-click
and select Cut, Copy, Paste, Delete and Select All. When you have used one of these
options you can also use Undo and Redo. All undo/redo steps are retained until you save
the file. Once saved, all levels of undo/redo are discarded.
WORKING WITH BOOKMARKS INDEX CONTENTS 94
Page 95

C
OREL
PDF F
USION USER GUIDE
WORKING WITH ANNOTATIONS INDEX CONTENTS 95
• Use Shift-click to select multiple consecutive bookmarks.
• Use Ctrl-click to select multiple non-consecutive bookmarks.
• Right-click on a bookmark to display the following pop-up menu:
Figure 8.4 Right-click bookmark menu options
Select All
Select all the bookmarks.
Deselect All
Deselect all bookmarks.
Select Level
Select all bookmarks at the current level.
Delete
Delete the selected bookmarks.
Edit Bookmark Destination
Select to edit the destination of the bookmark. When you click this
option the bookmark highlights. Your next action must be to click
somewhere within the document and specify the location to be
associated with the bookmark.
Properties
Display the Bookmark properties dialog. For more information see
“Bookmark proper ties” on page 96.
The following tools are available:
Add Bookmark / Add Text Bookmark / Add Area Bookmark
Click the down-arrow to select the Add Bookmark options.
Click Add Bookmark and then click onto the page to specify the location
for the bookmark. The Bookmark Properties dialog appears. See
“Bookmark proper ties” on page 96.
Click Add Text Bookmark to change cursor to an I-beam selector. Select
the text to be bookmarked. The Bookmark Properties dialog appears.
See “Bookmark properties” on page 96.
Click Add Area Bookmark to change the cursor to a crosshair allowing
you to select an area of the page to be bookmarked. The Bookmark
Properties dialog appears. See “Bookmark properties” on page 96.
WORKING WITH BOOKMARKS INDEX CONTENTS 95
Page 96

C
OREL
PDF F
USION USER GUIDE
WORKING WITH ANNOTATIONS INDEX CONTENTS 96
Delete Selected Bookmark(s)
Click to delete a bookmark from the list.
View / Edit Properties of Selected Bookmarks
Click to edit the bookmark properties. See “Bookmark properties” on
page 96.
Bold
Select a bookmark and click this icon to make it bold.
Italic
Select a bookmark and click this icon to make it italic.
Choose the color of the Bookmark text
Select a bookmark and click this icon to display the color picker. Choose
from the set of basic colors, select a color in the picker or enter specific
values. Click Add to Custom Colors to save the color.
Expand All / Collapse All
Click the down-arrow and select to expand or collapse all bookmark
entries.
8.1.2 Bookmark properties
To display the bookmark properties:
• Right-click a bookmark and select Properties... from the pop-up menu.
• Select a bookmark and click the View/Edit Properties of Selected Bookmarks icon to
display the Bookmark Proper ties dialog.
Name
This displays the current bookmark name. You can enter a new name.
Style
These options change the font style of the bookmark.
Bold / Italic
Click to make the bookmark bold or italic.
Color
Click to display a color picker. Choose colors from the set of basic colors,
select a color in the picker, or enter specific values. Click Add to Custom
Colors to save it when you have found a color you like.
The Destination Zoom panel contains the following options that decide the zoom value
of the page to use when the bookmark is selected.
Actual Size (100%)
Display the page associated with the bookmark at actual size.
Fit Width
Display the page associated with the bookmark so that it fits into the
available width of the display window.
WORKING WITH BOOKMARKS INDEX CONTENTS 96
Page 97

C
OREL
PDF F
USION USER GUIDE
WORKING WITH ANNOTATIONS INDEX CONTENTS 97
Fit Page
Display the page associated with the bookmark so that a whole page fits
into the display width.
Fit Selected Area
This only appears when a bookmark is associated with an area using the
Add Area Bookmark option. In this case the page is opened so that the
selected area of the bookmark fits into the display.
No Specific Zoom
With this selected the page is opened with the current zoom option.
Custom (%)
Display the page associated with the bookmark at the zoom value
entered into the Custom field.
NOTE: When you select a bookmark with a specified zoom value the whole document is zoomed to that
value. The document zoom remains in force even if you delete the bookmark that specified the
zoom. You can of course reduce the magnification of the document using
levels”
and
“Page Zoom” on page 33
.
“Magnification”, “Zoom
Select OK when you have completed the bookmark proper ties.
WORKING WITH BOOKMARKS INDEX CONTENTS 97
Page 98

C
OREL
PDF F
USION USER GUIDE
WORKING WITH ANNOTATIONS INDEX CONTENTS 98
8.2 Working with comments and annotations
This section provides information on comments and annotations.
Comments, sometimes called Notes, allow you to add various comments to a
document. Any notes you create can be spell checked. Annotations allow you to mark
text with highlights, underlines or strike-outs. Both comments and annotations are added
in the Page View and displayed on the page and in the Navigation pane when the
Comments tab is selected. If your document does not have any comments or
annotations see “Add comments/notes” on page 74 and “Add text annotations” on
page 76 for more information.
The available options are:
• “Comments in the Page View” on page 98
• “Comments in the Navigation pane” on page 99
• “Annotation properties” on page 101
8.2.1 Comments in the Page View
When the document is displayed in the Page View, comments that have been added to
a PDF document are displayed in their correct location.
When comments are displayed on the page in Page View you can:
• Drag and drop a comment to a new location on the page.
• Double-click a comment to open it.
• Right-click a comment to display the following menu:
Figure 8.5 Right-click comment menu options
Delete
Deletes the selected comment from the document.
Properties
Displays the Annotation properties dialog. For more information see
“Annotation properties” on page 101.
Open Comment
Opens the comment and displays its contents which you can edit. Click
the cross in the top right-hand corner to close the comment.
Reset Comment Location
Resets the comment to its original location.
WORKING WITH COMMENTS AND ANNOTATIONS INDEX CONTENTS 98
Page 99

C
OREL
PDF F
USION USER GUIDE
WORKING WITH ANNOTATIONS INDEX CONTENTS 99
8.2.2 Comments in the Navigation pane
Comments that have been added to a document are listed in the Navigation pane under
the Comments tab.
Figure 8.6 Comment pane
The tools for working with comments are found in the Comments toolbar which, by
default, is located in the Comment tab of the Navigation pane.
Figure 8.7 Comment tools
Select these options from the Document > Comments menu:
Figure 8.8 Document menu comment options
WORKING WITH COMMENTS AND ANNOTATIONS INDEX CONTENTS 99
Page 100

C
OREL
PDF F
USION USER GUIDE
WORKING WITH ANNOTATIONS INDEX CONTENTS 100
When Comments are displayed in the Navigation pane you can:
• Click in the Comments pane and use the mouse scroll wheel to scroll to the top or
bottom of the comments list.
• Double-click a comment and change its name. After double-clicking you can right-click
and select Cut, Copy, Paste, Delete and Select All. When you have used one of these
options you can also use Undo and Redo. All undo/redo steps are retained until you save
the file. Once saved, all levels of undo/redo are discarded.
• Use Shift-click to select multiple consecutive comments.
• Use Ctrl-click to select multiple non-consecutive comments.
• Right-click on a comment to display the following pop-up menu:
Figure 8.9 Right-click comment menu options
Select All
Selects all the comments in the document.
Deselect All
Deselects all comments.
Select Level
Selects all the comments at the current level.
Delete
Deletes the selected comment from the document.
Properties
Displays the Annotation properties dialog. For more information see
“Annotation properties” on page 101.
The following tools are available:
Comment type
Select a comment followed by this icon to display the options to create
a Note, Highlight, Underline or Strikeout annotation. When you select
a Note click the desired location on the page and then enter some text.
For Highlights, Underlines and Strike-outs the cursor changes to an Ibeam allowing you to select the text you want to annotate.
Delete Selected Comments
Select a comment and click this icon to delete it.
WORKING WITH COMMENTS AND ANNOTATIONS INDEX CONTENTS 100
 Loading...