

Page 1
USER GUIDE
Page 2

Table of contents
Welcome to Corel Paint Shop Pro Photo. . . . . . . . . . . . . . . . . 1
What’s in this user guide . . . . . . . . . . . . . . . . . . . . . . . . . . . . . . . . 1
What’s new in Corel Paint Shop Pro Photo X2 . . . . . . . . . . . . . . . 1
Installing and uninstalling Corel Paint Shop Pro Photo. . . . . . . . . 5
Starting and exiting Corel Paint Shop Pro Photo. . . . . . . . . . . . . . 7
Registering Corel products . . . . . . . . . . . . . . . . . . . . . . . . . . . . . . 8
Updating Corel Paint Shop Pro Photo . . . . . . . . . . . . . . . . . . . . . . 8
Corel Support Services . . . . . . . . . . . . . . . . . . . . . . . . . . . . . . . . . 8
About Corel Corporation . . . . . . . . . . . . . . . . . . . . . . . . . . . . . . . . 9
Learning how to use Corel Paint Shop Pro Photo . . . . . . . . . 11
Documentation conventions . . . . . . . . . . . . . . . . . . . . . . . . . . . . 11
Using the Learning Center palette. . . . . . . . . . . . . . . . . . . . . . . . 12
Using the Help system . . . . . . . . . . . . . . . . . . . . . . . . . . . . . . . . . 13
Workspace tour . . . . . . . . . . . . . . . . . . . . . . . . . . . . . . . . . . . . 15
Exploring the workspace . . . . . . . . . . . . . . . . . . . . . . . . . . . . . . . 15
Using palettes . . . . . . . . . . . . . . . . . . . . . . . . . . . . . . . . . . . . . . . 17
Using toolbars . . . . . . . . . . . . . . . . . . . . . . . . . . . . . . . . . . . . . . . 18
Using tools. . . . . . . . . . . . . . . . . . . . . . . . . . . . . . . . . . . . . . . . . . 19
Getting started with Corel Paint Shop Pro Photo . . . . . . . . . 25
Getting photos into Corel Paint Shop Pro Photo. . . . . . . . . . . . . 25
Opening and closing images . . . . . . . . . . . . . . . . . . . . . . . . . . . . 27
Saving images . . . . . . . . . . . . . . . . . . . . . . . . . . . . . . . . . . . . . . . 29
Copying images into other applications . . . . . . . . . . . . . . . . . . . 31
Deleting images. . . . . . . . . . . . . . . . . . . . . . . . . . . . . . . . . . . . . . 32
Working with the Organizer . . . . . . . . . . . . . . . . . . . . . . . . . . . . 32
Working with photo trays . . . . . . . . . . . . . . . . . . . . . . . . . . . . . . 33
Adjusting images . . . . . . . . . . . . . . . . . . . . . . . . . . . . . . . . . . 35
Rotating images. . . . . . . . . . . . . . . . . . . . . . . . . . . . . . . . . . . . . . 35
Table of contents i
Page 3

Cropping images . . . . . . . . . . . . . . . . . . . . . . . . . . . . . . . . . . . . . 37
Straightening images. . . . . . . . . . . . . . . . . . . . . . . . . . . . . . . . . . 39
Correcting photographic perspective . . . . . . . . . . . . . . . . . . . . . 40
Making basic photo corrections automatically . . . . . . . . . . . . . . 41
Removing digital camera noise . . . . . . . . . . . . . . . . . . . . . . . . . . 43
Combining bracketed photos . . . . . . . . . . . . . . . . . . . . . . . . . . . 44
Creating an area of focus by controlling depth of field. . . . . . . . 47
Resizing images . . . . . . . . . . . . . . . . . . . . . . . . . . . . . . . . . . . . . . 49
Retouching and restoring images . . . . . . . . . . . . . . . . . . . . 53
Removing red-eye . . . . . . . . . . . . . . . . . . . . . . . . . . . . . . . . . . . . 53
Applying cosmetic corrections . . . . . . . . . . . . . . . . . . . . . . . . . . 54
Removing scratches. . . . . . . . . . . . . . . . . . . . . . . . . . . . . . . . . . . 58
Removing flaws and objects . . . . . . . . . . . . . . . . . . . . . . . . . . . . 60
Erasing image areas. . . . . . . . . . . . . . . . . . . . . . . . . . . . . . . . . . . 62
Recoloring image areas for a realistic effect . . . . . . . . . . . . . . . . 64
Using the Express Lab. . . . . . . . . . . . . . . . . . . . . . . . . . . . . . . 67
Starting the Express Lab . . . . . . . . . . . . . . . . . . . . . . . . . . . . . . . 68
Getting to know the Express Lab. . . . . . . . . . . . . . . . . . . . . . . . . 69
Getting photos into the Express Lab . . . . . . . . . . . . . . . . . . . . . . 70
Displaying photos . . . . . . . . . . . . . . . . . . . . . . . . . . . . . . . . . . . . 71
Cropping and straightening photos. . . . . . . . . . . . . . . . . . . . . . . 71
Applying basic adjustments to photos . . . . . . . . . . . . . . . . . . . . 72
Cloning and retouching photos. . . . . . . . . . . . . . . . . . . . . . . . . . 73
Removing red-eye in the Express Lab . . . . . . . . . . . . . . . . . . . . . 75
Rotating photos. . . . . . . . . . . . . . . . . . . . . . . . . . . . . . . . . . . . . . 75
Zooming and panning . . . . . . . . . . . . . . . . . . . . . . . . . . . . . . . . . 76
Rating photos . . . . . . . . . . . . . . . . . . . . . . . . . . . . . . . . . . . . . . . 76
Saving photos . . . . . . . . . . . . . . . . . . . . . . . . . . . . . . . . . . . . . . . 77
Deleting photos . . . . . . . . . . . . . . . . . . . . . . . . . . . . . . . . . . . . . . 78
Exiting the Express Lab . . . . . . . . . . . . . . . . . . . . . . . . . . . . . . . . 78
ii Table of contents
Page 4

Working with selections . . . . . . . . . . . . . . . . . . . . . . . . . . . . . 79
Creating selections . . . . . . . . . . . . . . . . . . . . . . . . . . . . . . . . . . . 79
Hiding and displaying the selection marquee . . . . . . . . . . . . . . . 84
Modifying selections . . . . . . . . . . . . . . . . . . . . . . . . . . . . . . . . . . 84
Inverting and clearing selections. . . . . . . . . . . . . . . . . . . . . . . . . 86
Working with layers . . . . . . . . . . . . . . . . . . . . . . . . . . . . . . . . . 87
Understanding layers. . . . . . . . . . . . . . . . . . . . . . . . . . . . . . . . . . 87
Using layers with photos . . . . . . . . . . . . . . . . . . . . . . . . . . . . . . . 88
Using the Layers palette . . . . . . . . . . . . . . . . . . . . . . . . . . . . . . . 90
Creating layers. . . . . . . . . . . . . . . . . . . . . . . . . . . . . . . . . . . . . . . 92
Renaming layers. . . . . . . . . . . . . . . . . . . . . . . . . . . . . . . . . . . . . . 92
Viewing layers . . . . . . . . . . . . . . . . . . . . . . . . . . . . . . . . . . . . . . . 93
Changing the order of layers in an image . . . . . . . . . . . . . . . . . . 93
Moving layers on the canvas . . . . . . . . . . . . . . . . . . . . . . . . . . . . 94
Using layer styles . . . . . . . . . . . . . . . . . . . . . . . . . . . . . . . . . . . . . 94
Working with colors and materials . . . . . . . . . . . . . . . . . . . . 97
Using the Materials palette . . . . . . . . . . . . . . . . . . . . . . . . . . . . . 97
Choosing colors by using the Color Picker . . . . . . . . . . . . . . . . 100
Choosing colors from an image or the desktop . . . . . . . . . . . . 102
Applying effects . . . . . . . . . . . . . . . . . . . . . . . . . . . . . . . . . . 103
Choosing effects . . . . . . . . . . . . . . . . . . . . . . . . . . . . . . . . . . . . 103
Applying Photo Effects. . . . . . . . . . . . . . . . . . . . . . . . . . . . . . . . 106
Creating vintage-style photos with the Time Machine . . . . . . . 108
Applying film and filter effects to photos . . . . . . . . . . . . . . . . . 108
Adding picture frames to images. . . . . . . . . . . . . . . . . . . . . . . . 109
Using the Picture Tube tool. . . . . . . . . . . . . . . . . . . . . . . . . . . . 110
Warping images. . . . . . . . . . . . . . . . . . . . . . . . . . . . . . . . . . . . . 111
Working with text. . . . . . . . . . . . . . . . . . . . . . . . . . . . . . . . . . 113
Applying text . . . . . . . . . . . . . . . . . . . . . . . . . . . . . . . . . . . . . . . 113
Formatting text . . . . . . . . . . . . . . . . . . . . . . . . . . . . . . . . . . . . . 115
Table of contents iii
Page 5

Printing . . . . . . . . . . . . . . . . . . . . . . . . . . . . . . . . . . . . . . . . . . 119
Printing images . . . . . . . . . . . . . . . . . . . . . . . . . . . . . . . . . . . . . 119
Creating layouts. . . . . . . . . . . . . . . . . . . . . . . . . . . . . . . . . . . . . 123
E-mailing and photo sharing . . . . . . . . . . . . . . . . . . . . . . . . 125
E-mailing photos, videos, and slide shows . . . . . . . . . . . . . . . . 125
Sending images to a photo-sharing service. . . . . . . . . . . . . . . . 127
Index . . . . . . . . . . . . . . . . . . . . . . . . . . . . . . . . . . . . . . . . . . . 129
iv Table of contents
Page 6

Welcome to Corel Paint Shop Pro Photo
Corel® Paint Shop Pro® Photo X2 sets the standard for affordable,
professional image editing. You can edit photos, create graphics, draw,
and paint — all within a highly customizable workspace.
In this section, you’ll learn about
• what’s in this user guide
• what’s new in Corel Paint Shop Pro Photo X2
• installing and uninstalling Corel Paint Shop Pro Photo
• starting and exiting Corel Paint Shop Pro Photo
• registering Corel products
• updating Corel Paint Shop Pro Photo
• Corel® Support Services™
• Corel Corporation
What’s in this user guide
This user guide contains the information you need to become familiar
with the Corel Paint Shop Pro Photo workspace and to get started with
basic tasks and some creative possibilities. It is designed to accompany
the more comprehensive Help, which is available from within the
program, as well as other learning resources, such as tutorials, movies,
and training videos available on the Corel Web site (www.corel.com).
For information about additional learning resources, see “Learning how
to use Corel Paint Shop Pro Photo” on page 11.
What’s new in Corel Paint Shop Pro Photo X2
Corel Paint Shop Pro Photo X2 carries on where the last version of
Corel Paint Shop Pro Photo left off by offering affordable, powerful,
Welcome to Corel Paint Shop Pro Photo 1
Page 7

professional-grade tools and features. Photo enthusiasts — ranging
from professional photographers to digital camera newcomers — can
take their projects to a higher level with a toolset that yields
astonishing results yet is easy to learn.
For photographers
• New! Express Lab — Digital cameras are great for letting you take
lots of photos, but wading through them to pick the best can be
tedious. The new Express Lab lets you quickly view all the photos in
a selected folder, one at a time. You can also delete photos, add
star ratings, and perform basic editing tasks, such as cropping,
straightening, removing blemishes, and fixing red-eye. This rapidedit mode lets you quickly complete the first cut of photos before
doing more detailed work on a select few. For more information,
see “Using the Express Lab” on page 67.
• New! Modified user interface — Your photos look their best against
the new, darker interface of Corel Paint Shop Pro Photo X2. The
neutral gray background allows more accurate color adjustments.
If you prefer the classic Corel Paint Shop Pro Photo workspace
theme, you can toggle off this option. After trying out this new
interface for one week, however, you’ll probably find it much easier
on your eyes. For more information, see “To change the workspace
theme” on page 16.
• New! HDR Photo Merge — HDR (High Dynamic Range) Photo Merge,
a new File menu command, lets you do the seemingly impossible
when shooting high-contrast scenes such as sunsets or interior
shots with bright windows. By shooting one photo for the shadows
(dark areas) and another for the highlights (bright areas), you can
combine both to show the full range of detail. This effect is not
possible to achieve otherwise with any digital or film camera.
An essential part of the HDR Photo Merge feature is the Clarify
control, which analyzes the image and adjusts the brightness in
each region to intelligently compress contrast into a range that can
be shown on screen or on a print. Similar to performing dodging
and burning in a darkroom, using the Clarify control lets you add
just the right touches to an image. For more information, see
2 Corel Paint Shop Pro Photo X2 User Guide
Page 8

“Combining bracketed photos” on page 44.
• Improved! Black-and-White Film effect — This feature, which was
introduced in Corel Paint Shop Pro X, makes it easy to create
dynamic black-and-white photos by simulating the effect of
shooting black-and-white film with colored filters.
This feature, which previously offered only preset color filters, now
lets you select from a virtually infinite range of color combinations.
You have the full creative control of the Channel Mixer command,
but in a far simpler interface. Plus, you can adjust brightness and
use the Clarify control to further enhance the black-and-white
effect.For more information, see “To apply the Black and White Film
effect” in the Help.
• New! Visible watermarks — Whether you shoot professionally or
just share photos on public Web sites, adding a discrete mark to
your photos is a good way to remind viewers who took the shot.
This feature simplifies the task of adding a logo or other graphic,
and you can choose from professional effects like embossing to give
it a subtle look. First, create a graphic and save it to the hard drive.
Then you can easily add it to the center or corner of any photo. For
more information, see “To add a visible watermark” in the Help.
• Improved! Makeover tool enhancements — The Makeover tool puts
some fun into retouching your photos. Two new modes have been
added. The Thinify mode makes any photo subject you click on look
instantly thinner. The Eye Drops mode takes the red out of irritated,
bloodshot eyes. In addition, improvements have been made to the
Blemish Fixer and Suntan modes of the Makeover tool. For more
information, see “Applying cosmetic corrections” on page 54.
For everyone who works with images
Corel Paint Shop Pro Photo is renowned for being user-friendly because
your feedback has always played such a major role in the program’s
development. From requesting one-click automatic fixes that take the
guesswork out of image correction to demanding advanced tools that
meet the exacting standards in digital photography, you the user have
spoken, and Corel Paint Shop Pro Photo has responded.
Welcome to Corel Paint Shop Pro Photo 3
Page 9

• Enhanced! Easier file format selection — Corel Paint Shop Pro Photo
still supports an incredible range of file formats, but now the Save
As dialog box displays the most frequently used file formats in a
special short list at the top. As you use other formats, they are
added to this special list. Now you have the simplicity of a short list
combined with the power of the full list of formats when you need
it. For more information, see “Saving images” on page 29.
• Enhanced! Improved Resize command — The critical Resize
command can look daunting to a new user, so the layout has been
simplified, with settings that do not usually need to be changed
hidden from view. For full control, you can display the full set of
options. For more information, see “Resizing images” on page 49.
• New! Save for Office and Copy Special commands — When you use
photos in documents, presentations, or Web pages, they often are
much larger than they need to be. Photos that are too large can
cause bloated document file sizes, slow performance, and even
printing and sharing problems. The new Save for Office command
lets you resize and select an appropriate file format for the active
image. For more information, see “To save images for office
applications” in Help.
If you prefer the quicker cut-and-paste method, you can use the
new Copy Special command, which offers options for copying
based on what the image will be used for. The resizing function is
built in, which ensures that you don’t add unnecessary image data
to your document. For more information, see “Copying images into
other applications” on page 31.
• Enhanced! Crop tool features for scanned photos — Now, you can
easily separate scanned photos into individual image files with the
Crop to New Image option. This new Crop tool feature allows the
image area within the crop boundary to will become a new
document while the original full scan stays open. In addition, the
Crop tool includes a rotation handle, which provides a convenient
way to rotate or straighten photos in Corel Paint Shop Pro Photo
without switching tools. For more information, see “To create a
new image by cropping” on page 39.
4 Corel Paint Shop Pro Photo X2 User Guide
Page 10

• New! Auto-Preserve Originals — You no longer need to worry about
accidentally overwriting your original photos. The new AutoPreserve Originals feature automatically saves the original version
in a subfolder within the current folder on your hard drive. This new
feature makes the Restore Original feature a true safety net. For
more information, see “Setting Auto Preserve preferences” in the
Help.
• New! Layer styles — Available as a new, third tabbed area on the
Layer Properties dialog box, this feature lets you apply a variety of
common effects to a layer, such as Drop Shadow, Emboss, and
Reflection, without having to leave the dialog box. For more
information, see “Using layer styles” in Help.
• New! Dynamic language switching — If you are an international or
multilingual user, you can choose your language at the time of
installing. Now, for users who share workstations in an
international corporate environment, you can switch languages at
any time. You can select your desired language, exit the application,
and then restart it to work in the new language. (This feature does
not apply to switching between single-byte and double-byte
languages, such as European to Asian character sets.) For more
information, see “Switching languages” in the Help.
• Enhanced! Improved Corel Photo Downloader — This handy and
powerful utility has been streamlined and improved to help you get
photos from your camera, card reader, CD, or any removable
storage device and into your computer quickly and efficiently. For
more information, see “To get photos with the Corel Photo
Downloader” in Help.
• Enhanced! More Picture Tubes, frames, patterns, and preset shapes
— These creative elements offer many new choices.
Installing and uninstalling Corel Paint Shop Pro Photo
The Installer makes it easy to install Corel applications and
components. It lets you
Welcome to Corel Paint Shop Pro Photo 5
Page 11

• install and uninstall any Corel applications included in your
software package
• add components to a currently installed application
• refresh files and configurations of currently installed applications
Before installing Corel Paint Shop Pro Photo X2
• Close all open applications, including all antivirus software, firewall
applications, and any other applications open in the system tray or
on the Windows taskbar. Not doing so may increase the installation
time and interfere with installation.
• If you’re installing on a Windows XP or Windows Vista operating
system, you need to be logged in as Administrator or as a user with
local administrative rights.
• Make sure that you have 500 MB of free disk space available on the
drive where Corel Paint Shop Pro Photo X2 will be installed.
• To avoid possible conflicts with previous versions of the
application, install Corel Paint Shop Pro Photo X2 in the default
directory.
To install Corel Paint Shop Pro Photo
1 Close any open applications.
2 Insert the CD in the CD drive.
If the Installer does not start automatically, click Start
Run on the
Windows® taskbar. Type D:\Setup, where D is the letter that
corresponds to the CD drive.
3 Follow the instructions on your screen.
When you perform a custom installation, you can choose to
associate specific file formats, such as JPEG and TIFF, with
Corel Paint Shop Pro Photo. For more information, see “Setting
file format associations” in the Help.
To uninstall Corel Paint Shop Pro Photo
1 On the Windows taskbar, click Start
6 Corel Paint Shop Pro Photo X2 User Guide
Control Panel.
Page 12

If your operating system is Windows 2000, click Start Settings
Control Panel.
2 Click the Add or Remove Programs icon.
The Add or Remove Programs dialog box appears.
3 From the Currently installed programs list, choose Corel Paint
Shop Pro Photo X2, and click Remove.
4 Follow the InstallShield® wizard instructions.
You can remove user-created files such as presets, user-created
fills, and customized files during the uninstall process. Click
Change in the Add or Remove Programs dialog box, click the
Remove Corel Paint Shop Pro Photo X2 from your computer
button, mark the Remove Corel Paint Shop Pro Photo X2
settings check box, and click Remove.
Starting and exiting Corel Paint Shop Pro Photo
You can start Corel Paint Shop Pro Photo from the Windows taskbar
and exit the program from the File menu.
To start Corel Paint Shop Pro Photo
• On the Windows taskbar, click Start
Shop Pro Photo X2
Corel Paint Shop Pro Photo X2.
All Programs Corel Paint
If you associate specific file formats, such as JPEG and TIFF, with
Corel Paint Shop Pro Photo, you can double-click the associated
file to start the program. For information about setting file
format associations, see “Setting file format associations” in the
Help.
To exit Corel Paint Shop Pro Photo
• Choose File
Welcome to Corel Paint Shop Pro Photo 7
Exit.
Page 13

Registering Corel products
Registering Corel products is important to ensure that you receive
timely access to the latest product updates, as well as valuable
information about product releases. Registration also gives you access
to free downloads, articles, tips and tricks, and special offers.
You can register the program when you install it, or you can register at
a later date.
Yo u c a n re g i s te r th e p r o g r am i n one of the following ways:
• online — If you are connected to the Internet when you install the
Corel graphics application, you can launch the online registration. If
no Internet connection is detected, you are presented with a list of
options.
• by phone — You can call the Corel Customer Service Center nearest
you.
For more information about registering a Corel product, visit
www.corel.com/support/register.
Updating Corel Paint Shop Pro Photo
You can check for product updates. Updates notify you of important
new information about your program.
To update Corel Paint Shop Pro Photo
• Choose Help
Check for Updates.
Corel Support Services
Corel Support Services can provide you with prompt and accurate
information about product features, specifications, pricing, availability,
services, and technical support. For the most current information on
available support and professional services for your Corel product,
please visit www.corel.com/support.
8 Corel Paint Shop Pro Photo X2 User Guide
Page 14

Warranty support
Corel’s warranty support is designed to help customers with technical
issues related to installation and product defects, including crashes and
errors caused by Corel software.
Personal telephone support
Many customers choose to speak directly to a Corel support technician
over the telephone. Live person-to-person support on a toll-free line is
available as a paid service and is designed for individual, small business,
academic, trial version, and OEM users.
About Corel Corporation
Corel is a leading developer of graphics, productivity, and digital media
software, with more than 100 million users worldwide. The company’s
product portfolio includes some of the world’s most popular and widely
recognized software brands, including CorelDRAW® Graphics Suite,
Corel® Paint Shop Pro®, Corel® Painter™, Corel DESIGNER®, Corel®
WordPerfect® Office, WinZip®, and iGrafx®. In 2006, Corel acquired
InterVideo, makers of WinDVD®, and Ulead, a leading developer of
video, imaging, and DVD authoring software. Designed to help people
become more productive and express their creative potential, Corel’s
full-featured software products set a higher standard for value in being
easier to learn and use. The industry has responded with hundreds of
awards recognizing Corel’s leadership in software innovation, design,
and value. Corel’s products are sold in more than 75 countries through
a well-established network of international resellers, retailers, original
equipment manufacturers, online providers, and Corel’s global Web
sites. With its headquarters in Ottawa, Canada, the company has major
offices in the United States, the United Kingdom, Germany, China, and
Japan. Corel’s stock is traded on the NASDAQ under the symbol CREL
and on the TSX under the symbol CRE. For more information, please
visit www.corel.com.
Welcome to Corel Paint Shop Pro Photo 9
Page 15

Page 16

Learning how to use Corel Paint Shop Pro Photo
You can learn Corel Paint Shop Pro Photo in various ways: by reading
the user guide, by accessing the Help, by using the Learning Center
palette, or by exploring the resources on the Corel Web site
(www.corel.com), where you can access tips, tutorials, and information
about training from lynda.com.
You can also check the readme.html file installed with the program to
learn the latest information about the software.
In this section, you’ll learn about
• documentation conventions
• using the Learning Center palette
• using the Help system
Documentation conventions
The following table describes important conventions used in the user
guide and Help.
Convention Description Example
Menu
Menu
command
drop-list A list of options that drops
Learning how to use Corel Paint Shop Pro Photo 11
A menu item followed by a
menu command
down when a user clicks a
down arrow button
Choose File Open.
Choose an option from the
Selection Type drop-list on
the Tool Options palette.
Page 17

Convention Description Example
palette A window containing
available commands and
settings relevant to a specific
tool or task
mark and
unmark
Enter The Enter key on your
Terms that refer to enabling
or disabling check boxes by
clicking them
keyboard
A note containing
information that is
important to the preceding
steps. It may describe
conditions under which the
procedure can be
performed.
A tip containing
suggestions for performing
the preceding steps. It may
present alternatives to the
steps, or other benefits and
uses of the procedure.
Double-click the name of the
group on the Layers palette.
To preserve the current print
size, mark the Maintain
original print size check box.
To save this gradient as a
swatch that you can access
later, click the Add to
swatches button, type a
name, and press Enter.
The Background Eraser tool
cannot be applied directly to
the background layer, which
does not support
transparency.
You can also right-click in the
image to set the source point
for the Clone tool.
Using the Learning Center palette
The Learning Center palette contains helpful information about
Corel Paint Shop Pro Photo tasks, commands, and tools to help
first-time users as well as experienced users get their work done faster.
The Home page of the Learning Center palette provides a task-based
workflow, which begins with getting your photos into the program.
12 Corel Paint Shop Pro Photo X2 User Guide
Page 18

From there, the workflow takes you through tasks such as finding and
organizing your image files, adjusting and retouching photos, creating
collages, adding text, graphics, and effects, and printing and sharing
your creations.
Each task appearing on the Home page has its own topics with
instructions that describe its related tools or commands. You can click
a given topic to access a related tool or command. In this way, you can
perform a task as you learn about it. You can also access the Help from
the Learning Center palette to obtain additional information about a
task.
To display or hide the Learning Center palette
• Choose View
The Learning Center palette is displayed by default. It appears
along the left side of the main window.
To use the Learning Center palette
1 From the Home page, click a task.
The topics related to the task appear.
2 Click a topic.
The procedure related to the topic appears.
• For topics describing a tool, the tool becomes active. The Tool
Options palette and any other relevant palette appear.
• For topics describing a command associated with a dialog box,
the dialog box appears.
3 Read the procedure for using the tool or command.
Palettes Learning Center.
Some tasks and commands are not available unless an image is
open.
Using the Help system
The Help that is available from within the program is the most
comprehensive source of information for Corel Paint Shop Pro Photo.
Learning how to use Corel Paint Shop Pro Photo 13
Page 19

The Help topics dialog box provides three ways to find information. You
can choose a topic from the Contents page, use the Index page to
search for a specific subject, or use the Search page to search for
specific words and phrases. You can also print topics from the Help and
change the size of the text displayed in the Help window.
To use the Help system
1 Click Help
Help topics.
2 Click one of the following tabs:
• Contents — lets you browse through topics in the Help
• Index — lets you use the keywords from the index to find a topic.
For example, if you want to add a caption to a photo, but are not
sure which feature to use, type caption.
• Search — lets you search the full text of the Help for a particular
word or phrase. For example, if you are looking for information
about a specific tool or command, you can type the name of the
tool or command, such as Backlighting, to display a list of
relevant topics. To search for a phrase, type the phrase and
enclose it with quotation marks (for example, type “Smart photo
fix”).
• Favorites — lets you create a list of Help topics that you can
easily access. You can remove and add Help topics at any time.
You can also
Print a specific Help topic Open a Help topic, click the frame
you want to print, and click Print.
View Help for a dialog box Click Help in the bottom of the
dialog box.
Access information and
troubleshooting tips on the Corel
Web site
14 Corel Paint Shop Pro Photo X2 User Guide
On the Help window toolbar, click
Support.
Page 20

Workspace tour
The Corel Paint Shop Pro Photo workspace includes menus, tools, and
palettes that you can use to create and edit images. By navigating this
workspace, you can accomplish your photo-editing, painting, and
drawing tasks.
In this section, you’ll learn about
•exploring the workspace
• using palettes
• using toolbars
• using tools
Exploring the workspace
When you open Corel Paint Shop Pro Photo, the main program window
appears. This window is your work area. It contains the commands and
tools you need to create, edit, print, and export your images.
You can save the entire workspace, including all open images and their
magnifications and screen positions, as well as positions and
preferences of palettes, toolbars, dialog boxes, and windows. For
information about using custom workspaces, see “Using custom
workspaces” in the Help.
The Corel Paint Shop Pro Photo workspace includes the following
components:
• Menu bar — displays commands for performing tasks. For example,
the Effects menu contains commands for applying effects to images.
• To o lb a r s — display buttons for common commands
Workspace tour 15
Page 21
• Palettes — display image information and help you select tools,
modify options, browse through images, manage layers, select
colors, and perform other editing tasks
• Status bar — displays information about the selected tool or menu
command, as well as information about image dimensions, color
depth, and cursor position
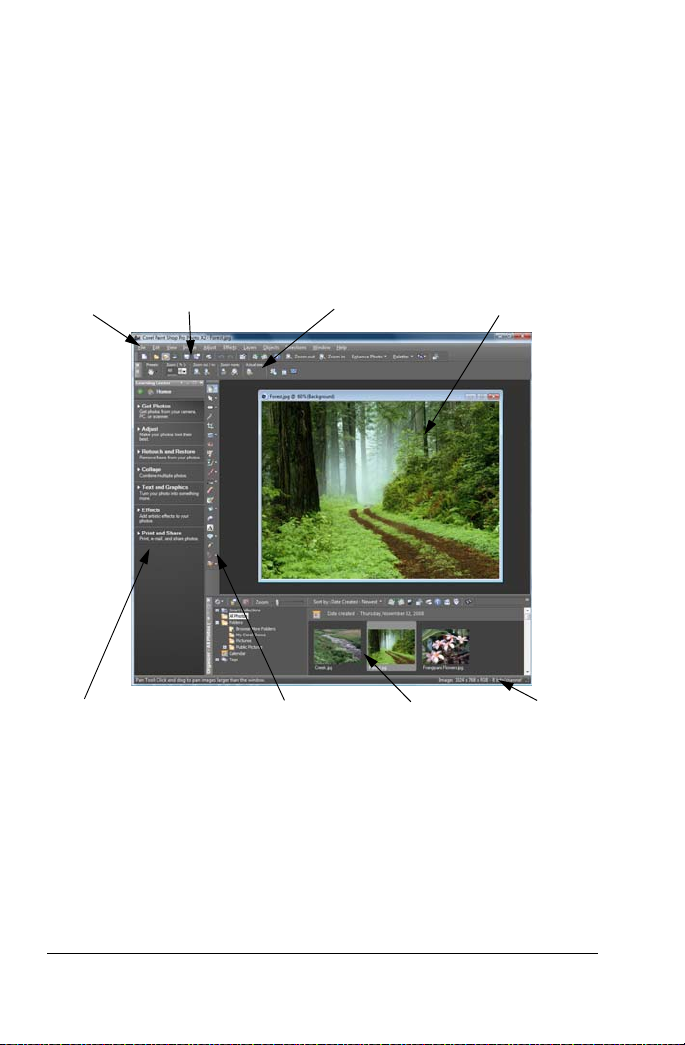
Shown below is an example of the workspace that appears when you
start Corel Paint Shop Pro Photo for the first time.
Menu bar
Learning Center palette
Standard toolbar
The workspace in Corel Paint Shop Pro Photo
Tool Options palette
Tools toolbar
Organizer
Image window
Status bar
To change the workspace theme
• Choose View
Use Graphite Workspace Theme.
The graphite workspace theme is the default. A check mark appears
next to the menu item when this workspace theme is active. To
disable this workspace theme and display the classic
16 Corel Paint Shop Pro Photo X2 User Guide
Page 22

Corel Paint Shop Pro Photo workspace theme, choose the menu
item again.
Using palettes
Corel Paint Shop Pro Photo contains many palettes that organize
information and commands to help you edit your images. Some
palettes appear automatically when you start the application for the
first time, others appear when you activate certain tools, and some
palettes appear only when you choose to open them. You can easily
turn a palette on and off by using the Palettes drop-list on the Standard
toolbar, or by choosing View
For more information about working with palettes, see “Using palettes”
in the Help.
Palette Description
Learning Center Displays information about workflow, tools, and
Organizer Lets you view thumbnails of all images on your hard
Palettes.
commands to help you complete common tasks
quickly and efficiently
drive. Images are cataloged, so you can quickly
search by folder, date, keyword, caption, or other
image data, which you can view and edit in the
Organizer. You can also create slide shows and print
contact sheets.
Photo Tray Lets you gather photos from various folders so that
you can edit, e-mail, print, or upload them. You can
add, remove, and rename trays within the Photo
Tray palette to match your workflow.
Tool Options Displays settings and controls for the active tool
Materials Lets you choose colors and materials for painting,
drawing, filling, and retouching
Workspace tour 17
Page 23

Palette Description
Layers Lets you view, organize, and adjust settings for
image layers
Overview Displays a thumbnail of the active image, lets you
set a zoom level, and displays image information
History Lists the actions taken on the active image, lets you
undo and redo adjacent or nonadjacent actions, and
lets you create a Quickscript that can be instantly
applied to other open images
Histogram Displays a graph of the distribution of red, green,
blue, grayscale, hue, saturation, and lightness
values in an image. You can analyze the distribution
of detail in the shadows, midtones, and highlights
to help you decide how to make corrections.
Brush Variance Lets you set additional brush options when you use
a paint brush or any other raster painting tool. This
palette is particularly useful when you use a
pressure-sensitive tablet or a four-dimensional
mouse. For example, you can vary the opacity of a
brushstroke by applying pressure with the stylus.
Some options also work well with a mouse.
Mixer Lets you place and mix pigments to use with the Oil
Brush tool and the Palette Knife tool, allowing you
to create realistic strokes with oil paints on Art
Media layers
Script Output Displays a list of your actions and results when you
run scripts
Using toolbars
The toolbars display buttons that are useful for performing common
tasks. When you position your cursor over a button, its name appears
on a ToolTip.
18 Corel Paint Shop Pro Photo X2 User Guide
Page 24

You can add and remove buttons from toolbars and create custom
toolbars. For more information about customizing toolbars, see
“Customizing toolbars” in the Help.
Corel Paint Shop Pro Photo contains the following toolbars:
• Effects — displays commands for applying effects to your images
• Photo — displays commands for enhancing photos
• Script — displays commands for creating and running scripts
• Standard — appears by default toward the top of the workspace
and displays the most common commands, such as saving images,
undoing a command, and cutting and pasting items
• To o ls — contains tools for painting, drawing, cropping, typing text,
and performing other image-editing tasks
• Web — displays commands for creating and saving images for the
Web
For information about the menu bar and the status bar, see “Exploring
the workspace” on page 15.
To display or hide a toolbar
• Choose View
display or hide.
A check mark beside the toolbar name in the menu indicates that
the toolbar is displayed.
To o lb a r s , and choose the toolbar that you want to
Using tools
You can use the Corel Paint Shop Pro Photo tools to paint, draw, crop
images, add text, and perform other image editing and creative tasks.
Some tools, such as the Crop, Move, and Text tools, reside in their own
space on the Tools toolbar. Most tools, however, are grouped with other
tools that perform similar tasks. A group of tools is denoted by a small
flyout arrow on the right side of the active tool.
Workspace tour 19
Page 25
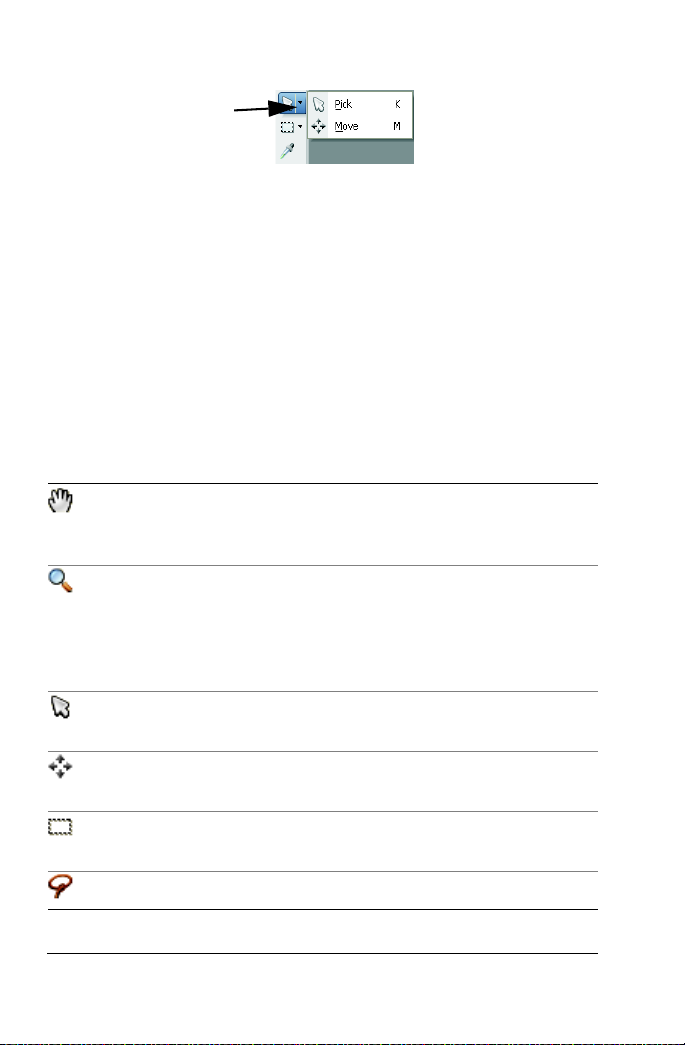
Flyout arrow
You can access all tools in a flyout by clicking the flyout
arrow beside the active tool.
When you hold the pointer over a tool, a ToolTip displays the tool name
and shortcut key, and the status bar displays hints for using the tool.
Depending on the type of layer you are working on, some tools may not
be available. For example, the Paint Brush and Clone Brush tools work
only on raster layers, the Pen tool works only on vector layers. For more
information about raster and vector layers, see “Working with layers”
on page 87.
The following table briefly describes each tool on the Tools toolbar.
Tool Description
Pan Moves the viewable portion of the image
window when part of the image extends
beyond the image window
Zoom Zooms in when you click, or zooms out when
you right-click. You can drag to define an area
for zooming. If your pointing device has a
scroll wheel, you can use it to quickly zoom in
and out quickly.
Pick Moves, rotates, and reshapes raster layers,
and selects and modifies vector objects
Move Moves a raster layer or a vector layer on the
canvas
Selection Creates a geometrically shaped selection, such
as a rectangle, ellipse, or triangle
Freehand Selection Creates an irregularly shaped selection
20 Corel Paint Shop Pro Photo X2 User Guide
Page 26
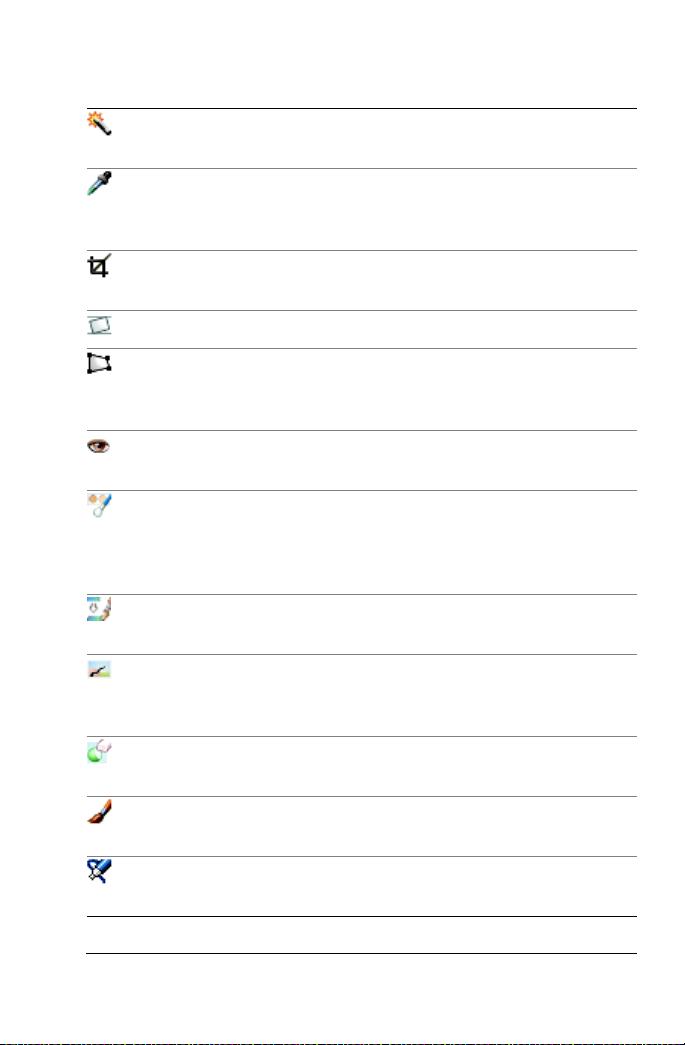
Tool Description
Magic Wand Makes a selection based on pixel values within
a specified tolerance level
Dropper Lets you choose the foreground/stroke color
by clicking, or the background/fill color by
right-clicking
Crop Trims or eliminates unwanted edges of an
image
Straighten Rotates a crooked photo to straighten it
Perspective Correction Squares the perspective of buildings or other
objects that appear to be leaning or
unnaturally angled
Red Eye Quickly corrects the red-eye effect commonly
seen in photos
Makeover Provides five modes — Blemish Fixer,
Toothbrush, Eye Drop, Suntan, and Thinify —
which let you apply cosmetic fixes to subjects
in your photos
Clone Removes flaws and objects by painting over
them with another part of the image
Scratch Remover Removes wrinkles, wires, and similar linear
flaws from digital photos, and removes
scratches from scanned photos
Object Remover Covers unwanted elements of a photo with a
neighboring texture in the same photo
Paint Brush Lets you paint on your image with colors,
textures, or gradients
Airbrush Simulates painting with an airbrush or spray
can
Workspace tour 21
Page 27
Tool Description
Lighten/Darken Lightens areas as you drag, or darkens areas as
you drag with the right mouse button. This
effect is stronger than the effects produced by
the Dodge and Burn tools.
Dodge Lets you lighten areas of a photo by clicking,
or darken areas by right-clicking. This tool and
the Burn tool produce opposite effects.
Burn Lets you darken areas of a photo by clicking,
or lighten areas by right-clicking. This tool and
the Dodge tool produce opposite effects.
Smudge Smears pixels by picking up new colors as you
drag, or pushes pixels by not picking up new
colors as you drag with the right mouse
button
Push Pushes pixels by not picking up new colors as
you drag, or smears pixels by picking up new
colors as you drag with the right mouse
button
Soften Softens pixels as you drag, or sharpens pixels
as you drag with the right mouse button
Sharpen Sharpens pixels as you drag, or softens pixels
as you drag with the right mouse button
Emboss Creates an embossed effect by suppressing
color and tracing edges as you drag
Saturation Up/Down Makes colors more vivid as you drag, or less
vivid as you drag with the right mouse button
Hue Up/Down Shifts pixel hue values up as you drag, or shifts
them down as you drag with the right mouse
button
22 Corel Paint Shop Pro Photo X2 User Guide
Page 28

Tool Description
Change to Target Recolors pixels while retaining photographic
detail
Color Replacer Replaces the background/fill color with the
foreground/stroke color when you click or
drag, or replaces the foreground/stroke color
with the background/fill color when you rightclick or drag
Eraser Erases raster layer pixels to transparency
Background Eraser Erases around the edges of the areas you want
to keep in a photo
Flood Fill Fills pixels of a similar tolerance level with the
current foreground/stroke material when you
click, or with the current background/fill
material when you right-click
Color Changer Changes the color of an element in a photo
while preserving the shading and luminosity
of the original color
Picture Tube Places Picture Tubes™, theme-based artistic
elements, in your image
Text Places text on your image
Preset Shape Adds predefined shapes (such as callouts,
arrows, and starbursts) to your image
Rectangle Creates a rectangle or square
Ellipse Creates an ellipse or circle
Symmetric Shape Creates symmetric or star-shaped objects
Pen Creates connected or unconnected lines,
freehand curves, and Bézier curve segments
Workspace tour 23
Page 29
Tool Description
Warp Brush Shrinks, grows, twists, or distorts pixels in
your photo
Mesh Warp Distorts a photo by dragging points along an
overlay grid
Oil Brush Simulates oil brushstrokes on an Art Media
layer
Chalk Simulates drawing with chalk on an Art Media
layer
Pastel Simulates drawing with pastels on an Art
Media layer
Crayon Simulates drawing with crayon on an Art
Media layer
Colored Pencil Simulates drawing with colored pencil on an
Art Media layer
Marker Simulates drawing with an ink marker on an
Art Media layer
Palette Knife Simulates applying oil paint with a knife
(instead of a brush) on an Art Media layer
Smear Smears whatever pigment you’ve applied to
an Art Media layer
Art Eraser Erases whatever pigment you’ve applied to an
Art Media layer
24 Corel Paint Shop Pro Photo X2 User Guide
Page 30

Getting started with
Corel Paint Shop Pro Photo
You can bring your images into Corel Paint Shop Pro Photo in various
ways: you can import images from a digital camera, card reader, or
scanner; you can capture images from the computer screen; you can
duplicate an existing image or layer; or you can create an image.
In this section, you’ll learn about
• getting photos into Corel Paint Shop Pro Photo
• opening and closing images
• saving images
• copying images into other applications
• deleting images
• working with the Organizer
• working with photo trays
Getting photos into Corel Paint Shop Pro Photo
You can use a variety of methods to bring your digital photos and
scanned images into Corel Paint Shop Pro Photo. Perhaps the easiest
and the most powerful method is to use the Corel Photo Downloader,
which is installed along with Corel Paint Shop Pro Photo X2.
After installation, the Corel Photo Downloader icon appears in your
system tray. You photos are detected, and the Corel Photo Downloader
dialog box appears, when you plug in your camera, insert a memory
card into your card reader, or insert a CD containing photos.
You can set the Corel Photo Downloader to rotate photos. You can also
choose to clear space on your camera’s memory card by automatically
deleting photos on the camera after you download them.
Getting started with Corel Paint Shop Pro Photo 25
Page 31

To get photos with the Corel Photo Downloader
1 Connect the camera or card reader to the computer by using a USB
cable, or insert the CD containing photos into your computer’s CD
drive.
The Corel Photo Downloader dialog box opens.
You can verify that the Corel Photo Downloader is active by
checking for its icon in your system tray.
2 Mark the Use Corel Photo Downloader to transfer photos check
box.
3 Choose one of the following options:
• Always start downloading automatically
• Display this prompt each time
4 Mark the Erase photos on device after download check box to
delete the photos on your device after downloading completes.
5 Click OK.
After a brief pause, the progress dialog box appears and provides
details on the downloading process.
6 After the last photo has been downloaded, you are prompted to
choose one of the following:
• Start Corel Paint Shop Pro Photo — starts the application if it
isn’t already running
• Review photos in Corel Paint Shop Pro Photo Express Lab —
opens the downloaded photos in the Express Lab mode
• View photos in Windows Explorer — displays a Windows
Explorer screen with the photo thumbnails
• Do nothing — exits the Corel Photo Downloader
7 Click OK.
You can set download options by clicking Options in the Corel
Photo Downloader dialog box and choosing the options you
want from the Download Options dialog box. For more
information, see “To set options for downloading” in Help.
26 Corel Paint Shop Pro Photo X2 User Guide
Page 32

You can also create default settings by clicking the Corel Photo
Downloader icon in your system tray and choosing Default
Settings, or by clicking the Default Settings button in the
Downloader Options dialog box. For more information, see “To
create default settings for the Corel Photo Downloader” in Help.
Opening and closing images
You can open most image formats in Corel Paint Shop Pro Photo. You
can open the images by using the menu bar in the main program
window or by using the Organizer. For information about using the
Organizer, see “Finding, organizing, and reviewing images” in the Help.
Opening camera raw images
For an updated list of supported camera models and their raw file
formats, go to www.corel.com, and click Support. Then, click Search
our Knowledge Base or E-mail Corel, choose Paint Shop Pro from the
Product and Services drop-list, and type raw in the Search Text box.
To open an image
1 Choose File
2 In the Look in drop-list, choose the folder where the file is stored.
3 Click the name of the file that you want to open.
If you want to open multiple files, hold down Ctrl, and click the
filenames.
4 Click Open.
Open.
You can also
View information about an image In the Open dialog box, click the
filename, and click Details.
View a thumbnail in the preview
area
Getting started with Corel Paint Shop Pro Photo 27
In the Open dialog box, mark the
Show preview check box.
Page 33

You can also
Run a script on the files as they open In the Open dialog box, mark the
Enable Pre-processing check box,
and choose a script from the droplist.
To open a recently viewed file
• Choose File
Recent Files, and choose the filename.
By default, the Recent Files menu lists four recently viewed files.
You can choose to list up to 10 files. For more information, see
“To set the number of files that appear in the Recent Files list” in
the Help.
To open an image from the Organizer
1 If the Organizer is not displayed, choose View
Palettes
Organizer, or click the Toggle Organizer button on the Standard
toolbar.
To view thumbnails from another folder, click Browse More Folders
from the left side of the Organizer, and from the Browse for Folder
dialog box that appears, choose the folder containing the desired
images. The folder you choose now appears in the Folders list.
2 Double-click the thumbnail to open the image in the workspace.
For more information on using the Organizer, see “Finding,
organizing, and reviewing images” in the Help.
To close an image
• Choose File
Close, or click the Close button in the title bar of
the image window.
28 Corel Paint Shop Pro Photo X2 User Guide
Page 34

Saving images
Befo re you save an image, you need to c onsider the file fo rmat in w hich
you want to save it, and you must ensure that you don’t overwrite an
original image that you may need in the future.
The PspImage file format of Corel Paint Shop Pro Photo supports layers,
alpha channels, and other features used in creating images. It is
recommended that you save and edit your images as PspImage files. You
can then save the file to a common file format. You can also use the Save
to Office command if you want to optimize your image for placement
in another application, such as a page layout, e-mail, or Web page
design application.
For more information about common image file formats, such as JPEG,
TIFF, PNG, see “Saving images” in the Help.
When you save a new image, Corel Paint Shop Pro Photo lets you select
its location, name, and file format. When you save an image and then
edit it, the image title bar displays an asterisk, or modifier tag, after the
filename to indicate that the file has been modified. This tag disappears
each time you save your work.
You can also automatically save your files at specific intervals to avoid
losing your work if your computer shuts down unexpectedly. For more
information, see “Setting Autosave preferences” in the Help.
Important! The Auto-Preserve Original preference setting can help
you avoid overwriting original images. By default, this feature is on.
Whenever you attempt to close a previously unedited original file, a
dialog box appears with Auto-Preserve information. For more
information on this preference setting, see “Setting Auto Preserve
preferences” in Help.
To save a new image
1 Choose File
The Save As dialog box appears.
2 From the Save in drop-list, choose the folder in which you want to
save the file.
Getting started with Corel Paint Shop Pro Photo 29
Save.
Page 35

3 In the Filename field, type a name for the file.
4 In the Save as type drop-list, choose a file format. The most
commonly used formats are listed first.
5 Click Save.
You can also
Save EXIF data with the image Click Options. In the Save Options
dialog box, mark the Save EXIF
information check box.
Compress an image file Click Options. In the Save Options
dialog box, choose a compression
option from the Compression group
box. The option is unavailable if the
file format does not support
compression.
Save in the last-used file format Choose File Preferences General
Program Preferences, and click
Display and Caching from the list on
the left side. In the Presentation
group box, mark the Re-use last type
in the file save-as dialog check box.
Yo u can a lso save y our work b y clickin g the Save As button on
the Standard toolbar to avoid overwriting your current file.
To save your work
• Choose File Save.
If the Auto-Preserve Originals preference setting is enabled, and
this is the first time you’ve attempted to save changes to this image,
you are prompted to save a copy of the original unedited image. If
Auto-Preserve Originals is not enabled, the original image is
overwritten by the modified image.
You can avoid overwriting the current file by using the Save As
command.
30 Corel Paint Shop Pro Photo X2 User Guide
Page 36

You can also save your work by clicking the Save button on
the Standard toolbar.
For more information, see “Setting view preferences” in the
Help.
Copying images into other applications
The proliferation of high-resolution digital cameras and scanners has
resulted in images with very large file sizes. When copied to the
Windows Clipboard, these images consume far more memory than
what is required after they are pasted into another application. You can
use the Copy Special commands to more efficiently place image data on
the Clipboard for pasting into office productivity software, such as
word-processing, presentation, and e-mail applications.
To copy images for use in other applications
1 Choose Edit
2 In the Copy Special submenu, choose one of the following
commands:
• Copy for Professional Printing — copies the current image to the
Clipboard at 300 dpi
• Copy for Desktop Printing — copies the current image to the
Clipboard at 200 dpi
• Copy for Screen/Email — copies the current image to the
Clipboard at 96 dpi
Note: These three submenu commands all automatically flatten the
current image to a single layer and convert the image depth to 8-bit/
channel RGB.
3 Switch to the application into which you want to paste the image,
and press Ctrl+V.
Copy Special.
Getting started with Corel Paint Shop Pro Photo 31
Page 37

Deleting images
You can delete image files from the main workspace, or you can delete
images by using the Organizer. For information about using the
Organizer, see “Finding, organizing, and reviewing images” in the Help.
To delete the current image in the workspace
• Choose File
Delete.
Working with the Organizer
The Organizer is a digital image management feature that lets you
effortlessly find, organize, review, and share images.
You can search for images by filename, date, file type, or folder location.
You can also find images based on a keyword tag that you’ve associated
with them (such as “kids,” “vacation,” or “birthday”). Thumbnail
zooming makes recognizing a particular image even easier and faster.
In addition, you can edit EXIF data, play video files, and extract frames
from video files.
From the Organizer, you can access a full-screen viewing mode called
Quick Review which lets you review images, make basic corrections,
and share your images as a slide show.
When you start Corel Paint Shop Pro Photo for the first time, the
Organizer appears as a palette docked to the bottom of the main
window.
To display or hide the Organizer
• Choose View
32 Corel Paint Shop Pro Photo X2 User Guide
Palettes Organizer
Page 38

To search for images
• On the right side of the Organizer toolbar, enter a search term in
the Find Photos text field.
Thumbnails matching the search term appear in the Organizer. You
can search by filename, folder name, keyword tags, caption text, or
image metadata (EXIF or IPTC data).
You can also use advanced methods for searching by clicking the
Find Photos button and using the Search dialog. For
information, see “To use the advanced search feature” in the
Help.
Working with photo trays
You can use photo trays to gather images from various folders. The
images remain in their original location, but are referenced in the photo
tray and can be accessed by clicking a thumbnail. For more information
about photo trays, see “Working with photo trays” in the Help.
To hide or display the Photo Tray palette
• Choose View
You can also hide or display the Photo Tray palette by pressing
Ctrl + W.
Palettes Photo Tray.
To add photos to a photo tray
1 Select the photo tray to which you want to add photos.
2 From the Organizer, drag the photos to the photo tray.
Getting started with Corel Paint Shop Pro Photo 33
Page 39

Page 40

Adjusting images
When you view your photos in Corel Paint Shop Pro Photo, you may
notice problems that you want to correct. In some photos, the
problems are obvious, such as when the subject is too dark. In other
photos, you may sense the need for improvement but not know what
to fix. With Corel Paint Shop Pro Photo, you can correct specific
aspects of a photo or allow the program to make basic photo
adjustments.
In this section, you’ll learn about
• rotating images
• cropping images
• straightening images
• correcting photographic perspective
• making basic photo corrections automatically
• removing digital camera noise
• combining bracketed photos
• creating an area of focus by controlling depth of field
• resizing images
Rotating images
You can rotate an image by 90 degrees to change its orientation to
landscape (horizontal) or portrait (vertical). If your camera contains
sensors that tag photos taken in portrait orientation, your photos are
automatically rotated to the correct orientation.
For information about rotating an image to straighten it according to
reference points within the image, such as the horizon, see
“Straightening images” on page 39.
Adjusting images 35
Page 41

You can rotate an image in Corel Paint Shop Pro Photo.
To rotate an image
• Select an image, and perform a task from the following table.
To Do the following
Rotate an image 90 degrees
clockwise or counterclockwise
Choose Image Rotate Right, or
choose Image Rotate Left.
Rotate an image interactively On the Tools toolbar, choose the
Pick tool . Rotate the image by
dragging the rotation handle (the
square connected by a line to the
rotation pivot point). The cursor
changes to two curved arrows when
it is positioned over the rotation
handle.
You can also rotate an image by clicking the Rotate Right or
Rotate Left button on the Standard toolbar.
36 Corel Paint Shop Pro Photo X2 User Guide
Page 42

Cropping images
You can remove unwanted portions of an image to create stronger
compositions or to draw attention to another area of the image.
Corel Paint Shop Pro Photo helps you crop by providing presets to
common image sizes, such as 4 × 6 inches or 10 × 15 centimeters.
Cropping reduces the amount of hard drive memory required for
storing the image. In addition, cropping can improve color corrections
by eliminating extraneous areas of color. If a photograph requires both
cropping and color correction, you should crop the image first and then
apply the color correction.
Important! Cropping permanently removes the image area outside
the crop rectangle. To preserve the original photo, use the Save As
command, and save the cropped version of your image to a new
filename.
Floating toolbar for the Crop tool
To crop an image
1 On the Tools toolbar, choose the Crop tool.
By default, the crop rectangle appears on the image, and the area
outside the crop rectangle is shaded.
2 Adjust the crop area size by dragging any of the handles or edges.
To reposition the crop rectangle, place the cursor inside and drag.
Adjusting images 37
Page 43

You can use a preset crop size by choosing an option from the
Presets drop-list on the floating toolbar for the Crop tool, or from
the drop-list on the Tool Options palette.
3 When you’re ready to crop the image, click the Apply button on
the Tool Options palette or on the floating toolbar for the Crop
tool.
You can also
Apply the crop by using your mouse
or keyboard
Set the size and position of the crop
rectangle on the Tool Options
palette
Constrain the crop area to its current
proportions
Rotate the crop rectangle by 90
degrees
Freely rotate the crop rectangle Drag the square end of the rotation
Move the rotation axis point of the
crop rectangle
Clear the crop area Click the Clear button on the
Double-click inside the crop
rectangle, or press Enter.
Specify the desired values in the
Width, Height, and Units controls,
and specify the desired positioning
coordinates in the Left, Top , Right,
and Bottom controls.
Mark the Maintain aspect ratio
check box on the Tool Options
palette. This option is available only
for custom-defined crop rectangles.
Click the Rotate Crop Rectangle
button on the floating toolbar.
handle. This feature can be helpful
when, for example, you want to
straighten and then crop a crookedly
scanned photo.
Hold down Ctrl, and then drag the
axis point of the rotation handle (the
circular end of the handle) to a new
position.
floating toolbar for the Crop tool.
38 Corel Paint Shop Pro Photo X2 User Guide
Page 44

To create a new image by cropping
1 On the Tools toolbar, choose the Crop tool .
2 Define the crop area by dragging within the image.
3 Click the Crop as new image button on the Tool Options
palette, or on the floating toolbar for the Crop tool.
A new image is created, but the cropped image remains unchanged,
and remains the active image.
This feature offers a useful method of creating individual images
from a scan of multiple images. For example, if you scan four
photos in one scanning session, you can use this feature to
quickly separate each photo into an individual image file.
Straightening images
You can easily straighten crooked images by aligning a straightening
bar with an image feature. Corel Paint Shop Pro Photo rotates the
image so that this straightening bar is perfectly horizontal and vertical.
This feature is especially useful when an image has a strong vertical or
horizontal feature, such as a building or horizon.
The Straighten tool lets you position a straightening bar
within an image.
To straighten an image
1 On the Tools toolbar, choose the Straighten tool .
Adjusting images 39
Page 45

A straightening bar with end handles appears on the image.
2 Drag each handle of the straightening bar to align it with the part of
the image that you want to straighten.
3 On the Tool Options palette, choose one of the following options
from the Mode drop-list:
• Auto — automatically straightens the image based on the
position of the straightening bar
• Make vertical — rotates the image to make the straightening bar
vertical
• Make horizontal — rotates the image to make the straightening
bar horizontal
4 Click the Apply button .
You can also
Straighten a single layer Before clicking the Straighten tool,
click the layer name on the Layers
palette.
Straighten all layers in the image Mark the Rotate all layers check box
on the Tools Options palette.
Choose a specific angle for the
straightening bar
Type or set a value in the Angle
control on the Tools Options palette.
You can also double-click the image to apply the command.
Correcting photographic perspective
When you take pictures of tall or wide objects, the resulting
photographs may have perspective distortion — that is, the objects
may seem to be leaning or angled. This distortion occurs when the
camera is at an angle to the subject.
By using the Perspective Correction tool, you can fix perspective
distortion, such as the angled sides of a building.
40 Corel Paint Shop Pro Photo X2 User Guide
Page 46

Using the Perspective Correction tool changes the angle of
the building.
To correct perspective in a photo
1 On the Tools toolbar, choose the Perspective Correction tool .
A bounding box with corner handles appears on the image.
2 On the Tool Options palette, choose settings for the following
controls:
• Grid lines — lets you type or set the number of gridlines to
display
• Crop image — recrops the image to a rectangular shape after the
perspective is applied
Note: Marking the Crop image check box deletes the areas of the
image that fall outside the rectangle.
3 Drag each handle to the corner of the object that should be
rectangular.
4 Click the Apply button .
You can also apply the command by double-clicking the image.
Making basic photo corrections automatically
If you are not sure what adjustments to make to a photo, you can apply
either the One Step Photo Fix command or the Smart Photo Fix
command and see if you like the results. The One Step Photo Fix
command automatically applies a predetermined set of color balancing
and sharpening corrections to your photo — all you need to do is select
Adjusting images 41
Page 47

the command. If you want the option of fine-tuning these same
corrections before applying them, you can use the Smart Photo Fix
command.
You can use the One Step Photo Fix command to improve the
exposure and color balance of images quickly and easily.
To apply basic corrections with One Step Photo Fix
• Choose Adjust
One Step Photo Fix.
After a brief pause, several basic corrections are applied to your
photo.
If you are not satisfied with the changes made to your photo,
choose Edit
Undo. Then, choose Adjust Smart Photo Fix, and
adjust the available settings. You can also try using other Adjust
menu commands, such as Brightness and Contrast
Brightness and Contrast
Levels.
Curves or
To fine-tune basic corrections with Smart Photo Fix
1 Choose Adjust
Smart Photo Fix.
The Smart Photo Fix dialog box appears. In the upper portion of the
dialog box, the Before pane shows the original photo. The After
pane shows how the photo would appear after applying the
suggested set of basic adjustments.
42 Corel Paint Shop Pro Photo X2 User Guide
Page 48

2 Perform one or more tasks from the following table, and click OK.
To Do the following
Brighten or darken the photo In the Brightness group box, type or
set a value in the Overall, Shadows,
and Highlights controls, or adjust
their corresponding sliders.
Note: Positive settings brighten the
photo, and negative settings darken
the photo.
Increase or decrease saturation Type or set a value in the Saturation
control, or adjust the slider.
Note: Positive settings make colors
more vibrant; negative settings make
colors less vibrant.
Sharpen the edges of the photo Type or set a value in the Focus
control, or adjust the slider.
You can reset all settings to their initial values by clicking
Suggest Settings, or to null settings by clicking the Reset to
Default button .
To use advanced settings of the Smart Photo Fix feature, mark
the Advanced Options check box. For more information on the
advanced options, see “To use the advanced options of Smart
Photo Fix” in the Help.
Removing digital camera noise
The term “noise” as it relates to photos refers to small specks of color
that interfere with image clarity. These specks are usually caused by
sources such as poor lighting conditions or the limitations of the sensor
in your digital camera. For example, when you zoom in on a photo of a
clear blue sky, you may see tiny specks of orange, red, purple, green, or
other colors.
Adjusting images 43
Page 49

The image on the left looks grainy because of digital camera
noise. The image on the right appears smoother and less
grainy after the noise has been removed.
Corel Paint Shop Pro Photo gives you two fast, powerful commands for
removing noise from your photos: One Step Noise Removal and Digital
Camera Noise Removal. When you use a noise removal command, the
program analyzes your photo, identifies the noise artifacts, and applies
corrections based on these identified areas, while preserving the
important edge details of your photo.
You can automatically apply noise correction to your photo with the
One Step Noise Removal command. You can also control more precisely
how these same corrections are applied by using the more
comprehensive Digital Camera Noise Removal command. For more
information about using the Digital Camera Noise Removal command,
see “Removing digital camera noise” in the Help.
To remove digital camera noise quickly
• Choose Adjust
After a brief pause, the noise is automatically removed.
One Step Noise Removal.
Combining bracketed photos
Many digital cameras are equipped with an “auto-bracket” feature,
which lets you shoot several exposures within seconds of each other.
You can then use the HDR Photo Merge command (HDR stands for High
Dynamic Range) to merge a set of bracketed digital photos into one
photo that combines the best elements of the set. This feature is
especially valuable for high-contrast scenes, such as sunsets or interior
44 Corel Paint Shop Pro Photo X2 User Guide
Page 50

photos with bright light seen in windows. (Note that low-contrast
scenes may not benefit from using the HDR Photo Merge command.) By
shooting one or more photos for the shadows (dark areas) and
additional photos for the highlights (bright areas), you can combine
them and show the full range of detail in a single photo.
You can usually achieve the best results by using a tripod and, if
possible, by adjusting the shutter speed instead of the f/stop.
Eliminating moving objects in the scene is also helpful.
The HDR Photo Merge command combines the best elements
of bracketed photos to create one ideal photo (on the
bottom).
To combine bracketed photos
1 Choose File
HDR Photo Merge.
The HDR Photo Merge dialog box appears.
2 In the Load Images group box, click Browse.
The HDR Photo Merge Open dialog box appears.
Note: The HDR Photo Merge command does not use images
currently open in the workspace.
Adjusting images 45
Page 51

3 Navigate to the folder containing the bracketed photos you wish to
merge. Hold down Shift, and click to select adjacent photos in the
list, or hold down Ctrl, and click to select nonadjacent photos.
4 Click Open.
The selected photos are loaded into the HDF Photo Merge dialog
box.
5 Review each loaded photo to ensure that you want to include it in
the merge. To remove a photo from this process, unmark the check
box below the thumbnail.
6 Click Align Images.
The pixel data for each photo is aligned with that of the other
photos. The time required for this step depends on the number of
photos loaded.
7 Set the any of the following controls in the Adjustments group box.
• To adjust the overall brightness of the resulting photo, drag the
Brightness slider.
• To adjust the overall clarity of the resulting photo, drag the
Clarify slider.
• To apply automatic adjustments based on the photos you’ve
selected, click Suggest Settings.
The new settings are reflected in the Preview area at the top of the
dialog box.
8 If you want the resulting photo to be a 16-bit image, mark the
Create result as 16 bit image check box next to the Align Images
button.
9 Click OK.
You can load a minimum of two photos and a maximum of nine
photos.
The order of loaded photos is based on their exposure values
(EV), with the darkest photos appearing first. The EV setting of
each photo appears under the thumbnail.
You can mark the Auto select by date/time taken check box and
use the Time Tolerance slider. These controls let you
46 Corel Paint Shop Pro Photo X2 User Guide
Page 52

automatically select photos taken within a specified number of
seconds.
For helpful tips and techniques in creating bracketed photos with
your digital camera, go to the Support pages at www.corel.com,
and search for the Knowledge Base article for Paint Shop Pro
Photo called “Getting the Most From HDR Photo Merge.”
Creating an area of focus by controlling depth of field
You can create an area of focus to draw attention to the subject in your
photo. For example, in a photo of a person surrounded by a field of
flowers, you can defocus (blur) the surrounding flowers while retaining
a clear focus on the person. In photography, this effect is achieved by
controlling the depth of field.
You can apply the Depth of Field effect to draw attention to
the subject in your photo.
Depth of field refers to the area that appears to be in focus. Different
factors affect the depth of field, including the distance between the
camera and your subject, the lens speed, and your camera’s aperture
setting. Most automatic cameras use the smallest aperture setting
possible to ensure that most of the image is in focus. You can draw
attention to your subject, however, by using a larger aperture setting,
which creates a shorter depth of field.
Adjusting images 47
Page 53

To create an area of focus by using the Depth of Field effect
1 Choose Adjust
Depth of Field.
2 In the Depth of Field dialog box, choose one of the following Area
of focus selection tools, and drag in the Before pane to enclose the
area you want to keep in focus:
• Circular — lets you create a round selection
• Freehand — lets you create an irregularly shaped selection by
dragging around an area to create a closed shape
• Rectangular — lets you create a rectangular selection
3 Move the Blur slider to adjust the amount of blur applied to the
out-of-focus area.
You can also
Control the aperture shape for the
blurred area
Adjust the transition between the
area in focus and the blurred area
Fine-tune the size of the area in
focus
Click the Circular or Hexagonal
Aperture Shape button.
Move the Feather edge slider.
Moving the slider to the right
increases the feathering; moving the
slider to the left decreases the
feathering. Note that a setting of 0
produces a hard, undefined edge,
which is probably not what you
want. In general, do not set this
slider to less than 2 or 3.
Move the Focus range slider to the
lef t to shrink the area in focus. Move
the slider to the right to expand the
area in focus to the edge of the
selection.
Make your selection slightly larger than the area you want to
keep in focus, and then fine-tune the edge of the selection by
using the Focus range slider.
48 Corel Paint Shop Pro Photo X2 User Guide
Page 54

Resizing images
After you adjust your image, you can resize it. It’s important to
understand how resizing affects image pixels.
Pixels have no set physical size. Each pixel represents one sample of a
single color. When an image is resized, the number of pixels in the
image may be reduced or increased, which causes the image to be
resampled. Resampling changes the file size. For guidelines about
resizing, see “Resizing images” in the Help.
When you use the Resize command to increase the image dimensions,
additional pixels must be interpolated from information in the existing
pixels. Imagine that you have an image of 100 × 100 pixels, and that you
want to enlarge the image by increasing the number of pixels to 200 ×
200. You begin with 10,000 pixels and after resizing end up with 40,000
pixels. Thus, three-fourths of the final pixels are “made up.” Most
methods of making up pixels involve interpolating the interpixel gaps
produced by stretching the image dimensions. The Pixel Resize method
copies the color of the nearest pixel. The Bilinear method is based on
an average of four neighboring pixels (from a 2 × 2 pixel neighborhood).
The Bicubic method is more sophisticated and uses 16 neighboring
pixels (from a 4 × 4 pixel neighborhood). This larger neighborhood
provides more information about how the color is changing in that
particular part of the image and therefore can improve the colors in the
made-up pixels.
When you use the Resize command to decrease the image dimensions,
the pixel colors are averaged together. Imagine that you want to
decrease an image from 100 × 100 pixels to 50 × 50 pixels. The result
contains 2,500 pixels, which is one-fourth of the pixels used to
represent the original image. The different resampling methods
determine how much weight is given to the original pixels when they
are averaged together.
The Copy Special command lets you copy the image to the Clipboard in
one of three sizes, depending on whether you are copying the image to
print professionally, to print from your desktop, or to copy to your
computer screen or an e-mail message. After copying the image to the
Adjusting images 49
Page 55

Clipboard, you can paste the resized image in a file in another
application, such as a word processor. For more information, see
“Copying images into other applications” on page 31.
The Save to Office command provides resizing options that are similar
to those provided by the Copy Special command, except that you can
save the file to disk as well as specify image size and resolution. For
more information, see “To save images for office applications” in Help.
You can use the Resize dialog box more effectively if you know why you
want to resize the image.
• If you want to use a very large photo on a Web page, or if you want
to attach a large photo to an e-mail, you can use the Width and
Height controls in the Print Size group box. In the Advanced
settings area, you should ensure that the Maintain original print
size check box is unmarked and that the Lock aspect ratio check
box is marked.
• If you want to resize an image by a specific percentage or to specific
pixel dimensions (for example, 800 × 600), you can use the controls
in the Pixel Dimensions group box. In the Advanced settings area,
you should ensure that the Resample using check box is marked.
• If you want to resize an image by changing only its resolution, you
can unmark the Resample using check box in the Advanced settings
area, and type or set a value in the Resolution control in the Print
Size group box. Resizing an image in this way does not change the
pixel dimensions of the image.
To resize by pixel dimensions or percentage
1 Choose Image
Resize.
2 Mark the Advanced settings check box to display the additional
Resize settings.
3 Mark the Resample using check box, and select a resampling
method from the drop-list.
Note: The Bicubic method usually produces the best results,
although it is also the slowest method.
50 Corel Paint Shop Pro Photo X2 User Guide
Page 56

If you want to resize the current layer only, unmark the Resize all
layers check box.
4 From the drop-list in the Pixel Dimensions group box, choose either
Pixels or Percent (to resize as a percentage of the original), and then
type or set values in the Width and Height controls.
5 Click OK.
It is recommended that you constrain the new image dimensions
to the image’s current proportions by marking the Lock aspect
ratio check box. Changing the aspect ratio distorts the image by
stretching or contracting it in one dimension more than the
other. In the Print Size and Pixel Dimensions group boxes, a lock
icon appears next to the Width and Height controls when the
Lock aspect ratio check box is marked. Changing the setting of
one of these controls automatically changes the setting of the
other control.
You can preserve the image’s current print size by marking the
Maintain original print size check box. When this check box is
marked, a lock icon appears next to the Resolution control and
the Width and Height controls in the Pixel Dimensions group
box.
Adjusting images 51
Page 57

Page 58

Retouching and restoring
images
Corel Paint Shop Pro Photo provides you with many ways to retouch
your images. Whether you want to remove a small scratch, erase the
entire background, or simply correct red-eye, you’ll find the tools you
need.
In this section, you’ll learn about
•removing red-eye
• applying cosmetic corrections
•removing scratches
• removing flaws and objects
• erasing image areas
• recoloring image areas for a realistic effect
Removing red-eye
Red-eye in photos is a common problem. When light from the camera’s
flash reflects off the retina of a photo subject, a red-eye effect is
captured in the photo. Corel Paint Shop Pro Photo has two methods of
removing red-eye from a color photo.
The Red Eye tool replaces the red color in the subject’s pupil
with a dark gray color, restoring a natural look.
Retouching and restoring images 53
Page 59

The fastest method of removal is to use the Red Eye tool. A more
powerful method is to use the advanced Red Eye Removal command,
which lets you change the eye color. For more information about using
the Red Eye Removal command, see “To use advanced options for redeye removal” in the Help.
To remove red-eye quickly
1 On the Tools toolbar, choose the Red Eye tool .
2 On the Tool Options palette, adjust the Size control so that the
cursor is about twice the size of the red area needing correction.
3 Position the cursor directly over the eye, and click.
You can zoom in on the photo, if necessary, for better control of
the Red Eye tool.
You can size the cursor interactively by holding down Alt while
dragging the Red Eye tool over the eye area.
Applying cosmetic corrections
You can quickly improve the appearance of the subjects in your photos
by performing the following cosmetic corrections:
• removing blemishes — by using the Blemish Fixer mode of the
Makeover tool
• whitening teeth — by using the Toothbrush mode of the Makeover
tool
• fixing bloodshot eyes — by using the Eye Drop mode of the
Makeover tool
• adding a suntan — by using the Suntan mode of the Makeover tool
• thinning a photo subject — by using the Thinify mode of the
Makeover tool
• removing wrinkles — by using the Scratch Remover tool
• smoothing skin tone quickly — by using the Skin Smoothing
command in the Adjust menu
54 Corel Paint Shop Pro Photo X2 User Guide
Page 60

You can remove blemishes, whiten teeth, and apply a suntan.
To remove facial blemishes
1 On the Tools toolbar, choose the Makeover tool .
2 On the Tool Options palette, choose the Blemish Fixer mode.
The cursor changes to concentric circles.
3 On the Tool Options palette, adjust the Size control to the smallest
size that allows the inner circle to enclose the blemish.
The outer circle is for the material used to cover the blemish.
4 On the Tool Options palette, adjust the Strength control.
Values range from 1 to 100. Higher values apply more of the source
material (enclosed in the outer circle) to the blemish area (enclosed
in the inner circle).
5 Click directly over the blemish.
You can zoom in on the photo for better control of the Makeover
tool.
To whiten teeth
1 On the Tools toolbar, choose the Makeover tool .
2 On the Tool Options palette, choose the Toothbrush mode.
3 On the Tool Options palette, adjust the Strength control as desired.
Higher settings produce more intense whitening but may also
produce an unnatural appearance.
Retouching and restoring images 55
Page 61

4 Click directly over the teeth.
If the teeth are separated or partially obscured, you may need to
apply this tool to each tooth individually.
The To o th b r u sh mode of the Makeover tool works only with
color photos.
To apply whitening eye drops
1 On the Tools toolbar, choose the Makeover tool .
2 On the Tool Options palette, choose the Eye Drop mode.
3 Type or set a value in the Strength control.
Higher values whiten more of the eye area but may spread the
whitening beyond the affected area of the eye.
4 Zoom in as necessary, and then carefully click over the bloodshot
portion of the eye.
To apply a suntan
1 On the Tools toolbar, choose the Makeover tool .
2 On the Tool Options palette, choose the Suntan mode.
3 Type or set a value in the Size control.
4 Type or set a value in the Strength control.
Higher values produce a darker tan.
5 Carefully drag over the skin of the photo subject.
To apply a thinning effect
1 On the Tools toolbar, choose the Makeover tool .
2 On the Tool Options palette, choose the Thinify mode.
3 Type or set a value in the Strength control.
Higher values compress more pixels in the horizontal axis.
4 Click the middle of the photo subject.
The pixels compress on either side of the point you click. You can
continue clicking to enhance the thinning effect.
56 Corel Paint Shop Pro Photo X2 User Guide
Page 62

To remove facial wrinkles
1 On the Tools toolbar, choose the Scratch Remover tool .
2 On the Tool Options palette, choose either the square edge or
the beveled edge selection box.
3 Type or set a value in the Width control so that the wrinkle fits
inside the inner portion of the selection box you drag.
4 Position the cursor just outside the wrinkle, and carefully drag over
the wrinkle so that the wrinkle is enclosed in the inner rectangle.
The wrinkle is covered by the surrounding skin texture.
If you need to start again, you can undo the correction, adjust the
Width control, and redrag.
For wrinkle lines that are not straight, correct just one portion at
a time.
To smooth skin tone
1 Choose Adjust
Skin Smoothing.
2 In the Skin Smoothing dialog box, adjust the Amount slider.
Moving the slider to the right applies more smoothing; moving the
slider to the left applies less smoothing.
The Skin Smoothing command automatically detects and
smooths skin tones without affecting eyes or lips. However, if
other areas in your photo are affected because they are similar in
color to the skin tone, you can use a selection to isolate the area
you want to smooth. For more information about selections, see
“Creating selections” on page 79.
Retouching and restoring images 57
Page 63

The Skin Smoothing command smooths
skin tones and diminishes the appearance
of wrinkles and blemishes quickly.
Removing scratches
The Scratch Remover tool lets you remove scratches, cracks, and other
unwanted image areas from photos. You can use the tool to enclose the
flawed area and fill it with surrounding content that you want to keep.
If the background is relatively smooth, the result is usually satisfying.
Scratches on a textured or more complex background may be more
effectively removed with the Clone Brush tool. For information about
the Clone Brush tool, see “Removing flaws and objects” on page 60.
You can repair individual scratches by using the Scratch
Remover tool.
58 Corel Paint Shop Pro Photo X2 User Guide
Page 64

To remove scratches
1 On the Layers palette, select the layer that contains the area you
want to remove.
2 On the Tools toolbar, choose the Scratch Remover tool .
3 On the Tool Options palette, choose one of the following options to
define the shape of the Scratch Remover tool:
• square edge — corrects scratches that are perpendicular to
object edges, in an open area, or of uniform color
• beveled edge — corrects scratches that are at an angle to
object edges
4 Position the cursor just outside the scratch on one end, hold down
the left mouse button, and drag to set a selection box over the
scratch.
5 Release the mouse button.
The enclosed area is replaced with the surrounding pixels.
You can also
Move the selection box starting
point in 1-pixel increments
Increase or decrease the width of
the selection box in 1-pixel
increments
Use surrounding pixels to fill the
area perpendicular to the edge of
the selection box
Before releasing the mouse button,
press an Arrow key.
Before releasing the mouse button,
press Page up or Page down.
Before releasing the mouse button,
press Shift.
This technique is ideal for photos in
which the background contains areas
with defined borders and lines, such
as a brick wall.
If the scratch extends over several different backgrounds, you
can try removing the scratch one section at a time.
Retouching and restoring images 59
Page 65

Removing flaws and objects
You can remove flaws and objects in your images by using the Clone
Brush tool or the Object Remover tool. The Clone Brush tool lets you
remove flaws and objects by painting over them with another part of
the image. The paint source can be a part of the same layer, another
layer in the image, a merged image, or a layer from another image.
The Clone Brush tool was used to remove the garbage bag
from the photo on the left.
The Object Remover tool lets you remove objects when the surrounding
area is fairly uniform in color and texture. This tool is similar to the
Clone Brush tool in that it lets you identify the area to remove and then
choose a background for covering that area.
The Object Remover tool was used to remove one boat from the water.
60 Corel Paint Shop Pro Photo X2 User Guide
Page 66

To clone a part of an image
1 On the Tools toolbar, choose the Clone Brush tool .
2 On the Tool Options palette, choose the brush tip, size, opacity, and
other settings.
If you want to clone data from all layers merged together, mark the
Use all layers check box. If you want to clone data from the current
layer only, unmark the check box.
3 On the source image, right-click the center point of the source area.
If the image has more than one layer, click the name of the layer on
the Layers palette before you define the source area.
4 Drag in the image where you want to paint the cloned area.
You can resize the brush interactively by pressing Alt while
dragging in the image window.
To remove objects from a photo
1 On the Tools toolbar, choose the Object Remover tool .
2 On the Tool Options palette, choose the Selection Mode button.
3 Drag around the object that you want to remove.
4 On the Tool Options palette, choose the Source Mode button.
A rectangle is displayed in the image window.
5 Position the rectangle over the area that will replace the previous
selection.
6 Drag the handles on the rectangle to resize it, or drag the rotation
handle on the rectangle to rotate it.
It is recommended that you make the rectangle as large as, or
slightly larger than, the area you are removing.
7 On the Tool Options palette, click the Apply button .
8 Choose Selections
Select None to deselect the selection.
Retouching and restoring images 61
Page 67

You can also
Feather a selection made with the
Freehand Selection tool
Blend edges and use the object’s
tonal ranges when applying the
source material
Before making the selection, adjust
the Feather control on the Tool
Options palette.
Choose the Smart Blending option
on the Tool Options palette.
Erasing image areas
You can use the Eraser tool to erase areas of a layer to transparency.
When you use the Eraser tool on a raster layer, all pixels in the tool’s
path become transparent. A gray-and-white checkerboard pattern
indicates transparent areas.
You can use the Background Eraser tool to erase pixels selectively. For
example, in a photo of a mountain range, you can erase the sky, or you
can isolate an object from the surrounding image area.
You can quickly remove the background from an
image by using the Background Eraser tool.
You can adjust the default settings for the Background Eraser tool on
the Tool Options palette. For example, you can change the opacity,
color tolerance, and sample area settings. For more information, see
“Erasing image areas” in the Help.
62 Corel Paint Shop Pro Photo X2 User Guide
Page 68

To erase an image area
1 On the Tools toolbar, choose the Eraser tool .
2 On the Tool Options palette, choose the brush options.
3 Drag in the image to erase.
You can also
Restore erased pixels Hold down the right mouse button,
and drag over the erased area.
Erase a straight line Click at the beginning of the line,
hold down Shift, and click the end of
the line. To continue erasing the
line, move to the next point, hold
down Shift, and click again.
If you erase the background layer, the Eraser tool erases to
transparency, and the layer is automatically promoted to a raster
layer.
To erase the background area of an image
1 On the Layers palette, click the layer that contains the image
element that you want to isolate.
2 On the Tools toolbar, choose the Background Eraser tool .
3 On the Tool Options palette, choose the brush options.
For information about setting brush options, see “Choosing brush
options” in the Help.
4 Drag around the edges of the image area that you want to isolate.
Slow, careful strokes give you the best results. Keep the center of
the brush on regions you want to erase, while keeping the edges of
the brush on regions you want to preserve.
You can also
Restore erased pixels Right-click and drag.
Retouching and restoring images 63
Page 69

You can also
Erase a straight line Click once at the beginning point,
hold down Shift, and click the
endpoint.
The background layer is automatically promoted to a raster layer
when you work on it with the Background Eraser tool.
Recoloring image areas for a realistic effect
You can use the Color Changer tool to realistically recolor an object or
a region in an image. What sets the Color Changer tool apart from other
tools and commands (such as the Flood Fill tool, some of the retouching
brushes, or the Colorize, Hue/Saturation/Lightness, or Hue Map
commands) is that it takes into account the shading of the specified
color. The Color Changer tool detects and analyzes variations in image
brightness and applies the recoloring based on that illumination.
One click can change the color of the girl’s dress.
The Color Changer tool works best on matte objects such as clothing,
carpet, and painted objects that are a solid color. It may not work as
64 Corel Paint Shop Pro Photo X2 User Guide
Page 70

well on shiny or reflective objects and is not designed to work with
gradients or patterns.
To recolor with the Color Changer tool
1 On the Tools toolbar, choose the Color Changer tool .
The Color Changer tool is grouped with the Flood Fill tool.
2 On the Materials palette, click the Color button on the Style
drop-list, and choose a solid color.
If the Materials palette is not displayed, choose View
Palettes
Materials.
For realistic-looking colors, set the Saturation value (in the Material
Properties dialog box) closer to 100 than to 255 (full saturation).
3 Position the Color Changer cursor over the color you want to
change in the image, and then click to recolor with the Foreground/
Stroke color, or right-click to recolor with the current Background/
Fill color.
4 Click Apply to set the color change on the object.
You can also
Use a color from the current image Choose the Dropper tool , click
the color you want in the image, and
then choose the Color Changer tool
to reactivate it.
Instantly change the color you want
to apply
Retouching and restoring images 65
Before clicking Apply, click a color
on the Materials palette.
Page 71

You can also
Adjust the color application Before clicking Apply, adjust one or
both of the following controls on the
Too l O p ti o n s p a le t te :
• To l er a n c e — determines how
closely the current color needs
to match similar colors in order
for the recoloring to be
applied. Higher settings cause
more pixels to be recolored.
• Edge Softness — determines
how pixels that border the
recolored pixels are affected.
Higher settings cause more
“bleeding” of the recoloring.
While using the Color Changer tool, you can undo and redo
actions such as adjusting colors or adjusting settings on the Tool
Options palette.
To isolate the area you want to recolor, you can create a
selection. For more information about creating selections, see
“Creating selections” on page 79.
66 Corel Paint Shop Pro Photo X2 User Guide
Page 72

Using the Express
Lab
Taking lots of photos with your digital camera is fun and easy.
Sometimes, though, the effort required to review them all, let alone
edit them, can be laborious. The new Express Lab can make this task
enjoyable. You can perform basic corrections, such as cropping,
straightening, color correcting, and removing blemishes and red-eye.
You can even apply star ratings and delete photos. This rapid-edit
mode lets you quickly complete the first cut of photos before doing
more detailed work on a select few.
Why use the Express Lab?
The Express Lab provides quick access to the most commonly used
tools and features of Corel Paint Shop Pro Photo X2. Instead of having
to root around menus or search through toolbars and palettes, you have
the controls right in front of you.
Another advantage of using the Express Lab is that after you select a
folder of photos to work on, you can use the Next and Previous buttons
to instantly move from one photo to the next. If you prefer to work in
the standard editing mode and have access to the application’s entire
range of tools and features, you can simply click the Exit Express Lab
button. The most recently displayed Express Lab photo becomes the
active image in the standard editing mode.
In this section, you’ll learn about
• starting the Express Lab
• getting to know the Express Lab
• getting photos into the Express Lab
• displaying photos
• cropping and straightening photos
Using the Express Lab 67
Page 73

• applying basic adjustments to photos
• cloning and retouching photos
• removing red-eye in the Express Lab
• rotating photos
• zooming and panning
• rating photos
• saving photos
• deleting photos
• exiting the Express Lab
Starting the Express Lab
You can start the Express Lab from the main application window, the
Organizer, or a photo tray.
To start the Express Lab from the main application window
• With one or more images open in the workspace, choose View
Express Lab.
The active image appears in the Express Lab, and any other open
images appear in the thumbnail area.
You can use the Express Lab even when no images are open in
the main application window. Just click the Get Photos button in
the Express Lab to open the images you want to work on.
You can also start the Express Lab by clicking the Express Lab
button on the Standard toolbar.
To start the Express Lab from the Organizer or a photo tray
1 Select one or more thumbnails in the Organizer or photo tray.
2 Right-click a selected thumbnail, and choose Open with Express
Lab.
68 Corel Paint Shop Pro Photo X2 User Guide
Page 74

You can also start the Express Lab by clicking the Express Lab
button on the Organizer toolbar, or by clicking the menu
button in a photo tray and choosing Open with Express Lab.
Getting to know the Express Lab
The Express Lab mode is like a mini-application within
Corel Paint Shop Pro Photo X2 that lets you access a set of the most
commonly used tools for editing, viewing, and managing your photos.
These tools appear directly below the current image, and settings for a
tool appear along the right side of the Express Lab. After you select the
folder that contains the photos you want to work on, the Express Lab
lets you easily move between photos by using the Next and Previous
buttons.
Note that the Express Lab is not customizable.
Using the Express Lab 69
Page 75

Tool controls
Thumbnails Previous and Next buttons Get Photos button
A photo displayed in the Express Lab
Getting photos into the Express Lab
The photos that first appear in the Express Lab depend on how you start
the Express Lab mode. After you start the Express Lab, you can load a
folder of photos quickly by using the Get Photos button. Thumbnails
appear below the tools, and the first photo in the list is displayed
automatically.
If no image is open in the main workspace, and if this is the first time
you are using the Express Lab, the images in the My Pictures folder are
loaded when you click the Get Photos button. Thereafter, when you use
the Express Lab with no image open in the main workspace, your most
recently viewed images are loaded when you click this button.
To load photos into the Express Lab
1 Click Get Photos.
The Get Photos dialog box appears.
70 Corel Paint Shop Pro Photo X2 User Guide
Page 76

2 Navigate to the folder containing the images you want to load:
• Folders — Click this tab to select a folder by using a standard
hierarchical list of the folders on your computer.
• Organizer — Click this tab to select a folder by using the
Organizer.
3 Click OK to load images from the selected folder into the Express
Lab.
Displaying photos
After you load photos into the Express Lab, you can easily move from
one photo to the next and quickly display any photo. Note that the
Express Lab lets you view only one full-size image at a time.
To display photos in the Express Lab
•Click Next to display the image shown after the current image,
or click Previous to display the image shown before the current
image. To display a specific photo, simply click its thumbnail.
Cropping and straightening photos
Two of the most common adjustments are cropping out unwanted
portions of a photo and straightening a crooked photo.
To crop a photo in the Express Lab
1 On the Express Lab toolbar, choose the Crop tool .
2 Drag to define the crop boundary, or use the settings on the right
side of the Express Lab window.
3 Click Apply to crop the image.
The floating toolbar of the Crop tool appears if it is enabled in
the Transparency and Shading category of the General Program
Preferences. To change this setting, you must exit the Express
Lab.
Using the Express Lab 71
Page 77

For more information on using the Crop tool, see “Cropping
images” on page 37.
To straighten a photo in the Express Lab
1 On the Express Lab toolbar, choose the Straighten tool .
A straightening bar with end handles appears on the image.
2 Drag each end of the straightening bar to align it with the part of
the photo that you want to straighten.
You can fine-tune the correction by using the controls on the right
side of the Express Lab window.
3 Click Apply to straighten the photo.
For more information on using the Straighten tool, see
“Straightening images” on page 39.
Applying basic adjustments to photos
You can make a series of corrections to photos in the Express Lab by
using the Smart Photo Fix command. This command lets you remove
color cast, brighten underexposed images, darken overexposed images,
and adjust saturation.
The Smart Photo Fix command is active by default when you use the
Express Lab.
To make basic adjustments to a photo
1 On the Express Lab toolbar, choose the Smart Photo Fix tool .
2 On the right side of the Express Lab window, make the desired
adjustments:
• Brightness, Shadows, and Highlights sliders — Drag these sliders
(or type or set a value in the numeric controls) to adjust these
respective attributes of the photo. Positive values brighten the
photo; negative values darken the photo.
• Saturation slider — Drag this slider (or type or set a value in the
numeric control) to adjust the color saturation. Positive values
72 Corel Paint Shop Pro Photo X2 User Guide
Page 78

make colors more vibrant; negative values make colors less
vibrant.
• Suggest Settings button — Click this button to see suggested
settings for the four sliders, as well as the black point and white
point controls below the histogram.
• Reset button — Click this button to set all sliders back to 0 and to
remove all sampling points that you may have placed on the
photo.
You can also
Correct a color cast Click areas in the photo that you
know should be black, white, or gray
but look different.
A sampling point appears over these
areas. Modifications to the
histogram are represented by a
darker red graph that overlays the
gray (original) graph.
Remove a sampling point Click the point again.
Adjust the photo’s dark regions Drag the black triangle directly
below the histogram.
Adjust the photo’s light regions Drag the white triangle.
For more information on using the Smart Photo Fix command,
see “To fine-tune basic corrections with Smart Photo Fix” on
page 42.
Cloning and retouching photos
You can cover up flaws and unwanted areas in a photo with the Clone
Brush tool and apply realistic cosmetic corrections with the Makeover
tool.
Using the Express Lab 73
Page 79

To cover up areas with the Clone Brush tool
1 On the Express Lab toolbar, choose the Clone Brush tool .
2 On the right side of the Express Lab window, adjust the controls for
the Clone Brush tool.
3 On the photo, right-click the source area that you want to use to
cover up the area that you want to hide.
The source area is indicated by an “X.”
4 Position the cursor over the area you want to cover up, hold down
the left mouse button, and drag slowly and carefully to paint over
the area with pixels from the source area.
For more information on using the Clone Brush tool, see “To
clone a part of an image” on page 61.
To apply cosmetic touch ups with the Makeover tool
1 On the Express Lab toolbar, choose the Makeover tool .
2 On the right side of the Express Lab window, choose the desired
mode of the Makeover tool:
• Blemish Fixer — covers up blemishes, such as moles, warts, acne,
or small scars. Use the Strength and Brush Size controls to finetune the tool.
• Toothbrush — whitens teeth. If the teeth are close together, one
click may suffice. If there are gaps between teeth, you may need
to click the teeth in sections. Use the Strength setting to define
the amount of whitening to apply.
• Eye Drop — whitens bloodshot areas of an eye. Similar to the
Toothbrush mode, the Eye Drop mode may require multiple clicks
to adequately remove the reddened areas. Use the Strength
setting to define the amount of whitening to apply.
• Suntan — applies a tan to pale skin tones. Use the Strength and
Brush Size controls to fine-tune the tool.
• Thinify — makes a photo subject appear thinner by compressing
pixels on either side. Use the Strength setting to define the
degree to which pixels compress toward the point you click.
74 Corel Paint Shop Pro Photo X2 User Guide
Page 80

For more information on using the different modes of the
Makeover tool, see “Applying cosmetic corrections” on page 54.
Removing red-eye in the Express Lab
You can use the Red Eye tool to cover up the red-eye effect that often
occurs when you use a camera flash. The tool covers the pupil with a
dark gray color, restoring a more natural look.
To eliminate red-eye
1 On the Express Lab toolbar, choose the Red Eye tool .
2 Position the cursor directly over the eye to see if the cursor size
needs to be adjusted.
If you need to adjust the size of the tool, use the Size control on the
right side of the Express lab window. For best results, the cursor
should be about twice the size of the red area needing correction.
3 Position the cursor directly over the eye, and click.
You can control more aspects of red-eye removal by using the
advanced options provided by the Red Eye Removal command.
For more information, see “To use advanced options for red-eye
removal” in Help.
Rotating photos
You can rotate photos in 90-degree increments with just one click.
To rotate a photo in the Express Lab
• On the Express Lab toolbar, click the Rotate Right button to
rotate the photo 90 degrees clockwise, or click the Rotate Left
button to rotate the photo 90 degrees counterclockwise.
For more information on rotating images, see “Rotating images”
on page 35.
Using the Express Lab 75
Page 81

Zooming and panning
Yo u c a n a d j u st t h e v i ew of the photo by zooming in or out, panning
around the photo, fitting the photo to the Express Lab window, or by
instantly viewing the photo at 100% zoom level.
To zoom in or out of a photo
1 On the Express Lab toolbar, choose the Zoom tool .
2 Place the cursor on the image, and either click to zoom in or right-
click to zoom out. To set a specific magnification level, use the
Zoom control on the right side of the Express Lab window.
To pan around a photo
1 On the Express Lab toolbar, choose the Pan tool .
2 Drag the cursor inside the photo to move the viewable area.
Panning requires part of the photo to be hidden. The Pan tool
does not work if the entire photo is visible.
You can pan around the image with any of the Express Lab tools
by holding down the Space Bar as you drag the cursor.
To fit the photo to the Express Lab window
• On the Express Lab toolbar, choose the Fit Image to Window tool
.
The magnification level is adjusted so that the entire photo can be
seen in the Express Lab window.
To display a photo at its actual size
• On the Express Lab toolbar, choose the Normal Viewing tool .
The zoom level is reset to 100%.
Rating photos
You can assign a star rating to your photos. The rating you assign is
saved in the photo’s metadata and reflected when you look at the image
76 Corel Paint Shop Pro Photo X2 User Guide
Page 82

information in the Organizer. Likewise, the ratings you apply in the
Organizer are reflected when you view the photo in the Express Lab.
To assign a rating to a photo
• Click the stars under the lower-right corner of the photo.
You can also
Increase a photo rating Click an additional star.
Decrease a photo rating Re-click a star.
Apply a rating with number keys Press the number keys 1 through 5
on your keyboard.
You do not have to save the photo for the rating to be applied.
Saving photos
You can save your work on a photo at any time in the Express Lab. You
can also assign a different filename, folder, or file format to a photo by
using the Save As command.
To save a photo in the Express Lab
• On the Express Lab toolbar, click the Save button .
If this is the first time you’ve edited the photo, and if the AutoPreserve Originals preference setting is enabled, you asked
whether you want to overwrite the original unedited image. For
more information on the Auto-Preserve preference setting, see
“Setting Auto Preserve preferences” in Help.
To save another version of a photo
1 On the Express Lab toolbar, click the Save As button .
The Save As dialog box appears.
2 In the Save As dialog box, do any of the following:
• Choose another folder or drive for the photo.
Using the Express Lab 77
Page 83

• Assign a new filename to the photo.
• ,Save the photo to a different file format.
3 Click Save.
For more information on saving images, see “Saving images” on
page 29.
Deleting photos
You can delete a photo from the hard disk while working in the Express
Lab.
To send a photo to the Recycle Bin
1 Display the photo you want to delete.
2 Click the Delete button .
You will be prompted to verify whether to send the current photo
to the Recycle Bin.
3 Click Ye s.
Exiting the Express Lab
You can exit the Express Lab and return to the main workspace at any
time.
To exit the Express Lab
•Click the Exit Express Lab button in the lower-right corner of the
Express Lab window.
78 Corel Paint Shop Pro Photo X2 User Guide
Page 84

Working with selections
Selecting the parts of images to edit is an important step in your
workflow. By creating a selection, you can edit an area while leaving
the rest of the image unchanged. You can use drawing or painting
tools to modify selected areas of your image. You can also apply
commands to flip, copy, crop, or perform other actions on the selected
areas.
The border of a selection is identified by a selection marquee, which is
a series of black and white dashes that outlines the selection.
In this section, you’ll learn about
•creating selections
• hiding and displaying the selection marquee
• modifying selections
• inverting and clearing selections
Creating selections
You can create a selection when you want to isolate part of an image.
For example, you can use a selection to adjust or retouch one area of a
photo, or to copy a portion of a photo and paste it into another photo.
The way you make a selection depends on whether you are working on
a raster layer or a vector layer. For more information about raster and
vector layers, see “Understanding layers” in the Help.
The following selection tools can be used to create raster selections:
• Selection tool — lets you create a selection of a specific shape,
such as a rectangle, square, ellipse, circle, or star
• Freehand Selection tool — lets you create a selection around
the edges of an object, such as petals of a flower or fingers on a
hand. You can make four types of selections with the Freehand tool:
Working with selections 79
Page 85

• Freehand — lets you quickly select an area by dragging
• Edge Seeker — finds the edges between two areas with color
differences when you click on the edges of irregularly shaped
areas
• Point to Point — lets you draw straight lines between points to
create a selection with straight edges
• Smart Edge — automatically finds the edges of irregularly shaped
areas when you click along the edges
• Magic Wand tool — makes a selection based on the color, hue,
brightness, or opacity of an object. This tool is designed to select an
area that has distinctly different pixels than those in other areas of
an image — for example, a pink rose surrounded by green leaves,
or a dark area in an otherwise bright image.
You can create a selection by using a Selection tool shape (left), by creating a
freehand selection (center), or by using the Magic Wand tool to select specific
areas of color or opacity (right).
You can make a selection with one tool and then switch to another tool
to add to or subtract from the selection. For more information, see
“Modifying selections” on page 84.
For more information about creating selections, see “Creating
selections” in the Help.
80 Corel Paint Shop Pro Photo X2 User Guide
Page 86

To create a selection by using the Selection tool
1 On the Tools toolbar, choose the Selection tool .
2 Check the settings of the following controls on the Tool Options
palette, and modify them if necessary:
• Selection Type — specifies the shape of the selection area
• Mode — specifies whether to replace, add, or remove an existing
selection. Replace is the default setting.
• Feather — softens the edges of a selection by specifying a fade
width (0 to 200 pixels)
• Anti-alias — applies a smooth edge to a selection by making the
pixels along its edges semitransparent
3 Drag to make the selection.
As you drag, a border indicates the selection. When you finish
dragging, the selection’s border becomes a selection marquee.
After you create a selection, changes to the settings on the Tool
Options palette apply to the next action, not to the current
selection. You can modify the options for the current selection
by choosing Selections
Modify and choosing a command from
the menu.
To create a selection by using the Freehand Selection tool
1 On the Tools toolbar, choose the Freehand Selection tool .
2 On the Tool Options palette, choose one of the following from the
Selection Type drop-list:
• Edge Seeker
• Freehand
• Point to Point
• Smart Edge
3 Check the settings of the following controls on the Tool Options
palette, and modify them if necessary:
• Feather — softens the edges of a selection by specifying a fade
width (0 to 200 pixels)
Working with selections 81
Page 87

• Smoothing — specifies the amount of smoothing to apply to the
selection border
• Anti-alias — applies a smooth edge to a selection by making
pixels semitransparent
• Use all layers — searches for an edge in all layers of the selected
area. This option is available when you use the Edge Seeker or the
Smart Edge selection type on multilayer images.
4 Depending on the selection type you chose, perform a task from the
following table.
To Do the following
Make a Freehand selection Drag to select an image area.
Make an Edge Seeker selection Click precisely along the edge of the
area you want to select, and doubleclick to complete the selection.
Make a Smart Edge selection Click along the edge of the area that
you want to select, ensuring that the
rectangular cursor encloses the
edge. Double-click to complete the
selection.
Make a Point to Point selection Click around the area you want to
select, and double-click to complete
the selection.
When making an Edge Seeker selection, you can set the distance
used to search for an edge by typing a value in the Range control
on the Tool Options palette.
You can increase the accuracy of Edge Seeker and Smart Edge
selections by clicking more frequently along the edge you are
following.
You can delete a previous point by pressing Delete.
82 Corel Paint Shop Pro Photo X2 User Guide
Page 88

To create a selection by using the Magic Wand tool
1 On the Tools toolbar, choose the Magic Wand tool .
2 On the Tool Options palette, choose a Match mode option:
• None — selects all pixels
• RGB Value — selects pixels that match the red, green, and blue
values of the pixel you click
• Color — selects pixels that match the shading variations of the
pixel you click
• Brightness — selects pixels that match the perceptual lightness
value of the pixel you click
• Perceptual — selects pixels that match the perceptual shading
variation and lightness of the pixel you click
• Traditional — selects pixels that match red, green, and blue
values, with a bias toward lightness variations. This match mode
is therefore more discriminating than the RGB Value match mode.
• All Opaque — selects all pixels that are not completely invisible
(that is, having an opacity value of 1 or greater). Choosing this
option disables the To l er a n c e control.
• Opacity — selects pixels that match the opacity value of the pixel
you click
3 Check the settings of the following controls on the Tool Options
palette, and modify them if necessary:
• To l er a n c e — controls how closely the selected pixels match the
pixel you click in the image. At low settings, only similar pixels are
chosen; at high settings, a wider range of pixels is selected.
• Feather — softens the edges of a selection by specifying a fade
width (0 to 200 pixels)
• Use all layers — searches for matching pixels across all layers in
the image
• Contiguous — selects only pixels that connect to the pixel you
click
Working with selections 83
Page 89

• Anti-alias — produces a smooth-edged selection by partially
filling in pixels along the edge, making them semitransparent. You
can use this option inside or outside the selection marquee.
4 Click the image area that contains the pixels you want to match.
The selection marquee surrounds all matching pixels.
Hiding and displaying the selection marquee
The selection marquee is visible by default. When you work with a
selection, it is sometimes helpful to hide the selection marquee
temporarily without disabling the selection. For example, you may want
to see the results of pasting a selection or of feathering a selection’s
edges.
To hide or display the selection marquee
• Choose Selections
When you hide the selection marquee, it does not deselect or
clear the selection. The tools and commands you use while the
selection marquee is hidden apply only to the selected area.
You can also hide or display the selection marquee by pressing
Ctrl + Shift + M.
Hide Marquee.
Modifying selections
Selections can be modified in various ways. You can modify a selection
by adding image content to it or by subtracting image content from it.
For example, in a picture of a person carrying a large sign, you can
select the sign by using the rectangular Selection tool and then add the
person to the selection by using the Freehand Selection tool.
For information about modifying selections by a specific number of
pixels or by color information, see “Modifying selections” in the Help.
84 Corel Paint Shop Pro Photo X2 User Guide
Page 90

After you create a selection, you can add to it.
To add to or subtract from a selection
1 On the Tools toolbar, choose a selection tool (Selection ,
Freehand , or Magic Wand tool).
2 Choose settings for the tool on the Tool Options palette.
3 Perform a task from the following table.
To Do the following
Add to a selection From the Mode drop-list, choose
Add, and select the image areas that
you want to add to the selection.
The areas do not need to be
adjacent.
Subtract from a selection From the Mode drop-list, choose
Remove, and select the image areas
that you want to remove from the
selection.
You can also add to a selection by holding down Shift while
clicking the image areas that you want to add, or subtract from a
selection by holding down Ctrl while clicking the image areas
that you want to remove.
Working with selections 85
Page 91

Inverting and clearing selections
Sometimes, the easiest way to make a complicated selection is to select
the part of the image that you don’t want and then invert the selection.
For example, in a picture of a person against a solid-color background,
you can select the background and then invert the selection, so that the
person is selected instead of the background.
By selecting a solid background (left) and inverting the selection,
you can isolate a complex, multicolored foreground (right).
You can also clear a selection, which removes the selection marquee
and integrates the selection back into the image. After clearing the
selection, you can resume your editing of the entire image.
To invert a selection
• Choose Selections
The selection marquee now encloses the previously unselected
image area and excludes the previously selected image area.
Invert.
To clear a selection
• Choose Selections
You can also clear a selection by right-clicking in the image
outside the selection marquee or by pressing Ctrl + D.
86 Corel Paint Shop Pro Photo X2 User Guide
Select None.
Page 92

Working with layers
When you work with layers in Corel Paint Shop Pro Photo, you can add
elements to your images, create artistic effects and illustrations, and
edit your images more easily. You can add or delete layers, rearrange
the order in which they are stacked, and blend their pixels in various
ways. Unless you merge the layers, you can edit each one
independently of the others.
For more information about layers, see “Working with layers” in the
Help.
In this section, you’ll learn about
• understanding layers
•using layers with photos
• using the Layers palette
• creating layers
•renaming layers
•viewing layers
• changing the order of layers in an image
• moving layers on the canvas
• using layer styles
Understanding layers
When you create or import an image in Corel Paint Shop Pro Photo, the
image has a single layer. Depending on the type of image you create or
import, the single layer is labeled as Background, Raster, Vector, or Art
Media. When you open a photo, scan, or screen capture, the single layer
is labeled as Background on the Layers palette.
Working with layers 87
Page 93

For most simple corrections and retouching, you do not have to add
la yers to an image . However, it is a good practice to duplic ate the si ngle
layer before making image corrections, so that you preserve the
original image on its own layer. If you intend to do more complex work
— such as adding elements to the image, creating photo compositions,
adding text, or applying other effects — the use of layers is highly
recommended.
Layers are like separate sheets that you combine to create a
final composition.
Each layer you add begins as a transparent sheet over the background.
As you add brushstrokes, vector objects, or text, you cover up parts of
the Background layer. Transparent areas let you see the underlying
layers. You can stack multiple layers to create artistic compositions,
photo collages, or complex illustrations. For more information about
different types of layers, see “Understanding layers” in the Help.
Using layers with photos
When you open a digital photo or scanned image, the image appears on
the background layer. For most photographic enhancements, such as
cropping, correcting colors, or retouching, you do not need to add
additional layers. By adding layers as you work, however, you can create
interesting effects and make corrections more easily. The following
table provides examples.
88 Corel Paint Shop Pro Photo X2 User Guide
Page 94

To Do the following
Preserve the original
image before making
changes
Make a duplicate of the background layer by
choosing Layers Duplicate. To work on the
duplicate layer, make it the active layer by
clicking it on the Layers palette.
Make color and tonal
corrections
Use adjustment layers instead of changing the
image directly. For more information about
using adjustment layers, see “Using adjustment
layers” in the Help.
Add text or graphics Create text and graphics, such as lines and
shapes, on vector layers to make them easier to
edit. For more information about adding text,
see “Working with text” on page 113.
Create interesting effects Duplicate the background layer, apply an effect
to the duplicate, and then blend the two layers
by changing the opacity or blend modes of the
layers.
Create a painting Choose an Art Media tool from the Tools toolbar
and mark the Tr ac e check box on the Tool
Options palette (an Art Media layer is created
automatically). Use the Art Media brushes to
create impressionistic effects. For more
information about the Art Media brushes, see
“Working with Art Media tools” in the Help.
Working with layers 89
Page 95

To Do the following
Combine photos to
create a photo collage
Create a panoramic
photo
Open the photos that you want to combine and
decide which image to use as your base image.
Copy the other images into the base image by
clicking an image, choosing Edit Copy
the base image, and choosing Edit Paste As
New Layer. Position each layer with the Move
.
tool
Use the opacity setting and blend mode to
control how much of each layer shows through.
Use a mask layer to hide parts of a layer or to
create soft edges around it.
Take a series of photos with overlapping subject
matter.
Create an image with a canvas large enough to
display a panorama, and then copy each photo
onto a separate layer. Decrease the opacity of
one layer so that you can see through it, and use
the Move tool to match up the edges of the next
layer. After all layers have been positioned,
return their settings to 100 percent opacity.
, clicking
Using the Layers palette
The Layers palette lists all layers in an image. The order of layers on the
palette is the order of layers in the image. The top layer is listed first,
and the bottom layer is listed last. You can change the stacking order of
layers on the Layers palette, depending on the layer types. For
information about layer types, see “Understanding layers” in the Help.
By default, a thumbnail view of the layer’s contents appears to the left
of the layer name. You can set the size of the thumbnail or turn the
thumbnail off. By default, the settings of the active layer appear above
the topmost thumbnail preview, but you can modify the appearance of
these settings.
90 Corel Paint Shop Pro Photo X2 User Guide
Page 96

New layer drop-list
Active layer settings
Layer type
indicator
Layer visibility toggle
Layer thumbnail
The Layers palette
Layer name
(customizable)
The Layers palette displays the names of layers and layer groups. You
can customize the names of layers in the palette (see examples in the
illustration above). It also indicates the types of layers (background,
raster, vector, Art Media, mask, adjustment, group, selection, or floating
selection) and lets you toggle the layer visibility on or off.
The Layers palette toolbar includes a drop-list for command tasks, such
as adding a new raster or vector layer.
Below the Layers palette toolbar are settings that let you change the
opacity and blend mode of layers, link layers, or lock their transparency.
If an image has more than one layer, you must select the layer that you
want to work on. Changes to the image affect only the selected layer
(also called the active layer). You can select only one layer at a time.
To display or hide the Layers palette
• Choose View
Palettes Layers.
This command toggles the display of the Layers palette on and off.
To select a layer
• On the Layers palette, click the name of a layer.
Working with layers 91
Page 97

Creating layers
You can create a layer from the Layers palette. When you create a layer,
you can specify properties such as the layer type, opacity, or blend
mode. These properties can be modified as you work with the layer. You
can also create layers from selections, vector objects, or other images.
For more information, see “Creating layers” in the Help.
Layers are created automatically when you use the Text tool, Art Media
tools, or vector drawing tools, such the Pen tool or the Preset Shape
tool.
To create a layer from the Layers palette
1 On the Layers palette, click the layer above which you want create a
layer.
2 From the drop-list on the toolbar of the Layers palette, choose a
layer type.
3 Adjust the available controls for the layer properties.
4 Click OK.
The new layer is added above the active layer. It is named with the
layer type and a number, such as “Vector 1.”
Renaming layers
As you add layers to an image, you may find it convenient to rename
them so that they are easy to identify on the Layers palette.
To rename a layer
1 On the Layers palette, click the layer you want to rename, pause a
moment, and re-click.
The name appears highlighted in a box.
2 Type the new name in the box, and press Enter.
92 Corel Paint Shop Pro Photo X2 User Guide
Page 98

Viewing layers
You can make layers, layer groups, or vector objects visible or invisible
in the image. The invisible layers remain in the image but are hidden
from view. You can also invert visible and hidden layers.
To display or hide a layer
•Click the Visibility Toggle button for the layer that you want to
display or hide.
— Visibility Toggle button when the layer is displayed
— Visibility Toggle button when the layer is hidden
Hiding a layer group hides all layers within that group.
To show one layer only, right-click the layer, and choose View
Current Only.
Changing the order of layers in an image
The order of layers within an image is critical to the appearance of the
image. To rearrange layers in the image, you can easily change the
stacking order of layers on the Layers palette. If a layer or a layer group
has components, such as vector objects or grouped layers, all of the
components move with the layer or layer group when its position in the
stacking order is changed. You can move vector objects within their
vector group, as well as from one vector layer to another.
To move a layer or layer group
• On the Layers palette, select the layer or layer group, and drag it to
a new position in the stack.
A black line shows the layer’s position as you drag.
When you drag a layer, the cursor changes to a hand. A cursor
displaying a null symbol indicates that the selected item
cannot be moved to a particular position.
Working with layers 93
Page 99

You can also move a layer or layer group by choosing Layers
Arrange and then choosing an option.
To move a vector object between layers
1 On the Layers palette, select the vector object.
To select multiple vector objects, hold down Shift while clicking
additional objects.
2 Drag the selected object to another vector layer, or to a new
position within the same layer group.
A black line shows the layer’s position as you drag.
Moving layers on the canvas
You can move the contents of an entire layer anywhere within the image
canvas. If you move part of a layer off the canvas, the layer is not
cropped — you can move it back to the canvas or increase the canvas
size to display the hidden area. For more information about resizing the
canvas, see “Resizing the canvas” in the Help.
To move a layer on the canvas
1 On the Layers palette, select the layer that you want to move.
2 On the Tools toolbar, click the Move tool .
3 Drag in the image to move the layer to a new position.
You can also select and move layers with the Pick tool .
Using layer styles
You can apply a variety of effects, either alone or in combination, by
using the Layer Styles tabbed area of the Layer Properties dialog box.
With this feature, you can create visually interesting and creative effects
to a layer in real time, and you can fine-tune the effect before applying
it. The Layer Styles feature provides six effects: Reflection, Outer Glow,
Bevel, Emboss, Inner Glow, and Drop Shadow.
94 Corel Paint Shop Pro Photo X2 User Guide
Page 100

When you apply these effects on a separate layer and save the resulting
file in a layer-capable file format (such as the PspImage format), your
original image remains unedited on its own layer. In this sense, layer
sty le s are si milar t o a djust me nt lay er s. They d if fer, h ow ever, i n that la yer
styles are applied not to the underlying canvas, but just to the
boundaries of the individual layer.
If you resize a layer with one or more layer styles applied to it, the
effects are resized proportionally.
Layer styles can be applied only to raster and vector layers.
Why is there a “Layer” check box?
When marked, this check box lets you show the layer data with the
effects applied. When unmarked, this check box lets you turn off the
layer data and just show the effects. Unmarking the Layer check box
makes the original layer data behave like a mask.
Is there a reason for the check box order?
Yes. The effects need to be composited in a particular order to obtain
sensible results. For example, you would not want a Drop Shadow effect
placed on top of its source object, nor would you want an Outer Glow
effect placed under a Drop Shadow effect. Thus, the Reflection effect is
placed on top, followed by the Outer Glow effect, the Bevel effect, and
so on. The Drop Shadow effect is applied last.
Working with layers 95
 Loading...