

Page 1

Page 2

Corel® Grafigo™ 2 User Guide
The contents of this user guide and the associated Corel Grafigo software are the
property of Corel Corporation and its respective licensors, and are protected by
copyright. For more complete copyright information about Corel Grafigo, please refer
to the end user license agreement.
Copyright 2003 Corel Corporation. All rights reserved.
Corel, the Corel logo, Corel Grafigo, the “Ideas go here” byline, and CorelDRAW are
trademarks or registered trademarks of Corel Corporation and/or its subsidiaries in
Canada, the U.S. and/or other countries.
Microsoft, NetMeeting, and Windows are registered trademarks of Microsoft
Corporation in the United States and/or other countries.
Other product, font, and company names and logos may be trademarks or registered
trademarks of their respective companies.
Page 3

Page 4

Table of Contents
Welcome to Corel Grafigo
What’s new in Corel Grafigo . . . . . . . . . . . . . . . . . . . . . . . . . . . . . . . . . . . . . . . . 1
Documentation conventions . . . . . . . . . . . . . . . . . . . . . . . . . . . . . . . . . . . . . . . . 3
Getting help . . . . . . . . . . . . . . . . . . . . . . . . . . . . . . . . . . . . . . . . . . . . . . . . . . . . 4
To use Help . . . . . . . . . . . . . . . . . . . . . . . . . . . . . . . . . . . . . . . . . . . . . . . . . . 5
To access ToolTips . . . . . . . . . . . . . . . . . . . . . . . . . . . . . . . . . . . . . . . . . . . . . 5
To access the user guide in PDF format . . . . . . . . . . . . . . . . . . . . . . . . . . . . . 5
Activating Corel products . . . . . . . . . . . . . . . . . . . . . . . . . . . . . . . . . . . . . . . . . . 5
Registering Corel products . . . . . . . . . . . . . . . . . . . . . . . . . . . . . . . . . . . . . . . . . 6
Technical support . . . . . . . . . . . . . . . . . . . . . . . . . . . . . . . . . . . . . . . . . . . . . . . . 6
Customer feedback . . . . . . . . . . . . . . . . . . . . . . . . . . . . . . . . . . . . . . . . . . . . . . . 9
Corel Corporation . . . . . . . . . . . . . . . . . . . . . . . . . . . . . . . . . . . . . . . . . . . . . . . . 9
Workspace tour
Corel Grafigo terminology and concepts . . . . . . . . . . . . . . . . . . . . . . . . . . . . . . 11
Corel Grafigo program window . . . . . . . . . . . . . . . . . . . . . . . . . . . . . . . . . . . . . 12
Corel Grafigo workspace tools . . . . . . . . . . . . . . . . . . . . . . . . . . . . . . . . . . . . . . 13
The standard toolbar . . . . . . . . . . . . . . . . . . . . . . . . . . . . . . . . . . . . . . . . . . . . . 13
The toolbox. . . . . . . . . . . . . . . . . . . . . . . . . . . . . . . . . . . . . . . . . . . . . . . . . . . . 15
The Library toolbar . . . . . . . . . . . . . . . . . . . . . . . . . . . . . . . . . . . . . . . . . . . . . . 15
To change the size of the Library toolbar . . . . . . . . . . . . . . . . . . . . . . . . . . . 17
To open the Library flyout . . . . . . . . . . . . . . . . . . . . . . . . . . . . . . . . . . . . . . 17
To change the size of the Library flyout . . . . . . . . . . . . . . . . . . . . . . . . . . . . 17
To change the size of the content preview window . . . . . . . . . . . . . . . . . . . . 17
To change the size of the Category and Content lists . . . . . . . . . . . . . . . . . . 18
The View manager toolbar . . . . . . . . . . . . . . . . . . . . . . . . . . . . . . . . . . . . . . . . 18
To display or hide the View manager toolbar . . . . . . . . . . . . . . . . . . . . . . . . 19
To change the size of the View manager toolbar. . . . . . . . . . . . . . . . . . . . . . 19
The Collaboration palette . . . . . . . . . . . . . . . . . . . . . . . . . . . . . . . . . . . . . . . . . 19
To open or close the Collaboration palette . . . . . . . . . . . . . . . . . . . . . . . . . . 20
To change the size of the Collaboration palette. . . . . . . . . . . . . . . . . . . . . . . 20
Changing workspace options . . . . . . . . . . . . . . . . . . . . . . . . . . . . . . . . . . . . . . . 20
To dock a toolbar . . . . . . . . . . . . . . . . . . . . . . . . . . . . . . . . . . . . . . . . . . . . . 21
To undock a toolbar . . . . . . . . . . . . . . . . . . . . . . . . . . . . . . . . . . . . . . . . . . . 21
To change the size of a toolbar . . . . . . . . . . . . . . . . . . . . . . . . . . . . . . . . . . . 21
To display or hide a toolbar . . . . . . . . . . . . . . . . . . . . . . . . . . . . . . . . . . . . . 21
To change the size of buttons on a toolbar . . . . . . . . . . . . . . . . . . . . . . . . . . 21
Table of contents i
Page 5

To change the color of the workspace . . . . . . . . . . . . . . . . . . . . . . . . . . . . . . 22
To add a grid to the workspace . . . . . . . . . . . . . . . . . . . . . . . . . . . . . . . . . . . 22
Basics
Creating and opening documents . . . . . . . . . . . . . . . . . . . . . . . . . . . . . . . . . . . . 23
To create a new document . . . . . . . . . . . . . . . . . . . . . . . . . . . . . . . . . . . . . . 23
To open a document . . . . . . . . . . . . . . . . . . . . . . . . . . . . . . . . . . . . . . . . . . . 23
Undoing and redoing actions . . . . . . . . . . . . . . . . . . . . . . . . . . . . . . . . . . . . . . . 24
To undo or redo an action . . . . . . . . . . . . . . . . . . . . . . . . . . . . . . . . . . . . . . . 24
Viewing documents . . . . . . . . . . . . . . . . . . . . . . . . . . . . . . . . . . . . . . . . . . . . . . 24
To zoom . . . . . . . . . . . . . . . . . . . . . . . . . . . . . . . . . . . . . . . . . . . . . . . . . . . . 25
To view a document that falls outside the current workspace view . . . . . . . . 25
To create a view . . . . . . . . . . . . . . . . . . . . . . . . . . . . . . . . . . . . . . . . . . . . . . 26
To access a view . . . . . . . . . . . . . . . . . . . . . . . . . . . . . . . . . . . . . . . . . . . . . . 26
To delete a view . . . . . . . . . . . . . . . . . . . . . . . . . . . . . . . . . . . . . . . . . . . . . . 27
Saving documents . . . . . . . . . . . . . . . . . . . . . . . . . . . . . . . . . . . . . . . . . . . . . . . 27
To save a document . . . . . . . . . . . . . . . . . . . . . . . . . . . . . . . . . . . . . . . . . . . 27
To navigate through views . . . . . . . . . . . . . . . . . . . . . . . . . . . . . . . . . . . . . . 27
Previewing documents . . . . . . . . . . . . . . . . . . . . . . . . . . . . . . . . . . . . . . . . . . . . 28
To preview a document. . . . . . . . . . . . . . . . . . . . . . . . . . . . . . . . . . . . . . . . . 28
Closing documents and quitting Corel Grafigo. . . . . . . . . . . . . . . . . . . . . . . . . . 28
To close a document . . . . . . . . . . . . . . . . . . . . . . . . . . . . . . . . . . . . . . . . . . . 29
To quit Corel Grafigo . . . . . . . . . . . . . . . . . . . . . . . . . . . . . . . . . . . . . . . . . . 29
Organizing document components
Understanding layers . . . . . . . . . . . . . . . . . . . . . . . . . . . . . . . . . . . . . . . . . . . . . 31
Working with underlays . . . . . . . . . . . . . . . . . . . . . . . . . . . . . . . . . . . . . . . . . . 32
To insert an underlay . . . . . . . . . . . . . . . . . . . . . . . . . . . . . . . . . . . . . . . . . . 33
To select or deselect an underlay . . . . . . . . . . . . . . . . . . . . . . . . . . . . . . . . . . 34
To copy and paste an underlay . . . . . . . . . . . . . . . . . . . . . . . . . . . . . . . . . . . 34
To resize an underlay . . . . . . . . . . . . . . . . . . . . . . . . . . . . . . . . . . . . . . . . . . 34
To move an underlay . . . . . . . . . . . . . . . . . . . . . . . . . . . . . . . . . . . . . . . . . . 35
To delete an underlay . . . . . . . . . . . . . . . . . . . . . . . . . . . . . . . . . . . . . . . . . . 35
Working with onionskins. . . . . . . . . . . . . . . . . . . . . . . . . . . . . . . . . . . . . . . . . . 35
To add an onionskin . . . . . . . . . . . . . . . . . . . . . . . . . . . . . . . . . . . . . . . . . . . 36
To select an onionskin. . . . . . . . . . . . . . . . . . . . . . . . . . . . . . . . . . . . . . . . . . 37
To resize an onionskin. . . . . . . . . . . . . . . . . . . . . . . . . . . . . . . . . . . . . . . . . . 37
To move an onionskin. . . . . . . . . . . . . . . . . . . . . . . . . . . . . . . . . . . . . . . . . . 37
To display or hide an onionskin. . . . . . . . . . . . . . . . . . . . . . . . . . . . . . . . . . . 38
ii Table of contents
Page 6

To lock or unlock an onionskin. . . . . . . . . . . . . . . . . . . . . . . . . . . . . . . . . . . 38
To set the properties of an onionskin . . . . . . . . . . . . . . . . . . . . . . . . . . . . . . 38
To delete an onionskin . . . . . . . . . . . . . . . . . . . . . . . . . . . . . . . . . . . . . . . . . 39
Working with ink strokes
Adding ink strokes . . . . . . . . . . . . . . . . . . . . . . . . . . . . . . . . . . . . . . . . . . . . . . 41
To add an ink stroke . . . . . . . . . . . . . . . . . . . . . . . . . . . . . . . . . . . . . . . . . . 42
To set the attributes of the Pen and Marker tools . . . . . . . . . . . . . . . . . . . . . 42
Selecting ink strokes . . . . . . . . . . . . . . . . . . . . . . . . . . . . . . . . . . . . . . . . . . . . . 43
To select an ink stroke . . . . . . . . . . . . . . . . . . . . . . . . . . . . . . . . . . . . . . . . . 43
To deselect an ink stroke . . . . . . . . . . . . . . . . . . . . . . . . . . . . . . . . . . . . . . . 44
Copying and pasting ink strokes . . . . . . . . . . . . . . . . . . . . . . . . . . . . . . . . . . . . 44
To copy and paste an ink stroke . . . . . . . . . . . . . . . . . . . . . . . . . . . . . . . . . . 44
Sizing ink strokes . . . . . . . . . . . . . . . . . . . . . . . . . . . . . . . . . . . . . . . . . . . . . . . 44
To size an ink stroke . . . . . . . . . . . . . . . . . . . . . . . . . . . . . . . . . . . . . . . . . . 45
Moving ink strokes . . . . . . . . . . . . . . . . . . . . . . . . . . . . . . . . . . . . . . . . . . . . . . 45
To move an ink stroke . . . . . . . . . . . . . . . . . . . . . . . . . . . . . . . . . . . . . . . . . 45
Rotating ink strokes . . . . . . . . . . . . . . . . . . . . . . . . . . . . . . . . . . . . . . . . . . . . . 46
To rotate an ink stroke . . . . . . . . . . . . . . . . . . . . . . . . . . . . . . . . . . . . . . . . . 46
Erasing ink strokes . . . . . . . . . . . . . . . . . . . . . . . . . . . . . . . . . . . . . . . . . . . . . . 47
To erase an ink stroke . . . . . . . . . . . . . . . . . . . . . . . . . . . . . . . . . . . . . . . . . 47
Using drawing assistance . . . . . . . . . . . . . . . . . . . . . . . . . . . . . . . . . . . . . . . . . . 48
To enable or disable drawing assistance . . . . . . . . . . . . . . . . . . . . . . . . . . . . 51
To choose drawing assistance settings. . . . . . . . . . . . . . . . . . . . . . . . . . . . . . 51
Working with text
Managing text frames . . . . . . . . . . . . . . . . . . . . . . . . . . . . . . . . . . . . . . . . . . . . 53
To insert a text frame . . . . . . . . . . . . . . . . . . . . . . . . . . . . . . . . . . . . . . . . . . 53
To select a text frame . . . . . . . . . . . . . . . . . . . . . . . . . . . . . . . . . . . . . . . . . . 54
To resize a text frame . . . . . . . . . . . . . . . . . . . . . . . . . . . . . . . . . . . . . . . . . . 54
To move a text frame . . . . . . . . . . . . . . . . . . . . . . . . . . . . . . . . . . . . . . . . . . 54
To delete a text frame . . . . . . . . . . . . . . . . . . . . . . . . . . . . . . . . . . . . . . . . . 56
Adding, selecting, and deleting text . . . . . . . . . . . . . . . . . . . . . . . . . . . . . . . . . 56
To add text . . . . . . . . . . . . . . . . . . . . . . . . . . . . . . . . . . . . . . . . . . . . . . . . . 57
To select text . . . . . . . . . . . . . . . . . . . . . . . . . . . . . . . . . . . . . . . . . . . . . . . . 57
To delete text. . . . . . . . . . . . . . . . . . . . . . . . . . . . . . . . . . . . . . . . . . . . . . . . 58
Converting ink into text . . . . . . . . . . . . . . . . . . . . . . . . . . . . . . . . . . . . . . . . . . 58
To convert ink into text . . . . . . . . . . . . . . . . . . . . . . . . . . . . . . . . . . . . . . . . 59
Editing text. . . . . . . . . . . . . . . . . . . . . . . . . . . . . . . . . . . . . . . . . . . . . . . . . . . . 59
Table of contents iii
Page 7

To edit text. . . . . . . . . . . . . . . . . . . . . . . . . . . . . . . . . . . . . . . . . . . . . . . . . . 60
To format text . . . . . . . . . . . . . . . . . . . . . . . . . . . . . . . . . . . . . . . . . . . . . . . 60
Changing the recognized language. . . . . . . . . . . . . . . . . . . . . . . . . . . . . . . . . . . 61
To change the recognized language. . . . . . . . . . . . . . . . . . . . . . . . . . . . . . . . 61
Reusing content
Managing categories . . . . . . . . . . . . . . . . . . . . . . . . . . . . . . . . . . . . . . . . . . . . . 63
To create a category . . . . . . . . . . . . . . . . . . . . . . . . . . . . . . . . . . . . . . . . . . . 63
To rename a category . . . . . . . . . . . . . . . . . . . . . . . . . . . . . . . . . . . . . . . . . . 64
To add content to a category . . . . . . . . . . . . . . . . . . . . . . . . . . . . . . . . . . . . 64
To delete content from a category. . . . . . . . . . . . . . . . . . . . . . . . . . . . . . . . . 64
To move content within a category . . . . . . . . . . . . . . . . . . . . . . . . . . . . . . . . 65
To move content between categories. . . . . . . . . . . . . . . . . . . . . . . . . . . . . . . 65
To move a category. . . . . . . . . . . . . . . . . . . . . . . . . . . . . . . . . . . . . . . . . . . . 65
To delete a category . . . . . . . . . . . . . . . . . . . . . . . . . . . . . . . . . . . . . . . . . . . 65
Reusing content in documents . . . . . . . . . . . . . . . . . . . . . . . . . . . . . . . . . . . . . . 66
To insert saved content . . . . . . . . . . . . . . . . . . . . . . . . . . . . . . . . . . . . . . . . . 66
Sharing content between documents . . . . . . . . . . . . . . . . . . . . . . . . . . . . . . . . . 67
To export a category . . . . . . . . . . . . . . . . . . . . . . . . . . . . . . . . . . . . . . . . . . . 67
To import a category . . . . . . . . . . . . . . . . . . . . . . . . . . . . . . . . . . . . . . . . . . 67
Sharing information between programs
Importing documents . . . . . . . . . . . . . . . . . . . . . . . . . . . . . . . . . . . . . . . . . . . . 69
To import a document . . . . . . . . . . . . . . . . . . . . . . . . . . . . . . . . . . . . . . . . . 69
Exporting documents. . . . . . . . . . . . . . . . . . . . . . . . . . . . . . . . . . . . . . . . . . . . . 70
To export a document. . . . . . . . . . . . . . . . . . . . . . . . . . . . . . . . . . . . . . . . . . 70
Exchanging information between programs . . . . . . . . . . . . . . . . . . . . . . . . . . . . 71
To copy an ink stroke to another program . . . . . . . . . . . . . . . . . . . . . . . . . . 71
To print a document to a Corel Grafigo SVG file . . . . . . . . . . . . . . . . . . . . . 71
To capture content from another program and bring it in as an underlay . . . 72
Collaborating online
Choosing a collaboration engine . . . . . . . . . . . . . . . . . . . . . . . . . . . . . . . . . . . . . 73
To choose a collaboration engine. . . . . . . . . . . . . . . . . . . . . . . . . . . . . . . . . . 73
Collaborating in real time using Microsoft peer-to-peer technology . . . . . . . . . . 74
To set up a collaboration session using Microsoft peer-to-peer technology . . . 75
To change the user name in peer-to-peer collaboration . . . . . . . . . . . . . . . . . 75
To change the peer-to-peer collaboration status . . . . . . . . . . . . . . . . . . . . . . 75
To check the peer-to-peer collaboration status . . . . . . . . . . . . . . . . . . . . . . . 76
iv Table of contents
Page 8

To send a User Identifier File in peer-to-peer collaboration. . . . . . . . . . . . . . 76
To add a User Identifier File to your peer-to-peer contact list . . . . . . . . . . . . 77
To change a contact’s name in peer-to-peer collaboration . . . . . . . . . . . . . . . 77
To delete a peer-to-peer contact . . . . . . . . . . . . . . . . . . . . . . . . . . . . . . . . . . 78
To send a peer-to-peer collaboration request . . . . . . . . . . . . . . . . . . . . . . . . 78
To accept or reject a peer-to-peer collaboration request . . . . . . . . . . . . . . . . 79
To leave a peer-to-peer collaboration session. . . . . . . . . . . . . . . . . . . . . . . . . 79
Collaborating in real time using NetMeeting. . . . . . . . . . . . . . . . . . . . . . . . . . . 80
To set up NetMeeting . . . . . . . . . . . . . . . . . . . . . . . . . . . . . . . . . . . . . . . . . 80
To set up a collaboration session using NetMeeting . . . . . . . . . . . . . . . . . . . 80
To place a call in NetMeeting . . . . . . . . . . . . . . . . . . . . . . . . . . . . . . . . . . . 81
To listen for and accept an incoming call in NetMeeting . . . . . . . . . . . . . . . 81
To end a call in NetMeeting. . . . . . . . . . . . . . . . . . . . . . . . . . . . . . . . . . . . . 82
E-mailing documents . . . . . . . . . . . . . . . . . . . . . . . . . . . . . . . . . . . . . . . . . . . . 82
To e-mail a document . . . . . . . . . . . . . . . . . . . . . . . . . . . . . . . . . . . . . . . . . 82
Shortcuts
Using gestures. . . . . . . . . . . . . . . . . . . . . . . . . . . . . . . . . . . . . . . . . . . . . . . . . . 85
To make a gesture . . . . . . . . . . . . . . . . . . . . . . . . . . . . . . . . . . . . . . . . . . . . 85
Erase . . . . . . . . . . . . . . . . . . . . . . . . . . . . . . . . . . . . . . . . . . . . . . . . . . . . . . 85
Undo . . . . . . . . . . . . . . . . . . . . . . . . . . . . . . . . . . . . . . . . . . . . . . . . . . . . . . 86
Redo . . . . . . . . . . . . . . . . . . . . . . . . . . . . . . . . . . . . . . . . . . . . . . . . . . . . . . 86
Zoom in . . . . . . . . . . . . . . . . . . . . . . . . . . . . . . . . . . . . . . . . . . . . . . . . . . . . 86
Zoom out. . . . . . . . . . . . . . . . . . . . . . . . . . . . . . . . . . . . . . . . . . . . . . . . . . . 87
Up one onionskin . . . . . . . . . . . . . . . . . . . . . . . . . . . . . . . . . . . . . . . . . . . . . 87
Down one onionskin . . . . . . . . . . . . . . . . . . . . . . . . . . . . . . . . . . . . . . . . . . 88
Glossary
Table of contents v
Page 9

Page 10

Welcome to Corel Grafigo
Corel® Grafigo™ is a graphics program for the Microsoft® Windows® XP Tablet
PC. It provides the simplicity of pencil and paper, yet allows you to quickly visualize
and communicate your ideas online.
In this section, you’ll learn about
• what’s new in Corel Grafigo
• documentation conventions
• getting help
• activating Corel products
• registering Corel products
•technical support
• customer feedback
•Corel Corporation
1
What’s new in Corel Grafigo
Corel Grafigo 2 provides new and enhanced features including the following.
Bringing content into Corel Grafigo
Corel Grafigo now lets you bring in content from virtually everywhere. You can import
documents from all programs installed on your Tablet PC that support the standard
Windows OS print functionality. You can also open documents in their native
programs, print them to a Corel Grafigo SVG file or the Corel Grafigo printer driver,
and open them in Corel Grafigo. In addition, the new Grab-It tool lets you capture
content from other programs and bring it into Corel Grafigo as an underlay. For more
information, see “Sharing information between programs” on page 69.
Underlays
This version of Corel Grafigo makes it easier to work with underlays: you can move,
resize, and delete underlays. You can import multipage documents as underlays. Each
page is brought in as a separate underlay, which in turn is automatically added as a view
to the View manager toolbar for easy access. For more information, see “Working with
underlays” on page 32.
Welcome to Corel Grafigo 1
Page 11

Library
The Library toolbar replaces the Symbols palette. You can now create reusable content
from underlays, onionskins, text frames, and ink strokes and organize content more
easily with a new intuitive workflow. For more information, see “The Library toolbar”
on page 15 and “Reusing content” on page 63.
Drawing assistance
Corel Grafigo provides new drawing aids that recognize the shapes you draw and
convert them into perfect forms, and that allow line straightening and alignment,
symmetry recognition, and snapping. In addition to the hand-drawn shapes recognized
in version 1.0, Corel Grafigo now recognizes arrows and trapezoids. For more
information, see “Using drawing assistance” on page 48.
Selecting content
Using the Pick selector and the Lasso selector, you can now select ink strokes, text
frames, and underlays with a tap of the pen and grab anywhere within a selection to
move the selected content. The new Pick selector allows you to use one motion to select
and move content around the workspace.
Ink
You can resize and rotate ink strokes. The new Local eraser tool lets you erase portions
of an ink stroke. For more information, see “Working with ink strokes” on page 41.
Onionskins
Corel Grafigo provides new options for onionskins: you can show, hide, lock, and unlock
onionskins. For more information, see “Working with onionskins” on page 35.
Navigating in documents
This version of Corel Grafigo provides new tools for viewing document contents and
navigating in documents. The Navigator facilitates navigating the workspace; you can
now pan to any area of the workspace with a tap of the pen. You can also auto-pan to
move the document view in the direction you drag a selected object. For more
information, see “Viewing documents” on page 24.
2 Corel Grafigo User Guide
Page 12

View manager
You can save specific views while working and access them at any time on the View
manager toolbar. For more information, see “The View manager toolbar” on page 18
and “Viewing documents” on page 24.
Slide shows
You can save views as a slide show and view them in an SVG viewer. This is especially
useful for viewing large SVG documents. When you view a multiview document in an
SVG viewer, Corel Grafigo provides navigation controls that let you navigate through
the views you’ve defined. For more information, see “Saving documents” on page 27.
Collaboration
In addition to using Microsoft® NetMeeting®, you can now collaborate in real time
using Microsoft peer-to-peer technology. For more information, see “Choosing a
collaboration engine” on page 73.
E-mailing documents
You can e-mail documents directly from Corel Grafigo. For more information, see “Emailing documents” on page 82.
Exchanging information between programs
You can now copy selected ink strokes from Corel Grafigo to another program that
supports ink. You can also take selected ink strokes from a program that supports ink
and insert them in Corel Grafigo as ink. For more information, see “Exchanging
information between programs” on page 71.
Documentation conventions
The table below describes important conventions used in the user guide and Help.
Welcome to Corel Grafigo 3
Page 13
Convention Description Examples
List box A list of options that drops
down when a user taps the
down arrow button
Drag Tap an object and, without
raising the tablet pen, drag
the object
Point to Hover the tip of the tablet
pen over an item
Workspace The area in which you create
and edit the content in a
document
Note A note contains information
that is important to the
preceding steps. It can
describe conditions under
which the procedure can be
performed.
From the Recognizer
language list box, choose
the language that you want
recognized.
Drag the selected ink stroke
to a new location in the
workspace.
Point to the selection box
and, when the cursor
changes to a four-headed
arrow, drag the text frame
to a new location in the
workspace.
The Cut button lets you cut
selected ink strokes from the
workspace and copy them to
the Clipboard.
The ink strokes that you
paste are added to the
workspace as selected ink
strokes.
Tip A tip contains suggestions
for performing the
preceding steps, and other
benefits and uses of the
procedure.
To maintain the relative line
weight of an ink stroke, tap
Settings on the standard
toolbar, tap the Wor k a r ea
tab, and enable the Relative
line weight check box in
the Scale ink area.
Getting help
You can get help directly from the user interface or from the user guide.
Corel Grafigo offers you a variety of ways to help you learn the program:
4 Corel Grafigo User Guide
Page 14

•Help — from the Help menu in the program, provides commonly used procedures
and information, as well as screen captures of user interface components and
graphics illustrating a wide range of concepts and features. The Help lets you find
topics using the contents, index, and word/phrase search tool.
• ToolTips — let you access names or functions of icons and buttons
• User guide — lets you access Corel Grafigo concepts and procedures in a PDF
format. You can print out either the entire user guide and use it as a reference or
selected topics relevant to the task you are performing.
To use H elp
1 On the standard toolbar, tap the arrow to the right of Help, and tap Help topics.
2 Tap one of the following tabs:
• Contents — lets you browse through topics in the Help
• Index — lets you use the index to find a topic
• Search — lets you search the full text of the online documentation for a
particular word
To access ToolTips
• Point to an icon or button.
You can display or hide ToolTips by tapping Settings on the standard
toolbar, tapping the Wor k a re a tab, and enabling or disabling the Show
To o l T i p s option in the Display area.
To access the user guide in PDF format
• Download the user guide in PDF format from http://www.corel.com/grafigo.
Activating Corel products
To use Corel products beyond the 15-day grace period, you must activate them.
Activating a product generates a unique activation code for the computer by using the
product serial number and by profiling the system.
You can activate a product online, by phone, or by using a previously attained product
activation code. When you activate a product online, the process is anonymous,
requiring no personal information.
Welcome to Corel Grafigo 5
Page 15

Registering Corel products
Registering Corel products is important. Registration provides you with timely access
to the latest product updates, valuable information about product releases, and access
to free downloads, articles, tips and tricks, and special offers. Also, when you register a
product, you are eligible for 30 days of free technical support.
You can register when you install the program, or choose to register at a later date.
You can register using the following methods:
• online — you can launch online registration if you are connected to the Internet
when you install the Corel graphics program. If no Internet connection is detected,
a list of options displays in a dialog box.
• FTP — you can complete the registration form and it will be sent automatically
when an Internet connection is detected
• by phone — you can call the Corel Customer Service Center nearest you
For more information about registering a Corel product, visit www.corel.com/support/
register.
Technical support
Corel Support Services
Corel Support Services can provide you with prompt and accurate information about
product features, specifications, pricing, availability, services, and technical support.
Online Support
For information about online support services, visit www.corel.com/support. Please
note, some of the services are available only in English.
• Corel® Knowledge Base — allows you to read, print, and download documents
that contain answers to many technical questions. You can access Corel Knowledge
Base at kb.corel.com.
• Newsgroups (peer-to-peer forums) — allow you to exchange information, tips,
and techniques with other users of Corel products. You can access the newsgroups
at www.corel.com/newsgroups.
• Downloads — allow you to access product patches, updates, and trial versions.
You can access downloads at www.corel.com/downloads.
6 Corel Grafigo User Guide
Page 16

Telephone Support
For detailed information regarding telephone support services, please visit
www.corel.com/support.
Live telephone support services are available for all Corel products from warranty
support (30 days) to fee-based Priority and Premium Services. OEM, "white box," jewel
case (CD only), trial, and Academic versions of Corel products are eligible for fee-based
support services only.
North America
• For pricing, purchasing, or general inquiries about Corel products, you can call
Customer Service toll-free at 1-800-772-6735.
• To speak directly to a technician, please dial 1-613-274-0500. The hours of
operation are 8:30 a.m. to 7:30 p.m., Monday to Friday, Eastern Standard Time
(EST).
Outside North America
For pricing, purchasing, or general inquiries about Corel products, call Customer
Service toll-free at the corresponding in-country number listed below.
Please note that these numbers may change as we adapt our services to fit user needs.
Check the international support numbers page at www.corel.com/support for the most
up to date contact details.
Contact Customer Service for pricing, purchasing, general inquiries, or replacement
CDs. Contact Technical Support should you require technical assistance operating your
Corel software.
Country Customer Service Technical Support
Argentina 0800 777 3203 57 1 523 1240
Australia 1 800 658 850 61 2 8844 4101
Austria 0192 89600 0192 89600
Belgium (Dutch) 0240 06733 0240 06733
Belgium (French) 0240 06777 0240 06777
Brazil 0800 14 1212 55 11 5696 5797
Chile 54 0800 777 3203 57 1 523 1240
Welcome to Corel Grafigo 7
Page 17

Country Customer Service Technical Support
China 10 800 610 2323 10 800 610 2673
Colombia 01 800 091 9370 57 1 523 1240
Czech Republic 0224 239645 0224 239645
Denmark 352 58008 352 58008
Finland 922 906040 922 906040
France 0170 706090 0170 706090
Germany 06922 2220288 06922 2220288
Hong Kong 800 964 514 800 964 515
Hungary 204 117089 204 117089
Indonesia 1 803 61 539 1 803 61 544
Ireland 0124 77724 0124 77724
Israel 44 1628 581601 44 1628 581601
Italy 0236 003600 0236 003600
Japan 813 5319 3017 813 5319 3013
Luxembourg 44 1628 581603 44 1628 581603
Malaysia 1 800 807 895 1 800 807 899
Mexico 1 800 1234 854 57 1 523 1240
Netherlands 0207 132700 0207 132700
New Zealand 0508 267 351 0800 908 592
Norway 229 71908 229 71908
Poland 071 3477279 071 3477279
Portugal 44 1628 581601 44 1628 581601
Singapore 800 6161 853 800 6161 854
South Africa 0860 223 388 0860 223 388
8 Corel Grafigo User Guide
Page 18

Country Customer Service Technical Support
South Korea 82 2 392 4198 82 2 392 4199
Spain 0914 141500 0914 141500
Sweden 0856 610555 0856 610555
Switzerland (German) 0158 03280 0158 03280
Switzerland (French) 0158 03300 0158 03300
Taiwan 00801 61 1411 00801 61 1412
UK 0870 774 0202 0870 774 0202
Mail and Fax Support
You can send inquiries to Corel Support Services representatives by mail or fax.
Corel Support Services
1600 Carling Avenue
Ottawa, Ontario, Canada
K1Z 8R7
Fax: 1-613-761-9176
Customer feedback
If you have any comments or suggestions about Corel Grafigo, you can send them by
e-mail to grafigosuggest@corel.com. If you have any comments or suggestions about
the Corel Grafigo Help, you can send them by e-mail to grafigodoc@corel.com or by
regular mail to the following address:
Product Manager, Corel Grafigo
Corel Corporation
1600 Carling Avenue
Ottawa, Ontario, Canada
K1Z 8R7
Corel Corporation
Founded in 1985, Corel Corporation (www.corel.com) is a leading technology company
specializing in content creation tools, business process management and XML-enabled
Welcome to Corel Grafigo 9
Page 19

enterprise solutions. The company’s goal is to give consumers and enterprise customers
the ability to create, exchange and instantly interact with visual content that is always
relevant, accurate and available. Corel Corporation has its headquarters in Ottawa,
Canada.
10 Corel Grafigo User Guide
Page 20

Workspace tour 2
Becoming familiar with the terminology and workspace of Corel Grafigo will help you
follow the concepts and procedures found in the Help and will allow you to learn the
program more quickly.
In this section, you’ll learn about
• Corel Grafigo terminology and concepts
• Corel Grafigo program window
• Corel Grafigo workspace tools
• changing workspace options
Corel Grafigo terminology and concepts
Before you get started with Corel Grafigo, you should be familiar with the following
terms.
Term Description
Tap To touch an item once with the tablet pen
and then lift the pen quickly. Corresponds to
a click with a mouse.
Double-tap To tap twice quickly with the tablet pen.
Corresponds to a double-click with a mouse.
Pressure sensitivity The ability of a Tablet PC to sense pressure.
It allows you to increase or decrease the
thickness of ink by varying the amount of
pressure on the tablet pen.
Onionskin A translucent drawing surface that is placed
on top of a workspace. You can use it like
tracing paper when drawing.
Ink strokes The writing or drawing strokes that you
make with the tablet pen.
Workspace tour 11
Page 21
Term Description
Underlay An underlay is an image that can be inserted
in the background of the workspace. You
can draw and place text on the underlay.
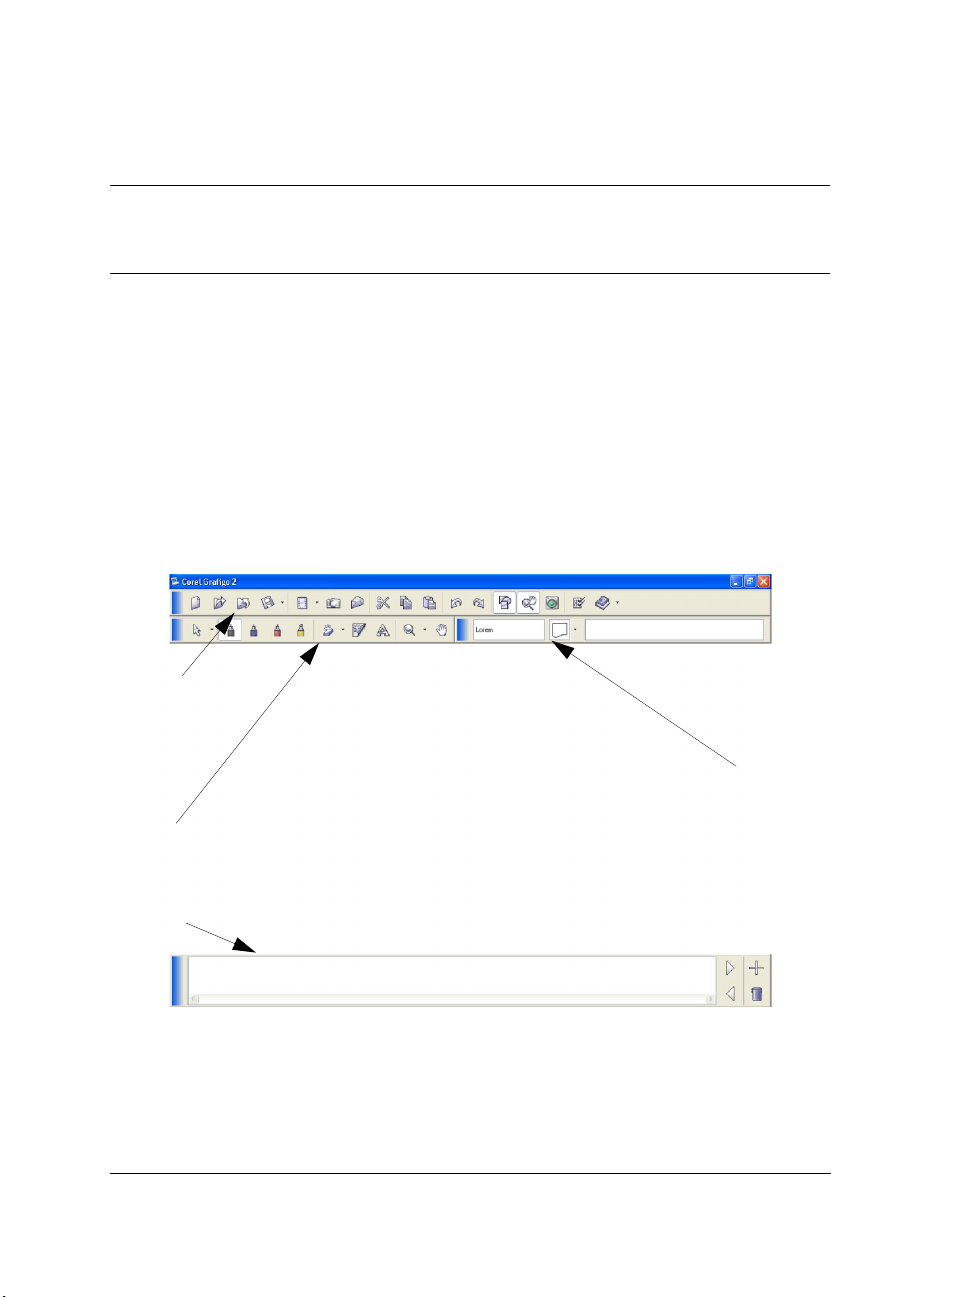
Corel Grafigo program window
When you start Corel Grafigo, the program window opens containing the workspace,
the standard toolbar, the toolbox, the Library toolbar, and the View manager toolbar.
You can customize the elements in the program window to suit your needs. For
information about customizing workspace options, see “Changing workspace options”
on page 20.
The Corel Grafigo program window appears below. A description of its parts follows.
Standard
toolbar
Library
toolbar
Toolbox
View manager
toolbar
12 Corel Grafigo User Guide
Page 22

Part Description
Standard toolbar A bar with buttons for managing
documents, underlays,
components, capturing content from other
programs, e-mailing documents,
customizing settings, accessing Help, and
collaborating with other users
Toolbox A bar with tools for adding and
manipulating ink strokes, adding text and
onionskins, and navigating in the workspace
Library toolbar A bar containing reusable content that you
can add to a document
View manager toolbar A bar located at the bottom of the screen
with controls for adding, deleting, and
navigating through document views
and document
Corel Grafigo workspace tools
Program commands are accessible through the standard toolbar, toolbox, Library
toolbar, View manager toolbar, and shortcuts. For information about the shortcuts
available in Corel Grafigo, see “Shortcuts” on page 85.
The standard toolbar
When you open Corel Grafigo, the standard toolbar is, by default, at the top of the
screen. The standard toolbar includes the following commands.
Button Description
The New button lets you create a new document.
The Open button lets you open a document.
The Close button lets you close a document.
The Save flyout lets you save and export a document.
Workspace tour 13
Page 23

Button Description
The Underlay flyout lets you add and remove an underlay.
The Grab-It button lets you capture an area of the computer
screen and bring it into Corel Grafigo as an underlay.
The Send to e-mail recipient button lets you send a document
by e-mail.
The Cut button lets you cut selected ink strokes, text frames, and
underlays from the workspace and copy them to the Clipboard.
The Copy button lets you copy selected ink strokes, text frames,
and underlays to the Clipboard.
The Paste button lets you paste the Clipboard contents into the
workspace (only ink strokes, text frames, and underlays that are
supported in Corel Grafigo can be pasted into a document).
The Undo button lets you reverse an action.
The Redo button lets you restore an action that was undone.
The Drawing assistance button lets you enable and disable
drawing assistance.
The View manager button lets you display and hide the View
manager toolbar.
The Collaborate button lets you collaborate with other users
over the Internet or a network by using Microsoft Peer-to-Peer
Microsoft NetMeeting technology. Depending on the
collaboration engine you choose, the icon on the standard toolbar
changes from a traffic light icon for Peer-to-Peer collaboration
to a handshake icon for Microsoft NetMeeting.
The Settings button lets you customize settings.
The Help flyout lets you access the Help.
14 Corel Grafigo User Guide
or
Page 24
The toolbox
The toolbox contains tools for drawing, creating text, and manipulating ink strokes in
the workspace. It contains the following tools.
Tool Description
The Selection tools flyout lets you access the Pick selector
and the Lasso selector . The Pick selector lets you select and
move ink, underlays, and text frames by tapping them and
dragging. The Lasso selector lets you select and move ink,
underlays, and text frames by circling them and dragging.
The Pen tools let you draw using opaque ink.
The Marker tool lets you draw using partially transparent ink.
The Eraser flyout lets you access the Stroke eraser and Local
eraser tools . The Stroke eraser tool lets you erase one or
multiple ink strokes. The Local eraser tool lets you erase an area
of an ink stroke.
The Onionskin tool lets you place a translucent drawing surface
on top of the workspace.
The Te x t tool lets you add a text frame or convert handwriting to
text.
The Zoom tool lets you reduce or magnify the view.
The Pan tool lets you move the view within the workspace and
access the Navigator.
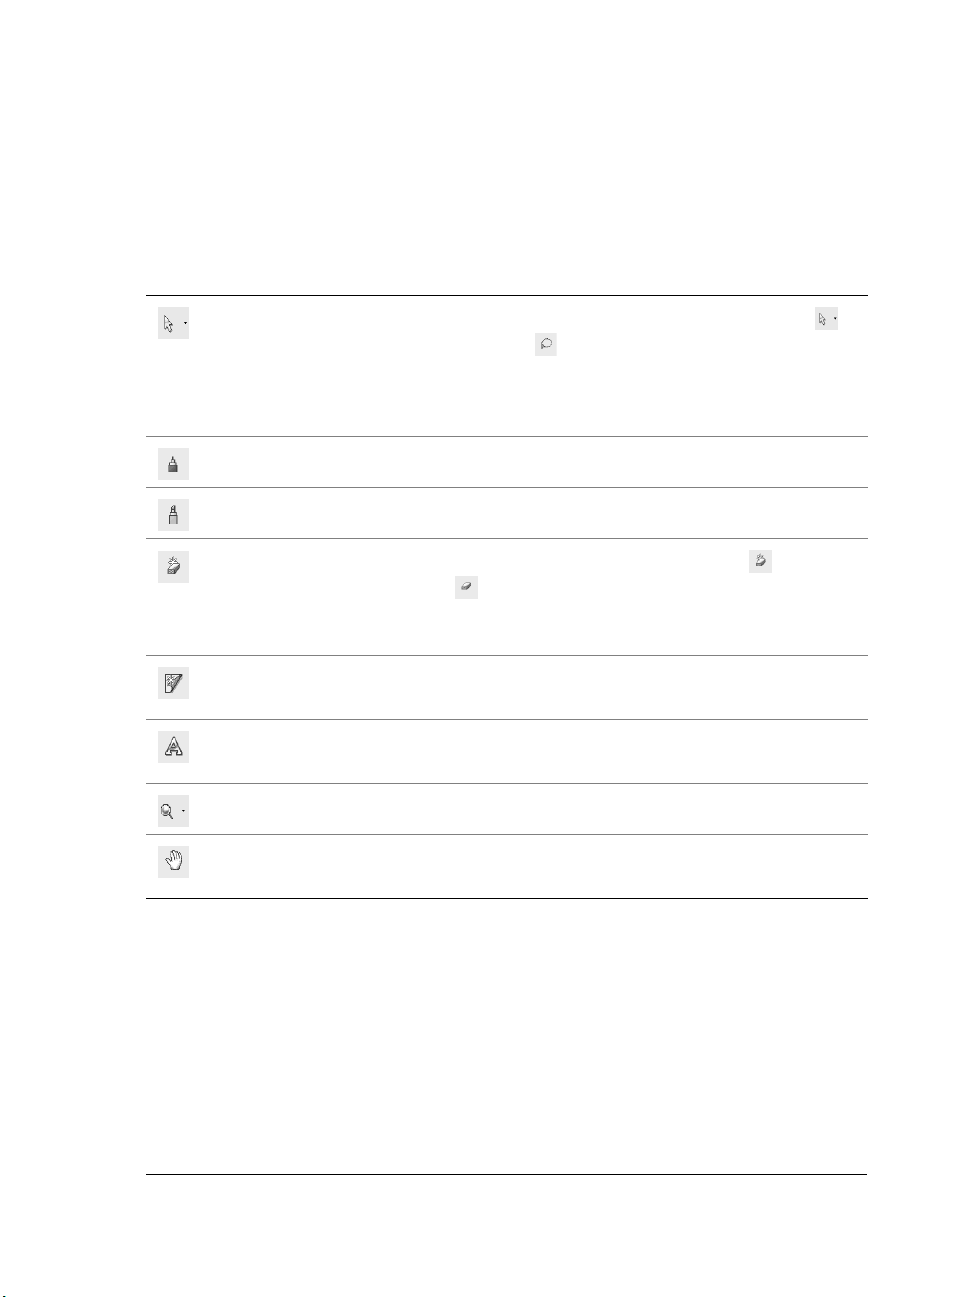
The Library toolbar
The Library toolbar provides access to reusable content, as well as to commands that
allow you to create, delete, and rearrange content categories and share categories with
other users. For more information about storing and reusing document content, see
“Reusing content” on page 63.
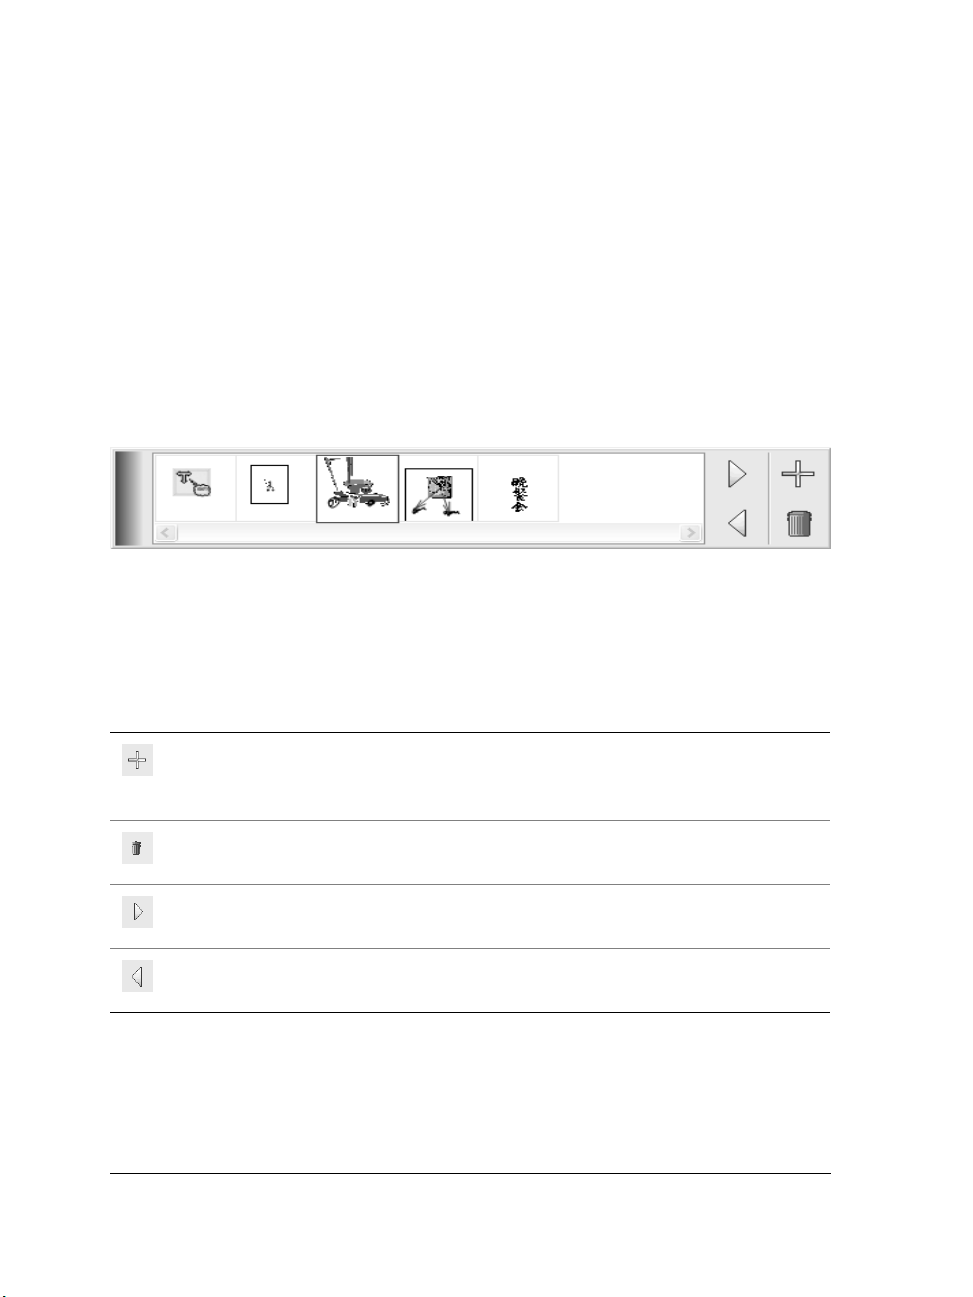
The Library toolbar consists of a Category preview control, which displays the
currently selected category; a Content preview control, which displays the currently
selected category item; and a Most Recently Used (MRU) items list, which displays
Workspace tour 15
Page 25
the most recently used category items. You can change the size of the Library toolbar
to see more items in the MRU list.
Category preview control Most Recently Used items listContent preview control
Library toolbar
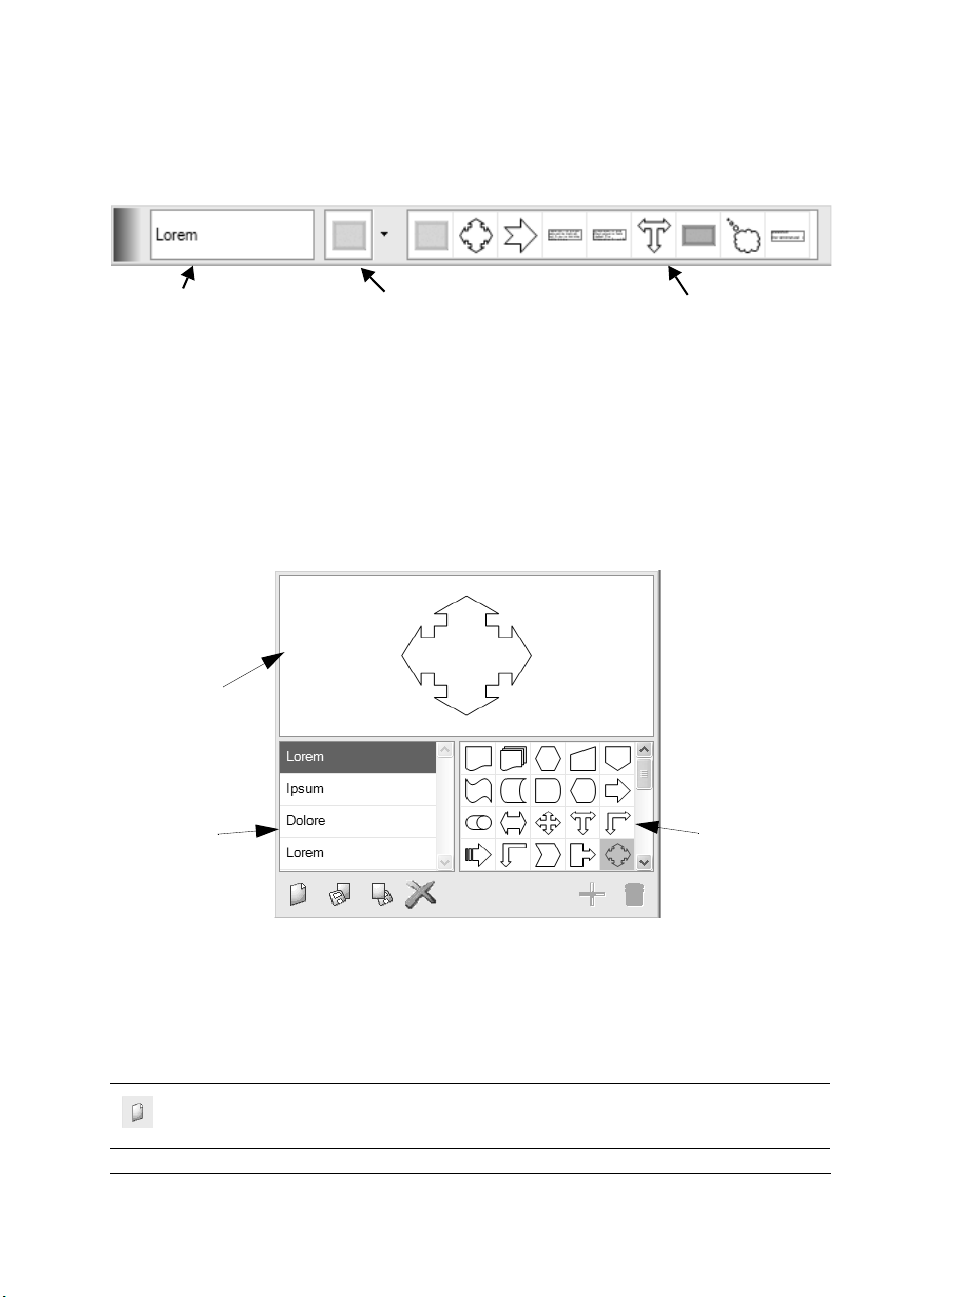
The Library toolbar lets you access the Library flyout. The Library flyout contains a
Category list, Content list, content preview window, and buttons for creating,
deleting, importing, and exporting categories. The Category list shows all categories
that you have created or imported; the Content list shows all items in a selected
category; the content preview window lets you preview content before you add it to a
document.
Content preview
window
Category list
The Library flyout
Content list
At the bottom of the Library flyout, you’ll find the following buttons.
Button Description
The New category button lets you add
content categories.
16 Corel Grafigo User Guide
Page 26
Button Description
The Import category button lets you
import content categories.
The Export category button lets you
export content categories.
The Delete category button lets you delete
content categories.
The Add content button lets you add
content from the workspace to a selected
category.
The Delete content button lets you delete
category items.
You can change the size of the Library flyout. You can also change the size of the
content preview window, as well as the size of the Content and Category lists.
To change the size of the Library toolbar
• Point to the edge of the Library toolbar and, using the two-directional arrow, drag
the edge of the toolbar.
To open the Library flyout
•On the Library toolbar, tap the arrow to the right of the Content preview control.
To change the size of the Library flyout
• Point to the edge of the Library flyout and, using the two-directional arrow, drag
the edge of the flyout.
To change the size of the content preview window
• Point to the border between the content preview window and the Category and
Content lists and, when the pointer changes to a bar with two vertical arrows, drag
up or down until the preview window is the size you want.
Workspace tour 17
Page 27
To change the size of the Category and Content lists
• Point to the border between the Category and Content lists and, when the pointer
changes to a bar with two horizontal arrows, drag until the lists are the size you
want.
The View manager toolbar
The View manager toolbar contains thumbnails of document views that you have
created, as well as buttons for adding, deleting, and navigating through views. For
information about creating, deleting, and navigating through views, see “Viewing
documents” on page 24.
The View manager toolbar allows you to save specific views and quickly jump
to them at any time.
The View manager toolbar contains the following commands.
Button Description
The Add button lets you add a view in a
document by capturing a specific coordinate
and magnification level.
The Delete button lets you delete a view
that you have defined.
The Next button lets you go to the next
view.
The Previous button lets you go back to
the previous view.
You can toggle between displaying and hiding the View manager toolbar. You can also
change its size.
18 Corel Grafigo User Guide
Page 28
To display or hide the View manager toolbar
•Tap View manager on the standard toolbar.
The View manager toolbar is displayed when the View manager button on the
standard toolbar appears raised.
To change the size of the View manager toolbar
• Point to the edge of the toolbar and, using the two-directional arrow, drag the edge
of the toolbar.
You can change the size of the View manager toolbar only when the toolbar
is undocked. For information about undocking a toolbar, see “To dock a
toolbar” on page 21.
The Collaboration palette
The Collaboration palette contains a list of your online meeting contacts, as well as
commands for changing the collaboration status, adding and deleting contacts,
importing User Identifier Files (UIF), and inviting contacts.
Button Description
The Invite this contact button lets you
invite another Corel Grafigo user to
participate in a collaboration session.
The Leave this session button lets you
leave a collaboration session and assign host
privileges to another participant.
The Import user identifier file button lets
you import a User Identifier File (UIF).
The Export user identifier file button lets
you export a User Identifier File (UIF).
The Delete this contact button lets you
remove a contact from your contact list.
Workspace tour 19
Page 29
To open or close the Collaboration palette
•Tap Collaborate on the standard toolbar.
When the Collaboration palette is open, the Collaborate button appears pressed.
To change the size of the Collaboration palette
• Point to the edge of the Collaboration palette and, using the two-directional
arrow, drag the edge of the palette.
Changing workspace options
In Corel Grafigo, you can change the default workspace settings according to your
preferences.
Toolbars can be either docked or floating. Docking a toolbar attaches it to the top or
bottom edge of the program window. Undocking a toolbar pulls it away from the edge
of the program window, so that it “floats” and can be easily moved around. You can
change the size of toolbars. You can also hide toolbars.
You can change the size of buttons on toolbars.
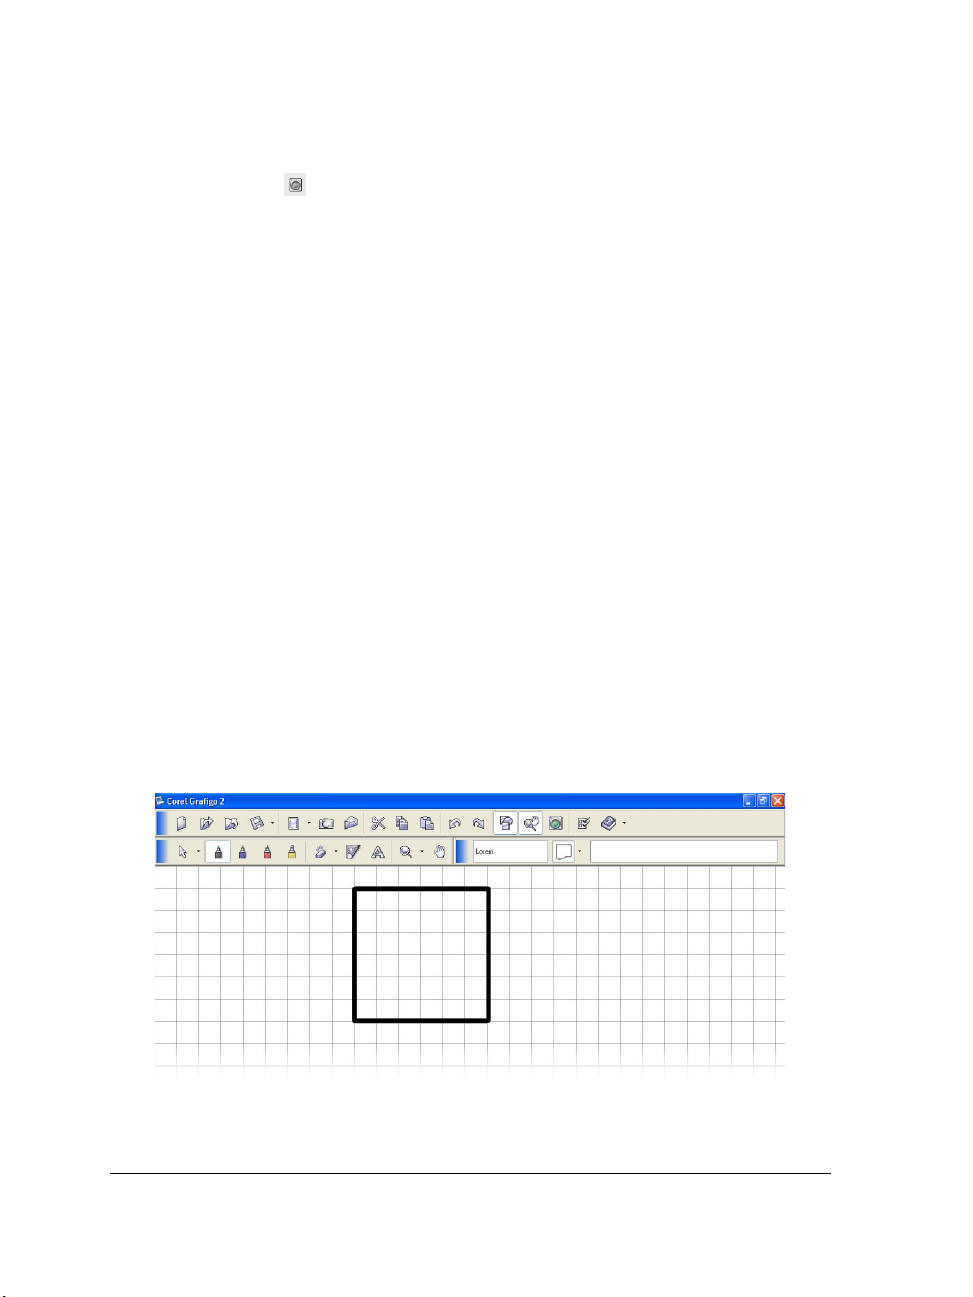
The workspace display can be changed by adding a background color.
You can also add a grid. The grid is a series of intersecting lines that can help you align
and position ink strokes accurately. You can display or hide the grid. You can change
the color of the grid to make it stand out against the workspace background.
The grid can be displayed in the workspace to aid in object and ink placement.
20 Corel Grafigo User Guide
Page 30

To dock a to olb ar
• Place the tablet pen on the grab area of a toolbar , and do one of the following:
• Drag the bar to the top or bottom edge of the program window — to dock the
standard toolbar, the toolbox, or the Library toolbar
• Drag the bar to the top or bottom edge of the program window — to dock the
View manager toolbar
To undock a toolbar
• Place the tablet pen on the grab area of a toolbar , and drag the bar to a
new position.
With the exception of the View manager toolbar, which is docked to the
bottom edge of the program window, all toolbars are docked by default to
the top edge of the program window.
To change the size of a toolbar
1Tap Settings on the standard toolbar.
2Tap the Wor k a r ea tab.
3In the Display area, enable the Small or Large option.
4Tap OK.
To display or hide a toolbar
• Double-tap the grab area of a toolbar.
When a toolbar is hidden, only its grab area is visible.
You can display or hide a toolbar only when it is undocked.
To change the size of buttons on a toolbar
1Tap Settings on the standard toolbar.
2Tap the Wor k a r ea tab.
3In the Display area, enable the Small or Large option.
Workspace tour 21
Page 31

4Tap OK.
To change the color of the workspace
1Tap Settings on the standard toolbar.
2Tap the Wor k a r ea tab.
3In the Display area, tap the Canvas color button, and choose a color.
4Tap OK.
The color of the workspace is program-specific; that is, it applies only to the
active program and is neither saved with the document nor displayed in the
workspace of a guest during a collaboration session.
To add a grid to the workspace
1Tap Settings on the standard toolbar.
2Tap the Wor k a r ea tab.
3In the Grid area, enable either the Small or Large option.
4Tap OK.
To Do the following
Hide the grid In the Grid area, enable the None option.
Set the color of the grid In the Grid area, tap the Color button, and
choose a color for the grid.
Change the grid size In the Grid area, enable either the Small or
Large option.
The grid settings are program-specific; that is, they apply only to the active
program and are neither saved with the document nor displayed in the
workspace of a guest during a collaboration session.
22 Corel Grafigo User Guide
Page 32

Basics 3
Before learning the more advanced features of Corel Grafigo, you may want to
familiarize yourself with the basic functionality of the program.
In this section, you’ll learn about
• creating and opening documents
• undoing and redoing actions
• viewing documents
• saving documents
• previewing documents
• closing documents and quitting Corel Grafigo
Creating and opening documents
You can start a new document, open a document created in Corel Grafigo, or import a
document created in another program. For information about importing documents
created in other programs, see “Importing documents” on page 69.
To create a new document
•Tap New on the standard toolbar.
When you tap New , a new instance of Corel Grafigo is launched.
Corel Grafigo creates documents in Scalable Vector Graphics (SVG) format.
To open a document
1Tap Open on the standard toolbar.
2 Choose the drive and folder where the Corel Grafigo SVG file is stored.
3 Choose a file.
4Tap the Open button.
Only SVG files created in Corel Grafigo can be opened.
Basics 23
Page 33

Undoing and redoing actions
You can undo the actions you perform in a document, starting with the most recent
action. If you don't like the result of undoing an action, you can redo it.
To undo or redo an action
To Do the following
Undo an action
Redo an action
Ta p Undo on the standard toolbar.
Ta p Redo on the standard toolbar.
You can undo up to twenty-one actions.
If you want to undo or redo more than one action, continue tapping the
corresponding button.
You can also undo an action by using the undo gesture. For more information
about the undo gesture, see “Undo” on page 86.
You can also redo an action by using the redo gesture. For more information
about the redo gesture, see “Redo” on page 86.
Viewing documents
Since the Corel Grafigo workspace is virtually endless and you often have to work with
large documents, the program provides a number of tools for viewing document
contents and navigating in documents.
You can change the view of a document by zooming in to get a closer look or by
zooming out to see more of the document. You can experiment with a variety of zoom
options to determine the amount of detail you want.
You can view document areas that fall outside the current workspace view. For
example, when you are working at a high magnification level or with large underlays,
you can pan or jump to a different area of a document without having to adjust the
magnification level. Auto-panning moves the document view in the direction you drag
a selected object such as an ink stroke, underlay, or text frame.
You can create multiple views in a document by capturing a specific coordinate and
magnification level and return to them at any time. The views you define are part of the
document properties; so when you save a document, the views are saved with the
24 Corel Grafigo User Guide
Page 34

document and will be available the next time you open it. Views are especially useful
when viewing large SVG documents in an SVG viewer. For more information, see
“Saving documents” on page 27. You can delete views when you no longer need them.
To zoom
• In the toolbox, tap Zoom .
To Do the following
Zoom in Tap the area of the document that you want
to magnify.
Zoom in to a specific area Drag a box to define the area that you want
to magnify.
Zoom out Hold down the tablet pen button, and tap
the area that you want to zoom out of.
By default, a document is at a zoom level of 100%. Th e minimum zoom level
is 25% and the maximum zoom level is 400%.
The program title bar displays the current zoom setting.
You can fit your work to the view by double-tapping Zoom .
You can also zoom in and out by tapping the arrow to the right of Zoom ,
and moving the slider.
You can also zoom in by using the up gesture. For information about the up
gesture, see “Zoom in” on page 86.
You can also zoom out by using the down gesture. For more information
about the down gesture, see “Zoom out” on page 87.
To view a document that falls outside the current workspace view
To Do the following
Pan
Basics 25
In the toolbox, tap Pan . Drag until the
area you want to view appears.
Page 35

To Do the following
Jump to another area of the document
Auto-pan In the toolbox, open the Selection tools
In the toolbox, tap Pan , and hold down
the tablet pen button. In the Navigator
window that appears, move the rectangle to
the area of the document you want to view,
and release the tablet pen button.
flyout, and tap the Pick selector . In the
workspace, drag an object close to any of the
edges of the viewable workspace.
To create a view
1Tap View manager on the standard toolbar.
2On the View manager toolbar, tap the Add button .
3 Lift the pen off the screen.
A thumbnail preview of the selected view is added to the strip on the View
manager toolbar.
Any changes you make to the document are automatically reflected in the
views that you have defined.
You can change the order of views in the View manager strip by dragging a
view to a new location. As you drag, a vertical bar appears to indicate the new
position of the view.
To access a view
•On the View manager toolbar, tap the view you want to access.
You can also navigate through views using the Next and Previous
buttons.
You can scroll through views using the horizontal scroll bar.
26 Corel Grafigo User Guide
Page 36

To delete a view
•On the View manager toolbar, tap a view, and tap the Delete button .
You can also delete a view by dragging it to the Delete button .
You can also delete a view using the scratch-out gesture. For information
about the scratch-out gesture, see “Erase” on page 85.
Saving documents
Corel Grafigo lets you save a document as you work. By default, documents are saved
to the Scalable Vector Graphics (SVG) file format. Large SVG files can be saved as
multiview documents for easier viewing. To save a document with multiple views, you
need to define views. For information about defining views, see “To create a view” on
page 26. When you view a multiview document in an SVG viewer, Corel Grafigo
provides navigation controls that let you navigate through the views that you have
defined.
You can also export and save images to a variety of file formats that can be used in other
programs. For example, you can export a file to the Windows Bitmap format (BMP).
For information about exporting files, see “Exporting documents” on page 70.
To save a do cumen t
1 On the standard toolbar, tap the arrow to the right of Save , and tap Save.
2 Chose the folder where you want to save the document.
3 Enter a name in the File name box.
4Tap Save.
To navigate through views
1 Open a multiview document in an SVG viewer.
2 On the navigation control at the top of the document, tap one of the following:
• Beginning — takes you to the first saved view
• Previous — takes you to the previous saved view
• Next — takes you to the next saved view
• End — takes you to the last saved view
Basics 27
Page 37

Views are numbered in the order they are arranged on the View manager
strip. For information about changing the order of views in the View
manager strip, see “To create a view” on page 26.
If you navigate outside of a specified view by zooming out or panning, the
dynamic string in the Views control, which displays the number of the
current view and the total number of views, is grayed. To go back to the
specified view, tap the dynamic string in the Views control.
You can zoom in or out by tapping Zoom in or Zoom out ,
respectively.
You can move around the document by tapping one of the following Pan
controls:
• Up
• Down
• Left
• Right
Previewing documents
You can preview a Corel Grafigo document in Windows Picture and Fax Viewer to see
how it will look when you export. Windows Picture and Fax Viewer allows you to view
documents without having to open them in an image editing application.
To preview a document
1 On the standard toolbar, tap the arrow to the right of Save .
2Tap Export.
3 Choose a file format from the Ty p e box.
4Tap Preview.
To return to your Corel Grafigo document, close Windows Picture and Fax
Viewer by clicking the Close button
on the program title bar.
Closing documents and quitting Corel Grafigo
When you close a document, Corel Grafigo remains open as a new document. When
you quit Corel Grafigo, both the document and the program close.
28 Corel Grafigo User Guide
Page 38

To close a document
•Tap Close document on the standard toolbar.
When you have more than one instances of Corel Grafigo open, tapping
Close document
of Corel Grafigo. When you have only one instance of Corel Grafigo open,
tapping Close document
closes both the active document and the active instance
closes the active document.
To quit Corel Grafigo
•Tap the Close button on the program title bar.
Basics 29
Page 39

Page 40

Organizing document components 4
A Corel Grafigo document consists of objects, such as underlays, onionskins, text
frames, and ink strokes, that coexist across multiple layers.
In this section, you’ll learn about
•understanding layers
• working with underlays
• working with onionskins
Understanding layers
Corel Grafigo documents are divided into multiple layers, each containing a portion of
the document's contents. Understanding the vertical order of these objects — the
stacking order — can help you organize and edit objects in complex documents.
What you see
Document view (left), view of layers (right)
By default, underlays are placed on the bottom layer of a document. When you insert
onionskins, they are placed above underlays. However, you can move underlays
between layers. For example, you can select an underlay and place it on an onionskin.
You can also select an underlay and bring it to the front of other underlays. For
View of layers
Organizing document components 31
Page 41

information about moving underlays between layers, see “To move an underlay” on
page 35.
While ink and onionskins can be layered in any order, ink always stays on top of
underlays. For example, when you create a new document, add ink strokes, and insert
an underlay, the ink strokes stay on top of the underlay. You can move ink strokes
between layers. For more information about working with ink strokes, see “Working
with ink strokes” on page 41.
Working with underlays
An underlay is an image that can be added to the background of the workspace. Once
you insert an underlay, it is embedded in the document and becomes part of it.
You can place onionskins, ink strokes, and text on top of underlays. For information
about adding onionskins, see “Working with onionskins” on page 35. For information
about placing ink on top of underlays, see “Adding ink strokes” on page 41. For
information about placing text on top of underlays, see “Working with text” on
page 53. Unlike onionskins, underlays do not hold ink; so if you change the position of
an underlay, the ink strokes that you have placed on top of it do not move with the
underlay.
You can insert one or more underlays in a Corel Grafigo document. For information
about importing documents as underlays, see “Importing documents” on page 69.
Selecting an underlay makes it active and changes its position in the stacking order of
underlays by bringing the underlay to the front of other underlays.
Selecting an underlay changes the underlay’s place in the stacking order by
bringing the underlay to the front of other underlays.
32 Corel Grafigo User Guide
Page 42

You can cut or copy an underlay and paste it into a Corel Grafigo document. You can
change the dimensions of an underlay. You can move an underlay to a new location in
a document. If you no longer need an underlay, you can remove it from your document.
You can store an underlay for reuse later on. For information about creating reusable
content, see “To add content to a category” on page 64.
To insert an underlay
1 On the standard toolbar, tap the arrow to the right of Underlay , and tap Add
underlay.
2In the Underlay dialog box, choose the drive and folder where the file is stored.
3 Choose a file.
4Tap Open.
If you are importing a document created in another program, a dialog box appears,
notifying you that Corel Grafigo will start the program native to the document and
will print a document image of the file to Corel Grafigo. Enable one of the
following options:
• Use standard format — prints the file to a Windows Enhanced Metafile (EMF)
vector image
• Use image format — prints the file to a raster image
Ta p OK to continue.
Corel Grafigo lets you import documents created in other programs and place
them in the workspace as underlays. For more information about importing
documents as underlays, see “To import a document” on page 69.
When you import a multipage document, each page is brought into Corel
Grafigo as a separate underlay, and the underlays are positioned below each
other in the workspace. As well, each underlay is automatically saved as a
view and can be accessed through the View manager toolbar. For more
information about views, see “The View manager toolbar” on page 18.
Every underlay that you insert displays at the center of your current
workspace view.
Every underlay that you insert is automatically selected. If you insert a
multipage document, only the first underlay is selected.
Organizing document components 33
Page 43

To select or deselect an underlay
• In the toolbox, open the Selection tools flyout, tap the Lasso selector , and drag
around an underlay.
To deselect an underlay, tap anywhere outside the selection box of the underlay.
You can also select an underlay by tapping the Lasso selector , and
tapping an underlay. If you have ink strokes, underlays, or text boxes on top
of the underlay, tap successively until a selection box displays around the
underlay you want to select.
You can also select an underlay by opening the Selection tools flyout in the
toolbox, tapping the Pick selector
, and tapping an underlay.
To copy and paste an underlay
1 Select an underlay.
2 Tap one of the following on the standard toolbar:
• Copy
• Cut
3Tap Paste on the standard toolbar.
The underlays that you paste are added to the workspace as active underlays.
If you have an active onionskin in the workspace, the underlay is pasted to
the onionskin.
To resize an underlay
• Drag any of the corner selection handles.
Dragging the corner handles maintains the underlay’s height-to-width
proportions.
Bitmaps are not resampled when resizing.
You can also stretch a selected underlay as you size it by dragging any of the
middle selection handles.
34 Corel Grafigo User Guide
Page 44

To move an underlay
1 Select an underlay.
2 Drag the selected underlay to a new location in the workspace.
You can also
Move an underlay to an area that falls
outside the workspace
Move an underlay to an onionskin Select the underlay, and drag it to an
Move an underlay to the front of another
underlay
Drag the underlay toward the edge of the
current workspace view to enable autopanning.
onionskin.
Select the underlay. If the two underlays
overlap each other, the active underlay is
brought to the front of the other underlay.
When you drag an underlay toward the edge of the current workspace view,
you enable auto-panning. For more information about auto-panning, see “To
view a document that falls outside the current workspace view” on page 25.
When moving an underlay to an onionskin, the onionskin must be unlocked.
To delete an underlay
1 Select an underlay.
2 On the standard toolbar, tap the arrow to the right of Underlay , and tap
Remove underlay.
Working with onionskins
Onionskins are transparent overlays used for annotating or marking up documents,
allowing you to see an underlay and annotate it without modifying the original. You
can use onionskins to add comments, draw sketches, and write notes on top of imported
underlays. Onionskins hold ink on their surface, so when you change the position of an
onionskin, the ink strokes that you have placed on the onionskin move with it.
Organizing document components 35
Page 45

Onionskins function like tracing paper that you can place over an underlay.
One or more onionskins can be inserted in a document. When you save a file, onionskins
are saved with the document.
Selecting an onionskin makes it active. You can change the size of an onionskin, and
you can move an onionskin to a new location in a document.
You can display or hide onionskins. For example, you can hide an onionskin to select an
ink stroke that lies under the onionskin.
Locking an onionskin prevents changes to its size and position. When you lock an
onionskin, you cannot delete it or edit its ink strokes, but you can hide it.
You can change the properties of an onionskin. For example, you can adjust the opacity
of an onionskin, change the size of its control bar, and choose a different color for its
surface. You can also dim inactive onionskins to distinguish them from active
onionskins.
You can save an onionskin for reuse later on. For example, you can insert an onionskin,
add text, lines, and shapes on it, and save it for use in other documents. For information
about creating reusable content, see “Reusing content” on page 63.
When you no longer need an onionskin, you can delete it.
To add an onionskin
1 In the toolbox, tap Onionskin .
2 Drag to define the size of the onionskin.
36 Corel Grafigo User Guide
Page 46

Corel Grafigo assigns a number to each onionskin that you insert in a
document. The number is displayed on the onionskin’s control bar.
If an ink stroke that you create on top of an active onionskin extends beyond
the boundaries of the onionskin, the onionskin is resized automatically to
accommodate the ink stroke.
To select an onionskin
• Tap anywhere in an onionskin.
The control bar and the color of onionskins both provide visual clues that
help you distinguish between active and inactive onionskins. By default,
active onionskins have a darker color than inactive onionskins. The control
bar of active onionskins contains buttons for deleting, locking and unlocking,
and hiding and displaying onionskins; whereas the control bar of inactive
onionskins contains only the number that Corel Grafigo assigns to every
onionskin you insert.
You don’t need to select an onionskin to be able to add ink strokes to it.
To resize an onionskin
1 Select an onionskin.
2 Point to the edge of the onionskin and, using the two-directional arrow, drag the
edge of the onionskin.
If an ink stroke that you create on top of an active onionskin extends beyond
the boundaries of the onionskin, the onionskin is resized automatically to
accommodate the ink stroke.
To move an onionskin
1 Select an onionskin.
2 On the control bar of the onionskin, point to the onionskin’s number, and drag the
onionskin to a new location in the workspace.
Organizing document components 37
Page 47

To display or hide an onionskin
To Do the following
Display an active onionskin
Hide an active onionskin
Ta p t he Hide/Show onionskin button
on the control bar of an onionskin.
Ta p t he Hide/Show onionskin button
on the control bar of an onionskin.
When you hide an onionskin, its control bar remains visible and lets you
display, select, move, delete, and lock the onionskin at any time.
To lock or unlock an onionskin
To Do the following
Lock an active onionskin Tap the Lock/Unlock onionskin button
on the control bar of the onionskin.
Unlock an active onionskin Tap the Lock/Unlock onionskin button
on the control bar of the onionskin.
To set the properties of an onionskin
1Tap Settings on the standard toolbar.
2Tap the Other tools tab.
To Do the following
Set the size of an onionskin’s control bar In the Onionskin area, enable either the
Small or Large option.
Set the opacity of an onionskin Move the Active onionskin opacity slider.
Set the color for new onionskins Tap the Color button, and choose a color.
Dim an inactive onionskin Enable the Dim inactive onionskins
option.
A lower opacity makes the onionskin more transparent.
38 Corel Grafigo User Guide
Page 48

Changes to the color of onionskins apply only to new onionskins that you add
to a document; existing onionskins are not affected.
You can also set the properties of an onionskin by double-tapping
Onionskin
in the toolbox, and adjusting the settings in the Onionskins
area.
To delete an onionskin
1 Select an onionskin.
2Tap the Delete button on the control bar of the onionskin.
When you delete an onionskin, any ink strokes, text frames, and underlays
on that onionskin are also deleted.
If you delete an onionskin, you can bring back the onionskin and any ink
strokes on it by tapping Undo
on the standard toolbar.
Organizing document components 39
Page 49

Page 50

Working with ink strokes 5
In Corel Grafigo, working with ink strokes is an essential part of annotating
documents and drawing content such as lines and shapes.
Ink strokes are independent document components that float above the background.
You can place ink strokes in the workspace, on onionskins, and on top of text frames
and underlays. When you apply ink, a new layer is formed on top of the previous one.
For example, if you add an ink stroke in the workspace, add a text frame, and then add
another ink stroke, the text frame will lie between the two ink strokes. For more
information about layers, see “Understanding layers” on page 31. Corel Grafigo lets you
add ink strokes using a variety of tools and techniques. Once you add ink strokes to a
document, you can move, resize, and edit them.
In this section, you’ll learn about
• adding ink strokes
• selecting ink strokes
• copying and pasting ink strokes
• sizing ink strokes
• moving ink strokes
• rotating ink strokes
• erasing ink strokes
• using drawing assistance
Adding ink strokes
Corel Grafigo provides three Pen tools and a Marker tool so you can add ink strokes.
The Pen tools use opaque ink, while the Marker tool uses ink that is partially
transparent. As well, the Marker tool has a different nib shape than the Pen tools.
Working with ink strokes 41
Page 51

You can add ink strokes of different size and color using the Pen and Marker
tools. For example, you can choose a fine red point for editing documents, an
extra fine black point for detailed drawing, and a thick yellow point for
highlighting text.
You can change the width and color of ink strokes by setting the attributes of the Pen
and Marker tools. For example, you can set the nib size to control the thickness of ink
strokes. You can choose different colors for the different pens. You can also enable
pressure sensitivity to make the thickness of ink strokes respond to subtle changes in
pen pressure.
To add an ink stroke
1 In the toolbox, tap one of the Pen tools or the Marker tool .
2Add an ink stroke.
Ink strokes that you add with the Marker tool are not affected by drawing
assistance or handwriting recognition.
To make a bolded ink stroke, go over the stroke several times. Use the same
motion as you would when using a pencil to make a thicker outline on paper.
The more you go over an ink stroke, the thicker the stroke becomes.
To set the attributes of the Pen and Marker tools
1Tap Settings on the standard toolbar.
2In the Settings dialog box, tap the Pen t ool tab.
42 Corel Grafigo User Guide
Page 52

3 Choose a nib size and ink color.
If you want to increase the thickness of ink while drawing by varying the amount
of pressure on the tablet pen, enable the Pressure sensitive option.
You can also set the attributes of the Pen and Marker tools by doubletapping one of the Pen tools
adjusting the settings in the Pens or Marker areas of the Pen tool page.
or the Marker tool in the toolbox, and
Selecting ink strokes
Before you can change or move an ink stroke, you have to select it. You can select a
single ink stroke or multiple ink strokes. When ink strokes are selected, a selection box
displays around them.
A selection box with eight selection handles displays around selected ink strokes.
To select an ink stroke
1 In the toolbox, open the Selection tools flyout, and tap one of the following:
• Pick selector
• Lasso selector
2 In the workspace, drag around one ink stroke or multiple ink strokes.
There is a subtle difference between the Pick selector and the Lasso
selector
text frames by tapping and dragging them in one step; whereas the Lasso
selector lets you select and move ink, underlays, and text frames by circling
them and then dragging, which involves two steps.
Working with ink strokes 43
. The Pick selector lets you select and move ink, underlays, and
Page 53

You can also select an ink stroke by opening the Selection tools flyout,
tapping the Lasso selector or Pick selector, and tapping an ink stroke. If you
have multiple ink strokes that overlap each other, tap successively until a
selection box displays around the ink stroke you want selected.
To select an ink stroke that is under an onionskin, you must first hide the
onionskin and then select the ink stroke. For information about hiding
onionskins, see “To display or hide an onionskin” on page 38.
To deselect an ink stroke
• Tap anywhere in the workspace.
Copying and pasting ink strokes
You can cut or copy an ink stroke and paste it into a Corel Grafigo document. Cutting
an ink stroke removes the original from the document; copying an ink stroke leaves the
original in the document.
To copy and paste an ink stroke
1 Select an ink stroke.
2 On the standard toolbar, tap one of the following:
• Cut
• Copy
3Tap Paste on the standard toolbar.
The ink strokes that you paste are added to the workspace as selected ink
strokes.
If you have an active onionskin in the workspace, the ink strokes are pasted
to the onionskin.
Sizing ink strokes
Corel Grafigo lets you change the dimensions of ink strokes. When you size an ink
stroke, you change its dimensions proportionally by preserving its aspect ratio. When
you stretch an ink stroke, you change the ratio between its width and height.
44 Corel Grafigo User Guide
Page 54

.
Dragging a corner handle sizes the height and width proportionally (left).
Dragging a middle handle stretches the shape (right).
To size an ink stroke
1 Select an ink stroke.
2 Drag any of the corner selection handles.
You can stretch a selected ink stroke as you size it by dragging any of the
middle selection handles.
If you want the line weight of ink strokes to increase proportionally as you
resize an ink stroke, tap Settings
on the standard toolbar, tap the Wo rk
area tab, and enable the Relative line weight check box in the Scale ink
area.
Moving ink strokes
You can position ink strokes by dragging them to a new location.
To move an ink stroke
1 In the toolbox, open the Selection tools flyout, and tap Pick selector .
2 In the workspace, drag an ink stroke to a new location.
Working with ink strokes 45
Page 55

You can also
Move an ink stroke to an area that falls
outside the current workspace view
Move an ink stroke from one onionskin to
another
Drag the ink stroke toward the edge of the
current workspace view to enable autopanning.
Make the onionskin that contains the ink
stroke active. Drag the ink stroke to another
onionskin.
When you drag an ink stroke toward the edge of the current workspace view,
you enable auto-panning. For more information about auto-panning, see “To
view a document that falls outside the current workspace view” on page 25.
For information about making onionskins active, see “To select an onionskin”
on page 37.
You can also move an ink stroke from an onionskin to the workspace by
selecting the ink stroke and dragging it to the workspace.
Rotating ink strokes
You can rotate an ink stroke clockwise and counterclockwise.
Rotating an ink stroke
To rotate an ink stroke
• Drag the rotation handle clockwise or counterclockwise.
46 Corel Grafigo User Guide
Page 56

The selected ink stroke rotates around the center of the selection.
Erasing ink strokes
You can erase an ink stroke or portions of it. For example, you can erase part of an ink
stroke to change its shape or to reveal more of an underlying ink stroke or underlay.
Original ink strokes (left). Local eraser is used to modify ink strokes (middle).
Stroke eraser is used to delete entire ink strokes (right).
To erase an ink stroke
To Do the following
Erase an ink stroke In the toolbox, open the Eraser flyout, and
tap Stroke eraser. Tap or drag over an ink
stroke.
Erase an area of an ink stroke In the toolbox, open the Eraser flyout, and
tap Local eraser. Drag across the area you
want to erase.
You can also erase an ink stroke by selecting it, and tapping Cut on the
standard toolbar.
You can also erase an ink stroke by using the scratch-out gesture. For more
information about the scratch-out gesture, see “Erase” on page 85.
Working with ink strokes 47
Page 57

Using drawing assistance
Corel Grafigo includes drawing assistance tools, which let you apply ink strokes with
precision. You can enable or disable drawing assistance. You can also choose drawing
assistance settings.
Using drawing assistance, Corel Grafigo can recognize the shapes you draw and convert
them into perfect forms. For example, you can draw an arrow that consists of two pen
strokes: one for the body and one for the arrowhead. Whether you start with the
arrowhead or the body, Corel Grafigo converts your hand-drawn arrow into a more
symmetrical and straightened arrow.
Corel Grafigo uses shape recognition to convert hand-drawn shapes (left) into
perfect forms (right).
Drawing assistance also allows line straightening and collinear alignment. For example,
if you draw a staircase pattern that is not perfectly straight, the line segments that are
arranged at approximately 90 degrees will be adjusted to be exactly horizontal or
vertical and set at 90 degrees.
48 Corel Grafigo User Guide
Page 58

Line segments can be straightened and aligned to the vertical or horizontal
axis. Line segments can also be aligned along a single line.
You can also use drawing assistance to create symmetrical lines and shapes. For
example, if you draw a star, Corel Grafigo will make all opposing sides symmetrical and
of equal length. Symmetry affects only straight line segments and not curves.
Corel Grafigo will make opposing sides of a shape symmetrical and of equal
length.
Corel Grafigo also lets you use drawing assistance to snap lines and curves to other lines,
and to shapes. For example, if you draw a line close to an existing ink stroke or between
two existing ink strokes, the new line is repositioned so that it snaps to the closest
Working with ink strokes 49
Page 59

hotspots of the existing ink strokes. If you draw a line close to an existing shape, the
new line is repositioned so that it snaps to the closest hotspot of the existing shape.
If you draw a line between two existing ink strokes, the line is repositioned so
that it snaps to the closest hotspots of the existing ink strokes.
When you draw a line between two existing shapes, the line is repositioned so
that it snaps to the closest hotspots of the existing shapes.
You can also set the delay between drawing a stroke and the implementation of drawing
assistance. For example, if the timer is set to one second and you draw a circle, drawing
assistance takes effect one second after you draw the circle. If the delay is set to zero,
drawing assistance occurs the instant you lift the pen.
50 Corel Grafigo User Guide
Page 60

You can undo the implementation of drawing assistance. For more information, see
“Undoing and redoing actions” on page 24.
To enable or disable drawing assistance
•Tap Drawing assistance on the standard toolbar.
When drawing assistance is enabled, the button appears pressed.
Drawing assistance is available only for the Pen tools.
To choose drawing assistance settings
1Tap Settings on the standard toolbar.
2In the Settings dialog box, tap the Pen t ool tab.
To Do the following
Set the delay between drawing a stroke and
the implementation of drawing assistance
Enable line straightening and collinear
alignment
Enable symmetry of lines and straight-line
shapes
Enable snapping of lines, curves, and shapes In the Drawing assistance area of the Pen
In the Drawing assistance area of the Pen
tool page, move the Timer slider.
In the Drawing assistance area of the Pen
tool page, enable the Align shapes option.
In the Drawing assistance area of the Pen
tool page, enable the Symmetry option.
tool page, enable the Snap to shapes
option.
The Align shapes, Symmetry, and Snap to shapes commands are available
only when drawing assistance is enabled.
When drawing assistance is enabled and ink strokes are sent to the
recognizer, information about the pen pressure applied when creating the ink
strokes is not used.
Shape recognition and curve smoothing work only for ink drawn with the
Pen tools. Shapes that you create with the Marker tool
are not
recognized.
When the timer is set to zero, you can only draw recognized shapes consisting
of one continuous stroke.
Working with ink strokes 51
Page 61

To disable the implementation of drawing assistance for a single ink stroke,
draw an ink stroke, lift the tablet pen, and quickly press the tablet pen
button before drawing assistance takes effect.
To undo the implementation of drawing assistance to the ink strokes just
drawn, tap Undo
on the standard toolbar.
52 Corel Grafigo User Guide
Page 62

Working with text 6
Corel Grafigo lets you annotate documents by adding text. When you are working
with text in Corel Grafigo, you are actually working with typed text in a text frame,
not the writing strokes you make with the tablet pen. You can always add words in
ink; however, if you don’t convert them into text, Corel Grafigo will interpret them as
drawing strokes, and not as text.
In this section, you’ll learn about
• managing text frames
• adding, selecting, and deleting text
• converting ink into text
• editing text
• changing the recognized language
Managing text frames
When adding text, you must first create a text frame. By default, text frames remain
the size you create them regardless of how much text you add. Text frames have v ertical
scroll bars that allow you to scroll through the text you add.
Before you can resize or move a text frame, you need to select it. Corel Grafigo provides
different tools for selecting text frames. The Te x t tool allows you to add text to a text
frame, edit it, and move a text frame within the same layer. The Pick selector and Lasso
selector allow you to move a text frame between layers. For information about layers,
see “Understanding layers” on page 31.
You can change the size of a text frame.
You can move a frame to a new location in the workspace.
You can save a text frame for reuse later on. For information about creating reusable
content, see “To add content to a category” on page 64.
If you don’t need a text frame, you can delete it.
To insert a text frame
1 In the toolbox, tap Te x t .
Working with text 53
Page 63

2 Tap in the workspace.
To select a text frame
1 Do one of the following:
• In the toolbox, tap Te x t — to add text or move text frames within a layer
• In the toolbox, open the Selection tools flyout, and tap the Pick selector or
Lasso selector
2 Tap anywhere in a text frame.
Selecting a text frame with the Te x t tool allows you to move the text
frame within the same layer. For example, if you select a text frame in the
workspace with the Te x t tool, you can place it elsewhere in the workspace,
but you can’t move it to an onionskin.
Selecting a text frame with the Pick selector or Lasso selector allows
you to move the text frame from one layer to another. For example, if you
want to move a text frame from the workspace to an onionskin, you must
select it with the Pick selector or Lasso selector.
If you have ink strokes placed on top of a text frame, open the Selection
tools flyout, tap the Pick selector
and tap successively until a selection box displays around the text frame you
want to select.
— to move text frames between layers
or Lasso selector , tap the text frame,
To resize a text frame
1 Select a text frame.
2 Drag any of the selection handles.
Dragging the corner handles changes the dimensions of a text frame
proportionally by preserving its aspect ratio.
Dragging the middle handles changes the width or height of a text frame
without preserving its aspect ratio.
To move a text frame
1 Select a text frame using one of the following tools:
• Te x t tool — to move text frames within a layer
54 Corel Grafigo User Guide
Page 64
• Pick selector — to move text frames between layers
2 Point to the selected text frame.
The pointer becomes a four-headed arrow.
3 Drag the text frame to a new location.
You can also
Move a text frame to an area that falls
outside the current workspace view
Move a text frame from one onionskin to
another
For more information about auto-panning, see “To view a document that
falls outside the current workspace view” on page 25.
For information about making onionskins active, see “To select an onionskin”
on page 37.
If you place a text frame in an onionskin, add some text, select the text frame
with the Te x t tool
, and move the text frame to an area that falls outside
the active onionskin, the onionskin is resized automatically to accommodate
the text frame.
You can also move a text frame by tapping Te x t in the toolbox, tapping
anywhere in a text frame, pointing to the selection box, and, when the cursor
changes to a four-headed arrow, dragging the text frame to a new location in
the workspace.
In the toolbox, open the Selection tools
flyout, and tap the Pick selector . Drag
the text frame toward the edge of the
current workspace view to enable autopanning.
Make the onionskin that contains the text
frame active. In the toolbox, open the
Selection tools flyout, and tap the Pick
selector . Drag the frame to another
onionskin.
You can also move a text frame by selecting the text frame with the Pick
selector
moving to another location in the workspace, and tapping Paste
or Lasso selector , tapping Cut on the standard toolbar,
on the
standard toolbar. If you have an active onionskin in the workspace, the text
frame is pasted to the onionskin.
Working with text 55
Page 65

To delete a text frame
1 In the toolbox, open the Eraser flyout, and tap one of the following:
• Stroke eraser
• Local eraser
2 Tap anywhere in a text frame.
Selecting a text frame with the Te x t tool does not allow you to delete the
frame.
Empty text frames are automatically removed from documents.
Adding, selecting, and deleting text
You can add text to a Corel Grafigo document in a number of ways. You can enter text
by using the standard keyboard or the Tablet PC Input Panel. You can write with the
tablet pen in a text frame and have the ink converted into text. You can copy or cut text
from another document, place it on the Clipboard, and then paste into a Corel Grafigo
document. You can also write with the tablet pen in the workspace and have the ink
converted into text. For more information about converting writing into typed text, see
“Converting ink into text” on page 58.
When you add text, you must first create a text frame. For information about text
frames, see “Managing text frames” on page 53.
You can annotate documents by adding text.
Before you can delete or edit text, you have to select it. You can select the text that’s in
a text frame or you can select the whole frame. For information about selecting text
frames, see “To select a text frame” on page 54.
56 Corel Grafigo User Guide
Page 66

You can delete text from a text frame or you can delete the whole frame. For
information about deleting text frames, see “To delete a text frame” on page 56.
To add text
• Insert a text frame.
To Do the following
Add text using the standard keyboard Type the text you want.
Add text using the Input Panel Tap the Input Panel button on the Windows
taskbar, and enter text using the Keyboard
or Writing Pad.
Write text using the tablet pen Write text in the text frame.
Corel Grafigo converts your handwriting
into typed text.
Add text by cutting or copying In Corel Grafigo or another program, select
the text you want. Cut or copy the text to
place it on the Clipboard. In Corel Grafigo,
do one of the following:
Ta p Paste on the standard toolbar.
Select an existing text frame, tap where you
want to insert the text, and tap Paste on
the standard toolbar.
You can also add text to a document by writing in the workspace with the
tablet pen and having Corel Grafigo convert your handwriting into typed
text. For more information about converting handwriting into typed text, see
“Converting ink into text” on page 58.
To sele ct tex t
1 In the toolbox, tap Te x t , and select a text frame.
2 In the text frame, tap at the beginning of the text you want to select, and drag
across the text.
Working with text 57
Page 67

To delete text
1 In the toolbox, tap Te x t , and select a text frame.
2 Select the text you want to delete.
3Tap Cut on the standard toolbar.
You can also delete words converted from handwriting by selecting a word,
pointing to the carat
that displays to the left of the word, tapping the
arrow, and tapping Delete.
Converting ink into text
You can write with the tablet pen in the workspace or in a text frame and have Corel
Grafigo convert your handwriting into typed text. If you want to write text in another
language, you have to change the language that is recognized by Corel Grafigo. For
more information about changing the recognized language, see “Changing the
recognized language” on page 61.
You can write with the tablet pen in the workspace or in a text frame and have
Corel Grafigo convert your handwriting (left) into typed text (right).
58 Corel Grafigo User Guide
Page 68

To convert ink into text
To Do the following
Convert selected ink into text
Convert ink into text as you write
In the toolbox, tap a Pen tool , and write
text with the tablet pen. In the toolbox, tap
Te x t , and drag around the handwriting.
Lift the pen off the screen.
In the toolbox, tap Te x t , and tap in the
workspace to insert a text frame. In the text
frame, write text with the tablet pen.
When adding words in ink, disable drawing assistance to avoid curve
smoothing, line straightening, and snapping, which Corel Grafigo applies to
the strokes you make with the tablet pen. For information about disabling
drawing assistance, see “To enable or disable drawing assistance” on page 51.
You can also convert ink into text by opening the Selection tools flyout in
the toolbox, tapping the Lasso selector
tapping Te x t
.
, selecting the handwriting, and
Editing text
You can edit text that you have entered using the standard keyboard, the Input Panel,
or the Clipboard. You can also edit converted text.
You can format text by modifying its character properties. For example, you can change
the font type and size or make the text bold or italic. You can add underlines and
strikeout lines to text. You can also change the color of text.
Working with text 59
Page 69

You can change the font type and size.
To edit text
To Do the following
Edit typed text Select the text and make the changes you
want.
Edit converted text In a text frame, tap anywhere in a converted
word. Point to the carat that displays
to the left of the word, tap the arrow, and
choose an alternative word.
You can also edit text with gestures. For example, you can use gestures for
keyboard actions, such as inserting a space using the Spacebar or inserting a
line using the Enter key. When you use these gestures, you get the same
result as pressing the corresponding key on the keyboard. For more
information, open the Input Panel, tap To o l s
the contents, index, and word/phrase search tool in the Tablet PC Input Panel
Help to find information about gestures.
` Help ` Help topics, and use
To format text
1 In the toolbox, double-tap Te x t .
2In the Settings dialog box, tap the Other tools tab.
3In the Te x t area, tap Format.
60 Corel Grafigo User Guide
Page 70

To Do the following
Change the font type Choose a font type from the Font list box.
Change the font style Choose a font style from the Font style list
box.
Change the font size Choose a font size from the Size list box.
Add underlines and strikeout lines Enable the Strikeout or Underline check
box.
Change the color of text Choose a color from the Color list box.
All font settings apply to the text in all text frames. As well, they are
program-specific; that is, they apply only to the active program and may vary
from one Corel Grafigo user to another. For example, if you set up Corel
Grafigo to use a 12-point Arial font, copy text from a Microsoft® Word
document where the text uses a 10-point Times New Roman font, and paste
it into Corel Grafigo, the pasted text will use the Corel Grafigo font settings.
As well, if you open a Corel Grafigo document created by another Corel
Grafigo user, the text in the document will use your current font settings and
not the font settings of the program where the document was originally
created.
Underlines and strikeout lines are retained when you save the document as a
Corel Grafigo (SVG) file and view it in an SVG viewer.
You can also format text by tapping Settings on the standard toolbar,
tapping the Other tools tab, tapping Format in the Te x t area, and
specifying the settings you want.
Changing the recognized language
You can change the language that is recognized by Corel Grafigo.
To change the recognized language
1Tap Settings on the standard toolbar.
2Tap the Other tools tab.
Working with text 61
Page 71

3From the Recognizer language list box, choose the language that you want recog-
nized.
The Recognizer language list is populated from the Multilingual User
Interface (MUI) or Language Interface Pack (LIP) that you have installed on
your Tablet PC. The Windows XP Multilingual User Interface and
Language Interface packs are add-ons to the English version of Windows XP
Professional. For more information about these products, please contact
Microsoft or visit http://www.microsoft.com/windowsxp/pro/techinfo/
planning/multilingual/.
62 Corel Grafigo User Guide
Page 72

Reusing content 7
Corel Grafigo provides an efficient way to manage document content by storing and
reusing document components. For example, you can save ink strokes, underlays, text
frames, and onionskins as reusable content. Reusable content is defined only once, but
can be inserted many times in a document. Reusable content is stored in categories and
can be shared between documents.
In this section, you'll learn about
• managing categories
• reusing content in documents
• sharing content between documents
Managing categories
Corel Grafigo lets you store reusable content in categories, so you can keep your content
organized. A category is a collection of similar or related items. For example, a category
could contain a collection of similar items related by a common function, such as text
frames. Or it could contain a collection of different items, such as underlays, onionskins,
text frames, and ink strokes, related by a common motif, subject, or project.
You can create a new category or import a category. For information about importing
categories, see “To import a category” on page 67.
Categories can be customized as needed. In addition to renaming categories, you can
add content to a category, delete content from a category, rearrange items within a
category, and move content between categories. Customization features also allow you
to change the order of the categories themselves.
When you no longer need a category, you can delete it.
To create a category
1Open the Library flyout.
2Tap the New category button.
To open the Library flyout, tap the arrow to the right of the Content
preview control on the Library toolbar. For more information about the
Library toolbar, see “The Library toolbar” on page 15.
Reusing content 63
Page 73

To rena me a categ or y
•On the Library flyout, double-tap a category name in the Category list, and enter
a name.
The maximum number of characters you can use in a category name is 50.
You can enter a name by using the standard keyboard or the Input Panel.
To add content to a category
1 In the workspace, select any content that you want to save for reuse.
2Open the Library flyout.
3 Choose a category from the Category list.
4Tap the Add content button .
To select content, open the Selection tools flyout in the toolbox, tap the
Lasso selector
You can also add content to a category by selecting content in the workspace,
and dragging the selected content to the Library toolbar. The content is
added to the currently selected category.
You can also add content to a category by moving content from one category
to another category. For more information, see “To move content between
categories” on page 65.
, and drag around the content.
If you want to create reusable content from an onionskin and another object
that is placed in the workspace, you must first place the object on the
onionskin, and then drag the onionskin to the Library toolbar.
To delete content from a category
1Open the Library flyout.
2 Choose a category from the Category list.
3 Tap an item in the Content list.
4Tap the Delete content button .
You can also delete content from a category by selecting an item in the
Content list, and dragging it to the Delete button
64 Corel Grafigo User Guide
.
Page 74

You can also delete content from a category by using the scratch-out gesture.
For more information about the scratch-out gesture, see “Erase” on page 85.
To move content within a category
1Open the Library flyout.
2 Choose a category from the Category list.
3In the Content list, drag an item to a new position.
As you drag, a vertical bar appears to indicate the new position of the item.
To move content between categories
1Open the Library flyout.
2In the Category list, tap the category that contains the content you want to move.
3In the Content list, drag an item to another category.
To move a cate gor y
1Open the Library flyout.
2In the Category list, drag a category to a new position.
As you drag, a horizontal bar appears to indicate the new position of the category.
To delete a category
1Open the Library flyout.
2 Choose a category from the Category list.
3Tap the Delete category button .
You can also delete a category by selecting the category, and dragging it to
the Delete category button
You can also delete a category by using the scratch-out gesture. For more
information about the scratch-out gesture, see “Erase” on page 85.
Reusing content 65
.
Page 75

Reusing content in documents
Content that you have created and saved can be reused in any document. For
information about creating reusable content, see “To add content to a category” on
page 64. Corel Grafigo also comes with a number of categories that contain predefined
ink strokes, text frames, onionskins, and underlays that you can use in your documents.
Objects such as text frames that appear many times in a document can be saved
as reusable content.
To insert saved content
1Open the Library flyout.
2 Choose a category from the Category list.
3 Tap an item in the Content list.
4 Tap in the workspace to close the Library flyout, and then tap again to add the
selected item.
The content preview window allows you to preview content before you insert
it in a document. You can change the size of the preview window. For more
information, see “To change the size of the content preview window” on
page 17.
You can also insert content from the Library flyout by tapping an item in
the Content list, and dragging in the workspace until the item is the size you
want. A preview of the selected item follows the pointer while you are
dragging.
66 Corel Grafigo User Guide
Page 76

You can also insert content by tapping an item in the list of most recently
used items, and tapping in the workspace. For more information about the
list of most recently used items, see “The Library toolbar” on page 15.
After you tap an item in the Content list and place it in the workspace, you
can tap the selected item in the Content preview control to deselect it and
return to the tool that you last used.
Sharing content between documents
Reusable content is stored in compiled category files, which have a .glf (Grafigo Library
file) file name extension. You can export a category so that other users will be able to
use the content stored in the file. You can also import categories that other users have
created.
To export a category
1On the Library flyout, choose a category from the Category list.
2Tap the Export category button .
3In the Export category dialog box, choose the drive and folder where you want to
save the Grafigo Library (GLF) file.
4 Enter a file name in the File name box.
Grafigo Library file (GLF) is chosen by default in the Save as type list box.
5Tap Save.
To impo rt a ca teg or y
1On the Library flyout, tap the Import category button .
2In the Import category dialog box, choose the drive and folder where the
compiled Grafigo Library file (GLF) file is stored.
Grafigo Library file (GLF) is chosen by default in the Save as type list box.
3 Choose a file.
4Tap Open.
The file name of the imported compiled category file is used as the name for
the new category.
Reusing content 67
Page 77

Page 78

Sharing information between programs 8
Corel Grafigo lets you use documents created in other programs and create documents
that can be used in other programs.
In this section, you’ll learn about
•importing documents
•exporting documents
• exchanging information between programs
Importing documents
Corel Grafigo lets you import documents created in other programs. You can import a
file and place it in the workspace as an underlay. For information about underlays, see
“Working with underlays” on page 32. The imported file becomes part of the active
Corel Grafigo document.
You can import documents in any of the following file formats: JPEG, Windows
Bitmap (BMP), TIFF, GIF, Portable Network Graphics (PNG), and Enhanced
Windows Metafile (EMF).
You can also import documents created in programs that are installed on your Tablet
PC. When you import a file created in an installed program, Corel Grafigo starts the
program native to the file and prints a document image of the original file to Corel
Grafigo. For example, if you have Microsoft Word installed on your computer, you can
import a Microsoft Word (DOC) file. Corel Grafigo will start Microsoft Word and print
the Microsoft Word (DOC) file to an image. Then the image will be brought into Corel
Grafigo as an underlay.
To import a document
1 On the standard toolbar, tap the arrow to the right of Underlay , and tap Add
underlay.
2In the Underlay dialog box, choose the drive and folder where the file is stored.
3 Choose a file.
4Tap Open.
Sharing information between programs 69
Page 79

If you are importing a document created in an installed program, a dialog box
appears, notifying you that Corel Grafigo will start the program native to the document and will print a document image of the file to Corel Grafigo. Enable one of
the following options:
• Use standard format — prints the file to an Enhanced Windows Metafile
(EMF) vector image
• Use image format — prints the file to a raster image
Ta p OK to continue.
Even if a program is installed on your Tablet PC, you cannot import
documents created in programs that do not support the standard Windows
OS print functionality. To check whether the printing engine of a program
supports this print functionality, tap a file in Windows Explorer, and hold
down the tablet pen until the shortcut menu appears. If the Print command
is listed among the available commands, the program native to the file
supports the standard Windows print functionality and you can import the
file as an underlay. If the Print command is not available, you cannot import
the file as an underlay.
If the document that you want to import is created in a program that doesn’t
support the standard Windows OS print functionality, you can capture the
entire document, or part of it, and bring it into Corel Grafigo using the
Grab-It tool. For more information, see “To capture content from another
program and bring it in as an underlay” on page 72.
Exporting documents
You can export and save documents to a variety of file formats that can be used in other
programs. Corel Grafigo allows you to export to the following formats: JPEG, Portable
Network Graphics (PNG), GIF, TIFF, Windows Bitmap (BMP), and Enhanced
Windows Metafile (EMF).
You can preview a document to see how it will look when you export. For information
about previewing documents on export, see “Previewing documents” on page 28.
To export a document
1 On the standard toolbar, tap the arrow to the right of Save , and tap Export.
2From the Ty p e box, choose the type of file format that you want to export to.
70 Corel Grafigo User Guide
Page 80

The settings available for the exported file change depending on the file format you
choose.
3Tap OK.
Exchanging information between programs
One way to exchange information between programs is to copy ink strokes from one
program, called the source program, to another program, called the destination
program. You can copy selected ink strokes from Corel Grafigo to another program. If
the program supports ink, the ink strokes will be inserted as ink. If the program doesn’t
support ink, the ink strokes will be inserted as a raster image. For example, you can
select an ink stroke in a Corel Grafigo document and insert it in a CorelDRAW®
(CDR) file as a raster image. If you take an ink stroke from Corel Grafigo and insert it
in a Microsoft® Windows® Journal note, you will be able to apply to it all the
commands that you can apply to ink. Once you place the ink stroke in the destination
program, the ink stroke is embedded in the file and is not linked to its source. You can
also take selected ink strokes from a program that supports ink and insert them in Corel
Grafigo as ink. For example, you can take an ink stroke from a Microsoft Windows
Journal note and insert it in a Corel Grafigo document.
Another way to exchange information between programs is to use the print
functionality of the program native to the document and print the document to a Corel
Grafigo SVG file. For example, if you are working in CorelDRAW and you want to use
the active document in Corel Grafigo, the document can be printed to a Corel Grafigo
SVG file using the Corel Grafigo Writer and opened in Corel Grafigo.
To copy an ink stroke to another program
1 In the source program, select an ink stroke.
2 Drag the ink stroke to the destination program.
You can also insert an ink stroke into another program by selecting the ink
stroke in Corel Grafigo, tapping Copy
pasting the stroke into the destination program.
on the standard toolbar, and
To print a document to a Corel Grafigo SVG file
1 Open a file in its native program.
2Tap File ` Print.
Sharing information between programs 71
Page 81

3 From the list of printers, choose the Corel Grafigo Writer printer driver.
4 Choose the drive and folder where you want to save the file.
5Tap Print.
6In Corel Grafigo, tap Open on the standard toolbar, browse to the folder where
you saved the file, and open the file.
To capture content from another program and bring it in as an underlay
1Tap Grab-It on the standard toolbar.
2 Make the program that contains the image or document you want to capture
active.
3In the Grab-It dialog box, enable one of the following options:
• Lasso — lets you make a freeform selection
• Rectangular — lets you make a rectangular selection
4Tap Start.
5 Drag to select an area of the computer screen.
6 Lift the tablet pen off the screen.
The Grab-It dialog box always stays on top of all other windows that you
open.
72 Corel Grafigo User Guide
Page 82

Collaborating online 9
People collaborate on projects by sharing information and processes. Corel Grafigo
allows you to share information with your colleagues in a number of ways. You can
share documents in real time over the Web or e-mail documents using your default email program.
In this section, you’ll learn about
• choosing a collaboration engine
• collaborating in real time using Microsoft peer-to-peer technology
• collaborating in real time using NetMeeting
• e-mailing documents
Choosing a collaboration engine
Two or more tablet users can view, discuss, annotate, and revise a Corel Grafigo
document. Collaboration is accomplished over the Web by using Microsoft peer-to-peer
technology or Microsoft NetMeeting. For information about using Microsoft peer-topeer technology, see “Collaborating in real time using Microsoft peer-to-peer
technology” on page 74. For information about using Microsoft NetMeeting, see
“Collaborating in real time using NetMeeting” on page 80.
To choose a collaboration engine
1Tap Settings on the standard toolbar.
2Tap the Other tools tab.
3In the Collaboration engine area, enable one of the following options:
• Peer-to-Peer — to collaborate using Microsoft peer-to-peer technology
• NetMeeting — to collaborate using Microsoft NetMeeting
4Tap OK.
5Restart Corel Grafigo.
You can also choose a collaboration engine by double-tapping Collaboration
on the standard toolbar, tapping the Other tools tab, and enabling the
Peer-to-Peer or NetMeeting option in the Collaboration engine area.
Collaborating online 73
Page 83

Collaborating in real time using Microsoft peer-to-peer technology
You can collaborate using Microsoft peer-to-peer technology. To use peer-to-peer
collaboration, you must have the Advanced Networking Pack for Windows XP
installed on your computer. For information about the Advanced Networking Pack,
please visit the Microsoft Windows Update site http://windowsupdate.microsoft.com.
You can change your user name, which others can use to identify you in a collaboration
session. By default, your user name is the same as your Windows login name.
You can change your collaboration status to indicate whether you are available to
collaborate or not. For example, if you are in a meeting and cannot participate in a
collaboration session, you must indicate that you are not available. Before you invite
others, you must always check their collaboration status.
Before you initiate a collaboration session with others, you must have their User
Identifier File. A User Identifier File (UIF) contains the following information:
• display name for the user
• internal peer-to-peer data used to create invitations for the user
• peer-to-peer ID for finding the user, checking the user collaboration status, and
sending invitations to the user
You can exchange User Identifier Files with others by e-mail using your default e-mail
program. When you receive a UIF, you can add it to your contact list.
The contact list provides convenient means for storing and accessing contact
information about people you often collaborate with. There are various ways to add new
people to your contact list. You can add contacts by adding User Identifier Files that
others send to you. You can also add contacts by accepting an invitation from someone
who has your UIF. For more information, see “To accept or reject a peer-to-peer
collaboration request” on page 79. If the person who invites you is in a collaboration
session with other people, you automatically receive all paticipants’ UIFs. You can
change the name of a contact if two contacts in your contact list have identical names.
You can also delete a contact.
You can send a collaboration request to, or accept a collaboration request from, another
Corel Grafigo user. The person who sends the collaboration request is called the host,
and the person who receives the collaboration request is called the guest. The document
in the workspace of the host is displayed in the workspace of the guest. When you are
in a collaboration session, any changes made on one computer appear on the others. You
can send requests to more than one Corel Grafigo user, and anyone who joins the session
can include others by inviting them. You can participate in one collaboration session at
a time. You can leave a session at any time.
74 Corel Grafigo User Guide
Page 84

During a collaboration session, only the host can draw in the workspace. Guests can
draw only on onionskins that they create. For information about inserting onionskins,
see “Working with onionskins” on page 35. All onionskins on which you cannot draw
are marked with an asterisk in your workspace.
During a collaboration session, only the host can create and delete views. Guests can
only jump to the views that the host has defined. For information about defining views,
see “Viewing documents” on page 24.
To set up a collaboration session using Microsoft peer-to-peer technology
1 All participants must start Corel Grafigo.
2 If you are sending a collaboration request, follow the instructions in “To send a
peer-to-peer collaboration request” on page 78.
3 If you are receiving a collaboration request, follow the instructions in “To accept or
reject a peer-to-peer collaboration request” on page 79.
The participant who is receiving the call must accept it before the collaboration
session can begin.
To change the user name in peer-to-peer collaboration
1Open the Collaboration palette.
2Tap the Change user name button .
3In the Change user name dialog box, enter a name that others can use to identify
you.
To open the Collaboration palette, tap Collaborate on the standard
toolbar. For more information about the Collaboration palette, see “The
Collaboration palette” on page 19.
To change the peer-to-peer collaboration status
1Open the Collaboration palette.
2From the Status list box, choose one of the following:
• Available — to indicate that you are available to collaborate
• Not available — to indicate that you are not available to collaborate
Collaborating online 75
Page 85

The Collaborate button on the standard toolbar and the icon to the left of
each name on the contact list both provide visual clues that help you identify
the different status modes. When you are available to communicate, the
Collaborate button is green; when you are not available to communicate,
the Collaborate button is red. As well, the icon to the left of each name in
the contact list changes its color to indicate the contact’s current status mode.
For more information, see “To check the peer-to-peer collaboration status”
on page 76.
If you change your status to Not available while in a session, the participants
in the session will see your status as Collaborating; other users, however, will
not be able to invite you.
Once you set your collaboration status, you can close the Collaboration
palette and continue your work. To get invited by another user, you don’t
need to keep the Collaboration palette open.
To check the peer-to-peer collaboration status
1Open the Collaboration palette.
2 Check the icon to the left of a contact’s name in the contact list.
If a contact is available to collaborate, the icon is green.
If a contact is not available to collaborate, the icon is red, and the Invite this
contact
If a contact is in a collaboration session with you, the icon is yellow.
button is grayed.
To send a User Identifier File in peer-to-peer collaboration
1Open the Collaboration palette.
2Tap the Export user identifier file button .
76 Corel Grafigo User Guide
Page 86

To Do the following
E-mail a User Identifier File Enable the Send user identifier file by e-
mail option. Tap OK. When your default e-
mail client launches, enter the required
information in the New message dialog
box. Tap Send.
The User Identifier File is added as an
attachment to your e-mail message.
Save a User Identifier File to disk Enable the Save user identifier file to disk
option. Tap OK. In the Save as dialog box,
choose the file and folder where you want to
save the file. Enter a file name in the File
name box. Tap Save.
To add a User Identifier File to your peer-to-peer contact list
1Open the Collaboration palette.
2Tap the Import user identifier file button .
3In the Import user identifier file dialog box, choose the drive and folder where
the User Identifier File sent by another user is stored.
4 Choose a User Identifier File.
5Tap Open.
The User Identifier File is added to your contact list.
If you try to import a User Identifier File that already exists in your contact
list, a standard dialog box displays notifying you that you are going to replace
the existing file.
Only one user must send a User Identifier File to initiate a collaboration
session. The person who receives the User Identifier File can invite that user.
When the session begins, the guest automatically receives the host’s User
Identifier File through the collaboration connection. This User Identifier File
is automatically added to the guest's contact list.
To change a contact’s name in peer-to-peer collaboration
1Open the Collaboration palette.
Collaborating online 77
Page 87

2 Double-tap a name in the contact list.
3 Enter a new user name.
You can enter a name by using the standard keyboard or the Input Panel.
To delete a peer-to-peer contact
1Open the Collaboration palette.
2 Tap a contact in the contact list.
3Tap the Delete this contact button .
You can also delete a contact by tapping a contact in the contact list, and
dragging the item over the Delete this contact button
.
To send a peer-to-peer collaboration request
1Open the Collaboration palette.
2 Tap a name in the contact list.
3Tap the Invite this contact button .
The person that you are calling is contacted and must accept your invitation before
a connection is made. The text in brackets beside the contact’s name, which
displays the message Connecting, indicates the collaboration status.
If the person accepts the invitation, the text in brackets beside the contact’s name
disappears and the icon to the left of the contact’s name in the contact list turns
yellow.
If the person you want to contact does not accept the invitation, a dialog box
displays notifying you that the invitation was not accepted, the text in brackets
beside the contact’s name disappears, and the color does not change to yellow.
4 Repeat steps 1 and 2 for each user that you want to include in the collaboration ses-
sion.
When you are in a session, you don’t need to keep the Collaboration palette
open. For information about closing the Collaboration palette, see “To open
or close the Collaboration palette” on page 20.
78 Corel Grafigo User Guide
Page 88

To accept or reject a peer-to-peer collaboration request
1 When someone invites you to a meeting, a dialog box appears with the user name
of the person who is trying to contact you.
2 Do one of the following:
• Tap Ye s — to accept a collaboration request
The Collaboration dialog box that appears indicates the collaboration status, and
the inviter's icon in your contact list turns yellow.
• Tap No — to reject a collaboration request
The icon to the left of the inviter's name in your contact list returns to green.
Accepting an invitation closes your active document. If you are working on
a document when you receive a collaboration request, Corel Grafigo prompts
you to save the document. The workspace is cleared and is replaced by the
document that is open on the host computer.
If an error occurs in the processing of the collaboration request, a dialog box
appears, which notifies the guest that the collaboration request could not be
processed.
The text in brackets to the left of the host’s user name in the contact list
displays the message (Host) to help you identify who is hosting the session.
During collaboration, underlays can be opened only by the host.
When the collaboration session starts, none of the drawing tools except the
Onionskin
can use the other tools.
tool are accessible. You must create an onionskin before you
To leave a peer-to-peer collaboration session
1Open the Collaboration palette.
2Tap on the Leave this session button .
If you are the host in a collaboration session, a dialog box appears, which prompts
you to designate host privileges to another participant. Choose a participant from
the list of people participating in the meeting, and tap OK.
When a participant leaves a session, that participant’s onionskins now belong
to the host.
Collaborating online 79
Page 89

Collaborating in real time using NetMeeting
You can collaborate over the Web through NetMeeting. Once set up, NetMeeting lets
you place a call to, or receive a call from, another computer. NetMeeting must be
installed and configured properly on all computers that participate in a collaboration
session. For more information on using NetMeeting, tap the Help menu in the
NetMeeting dialog box.
You can place a call to, or listen for a call from, another computer. The person who
places the call is called the host, and the person who receives the call is called the guest.
You can place calls to more than one computer, and anyone who joins the session can
include others by calling them. The document in the workspace of the host is displayed
in the workspace of the guest. When you are in a collaboration session, any changes
made on one computer appear on the others.
During a collaboration session, only the host can draw in the workspace. Guests can
draw only on onionskins that they create, provided the host grants them write
permission. For information about inserting onionskins, see “Working with onionskins”
on page 35. All onionskins on which you cannot draw are marked with an asterisk in
your workspace.
During a collaboration session, only the host can create and delete views. Guests can
only jump to the views that the host has defined. For information about defining views,
see “Viewing documents” on page 24.
The host can restrict guests from performing certain tasks, such as modifying, saving,
and e-mailing a document, by giving them read-only access.
To set up NetMeeting
1 On the Windows taskbar, tap Start, and tap Run.
2In the Open box, type conf, and tap OK.
If NetMeeting is already set up on your computer, the NetMeeting dialog box
opens.
If NetMeeting is not set up on your computer, a wizard opens to guide you through
the setup procedure for NetMeeting. Follow the instructions in the wizard until the
main NetMeeting window displays.
To set up a collaboration session using NetMeeting
1 All participants must start Corel Grafigo.
80 Corel Grafigo User Guide
Page 90

2 If you are placing a call, follow the instructions in “To place a call in NetMeeting”
on page 81
3 If you are receiving a call, follow the instructions in “To listen for and accept an
incoming call in NetMeeting” on page 81
The participant who is receiving the call must accept it before the collaboration
session can begin.
To place a call in NetMeeting
1Tap Collaborate on the toolbar.
2In the Collaborate dialog box, enable the Place a call to another computer
option.
3In the IP address or computer name box, type the IP address of the computer
you want to call.
If you want to prevent the participants in a meeting from modifying your
document, enable the Read only check box.
4Tap OK.
A dialog box appears, which notifies you that NetMeeting is placing a call. The
computer that you are calling is contacted and must accept your call before a
connection is made.
5 Repeat steps 2 to 4 for each computer that you want to include in the collaboration
session.
If the guest computer is on the same network as the host computer, the host
can type the guest computer name instead of the IP address.
If you don't know the IP address of your computer, tap Collaborate to
display the Collaborate dialog box; the IP address of your computer is
displayed at the bottom.
If the person you want to contact does not accept your call, NetMeeting
displays a warning message that your call has been cancelled or rejected.
To listen for and accept an incoming call in NetMeeting
1Tap Collaborate on the toolbar.
2In the Collaborate dialog box, enable the Listen for an incoming call option.
Collaborating online 81
Page 91

3Tap OK to start NetMeeting.
A dialog box displays, which notifies you that NetMeeting is waiting for a call.
4 When a call is received, the NetMeeting - Incoming call dialog box displays with
the user name of the person who is trying to contact you. Tap Accept to begin the
collaboration session.
Listening for a call closes your active document. If you are working on a
document when you tap Collaborate
the document. The workspace is cleared and is replaced by the document that
is open on the host computer.
During collaboration, underlays can be opened only by the host.
When the collaboration session starts, none of the drawing tools except the
Onionskin
can use the other tools.
If the host assigns you read-only access during a collaboration session, you
can view a document, but you cannot make any changes to it.
tool are accessible. You must create an onionskin before you
, Corel Grafigo prompts you to save
To end a call in NetMeeting
• In NetMeeting, tap the End call button.
E-mailing documents
You can send a document by e-mail using your default e-mail program. By default, a
copy of the document is added as an attachment to your e-mail.
To e-mail a document
1Tap Send to e-mail recipient on the standard toolbar.
If your Internet connection and e-mail client are already set up, the New message
dialog box opens.
If your Internet connection is not set up on your computer, a wizard opens to guide
you through the setup procedure for configuring an Internet connection. Follow
the instructions in the wizard until the New message dialog box displays.
2In the New message dialog box, enter the required information.
3Tap Send.
82 Corel Grafigo User Guide
Page 92

Before you can send a document by e-mail, you must save it.
Collaborating online 83
Page 93

Page 94

Shortcuts 10
Application commands are accessible through gestures.
In this section, you’ll learn about
•using gestures
Using gestures
Gestures are shortcuts for performing frequently used commands. For example, you can
use gestures to erase pen strokes and text frames, undo or redo actions, change the
magnification level, and switch between layers of onionskins. When you use gestures,
you get the same result as pressing the corresponding buttons on the standard toolbar.
To make a ge sture
• Press the tablet pen button and make the gesture strokes.
Erase
The scratch-out gesture erases content. Make the strokes as horizontal as possible, and
draw at least three strokes. If the height of the gesture increases, the number of back
and forth strokes also needs to increase.
Shortcuts 85
Page 95

Undo
The left-semicircle gesture invokes the Undo command. Make sure you draw the
semicircle from the right to the left. The two ends of the arc should be on the same
horizontal line.
Redo
The right-semicircle gesture invokes the Redo command. Make sure you draw the
semicircle from the left to the right. The two ends of the arc should be on the same
horizontal line.
Zoom in
The up gesture magnifies the view to the next zoom level. This gesture is a single, fast
flick upward.
86 Corel Grafigo User Guide
Page 96

Zoom out
The down gesture reduces the view to the lowest level of magnification. This gesture is
a single, fast flick downward.
Up one onionskin
The chevron-right gesture activates the next higher layer of onionskin. Draw the
chevron in a single stroke.
Shortcuts 87
Page 97

Down one onionskin
The chevron-left gesture activates the next lower layer of onionskin. Draw the chevron
in a single stroke.
88 Corel Grafigo User Guide
Page 98

Glossary 11
aspect ratio
The ratio of the width of an ink stroke to its height (expressed mathematically as x:y)
bitmap (raster) image
An image composed of grids of pixels, or dots
center of rotation
The point around which an ink stroke rotates
collinear
Two or more line segments are collinear when they lie along the same straight line.
Corel Grafigo Writer
The printer driver that converts a document from another program into a Corel Grafigo
(SVG) file
grab area
The area of a toolbar that can be dragged. Dragging the grab area moves the bar, while
dragging any other area of the bar has no effect. Toolbars with grab areas include the
standard toolbar, the toolbox, the Library toolbar, and the View manager toolbar.
grid
A series of nonprinting vertical and horizontal lines that can be used to determine
placement of ink and objects in the workspace
hotspots
A snap point, such as an endpoint, midpoint, or centerpoint, used to position and align
an ink stroke more precisely.
ink strokes
The writing or drawing strokes that you make with your tablet pen
line weight
The thickness of an ink stroke. Ink strokes can vary in thickness depending on the
amount of pressure you apply.
Glossary 89
Page 99

onionskin
A transparent overlay for annotating or marking up documents, allowing you to see the
underlay and annotate it without modifying the original.
opacity
The quality of an onionskin that makes it difficult to see through. If an onionskin is
100% opaque, you cannot see through it. Opacity levels under 100% increase the
ability to see through onionskins.
pan
To move the document in any direction while maintaining the current zoom level.
Scalable Vector Graphics (SVG)
The Scalable Vector Graphics (SVG) format is an Extensible Markup Language (XML)
grammar for defining vector-based two-dimensional graphics for the Web and other
applications. Scalable Vector Graphics can provide superior detail and faster download
times than bitmaps.
snap
To force an object being drawn to align automatically to a point on another object
SVG viewer
A browser plug-in that parses, processes, and displays files in the Scalable Vector
Graphics (SVG) format
selection handles
A set of eight squares that appear at the corners and sides of an object when the object
is selected. By dragging individual handles, you can resize the object.
selection box
A visible rectangle with eight handles that appears around any object you select using
the Pick selector or Lasso selector
stacking order
The vertical order in which objects, such as onionskins and underlays, are arranged in a
Corel Grafigo document
Tablet PC Input Panel
A Tablet PC accessory that lets you use handwriting or an on-screen keyboard to enter
text, numbers, symbols, and keyboard shortcuts
90 Corel Grafigo User Guide
Page 100

text frame
The rectangle that appears around a block of text created using the Text tool
typed text
The text you convert from handwriting or enter by using the standard keyboard or the
Tablet PC Input Panel
underlay
An image that can be inserted in the background of the workspace. You can place
onionskins, ink, and text on the underlay. You can also delete an underlay.
vector graphic
An image generated from mathematical descriptions that determine the position,
length, and direction in which lines are drawn. Vector graphics are created as collections
of lines rather than as patterns of individual dots, or pixels.
Windows Picture and Fax Viewer
A program that allows you to view documents without having to open them in an
image editing application.
Glossary 91
 Loading...