

Page 1

Page 2

Corelâ GrafigoÔ User Guide
The contents of this user guide and the associated Corel Grafigo software are the
property of Corel Corporation and its respective licensors, and are protected by
copyright. For more complete copyright information about Corel Grafigo, please refer
to the About section in the Help menu of the software.
Copyright Ó 2002 Corel Corporation. All rights reserved.
Corel, Corel Grafigo, and the "Ideas go here" byline are trademarks or registered
trademarks of Corel Corporation and/or its subsidiaries in Canada, the U.S. and/or
other countries. Microsoft, NetMeeting, and Windows are registered trademarks of
Microsoft Corporation in the United States and/or other countries. Other product,
font, and company names and logos may be trademarks or registered trademarks of
their respective companies.
Page 3

Table of Contents
Welcome to Corel Grafigo ...............5
Corel Corporation ...................5
Technical support ...................5
Customer feedback...................6
Getting Started ..................7
Understanding Corel Grafigo terms .............7
The toolbar .....................8
The Toolbox .....................8
The Symbols palette ..................9
Creating and opening documents ..............9
Changing the look of the work area ............10
Using underlays ...................10
Changing the view ..................11
Selecting, moving, and copying objects ...........12
Undoing and redoing actions ...............13
Using gestures ....................13
Saving and exporting documents..............16
Closing documents and quitting Corel Grafigo .........16
Drawing ....................18
Drawing with the Pen tools ...............18
Drawing with the Marker tool ..............20
Erasing ......................21
Working with Onionskins ................22
Table of contents 3
Page 4

Working with symbols .................23
Working with text .................26
Adding, editing, moving, and deleting text ..........26
Converting Ink into text ................28
Formatting text ...................28
Changing the recognized language .............29
Collaborating with others ...............30
Setting up Microsoft NetMeeting .............30
Placing or receiving a call ................30
Table of contents 4
Page 5

Welcome to Corel Grafigo
CorelÒ GrafigoÔ is a graphics application for the Tablet PC. It provides the
simplicity of a pencil and paper, and allows you to quickly visualize and communicate
your ideas. This chapter provides information on the following:
Corel Corporation
•
Technical support
•
Customer feedback
•
Corel Corporation
Founded in 1985, Corel Corporation (www.corel.com) is a leading technology
company specializing in content development (both text and graphics), business
process management and XML-enabled enterprise solutions. The company’s goal is to
give consumers and enterprise customers the ability to create, exchange and instantly
interact with content that is always relevant, accurate and available. With its
headquarters in Ottawa, Canada, Corel’s common stock trades on the Nasdaq Stock
Market under the symbol CORL and on the Toronto Stock Exchange under the
symbol COR.
Technical support
Priority Service is fee-based, toll-free technical service designed for individual users
and small businesses, including Academic and OEM users, and encompasses two
options:
Pay-As-You-Go
Traditional, per-minute telephone support.
For Pay-As-You-Go service call: 1-900-733-8780 (Mon-Fri: 8:30 - 19:30 EST)
Support Incident
A support incident is the resolution of one technical question, problem or issue,
regardless of the number of telephone calls required to resolve it. You can purchase
support incidents in the following ways:
Welcome to Corel Grafigo 5
Page 6

Purchase your single support incident at the time of use. This is payable over the
phone by major credit card only.
Purchase your support incidents, in packs of three or more, before you encounter
any technical issues and save over 15% of the individual purchase price. These are
payable by major credit card, check, or purchase order. All support incident packs
expire one year from the date of purchase.
For Support Incident service call: 1-877-662-6735 (Mon-Fri: 8:30 - 19:30 EST)
Customer feedback
If you have any comments or suggestions about Corel Grafigo, you can send them by
email to grafigosuggest@corel.com. If you have any comments or suggestions about
the Corel Grafigo Help, you can send them by email to grafigodoc@corel.com or by
regular mail to the following address: Product Manager, Corel Grafigo, Corel
Corporation, 1600 Carling Avenue, Ottawa, Ontario, Canada, K1Z 8R7.
Welcome to Corel Grafigo 6
Page 7

Getting Started
In this chapter you will learn about:
Understanding Corel Grafigo terms
•
The toolbar
•
The Toolbox
•
The Symbols palette
•
• Creating and opening documents
• Changing the look of the work area
• Using underlays
• Changing the view
• Selecting, moving, and copying objects
• Undoing and redoing actions
• Using gestures
• Saving and exporting documents
•
Closing documents and quitting Corel Grafigo
Understanding Corel Grafigo terms
Tap: To touch an item once with your tablet pen and then lift the pen quickly.
Corresponds to a click with a mouse.
Double-tap: To tap twice quickly with your tablet pen. Corresponds to a double-click
with a mouse.
Pressure sensitivity: The ability of a Tablet PC to sense pressure. It allows you to
increase or decrease the thickness of ink by varying the amount of pressure on the
tablet pen.
Onionskin: A translucent drawing surface that is placed on top of a work area. You
can use it like trace paper when drawing.
Getting Started 7
Page 8

Ink: The writing or drawing strokes that you make with your tablet pen.
Underlay: A background image that can be inserted in the work area.
Work area: The area in which you create and edit the content in a document.
The toolbar
When you open Corel Grafigo the toolbar is, by default, at the top of the screen. It
includes the following commands:
New—creates a new document.
Open—lets you browse for a file to open.
Close—closes a document.
Save—saves the open document
Cut—removes a selected object from the work area and copies it to the
Clipboard
Copy—places a selected object on the Clipboard so it can be pasted
Paste—places the contents of the Clipboard into the work area (only objects that
are supported in Corel Grafigo can be pasted into a document).
Undo—reverses the previous action. You can undo up to 21 of the previous
actions.
Redo—reverses the previous Undo
Underlay—allows you to select a file to place as an underlay in your work area.
Collaborate—allows you to collaborate with other users over the Internet or a
network by using Microsoftâ NetMeetingâ .
Settings—opens a dialog box for setting options.
Help—opens the Corel Grafigo Help.
The Toolbox
The Toolbox contains tools for drawing, creating text, and manipulating objects in the
work area. It contains the following tools:
Lasso—lets you select ink and text in the work area
Pen 1, Pen 2, and Pen 3—These pens let you draw using opaque ink.
Getting Started 8
Page 9
Marker—lets you draw lines and shapes using partially transparent ink
Onionskin—lets you place a translucent drawing surface on top of a work area.
An Onionskin works like a piece of trace paper on a drawing.
Eraser—lets you remove ink and text from the work area
Text—lets you add a text box, or convert handwriting to text
Zoom—lets you reduce or magnify the view, or fit your work to the view
Pan—lets you move the view within the work area
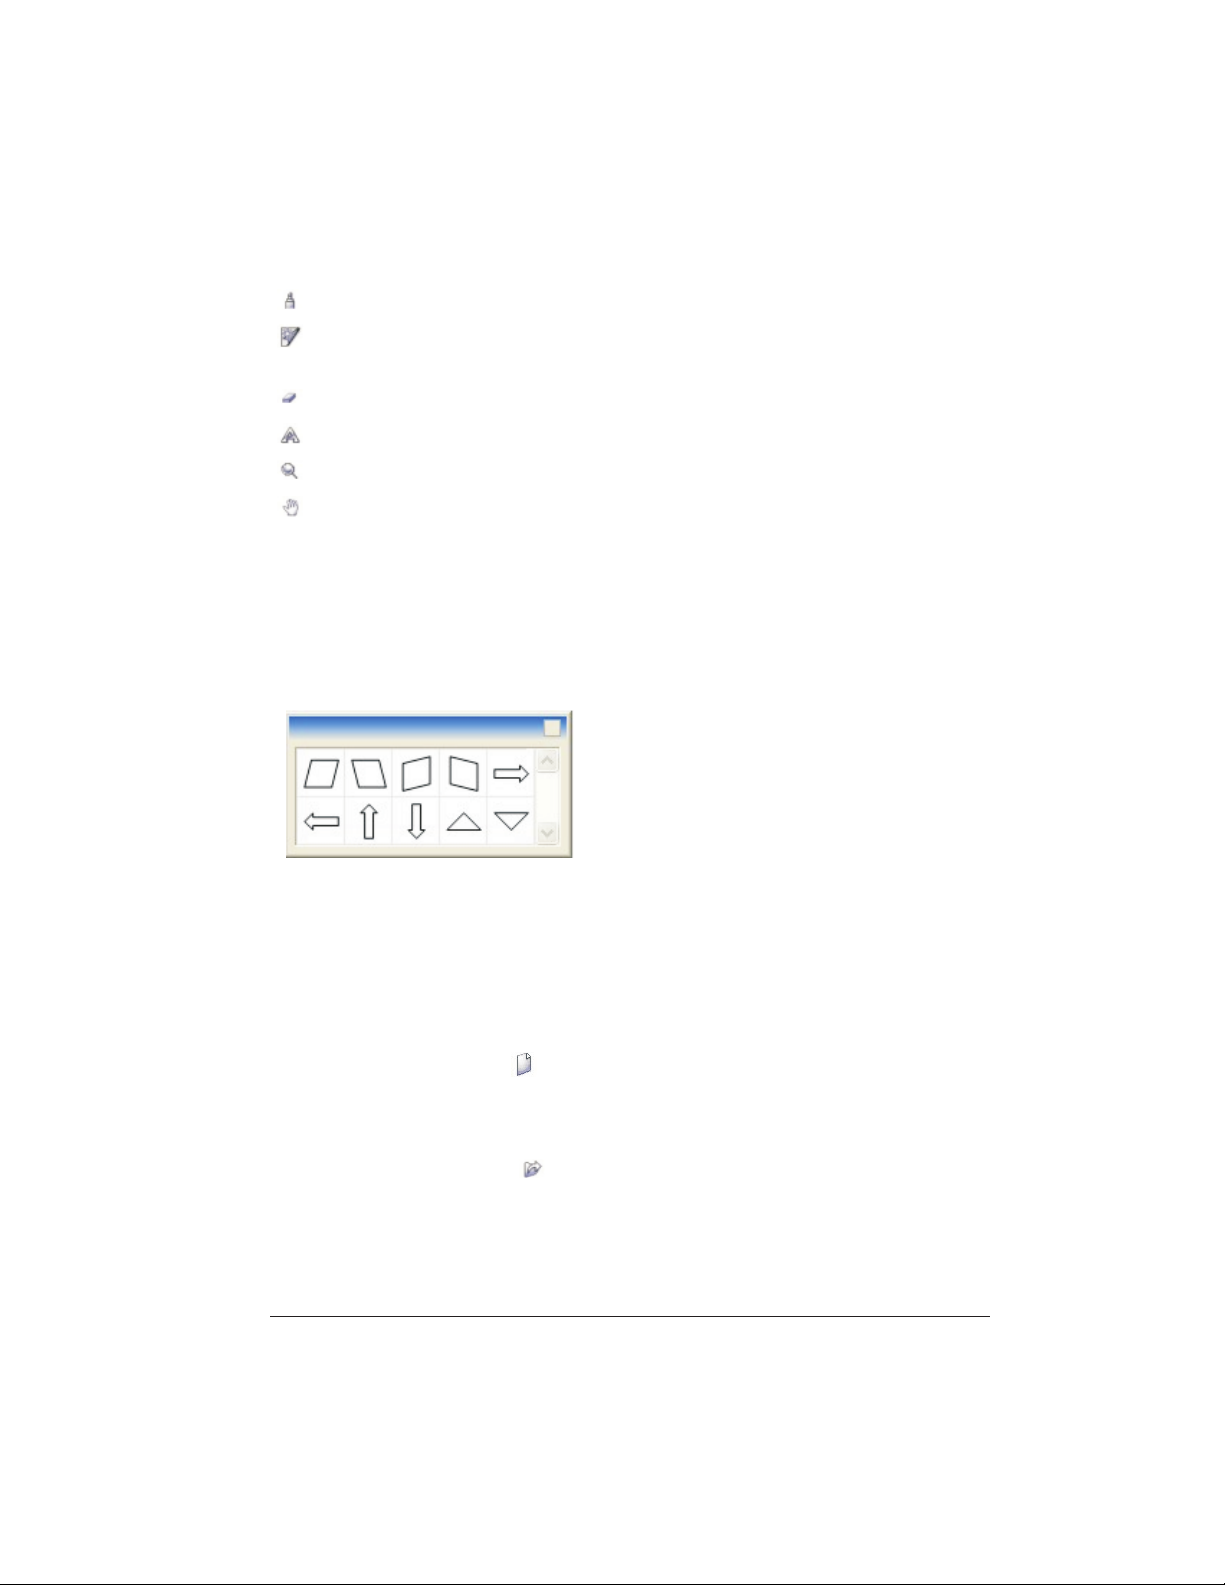
The Symbols palette
The Symbols palette contains shapes that you can add to a drawing. From the
Symbols palette you can place a shape on the work area and determine its size and
orientation by dragging. You can create new symbols and add them to the Symbols
palette.
Creating and opening documents
Corel Grafigo creates SVG files. Only SVG files created in Corel Grafigo can be
opened by the application.
To create a new document
1
On the toolbar, tap New . A new instance of Corel Grafigo is launched.
To open a Corel Grafigo document
1
On the toolbar, tap Open .
2
In the Look in box, choose the drive and folder where the Corel Grafigo SVG file
is stored.
3 Choose a file.
4
Ta p Open.
Getting Started 9
Page 10

Notes
Only SVG files created in Corel Grafigo can be opened.
•
Changing the look of the work area
You can change the look of the work area by adding a background color or a grid.
These elements are for display only, and are not part of a document.
To add a grid to the work area
1
On the toolbar, tap Settings .
2
Tap the Work area tab.
3
In the Grid section, choose either Small or Large to set the size of the grid.
4
Tap the Color button and choose a color for the grid.
5
Ta p OK.
To change the color of the canvas
1
On the toolbar, tap Settings .
2
Tap the Work area tab.
3
In the Display section, tap the Canvas color button and choose a color.
4
Ta p OK.
Using underlays
An underlay is an image that you place in the background of your work area. The
underlay is embedded in a document and becomes part of it. You can draw and place
text on the underlay.
To insert an underlay
1
On the toolbar, tap Underlay .
2 Browse to select the image file you want to use as an underlay.
3
Ta p Open.
Getting Started 10
Page 11

Notes
Underlays must be in one of the following file formats: JPG, BMP, TIF, GIF, PNG,
•
EMF.
Once you insert an underlay and save your document, the underlay is embedded in
•
the document and cannot be removed. However, you can replace it with another
underlay.
Changing the view
You can change the view by zooming in or out, or panning within the work area.
To zoom in and out
1
In the Toolbox, tap Zoom .
2 In the work area, tap the area that you want to zoom in on.
3 To increase the magnification, tap the work area again.
4
To zoom out, tap Zoom then hold down the button on the tablet pen and tap
the area that you want to zoom out on.
Note
•
By default, a document is at a zoom level of 100%. The minimum zoom level is
25% and the maximum zoom level is 400%.
Tips
•
You can zoom in on a specific area by tapping Zoom and then dragging a box
on the work area to define the area you want to zoom on.
•
You can also Zoom in or out by using Gestures. For more information see "Using
gestures" on page 13.
•
You can double-tap Zoom to fit your work to the view.
To pan
1
In the Toolbox, tap Pan .
2 Place the tablet pen on the screen, and drag to move the view within the work
area.
Getting Started 11
Page 12

To fit your work to the view
1
In the Toolbox, double-tap Zoom . The zoom level and panning is adjusted to
fit your document to the view.
Selecting, moving, and copying objects
You can select one or more objects in a document by using the Lasso tool. Selected
objects can be cut, copied, or moved.
To select objects
1
In the Toolbox, tap Lasso .
2 Drag around one or more objects, then lift the tablet pen from the screen. The
appearance of a selected object changes as shown below. In the following picture,
an object is shown when it is not selected (left) and when it is selected (right).
To move objects
1
In the Toolbox, tap Lasso and select one or more objects.
2
Place the tablet pen on a line in the object, and when the pointer changes to ,
drag the selected object or objects to another location within the work area.
To copy, cut, and paste objects
1
In the Toolbox, tap Lasso and select one or more objects that you want to
copy or cut.
2
On the toolbar, tap Copy , or to remove selected objects and place them on
the Clipboard, tap Cut .
3
To paste a copy of the selected objects, tap Paste . The objects that you paste
are added to the work area as selected objects. You can tap and drag the selected
objects to move them within the work area.
Getting Started 12
Page 13

Undoing and redoing actions
If you make a mistake you can undo up to 21 of your previous actions. Immediately
after undoing actions, you can redo them.
Toundoorredoanaction
1
On the toolbar, tap Undo .
2
To redo the action that was just undone, tap Redo .
Note
If you want to undo or redo more than one action, continue tapping the
•
appropriate button.
Tip
•
You can also undo or redo actions by using gestures. For more information see
"Using gestures," below.
Using gestures
Gestures are shortcuts for performing frequently used commands. Gestures are
invoked by pressing the tablet pen button as you make the gesture strokes. The
following is a list of gestures that can be used in Corel Grafigo.
Erase
The Scratch-out gesture erases content. Make the strokes as horizontal as possible,
and draw at least three strokes. If the height of the gesture increases, the number of
back and forth strokes also needs to increase.
Undo
The Left-semicircle gesture invokes the Undo command. Make sure to draw the
Getting Started 13
Page 14

semicircle from the right to the left. The two ends of the arc should be on the same
horizontal line.
Redo
The Right-semicircle gesture invokes the Redo command. Make sure to draw the
semicircle from the left to the right. The two ends of the arc should be on the same
horizontal line.
Zoom-in
The Up gesture magnifies the view to the next zoom level. This gesture is a single,
fast flick upward.
Zoom-out
The Down gesture reduces the view to the lowest level of magnification. This gesture
is a single fast flick downward.
Up one Onionskin
The Chevron-left gesture activates the next lower layer of onionskin. Draw the
chevron in a single stroke.
Getting Started 14
Page 15

Down one Onionskin
The Chevron-right gesture activates the next higher layer of onionskin. Draw the
chevron in a single stroke.
Getting Started 15
Page 16

Saving and exporting documents
You can save a document in SVG format, or export it to a bitmap format.
To save a new document
1
On the toolbar, tap Save .
2
In the Save in box, browse to select the folder in which you want to save the
document.
3
In the File name box, enter a name for the document.
4
Ta p Save.
To save changes to a document
1
On the toolbar, tap Save .
To export a document
1
On the toolbar, tap the small arrow to the right of Save . A menu appears.
2
Ta p Export.
3
In the Type box, select the type of file format that you want to export to. The
available settings for the exported file will change depending on the file format you
choose.
4
Ta p OK.
Note
•
Corel Grafigo allows you to export to the following formats: JPG, PNG, GIF, TIF,
BMP, EMF
Closing documents and quitting Corel Grafigo
When you close a document, Corel Grafigo remains open as a new document. When
you quit Corel Grafigo, both the document and the application close.
Getting Started 16
Page 17

To close a document
1
On the toolbar, tap Close Document . If the document has been changed
since it was last saved, you will be asked if you want to save the document.
To quit Corel Grafigo
1
Tap in the upper right corner of the work area.
Getting Started 17
Page 18

Drawing
Corel Grafigo provides tools for drawing lines and shapes. Corel Grafigo has drawing
assistance which automatically smooths lines and recognize shapes. For example, if
you draw a square or circle, Corel Grafigo will recognize your intent and convert the
shape to a perfect square or circle. The sensitivity of the drawing assistance tools can
be adjusted or turned off.
Drawing with the Pen tools
•
• Drawing with the Marker tool
• Erasing
• Working with Onionskins
• Working with symbols
Drawing with the Pen tools
The Toolbox provides four tools for drawing. There are three Pen tools and a Marker
tool. The Pen tools use opaque ink while the Marker tool uses ink that is partially
transparent. Shape recognition, curve smoothing, and text recognition work only for
lines and shapes drawn with a Pen tool.
To draw with a Pen tool
1
In the Toolbox, tap one of the three Pen tools.
2 Use the tablet pen to draw in the work area.
Notes
•
You can change the line thickness and color for each of the pens by tapping
Settings , and making changes in the Pen Tool tab of the Settings dialog box.
Drawing 18
Page 19

To change settings for the Pen tools
1
On the toolbar, tap Settings .
2
In the Settings dialog box, tap the Pen Tool tab.
3 For each of the three pens, choose a nib size and ink color.
4
For each of the three pens, enable or disable the Pressure sensitive check box.
When pressure sensitivity is enabled, you can increase or decrease the thickness of
ink while drawing by varying the amount of pressure on the tablet pen.
To change the Drawing Assistance settings
1
On the toolbar, tap Settings .
2
In the Settings dialog box, tap the Pen Tool tab.
3
In the Drawing Assistance section, set the following options:
Timer—specifies the time between a pen stroke and the implementation of
drawing assistance and the auto-growing for Onionskins. For example, if the
timer is set to 1 second and you draw a circle, shape recognition will take effect
one second after you lift your tablet pen. If the timer is set to zero, shape
recognition will occur the instant you lift your pen. Therefore, when the timer is
set to zero you can only draw recognized shapes consisting of one stroke.
Curve smoothing level—determines the amount of curve smoothing that is
applied. To turn curve smoothing off, move the slider all the way to the left.
Shape recognition level—determines the tolerances that are set for shape
recognition. If this control is set to its highest level, shapes will be recognized
even when they are not drawn very precisely. If the control is set to a lower
level, only shapes that are drawn more precisely will be recognized. To turn
shape recognition off, move the slider all the way to the left.
Automatically straighten shapes—If this check box is enabled, recognized
shapes that are close to the vertical or horizontal axis will be automatically
straightened. If the Shape recognition level is set to off, this check box is not
available.
Drawing 19
Page 20

To draw a recognized shape
1
In the Toolbox, tap one of the Pen tools .
2 In the work area, draw a circle, square, or other recognized shape. If the shape is
recognized, it will change to a precise shape.
Notes
The following shapes are recognized: straight line, square, rectangle,
•
parallelogram, diamond, circle, ellipse, and triangle. Dashed lines are also
recognized.
For shapes to be recognized, shape recognition must be turned on in the Settings
•
dialog box. For more information, see "To change the Drawing Assistance settings"
on page 19 .
Tips
•
To make the outline of your shape thicker, go over the shape several times with the
tablet pen. Use the same motion that you would when using a pencil to make a
thicker outline on paper. The outline becomes thicker for each time that you go
over the shape.
To disable shape recognition for a single shape
1
In the Toolbox, tap one of the Pen tools .
2 Immediately lift the tablet pen slightly and click the tablet pen button.
Notes
•
You must click the tablet pen button before shape recognition takes effect. For
information on increasing the lag time between when you lift your tablet pen and
when a shape is recognized, see "To change the Drawing Assistance settings" on
page 19
Drawing with the Marker tool
The Marker tool uses ink that is partially transparent. It has a different nib shape than
the Pen tools. The size of the nib and the color of the ink can be changed in the
Settings dialog box. The lines and shapes you draw with the Marker tool are not
affected by shape recognition, curve smoothing, or text recognition.
Drawing 20
Page 21

To draw with the Marker tool
1
In the Toolbox, tap Marker .
2 Use the tablet pen to draw in the work area.
Notes
You can change the line thickness and color for the Marker tool by tapping
•
Settings , and making changes in the Other tools tab of the dialog box.
Lines and shapes that you create with the Marker tool are not recognized by shape
•
recognition, text recognition, or curve smoothing.
To change settings for the Marker tool
1
On the toolbar, tap Settings .
2
In the Settings dialog box, tap the Other Tools tab.
3
In the Marker section, choose a nib size and ink color.
4
Enable or disable the Pressure sensitive check box. When pressure sensitivity is
enabled, you can increase or decrease the thickness of ink while drawing by varying
the amount of pressure on the tablet pen.
Erasing
You can erase lines, shapes, or text.
To erase with the Eraser
1
In the Toolbox, tap Eraser .
2 With the tablet pen, tap or drag over the line, shape, or text you want to erase.
To erase by cutting
1
In the toolbox, tap Lasso .
2 Drag around the object you want to cut to select it.
3
Ta p Cut .
Drawing 21
Page 22

To erase by using the scratch-out gesture
1 Hold down the button on the tablet pen.
2 Make three or more horizontal back and forth strokes without lifting the tablet
pen.
Working with Onionskins
Onionskins function like trace paper that you can place over a drawing. You can
change the color of Onionskins and use multiple Onionskins in the same drawing.
When you save a file, any Onionskins are saved with the document.
To add an Onionskin
1
On the Toolbox, tap Onionskin .
2 With the tablet pen, drag to define the size of the Onionskin.
Notes
If a drawing stroke extends beyond the boundaries of an active Onionskin, the
•
Onionskin is automatically enlarged to accommodate the stroke.
To change Onionskin settings
1
On the toolbar, tap Settings .
2
Tap the Other tools tab.
3
In the Onionskinsection, set the size of the control bar to either small or large, set
a color for Onionskins, and set the percentage of opacity. A lower opacity makes
the Onionskins more transparent.
To make an Onionskin active.
1
In the Toolbox, tap the Lasso, Marker, or one of the Pen tools.
2 Tap the Onionskin that you want to make active. The active Onionskin will have a
darker color than inactive Onionskins.
Drawing 22
Page 23

To move an object between Onionskins
1 For the object that you want to move, make the Onionskin active.
2
In the Toolbox, tap Lasso .
3 Drag around the object that you want to move to select it. When you drag, make
sure to start with the tablet pen on the active Onionskin.
4
Place the tablet pen on the object and when the pointer changes to , drag the
object from one Onionskin to another. When you lift the tablet pen, the object is
placed on the Onionskin.
Tip
You can also move an object from one Onionskin to another or to the canvas by
•
using Cut and Paste. Select an object you want to move, tap Cut , make the
Onionskin or canvas you want to move to active, and tap Paste .
To delete an Onionskin
1 Make the Onionskin active.
2
Tap the X in the lower left corner of the Onionskin.
Notes
•
When you delete an Onionskin, any objects on that Onionskin are also deleted.
•
If you delete an Onionskin, you can return the Onionskin and any objects on it by
clicking Undo .
Working with symbols
The Symbols palette contains shapes that you can place in your drawing. You can
select a symbol and then drag in the work area to define its size and orientation. You
can also create objects in your document and add them to Symbols palette. Symbols
can be used with or without a relative line weight. If the line weight is set to relative,
it will increase as the scale of the symbol increases. You can delete any symbol from
the Symbols palette, and you can hide the Symbols palette if you don't need it.
Drawing 23
Page 24

To insert a symbol
1
In the Symbols palette, tap the symbol you want to insert.
2 Drag the tablet pen in the work area to define the size and orientation of the
symbol.
3 Lift the tablet pen to place the symbol in a document.
To add a symbol to the Symbols palette
1
In the Toolbox, tap Lasso .
2
Drag around the object that you want to add to the Symbols palette to select it.
3
Click the button in the top right corner of the Symbols palette to display a
pull-down menu.
4
Ta p Add New Symbol.
Notes
The pull-down menu in the Symbols palette, allows you to undo the addition of a
•
symbol immediately after you add it.
To maintain the relative line weight of a symbol
1
In the Symbols palette, tap the button in the upper right corner to display a
pull-down menu.
2
Ta p Relative Line Weight to enable it.
Note
•
When Relative Line Weight is enabled and you place a symbol in the work area,
the line thickness will retain its relative value. For example, if you increase the size
of a symbol its line thickness will also increase proportionally.
Drawing 24
Page 25

To delete a symbol from the Symbols palette
1
In the Symbols palette, tap the symbol that you want to delete.
2
Tap the button in the upper right corner of the Symbols palette to display a
pull-down menu.
3
Ta p Delete Symbol.
To hide the Symbols palette
1
Double-tap the bar at the top of the Symbols palette.
Drawing 25
Page 26

Working with text
You can enter text into a Corel Grafigo document by typing, by using the Tablet PC
input panel, or by writing on the screen with the tablet pen and having the ink
converted into text. All text is contained within a text box.
Adding, editing, moving, and deleting text
•
Converting Ink into text
•
Formatting text
•
• Changing the recognized language
Adding, editing, moving, and deleting text
To add text to a Corel Grafigo document, you must insert a text box. You can then
add text to the text box.
To insert a text box into the work area
1
In the Toolbox, tap Text .
2 In the work area, tap to place the text box.
To enter text in a text box
1 Insert a text box into your document.
2 Do one of the following:
Use the keyboard to type text.
Tap the Tablet PC Input Panel button on the Windowsâ taskbar, and use either
the Keyboard tab or Writing Pad tab to enter text.
Use the tablet pen to write directly in the text box. Your handwriting is
converted to text.
Working with text 26
Page 27

Topastetextinatextbox
1 From within Corel Grafigo, or another application, highlight the text you want to
place in a text box and use the Copy or Cut command to place the text on the
Clipboard.
2 In your Corel Grafigo document, insert a text box.
3
On the toolbar, tap Paste .
To paste a text box in a document
1
On the Toolbox, tap Lasso .
2 Drag around the text box to select it.
3
When the text box is selected, tap Copy or Cut .
4 Open the Corel Grafigo document that you want to paste the text box into.
5
On the Toolbar, tap Paste .
To select and edit text
1
In the Toolbox, tap Text .
2 Tap the text that you want to edit. The text box becomes active and you can edit
the text.
To move text
1
On the Toolbox, tap Lasso .
2 Drag around the text box to select it.
3 Move the tablet pen over the boundary of the text box. When the pointer changes
to , drag the text box and drop it in a new location.
To delete text
1
On the Toolbox, tap Lasso .
2 Drag around the text box to select it.
3
When the text box is selected, tap Cut .
Working with text 27
Page 28

Tips
•
You can also delete text by selecting the text box and removing the text. When a
text box is empty it is automatically removed from the document.
•
You can also delete text by using the Eraser tool.
Converting Ink into text
When you use a pen to write directly in the work area, you can select your
handwriting and convert it to text. You can also write directly in a text box and have
the ink converted to text as you write.
To convert selected ink into text
1
Use one of the Pen tools to create the handwriting you want to convert to
text.
2
Ta p Text and drag around the handwriting.
3 Lift the tablet pen. The handwriting is converted to text.
Notes
•
You can also convert ink into text by using Lasso to select the handwriting,
and then tapping Text.
To convert ink into text as you write
1 Insert a text box.
2 With the tablet pen, write directly in the text box. Your handwriting is
automatically converted to text.
Formatting text
You can change the font, font style, size and color for the text that is displayed in a
document. When you format the text, your settings are applied to all text that is
displayed in a document.
Working with text 28
Page 29

To change the display font
1
On the toolbar, tap Settings .
2
Tap the Tools tab.
3
In the Text section, tap Format.
4 Adjust any of the font settings. The settings you choose are applied to all text in a
document.
Changing the recognized language
You can change the language that is recognized by Corel Grafigo.
To change the recognized language
1
On the toolbar, tap Settings .
2
Tap the Tools tab.
3
In the Recognizer language box, select the language that you want recognized.
Working with text 29
Page 30

Collaborating with others
Two or more users can view and work on the same Corel Grafigo document.
Collaboration is accomplished over the Internet through Microsoft NetMeeting. With
NetMeeting, you can place a call to another computer or receive a call from another
computer.
Setting up Microsoft NetMeeting
•
Placing or receiving a call
•
Setting up Microsoft NetMeeting
NetMeeting must be installed and configured properly on all computers that will
participate in a collaboration session.
To set up Microsoft NetMeeting
1
On the Windows Taskbar, tap Start, and then tap Run.
2
In the Open box, type conf and press OK. If Microsoft NetMeeting is already set
up on your computer, then the NetMeeting dialog box opens.
3 If Microsoft NetMeeting is not set up on your computer, a wizard opens which will
guide you through the setup procedure for NetMeeting. Follow the instructions in
the wizard until the main NetMeeting window appears.
4 Close Microsoft NetMeeting.
Placing or receiving a call
You can either place a call to another computer or listen for a call from another
computer. You can place calls to more than one computer and anyone who joins the
session can include others by calling them. When you are in a collaboration session,
any changes made on one computer will appear on the others. For more information
on using Microsoft NetMeeting, tap the Help menu in the NetMeeting dialog box.
The person who places the call is the host and anything that is in their Corel Grafigo
work area will be displayed in the Corel Grafigo work area of the computer that
receives the call.
Collaborating with others 30
Page 31

During a collaboration session, only the host can draw on the canvas of the work area.
Other collaborators will be able to draw only on Onionskins that they create. All
Onionskins on which you cannot draw are marked with an asterisk.
To set up a collaboration session
1 All participants in the session must launch Corel Grafigo.
2 Those who will receive the call should follow the instructions in the following
procedure.
3 If you are placing the call, follow the instructions in "To place a call" on the next
page . The participant who is receiving the call must accept it before the
collaboration session can begin.
4 If NetMeeting remains in the foreground, minimize it to the taskbar.
To listen for and accept an incoming call
1
On the toolbar, tap Collaborate .
2
In the Collaborate dialog box, choose Listen for an incoming call.
3 When a call is received, a window appears with the user name of the person trying
to contact you. Click Accept to begin the collaboration session.
Notes
•
If you have anything in your work area when you accept a call, a message will ask
you if you wish to save your document. Your work area is cleared and is replaced by
the document that is open on the host computer.
•
When the collaboration session starts, none of the drawing tools except for the the
Onionskin tool are accessible. You must create an onionskin before the tools
become accessible.
Collaborating with others 31
Page 32

To place a call
1
On the toolbar, tap Collaborate.
2
In the Collaborate dialog box, choose Place a call to another computer.
3 In the IP address or computer name box, type the IP address of the computer you
want to call. If the computer is on the same network as your computer, you can
type the computer name.
4
Ta p OK to launch Microsoft NetMeeting. The computer that you call is contacted
and must accept your call before a connection is made.
5 Repeat the above steps for each computer that you want to include in the
collaboration session.
Tip
•
If you don't know the IP address of your computer, tap Collaborate to display the
Collaborate dialog box. The IP address of your computer is displayed at the
bottom of the Collaborate dialog box.
Collaborating with others 32
Page 33

Index
A
accepting a call ......31
B
bitmaps ........16
BMP.........16
C
canvas
color ·········10
closing Corel Grafigo ....16-17
closing documents .....16-17
collaborate .......30-32
color
canvas ········10
converting ink to text .....28
copying ........12
copying objects ......12
Corel Corporation ......5
creating documents ......9
cutting........12,21
D
deleting onionskins .....23
deleting text .......27
documents
closing ·······16-17
creating ········9
exporting ·······16
opening ········9
saving ········16
drawing assistance settings . . . 19
E
EMF.........16
erasing .........21
exporting documents .....16
F
font .........29
formatting text ......28
G
gestures .......13,22
GIF.........16
grid .........10
H
handwriting recognition . . . 28-29
hiding the symbols palette ....25
J
JPG.........16
L
language ........29
Index 33
Page 34

M
S
magnification .......11
Marker tool ......20-21
Microsoft NetMeeting .....30
moving objects.......12
moving text .......27
N
NetMeeting .......30
O
Onionskin settings......22
Onionskins........22
opening documents ......9
P
panning ........11
pasting.........12
pasting text .......27
Pen tool settings ......19
Pen tools ........18
placing a call ......30,32
PNG.........16
saving documents ......16
scratch-out gesture .....22
selecting objects ......12
selecting text .......27
shape recognition ......20
shortcuts ........13
symbols .......23-24
Symbols palette .......9
T
Technical support ......5
terms .........7
text .........26
text box ........26
TIF .........16
toolbar .........8
Toolbox .........8
U
underlays
inserting ········10
overview ········10
Q
quitting Corel Grafigo ....16-17
R
raster images .......16
receiving a call ......30-31
redoing actions.......13
relative line weight .....24
Index 34
undoing actions ......13
V
view .........11
Z
zoom in or out .......11
 Loading...