


 Loading...
MO1005-EA
Operation Guide 3214
Getting Acquainted
Congratulations upon your selection of this CASIO watch. To get the most out of your purchase, be sure to read this manual carefully.
Warning!
•The measurement functions built into this watch are not intended for taking measurements that require professional or industrial precision. Values produced by this watch should be considered as reasonable representations only.
•The Moon phase indicator and tide graph data that appear on the display of this watch are not intended for navigation purposes. Always use proper instruments and resources to obtain data for navigation purposes.
•This watch is not an instrument for calculating low tide and high tide times. The tide graph of this watch is intended to provide a reasonable approximation of tidal movements only.
•Note that CASIO COMPUTER CO., LTD. assumes no responsibility for any damage or loss suffered by you or any third party arising through the use of this product or its malfunction.
Keep the watch exposed to bright light
|
|
Bright Light |
|
|
|
The electricity generated by the solar cell of the watch is |
|||
|
|
|
|
|
stored by a rechargeable battery. Leaving or using the |
||||
l |
|
|
|
|
|
|
l |
||
l |
l l l |
l |
l l |
l |
l |
watch where it is not exposed to light causes the battery |
|||
|
|
||||||||
Solar cell |
|
|
|
|
|
to run down. Make sure the watch is exposed to light as |
|||
|
|
|
|
|
much as possible. |
||||
|
|
|
|
|
|
|
|
• When you are not wearing the watch on your wrist, |
|
|
|
|
|
|
|
|
|
position the face so it is pointed at a source of bright |
|
|
|
|
|
|
|
|
|
light. |
|
|
|
|
|
|
|
|
|
• You should try to keep the watch outside of your sleeve |
|
|
|
|
|
|
|
|
|
as much as possible. Charging is reduced significantly if |
|
|
|
|
|
|
|
|
|
the face is covered only partially. |
|
• The watch continues to operate, even when it is not exposed to light. Leaving the watch in the dark can cause the battery to run down, which will result in some watch functions to be disabled. If the battery goes dead, you will have to re-configure watch settings after recharging. To ensure normal watch operation, be sure to keep it exposed to light as much as possible.
Battery charges in the light.
Solar cell |
Bright Light |
|
(Converts light to |
|
Electrical |
electrical power.) |
|
energy |
|
LEVEL 1 |
All |
|
functions |
|
|
LEVEL 2 |
|
|
enabled |
|
Charge |
LEVEL 3 |
|
LEVEL 4 |
|
|
Rechargeable battery
Battery discharges in the dark.
|
LEVEL 1 |
|
|
|
LEVEL 2 |
|
|
Dis- |
LEVEL 3 |
Some or all |
|
charge |
LEVEL 4 |
functions |
|
disabled |
|||
|
|
General Guide
•Press Cto change from mode to mode.
•In any mode (except when a setting screen is on the display), press Bto illuminate the display.
Timekeeping Mode |
Tide/Moon Data Mode |
||
|
Press C. |
l |
|
|
l ll |
||
|
▲ |
ll |
l |
|
|
l |
l |
|
l |
ll |
|
l ll |
|
|
|
ll |
l |
|
|
l |
l |
|
|
ll |
|
|
|
|
▲ |
|
|
Timekeeping
Press the Abutton to toggle the upper display between the day of the week and date, and the currently selected World Time city and time (Dual Time).
Use the Timekeeping Mode to set and view the current time and date.
Current Time |
|
|
Dual Time |
||
Day of week |
Month – Day |
|
|
City code |
Dual time |
|
|
|
A |
|
|
|
l |
|
▲ |
|
l |
l ll |
|
|
l ll |
||
l |
l |
|
|
l |
l |
l |
▲ |
|
l |
||
l |
l |
|
l |
l |
|
ll |
|
ll |
|||
A
Hour : Minutes
Seconds
PM indicator
Read This Before You Set the Time and Date!
This watch is preset with a number of city codes, each of which represents the time zone where that city is located. When setting the time, it is important that you first select the correct city code for your Home City (the city where you normally use the watch). If your location is not included in the preset city codes, select the preset city code that is in the same time zone as your location.
•Note that all of the times for the World Time Mode city codes are displayed in accordance with the time and date settings you configure in the Timekeeping Mode.
To set the time and date manually
l |
ll l l l |
|
1. In the Timekeeping Mode hold down Auntil the city |
|
l |
code starts to flash, which indicates the setting screen. |
|
l |
l |
||
l |
ll l ll |
l |
2. Use Dand Bto select the city code you want. |
|
|||
|
|
||
|
|
|
• Make sure you select your Home City code before |
changing any other setting.
• For full information on city codes, see the “City Code Table”.
•The actual level at which some functions are disabled depends on the watch model.
•Frequent display illumination can run down the battery quickly and require charging. The following guidelines give an idea of the charging time required to recover from a single illumination operation.
Approximately 5 minutes exposure to bright sunlight coming in through a window Approximately about 8 hours exposure to indoor fluorescent lighting
•Be sure to read “Power Supply” for important information you need to know when exposing the watch to bright light.
If the display of the watch is blank...
If the display of the watch is blank, it means that the watch’s Power Saving function has turned off the display to conserve power.
• See “Power Saving Function” for more information.
About This Manual
•Button operations are indicated using the letters shown in the illustration.
•Each section of this manual provides you with the information you need to perform operations in each mode. Further details and technical information can be found in the “Reference” section.
World Time Mode |
Alarm Mode |
|
lll |
|
ll l |
|
l l |
|
l l |
|
ll |
▲ |
▲ |
Countdown Timer Mode |
Stopwatch Mode |
▲ |
▲ |
3.Press Cto move the flashing in the sequence shown below to select the other settings.

 City Code
 DST
DST 
 12/24-Hour
 Seconds
 Hour
Hour 
 Minutes
Format
|
Power Saving |
|
|
Illumination |
|
|
Button |
|
|
Day |
|
|
Month |
|
|
Year |
|
|
|
Duration |
|
|
Operation Tone |
|
|
|
|
|
|
||||
|
|
|
|
|
|
|
|
|
|
|
|
|
|
|
• The following steps explain how to configure timekeeping settings only.
4.When the timekeeping setting you want to change is flashing, use Dor B to change it as described below.
Screen: |
To do this: |
|
|
|
Do this: |
|
|
Change the city code |
|
|
|
Use D(east) and B |
|
|
|
|
|
|
|
(west). |
|
Toggle between Daylight Saving Time (ON) Press D. |
|||||
|
and Standard Time (OFF). |
|
|
|
||
|
Toggle between 12-hour ( |
) and 24- |
Press D. |
|||
|
hour ( |
) timekeeping |
|
|
|
|
|
Reset the seconds to |
|
|
|
Press D. |
|
|
Change the hour and minutes |
|
|
Use D(+) and B(–). |
||
|
Change the year, month, or day |
|
|
Use D (+) and B (–). |
||
/ |
Toggle the button operation tone between |
Press D. |
||||
|
(on) and |
(off) |
|
|
|
|
|
|
|
|
|
||
|
Toggle the illumination duration between |
Press D. |
||||
|
(approximately 1.5 seconds) and |
|
||||
|
(approximately 3 seconds). |
|
|
|||
|
Toggle between Power Saving on ( |
) and |
Press D. |
|||
|
off ( |
) |
|
|
|
|
5. Press Ato exit the setting screen.
• The day of the week is displayed automatically in accordance with the date (year,
month, and day) settings.
1
Operation Guide 3214
12-hour and 24-hour timekeeping
•With the 12-hour format, the P (PM) indicator appears to the left of the hour digits for times in the range of noon to 11:59 p.m. and no indicator appears to the left of the hour digits for times in the range of midnight to 11:59 a.m.
•With the 24-hour format, times are displayed in the range of 0:00 to 23:59, without any indicator.
•The 12-hour/24-hour timekeeping format you select in the Timekeeping Mode is applied in all other modes.
Daylight Saving Time (DST)
Daylight Saving Time (summer time) advances the time setting by one hour from Standard Time. Remember that not all countries or even local areas use Daylight Saving Time.
To change the Daylight Saving Time (summer time) setting
|
|
|
l |
l l l |
|
1. In the Timekeeping Mode, hold down Auntil the city |
|
|
|
|
|
code starts to flash, which indicates the setting screen. |
|||
|
|
l |
l |
||||
|
|
l |
|
|
l |
2. Press Cand the DST setting screen appears. |
|
|
|
l |
l l l |
l |
|||
ll |
l |
lll |
|
3. Use Dto cycle through the DST settings in the |
|||
|
|
||||||
l |
|
|
|
l |
|
|
sequence shown below. |
l |
|
|
|
|
|
||
ll ll |
|
|
|
||||
DST indicator |
4. When the setting you want is selected, press A to exit |
|
|
|
the setting screen. |
|
• The DST indicator appears to indicate that Daylight |
|
Saving Time is turned on. |
Tide/Moon Data
In the Tide/Moon Data Mode, you can see the current tide and the current date’s Moon phase for your Home City. You can specify a date and view tide and Moon data for that date.
•See “Moon Phase Indicator” for information about the Moon phase indicator and “Tide Graph” for information about the tide graph.
•All of the operations in this section are performed in the Tide/Moon Data Mode.
Note
•It takes about two seconds to calculate tide graph data. You will not be able to display a setting screen while data calculation is in progress.
•Moon age is calculated to an accuracy of ±1 day.
Tide Data
The Tide Graph that appears first when you enter the Tide/Moon Data Mode shows the data at 6:00 a.m. for your currently selected Home City on the current date, according to the Timekeeping Mode. From there you can specify another date or time.
•If the tide data is not correct, check your Timekeeping Mode settings and correct them if necessary.
•If you feel that the information shown by the Tide Graph is different from actual tide conditions, you need to adjust the high tide time. See “Adjusting the High Tide Time” for more information.
Moon Data
The Moon phase and Moon age information that appears first when you enter the Tide/Moon Data Mode shows the data at noon for your currently selected Home City on the current date, according to the Timekeeping Mode. After that you can specify another date to view data.
•If the Moon data is not correct, check your Timekeeping Mode settings and correct them if necessary.
•If the Moon phase indicator shows a phase that is a mirror image of the actual moon phase in your area, you can use the procedure under “Reversing the Displayed Moon Phase” to change it.
Tide/Moon Data Screens
In the Tide/Moon Data Mode, press A to toggle between the tide data screen and the Moon data screen.
Tide Data Screen |
Moon Data Screen |
||
Current tide range |
Month – Day |
Moon phase |
Month – Day |
llll |
|
Press A. |
|
l |
l |
▲ |
▲ |
l |
|||
l |
l |
|
|
ll |
|
|
|
Time |
Current |
Moon age |
|
|
|
|
|
tide level
•When you display the Tide Data Screen, it initially shows tide data for 6:00 a.m..
•Use the Tide Data Screen to specify the Tide Data time. You can use D (+) to change the displayed time in one-hour increments.
•Use the Moon Data Screen to specify the Tide/Moon Data date. You can use D (+) to change the displayed date in one-day increments. Pressing Dwill display the year of the displayed date.
Adjusting the High Tide Time
Use the following procedure to adjust the high tide time within a particular date. You can find out high tide information for your area from a tide table, the Internet, or your local newspaper.
To adjust the high tide time
|
|
|
|
|
|
|
|
|
1. In the Tide/Moon Data Mode, hold down Auntil the |
|
|
|
|
l |
|
|
|
|
|
hour digits start to flash. |
|
|
|
ll |
|
l |
|
|
|
2. Use D(+) and B(–) to change the hour setting. |
||
|
|
|
l ll |
|
|
|
|
|
||
|
l |
|
|
l |
|
|
|
3. When the hour is the setting you want, press C. |
||
|
llllll |
|
|
|
||||||
l |
|
l |
|
|
l |
|
|
|
|
|
|
|
l |
|
|
|
|
|
• |
|
|
l |
|
|
|
|
|
|
|
|
|
|
l |
|
|
l |
|
|
|
|
|
|
This will cause the minute digits to flash. |
l |
|
|
|
|
|
|
|
|||
l |
|
|
l |
|
|
|
|
|
|
|
l |
|
l |
|
|
|
|
|
4. Use D(+) and B(–) to change the minute setting. |
||
|
l |
|
|
|
|
|
||||
|
ll |
|
|
|
|
|
|
|||
|
|
|
|
|
|
|
|
|
5. When the minute setting is the way you want, press A |
|
Hour |
|
|
|
|
|
|
|
|
to exit the adjustment screen and return to the Tide/ |
|
|
|
|
|
|
|
|
|
Moon Data Mode screen. |
||
|
|
|
|
|
|
|
|
|
||
|
|
ll ll |
|
|
|
• Pressing Dand Bat the same time while the time |
||||
|
|
|
|
|
adjustment screen is displayed (steps 2 through 5 |
|||||
|
|
l |
l |
|
|
|
|
|
|
|
|
|
|
|
l |
|
|
|
above) will return the high tide time to its initial factory |
||
|
|
l |
lllll |
|||||||
|
l |
|
|
l |
|
|
|
|
|
|
|
|
l |
lll |
|
|
|
|
|
||
|
|
|
l |
default setting. |
||||||
|
|
l |
|
|
|
|
l |
|||
|
|
l |
|
|
|
l |
|
|
||
|
|
l |
|
|
|
|
|
l |
• The high tide time setting is not affected by the DST |
|
|
|
l |
|
|
ll |
l |
||||
|
|
|
ll |
l |
|
|
||||
|
|
|
|
ll |
|
|
(summer time) setting of the Timekeeping Mode. |
|||
|
|
|
|
|
|
|
|
|
||
|
|
|
|
|
|
|
|
|
• On some days, there are two high tides. With this watch, |
|
|
|
Minute |
|
|
||||||
|
|
|
|
you can adjust the first high tide time only. The second |
||||||
|
|
|
|
|
|
|
|
|
||
|
|
|
|
|
|
|
|
|
high tide time for that day is adjusted automatically |
|
|
|
|
|
|
|
|
|
|
based on the first high tide time. |
|
Reversing the Displayed Moon Phase
The left-right (east-west) appearance of the Moon depends on whether the Moon is north of you (northerly view) or south of you (southerly view) as you view it.
You can use the procedure below to reverse the displayed Moon phase so it matches the actual appearance of the Moon where you are located.
•To determine the viewing direction of the Moon, use a compass to take a direction reading of the Moon at its meridian passage.
•For information about the Moon phase indicator, see “Moon Phase Indicator”.
To reverse the displayed Moon phase
|
|
|
llll |
1. In the Tide/Moon Data Mode, hold down Auntil the |
||
|
|
|
hour digits start to flash. |
|
||
|
|
l |
l |
|
||
|
|
l |
|
|
|
|
l ll |
|
l |
2. Press C twice. |
|
||
l |
|
ll |
|
|
||
|
|
l |
|
|
|
|
l |
|
ll l |
• This will cause the Moon phase indicator to flash. This |
|||
l |
|
|
l |
|
||
l |
|
|
|
|||
l |
ll |
l |
l |
|
||
|
|
is the indicator switching screen. |
|
|||
|
|
|
|
|
||
|
|
|
|
|
|
|
|
|
|
|
|
3. Press D to toggle the Moon phase indicator between |
|
|
|
|
|
|
the southerly view (indicated by |
) and northerly |
view (indicated by 


 ).
).
•Northerly view: Moon is north of you.
•Southerly view: Moon is south of you.
4.When the Moon phase indicator setting is the way you want, press Ato exit the switching screen and return to the Tide/Moon Data Mode screen.
World Time
City code
Current time in selected city
World Time shows the current time in 48 cities (31 time zones) around the world.
•The times kept in the World Time Mode are synchronized with the time being kept in the Timekeeping Mode. If you feel that there is an error in any World Time Mode time, check to make sure you have the correct city selected as your Home City. Also check to make sure that the current time as shown in the Timekeeping Mode is correct.
•Select a city code in the World Time Mode to display the current time in any particular time zone around the globe. See the “City Code Table” for information about the UTC differential settings that are supported.
•All of the operations in this section are performed in the World Time Mode, which you enter by pressing C.
To view the time in another city
While in the World Time Mode, use the D(eastward) to scroll through the city codes (time zones).
• Pressing the Dand B at the same time will jump to the UTC time zone.
To toggle a city code time between Standard Time and Daylight Saving Time
1. In the World Time Mode, use D to display the city code (time zone) whose Standard Time/Daylight Saving Time setting you want to change.
2. Hold down A to toggle between Daylight Saving Time
(DST indicator displayed) and Standard Time (DST
indicator not displayed).
• The DST indicator is shown on the World Time Mode screen while Daylight Saving Time is turned on.
• Note that the Standard Time/Daylight Saving Time setting affects only the currently displayed city code. Other city codes are not affected.
•Note that you cannot switch between Standard Time and Daylight Saving Time while UTC is selected as the city code.
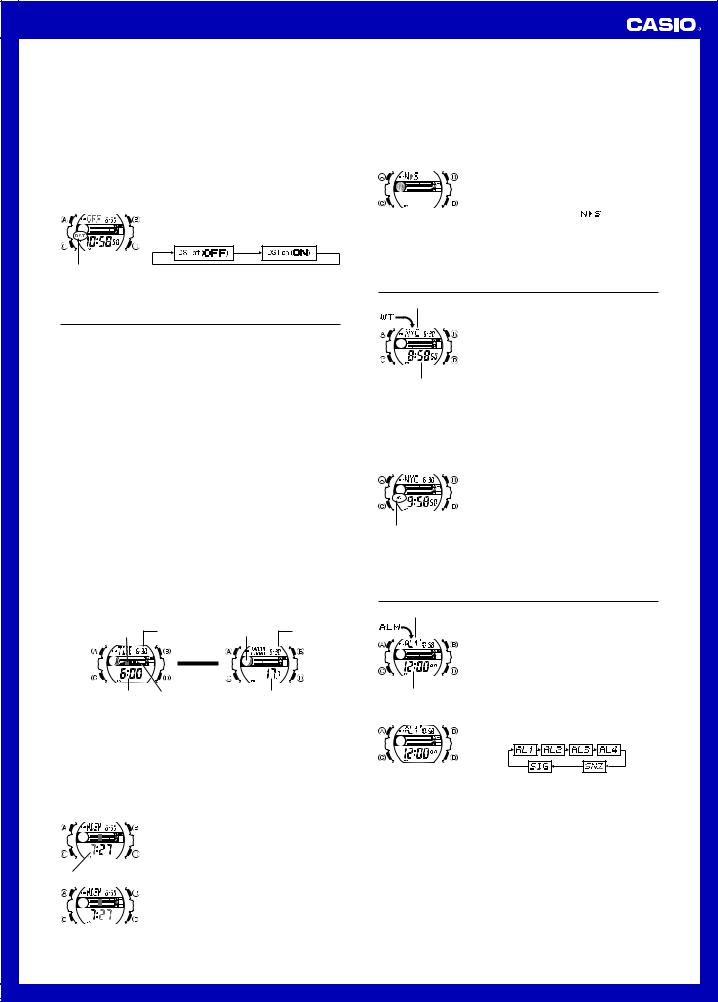
Alarms
Alarm number
Alarm time (Hour : Minutes)
To set an alarm time
lll |
|
ll |
l |
l |
l |
l l |
|
|
ll |
The Alarm Mode gives you a choice of four one-time alarms and one snooze alarm.
Also use the Alarm Mode to turn the Hourly Time Signal (SIG) on and off.
•There are five alarm screens numbered AL1, AL2, AL3 and AL4 for the one-time alarm, and a snooze alarm screen indicated by SNZ. The Hourly Time Signal screen is indicated by SIG.
•All of the operations in this section are performed in the Alarm Mode, which you enter by pressing C.
1.In the Alarm Mode, use Dto scroll through the alarm screens until the one whose time you want to set is displayed.
•To set a one-time alarm, display alarm screen AL1, AL2, AL3 or AL4. To set the snooze alarm, display the SNZ screen.
•The snooze alarm repeats every five minutes.
2.After you select an alarm, hold down A until the hour setting of the alarm time starts to flash, which indicates the setting screen.
•This operation turns on the alarm automatically.
3.Press Cto move the flashing between the hour and minute settings.
4.While a setting is flashing, use D(+) and B(–) to change it.
•With the 12-hour format, set the time correctly as a.m. or p.m. (P indicator).
5.Press Ato exit the setting screen.
Alarm Operation
The alarm tone sounds at the preset time for 10 seconds, regardless of the mode the watch is in. In the case of the snooze alarm, the alarm operation is performed a total of seven times, every five minutes, until you turn the alarm off.
•Alarm and Hourly Time Signal operations are performed in accordance with the Timekeeping Mode time.
•To stop the alarm tone after it starts to sound, press any button.
•Performing any one of the operations below during a 5-minute interval between snooze alarms cancels the current snooze alarm operation.
Displaying the Timekeeping Mode setting screen Displaying the SNZ setting screen
2
Loading...