


 Loading...
EN
WSD-F30
User’s Guide
Thank you for purchasing this watch.
Before trying to use this watch, be sure to read the Safety Precautions in the Quick Start Guide that comes with it. Make sure you use the watch correctly.
© 2019 CASIO COMPUTER CO., LTD.

Contents
Introduction ....................................................................................... |
EN-2 |
Watch Features ............................................................................ |
EN-2 |
Measurement Functions ............................................................... |
EN-4 |
Overview ...................................................................................... |
EN-6 |
About This Manual ....................................................................... |
EN-7 |
Getting Ready ................................................................................... |
EN-8 |
Basic Operations You Should Remember ................................... |
EN-14 |
Using Outdoor Watch Functions - Using CASIO Watch Faces and Apps |
|
........................................................................................................... |
EN-19 |
Using CASIO Watch Faces ........................................................ |
EN-20 |
Using the Location Memory App ................................................ |
EN-23 |
Using the TOOL App .................................................................. |
EN-33 |
Using the Activity App ................................................................ |
EN-48 |
Using the MOMENT SETTER App ............................................. |
EN-54 |
Using the Extend Mode App ....................................................... |
EN-58 |
Using the Multi Timepiece App ................................................... |
EN-63 |
Common Outdoor Function Settings .......................................... |
EN-67 |
Troubleshooting ............................................................................. |
EN-82 |
Important! ........................................................................................ |
EN-84 |
Precautions During Use .............................................................. |
EN-84 |
User Maintenance ...................................................................... |
EN-94 |
Chargeable Battery Handling (Please recycle!) .......................... |
EN-95 |
Personal Information Protection Precautions .............................. |
EN-95 |
Main Specifications ........................................................................ |
EN-96 |
Supplementary Information ......................................................... |
EN-102 |
EN-1

Introduction
Attention iPhone Owners!
●When using this watch while it is paired with an iPhone, be sure to have the
Wear OS by GoogleTM app running on the iPhone. If the Wear OS by Google app is not running, functions that require communication with the iPhone will not operate.
●Some watch functions are restricted when it is paired with an iPhone. For details, visit the website below.
https://support.casio.com/wsd/
Watch Features
Dual-layer Display for Improved Readability
Your watch comes with a dual-layer color and monochrome display. The color display employs high contrast ratio organic electroluminescence (EL). The monochrome display is designed to show a greater amount of information (compared with previous CASIO products).
Extend Mode
Extend Mode activates an original power management system for the duallayer display, which allows access to maps and GPS, even during overnight activities. For details, visit the website below. https://support.casio.com/wsd/
Powered with Wear OS by Google
This watch is designed primarily to be paired with a smartphone running
AndroidTM 4.4+ (excluding Go edition) or iOS 9.3+. Pairing with a smartphone enables use of variety of different functions, both in conjunction with the smartphone and when the watch is being used by itself.
EN-2
Five-atmosphere Water Resistance + MIL-STD*1
Even though this watch has a built-in voice recognition microphone, it still is water resistant up to five atmospheres. This means you can wear your watch while swimming, fishing, etc. MIL-STD-810G standard environment resistance allows you to wear your watch while engaged in a variety of vigorous outdoor activities, including: mountain climbing, cycle sports, fishing, and more.
*1 United States Department of Defense Military Standard
Built-in GPS
This watch has GPS*2 built in, and you can acquire location information
without connecting with a phone. The watch itself can display a map*3 of your current location, measure and record data for a variety of activities, and more.
*2 In addition to GPS (U.S.), your watch also supports GLONASS (Russia) and QZSS (Japan) positioning. This manual uses “GPS” to refer to all of the above positioning systems.
*3 To display the map when you do not have a smartphone, you need to have the map data downloaded beforehand.
Three Side Buttons Designed for Sure Operation
The three side buttons are designed for sure operation even when outdoors. Apps can be freely assigned to the MAP button and the TOOL button.
EN-3
Measurement Functions
Your watch can take barometric pressure, altitude, bearing, and other readings. Its built-in watch faces and applications can use readings for display and other useful functions. Note that this watch is not a special purpose measuring instrument. Readings produced by measurement functions are intended as general reference information only.
Compass (Bearing Measurement)
For serious mountain climbing and other activities that require accurate bearing readings, take along a highly reliable compass to use in combination with the watch’s compass.
 Important!
●Note that accurate compass readings and/or correction will not be possible in the areas described below.
In the vicinity of a permanent magnet (magnetic accessory, etc.), metal objects, high-voltage wires, aerial wires, or electrical household appliances (TV, computer, cellphone, etc.)
On trains, on boats, on aircraft, etc.
Indoors, especially inside of reinforced concrete structures.
EN-4
Altimeter, Barometer
The watch’s Altimeter uses a pressure sensor to measure barometric pressure, and then calculates and displays relative altitude based on the measured value. Because of this, readings taken at different times at the same location may produce different altitude values due to changes in temperature, humidity, barometric pressure, and other factors. Also note that values displayed by the watch may be different from elevations indicated for areas where you are located. When using the watch’s altimeter while mountain climbing, it is recommended that you perform regular correction in accordance with the local altitude (elevation) indications.
Tide Graph (Graphic Display of Tide Information)
The Tide Graph feature of your watch is intended to provide a rough image of current tide conditions. Do not use its tide information for navigation purposes. For navigation purposes, be sure to use official tide charts issued by a reliable agency or authority for the area you are navigating.
EN-5
Overview
Package Contents
Watch, AC adaptor, charger cable, Quick Start Guide, warranty
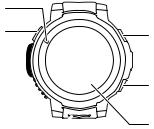
General Guide


A Charge LED
B Charger terminal
C Pressure sensor
D Microphone

E MAP button F Power button G TOOL button H Touch screen
EN-6
About This Manual
●The contents of this manual are subject to change without notice.
●Copying of this manual, either in part or its entirety, is forbidden. You are allowed to use this manual for your own personal use. Any other use is forbidden without the permission of CASIO COMPUTER CO., LTD.
●CASIO COMPUTER CO., LTD. shall not be held liable for any lost profits or claims from third parties arising out of the use of this product or this manual.
●CASIO COMPUTER CO., LTD. shall not be held liable for any loss or lost profits due to loss of data caused by malfunction or maintenance of this product, or any other reason.
●The watch and sample screens depicted in the illustrations in this manual may be different from the actual appearance of the watch.
EN-7

Getting Ready
Be sure to read the precautions in the “Quick Start Guide”, and also perform all of the steps under “Preparing the Watch for First Use” and “Preparing the Watch for Outdoor Use”.
Preparing the Watch for First Use
You must perform the steps below before using the watch for the first time.
1.Charge the watch
Plug the provided AC adaptor into a power outlet, and then connect the provided charger cable and AC adaptor as shown in the illustration.
●The charge LED lights red during charging, and green when a full charge is achieved.
Charge LED
AC adaptor*
*The shape of the AC adaptor supplied in your geographic area may be different from the one shown in the illustration.
 Important!
●To help promote longer battery life, regular charging of the watch (about once a month) is recommended even if you do not use it for a long time.
EN-8
2.Install the Wear OS by Google App on a Smartphone
Android smartphone: Download the Wear OS by Google app on Google Play.
iPhone: Download the Wear OS by Google app from the iTunes App Store.
3.Pair the Watch with Your Smartphone
●If the watch is turned off, hold down the power button for about two seconds to turn it on.
●When pairing, it is recommended that you have the smartphone and watch within one meter of each other. Refer to the websites below for information about how to pair the watch with a smartphone.
Wear OS by Google Help https://support.google.com/wearos/
CASIO website https://support.casio.com/wsd/
4.Install the CASIO MOMENT SETTER+ App on the Smartphone (Android Only)
If you are using an Android smartphone, download the “CASIO MOMENT SETTER+” app on Google Play and install it. You can use the CASIO MOMENT SETTER+ app to configure the following watch settings from your smartphone: TOOL App, MOMENT SETTER App.
EN-9
 Important!
●There are two versions of the CASIO MOMENT SETTER+ app. Make sure you have the latest version installed on your phone. Icons shown on Google Play indicate whether the app is the old version or new version.
Old version icon |
New version icon |
●In order to use all of the functionality provided by this watch, be sure to update all of your related CASIO apps to their latest versions before using your watch. For information about the update procedure, visit the website below.
https://support.casio.com/wsd/
EN-10
Preparing the Watch for Outdoor Use
Performing the steps below prepares the watch’s outdoor functions (CASIO watch faces and apps) for optimal operation. Perform these steps after you have completed the procedure under “Preparing the Watch for First Use”.
1.Configure watch settings to enable use of Play Store.
1.If you are using the watch while it is connected with an iPhone, connect the watch to Wi-Fi.
2.While a watch face is displayed, short press the power button to display the App menu.
3.Scroll the list of apps upwards or downwards until “Play Store” is displayed, and then tap it.
4.When the Google Play Terms of Service screen appears, tap “Yes, I'm In”.
●This will give you access to Play Store. Install the app you want to try.
2.Update your CASIO apps to their latest versions.
1.On the app menu, tap “Play Store”.
2.Swipe the touch screen from top to bottom to display the Play Store home screen.
3.Tap the “My Apps” icon to display a list of the apps currently installed on the watch.
●Apps for which updates are available will be shown under “Updates”.
4.If there is an update available for CASIO MOMENT SETTER+, be sure to update it. Updating any other apps that are available is also recommended.
EN-11
3.Configure the location settings of the watch and smartphone.
Watch Operation
1.While the watch face is displayed, swipe the touch screen from top to bottom and then tap D.
2.Scroll downwards and tap “Connectivity”.
3.On the screen that appears, enable “Location”.
Smartphone Operation
Go to “Settings” and turn on “Location”. Next, select “High Accuracy” mode. If your smartphone does not have “High Accuracy” setting, turn on its GPS, Wi-Fi, and mobile network (data communication) settings.
The settings in the steps below are required to enable the following functions: CASIO watch faces, the Location Memory app, the TOOL app, the Activity app, and all functions of the MOMENT SETTER app.
4.Enable the CASIO MOMENT SETTER+“Permissions” setting.
1.While the watch face is displayed, swipe the touch screen from top to bottom and then tap D.
2.Scroll the screen downwards, and then tap in the following sequence: “Apps & notifications”, “App permissions”, “System Apps”, “CASIO MOMENT SETTER+”.
3.Tap the items that appear on the display (“Calendar”, “Microphone”, “Location”, etc.) and enable all of them.
EN-12
5.Turn on the “Save daily activity records” setting.
1.While a watch face is displayed, press the TOOL button to display the Tool app.
2.Swipe the touch screen from right to left. On the “Settings” screen that appears, tap Dto display the settings menu.
3.Scroll the setting menu downwards. When “Save daily activity records” is displayed, check to make sure that its setting is “OFF”. Next, tap the setting.
●A dialog box will appear to confirm if you want to save activity records. Carefully read the text of the dialog box.
4.Tap “I agree.”.
●This changes the “Save daily activity records” setting to “ON”.
6.Turn on the “Save Daily Location Info” setting.
1.While a watch face is displayed, press the MAP button to display the Location Memory app.
2.Swipe the touch screen from bottom to top. On the menu that appears, tap “Settings”.
●This displays the setting menu.
3.Scroll the setting menu downwards. When “Save Daily Location Info” is displayed, check to make sure that its setting is “OFF”. Next, tap the setting.
●A dialog box will appear to confirm if you want to save location information. Carefully read the text of the dialog box.
4.Tap “Every 6 minutes” or “Every 1 minute”.
●This changes the “Save Daily Location Info” setting to “ON”.
●Note that selecting “Every 1 minute” will cause a large amount of power to be consumed.
EN-13

Basic Operations You Should Remember
 Important!
●Note that the operations described here are subject to change due to the type and version of the operating system being used by the smartphone connected with the watch, changes that occur when the watch’s operating system is updated, and other factors. For details about Wear OS by Google operations, visit the website below.
https://support.google.com/wearos/
Button Functions
Power button |
● Press to restore display brightness after it goes dark. |
|
● Pressing while a watch face is displayed will display the |
|
App menu (app list for launching apps). |
|
● If watch power is off, hold down the power button for at |
|
least two seconds to turn the watch on. |
MAP button |
Pressing while a watch face is displayed starts up a |
(Top right) |
previously specified app (Location Memory under initial |
|
default settings). |
TOOL button |
● Pressing while a watch face is displayed starts up a |
(Bottom right) |
previously specified app (TOOL under initial default |
|
settings). |
|
● Each press of this button while TOOL is displayed |
|
switches between TOOL functions. |
Note
●Visit the website below for information about changing the apps that are started up by pressing the MAP button and TOOL button. https://support.google.com/wearos/
EN-14

Wake Up
If you don’t tap the touch screen for a few seconds, the watch screen will dim. To wake up the watch and restore it to normal brightness, tap the touch screen or press the power button.
Power Supply Operations
To do this: |
|
Perform this operation: |
|
Charge the |
See step 1 under “Preparing the Watch for First Use”. |
||
watch |
|
|
|
Turn off power |
1. |
While the watch face is displayed, swipe the touch |
|
|
2. |
screen from top to bottom and then tap D. |
|
|
Scroll the screen downwards. Tap “System” and |
||
|
|
then “Power off” in sequence. On the confirmation |
|
|
|
screen that appears, tap |
. |
Turn on power |
Hold down the power button for about three seconds. |
||
EN-15
Watch Face Operations
|
|
|
To do this: |
|
Perform this operation: |
Switch to |
1. |
While a watch face is displayed, touch and hold the |
another watch |
2. |
center of the touch screen for about two seconds. |
face |
Scroll a list of favorite watch faces left and right. |
|
|
|
When the watch face you want to use is displayed, |
|
|
tap it. |
Add a watch |
1. |
Scroll a list of favorite watch faces as far as it will go |
face to favorites |
|
to the right and then tap the + button. |
|
2. |
This displays a list of all watch faces. |
|
Scroll the list of all watch faces upwards and |
|
|
|
downwards. When the watch face you want to add |
|
|
to favorites is displayed, tap it. |
Remove a |
On a list of favorite watch faces, swipe upwards on the |
|
watch face from |
watch face you want to remove. |
|
favorites |
|
|
Favorite watch faces
Your watch has a wide selection of watch faces built in. You can add the ones you most often use to a list of favorite watch faces for easier selection when you need them.
Note
●For details about watch face operations, visit the website below. https://support.google.com/wearos/
●For information about CASIO watch faces, see “Using CASIO Watch Faces”.
EN-16
Using Apps
|
|
|
To do this: |
|
Perform this operation: |
Start up an app |
1. |
While a watch face is displayed, short press the |
|
2. |
power button to display the App menu. |
|
Scroll the list of apps upwards or downwards. When |
|
|
|
the app you want to run is displayed, tap it. |
Return to the |
Press the power button. |
|
watch face |
|
|
Using a Specific App
●For information about the Location Memory, Point Navigation, TOOL, Activity, MOMENT SETTER, Extend Mode and Multi Timepiece apps, see “Using Outdoor Watch Functions - Using CASIO Watch Faces and Apps”.
●For details about GoogleTM apps (standard Wear OS by Google apps), visit the website below.
https://support.google.com/wearos/
●For information about third-party apps, refer to the website, user documentation, and other information provided by the developer.
EN-17
Wear OS by Google Functions
The Wear OS by Google operating system of this watch provides the functions below as standard.
●Dictation and voice command operation
●Messaging and incoming phone call notification
●Google FitTM, Timer, Agenda, Translate and other standard Wear OS by Google apps
●Watch faces and apps can be added using the Play Store app
●Wear OS by Google Settings
For details, visit the website below. https://support.google.com/wearos/
Smartphone Dependent Functions
Though you can use a wide range of functions without connecting to a smartphone, some apps and services (dictation, smartphone related apps, etc.) are not available unless there is a connection between the watch and a smartphone. For details, visit the websites below. https://support.google.com/wearos/
https://support.casio.com/wsd/
EN-18

Using Outdoor Watch Functions - Using
CASIO Watch Faces and Apps
This section explains how to interpret the contents of CASIO watch faces and how to use CASIO apps and make your outdoor adventures more interesting and enjoyable.
Use this app: |
To do this: |
Location Memory |
Check your current location on a color map. |
Point Navigation |
Display the direction and distance to your |
|
destination. |
TOOL |
Find out more about the natural environment around |
|
you. |
Activity |
Keep track of current information about your |
|
activities. |
MOMENT SETTER |
Get useful notifications when they really matter. |
Extend Mode |
Record multiple days of location information without |
|
charging along the way. |
Multi Timepiece |
Save power by limiting operation to timekeeping |
|
and certain functions. |
 Important!
●In order to get the very best out of the outdoor functions of your watch, be sure to perform the operation under “Preparing the Watch for Outdoor Use” before using them.
●Speeds and distances displayed by the Location Memory, Point Navigation, Activity, and TOOL apps are values measured by the watch’s or your smartphone’s GPS function. This means displayed values may not be exact due to GPS reception conditions and position sensing error.
EN-19
Using CASIO Watch Faces
Your watch comes with the CASIO Watch Faces described below built in. Watch face names are used in the list of favorite watch faces and the list of all watch faces (see “Watch Face Operations”).
|
|
Frontier |
Analog watch face on which areas you visit are color |
|
highlighted on a map. |
2 Layers |
Digital watch face that combines easy-to-read |
|
monochrome LCD and a color LCD. Either of two |
|
display styles can be selected: “Daily Style” (day of the |
|
week, day, time, battery level, step count) or “Outdoor |
|
Style” (time, barometer, altimeter, compass). |
Place |
Analog watch face that can be linked with Google |
|
CalendarTM so the locations of specific scheduled |
|
events appear as the background image. A map of your |
|
current location is shown if there is no event specified. |
Authentic |
Simple analog watch face. In addition to a fixed 24-hour |
|
time dial, there are two more dials whose contents can |
|
be changed by tapping them. |
Journey |
Analog watch face that shows a map of your current |
|
location. The watch will display up to three events |
|
saved to Google Calendar. Tapping an event displays |
|
a map to its location. |
Traveler |
Analog watch face that shows useful information about |
|
your travel destination, etc. Each tap of the dial at 10 |
|
o’clock changes the information displayed at the |
|
bottom of the watch screen. |
Multi |
Casual digital watch face with three dials whose |
|
content can be changed by tapping them. |
Location |
Analog watch face that shows your current latitude and |
|
longitude based on the watch’s GPS, along with a |
|
background image of a world map centered on your |
|
current location. |
World Time |
Digital watch face that shows the date, time, and city |
|
name (time zone name) in your current location, the |
|
time offset between your current location and your |
|
home city time, and the current date, time, and city |
|
name (time zone name) of your home city. |
EN-20
 Important!
●While the “Always-on screen*” setting is off (default setting), the watch will automatically switch to the monochrome LCD when display illumination dims after the prescribed period of non-use, regardless of the currently selected watch face. To switch back to the original watch face, tap the touch screen.
●When remaining battery power is lower than 3%, the watch will automatically switch to the monochrome LCD when display illumination dims after the prescribed period of non-use, regardless of the currently selected watch face, and even if the “Always-on screen” setting is on.
* “Always-on screen” is a Wear OS by Google setting item. For details, visit the website below.
https://support.google.com/wearos/
If the message “Perform magnetization correction.” appears...
The “Perform magnetization correction.” notification may appear while you are using a watch face that includes a compass.
To calibrate the compass, tap the notification and then tap D. Move the watch around as shown in the animation that appears on the watch display.
EN-21
If you feel that altitude, barometric pressure, or other readings are not correct...
Perform the operation required to calibrate the readings you feel are incorrect. See “Common Outdoor Function Settings” and perform one or more of the operations below.
|
|
To calibrate this: |
See the information here: |
Barometer |
“Barometric Pressure Calibration” |
Altimeter |
“Altitude Calibration”, “Correct Altitude Using |
|
Location” |
Compass |
“Compass Calibration”, “Compass Magnetic |
|
Declination Calibration” |
Changing CASIO Watch Face Settings
See “Common Outdoor Function Settings”.
EN-22
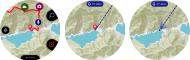
Using the Location Memory App
The Location Memory app makes it quick and easy to record map-related information. You can use the Location Memory app to perform the operations described below.
●Display a map to check your current location.
●Select from a variety of different map skins including street view, geographic view, satellite view, and more.
●While the app is running, you can track your route on the map.
●Use dictation to create a text memo about your current location.
●Use marks to leave quick memos or when a network connection is not available.
●Use “Revisit” marks to record a memo and have the watch alert you with a notification and navigation instructions back to the marked point whenever you are in the vicinity.
EN-23

Location Memory App Basic Operations
You can perform main Location Memory app operations using the MAP button and TOOL button. The operations you can perform with these two buttons are indicated by on-screen icons displayed to the left of each button. You can also perform the operations by tapping the icons.
Icon Pressing the button or tapping the icon does this: Changes the functions of the two buttons to zoom in and zoom out (see below).
Changes the functions of the two buttons to mark and dictation (see below).
Zooms in on the map. Zooms out from the map. Records a memo with a mark. Records a dictated memo.
Downloading Mapbox Maps
If you are planning to go to a location where there is no net access but you still want to use maps, you can download them ahead of time while you still have net access.
Using the procedure below to download a map automatically changes the “Map Type” setting to “Mapbox”.
1.While the map is displayed, swipe the touch screen from bottom to top. On the menu that appears, tap “Download Map”.
2.Perform the procedure from step 2 under “Download Map”.
“Revisit” Marks
Use “Revisit” marks (  ) to record a memo and have the watch alert you with a notification whenever you are in the vicinity (within 5 km under initial default settings). For information about changing the notification distance setting and disabling notification, see “Changing the “Revisit” Mark Notification Setting”.
EN-24

 Important!
●In order to be able to receive notifications triggered by “Revisit” marks, your Android phone must have the CASIO MOMENT SETTER+ app installed, and there must be a connection between the phone and watch.
●Note that notification receipt triggered by “Revisit” marks is not supported when the watch is connected with an iPhone.
●You can have up to 50 “Revisit” marks registered at one time. Adding a new Revisit mark while there are already 50 marks in memory will delete the oldest one in memory to make room for the new one.
Point Navigation and Show Direction
Using “Point Navigation” and “Show Direction” at the same time provides you with intuitive information about your destination.
Point Navigation
●This setting can be used to have the direction and distance to a destination displayed on the map. While a map is displayed, swipe from bottom to top. On the menu that appears, tap “Point Navigation”.
For details, see “Using Point Navigation”.
Show Direction
●This setting can be used to have the direction that the 12 o’clock position of the watch is pointing displayed on the map. While a map is displayed, swipe from bottom to top. On the menu that appears, tap “Show Direction” to change the setting to “ON”.
While the “Show Direction” setting is “ON”, directions also are displayed on the Activity app maps.
When the direction to the destination (linear) indicated by “Point Navigation” and the cone of view displayed by “Show Direction” are aligned with each other, it means that 12 o’clock on the watch is pointed in the direction of your destination.
EN-25

Other Operations
●To view a recorded memo, swipe the displayed map from bottom to top. On the menu that appears, tap “History”.
●For information about how to track your route on a map, see “Enabling Route Tracking on the Map (Route Display)”.
●For information about map display settings, see “Common Outdoor Function Settings” and perform one or more of the operations below.
To switch the map between Google MapsTM and Mapbox: Map Type
To change the map skin to geographic view or satellite view: Map Skin
Location Memory App Settings
This section explains settings that are particular to the Location Memory app (“Route Display” and “Revisit”). For information about other setting items, see “Common Outdoor Function Settings”.
Enabling Route Tracking on the Map (Route Display)
Your route can be tracked on the map.
Your route is normally displayed as a blue line. However, the portion of your route where you performed an Activity app measurement operation is indicated by a red line.
EN-26
To display your route, use the procedure below to change “Route Display” on the setting menu from “OFF” (initial default setting) to “ON”.
1.While the map is displayed, swipe the touch screen from bottom to top. On the menu that appears, tap “Settings”.
2.Scroll the setting menu downwards. After confirming that the “Route Display” setting is “OFF”, tap to change it to “ON”.
 Important!
●This watch acquires location information at regular intervals and tracks your route on a map. To conserve battery power, the frequency of GPS information acquisition is normally low. Because of this, the route tracking displayed while you are traveling by car, train, or other higher speed mode of transportation may appear rather rough. Very high-speed transportation may make it impossible to obtain GPS information and display route correctly.
●If you want smoother route display, start a data measurement operation with the Activity app. GPS information is acquired more frequently during an Activity app data measurement operation, so this will make the route display smoother.
●The watch saves route information, marks, memos, and other data in internal storage. Data is retained as long as memory capacity is available. When memory becomes full, the watch automatically deletes the oldest data to make room for newly recorded data.
EN-27
Changing the “Revisit” Mark Notification Setting
Use “Revisit” marks to record a mark and have the watch alert you whenever you are in the vicinity. Under the watch’s initial default settings, notification is performed when both of the conditions below are satisfied.
●You are <<within five kilometers>> of the “Revisit” mark location.
●<<At least one day>> has passed since you were last <<within one kilometer>> of the “Revisit” mark location.
The parts of the above conditions enclosed in double angle brackets (<< >>) can be specified by you. You can also disable notifications, if you want. You can use the steps below to configure settings.
1.While the map is displayed, swipe the touch screen from bottom to top. On the menu that appears, tap “Settings”.
2.Scroll the setting menu downwards. When “Revisit” is displayed, tap it.
3.On the screen that appears, configure the required settings.
●Perform the steps below to modify notification conditions.
1.If the “Notifications” setting is “OFF”, tap to change it to “ON”.
2.Tap “Region”. On the list that appears, tap the distance you want to specify.
3.Tap “Notification Control”. On the list that appears, tap the interval you want to specify.
●To disable notification, tap “Notifications” to change its setting to “OFF”.
EN-28
Viewing Your Route on a Phone
You can perform the procedure below to export a route stored in watch memory and view it on a phone using Google EarthTM, etc. Note that your phone needs to have Google DriveTM and Google Earth installed in order to perform this procedure.
To output a traveled route from the history display
1.While the map is displayed, swipe the touch screen from bottom to top. On the menu that appears, tap “History”.
2.Select the date of the history data you want to display.
3.Tap “Show on Map”.
●This displays the history data of the route you traveled on the map.
4.Swipe the touch screen from bottom to top. On the menu that appears, tap “Output as KML file”.
●If this is the first time for you to perform this operation, an account selection screen will appear. The KML file will be stored on Google Drive, so select your Google account.
●Once export starts, do not perform any operation on the watch until it is complete.
●The exported KML file will be stored on your Google Drive in a folder named CASIO-WSD.
To output a traveled route from a normal map display
1.While the map is displayed, swipe the touch screen from bottom to top. On the menu that appears, tap “Settings”.
2.Scroll the setting menu downwards. Tap “Export” and then “Output as KML file” in sequence.
●If this is the first time for you to perform this operation, an account selection screen will appear. The KML file will be stored on Google Drive, so select your Google account.
3.Select the date of the route you want to export.
●This will start export. Do not perform any operation on the watch until the export is complete.
●The exported KML file will be stored on your Google Drive in a folder named CASIO-WSD.
EN-29
Loading...