


XJ-UT351XJ
Table of contents
 Loading...
Casio XJ-UT351XJ, XJ-UT351WN, XJ-UT311WN, XJ-UT351W, XJ-UT331XJ User Manual
...
DATA PROJECTOR
EN
XJ-UT331X/XJ-UT311WN*/
XJ-UT351W/XJ-UT351WN*
*Network Models
User’s Guide
Be sure to read the “Safety Precautions” and “Operating Precautions” in the “Read this first”
document, and make sure you use this product correctly.
Keep this manual in a safe place for future reference.
Visit the site below for the latest version of this manual.
http://world.casio.com/manual/projector/
1

DLP is a registered trademark of Texas Instruments of the United States.
Microsoft and Windows are registered trademarks or trademarks of Microsoft Corporation in the
United States and other countries.
HDMI, the HDMI Logo and High-Definition Multimedia Interface are trademarks or registered
trademarks of HDMI Licensing, LLC.
PJLink is a pending trademark or a registered trademark in Japan, the United States, and other
countries and areas.
Crestron and Crestron Connected are registered trademarks of Crestron Electronics, Inc. of the
United States.
AMX is a registered trademark of AMX LLC of the United States.
XGA is a registered trademark of IBM Corporation of the United States.
Other company and product names may be registered trademarks or trademarks of their
respective owners.
Portions of this product are based in part on the work of the Independent JPEG Group.
The contents of this User’s Guide are subject to change without notice.
Copying of this manual, either in part or its entirety is forbidden. You are allowed to use this
manual for your own personal use. Any other use is forbidden without the permission of CASIO
COMPUTER CO., LTD.
CASIO COMPUTER CO., LTD. shall not be held liable for any lost profits or claims from third
parties arising out of the use of this product or this manual.
CASIO COMPUTER CO., LTD. shall not be held liable for any loss or lost profits due to loss of
data due to malfunction or maintenance of this product, or any other reason.
The sample screens shown in this manual are for illustrative purposes only, and may not be
exactly the same as the screens actually produced by the product.
2

Contents
Safety Precautions.......................................................... 6
Operating Precautions.................................................. 12
About the Light Source Unit.................................................................12
Projector Light Emission ......................................................................12
Laser and High Temperature Precautions
(See the label on the projector) ............................................................13
Other Precautions ................................................................................14
Precaution when Handling the Projector after Use ..............................15
Getting Ready................................................................ 16
Unpacking ............................................................................................16
Operation Flow to Projection................................................................16
General Guide ......................................................................................17
Terminals ..............................................................................................18
Setting Up the Projector.......................................................................19
Setup Precautions ..................................................................................................... 19
Connecting with an External Device ....................................................20
Cover Included with the YW-40 Wireless Adapter ...............................22
Attaching and Removing the Cable Cover ...........................................22
Remote Controller ................................................................................23
Operating the Projector................................................ 24
Basic Image and Audio Operations During Projection.........................24
Basic Operation List ..................................................................................................24
Input Source Details .................................................................................................. 26
Light Control ..............................................................................................................27
Digital Screen Shift...............................................................................28
Test Pattern Projection.........................................................................28
Changing the Audio Input.....................................................................29
Control Panel Lock...............................................................................29
3

Configuring Remote Control ID and Projector ID Settings...................30
Using the Presentation Timer (TIMER) .................................................30
To display the timer ................................................................................................. 30
To display the timer function menu .......................................................................... 30
To configure timer settings.......................................................................................31
Timer Operations ..................................................................................................... 31
Using the Setup Menu (MENU) ............................................................32
Setup Menu Settings .................................................................................................32
Password Protection ............................................................................38
If you forget your password... .................................................................................. 39
Projecting from USB Input (Network Models Only)..............................39
Supported Playback Files.......................................................................................... 39
Supported USB Memory Devices.............................................................................. 39
Connecting USB Memory Devices to the Projector.................................................. 40
Projecting Files from a USB Memory Device.............................................................40
Operation During Image File Projection .................................................................... 41
Operation During Movie File Projection..................................................................... 41
File Viewer Setting Items..........................................................................................42
File Menu Operations................................................................................................. 42
Autorun ...................................................................................................................... 43
File Viewer Troubleshooting.......................................................................................43
File Viewer Error Messages .......................................................................................44
Projecting the Screen Image of a Graphing Calculator........................45
To project the screen image of a graphing calculator............................................... 45
Cleaning the Projector.................................................. 46
Cleaning the Projector Exterior ............................................................46
Cleaning the Lens.................................................................................46
Cleaning Vents .....................................................................................46
Troubleshooting ............................................................ 47
Indicators..............................................................................................47
Error Indicators and Warning Messages ..............................................47
Projector Troubleshooting....................................................................49
4

Appendix ........................................................................ 51
Supplying Power to External Equipment..............................................51
Updating Firmware and Transferring a User Logo...............................52
Mounting the Projector on a Wall.........................................................52
Using the MONITOR OUT Terminal .....................................................53
Projection Distance and Screen Size ...................................................54
Aspect Ratio Setting and Projection Image .........................................55
Projector RS-232C Control ..................................................................57
Specifications................................................................ 60
TCO Certified Document URL...................................... 62
B
5
Safety Precautions
Thank you for selecting this CASIO product. Be sure to read these “Safety Precautions” before trying
to use it. After reading this User’s Guide, keep it in a safe place for future reference.
About safety symbols
Various symbols are used in this User’s Guide and on the product itself to ensure safe use, and to
protect you and others against the risk of injury and against material damage. The meaning of each of
the symbols is explained below.
Icon Examples
*
Danger
This symbol indicates information that, if ignored or applied incorrectly,
creates the risk of death or serious personal injury.
*
Warning
This symbol indicates information that, if ignored or applied incorrectly, could
possibly create the risk of death or serious personal injury.
*
Caution
This symbol indicates information that, if ignored or applied incorrectly, could
possibly create the risk of personal injury or material damage.
’
A triangle indicates a situation against which you need to exercise caution. The example
shown here indicates you should take precaution against electric shock.
!
A circle with a line through it indicates information about an action that you should not
perform. The specific action is indicated by the figure inside the circle. The example shown
here means disassembly is prohibited.
$
A black circle indicates information about an action that you must perform. The specific
action is indicated by the figure inside the circle. The example shown here indicates you must
unplug the power cord from the power outlet.
*
Precautions During Use
Warning
Adult supervision is required whenever
there are young children present and
especially when there is the possibility
of young children coming into contact
with the projector.
Smoke, odor, heat, and other
abnormalities
1. Unplug the projector.
2. Contact your original dealer or authorized
CASIO service center.
Should you ever notice smoke, strange
odor, or any other abnormality,
immediately stop using the projector.
Continued use creates the risk of fire
and electric shock. Immediately perform
the following steps.
Malfunction
Immediately stop using the projector if
the screen appears abnormal, or if any
other abnormal operation occurs even
though you are operating the projector
correctly. Continued use creates the
risk of fire and electric shock.
Immediately perform the following
steps.
1. Turn off the projector.
2. Unplug the projector.
3. Contact your original dealer or authorized
CASIO service center.
6

Power cord
Misuse of the power cord creates the
risk of fire and electric shock.
Make sure that you always observe the
following precautions.
• Be sure to use only the accessories that come
with the projector.
• Make sure that you use a power source with
the same voltage as that specified for the
projector.
• Do not overload a power outlet with too many
devices.
• Do not locate the power cord near a stove.
• Do not use the power cord that comes with
the projector with any other device.
• Do not share the outlet supplying power to the
projector with other devices. If you are using
an extension cord, make sure that the ampere
rating of the extension cord is compatible with
the power consumption value of this projector.
• Never use the power cord while it is still
bundled together.
• Use a conveniently located power outlet that
you can reach easily when you need to unplug
the projector.
A damaged power cord creates the risk
of fire and electric shock.
Make sure that you always observe the
following precautions.
• Never place heavy objects on the power cord
and never expose it to heat.
• Make sure the power cord is not pinched
between the wall and the rack or table where
the projector is located, and never cover the
power cord with a cushion or other object.
• Never try to modify the power cord, allow it to
become damaged, or subject it to excessive
bending.
• Do not twist the power cord or pull on it.
Never touch the power cord or plug
while your hands are wet.
Doing so creates the risk of electric
shock.
• When using this projector in the country where
you purchased it, be sure to use the power
cord that came with it. Whenever using the
projector in another country, be sure to
purchase and use a power cord that is rated
for the voltage of that country. Also make sure
that you are aware of the Safety Standards
that apply in that country.
When going out, make sure the
projector is in a location away from pets
and other animals, and unplug the
power plug from the power outlet. A
power cord damaged by chewing can
cause shorts, and creates the risk of
fire.
Water and foreign matter
Never allow water to get on the
projector. Water creates the risk of fire
and electric shock.
Never place a vase or any other
container of water on top of the
projector. Water creates the risk of fire
and electric shock.
Water or other liquid, or foreign matter
(metal, etc.) getting into the projector
creates the risk of fire and electric
shock. Should anything get inside the
projector, immediately perform the
following steps.
1. Turn off the projector.
2. Unplug the projector.
3. Contact your original dealer or authorized
CASIO service center.
Disassembly and modification
Never try to take the projector apart or
modify it in any way. The projector
contains a large number of high-voltage
components that create the risk of
electric shock and burn injury. Also,
note that problems caused by
unauthorized projector disassembly or
modification are not covered by the
warranty and are not eligible for repair
by CASIO.
Be sure to leave all internal inspection,
adjustment, and repair up to your original dealer
or authorized CASIO service center.
7

Dropping and impact
Continued use of the projector after it
has been damaged by dropping or
other mistreatment creates the risk of
fire and electric shock. Immediately
perform the following steps.
1. Turn off the projector.
2. Unplug the projector.
3. Contact your original dealer or authorized
CASIO service center.
Disposal by burning
Never try to dispose of the projector by
burning it. Doing so can cause an
explosion, which creates the risk of fire
and personal injury.
Projector light emission
• Never look directly into the lens,
intake vents, or exhaust vents while
the light is on. When turning on the
projector, check to make sure that no
one is looking directly into its lens,
intake vents, or exhaust vents. The
strong light emitted by the projector
creates the risk of eye damage.
• Do not attempt to use a magnifying
glass, mirror, or other similar object
to bend or reflect the projector’s light,
and never hold or place such object
in the path of the projector’s light.
Refracted or reflected light can shine
into a person’s eyes and create the
risk of eye damage.
Blocking the vents
Never allow the vents to become
blocked. Doing so causes internal heat
build up, which creates the risk of fire
and breakdown of the projector.
Touching the projector while it is hot
creates the risk of burn injury. Make
sure that you always observe the
following precautions.
• Maintain a distance of at least 6 cm (2.4
inches) between the front of the projector
(from which light is being emitted) and the
projection surface (screen). Maintain a
distance of at least 30 cm (11.8 inches)
between surfaces and the other sides of the
projector.
• Do not insert the projector into any space
where air circulation is poor.
• Never cover the projector with a blanket or any
similar item.
• Locate the projector on a firm, flat surface
during use. Never use the projector while it is
on a carpet, blanket, towel, seat cushion, or
other pliable surface.
• Never stand the projector up on either end
during use.
Projector cabinet
Never open the projector’s cabinet.
Doing so creates the risk of electric
shock.
Cleaning
Before cleaning the projector, be sure to
turn it off and unplug it from the power
outlet. Failure to do so creates the risk
of electric shock.
Exhaust vents
The exhaust vents become very hot while the
projector is running. Never touch them. Doing so
creates the risk of burn injury. The areas near the
exhaust vents also become quite hot. Never
locate objects made of plastic or other
heat-sensitive materials near or under the
projector. Doing so creates the risk of
deformation and discoloration of the object.
Location
Never locate the projector in any of the following
types of locations. Doing so creates the risk of
fire and electric shock.
• Near an area subject to strong vibration
• An area subject to large amounts of moisture
or dust
• In a kitchen or other area exposed to oil
smoke
• Near a heater, on a heated carpet, or in an
area exposed to direct sunlight
• An area subject to temperature extremes
(Operating temperature range is 5°C to 35°C
(41°F to 95°F)).
8

Heavy objects
*
Never place heavy objects on the projector or
climb on top of the projector. Doing so creates
the risk of fire and electric shock.
Water
Never locate the projector in a bathroom or
anywhere else there is the chance that it will be
splashed with water.
Unstable location
Never place the projector on an
unstable surface or on a high shelf.
Doing so can cause it to fall, creating
the risk of personal injury.
Using the projector on a base with
casters
Whenever using the projector on a base that has
casters, make sure that you lock the casters
when not moving the base.
Lightening
During a lightening storm, do not touch the plug
of the projector’s power cord.
Remote controller
Never try to take the remote controller
apart or modify it in any way. Doing so
creates the risk of electric shock, burn
injury, and other personal injury. Be sure
to leave all internal inspection,
adjustment, and repair up to your
original dealer or authorized CASIO
service center.
Never allow the remote controller to
become wet. Water creates the risk of
fire and electric shock.
Radio waves emitted by the YW-40
wireless adapter (included or
purchased separately)
Never use this product inside of an
aircraft or medical facility, or in any
other location where use of such
devices is prohibited. Radio waves can
have an effect on the operation of
electronic equipment and medical
equipment, and cause accidents.
Do not use this product in the vicinity of
high-precision electronic instruments or
electronic devices that handle weak
radio signals. Radio waves can have an
effect on the operation of such
equipment, and cause accidents.
• If you are using a pace maker or any other
electronic medical device, be sure to consult
your physician or device manufacturer before
using this product.
Do not use flammable gas sprays
nearby
Do not spray flammable gas into or in
the vicinity of the projector. The gas
may ignite and create the risk of fire.
Caution
Power cord
Misuse of the power cord creates the
risk of fire and electric shock. Make
sure that you always observe the
following precautions.
• When unplugging the power cord, always grasp
the plug, and do not pull on the power cord.
• Insert the plug into the power outlet as far as it
will go.
• After using the projector, unplug it from the
power outlet.
• Unplug the projector from the power outlet if
you do not plan to use it for a long time.
• At least once a year, unplug the power plug
and use a dry cloth or vacuum cleaner to clear
dust from the area around the prongs of the
power plug.
• Never use detergent to clean the power cord,
especially the power plug and jack.
• Before moving the projector, be sure to turn it
off and unplug it from the power outlet first.
Backup of important data
Be sure to keep separate written
records of all data stored in projector
memory. Memory data can be lost due
to breakdown, maintenance, etc.
During projection, make sure there is
nothing in front of the lens blocking
the light.
An object in front of the lens creates the risk of
fire.
Lens effect
Never have an aquarium or any other object that
produces a lens effect in front of the projector
while the light source unit is on. Such an object
creates the risk of fire.
Lens
Never touch the lens with your hand.
B
9

YW-40 wireless adapter (included or
*
*
*
*
purchased separately)
Keep the wireless adapter out of the
reach of small children. Accidental
swallowing of a wireless adapter can
interfere with proper breathing and
create a life-threatening situation.
Battery Precautions
Caution
Misuse of batteries can cause them to leak and
stain the area around them, or to explode,
creating the risk of fire and personal injury. Make
sure that you always observe the following
precaution.
• Use only the type of batteries that is
specified for the remote controller.
Danger
Should liquid leaking from an alkaline
battery get into the eyes, immediately
take the following steps.
1. Do not rub the eyes! Wash the eyes with clean
water.
2. Contact a physician immediately. Failure to
take immediate action can lead to loss of
eyesight.
Warning
Misuse of batteries can cause them to leak and
stain the area around them, or to explode,
creating the risk of fire and personal injury. Make
sure that you always observe the following
precautions.
• Never try to take batteries apart and
do not allow them to become shorted.
• Never expose batteries to heat or
throw them into fire.
• Never mix old batteries and new ones.
• Never mix batteries of different types.
• Never try to charge batteries.
• Take care that batteries are oriented
correctly when you load them.
Dead batteries
Be sure to remove batteries from the remote
controller as soon as they go dead.
• Remove batteries from the remote
controller if you do not plan to use it
for a long time.
Disposing of batteries
Make sure that you dispose of used batteries in
accordance with the rules and regulations in your
local area.
Magnetism
Caution
This projector has a magnet inside.
Because of this, it should not be used in
the vicinity of anyone wearing a
pacemaker or any other electric medical
device. Should any problem arise, move
the projector away from the person
experiencing the problem and consult a
physician.
Keep the projector away from floppy
disks, magnetic cards, magnetic tapes,
prepaid cards, checks, and any other
media that uses magnetic recording.
The projector can corrupt data recorded
on magnetic media.
10

Other
*
Caution
Allowing dust to build up inside the projector by
not cleaning it for long periods creates the risk of
fire and accident, and can cause loss of
projection luminosity. Contact your original
dealer or authorized CASIO service center once
a year about having the interior of the projector
cleaned. Note that you will be charged for
cleaning.
Be sure to follow all applicable local
laws and regulations, and do not
dismantle the projector when
disposing of it.
11
Operating Precautions
About the Light Source Unit
The projector’s light source unit uses a laser and LED.
The life of the light source unit is rated at approximately 20,000 hours. The actual life will depend on
use conditions, the settings configured on the setup menu, and differences between each individual
light source unit.
The light source unit is warranted for the period noted on the warranty certificate or for 6,000 hours,
whichever comes first.
The failure of the light source unit to light or a noticeable drop in light source unit brightness
indicates the end of the light source unit’s life. Contact your original dealer or authorized CASIO
service center for replacement. Note that problems caused by unauthorized projector disassembly
or modification are not covered by the warranty and are not eligible for repair by CASIO.
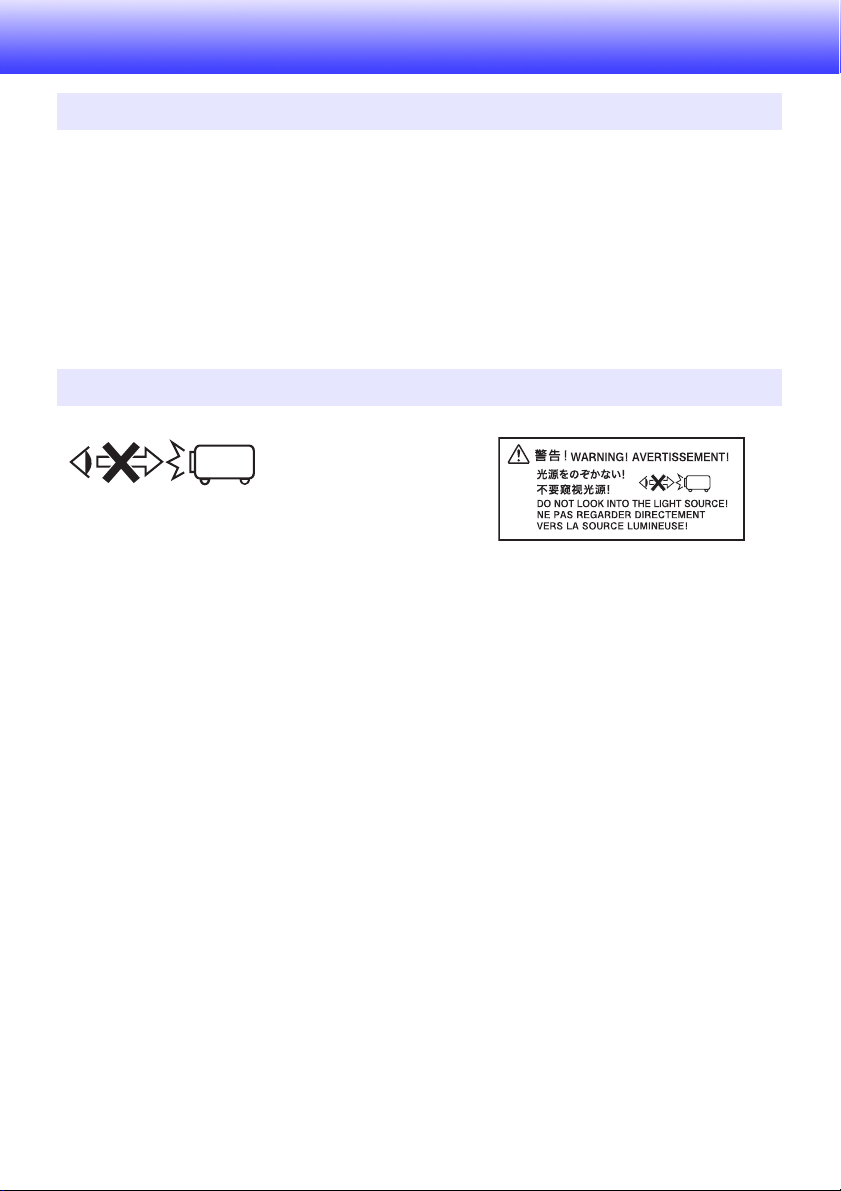
Projector Light Emission
• Never look directly into the lens while the light is on.
Particular care is required when children are present.
12
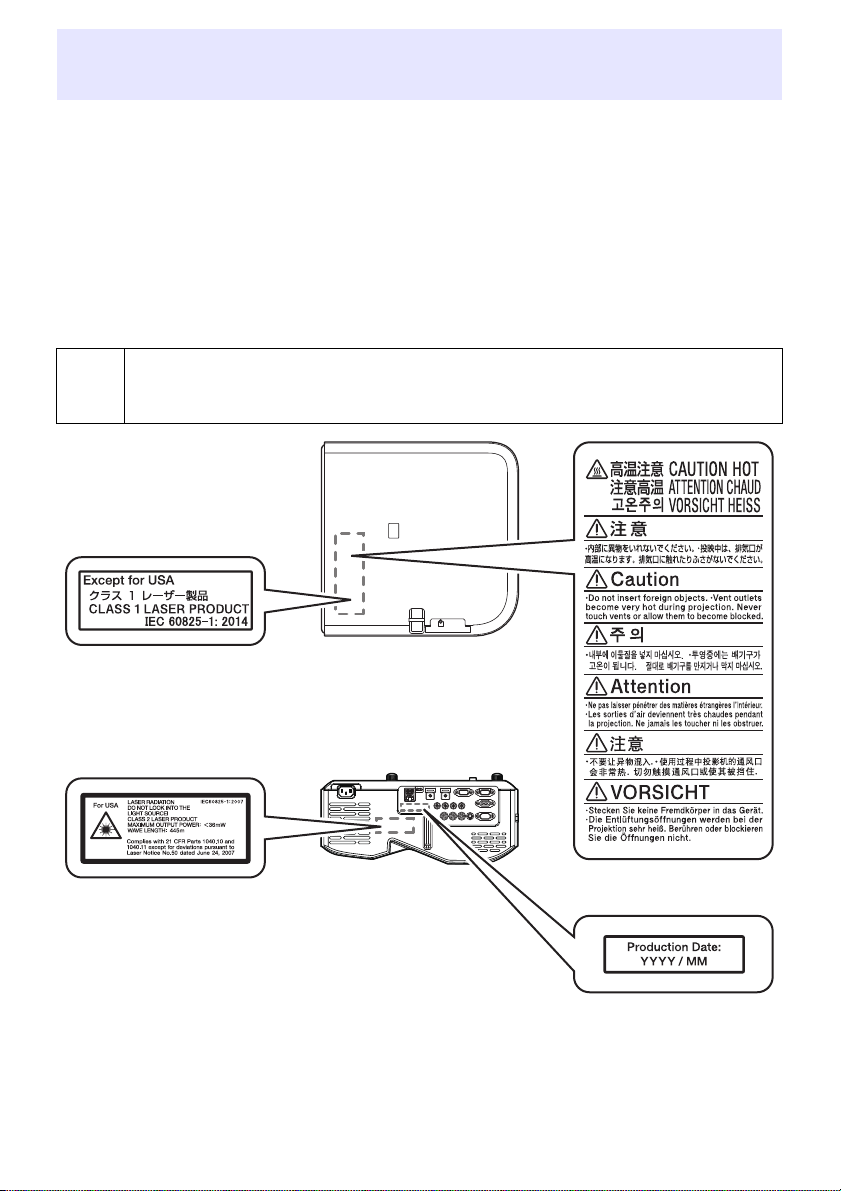
Laser and High Temperature Precautions (See the
Label
Label
Bottom
Rear
Label
label on the projector)
Laser Precautions
Non- U.S. Label : This projector is a Class 1 laser device that conforms to IEC 60825-1: 2014.
U.S. Label
This projector has a built-in laser module. Disassembly or modification is very dangerous and
should never be attempted.
Any operation or adjustment not specifically instructed by the user’s guide creates the risk of
hazardous laser radiation exposure.
Vent Outlet Precautions (Label )
&
: This projector is a Class 2 laser device that conforms to IEC 60825-1: 2007.
Vent outlets become very hot during projection. Never touch vents or allow them to
become blocked.
Do not insert foreign objects.
13

Other Precautions
This projector is made of precision components. Failure to observe the following precautions can
result in inability to correctly save data and malfunction.
Never use or store the projector in the following locations. Doing so creates the
risk of malfunction of and damage to the projector.
Locations subjected to electrostatic charge
Locations subjected to temperature extremes
Locations where there is extreme moisture
Locations subjected to sudden temperature changes
Locations where there is a lot of dust
On a shaky, slanted, or otherwise unstable surface
Locations where there is the danger of getting wet
Locations where there are large amounts of oil smoke or other smoke
Locations where there is the risk of salt damage
Locations where corrosive gas (such as the sulfur gas at hot springs) is generated
Ensure that the remote control signal receiver is not exposed fluorescent light,
sunlight, or other strong light. Strong light can cause malfunction.
Avoid using the projector under the following conditions. Such conditions create
the risk of malfunction of and damage to the projector.
Avoid areas subject to temperature extremes (operating temperature range is 5°C to 35°C (41°F
to 95°F)).
Never place heavy objects on the projector or climb on top of the projector.
Never insert or allow foreign objects to drop into the projector.
Never place a vase or any other container of water on top of the projector.
Whenever setting the projector down or performing any operation that involves
moving or reorienting it, take care that you do not pinch your fingers under the
projector.
Never leave dead batteries inside the remote controller for a long time.
Dead batteries can leak, which leads to malfunction of and damage to the remote controller. Be sure
to replace the batteries at least once every one year, no matter how much you use the remote
controller during that time.
Clean with a soft, dry cloth.
When very dirty, use a soft cloth that has been dampened in a weak solution of water and a mild
neutral detergent. Wring all excess water from the cloth before wiping. Never use thinner, benzine, or
any other volatile agent to clean the projector. Doing so can remove its markings and cause staining of
the case.
Missing Screen Dots
Though this projector is manufactured using the most advanced digital technology available today,
some of the dots on the screen may be missing. This is normal, and does not indicate malfunction.
Never subject the projector to strong impact while it is projecting.
If the projector is accidentally subjected to strong impact, the projection image will momentarily go
blank. The image will reappear after some time, but it may be the wrong color or it may be
accompanied by an error message.
If the projected image is the wrong color, re-select the current input source. If this does not return the
projected image to its proper color, turn projector power off and then back on again.
If the image reappears with an error message, correct the problem in accordance with the indicator
explanations under “Error Indicators and Warning Messages” (page 47).
14

Use a power outlet near the projector. Always use the projector so that the power
cord can be easily unplugged.
The YW-40 Wireless Adapter (included or purchased separately) supports the
2.4GHz band only.
Keystone Correction and Image Quality
Performing keystone correction causes the image to be compressed before it is projected. This can
result distortion of the image or a loss of image quality. If this happens, change orientation of the
projector and/or screen so it conforms as much as possible to the illustration under “Setting Up the
Projector” (page 19).
If image quality is the highest priority, turn off auto keystone correction and position the projector so it
is pointed straight at the screen.
Even if your projector is still within the warranty period, you will be charged for repair if a problem is
due to running the projector non-stop for very long periods (like 24 hours) or if the projector was set
up and used without following the “Setup Precautions” (page 19).
Use under high ambient temperature or in environments subjected to large amounts of dust, oil
smoke, tobacco smoke, or other types of smoke can shorten the replacement cycles and require
more frequent replacement of the optical engine and other components. Note that you are charged
for such replacement. For details about replacement cycles and fees, contact an authorized CASIO
service center.
Condensation
Moving the projector from a cold room to a heated room, turning on a heater in a cold room, and other
similar conditions can cause condensation (fogging) to form on the projector lens and/or inside the
projector, which will make the projected image appear out of focus and can lead to malfunction and
other trouble. If this happens, turn off the projector and wait for a while until the condensation clears
naturally. When it does, you will be able to project images normally.
Power Supply to External Equipment
Turning off projector power also cuts power being supplied to external equipment. Note that power
being supplied is also cut when the projector is turned off due to restarting by its self-check function
or Auto Power Off, due to some error, or for any other reason. Depending on the external equipment
being used, cut off of the power supply may cause data that is being edited to be lost or corrupted.
Make it a habit to frequently save data on external equipment being powered by the projector. Note
that CASIO COMPUTER CO., LTD. shall be held in no way liable for any loss or corruption of data.
Precaution when Handling the Projector after Use
The projector’s exhaust vents and the area around the vents
become very hot during operation, and will still be hot immediately
after turning off the projector. Because of this, you should hold the
projector as shown in the illustration whenever moving it.
15
Getting Ready
Unpacking
As you unpack the projector, check to make sure that all of the items listed below are present.
Projector
Wireless remote controller YT-131 (XJ-UT311WN, XJ-UT351WN)
Wireless remote controller YT-160 (XJ-UT331X, XJ-UT351W)
Test Batteries (AAA-size × 2)
AC Power Cord
Cable cover
“Safety Precautions” Sheet
“Read this first” Sheet
Warranty
Wireless adapter YW-40 (XJ-UT311WN only)
Operation Flow to Projection
This section explains the operational flow up to the point that projection is started.
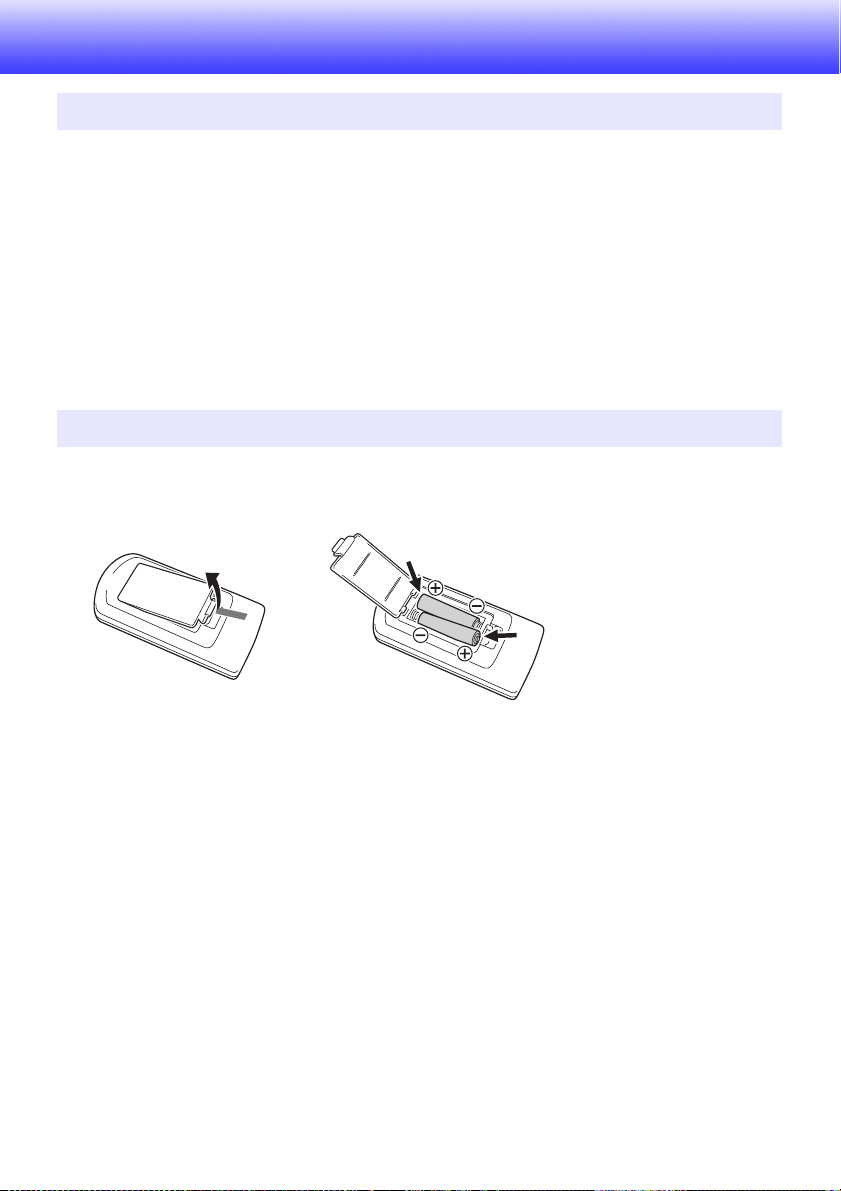
1.
Load the test batteries that come with the projector into the remote controller.
Use only alkaline batteries to power the remote controller.
2.
Place the projector onto a table, desk, or stand that is level and firm, making
sure that you allow enough room around it.
“Safety Precautions” (page 6), “Operating Precautions” (page 12)
“Setting Up the Projector” (page 19), “Setup Precautions” (page 19)
You will need to purchase special hardware to mount this projector on a wall. For details, contact
the retailer where you purchased the projector.
3.
Adjust the vertical angle of the projector.
“To adjust the vertical angle of the projector” (page 19)
4.
Use the supplied power cord to plug the projector into a power outlet.
5.
Connect the projector to an image output device and/or audio output device, and
then turn on each device.
“Connecting with an External Device” (page 20)
16
6.
Note
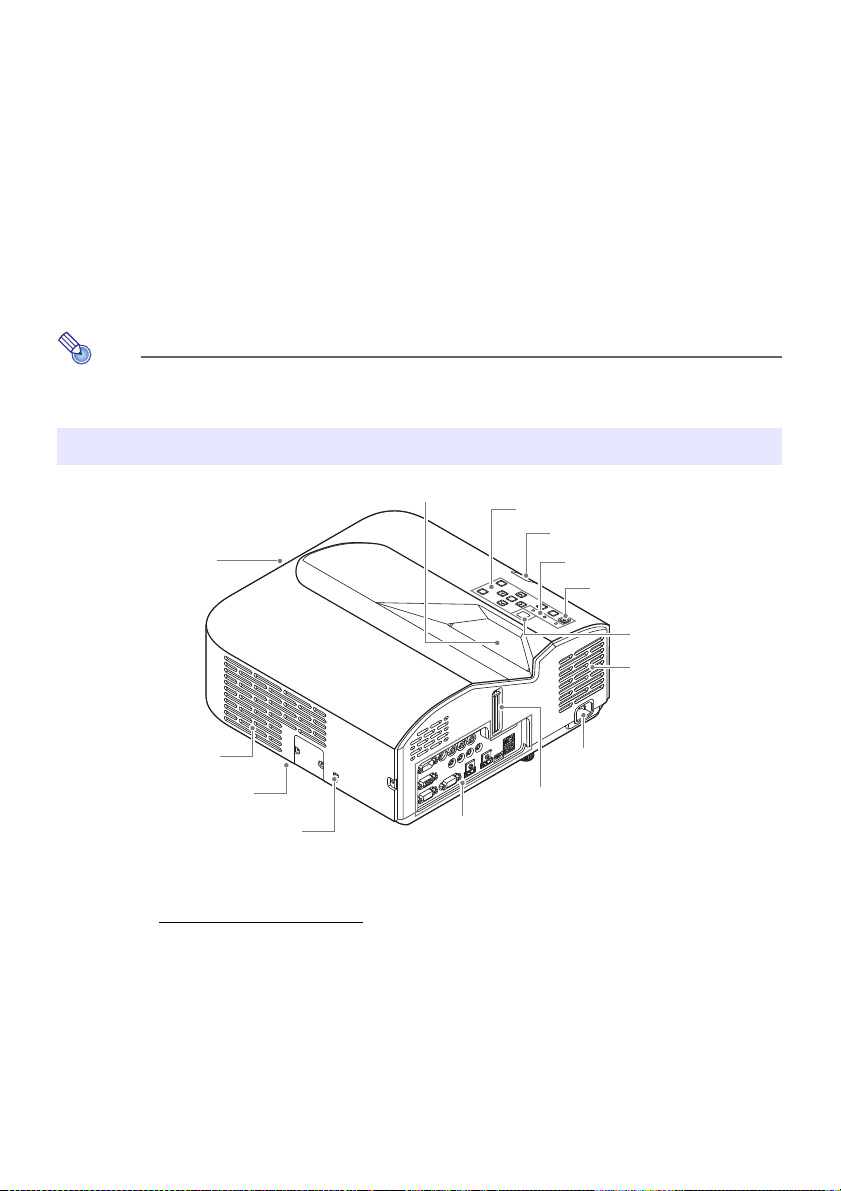
Focus lever
AC Terminal
Remote control signal receiver
Terminals
Brightness sensor
[P] key
Indicators
Control panel
Intake vents
Exhaust vents (left side)
Projection lens
Security bar
Security lock hole*
1
Intake vents
Press the [P] key to turn on the projector.
The first time you turn on the projector, a “Language” window will appear in the center of the
projection screen. Select the language you want.
7.
Use the [INPUT] key to select the input source.
“Select the input source (INPUT)” (page 24)
8.
Use the focus lever to adjust the focus.
“General Guide” (page 17)
9.
Perform keystone correction and adjust brightness as required.
“Use manual keystone correction (/) (KEYSTONE)” (page 24), “Light Control” (page 27).
10.
After you finish projecting, press the [P] key to turn off the projector.
This product is also designed for IT power distribution system with phase-to-phase voltage
230V.
General Guide
*1 The anti-theft lock hole is provided for connection of an anti-theft chain. Visit the Kensington Lock
Website at http://www.kensington.com/
for more information.
17

Control Panel and Indicators
TEMP indicator
LIGHT indicator
[ENTER] key
POWER/STANDBY indicator
[MENU] key
[ON/Stand-byP] key
[ESC] key
[INPUT] key
Cursor keys (q/w/U/I)
[AUTO] key
Brightness sensor
Terminals
LAN terminal (Network models only)
USB-A (5V/2A) port (XJ-UT311WN, XJ-UT351WN) or
DC (5V/2A) port (XJ-UT331X, XJ-UT351W)
LOGO port
HDMI 2 terminal (XJ-UT351W and XJ-UT351WN only)
HDMI 1 terminal
AUDIO IN 1 terminal
AUDIO IN 2 terminal
MONITOR OUT terminal
18
COMPUTER IN 1 terminal
COMPUTER IN 2 terminal
MIC terminal
AUDIO OUT terminal
AUDIO IN R L terminals
VIDEO terminal
S-VIDEO terminal
SERIAL port
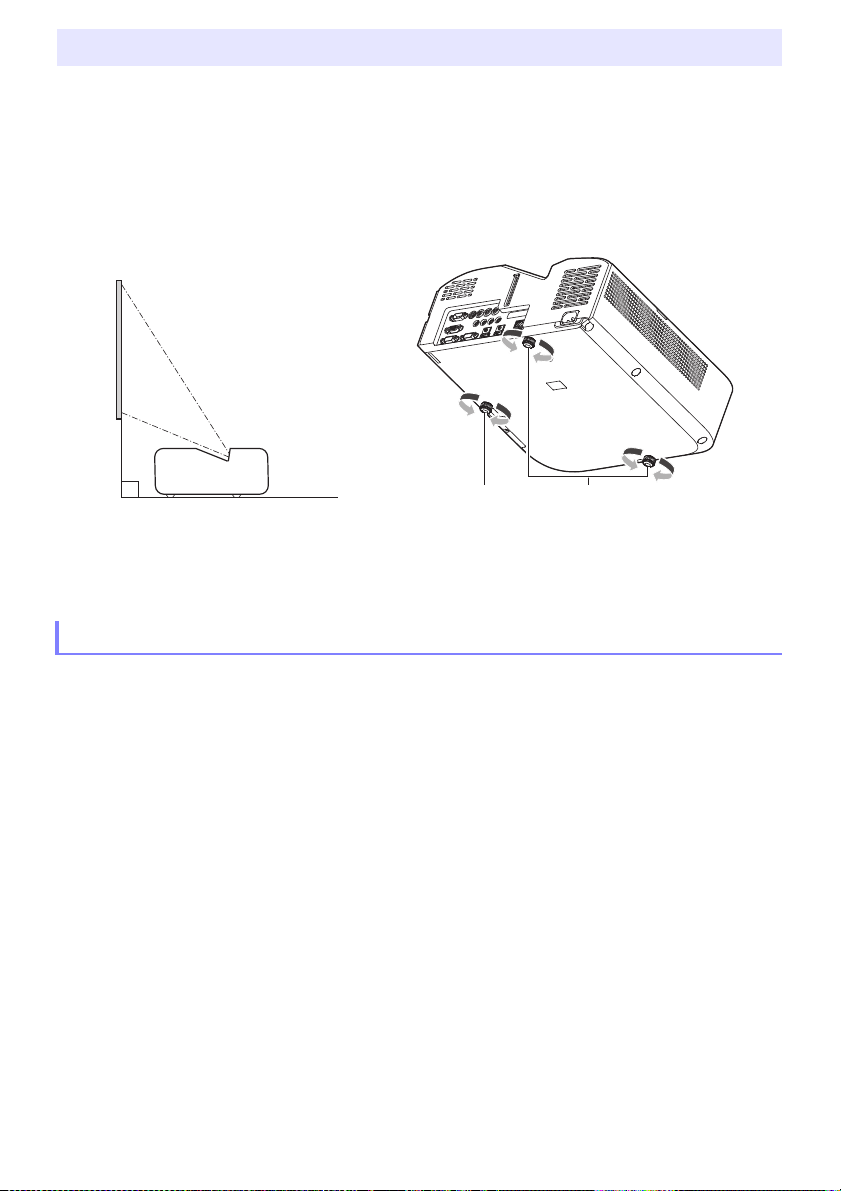
Setting Up the Projector
Screen
21
Locate the projector on a desk, table, or
stand that is firm and level. Make sure
that you allow sufficient space around
the sides and back of the projector for
proper ventilation. The illustrations
below show how the projector should
be oriented relative to the screen for
optimum projection.
To adjust the vertical angle of the projector
Rotate the single foot on the bottom front of the
projector to fine adjust the projector’s vertical angle.
Rotate the two feet on the bottom back of the projector
to fine adjust the projector’s horizontal angle.
Test Pattern
You can project a test pattern when setting up the projector to help determine the proper image size,
projector orientation, etc. For details, see “Test Pattern Projection” on page 28.
Setup Precautions
Use a conveniently located power outlet that you can reach easily when you need to unplug the
projector.
Maintain a distance of at least 6 cm (2.4 inches) between the front of the projector (from which light
is being emitted) and the projection surface (screen). Maintain a distance of at least 30 cm (11.8
inches) between surfaces and the other sides of the projector. There should be no other objects
within the above distances from the projector. Particular care is required to keep objects away from
projector air intake and exhaust openings.
Airflow from air conditioning equipment can blow the heat being exhausted from the area around
the projector’s lens in a way that causes heat ripples to appear in the projected image. If this
happens, adjust the airflow of the air conditioning equipment or move the projector.
19

Connecting with an External Device
Before starting projection, you first need to connect a computer, video device, and/or other external
devices to the projector.
For information about locations of the terminals that correspond to the numbers in the “Projector
Terminal” column of the table, see “Terminals” (page 18).
When a cable is not provided with the projector for a connection, use a commercially available
cable. When selecting a cable, make sure that the shapes of its connectors match the shapes of the
projector and other equipment terminals.
Connecting to an Image Output Device
You can have multiple image output devices connected to the projector at the same time. Use the
projector’s [INPUT] key to select the device whose image you want to project.
Other Device / Terminal Type
Computer / RGB Out Terminal
Video Device / Component Video Out Terminal
Video Device / S-Video Out Terminal
Video Device / Composite Video Out Terminal
Computer or Video Device / HDMI Out Terminal
USB flash drive or other external USB storage
1
device*
Graphing Calculator / USB Port*
YW-40 Wireless Adapter (available separately or
included)*
4
3
Projector
Terminal
,
,
,
Projector Terminal Shape Cable
15-pin Mini D-Sub female RGB
15-pin Mini D-Sub female Component video
4-pin Mini Din female S-terminal
RCA pin jack Pin plug
HDMI Type A female High Speed HDMI
USB Type A female *
USB Type A female USB
USB Type A female
2
–
*1 Network models only. For information about operation following connection, see “Projecting from
USB Input (Network Models Only)” (page 39).
*2 See “Connecting USB Memory Devices to the Projector” (page 40).
*3 Network models only. For information about operation following connection, see “Projecting the
Screen Image of a Graphing Calculator” (page 45).
*4 Network models only. For information about operation following connection, see the separate
“Network Function Guide”.
20
Loading...