


1625
- 2 -
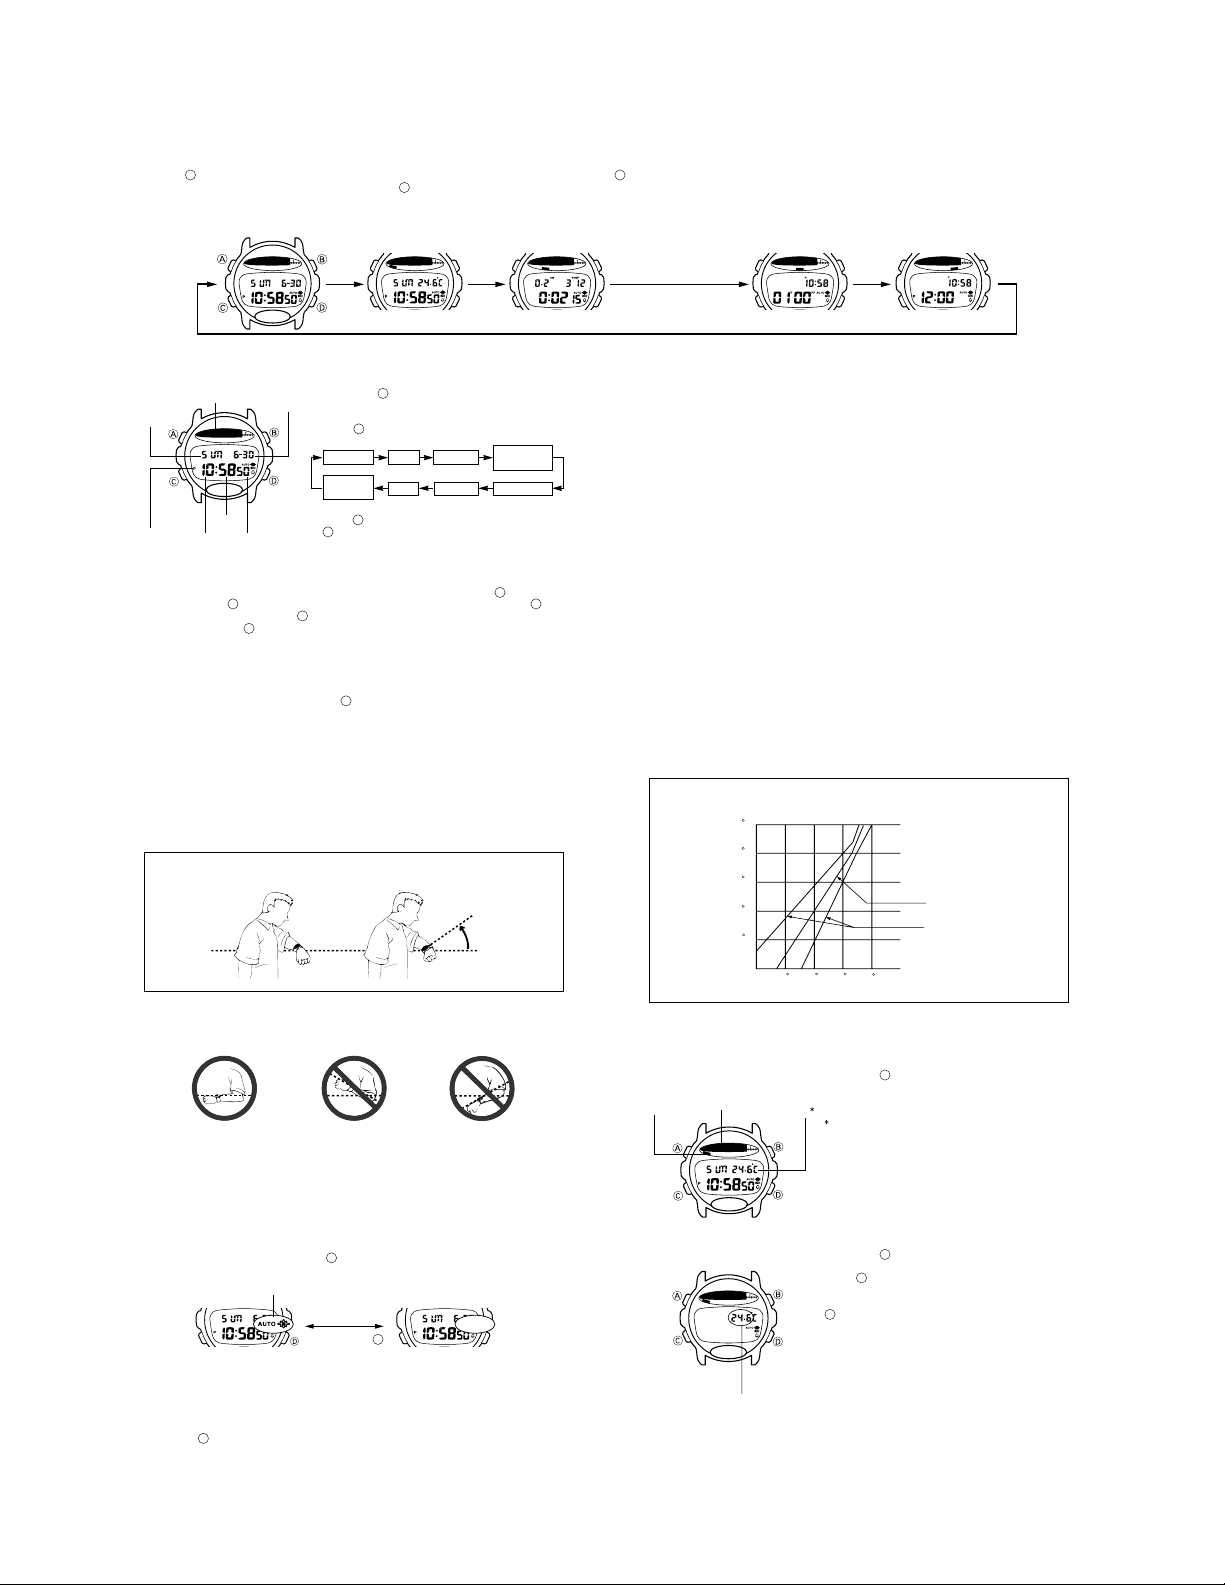
2. OPERATION CHART : MODULE QW-1625
GENERAL GUIDE
• Press to change from mode to mode. After you perform an operation in any mode, pressing returns to the Timekeeping Mode.
• In any mode (except when making settings) press to illuminate the display for about two seconds.
Thermometer Mode Alarm ModeTimekeeping Mode Countdown
Alarm Mode
Trekking
Counter Mode
TIMEKEEPING MODE
To set the time and date
1. Hold down while in the Timekeeping Mode
until the seconds digits flash on the display
because they are selected.
2. Press to change the selection in the following
sequence.
3. While the seconds digits are selected (flashing),
press to reset the seconds to 00. If you press
while the seconds count is in the range of 30
to 59, the seconds are reset to 00 and 1 is added
to the minutes. If the seconds count is in the
range of 00 to 29, the minutes count is
unchanged.
Month
and Day
Minutes
PM
indicator
Day of
week
Seconds
Day Month Year
Hour Minutes
12/24-Hour
Format
Day of
week
Hour
Seconds
Temperature
graph
4.While any other digits (beside seconds) are selected (flashing), press to increase
the number or to decrease it. While the day of the week is selected, press to
advance to the next day and to move back. While the 12/24-hour format setting
is selected, press to toggle it between 12 and 24.
• Except for when adjusting the seconds or setting the 12/24-hour format, holding
down a button changes the current selection at high speed.
• When the 12-hour format is selected, the indicator A appears on the display to
indicate “A.M.” times or indicator P appears on the display to indicate “P.M.” times.
Selecting the 24-hour format causes the indicator 24 to appear on the display.
5.After you set the time and date, press to return to the Timekeeping Mode.
• The date can be set within the range of January 1, 1995 to December 31, 2039.
• If you do not operate any button for a few minutes while a selection is flashing, the
flashing stops and the watch goes back to the Timekeeping Mode automatically.
ABOUT THE BACKLIGHT
About the Auto Backlight Function
When the auto backlight function is turned on, the backlight automatically turns on for
two seconds under the conditions described below. Avoid wearing the watch on the
inside of your wrist. Doing so causes the auto backlight to operate when not needed,
which shortens battery life.
Moving the watch to a position that is parallel to the ground and then tilting it
towards you approximately 40 degrees causes the backlight to illuminate.
Parallel to
ground
• The backlight may not illuminate if the face of the watch is more than 15 degrees off
parallel to the left or right. Make sure that the back of your hand is parallel to the
ground.
• Static electricity or magnetic force can interfere with proper operation of the auto
backlight function. If the auto backlight does not illuminate, try moving the watch
back to the starting position (parallel with the ground) and then tilt it back toward you
again. If this does not work, drop your arm all the way down so it hangs at your side,
and then bring it back up again.
• Under certain conditions the backlight may not light until about one second or less
after turn the face of the watch towards you. This does not necessarily indicate
malfunction of the backlight.
Parallel to ground
More than 15 degrees
too high
More than 15 degrees
too low
To switch the auto backlight function on and off
In the Timekeeping Mode, hold down for one or two seconds to turn the auto
backlight function on and off.
• The auto backlight indicator is shown on the display in all modes while the auto
backlight function is on.
• In order to protect against running down the battery, the auto backlight function is
automatically turned off approximately three hours after you turn it on. Repeat the
above procedure to turn the auto backlight function back on if you want.
• Pressing at any time illuminates the display for about two seconds, regardless of
the auto backlight's on/off setting.
Holding down
OFFON
Auto backlight indicator
Caution
• The backlight of this watch employs an electro-luminescent (EL) light, which loses its
illuminating power after very long term use.
• Frequent use of the backligfht shortens the battery life.
• The watch emits an audible sound whenever the display is illuminated. This is because the
EL light vibrates slightly when lit. It does not indicate malfunction of the watch.
Warning!
• Never try to read your watch when mountain climbing or hiking in areas that are dark
or in areas with poor footing. Doing so is dangerous and can result in serious
personal injury.
• Never try to read your watch when running on a roadside or in any other location
where there might be vehicular or pedestrian traffic. Doing so is dangerous and can
result in serious personal injury.
• Never try to read your watch when riding on a bicycle or when operating a motorcycle
or any other motor vehicle. Doing so is dangerous and can result in a traffic accident
and serious personal injury.
• When you are wearing the watch, make sure that its auto backlight function is turned
off before riding on a bicycle or operating a motorcycle or any other motor vehicle.
Sudden and unintended operation of the auto backlight can create a distraction,
which can result in a traffic accident and serious personal injury.
THERMOMETER MODE
A built-in temperature sensor measures temperature and shows the measured value
on the display. The readout from the temperature sensor can also be switched
between Celsius (˚C) and Fahrenheit (˚F). The thermometer can be calibrated to
correct for errors.
Important!
Temperature measurements are affected by your body temperature (while you are
wearing the watch), direct sunlight, and moisture. To achieve a more accurate
temperature measurement, remove the watch from your wrist, place it in a well
ventilated location out of direct sunlight, and wipe off all moisture from the case. It
takes approximately 20 to 30 minutes for the case of the watch to reach the actual
surrounding temperature.
Accurate temperature measurements cannot be achieved while you are wearing the
watch. The following graph illustrated affects of body temperature on actual
temperature.
Temperature
Temperature measured when watch is worn on wrist
40 C
30
C
20
C
10 C
0
C
10
C20C30C
40 C
Approximate
Differences caused by
individual body
temperture or clothing
About Temperature Measurement
• A temperature graph which is automatically updated every five minutes, is shown on
the display in all modes (except when making settings). Measured temperature
values can be viewed in the Thermometer Mode only.
• Pressing while in the Thermometer Mode
performs temperature measurement and causes
the measured value to appear on the display.
The display shows “– – . – ˚C (or ˚F)” if a
measured value falls outside the range of –20˚C
to 60˚C (–4˚F to 140˚F). The normal display will
return as soon as the temperature returns within
the allowable range.
Current
temperature
Mode
indicator
Temperature
graph
Switching between Celsius and Fahrenheit
1.Hold down while in the Thermometer Mode
and the current temperature digits flash.
2.Press to select either Celsius “˚C” or
Fahrenheit “˚F”.
3.After you select the Celsius or Fahrenheit, press
to return to the Temperature Display.
• If you do not operate any button for a few minutes
while a selection is flashing, the flashing stops and
the watch goes back to the Thermometer Mode
automatically.
Flashes
C
C
C C
D
D
D
D
D
D
D
D
B
B
B
B
A
A
A
A
40˚
 Loading...