


USER’S GUIDE 2506
About This Manual
•Button operations are indicated using the letters shown in the illustration.
• Each section of this manual provides you with the information you need to perform operations in each mode. Further details and technical information can be found in the “Reference” section.
General Guide
•Press Cto change from mode to mode. After you perform an operation in any mode, pressing Creturns to the Timekeeping Mode.
•In any mode, press L to illuminate the display for about two seconds.
Alarm Mode
Timekeeping Mode
Press C.
▲
▲
Timekeeping
Use the Timekeeping Mode to set and view the current time and date. You can also display the Last Signal and World Time screens.
Last Signal |
Timekeeping |
|
World Time |
|
|
Receive indicator |
|
Timekeeping Mode time |
|
Receive date |
Day of week |
Month – Day |
||
|
City code |
|||
|
|
|||
|
|
|
|
Hold down B. |
Press D. |
|
|
|
|
▲ |
▲ |
|
|
|
|
|
|
|
▲ |
|
Hour : Minutes |
|
Release |
|
Receive time |
|
Current time in the |
||
|
PM indicator |
Seconds |
selected city code |
|
•The Last Signal screen shows the time and date of the last successful time calibration signal reception.
•The World Time screen shows the data you were viewing when you last exited the World Time Mode.
Current Time Setting
Normally, you do not need to do anything to set the current time as long as you are within an area in West Europe where the watch can pick up the time calibration signal. You can also set the current time manually when you are outside the range of the signal.
•Before using the watch after purchasing it, use the procedure under “Selecting Your Home City Code” to specify your home city, and then use the procedure under “To perform manual time calibration signal reception.”
•Note that after you set your Home City code, you must also turn on the watch’s time calibration signal receiver if you want to enable auto time calibration. See “About Auto Receive” for more information.
•See “Setting the Time and Date Manually” for information about manual settings.
Setting the Time and Date Manually
The times displayed in the Timekeeping Mode and World Time Mode are linked. Even if you plan to use the watch without enabling auto time calibration, be sure to select a Home City code (the city code whose time and date you are setting), before you set the time and date.
To set the current time and date manually
12-hour format indicator |
1. In the Timekeeping Mode, hold down Auntil the |
||||
current Auto Receive On/Off setting starts to flash, |
|||||
City code |
|
||||
|
which indicates the setting screen. |
||||
|
|
|
|
2. Press Cto move the flashing in the sequence shown |
|
|
|
|
|
below to select other settings. |
|
|
|
|
|
|
|
|
|
Auto |
|
|
|
DST |
|
|
|
12/24-Hour |
|
|
|
City Code |
|
|
|
Seconds |
|
|
|
|
Receive |
|
|
|
|
|
|
|
Format |
|
|
|
|
|
|
|
|
|
|
|
|
|
|
|
|
|
|
|
|
|
|
|
|
|
|
|
|
|
|
|
|
|
Day |
|
|
|
Month |
|
|
|
Year |
|
|
|
Minutes |
|
|
|
Hour |
|
|
|
|
|
|
|
|
|
|
|
|
|
|
|
|
|
|
|||||
|
|
|
|
|
|
|
|
|
|
|
|
|
|
|
|
|
|
|
|
|
3.When the setting you want to change is flashing, use Band/or Dto change it as described below.
Setting |
Button Operations |
|
Auto Receive |
Press Dto toggle auto receive on and off. |
|
DST |
Press Dto toggle between Daylight Saving TIme (ON) and |
|
|
standard time (OFF). |
|
12/24-Hour format |
Press Dto toggle between 12-hour (12H) and 24-hour (24H) |
|
|
timekeeping. |
|
City Code |
Use D (+) and B(–) to change the setting. |
|
Seconds |
Press Dto reset to 00. |
|
Hour, Minutes, |
Use D (+) and B (–) to change the setting. |
|
Year, Month, Day |
|
|
•Auto Receive setting is used for time calibration signal reception only. See “About Auto Receive” for details.
•See “City Code Table” for a complete list of available codes.
•Daylight Saving Time (DST) advances the time setting by one hour from Standard Time. Remember that no all countries or even local areas use Daylight Saving Time.
4.Press Ato exit the setting screen.
Day Counter Mode |
World Time Mode |
▲ |
▲ |
|
▲ |
Stopwatch Mode |
Telememo Mode |
|
▲ |
Selecting Your Home City Code
You can select a city code for your Home City (the city where you normally use the watch). This data can be changed any time you move to another geographic area.
• See “City Code Table” for a complete list of available codes.
To select your Home City code
City code |
1. In the Timekeeping Mode, hold down Auntil the |
||
current Auto Receive On/Off setting starts to flash, |
|||
|
|
||
|
|
which indicates the setting screen. |
|
|
|
||
2.Press Cthree times to move the flashing to the City Code setting.
3.Use D (+) and B(–) to change it.
4.Press Ato exit the setting screen.
Time Calibration Signal Reception
This watch is designed to pick up a time calibration signal transmitted from Mainflingen, Germany and update its time setting in accordance with the signal. There are two different methods you can use to receive the signal: Auto Receive and Manual Receive. With Auto Receive, the watch automatically receives the calibration signal three times each day and makes appropriate adjustments. With Manual Receive, you perform a specific button operation to receive the calibration signal.
Note
•If you are using the time calibration signal to set the time for this watch, be sure to correctly set your home city. Otherwise, there is the chance that the watch will not set the correct time. See the “To select your Home City code” for details.
•This watch automatically switches between DST and standard time while BER is selected as the home city code. For any other home city code, you must perform the procedure under “To set the current time and date manually” to switch between DST and standard time.
•Time calibration reception is limited to specific geographic areas in West Europe.
•The current time setting in accordance with the time calibration signal takes priority over any time settings you make.
•The watch is designed to automatically update the date and day of the week for the period January 1, 2000 to December 31, 2039. Setting of the date by the time calibration signal cannot be performed starting from January 1, 2040.
•This watch can receive signals that differentiate between leap years and non-leap years.
•Auto Receive is turned on when the watch is shipped from the factory.
•See the information under “Time Calibration Signal Reception Precautions”
if you experience problems with time calibration signal reception.
To perform manual time calibration signal reception
1.Place the watch on a stable surface to its top (12 o’clock side) is facing in the general direction of Frankfurt, Germany.
•This puts the watch in the optimum position for time calibration signal reception.
2.In the Timekeeping Mode, hold down Dfor about two seconds, until the watch beeps.
• At this time, the 


 indicator on the watch’s display should scroll from left to right, which indicates that signal reception has started.
•Time calibration signal reception takes from four to 11 minutes. Take care that you do not move the watch during this time.
•After signal reception is complete, the display of the watch changes to the Last Signal screen, which shows the new signal receive date and time.
Note
•To interrupt a receive operation and return to the Timekeeping screen, press D.
•If the receive operation is unsuccessful, the message “ERR” appears on the Last Signal screen for about one or two minutes. After that, the watch returns to the Timekeeping screen.
•You can also change from the Last Signal screen to the Timekeeping screen by pressing D.
About the Receive Indicator
The receive indicator shows the strength of the calibration signal being received. For best reception, be sure to keep the watch in a location where signal strength is strongest.
Weak 
 Strong
•Even in an area where signal strength is strong, it takes about 10 seconds for signal reception to stabilize enough for the receive indicator to indicate signal strength.
1
USER’S GUIDE 2506
•Use the receive indicator as a guide for checking signal strength and for finding the best location for the watch during signal receive operations.
•The receive indicator remains on the display in all modes following reception of the time calibration signal and calibration of the watch’s time setting. The receive indicator does not appear if signal reception was unsuccessful or after manual adjustment of the current time setting.
About Auto Receive
When auto receive is turned on, the watch automatically starts to receive the time calibration signal when the digital time in the Timekeeping Mode reaches 2:00 AM, 4:00 AM, and 6:00 AM each day (calibration times).
Note
•The Auto Receive operation is performed only if the watch is in the Timekeeping Mode or World Time Mode when one of the calibration times is reached. It is not performed if the calibration time is reached while you are making settings (while settings are flashing on the display).
•Auto receipt of the calibration signal is designed to be performed early in the morning, while you sleep (provided that the digital time is set correctly). Before going to bed for the night, remove the watch from your wrist, and put it in a location where it can easily receive the signal.
• The receive indicator ( ) indicates that one, two, or all three of the last calibration time reception attempts were successful.
•When auto receive is turned on, the watch receives the calibration signal for four to 11 minutes each day when the digital time reaches 2:00 AM, 4:00 AM, and 6:00 AM. Do not operate any of the watch’s buttons within 15 minutes prior to or following the calibration times. Doing so can interfere with correct calibration.
•Remember that reception of the calibration signal depends on the time shown on the digital display. The receive operation will be performed whenever the digital display shows 2:00 AM, 4:00 AM, and 6:00 AM, regardless of whether or not the displayed time is actually the correct time.
•When two or three receptions are successful, the watch uses the data of the last reception for calibration. When only one reception is successful, the watch uses the data of the successful reception.
To turn auto receive on and off
1. In the Timekeeping Mode, hold down Auntil the current Auto Receive On/Off setting starts to flash,
which indicates the setting screen.
2. Press Dto toggle Auto Receive on (ON) and off
(OFF).
3. Press Ato exit the setting screen.
Alarms
Alarm time
Alarm number
Text
Remaining time (Hours : Minutes Seconds)
You can set three independent Daily Alarms, and even input text that appears on the display to remind you of the purpose of each alarm. When an alarm is turned on, the alarm tone sounds when the alarm time is reached. You can also turn on an Hourly Time Signal that causes the watch to beep twice every hour on the hour.
•The remaining time shows the amount of time from the current time (Timekeeping Mode time) until the alarm time whose screen is on the display.
•The alarm number (“AL1” though “AL3”) indicates an alarm screen. “SIG” appears in place of the alarm number when the Hourly Time Signal screen is shown.
•All of the operations in this section are performed in the Alarm Mode, which you enter by pressing C.
To view Alarm Mode screen
In the Alarm Mode, use B and Dto cycle through the alarm screens as shown below.
Press D. |
|
|
|
AL1 |
AL2 |
AL3 |
SIG |
Press B. |
|
|
|
•Displaying an alarm time shows any text assigned to it for about two seconds (or a blank screen if no text is assigned), followed by the remaining time screen.
•Your watch comes preset with the text data “LUNCH” and an alarm time of 12:00PM (noon) for alarm AL1. You can use this setting as it is or change it to something else.
To set an alarm
1.In the Alarm Mode, use Band Dto select the alarm whose time you want to set.
2. Hold down Auntil the flashing cursor appears on the display, which indicates the setting screen.
• This automatically turns on the alarm.
•Holding down Lfor about two seconds at this time sets an alarm time of 12:00AM, without assigning any text to the alarm.
Cursor |
3. Press Cto move the flashing in the sequence shown |
||||||||
|
|
below to select other settings. |
|||||||
|
|
|
|
|
|
|
|
|
|
|
Text |
|
|
|
Hour |
|
|
Minutes |
|
|
|
|
|
||||||
|
|
|
|
|
|
|
|
|
|
•There are eight spaces in the text, so you have to press Ceight times to move to the Hour setting.
4.When the setting you want to change is selected, use B and Dto change it.
•Selecting the text causes the text input cursor to appear.
•When inputting text, use Band Dto cycle through characters at the current cursor location, and Cto move the cursor to the right. See “Inputting Text”.
•While the hour or minute setting is flashing, use D(+) and B (–) to change it.
•When setting the alarm time using the 12-hour format, take care to set the time correctly as a.m. (no indicator) or p.m. (P indicator).
5.Press A to exit the setting screen.
Note
• Use the above procedure to edit alarm settings, too.
Alarm Operation
The alarm sounds at the preset time for about 20 seconds, or until you stop it by pressing any button.
•Alarms and the Hourly Time Signal sound in all modes. To view text assigned to alarms and the remaining time, however, you must enter the Alarm Mode.
To test the alarm
In the Alarm Mode, hold down Dto sound the alarm.
To turn an alarm and the Hourly Time Signal on and off
1.In the Alarm Mode, use Band Dto select an alarm or the Hourly Time Signal.
2.When the alarm or the Hourly Time Signal you want to is selected, press A to turn it on and off.
Note
•The on/off status of an alarm is indicated on the corresponding alarm screen (AL1
through AL3). The symbol 
 indicates an alarm is turned on, while absence of the

 symbol indicates the alarm is turned off.
•The on/off status of the Hourly Time Signal is indicated on the SIG screen. The symbol  along with the message “ON” indicates the Hourly Time Signal is turned on, while the message “OFF” without the
  symbol indicates it is turned off.
•The alarm on indicator and the Hourly Time Signal on indicator are shown on the display in all modes while these functions are turned on.
•If any alarm is on, the alarm on indicator is shown on the display in all modes.
Day Counter
The Day Counter lets you count the number of days from the Timekeeping Mode’s current date to a specific target date.
•There are five Day Counter records, each of which can be set with its own text and target date (year, month, day).
•All of the operations in this section are performed in the Day Counter Mode, which you enter by pressing C.
To recall Day Counter records
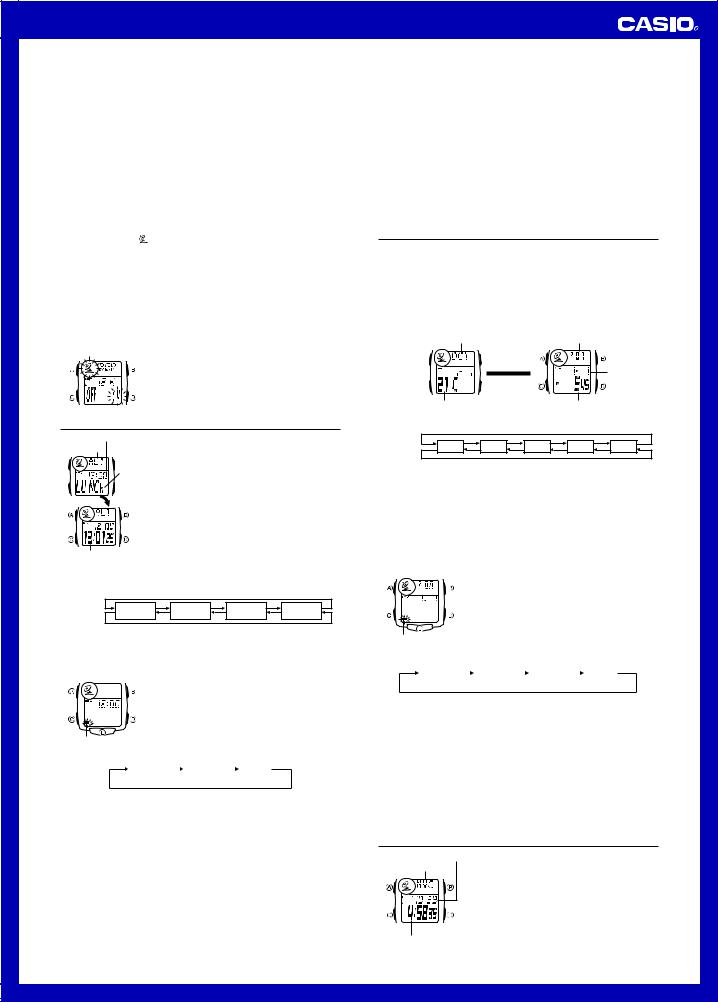
Whenever you enter the Day Counter Mode, the Day Counter Number screen appears for about two seconds, followed by the corresponding Target Date screen.
Day Counter Number |
Target Date |
Day counter number |
Target year |
▲ |
Target |
|
Month – Day |
Text |
Day counter |
• In the Day Counter Mode, use B and Dto cycle through the Day Counter number |
||||
screens as shown below. |
|
|
|
|
Press D. |
|
|
|
|
DC1 |
DC2 |
DC3 |
DC4 |
DC5 |
Press B. |
|
|
|
|
• A Day Counter Number screen remains on the display for about two seconds, after |
||||
which it is replaced by the corresponding Target Date screen. Pressing A while a |
||||
Target Date screen is on the display switches to the corresponding Day Counter |
||||
Number screen for about two seconds. |
|
|
|
|
• The day counter value has a plus sign (+) in front of it when the corresponding target |
||||
date comes after the current date, or a minus sign (–) in front of it when the target |
||||
date comes before the current date. |
|
|
|
|
• Your watch comes preset with the following Day Counter text settings. You can use |
||||
these as they are or change them to something else, if you want. |
|
|||
DC1: 21C (21ST century) |
|
|
|
|
DC2: PAYDAY |
|
|
|
|
DC3: BIRTHDAY |
|
|
|
|
To make Day Counter record settings
1.In the Day Counter Mode, use Band Dto scroll through the Day Counter Number screens until the one you want is on the display.
2.Hold down Auntil the flashing cursor appears on the display, which indicates the setting screen.
•Holding down Lfor about two seconds at this time clears the text (if there is any already input) and sets the current Timekeeping Mode date as the target
Cursor |
date. |
3.Press Cto move the flashing in the sequence shown below to select other settings.
Text |
|
|
Year |
|
|
Month |
|
|
Day |
|
|
|
|
|
|
|
|
|
|
•There are eight spaces in the text, so you have to press Ceight times to move to the Year setting.
•When the Year setting is selected, the cursor changes for a four-digit target year. Though the setting screen shows four digits, other screens show only the last (rightmost) two digits.
4.When the setting you want to change is selected, use Band Dto change it.
•Selecting the text causes the text input cursor to appear.
•When inputting text, use B and Dto cycle through characters at the current cursor location, and Cto move the cursor to the right. See “Inputting Text”.
•While the year, month, or day setting is flashing, use D(+) and B(–) to change the setting.
•You can set a target date in the range of January 1, 1940 to December 31, 2039.
5.Press Ato exit the setting screen.
Note
• Use the above procedure to edit Day Counter records, too.
World Time
Timekeeping Mode time
City code
Current time in the selected city code
World Time shows the current time in 28 cities (29 time zones) around the world.
•For full information on city codes, see the “City Code Table”.
•All of the operations in this section are performed in the World Time Mode, which you enter by pressing C.
To view the time in another city code
While in the World Time Mode, press Dto scroll forward through the city codes (time zones) and Bto scroll back.
•If the current time shown for a city is wrong, check your Timekeeping Mode time and Home City settings and make the necessary changes.
2
 Loading...