


33CS450-01

OWNER’S
OWNER’S
MANUAL
MANUAL
7-DAY
7-DAY
PROGRAMMABLE
PROGRAMMABLE
COMMERCIALCOMMERCIAL
THERMOSTATTHERMOSTAT
33CS450-0133CS450-01
P/N P/N
DIGITAL
DIGITAL
THERMOSTAT
THERMOSTAT
HEAT
COOL
3 Configurable Outputs
3 Configurable Outputs
Control up to 3 Heat &
Control up to 3 Heat &
2 Cool Stages
2 Cool Stages
Adjustable 2nd & 3rd Stage
Timers & Deadbands
Backlit Display & Button
Legends
Aux Heat Indicator
Dry Contact Equipped
Outdoor Sensor Ready with
High/Low Readouts for the Day
Set Point Limiting
Economizer Control
Preoccupancy Fan Purge
Use with most Air Conditioning & Heating Systems including: 1 or 2 Stage
Electric Cooling & 3 Stage Gas Heating, Heat Pump, Electric or Hydronic Heat.
HEAT
PUMP
&
Accepts the
Accepts the
OPTIONAL
OPTIONAL
HUMIDITY MODULE
HUMIDITY MODULE
Carrier Corporation 04/06
Accepts EZ Programmer
Remote Averaging
Programmable Output
Light Activation Equipped
Accepts Optional Humidity Module:
Controls Humidification,
Dehumidification and Reheat
Accepts Optional IR Remote Control
I2:00
Su
AUTO
Pm
74
COOL
HEAT
72
Carrier
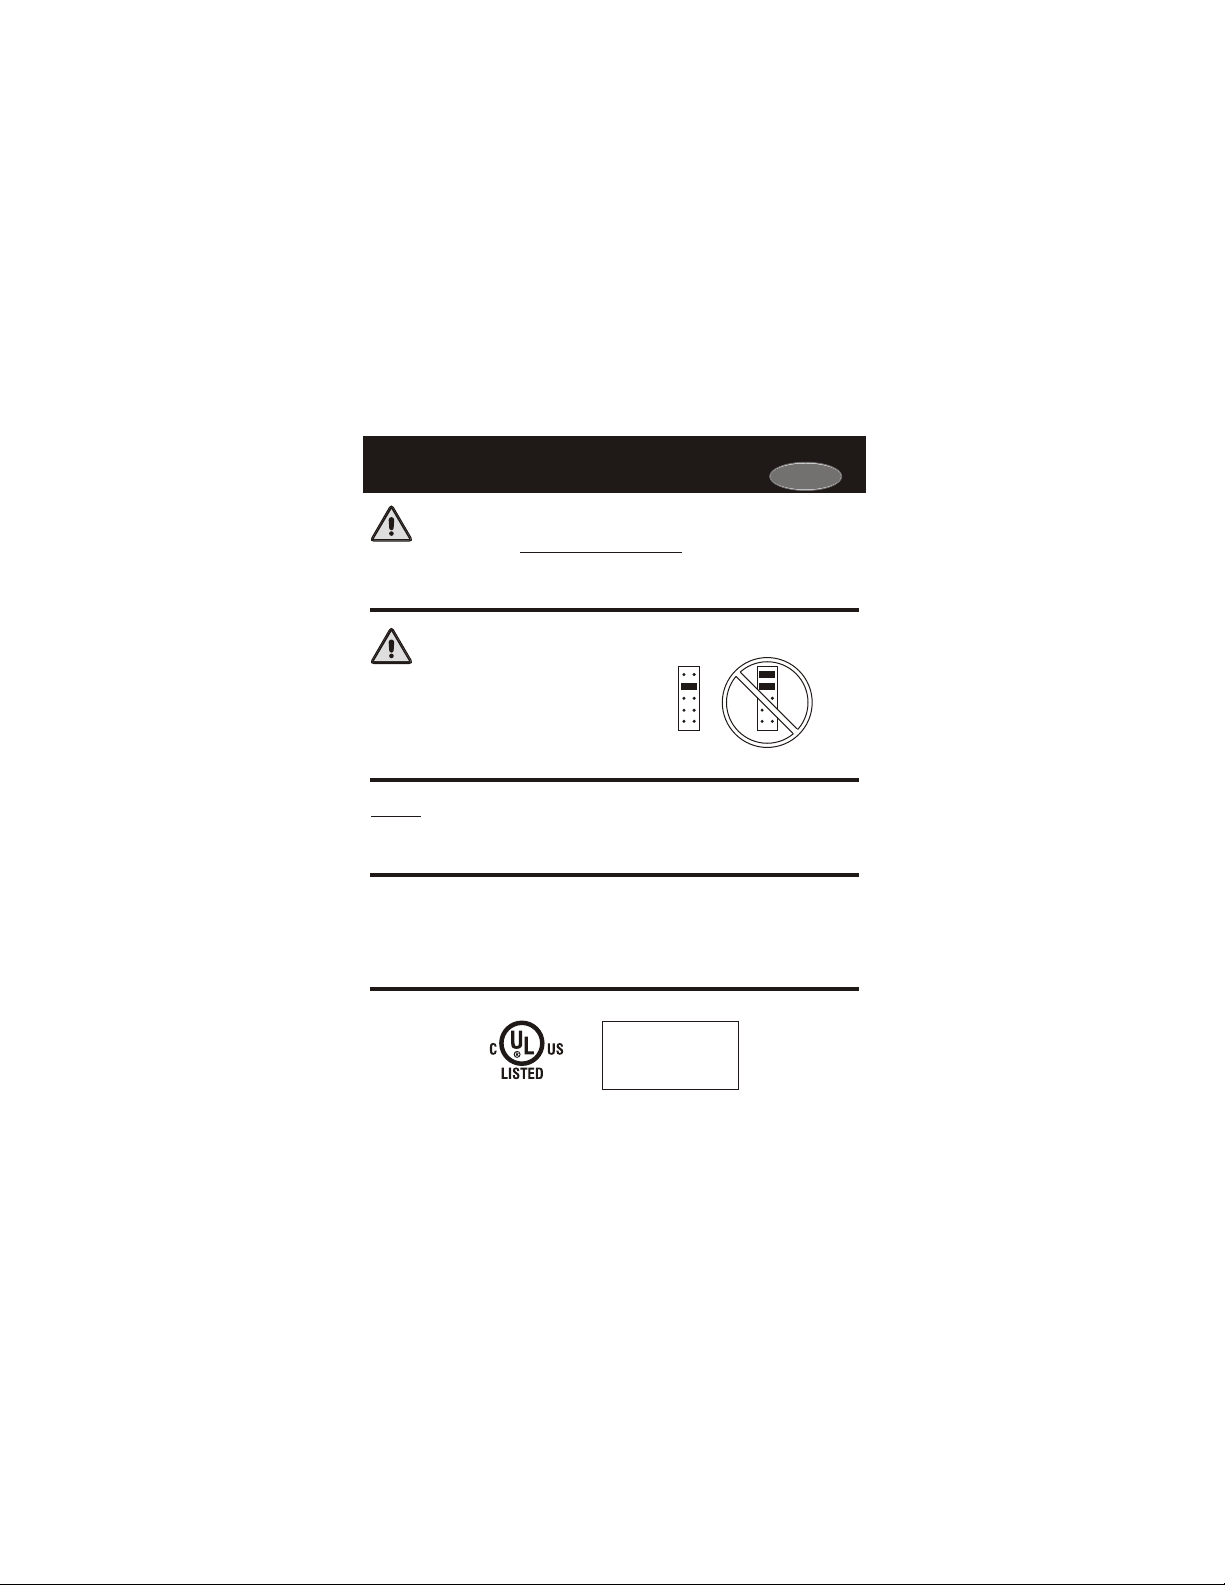
CAUTION
Follow the Installation Instructions before proceeding.
Set the thermostat mode to “OFF” prior to changing
settings in setup or restoring Factory Defaults.
CAUTION
NEVER PUT MORE THAN ONE
JUMPER ON THE SAME MISC
JUMPER BLOCK!
THIS MAY DAMAGE YOUR
THERMOSTAT.
NOTE: Due to variations in environmental conditions, it is not
always possible to achieve the desired humidification or
dehumidification setpoint.
This device complies with Part 15 of the FCC Rules. Operation is
subject to the following two conditions: (1) this device may not cause
harmful interference, and (2) this device must accept any interference
received, including interference that may cause undesired operation.
Thermostat 33CS450-01
F
4Z95
FOR HOME OR OFFICE USE
Tested to Comply
c
with FCC Standards
C
MISC3
OK
MISC3
Page i
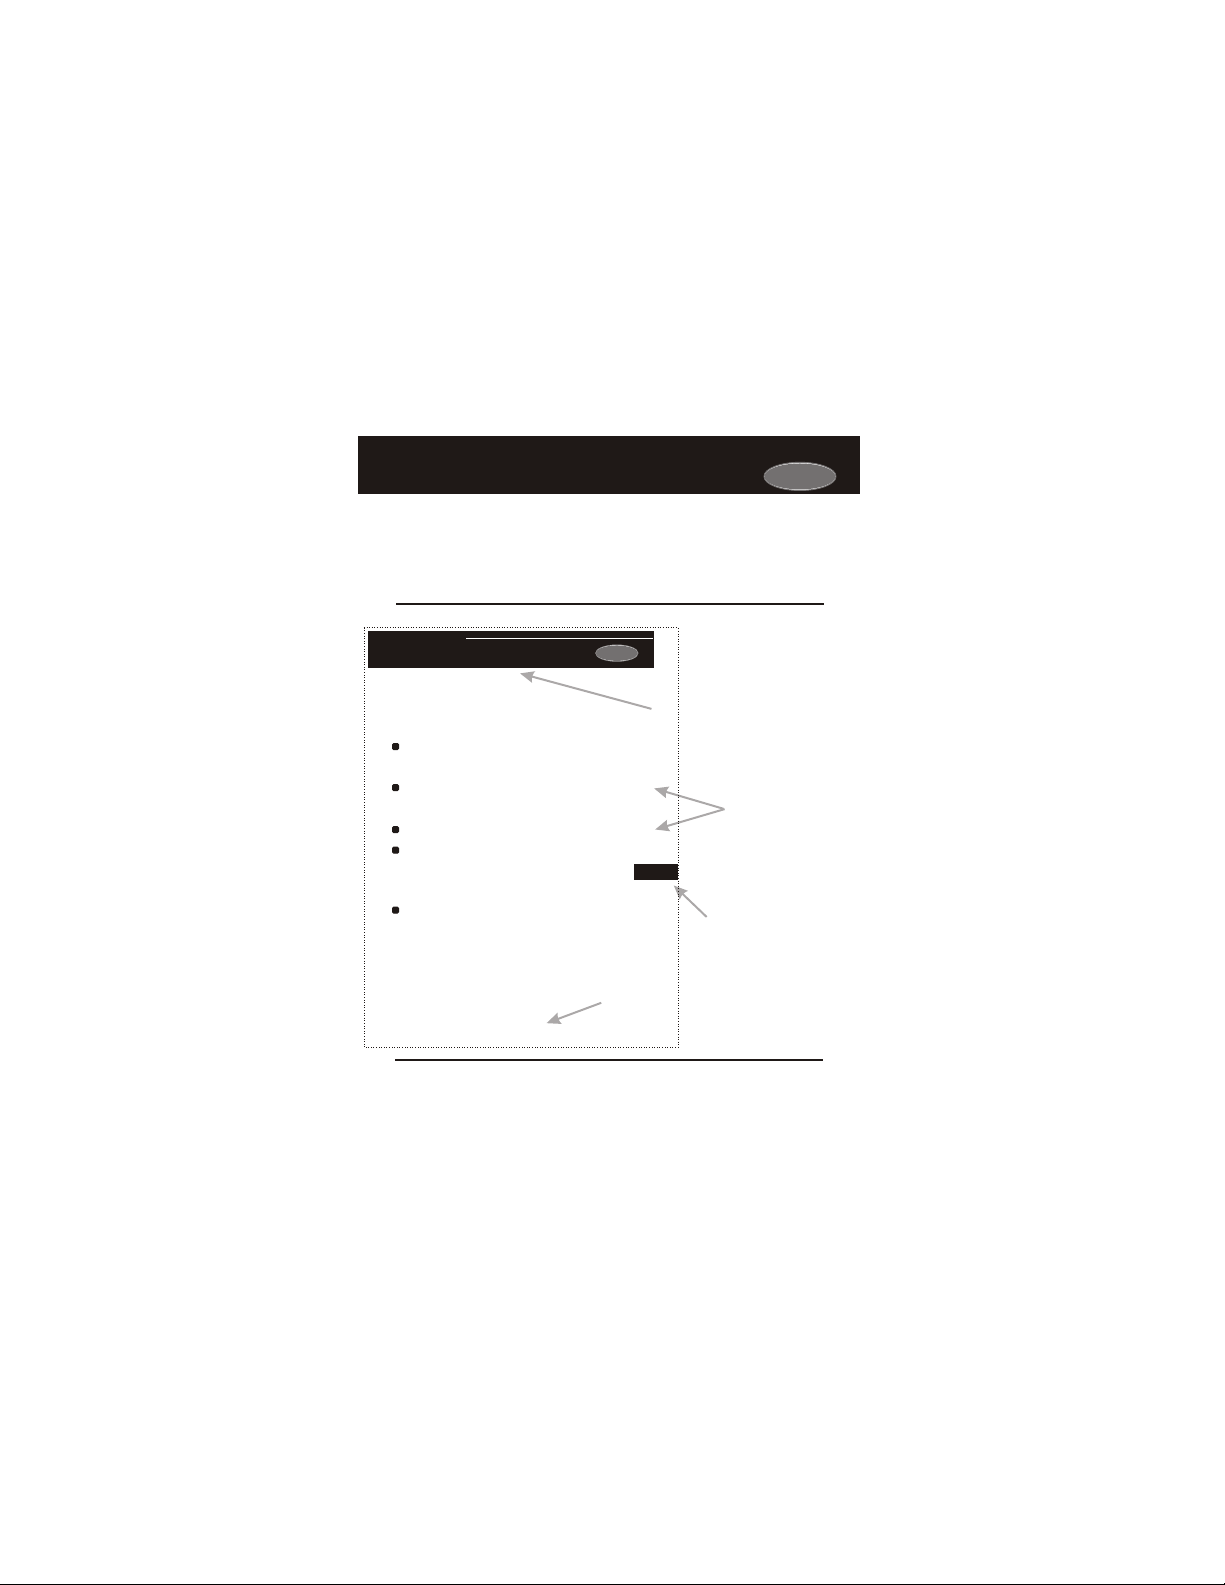
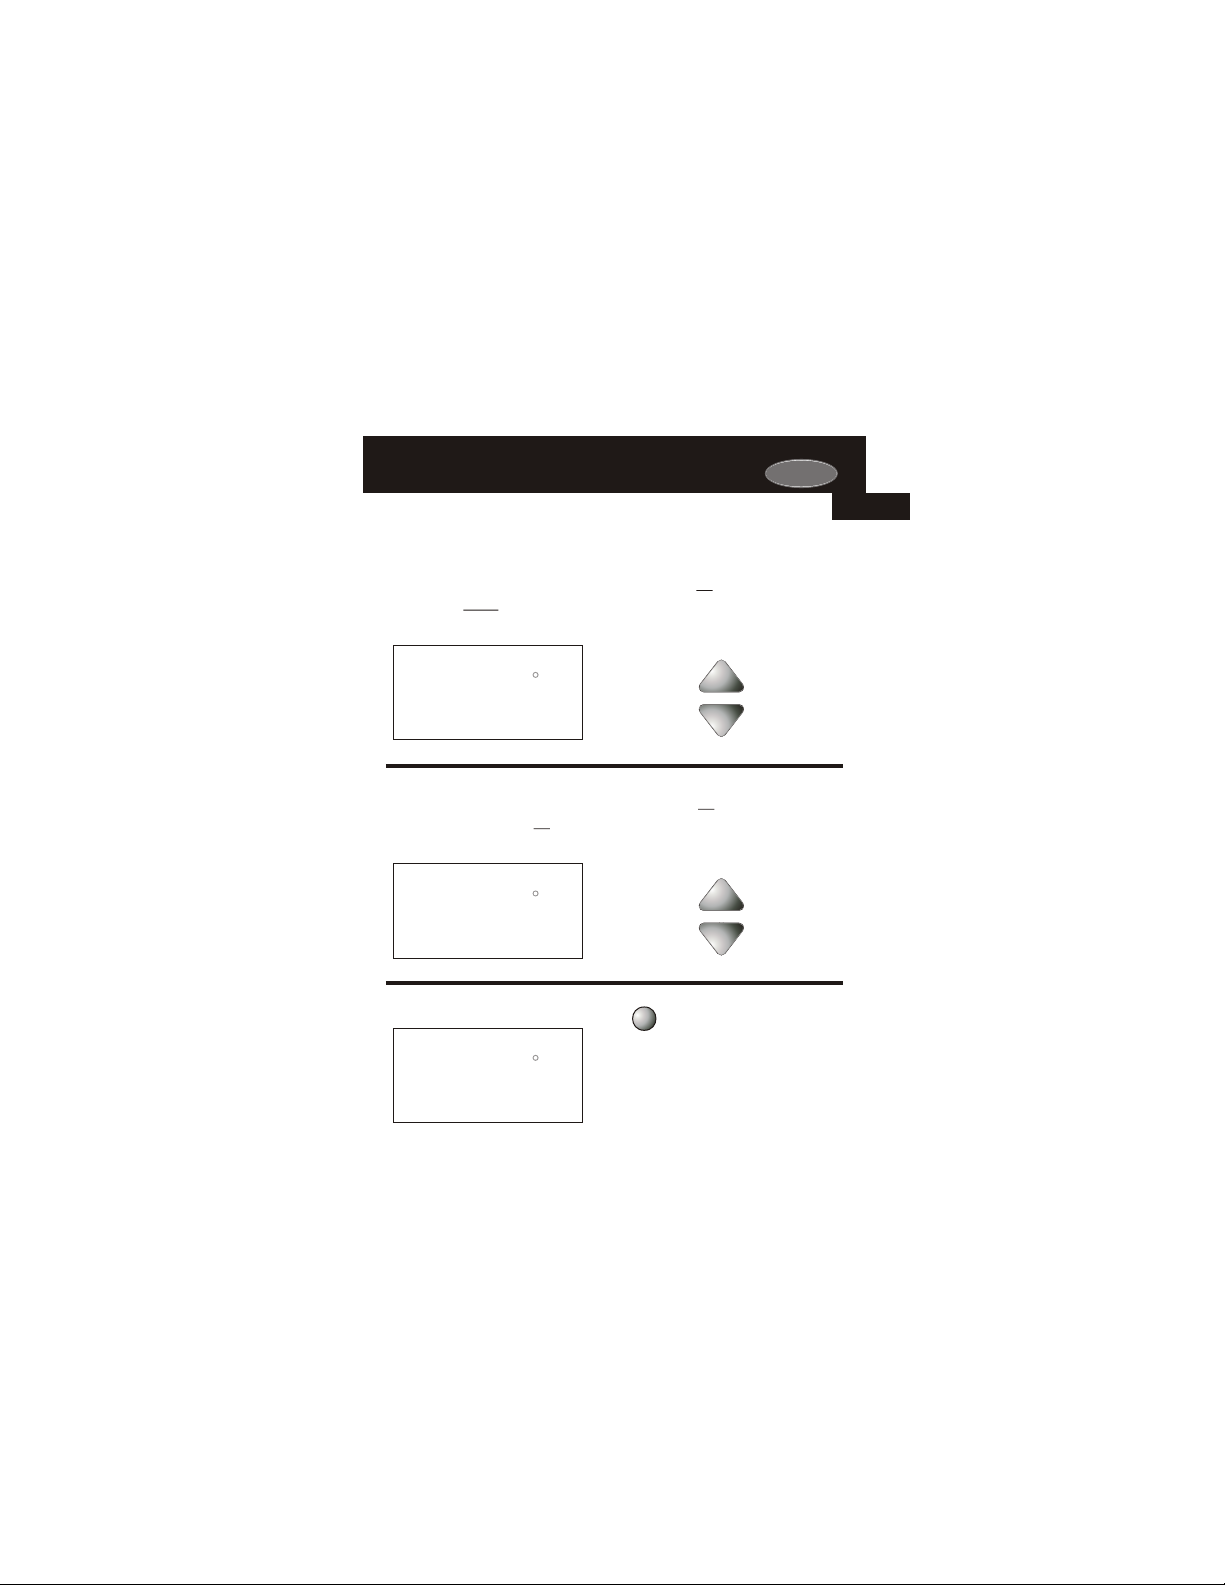
How to Use This ManualHow to Use This Manual
Carrier
The Table of Contents divides the thermostat features into sections
The first page of each section contains a more detailed list of the contents
SECTION 14
Timers and DeadbandsTimers and Deadbands
making it easier to quickly find information.
within that section, such as the example page shown below.
Carrier
Header shows section #
Section 14 Contents:
Adjusting the Heat/Cool
Differential..............................14.2
Adjusting the Cycles
Per Hour..................................14.3
Adjusting the Deadband..........14.4
Adjusting the Minutes of
Run-Time Before the
Next Stage...............................14.6
Selecting 2nd Stage Turn
Off Temperature.....................14.7
and title of section
Section contents
14
Visible section tab
on the side of the
page
Section and page #
Page 14.1
In addition, this manual also has an Index to help you find any information
regarding this thermostat quickly.
Page ii

Glossary of TermsGlossary of Terms
Auto-Changeover: A mode in which the thermostat will turn on
the heating or cooling based on room temperature demand.
Configurable Output Jumper: Using jumpers on the thermostat
you can configure the MISC1, MISC2, and MISC3 terminals to
control humidification, dehumidification, 2nd stage cooling, 3rd
stage heating, and a programmable output.
Cool Setpoint: The warmest temperature that the space should
rise to before cooling is turned on (without regards to
deadband).
Deadband: The number of degrees the thermostat will wait, once
setpoint has been reached, before energizing heating or cooling.
Dehumidify: To reduce the amount of moisture in the air.
Differential: The forced temperature difference between the
heat setpoint and the cool setpoint.
Heat Setpoint: The coolest temperature that the space should
drop to before heating is turned on (without regards to
deadband).
Humidify: To increase the amount of moisture in the air.
Icon: The word or symbol that appears on the thermostat
display.
Mode: The current operating condition of the thermostat (i.e. Off,
Heat, Cool, Auto, Program On).
Non-Programmable Thermostat: A thermostat that does not
have the capability of running the Time Period Programming.
Programmable Thermostat: A thermostat that has the capability
of running the Time Period Programming.
Reheat: Running the cooling and 2nd stage strip heaters at the
same time in order to dehumidify the air without cooling down
the room temperature.
Temperature Swing: Same as Deadband.
Time Period Programming: A program that allows the
thermostat to automatically adjust the heat setpoint and/or the
cool setpoint based on the time of day.
Carrier
Page iii


Table of ContentsTable of Contents
Page iv
Carrier
Quick Start
Getting to Know Your
Thermostat
Setting Clock and Day
Basic Operation
Viewing Temperature
and Humidity
Programming the
Daily Schedule
Programming the
Fan Operation
Thermostat Display
Options
Humidification
Dehumidification
Viewing Equipment
Run-Times
Electric Heat and
Heat Pump Operation
Timers and Deadbands
Using the
Programmable Output
Programming Remote
Sensor Operation
Dry Contact Operation
Light Activated
Operation
Energy Save
Operation
Programming the Run Time Alerts
Programming the
Holiday Mode
Configuring the MISC
Outputs
Factory Defaults,
Calibration, and Sensors
Accessories
Advanced Setup Table
1
2
3
4
5
6
7
8
9
10
11
12
13
14
15
16
17
18
19
20
21
22
23
24

SECTION 1
Quick StartQuick Start
1
Carrier
Section 1 Contents:
Setting the Clock and Day...........1.2
Selecting the Heat or Cool
Mode............................................1.3
Selecting Your Desired
Temperature................................1.4
Using the Fan Button...................1.4
Note: Following the instructions in this section will allow you to
operate your thermostat using the factory default settings. These
settings are depicted in the illustrations throughout this manual.
Page 1.1
Carrier
HUMIDITYMODE
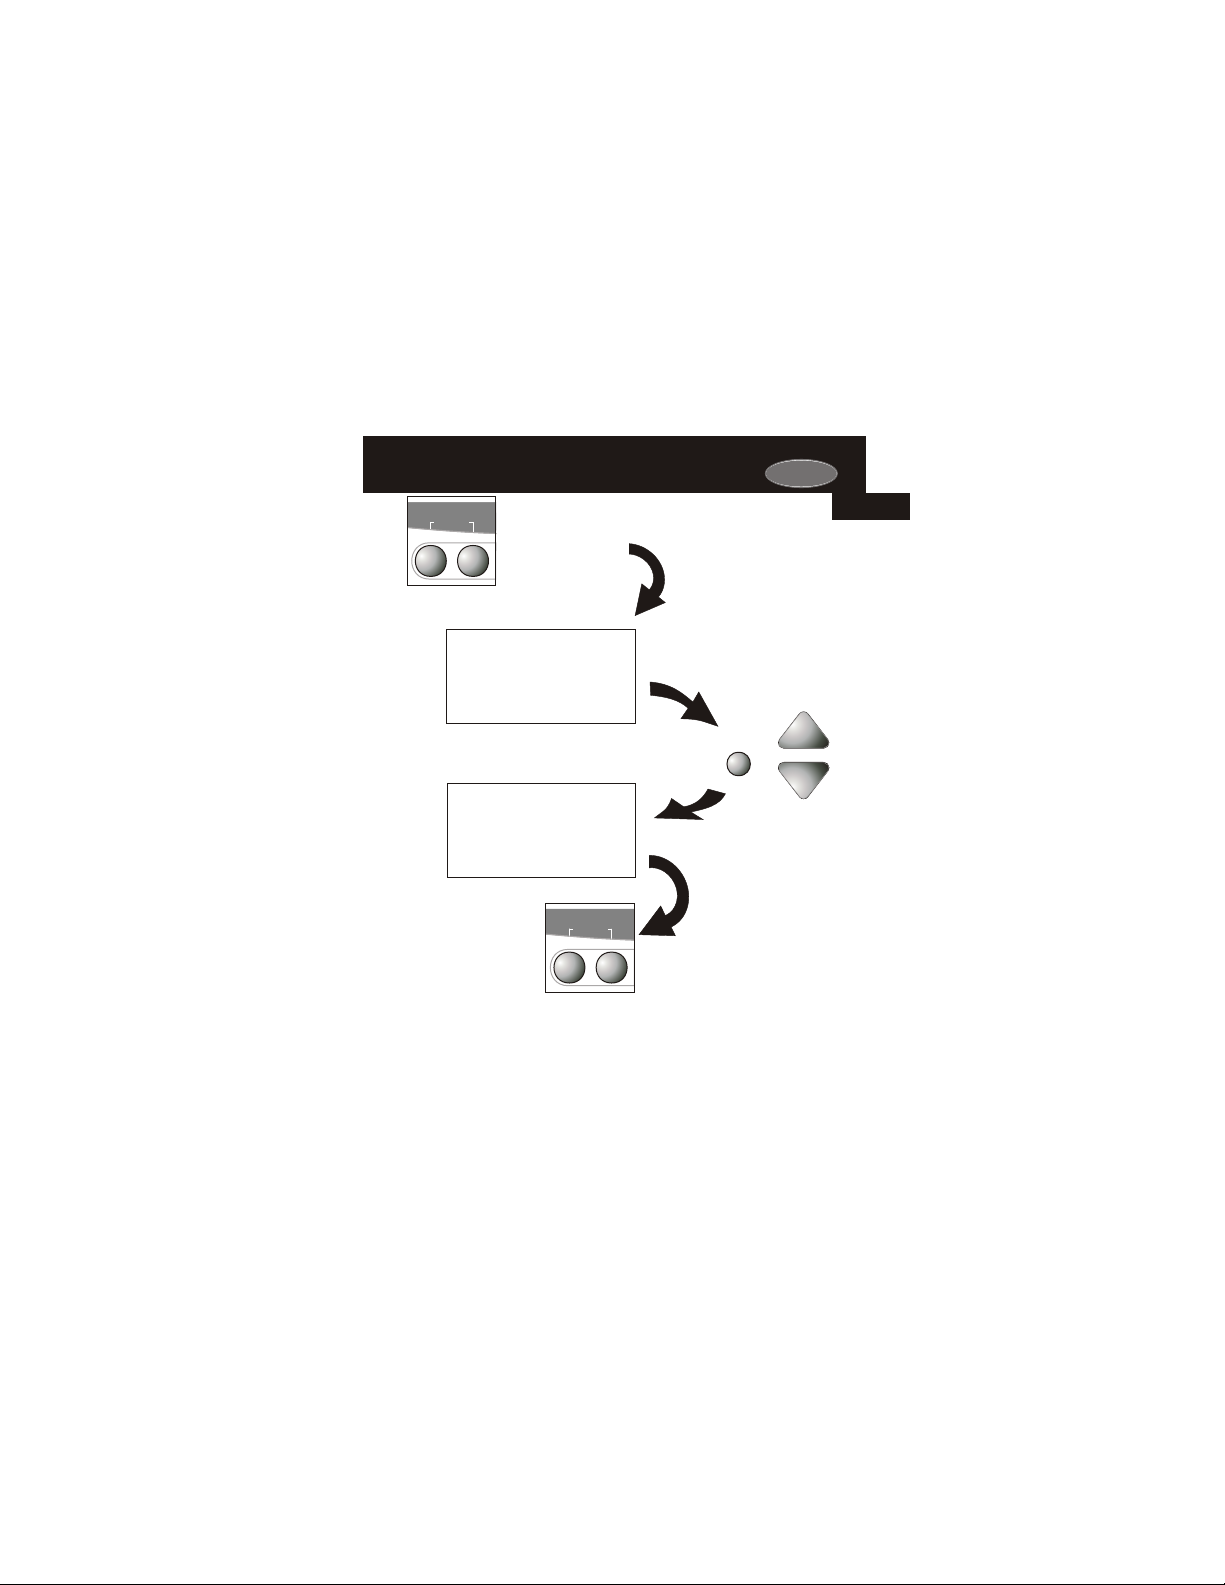
SET CLOCK
Press the MODE and
HUMIDITY buttons
at the same time
Setting the Clock Setting the Clock
Am
I2:00
Setting the DaySetting the Day
Mo
Press the MODE
and HUMIDITY
buttons at the
same time to
return to normal
operation.
Setup
Setup
SET CLOCK
I
2
HUMIDITYMODE
During Setup & Programming:
Pressing the UP or DOWN
buttons will modify the flashing
selection.
To adjust the
Clock or Day use
Press
MODE
Buttons.
1
Page 1.2
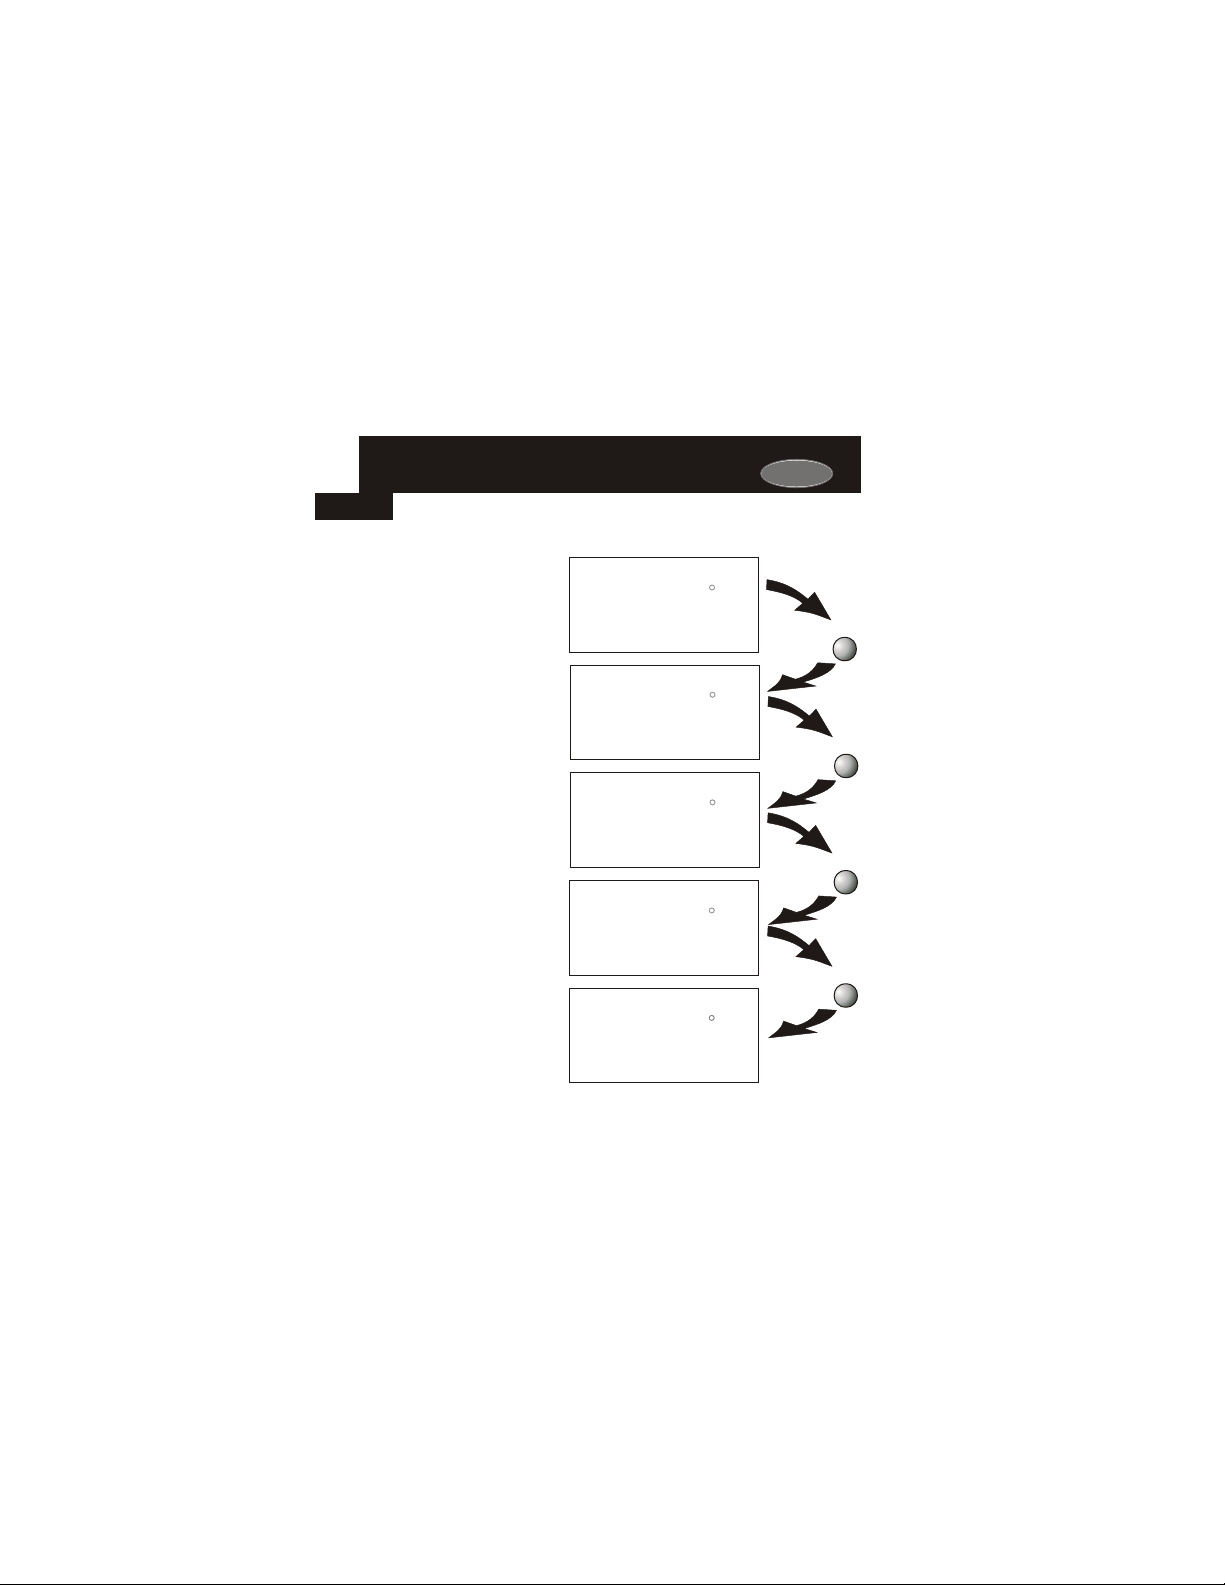
Selecting the Heat or Cool ModeSelecting the Heat or Cool Mode
1
Select Mode by Pressing the MODE Button
Pm
Heating Only
The HEAT setting indicates the
temperature the room has to
reach before the furnace will
turn on to heat the room.
Cooling Only
The COOL setting indicates the
temperature the room has to
reach before the air conditioner
will turn on to cool the room.
Heating or Cooling
AUTO will automatically select
heat or cool based on room
temperature demand.
I2:00
Su
I2:00
Su
I2:00
Su
AUTO
70
Pm
70
Pm
70
Time Schedule for
Heating or Cooling
Program On will activate the
stored timer operation for the
heating and cooling
setpoints (occupied or
unoccupied periods).
OFF indicates both heating
Off
and air conditioning
systems are turned off.
I2:00
Su
I2:00
Su
OFF
occupied
1
Program On
Pm
70
Pm
70
HEAT
68
76
COOL
76
COOL
HEAT
68
76
COOL
HEAT
68
Carrier
Press
MODE
Press
MODE
Press
MODE
Press
MODE
Page 1.3
Carrier
Selecting Your Desired Temperature
Selecting Your Desired Temperature
(adjusting the setpoints)
(adjusting the setpoints)
AUTO OR PROGRAM MODE
Pressing the UP or DOWN buttons in Auto or Program mode
will adjust both the heat and cool set temperatures
simultaneously.
Pm
I2:00
Su
AUTO
70
HEAT OR COOL MODE
Pressing the UP or DOWN buttons in Heat or Cool mode will
adjust only the heat or cool set temperature.
Pm
I2:00
Su
76
COOL
HEAT
68
76
COOL
Adjust the desired
set temperature with the
buttons.
Adjust the desired
set temperature with the
70
buttons.
Using the Fan ButtonUsing the Fan Button
Pm
I2:00
Su
AUTO
FanOn
70
76
68
COOL
HEAT
Press
FAN
Fan On indicates constant fan operation.
If Fan On is selected the fan will run
continuously at all times, except in Off,
and will only run if there is a heating or
cooling demand in Unoccupied periods.
Pressing the FAN button toggles this
feature on or off.
Page 1.4
1

SECTION 2
Getting to Know Your ThermostatGetting to Know Your Thermostat
2
Section 2 Contents:
Front Panel Buttons.....................2.2
Display Features...........................2.3
Carrier
Page 2.1
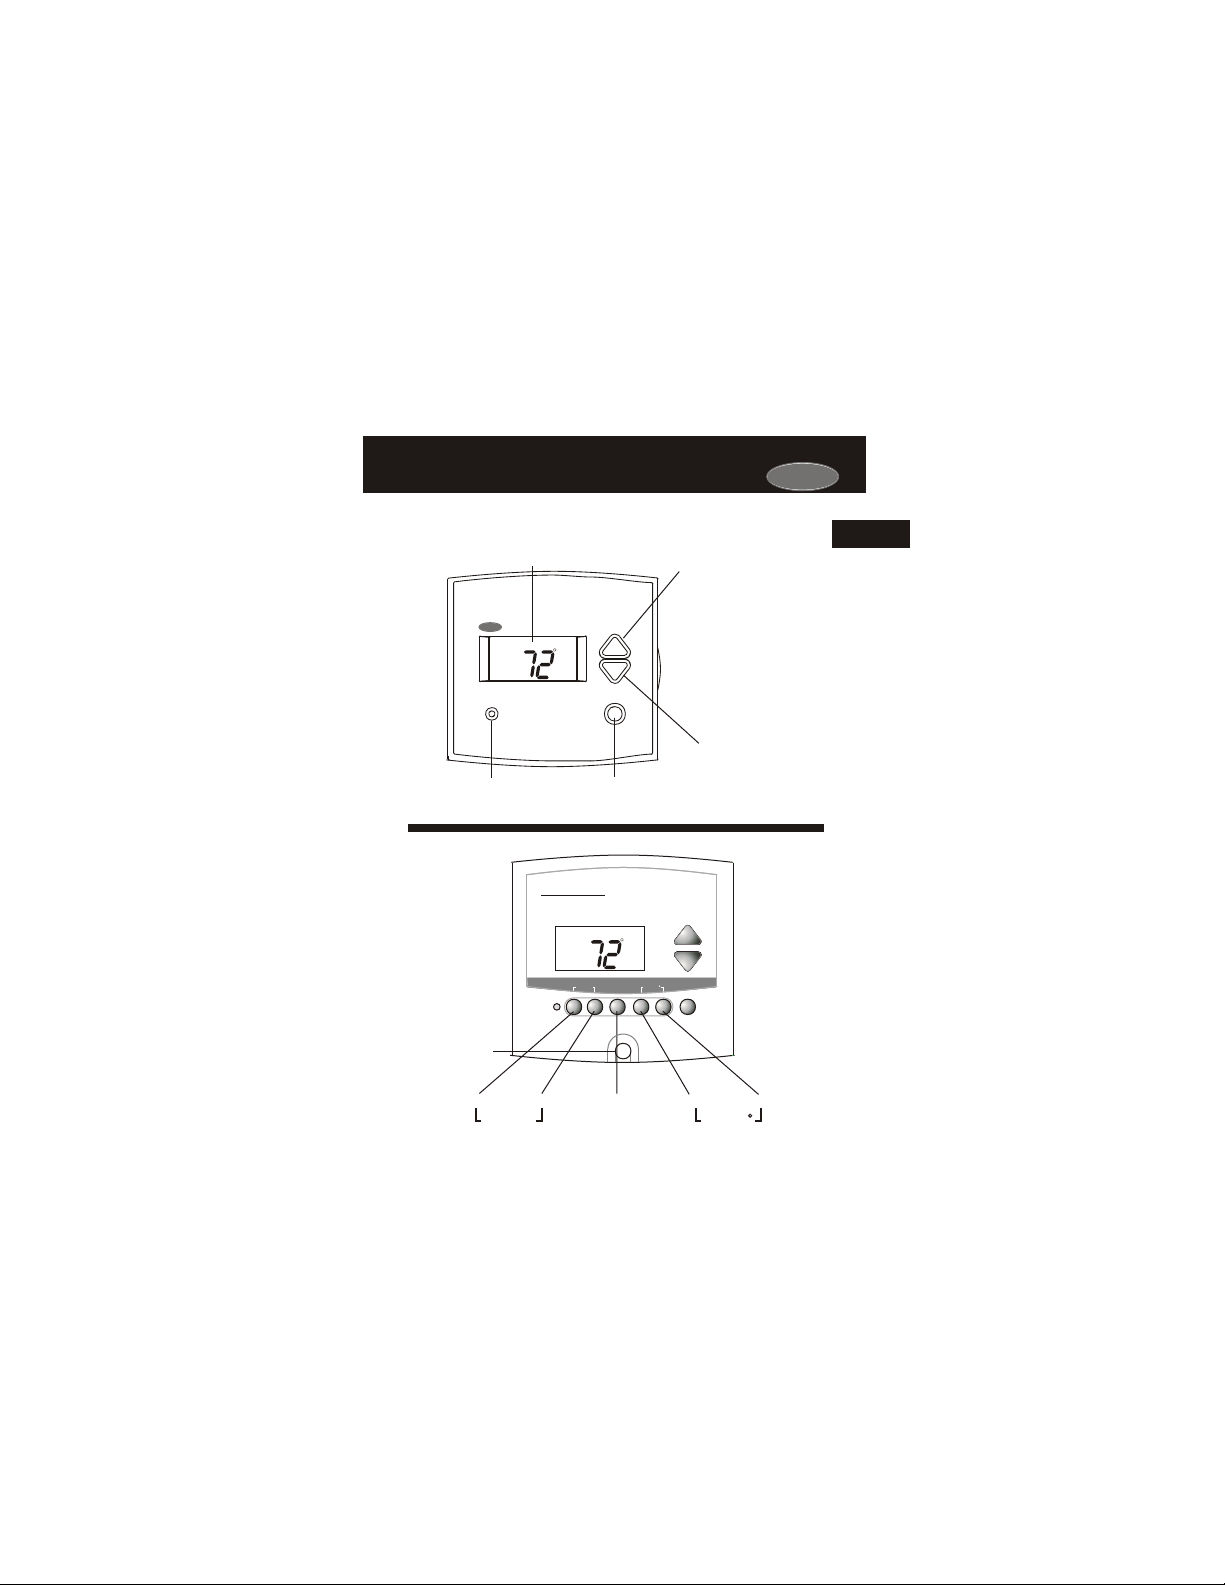
Front Panel Front Panel
Backlit LCD Display
Carrier
I2:00
Su
AUTO
Heat or Cool Demand Indicator
Red = Heat, Green = Cool
QUICK RELEASE FOR
ACCESSORY PORT
(pg. 23.1)
Pm
74
COOL
HEAT
72
Premier
Commercial
Programmable Thermostat
Pm
I2:00
Su
AUTO
HUMIDITY
SET CLOCK
Warmer Button
(glows red)
Override
Button
74
COOL
HEAT
72
HOLIDAY
FANMODE PROGRAM
OUTSIDE
Carrier
2
sometimes referred
to as the UP button
[ ]
Cooler Button sometimes refer-
(glows blue) red to as the
DOWN button
OVER
RIDE
[ ]
HUMIDITY
SET CLOCK
FANMODE
Page 2.2
PROGRAM
OUTSIDE
HOLIDAY

Display FeaturesDisplay Features
2
2
Carrier
Program On
Am
I8:88
SuMoTuWeThFrSa
Service Filter
Pan UV Light
AUTO
OFFON
Unoccupied
123
Override
FanOn
Mode Indicators - Section 4
Selects the operational mode of the equipment.
HEAT - Indicates the heating mode.
COOL - Indicates the air conditioning mode.
AUTO - Indicates the system will automatically changeover
between heat and cool modes as the temperature varies.
OFF - Indicates heating and cooling is turned off.
PROGRAM ON - Indicates the time period program is enabled to
run.
Clock with Day of the Week - Section 3
Indicates the current time and day. This clock is also used to program
the time period schedules.
Room Temperature Display - Section 5
Indicates the current room temperature and displays the outside
temperature when selected.
Desired Set Temperature - Section 4/5
Indicates desired room temperature(s). Also displays the highest
and lowest outside temperatures for the day.
Outside icon - Section 5
Indicates the temperature displayed is from the optional outside
sensor.
Pm
StartStop
DeHumidify
I88
Page 2.3
Setup
H I
88
COOL
Outside
Remote
AUXHEAT
L O
88
Carrier
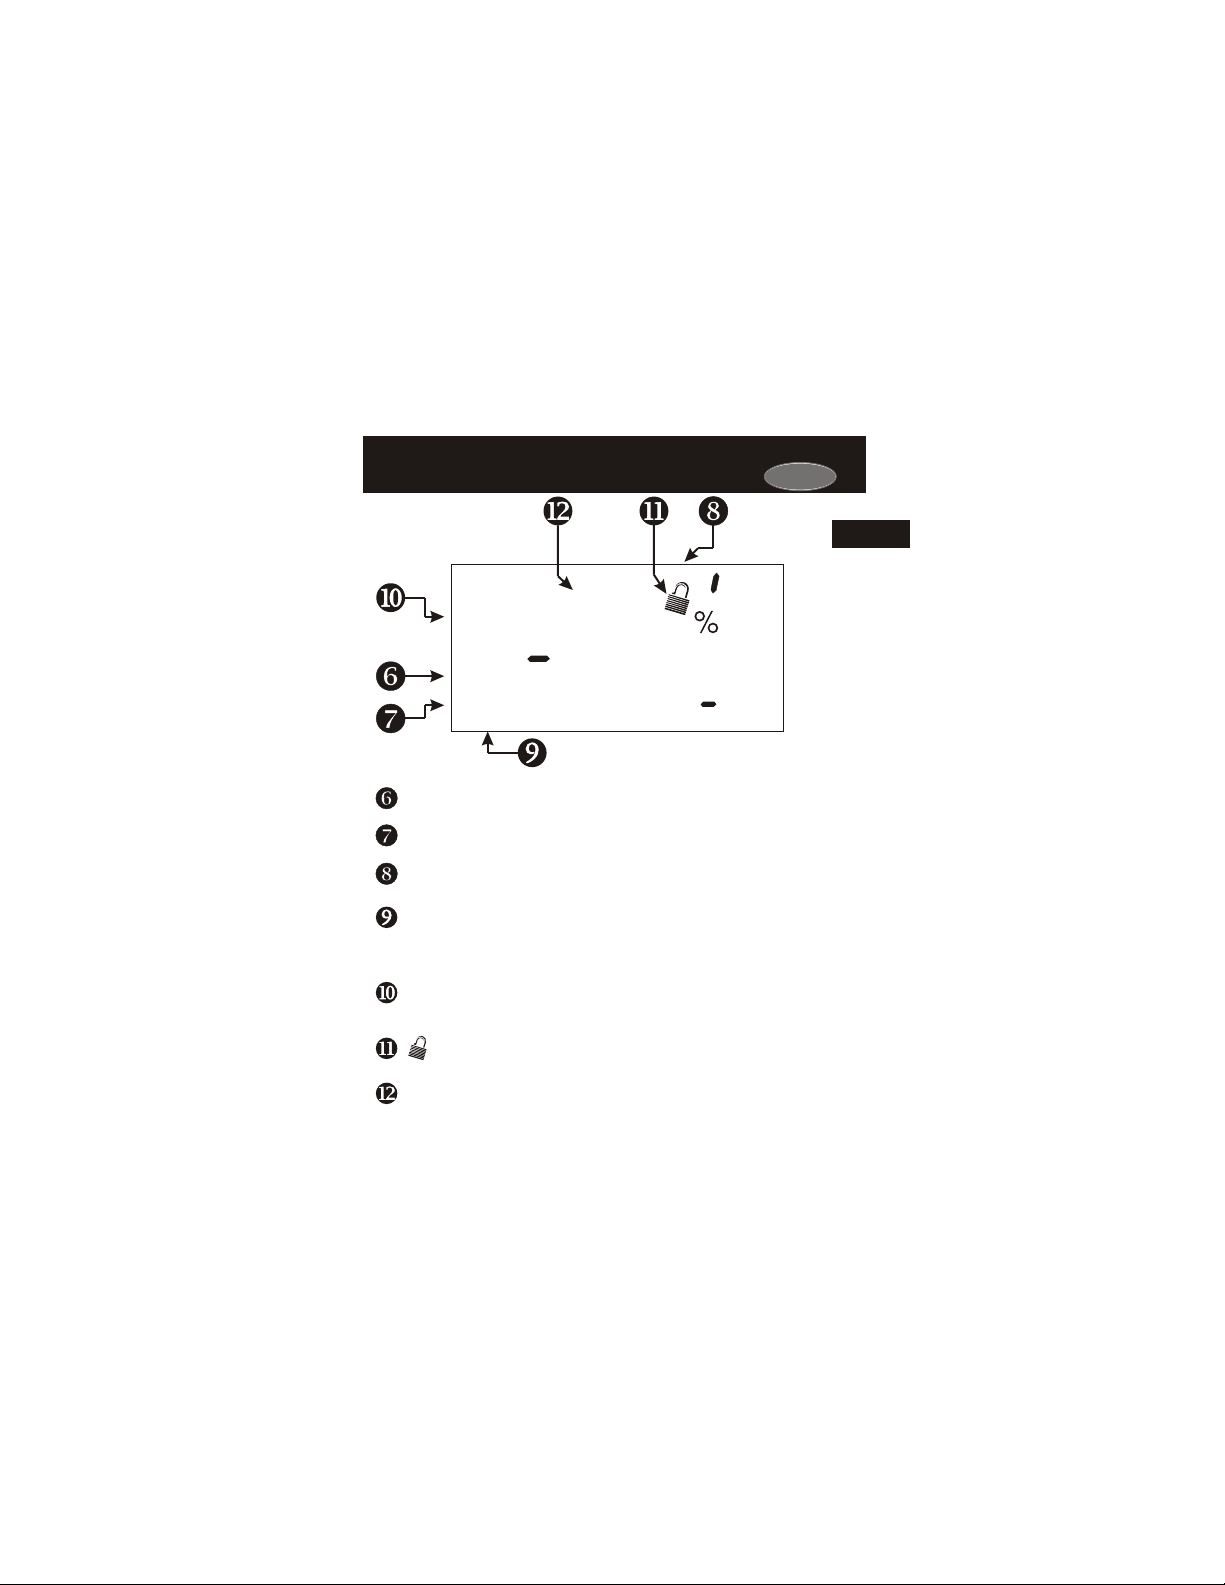
Display FeaturesDisplay Features
2
Program On
Am
I8:88
SuMoTuWeThFrSa
Service Filter
Pan UV Light
AUTO
OFFON
Unoccupied
123
Override
FanOn
Occupied & Unoccupied icons - Section 6
Indicates the program number: Occupied 1,2,3,or Unoccupied.
Override icon - Section 6
Indicates the program is currently being overridden for up to 4 hours.
Setup icon - Sections 7-20
Indicates the thermostat is in the setup mode.
Fan On icon - Section 7
Indicates constant, continuous fan operation. When Fan On is not
lit - indicates the fan will only operate when necessary to heat or to
cool.
Service Filter icon - Section 19
Appears when the filter should be serviced under normal conditions.
Adjustable from 0 - 1950 hours of blower operation.
icon - Section 8
Indicates keypad has been locked.
StartStop icon Appears when programming occupied time periods.
Pm
StartStop
DeHumidify
I88
Section 6
Page 2.4
Setup
H I
88
COOL
Outside
Remote
AUXHEAT
L O
88
2

Display FeaturesDisplay Features
2
Carrier
Program On
Am
I8:88
SuMoTuWeThFrSa
Service Filter
Pan UV Light
AUTO
OFFON
Unoccupied
123
Override
FanOn
UV Light icon - Section 11/19
Appears when the UV bulb should be serviced under normal
conditions. Adjustable from 0 - 1950 days of operation.
Remote icon - Page 22.4
Indicates the remote sensor reading of the thermostat is being
viewed.
AuxHeat icon - Pages
Indicates 2nd stage electric strip heat is being used when the therm ostat is programmed for Heat Pump operation. Only the Aux icon
will appear during Cool to Dehumidify to indicate Reheat operation.
Humidify/DeHumidify icon Indicates the system is currently humidifying/dehumidifying the air.
Lo icon Indicates the lowest recorded outside temperature for the day.
Hi icon - Section 5
Indicates the highest recorded outside temperature for the day.
Service Pan icon - Section 16
Indicates that a sensor (accessory) has detected the condensate
drain pan is full and the compressor (Y1) has been locked out.
Section 5
Pm
StartStop
DeHumidify
I88
10.5 & 13.4
Sections 9-10
Page 2.5
Setup
H I
88
COOL
Outside
Remote
AUXHEAT
L O
88

SECTION 3
Setting the Clock and DaySetting the Clock and Day
Section 3 Contents:
Setting the Clock..........................3.2
Setting the Day.............................3.2
Carrier
3
Note: During setup & programming pressing the UP or DOWN
buttons will modify the flashing selection.
Page 3.1

HUMIDITYMODE
SET CLOCK
3
Setting the Clock Setting the Clock
I2:00
Press the MODE and
HUMIDITY buttons
at the same time
Am
Setup
I
Carrier
During Setup & Programming:
Pressing the UP or DOWN
buttons will modify the flashing
selection.
To adjust the
Clock or Day use
Setting the DaySetting the Day
Mo
Press the MODE
and HUMIDITY
buttons at the
same time to
return to normal
operation.
Setup
2
HUMIDITYMODE
SET CLOCK
Page 3.2
Press
MODE
Buttons.

SECTION 4
Basic OperationBasic Operation
Section 4 Contents:
Programming for Auto or
Program Operation....................4.2
Selecting the Proper
Operating Mode.........................4.3
Selecting Your Desired
Temperature...............................4.7
Carrier
4
Note: During setup & programming pressing the UP or DOWN
buttons will modify the flashing selection.
Page 4.1
Carrier
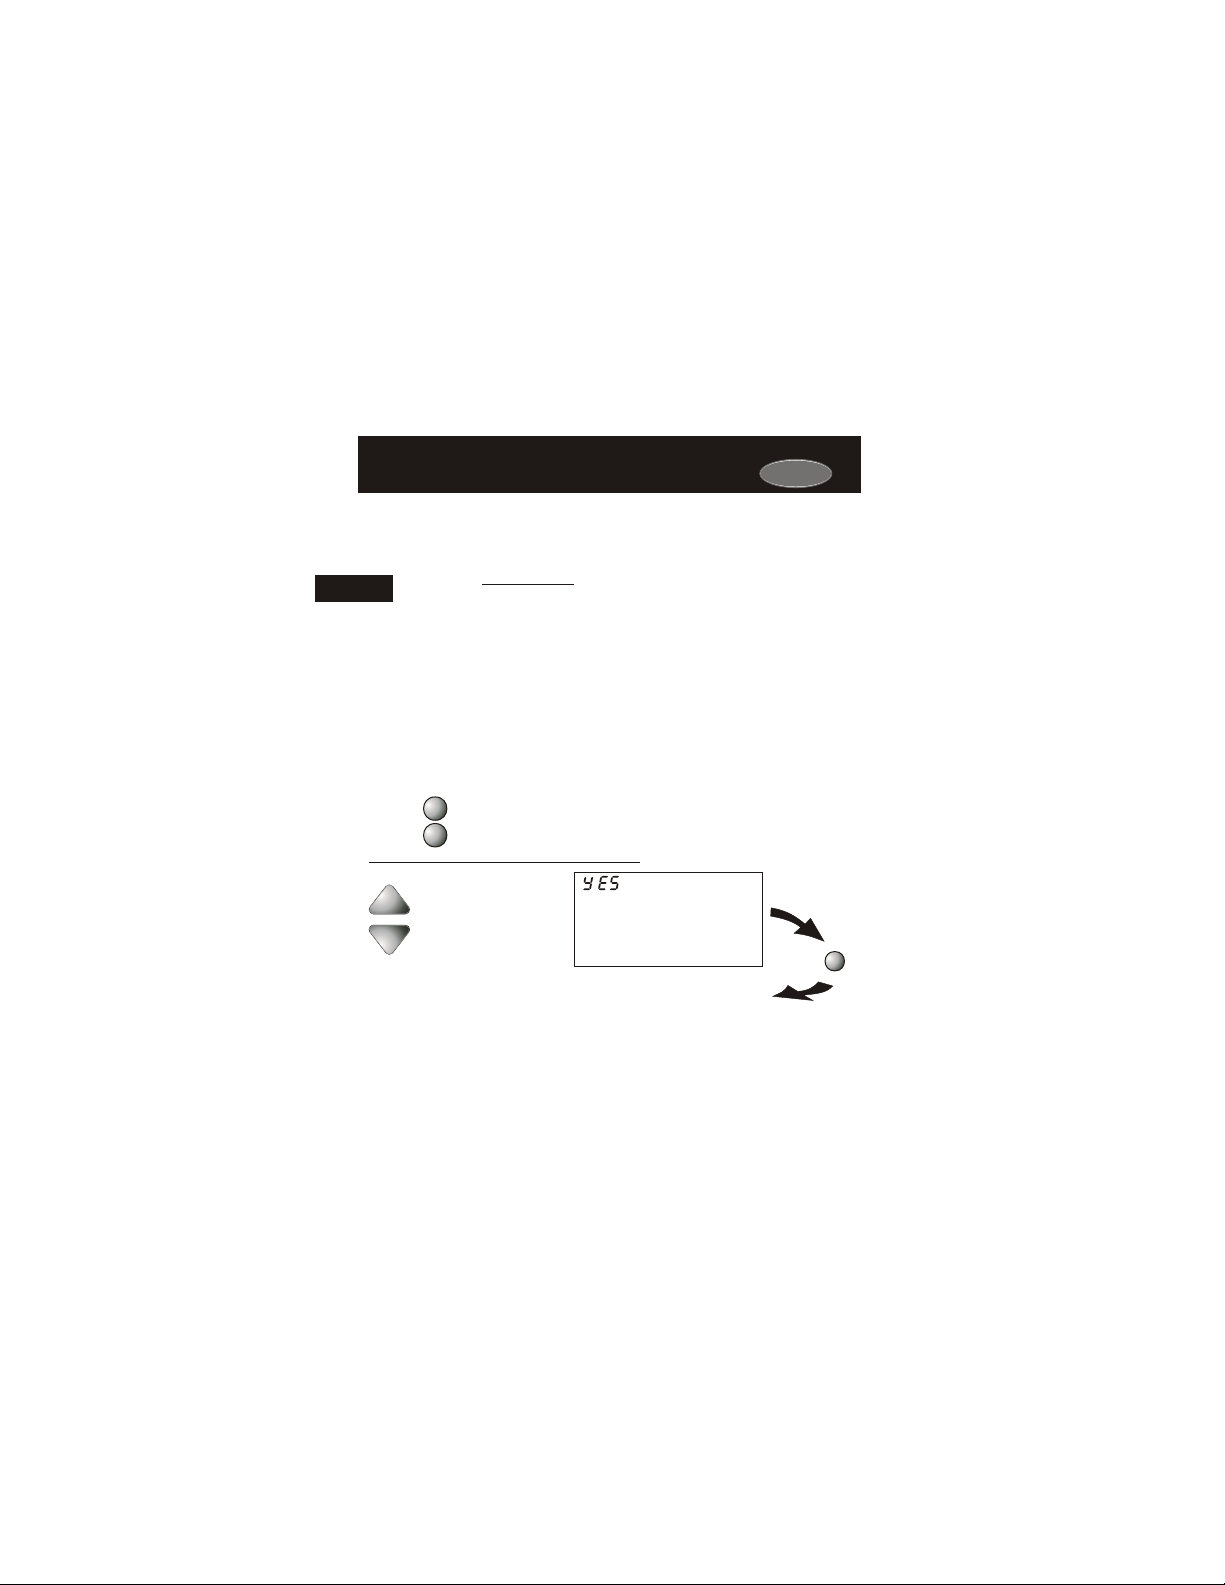
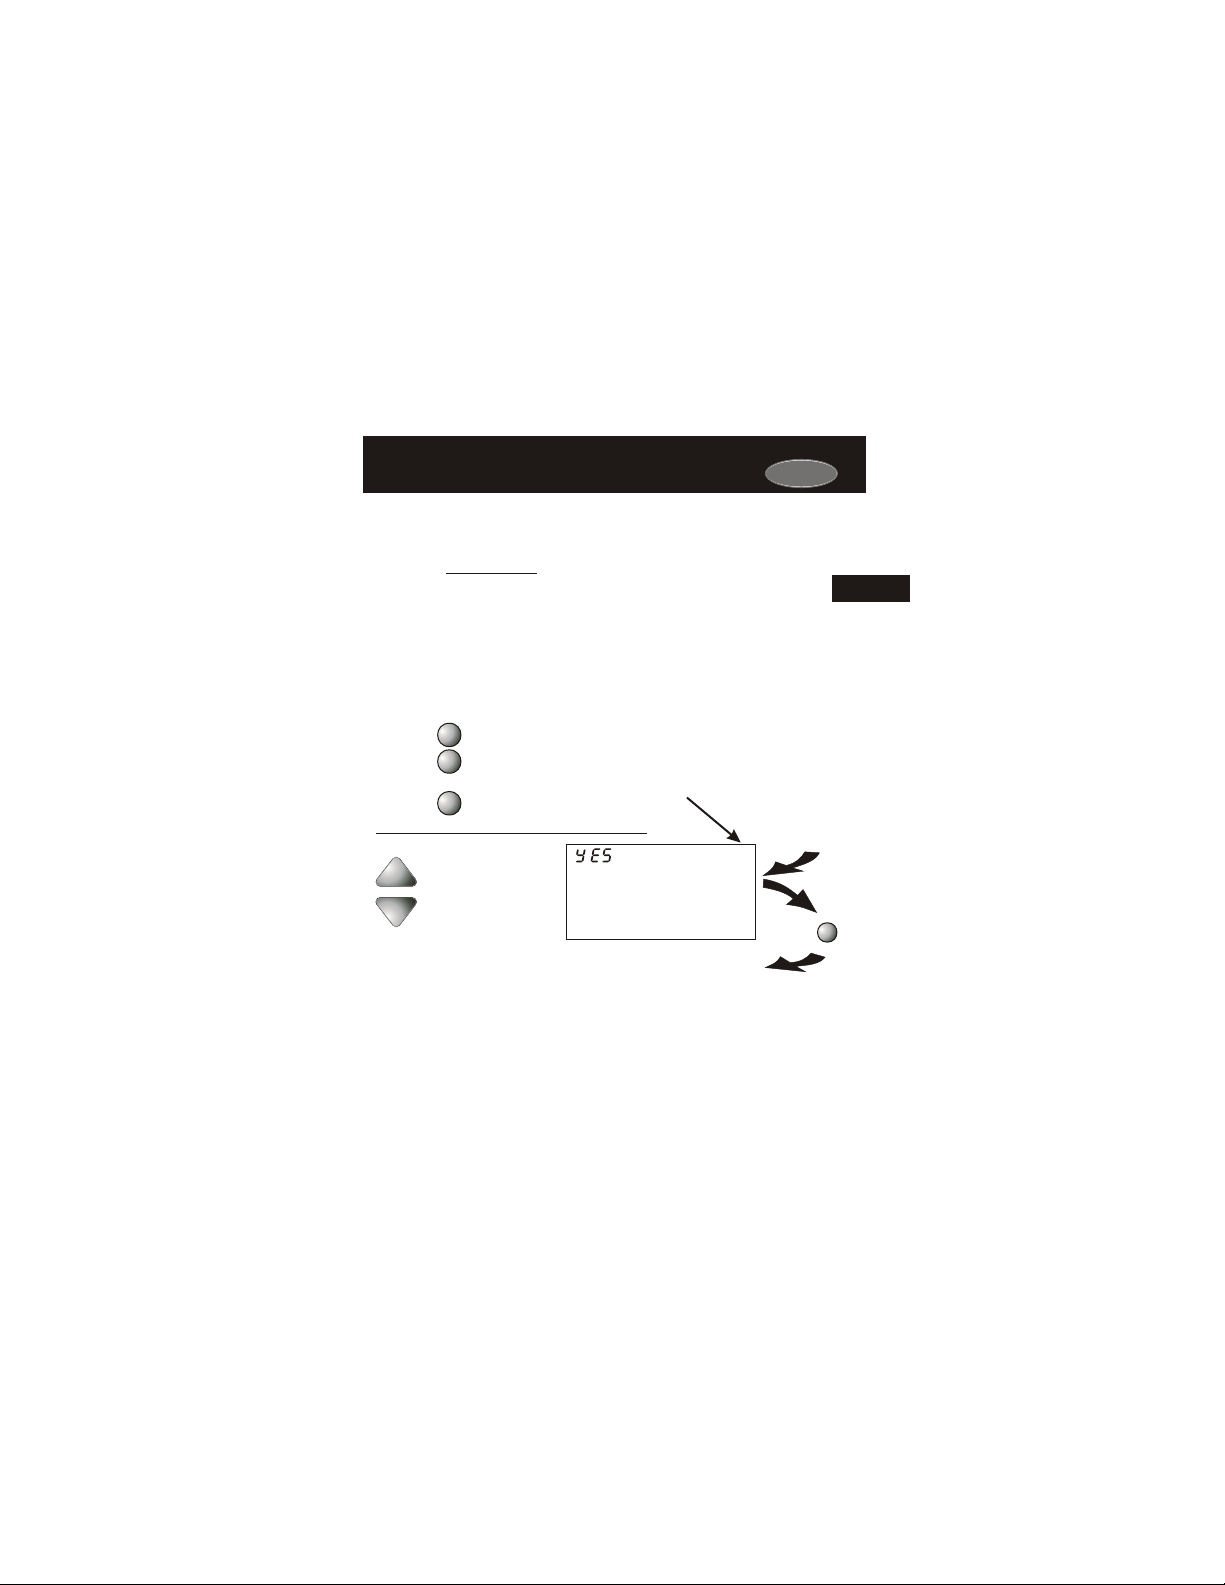
Programmable or Non-Programmable
Programmable or Non-Programmable
Thermostat
Thermostat
When the very simplest operation is desired, this thermostat
4
may be configured to be non-programmable, with or without
Auto-Changeover. Follow the step below.
If ‘NO’ is selected, the thermostat will lockout the Program On screen;
only the Off, Heat, Cool, and Auto screens may be accessed by
pressing the MODE button.
Select ‘YES’ if you would like your thermostat to be programmable,
then the Program mode will be accessible through the use of the
MODE button.
Note: Press the MODE
button momentarily
MODE
PROGRAM
Press the PROGRAM button to leave the Setup screens. If no buttons are
Press the MODE button. While holding
the MODE, press the PROGRAM
button to enter Setup screens.
YES
Select Yes if you would like
the thermostat to be programmable or No for non-programmable.
NO
pressed, the display will leave the setup screens after 30 seconds.
Program On
to move through the
setup screens. Press
and hold the MODE
button to move backwards through the
setup screens.
Setup
i
Press
PROGRAM
Page 4.2
Carrier
Manual or Auto-Changeover
Manual or Auto-Changeover
Thermostat
Thermostat
When the very simplest operation is desired, this thermostat may
be configured to be a manual heat and cool thermostat, with or
without time period programmability. Follow the step below.
The thermostat may be programmed to function as a Heat Only or
Cool Only thermostat by selecting ‘NO’ in the setup screen below.
This will lockout the Auto-Changeover screen and only allow the Off,
Heat, Cool, and Program On screens to be accessed.
4
MODE
PROGRAM
MODE
Press the PROGRAM button to leave the Setup screens. If no buttons are
Press the MODE button. While holding
the MODE, press the PROGRAM
button to enter Setup screens.
Press the MODE button repeatedly
until this setup screen appears.
YES
Select Yes if you would
like the thermostat to
be Auto-Changeover or
No for a Heat Only and
Cool Only Thermostat.
NO
pressed, the display will leave the setup screens after 30 seconds.
AUTO
Setup
Page 4.3
Note: Press the MODE
button momentarily
to move through the
setup screens. Press
and hold the MODE
button to move backwards through the
setup screens.
2
Press
PROGRAM
Operating Mode when the Thermostat
Operating Mode when the Thermostat
is Configured to be:
is Configured to be:
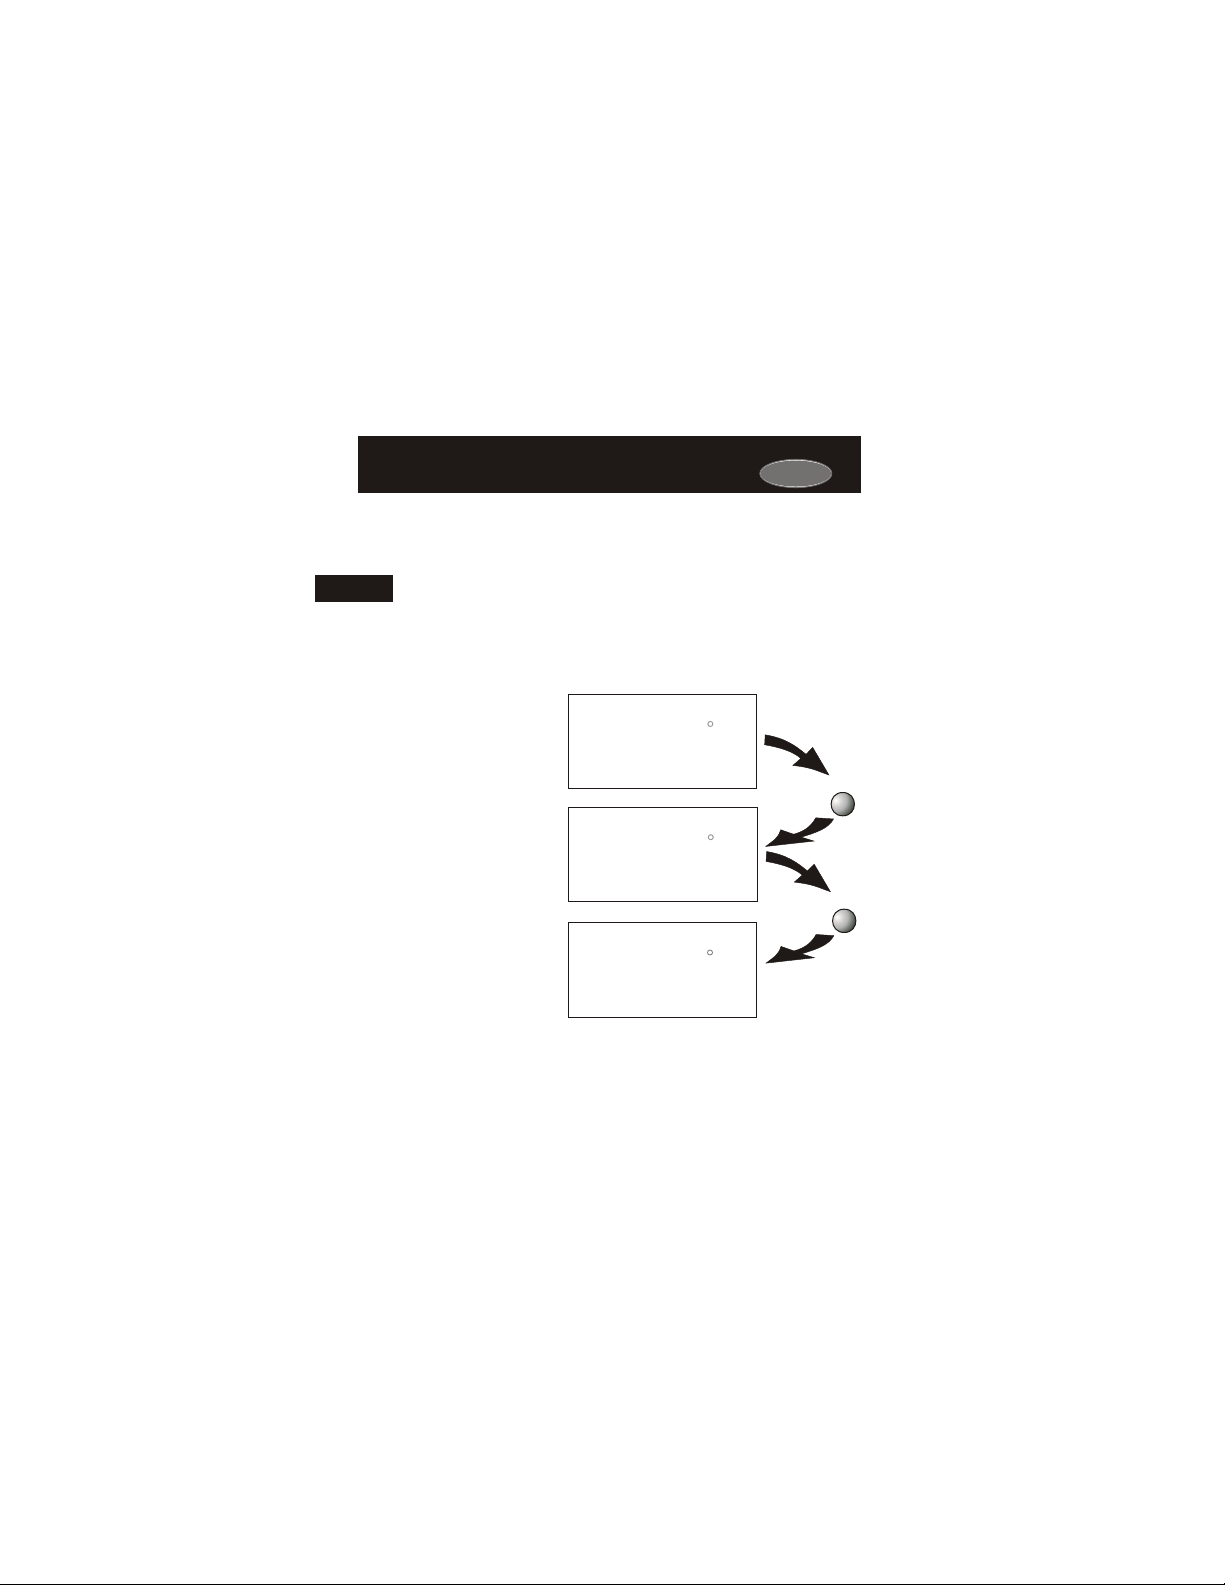
NON-PROGRAMMABLE WITH MANUAL-CHANGEOVER - If the
thermostat is configured to be a non-programmable thermostat with
4
Manual-Changeover, the following screens will be available by
pressing the MODE button.
Select the Mode by Pressing the MODE Button
Pm
Heating Only
The HEAT setting indicates the
temperature the room has to
reach before the furnace will
turn on to heat the room.
The COOL setting indicates the
reach before the air conditioner
Cooling Only
temperature the room has to
will turn on to cool the room.
OFF indicates both heating
systems are turned off.
Off
and air conditioning
I2:00
Su
I2:00
Su
I2:00
Su
OFF
70
Pm
70
Pm
68
76
70
Carrier
HEAT
Press
MODE
COOL
Press
MODE
Page 4.4
Operating Mode when the Thermostat
Operating Mode when the Thermostat
is Configured to be:
is Configured to be:
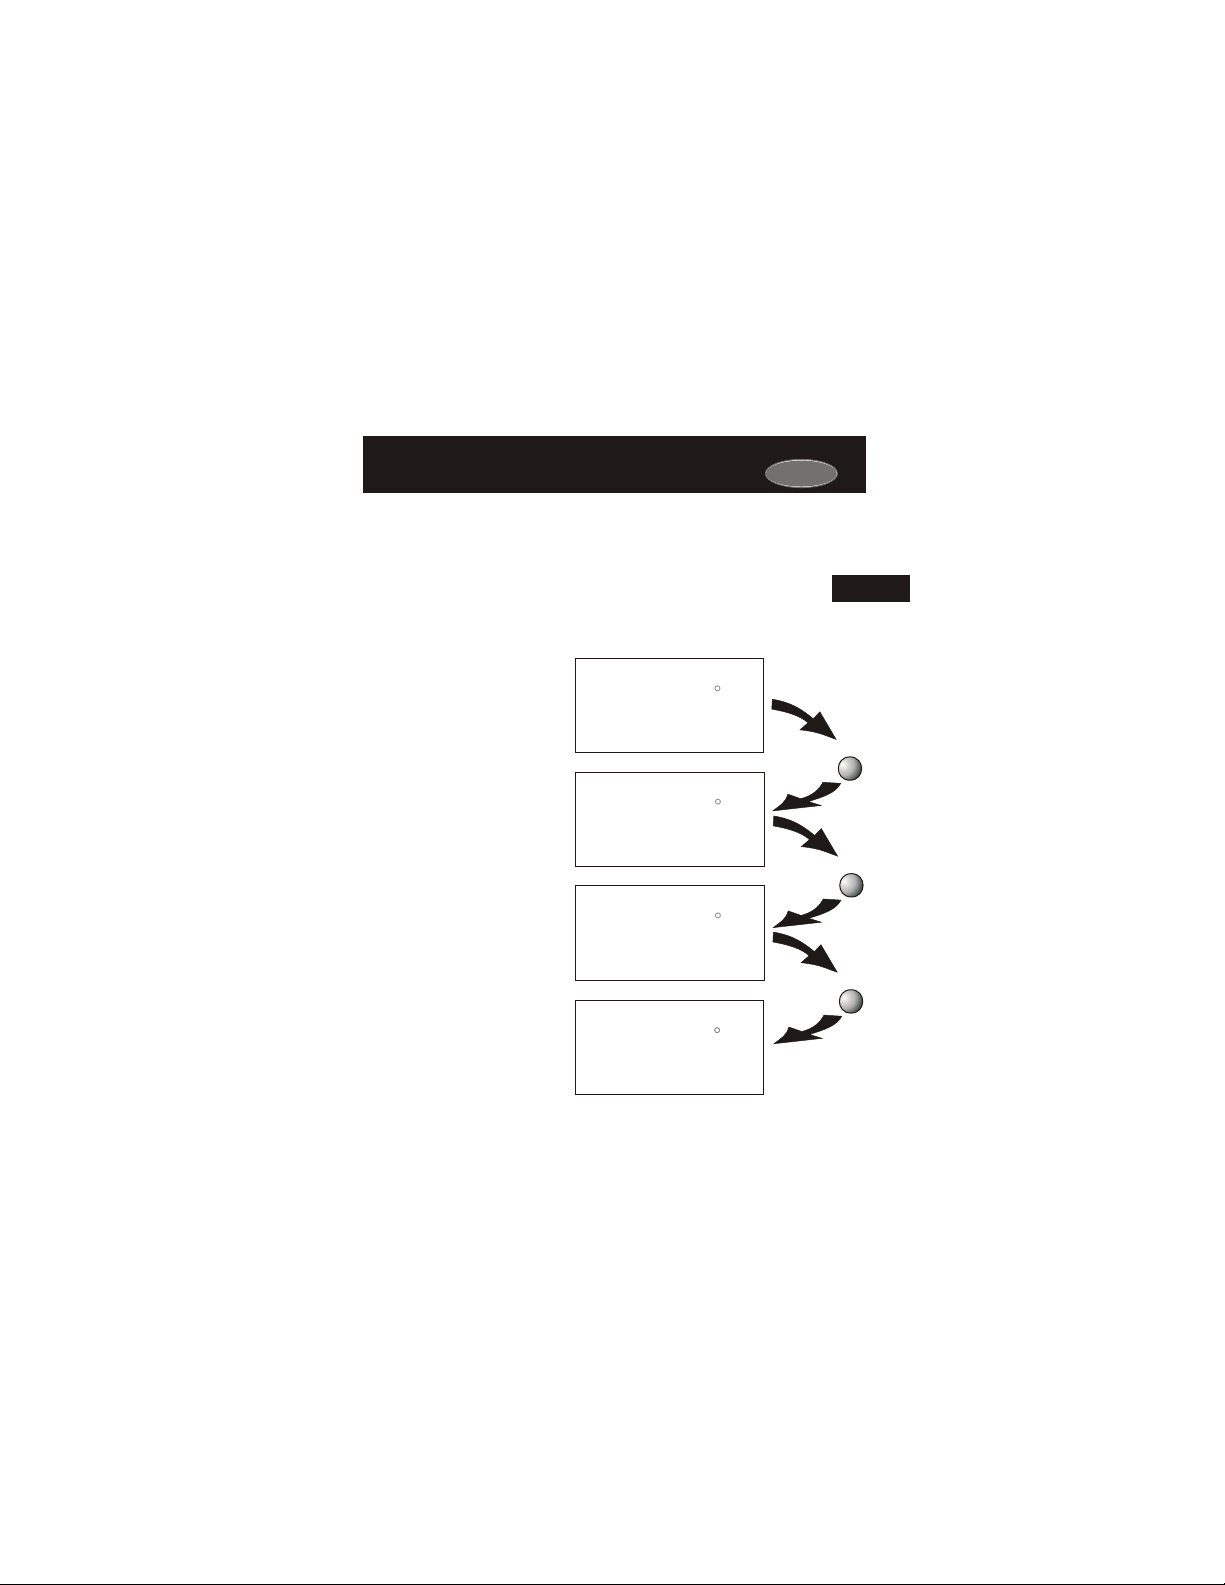
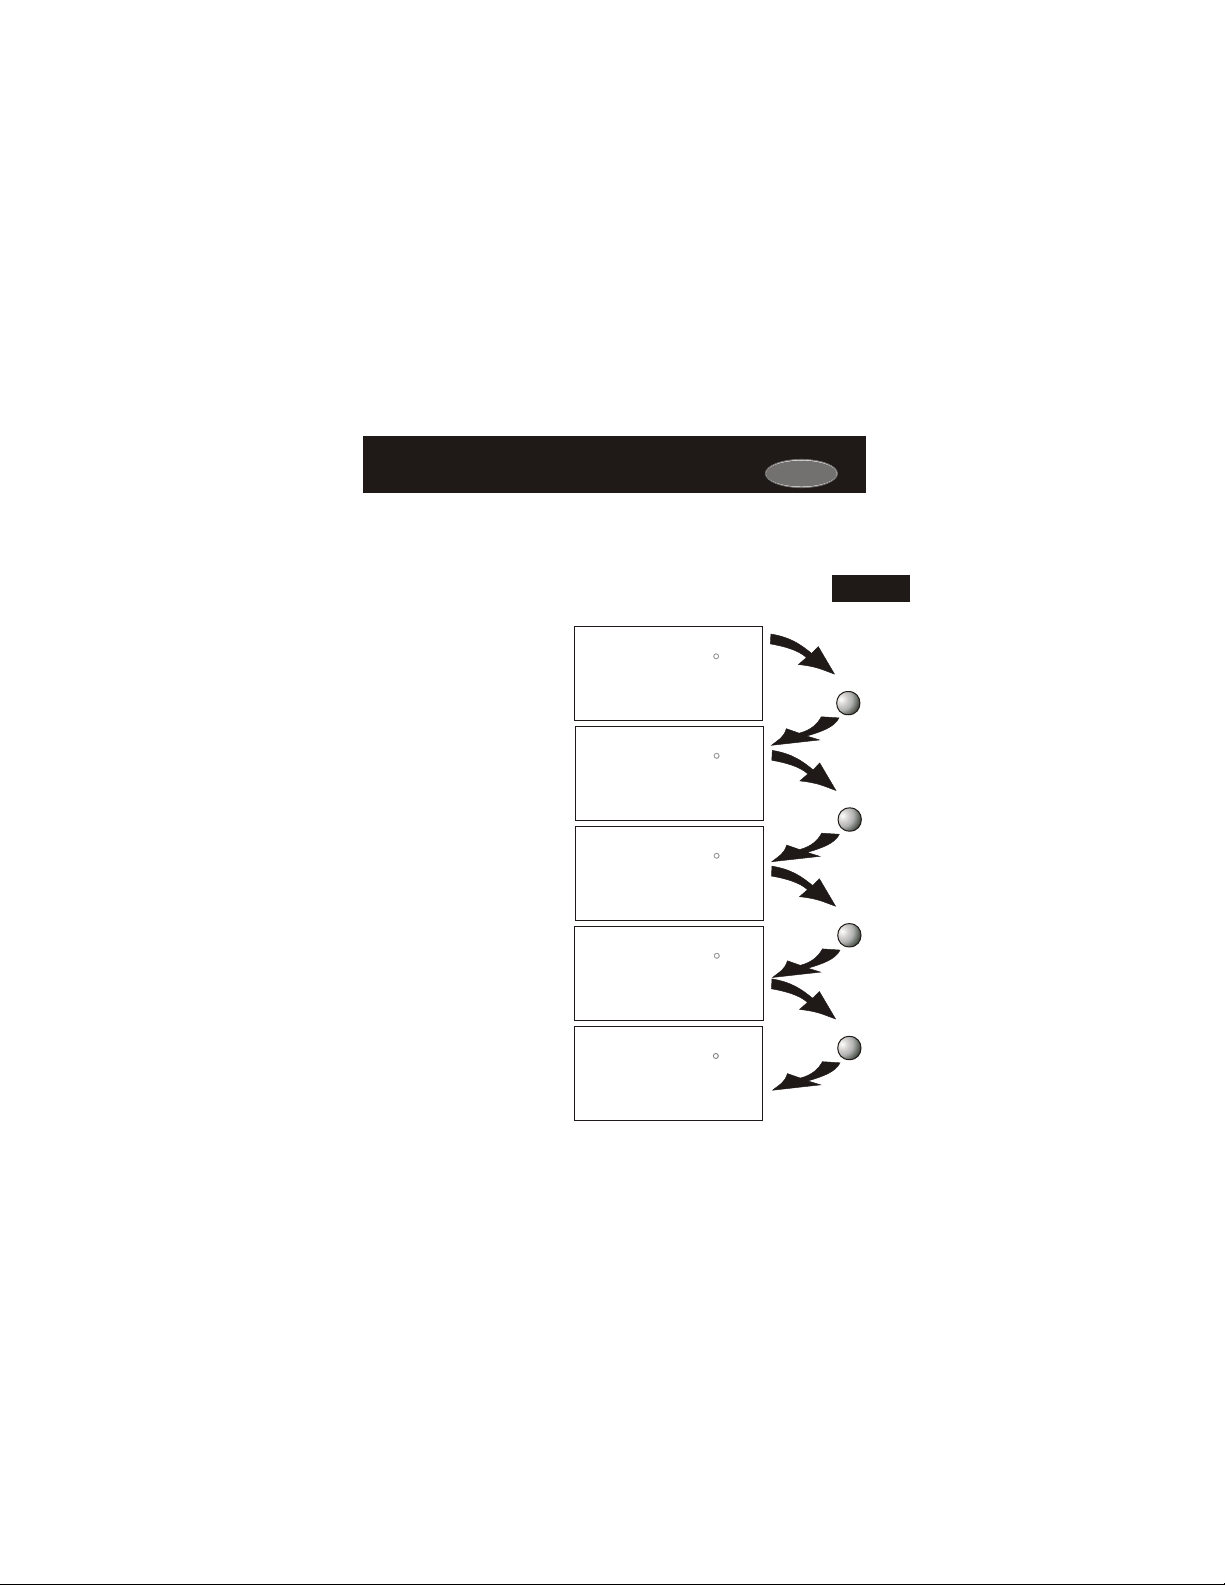
NON-PROGRAMMABLE WITH AUTO-CHANGEOVER - If the
thermostat is configured to be a non-programmable thermostat
with Auto-Changeover, the following screens will be available by
pressing the MODE button
Select the Mode by Pressing the MODE Button
Pm
Heating Only
The HEAT setting indicates the
temperature the room has to
reach before the furnace will
turn on to heat the room.
Cooling Only
The COOL setting indicates the
temperature the room has to
reach before the air conditioner
will turn on to cool the room.
Heating or Cooling
AUTO will automatically select
heat or cool based on room
temperature demand.
OFF indicates both heating
systems are turned off.
Off
and air conditioning
I2:00
Su
I2:00
Su
I2:00
Su
AUTO
I2:00
Su
OFF
70
Pm
70
Pm
70
Pm
HEAT
68
76
COOL
76
COOL
HEAT
68
70
Carrier
4
Press
MODE
Press
MODE
Press
MODE
Page 4.5
Carrier
Operating Mode when the Thermostat
Operating Mode when the Thermostat
is Configured to be:
is Configured to be:
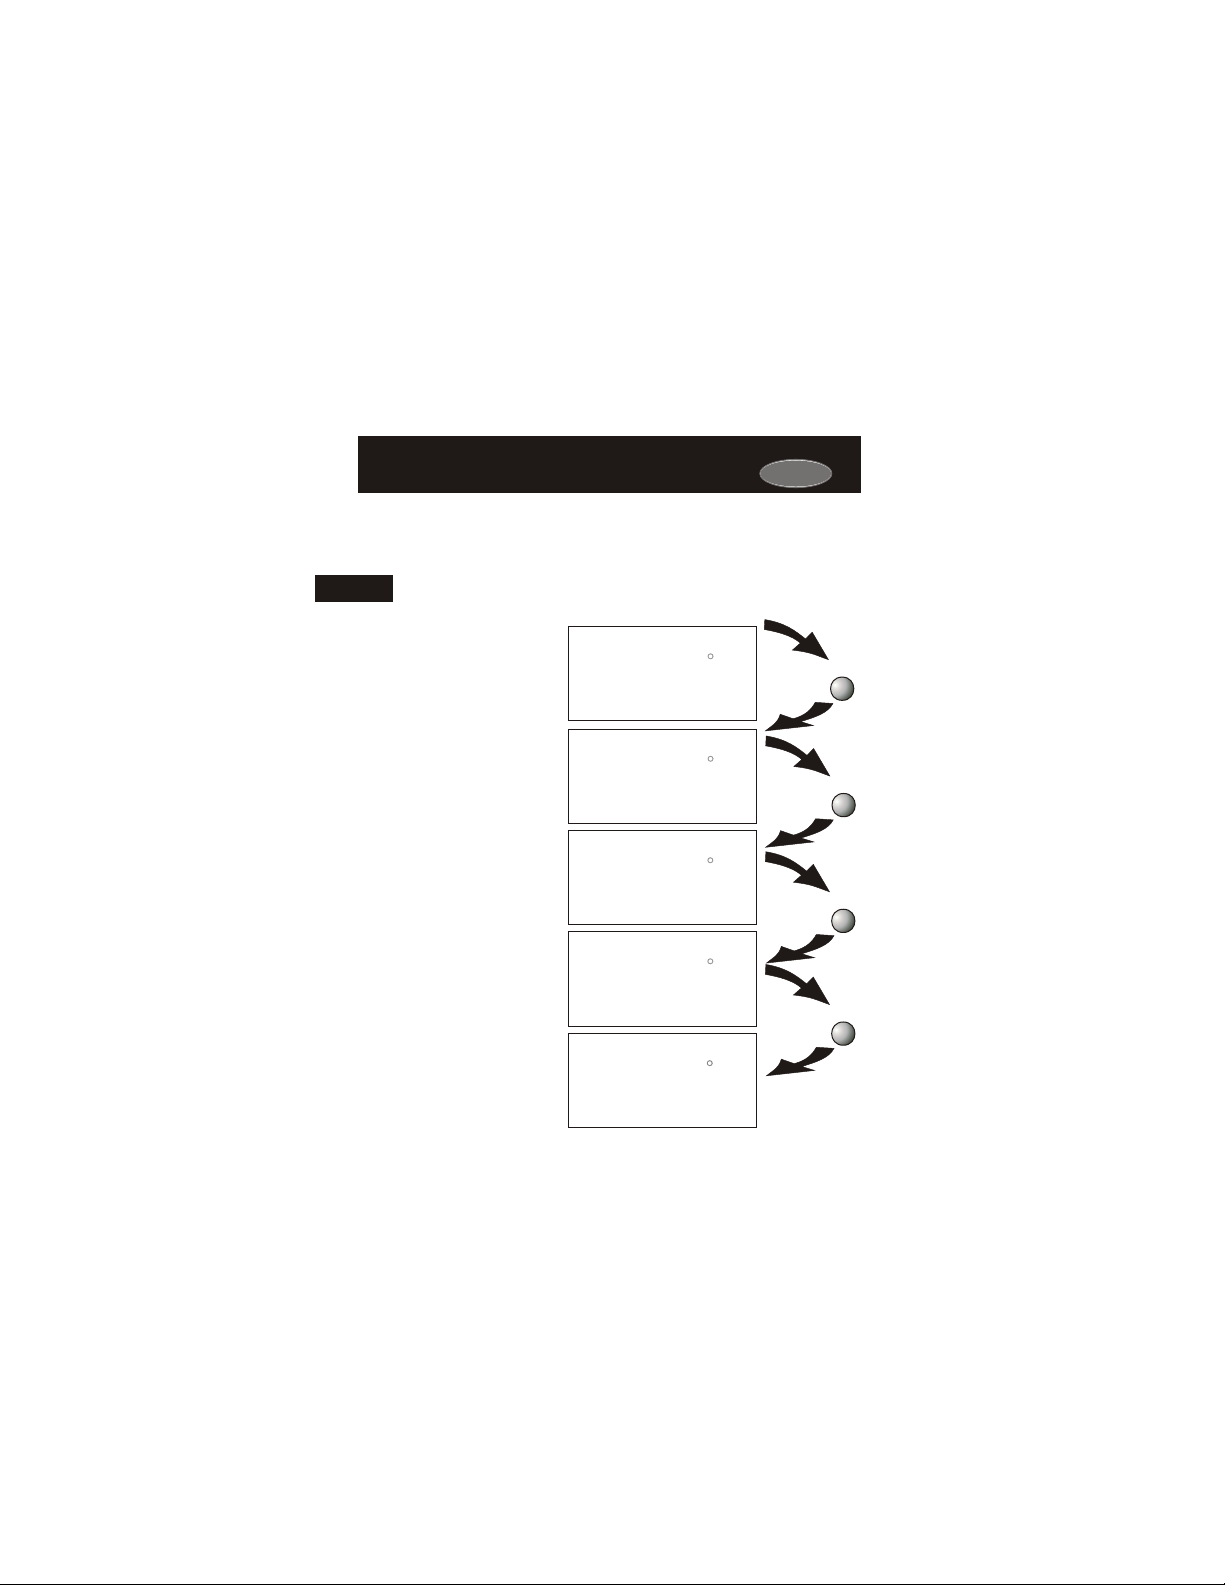
PROGRAMMABLE WITH MANUAL-CHANGEOVER - If the thermostat is
configured to be a programmable thermostat with Manual-Changeover, the
following screens will be available by pressing the MODE button.
4
Select the Mode by Pressing the MODE Button
Pm
Heating Only
The HEAT setting indicates the
temperature the room has to
reach before the furnace will
turn on to heat the room.
Cooling Only
The COOL setting indicates the
temperature the room has to
reach before the air conditioner
will turn on to cool the room.
Time Schedule for
Heating Only
The HEAT Program On setting
will activate the time period
program for the heating
setpoint ONLY (occupied or
unoccupied periods).
Time Schedule for
Cooling Only
The COOL Program On setting
will activate the time period
program for the cooling
setpoint ONLY (occupied or
unoccupied periods).
OFF indicates both heating
systems are turned off.
Off
and air conditioning
I2:00
Su
I2:00
Su
I2:00
Su
occupied
1
I2:00
Su
occupied
1
I2:00
Su
OFF
70
Pm
70
Program On
Pm
70
Program On
Pm
70
Pm
HEAT
68
76
COOL
HEAT
68
76
COOL
70
Page 4.6
Press
MODE
Press
MODE
Press
MODE
Press
MODE
Operating Mode when the Thermostat
Operating Mode when the Thermostat
is Configured to be:
is Configured to be:
PROGRAMMABLE WITH AUTO-CHANGEOVER - If the thermostat is
configured to be a programmable thermostat with Auto-Changeover,
the following screens will be available by pressing the MODE button.
Select the Mode by Pressing the MODE Button
Pm
Heating Only
The HEAT setting indicates the
temperature the room has to
reach before the furnace will
turn on to heat the room.
Cooling Only
The COOL setting indicates the
temperature the room has to
reach before the air conditioner
will turn on to cool the room.
Heating or Cooling
AUTO will automatically select
heat or cool based on room
temperature demand.
Time Schedule for
Heating or Cooling
Program On will activate the
time period program for the
heating and cooling
setpoints. (occupied or
unoccupied periods)
OFF indicates both heating
Off
and air conditioning
systems are turned off.
I2:00
Su
I2:00
Su
I2:00
Su
AUTO
I2:00
Su
occupied
1
I2:00
Su
OFF
70
Pm
70
Pm
70
Program On
Pm
70
Pm
HEAT
68
76
COOL
76
COOL
HEAT
68
76
COOL
HEAT
68
70
Page 4.7
Carrier
4
Press
MODE
Press
MODE
Press
MODE
Press
MODE

Carrier
Selecting Your Desired Temperature (adjusting setpoints)Selecting Your Desired Temperature (adjusting setpoints)
AUTO OR PROGRAM MODE
Pressing the UP or DOWN buttons in Auto or Program
modes will adjust both the heat and cool set temperatures
4
simultaneously. For more information on this see page 13.2.
Adjust the desired
Pm
I2:00
Su
AUTO
70
HEAT OR COOL MODE
Pressing the UP or DOWN buttons in Heat or Cool modes will
adjust only the heat or cool set temperature.
Pm
I2:00
Su
76
COOL
HEAT
68
76
COOL
set temperature with the
buttons.
Adjust the desired
set temperature with the
70
buttons.
Page 4.8

SECTION 5
Viewing the Temperature and Humidity SensorsViewing the Temperature and Humidity Sensors
Carrier
Section 5 Contents:
Viewing the Outside
Temperature..............................5.2
Viewing the Indoor
Humidity....................................5.3
5
Page 5.1
Carrier
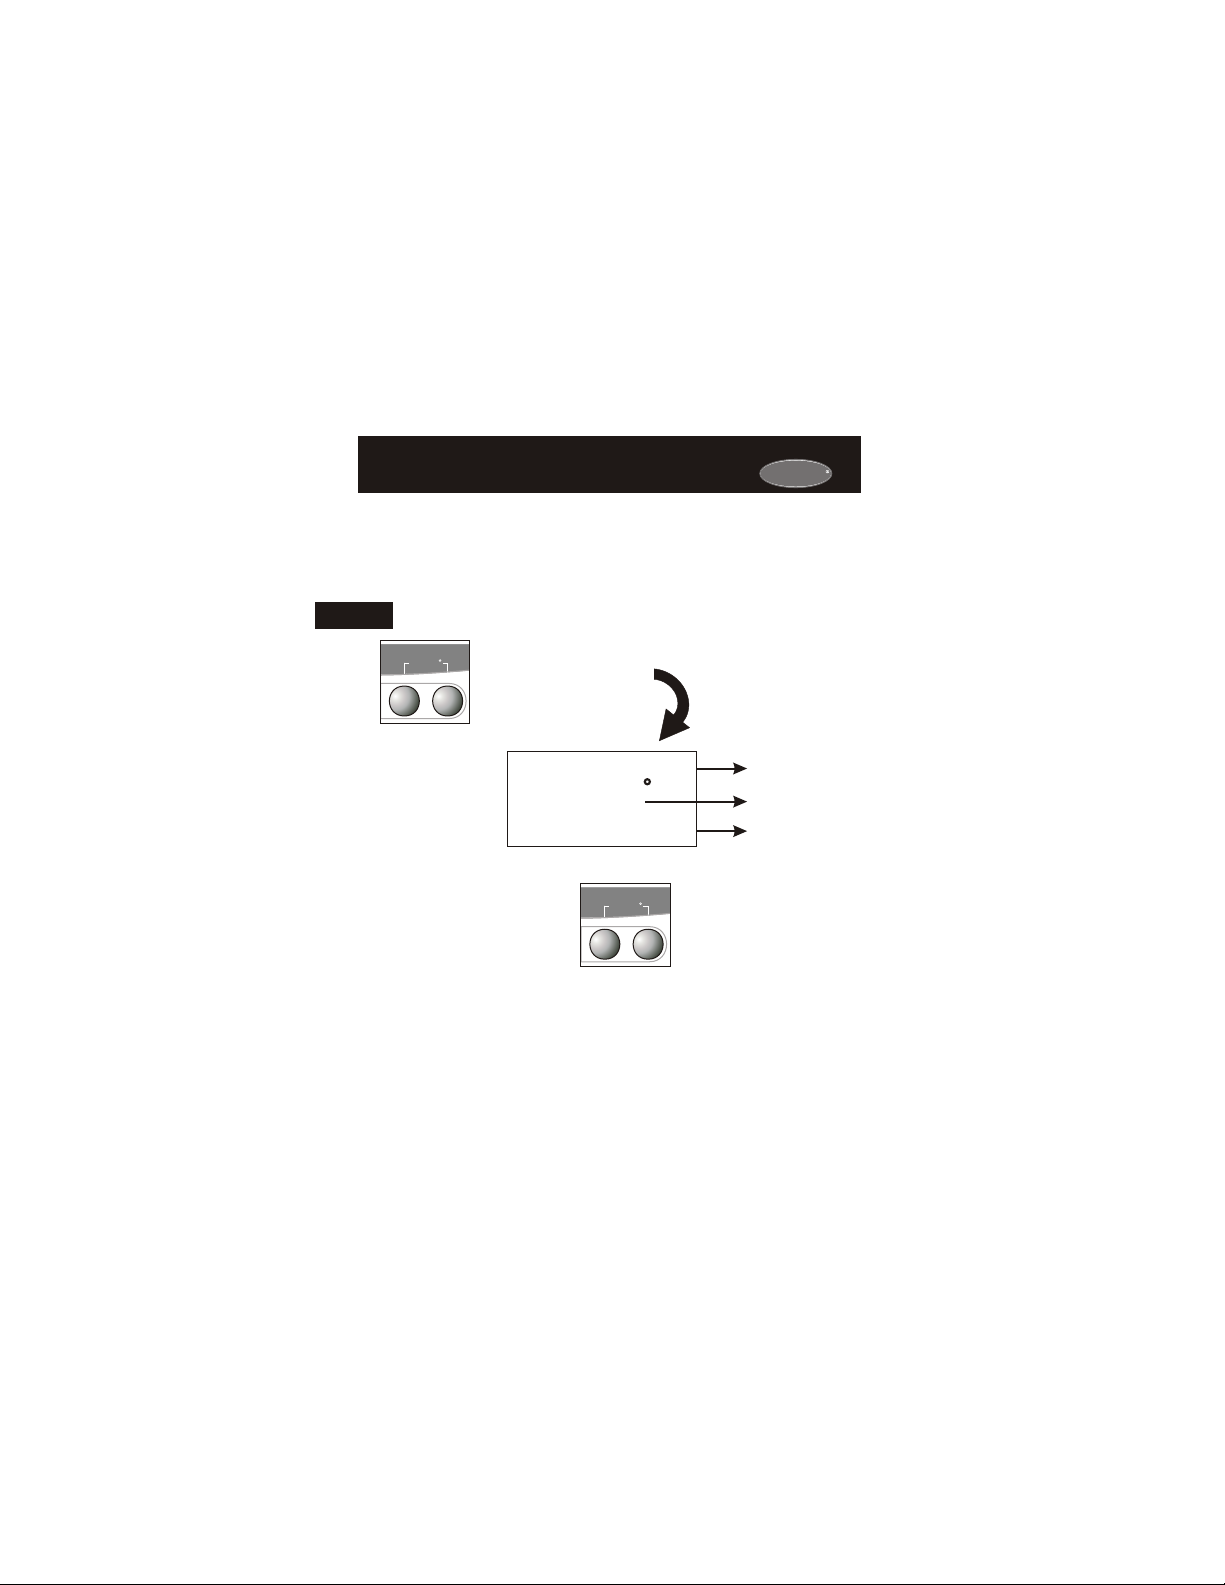
Viewing the Outside TemperatureViewing the Outside Temperature
Requires an outside sensor (optional accessory) to be installed (see
page 15.2 for wiring instructions). To read the temperature from the
outside sensor, press the PROGRAM and HOLIDAY buttons. The
display will then show the current outside temperature along with the
highest and lowest temperatures for the day.
5
PROGRAM
OUTSIDE
HOLIDAY
Press the PROGRAM
button. While holding
PROGRAM, press the
HOLIDAY button to view
the Outside temperature.
The highest and lowest
temperatures for the day
will be displayed along
with the current outside
temperature.
This reading is from the
sensor connected to RS2.
Press the PROGRAM
button. While holding
PROGRAM, press the
HOLIDAY button to leave
the Outside temperature
screen.
Note: If no sensors are connected 2 dashes [- -] will appear.
83
PROGRAM
OUTSIDE
H I
L O
HOLIDAY
92
Outside
68
Page 5.2
High temperature
for the day.
Current outside
temperature.
Low temperature
for the day.
Carrier
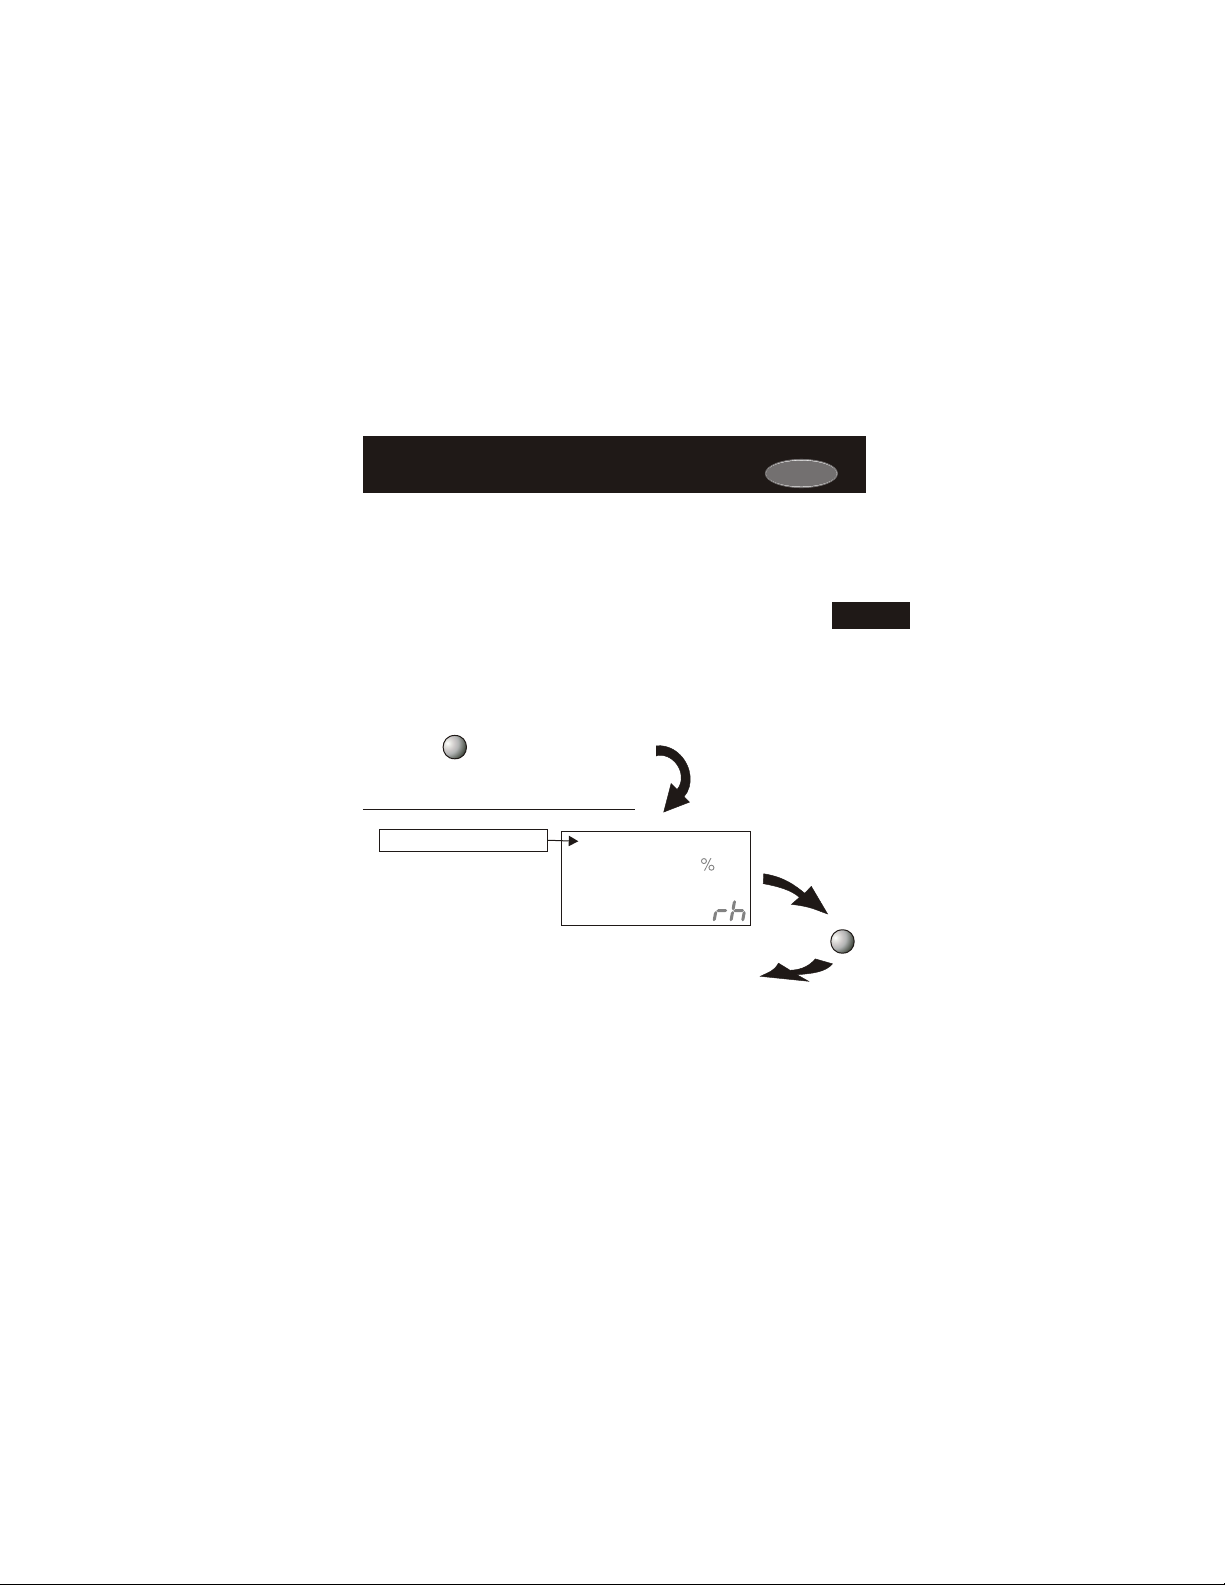
Viewing the Indoor HumidityViewing the Indoor Humidity
Requires the Humidity Module (optional accessory) to be installed.
To display the current humidity at the thermostat, press the
HUMIDITY button. The display will then show the current indoor
humidity along with the humidification setpoint (Section 9).
Note: The humidity reading will not appear unless the Humidity
Module has been installed. If the Humidity Module has not been
installed dashes will appear in place of the humidity reading.
5
HUMIDITY
Current Room Humidity
NOTE: Due to variations in environmental conditions, it is not always possible
to achieve the desired humidification or dehumidification setpoint.
To view the indoor humidity
reading, press the
HUMIDITY button
40
Press the HUMIDITY button
again to return the display
to normal operation.
Humidify
0
Setup
I
Press
HUMIDITY
Page 5.3

SECTION 6
Programming the Daily ScheduleProgramming the Daily Schedule
Section 6 Contents:
6
Programming a Daily
Schedule...................................6.2
Overriding the Daily
Schedule...................................6.6
Carrier
Page 6.1
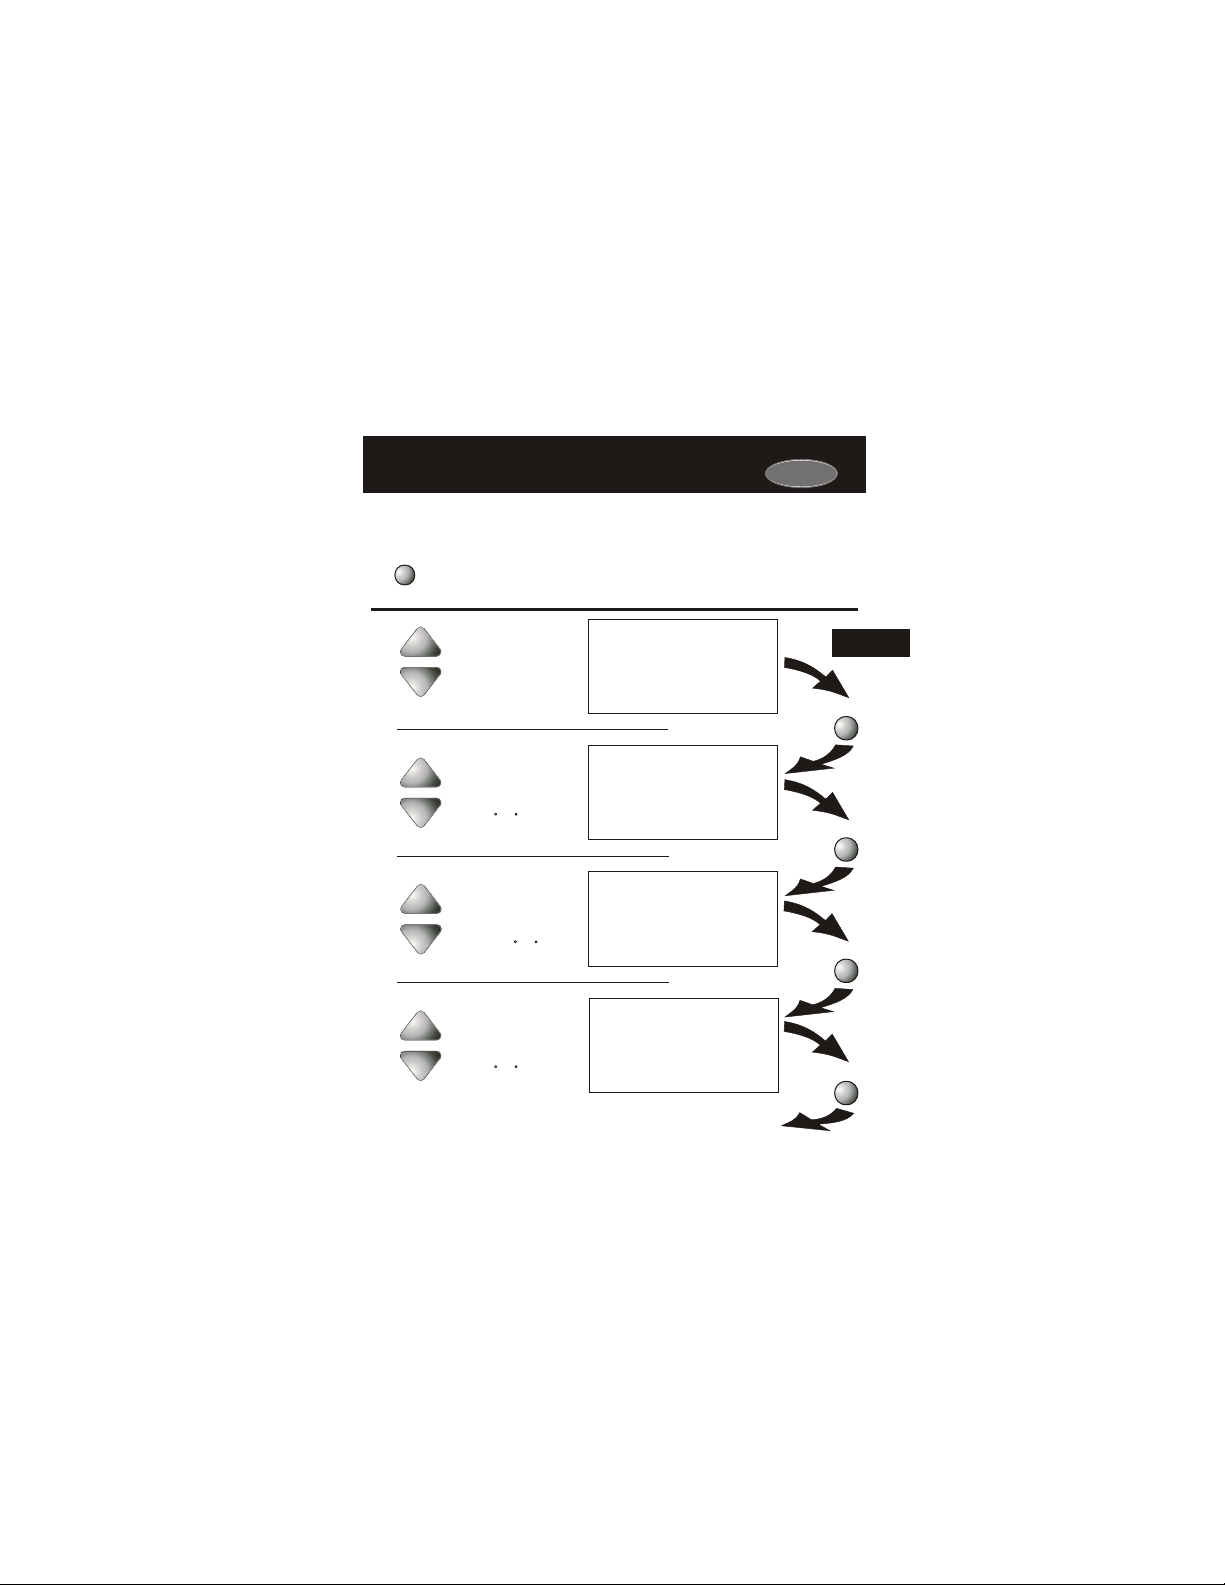
Programming a Daily ScheduleProgramming a Daily Schedule
Carrier
Press
PROGRAM
Press the PROGRAM button to enter time period programming.
Use the Programming Worksheet on the back cover
to help with this section.
Select the maximum # of
occupied periods to be
used on any one day.
Typically most installations
use only Occupied 1.
(1,2 or 3)
Adjust the cooling
setpoint for Occupied 1.
(35 - 99, OF )
Adjust the heating
setpoint for Occupied 1.
(OF, 35 - 99 )
Adjust the cooling
setpoint for unoccupied
periods.
(35 - 99, OF )
occupied
1
occupied
1
occupied
1
Unoccupied
Page 6.2
74
COOL
74
COOL
HEA T
72
85
COOL
Continued
MODE
MODE
MODE
MODE
6
Press
Press
Press
Press
 Loading...