


 ®
®
User
Manual
Lit # 98-2380/08-12

|
|
|
|
|
|
|
|
|
|
|
|
|
|
|
|
|
|
english |
3-24 |
|
|
Français |
25-46 |
|
|
Español |
47-68 |
|
|
Deutsch |
69-90 |
|
|
Italiano |
91-112 |

Table of Contents
Page Title |
Page # |
Welcome |
4 |
Important Info / Our Website |
5 |
|
|
Registering Online / Updating Course Data |
6 |
|
|
Battery Information |
7 |
Package Contents / Computer Requirements |
8 |
|
|
Controls/Parts Reference |
9 |
|
|
Button Functions |
10 |
Power On/Off and Backlight |
11 |
|
|
Getting Started/Main Menu |
12 |
|
|
Play Golf Mode |
13-14 |
Shot Distance Feature |
15 |
|
|
Play Golf Menu |
16 |
|
|
Options Menu |
17-20 |
Options Menu (Settings Submenu) |
19 |
|
|
Troubleshooting |
21-22 |
|
|
Warranty |
23 |
FCC Statement |
24 |
|
|
3

Introduction
Welcome
Dear Valued Consumer:
Congratulations on your purchase of the Bushnell Neo+ Golf GPS. We sincerely hope you will find your Bushnell product both enjoyable and easy to use. Knowing the exact distance for each shot will assist you in lowering your score and enhance your overall golfing experience.
This User Manual was created for you to get the most out of your new device and assist with the initial setup. It only takes a few minutes to read, after which you can immediately begin using your new Neo+ and enjoying its many features.
The Bushnell Neo+ is preloaded with over 30,000 golf courses worldwide, and ready to use out of the box with no membership fees and nothing more to download.
For updates to course files, you can obtain the latest course information at www. bushnell.igolf.com by setting up a free account and following instructions on the website. This will let you make sure the internally stored GPS data includes any newly added courses as well. You can also restore any courses you delete from the Neo+ memory by reloading them from the iGolf database.
Thank you for choosing Bushnell.
4

Introduction
Important Information
Legal Disclaimer
By using this product, you agree that Bushnell Outdoor Products will not be held legally responsible for any injury or damage to you or any person or property caused by the user’s improper operation and/or poor judgment while using this product.
Note: See Limited Warranty for other limitations to our liability.
Additional Information
The Global Positioning System (GPS), a network of 32 satellites orbiting Earth, is operated and maintained by the U.S. government. This GPS device requires at least 3 satellites to be acquired to accurately determine your position. Any change made to the system by the government could affect the accuracy and performance of this product.
Our Website: www.bushnellgolf.com
Bushnell Golf GPS Website www.bushnellgolf.com is an online resource for all our Golf GPS product owners, including product support, FAQs, etc. It also serves as a portal to access iGolf.com GPS course files to use with these Bushnell products. Setting up your iGolf.com membership will ensure your unit has access to the latest updated GPS course data.
5

Introduction
Registering and Updating Course Data
Setting up a free account and registering your Neo+ at www.bushnell.igolf.com is not required. However, doing so will allow you to update the preloaded GPS course data, and load any new courses. Registration is free and takes only a few minutes. Completing the registration will give you access to the latest GPS data for use on your device.
1.Using the provided cable, connect one end to the mini USB port on the front of your Neo+ and attach the other end to a USB port on your computer. The display will indicate “USB Mode” and your computer will recognize it as a standard USB mass storage device (no driver is required).
2.Go to www.bushnell.igolf.com, select ‘Register Now’, and enter the requested information, clicking “Next” and following the directions until your registration is complete.
Once your Neo+ has been registered, you may update the GPS data for an existing course or download a new course to it at anytime. First make sure your Neo+ is connected to the computer and that you are logged in to your iGolf.com account. Then, simply repeat these steps to update existing courses* or download other courses to your Neo+.
1.Select ‘GPS Courses’ from the header menu, enter the name of a golf course in the search bar, and select the ‘Search’ button.
2.Select the desired course from the results list to access the course download page.
3.Select ‘Download GPS & Scorecard’ to download the selected course files to your Neo+.
*Note: If you only play a limited number of courses on a regular basis, we recommend you update individual courses (or load new courses) one at a time. A “full sync” to update all the preloaded courses may take up to half an hour (depending on your download speed and other factors).
66

Introduction
Battery Information
Battery Charging
This product contains an internal rechargeable lithium-ion battery. Under normal operating conditions, a new battery will last 14 -16 hours on a full charge. However, battery life may be reduced due to a variety of factors (external temperature, etc). All rechargeable batteries lose their effective charge length over time.
The internal battery can be charged by connecting the included USB cable to the device and a computer. Alternatively, the battery can be charged by connecting the USB cable to the device and using the included adapter to plug the charger into a standard 110V wall outlet. If the battery is new or has been totally drained, allow six to eight hours for a full charge.
WARNING
Keep battery cover closed at all times. Risk of explosion if battery is replaced with incorrect type.
•Do not attempt to open, disassemble or service the battery. Battery must be replaced by qualified technician.
•Do not crush, puncture or short external contacts. Do not expose to temperatures above 140o F (60o C).
•Properly recycle or dispose of battery. Do not dispose in fire or water.
Firmware/Software Updates
Please check www.bushnellgolf.com periodically for the latest firmware and software releases.
7

Introduction
Package Contents / Computer Requirements
Package Contents
1 - Bushnell Neo+
1 - Belt Clip
1 - USB Cable
1 - AC/DC 5V Adapter
1 - Quick Start Guide
Computer Requirements*
USB (1.1 or 2.0) Port
OS: Windows 7/Vista/XP/2000 or Mac OSX **
*Required to transfer course data files.
**Windows is a registered trademark of Microsoft Corporation in the United States and other countries. Mac and Mac OS are trademarks of Apple Inc., registered in the U.S. and other countries.
Note: earlier versions of the Neo also included a CD-Rom containing a Sync App and Drivers. This CD is no longer included or necessary, as the new Neo+ comes preloaded with golf courses, ready to use. Your computer will recognize it automatically (no driver necessary) when you connect to the www.bushnell.igolf.com website to set up your account and download the latest updated course data.
8
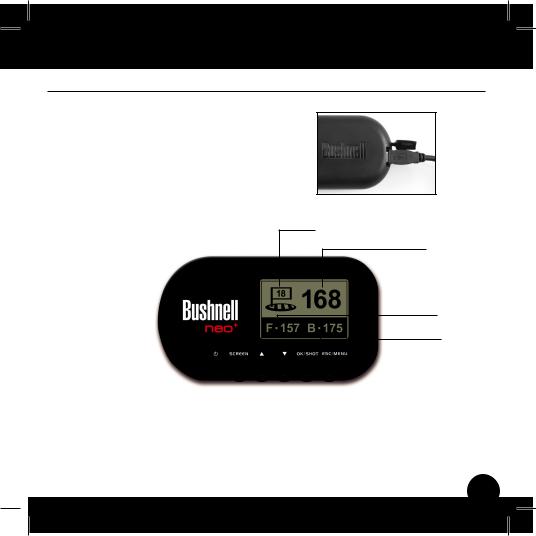
Parts / Controls
Controls and Parts Reference
USB Connection >
Hole #
Distance to the Center
Distance to the Front
Distance to the Back
Power Button / Backlight |
|
|
|
|
|
|
ESC / MENU Button |
|
|
|
|
|
|
|
|||
SCREEN Button |
|
|
|
|
|
|
OK / SHOT Button |
|
Up / Down Buttons |
|
|
|
|
|
|
|
|
9
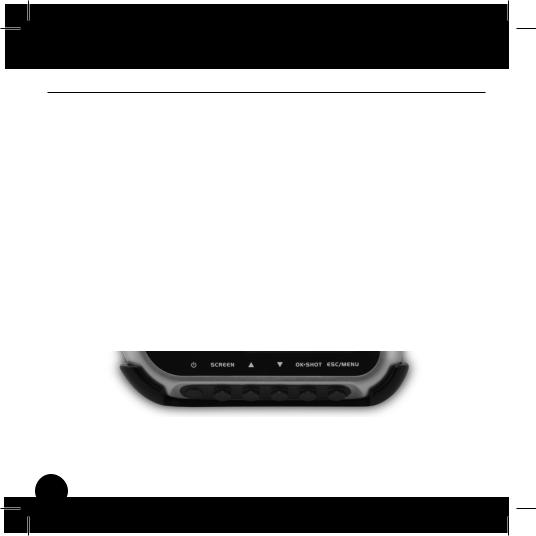
Control Functions
Button Functions
Power Button
•Turns the device on & off
•Turns the backlight on & off
SCREEN Button
•Displays distances to additional points of interest
Up Button
•Scrolls up
•Selects previous hole
Down Button
•Scrolls down
•Changes hole number (-)
OK/SHOT Button
•Selects highlighted option
•Activates Shot Distance
ESC/MENU Button
•Cancels current operation
•Returns to previous step/screen/menu
Power Button |
|
|
|
|
|
|
|
|
|
|
ESC / MENU Button |
|
|
|
|
|
|
|
|
|
|
||
|
|
|
|
|
|
|
|
|
|
||
|
|
|
|
|
|
|
|
|
|
||
|
|
|
|
|
|
|
|
|
|
|
|
SCREEN Button |
|
|
|
|
|
|
OK / SHOT Button |
||||
|
|
|
|
|
|
||||||
|
|
|
|
Up / Down |
Buttons |
||||||
10
Start Up
Power On/Off and Backlight
Power On
•Press and hold the power button until“Bushnell Neo+” appears (about 2 seconds).
Power Off
•Press and hold the power button until the screen goes blank*.
Backlight On/Off
•From any screen, press the power button to turn the backlight on.
•Press power button again to turn the backlight off.
*Note: the unit will automatically power off after 45 minutes if no buttons are pressed. To override this, enter the OPTIONS menu, select SETTINGS and change the AUTO OFF setting to “OFF”.
11
Main Menu
Getting Started / Main Menu
Ready to start using your Neo+ ?
First, be sure the battery has a full charge. If you are using it for the first time, it should be charged for 6 hours minimum (refer to “Battery Charging” on pg. 7 for details). Next, make sure you are outdoors, in a location with a clear view of the sky overhead, to ensure good reception of GPS satellite signals. Now, you’re ready to power up and begin to use your Neo+.
Hold down the Power button until you see the “Bushnell Neo+” startup screen, then release it.
You will see the Main Menu screen, which has only two items: PLAY GOLF and OPTIONS (Fig. 1).
Using the Neo+ menu system is simple:
1.Select (highlight) a menu item using the UP/ DOWN buttons.
2.Press the OK/SHOT button to enter it.
3.Press the ESC/MENU button to return to the previous menu level.
Battery |
Satellite |
Level |
Signal |
Fig. 1
12
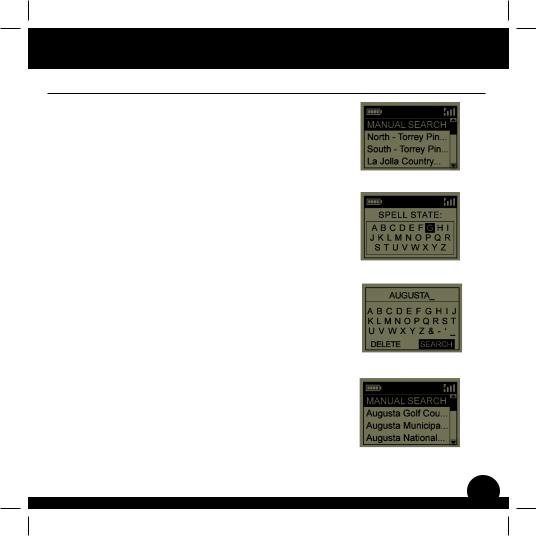
Play Golf
Play Golf Mode
With PLAY GOLF highlighted, press OK. The display will indicate that the unit is SEARCHING FOR LOCAL COURSES. If it does not, and you see this message: “Not enough satellites for local search. Press OK to start manual search.”, press OK/SHOT and follow the MANUAL SEARCH procedure described in the next paragraph*. When the search is complete, a list of golf courses in order of their distance from your current location is displayed (Fig. 2). Select the course you want from the list and press OK/SHOT.
A manual search option is also available. If no courses are found, or the one you want to play is not listed (as GPS info for new courses is added to the iGolf.com database, it will be available via your user account), select MANUAL SEARCH and press OK/SHOT, then enter the name of the state using the UP/DOWN buttons (Fig. 3). If you get multiple results, select the state from the list and press OK/SHOT, then enter the course name (at least the first few letters) (Fig. 4). When finished, select“SEARCH”and press OK/SHOT. You should then be able to select the course from the search results (Fig. 5).
*If you are indoors, or don’t have an unobstructed view of the sky outdoors, you may see the “Not enough satellites...” message when you enter the PLAY GOLF mode. You can press ESC/MENU to return to the Main Menu, move to a better location and/or see if the satellite signal indication improves, then press OK (with PLAY GOLF selected) to try a local course search again.
Fig. 2
Fig. 3
Fig. 4
Fig. 5
13
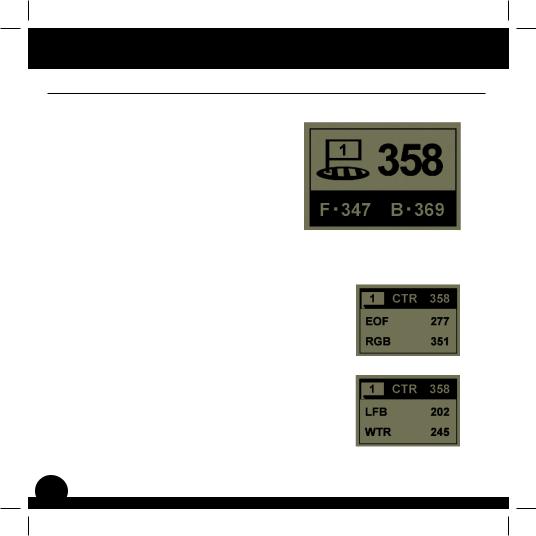
Play Golf
Play Golf Mode
|
Hole # |
Distance to Center |
||||
Once you have selected your course, the display |
|
|
|
|
|
|
will show you distances from your current location |
|
|
|
|
|
|
|
|
|
|
|
|
|
to the center (largest digits), front (F) and back (B) |
|
|
|
|
|
|
of the green for the first hole of the course (Fig. 6). |
|
|
|
|
|
|
The Neo+ will automatically advance to the next |
|
|
|
|
|
|
hole as you move around the course, but you can |
|
|
|
|
|
|
manually select a different hole than the current |
|
|
|
|
|
|
|
|
|
|
|
|
|
one at any time by pressing the UP/DOWN |
|
|
|
|
|
|
buttons. |
Distance to |
Distance to |
||||
|
Front |
|
Back |
|||
Press SCREEN to view the distance to additional |
|
|
|
Fig. 6 |
||
|
|
|
|
|
|
|
points for the current green (Fig. 7). Press the |
|
|
|
|
|
|
DOWN button to see the next screen of additional |
|
|
|
|
|
|
points (Fig. 8). |
|
|
|
|
|
|
|
|
|
|
Fig.7 |
||
Fig. 8
14
Play Golf
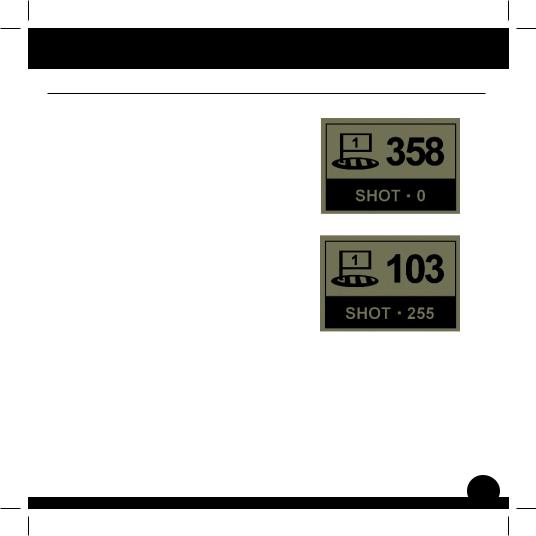
Shot Distance Feature
This feature allows you to easily check the distance between any two points and would normally be used to measure the length of your shot. To use it:
1.From the PLAY GOLF distance display, press the OK/SHOT button to activate the Shot Distance feature.
2.Press OK/SHOT again to establish a starting point (Fig. 9). The distance will automatically update as you move.
3.Once you reach your end position, press OK/SHOT to “freeze” the Shot Distance measurement (Fig. 10).
4.Press ESC/MENU to return to the previous screen at any time.
5.Press OK/SHOT again at any time to reactivate the Shot Distance feature and establish a new start position.
Fig. 9
Fig. 10
15
Play Golf
Play Golf Menu
PLAY GOLF MENU
When you are in “Play Golf” Mode, on the green distance display, pressing ESC/MENU will display the Play Golf Menu. Select an item from the menu and press OK/SHOT to use or display it:
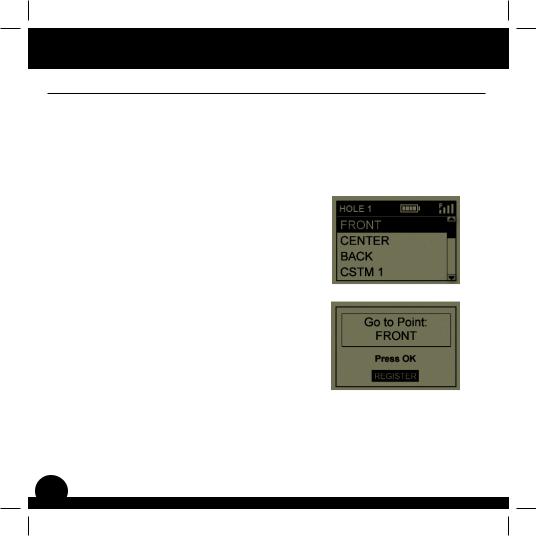
MAP GOLF HOLE: This feature allows you to edit the distances given for the various points (Front, Center, Back, etc.) on the current hole/green. To use the feature:
1.Highlight the point you want to re-map from the list and press OK/SHOT.
2.Stand at the desired location and press OK/ SHOT to register the point. Do not move until the process is complete.
3.Repeat this process for any other points you wish to map.
4.When finished, scroll to highlight “Save” and press OK/SHOT. The Neo+ will retain this setting along with the course data, so your revised distance will be displayed instead of the original distance next time you return to play this course.
SATELLITES: Displays the available GPS satellite relative positions and signal strength, along with an indication of the overall satellite reception quality (“STRONG”, “GOOD”, “WEAK”).
Fig. 11
Fig. 12
BATTERY LEVEL: Displays the remaining battery power level as a percentage.
16
Options
Options Menu
RESUME PLAY: Returns to the distance display for the current hole. Any edits you made via the Map Golf Hole option will be shown instead of the original distance.
EXIT: Exits the Play Golf Menu and returns to the Main Menu.
OPTIONS MENU
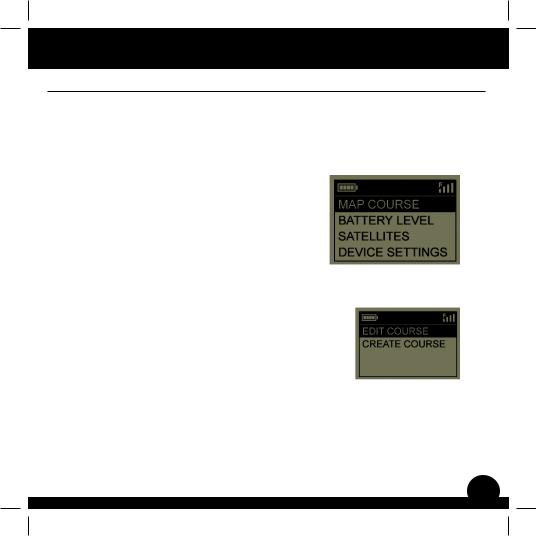
From the Main Menu, select (press the DOWN button to highlight) OPTIONS and press OK/SHOT to access the following features and settings in the Options Menu (Fig. 13):
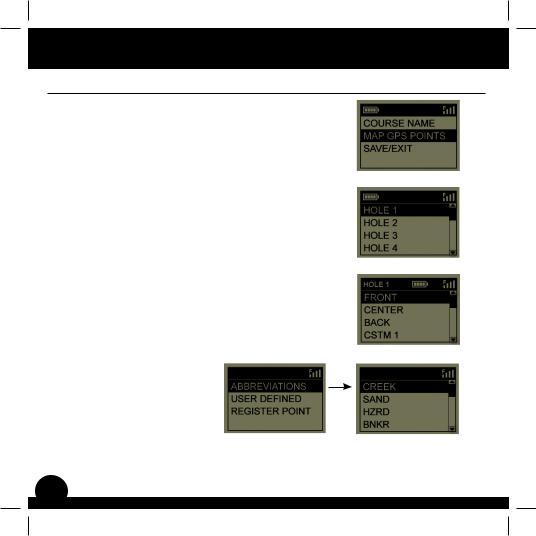
MAP COURSE: This feature allows you to customize existing course data (adding new points like bunkers, hazards, etc.), or you can even create an entire new file of course data (if you want to map a course not yet in the
iGolf database). Here’s how to use the MAP COURSE feature:
1.Select EDIT COURSE to customize an existing course, or select CREATE COURSE to begin setting up an entirely new set of data, and press OK/SHOT (Fig. 14).
2.If you need to revise or create the course name, select COURSE NAME and press OK/
SHOT. Names are limited to fourteen (14) |
Fig. 14 |
characters and should be different from |
|
any of your other golf courses. |
|
3.Using the UP/DOWN buttons, scroll to highlight each character and press OK/SHOT. To delete characters, scroll to “BKSPC” and press OK. When finished, scroll to highlight “SAVE” and press OK/SHOT.
17
Options
Options Menu
4. Next, select MAP GPS POINTS and press |
|
|
OK/SHOT (Fig. 15). Select the hole (Fig. 16), |
|
|
then the default name for the point (Fig. 17) |
|
|
and press OK/SHOT. |
|
|
5. You can select a name for it from a list of |
|
|
common ABBREVIATIONS (Fig. 18, 19) or |
Fig. 15 |
|
give it your own USER DEFINED name. After |
||
|
||
you have selected or created a name for the |
|
|
custom point, make sure you are standing |
|
|
at the point, and press OK/SHOT to register |
|
|
it. You can also just accept the default name |
|
|
and go directly to REGISTER POINT. |
|
BATTERY LEVEL: Displays the remaining battery power level as a percentage.
SATELLITES: Displays the available GPS satellite relative positions and signal strength, along with an indication of the overall satellite reception quality (“STRONG”, “GOOD”, “WEAK”).
Fig. 16
Fig. 17
Fig. 18 |
Fig. 19 |
18

Options
Options Menu (Settings Submenu)
SETTINGS: Press OK/SHOT to view the Settings Submenu, which lets you set the following user preferences for the display and GPS operation. Use the UP/DOWN buttons to highlight an item, then press OK/SHOT to select it. Make the desired adjustment using UP/DOWN, then press OK/SHOT to confirm your setting and return to the Settings Submenu. When finished setting your preferences, press ESC/MENU to exit the SETTINGS Submenu and return to the OPTIONS menu. The SETTINGS Submenu items are:
CONTRAST: Use the UP/DOWN buttons to adjust the display contrast to improve viewing in different lighting conditions.
AUTO ADVANCE: The default is ON. Select OFF if you don’t want the Neo+ to automatically advance to the next hole on the course as you play, and would prefer to use the UP/DOWN buttons to manually select the displayed hole yourself.
AUTO OFF: The default “ON” setting will shut power off after 45 minutes of inactivity (no buttons pressed) to avoid unnecessary battery drain. Selecting “OFF” will allow the unit to remain powered on with no time limit, until manually turned off.
YARDS/METERS: Select YARD or METER distance units.
WAAS: This allows you to turn off location correction used to improve GPS accuracy within the United States. Commonly known as WAAS, this system of satellites and ground stations provides GPS signal corrections for much of the U.S. You may need to adjust the WAAS setting according to geographic location. The default setting is “ON”.
19

Options
Options Menu
STABILIZER: Allows you to select the GPS position refresh mode. With the Stabilizer set to “ON”, the Neo+ will not refresh the GPS distance readings when the unit is not in motion (when you are not walking). This can be useful if you experience fluctuating distance readings when you remain stationary. The default setting is “ON”.
DEFAULT: Pressing OK will display “RESTORE?” -select YES and press OK again to reset the Neo+ GPS to its factory default condition. All items in the OPTIONS menu (as listed above) will return to their original settings. Any changes you made to the distances using MAP GOLF HOLE in the PLAY menu will be replaced with the original distance data for the course (which can be useful as a quick way to start over and re-map the holes). However, any new course data you have created using the MAP COURSE>CREATE COURSE option will not be lost.
DELETE COURSE: This option erases a golf course data file from the Neo+’s internal memory. Highlight DELETE COURSE in the OPTIONS menu and press OK/ SHOT. Select the golf course from the list and press OK/SHOT. To verify you want to delete the course, select YES and press OK/SHOT. If you need to restore the deleted course data at a later date, simply connect the Neo+ to your computer, log on to your iGolf account and download it.
ABOUT: Displays the software version.
20
Troubleshooting
Problem: The backlight does not work.
•Turn the Neo+ off for ten (10) seconds and try again. Re-test in a lowlight environment.
•From the Main Menu, press and release the power button.
Problem: The Neo+ will not turn off.
•Press and hold power button for at least ten (10) seconds.
Problem: There is no GPS data for the selected golf course.
•Confirm mapped GPS points were saved prior to exiting the Map Course page.
•Confirm the Neo+ has acquired at least 3 satellites (using SATELLITES on the PLAY GOLF or OPTIONS menus).
Problem: There are no custom points available for my golf course.
•No custom points are included in the GPS data for the course.
•If you created your own custom points, remember to Save them prior to exiting the Map Course page.
Problem: GPS points cannot be mapped/registered on device.
•Ensure satellite strength is sufficient to obtain accurate data.
•Move to a clear, unobstructed view of the sky (i.e. no trees, buildings or objects that might interfere GPS satellite strength).
•Time of day may affect GPS signal strength. Try again during different hours of the day.
Problem: Entire golf course name cannot be entered in the space provided.
•Limit the golf course name to fourteen (14) characters.
•Abbreviate the name so it is different from other golf courses on device.
21

Troubleshooting
Problem: There are “not enough satellites”.
•Move to a clear, unobstructed view of the sky (i.e. no trees, buildings or objects that might interfere with GPS satellite strength).
•The time required to acquire satellites may increase to 5-10 minutes for
first use or if the Neo+ has not been used for an extended period of time.
Problem: The distances the Neo+ displays seem inaccurate.
•Confirm the correct golf course and hole number were selected from the Play Golf screens.
•Move to a clear, unobstructed view of the sky (i.e. no trees, buildings or objects that might interfere GPS satellite strength).
•Go to the Settings page menu and set WAAS to “Off”.
•Go to the Settings page menu and set Stabilizer to “On”.
•Remap GPS points using the Neo+ and confirm accuracy.
•Report any GPS or scorecard errors found to iGolf.com.
Problem: The distances on the Neo+ are in yards, not meters.
•Go to the Settings Submenu in OPTIONS and set YARDS/METERS to “Meters”.
Problem: The distance displayed on the Neo+ is fluctuating.
•Go to the Settings page menu and set Stabilizer to “On”.
•Move to a clear, unobstructed view of the sky (i.e. no trees, buildings or objects that might interfere GPS satellite strength).
•Go to the Settings page menu and set WAAS to “Off”.
22

Warranty
ONE Year LIMITED WARRANTY
Your Bushnell® product is warranted to be free of defects in materials and workmanship for one year after the date of purchase. In the event of a defect under this warranty, we will, at our option, repair or replace the product, provided that you return the product postage prepaid. This warranty does not cover damages caused by misuse, improper handling, installation, or maintenance provided by someone other than a Bushnell Authorized Service Department.
Any return made under this warranty must be accompanied by the items listed below:
1.A check/money order in the amount of $10.00 to cover the cost of postage and handling
2.Name and address for product return
3.An explanation of the defect
4.Proof of Date Purchased
5.Product should be well packed in a sturdy outside shipping carton, to prevent damage in transit, with return postage prepaid to the address listed below:
IN U.S.A. Send To: |
IN CANADA Send To: |
Bushnell Outdoor Products |
Bushnell Outdoor Products |
Attn.: Repairs |
Attn.: Repairs |
9200 Cody |
25A East Pearce Street, Unit 1 |
Overland Park, Kansas 66214 |
Richmond Hill, Ontario L4B 2M9 |
For products purchased outside the United States or Canada please contact your local dealer for applicable warranty information. In Europe you may also contact Bushnell at:
Bushnell Germany GmbH
European Service Centre
Mathias-Brüggen-Str. 80
D-50827 Köln
GERMANY
Tel: +49 221 995568-0
Fax: +49 221 995568-20
This warranty gives you specific legal rights.
You may have other rights which vary from country to country.
©2012 Bushnell Outdoor Products
23
FCC Statement
FCC Compliance Statement
This device complies with Part 15 of the FCC interference limits for Class B digital devices FOR HOME OR OFFICE USE. These limits are designed to provide reasonable protection against harmful interference in a residential installation, and are more stringent than “outdoor” requirements.
Operation of this device is subject to the following conditions; (1) This device may not cause harmful interference, and
(2) this device must accept any interference received, including interference that may cause undesired operation.
This equipment generates, uses and can radiate radio frequency energy and, if not installed and used in accordance with the instructions, may cause harmful interference to radio communications. However, there is no guarantee that interference will not occur in a particular installation. If this equipment does cause harmful interference to radio or television reception, which can be determined by turning the equipment off and on, the user is encouraged to try to correct the interference by one or more of the following measures:
·Reorient or relocate the receiving antenna.
·Increase the separation between the equipment and receiver.
·Connect the equipment into an outlet on a circuit different from that to which the receiver is connected.
·Consult the dealer or an experienced radio/TV technician for help.
The device does not contain any user-serviceable parts. Repairs should only be made by an Authorized Bushnell repair center. Unauthorized repairs or modifications could result in permanent damage to the equipment, and will void your warranty and your authority to operate this device under Part 15 regulations.
The shielded interface cable which is provided must be used with the equipment in order to comply with the limits for a digital device pursuant to Subpart B of Part 15 of FCC Rules.
Specifications and designs are subject to change without any notice or obligation on the part of the manufacturer.
24

Table des matières
Titre de la page |
Page # |
Bienvenue |
26 |
Informations importantes / Notre site internet |
27 |
|
|
Inscription en ligne / Mise à jour des données sur les |
28 |
parcours de golf |
|
|
|
Informations concernant la batterie |
29 |
|
|
Contenu de la boîte / Configuration requise de l'ordinateur |
30 |
Description des commandes et des pièces |
31 |
|
|
Fonctionnalités des touches |
32 |
|
|
Marche-Arrêt et Rétro-éclairage |
33 |
Démarrage / Menu principal |
34 |
|
|
Mode Jouer au golf |
35-36 |
|
|
Fonction Distance du coup |
37 |
Menu Jouer au golf |
38 |
|
|
Menu OPTIONS |
39-42 |
|
|
Menu Options (Sous-menu Paramètres) |
41 |
Dépannage |
43-44 |
|
|
Garantie |
45 |
|
|
Directive DEEE |
46 |
25

Introduction
Bienvenue
Cher utilisateur,
Nous vous remercions pour votre achat du GPS Golf Neo+ de Bushnell. Nous espérons sincèrement qu’il se révèlera agréable et facile à utiliser. Connaître la distance exacte à jouer avant chaque coup vous permettra d’améliorer votre score et l’ensemble de votre jeu.
Ce Manuel d’utilisation a été élaboré pour vous permettre de tirer le meilleur parti de votre nouvel appareil et vous fournir une assistance au démarrage. Quelques minutes suffisent pour le lire et vous pourrez ensuite commencer immédiatement à utiliser votre nouveau Neo+ et apprécier ses nombreuses fonctionnalités.
Plus de 30 000 parcours de golf situés dans le monde entier sont préenregistrés dans le Neo+ de Bushnell. Prêt à l’emploi et sans frais d’inscription, vous n’avez rien de plus à télécharger.
Pour les dernières mises à jour et informations sur les parcours, rendez-vous sur le site Internet www.bushnell.igolf.com, créez gratuitement un compte et suivez les instructions qui s’affichent. Ce site vous permettra de vous assurer que les données GPS stockées dans votre appareil intègrent les parcours les plus récents. Vous pouvez également réintégrer les parcours effacés de la mémoire Neo+ en les rechargeant depuis la base de données iGolf.
Merci d’avoir choisi Bushnell.
26

Introduction
Informations importantes
Avertissement légal
En utilisant ce produit, vous reconnaissez que Bushnell Outdoor Products ne peut être tenue légalement responsable en cas de blessure ou de dommage causé par un usage impropre et/ou par une négligence de l’utilisateur lors de l’utilisation du produit, et pouvant vous affecter ou affecter toute autre personne ou tout autre bien.
Remarque : Voir la section Garantie pour les autres limitations de notre responsabilité.
Informations complémentaires
Le système de positionnement à capacité globale (GPS - Global Positioning System), un réseau de 32 satellites en orbite autour de la Terre, est géré et maintenu par le gouvernement américain. Cet appareil GPS requiert au moins l’acquisition de signaux de 3 satellites pour déterminer précisément votre position. Toute modification effectuée dans le système par le gouvernement pourrait affecter l’exactitude et la performance de ce produit.
Notre site internet : www.bushnellgolf.com
Le site internet du GPS Bushnell pour le golf www.bushnellgolf.com, est une ressource accessible en ligne, mise à la disposition de toutes les personnes ayant acquis notre GPS pour le golf. Ce site web offre un service client, une FAQ, etc., et sert de portail pour accéder aux fichiers de données des parcours GPS, utilisables sur les produits Bushnell. En devenant membre sur iGolf.com, vous pourrez accéder, à l’aide de votre appareil, aux dernières mises à jour des données GPS.
27

Introduction
Inscription en ligne /
Mise à jour des données sur les parcours de golf
Il n’est pas nécessaire de créer un compte gratuit ni d’enregistrer votre Neo+ sur www.bushnell. igolf.com.
Néanmoins, l’ouverture d’un compte et l’enregistrement de votre Neo+ vous permettront de mettre à jour les données GPS des parcours préchargés ainsi que de charger les nouveaux parcours. L’inscription est gratuite et ne prend que quelques minutes. En vous inscrivant, vous bénéficierez d’un accès aux dernières mises à jour des données GPS à utiliser sur votre appareil.
1.Connectez une extrémité du câble fourni au mini-port USB, situé à l’avant de votre Neo+, et connectez l’autre extrémité à la prise USB de votre ordinateur. L’affichage indiquera « USB Mode » (Mode USB) et votre ordinateur reconnaîtra l’appareil en tant que mémoire de masse USB standard (aucun pilote n’est requis).
2.Rendez-vous sur www.bushnell.igolf.com, sélectionnez « Inscrivez-vous maintenant » et saisissez les informations demandées. Puis, cliquez sur « Suivant » et suivez les instructions jusqu’à ce que votre inscription soit finalisée.
Une fois votre Neo+ enregistré, vous pourrez mettre à jour les données d’un parcours GPS existant ou télécharger un nouveau parcours à tout moment. Tout d’abord, assurez-vous que votre Neo+ est connecté à l’ordinateur et que vous êtes connecté(e) sur votre compte iGolf.com. Puis, effectuez les étapes suivantes, que ce soit pour mettre à jour des parcours existants ou en télécharger de nouveaux sur votre Neo+*.
1.Sélectionnez « GPS Courses » (Parcours GPS) dans le menu principal, puis saisissez le nom d’un parcours de golf dans la barre de recherche et appuyez sur le bouton « Search » (Rechercher).
2.Sélectionnez le parcours de votre choix parmi la liste de résultats ; vous serez alors redirigé(e) vers la page de téléchargement.
3.Sélectionnez « Download GPS & Scorecard » (Télécharger GPS et Carte de score) pour télécharger les fichiers sélectionnés sur votre Neo+.
*Remarque : Si vous avez l’habitude de jouer sur un nombre de parcours limité, nous vous recommandons de mettre à jour les parcours individuels (ou d’en charger de nouveaux) un par un. Une « synchronisation complète » pour mettre à jour tous les parcours préchargés peut prendre un certain temps (en fonction de votre vitesse de téléchargement et d’autres facteurs).
28

Introduction
Informations concernant la batterie
Chargement de la batterie
Ce produit contient une batterie interne au lithium-ion rechargeable. En conditions normales de fonctionnement, une batterie neuve dure 14 à 16 heures à pleine charge. Cependant, un certain nombre de facteurs (température extérieure, etc.) peuvent réduire la durée de vie de la batterie. Toutes les batteries rechargeables perdent leur charge effective avec le temps.
La batterie peut être chargée en connectant le câble USB fourni à l’appareil et à un ordinateur. La batterie peut également être chargée en branchant le câble USB à l’appareil et en utilisant l’adaptateur fourni pour brancher le chargeur sur une prise murale standard 220 V. Si la batterie est neuve ou complètement déchargée, compter six à huit heures pour la recharger complètement.
AVERTISSEMENT
Le compartiment de la batterie doit être fermé en tout temps. Le remplacement de la batterie par une batterie inadaptée est susceptible d’entraîner un risque d’explosion.
•Ne pas tenter d’ouvrir, de démonter ou de réparer la batterie. La batterie doit être remplacée par un technicien qualifié.
•Ne pas écraser, percer ou endommager les points de contact externes. Ne pas exposer à des températures supérieures à 140° F (60° C).
•Recycler ou éliminer la batterie de manière adaptée. Ne pas jeter au feu ou dans l’eau.
Mises à jour des logiciels/micrologiciels
Veuillez régulièrement consulter le site www.bushnellgolf.com pour obtenir les dernières versions des logiciels et micrologiciels.
29

Introduction
Contenu de la boîte / Configuration requise de l’ordinateur
Contenu du kit
1 - Neo+ de Bushnell
1 - Clip pour ceinture
1 - Câble USB
1 - Adaptateur 5 V AC/DC
1 - Guide d’utilisation rapide
Configuration requise de l’ordinateur*
Port USB (1.1 ou 2.0)
Système d’exploitation : Windows 7/Vista/XP/2000 ou Mac OSX **
*Requise pour transférer les fichiers de données sur les parcours.
**Windows est une marque déposée de Microsoft Corporation aux États-Unis et dans d’autres pays. Mac et Mac OS sont des marques de commerce d’Apple Inc., déposées aux États-Unis et dans d’autres pays.
Remarque: les versions précédentes du Neo incluaient également un CD-Rom contenant une application de synchronisation et des pilotes. Ce CD n’est plus inclus, ni nécessaire, car le nouveau Neo+ est livré avec des parcours de golf pré-enregistrés, prêts à l’emploi. Votre ordinateur détectera l’appareil automatiquement (aucun pilote n’est requis) lorsque vous vous connecterez au site www.bushnell.igolf.com pour créer votre compte et télécharger les dernières mises à jour des parcours.
30
 Loading...