

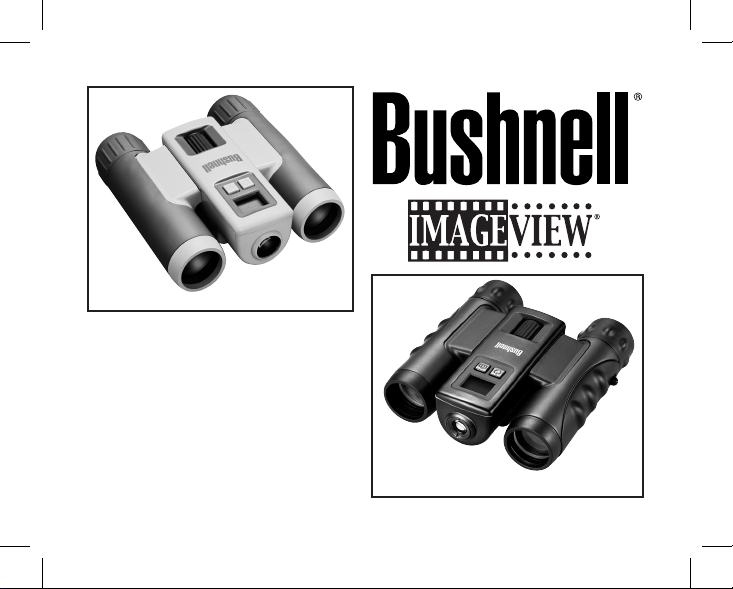
Model #s: 111026 / 111027
LIT. #: 98-0828/02-07
Instruction
Manual
Model 11-1026
Model 11-1027


LANGUAGES
English .............4
Français ......... 20
Español.......... 36
Deutsch ......... 52
Italiano .......... 68
Português ...... 84

4
WARNING
Make sure you download any pictures from your camera BEFORE removing
or changing batteries, unless you have been using an SD card rather than the
internal memory for photo storage. We recommend you download all current
photo files for safekeeping before storing the ImageView away if you are not
using an SD card in the camera, in case the batteries become depleted during
extended storage.
WARNING
Do NOT look directly at the sun through your binoculars.
Doing so may cause permanent eye damage.
NOTE: To reset the camera if you experience problems or if the display becomes
unresponsive, remove the batteries for at least one minute, then re-install them.
This may result in the loss of all photos/videos stored in the internal memory.

5
Congratulations on your purchase of the Bushnell ImageView®
binocular! The Bushnell ImageView binocular takes the technology
of digital photography and combines it with a high-quality compact
binocular. This allows you to observe sporting events, wildlife, scenic
vistas or anything you would normally use a binocular for, and then
save the image in a built-in attached digital camera. You can then
download these images to your computer and e-mail them to your
friends and family, print out the picture using the included software or
save them in a photo album for future use. Before using the product,
please read the instructions contained in this manual and take time
to familiarize yourself with the different parts and features of the
product.
English
6
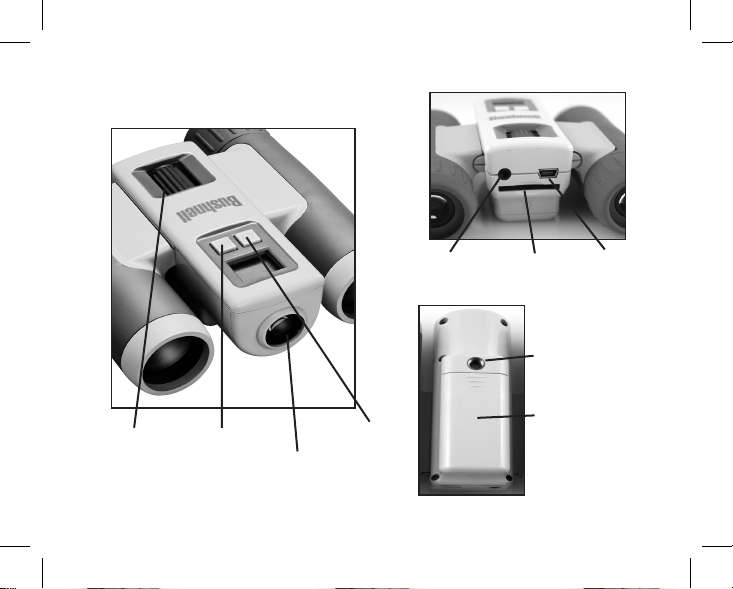
Camera and Binocular Parts Guide
Snap
Button
Mode
Button
Camera
Lens
Binocular
Focus
Remote
Jack
USB
Port
Card
Slot
Battery
Compartment
Tripod
Socket
(Slide Open In
Direction of Arrow)

7
CAMERA PARTS
1.e camera is powered by two AAA alkaline, lithium, or NiMh batteries (not included). Insert batteries
into the compartment, with the springs in contact with the negative (flat) end of each battery. A power
meter on the left center of the display indicates battery condition.
2. Insert an SD card ("upside down" with metal contacts facing up) in the slot if greater storage is desired.
You may use SD cards (not MMC cards) up to 1 GB capacity. e camera has 8 MB of internal memory
which can hold over 100 photos, so a card is not necessary. However, the internal memory contents will be
lost if the batteries are removed or die-unlike photos stored on an SD memory card. A 256 MB standard
speed SD card is available in most consumer electronics or computer stores and a is good choice for your
ImageView.
3. Press and hold the MODE button until the camera turns on. e camera will turn off automatically after
about one minute if no buttons are pressed. Note: when the camera is connected to a computer via the supplied
USB cable, the camera will power on automatically, and draw power from the computer with no battery drain.
4. Hold the ImageView steady and press SNAP to take a picture (or start/stop shooting a video, when the
camera is in video mode). e camera focus is preset to take sharp photos from appoximately 35 feet to
infinity.
5. When using a tripod, you can help avoid the effects of camera shake by plugging the supplied remote
shutter release into the jack next to the SD card slot, and using the button on the remote rather than SNAP
to take photos.
Setup and Basic Operation

8
e ImageView will imprint the date and time in the bottom right corner of your photos. To
set the current date and time, after turning on the camera, press and hold both the MODE and
SNAP buttons at the same time, until the display begins to flash. e display now shows the
last two digits of the year. Press the MODE button to move the cursor to the second digit if
necessary. Press the SNAP button to advance the digit to the current year ("07" for 2007, etc).
en press MODE to go to the next number, which is the month. Again, use SNAP to change
this to the current month. Following the month display is: date, hour (24hr format), minute,
and second-continue to set these following the same process using the MODE and then SNAP
buttons. When you have completed all of the date/time settings, the display will stop flashing
and return to normal. Note that you will need to reset the date/time after replacing batteries.
Your ImageView is already set to high resolution and quality right out of the box, and it is
not necessary to use the MODE settings and make any changes to get good results by simply
pressing the SNAP button to take photos. However, as you might want to shoot a video clip,
delete one or more previous photos, or explore other options, we recommend you review the
available mode options listed on the following pages. Briefly pressing the MODE button will
step through these operational modes in the listed order, and you will see the icon for each
mode along with its current setting on the display. Use the SNAP button to select the desired
setting for any mode. If you make no changes, and the SNAP or MODE button is not pressed
within 5 seconds, the camera will return to normal operation and display.
Using the Operational Modes/Setting Date & Time

9
Mode Icon Settings Description
Video Video
Camera
OFF, High
(640x480 pixels
per frame, 15 fps),
Low (320x240
pixels)
Select "Hi" (recommended) or "Lo" video resolution
instead of "OFF" to put the camera in video mode.
Wait a few seconds for the camera to automatically
return to the normal display, then begin shooting by
pressing SNAP. e counter will show elapsed timeup to the 53 (Hi) or 132 (Lo) second maximum for
each video clip. Press SNAP again to stop shooting.
e counter will advance by one, indicating the
video file has been saved. Return to the video mode
setting and select OFF to reset the camera to still
photo mode.
Quality Hq or Lq High, Low Select "Hi" (recommended) or "Lo" quality to
choose the amount of file compression, which affects
the size of the photo file. "Lo" allows more photos
to be stored in memory, but at reduced quality.
Resolution Hi or Lo High (640x480
pixels), Low
(320x240 pixels)
Select "Hi" (recommended) or "Lo" resolution,
based on your preference for better looking photos
(Hi) or being able to take a greater number of
photos (Lo).
Using the Operational Modes (Bold indicates default settings)

10
Mode Icon Settings Description
Line Frequency 60 or 50 60 Hz, 50 Hz Set to match the AC power frequency (cycles) of
your country. is ensures that stills and videos shot
under fluorescent lighting appear normal.
Continuous CT OFF, 3, 5 Select 3 or 5 frames to shoot a rapid series of photos
instead of a single frame when SNAP is pressed
(in normal still photo mode). To cancel, enter this
mode again and select OFF.
Memory Access MEM Sto (USB Mass
Storage), PC (USB
Camera)
Select "Sto" to access the internal or card memory
when the camera is connected to a computer with
the USB cable. "PC" allows the camera to be
used as a live USB/PC camera (note that the 8x
magnification and lack of close focus capability
limits usefulness in most size rooms)
Delete Last LSt+Trash
Can
None-press SNAP
to delete the last
photo or video
Select this mode and press SNAP to delete only the
last photo or video you took. e counter will go
down one number.
Using the Operational Modes

11
Mode Icon Settings Description
Delete All ALL+Trash
Can
None-press SNAP
to delete all photo
and video files
Select this mode and press SNAP to erase the entire
memory contents (the counter resets to zero).
Use this after downloading your files, to clear the
memory so you can take new photos. If "Delete All"
is selected accidently, simply wait a few seconds and
the camera will return to normal operation.
Format FOr+Trash
Can
None-press SNAP
to format card or
internal memory
If you are using a new SD card, or one previously
used in other devices, we recommend you select
Format and press SNAP before you start taking
photos, to the card is setup with the correct data file
system for this camera. Note that formatting a card
erases its contents-please be sure you have backed up
any previous files first.
Self-Timer Clock OFF or On Photo is taken after a 10 second delay when SNAP
is pressed (in normal still photo mode.) is can be
used to avoid accidently shaking the camera when
the SNAP button is pressed. If the remote shutter
cable is available, it should be used instead of the
self timer when the camera is tripod mounted. e
timer automatically cancels after use.
Using the Operational Modes

12
USING THE IMAGEVIEW WITH YOUR COMPUTER:
1. The camera will be recognized as a USB mass storage device (if it is set to "STO" and not "PC"),
which means no special drivers are required for all operating systems later than Windows 98 (Me,
2000, XP.) Mac OS 9 and OSX are also compatible. If you have a PC running Windows 98,
you must install the driver found on the included CD-ROM BEFORE CONNECTING THE
CAMERA TO YOUR PC.
2. If you have a computer OS as listed above that is USB mass storage compliant, a new disc icon will
appear in Windows Explorer (under “My Computer”) as a new “Removable Disc” after plugging in
the USB cable from the Imageview. Mac users will see the new disc device appear on their desktop.
Clicking on the new disc icon will show the contents, a folder named “DCIM.” The image folder
inside this contains your photos, stored as JPEGs (.jpg file format). They may then be opened,
edited, renamed and saved using any photo or graphics software that accepts .jpg files. If you do not
have software that will open .jpg files, you should install MGI Photosuite (Windows only) from the
included CD-ROM. See “Software Installation” for instructions.
3. After you have copied or opened and saved the photo files to your computers hard drive, you
may disconnect the Imageview camera (NEVER disconnect the camera while files are still being
transferred to your computer.) Before disconnecting, you should “eject” or stop the removable disc
representing the camera to avoid an error message (not necessary with Windows XP).
4. See the following pages for full step by step instructions to download your photos.

13
System Requirements (Minimum)
Soware Installation
Transferring e Photos & Videos to Your PC - Step by Step
OS: Windows® 98/98SE/2000/ME/XP
CPU: MMX Pentium® 200MHZ equivalent or faster (Pentium® III 500 MHz for PhotoSuite5™)
Memory: 32MB minimum (64MB recommended for PhotoSuite)
SVGA video card w/2MB VRAM, 800x600 screen display, 16 bit High color
200 MB available hard disk space (if installing PhotoSuite)
Internal USB Port
If you are using Windows 98, you must install drivers before connecting the camera to your PC. Insert the CD-ROM
into your computer’s CD drive; it will auto-run and the install screen will be displayed. Select “Install Driver”, then
follow the directions. After installation, restart your computer. Windows 2000, ME, and XP do not require drivers,
as the camera uses the USB mass storage standard , allowing the photo files to be accessed as if they were stored on
an external hard drive. For any Windows OS, if you are not already using photo editing software you prefer, you may
install Roxio PhotoSuite® from the CD-ROM. Be sure to read the “Release Notes” completely, noting any tips or
potential issues relevant to your PC configuration and OS.
1. Be sure the driver has been installed first if you are on Windows 98/98SE.
2. Connect the supplied cable to the ImageView’s USB port, then directly to a main USB port on your computer-do
not use front panel/keyboard USB ports or unpowered “hubs”.
WARNING: Make sure you download any picture from your camera before you remove the
batteries from the camera.

14
Transferring e Photos & Videos to Your PC continued
3. e LCD display will indicate “STO”, and the ImageView will be recognized as a standard “USB
Mass Storage” device. is means that the camera files can be easily viewed, edited, or copied to your
hard drive, just as if they were stored on an external hard drive or a CD-ROM.
4. (is step is not required with Windows XP, simply use the options in the pop-up window to view, copy
or edit your photos). Open My Computer or Windows Explorer. e camera will be seen as a new
“Removable Disk” with an unused drive letter assigned to it. Double click this new “Disk” icon, open
the “DCIM” folder inside, then the folder(s) inside that (“100MEDIA” ,etc). Your photos/videos are
the files inside-they have the prefix “IMG__” followed by a number, same as seen earlier on the camera’s
display when you review photos. Single clicking any file should show a small preview image.
5. Click “Edit>Select All” (or click on one photo, contol+click to select multiple photos), then
“Edit>Copy to Folder” (in Windows menus). Select an existing folder on your hard drive, such as “My
Pictures”, or create a new folder (“Hawaii Vacation”, etc), then click “OK” to transfer copies of the
photo files you want.
6. After the photos are transferred to your hard drive, you can disconnect the camera. Windows 2000
may produce a screen warning that you have disconnected a USB device without stopping or ejecting
the “disk” first (your photo files will not be harmed). If so, check the box that adds an icon to your
system tray or taskbar. en next time you finish transferring photos, you can click that icon first, and
“Stop the USB Mass Storage Device” before disconnecting the camera. (On Mac computers, you should
“eject” the “disk” that appeared on your desktop when the camera was connected.)

15
Transferring e Photos & Videos to Your PC continued
7. You’re now ready to open the photo files in any photo editing software. Just use File>Open and go to the folder
where you stored the photos earlier. If you are using PhotoSuite, select File>Open Photo, then use the “Look in”
pull down menu at the top of the Open window, select “My Computer”, select your hard drive, and double click
any photo in the folder where you copied the files from the camera. It is also possible to open and work with your
photos directly from the ImageView while it is still connected.To do this with PhotoSuite, first follow steps 1-3,
then open PhotoSuite, select File>Open Photo and use the “Look in” menu to select My Computer, then select
the “Removable Disk”, and open the folders inside until you get to the JPEG photo files. If you choose to work
this way, from a connected camera, be sure that you save the photo (when you are done editing) to your hard drive,
and not the camera’s memory or card. To do this in PhotoSuite, after clicking “Done”, answer “Save Changes?”
with “Yes”, but then answer “Replace Existing File”? with “No” and use the “Save As” dialog box to save the edited
photo in a folder on your hard drive (“Save In>Local Disk”), not the “Removable Disk” (camera).
8. If you are new to photo editing on a computer, consult your software’s Help menu (PhotoSuite has extensive
built-in Help) for tips on using its features. Along with adjusting the brightness, contrast, sharpness and color
of your photos, you can resize the photo to fit the paper if you are printing, or save a smaller, low or medium
resolution version for email or inserting into documents. When you are ready to save your edited file, you may
want to use “Save As” and give it a more descriptive name than “IMG___”. Doing this also preserves the original
file as a backup to reopen and re-edit later. Make sure you have successfully transferred all the photos you wanted
to save before using “Delete All” on your camera to make room for new images.
16
BINOCULAR INSTRUCTIONS
Your Bushnell binocular is a precision instrument designed to provide many years of pleasurable
viewing. This portion of the booklet will help you achieve optimum performance by explaining how
you can adjust the binocular to your eyes, and how to care for this instrument. Read the instructions
carefully before using your binocular.
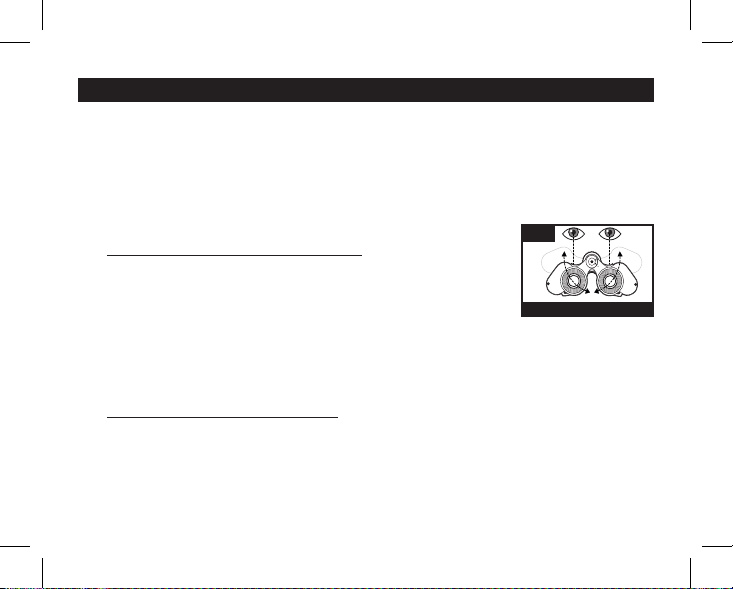
EYE ADJUSTMENTS (Figure 1)
How to Adjust For Distance Between Your Eyes
The distance between the eyes, called “interpupillary distance,” varies from
person to person. To achieve perfect alignment of lens to eye, follow these
simple steps.
1. Hold your binocular in the normal viewing position.
2. Grasp each barrel firmly. Move the barrels closer together or further apart
until you see a single circular field. Always re-set your binocular to this position before using.
How to Adjust For Individual Eye Strength
As individual eyesight varies from one person to another, most Bushnell binoculars have a diopter setting
feature which allows you to fine-tune the binocular to your vision. Follow the focusing instructions below
for your type of binocular.
INTERPUPILLARY DISTANCE
Fig. 1
17
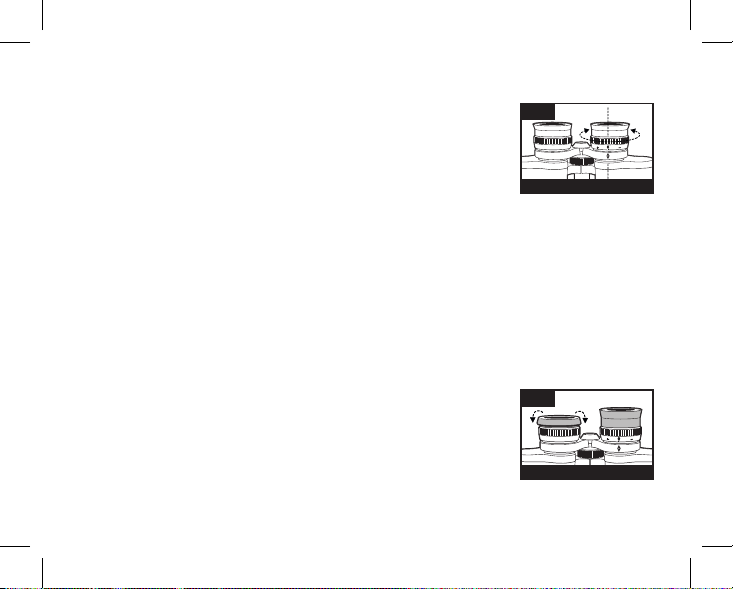
FOCUSING
1. Adjust interpupillary distance. (Figure 1)
2. Set the “diopter setting” (Figure 2) to zero and view a distant object.
3. Keep both eyes open at all times.
4. Using a lens cover or your hand, cover the objective (front) lens of the
same side of the binocular that has the “diopter setting.” This is usually
the right side. (The left side on zoom models.)
5. Using the center focus wheel, focus on a distant object with fine detail
(e.g., brick wall, tree branches, etc.) until it appears as sharp as possible.
6. Uncover the objective lens on the diopter side, cover the other objective lens, then view the same object.
7. Using the “diopter setting” adjustment ring, focus the same object being viewed. Caution should
be used as over turning or forcing the diopter eyepiece can cause damage or cause the eyepiece to
break away from the chassis.
8. Your binocular should be adjusted for your eyes. Focus at any far or near distances can now be
attained simply by turning the center focus wheel. Make a note of the diopter setting for your eyes
for future reference.
EYECUPS (Figure 3)
Your Bushnell binocular is fitted with rubber roll-down eyecups designed for
your comfort and to exclude extraneous light. If you wear sun/eyeglasses, roll
down the eyecups. This will bring your eyes closer to the binocular lens thus
providing improved field of view.
DIOPTER SETTING
Fig. 2
ROLL-DOWN EYECUPS
Fig. 3

18
INSTRUCTIONS FOR CARE OF BINOCULARS
Your Bushnell binocular will provide years of trouble-free service if it receives the normal care you would
give any fine optical instrument. The Imageview is not waterproof, and should not be exposed to any
source of moisture. Water damage is not covered by the warranty.
1. If your binocular has roll-down, flexible eyecups, store it with the eyecups up. This avoids excessive
stress and wear on the eyecups in the down position.
2. Avoid banging and dropping.
3. Store in a cool, dry place.
4. WARNING: Looking directly at the sun with your binocular can cause permanent eye damage.
5. Never expose your ImageView binocular to any type of excessive liquid or fluid, as it is not water/
fogproof.
6. Take the batteries out of your ImageView if you are not going to use it for a long period of time. (Make
sure you download any pictures from your camera before you remove the batteries out of the camera.)
CLEANING
1. Blow away any dust or debris on the lens (or use a soft lens brush.)
2. To remove dirt or finger prints, clean with a soft cotton cloth rubbing in a circular motion. Use of
a coarse cloth or unnecessary rubbing may scratch the lens surface and eventually cause permanent
damage. A “microfiber” cleaning cloth (available at most photo dealers) is ideal for the routine
cleaning of your optics.
3. For a more thorough cleaning, photographic lens tissue and photographic-type lens cleaning fluid
or isopropyl alcohol may be used. Always apply the fluid to the cleaning cloth – never directly on
the lens.
19
TWO-YEAR LIMITED WARRANTY
Your Bushnell® product is warranted to be free of defects in materials and workmanship for two years after
the date of purchase. In the event of a defect under this warranty, we will, at our option, repair or replace
the product, provided that you return the product postage prepaid. This warranty does not cover damages
caused by misuse, improper handling, installation, or maintenance provided by someone other than a Bushnell
Authorized Service Department.
Any return made under this warranty must be accompanied by the items listed below:
1) A check/money order in the amount of $10.00 to cover the cost of postage and handling
2) Name and address for product return
3) An explanation of the defect
4) Proof of Date Purchased
5) Product should be well packed in a sturdy outside shipping carton, to prevent
damage in transit, with return postage prepaid to the address listed below:
IN U.S.A. Send To: IN CANADA Send To:
Bushnell Outdoor Products Bushnell Performance Optics
Attn.: Repairs Attn.: Repairs
8500 Marshall Drive 25A East Pearce Street, Unit 1
Lenexa, Kansas 66214 Richmond Hill, Ontario L4B 2M9
For products purchased outside the United States or Canada please contact your local dealer for applicable
warranty information. In Europe you may also contact Bushnell at:
BUSHNELL Performance Optics Gmbh
European Service Centre
MORSESTRASSE 4
D- 50769 KÖLN
GERMANY
Tél: +49 (0) 221 709 939 3
Fax: +49 (0) 221 709 939 8
This warranty gives you specific legal rights.
You may have other rights which vary from country to country.
©2006 Bushnell Outdoor Products
FCC Note:
is equipment has been tested and found to comply
with the limits for a Class B digital device, pursuant
to Part 15 of the FCC Rules. ese limits are designed
to provide reasonable protection against harmful
interference in a residential installation. is equipment
generates, uses and can radiate radio frequency energy
and, if not installed and used in accordance with the
instructions, may cause harmful interference to radio
communications. However, there is no guarantee that
interference will not occur in a particular installation. If
this equipment does cause harmful interference to radio
or television reception, which can be determined by
turning the equipment off and on, the user is encouraged
to try to correct the interference by one or more of the
following measures:
· Reorient or relocate the receiving antenna.
·
Increase the separation between the equipment and receiver
.
· Connect the equipment into an outlet on a circuit
different from that to which the receiver is connected.
· Consult the dealer or an experienced radio/TV
technician for help.
e shielded inter face cable must be used with the
equipment in order to comply with the limits for a digital
device pursuant to Subpart B of Part 15 of FCC Rules.
Specifications and designs are subject to change without
any notice or obligation on the part of the manufacturer.

20
AVERTISSEMENT
AVANT de retirer ou de changer les piles, veillez à télécharger les photos de votre
appareil, à moins que vous n’ayez utilisé une carte SD plutôt qu’une mémoire
interne pour stocker vos photos. Si vous n’utilisez pas de carte SD dans l’appareil
ImageView, nous vous conseillons, avant de le ranger, de télécharger tous les
fichiers photos en cours pour les conserver, afin d’éviter que les piles ne se
déchargent durant un stockage prolongé.
AVERTISSEMENT
NE REGARDEZ PAS directement le soleil à travers vos jumelles.
Cela pourrait causer des lésions oculaires permanentes.
REMARQUE: Pour réinitialiser votre appareil photo si vous rencontrez des
problèmes ou si l’affichage ne réagit pas, retirez les piles pendant au moins une
minute, puis remettez-les en place. Cela peut causer la perte de toutes les photos /
vidéos stockées dans la mémoire interne.

21
Félicitations pour votre achat de jumelles Bushnell ImageView™ ! Les
jumelles Bushnell ImageView combinent la technologie de la photo
numérique avec des jumelles compactes de haute qualité.
Vous pouvez ainsi observer des évènements sportifs, des animaux
sauvages, des panoramas magnifiques, ou tout ce que vous observez
normalement avec des jumelles, puis sauvegarder l’image dans un
appareil photo numérique intégré. Vous pouvez ensuite télécharger
ces images sur votre ordinateur et les envoyer par courriel à vos amis
et vos parents, imprimer les images à l’aide du logiciel inclus ou les
sauvegarder dans un album photo pour usage ultérieur.
Avant d’utiliser le produit, veuillez lire les instructions contenues dans
ce manuel et prendre le temps de vous familiariser avec les différentes
parties et fonctions de l’appareil.
Français

22
Guide des pièces de l’appareil photo
et des jumelles
Bouton
« Snap »
Bouton
de mode
Lentille de
l’appareil
photo
Mise au point
des jumelles
Jack de
télécommande
Port
USB
Fente pour
carte
Compartiment des
piles
Douille pour
trépied
(Glissez dans le sens
de la flèche pour
ouvrir)

23
CAMERA PARTS
1. L’appareil fonctionne à l’aide deux piles alcalines AAA au lithium ou NiMh (non incluses). Insérez les
piles dans le compartiment, ressorts en contact avec l’extrémité négative (plate) de chaque pile. Un wattmètre
situé au centre gauche de l’affichage indique l’état de la pile.
2. Insérez une carte SD (« à l’envers », contacts métalliques dirigés vers le haut) dans la fente si vous souhaitez
une plus grande capacité de stockage.
Vous pouvez utiliser des cartes SD (et non des cartes MMC) d’une capacité maximale de 1 Go. L’appareil
photo dispose d’une mémoire interne de 8 Mo, capable de contenir plus de 100 photos, de sorte qu’une
carte n’est pas nécessaire. Toutefois, le contenu de la mémoire interne est perdu si les piles sont retirées ou si
elles s’épuisent, contrairement au contenu stocké sur une carte mémoire SD.
Des cartes SD standard de 256 Mo sont en vente dans la plupart des magasins d’électronique ou d’ordinateurs
et sont le choix idéal pour votre ImageView.
3. Appuyez sur le bouton MODE sans le relâcher jusqu’à ce que l’appareil photo s’active. L’appareil se
désactive automatiquement au bout d’environ une minute si vous n’appuyez sur aucun bouton. Remarque
: lorsque l’appareil est relié à un ordinateur via le câble USB fourni, il s'active automatiquement et est
alimenté par l'ordinateur, ce qui évite d’épuiser la pile.
4. Tenez l’ImageView immobile et appuyez sur SNAP pour prendre une photo (ou commencer/arrêter de
filmer une vidéo, lorsque l'appareil est en mode vidéo).
La mise au point de l’appareil est préréglée de manière à prendre des photos nettes depuis des distances de
11 mètres (35 pieds) à l’infini.
5. Si vous utilisez un trépied, vous pouvez minimiser les effets des vibrations de l’appareil en branchant le
déclencheur à télécommande fourni
dans le jack situé à côté de la fente à carte SD, et en utilisant le bouton de la télécommande plutôt que le
bouton SNAP pour prendre des photos.
Configuration et principes de fonctionnement

24
L’ImageView indique la date et l’heure dans le coin inférieur droit de vos photos. Pour régler la date et
l’heure en cours, activez l’appareil photo, puis appuyez en même temps sur les boutons MODE et SNAP
sans les relâcher, jusqu’à ce que l’affichage commence à clignoter. L’affichage indique alors les deux derniers
chiffres de l’année. Appuyez sur le bouton MODE pour amener le curseur au deuxième chiffre si nécessaire.
Appuyez sur le bouton SNAP pour avancer le chiffre jusqu’à l’année en cours (« 07 » pour 2007, etc.).
Appuyez ensuite sur MODE pour passer au nombre suivant, c’est-à-dire le mois. Appuyez à nouveau sur
SNAP pour afficher le mois en cours. Après le mois viennent : la date, l’heure (échelle de 24 heures), les
minutes et secondes. Continuez à les régler de la même manière, en utilisant les boutons MODE, puis
SNAP. Une fois tous les réglages de date et d’heure terminés, l’affichage cesse de clignoter et revient à son
état normal. À noter : vous devrez procéder à nouveau au réglage de la date et de l’heure après avoir remplacé
les piles.
Votre ImageView est déjà réglé pour haute résolution et qualité au départ d’usine. Il n’est donc pas nécessaire
d’utiliser les réglages MODE et de changer quoi que ce soit pour obtenir de bons résultats. Il suffit d’appuyer
sur le bouton SNAP pour prendre des photos. Toutefois, si vous souhaitez filmer un clip vidéo, effacer une
ou plusieurs des photos précédentes, ou explorer d'autres options, nous vous conseillons d'étudier les options
disponibles décrites dans les pages suivantes. Appuyez brièvement sur le bouton MODE pour passer de l’un
à l’autre de ces modes opératoires dans l’ordre indiqué, et vous verrez s’afficher l’icône avec le réglage actuel
correspondant à chaque mode. Utilisez le bouton SNAP pour sélectionner le réglage souhaité correspondant
à chaque mode. Si vous ne faites aucun changement et n’utilisez pas le bouton SNAP ou MODE dans les 5
secondes, l’appareil photo reprend le fonctionnement normal et l’affichage normal.
Utilisation des modes opératoires / réglage de la date et de l’heure

25
Mode Icône Réglages Description
Vidéo Caméra
vidéo
ARRÊT, Haut
(640x480 pixels
par image, 15
fps [images par
seconde]) Bas
(320x240 pixels)
Sélectionnez la résolution vidéo “Hi” (recommandée)
ou “Lo”au lieu de “ARRÊT” pour mettre l’appareil
en mode vidéo.Attendez quelques secondes que
l’appareil revienne automatiquementà l’affichage
normal, puis commencez à filmer en appuyant sur
SNAP. Le compteur affiche le temps écoulé, jusqu’au
maximum de 53 secondes (Hi.) ou 132 secondes
(Lo) pour chaque clip vidéo. Appuyez sur SNAP
pour arrêter de filmer. Le compteur avance d’un
cran, indiquant que le fichier vidéo a été sauvegardé.
Revenez au mode vidéo et sélectionnez OFF pour
réinitialiser l’appareil pour le mode photo fixe.
Qualité Qualité
Hq ou Lq
Haute, Basse Sélectionnez la qualité “Hi” (recommandée) ou
“Lo” pour choisir le degré de compression de fichier,
ce qui affecte la taille du fichier photo. “Lo” permet
de stocker davantage de photos en mémoire, mais
cela, au détriment de la qualité.
Résolution Hi ou Lo Haute (640x480
pixels), Faible
(320x240 pixels)
Sélectionnez la résolution “Hi” (recommandée) ou
“Lo” en fonction de vos préférences pour obtenir de
plus belles photos
(Hi) ou pour pouvoir prendre un plus grand nombre de photos (Lo).
Utilisation des modes opératoires (Gras indique les réglages par défaut)

26
Mode Icône Réglages Description
Fréquence 60 ou 50 60 Hz, 50 Hz Réglée pour correspondre à la fréquence CA (cycles)
de votre pays. Cela garantit que les photos fixes et
les vidéos prises sous éclairage fluorescent apparaissent normales.
Continu CT ARRÊT, 3, 5 Sélectionnez 3 ou 5 images pour prendre une série
rapide de photos au lieu d’une seule image lorsque
vous appuyez sur SNAP (en mode photo fixe normal). Pour annuler, entrez à nouveau dans ce mode
et sélectionnez OFF (arrêt).
Accès mémoire MEM Sto (mémoire de
masse USB). PC
(appareil photo
USB)
Sélectionnez « Sto » pour accéder à la mémoire
interne ou la carte mémoire lorsque l’appareil est
relié à un ordinateuravec le câble USB. « PC »
permet d’utiliser l’appareil comme appareil photo
USB/PC actif (il est à noter que le grossissement 8x
et le manque de capacité limitée de mise au point
sur une courte distance limite son utilité dans la
plupart des pièces)
Effacer la
dernière (photo
ou vidéo)
LSt +
poubelle
Aucune – appuyez
sur SNAP pour
effacer la dernière
photo ou vidéo.
Sélectionnez ce mode et appuyez sur SNAP pour effacer seulement la dernière photo ou vidéo que vous
avez prise. Le compteur baisse d’un chiffre.
Utilisation des modes opératoires

27
Mode Icône Réglages Description
Effacer toutes
(les photos ou
vidéos)
ALL +
poubelle
Aucune – appuyez
sur SNAP pour
effacer tous les
fichiers photos ou
vidéos.
Sélectionnez ce mode et appuyez sur SNAP pour effacer tout le contenu de la mémoire (le compteur se
remet à zéro). Ne faites cela qu’après avoir téléchargé vos fichiers, pour vider la mémoire et pouvoir
prendre de nouvelles photos. Si « Effacer toutes »
est sélectionné accidentellement, il suffit d’attendre
quelques secondes et l’appareil reprendra son fonctionnement normal.
Formatage FOr +
poubelle
Aucun – appuyez
sur SNAP pour
formater la carte
ou la mémoire
interne.
Si vous utilisez une nouvelle carte SD ou une carte
déjà utilisée dans d'autres appareils, nous vous conseillons de sélectionner. Formatage et d’appuyer sur
SNAP avant de commencer à prendre des photos,
afin que la carte soit configurée avec les fichiers de
données corrects pour cet appareil. Il est à noter que
le formatage d’une carte efface son contenu. Assurezvous que vous avez sauvegardé les fichiers précédents.
Retardateur Horloge ARRÊT ou
marche
La photo est prise avec un retard de 10 secondes lorsque
vous appuyez sur SNAP (en mode photo fixe normal).
Cette caractéristique peut servir à éviter toute vibration
accidentelle de l’appareil lorsque vous appuyez sur le bouton SNAP. Si vous disposez du câble de télécommande
de déclencheur, utilisez-le au lieu du retardateur lorsque
l’appareil est monté sur un trépied. Le retardateur s’annule
automatiquement après usage.
Utilisation des modes opératoires

28
UTILISATION DE L’IMAGEVIEW AVEC VOTRE ORDINATEUR :
1. L’appareil photo est reconnu comme appareil à mémoire de masse USB (s’il est réglé sur « STO » et non sur
« PC »),ce qui signifie qu'aucun programme d’essai spécial n’est requis pour tous les systèmes d’exploitation
postérieurs à Windows 98 (Me, 2000, XP). Max OS 9 et OSX sont également compatibles. Si votre ordinateur
utilise Windows 98, vous devez installer le programme d’essai se trouvant sur le CD-ROM inclus, AVANT DE
RELIER L’APPAREIL PHOTO À VOTRE ORDINATEUR.
2. Si vous disposez d’un programme d’exploitation (indiqué dans la liste ci-dessus) compatible avec la mémoire de
masse USB, une fois que vous avez branché le câble USB venant de votre ImageView, une nouvelle icône de
disque apparaît dans Windows Explorer en tant que « Disque amovible » (sous la rubrique « My Computer »).
Les utilisateurs d’ordinateurs Mac verront le nouveau disque apparaître sur leur surface de bureau.
Cliquez sur la nouvelle icône de disque pour afficher le contenu, un dossier intitulé « DCIM ». Le dossier d’images
à l’intérieur contient vos photos, stockées en tant que JPEG (format fichier .jpg). Ces fichiers peuvent être
ouverts, modifiés, renommés et sauvegardés à l'aide de n'importe logiciel photos ou graphiques acceptant les
fichiers .jpg. En l’absence d’un logiciel capable d’ouvrir des fichiers .jpg, vous devez installer MGI Photosuite
(Windows uniquement) se trouvant dans le CD-ROM inclus. Consultez les instructions dans la section «
Installation de logiciels ».
3. Après avoir copié ou ouvert et sauvegardé les fichiers photos sur le disque dur de votre ordinateur, vous pouvez
débrancher l’appareil ImageView. (NE débranchez JAMAIS l’appareil durant le transfert de fichiers vers votre
ordinateur.) Avant de débrancher, vous devez “éjecter » ou stopper le disque amovible représentant l’appareil
pour éviter tout message d’erreur (ce qui n’est pas nécessaire avec Windows XP).
4. Consultez les instructions étape par étape dans les pages suivantes pour télécharger vos photos.

29
Conguration nécessaire (Minimum)
Installation de logiciels
Transfert de photos et de vidéos sur votre ordinateur – Étape par étape
Système d’exploitation : Windows® 98/98SE/2000/ME/XP
Unité centrale : Équivalente ou supérieure à MMX Pentium® 200MHZ (Pentium® III 500 MHz pour
PhotoSuite5™)
Mémoire : 32 Mo minimum (64 Mo recommandés pour Photosuite), carte vidéo SVGA avec VRAM 2 Mo, affichage
écran 800x600, couleur très visible 16 bits 200 MB d’espace disponible sur disque dur (en cas d’installation de
PhotoSuite), Port USB interne
Si vous utilisez Windows 98, vous devez installer des programmes d’essai avant de relier votre appareil photo à votre ordinateur. Insérez le CD-ROM dans le lecteur CD de votre ordinateur ; il s’exécute automatiquement et l’écran d’installation s’affiche. Sélectionnez
« Install Driver » (installer programme d’essai), et suivez les instructions. Après l’installation, redémarrez votre ordinateur. Windows
2000, ME, et XP n’exigent pas de programmes d’essai, car l’appareil utilise la mémoire de masse USB, ce qui permet d’accéder aux
fichiers photos comme s’ils étaient stockés sur un disque dur externe. Pour tout système d’exploitation Windows, si vous ne disposez
pas déjà d’un logiciel d’édition de photos, vous pouvez installer le Roxio PhotoSuite® qui se trouve sur votre CD-ROM. Veillez à
lire entièrement les instructions d’utilisation, en notant les astuces ou les problèmes potentiels s’appliquant à la configuration et au
système d’exploitation de votre ordinateur.
1. Veillez à installer d’abord un programme d’essai si Windows 98/98SE est votre système d’exploitation.
2. Reliez le câble fourni au port USB de l’appareil ImageView, puis directement au port USB principal de votre
ordinateur. N’utilisez pas les ports USB du panneau avant/clavier, ni des « moyeux » non alimentés.
AVERTISSEMENT : Veillez à télécharger les images de votre appareil avant de
retirer les piles.

30
Transfert de photos et de vidéos sur votre ordinateur
3. L’écran LCD affiche « STO », et l’appareil ImageView sera reconnu comme un appareil standard « à mémoire de masse
USB ». Cela signifie que les fichiers de l’appareil photo peuvent être facilement visualisés, modifiés ou copiés sur votre
disque dur comme s’ils étaient stockés sur un disque dur externe ou un CD-ROM.
4. (Cette étape est facultative avec Windows XP ; utilisez simplement les options de la fenêtre flash pour visualiser, copier
ou modifier vos photos). Ouvrez « My Computer » (mon ordinateur) ou Windows Explorer. L’appareil photo apparaît
comme un nouveau « Removable Disk » (disque amovible) avec la lettre de lecteur inutilisé qui lui est affectée. Cliquez
deux fois sur cette nouvelle icône « Disk », ouvrez le dossier DCIM qui se trouve à l’intérieur, puis le(s) dossier(s) se
trouvant à l’intérieur de ce dernier (« 100MEDIA », etc.). Vos photos/vidéos sont dans les fichiers à l’intérieur ; elles sont
dotées du préfixe « IMG_ », suivi d’un numéro, celui que vous avez vu précédemment sur l’écran de l’appareil photo,
lorsque vous visualisez les photos. Cliquez une fois sur n’importe quel fichier pour faire apparaître une petite image de
prévisualisation.
5. Cliquez sur « Edit>Select All » (modifier>sélectionner toutes) (ou cliquez sur une photo, control+click pour sélectionner
plusieurs photos), puis « Edit>Copy to Folder » (modifier>copier vers dossier) (dans les menus Windows).
Sélectionnez un dossier existant sur votre disque dur, par exemple « My Pictures » (mes photos), ou créez un nouveau
dossier (« Vacances à Hawaï », etc.), puis cliquez sur « OK » pour transférer les copies des fichiers photos que vous
voulez.
6. Une fois les photos transférées sur le disque dur, vous pouvez débrancher l’appareil photo. Windows 2000 peut
produire à l’écran un avertissement indiquant que vous avez débranché un appareil USB sans arrêter ou éjecter le « disque
» préalablement (vos fichiers photos ne seront pas endommagés). Dans ce cas, vérifiez la boîte qui ajoute une icône dans
le plateau ou la barre de tâches de votre système. Ainsi, la prochaine fois que vous terminerez le transfert de photos, vous
pourrez cliquer d’abord sur cette icône et sur « Stop the USB Mass Storage Device » (arrêter l’appareil à mémoire de masse
USB) avant de débrancher l’appareil. (Sur les ordinateurs Mac, vous devez « éjecter » le disque qui est apparu sur votre
surface de bureau lors du branchement de l’appareil.)

31
Transfert de photos et de vidéos sur votre ordinateur
7. Vous êtes désormais prêt à ouvrir les fichiers photos dans n’importe quel logiciel d’édition de photos. Il suffit d’utiliser File>Open
(fichier>ouvrir) et d’aller au dossier où vous avez stocké les photos précédemment. Si vous utilisez PhotoSuite, sélectionnez
File>Open Photo, puis utilisez le menu déroulant « Look in » (regarder) en haut de la fenêtre Open Window, sélectionnez « My
Computer », sélectionnez votre disque dur et cliquez deux fois sur n’importe quelle photo dans le dossier où vous avez copié les
fichiers provenant de votre appareil photo. Il est également possible d’ouvrir et d’utiliser les photos directement depuis l’ImageView
s’il est encore branché. Pour ce faire avec PhotoSuite, suivez d’abord les étapes 1 à 3, puis ouvrez PhotoSuite, sélectionnez
File>Open Photo (fichier> ouvrir photo) et utilisez le menu « Look in » (regarder) pour sélectionner « My Computer », puis
sélectionnez le « Disque amovible » et ouvrez les dossiers se trouvant à l’intérieur jusqu’à ce vous parveniez aux fichiers photos
JPEG. Si vous choisissez de travailler de cette façon, à partir d’un appareil photo connecté, veillez à sauvegarder la photo (lorsque
vous avez fini l'édition) sur votre disque dur et non pas dans la mémoire ou la carte mémoire de votre appareil. Pour effectuer
cette démarche dans PhotoSuite, après avoir cliqué sur « Done » (fini), répondez à « Save Changes? » (voulez-vous sauvegarder les
changements ?) par Oui, mais ensuite, répondez à « Replace existing File? » (voulez-vous remplacer le fichier existant ?) par Non,
et utilisez la boîte de dialogue « Save As » (enregistrer sous) pour sauvegarder la photo éditée dans un dossier sur votre disque dur
(« Save In > Local Disk [Enregistrer dans> disque local] »), et non sur le « disque amovible » (appareil photo).
8. Si vous êtes novice en matière d’édition de photos sur un ordinateur, consultez le menu « Help » (Aide) de votre logiciel
(PhotoSuite comporte une importante fonction intégrée d’Aide) pour y trouver des détails sur l’utilisation de ses fonctions.
Non seulement vous pouvez ajuster la brillance, le contraste, la netteté et la couleur de vos photos, mais vous pouvez aussi les
redimensionner à la mesure du papier si vous l’imprimez, ou sauvegarder une petite version à basse ou moyenne résolution pour
l’envoyer par courriel ou l’insérer dans des documents. Lorsque vous êtes prêt à enregistrer votre fichier modifié, vous pouvez
utiliser la fonction « Save as » (enregistrer sous) et lui donner un nom plus descriptif que « IMG_ ». Cela permet de préserver le
fichier d’origine comme fichier de sauvegarde pour le rouvrir et le modifier à nouveau plus tard. Assurez-vous que vous avez réussi
le transfert de toutes les photos que vous souhaitiez sauvegarder avant d’utiliser « Delete All » (effacer toutes) sur votre appareil
photo dans le but de créer de la place pour de nouvelles photos.

32
INSTRUCTIONS CONCERNANT L’USAGE DE VOS JUMELLES
Vos jumelles Bushnell constituent un instrument de précision conçu pour vous assurer de
nombreuses années d’utilisation. Cette partie du livret vous permettra d’en obtenir une performance
optimale, car il vous explique comment ajuster vos jumelles en fonction de vos yeux, et comment
entretenir cet instrument. Lisez bien les instructions avant d’utiliser vos jumelles.
RÉGLAGES EN FONCTION DE VOS YEUX (Figure 1)
Comment régler la distance entre vos yeux
La distance entre les yeux, appelée « distance interpupillaire », varie d’une
personne à l’autre. Pour obtenir un alignement parfait entre la lentille et
l’œil, suivez ces simples étapes.
1. Tenez vos jumelles en position de visée normale.
2. Tenez fermement chaque lunette. Rapprochez ou éloignez les lunettes l’une
de l’autre jusqu’à ce que vous perceviez un champ circulaire. Remettez
toujours vos jumelles dans cette position avant de les utiliser.
Comment régler en fonction de votre vision
Comme la vision varie d’une personne à une autre, la plupart des jumelles Bushnell comportent un réglage
dioptriquequi vous permet de régler avec précision les jumelles en fonction de votre vision. Suivez les
instructions de mise au point suivantes correspondant à votre type de jumelles.
INTERPUPILLARY DISTANCE
Fig. 1
DISTANCE INTERPUPILLAIRE

33
MISE AU POINT
1. Réglez la distance interpupillaire. (Figure 1)
2. Mettez le “réglage dioptrique”(Figure 2) sur zéro et observez un objet éloigné.
3. Gardez les deux yeux ouverts en permanence.
4. À l’aide d’un couvercle d’objectif ou de votre main, couvrez l’objectif (l’avant) du
côté des jumelles qui comporte le « réglage dioptrique », généralement le côté
droit. (Le côté gauche sur les modèles à zoom.)
5. À l’aide de la molette centrale, effectuez la mise au point pour un objet éloigné
comportant des détails précis (par ex., un mur en briques, des branches d’arbre, etc.) jusqu’à ce qu’il apparaisse
aussi net que possible.
6. Découvrez la lentille d’objectif côté dioptre, couvrez l’autre lentille d’objectif, puis observez le même objet.
7. À l’aide de la bague de correction dioptrique, effectuez la mise au point pour l’objet observé. Il convient de
prendre des précautions, car retourner ou forcer l’oculaire de correction dioptrique peut endommager celui-ci
ou le détacher du châssis.
8. Vos jumelles doivent être adaptées à vos yeux. La mise au point de loin ou de près peut désormais être réalisée en
tournant simplement la molette de mise au point centrale. Prenez note du réglage dioptrique en fonction de vos
yeux pour référence ultérieure.
ŒILLETONS (Figure 3)
Vos lunettes Bushnell sont dotées d’œilletons en caoutchouc rabattables,
conçus pour votre confort et pour bloquer la lumière parasite.
Si vous portez des lunettes optiques ou des lunettes de soleil, rabattez les
œilletons. Cela permet de rapprocher vos yeux de la lentille des jumelles,
améliorant ainsi le champ de vision.
DIOPTER SETTING
Fig. 2
ROLL-DOWN EYECUPS
Fig. 3
RÉGLAGE DIOPTRIQUE

34
INSTRUCTIONS POUR L’ENTRETIEN DE VOS JUMELLES
Vos jumelles Bushnell vous assureront des années de service sans problèmes si vous en prenez soin
comme de tout autre instrument d’optique de qualité. L’ImageView n’est pas étanche et ne doit pas
être exposé à l’humidité. Les dommages causés par l’eau ne sont pas couverts par la garantie.
1. Si vos jumelles sont munies d’œilletons flexibles rabattables, rangez-les avec les œilletons relevés. Cette
position permet d’éviter les contraintes et l’usure des œilletons s’ils sont en position abaissée.
2. Évitez de heurter et de laisser tomber les jumelles.
3. Rangez-les dans un endroit frais et sec.
4. AVERTISSEMENT : L’observation directe du soleil avec les jumelles peut causer des lésions oculaires
permanentes.
5. N’exposez jamais vos jumelles ImageView à un excès de liquides ou de fluides, car elles ne sont ni
étanches ni antibuée.
6. Retirez les piles de votre ImageView si vous prévoyez de ne pas l’utiliser pendant une longue période.
(Veillez à télécharger les images de votre appareil photo avant de retirer les piles.)
NETTOYAGE
1. Soufflez doucement pour chasser toute poussière ou débris des lentilles (ou utilisez une brosse
douce).
2. Pour chasser les impuretés ou les traces de doigts, frottez en un mouvement circulaire avec un chiffon
doux en coton. L’usage d’un chiffon rugueux ou le frottement superflu peut rayer la lentille et causer
des dommages permanents. Un chiffon de nettoyage en « microfibres » (en vente chez la plupart des
marchands-photographes) est idéal pour le nettoyage de routine des éléments optiques.
3. Pour un nettoyage plus approfondi, du papier pour lentilles photographiques et du nettoyant
photographique ou de l'alcool isopropylique peuvent être utilisés.Appliquez toujours le nettoyant
sur le chiffon – jamais directement sur la lentille.

35
Remarque relative à la FCC (Commission fédérale des
télécommunications)
Ce matériel a été testé et s’est révélé être conforme aux limites
d’un dispositif numérique de classe B, conformément à la
section 15 de la réglementation FCC. Ces limites ont été
établies pour assurer une protection raisonnable contre
les parasites nuisibles dans les immeubles résidentiels.
Ce matériel produit, utilise et peut émettre de l’énergie
radiofréquence ; en conséquence, s’il n’est pas installé et
utilisé en conformité avec les instructions, il risque de
provoquer des parasites nuisibles aux communications
radio. Toutefois, il n’est pas garanti que des parasites ne
se produiront pas dans une installation particulière. Si ce
matériel causait des parasites nuisibles à la réception radio
ou télévision, qui peuvent être déterminés en mettant le
matériel hors tension puis sous tension, l’utilisateur peut
essayer de remédier au problème en appliquant l’une ou
plusieurs des mesures suivantes :
· Réorienter ou déplacer l’antenne de réception.
· Augmenter la distance séparant le matériel du récepteur.
· Connecter le matériel à une prise de courant ou à un
circuit différent(e) de celui (celle) auquel (à laquelle) le
récepteur est relié.
· Consulter le concessionnaire ou un technicien radio/TV
expérimenté.
Le câble d’interface blindé doit être utilisé avec le matériel
afin d’être conforme aux limites d’un dispositif numérique,
conformément à la sous-section B de la section 15 de la
réglementation FCC.
Les spécifications et conceptions sont sujettes à
modification sans préavis ni obligation de la part du
fabricant.
GARANTIE LIMITÉE DE DEUX ANS
Votre produit Bushnell® est garanti exempt de défauts de matériaux et de fabrication
pendant deux ans après la date d'achat. Au cas où un défaut apparaîtrait sous cette
garantie, nous nous réservons l'option de réparer ou de remplacer le produit, à condition
de nous le renvoyer en port payé. La présente garantie ne couvre pas les dommages
causés par une utilisation, une manipulation, une installation incorrecte(s) ou un
entretien incorrect ou fourni par quelqu'un d'autre qu'un centre de réparation agréé
par Bushnell.
Tout retour effectué dans le cadre de la présente garantie doit être accompagné des
articles indiqués ci-dessous :
1) un chèque ou mandat d'une somme de 10,00 $ US pour couvrir les frais
d'envoi et de manutention
2) le nom et l'adresse pour le retour du produit
3) une description du défaut constaté
4) la preuve de la date d'achat
5) Le produit doit être emballé soigneusement, dans un carton d'expédition
solide, pour éviter qu'il ne soit endommagé durant le transport ; envoyez-le
en port payé, à l'adresse indiquée ci-dessous :
Aux États-Unis, envoyez à: Au CANADA, envoyez à:
Bushnell Outdoor Products Bushnell Performance Optics
Attn.: Repairs Attn.: Repairs
8500 Marshall Drive 25A East Pearce Street, Unit 1
Lenexa, Kansas 66214 Richmond Hill, Ontario L4B 2M9
Pour les produits achetés en dehors des États-Unis et du Canada, veuillez contacter votre
distributeur local pour tous renseignements concernant la garantie. En Europe, vous
pouvez aussi contacter Bushnell au : BUSHNELL Performance Optics Gmbh
European Service Centre
MORSESTRASSE 4
D- 50769 Cologne
Allemagne
Tél: +49 (0) 221 709 939 3
Fax: +49 (0) 221 709 939 8
La présente garantie vous donne des droits légaux spécifiques.
Vous pouvez avoir d'autres droits qui varient selon les pays.
©2006 Bushnell Outdoor Products

36
ADVERTENCIA
Asegúrese de descargar las fotos de la cámara ANTES de quitar o cambiar las
pilas, a menos que haya estado usando una tarjeta SD en vez de la memoria
interna para almacenar las fotos. Recomendamos que descargue todos los
archivos de fotos actuales para guardarlos antes de guardar la ImageView si
no está usando una tarjeta SD en la cámara, en caso de que las pilas se agoten
durante un almacenamiento prolongado.
ADVERTENCIA
NO mire directamente al sol por sus binoculares.
Al hacer esto se puede producir daños permanentes en los ojos.
NOTA: Para reajustar la cámara si tiene problemas o si la pantalla no responde,
saque las pilas al menos un minuto y vuelva a instalarlas. Esto puede resultar en
la pérdida de todas las fotos/vídeos guardados en la memoria interna.

37
¡Enhorabuena por la compra de los binoculares ImageView® de
Bushnell! Los binoculares ImageView de Bushnell adoptan la
tecnología fotográfica digital y la combinan con unos binoculares
compactos de alta calidad. Esto le permite observar acontecimientos
deportivos, fauna salvaje, vistas pintorescas o cualquier cosa para la que
normalmente usaría unos binoculares, y después guardar la imagen en
una cámara digital adjunta integrada. A continuación podrá descargar
estas imágenes en el ordenador y enviarlas por correo a sus amigos
y familia, imprimir la foto usando el software incluido o guardarlas
en un álbum de fotos para el futuro. Antes de usar el producto, lea
las instrucciones contenidas en este manual y tómese el tiempo para
familiarizarse con las distintas piezas y características del producto.
Español

38
Guía de piezas de cámara y Binocular
Botón
Snap
Botón
Mode
Lente
de la
cámara
Enfoque
de los
binoculares
Jack
remoto
Puerto
USB
Ranura
de tarjeta
Compartimiento
de las pilas
Adaptador
de trípode
(abra deslizando
en el sentido de
la flecha)

39
CAMERA PARTS
1. La cámara está alimentada por dos pilas AAA alcalinas, de litio o NiMh (no incluidas). Introduzca las pilas
en el compartimiento, con los resortes en contacto con el extremo negativo (plano) de cada pila. La presencia
de un medidor de corriente en el centro izquierdo de la pantalla indica el estado de las pilas.
2. Introduzca una tarjeta SD ("boca abajo" con los contactos de metal apuntando hacia arriba) en la ranura
si se desea una mayor capacidad de almacenamiento. Puede usar tarjetas SD (no tarjetas MMC) de hasta
1 GB de capacidad. La cámara tiene 8 MB de memoria interna que puede contener más de 100 fotos, de
modo que no es necesaria una tarjeta. No obstante, el contenido de la memoria interna se perderá si se sacan
las pilas o se agotan, a diferencia de las fotos almacenadas en una tarjeta de memoria SD. Se dispone de una
tarjeta SD estándar de 256 MB en la mayoría de las tiendas de componentes electrónicos o de ordenadores
y es una buena opción para su ImageView.
3. Pulse sin soltar el botón MODE hasta que se encienda la cámara. La cámara se apagará automáticamente
después de aproximadamente un minuto si no se pulsa ningún botón. Nota: cuando la cámara esté conectada
a un ordenador por el cable USB incluido, la cámara se encenderá automáticamente, y absorberá corriente
del ordenador sin drenar las pilas.
4. Mantenga fija la ImageView y pulse SNAP para tomar una foto (o empezar/dejar de filmar un vídeo,
cuando la cámara esté en la modalidad de vídeo). El foco de la cámara está prefijado para tomar fotos nítidas
desde aproximadamente 10,5 m (35 pies) al infinito.
5. Cuando se use un trípode, puede evitar los efectos de vibración de la cámara conectando el disparador del
obturador remoto suministrado en el jack junto a la ranura de la tarjeta SD, y usando el botón del control
remoto en vez de pulsar SNAP para tomar fotos.
Configuración y operación básica

40
La ImageView imprimirá la fecha y la hora en la esquina inferior derecha de las fotos. Para fijar
la fecha y la hora actuales, después de encender la cámara, pulse sin soltar los botones MODE y
SNAP al mismo tiempo, hasta que la pantalla empiece a destellar. La pantalla muestra ahora los
dos últimos dígitos del año. Pulse el botón MODE para mover el cursor al segundo dígito si es
necesario. Pulse el botón SNAP para hacer avanzar el dígito al año actual ("07" para 2007, etc).
Después, pulse MODE para ir al número siguiente, que es el mes. Use nuevamente SNAP para
cambiar esto al mes actual. A continuación de la pantalla del mes está: fecha, hora (formato
de 24 horas), minutos y segundos-continúe fijando éstos siguiendo el mismo proceso con los
botones MODE y después SNAP. Cuando haya completado todos los ajustes de fecha/hora, la
pantalla dejará de destellar y volverá a normal. Observe que tendrá que reajustar la fecha/hora
después de reemplazar las pilas. Su ImageView ya está fijada en alta resolución y alta calidad
nada más sacarla de la caja, y no es necesario usar los ajustes MODE ni hacer ningún cambio
para obtener buenos resultados pulsando simplemente el botón SNAP para tomar las fotos.
No obstante, ya que como también podría filmar un clip de vídeo, borrar una o más fotos,
o explorar otras opciones, recomendamos que revise las opciones de modalidades disponibles
indicadas en las páginas siguientes. Pulsando brevemente el botón MODE podrá recorrer estas
modalidades de operación en el orden indicado, y podrá ver el icono para cada modalidad junto
con su ajuste actual en la pantalla. Use el botón SNAP para seleccionar el ajuste deseado para
cualquier modalidad. Si no efectúa ningún cambio, y no se pulsa el botón SNAP o MODE en
un plazo de 5 segundos, la cámara volverá a la operación y visualización normales.
Uso de las modalidades de operación/ajUste de fecha y hora

41
Modalidad Icono Ajustes Descripción
Vídeo Cámara de
vídeo
OFF (apagada),
High (alta)
(640x480 pixels
por cuadro, 15
pie/s), Low (baja)
(320x240 pixels)
Seleccione una resolución de vídeo "Hi"
(recomendada) o "Lo" en vez de "OFF" para
poner la cámara en la modalidad de vídeo. Espere
unos pocos segundos para que la cámara vuelva
automáticamente a la pantalla normal, y después
empiece a filmar pulsando SNAP. El contador
mostrará el tiempo transcurrido, hasta 53 (alta) o
132 (baja) segundos como máximo para cada clip
de vídeo. Pulse SNAP otra vez para dejar de filmar.
El contador avanzará una unidad, indicando que el
archivo de vídeo se ha guardado. Vuelva al ajuste de
modalidad de vídeo y seleccione OFF para reajustar
la cámara a la modalidad de fotos fijas.
Calidad Hq o Lq High (alta), Low
(baja)
Seleccione calidad "Hi" (recomendada) o "Lo" para
escoger la cantidad de compresión de archivos, lo
que afecta el tamaño del archivo de fotos. "Lo" permite almacenar más fotos en la memoria, pero de
menor calidad.
Resolución Hi o Lo High (alta)
(640x480
pixels), Low (baja)
(320x240 pixels)
Seleccione resolución "Hi" (recomendada) o "Lo",
dependiendo de si prefiere mejores fotos (Hi) o desea almacenar un mayor número de fotos (Lo).
Uso de las modalidades de operación
(los ajustes predeterminados se indican en negrita)

42
Modalidad Icono Ajustes Descripción
Frecuencia de
línea
60 ó 50 60 Hz, 50 Hz Fije para hacer coincidir la frecuencia (ciclos) de
CA de su país. Esto asegura que las fotos fijas y los
vídeos filmados con iluminación fluorescente parezcan normales.
Continua CT OFF, 3, 5 Seleccione 3 ó 5 cuadros para tomar una serie rápida
de fotos en vez de un solo cuadro cuando se pulse
SNAP (en la modalidad normal de fotos fijas). Para
cancelar, entre en esta modalidad nuevamente y seleccione OFF.
Acceso de
memoria
MEM Sto (almace-
namiento masivo
USB), PC (cámara
USB)
Seleccione "Sto" para tener acceso a la memoria
interna o de la tarjeta cuando la cámara esté
conectada a un ordenador por medio de una cable
USB. "PC" permite usar una cámara USB/PC en
vivo (observe que los 8 aumentos y la carencia de
capacidad de enfoque cercano limita su utilidad en
la mayoría de los tamaños de habitaciones)
Borrar último LSt+Papelera Ninguno-pulse
SNAP para borrar
la última foto o
vídeo
Seleccione esta modalidad y pulse SNAP para borrar sólo la última foto o vídeo tomados. El contador
disminuirá en una unidad.
Uso de las modalidades de operación

43
Modalidad Icono Ajustes Descripción
Borrar todo ALL
+Papelera
Ninguno-pulse
SNAP para borrar
todos los archivos
de fotos y vídeos
Seleccione esta modalidad y pulse SNAP para borrar todo el contenido de la memoria (el contador se
reajusta a cero). Use esto después de descargar sus
archivos para borrar la memoria a fin de poder tomar fotos nuevas. Si se selecciona "Delete All" por
accidente, espere simplemente unos segundos y la
cámara volverá a la operación normal.
Formato FOr
+Papelera
Ninguno-pulse
SNAP para formatear la tarjeta o
la memoria interna
Si está usando una tarjeta SD nueva, o una usada
con anterioridad en otros dispositivos, recomendamos que seleccione Format y pulse SNAP antes
de empezar a tomar fotos, de modo que la tarjeta
esté configurada con el sistema de archivo de datos
correcto para esta cámara. Observe que al format-
ear una tarjeta se borrará su contenido-asegúrese
primero de haber hecho una copia de los archivos
anteriores
Autotemporizador
Reloj OFF (desactivado)
o On (activado)
La foto se toma con una demora de 10 segundos cuando
se pulsa SNAP (en la modalidad normal de fotos fijas).
Esto puede usarse para evitar por accidente que se sacuda
la cámara cuando se pulse el botón SNAP. Si se dispone de
cable de obturador remoto, éste se debe usar en vez del autotemporizador cuando se monte la cámara en el trípode. El
temporizador se cancela automáticamente después del uso.
Uso de las modalidades de operación

44
USO DE LA IMAGEVIEW CON UN ORDENADOR:
1. La cámara será reconocida como un dispositivo de almacenamiento masivo USB (si está fijada en "STO"
y no en "PC"), lo que significa que no se requieren controladores especiales para todos los sistemas
operativos posteriores a Windows 98 (Me, 2000, XP). Mac OS 9 y OSX también son compatibles.
Si tiene una PC con Windows 98, debe instalar el controlador encontrado en el CD-ROM incluido
ANTES DE CONECTAR LA CÁMARA A SU PC.
2. Si tiene un ordenador OS, según se indica arriba, que cumpla con el almacenamiento masivo USB,
aparecerá un nuevo icono de disco en Windows Explorer (en “Mi PC”) como nuevo “Disco extraíble”
después de enchufar el cable USB de la Imageview. Los usuarios de Mac verán aparecer el nuevo
dispositivo en su despacho. Al hacer clic en el icono del nuevo disco se mostrará el contenido, una
carpeta llamada “DCIM”. La carpeta de imágenes del interior contiene sus fotos, almacenadas como
JPEG (formato de archivos .jpg). Pueden abrirse, modificarse, cambiarse de nombre y guardarse usando
cualquier software de fotos o gráficos que acepte archivos .jpg. Si no dispone de software que abra
archivos .jpg, debe instalar MGI Photosuite (Windows solamente) del CD-ROM incluido. Vea las
instrucciones en “Instalación del software”.
3. Después de haber copiado o abierto y guardado los archivos de fotos en el disco duro de su ordenador,
podrá desconectar la cámara Imageview (no desconecte NUNCA la cámara mientras se estén
transfiriendo archivos a su ordenador). Antes de desconectar, debe “expulsar” o detener el disco extraíble
que representa la cámara para evitar un mensaje de error (no es necesario con Windows XP).
4. Vea las páginas siguientes para obtener instrucciones completas paso a paso para descargar las fotos.

45
Requisitos del sistema (mínimos)
Instalación del soware
Transferencia de las fotos y vídeos a su PC – Paso a paso
OS: Windows® 98/98SE/2000/ME/XP
CPU: MMX Pentium® 200MHZ equivalente o más rápida (Pentium® III 500 MHz para PhotoSuite5™)
Memoria: 32MB mínimo (64MB recomendada para PhotoSuite)
Tarjeta de vídeo SVGA con 2MB de VRAM, pantalla de 800x600, 16 bit High color
Espacio de disco duro de 200 MB (si va a instalar PhotoSuite)
Puerto USB interno
Si está usando Windows 98, debe instalar los controladores antes de conectar la cámara a su PC. Introduzca el CDROM en la unidad de CD del ordenador; se ejecutará automáticamente y se visualizará la pantalla de instalación.
Seleccione “Instale el controlador” y siga después las instrucciones. Después de la instalación, vuelva a iniciar su computadora. Windows 2000, ME y XP no requieren controladores, ya que la cámara usa la norma de almacenamiento
masivo USB, permitiendo tener acceso a los archivos de fotos como si estuvieran almacenados en una unidad de disco
duro externa. Para cualquier Windows OS, si no está usando ya el software de modificación de fotos preferido, puede
instalar Roxio PhotoSuite® del CD-ROM. Asegúrese de leer completamente las “Notas de la versión”, observando
cualquier recomendación o asunto potencial pertenecientes a su configuración PC y OS.
1. Asegúrese de que el controlador se haya instalado primero si está en Windows 98/98SE.
2. Conecte el cable suministrado al puerto USB de ImageView y después directamente al puerto principal de USB
en su ordenador-no use puertos USB del tablero delantero/teclado o “concentradores” sin corriente.
ADVERTENCIA: Asegúrese descargar cualquier foto de la cámara antes de sacar las pilas de
la misma.

46
Transferencia de las fotos y vídeos a su PC
3. La pantalla LCD indicará “STO”, y la ImageView será reconocida como un dispositivo estándar de
“Almacenamiento masivo USB”. Esto significa que los archivos de la cámara pueden verse, modificarse
o copiarse fácilmente en su disco duro, justo como si se almacenaran en una unidad de disco externa
o en CD-ROM.
4. (Este paso no se requiere con Windows XP, use simplemente las opciones de la ventana emergente
para ver, copiar o modificar sus fotos). Abra Mi PC o Windows Explorer. La cámara se verá como un
nuevo “Disco extraíble” con una letra de unidad sin usar asignada. Haga doble clic en este nuevo icono
de “Disco”, abra la carpeta “DCIM” de dentro, y después las carpetas de dentro (“100MEDIA”, etc).
Sus fotos/vídeos son los archivos de dentro-tienen el prefijo “IMG__” seguido de un número, igual que
se ve antes en la pantalla de la cámara al revisar fotos. Al hacer un solo clic en cualquier archivo se debe
mostrar una pequeña imagen preliminar.
5. Haga clic en “Editar>Seleccionar todo” (o haga clic en una foto, control+clic para seleccionar múltiples
fotos) y después en “Editar>Copiar a la carpeta” (en los menús de Windows). Seleccione una carpeta
existente en su unidad de disco duro, como “Mis imágenes”, o cree una nueva carpeta (“Vacaciones en
Hawai”, etc), y después haga clic en “OK” para transferir copias de los archivos de fotos deseados.
6. Después de transferir las fotos a su unidad de disco duro, puede desconectar la cámara. Windows
2000
puede producir una advertencia de pantalla de que se ha desconectado un dispositivo USB sin detenerse
o expulsar el “disco” primero (sus archivos de fotos no resultarán perjudicados). Si es así, marque la casilla
que añade un icono a su bandeja del sistema o barra de tareas. Después, la siguiente vez que termine
de transferir datos, puede hacer clic primero en ese icono, y “Parar el dispositivo de almacenamiento
masivo USB” antes de desconectar la cámara. (En ordenadores Mac, se debe “expulsar” el “disco” que ha
aparecido en su despacho cuando se haya desconectado la cámara).

47
Transferencia de las fotos y vídeos a su PC
7. Ahora está listo para abrir los archivos de fotos en cualquier software de modificación de fotos. Use simplemente
Archivo>Abrir y vaya a la carpeta donde haya guardado las fotos antes. Si está usando PhotoSuite, seleccione
Archivo>Abrir foto, y después use el menú de despliegue “Buscar en” en la parte de arriba de la ventana Abrir,
seleccione “Mi PC”, seleccione la unidad de disco duro y haga doble clic en cualquier foto de la carpeta donde se
copiaron archivos de la cámara. También es posible abrir y trabajar con sus fotos directamente de la ImageView
mientras siga conectada. Para hacer esto con PhotoSuite, siga primero los pasos 1-3 y después abra PhotoSuite,
seleccione Archivo>Abrir foto y use el menú “Buscar en” para seleccionar Mi PC. A continuación, seleccione el
“Disco extraíble” y abra las carpetas de dentro hasta que obtenga los archivos de fotos JPEG. Si desea trabajar de esta
manera, desde una cámara conectada, asegúrese de guardar la foto (cuando termine la modificación) en su unidad
de disco duro, y no en la memoria o tarjeta de la cámara. Para hacer esto en PhotoSuite, después de hacer clic en
“Hecho”, conteste “¿Guardar cambios?” con “Sí”, pero después conteste “¿Reemplazar archivo existente”? con “No” y
use la casilla de diálogo “Guardar como” para guardar la foto modificada en una carpeta en su unidad de disco duro
(“Guardar en>Disco local”), no en el “Disco extraíble” (cámara).
8. Si va a modificar una foto por primera vez en un ordenador, consulte el menú de Ayuda del software (PhotoSuite
tiene una Ayuda integrada amplia) para obtener recomendaciones sobre cómo usar estas características. Junto con el
ajuste del brillo, contraste, nitidez y color de sus fotos, puede cambiar el tamaño de la foto para que se adapte al papel si
lo está imprimiendo, o guardar una versión de resolución menor, baja o intermedia para enviar por correo electrónico o
insertar en documentos. Cuando esté listo para guardar su archivo modificado, puede usar “Guardar como” y darle un
nombre más descriptivo que “IMG___”. Al hacer esto se conserva el archivo original como una copia de reserva para
volver a abrir y volver a modificar más adelante. Asegúrese de haber transferido con éxito todas las fotos que deseaba
guardar antes de usar “Borrar todo” en su cámara para dejar sitio para nuevas imágenes.

48
INSTRUCCIONES PARA LOS BINOCULARES
Sus binoculares Bushnell son es un instrumento de precisión diseñado para proporcionar muchos
años de visión agradable. Esta parte del librito le ayudará a lograr el rendimiento óptimo explicando
cómo ajustar los binoculares a los ojos, y cómo cuidar este instrumento. Lea las instrucciones con
cuidado antes de usar los binoculares.
AJUSTES DE LOS OJOS (Figure 1)
Cómo ajustar la distancia entre los ojos
La distancia entre los ojos, llamada “distancia entre pupilas”, varía de una a
otra persona. Para lograr el alineamiento perfecto de la lens del ojo, siga
estos pasos sencillos.
1. Sujete los binoculares en su posición de visión normal.
2. Agarre cada cilindro con firmeza. Acerque o aleje los cilindros hasta que vea
un solo campo circular. Reajuste siempre los binoculares a esta posición
antes de usarlos.
Cómo ajustar según la vista de las personas
Como la vista varía de una persona a otra, la mayoría de los binoculares Bushnell tiene una función de
ajuste dióptrico que permite ajustar los binoculares con precisión a su vista. Siga las instrucciones
de enfoque de abajo para su tipo de binoculares.
INTERPUPILLARY DISTANCE
Fig. 1
Distancia entre pupilas

49
ENFOQUE
1. Ajuste la distancia entre pupilas. (Figura 1)
2. Fije el “ajuste dióptrico” (Figura 2) en cero y mire a un objeto distante.
3. Mantenga los dos ojos abiertos en todo momento.
4. Usando una tapa de lente o una mano, tape el objetivo (delantero) del
mismo lado de los binoculares que tienen el “ajuste dióptrico”. Se trata
normalmente del lado derecho. (El lado izquierdo en los modelos de
zoom).
5. Usando la rueda de enfoque central, enfoque un objeto distante con un detalle fino (por ejemplo, un
muro de ladrillo, ramas de árbol, etc.) hasta que aparezca lo más nítido posible.
6. Destape el objetivo en el lado dióptrico, tape el otro objetivo y después mire al mismo objeto.
7. Usando el anillo de “ajuste dióptrico”, enfoque el mismo objeto que se está mirando. Se debe tener
cuidado, ya que se puede dañar el ocular dióptrico al girarlo excesivamente o forzarlo o se puede
desprender el ocular del chasis.
8. Sus binoculares deben ajustarse a sus ojos. El enfoque a cualquier distancia lejana o cercana puede
lograrse ahora simplemente girando la rueda central de enfoque. Haga una nota del ajuste dióptrico
para sus ojos como futura referencia.
OJERAS (Figura 3)
Sus binoculares Bushnell disponen de ojeras de goma que se pueden
bajar diseñadas para su confort y excluir luz extraña. Si lleva gafas de
sol/normales, baje las ojeras. Esto acercará sus ojos a las lentes de los
binoculares mejorando así el campo de visión.
DIOPTER SETTING
Fig. 2
ROLL-DOWN EYECUPS
Fig. 3
AJUSTE DIÓPTRICO

50
INSTRUCCIONES PARA EL CUIDADO DE BINOCULARES
Sus binoculares Bushnell le proporcionarán muchos años de servicio sin problemas si reciben el
cuidado normal que le daría a cualquier instrumento óptico de calidad. La Imageview no es a prueba
de agua, y no debe exponerse a ninguna fuente de humedad. Los daños ocasionados por el agua no
están cubiertos por la garantía.
1. Si sus biboculares disponen de ojeras flexibles que se bajan, guárdelos con las ojeras hacia arriba. Esto
evita una tensión excesiva y el desgaste de las ojeras en la posición bajada.
2. No la golpee ni la deje caer.
3. Guarde en un lugar fresco y seco.
4. ADVERTENCIA: La mirada directa al sol con los binoculares puede causarle daños permanentes
en elos ojos.
5. No exponga nunca sus binoculares ImageView a ningún exceso de líquido o fluido, ya que no es a
prueba de agua/neblina.
6. Saque las pilas de su ImageView si no va a usarlos durante un período largo. (Asegúrese de descargar
las fotos de su cámara antes de sacar las pilas).
LIMPIEZA
1. Sople el polvo o residuos de la lente (o use un cepillo suave para lentes).
2. Para eliminar la suciedad o las huellas dactilares, limpie con un trapo de algodón suave frotando y
siguiendo un movimiento circular. El uso de un trapo áspero o el rozamiento innecesario puede
rayar la superficie de la lente y con el tiempo causar daños permanentes. El uso de un trapo de
limpieza de “microfibras” (disponible en la mayoría de las tiendas de fotos) es ideal para la limpieza
de rutina de su sistema óptico.
3. Para lograr una limpieza más completa, se puede usar papel fotográfico para lentes y fluido de
limpieza para lentes de tipo fotográfico o alcohol isopropílico. Aplique siempre el fluido en el paño
de limpieza – nunca directamente en la lente.

51
GARANTÍA LIMITADA de D OS años
Su producto Bushnell está garantizado contra defectos de materiales y fabricación durante dos años después de la fecha de compra. En caso de defectos bajo esta garantía,
nosotros, a nuestra opción, repararemos o sustituiremos el producto siempre que lo
devuelva con portes pagados. Esta garantía no cubre defectos causados por el uso indebido, ni por un manejo, instalación o mantenimiento realizados por alguien que no sea
un departamento de servicio autorizado de Bushnell.
Cualquier envío que se haga bajo esta garantía deberá ir acompañado por lo siguiente:
1) Un cheque/giro postal por la cantidad de 10 dólares para cubrir los gastos postales y de manejo
2) Nombre y dirección donde quiere que se le envíe el producto
3) Una explicación del defecto
4) Una prueba de la fecha de compra
5) E l producto debe empaquetarse bien en una caja resistente para evitar que se dañe durante el
transporte, con los portes prepagados a la direcciÛn que se muestra a continuación:
En EE.UU. enviar a: En CANADÁ enviar a:
Bushnell Outdoor Products Bushnell Outdoor Products
Attn.: Repairs Attn.: Repairs
8500 Marshall Drive 25A East Pearce Street, Unit 1
Lenexa, Kansas 66214 Richmond Hill, Ontario L4B 2M9
En el caso de productos comprados fuera de Estados Unidos o Canadá, póngase en contacto con su distribuidor local para que le den la información pertinente sobre la garantía.
En Europa también puede ponerse en contacto con Bushnell en:
BUSHNELL Per formance Optics Gmbh
European Service Centre
MORSESTRASSE 4
D- 50769 K÷LN
ALEMANIA
Tél: +49 (0) 221 709 939 3
Fax: +49 (0) 221 709 939 8
Esta garantía le ofrece derechos legales especícos.
Puede que tenga otros derechos que varían de un país a otro.
©2006 Bushnell Outdoor Products
Nota de la FCC:
Este equipo ha sido s ometido a pruebas y cumple con
los límites establecidos para un aparato digital de Clase
B, de acuerdo con la Parte 15 del Reglamento de la
FCC. Estos límites están diseñados para proporcionar
protección razonable contra interferencias perjudiciales
en una instalación residencial. Este equipo genera,
emplea y puede ir radiar energía de radiofrecuencia
y, si no se instalada y utiliza de acuerdo con las
instrucciones, puede causar interferencia perjudicial a
las radiocomunicaciones. Sin embargo, no garantizamos
que no ocurrirán interferencias en una instalación
en particular. Si este equipo causa interferencias
perjudiciales a la recepción radial o televisiva, situación
que puede determinarse apagando y encendiendo el
equipo, se sugiere al usuario que trate de corregir tal
interferencia mediante uno o más de las siguientes
medidas:
· Reorientar o relocalizar la antena receptora.
· Incrementar la separación entre el equipo y el
receptor.
· Conectar el equipo a un tomacorriente en un circuito
diferente al que está conectado el receptor.
· Consultar con el concesionario o un técnico
experimentado en radio/televisión solicitándole
asistencia.
Con este equipo se debe usar un cable de interfaz
blindado para cumplir con los límites para un aparato
digital de acuerdo con la Subparte B de la Parte 15 del
Reglamento de la FCC.
Las espe cicaciones y dis eños están sujetos a cambios
sin ningún aviso u obligación por parte del fabricante.

52
WARNHINWEIS
Sorgen Sie dafür, dass VOR dem Entfernen oder Wechseln der Batterien alle Bilder
von Ihrer Kamera herunter geladen wurden, außer Sie haben für das Speichern der
Fotos eine SD Karte anstelle des internen Speichers verwendet. Wir empfehlen das
Herunterladen aller aktuellen Fotodateien zum Speichern vor dem Aufbewahren der
ImageView Kamera, falls Sie keine SD Karte in der Kamera verwenden, für den Fall,
dass die Batterien während einer längeren Aufbewahrungszeit leer werden.
WARNHINWEIS
NIE direkt mit dem Fernglas in die Sonne sehen.
Der direkte Blick in die Sonne kann zu einer dauerhaften Schädigung der Augen
führen
HINWEIS: Zur Durchführung eines Resets der Kamera, oder falls das Display nicht
mehr reagiert, entfernen Sie mindestens eine Minute lang die Batterien, dann setzen
Sie diese wieder ein.Dies kann zum Verlust aller im internen Speicher enthaltenen
Fotos/Videoaufnahmen führen.

53
Herzlichen Glückwunsch zum Kauf des Bushnell ImageView®
Fernglases! Das Bushnell ImageView Fernglas nutzt die Technologie
digitaler Fotografie und verbindet sie mit einem qualitativ hochwertigen,
kompakten Fernglas. Somit können Sie Sportereignisse, Tieraufnahmen
und Landschaftsaufnahmen betrachten oder das Fernglas für alle
üblichen Verwendungszwecke einsetzen und danach das Bild in der
eingebauten, angeschlossenen Digitalkamera speichern. Danach können
Sie diese Bilder auf Ihren Computer herunter laden und per E-Mail an
Ihre Freunde und an Ihre Familie verschicken, das Bild mit Hilfe der
mitgelieferten Software ausdrucken oder die Bilder in einem Fotoalbum
zur späteren Verwendung abspeichern. Bevor Sie Ihr neues Gerät
benutzen, lesen Sie bitte die Anweisungen in diesem Handbuch und
nehmen Sie sich Zeit, um sich mit den verschiedenen Komponenten und
den technischen Produkteigenschaften vertraut zu machen.
Deutsch

54
Kamera und Fernglas
Teile-Handbuch
Taste
„Knipsen“
Nr.
Modus
Taste Nr
Kamera
Linse
Bildschärfe
Fernglas
Buchse für
Fernbedienung
USB
Port
Kartenschlitz
Batteriefach
(Schieber offen in
Pfeilrichtung)
Stativbuchse

55
CAMERA PARTS
1. Die Kamera wird durch zwei AAA Alkali-, Lithium, oder NiMh Batterien (nicht im Lieferumfang
enthalten) mit Strom gespeist. Legen Sie die Batterien in das Batteriefach ein, die Federn sind dabei in
Kontakt mit dem negativen (flachen) Ende jeder Batterie. Ein Strommessgerät im linken mittleren
Displaybereich zeigt den Zustand der Batterien an.
2. Legen Sie eine SD Karte ("mit der Oberseite nach unten“ ein, wobei die Metallkontakte nach oben
gerichtet sind) in den Schlitz ein, falls ein größerer Speicherplatz gewünscht wird. Sie können SD Karten
(keine MMC Karten) mit einer Speicherkapazität von bis zu 1 GB verwenden. Die Kamera verfügt über
einen internen Speicher mit einer Speicherkapazität von 8MB, der über 100 Fotos aufnehmen kann, folglich
ist keine Karte erforderlich. Der Inhalt des internen Speichers geht jedoch verloren, wenn die Batterien
entfernt werden oder verschiedenartige Fotos auf einer SD Speicherkarte gespeichert werden. Eine 256 MB
Standard Speed SD Karte ist in den meisten Elektro-Verbrauchermärkten oder Computerläden erhältlich
und ist eine gute Wahl für Ihre ImageView Kamera.
3. Drücken Sie die MODUS Taste und halten Sie diese gedrückt, bis sich die Kamera einschaltet. Die
Kamera schaltet nach etwa einer Minute automatisch ab, wenn keine Tasten gedrückt werden. Anmerkung:
Wenn die Kamera mit Hilfe des mitgelieferten USB Kabels an den Computer angeschlossen wird, wird die
Kamera automatisch mit Strom gespeist und über den Computer mit Strom versorgt, ohne dass die Batterie
entleert wird.
4. Halten Sie die ImageView Kamera in einer stabilen Position und drücken Sie die Taste „KNIPSEN“ zur
Erstellung eines Fotos (oder Starten/Stoppen Sie die Aufnahme eines Videos, wenn sich die Kamera
im Video-Modus befindet). Die Brennweite der Kamera ist so voreingestellt, dass scharfe Aufnahmen aus
einer Entfernung von ungefähr 35 Fuß bis unendlich aufgenommen werden können.
5. Falls Sie ein Stativ verwenden, können Sie die Auswirkungen des Verwackelns der Kamera dadurch
vermeiden, dass Sie den mitgelieferten Blendenauslöser mit Fernbedienung in die Buchse neben dem
SD Kartenschlitz stecken und Ihre Fotos lieber mit Hilfe des Fernbedienungsknopfs als mit der Taste
„KNIPSEN“ erstellen.
Ersteinrichtung und Grundbetrieb

56
Die ImageView Kamera druckt Datum und Uhrzeit in den unteren rechten Rand Ihrer Fotos. Zur
Einstellung des aktuellen Datums und der aktuellen Uhrzeit nach Einschalten der Kamera drücken Sie
sowohl die MODUS Taste als auch die Taste „KNIPSEN“ gleichzeitig, bis das Display zu leuchten beginnt.
Auf dem Display erscheinen jetzt die letzten beiden Ziffern des Jahres. Drücken Sie die MODUS Taste und
bewegen den Cursor auf die zweite Ziffer, falls notwendig. Drücken Sie die Taste „KNIPSEN“ und setzen
so die Ziffer nach vorne auf das aktuelle Jahr („07“ für 2007, etc.) Anschließend drücken Sie die MODUSTaste, um zur nächsten Zahl, dem Monat, zu gelangen. Verwenden Sie wieder die Tast „KNIPSEN“ zur
Änderung der Anzeige auf den aktuellen Monat. Nach dem Monat erscheint auf dem Display: Datum,
Uhrzeit (24h FORMAT), Minute und Sekunde – stellen Sie diese Daten mit Hilfe des gleichen Ablaufs
ein und verwenden Sie dazu die MODUS-Taste und die Taste „KNIPSEN“. Sobald Sie alle Datumsund Uhrzeiteinstellungen abgeschlossen haben, leuchtet das Display nicht mehr auf und kehrt zum
Normalbetrieb zurück. Beachten Sie bitte, dass nach dem Batteriewechsel ein Datums- und Uhrzeit-Reset
erforderlich ist. Ihre ImageView Kamera erstellt unmittelbar nach ihrer Entnahme aus dem Etui Fotos mit
hoher Auflösung und hervorragender Qualität und die Verwendung der MODUS-Einstellungen oder die
Durchführung von Änderungen jeglicher Art ist nicht erforderlich; zur Aufnahme Ihrer Fotos drücken Sie
einfach die Taste „KNIPSEN“. Wenn Sie jedoch einen Videoclip erstellen, ein vorhergehendes Foto oder
mehrere vorhergehende Fotos löschen möchten, empfehlen wir Ihnen, die auf den nachfolgenden Seiten
angegebenen, verfügbaren Betriebsmodi durchzusehen. Durch kurzes Drücken der MODUS Taste können
Sie diese Betriebsmodi in der aufgelisteten Reihenfolge durchtippen und es wird Ihnen das Symbol für
jeden Betriebsmodus zusammen mit dessen aktueller Einstellung auf dem Display angezeigt. Drücken Sie
zur Auswahl der gewünschten Einstellung für jeden Betriebsmodus die „KNIPSEN“ Taste. Wenn Sie keine
Änderungen vornehmen und innerhalb von 5 Sekunden weder die „KNIPSEN“ Taste noch die MODUSTaste gedrückt werden, kehrt die Kamera zum Normalbetrieb und zur normalen Displayanzeige zurück.
Verwendung der Betriebsarten/Einstellung von Datum & Uhrzeit

57
Modus Symbol Einstellunge Beschreibung
Video Video Ka-
mera
AUS, Hoch
(640x480 Pixel pro
Rahmen, 15 fps),
Niedrig (320x240
Pixel)
Zur Einstellung des Video-Modus der Kamera
wählen Sie "Hi" = Hoch (empfohlen) oder "Lo"
= Niedrig Video Auflösung anstelle von "AUS"
Warten Sie einige Sekunden, bis das normale
Display der Kamera automatisch wieder angezeigt
wird, dann beginnen Sie mit der Aufnahme, indem
Sie auf KNIPSEN drücken. Der Zähler zeigt die
verstrichene Zeit , oben bis hin zu 53 (Hoch) oder
die zweithöchste 132 (Niedrig) für jeden Videoclip
an. Zur Beendigung der Aufnahme erneut auf
KNIPSEN drücken. Der Zähler rückt um eine
Position vor und zeigt an, dass die Videodatei
gespeichert wurde. Kehren Sie zur Voreinstellung
Videomodus zurück und wählen Sie AUS für den
Reset der Kamera auf den unbewegten Fotomodus.
Qualität Hq or Lq Hoch, Niedrig Wählen Sie "Hohe" (empfohlen) oder “Niedrige”
Qualität zur Auswahl des Ausmaßes der Dateikomprimierung, die sich auf die Größe der Fotodatei
auswirkt. Die Einstellung "Niedrig” ermöglicht die
Aufnahme einer größeren Zahl an Fotos in den
Speicher, jedoch bei niedrigerer Qualität.
Auflösung Hi or Lo Hoch (640x480
Pixel), Niedrig
(320x240 Pixel)
Wählen Sie "Hohe" (empfohlen) oder "Niedrige”
Auflösung , je nachdem, ob Sie mehr Wert auf qualitativ hochwertigere Fotos legen (Hi=Hoch) oder ob
es Ihnen wichtiger ist, eine größere Anzahl an Fotos
aufnehmen zu können (Lo=Niedrig).
Bei Verwendung der Betriebsmodi (Fett werden die Voreinstellungen angezeigt)

58
Modus Symbol Einstellunge Beschreibung
Linienfrequenz 60 oder 50 60 Hz, 50 Hz Die Einstellung entspricht der Netzfrequenz
(Zyklenzahl) in Ihrem Land. So wird sichergestellt,
dass feststehende Bilder und Videos, die bei
fluoreszierender Beleuchtung aufgenommen
wurden, normal erscheinen.
Gleich bleibend CT AUS, 3, 5 Wählen Sie 3 oder 5 Rahmen für die Aufnahme
einer schnellen Fotoserie anstelle eines.. einzelnen
Rahmens, wenn KNIPSEN gedrückt ist (im
herkömmlichen, feststehenden Fotomodus). Zum
Stornieren geben Sie erneut diesen Modus ein und
wählen Sie AUS.
Speicher:
Zugang
MEM STO (USB Mas-
senspeicher), PC
(USB Kamera)
Für den Zugang zum internen Speicher oder
Kartenspeicher wählen Sie “Speicher: wenn die
Kamera mit Hilfe des USB Kabels an einen
Computer angeschlossen ist. "PC" ermöglicht die
Benutzung der Kamera einer USB/PC Kamera für
bewegte Bilder (Bitte beachten Sie, dass die 8-fach
Vergrößerung und die fehlende Möglichkeit der
Nahfokusaufnahmen die Zweckmäßigkeit in den
meisten großen Räumen einschränkt)
Löschen Letzte LSt
+Papierkorb
Kein- Foto-zum
Löschen des letzten
Fotos oder Videos
auf KNIPSEN
drücken.
Wählen Sie diesen Betriebsmodus und drücken Sie
auf KNIPSEN, um ausschließlich das letzte von
Ihnen aufgenommene Foto oder Video zu löschen.
Die Zähleranzeige vermindert sich um eine Zahl.
Bei Verwendung der Betriebsmodi

59
Modus Symbol Einstellunge Beschreibung
Alles Löschen ALL
+Papierkorb
Kein- Foto-zum
Löschen aller
Foto- und Videodateien KNIPSEN
drücken.
Zum Löschen des gesamten Speicherinhalts diesen
Betriebsmodus wählen und KNIPSEN drücken:
(der Zähler wird auf Null zurückgesetzt). Nach
dem Herunterladen Ihrer Dateien zum Löschen
des Speichers diesen Befehl verwenden: Sie können
somit neue Fotos aufnehmen. Falls Sie unabsichtlich
auf "Alles Löschen” gedrückt haben, warten Sie
einfach ein paar Sekunden und die Kamera kehrt
zum Normalbetrieb zurück.
Format FOr
+Papierkorb
Kein Foto-drücken
Sie auf KNIPSEN
zum Formatieren
der Karte oder des
internen Speichers.
Bei Verwendung einer neuen SD Karte oder einer
SD Karte, die zuvor in anderen Geräten verwendet
wurde, empfehlen wir die Auswahl von FORMAT.
Vor dem Beginn Ihrer Fotoaufnahmen drücken Sie
auf KNIPSEN, damit wird auf der Karte das korrekte Dateiordnersystem für diese Kamera voreingestellt. Bitte beachten Sie, dass die Formatierung
einer Karte deren Inhalt löscht – stellen Sie sicher,
dass Sie zuvor alle vorher aufgenommenen Dateien
gesichert haben.
Selbstauslöser Uhr AUS oder Ein Bei Betätigung der Taste „KNIPSEN“ wird das Foto
mit 10 Sekunden Verzögerung aufgenommen (im
herkömmlichen unbewegten Fotomodus). Damit
kann ein unbeabsichtigtes Verwackeln der Kamera
vermieden werden, wenn die Taste „KNIPSEN“
gedrückt ist. Wenn das Blendenkabel für die
Fernbedienung verfügbar ist, sollte es anstelle des
Selbstauslösers verwendet werden, wenn die Kamera
auf ein Stativ montiert ist. Der Selbstauslöser löscht
automatisch nach Gebrauch.
Bei Verwendung der Betriebsmodi

60
VERWENDUNG DER IMAGEVIEW KAMERA MIT IHREM COMPUTER:
1. Die Kamera wird als ein USB Massenspeichergerät erkannt (bei Einstellung von "STO" anstelle von
"PC"), Dies bedeutet, dass für alle Betriebssysteme nach Windows 98 (Me,2000, XP.) keine speziellen
Treiber erforderlich sind); die Betriebssysteme Mac BETRIEBSSYSTEM 9 und OSX sind ebenfalls
kompatibel. Wenn Sie Windows 98 benutzen, müssen Sie den Treiber entsprechend der beigefügten
CD-ROM installieren, BEVOR Sie DIE KAMERA AN IHREN PC ANSCHLIESSEN.
2. Wenn das Betriebssystem Ihres Computers, wie oben aufgeführt, mit einem USB Massenspeicher
kompatibel ist, erscheint ein neues CD Symbol im Windows Explorer (unter “Arbeitsplatz“) als neuer
“Wechseldatenträger”, nach Anschluss des USB Kabels der Imageview Kamera. Bei Mac Anwendern
erscheint das neue CD Symbol auf dem Desktop. Durch einen Mausklick auf das neue CD Symbol
wird der Inhalt, eine „DCIM“ Datei, angezeigt. Die darin enthaltene Bilddatei beinhaltet Ihre Fotos,
gespeichert als JPEGs (.jpg Dateiformat). Sie können mit Hilfe jeglicher Photo- oder Graphiksoftware,
die .jpg Dateien verarbeiten kann, geöffnet, bearbeitet, umbenannt und gespeichert werden. Wenn Sie
über keine entsprechende Software zum Öffnen von .jpg Dateien verfügen, empfehlen wir die Installation
der MGI Photosuite Software (nur Windows) aus der beigefügten CD-ROM. Die Anweisungen dazu
entnehmen Sie bitte dem Kapitel „Software-Installation“.
3. Nach dem Kopieren oder Öffnen und Speichern der Fotodateien auf die Festplatte Ihres Computers
können Sie die Imageview Kamera vom Computer trennen (NIEMALS die Kamera trennen, während
die Übertragung von Dateien auf Ihren Computer noch läuft). Vor dem Trennen sollten Sie den
Wechseldatenträger der Kamera aus dem Laufwerk “auswerfen” oder stoppen, um die Ausgabe einer
Fehlermeldung zu vermeiden (nicht erforderlich mit Windows XP).
4. Auf den nachfolgenden Seiten erhalten Sie eine vollständige Beschreibung der einzelnen Schritte für das
Herunterladen Ihrer Fotos.

61
Systemanforderungen (Mindestanforderungen)
Soware-Installation
Übertragung von Fotos und Videos auf Ihren PC – Schritt für Schritt
Betriebssystem Windows® 98/98SE/2000/ME/XP
CPU: gleichwertig zu MMX Pentium® 200MHZ oder schneller (Pentium® III 500 MHz für PhotoSuite5™)
Speicher: mindestens 32MB (64MB empfohlen für PhotoSuite) SVGA Videokarte w/2MB VRAM, 800x600
Bildschirmanzeige, 16 bit High color) verfügbarer Festplattenspeicher 200 MB (bei Installation von Photosuite)
Interner USB-Port
Wenn Sie Windows 98 benutzen, müssen Sie Treiber installieren, bevor Sie die Kamera an Ihren PC anschließen.
Legen Sie die CD-ROM in das CD-ROM Laufwerk Ihres Computers ein; Das Programm fährt automatisch hoch
und das Installationsbild wird angezeigt. Wählen Sie „Install Driver” (Treiber installieren) und befolgen Sie dann die
Anweisungen. Starten Sie nach der Installation Ihren Computer neu. Windows 2000, ME und XP benötigen keine
Treiber, da die Kamera den USB-Massenspeicher Standard benutzt, was den Zugriff auf die Fotodateien ermöglicht,
als ob sie auf einer externen Festplatte gespeichert wären. Wenn Sie noch keine bestimmte Fotobearbeitungssoftware verwenden, so können Sie für jedes beliebige Windows-Betriebssystem Roxio PhotoSuite® von der CDROM installieren. Lesen Sie auf jeden Fall die „Release Notes” (Freigabe-Anmerkungen) vollständig, da diese Tipps
enthalten oder mögliche Probleme ansprechen, die Ihre PC-Konfiguration und Ihr Betriebssystem betreffen.
1. Vergewissern Sie sich, dass zuerst der Treiber installiert wurde, wenn Sie mit Windows 98/98SE arbeiten.
2. Verbinden Sie das mitgelieferte Kabel mit dem USB-Port des ImageView und dann direkt mit dem Haupt-USBPort an Ihrem Computer – benutzen Sie keine USB-Ports auf der Frontplatte/Tastatur oder „Hubs“ ohne eigene
Stromversorgung.
WARNHINWEIS: Stellen Sie sicher, dass Sie vor dem Entfernen der
Batterien aus der Kamera alle Bilder von Ihrer Kamera herunter laden

62
Übertragung von Fotos und Videos auf Ihren PC
3. Auf der LCD-Anzeige erscheint „Mass Storage” (Massenspeicherung), und der ImageView wird als
ein standardmäßiges „USB-Massenspeichergerät“ erkannt. Das bedeutet, dass die Kamera-Dateien
leicht angezeigt, bearbeitet oder auf Ihre Festplatte kopiert werden können, genau wie wenn sie auf
einer externen Festplatte oder einer CD-ROM gespeichert wären.
4. (Dieser Schritt ist bei Windows XP nicht erforderlich, benutzen Sie einfach die Optionen im Pop-upFenster zum Anzeigen, Kopieren oder Bearbeiten Ihrer Fotos). Öffnen Sie Arbeitsplatz oder Windows
Explorer. Die Kamera erscheint als ein neuer “Wechseldaten-träger“ mit einem ihr zugewiesenen
unbenutzten Laufwerk-Buchstaben. Doppelklicken Sie auf dieses neue „Gerät-Symbol“, öffnen Sie den
darin enthaltenen „DCIM”-Ordner und dann den (die) in diesem enthaltenen Ordner („100MEDIA”
usw). Ihre Fotos/Videos sind die darin enthaltenen Dateien – sie tragen den Präfix „IMG__“, gefolgt
von einer Zahl - derselben, die vorher beim Anzeigen der Fotos auf der Anzeige der Kamera zu sehen
war. Bei einem einzelnen Klick auf eine Datei sollte ein kleines Kontrollbild gezeigt werden.
5. Klicken Sie auf „Bearbeiten > Alle auswählen“ (oder klicken Sie auf ein einzelnes Foto, oder auf
Strg+Klick, um mehrere Fotos auszuwählen), dann “ auf „Bearbeiten > In Ordner kopieren“ (in
Windows-Menüs). Wählen Sie einen bestehenden Ordner auf Ihrer Festplatte, wie etwa „Eigene
Bilder“, oder erstellen Sie einen neuen Ordner („Hawaii-Urlaub“ usw.) und klicken Sie dann auf „OK“,
um die Kopien der gewünschten Fotodateien. zu übertragen.
6. Nach Übertragung der Fotos auf Ihre Festplatte können Sie die Kamera abkoppeln. Windows 2000
zeigt möglicherweise eine Warnung an, dass Sie ein USB-Gerät abgehängt haben, ohne das Gerät zuvor
deaktiviert oder ausgeworfen zu haben (Ihre Fotodateien werden dadurch nicht beschädigt). Sollte das
der Fall sein, so kennzeichnen Sie das Kontrollkästchen, das zu Ihrer Systemleiste oder Taskleiste ein
Symbol hinzufügt. Dann können Sie beim nächsten Mal, wenn Sie mit der Übertragung von Fotos
fertig sind, erst auf dieses Symbol und dann “ auf „USB-Massenspeichergerät auswerfen“ klicken,
bevor Sie die Kamera abkoppeln. (Bei Mac-Computern müssen Sie die CD „auswerfen“, die auf Ihrem
Desktop erschien, als die Kamera angeschlossen war.)

63
Übertragung von Fotos und Videos auf Ihren PC
7. Jetzt können Sie die Fotodateien in jeder beliebigen Foto-Bearbeitungssoftware öffnen. Benutzen Sie einfach nur
Datei>Öffnen und gehen Sie zu dem Ordner, in dem Sie die Fotos zuvor abgelegt haben. Wenn Sie PhotoSuite
benutzen, wählen Sie Datei>Foto öffnen, und benutzen Sie dann „Suchen in“ oben im „Öffnen“-Fenster, wählen
Sie „Arbeitsplatz“, dann Ihre Festplatte, und doppelklicken Sie auf irgendein Foto in dem Ordner, in den Sie die
Dateien von der Kamera kopiert haben. Sie können Ihre Fotos auch direkt von ImageView aus öffnen und mit ihnen
arbeiten, solange dieses noch angeschlossen ist. Um dies mit PhotoSuite zu tun, führen Sie erst die Schritte 1 – 3 aus,
öffnen Sie dann PhotoSuite, wählen Sie Datei>Foto öffnen und benutzen Sie dann „Suchen in“, um „Arbeitsplatz“
auszuwählen, wählen Sie dann „Wechseldatenträger“ und öffnen Sie die darin enthaltenen Ordner, bis Sie zu den
JPEG-Fotodateien gelangen. Wenn Sie sich entscheiden so vorzugehen, von der angeschlossenen Kamera aus, dann
achten Sie darauf, dass Sie das Foto auf Ihre Festplatte speichern (wenn Sie es bearbeitet haben), und nicht auf die
Speicherkarte der Kamera. Um dies mit PhotoSuite zu tun, antworten Sie nach dem Klick auf „Fertig“ auf die Frage
„Änderungen speichern?“ mit „Ja“, antworten Sie jedoch auf die Frage „Bereits existierende Datei ersetzen?“ mit
„Nein“ und benutzen Sie das Dialogfenster „Speichern unter“, um das bearbeitete Foto in einen Ordner auf Ihrer
Festplatte zu speichern („Speichern unter>lokale Festplatte“), nicht auf dem „Wechseldatenträger“ (Kamera).
8. Wenn Sie mit der Fotobearbeitung auf dem Computer noch keine Erfahrung haben, so befragen Sie das Hilfemenü
Ihrer Software (PhotoSuite verfügt eine umfangreiche eingebaute Hilfe) nach Tipps für die Benutzung seiner
Funktionen. Neben der Einstellung von Helligkeit, Kontrast, Schärfe und Farbe Ihrer Fotos können Sie auch die
Größe eines Fotos an das Papier anpassen, wenn Sie drucken, oder Sie können eine Version mit geringerer, niedriger
oder mittlerer Auflösung speichern, um Sie als E-Mail zu verschicken oder in Dokumente einzufügen. Wenn Sie soweit
sind, dass Sie Ihre bearbeitete Datei speichern können, dann möchten Sie vielleicht „Speichern unter“ benutzen und
der Datei einen aussagekräftigeren Namen geben als “IMG___”. Dabei bleibt die Originaldatei als Sicherungskopie
erhalten und kann später wieder geöffnet und erneut bearbeitet werden. Vergewissern Sie sich, dass Sie alle Fotos,
die Sie speichern wollten, erfolgreich übertragen haben, bevor Sie bei Ihrer Kamera „Delete All” (alles Löschen)
anwenden, um Platz für neue Bilder zu schaffen.

64
BEDIENUNGS-ANLEITUNG FERNGLAS
Ihr Bushnell Fernglas ist ein Präzisionsinstrument, das Ihnen viele Jahre lang Freude am Betrachten
bietet. Dieses Kapitel der Broschüre ermöglicht Ihnen das Erreichen optimaler Leistungen durch
Erläuterungen zur Abstimmung des Fernglases auf Ihre Augen und mit Hilfe von Hinweisen zur
Wartung dieses Instruments. Lesen Sie bitte diese Bedienungsanleitung vor dem Gebrauch Ihres
Fernglases sorgfältig durch.
AUGENEINSTELLUNGEN (Abbildung 1)
Einstellung des Abstands zwischen ihren Augen
Der Abstand zwischen den Augen, auch “Pupillendistanz” genannt, ist
von Person zu Person unterschiedlich. Zur Erreichung eines perfekten
Abgleichs zwischen Linse und Auge befolgen Sie diese einfachen
Schritte.
1. Halten Sie Ihr Fernglas in der normalen Sichtposition.
2. Umgreifen Sie jedes Sichtrohr fest. Bewegen Sie die Sichtrohre näher
zusammen oder weiter auseinander, bis ein einzelnes, kreisförmiges Feld erscheint. Stellen Sie Ihr
Fernglas vor dem Gebrauch immer wieder auf diese Position ein.
Wie erfolgt die Einstellung auf die individuelle Sehschärfe
Da sich die individuelle Sehkraft von einer Person zur anderen unterscheidet, sind die meisten Bushnell
Ferngläser mit einer Dioptrien-Einstellung ausgerüstet Ein Merkmal, das die Feineinstellung des Fernglases
entsprechend Ihrer Sehkraft ermöglicht. Befolgen Sie die unten aufgeführten Anweisungen zur Einstellung
der Bildschärfe für Ihren Fernglas Typ.
PUPILLENDISTANZ
Fig. 1

65
EINSTELLUNG DER BILDSCHÄRFE
1. Pupillendistanz einstellen. (Abbildung 1)
2. Die “Dioptrien-Einstellung” (Abbildung 2) auf Null setzen und einen
entfernten Gegenstand betrachten.
3. Stets beide Augen geöffnet halten.
4. Mit Hilfe einer Linsenabdeckung oder Ihrer Hand decken Sie das
Objektiv (vordere) Linse der gleichen Seite des Fernglases ab, an der die
“Dioptrieneinstellung” angebracht ist. Normalerweise ist dies die rechte
Seite. (Die linke Seite bei Modellen mit Zoom.)
5. Das Fokussier-Rädchen in der Mitte dient der Scharfeinstellung eines
entfernten Gegenstandes mit feinen Details (z.B. Ziegelwand, Baumäste, etc.), bis dieser so scharf wie
möglich erscheint.
6. Entfernen Sie die Abdeckung der Objektivlinse auf der Dioptrien-Seite, decken Sie die andere
Objektivlinse ab, dann betrachten Sie den gleichen Gegenstand.
7. Mit Hilfe des Verstellrings für die “Dioptrien-Einstellung” nehmen Sie die Scharfeinstellung
des gleichen betrachteten Gegenstands vor. Bitte vorsichtig vorgehen, da ein Überdrehen oder
erzwungenes Betätigen der Dioptrien-Augenmuschel Beschädigungen zur Folge hat oder dazu führt,
dass die Augenmuschel vom Gestell abbricht.
8. Einstellung der Fernglasoptik auf Ihre Augen. Die Fokussierung aller weit entferntenoder nahe
liegenden Entfernungen ist jetzt ganz einfach durch Drehen des Fokussier-Rädchens in der Mitte
möglich. Notieren Sie die Dioptrieneinstellung für Ihre Augen als zukünftigen Anhaltspunkt.
AUGENMUSCHELN (Abbildung 3)
Ihr Bushnell Fernglas ist mit abrollbaren Gummi-Augenmuscheln für Ihren
Komfort und zum Schutz vor von außen eindringendem Licht ausgerüstet.
Wenn Sie eine Sonnenbrille/Brille tragen, rollen Sie die Augenmuscheln nach
unten. Dies verringert den Abstand zwischen Ihren Augen und dem Fernglas
und bietet Ihnen somit ein verbessertes Sehfeld.
DIOPTRIENE INSTELLUNG
Fig. 2
ROLL-DOWN EYECUPS
Fig. 3

66
GEBRAUCHS- ANWEISUNG FÜR DIE PFLEGE DES FERNGLASES
Ihr Bushnell Fernglas wird jahrelang störungsfrei funktionieren, wenn Sie die herkömmlichen
Pflegearbeiten durchführen, die für jedes optische Feininstrument üblich sind. Das Imageview Gerät
ist nicht wasserdicht und sollte keinerlei Feuchtigkeit ausgesetzt werden. Die Gewährleistung deckt
keinerlei Wasserschäden ab.
1. Falls Ihr Fernglas über abrollbare, flexible Augenmuscheln verfügt, bewahren Sie es mit den
Augenmuscheln nach oben auf. So wird übermäßige Beanspruchung und Verschleiß an den
Augenmuscheln in der nach unten gerichteten Position vermieden.
2. Nicht gegen das Fernglas schlagen oder das Fernglas auf den Boden werfen.
3. An einem kühlen, trockenen Platz aufbewahren.
4. WARNHINWEIS: Direktes Betrachten der Sonne durch Ihr Fernglas kann zur dauerhaften
Schädigung Ihrer Augen führen.
5. Bringen Sie Ihr ImageView Fernglas nie mit einer größeren Menge an Flüssigkeit oder eines
Flüssigmediums in Kontakt, da es nicht wasserdicht/ nebel abweisend ist.
6. Entfernen Sie die Batterien aus Ihrem ImageView Gerät, wenn Sie dieses während eines längeren
Zeitraums nicht benutzen. (Stellen Sie sicher, dass Sie alle Bilder von Ihrer Kamera herunterladen,
bevor Sie die Batterien aus der Kamera entfernen.)
REINIGUNG
1. Blasen Sie jeglichen Staub oder Schmutzpartikel von der Linse (oder verwenden Sie eine weiche
Linsenbürste.)
2. Zur Entfernung von Verschmutzungen oder Fingerabdrücken verwenden Sie ein weiches Baumwolltuch
und führen damit kreisende Bewegungen aus. Die Verwendung eines rauen Tuchs oder unnötiges
Reiben kann die Oberfläche der Linse verkratzen und möglicherweise dauerhafte Beschädigungen
verursachen. Ein “Mikrofaser” Reinigungstuch (erhältlich in den meisten Fotoläden) ist ideal
geeignet für die routinemäßige Reinigung Ihres optischen Gerätes.
3. Zur gründlicheren Reinigung verwenden Sie ein Tuch für die Fotolinsen und eine Reinigungsflüssigkeit
für Fotolinsen oder Isopropyl-Alkohol. Tragen Sie die Flüssigkeit immer zuerst auf das Reinigungstuch
auf – nie direkt auf die Linse.

67
GEWÄHRLEISTUNGSFRIST ZWEI JAHRE
uf das von Ihnen erworbene Produkt der Firma Bushnell® gewähren wir eine zweijährige Garantie auf Materialmängel und Verarbeitung, gültig ab dem Kaufdatum. Falls
während dieser Garantiezeit ein Mangel aureten sollte, behalten wir uns die Entscheidung darüber vor, das Produkt zu reparieren oder zu ersetzen, unter der Voraussetzung,
dass der Kunde das Produkt porto- und versandkostenfrei an uns zurückschickt. Diese
Gewährleistung schließt keinerlei Schäden ein, die durch Missbrauch, unsachgemäßen
Umgang, Einbau oder durch fehlerhae Wartung verursacht wurden, und gilt ebenfalls
nicht, wenn diese Tätigkeiten von anderen Personen als den durch die Kundendienstabteilung der Firma Bushnell hierfür autorisierten Personen durchgeführt wurden.
Jegliche Rücksendung, die in bezug auf diese Gewährleistung erfolgt, muss folgende
Begleitpapiere enthalten:
1) Einen Scheck/Bargeld in Höhe von $10.00 für die Porto- und Handlingkosten
2) Name und Adresse für Rücksendung des Produkts
3) Eine genaue Erläuterung des Mangels
4) B eleg des Kaufdatums
5) Das Produkt ist in einem stabilen Versandkarton gut zu verpacken, um Beschädigungen beim
Transport zu vermeiden, die Portospesen für den Versand an nachstehend aufgeführte
Adresse sind im Voraus zu ent richten:
Versandadresse für die U.S.A.: Versandadresse für Kanada:
Bushnell Outdoor Products
Bushnell Outdoor Products
z.H.: Reparaturabteilung z.H. Reparaturabteilung
8500 Marshall Drive 25A East Pearce Street, Unit 1
Lenexa, Kansas 66214 Richmond Hill, Ontario L4B 2M9
Was Produkte anbelangt, die nicht in den U.S.A. oder in Kanada gekau wurden, erfragen Sie bitte die gültigen Garantiebedingungen bei Ihrem örtlichen Händler. Innerhalb
Europas kann die Firma Bushnell unter folgender Adresse kontaktiert werden:
BUSHNELL Performance Optics Gmbh
European Service Centre
MORSESTRASSE 4
D- 50769 KÖLN
DEUTSCHLAND
Tel: +49 (0) 221 709 939 3
Fax: +49 (0) 221 709 939 8
Diese Gewährleistung räumt Ihnen besondere juristische Rechte ein.
Für die jeweiligen Länder gelten möglicherweise länderspezische Rechte.
©2006 Bushnell Outdoor Products
Anmerkung bezüglich FCC Richtlinien:
Dieses Gerät wurde getestet und es wurde als mit
den Vorschrien für ein digitales Gerät der Klasse
B übereinstimmend befunden, gemäss Teil B der
FCC Vorschrien. Diese Vorschrien wurden
entwickelt, um innerhalb eines Wohnhauses einen
vernünigen Schutz vor gefährlichen Interferenzen
zu gewährleisten. Dieses Gerät erzeugt und verwendet
Radiofrequenzenergie und kann diese ausstrahlen
und, wenn dieses nicht in Übereinstimmung mit der
Bedienungsanleitung eingesetzt wird, kann es den
Rundfunkverkehr empndlich stören. Es gibt jedoch
keinerlei Garantie dafür, dass die Störung in einer
bestimmten Einrichtung nicht auritt. Wenn dieses
Gerät störende Auswirkungen auf den Radio- oder
Fernsehempfang haben sollte, die durch Aus- und
Einschalten des Gerätes festgestellt werden können, ist
es für den Gerätenutzer möglich, eine Behebung der
Störung mit Hilfe einer oder mehrerer der folgenden
Maßnahmen zu erreichen:
· Neuausrichtung oder Neuplatzierung der
Empfangsantenne.
· Das Gerät mit einem Ausgang eines Netzes
verbinden, das in keinerlei Verbindung zu dem Netz
steht, womit der Receiver verbunden ist.
· Fragen Sie den Fachhändler oder einen erfahrenen
Radio- oder Fernsehtechniker um Rat.
Unter Beachtung der Vorschrien für ein dig itales
Gerät gemäß Unterartikel B des Abschnitts 15 der FCC
Richtlinien ist ein abgeschirmtes Interface-Kabel mit
dem Gerät zu verwenden.
Der Hersteller behält sich das Recht auf die
Durchführung von Änderungen von Spezikationen
und Konstruktionsmerkmalen ohne jegliche vorherige
Ankündigung oder Verpichtung vor.

68
AVVERTENZA
Ricordarsi di scaricare le foto dalla fotocamera PRIMA di rimuovere o cambiare
le pile, a meno che le foto non siano state memorizzate su una card SD invece
che nella memoria interna della fotocamera. Prima di riporre l’ImageView se non
viene usata una card SD nella fotocamera, si raccomanda di scaricare e conservare
tutti i file delle foto correnti, per evitare che detti file vadano perduti nel caso in
cui le pile si dovessero scaricare durante un lungo arco di tempo di inattività.
AVVERTENZA
NON guardare direttamente al sole attraverso il binocolo.
Gli occhi potrebbero subire danni permanenti.
NOTA: Per azzerare la fotocamera in caso di problemi o se il display non
risponde, rimuovere le pile per almeno un minuto, quindi installarle di nuovo.
Ciò può causare la perdita di ogni foto/video conservati nella memoria interna.

69
Grazie per la preferenza accordataci acquistando il binocolo Bushnell
ImageView®! Il binocolo Bushnell ImageView abbina la tecnologia
della fotografia digitale ad un binocolo compatto di alta qualità. Ciò
permette di osservare avvenimenti sportivi, selvaggina, panorami
o qualsiasi cosa per la quale si pensi di usare un binocolo, e quindi
salvare l’immagine in una fotocamera digitale incorporata allegata al
binocolo. È possibile quindi scaricare le immagini sul computer e
spedirle tramite email ad amici e parenti, stampare le immagini usando
l’accluso software o salvarle in un album ed usarle in futuro. Prima di
usare il prodotto, leggere le istruzioni contenute nel presente manuale
e familiarizzarsi con le diverse parti e caratteristiche funzionali del
prodotto.
Italiano

70
Guida alle parti della
fotocamera e del binocolo
Pulsante
SNAP
Pulsante
MODE
Obiettivo
della
fotocamera
Messa a
fuoco del
binocolo
Presa
remota
Porta
USB
Slot della
card
Vano delle pile
Zoccolo per
treppiede
(si apre facendolo
scorrere nella
direzione della
freccia)

71
CAMERA PARTS
1.La fotocamera è alimentata da due pile alcaline AAA, al litio o NiMh (non incluse). Inserire le pile
nel vano apposito, con le molle che toccano il polo negativo (estremità piatta) di ogni pila. Un misuratore
della potenza al centro a sinistra del display indica la carica delle pile.
2. Se si desidera una maggiore capacità di memoria, inserire una Card SD (‘alla rovescia” con i contatti di
metallo rivolti in alto). È possibile usare Card SD (non MMC card) fino a 1 GB di capacità. La fotocamera
ha una memoria interna di 8 MB capace di contenere più di 100 foto; pertanto, la card non è necessaria.
Tuttavia, il contenuto della memoria interna andrà perduto se le pile vengono rimosse o sono completamente
scariche, a differenza delle foto memorizzate su una Card SD. Card con velocità standard da 256 MB sono
disponibili presso la maggior parte dei negozi di prodotti elettronici o di computer, e sono una buona
soluzione per l’ImageView.
3. Premere e tenere premuto il pulsante MODE fino a quando la fotocamera si accende. La fotocamera
si accenderà automaticamente dopo circa un minuto se non viene premuto alcun pulsante. Nota:
quando è collegata a un computer tramite il cavo USB (fornito in dotazione), la fotocamera si accenderà
automaticamente e si alimenterà dal computer, risparmiando la carica delle pile.
4. Tenere fermo l’ImageView e premere SNAP per scattare una foto (oppure per avviare/fermare un video,
quando la fotocamera è in modo video) La messa a fuoco della fotocamera è prefissata per prendere foto
nitide da circa 10 metri all’infinito.
5. Quando viene usato un treppiede, per evitare gli effetti causati dall’oscillazione della fotocamera, collegare
l’otturatore remoto, fornito in dotazione, alla presa vicina allo slot della Card SD, e usare il pulsante
dell’otturatore remoto invece del pulsante SNAP per prendere le foto.
Preparazione della fotocamera e funzionamento di base

72
ImageView stampa la data e l’ora nell’angolo in basso a destra delle foto. Per impostare la
data e l’ora, dopo aver acceso la fotocamera, premere e tenere premuti contemporaneamente i
pulsanti MODE e SNAP, fino a quando il display comincia a lampeggiare. Il display mostra ora
le ultime due cifre dell’anno. Premere il pulsante MODE per spostare il cursore alla seconda
cifra, se necessario. Premere il pulsante SNAP per scorrere la cifra all’anno corrente (“07”per
2007, ecc.). Premere quindi MODE per passare al numero successivo, cioè al mese. Di nuovo,
usare SNAP per cambiare il numero al mese corrente. Dopo il mese, sul display appare: data,
ora (formato delle 24 ore), minuti e secondi – continuare a impostare queste cifre seguendo la
stesso procedura usando i pulsanti MODE e SNAP. Una volta completate tutte le impostazioni
della data e dell’ora, il display cessa di lampeggiare e torna allo stato normale. Si ricorda che la
data e l’ora devono essere impostate di nuovo dopo aver cambiato le pile.
L’ImageView viene consegnato già impostato per una risoluzione e una qualità ottima delle
immagini; non è necessario usare le impostazioni di MODE e fare cambiamenti: buoni
risultati si ottengono semplicemente premendo il pulsante SNAP per scattare le foto. Tuttavia,
quando si desidera riprendere un breve filmato video, cancellare una o più foto o esplorare altre
opzioni, si raccomanda di rivedere le opzioni dei modi disponibili elencate alle pagine seguenti.
Premendo brevemente il pulsante MODE, il display mostra, nell’ordine di seguito indicato,
questi modi operativi, e di ogni modo si vedrà la relativa icona e l’impostazione corrente.
Usare il pulsante SNAP per selezionare l’impostazione desiderata di ogni modo. Se non viene
fatta alcuna modifica, e il pulsante SNAP o MODE non viene premuto entro 5 secondi, la
fotocamera torna al funzionamento e al display normale.
Uso dei modi operativi/Impostazione della data e dell’ora

73
Modo Icona Impostazioni Descrizione
Video Video
Camera
OFF, Alta
(640x480 pixel
per fotogramma,
15fps), Bassa
(320x240 pixel)
Selezionare la risoluzione video “Hi” (consigliata)
o “Lo invece di “OFF” per mettere la camera in
modo video. Attendere alcuni secondi prima che
la fotocamera torni automaticamente al display
normale, quindi cominciare le riprese premendo
SNAP. Il contatore visualizzerà il tempo trascorso,
fino ad un massimo di 53 (Hi) o132 secondi per
ogni filmato. Premere di nuovo SNAP per cessare
la ripresa video. Il contatore indicherà uno,
significando che il file video è stato salvato. Tornare
all’impostazione del modo video e selezionare OFF
per riportare la fotocamera al modo fotografico.
Qualità Hq o Lq Alta, Bassa Selezionare la qualità “Hi” (consigliata) o “Lo” per
selezionare l’entità della compressione dei file, che
influiscesulle dimensioni del file delle foto. “Lo”
permette di memorizzare una maggiore quantità di
foto, se pure a qualità ridotta.
Risoluzione Hi o Lo Alta (640x480
pixel), Bassa
(320x240 pixel)
Selezionare la risoluzione “Hi” (consigliata) o “Lo”,
in base alle preferenze personali per foto di aspetto
migliore (Hi) o per scattare una quantità di foto
maggiore (Lo).
Uso dei modi operativi
(le impostazioni predefinite sono indicate in grassetto)

74
Modo Icona Impostazioni Descrizione
Frequenza di
rete
60 o 50 60 Hz, 50 Hz Impostare la frequenza sulla frequenza della potenza
CA (cicli) del proprio paese. In tal modo, la foto e i
video appaiono normali in presenza di illuminazione
a fluorescenza.
Continuo CT OFF, 3, 5 Selezionare 3 o 5 fotogrammi per scattare una serie
rapida di foto invece di un singolo fotogramma,
quando viene premuto SNAP (nel modo normale
foto da fermo). Per annullare, accedere di nuovo
a questo modo e selezionare OFF.
Accesso alla
memoria
MEM Sto (memoria di
massa USB), PC
(fotocamera USB)
Selezionare “Sto” per accedere alla memoria interna
o alla card quando la fotocamera è collegata a un
computer con il cavo USB. "PC" permette di usare
la fotocamera come una fotocamera USB/PC dal
vivo (notare che l’ingrandimento 8x e l’incapacità
di messa a fuoco ravvicinata limita l’utilità di questa
impostazione nella maggior parte degli ambienti)
Cancella ultima LSt +Cestino Nessuna-premere
SNAP per
cancellare l’ultima
foto o l’ultimo
video
Selezionare questo modo e premere SNAP per
cancellare solo l’ultima foto scattata o l’ultima
ripresa video. Il contatore scenderà diun numero.
Uso dei modi operativi

75
Modo Icona Impostazioni Descrizione
Cancella tutto ALL
+Cestino
Nessuna-premere
SNAP per
cancellare tutti i
file delle foto e dei
video
Selezionare questo modo e premere SNAP per
cancellare l’intero contenuto della memoria (il
contatore si azzera). Dopo aver scaricato i file, usare
questo modo per liberare la memoria in modo da
poter scattare nuove foto. Se “Cancella tutto” viene
selezionato per sbaglio, attendere alcuni secondi e la
fotocamera torna al funzionamento normale.
Formatta FOr
+Cestino
Nessuno- premere
SNAP per
formattare la card
o la memoria
interna
Se viene usata una nuova card SD, oppure una card
già usata in altri dispositivi, si consiglia di selezionare
Formatta e premere SNAP prima di scattare le foto,
in modo che la card è configurata con il sistema di
file corretto per questa fotocamera. Si noti che la
formattazione di una card cancella il suo contenutoaccertarsi di aver fatto prima una copia di tutti i file.
Autoscatto Orologio OFF o On La foto viene scattata dopo un ritardo di 10
secondi quando viene premuto SNAP (nel modo
normale foto da fermo). Questo modo può essere
usato per evitare che la fotocamera venga scossa
accidentalmente quando si si preme SNAP. Se il
cavo dell’otturatore a distanza è disponibile, si
consiglia di usarlo al posto dell’autoscatto quando
la fotocamera è montata sul treppiede. Il timer si
annulla automaticamente dopo l’uso.
Uso dei modi operativi

76
USO DI IMAGEVIEW CON IL COMPUTER:
1. La fotocamera verrà riconosciuta come dispositivo USB di memoria di massa (se è impostata su
"STO", non su "PC"), il che significa che non è richiesto alcun driver speciale per ogni sistema
operativo successivo a Windows 98 (Me, 2000, XP). Sono anche compatibili i sistemi operativi
Mac OS 9 e OSX. Se il PC usa Windows 98, è necessario installare il driver incluso nel CD-ROM,
PRIMA DI COLLEGARE LA FOTOCAMERA AL PC.
2. Se il sistema operativo del proprio computer è uno di quelli sopra elencati che è conforme alla
memoria di massa USB, una nuova icona del disco apparirà in Esplora Risorse (in “Risorse del
computer”) come un nuovo “Disco rimovibile”, dopo aver collegato il cavo USB da ImageView.
Gli utenti Mac vedranno apparire sul desktop il nuovo dispositivo a disco. Cliccando sull’icona
del nuovo disco, apparirà il contenuto, una cartella chiamata “DCIM”. La cartella delle immagini
contiene le foto, memorizzate come JPEG (formato dei file .jpg). I file delle foto possono essere
aperti, modificati, cambiati di nome e salvati usando un software fotografico o grafico che accetta
i file .jpg. Se il software che apre i file .jpg non è disponibile, installare MGI Photosuite (solo per
Windows) dall’accluso CD-ROM. Per istruzioni, vedere “Installazione del software”.
3. Dopo aver copiato o aperto e salvato i file delle foto sul disco rigido del computer, scollegare la
fotocamera di ImageView (NON scollegare MAI la fotocamera mentre i file vengono trasferiti
al computer). Per evitare messaggi di errore, prima di scollegare, “espellere” o fermare il disco
rimovibile rappresentante la fotocamera (non necessario con Windows XP).
4. Vedere alle pagine seguenti le istruzioni ordinate su come scaricare le foto.

77
Requisiti di sistema (minimo)
Installazione del soware
Trasferimento di foto e video al PC – Procedura ordinata
Sistema operativo Windows® 98/98SE/2000/ME/XP
CPU: MMX Pentium® 200MHZ equivalente o più veloce (Pentium® III 500 MHz per PhotoSuite5™)
Memoria: 32MB minimo (64MB consigliati per PhotoSuite)
Scheda video SVGA con 2MB di RAM, display 800x600, alta colorazione a 16 bit
200 MB di spazio disponibile sul disco rigido (se viene installato PhotoSuite)
Porta USB interna
Se viene usato Windows 98, prima di collegare la fotocamera al PC è necessario installare i driver. Inserire il CDROM nel lettore di CD del computer; si avvierà automaticamente e apparirà la schermata dell’installazione. Selezionare “Install Driver”, quindi seguire le istruzioni. Terminata l’installazione, riavviare il computer. Windows 2000, ME
e XP non richiedono i driver, poiché la fotocamera usa lo standard USB della memoria di massa, permettendo di accedere alle foto come se queste fossero memorizzate su un disco rigido esterno. Per ogni sistema operativo Windows,
se al momento non viene usato un qualsiasi software per l’elaborazione delle immagini, è possibile installare Rodio
PhotoSuite® dal CD-ROM. Leggere completamente le “Relegasse Notes”, osservando ogni consiglio o problema
potenziale importante per la configurazione e il sistema operativo del PC.
1. Se viene usato Windows 98/98SE, verificare che il driver sia stato installato.
2. Collegare il cavo in dotazione alla porta USB di ImageView, quindi direttamente ad una porta USB principale del
computer-non usare le porte USB sul pannello frontale o sulla tastiera, né su “pub” non alimentati.
AVVERTENZA: Ricordarsi di scaricare ogni foto
dalla fotocamera prima di rimuovere le pile.

78
Trasferimento di foto e video al PC
3. Il display LCD mostrerà “STO”, e ImageView sarà riconosciuto come un “dispositivo di memoria
di massa USB” standard. Questo significa che i file della fotocamera possono essere facilmente visti,
modificati o copiati sul disco fisso come se fossero memorizzati su un disco fisso esterno o su un CDROM.
4. (Questa operazione non è necessaria con Windows XP: basta usare le opzioni visualizzate sullo schermo
per vedere, copiare o modificare le foto). Aprire Esplora Risorse o Risorse del Computer. La fotocamera
sarà rilevata come un nuovo “Disco rimovibile” e gli verrà assegnata una lettera di unità non utilizzata.
Fare doppio clic sull’icona di questo nuovo “Disco”, aprire la cartella “DCIM” all’interno, quindi le
cartelle all’interno di detta cartella (“100MEDIA”, ecc.). Le foto e i video sono i file all’interno-hanno il
prefisso “IMG_”seguito da un numero, lo stesso visto in precedenza sul display della fotocamera in sede
di riesame delle foto. Un solo clic su un file mostra una piccola immagine di anteprima.
5. Fare clic su “Modifica>Seleziona tutte” (oppure fare clic su una foto, control+clic per selezionare più
foto), quindi “Modifica>Copia su cartella” (nei menu di Windows). Selezionare una cartella esistente sul
disco rigido, quale “”Mie foto”, oppure creare una nuova cartella (“Vacanze alle Hawaii, ecc.), quindi fare
clic su “OK” per trasferire le copie deifile delle foto preferite.
6. Dopo che le foto sono state trasferite sul disco rigido, è possibile scollegare la fotocamera. Windows
2000 potrebbe produrre una schermata avvertendo che un dispositivo USB è stato scollegato prima
che un “disco” sia stato fermato o espulso (i file delle foto non subiranno alcun danno). In questo caso,
selezionare la casella che aggiunge un’icona alla system tray o alla barra delle applicazioni. La prossima
volta che si è finito di trasferire altre foto, prima di scollegare la fotocamera, è possibile fare clic su
quest’icona e selezionare “Ferma il dispositivo di memoria di massa USB” (nei computer Mac, “espellere”
il “disco” che è apparso sul desktop quando è stata collegata la fotocamera).

79
Trasferimento di foto e video al PC
7. È possibile adesso aprire i file delle foto usando qualsiasi programma di elaborazione delle immagini. Selezionare
File>Apri e andare alla cartella dove sono stati già salvati i file delle foto. Se viene usato PhotoSuite, selezionare
File>Apri foto, quindi usare il menu a discesa “Cerca in” in alto sulla finestra Apri, selezionare “Esplora risorse”,
selezionare il disco rigido e fare doppio clic sulla foto nella cartella dove sono stati copiati i file dalla fotocamera.
È anche possibile aprire e lavorare sulle foto direttamente da ImageView mentre è ancora collegata: Per fare questo
con PhotoSuite, innanzitutto seguire i passi 1-3, quindi aprire PhotoSuite, selezionare File>Apri foto e usare il menu
“Cerca in” per selezionare Esplora risorse, quindi selezionare “Disco rimovibile”, e aprire le cartelle fino a quando si
trovano i file JPEG delle foto. Se si decide di procedere in questo modo, da una fotocamera collegata, accertarsi di
salvare le foto (dopo aver terminato l’editing) sul disco rigido, anziché nella memoria o nella card della fotocamera.
Per fare questo in PhotoSuite, dopo aver fatto clic su “Fatto”, rispondere a “Salva Modifiche?” con “Sì”, ma poi
rispondere a “Sostituire file esistente”? con “No” e usare la finestra di dialogo “Salva con nome” per salvare la foto
modificata in una cartella del disco rigido (“Salva In>Disco locale”), non il “Disco rimovibile” (fotocamera).
8. Se non si ha molta pratica con i programmi di foto editing al computer, consultare il menu Guida del software
(PhotoSuite ha un’ampia Guida incorporata) per consigli su come usare le funzioni del programma. Oltre a regolare
la luminosità, il contrasto, la nitidezza e il colore delle foto, è possibile ridimensionare la foto per adattarla alla carta
sulla quale stampare la foto, oppure salvare una versione con risoluzione minore, bassa, o media per allegare la foto ad
un’email o per inserirla in un documento. Quando si è pronti a salvare il file modificato, è possibile usare “Salva con
nome” e dare al file un nome più descrittivo di “IMG__”. Agendo in tal modo, il file originale viene conservato come
file di riserva da aprire e modificare di nuovo in un secondo momento. Prima di selezionare “Cancella tutte” nella
fotocamera, per lasciare spazio a nuove immagini, accertarsi di aver trasferito tutte le foto che si volevano salvare.

80
ISTRUZIONI PER L’USO DEL BINOCOLO
Il binocolo Bushnell è uno strumento di precisione, costruito per durare anni e anni. Le sezioni che
seguono spiegano come regolare il binocolo per adattarlo agli occhi e come averne cura. Leggere
attentamente le istruzioni prima di usare il binocolo, per ottenere i migliori risultati possibili.
REGOLAZIONI PER L’ADATTAMENTO AGLI OCCHI (Figura 1)
Regolazione della distanza interpupillare
La distanza interpupillare è la distanza tra i punti centrali delle pupille
e varia da una persona all’altra. Per allineare gli oculari del binocolo agli
occhi, procedere come segue.
1. Tenere il binocolo nella normale posizione di osservazione.
2. Mantenendo una presa salda sui due barilotti, avvicinarli l’uno all’altro
o allontanarli finché il campo visivo, circolare, non diventa unico.
Riportare sempre il binocolo su questa posizione prima di usarlo.
Regolazione diottrica
Ogni persona ha una capacità visiva diversa; la maggior parte dei binocoli Bushnell è dotata di anelli
per la regolazione diottrica, che permettono di regolare la convergenza del sistema ottico secondo la
propria capacità visiva. Procedere come segue.
INTERPUPILLARY DISTANCE
Fig. 1
DISTANZA INTER PUPILLARE

81
MESSA A FUOCO
1. Regolare la distanza interpupillare (Figura 1).
2. Portare su zero l’anello di regolazione diottrica (Figura 2) e osservare un
oggetto lontano.
3. Mantenere sempre aperti entrambi gli occhi.
4. Coprire con un coperchietto o una mano l’obiettivo (lente frontale)
dello stesso barilotto su cui si trova l’anello di regolazione diottrica (in
genere il barilotto destro; quello sinistro per i modelli con zoom).
5. Girare la ghiera centrale di messa a fuoco finché un oggetto distante che presenti dettagli minuti (p.
es. un muro di mattoni, i rami di un albero) appaia con la massima nitidezza possibile.
6. Scoprire l’obiettivo sul lato dell’anello di regolazione diottrica, coprire l’altro obiettivo e osservare lo
stesso oggetto.
7. Girare l’anello di regolazione diottrica per mettere a fuoco l’oggetto osservato. Fare attenzione a non
girare eccessivamente l’anello, poiché forzandolo si può danneggiarlo o si può causare il distacco
dell’oculare dal barilotto.
8. Regolare il binocolo in modo da adattarlo ai propri occhi. Per metterlo a fuoco basta girare l’apposita
ghiera centrale. Prendere nota della posizione ottimale dell’anello di regolazione diottrica.
BORDI DEGLI OCULARI (Figura 3)
Gli oculari del binocolo sono dotati di bordi di gomma rovesciabili, studiati
per aderire meglio e riparare dalla luce esterna. Se portate occhiali, sia da
vista che da sole, ripiegate questi bordi per avvicinare gli oculari agli occhi e
migliorare quindi il campo visivo.
DIOPTER SETTING
Fig. 2
ROLL-DOWN EYECUPS
Fig. 3
REGOLAZIO NE DIOTTRICA

82
COME AVERE CURA DEL BINOCOLO
Ogni binocolo Bushnell assicura anni e anni di servizio senza problemi purché se ne abbia la stessa
cura che si dedicherebbe a qualsiasi strumento ottico di precisione. ImageView non è impermeabile
e non va esposto a un’umidità eccessiva. I danni causati dall’acqua non sono coperti dalla garanzia.
1. Se gli oculari hanno bordi flessibili rovesciabili, riportarli in posizione estesa prima di riporre il
binocolo, per evitare che siano sottoposti a inutili sollecitazioni prolungate e che si usurino.
2. Evitare urti al binocolo e fare attenzione a non farlo cadere.
3. Riporre il binocolo in un luogo fresco e asciutto.
4. AVVERTENZA: non osservare mai direttamente il sole attraverso il binocolo, poiché si possono
subire gravi lesioni, compresa la perdita della vista.
5. Non esporre mai il binocolo a quantità eccessive di un liquido di qualsiasi natura, poiché il binocolo
non è impermeabile all’acqua o all’umidità della nebbia.
6. Se il binocolo non verrà usato per un lungo periodo di tempo, estrarre le pile dalla fotocamera
(accertarsi prima che tutte le foto memorizzate siano state scaricate).
PULIZIA
1. Spolverare le lenti soffiandovi (o adoperare un pennellino morbido per lenti).
2. Per ripulire le lenti dallo sporco o da impronte digitali, adoperare un panno di cotone morbido,
passandolo con movimenti circolari. Utilizzando un panno ruvido o strofinando eccessivamente
si possono graffiare le lenti e anche danneggiarle irreversibilmente. Per la pulizia ordinaria delle
lenti è ideale un panno apposito in microfibre, reperibile nella maggior parte dei negozi di articoli
fotografici.
3. Per una pulizia più accurata si possono usare salviette per lenti e un detergente apposito o alcol
isopropilico. Applicare sempre il liquido alla salvietta, mai direttamente alle lenti.

83
GARANZIA LIMITATA PER DUE ANNI
Si garantisce che questo prodotto Bushnell® sarà esente da difetti di materiale e
fabbricazione per due anni a decorrere dalla data di acquisto. In caso di difetto durante
il periodo di garanzia, a nostra discrezione ripareremo o sostituiremo il prodotto
purché sia restituito f ranco destinatario. Sono esclusi dalla garanzia eventuali danni
causati da abuso, maneggiamento improprio, installazione o manutenzione eseguiti da
persone non autorizzate dal servizio di assistenza Bushnell.
A un prodotto restituito e coperto da questa garanzia occorre allegare quanto segue.
1) Assegno/ordine di pagamento per l’importo di 10 $US per coprire i costi di
spedizione.
2) Nome e indirizzo da utilizzare p er la restituzione del prodotto.
3) Una spiegazione del difetto.
4) Scontrino riportante la data di acquisto.
5) Il prodotto deve essere imball ato in una scatola robusta, per prevenire danni
durante il trasporto, e va spedito franco destinatario a uno dei seguenti
indirizzi.
Recapito negli Stati Uniti: Re capito in Canada:
Bushnell Outdoor Products Bushnell Performance Optics
Attn.: Repairs Attn.: Repairs
8500 Marshall Drive 25A East Pearce Street, Unit 1
Lenexa, Kansas 66214 Richmond Hill, Ontario L4B 2M9
Per prodotti acquistati fuori degli Stati Uniti o del Canada, rivolgersi al rivenditore per
le clausole pertinenti della garanzia. In Europa si può anche contattare la Bushnell a
questo numero: BUSHNELL Performance Optics Gmbh
European Service C entre
MORSESTRASSE 4
D- 50769 - Cologne
Germania
Tél: +49 (0) 221 709 939 3
Fax: +49 (0) 221 709 939 8
Questa garanzia dà specifici diritti legali.
Eventuali altri diritti variano da una nazione all’altra.
©2006 Bushnell Outdoor Products
Dichiarazione relativa alla normativa FCC (Federal
Communications Commission)
In base alle prove eseguite su questo apparecchio,
se ne è determinata la conformità ai limiti relativi ai
dispositivi digitali di Classe B, secondo la Parte 15 delle
norme FCC. Tali limiti sono stati concepiti per fornire
una protezione adeguata da interferenze pericolose
in ambiente domestico. Questo apparecchio genera,
utilizza e può irradiare energia a radiofrequenza e, se
non installato e utilizzato secondo le istruzioni, può
causare interferenze dannose per le comunicazioni
radio. Tuttavia, non esiste alcuna garanzia che, in uno
specico impianto, non si vericheranno interferenze.
Se questo apparecchio causasse interferenze dannose per
la ricezione dei s egnali radio o televisivi, determinabili
spegnendolo e riaccendendolo, si consiglia di tentare di
rimediare all’interferenza con uno o più dei seguenti
metodi.
· Cambiare l’orientamento dell’antenna ricevente o
spostarla.
· Aumentare la distanza tra l’apparecchio e il ricevitore.
· Collegare l’apparecchio a una presa inser ita in un
circuito diverso da quello a cui è collegato il ricevitore.
· Rivolgersi al rivenditore o a un tecnico radio/TV
qualicato.
Per soddisfare la conformità di questo apparecchio ai
limiti relativi ai dispositivi digitali di Classe B, secondo
la Parte 15 delle norme FCC occorre adoperare con esso
un cavo di interfaccia schermato.
I dati tecnici e progettuali sono soggetti a modiche
senza preavviso o obbligo da parte del produttore.

84
AVISO
Verifique se fez o download das imagens de sua câmera ANTES de remover
ou trocar as pilhas, a menos que você tenha usado um cartão SD em vez da
memória interna para o armazenamento das fotografias. É recomendável fazer o
download de todos os arquivos de fotografias atuais para mantê-los seguros antes
de armazenar o ImageView se não estiver usando um cartão SD na câmera, caso
as pilhas descarreguem durante o armazenamento maior.
AVISO
NÃO olhe diretamente para o sol com os binóculos.
Pois isso poderá causar danos permanentes aos seus olhos.
NOTA: Para reconfigurar a câmera se houver problemas ou se o display não estiver
respondendo, remova as pilhas por pelo menos um minuto e, em seguida, reinstaleas.
Isso poderá resultar na perda de todas as fotografias/vídeos armazenados na
memória interna.

85
Parabéns por sua aquisição do binóculo ImageView® da Bushnell! O
binóculo ImageView da Bushnell tem a tecnologia da fotografia digital
e a combina com um binóculo compacto de alta qualidade. Isso permite
a você observar eventos esportivos, vida selvagem, vistas panorâmicas
ou qualquer outra observação para a qual você normalmente usaria
o binóculo, e depois salvar a imagem em uma câmera digital anexa
embutida. Em seguida, você poderá fazer o download dessas imagens
para o seu computador e enviá-las por e-mail para amigos e família,
imprimir a imagem usando o software incluído ou salvá-las em um
álbum de fotografias para uso futuro. Antes de usar o produto, leia
as instruções contidas neste manual e familiarize-se com os diferentes
recursos e peças do produto.
Português

86
Guia de peças do binóculo
e da câmera
Botão
Snap
Botão
de
modo
Lente da
câmera
Foco do
binóculo
Conector
remoto
Porta
USB
Slot para
cartão
Compartimento
das pilhas
Soquete
do tripé
(Para abrir, deslize
na direção da seta)

87
CAMERA PARTS
1.A câmera funciona com duas pilhas AAA alcalinas, lítio ou NiMh (não incluídas). Insira as pilhas
no compartimento, com as molas em contato com a extremidade negativa (plana) de cada pilha. Um
medidor de energia à esquerda do centro do display indica a condição da pilha.
2. Insira um cartão SD ("de cabeça para baixo" com os contatos de metal para cima) no slot se desejar maior
armazenamento. Você pode usar cartões SD (não cartões MMC) até 1 GB de capacidade. A câmera possui
8 MB de memória interna que pode armazenar mais de 100 fotografias, por isso o cartão não é necessário.
Porém, o conteúdo da memória interna será perdido se as pilhas forem removidas ou descarregarem, diferente
de fotografias armazenadas em um cartão de memória SD. Um cartão de velocidade padrão de 256 MB
está disponível na maioria das lojas de computadores ou produtos eletrônicos e é uma boa escolha para o
seu ImageView.
3. Pressione e mantenha pressionado o botão de MODO até que a câmera ligue. A câmera desligará
automaticamente após um minuto se nenhum botão for pressionado. Nota: quando a câmera estiver
conectada a um computador via o cabo USB fornecido, a câmera ligará automaticamente e a energia será
fornecida pelo computador sem gasto de pilhas.
4. Mantenha o ImageView firme e pressione SNAP para tirar uma fotografia (ou iniciar/parar de filmar um
vídeo quando a câmera estiver no modo de vídeo). O foco da câmera está predefinido para tirar fotos nítidas
de aproximadamente 35 pés (10, 67 m) ao infinito.
5. Ao usar um tripé, você pode ajudar a evitar os efeitos da vibração da câmera conectando o disparador
remoto fornecido no conector próximo ao slot de cartão SD e usando o botão no remoto em vez do SNAP
para tirar fotografias.
Configuração e operação básica

88
O ImageView irá imprimir a data e a hora no canto inferior direito das fotografias. Para definir
a data e hora atual, após ligar a câmera, pressione e mantenha pressionado ambos os botões
de MODO e SNAP ao mesmo tempo, até que o display comece a piscar. O display agora
mostra os dois últimos dígitos do ano. Pressione o botão de MODO até mover o cursor para o
segundo dígito se necessário. Pressione o botão SNAP para avançar o dígito ao ano atual ("07"
para 2007, etc). Em seguida, pressione o botão de MODO para ir até o próximo número,
que é o mês. Novamente, use SNAP para alterar esse número ao mês atual. Após a exibição
do mês está: data e hora (formato de 24 horas), minuto e segundo-continue a definir essas
opções usando o mesmo processo através dos botões de MODO e SNAP. Após completar
todos os ajustes de data/hora, o display não mais piscará e voltará ao normal. Observe que será
necessário redefinir a data/hora após substituir as pilhas.
O ImageView já vem configurado de fábrica para alta resolução e qualidade, e não é necessário
usar as definições de MODO e fazer alterações. Para obter bons resultados, simplesmente
pressione o botão SNAP para tirar fotografias. Porém, se você desejar filmar um clipe de vídeo,
excluir uma ou mais fotografias anteriores ou explorar outras opções, é recomendável revisar as
opções de modo disponíveis relacionadas nas páginas seguintes. Pressionar brevemente o botão
de MODO irá passar por esses modos operacionais na ordem listada e você verá o ícone para
cada modo junto com as configurações atuais no display. Use o botão SNAP para selecionar
a configuração desejada para qualquer modo. Se você não fizer alterações, e o botão SNAP ou
MODO não estiver pressionado em 5 segundos, a câmera retornará ao display e à operação
normal.
Usando os modos operacionais/configurando a data e a hora

89
Modo Ícone Configurações Descrição
Vídeo Vídeo
Câmera
OFF (DESLIGADO), Alta
(640x480 pixels
por quadro, 15
fps (quadros por
segundo)), Baixa
(320x240 pixels)
Selecione a resolução de vídeo "Hi" (recomendável)
ou "Lo" em vez de "OFF" para colocar a câmera
no modo de vídeo. Espere alguns segundos para
a câmera retornar automaticamente ao display
normal. Em seguida, comece a filmar pressionando
SNAP. O contador começará a mostrar o tempo
decorrido até o máximo de segundos de 53 (Hi)
ou 132 (Lo) para cada clipe de vídeo. Pressione
SNAP novamente para parar de filmar. O contador
avançará um, indicando que o arquivo de vídeo foi
salvo. Retorne à configuração de modo de vídeo e
selecione OFF (DESLIGADO) para redefinir a
câmera para o modo de fotografia still.
Qualidade Hq ou Lq Alta, Baixa Selecione a qualidade "Hi" (recomendável) ou
"Lo" para escolher a quantidade de compactação
do arquivo, que afeta o tamanho do arquivo de
fotografia. "Lo" permite que mais fotografias sejam
armazenadas na memória, mas com qualidade
reduzida.
Resolução Hi ou Lo Alta (640x480
pixels), Baixa
(320x240 pixels)
Selecione a resolução "Hi" (recomendável) ou "Lo",
com base na sua preferência para tirar fotografias
melhores (Hi) ou para tirar um número maior de
fotografias (Lo).
Usando os modos operacionais (Negrito indica as configurações padrão)

90
Modo Ícone Configurações Descrição
Freqüência de
linha
60 ou 50 60 Hz, 50 Hz Configure para que corresponda à freqüência de
energia CA (ciclos) do seu país. Isso garante que
as fotografias still e os vídeos filmados sob luz
fluorescente apareçam normais.
Contínua CT OFF, 3, 5 Selecione 3 ou 5 quadros para tirar uma série rápida
de fotografias em vez de um único quadro quando
SNAP for pressionado (no modo de fotografia still
normal). Para cancelar, entre nesse modo novamente
e selecione OFF.
Acesso à
memória
MEM Sto
(Armazenamento
em massa USB),
PC (Câmera USB)
Selecione "Sto" para acessar a memória interna ou
do cartão quando a câmera estiver conectada a um
computador com o cabo USB. "PC" permite que a
câmera seja usada como uma câmera USB/PC ativa
(observe que a ampliação 8x e a falta da capacidade
de proximidade de foco limita a utilidade na maioria
dos aposentos)
Excluir última LSt+Trash
Can
Nenhum-pressione
SNAP para excluir
a última fotografia
ou vídeo
Selecione esse modo e pressione SNAP para excluir
somente a última fotografia ou vídeo que você tirou.
O contador baixará um número.
Usando os modos operacionais

91
Modo Ícone Configurações Descrição
Excluir todas ALL+Trash
Can
Nenhum-pressione
SNAP para
excluir todos os
arquivos de vídeo e
fotografias
Selecione esse modo e pressione SNAP para
excluir todo o conteúdo da memória (o contador é
redefinido para zero). Use isso após fazer o download
de seus arquivos, para limpar a memória para que
você possa tirar novas fotografias. Se "Excluir todas"
for selecionado acidentalmente, simplesmente
aguarde alguns segundos e a câmera retornará à
operação normal.
Formatar FOr+Trash
Can
Nenhumpressione SNAP
para formatar a
memória interna
ou do cartão
Se você estiver usando um novo cartão SD ou um
previamente usado em outros dispositivos, será
recomendável que você selecione Format (Formatar)
e pressione SNAP antes de começar a tirar
fotografias, para que o cartão seja configurado com
o sistema de arquivos de dados corretos para essa
câmera. Observe que formatar um cartão irá apagar
seu conteúdo-certifique-se de que fez o backup de
quaisquer arquivos anteriores primeiro.
Cronômetro
automático
Relógio OFF (Desligado)
ou On (Ligado)
A fotografia é tirada após um atraso de 10 segundos
quando SNAP é pressionado (no modo de
fotografia still normal). Isso pode ser usado para
evitar de acidentalmente sacudir a câmera quando
o botão SNAP for pressionado. Se o cabo do
obturador remoto estiver disponível, ele deverá ser
usado em vez do cronômetro automático quando a
câmera estiver montada no tripé. O cronômetro é
cancelado automaticamente após o uso.
Usando os modos operacionais

92
USANDO O IMAGEVIEW COM O COMPUTADOR:
1. A câmera será reconhecida como um dispositivo de armazenamento em massa USB (se estiver
definida para "STO" e não "PC"), o que significa que não é necessário nenhum driver especial
para todos os sistemas operacionais superiores ao Windows 98 (ME, 2000, XP). Mac OS 9 e
OSX também são compatíveis. Se você tiver um PC com o Windows 98, deverá instalar o driver
encontrado no CD-ROM incluído ANTES DE CONECTAR A CÂMERA AO PC.
2. Se você tiver um SO de computador como relacionado acima que é compatível com o armazenamento
em massa USB, um novo ícone de disco será exibido no Windows Explorer (sob “Meu computador”)
como um novo “Disco removível” após conectar o cabo USB a partir do Imageview. Os usuários do
Mac verão o novo dispositivo de disco exibido na área de trabalho.
Clicar no ícone do novo disco mostrará o conteúdo, uma pasta chamada “DCIM”. A pasta de
imagem dentro dela contém suas fotografias, armazenadas como JPEGs (formato de arquivo .jpg).
Elas podem ser abertas, editadas, renomeadas e salvas usando qualquer software de fotografia ou
gráficos que aceita arquivos .jpg. Se você não tiver um software que abre arquivos .jpg, deverá instalar
o MGI Photosuite (somente para Windows) a partir do CD-ROM incluído. Consulte “Instalação
do software” para obter instruções.
3. Após ter copiado e salvo os arquivos de fotografias para o disco rígido do computador, você poderá
desconectar a câmera Imageview (NUNCA desconecte a câmera enquanto os arquivos ainda estão
sendo transferidos para o computador). Antes de desconectar, você deve “ejetar” ou parar o disco
removível representando a câmera para evitar uma mensagem de erro (não é necessário com o
Windows XP).
4. Consulte as páginas seguintes para obter as instruções passo a passo completas para fazer o download
dos arquivos.

93
Requisitos do sistema (Mínimo)
Instalação do soware
Transferindo as fotograas e os vídeos para o PC – Passo a passo
SO: Windows® 98/98SE/2000/ME/XP
CPU: MMX Pentium® 200MHZ equivalente ou mais rápido (Pentium® III 500 MHz para PhotoSuite5™)
Memória: 32 MB mínimo (64 MB recomendável para PhotoSuite)
placa de vídeo SVGA com 2 MB VRAM, exibição de tela 800x600, High color (16 bits)
200 MB de espaço em disco rígido disponível (se estiver instalando o PhotoSuite)
Porta USB interna
Se você estiver usando o Windows 98, deverá instalar os drivers antes de conectar a câmera ao PC. Insira o CD-ROM
na unidade de CD do computador; ele será executado automaticamente e a tela de instalação será exibida. Selecione
“Instalar driver” e siga as instruções. Após a instalação, reinicie o computador. O Windows 2000, ME, e XP não exigem drivers, pois a câmera usa o padrão de armazenamento em massa USB, permitindo que os arquivos de fotografias
sejam acessados mesmo se estiverem armazenados em um disco rígido externo. Para qualquer SO Windows, se você
ainda não estiver usando o software de edição de fotografias desejado, poderá instalar o Roxio PhotoSuite® a partir
do CD-ROM. Leia as “Notas de versão” completamente, observando quaisquer dicas ou problemas em potencial
relevantes para o SO e a configuração do PC.
1. Verifique se o driver foi instalado primeiro se você estiver no Windows 98/98SE.
2. Conecte o cabo fornecido à porta USB do ImageView, em seguida, diretamente a uma porta USB principal no
computador-não use as portas USB do teclado/painel frontal ou “hubs” sem energia.
AVISO: Verifique se fez o download de qualquer
imagem da câmera antes de remover as pilhas da câmera.

94
Transferindo as fotograas e os vídeos para o PC – Passo a passo
3. O display LCD irá indicar “STO” e o ImageView será reconhecido como um dispositivo padrão
de “Armazenamento em massa USB”. Isso significa que os arquivos da câmera podem ser facilmente
exibidos, editados ou copiados para o seu disco rígido, como se estivessem armazenados em um disco
rígido externo ou um CD-ROM.
4. (Essa etapa não é necessária com o Windows XP, simplesmente use as opções na janela instantânea para
exibir, copiar ou editar suas fotografias). Abra Meu computador ou o Windows Explorer. A câmera será
exibida como um novo “Disco removível” com uma letra de unidade não usada atribuída a ela. Clique
duas vezes nesse novo ícone “Disco”, abra a pasta “DCIM” no interior, em seguida a(s) pasta(s) dentro
dela (“100MEDIA”, etc). As fotografias/vídeos são os arquivos no interior-elas têm o prefixo “IMG_
_” seguido por um número, como visto anteriormente no display da câmera quando você revisar as
fotografias. Clicar uma vez em qualquer arquivo deverá mostrar uma pequena imagem de visualização.
5. Clique em “Editar>Selecionar todas” (ou clique em uma fotografia, control+click para selecionar
várias fotografias), e “Editar>Copiar para pasta” (nos menus do Windows). Selecione uma pasta existente
no disco rígido como “Minhas imagens”, ou crie uma nova pasta (“Férias no Havaí”, etc), e clique em
“OK” para transferir as cópias dos arquivos de fotografias desejados.
6. Após as fotografias terem sido transferidas para o disco rígido, você poderá desconectar a câmera.
O Windows 2000 talvez produza uma tela avisando que você desconectou um dispositivo USB sem
parar ou ejetar o “disco” primeiro (seus arquivos de fotografias não serão danificados). Se isso ocorrer,
marque a caixa que adiciona um ícone à bandeja do sistema ou barra de tarefas. Na próxima vez em que
você terminar de transferir as fotografias, poderá clicar nesse ícone primeiro e “Parar o dispositivo de
armazenamento em massa USB” antes de desconectar a câmera. (Em computadores Mac, você deve
“ejetar” o “disco” que aparecer na área de trabalho quando a câmera foi conectada.)

95
Transferindo as fotograas e os vídeos para o PC – Passo a passo
7. Agora você está pronto para abrir os arquivos de fotografias em qualquer software de edição de fotografias. Use
Arquivo>Abrir e vá para a pasta em que armazenou as fotografias anteriormente. Se você estiver usando o PhotoSuite,
selecione Arquivo>Abrir fotografia, e use o menu suspenso “Examinar” no topo da janela Abrir, selecione “Meu
computador”, selecione o disco rígido e clique duas vezes em qualquer fotografia na pasta em que copiou os arquivos
da câmera. Também é possível abrir e trabalhar com as fotografias diretamente do ImageView enquanto ainda está
conectado. Para fazer isso com o PhotoSuite, primeiro siga as etapas 1-3, em seguida, abra o PhotoSuite, selecione
Arquivo>Abrir fotografia e use o menu “Examinar” para selecionar Meu computador e selecione “Disco removível”,
e abra as pastas até que você chegue nos arquivos de fotografias JPEG. Se você escolher trabalhar desta forma, de uma
câmera conectada, verifique se salvou a fotografia (quando terminar de editar) no disco rígido e não no cartão ou na
memória da câmera. Para fazer isso no PhotoSuite, após clicar em “Concluído”, responda “Salvar alterações?” com
“Sim”, mas em seguida responda “Substituir arquivo existente”? com “Não” e use a caixa de diálogo “Salvar como”
para salvar a fotografia editada em uma pasta no disco rígido (“Salvar em>Disco local”), não o “Disco removível”
(câmera).
8. Se você não tem experiência com edição de fotografias no computador, consulte o menu de Ajuda do software
(o PhotoSuite tem uma Ajuda interna abrangente) para obter dicas sobre como usar os seus recursos. Junto com o
ajuste de brilho, contraste, nitidez e cor das fotografias, você poderá redimensionar a fotografia para caber no papel
se estiver imprimindo, ou salvar uma versão de resolução média, baixa ou menor para enviar por e-mail ou inserir em
documentos. Quando você estiver pronto para salvar o arquivo editado, talvez deseje usar “Salvar como” e fornecer
a ele um nome mais descritivo do que “IMG___”. Fazer isso também preserva o arquivo original como backup para
abrir e editar novamente mais tarde. Verifique se transferiu com êxito todas as fotografias que desejava salvar antes de
usar “Excluir todas” na câmera para criar mais espaço para as novas imagens.

96
INSTRUÇÕES DO BINÓCULO
O seu binóculo Bushnell é um instrumento de precisão projetado para proporcionar vários anos de
observação prazerosa. Essa parte do livreto o ajudará a obter desempenho superior explicando como
você pode ajustar o binóculo aos seus olhos e como cuidar deste instrumento. Leia as instruções
com cuidado antes de usar o binóculo.
AJUSTE PARA OS OLHOS (Figura 1)
Como ajustar a distância entre os olhos
A distância entre os olhos, chamada de “distância interpupilar”, varia de
pessoa a pessoa. Para obter o alinhamento perfeito entre as lentes e os
olhos, siga essas etapas simples.
1. Mantenha o binóculo na posição normal de observação.
2. Segure cada cilindro com firmeza. Aproxime ou afaste os cilindros até
enxergar somente um único campo circular. Sempre reajuste o binóculo para esta posição antes de
usá-lo.
Como ajustar para a sua visão
Como a visão varia de uma pessoa para outra, a maioria dos binóculos Bushnell apresenta um recurso de
ajuste de dioptria que permite ajustar o binóculo à sua visão. Siga as instruções de focalização abaixo
para o seu tipo de binóculo.
INTERPUPILLARY DISTANCE
Fig. 1
DISTÂNCIA INTERPU PILAR

97
FOCALIZAÇÃO
1. Ajuste a distância interpupilar. (Figura 1)
2. Coloque o “ajuste de dioptria” (Figura 2) na posição zero e visualize um
objeto distante.
3. Mantenha ambos os olhos sempre abertos.
4. Usando a tampa da lente ou sua mão, cubra a lente da objetiva (frente) do
mesmo lado do binóculo que possui o “ajuste de dioptria”. Geralmente é o
lado direito. (O lado esquerdo em modelos com zoom.)
5. Usando o disco de focalização central, focalize um objeto distante com detalhes precisos
(por exemplo, uma parede de tijolos, galhos de árvore, etc.) até que a imagem fique tão nítida quanto
possível.
6. Descubra a lente objetiva do lado da dioptria e cubra a lente objetiva do outro lado. Em seguida,
visualize o mesmo objeto.
7. Usando o anel de ajuste do “ajuste da dioptria”, focalize o mesmo objeto sendo visualizado. Tenha
cuidado para não girar muito nem forçar a ocular de dioptria, pois isso poderá causar danos ou fazer
com que a ocular se destaque do chassi.
8. O seu binóculo deve estar ajustado aos seus olhos. Agora, qualquer distância poderá ser focalizada,
bastando girar o disco de focalização central. Anote o ajuste de dioptria para seus olhos para uso
futuro.
VISEIRAS (Figura 3)
O binóculo Bushnell possui viseiras de borracha dobráveis projetadas para
o seu conforto e para eliminar a luz externa supérflua. Se você usar óculos ou
óculos de sol, abaixe as viseiras. Isso fará com que seus olhos se aproximem da
lente do binóculo, melhorando assim o campo de visão.
DIOPTER SETTING
Fig. 2
ROLL-DOWN EYECUPS
Fig. 3
AJUSTE DE DIOPTRIA

98
INSTRUÇÕES DE CUIDADO DOS BINÓCULOS
O seu binóculo Bushnell proporcionará vários anos de serviço sem problemas se receber os cuidados
usuais que devem ser dados a qualquer instrumento óptico delicado. O Imageview não é à prova
d'água e não deve ser exposto a qualquer fonte de umidade. Os danos por água não são cobertos pela
garantia.
1. Se o seu binóculo tem viseiras flexíveis, dobráveis, armazene-o com as viseiras para cima. Isso evitará
tensão e gasto excessivos nas viseiras na posição para baixo.
2. Evite esbarrar no binóculo ou deixá-lo cair.
3. Armazene em local seco e fresco.
4. AVISO: Olhar diretamente para o sol com o binóculo pode causar danos permanentes aos olhos.
5. Nunca exponha o binóculo ImageView a qualquer tipo de fluido ou líquido excessivo, pois ele não é
à prova d’águanem de embaçamento.
6. Retire as pilhas do ImageView se não for usá-lo por um longo período de tempo. (Verifique se você fez
o download de quaisquer imagens da câmera antes de remover as pilhas da câmera.)
LIMPEZA
1. Sopre toda a sujeira ou detritos nas lentes (ou use uma escova para lentes macia).
2. Para retirar a sujeira ou impressões digitais, limpe com um tecido de algodão macio, usando movimento
circular. A utilização de um pano áspero ou o atrito desnecessário poderá arranhar a superfície da
lente e causar danos permanentes. Um pano de limpeza de “microfibra” (disponível na maioria dos
fornecedores de material fotográfico) é ideal para a limpeza rotineira dos materiais ópticos.
3. Para uma limpeza mais profunda, pode-se usar lenços para lentes fotográficas e fluido de limpeza “tipo
fotográfico” ou com álcool isopropílico. Coloque sempre o fluido sobre o pano de limpeza, nunca
diretamente sobre a lente.

99
GARANTIA LIMITADA DE DOIS ANOS
Garantimos que seu produto Bushnell® estará isento de defeitos materiais e de
fabricação. por dois anos após a data de aquisição. Caso tenha algum um defeito sob
esta garantia, iremos a nossa opção, consertar ou trocar este produto desde que o
produto seja devolvido com porte pago. Esta garantia não abrange danos causados por
uso indevido, operação, instalação, ou manutenção incorretas efetuadas a não s er que
seja do Departamento do Serviço de Manutenção Autorizada da Bushnell.
Qualquer devolução efetuada sob esta garantia deve incluir os itens relacionados
a seguir:
1) Um cheque/ordem de pagamento no montante de $10,00 para cobrir as
despesas de porte e gastos administrativos
2) Nome e endereço para a devolução do produto
3) Uma explicação do defeito
4) Comprovante da Data de Aquisição
5) O produto deve ser cuidadosamente embalado, numa caixa de papelão
resistente para prevenir danos enquanto em trânsito e enviado para os
endereços indicados a seguir com p orte de devolução pago:
NOS EUA REMETER PARA: NO CANADÁ REMETER PARA:
Bushnell Outdoor Products Bushnell Performance Optics
Attn.: Repairs Attn.: Repairs
8500 Marshall Drive 25A East Pearce Street, Unit 1
Lenexa, Kansas 66214 Richmond Hill, Ontario L4B 2M9
Para produtos adquiridos fora dos Estados Unidos ou do Canadá favor contatar seu
revendedor local quanto a informações aplicáveis referentes a sua garantia. A Bushnell
também pode ser contatada na Europa pelo telefone:
BUSHNELL Performance Optics Gmbh
European Service Centre
MORSESTRASSE 4
D- 50769 KÖLN
Alemanha
Tél: +49 (0) 221 709 939 3
Fax: +49 (0) 221 709 939 8
Esta garantia lhe dá direitos legais específicos.
Poderá ter outros direitos que podem variar de país para p aís.
©2006 Bushnell Outdoor Products
Nota da FCC:
Este equipamento foi testado e vericou-se que
cumpre com os limites p ara um dispositivo digital
Classe B, de acordo com a Parte 15 das regras d a
FCC. Esses limites são estabelecidos para oferecer
proteções adequadas contra a interferência prejudicial
em uma instalação residencial. Este equipamento
gera, usa e pode irradiar energia de radiofreqüência
e, se não for instalado e usado de acordo com as
instruções, poderá causar interferência prejudicial nas
radiocomunicações. Entretanto, não há garantia de que
não ocorrerão casos de interferência em determinadas
instalações. Se este equipamento causar interferência
prejudicial na recepção de rádio ou televisão (a qual
poderá ser determinada ligando-se e desligando-se o
equipamento), tente corrigir o problema adotando uma
ou mais das medidas seguintes:
· Reoriente ou mude o lugar da antena receptora.
· Aumente a distância entre o equipamento e receptor.
· Conecte o e quipamento em uma tomada que faça parte de
um circuito diferente daquele onde o receptor se encontra
conectado.
· Consulte um representante ou um técnico experiente em
rádio/televisão para auxílio.
O cabo de interferência blindado deve s er usado com
o equipamento para cumprir os limites de dispositivo
digital s egundo a Sub-parte B d a Parte 15 das Regras
da FCC.
Projetos e especicações estão sujeitos a mudanças sem
aviso prévio ou obrigação por parte do fabricante.

100
 Loading...