


INSTALLATION, OPERATING AND
SERVICE INSTRUCTIONS FOR
APEX™
CONDENSING HIGH
 EFFICIENCY
DIRECT VENT
GAS - FIRED HOT WATER BOILER
9700609
Warning: Improper installation, adjustment, alteration, service or maintenance can cause property damage, injury, or loss of life. For assistance or additional information, consult a qualified installer, service agency or the gas supplier. This boiler requires a special venting system. Read these instructions carefully before installing.
103022-04 - 8/13 |
Price - $5.00 |

IMPORTANT INFORMATION - READ CAREFULLY
NOTE: The equipment shall be installed in accordance with those installation regulations enforced in the area where the installation is to be made. These regulations shall be carefully followed in all cases. Authorities having jurisdiction shall be consulted before installations are made.
All wiring on boilers installed in the USA shall be made in accordance with the National Electrical Code and/or local regulations. All wiring on boilers installed in Canada shall be made in accordance with the Canadian Electrical Code and/or local regulations.
The City of New York requires a Licensed Master Plumber supervise the installation of this product.
The Massachusetts Board of Plumbers and Gas Fitters has approved the Apex™ Series boiler. See the Massachusetts Board of Plumbers and Gas Fitters website, http://license.reg.state.ma.us/pubLic/pl_products/pb_pre_form.asp for the latest Approval Code or ask your local Sales Representative.
The Commonwealth of Massachusetts requires this product to be installed by a Licensed Plumber or Gas Fitter.
The following terms are used throughout this manual to bring attention to the presence of hazards of various risk levels, or to important information concerning product life.
DANGER
Indicates an imminently hazardous situation which, if not avoided, will result in death, serious injury or substantial property damage.
CAUTION
Indicates a potentially hazardous situation which, if not avoided, may result in moderate or minor injury or property damage.
WARNING
Indicates a potentially hazardous situation which, if not avoided, could result in death, serious injury or substantial property damage.
NOTICE
Indicates special instructions on installation, operation, or maintenance which are important but not related to personal injury hazards.
DANGER
DO NOT store or use gasoline or other flammable vapors or liquids in the vicinity of this or any other appliance.
If you smell gas vapors, NO NOT try to operate any appliance - DO NOT touch any electrical switch or use any phone in the building. Immediately, call the gas supplier from a remotely located phone. Follow the gas supplier’s instructions or if the supplier is unavailable, contact the fire department.
2
Special Installation Requirements for Massachusetts
A.For all sidewall horizontally vented gas fueled equipment installed in every dwelling, building or structure used in whole or in part for residential purposes and where the sidewall exhaust vent termination is less than seven (7) feet above grade, the following requirements shall be satisfied:
1.If there is no carbon monoxide detector with an alarm already installed in compliance with the most current edition of NFPA 720, NFPA 70 and the Massachusetts State Building Code in the residential unit served by the sidewall horizontally vented gas fueled equipment, a battery operated carbon monoxide detector with an alarm shall be installed in compliance with the most current edition of NFPA 720, NFPA 70 and the Massachusetts State Building Code.
2.In addition to the above requirements, if there is not one already present, a carbon monoxide detector with an alarm and a battery back-up shall be installed and located in accordance with the installation requirements supplied with the detector on the floor level where the gas equipment is installed. The carbon monoxide detector with an alarm shall comply with 527 CMR, ANSI/UL 2034 Standards or CSA 6.19 and the most current edition of NFPA 720. In the event
that the requirements of this subdivision can not be met at the time of the completion of the installation of the equipment, the installer shall have a period of thirty (30) days to comply with this requirement; provided, however, that during
said thirty (30) day period, a battery operated carbon monoxide detector with an alarm shall be installed in compliance with the most current edition of NFPA 720, NFPA 70 and the Massachusetts State Building Code. In the event that the sidewall horizontally vented gas fueled equipment is installed in a crawl space or an attic, the carbon monoxide detector may be installed on the next adjacent habitable floor level. Such detector may be a battery operated carbon monoxide detector with an alarm and shall be installed in compliance with the most current edition of NFPA 720, NFPA 70 and the Massachusetts State Building Code.
3.A metal or plastic identification plate shall be permanently mounted to the exterior of the building at a minimum height of eight (8) feet above grade directly in line with the exhaust vent terminal for the horizontally vented gas fueled heating appliance or equipment. The sign shall read, in print size no less than one-half (1/2) inch in size, “GAS VENT DIRECTLY BELOW. KEEP CLEAR OF ALL OBSTRUCTIONS”.
4.A final inspection by the state or local gas inspector of the sidewall horizontally vented equipment shall not be performed until proof is provided that the state or local electrical inspector having jurisdiction has granted a permit for installation of carbon monoxide detectors and alarms as required above.
B.EXEMPTIONS: The following equipment is exempt from 248 CMR 5.08(2)(a) 1 through 4:
1.The equipment listed in Chapter 10 entitled “Equipment Not Required To Be Vented” in the most current edition of NFPA 54 as adopted by the Board; and
2.Product Approved sidewall horizontally vented gas fueled equipment installed in a room or structure separate from the dwelling, building or structure used in whole or in part for residential purposes.
C.When the manufacturer of Product Approved sidewall horizontally vented gas equipment provides a venting system design or venting system components with the equipment, the instructions for installation of the equipment and the venting system shall include:
1.A complete parts list for the venting system design or venting system; and
2.Detailed instructions for the installation of the venting system design or the venting system components.
D.When the manufacturer of a Product Approved sidewall horizontally vented gas fueled equipment does not provide the parts for venting flue gases, but identifies “special venting systems”, the following shall be satisfied:
1.The referenced “special venting system” instructions shall be included with the appliance or equipment installation instructions; and
2.The “special venting systems” shall be Product Approved by the Board, and the instructions for that system shall include a parts list and detailed installation instructions.
E.A copy of all installation instructions for all Product Approved sidewall horizontally vented gas fueled equipment, all venting instructions, all parts lists for venting instructions, and/or all venting design instructions shall remain with the appliance or equipment at the completion of the installation.
3
WARNING
This boiler requires regular maintenance and service to operate safely. Follow the instructions contained in this manual.
Improper installation, adjustment, alteration, service or maintenance can cause property damage, personal injury or loss of life. Read and understand the entire manual before attempting installation, start-up operation, or service. Installation and service must be performed only by an experienced, skilled, and knowledgeable installer or service agency
This boiler must be properly vented.
This boiler needs fresh air for safe operation and must be installed so there are provisions for adequate combustion and ventilation air.
The interior of the venting system must be inspected and cleaned before the start of the heating season and should be inspected periodically throughout the heating season for any obstructions. A clean and unobstructed venting system is necessary to allow noxious fumes that could cause injury or loss of life to vent safely and will contribute toward maintaining the boiler’s efficiency.
Installation is not complete unless a pressure relief valve is installed into the tapping located on left side of appliance. - See the Water Piping and Trim Section of this manual for details.
This boiler is supplied with safety devices which may cause the boiler to shut down and not re-start without service. If damage due to frozen pipes is a possibility, the heating system should not be left unattended in cold weather; or appropriate safeguards and alarms should be installed on the heating system to prevent damage if the boiler is inoperative.
This boiler contains very hot water under high pressure. Do not unscrew any pipe fittings nor attempt to disconnect any components of this boiler without positively assuring the water is cool and has no pressure. Always wear protective clothing and equipment when installing, starting up or servicing this boiler to prevent scald injuries. Do not rely on the pressure and temperature gauges to determine the temperature and pressure of the boiler. This boiler contains components which become very hot when the boiler is operating. Do not touch any components unless they are cool.
Boiler materials of construction, products of combustion and the fuel contain alumina, silica, heavy metals, carbon monoxide, nitrogen oxides, aldehydes and/or other toxic or harmful substances which can cause death or serious injury and which are known to the state of California to cause cancer, birth defects and other reproductive harm. Always use proper safety clothing, respirators and equipment when servicing or working nearby the appliance.
Failure to follow all instructions in the proper order can cause personal injury or death. Read all instructions, including all those contained in component manufacturers manuals which are provided with the boiler before installing, starting up, operating, maintaining or servicing.
All cover plates, enclosures and guards must be in place at all times.
NOTICE
This boiler has a limited warranty, a copy of which is printed on the back of this manual. It is the responsibility of the installing contractor to see that all controls are correctly installed and are operating properly when the installation is complete.
4

TABLE OF CONTENTS
I. |
Product Description, Specifications and Dimensional Data |
...................... 6 |
|
II. |
Unpacking Boiler........................................................................................ |
10 |
|
III. |
Pre-Installation and Boiler Mounting.......................................................... |
11 |
|
IV. |
Venting...................................................................................................... |
15 |
|
|
A. General Guidelines............................................................................... |
15 |
|
|
B. CPVC/PVC Venting.............................................................................. |
18 |
|
|
C. Polypropylene Venting......................................................................... |
26 |
|
|
D. Stainless Steel Venting........................................................................ |
30 |
|
|
E. Concentric Polypropylene Venting....................................................... |
32 |
|
|
F. Removing the Existing Boiler............................................................... |
38 |
|
|
G. Multiple Boiler Installation Venting....................................................... |
40 |
|
V. |
Condensate Disposal................................................................................. |
43 |
|
VI. |
Water Piping and Trim............................................................................... |
45 |
|
VII. |
Gas Piping ............................................................................................... |
59 |
|
VIII. |
Electrical ................................................................................................... |
63 |
|
IX. |
System Start-Up ....................................................................................... |
75 |
|
X. |
Operation...................................................................................................... |
81 |
|
|
A. Overview.............................................................................................. |
81 |
|
|
B. Supply Water Temperature Regulation................................................ |
82 |
|
|
C. Boiler Protection Features.................................................................... |
83 |
|
|
D. Multiple Boiler Control Sequencer........................................................ |
84 |
|
|
E. Boiler Sequence of Operation.............................................................. |
85 |
|
|
1. |
Normal Operation........................................................................... |
85 |
|
2. |
Using the Display............................................................................ |
86 |
|
F. Viewing Boiler Status.......................................................................... |
87 |
|
|
1. |
Status Screens............................................................................... |
87 |
|
2. |
Detail Screens................................................................................ |
88 |
|
3. |
Multiple Boiler Sequencer Screens................................................ |
89 |
|
G. Changing Adjustable Parameters........................................................ |
90 |
|
|
1. |
Entering Adjust Mode.................................................................... |
90 |
|
2. |
Adjusting Parameters.................................................................... |
90 |
XI. |
Service and Maintenance ........................................................................ |
101 |
|
XII. |
Troubleshooting........................................................................................ |
105 |
|
XIII. |
Repair Parts ............................................................................................. |
109 |
|
|
Appendix A - Figures................................................................................ |
124 |
|
|
Appendix B - Tables.................................................................................. |
127 |
|
|
Warranty........................................................................................... |
Back Page |
|
5

I. Product Description, Specifications and Dimensional Data
Apex™ Series boilers are condensing high efficiency gas-fired direct vent hot water boilers designed for use in forced hot water space or space heating with indirect domestic hot water heating systems, where supply water temperature does not exceed 210°F. These boilers have special coil type stainless steel heat exchangers, constructed, tested and stamped per Section IV ‘Heating Boilers’ of
Table 1: Dimensional Data (See Figures 1A, 1B and 1C)
ASME Boiler and Pressure Vessel Code, which provide a maximum heat transfer and simultaneous protection against flue gas product corrosion. These boilers are not designed for use in gravity hot water space heating systems or systems containing significant amount of dissolved oxygen
(swimming pool water heating, direct domestic hot water heating, etc.).
Dimension |
|
|
Boiler Model |
|
|
|
|
|
|
APX399 |
|
APX500 |
APX800 |
|
|
|
|||
|
|
|
|
|
A - Inch |
28-7/8 |
|
44-7/8 |
54-9/16 |
(mm) |
(734) |
|
(1140) |
(1384) |
B - Inch |
6-3/16 |
|
22-1/8 |
28-3/8 |
(mm) |
(157) |
|
(562) |
(724) |
C - Inch |
13-1/16 |
|
29 |
34-1/4 |
(mm) |
(332) |
|
(737) |
(876) |
D - Inch |
23-3/4 |
|
39-11/16 |
48-1/16 |
(mm) |
(602) |
|
(1008) |
(1226) |
E - Inch |
15-13/16 |
|
29-3/8 |
33-13/16 |
(mm) |
(402) |
|
(752) |
(864) |
Gas Inlet F |
3/4” |
|
3/4” |
1 |
(FPT) |
|
|||
|
|
|
|
|
Return G |
|
1-1/2” (FPT) |
2” (MPT) |
|
|
|
|
|
|
Supply H |
|
1-1/2” (FPT) |
2” (MPT) |
|
|
|
|
||
Condensate Drain J |
Factory Provided Socket End Compression Pipe Joining Clamp for 3/4” Schedule 40 PVC Pipe |
|||
|
|
|
|
|
Boiler Two-Pipe |
|
|
|
|
CPVC/PVC Vent Connector |
|
4 x 4 |
6 x 6 |
|
(Figures 1A, 1B and 1C) - Inch |
|
|
|
|
Approx. Shipping Weight (LBS) |
304 |
|
350 |
430 |
|
|
|
|
|
6

I. Product Description, Specifications and Dimensional Data (continued)
Figure 1A: Apex™ - Model APX399 |
7

8
I. Product Description, Specifications and Dimensional Data (continued)
Figure 1B: Apex™ - Model APX500 |

I. Product Description, Specifications and Dimensional Data (continued)
Figure 1C: Apex™ - Model APX800
9

I. Product Description, Specifications and Dimensional Data (continued)
Table 2A: Rating Data - Models APX399, APX500 and APX800 (0 to 5000 Feet Elevation Above Sea Level)
|
|
|
|
|
|
|
Apex Series Gas-Fired Boilers |
||
|
|
|
|
|
|
|
|
|
|
Model |
|
Input (MBH) |
* Output |
Net AHRI |
Thermal |
Combustion |
Boiler Water |
Heat Transfer |
|
|
Ratings Water |
Efficiency |
Area |
||||||
Number |
|
|
|
(MBH) |
Efficiency (%) |
Volume (Gal.) |
|||
|
|
|
(MBH) |
(%) |
(Sq. Ft.) |
||||
|
|
Min. |
Max. |
|
|
|
|||
|
|
|
|
|
|
|
|
||
APX399 |
|
80 |
399 |
375 |
326 |
94.1 |
94.5 |
3.4 |
41.8 |
APX500 |
|
100 |
500 |
475 |
413 |
95.0 |
95.0 |
4.2 |
50.8 |
APX800 |
|
160 |
800 |
760 |
661 |
95.0 |
93.0 |
5.0 |
65.3 |
Notes: * |
Gross Output |
|
|
|
|
|
|
||
Maximum Allowable Working Pressure, Water - 160 PSI
Safety Relief Valve Pressure, Water - 50 PSI Shipped from Factory (std.) (APX399 and APX500); 60 PSI Shipped from Factory (std.) (APX800); 80 PSI and 100 PSI - optional (APX399, APX500 and APX800)
Maximum Allowable Temperature, Water - 210°F
APX399 and APX500 Boiler models are factory shipped as Natural Gas builds and have to be field adjusted for LP gas application. Refer to ‘System StartUp Section of this manual for detailed procedure.
APX800 Boiler Model is factory shipped as either Natural Gas build or LP gas build.
Ratings shown are for installations at sea level and elevations up to 2000 Feet. For elevations above 2000 Feet, ratings should be reduced at the rate of two and half percent (2.5%) for each 1000 Feet above sea level.
Table 2B: Rating Data - Models APX399, APX500 and APX800 (5001 to 10000 Feet Elevation Above Sea Level)
|
|
|
|
|
|
|
Apex Series Gas-Fired Boilers |
||
|
|
|
|
|
|
|
|
|
|
Model |
|
Input (MBH) |
* Output |
Net AHRI |
Thermal |
Combustion |
Boiler Water |
Heat Transfer |
|
|
|
|
Ratings |
Efficiency |
Volume |
Area |
|||
Number |
|
|
|
(MBH) |
Efficiency (%) |
||||
|
|
Min. |
Max. |
|
Water (MBH) |
(%) |
|
(Gal.) |
(Sq. Ft.) |
|
|
|
|
|
|
|
|
|
|
APX399 |
|
80 |
399 |
375 |
328 |
94.1 |
94.5 |
3.4 |
41.8 |
APX500 |
|
167 |
500 |
475 |
413 |
95.0 |
95.0 |
4.2 |
50.8 |
APX800 |
|
267 |
800 |
760 |
661 |
95.0 |
93.0 |
5.0 |
65.3 |
Notes: * |
Gross Output |
|
|
|
|
|
|
||
Maximum Allowable Working Pressure, Water - 160 PSI
Safety Relief Valve Pressure, Water - 50 PSI Shipped from Factory (std.) (APX399 and APX500); 60 PSI Shipped from Factory (std.) (APX800); 80 PSI and 100 PSI - optional (APX399, APX500 and APX800)
Maximum Allowable Temperature, Water - 210°F
APX399 and APX500 Boiler models are factory shipped as Natural Gas builds and have to be field adjusted for LP gas application. Refer to ‘System StartUp Section of this manual for detailed procedure.
APX800 Boiler Model is factory shipped as either Natural Gas build or LP gas build.
Ratings shown are for installations at sea level and elevations up to 2000 Feet. For elevations above 2000 Feet, ratings should be reduced at the rate of two and half percent (2.5%) for each 1000 Feet above sea level.
II. Unpacking Boiler
CAUTION
Do not drop boiler.
A.Move boiler to approximate installed position.
B.Remove all crate fasteners.
C.Lift and remove outside container.
D.Remove boiler from cardboard positioning sleeve on shipping skid.
WARNING
Installation of this boiler should be undertaken only by trained and skilled personnel from a qualified service agency.
E. Move boiler to its permanent location.
10
III. Pre-Installation and Boiler Mounting
WARNING
If you do not follow these instructions exactly, a fire or explosion may result causing property damage or personal injury.
NOTICE
Due to the low water content of the boiler, missizing of the boiler with regard to the heating system load will result in excessive boiler cycling and accelerated component failure. Burnham Commercial DOES NOT warrant failures caused by mis-sized boiler applications. DO NOT oversize the boiler to the system. Multiple boiler installations greatly reduce the likelihood of boiler oversizing.
A. Installation must conform to the requirements of the authority having jurisdiction. In the absence of such requirements, installation must conform to the National Fuel Gas Code, NFPA 54/ANSI Z223.1, and/or CAN/ CSA B149.1 Installation Codes.
B.Boiler is certified for installation on combustible flooring. Do not install boiler on carpeting.
C.Provide clearance between boiler jacket and combustible material in accordance with local fire ordinance. Refer to Figure 2 for minimum listed clearances from combustible material. Recommended service clearance is 24 inches from left side, front, top and rear of the boiler. Recommended front clearance may be reduced to the combustible material clearance providing:
1.Access to boiler front is provided through a door or removable front access panel.
2.Access is provided to the condensate trap located underneath the heat exchanger.
D.Protect gas ignition system components from water (dripping, spraying, rain, etc.) during boiler operation and service (circulator replacement, condensate trap, control replacement, etc.).
E.Provide combustion and ventilation air in accordance with applicable provisions of local building codes,
or: USA - National Fuel Gas Code, NFPA 54/ANSI Z223.1, Air for Combustion and Ventilation;
Canada - Natural Gas and Propane Installation Code, CAN/CSA-B149.1, Venting Systems and Air Supply for Appliances.
WARNING
Adequate combustion and ventilation air must be provided to assure proper combustion.
F.The boiler should be located so as to minimize the length of the vent system. The PVC combustion air piping, or the optional concentric vent piping, containing integral combustion air inlet piping, must
terminate where outdoor air is available for combustion and away from areas that may contaminate combustion air. In particular, avoid areas near chemical products containing chlorines, chlorofluorocarbons, paint removers, cleaning solvents and detergents. Avoid areas containing saw dust, loose insulation fibers, dry wall dust etc.
CAUTION
Avoid operating this boiler in an environment where sawdust, loose insulation fibers, dry wall dust, etc. are present. If boiler is operated under these conditions, the burner interior and ports must be cleaned and inspected daily to insure proper operation.
G.General.
1.Apex boilers are intended for installations in an area with a floor drain, or, in a suitable drain pan to prevent any leaks or relief valve discharge to cause property damage
2.Apex boilers are not intended to support external piping and venting. All external piping and venting must be supported independently of the boiler.
3.Apex boilers must be installed level to prevent condensate from backing up inside the boiler.
4.Boiler Installation:
a.For basement installation provide a solid level base such as concrete, where floor is not level, or, water may be encountered on the floor around boiler. Floor must be able to support weight of boiler, water and all additional system components.
b.Boiler must be level to prevent condensate from backing up inside the boiler.
c.Provide adequate space for condensate piping or a condensate pump if required.
11

III. Pre-Installation and Boiler Mounting
Boiler Clearances to Combustible (and NonCombustible) Material:
APX399 and APX500 Boiler Models:
These boilers are approved for closet installation with the following clearances – Top = 1”, Front = 1”, Left Side = 10”, Right Side = 2”, Rear = *6”
APX800 Boiler Model:
This boiler is approved for alcove installation with the following clearances – Top = 1”, Front = Open, Left Side = 10”, Right Side = 2”, Rear = *6”
* Note:
When boiler is vented vertically, the minimum clearance from the rear of the jacket is increased to 18” with a short radius 90° elbow provided in order to provide adequate space at boiler rear for
installation of vent and air intake piping and service
G. General (continued)
Boiler Service Clearances – Applicable to all Boiler Models:
Top = 24”, Front = 24”, Left Side = 24”, Right Side = 24”, Rear = 24”
The above Clearances are recommended for Service Access but may be reduced to the Combustible Material Clearances provided:
1.The boiler front is accessible thru a door
2.Access is provided to the condensate trap located on the left side of boiler
3.Access is provided to thermal link located at the boiler rear
access
|
|
|
|
|
|
|
|
|
|
|
|
Vent |
|
|
|
|
|
|
|
|
|
|
Vent Pipe |
Minimum |
||||||||
|
Approved Direct |
Vent Pipe |
|
|
|
|
|
|
|
|
|
|
|
|
|
Clearance to |
||||||||||||||||
|
|
|
|
Pipe |
|
Enclosure |
|
|
Nominal |
|||||||||||||||||||||||
|
Vent System |
Material |
|
|
|
|
|
|
Combustible |
|||||||||||||||||||||||
|
|
Direction |
|
|
|
|
|
|
|
|
|
|
Diameter |
|||||||||||||||||||
|
|
|
|
|
|
|
|
|
|
|
|
|
|
|
|
|
|
|
|
Material |
||||||||||||
|
|
|
|
|
|
|
|
|
|
|
|
|
|
|
|
|
|
|
|
|
|
|
|
|
|
|
|
|
|
|
|
|
Factory Standard |
|
|
|
|
|
|
|
|
|
|
|
|
|
|
|
|
|
|
|
|
|
|
|
|
|
|
|
|
|
|
|
|
Two-Pipe CPVC/PVC Vent and PVC |
* CPVC/PVC |
|
|
|
|
|
|
|
|
|
|
|
|
|
|
|
|
|
|
|
|
|
|
4” or 6” |
1” |
|||||||
Air Intake |
|
|
|
|
|
|
|
|
|
|
|
|
|
|
|
|
|
|
|
|
|
|
|
|
|
|
|
|
|
|
|
|
Available Optional |
Pipe Rigid |
|
|
|
|
|
|
|
|
|
|
|
|
|
|
|
|
|
|
|
|
|
|
|
|
|||||||
Polypropylene |
|
|
|
|
|
|
|
|
|
|
|
|
|
|
|
|
|
|
|
|
|
|
80 mm |
|
||||||||
Two-Pipe Rigid Polypropylene Vent |
Vent (or, |
|
|
|
|
|
|
|
|
|
|
|
|
|
|
|
|
|
|
|
|
|
|
10 mm |
|
|||||||
(or, Flexible Polypropylene Liner |
Flexible |
|
|
|
|
|
|
|
|
|
|
|
|
|
|
|
|
|
|
|
|
|
(110 mm) |
1” |
||||||||
for Vertical Venting only) and Rigid |
Polypropylene |
|
|
|
|
|
|
|
|
|
|
|
|
|
|
|
|
|
|
|
|
|
|
|
|
|||||||
Polypropylene or PVC Combustion |
Liner for |
|
Vertical or |
Unenclosed at |
|
|
|
150 mm |
|
|||||||||||||||||||||||
Air Intake |
Vertical |
|
Horizontal |
|
|
all Sides |
|
|
(160 mm) |
|
||||||||||||||||||||||
|
|
Venting only) |
|
|
|
|
|
|
|
|
|
|
|
|
|
|
|
|
|
|
|
|
|
|
|
|
||||||
Available Optional |
Stainless |
|
|
|
|
|
|
|
|
|
|
|
|
|
|
|
|
|
|
|
|
|
|
|
|
|||||||
Two-Pipe Stainless Steel Vent and |
|
|
|
|
|
|
|
|
|
|
|
|
|
|
|
|
|
|
|
|
|
|
4” or 6” |
1” |
||||||||
|
Steel |
|
|
|
|
|
|
|
|
|
|
|
|
|
|
|
|
|
|
|
|
|
|
|||||||||
Galvanized Steel or Air Intake |
|
|
|
|
|
|
|
|
|
|
|
|
|
|
|
|
|
|
|
|
|
|
|
|
|
|
|
|
|
|
|
|
Available Optional |
|
|
|
|
|
|
|
|
|
|
|
|
|
|
|
|
|
|
|
|
|
|
|
|
|
|
|
|
100/150 mm |
|
||
Concentric Inner Polypropylene Vent |
Polypropylene |
|
|
|
|
|
|
|
|
|
|
|
|
|
|
|
|
|
|
|
|
|
0” |
|||||||||
|
|
|
|
|
|
|
|
|
|
|
|
|
|
|
|
|
|
|
|
(110/160 mm) |
||||||||||||
and Outer Steel Air Intake |
|
|
|
|
|
|
|
|
|
|
|
|
|
|
|
|
|
|
|
|
|
|
|
|
|
|
|
|
||||
|
|
|
|
|
|
|
|
|
|
|
|
|
|
|
|
|
|
|
|
|
|
|
|
|
|
|
|
|
|
|
||
|
|
|
|
|
|
|
||||||||||||||||||||||||||
* Do not enclose PVC venting - use CPVC vent pipe in enclosed spaces, or to penetrate through |
||||||||||||||||||||||||||||||||
combustible or non-combustible walls |
|
|
|
|
|
|
|
|
|
|
|
|
|
|
|
|
|
|
|
|
|
|
|
|
||||||||
|
|
|
|
|
|
|
|
|
|
|
|
|
|
|
|
|
|
|
|
|
|
|
|
|
|
|
|
|
|
|
|
|
|
|
|
|
|
|
|
|
|
|
|
|
|
|
|
|
|
|
|
|
|
|
|
|
|
|
|
|
|
|
|
|
|
|
|
|
|
|
|
|
|
|
|
|
|
|
|
|
|
|
|
|
|
|
|
|
|
|
|
|
|
|
|
|
|
|
|
|
|
|
|
|
|
|
|
|
|
|
|
|
|
|
|
|
|
|
|
|
|
|
|
|
|
|
|
|
|
|
|
|
|
|
|
|
|
|
|
|
|
|
|
|
|
|
|
|
|
|
|
|
|
|
|
|
|
|
|
|
|
|
|
|
|
|
|
|
|
|
|
|
|
|
|
|
|
|
|
|
|
|
|
|
|
|
|
|
|
|
|
|
|
|
|
|
|
|
|
|
|
|
|
|
|
|
|
|
|
|
|
|
|
|
|
|
|
|
|
|
|
|
|
|
|
|
|
|
|
|
|
|
|
|
|
|
|
|
|
|
|
|
|
|
|
|
|
|
|
|
|
|
|
|
|
|
|
|
|
|
|
|
|
|
|
|
|
|
|
|
|
|
|
|
|
|
|
|
|
|
|
|
|
|
|
|
|
|
|
|
|
|
|
|
|
|
|
|
|
|
|
|
|
|
|
|
|
|
|
|
|
|
|
|
|
|
|
|
|
|
|
|
|
|
|
|
|
|
|
|
|
|
|
|
|
|
|
|
|
|
|
|
|
|
|
|
|
|
|
|
|
|
|
|
|
|
|
|
|
|
|
|
|
|
|
|
|
|
|
|
|
|
|
|
|
|
|
|
|
|
|
|
|
|
|
|
|
|
|
|
|
|
|
|
|
|
|
|
|
|
|
|
|
|
|
|
|
|
|
|
|
|
|
|
|
|
|
|
|
|
|
|
|
|
|
|
|
|
|
|
|
|
|
|
|
|
|
|
|
|
|
|
|
|
|
|
|
|
|
|
|
|
|
|
|
|
|
|
|
|
|
|
|
|
|
|
|
|
|
|
|
|
|
|
|
|
|
|
|
|
|
|
|
|
|
|
|
|
|
|
|
|
|
|
|
|
|
|
|
|
|
|
|
|
|
|
|
|
|
|
|
|
|
|
|
|
|
|
|
|
|
|
|
|
|
|
|
|
|
|
|
|
|
|
|
|
|
|
|
|
|
|
|
|
|
|
|
|
|
|
|
|
|
|
|
|
|
|
|
|
|
|
|
|
|
|
|
|
|
|
|
|
|
|
|
|
|
|
|
|
|
|
|
|
|
|
|
|
|
|
|
|
|
|
|
|
|
|
|
|
|
|
|
|
|
|
|
|
|
|
|
|
|
|
|
|
|
|
|
|
|
|
|
|
|
|
|
|
|
|
|
|
|
|
|
|
|
|
|
|
|
|
|
|
|
|
|
|
|
|
|
|
|
|
|
|
|
|
|
|
|
|
|
|
|
|
|
|
|
|
|
|
|
|
|
|
|
|
|
|
|
|
|
|
|
|
|
|
|
|
|
|
|
|
|
|
|
|
|
|
|
|
|
|
|
|
|
|
|
|
|
|
|
|
|
|
|
|
|
|
|
|
|
|
|
|
|
|
|
|
|
|
|
|
|
|
|
|
|
|
|
|
|
|
|
|
|
|
|
|
|
|
|
|
|
|
|
|
|
|
|
|
|
|
|
|
|
|
|
|
|
|
|
|
|
|
|
|
|
|
|
|
|
|
|
|
|
|
|
|
|
|
|
|
|
|
|
|
|
|
|
|
|
|
|
|
|
|
|
|
|
|
|
|
|
|
|
|
|
|
|
|
|
|
|
|
|
|
|
|
|
|
|
|
|
|
|
|
|
|
|
|
|
|
|
|
|
|
|
|
|
|
|
|
|
|
|
|
|
|
|
|
|
|
|
|
|
|
|
|
|
|
|
|
|
|
|
|
|
|
|
|
|
|
|
|
|
|
|
|
|
|
|
|
|
|
|
|
|
|
|
|
|
|
|
|
|
|
|
|
|
|
|
|
|
|
|
|
|
|
|
|
|
|
|
|
|
|
|
|
|
|
|
|
|
|
|
|
|
|
|
|
|
|
|
|
|
|
|
|
|
|
|
|
|
|
|
|
|
|
|
|
|
|
|
|
|
|
|
|
|
|
|
|
|
|
|
|
|
|
|
|
|
|
|
|
|
|
|
|
|
|
|
|
|
|
|
|
|
|
|
|
|
|
|
|
|
|
|
|
|
|
|
|
|
|
|
|
|
|
|
|
|
|
|
|
|
|
|
|
|
|
|
|
|
|
|
|
|
|
|
|
|
|
|
|
|
|
|
|
|
|
|
|
|
|
|
|
|
|
|
|
|
|
|
|
|
|
|
|
|
|
|
|
|
|
|
|
|
|
|
|
|
|
|
|
|
|
Figure 2: Clearances To Combustible and Non-combustible Material
12

III. Pre-Installation and Boiler Mounting G. General (continued)
H. Boiler Stacking
1.For installations with unusually high space heating and/or domestic hot water heating loads, where employing two (2) Apex (APX) boilers will offer the benefits of greater operational efficiency, floor space savings and boiler redundancy, the Apex (APX) boilers may be installed stacked one on the top of the other. Refer to Table 3 “Apex (APX) Boiler Model Stacking Combinations” for details.
Table 3: Apex (APX) Boiler Model Stacking
Combinations
Bottom |
Top Boiler Model |
|
Boiler Model |
||
|
||
APX399 |
APX399 |
|
APX500 |
APX399 or APX500 |
|
APX800 |
APX399, APX500 or APX800 |
2.To field assemble individual Apex (APX) boilers into a stackable configuration, use the steps below:
a.Position the bottom boiler first. Refer to Sections
II “Unpacking Boiler” and III “Pre-Installation & Boiler Mounting” of the manual for details.
Always position higher input boiler model as bottom boiler.
b.Each Apex (APX) boiler is factory packaged with two (2) Stacking Boiler Attachment Brackets (P/N 101679-01) and the bracket mounting hardware [six (6) self-drilling hex washer head plated #8 x ½” long screws, P/N 80860743]. Locate and remove the brackets and the hardware. The Stacking Boiler Attachments Bracket has three 7/32” diameter holes punched in a triangular pattern. See Figure 3 “Stacking Boiler Attachment Bracket Placement”.
c.Apex (APX) boiler left and right side panels have a series of dimples at panel top and bottom. These dimples are positioning dimples for Stacking Boiler Attachment Bracket mounting screws. Side panel bottom positioning dimples are evenly spaced from boiler front and back, while side panel top positioning dimples follow specific pattern to compensate for Apex (APX) boiler model variable depth.
d.Position the upper boiler on the top of the bottom boiler and align boiler front doors and sides flush with each other.
• Place first Stacking Boiler Attachment
Bracket onto the upper boiler left side panel, at the panel lower left corner and align bracket two upper holes with corresponding side panel lower dimples.
• The remaining lower bracket hole must align with a matching bottom boiler left side panel top positioning dimple.
•Once bracket holes and side panel dimple alignment is verified, attach the bracket to top and bottom boiler left side panels with the mounting screws.
e.Repeat above procedure to install second Stacking Boiler Attachment Bracket and secure the stacked boiler right side panels together at the front right corner.
f.Install the third Stacking Boiler Attachment Bracket to secure top and bottom boiler left side panels at the rear left corner. Align the bracket holes with corresponding positioning dimples in the top boiler and bottom boiler left side panels, then secure bracket with the screws.
g.Repeat above procedure to install the forth Stacking Boiler Attachment Bracket to secure stacked boiler right side panels at the rear right corner.
3.When installing stackable boiler combinations observe the following guidelines:
a.Venting - Top and bottom boilers must have their individual vent piping and vent terminals.
WARNING
No common manifolded venting is permitted.
For side-wall venting individual model vent terminals must terminate not closer than 12 inches horizontally and three (3) feet vertically from each other in order to prevent combustion air contamination. For vertical through the roof venting, individual vertical vent terminals, if level with each other, must be spaced no closer than 12 inches horizontally. If vertical terminals cannot end in one plane, they must be spaced no closer than three (3) feet horizontally.
Chimney chase concentric venting is permitted for modules, when stackable, providing concentric vertical (roof) vent terminals, if level with each other, are spaced no closer then 12 inches horizontally.
If vertical vent terminals cannot end in one plane, they must be spaced no closer then three
(3) feet horizontally.
Follow instructions in Section IV “Venting” of the manual for specifics of individual boiler
vent termination. Follow instructions in Section V “Condensate Disposal” for each individual boiler flue gas condensate line construction and condensate disposal. Terminating individual boiler condensate lines into common pipe prior to drain disposal is permissible, providing common pipe has sufficient flow capacity
to handle combined condensate volume of stackable combination.
13

III. Pre-Installation and Boiler Mounting G. General (continued)
b.Gas Piping - Follow instructions in Section VII “Gas Piping” of the manual for sizing and installation of an individual boiler. When
common gas piping is sized, insure it will have adequate capacity for combined input (CFH gas flow) of the selected stackable boiler combination.
c.Water Piping and Trim - Follow instructions in Section VI “Water Piping and Trim” of the manual for system piping and boiler secondary
piping selection/sizing based on combined heating capacity and/or gross output of the selected stackable boiler combination. Follow instructions of Section VI “Water
Piping and Trim” for each individual boiler trim installation.
d.Electrical - Follow instructions in Section VIII “Electrical” of the manual to wire individual boilers.
Figure 3: Stacking Boiler Attachment Bracket Placement
14

IV. Venting
WARNING
Failure to vent this boiler in accordance with these instructions could cause products of combustion to enter the building resulting in severe property damage, personal injury or death.
Do not interchange vent systems or materials unless otherwise specified.
The use of thermal insulation covering vent pipe and fittings is prohibited.
Do not use a barometric damper, draft hood or vent damper with this boiler.
When using the CPVC/PVC vent option, the use of CPVC is required when venting in vertical or horizontal chase ways, closets and through wall penetrations.
The CPVC vent materials supplied with this boiler do not comply with B149.1.S1-07 and are not approved for use in Canadian jurisdictions that require vent systems be listed to ULC S636-2008. In these jurisdictions, vent this boiler using either stainless steel Special Gas vent or a listed ULC S636 Class IIB venting system.
Do not locate vent termination where exposed to prevailing winds. Moisture and ice may form on surface around vent termination. To prevent deterioration, surface must be in good repair (sealed, painted, etc.).
Do not locate air intake vent termination where chlorines, chlorofluorocarbons (CFC’s), petroleum distillates, detergents, volatile vapors or other chemicals are present. Severe boiler corrosion and failure will result.
The use of cellular core PVC (ASTM F891), cellular core CPVC or Radel (polyphenolsulfone) is prohibited.
Do not locate vent termination under a deck.
Do not reduce specified diameters of vent and combustion air piping.
When installing vent pipe through chimney, as a chase, no other appliance can be vented into the chimney.
Do not allow low spots in the vent where condensate may pool.
A.General Guidelines
1.Vent system installation must be in accordance with National Fuel Gas Code, NFPA 54/ANSI Z221.3 or CAN/CSA B149.1 Installation Code for Canada, or, applicable provisions of local building codes. Contact local building or fire officials about restrictions and installation inspection in your area.
2.The Apex™ is designed to be installed as a Direct Vent (sealed combustion) boiler. The air for combustion is supplied directly to the burner enclosure from outdoors and flue gases are vented directly outdoors (through wall or roof).
3.The following combustion air/vent system options are approved for use with the Apex™ boilers (refer to Table 4):
a.Two-Pipe CPVC/PVC Vent/Combustion Air
System - separate CPVC/PVC pipe serves to expel products of combustion and separate PVC pipe delivers fresh outdoor combustion air.
Refer to Part B for specific details.
b.Two-Pipe Polypropylene Vent/Combustion Air System - separate rigid or flexible polypropylene pipe serves to expel products of combustion and separate rigid polypropylene pipe or PVC pipe delivers fresh outdoor combustion air. Refer to part C for specific details.
c.Two-Pipe Stainless Steel Vent/Combustion Air
System - separate stainless steel pipe serves to
expel products of combustion. Separate PVC or galvanized pipe delivers fresh outdoor air. Refer to Part D for specific details.
d.Concentric Inner Polypropylene Vent and Outer Steel Combustion Air System
- the assembly consists of inner fire resistant polypropylene vent pipe and outer steel pipe casing. The inner pipe serves as conduit to expel products of combustion, while outdoor fresh combustion air is drawn through the space between the inner and outer pipes. Refer to Part
E for specific details.
4.Horizontal vent pipe must maintain a 1/4" per foot slope down towards the boiler.
5.Horizontal combustion air pipe must maintain a minimum ¼" per foot slope down towards terminal, when possible. If not, slope toward boiler.
6.Do not install venting system components on the exterior of the building except as specifically required by these instructions (refer to Figure 4):
a.Vent terminals must be at least 1 foot from door, window, or gravity inlet into the building.
b.Maintain the correct clearance and orientation between the vent and air intake terminals.
15
IV. Venting A. General Guidelines (continued)
Table 4: Vent/Combustion Air System Options
Approved Direct |
Vent |
Orientation |
Termination |
Description |
Figures |
Component |
Part |
Vent System |
Material |
|
|
|
|
Table |
|
|
|
|
|
The system includes separate CPVC |
|
|
|
|
|
|
Standard |
vent pipe and PVC air intake pipe |
4 thru 9A, |
|
|
|
|
|
(thru sidewall) |
terminating thru sidewall with individual |
5A |
|
|
|
|
|
9B, 10 |
|
|||
|
|
|
|
penetrations for the vent and air intake |
|
|
|
|
|
Horizontal |
|
|
|
|
|
Factory Standard |
|
|
piping and separate terminals (tees). |
|
|
|
|
|
|
|
|
|
|
||
|
|
Optional |
Same as above but separate snorkel |
4 thru 7, |
|
|
|
Two-Pipe, |
CPVC/PVC |
|
|
|
|||
|
Snorkel |
5B |
B. |
||||
|
type terminals. |
10, 11 |
|||||
CPVC/PVC Vent and |
|
|
(thru sidewall) |
|
|
||
|
|
|
|
|
|
||
PVC Air Intake |
|
|
|
|
|
|
|
|
|
|
The system includes separate CPVC |
|
|
|
|
|
|
|
|
|
|
|
|
|
|
Optional |
Vertical |
vent pipe and PVC air intake pipe |
4 thru 6, 10, |
|
|
|
|
(thru roof) |
terminating thru roof with individual |
5C |
|
||
|
|
Vertical |
12, 13 |
|
|||
|
|
|
penetrations for the vent and air intake |
|
|
||
|
|
|
|
|
|
|
|
|
|
|
|
piping and separate vertical terminals. |
|
|
|
|
|
|
|
The system includes separate Rigid |
|
|
|
|
|
|
Standard |
Polypropylene vent pipe and Rigid |
|
|
|
|
|
|
Polypropylene or PVC air intake pipe |
4 thru 9A, |
|
|
|
Available Optional |
|
|
(thru sidewall) |
9, 10 |
|
||
|
|
terminating thru sidewall with individual |
9B, 10 |
|
|||
|
Horizontal |
|
|
|
|||
Two-Pipe, Rigid |
|
|
penetrations for the vent and air intake |
|
|
|
|
|
|
|
|
|
|
||
Rigid |
|
|
piping and separate terminals (tees). |
|
|
|
|
Polypropylene |
|
|
|
|
|
||
Polypropylene |
|
Optional Snorkel |
Same as above but separate snorkel |
4 thru 7, |
|
|
|
Vent (or Flexible |
|
9, 10 |
|
||||
(or Flexible |
|
(thru sidewall) |
type terminals. |
10, 11 |
|
||
Polypropylene Liner |
|
|
C. |
||||
Polypropylene |
|
|
|
|
|
||
for Vertical venting |
|
|
The system includes separate Flexible |
|
|
|
|
Liner for vertical |
|
|
|
|
|
||
only) and Rigid |
|
|
Polypropylene vent liner and Rigid |
|
|
|
|
Venting only) |
|
|
|
|
|
||
Polypropylene or PVC |
|
Vertical |
Polypropylene vent pipe combination |
|
|
|
|
Pipe Air Intake |
|
Optional |
for venting and Rigid Polypropylene or |
|
|
|
|
|
(thru roof or |
12 thru 16 |
9, 10 |
|
|||
|
|
Vertical |
PVC air intake pipe terminating thru roof |
|
|||
|
|
chimney/chase) |
|
|
|
||
|
|
|
with individual penetrations for the vent |
|
|
|
|
|
|
|
|
|
|
|
|
|
|
|
|
and air intake and individual vent /air |
|
|
|
|
|
|
|
terminals. |
|
|
|
|
|
|
|
The system includes separate stainless |
|
|
|
|
|
|
|
steel vent pipe and PVC/galvanized steel |
|
|
|
|
|
|
Standard |
air intake pipe terminating thru sidewall |
9A, 9B, |
|
|
Available Optional |
|
|
(thru sidewall) |
with individual penetrations for the |
16, 17 |
|
|
|
Horizontal |
|
vent and air intake piping and separate |
|
|
|
|
Two-Pipe, |
|
|
|
terminals |
|
|
|
|
|
Optional Snorkel |
|
|
|
|
|
Stainless Steel Vent |
Stainless Steel |
|
Same as above but separate snorkel |
|
11A, 11B |
D. |
|
|
(thru sidewall) |
11, 16, 17 |
|||||
and PVC/Galvanized |
|
|
type terminals. |
|
|
||
|
|
|
|
|
|
||
Steel Air Intake |
|
|
|
|
|
|
|
|
|
|
|
The system includes separate stainless |
|
|
|
|
|
|
|
steel vent pipe and PVC/galvanized steel |
|
|
|
|
|
Vertical |
Vertical (thru roof) |
air intake pipe terminating thru roof with |
12, 13, 17 |
|
|
|
|
|
|
individual penetrations for the vent and |
|
|
|
|
|
|
|
air intake piping and separate terminals. |
|
|
|
Available Optional |
|
|
Horizontal |
Concentric vent/air pipe terminates thru |
|
|
|
|
Horizontal |
(Wall) Terminal |
18 thru 25 |
|
|
||
Concentric, Inner |
|
sidewall. |
|
|
|||
|
|
|
|
|
|
||
Polypropylene |
|
|
|
|
12, 13 |
E. |
|
Polypropylene Vent and |
|
|
|
|
|||
|
Vertical (Roof) |
Concentric vent/air pipe terminates thru |
18 thru 21, |
||||
|
|
|
|
||||
Outer Steel Air Intake |
|
Vertical |
|
|
|||
|
|
Terminal |
roof. |
26 thru 31 |
|
|
|
|
|
|
|
|
|||
|
|
|
|
|
|
|
|
i. |
The centerlines between the vent and air |
|
intake terminals must be spaced a minimum |
|
of 12” apart. More than 12” spacing is |
|
recommended. |
ii. |
If possible, locate air intake and vent |
|
terminations on the same wall to prevent |
|
nuisance shutdowns. However, boiler |
|
may be installed with vertical venting and |
|
sidewall combustion air inlet or vice versa |
|
where installation conditions do not allow |
|
for alternate arrangement. |
iii. |
The vent and air intake terminations may |
|
be at varying heights when installed on |
|
the same wall, but the height of the vent |
|
termination should always be higher than |
|
the air intake termination and within the |
16 |
specified limit as shown in Figure 9B. |
|
c.The bottom of the vent and air intake terminal must be at least 12" (18" in Canada) above the normal snow line. In no case should they be less than 12" above grade level.
d.The bottom of the vent terminal must be at least 7 feet above a public walkway.
e.Do not install the vent terminal directly over windows or doors.
f.The bottom of the vent terminal must be at least 3 feet above any forced air inlet located within 10 feet.
g.A clearance of at least 4 feet horizontally must be maintained between the vent terminal and gas meters, electric meters, regulators, and relief equipment. Do not install vent terminal over this equipment.

IV. Venting A. General Guidelines (continued)
Figure 4: Location of Vent Terminal Relative to Windows, Doors, Grades, Overhangs, Meters and Forced Air Inlets
(Concentric Terminal Shown - Two-Pipe System Vent Terminal to be installed in same location - Two-Pipe System Air Intake Terminal Not Shown)
h.Do not locate the vent terminal under decks or similar structures.
i.Minimum twelve (12) inches vertically from any roof overhang twelve (12) inches or less wide.
If a roof overhang width exceeds twelve (12) inches the terminal vertical clearance must be increased to avoid flue vapor condensation.
j.Top of vent terminal must be at least 5 feet below eaves, soffits, or overhangs. Maximum depth of overhang is 3 ft.
k.If window and/or air inlet is within four (4) feet of an inside corner, then terminal must be at least six (6) feet from adjoining wall of inside corner.
l.Concentric - Minimum twelve (12) inches horizontally from a building corner.
m.Under certain conditions, water in the flue gas may condense, and possibly freeze, on objects around the terminal including on the structure itself. If these objects are subject to damage by flue gas condensate, they should be moved or protected.
n.If possible, install the vent and air intake terminals on a wall away from the prevailing
wind. Reliable operation of this boiler cannot be guaranteed if the terminal is subjected to winds in excess of 40 mph.
o.Air intake terminal must not terminate in areas that might contain combustion air contaminates, such as near swimming pools.
p.For sidewall venting the minimum horizontal distance between any adjacent individual module (boiler) vent terminations is twelve (12) inches.
Increasing this distance is recommended to avoid frost damage to building surfaces where vent terminations are placed.
CAUTION
Installing multiple individual module (boiler) vent terminations too close together may result in cross contamination and combustion product water vapor condensation on building surfaces, where vent termination are placed, and subsequent frost damage. To avoid/minimize frost damage, extend the distance from building surfaces to vent termination end and increase the horizontal distance between adjacent vent terminations.
17

IV. Venting A. General Guidelines (continued)
q.The minimum horizontal distance between any adjacent individual module (boiler) roof vent terminations is one (1) foot.
7.Use noncombustible ¾" pipe strap to support horizontal runs and maintain vent location and slope while preventing sags in pipe. Do not restrict thermal expansion or movement of vent system. Maximum support spacing four (4) feet. Avoid low spots where condensate may pool. Do not penetrate any part of the vent system with fasteners.
8.Maintain minimum clearance to combustible materials. See Figure 2 for details.
9.Enclose vent passing through occupied or unoccupied spaces above boiler with the material having a fire resistance rating of at least equal to the rating of adjoining floor or ceiling.
Note: For one or two family dwellings, fire resistance rating requirement may not need to be met, but is recommended.
10.Multiple individual module vertical vent pipes may be piped through a common conduit or chase so that one roof penetration may be made.
B. CPVC/PVC Venting
WARNING
All CPVC vent components (supplied with boiler) must be used for near-boiler vent piping before transitioning to Schedule 40 PVC pipe (ASTM 2665) components for remainder of vent system.
WARNING
CPVC vent components must be used within any interior space where air cannot circulate freely, such as air inside a stud wall, and in any boiler closet or chase way.
When using the CPVC/PVC vent options, the useofCPVCisrequiredwhenventinginvertical or horizontal chase ways.
All condensate that forms in the vent must be able to drain back to the boiler.
1.Components and Length Restrictions
a.See Table 5A for CPVC/PVC Vent & Air Intake Components included with boiler, Table 5B for CPVC/PVC Vent and Air Intake Components (Installer Provided) required for Optional
Table 5A: CPVC/PVC Vent & Air Intake Components Included With Boiler
|
|
Quantity |
||
|
|
|
|
|
|
Part |
APX399 and APX500 |
|
APX800 |
Vent & Air Intake Components |
Standard Termination |
|
Standard Termination |
|
Number |
|
|||
|
Vent Kit |
|
Vent Kit |
|
|
|
|
||
|
|
(P/N 102189-03) |
|
(P/N 103253-01) |
|
|
includes |
|
includes |
4” Schedule 40 PVC Tee (Vent or Air Intake Terminals) |
102190-02 |
2 |
|
N/A |
|
|
|
|
|
6” Schedule 40 PVC 90° Elbow (Vent or Air Intake |
103313-01 |
N/A |
|
2 |
Terminal) |
|
|||
|
|
|
|
|
4” Stainless Steel Rodent Screen |
102191-02 |
2 |
|
N/A |
|
|
|
|
|
6” Stainless Steel Rodent Screen |
102191-03 |
N/A |
|
2 |
|
|
|
|
|
4” x 30” Schedule 40 CPVC Pipe |
102193-02 |
1 |
|
N/A |
|
|
|
|
|
6” x 30” Schedule 40 CPVC Pipe |
103267-01 |
N/A |
|
1 |
|
|
|
|
|
4” Schedule 80 CPVC 90° Elbow |
102192-02 |
1 |
|
N/A |
|
|
|
|
|
6” Schedule 80 CPVC 90° Elbow |
103268-01 |
N/A |
|
1 |
|
|
|
|
|
4 oz. Bottle of Transition Cement |
102195-01 |
|
1 |
|
|
|
|
|
|
4 oz. Bottle of Primer |
102194-01 |
|
1 |
|
|
|
|
|
|
4" Vent/4" Combustion Air CPVC/PVC Connector |
102183-03 |
1 |
|
N/A |
|
|
|
|
|
6" Vent/6" Combustion Air CPVC/PVC Connector |
103270-01 |
N/A |
|
1 |
|
|
|
|
|
4" Vent/4" Combustion Air CPVC/PVC Connector |
102185-02 |
1 |
|
N/A |
Gasket |
|
|||
|
|
|
|
|
6" Vent/6" Combustion Air CPVC/PVC Connector |
103248-01 |
N/A |
|
1 |
Gasket |
|
|||
|
|
|
|
|
18
IV. Venting B. CPVC/PVC Venting (continued)
Table 5B: CPVC/PVC Vent & Air Intake Components (Installer Provided) required for Optional Horizontal
(Snorkel) Termination
|
|
Part |
Quantity |
|
|
Vent Components |
APX399 and APX500 |
APX800 |
|
|
|
Number |
Horizontal (Snorkel) |
Horizontal (Snorkel) |
|
|
|
Termination |
Termination |
4" Schedule 40 PVC Pipe x up to 7 ft. max. vertical run |
|
2 |
N/A |
|
|
|
|
|
|
6" Schedule 40 PVC Pipe x up to 7 ft. max. vertical run |
|
N/A |
2 |
|
|
|
|
|
|
4" Schedule 40 |
PVC 90° Elbow |
N/A |
4 |
N/A |
6" Schedule 40 |
PVC 90° Elbow |
Supplied by Others |
N/A |
4 |
|
|
|
|
|
4" Schedule 40 |
PVC Pipe x ½ ft. min. horizontal run |
|
2 |
N/A |
|
|
|
|
|
6" Schedule 40 |
PVC Pipe x ¾ ft. min. horizontal run |
|
N/A |
2 |
|
|
|
|
|
Table 5C: CPVC/PVC Vent & Air Intake Components (Installer Provided) required for Optional Vertical
(Roof) Termination
|
|
Part |
Quantity |
|
|
|
Vent Components |
APX399 and APX500 |
|
APX800 |
|
|
Number |
Vertical (Roof) |
|
Vertical (Roof) |
|
|
|
|
|||
|
|
|
Termination |
|
Termination |
4" Schedule 40 PVC Coupler |
|
1 |
|
N/A |
|
|
|
|
|
|
|
6" Schedule 40 PVC Coupler |
|
N/A |
|
1 |
|
|
|
|
|
|
|
4" Schedule 40 |
PVC 90° Elbow |
N/A |
2 |
|
N/A |
6" Schedule 40 |
PVC 90° Elbow |
Supplied by Others |
N/A |
|
2 |
|
|
|
|
|
|
4" Schedule 40 |
CPVC Pipe x ½ ft. min. horizontal run |
|
1 |
|
N/A |
|
|
|
|
|
|
6" Schedule 40 |
CPVC Pipe x ¾ ft. min. horizontal run |
|
N/A |
|
1 |
|
|
|
|
|
|
Horizontal (Snorkel) Termination and Table 5C for CPVC/PVC Vent and Air Intake Components (Installer Provided) required for Optional Vertical (Roof) Termination.
b.Vent length restrictions are based on equivalent length of vent/combustion air pipe (total length of straight pipe plus equivalent length of fittings). Maximum vent/combustion air lengths are listed in Table 8. Do not exceed maximum vent/combustion air lengths. Table 6 lists equivalent lengths for fittings. Do not include vent/combustion air terminals in equivalent feet calculations. See “Combustion Air/Vent, Equivalent Length Work Sheet”.
c.The vent termination location is restricted as per 'General Guidelines', Paragraph A, 6.
(Refer to Figure 4).
2.System Assembly
a.Plan venting system to avoid possible contact with plumbing or electrical wires. Start at vent connector at boiler and work towards vent termination.
b.Do not exceed maximum Vent/Combustion Air length. Refer to Table 8.
c.Design the Vent System to allow 3/8" of thermal expansion per 10 feet of CPVC/PVC pipe. Runs of 20 feet or longer that are restrained at both ends must use an offset or expansion loop. Refer to Figure 5 and Table 7.
d.Follow all manufacturer instructions and warnings when preparing pipe ends for joining and using the primer and the cement.
3.Field Installation of CPVC/PVC Two-Pipe
Vent System Connector
Refer to Figure 6 and Steps below:
a.Position the CPVC/PVC vent connector and gasket onto boiler rear/bottom panel and insert vent connector inner stainless steel vent pipe into heat exchanger vent outlet.
b.Align vent connector plate and gasket clearance holes with rear/bottom panel engagement holes; than, secure the connector and gasket to the panel with six mounting screws.
c.Apply supplied dielectric grease (grease pouch attached to two-pipe vent connector) to gasket inside vent section of two-pipe vent connector, The grease will prevent gasket rupture when inserting vent pipe and gasket deterioration due to condensate exposure.
19

IV. Venting B. CPVC/PVC Venting (continued)
Table 6: Vent System and Combustion Air System Components Equivalent Length vs. Component Nominal Diameter
Vent or Combustion Air System |
Equivalent Length (Ft.) for Vent or Combustion Air System Component |
||||||
|
Component Description |
vs. Component Nominal Diameter (In.) |
|
||||
Component Nominal Diameter, In. |
4” |
|
6” |
|
|||
90° Elbow (Sch. 80 or Sch.40) |
|
13 |
|
22 |
|
||
45° Elbow (Sch. 80 or Sch. 40) |
|
4.5 |
|
7.5 |
|
||
Sch. 40 CPVC Pipe x 30 In. Long |
|
2.5 |
|
|
|||
Sch. 40 PVC Pipe x 1 Ft. Long |
|
|
1 |
|
|
||
Sch. 40 PVC Pipe x 2 Ft. Long |
|
|
2 |
|
|
||
Sch. 40 PVC Pipe x 3 Ft. Long |
|
|
3 |
|
|
||
Sch. 40 PVC Pipe x 4 Ft. Long |
|
|
4 |
|
|
||
Sch. 40 PVC Pipe x 5 Ft. Long |
|
|
5 |
|
|
||
|
|
|
|
|
|
L |
OFFSET |
|
|
|
|
CHANGE OF DIRECTION |
|
4 |
|
|
|
|
|
|
|
|
|
|
|
|
|
(VERTICAL OR HORIZONTAL) |
|
|
|
|
|
|
|
LONG RUN OF PIPE |
|
|
|
|
|
|
|
L |
|
LOOP LENGTH (L) |
L |
|
|
|
|
|
|
|
2 |
|
|
|
KEY |
|
|
|
|
|
|
|
RESTRAINT (RESTRICTS MOVEMENT) |
|
|
|
|
|
|
|
HANGER (ALLOWS MOVEMENT) |
|
|
L |
|
|
|
|
|
|
4 |
||
|
|
|
|
|
LOOP |
|
|
|
|
|
|
|
(HORIZONTAL ONLY) |
|
|
Table 7: Expansion Loop Lengths |
|
(TOP VIEW) |
|
|
|||
|
|
|
|
||||
Nominal |
Length of |
Loop Length |
|
L |
|
|
|
Pipe |
Straight Run |
|
|
|
|
||
Dia. (In.) |
(Ft.) |
“L” (In.) |
|
|
|
|
|
|
60 |
|
|
|
|
||
|
20 |
|
|
|
5 |
|
|
|
|
|
|
|
|
2 L |
|
|
30 |
|
74 |
|
|
|
|
4 |
40 |
|
85 |
|
|
|
|
|
50 |
|
95 |
|
|
|
|
|
60 |
|
104 |
6" |
L |
6" |
|
|
|
|
|
|
|||
|
20 |
|
73 |
MIN |
5 |
MIN |
|
|
|
|
|
|
|
||
|
30 |
|
90 |
Figure 5: Expansion Loop and Offset |
|
||
6 |
40 |
|
103 |
|
|
|
|
|
50 |
|
116 |
|
|
|
|
|
60 |
|
127 |
|
|
|
|
WARNING
Apply supplied dielectric grease to gasket inside vent section of two-pipe vent connector. Failure to apply the grease could result in gasket rupture during vent pipe installation and gasket deterioration due to condensate exposure.
20
IV. Venting B. CPVC/PVC Venting (continued)
Figure 6: Field Installation of CPVC/PVC Two-Pipe Vent System Connector
4.Near-Boiler Vent/Combustion Air Piping
Refer to Figure 7 and the following Steps:
APX399 and APX500 Boiler Models:
a.4” x 4” Two-Pipe CPVC/PVC Vent System Connector (P/N 102183-03), used on APX399 and APX500 boiler models, has factory installed internal sealing gaskets at both vent and air intake sections.
b.Install provided 4” Schedule 40 x 30” long CPVC pipe into the connector vent section with a slight twisting motion and secure by tightening the metal strap.
c.All CPVC vent components supplied with boiler inside vent carton (4” Schedule 40 x 30”
long CPVC pipe and 4” Schedule 80 CPVC 90° Elbow) must be used for near-boiler piping
before transitioning to Schedule 40 PVC (ASTM 2665) pipe components for reminder of vent system. The CPVC 30” long straight pipe may be cut to accommodate desired vent configuration provided both pieces are used in conjunction with CPVC 90° Elbow before any PVC components are used. Ensure that the CPVC 90°
Elbow is the first elbow used in the vent system as it exits the boiler.
d.Insert 4” Schedule 40 PVC combustion air pipe (installer provided) into the connector air intake section with a slight twisting motion and secure by tightening the metal strap.
Figure 7: Near-Boiler Vent/Combustion Air Piping
21

IV. Venting B. CPVC/PVC Venting (continued)
Table 8: Vent/Combustion Air Pipe Length – Two-Pipe Direct Vent System Options
CPVC/PVC
Polypropylene (PP) or Polypropylene (PP)/PVC
Stainless Steel/PVC or Galvanized Steel)
Boiler |
4” Combustion Air Pipe |
6” Combustion Air Pipe |
4” Vent Pipe |
6” Vent Pipe |
|||||
(Equivalent Length) |
(Equivalent Length) |
(Equivalent Length) |
(Equivalent Length) |
||||||
Model |
|
|
|
|
|
|
|
|
|
Min. |
Max. |
Min. |
Max. |
Min. |
Max. |
Min. |
Max. |
||
|
|||||||||
|
|
|
|
|
|
|
|
|
|
APX399 |
30 In. |
100 Ft. |
|
|
30 In. |
100 Ft. |
|
|
|
|
|
|
|
|
|
|
|
|
|
APX500 |
30 In. |
100 Ft. |
|
|
30 In. |
100 Ft. |
|
|
|
|
|
|
|
|
|
|
|
|
|
APX800 |
|
|
30 In. |
200 Ft. |
|
|
30 In. |
200 Ft. |
|
|
|
|
|
|
|
|
|
|
|
Vent/Combustion Air Equivalent Length Calculation Work Sheet
|
|
Combustion Air |
|
|
|
|
Vent |
|
|
|
|
|
|
|
|
|
|
||
90° Elbow(s) PVC (Installer Supplied) |
90° Elbow(s) CPVC (Supplied with Boiler) |
||||||||
|
|
|
|
|
|
|
|
|
|
Nominal |
|
Quantity |
Equivalent |
Subtotal, |
Nominal |
|
Quantity |
Equivalent Length, |
Subtotal, |
Diameter, |
|
Equivalent |
Diameter, |
|
Equivalent Ft. |
||||
In. |
|
(Pc) |
Length, Ft/Pc |
Ft. (A) |
In. |
|
(Pc) |
Ft/Pc |
(D) |
|
|
|
|
|
|
||||
4 |
|
|
13 |
|
4 |
|
1 |
13 |
13 |
6 |
|
|
22 |
|
6 |
|
1 |
22 |
22 |
|
45° Elbow(s) PVC (Installer Supplied) |
|
90° Elbow(s) PVC (Installer Supplied) |
||||||
|
|
|
|
|
|
|
|
|
|
Nominal |
|
Quantity |
Equivalent |
Subtotal, |
Nominal |
|
Quantity |
Equivalent Length, |
Subtotal, |
Diameter, |
|
Equivalent |
Diameter, |
|
Equivalent Ft. |
||||
In. |
|
(Pc) |
Length, Ft/Pc |
Ft. (B) |
In. |
|
(Pc) |
Ft/Pc |
(A) |
|
|
|
|
|
|
||||
4 |
|
|
4.5 |
|
4 |
|
|
13 |
|
6 |
|
|
7.5 |
|
6 |
|
|
22 |
|
|
Straight Pipe, PVC (Installer Supplied) |
|
45° Elbow(s) PVC (Installer Supplied) |
||||||
|
|
|
|
|
|
|
|
|
|
Nominal |
|
Quantity |
Equivalent |
Subtotal, |
Nominal |
|
Quantity |
Equivalent Length, |
Subtotal, |
Diameter, |
|
(Length, |
Length, |
Equivalent |
|
Equivalent Ft. |
|||
In. |
|
Ft.) |
Ft/Ft |
Ft. (C) |
Diameter, In. |
|
(Length, Ft.) |
Ft/Ft |
(B) |
|
|
|
|
|
|||||
4 |
|
|
1 |
|
4 |
|
|
4.5 |
|
6 |
|
|
1 |
|
6 |
|
|
7.5 |
|
* Total Equivalent Length, Ft. (A+B+C) = |
|
30” (2.5 Ft.) Straight Pipe, CPVC (Supplied with Boiler) |
|||||||
|
|
|
|
|
|
|
|
|
|
|
|
|
|
|
Nominal |
|
Quantity |
Equivalent Length, |
Subtotal, |
|
|
|
|
|
Diameter, |
|
Equivalent Ft. |
||
|
|
|
|
|
|
(Length, Ft.) |
Ft/Ft |
||
|
|
|
|
|
In. |
|
|
|
(E) |
|
|
|
|
|
4 |
|
2.5 |
1 |
2.5 |
|
|
|
|
|
6 |
|
2.5 |
1 |
2.5 |
|
|
|
|
|
Straight Pipe, PVC (Installer Supplied) |
||||
|
|
|
|
|
|
|
|
|
|
|
|
|
|
|
Nominal |
|
Quantity |
Equivalent Length, |
Subtotal, |
|
|
|
|
|
Diameter, |
|
Equivalent Ft. |
||
|
|
|
|
|
In |
|
(Length, Ft.) |
Ft/Ft |
(C) |
|
|
|
|
|
|
|
|
||
|
|
|
|
|
4 |
|
|
1 |
|
|
|
|
|
|
6 |
|
|
1 |
|
|
|
|
|
|
* Total Equivalent Length, Ft. (A+B+C+D+E) = |
|
|||
|
|
|
|
|
|
|
|
|
|
* Note: Total Equivalent Length Calculated Value Cannot Exceed Max. Equivalent Length Values shown in Table 8.
Vent and Combustion Air Terminals Do Not Count Towards Total Equivalent Length.
22

IV. Venting B. CPVC/PVC Venting (continued)
e.Clean all vent and combustion air pipe joints with primer and secure with transition cement (4-oz. bottles of primer and cement are supplied with boiler inside vent carton). Follow application instructions provided on primer and
cement bottles. APX800 Boiler Model:
f.6” x 6” Two-Pipe CPVC/PVC Vent System Connector (P/N 102183-03), used on APX800 boiler model, does not have factory installed internal sealing gaskets at both vent and air intake sections and requires use of supplied red RTV silicon sealant to seal vent and combustion air pipes to the connector.
g.Apply a coating of the sealant, at least 1” wide, onto provided 6” Schedule 40 x 30” long CPVC pipe.
h.Insert the coated end of the CPVC pipe with a slight twisting motion into the connector vent section and secure by tightening the metal strap.
i.All CPVC vent components supplied with boiler inside vent carton (6” Schedule 40 x 30” long CPVC pipe and 6” Schedule 80 CPVC 90° Elbow) must be used for near-boiler piping
before transitioning to Schedule 40 PVC (ASTM 2665) pipe components for remainder of vent system. The CPVC 30” long straight pipe may be cut to accommodate desired vent configuration provided both pieces are used in conjunction with CPVC 90° Elbow before any PVC components are used. Ensure that the CPVC 90°
Elbow is the first elbow used in the vent system as it exits the boiler.
j.Apply a coating of the sealant, at least 1” wide, onto 6” Schedule 40 PVC combustion air pipe (installer provided).
k.Insert the coated end of the PVC pipe with a slight twisting motion into the connector air intake section and secure by tightening the metal strap.
l.Clean all vent and combustion air pipe joints with primer and secure with transition cement (4-oz. bottles of primer and cement are supplied with boiler inside vent carton). Follow application instructions provided on primer and cement bottles.
5.Horizontal Vent Termination
a.Standard Two-Pipe Termination
See Figures 8 through 11.
i.Vent Piping
Running PVC vent pipe inside Enclosures and thru Walls:
Figure 8: Wall Penetration Clearances for PVC Vent Pipe
•PVC vent pipe must be installed in such way as to permit adequate air circulation around the outside of the pipe to prevent internal wall temperature rising above
ANSI Z21.13 standard specified limit.
•Do not enclose PVC venting – use higher temperature rated CPVC pipe in enclosed spaces, or, to penetrate combustible or non-combustible walls.
•PVC vent pipe may not be used to penetrate combustible or non-
combustible walls unless all following three conditions are met simultaneously (see Figure 8 “ Wall Penetration Clearances for PVC Vent Pipe”):
-The wall penetration is at least 66 inches from the boiler as measured along the vent
Figure 9A: Direct Vent - Sidewall Terminations
23

IV. Venting B. CPVC/PVC Venting (continued)
Figure 9B: Direct Vent - Sidewall Terminations (Optional)
- The wall is 12” thick or less
- An air space of at least of that shown in Figure 8 is maintained around
outside of the vent pipe to provide air circulation
• If above three conditions cannot be met simultaneously when penetrating a combustible wall, use a single wall thimble [Burnham Commercial part
numbers 102181-01 (4”) and 103419-01 (6”)].
• Thimble use is optional for noncombustible wall.
• Insert thimble into cut opening from outside. Secure thimble outside flange to
wall with nails or screws and seal ID and OD with sealant material.
• When thimble is not used for noncombustible wall, size and cut wall opening such that a minimal clearance is obtained and to allow easy insertion of vent pipe.
•Apply sealant between vent pipe and thimbleorwallopeningtoprovideweathertight seal. Sealant should not restrain the expansion of the vent pipe.
• Install Rodent Screen and Vent Terminal
(supplied with boiler). See Figure 10 for appropriate configuration details.
24
WARNING
All CPVC pipe supplied with boiler vent carton must be used as part of vent system prior to connecting supplied PVC vent terminal.
Methods of securing and sealing terminals to the outside wall must not restrain the thermal expansion of the vent pipe.
ii. Combustion Air Piping
•Do not exceed maximum combustion air pipe length. Refer to Table 8.
•Size combustion air pipe wall penetration opening to allow easy insertion of the pipe.
•Install Rodent Screen and CombustionAir
Terminal (supplied with boiler). See Figure
10 for appropriate configuration details.
•Applysealantbetweencombustionairpipe and wall opening to provide weather-tight seal.
b.Optional Two-Pipe Snorkel Termination
See Figures 10 and 11.
This installation will allow a maximum of seven (7) feet vertical exterior run of the vent/combustion air piping to be installed on the CPVC/PVC horizontal venting application.
Figure 10: Rodent Screen Installation
Figure 11: Direct Vent - Optional Sidewall
Snorkel Terminations
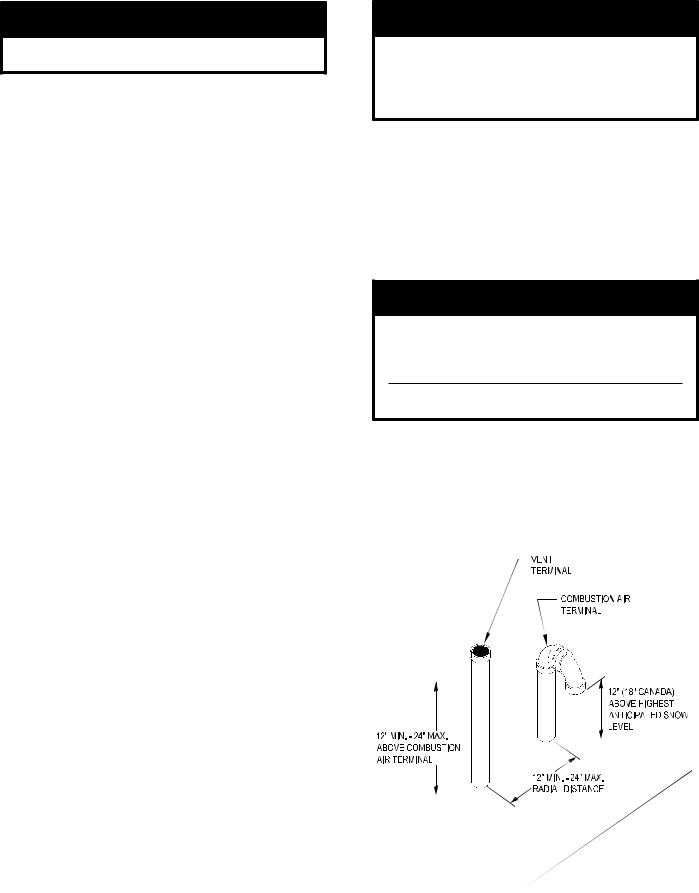
IV. Venting B. CPVC/PVC Venting (continued)
NOTICE
Exterior run to be included in equivalent vent/ combustion air lengths.
i.Vent Piping
•After penetrating wall, install a Schedule
40 PVC 90° elbow so that the elbow leg is in the up direction.
•Install maximum vertical run of seven (7) feet of Schedule 40 PVC vent pipe. See Figure 11.
•At top of vent pipe length install another
PVC 90°elbowsothatelbowlegisopposite the building’s exterior surface.
•Install Rodent Screen and Vent Terminal
(supplied with boiler), see Figure 10 for appropriate configuration.
•Brace exterior piping if required.
ii.Combustion Air Piping
•After penetrating wall, install a Schedule
40 PVC 90° elbow so that elbow leg is in the up direction.
•Install maximum vertical run of seven (7) feet of Schedule 40 PVC vent pipe. See Figure 11.
•AttopofairpipelengthinstallanotherPVC
90° elbow so that elbow leg is opposite the building’s exterior surface.
•Install Rodent Screen and CombustionAir
Terminal (supplied with boiler), see Figure
10 for appropriate configuration.
•Brace exterior piping if required.
6.Vertical Vent Termination
a.Standard Two-Pipe Termination Refer to Figures 10, 12 and 13.
i.Vent Piping
•Installfirestopswhereventpassesthrough floors, ceilings or framed walls. The fire stop must close the opening between the vent pipe and the structure.
•Whenever possible, install vent straight through the roof. Refer to Figures 12 and 13.
-Size roof opening to maintain minimum clearance of 1" from combustible materials.
-Extend vent pipe to maintain minimum vertical and horizontal distance of twelve (12) inches from roof surface. Additionalverticaldistanceforexpected snow accumulation. Provide brace as required.
CAUTION
Vertical venting and combustion air roof penetrations (where applicable) require the use of roof flashing and storm collar, which are not supplied with boiler, to prevent moisture from entering the structure.
-Install storm collar on vent pipe immediately above flashing. Apply
Dow Corning Silastic 732 RTV Sealant between vent pipe and storm collar to provide weather-tight seal.
•Install Rodent Screen and Vent Terminal
(supplied with boiler), see Figure 10 for appropriate configuration.
•Brace exterior piping if required.
WARNING
All CPVC pipe and elbow supplied with boiler vent carton must be used as part of vent system prior to connecting supplied PVC vent terminal.
Do not operate boiler without the rain cap over vent pipe in place.
ii.Combustion Air Piping
•Locate combustion air termination on the same roof location as the vent termination to prevent nuisance boiler shutdowns. Combustion air terminal can be installed closer to roof than vent.
Figure 12: Direct Vent - Vertical Terminations
25

IV. Venting B. CPVC/PVC Venting (continued)
Figure 13: Direct Vent - Vertical Terminations
with Sloped Roof
Extend vent/combustion air piping to maintain minimum vertical (‘X’) and minimum horizontal (‘Y’) distance of twelve (12) inches (18 inches Canada) from roof surface. Allow additional vertical (‘X’) distance for expected snow accumulation.
•Size roof opening to allow easy insertion of combustion air piping and allow proper installation of flashing and storm collar to prevent moisture from entering the structure.
-Useappropriatelydesignedventflashing when passing through roofs. Follow flashingmanufacturers’instructionsfor installation procedures.
-Extend combustion air pipe to maintain minimumverticalandhorizontaldistance of twelve (12) inches from roof surface. Allow additional vertical distance for expected snow accumulation. Provide brace as required.
-Install storm collar on combustion air pipe immediately above flashing.
Apply Dow Corning Silastic 732 RTV Sealant between combustion air pipe and storm collar to provide weather-tight seal.
•Install Rodent Screen and Combustion
Air Terminal (supplied with boiler), see
Figure 10 for appropriate configuration.
•Brace exterior piping if required.
C.Polypropylene Venting
Apex boilers have been approved for use with polypropylene vent system.
It is an installing contractor responsibility to procure listed below polypropylene vent system pipe and related components.
Polypropylene vent system manufactures are listed below:
Approved Polypropylene Vent System Manufacturers
Make |
Model |
M&G/DuraVent |
PolyPro Single Wall Rigid Vent |
PolyPro Flex Flexible Vent (APX399 and |
|
|
APX500) |
Centrotherm |
InnoFlue SW Rigid Vent |
Eco Systems |
Flex Flexible Vent (APX399 and APX500) |
NOTE: Do not mix vent components from approved manufacturers.
M&G/DuraVent PolyPro Single Wall Rigid Vent and PolyPro Flex Flexible Vent comply with the
requirements of ULC-S636-08 ‘Standard for Type BH Gas Venting Systems’.
Centrotherm Eco Systems InnoFlue SW Rigid Vent and Flex Flexible Vent comply with the requirements of UL 1738 ‘Standard for Safety for Venting Systems’ and ULC-S636-08 ‘Standard for Type BH Gas Venting Systems’.
For polypropylene vent system installation details refer to an approved manufacturer either Rigid Single Wall Polypropylene Vent Installation Instructions, or Flexible Polypropylene Vent Installation Instructions provided with a manufacturer specific kits. See Tables 9 and 10.
Refer to Table 8 ‘Vent/Combustion Air Pipe Length – Two-Pipe Direct Vent System Options’ for minimum and maximum listed equivalent length values.
All terminations must comply with listed options for two-pipe venting system. See Figures 8 thru 12 for details.
26

IV. Venting C. Polypropylene Venting (continued)
Table 9: Approved Polypropylene Pipe, Fittings and Terminations - M&G/DuraVent
Boiler |
|
|
M&G / DuraVent Part Numbers/Sizes |
|
|
|||
Male Boiler Adapter, |
|
|
|
Pipe Joint |
|
Side Wall |
Chimney Kit for |
|
Model |
Rigid Pipe |
|
Flex Pipe |
|
||||
PVC to PP |
|
Locking Band |
|
Termination Tee |
Venting Only |
|||
|
|
|
|
|
||||
APX399 |
4PPS-04PVCM-4PPF |
100 mm |
|
100 mm |
43PPS-LB |
|
43PPS-TB |
4PPS-FK |
APX500 |
|
|
||||||
|
|
|
|
|
|
|
|
|
APX800 |
6PPS-06PVCM-6PPF |
150 mm |
|
N/A |
6PPS-LBC |
|
6PPS-E90B |
N/A |
Table 10: Approved Polypropylene Pipe, Fittings and Terminations - Centrotherm Eco
Boiler |
|
Centrotherm Eco Part Numbers/Sizes |
|
|
|||
Male Boiler Adapter, |
|
|
Pipe Joint |
|
Side Wall |
Chimney Kit for |
|
Model |
Rigid Pipe |
Flex Pipe |
|
||||
PVC to PP |
Locking Band |
|
Termination Tee |
Venting Only |
|||
|
|
|
|
||||
APX399 |
ISAA0404 |
|
|
|
|
|
IFCK0425 |
|
110 mm |
110 mm |
IANS04 |
|
ISTT0420 |
and |
|
APX500 |
ISSAL0404 |
|
|||||
|
|
|
|
|
IFCK0435 |
||
|
|
|
|
|
|
|
|
APX800 |
ISAA0606 |
160 mm |
N/A |
IANS06 |
|
ISTT0620 |
N/A |
ISSAL0606 |
|
||||||
|
|
|
|
|
|
|
|
When using flexible polypropylene vent pipe (liner):
•Flexible pipe must be treated carefully and stored at temperatures higher than 41°F (5°C).
•Do not bend or attempt to install flexible pipe if it has been stored at lower ambient temperature without allowing the pipe to warm up to a higher temperature first.
CAUTION
Bending or attempting to install flexible pipe if it has been stored at ambient temperature below 41°F (5°C) will cause material to become brittle and lead to cracks.
When flexible polypropylene pipe (liner) is used for combustion product venting, it must not be installed at an angle greater than 45 degrees from vertical plane. This will insure proper condensate flow back towards the boiler.
CAUTION
Do not install flexible polypropylene pipe at an angle greater than 45 degrees from vertical plane when used for combustion product venting. Failure to do so will result in improper condensate drainage towards the boiler and possible subsequent vent pipe blockage.
•When flexible polypropylene pipe (liner) is used for combustion air supply to a boiler, the pipe (liner) can be installed in vertical or horizontal position.
•Follow flexible polypropylene pipe (liner) manufacturer specific installation instructions regarding application/listing, permits, minimum clearances to combustibles; installation details
(proper joint assembly, pipe support and routing, gasket and fitting installation, optional tooling availability/usage, routing thru masonry chimney for combustion product venting or, combination of combustion product venting and combustion air supply).
•When there is a conflict between flexible polypropylenepipe(liner)manufacturerinstallation instructionsandApexboilerInstallation,Operating and Service Instructions, the more restrictive instructions shall govern.
Apex Boiler Two-Pipe Vent System Connector Field Modification Procedure To Accept Polypropylene
Vent Piping:
Apex boilers are factory supplied with a model-specific boiler two-pipe CPVC/PVC vent system connector shipped within a model-specific boiler CPVC gasketed vent kit carton.
Locate and remove a model-specific boiler two-pipe
CPVC/PVC vent system connector.
When using M&G/DuraVent polypropylene pipe for combustion product venting and/or air supply, male PVC to PP boiler adapter (4PPS-04PVCM-4PPF or 6PPS-06PVCM-6PPF as applicable) is installed into the two-pipe vent system connector vent or combustion air supply port as follows (see Figure 14):
1)APX399 and APX500 models - Apply provided dielectric grease (grease pouch taped to the vent system connector) all around to the vent or air connection inner red silicon gasket.
2)APX399 and APX500 models - Push and twist PVC to PP boiler adapter (4PPS-04PVCM-4PPF) into two-pipe vent system connector vent connection or air supply port until bottomed out.
27

IV. Venting C. Polypropylene Venting (continued)
Figure 14: Vent System Field Modification to Install PVC to PP Adapter (M&G/DuraVent Shown)
3)Tighten the worm band clamp screw to secure PVC to PP boiler adapter.
4)Do not install PVC to PP boiler adapter at the lower combustion air supply port of the two-pipe vent system connector when using PVC pipe for combustion air supply to boiler.
5)APX800 model - Apply a coating of supplied red RTV silicon sealant, at least 1” wide, to PVC to PP boiler adapter (6PPS-06PVCM-6PPF) male end, when used for combustion product venting.
If polypropylene pipe is also used for combustion air supply, application of the silicon sealant to PVC to PP boiler adapter (6PPS-06PVCM-6PPF) male end is not required.
6)APX800 model - Push and twist PVC to PP boiler adapter (6PPS-06PVCM-6PPF) into two-pipe vent system connector vent port or air supply port until bottomed out.
7)Tighten the worm band clamp screw to secure PVC to PP boiler adapter.
8)Do not install PVC to PP boiler adapter at the lower combustion air supply port of the two-pipe vent system connector when using PVC pipe for combustion air supply to boiler.
When using Centrotherm Eco polypropylene pipe for combustion product venting and/or air supply PVC to PP boiler adapter (ISAA0404 or ISAAL0404 and ISAA0606 or ISAAL0606 as applicable) is installed into the two-pipe vent system connector vent or combustion air supply port as follows (see Figure 14):
9)APX399 and APX500 models - Apply provided dielectric grease (grease pouch taped to the vent system connector) all around to the vent or air connection inner red silicon gasket.
10)APX399 and APX500 models - Push and twist PVC to PP boiler adapter (ISAA0404 or
ISAAL0404) into two-pipe vent system connector vent connection or air supply port until bottomed out.
11)Tighten the worm band clamp screw to secure PVC to PP boiler adapter.
12)Do not install PVC to PP boiler adapter at the lower combustion air supply port of the two-pipe vent system connector when using PVC pipe for combustion air supply to boiler.
13)APX800 model - Apply a coating of supplied red RTV silicon sealant, at least 1” wide, to PVC to PP boiler adapter (ISAA0606 or ISAAL0606) male end, when used for combustion product venting.
If polypropylene pipe is also used for combustion air supply, application of the silicon sealant to PVC to PP boiler adapter (ISAA0606 or ISAAL0606) male end is not required.
14)APX800 model - Push and twist PVC to PP boiler adapter (ISAA0606 or ISAAL0606) into two-pipe vent system connector vent port or air supply port until bottomed out.
15)Tighten the worm band clamp screw to secure PVC to PP boiler adapter.
16)Do not install PVC to PP boiler adapter at the lower combustion air supply port of the two-pipe vent system connector when using PVC pipe for combustion air supply to boiler.
Optional Two-pipe Vertical Venting Installation –
Running Flexible Polypropylene Vent (Liner) Thru Unused Chimney Chase (see Figure 15).
Apex APX399 and APX500 boilers are approved for vertical venting by installing FlexibleVent in an UNUSED masonry chimney/chase and supplying combustion air thru a separate wall or roof air intake terminal.
28

IV. Venting C. Polypropylene Venting (continued)
Venting of Other Appliances (or Fireplace) into Chase or Adjacent Flues Prohibited!
Figure 15: Flexible Vent in Masonry
Chimney with Separate Air Intake
WARNING
Follow installation instructions included by the original polypropylene venting component manufacturers, M&G/DuraVent or Centrotherm, whichever applicable.
Flexible Polypropylene Vent must be installed in an UNUSED chimney. A chimney, either single or multiple flue type, is considered UNUSED when none of the flues is being used for any appliance venting.
Where one of the multiple flues is being used for an appliance venting, the flexible vent installation is not permitted thru any of adjacent flues.
Observe all precautions outlined in either M&G/DuraVent or Centrotherm instructions in addition to those outlined in these instructions.
Examine all components for possible shipping damage prior to installation. Proper joint assembly is essential for safe installation.
The venting system must be free to expand and contract and supported in accordance with installation instructions included by the original polypropylene venting component manufacturers, M&G/DuraVent or Centrotherm, whichever applicable.
Do not mix vent components or joining methods for different vent systems.
Where a conflict arises between M&G/DuraVent or Centrotherm instructions and these instructions, the more restrictive instructions shall govern.
Do not apply thermal insulation to vent pipe and fittings.
Do not obtain combustion air from within the building.
29

IV. Venting D. Stainless Steel Venting (continued)
D. Stainless Steel Venting
CAUTION
Vent systems made by Heat Fab, Protech and Z-Flex rely on gaskets or proper sealing. When these vent systems are used, take the following precautions:
•Make sure that gasket is in position and undamaged in the female end of the pipe.
•Make sure that both the male and female pipes are free of damage prior to assembly.
•Only cut vent pipe as permitted by the vent manufacturer in accordance with their instructions. When pipe is cut, cut end must be square and carefully de-burred prior to assembly.
WARNING
All condensate that forms in the vent must be able to drain back to the boiler.
1.Vent Length Restrictions
a.Vent length restrictions are based on equivalent length of vent/combustion air pipe (total length of straight pipe plus equivalent length of fittings). Maximum vent/combustion air lengths are listed in Table 8. Do not exceed maximum vent/combustion air lengths. Do not include vent/combustion air terminals in equivalent feet calculations. See “Combustion Air/Vent, Equivalent Length Work Sheet”.
b.The vent termination location is restricted as per ‘General Guidelines’, Section A.5. (Refer to Figure 4)
c.Where the use of “silicone” is called for in the following instructions, use GE RTV 106 or equivalent for the vent collar. Air inlet piping sections are sealed with any general-purpose silicone sealant such as GE RTV102. PVC air inlet piping sections are connected with PVC cement.
d.Longitudinal welded seams should not be placed at the bottom of horizontal sections of exhaust pipe.
e.Do not drill holes in vent pipe.
f.Do not attempt to mix vent components of different vent system manufacturers.
2.Near Boiler Connection
To install the stainless steel vent adapter [P/N 102220-01 (4”)]:
a.Push the stainless steel vent adapter onto the CPVC/PVC connector with a slight twisting motion. Make sure that the stainless steel vent adapter is inserted at least 1” (refer to Figure 16).
b.Secure the adapter to the CPVC/PVC connector by tightening the metal strap.
To install the stainless steel vent adapter [P/N 103285-01 (6”)]:
c.Apply a coating of supplied red RTV silicone sealant, at least 1” wide, all around male end of the stainless steel vent adapter.
d.Afterwards, insert the male end of the adapter with a slight twisting motion into vent section of installed two-pipe CPVC/PVC vent connector.
e.Secure the adapter to the two-pipe CPVC/PVC vent connector by tightening the metal strap.
3.System Assembly
a.Plan venting system to avoid possible contact with plumbing or electrical wires. Start at vent connector at boiler and work towards vent termination.
b.Refer to Tables 11A and 11B for approved AL29C Vent Systems.
c.Do not exceed maximum Vent/Combustion air length. Refer to Table 8.
d.Follow all manufacturer instructions and warnings when preparing pipe ends for joining and using the primer and the cement.
e.Assemble the air intake system using either galvanized or PVC pipe.
i.If PVC piping is used, use PVC cement to assemble the PVC intake system components. See Part B for air intake installation instructions.
ii.If galvanized piping is used, use at least two sheet metal screws per joint. Seal the outside of all joints.
4.Horizontal Vent Termination
a.Standard Two-Pipe Termination Refer to Figure 9A.
i.Vent Termination
•Use Burnham Commercial stainless exhaust terminal [P/N 100184-01 (4”)]. The outer edge of this terminal must be between 6” and 12” from the surface of the wall. The joint between the terminal and the last piece of pipe must be outside of the building.
•Male end of terminal will fit into the female end of any of the approved stainless vent systems.
30
 Loading...