


 Loading...
OWNER’S MANUAL |
FAX-645 FAX-685MC MFC-960MC
®

If You Need to Call Customer Service
Please complete the following information for future reference:
Model: FAX-645 FAX-685MC MFC-960MC (Circle your model number)
Serial Number:*
Date of Purchase:
Place of Purchase:
*The serial number is on the underside of the unit. Retain this Owner's Manual with your sales receipt as a permanent record of your purchase, in the event of a warranty service.
 WARNING
Failure to use only GENUINE brother® supplies will damage the machine and such damages will not be covered under warranty.

Table of Contents


 1
1


 2
2


 3
3


Introduction ..................................................................................... |
1-1 |
Using This Manual ..................................................................... |
1-1 |
Finding Information............................................................. |
1-1 |
About FAX/MFC ....................................................................... |
1-1 |
Fax Tones and Handshake................................................... |
1-2 |
ECM (Error Correction Mode) ............................................ |
1-2 |
FAX-645 Control Panel Overview............................................. |
1-3 |
FAX-685MC Control Panel Overview |
|
(MFC-960MC panel keys are same as FAX-685MC) ............. |
1-5 |
Location and Connections .............................................................. |
2-1 |
Caution ....................................................................................... |
2-1 |
Packing List................................................................................ |
2-1 |
Choosing a Location................................................................... |
2-2 |
Remove Ribbon Protection Sheet .............................................. |
2-2 |
Assembly .................................................................................... |
2-3 |
Attach the paper wire extension .......................................... |
2-3 |
Attach the paper tray ........................................................... |
2-3 |
Attach the output paper support .......................................... |
2-3 |
Loading the Paper................................................................ |
2-4 |
Acceptable Paper ................................................................. |
2-4 |
Connections ................................................................................ |
2-5 |
Connecting the Machine...................................................... |
2-5 |
Multi-Line Connections (PBX) ........................................... |
2-6 |
If you are installing the FAX/MFC to work with |
|
a PBX:........................................................................... |
2-6 |
Connecting an External Telephone Answering |
|
Device (TAD).................................................................... |
2-7 |
Connections..................................................................... |
2-7 |
Outgoing Message (OGM) of External TAD ...................... |
2-8 |
Sequence of External TAD Reception ................................ |
2-8 |
Connecting an External Telephone ............................................ |
2-9 |
On-Screen Programming ............................................................... |
3-1 |
User-Friendly Programming ...................................................... |
3-1 |
Function Mode..................................................................... |
3-1 |
Alternating Displays ............................................................ |
3-1 |
i


 4
4


 5
5


Menu Selection Table.......................................................... |
3-2 |
Initial Setup...................................................................................... |
4-1 |
Getting Started............................................................................ |
4-1 |
Setting the Dialling Mode (Tone/Pulse).............................. |
4-1 |
Setting Date and Time ......................................................... |
4-1 |
Setting the Station ID .......................................................... |
4-2 |
Details for Entering Text................................................. |
4-2 |
Inserting spaces ............................................................... |
4-3 |
Making corrections ......................................................... |
4-3 |
Repeating letters.............................................................. |
4-3 |
Special characters and symbols....................................... |
4-3 |
Setting Beeper Volume........................................................ |
4-4 |
PABX and TRANSFER ...................................................... |
4-4 |
Setting PABX ...................................................................... |
4-4 |
Setting the Speaker Volume ................................................ |
4-5 |
Setting the Ring Volume ..................................................... |
4-5 |
Memory Storage .................................................................. |
4-5 |
Setup Receive ................................................................................... |
5-1 |
Basic Receiving Operations ....................................................... |
5-1 |
Select Answer Mode............................................................ |
5-1 |
To select or change your Answer Mode ......................... |
5-2 |
Setting Ring Delay .............................................................. |
5-3 |
Setting F/T Ring Time (Only for F/T receiving mode) ....... |
5-3 |
Record FAX/TEL Outgoing Announcement |
|
(FAX/TEL OGM) |
|
(For FAX-685MC and MFC-960MC only) ...................... |
5-3 |
Fax Detect (set ON by default)............................................ |
5-4 |
Printing a Reduced Incoming Document ............................ |
5-4 |
Reception into Memory if: .................................................. |
5-5 |
1 If the MEMORY RECEPTION switch is ON |
|
at this time..................................................................... |
5-5 |
2 If the MEMORY RECEPTION switch is OFF |
|
at this time..................................................................... |
5-5 |
Advanced Receiving Operations ................................................ |
5-6 |
Operation from an External or Extension Telephone.......... |
5-6 |
For F/T (FAX/TEL) Mode Only..................................... |
5-6 |
Remote Call Transfer ...................................................... |
5-6 |
To transfer telephone call to the FAX/MFC ................... |
5-7 |
ii

|
|
|
Changing Remote Codes................................................. |
5-7 |
|
|
|
Printing a FAX in Memory (For FAX-645 only) ................ |
5-8 |
|
|
|
Telephone Services .................................................................... |
5-8 |
|
|
|
Caller ID (Caller IDentification) ......................................... |
5-8 |
|
|
|
Advantages of Caller ID ................................................. |
5-8 |
|
|
|
For Business.................................................................... |
5-8 |
|
|
|
At Home.......................................................................... |
5-8 |
|
|
|
How Does the Caller ID Work? .......................................... |
5-9 |
|
|
|
The Caller ID Appears on the Display When Your |
|
|
|
|
Telephone Rings ........................................................... |
5-9 |
|
|
|
Helpful Hints................................................................... |
5-9 |
|
|
|
The Caller ID is Stored in Your Machine’s Memory ..... |
5-9 |
|
|
|
Selecting a Caller ID from the Memory for Call Reply ...... |
5-9 |
|
|
|
Clearing the Caller ID Stored in Memory |
|
|
|
|
(Only for FAX-685MC and MFC-960MC)................ |
5-10 |
|
|
|
Printing Caller ID List .................................................. |
5-10 |
|
|
|
Distinctive Ringing (Telstra™ Fax Stream Duet ® ) .......... |
5-10 |
|
|
|
Set the Distinctive Ringing to ON..................................... |
5-11 |
|
|
|
Polling ...................................................................................... |
5-11 |
|
|
|
Secure Polling.................................................................... |
5-11 |
|
|
|
Set for Polling Receive ...................................................... |
5-12 |
|
|
|
Setup for Polling Receive with Secure Code .................... |
5-12 |
|
|
|
Setup Delayed Polling Receive ......................................... |
5-12 |
|
|
|
Sequential Polling.............................................................. |
5-13 |
|
|
|
Cancelling a Scheduled Job............................................... |
5-13 |
|
|
|
Setting PC Interface Mode (Only for MFC-960MC or |
|
|
|
|
With Multi-Function Link option) .................................. |
5-14 |
|
6 |
|
Setup Send |
6-1 |
|
|
|||
|
|
|
..........................................Automatic Document Feeder (ADF) |
6-1 |
|
|
|
Manual Transmission .......................................................... |
6-2 |
|
|
|
Automatic Transmission...................................................... |
6-2 |
|
|
|
Manual and Automatic Fax Redial...................................... |
6-2 |
|
|
|
Memory Transmission......................................................... |
6-2 |
|
|
|
Basic Sending Operations .......................................................... |
6-3 |
|
|
|
Composing Electronic Cover Page...................................... |
6-3 |
|
|
|
Cover Page for Next Fax Only ............................................ |
6-4 |
|
|
|
Always Send Cover Page .................................................... |
6-5 |
|
|
|
Using a Printed Cover Page................................................. |
6-5 |
|
|
|
Cover Page Message............................................................ |
6-6 |
iii


 7
7


 8
8


Composing Your Own Comments ...................................... |
6-6 |
Contrast................................................................................ |
6-6 |
Resolution............................................................................ |
6-6 |
Advanced Sending Operations ................................................... |
6-7 |
Overseas Mode .................................................................... |
6-7 |
Call Reservation .................................................................. |
6-7 |
Print Sample Call Back Message ........................................ |
6-8 |
Delayed Transmission (Timer)............................................ |
6-8 |
Next-Fax Reservation .......................................................... |
6-9 |
Multiple Resolution Transmission ...................................... |
6-9 |
Setup for Polling Transmit ................................................ |
6-10 |
Setup for Polling Transmit with Secure Code ................... |
6-10 |
Interrupting Timer and Polling Transmit Jobs .................. |
6-11 |
Automatic Dial Numbers and Dialing Options ............................ |
7-1 |
Storing Numbers for Easy Dialing ............................................. |
7-1 |
Storing One Touch Dial Numbers ....................................... |
7-1 |
Storing Speed Dial Numbers ............................................... |
7-2 |
Changing One Touch and Speed Dial Numbers.................. |
7-2 |
Setting Up Groups for Broadcasting ................................... |
7-3 |
Dialing Options .......................................................................... |
7-4 |
Manual Dialing .................................................................... |
7-4 |
One Touch Dialing .............................................................. |
7-4 |
Speed Dialing ...................................................................... |
7-5 |
Search .................................................................................. |
7-5 |
Redial................................................................................... |
7-6 |
Answering Calls with the Speakerphone |
|
(For FAX-685MC and MFC-960MC Only) ..................... |
7-6 |
Broadcasting ........................................................................ |
7-6 |
Mute..................................................................................... |
7-7 |
Pause.................................................................................... |
7-7 |
F/T (FAX/TEL) Mode ......................................................... |
7-7 |
On Hook Dialling |
|
(For FAX-685MC and MFC-960MC Only) ..................... |
7-7 |
Remote Fax Options (For FAX-645 Only).................................... |
8-1 |
Fax Forwarding .......................................................................... |
8-1 |
Programming a Fax Forwarding Number............................ |
8-1 |
Setting Fax Storage .................................................................... |
8-1 |
Changing Remote Retrieval Access Code.................................. |
8-2 |
iv

|
|
|
Remote Retrieval........................................................................ |
8-2 |
|
|
|
Using Remote Retrieval Access Code................................. |
8-2 |
|
|
|
Remote Commands ............................................................. |
8-3 |
|
|
|
Retrieving Memory Status List ........................................... |
8-4 |
|
|
|
Retrieving Fax Messages..................................................... |
8-4 |
|
|
|
Changing Fax Forwarding Number..................................... |
8-5 |
|
9 |
|
Message Centre (For FAX-685MC and MFC-960MC Only) |
9-1 |
|
|
|||
|
|
|
................................................................Message Centre Mode |
9-1 |
|
|
|
Flexible Memory Settings (Message Storage) .................... |
9-1 |
|
|
|
Setting Up the Message Centre ........................................... |
9-2 |
|
|
|
Setting Message Storage...................................................... |
9-2 |
|
|
|
Recording Message Centre Outgoing Message................... |
9-2 |
|
|
|
Listening to Outgoing Message (OGM) ......................... |
9-3 |
|
|
|
Erasing Outgoing Message (OGM) ................................ |
9-3 |
|
|
|
Activating Message Centre Mode ....................................... |
9-3 |
|
|
|
Message Indicator................................................................ |
9-3 |
|
|
|
What Happens When the Memory is Full... ........................ |
9-4 |
|
|
|
Playing Voice Messages...................................................... |
9-4 |
|
|
|
Printing a Fax Message ....................................................... |
9-4 |
|
|
|
Backup Printing Option ....................................................... |
9-5 |
|
|
|
Erasing Messages ................................................................ |
9-5 |
|
|
|
To erase voice messages individually............................. |
9-5 |
|
|
|
To erase messages all at once ......................................... |
9-5 |
|
|
|
Setting Maximum Time for Incoming Messages ................ |
9-6 |
|
|
|
Setting Toll Saver ................................................................ |
9-6 |
|
|
|
ICM Recording Monitor...................................................... |
9-6 |
|
|
|
Recording a Conversation ................................................... |
9-6 |
|
|
|
Fax Forwarding/Paging ....................................................... |
9-7 |
|
|
|
Programming a Fax Forwarding Number ....................... |
9-7 |
|
|
|
Recording the Paging Outgoing Message (OGM).......... |
9-8 |
|
|
|
Programming the Paging Number .................................. |
9-8 |
|
|
|
Remote Retrieval........................................................................ |
9-9 |
|
|
|
Using Remote Retrieval Access Code................................. |
9-9 |
|
|
|
Changing Remote Retrieval Access Code........................... |
9-9 |
|
|
|
Remote Commands ........................................................... |
9-10 |
|
|
|
Retrieving Memory Status List ......................................... |
9-12 |
|
|
|
Retrieving Fax Messages................................................... |
9-12 |
|
|
|
Changing Fax Forwarding Number................................... |
9-13 |
v

|
10 |
...............................................................................Making Copies |
10-1 |
|
|
.........................................................................Copy Functions |
10-1 |
|
|
Making a Single Copy ....................................................... |
10-1 |
|
|
Copy Options: Single or Multiple Copies, |
|
|
|
Reduce/Enlarge, Sort/Stack............................................. |
10-1 |

 11
11


 12
12


 13
13


 14
14


Printing Reports ............................................................................ |
11-1 |
FAX/MFC Settings and Activity.............................................. |
11-1 |
To Print a Report ............................................................... |
11-1 |
Transmission Verification (Xmit) Report.......................... |
11-2 |
Journal Period .................................................................... |
11-2 |
Important Information ................................................................. |
12-1 |
Important Safety Instructions ............................................ |
12-1 |
Troubleshooting and Routine Maintenance ............................... |
13-1 |
Troubleshooting........................................................................ |
13-1 |
Error Messages .................................................................. |
13-1 |
If You Are Having Difficulty with Your FAX/MFC ........ |
13-4 |
Printing or Receiving Faxes.......................................... |
13-4 |
Phone Line or Connections ........................................... |
13-4 |
Sending Faxes ............................................................... |
13-5 |
Handling Incoming Calls .............................................. |
13-5 |
Routine Maintenance................................................................ |
13-6 |
Cleaning the Scanner ......................................................... |
13-6 |
Cleaning the Print Head..................................................... |
13-6 |
Changing the Ribbon ......................................................... |
13-7 |
Multi-Function Link® (option) .................................................... |
14-1 |
Specifications ................................................................................... |
S-1 |
Glossary........................................................................................... |
G-1 |
Index .................................................................................................. |
I-1 |
Accesssory List ............................................................................... |
R-1 |
vi


 1
1


 1Introduction
Using This Manual
Thank you for purchasing a Brother FAX/MFC. This FAX/MFC has been designed to be simple to use, with LCD screen prompts to guide you through functions. However, you can use your FAX/MFC to its fullest potential by taking a few minutes to read this manual.
Additionally, your FAX/MFC has a Help Key. Press Copy/Help and then press Start to print a list of basic operational steps and functions.
Finding Information
All chapter headings and subheadings are listed in the Table of Contents. You will be able to find information about a specific feature or function by checking the Index at the back of this manual. Also, throughout this manual, you’ll see special symbols alerting you to important information, cross-references, and warnings. Illustrations of some screen displays also help you choose the correct key-presses.
About FAX/MFC
If you’re a first-time FAX/MFC user, fax operation might seem a little mysterious. You’ll soon get used to the unusual fax tones on your phone line, and be able to send and receive faxes easily.
I N T R O D U C T I O N |
1 - 1 |

Fax Tones and Handshake
When someone is sending a fax, the FAX/MFC sends fax calling tones (CNG tones)— soft, intermittent beeps at 4-second intervals. You’ll hear them when you dial and press Start, and they continue for about 40 seconds after dialing. During that time, the sending machine must begin the “handshake” with the receiving machine. Each time you use automatic procedures to send a fax, you are sending CNG tones over the phone line. You’ll soon learn to listen for these soft beeps each time you answer a phone on your fax line, so you know if you are receiving a fax message.
The receiving fax responds with fax receiving tones—loud, chirping sounds. A receiving fax chirps for about 40 seconds over the phone line, and the screen displays RECEIVE. If your FAX/MFC is set to the FAX ONLY Mode, it will answer every call automatically with fax receiving tones. Even if the other party hangs up, your FAX/MFC continues to send the “chirps” for about 40 seconds, and the screen continues to display “RECEIVE”. To cancel the receiving mode, press Stop.
When your FAX/MFC answers in FAX/TEL (F/T) Mode, the FAX/MFC listens for CNG tones and then responds with receiving tones. This mode is best suited to conditions where you want to man the FAX/MFC.
The fax “handshake” is the time in which the sending machine’s CNG tones and the receiving machines “chirps” overlap. This must be for at least 2 to 4 seconds, so the machines can understand how each is sending and receiving the fax. The handshake cannot begin until the call is answered, and the CNG tones only last for about 40 seconds after the number is dialed. Therefore, it’s important for the receiving machine to answer the call in as few rings as possible.
When you have an external telephone answering device (TAD) on your fax line, your TAD will determine the number of rings before the call is answered. Pay special attention to the directions in the Installation chapter for connecting a TAD to your FAX/MFC.
ECM (Error Correction Mode)
The Error Correction Mode (ECM) is a way for the FAX/MFC to check the integrity of a fax transmission while it is in progress. ECM transmissions are possible only between machines that both have the ECM feature. If they do, you may send and receive fax messages that are continuously checked for their integrity. ECM by default is set ON.
Sufficient memory must be available in your FAX/MFC for this feature to work.
1 - 2 I N T R O D U C T I O N
FAX-645 Control Panel Overview
1 
2 
3 
4 
5 
6
1Liquid Crystal Display
The LCD displays messages to help you set up and operate your FAX/MFC.
2Mute/Search
Lets you put calls on hold. Also, lets you dial stored phone numbers by pressing # and a two-digit number. Also lets you look up numbers stored in the dialing memory.
3Recall
Use this key to gain access to an outside line and/or to recall the operator or transfer a call to another extension when it is connected to
a PABX.
4Redial/Pause
Redials the last number called. Also inserts a pause in autodial numbers.
7 |
8 |
9 |
5Hook
Lets you dial telephone and fax numbers without lifting the handset.
6Dial Pad
Dials phone and fax numbers, and can be used as a keyboard for entering information into the FAX/MFC.
7One Touch Dial Keys
These 4 keys give you access to 4 previously stored phone numbers.
8Stop
Stops a fax, cancels an operation, or exits from function menu mode.
9Mode
Use to select how FAX/MFC will handle incoming calls.
I N T R O D U C T I O N |
1 - 3 |
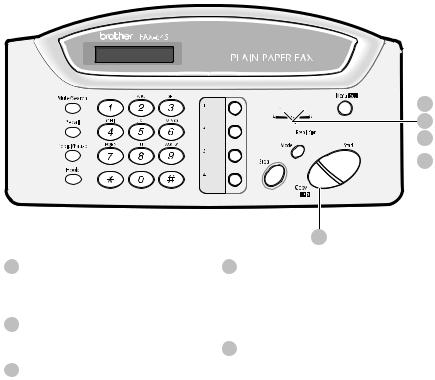
10Copy/Help
Makes a copy. If no originals are in the ADF, it prints a quick reference Help List.
11Start
Starts an operation, such as sending a fax.
12Resolution
Sets the resolution when you send a fax or make a copy.


 14
14
13  12
12
 11
11
10
13 (Left Arrow)
 (Right Arrow) (Volume)
Moves the LCD cursor to the left or right. Adjusts speaker and ring volume.
14Menu/Set
Lets you access the function menu and programming mode. Also, stores a function setting into the FAX/MFC.
1 - 4 I N T R O D U C T I O N
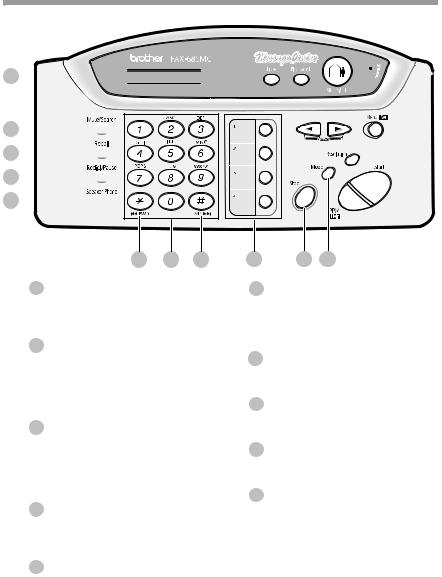
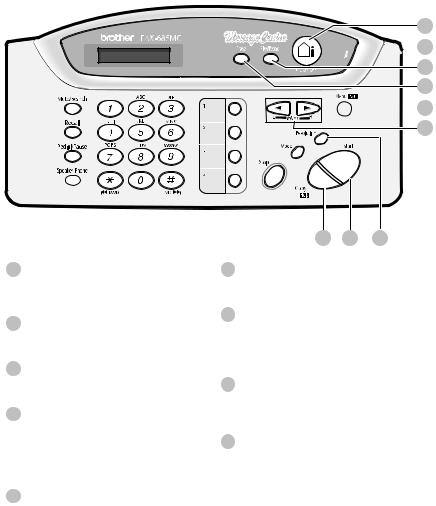
FAX-685MC Control Panel Overview (MFC-960MC panel keys are same as FAX-685MC)
1 


2 

3 

4 

5 

7 6 7
1Liquid Crystal Display
The LCD displays messages to help you set up and operate your FAX/MFC.
2Mute/Search
Lets you put calls on hold. Also, lets you dial stored phone numbers by pressing # and a two-digit number. Also lets you look up numbers stored in the dialing memory.
3Recall
Use this key to gain access to an outside line and/or to recall the operator or transfer a call to another extension when it is connected to
a PABX.
4Redial/Pause
Redials the last number called. Also inserts a pause in autodial numbers.
5Speaker Phone
Lets you speak to the person at the other end and dial telephone and fax numbers without lifting the handset.
8 |
9 |
10 |
6Dial Pad
Dials phone and fax numbers, and can be used as a keyboard for entering information into the FAX/MFC.
7RWD ( ) FWD ( # )
Use to repeat or skip to the next voice message during playback.
8One Touch Dial Keys
These 4 keys give you access to 4 previously stored phone numbers.
9Stop
Stops a fax, cancels an operation, or exits from function menu mode.
10Mode
Use to select how FAX/MFC will handle incoming calls.
I N T R O D U C T I O N |
1 - 5 |
19

 18
18
17
16 
 15 14
15 14
11Copy/Help
Makes a copy. If no originals are in the ADF, it prints a quick reference Help List.
12Start
Starts an operation, such as sending a fax.
13Resolution
Sets the resolution when you send a fax or make a copy.
14 (Left Arrow)
 (Right Arrow) (Volume)
Moves the LCD cursor to the left or right. Adjusts speaker and ring volume.
15Menu/Set
Lets you access the function menu and programming mode. Also, stores a function setting into
the FAX/MFC.
11 12 13
16Erase
Lets you delete voice messages, fax messages or all messages.
17Play/Record
Lets you listen to voice messages and print fax messages stored in memory. Also, lets you record telephone calls.
18MIC (Microphone)
Picks up your voice when you speak to another party using Speaker Phone.
19MC ON/OFF
Lets you activate Message Centre. Also, notifies you that you have voice or fax messages in the memory.
1 - 6 I N T R O D U C T I O N


 2
2


 2Location and Connections
Caution
1
2
Never install telephone wiring during a lightning storm.
We recommend that this product be used with a surge protection device to protect the product against lightning storms.
3 Never install a telephone jack in a wet location unless the jack is specifically designed for a wet location.
4 Never touch telephone wires or terminals that are not insulated unless the telephone line has been disconnected at the network interface.
5
6
7
8
Use caution when installing or modifying telephone lines.
Avoid using a telephone (other than a cordless type) during an electrical storm. There may be a remote risk of electric shock from lightning.
Do not use the telephone to report a gas leak in the vicinity of the leak.
For PLUGGABLE EQUIPMENT, the socket-outlet should be installed near the equipment and should be easily accessible.
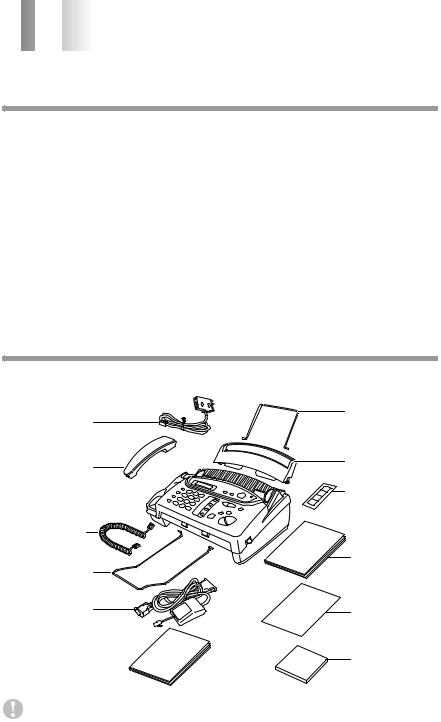
Packing List
Check that you have the following items:
Telephone
Line Cord
Telephone
Handset
Handset
Curled Cord
Output Paper
Support
Cable and
PC/IF Box
(For MFC-960MC Only)
Muiti-Function Link
Owner's Manual
(For MFC-960MC Only)
Paper
Wire Extension
Paper Tray
One Touch
Name Label
Owner’s
Manual
Start Guide
Multi-Function
Link CD-ROM
(For MFC-960MC Only)
Keep the packing materials for possible future transport. If you do not pack the machine properly, such damage will not be covered under warranty.
L O C A T I O N A N D C O N N E C T I O N S |
2 - 1 |

Choosing a Location
Place your FAX/MFC on a flat, stable surface, such as a desk. Select a place that is free of vibration and shocks. Locate the FAX/MFC near a telephone jack and a standard, grounded power outlet.
Avoid placing your machine in a high-traffic area. Do not place near heaters, air conditioners, water, chemicals or refrigerators. Do not expose the FAX/MFC to direct sunlight, excessive heat, moisture or dust. Do not connect your machine to electrical outlets controlled by wall switches or automatic timers. Disruption of power can wipe out information in the unit’s memory. Do not connect your machine to electrical outlets on the same circuit as large appliances or other equipment that might disrupt the power supply. Avoid interference sources, such as speakers or the base units of cordless phones.
Remove Ribbon Protection Sheet
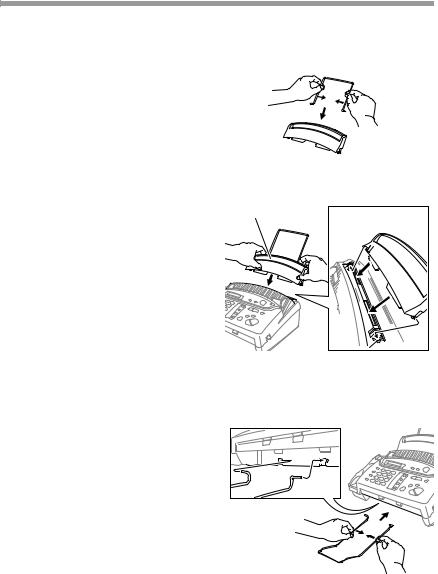
1 Open the top cover by lifting the gray lever on the right side of the top cover.
Top Cover
2 Remove the ribbon protection sheet.
YES!
NO!
3 Remove the print cartridge and notice how the ribbon is wound on the print cartridge frame.
4
5
Re-install cartridge.
Close the top cover.
2 - 2 L O C A T I O N A N D C O N N E C T I O N S
Assembly
Attach the paper wire extension
Attach the paper wire extension as shown in the illustration below.
Attach the paper tray
Attach the paper tray. Make sure the wide
pins on the paper tray are inserted firmly |
Paper Tray |
|
|
into the pockets on the top edge of the |
|
machine. |
|
Paper Wire
 Extension
Attach the output paper support
Attach the output paper support.
Output
Paper 
Support
L O C A T I O N A N D C O N N E C T I O N S |
2 - 3 |

Loading the Paper
The paper tray can hold about 30 sheets of paper.
Temperature: |
20˚C (68˚F) |
Humidity: 60%
1 Place paper in the paper tray.
Tap the stack of paper so the edges are even.
Acceptable Paper
Size: A4
Weight: 64gsm-90gsm (17 lb. – 24 lb.)
Thickness: 0.08 – 0.10mm
DO NOT use curled, wrinkled, folded or ripped paper, or paper with staples, paper clips, paste or tape attached. DO NOT use cardboard, newspaper or fabric.
2 - 4 L O C A T I O N A N D C O N N E C T I O N S
Connections
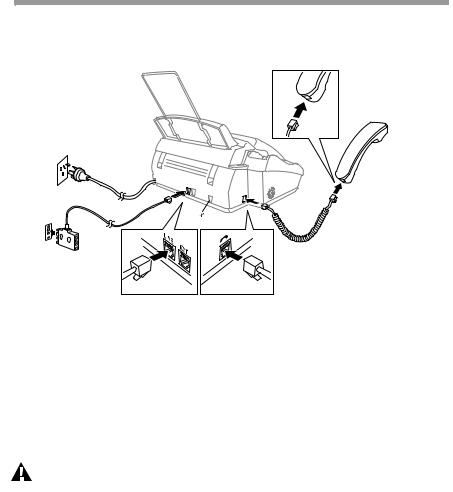
Connecting the Machine
Connect the handset, power cord, and telephone line cord.
 PC I/F jack is for Use with the Brother Multi-Function Link option. If you have not purchased this option then ignore this part.
1 Connect the Handset.
2
3
Connect the curled handset cord to the bottom of the handset and the back of the machine.
Connect the power cord.
Connect the telephone line cord.
Connect one end of the telephone line cord to the jack labeled LINE on the back of the machine. Connect the other end to a modular wall jack.
WARNING
■This machine must be grounded using a three-prong plug.
■Since the machine is grounded through the power outlet, you can protect yourself from potentially hazardous electrical conditions on the telephone line by keeping the power to your machine on when you connect it to a telephone line. When you want to move your machine, protect yourself by disconnecting the telephone line first, and then the power cord.
■Lightning and power surges can damage this product! We recommend that you use a quality surge protection device on the AC power line as well as on the telephone line, or unplug the lines during a lightning storm.
L O C A T I O N A N D C O N N E C T I O N S |
2 - 5 |

Multi-Line Connections (PBX)
Most offices use a central telephone system. While it is often relatively simple to connect the FAX/MFC to a key system or a PBX (Private Branch Exchange), we suggest that you contact the company that installed your telephone system and ask them to connect the FAX/MFC for you. It is advisable to have a separate line for the FAX/MFC. You can then leave the FAX/MFC in FAX ONLY Mode to receive faxes any time of day or night.
If the FAX/MFC is to be connected to a multi-line system, ask your installer to connect the unit to the last line on the system. This prevents the unit from being activated each time a telephone call is received. (See Fax Detect (set ON by default), page 5-4.)
As with all fax units, this machine must be connected to a two wire system. If your line has more than two wires, proper connection of the FAX/MFC cannot be made.
If you are installing the FAX/MFC to work with a PBX:
1 It is not guaranteed that the unit will operate correctly under all circumstances with a PBX. Any cases of difficulty should be reported first to the company that handles your PBX.
2 If all incoming calls will be answered by a switchboard operator, it is recommended that the Answer Mode be set to MANUAL. All incoming calls should initially be regarded as telephone calls.
3 The unit may be used with either pulse or tone dialing telephone service.
2 - 6 L O C A T I O N A N D C O N N E C T I O N S
Connecting an External Telephone Answering
Device (TAD)
Connections
1 You may connect an external TAD to your machine, as shown below.
TAD |
TAD |
2 Set the number of rings to one or two on your external TAD. (The FAX/MFC’s Ring Delay setting does not apply.)
3
4
5
Record the outgoing message on your external TAD (see below).
Set the external TAD to answer calls.
Set MESSAGE STORE (Function menu 8-1) to VOICE:EXT. (Only for FAX-685MC and MFC-960MC)
6 Set the Answer Mode to TAD:ANSWER MACH. (Only for FAX-645)
On the FAX-685MC and MFC-960MC, set the Answer Mode to MC:MSG CTR.
Do not connect a TAD elsewhere on the same phone line––your machine and TAD will both try to control the line.
L O C A T I O N A N D C O N N E C T I O N S |
2 - 7 |
Outgoing Message (OGM) of External TAD
Timing is important in recording this message.
1 Record four seconds of silence at the beginning of your message. (This allows your machine time to listen for the fax CNG tones of automatic transmissions before they stop.)
2 Try to record the shortest possible message on your telephone answering device (ideally less than 10 seconds).
3 End your message by giving your Remote Activation Code for people sending manual faxes. For example:
“After the beep, leave a message or send a fax manually by pressing  5 1.”
5 1.”
Please note that some faxes that are sent manually cannot be received automatically because some FAX/MFCs do not send a fax tone in manual mode. In these cases you must inform callers that they must enter the remote activation code to send a fax.
Sequence of External TAD Reception
When you leave your machine set in TAD mode, all calls will be answered by the externally connected telephone answering device, and fax calls will be received automatically provided they come from a machine which sends standard CalliNG tone (CNG).
Incoming Call
The call is picked up by the TAD. (Recommended short TAD ring delay such as 1 or 2 rings.)
Fax reception is |
|
|
|
|
Auto dial |
||||
automatically |
||||
activated by |
fax call |
|||
fax tone. |
|
|
|
|
|
|
|
|
|
The fax message is received on paper.
The external TAD outgoing message begins (recommended length of 10 seconds or less).
Voice call
The caller leaves a voice message on the external TAD.
|
|
|
The caller must press |
|
Manual |
Start, or enter your |
|||
remote activation |
||||
fax call |
||||
code to activate the |
||||
|
|
|
||
|
|
|
machine and then |
|
|
|
|
press Start. |
|
|
|
|
|
|
The fax message is received on paper.
The caller can also send a fax message after the voice message.
2 - 8 L O C A T I O N A N D C O N N E C T I O N S

Connecting an External Telephone
Your machine is equipped with a handset that you can use as a regular phone. However, you can also connect a separate telephone to your machine, as shown below.
External |
Extension |
Telephone |
Telephone |
Whenever this external phone (or TAD) is in use, the screen displays EXT. TEL IN USE, and, if the fax handset is lifted, an alarm sounds.
To disconnect the call on the external phone and switch to the fax, press Hook or
Speaker Phone.
L O C A T I O N A N D C O N N E C T I O N S |
2 - 9 |


 3
3


 3On-Screen Programming
User-Friendly Programming
We have designed your FAX/MFC with on-screen programming and a Help key. User-friendly programming helps you take full advantage of all the functions your FAX/MFC has to offer. (See Using This Manual, page 1-1.)
Since your fax programming is done on the LCD, we created step-by-step on-screen prompts to help you program your FAX/MFC. All you need to do is follow the prompts as they guide you through the function menu selections and programming options and settings.
Function Mode
You can access the function mode by pressing Menu/Set. When you enter the function mode, your FAX/MFC displays a list of main menu options from which you can choose. These options appear one after the other on the display. Select a menu option by pressing Menu/Set when the option appears on the screen. The display will scroll the options within that menu.
You can “scroll” more quickly through options by pressing  . When the screen displays your selection, press Menu/Set. (Press
  to scroll backward if you passed your choice or to save key strokes. Both arrow keys show all options, in the opposite order.)
Before you press Menu/Set after entering information in a field using the dial pad, you can correct a mistake. Use  to back up and then type over the incorrect characters.
When you finish a function, the screen displays ACCEPTED.
If you want to exit the Function mode, press Stop.
Alternating Displays
When you see alternating displays, the LCD sometimes alternates between the currently selected option, and a help message giving brief instructions about how to proceed. The display you’ll probably see most often is shown below, showing you, when you place an original in the ADF, that you can dial a number and send a fax, or you can make a copy.
FAX: NO. & START
 COPY: PRESS COPY
3 - 1 O N - S C R E E N P R O G R A M M I N G

Menu Selection Table
If you have a basic understanding of how to program your FAX/MFC, you can perform most of the programming settings without the Owner’s Manual. To help you understand the function selections, options, and settings that are found in your fax programs, use the Menu Selection Table below.
1. INITIAL SETUP
Function |
Description |
|
Factory Set |
More Info |
|||||
|
|
|
|
|
|
|
|
|
|
1. TONE/PULSE |
Selects the dialling mode. |
|
|
TONE |
4-1 |
||||
2. DATE/TIME |
Enter date and time for LCD |
|
|
— |
4-1 |
||||
|
display and to print on |
|
|
|
|
|
|
|
|
|
transmissions. |
|
|
|
|
|
|
|
|
3. STATION ID |
Program the name, fax number |
|
|
— |
4-2 |
||||
|
and telephone number to appear |
|
|
|
|
|
|
|
|
|
on each transmitted page. |
|
|
|
|
|
|
|
|
4. BEEPER |
Adjust the volume level of the |
|
|
LOW |
4-4 |
||||
|
beeps when you press a key, an |
|
|
|
|
|
|
|
|
|
error occurs or a document is |
|
|
|
|
|
|
|
|
|
sent or received. |
|
|
|
|
|
|
|
|
5. PBX |
Turn on if PABX (Private |
|
|
OFF |
4-4 |
||||
|
Automatic Branch Exchange) is |
|
|
|
|
|
|
|
|
|
connected to your machine. |
|
|
|
|
|
|
|
|
|
|
|
|
|
|
|
|
|
|
|
|
|
|
|
|
|
|
|
|
2. SETUP RECEIVE |
|
|
|
|
|
|
|
|
|
Function |
Description |
|
Factory Set |
More Info |
|||||
|
|
|
|
|
|
|
|
|
|
1. RING DELAY |
Number of rings before the |
RING DELAY:02 |
5-3, 9-6 |
||||||
|
machine answers in F/T, FAX, |
|
|
TOLL |
|
||||
|
or MC (Message Centre) mode. |
SAVER:OFF |
|
||||||
|
|
(FAX-685MC and |
|
||||||
|
|
MFC-960MC Only) |
|
||||||
2. F/T RING TIME |
Sets the time for “F/T pseudo- |
30 |
|
|
|
|
5-3 |
||
|
ring” in F/T mode. |
|
|
|
|
|
|
|
|
3. FAX DETECT |
Receive fax messages without |
|
|
ON |
5-4 |
||||
|
pressing the Start key. |
|
|
|
|
|
|
|
|
4. REMOTE CODE |
Enter code to activate or |
|
|
ON |
5-7 |
||||
|
deactivate machine from a |
( |
|
51, # 51, |
|
|
|
81) |
|
|
|
|
|
|
|
||||
|
|
|
|
||||||
|
remote location or to transfer |
|
|
|
|
|
|
|
|
|
|
|
|
|
|
|
|
|
|
|
voice call from DECT cordless |
|
|
|
|
|
|
|
|
|
phone to the machine. |
|
|
|
|
|
|
|
|
5. REDUCTION |
Reduces size of image. |
|
|
AUTO |
5-4 |
||||
|
|
|
|
|
|
|
|
|
|
O N - S C R E E N P R O G R A M M I N G |
3 - 2 |

2. SETUP RECEIVE
6. MEM.RECEIVE |
Automatically stores any |
ON |
5-5 |
|
incoming faxes in its memory |
|
|
|
if it runs out of paper. |
|
|
7. POLLING RX |
You call another FAX/MFC to |
— |
5-12, 5-13 |
|
receive a fax from it. |
|
|
8. PC INTERFACE |
Fax Receive Only/PC |
PC PRIORITY |
See Multi- |
(Only for |
Priority/PC Receive Only. |
|
Function |
MFC-960MC or with |
|
|
Link |
Multi-Function Link |
|
|
Owner’s |
for FAX) |
|
|
|
|
|
manual |
|
|
|
|
|
|
|
|
|
|
|
|
|
3. SETUP SEND |
|
|
|
Function |
Description |
Factory Set |
More Info |
|
|
|
|
1. COVERPG SETUP |
Automatically sends a cover |
OFF |
6-4, 6-5 |
|
page you program or prints a |
|
|
|
sample coverpage. |
|
|
2. COVERPAGE |
Program customized message |
— |
6-6 |
NOTE |
for fax cover page. |
|
|
3. CONTRAST |
Change lightness or darkness of |
AUTO |
6-6 |
|
a fax you are sending. |
|
|
4. RESOLUTION |
Allows you to change |
STANDARD |
6-9 |
|
resolutions page by page. |
|
|
5. OVERSEAS MODE |
Adjusts for sometimes difficult |
OFF |
6-7 |
|
overseas transmissions |
|
|
6. CALL RESERVE |
You can send a fax, then speak |
OFF |
6-7, 6-8 |
|
or print a sample call back |
|
|
|
message. |
|
|
7. TIMER |
Send documents later. |
— |
6-8 |
8. POLLED TX |
Set Polled Transmission for |
— |
6-10 |
|
someone to poll your fax |
|
|
|
machine to receive a fax. |
|
|
9. MEMORY TX |
You can send faxes from memory. |
OFF |
6-2, 7-6 |
|
|
|
|
|
|
|
|
4. CANCEL JOB |
|
|
|
Function |
Description |
Factory Set |
More Info |
|
|
|
|
|
Cancel a delayed fax or polling |
|
5-13 |
|
job. |
|
|
|
|
|
|
3 - 3 O N - S C R E E N P R O G R A M M I N G

5. INTERRUPT
Function |
Description |
Factory Set |
More Info |
||
|
|
|
|
|
|
|
Send a fax now, even if you |
|
|
|
6-11 |
|
have the machine set to send a |
|
|
|
|
|
fax later, or if you have it set for |
|
|
|
|
|
Polling. |
|
|
|
|
|
|
|
|
|
|
|
|
|
|
|
|
6. SET QUICK-DIAL |
|
|
|
|
|
Function |
Description |
Factory Set |
More Info |
||
|
|
|
|
|
|
1. ONE-TOUCH DIAL |
Dial numbers stored in memory |
— |
7-1 |
||
|
by pressing only one key. |
|
|
|
|
2. SPEED-DIAL |
Dial numbers stored in memory |
— |
7-2 |
||
|
by pressing only four keys. |
|
|
|
|
3. SETUP GROUPS |
Set up a Group number for |
— |
7-3 |
||
|
broadcasting. |
|
|
|
|
|
|
|
|
|
|
|
|
|
|
|
|
7. PRINT REPORTS |
|
|
|
|
|
Function |
Description |
Factory Set |
More Info |
||
|
|
|
|
|
|
1. TRANSMIT REPOR |
|
OFF |
11-1, 11-2 |
||
2. JOURNAL |
|
JOURNAL: |
11-1, 11-2 |
||
|
|
OFF |
|
||
3. QUICK-DIAL |
Print lists and reports of |
— |
11-1 |
||
|
activity. (Details in chapter 11) |
|
|
|
|
4. TEL.INDEX |
|
— |
11-1 |
||
5. SYSTEM SETUP |
|
— |
11-1 |
||
6. MEMORY STATUS |
|
— |
11-1 |
||
|
|
|
|
|
|
|
|
|
|
|
|
8. REMOTE FAX OPT (FAX-645 Only) |
|
|
|
|
|
Function |
Description |
Factory Set |
More Info |
||
|
|
|
|
|
|
1. FAX FWD |
Set your FAX/MFC to forward |
OFF |
8-1 |
||
|
faxes. |
|
|
|
|
2. FAX STORAGE |
Store incoming faxes in |
OFF |
8-1 |
||
|
memory for remote retrieval. |
|
|
|
|
3. REMOTE ACCESS |
Set code for retrieving faxes. |
159 |
|
|
8-2 |
|
|
||||
|
|
||||
4. PRINT DOCUMENT |
|
|
|
|
|
Print incoming faxes stored in |
— |
5-8 |
|||
|
the memory. |
|
|
|
|
|
|
|
|
|
|
O N - S C R E E N P R O G R A M M I N G |
3 - 4 |

8. SETUP MSG CTR (FAX-685MC and MFC-960MC Only)
Function |
Description |
Factory Set |
More Info |
||
|
|
|
|
|
|
1. MESSAGE STORE |
Select if memory will store fax, |
DOC:OFF |
9-2 |
||
|
voice or both. |
VOICE:ON |
|
||
2. BACKUP PRINT |
Automatically prints a copy of |
ON |
9-5 |
||
|
faxes received into memory. |
|
|
|
|
3. OGM |
Select/Record outgoing |
MSG CTR |
5-3, 9-8 |
||
|
message. |
OGM |
|
||
4. ICM MAX. TIME |
Select maximum length of |
30 seconds |
9-6 |
||
|
incoming messages. |
|
|
|
|
5. ICM REC. MONITR |
Select ON or OFF for voice |
ON |
9-6 |
||
|
messages as they come in. |
|
|
|
|
6. FAX FWD/PAGING |
Set FAX/MFC to forward |
OFF |
9-7, 9-8 |
||
|
fax/message—OR—to call |
|
|
|
|
|
your pager. |
|
|
|
|
7. REMOTE ACCESS |
Set code for retrieving |
159 |
|
|
9-9 |
|
|
||||
|
|
||||
|
messages. |
|
|
|
|
|
|
|
|
|
|
|
|
|
|
|
|
|
|
|
|
|
|
0. TEL SERVICE |
|
|
|
|
|
Function |
Description |
Factory Set |
More Info |
||
|
|
|
|
|
|
1. CALLER ID |
View and dial back, or print a |
— |
5-9, 5-10 |
||
|
list of the last 30 Caller IDs |
|
|
|
|
|
stored in memory. |
|
|
|
|
2. DISTINCTIVE |
Use with phone company |
OFF |
5-10 |
||
|
distinctive ringing service. |
|
|
|
|
|
|
|
|
|
|
3 - 5 O N - S C R E E N P R O G R A M M I N G


 4
4


 4Initial Setup
Getting Started
Setting the Dialling Mode (Tone/Pulse)
Your machine is initially set to TONE. If you are using a PULSE dial line, you can change the setting to PULSE by following the steps below.
1 |
Press Menu/Set, 1, 1 The screen prompts you to |
DIALLING:TONE |
|
|
select TONE or PULSE. |
||
|
DIALLING:PULSE |
||
2 |
Use or to select the dialling mode. |
||
|
|||
3 |
Press Menu/Set when the screen displays the dialling mode you want. |
||
4 |
Press Stop to exit. |
|
|
Setting Date and Time
Your FAX/MFC displays the date and time, and prints it on every fax you send.
In the event of a power failure, the FAX/MFC maintains date and time information for up to 48 hours. All other settings remain unaffected.
1 |
Press Menu/Set, 1, 2. |
ENTER |
YEAR:XX |
|
|
||
2 |
Enter the last two digits of the year and press |
ENTER |
MONTH:XX |
|
Menu/Set. |
||
|
|
|
|
3 |
Enter two digits for the month and press |
ENTER |
DAY:XX |
|
Menu/Set. (For example, enter 09 for September, |
||
|
|
|
|
|
or 10 for October) |
|
|
4 |
Enter two digits for the day and press Menu/Set. ENTER |
TIME:XX:XX |
|
|
(For example, 06) |
|
|
5 Enter the time in 24-hour format and press Menu/Set. (For example, enter 15:25 for 3:25 PM)
6 Press Stop. The screen now displays the date and time you set, and displays it whenever the FAX/MFC is in Standby mode.
Display shows DAY/MONTH/YEAR.
I N I T I A L S E T U P |
4 - 1 |

Setting the Station ID
You can store your name, fax number, and telephone number to be printed on all fax pages.
It is important that you enter the fax numbers in the internationally standardised format, i.e. in accordance with the following strict sequence:
-The “+” (plus) character
-Your Country Code (e.g. “61” for Australia)
-Your local area code minus any leading “0” (e.g. “2” not “02” for Sydney)
-A space ( press  twice)
-Your number on the local exchange, using spaces to aid readability as appropriate.
As an example, your machine is installed in Australia and your national telephone number is 02 9887 4344, then you must set the fax number part of your station ID as: +61 2 9887 4344
1 Press Menu/Set, 1, 3.
2 Enter your fax number (up to 20 digits) and press
Menu/Set.
3 Enter your telephone number (up to 20 digits) and press Menu/Set. If your telephone number and fax number are the same, enter the same number again. The screen displays your entry.
FAX:
TEL:
NAME:
4 Use the dial pad to enter your name (up to 20 characters) and press Menu/Set. (You can use the chart on next page to help you enter letters.)
5 Press Stop. The screen returns to the date and time.
Details for Entering Text
When you are setting certain functions, such as the Station ID, you may need to enter text into the FAX/MFC. Most keys on the dial pad have three or four letters printed above them. The keys for 0, # and  don’t have printed letters because they are used for special characters or operations.
By pressing the appropriate number on the dial pad the correct number of times, you can access the character you want.
Press Key |
one time |
two times |
three times |
four times |
2 |
A |
B |
C |
2 |
3 |
D |
E |
F |
3 |
4 |
G |
H |
I |
4 |
5 |
J |
K |
L |
5 |
6 |
M |
N |
O |
6 |
7 |
P |
Q |
R |
S |
8 |
T |
U |
V |
8 |
9 |
W |
X |
Y |
Z |
|
|
|
|
|
4 - 2 I N I T I A L S E T U P
Loading...