


 Loading...
3FHJTUFS ZPVS OFX #PTDI OPX
XXX CPTDI IPNF DPN XF DPNF
%JTIXBTIFS |
SM… |
|
|
|
|
||
|
|
||
|
SB… |
||
|
|
|
|
FO 0QFSBUJOH JOTUSVDUJPOT

5HVHW VHF |
6WDUW |
Table of contents |
|
8Intended use . . . . . . . . . . . . . . . |
4 |
(Safety instructions . . . . . . . . . . |
4 |
Before you switch ON the appliance . 4 Delivery. . . . . . . . . . . . . . . . . . . . . . . . 5 Installation. . . . . . . . . . . . . . . . . . . . . . 5 In daily use . . . . . . . . . . . . . . . . . . . . . 6 Door lock . . . . . . . . . . . . . . . . . . . . . . 6 Damage . . . . . . . . . . . . . . . . . . . . . . . 6 Disposal . . . . . . . . . . . . . . . . . . . . . . . 6
7Protection of the environment . 8
Packaging. . . . . . . . . . . . . . . . . . . . . . 8 Old appliances . . . . . . . . . . . . . . . . . . 8
*Getting to know your
appliance . . . . . . . . . . . . . . . . . . 9
Control panel . . . . . . . . . . . . . . . . . . . 9 Appliance interior . . . . . . . . . . . . . . . . 9
+Water softening system/
Special salt . . . . . . . . . . . . . . . . 9
Setting . . . . . . . . . . . . . . . . . . . . . . . . 9 Water hardness table . . . . . . . . . . . . 10 Using special salt . . . . . . . . . . . . . . . 10 Detergents with salt component . . . . 10
Switching off water softening
system . . . . . . . . . . . . . . . . . . . . . . . 10
,Rinse aid . . . . . . . . . . . . . . . . . |
11 |
Setting amount of rinse aid. . . . . . . . 11
Switching off rinse aid refill
indicator . . . . . . . . . . . . . . . . . . . . . . 11
-Utensils . . . . . . . . . . . . . . . . . . |
12 |
Not suitable . . . . . . . . . . . . . . . . . . . 12 Glass and utensil damage . . . . . . . . 12 Loading the dishwasher . . . . . . . . . . 12 Unloading the dishwasher . . . . . . . . 12
en
Cups and glasses . . . . . . . . . . . . . . . 13 Pans . . . . . . . . . . . . . . . . . . . . . . . . . 13 Cutlery basket. . . . . . . . . . . . . . . . . . 13 Etagere . . . . . . . . . . . . . . . . . . . . . . . 13 Folding spikes . . . . . . . . . . . . . . . . . 14 Small accessories holder . . . . . . . . . 14 Knife shelf . . . . . . . . . . . . . . . . . . . . . 14 Adjusting the height of the basket . . 14
.Detergent . . . . . . . . . . . . . . . . . 15
Adding detergent . . . . . . . . . . . . . . . 16 Combination detergent . . . . . . . . . . . 16
/Overview of programmes . . . . 18
Programme selection . . . . . . . . . . . . 19 Information for test institutes . . . . . . . 19
0Additional options . . . . . . . . . . 19
Express Wash/ Speed Perfect (VarioSpeed). . . . . . . . . . . . . . . . . . . 19
Half load . . . . . . . . . . . . . . . . . . . . . . 19 Hygiene. . . . . . . . . . . . . . . . . . . . . . . 19 Intensive zone . . . . . . . . . . . . . . . . . . 19 Extra drying. . . . . . . . . . . . . . . . . . . . 19
1Operating the appliance . . . . . 20
Programme data . . . . . . . . . . . . . . . . 20 Aqua sensor . . . . . . . . . . . . . . . . . . . 20 Switching on the appliance . . . . . . . . 20 Remaining running time display . . . . 20 Timer programming . . . . . . . . . . . . . 20 End of programme . . . . . . . . . . . . . . 21
Switching off automatically after
the end of the programme . . . . . . . . 21 Switching off the appliance . . . . . . . . 21 Interrupting the programme . . . . . . . 21 Terminating the programme . . . . . . . 22 Changing the programme. . . . . . . . . 22 Intensive drying. . . . . . . . . . . . . . . . . 22
3

en Intended use
2Cleaning and maintenance . . . 22
Overall condition of the machine . . . 22 Special salt and rinse aid . . . . . . . . . 23 Filters . . . . . . . . . . . . . . . . . . . . . . . . 23 Spray arms . . . . . . . . . . . . . . . . . . . . 23
3Fault, what to do? . . . . . . . . . . |
24 |
Waste water pump . . . . . . . . . . . . . . |
24 |
Fault table . . . . . . . . . . . . . . . . . . . . . |
25 |
4Customer service . . . . . . . . . . |
33 |
5Installation and connection . . |
33 |
Product package . . . . . . . . . . . . . . . 33 Safety instructions. . . . . . . . . . . . . . . 33 Delivery. . . . . . . . . . . . . . . . . . . . . . . 34 Technical specifications . . . . . . . . . . 34 Installation. . . . . . . . . . . . . . . . . . . . . 34 Waste-water connection . . . . . . . . . . 34 Drinking water connection . . . . . . . . 34 Warm water connection . . . . . . . . . . 35 Electrical connection. . . . . . . . . . . . . 35 Removing the appliance . . . . . . . . . . 36 Transportation. . . . . . . . . . . . . . . . . . 36
Protection against frost
(Emptying the appliance) . . . . . . . . . 36
8Intended use
This appliance is intended for use in the home and
the home environment.
Use the dishwasher only in the household
and only for its designed purpose: for washing domestic dishes.
(Safety instructions
Children from 8 years of age or people whose physical, sensory or mental abilities or their lack of experience or knowledge prevent them
from using the appliance safely must not use this appliance without supervision
or instruction by a responsible person.
Before you switch ON the appliance
Please read the operating and installation instructions carefully. They contain
important information on how to install, use and maintain
the appliance.
Retain all documents for subsequent use or for the next owner.
4
Delivery
1.Check the packaging and dishwasher immediately for damage caused in transit. Do not switch on a damaged appliance, but contact your supplier.
2.Please dispose of the packaging material in an environmentally friendly manner.
3.Do not let children play with packaging and its parts. There is a risk of suffocation from collapsible boxes and film.
Installation
Following installation, ensure that the back
of the dishwasher is not freely accessible (protection against contact due to hot surface).
Install and connect
the appliance according to the installation
and assembly instructions.
Prior to installation, disconnect the dishwasher from the power supply.
Ensure that the protective conductor system
of the domestic supply has been correctly installed.
Safety instructions |
en |
The electrical connection conditions must correspond with the specifications
on the dishwasher rating plate 92.
If the power cord of this appliance is damaged, it must be replaced with a particular power cord.
To prevent injury, the power cord may be purchased from customer service only.
If the dishwasher is installed in a high-sided unit, the unit must be secured properly.
If the dishwasher is installed below or above other domestic appliances, follow the information for installation in combination with
a dishwasher
in the installation instructions for the particular appliances.
Also follow the installation instructions for
the dishwasher to ensure that all appliances are operated safely.
If there is no information or if the installation instructions do not include
the appropriate information, contact the manufacturer of these appliances
to ensure that
the dishwasher can be installed above or below these appliances.
5
en Safety instructions
If you cannot obtain any information from
the manufacturer, you must not install the dishwasher above or below these appliances.
If you install a microwave oven above the dishwasher, the microwave oven may be damaged.
Install built-under
or integratable appliances only under continuous worktops which have been screwed to adjacent cupboards to ensure stability.
Do not install the appliance near heat sources (radiators, heat storage tanks, cookers or other appliances which generate heat) and do not install under a hob.
After installing the appliance, ensure that the plug is easily accessible.
(See Electrical connection)
Some models:
The plastic housing on the water connection contains an electric valve,
the connecting cables are in the supply hose.
Do not cut through this hose, do not immerse the plastic housing in water.
In daily use
Read and observe the safety information and instructions for use on the packaging
for cleaning and rinsing agents.
Childproof lock (door lock) *
The description of the childproof lock is at the back in the envelope.
* depending on model
Damage
The appliance may be repaired and opened up by a technician only. To do this, disconnect the appliance from the power supply. Pull out the mains plug or switch off the fuse. Turn off the tap.
If the appliance is damaged, especially the fascia (cracks, holes, broken buttons), or the door function is impaired, stop operating the appliance. Pull out mains plug or switch off fuse. Turn off tap, call customer service.
Disposal
1.Make redundant appliances unusable to prevent subsequent accidents.
2.Dispose of the appliance in a n environmentally friendly manner.
6
M Warning
Risk of injury!
To prevent injuries, e.g. caused by stumbling, open the dishwasher only briefly in order to load and unload the dishwasher.
Knives and other utensils with sharp points must be placed in the cutlery basket with the points
downwards or horizontally on the knife shelf*.
Do not lean or sit on the open door.
In the case of free-standing appliances, ensure that the baskets are not overloaded.
If the appliance
is not in a cavity and a side panel is accessible, the door hinge area must be covered at the side
for reasons of safety
(risk of injury). The covers are available as optional accessories from customer service or specialist outlets.
* depending on model
M Warning
Risk of explosion!
Do not add any solvents to the washing chamber. Danger of explosion!
Safety instructions |
en |
M Warning Risk of scalding!
Open the door carefully when the programme is still running. There is a risk of hot water spraying out of the appliance.
M Warning
Risks to children!
If fitted, use the childproof lock. An exact description can be
found in the back of the enve lope.
Do not allow children to play with or operate
the appliance.
Keep children away from detergents and rinse aid. These may cause chemical burns in the mouth, throat and eyes or asphyxiation.
Keep children away from open dishwasher.
The water in the rinsing compartment is not drinking water and could contain detergent residue.
Ensure that children do not
place fingers in the tablet collecting tray 12. Small fingers could become caught in the slots.
7

en Protection of the environment
When opening and closing the door on an eye-level appliance, ensure that children do not become jammed or crushed between the appliance door and the cupboard door below.
Children could become locked in the appliance (danger of suffocation) or get into another dangerous situation.
Redundant appliances: Pull out the mains plug, sever and dispose of the power cord. Destroy the door lock so that the door can no longer be closed.
7Protection of the environment
Both the packaging of new appliances and the old appliances themselves contain valuable raw materials
and recyclable materials.
Please dispose of the individual parts separated according to type.
Please ask your dealer or inquire at your local authority about current means
of disposal.
Packaging
All plastic parts of the appliance are identified with internationally standardised abbreviations (e.g. >PS< polystyrene). Therefore, plastic waste can be sorted out when the appliance is being disposed of.
Please follow the safety instructions under “Delivery”.
Old appliances
Please follow the safety instructions under “Disposal of your appliance”.
according to the European guideline 2012/19/EU on waste electrical and electronic equipment – WEEE. The guideline specifies the framework for an EU-wide valid
return and re-use of old appliances.This appliance is identified
8

*Getting to know your appliance
Diagrams of the control panel
and the interior of the appliance can be found in the envelope at the front.
Individual positions are referred to in the text.
Control panel
( ON/OFF switch 0 Door opener
8 Programme selector @ START button
H Digital display
P Timer programming * X Additional options ** ` Rinse aid refill indicator h Salt refill indicator
)" Display “Check water supply” * depending on model
** Number depending on model
Appliance interior
1" Top basket 1* Knife shelf *
12 Tablet collecting tray 1: Top spray arm
1B Bottom spray arm
1J Dispenser for special salt
1R Filters
1Z Cutlery basket
1b Bottom basket
1j Dispenser for rinse aid 9" Detergent dispenser
9* Lock for detergent dispenser
92 Rating plate
* depending on model
Getting to know your appliance |
en |
+Water softening system/Special salt
To ensure good washing results,
the dishwasher requires soft water, i.e. containing low amounts of lime, otherwise white limescale will be deposited on the utensils and inner container.
Tap water above 1.2 mmol/l must be softened. The water is softened with special salt (regeneration
salt) in the water softening system of the dishwasher.
The setting and therefore the required amount of salt
depends on the degree of hardness of your tap water (see table).
Setting
The amount of salt dispensed can be set from •:‹‹ to •:‹ˆ.
Salt is not required at the set value •:‹‹.
1.Find out about the hardness value of your tap water. Your water utility company will help you with this.
2.Set value can be found in the water hardness table.
3.Close the door.
4.Switch on ON/OFF switch (.
5.Press and hold down the START button @.
6.Rotate programme selector 8 until •:‹... is indicated on the digital display H.
7.Release button.
The factory set value •:‹… is lit on the digital display H.
9
en Water softening system/Special salt
To change the setting:
1.Rotate programme selector 8 until
the required value is indicated on the digital display H.
2.Press START button @. The set value is saved.
Water hardness table
:DWHU |
+DUGQHVV |
PPRO O |
6HW YDOXH |
||
KDUGQHVV |
UDQJH |
|
|
RQ WKH |
|
YDOXH |
|
|
|
PDFKLQH |
|
&ODUNH |
|
|
|
|
|
|
|
VRIW |
|
|
|
|
|
VRIW |
|
|
|
|
|
PHGLXP |
|
|
|
|
|
PHGLXP |
|
|
|
|
|
PHGLXP |
|
|
|
|
|
KDUG |
|
|
|
|
|
KDUG |
|
|
|
|
|
KDUG |
|
|
|
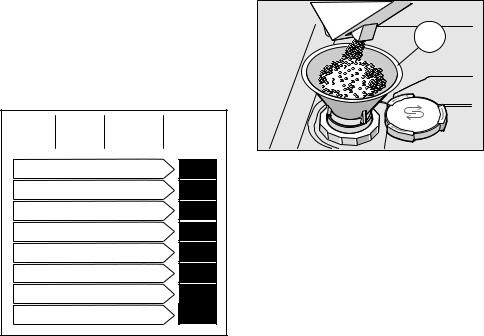
As soon as the salt refill indicator h on the fascia is lit, top up the salt.
* depending on model
Using detergents with salt component
If combined detergents with a salt component are used, salt can usually be omitted up to a water hardness of
21° dH (37° fH, 26° Clarke, 3.7 mmol/ l). If the water hardness is over 21° dH, special salt must be used.
Using special salt
Always refill with special salt immediately before switching on the appliance. This ensures that overrun special salt solution is immediately washed out and does not corrode the rinsing tank.
1.Open the screw-type cap of the compartment 1J.
2.Fill the tank with water (only required when switching on the appliance for the first time).
3.Then add dishwasher salt (not table salt or tablets).
The water is displaced and runs out.
Switching off salt refill indicator/water softening system
If the salt refill indicator h is impaired (e.g. when using combined detergents containing salt component), it can be switched off.
Proceed as described under
“Adjusting the water softening system” and set the value to •:‹‹.
The water softening system and salt refill indicator are now switched off.
M Caution
Never fill the salt dispenser with detergent. You will destroy the water softening system.
10
,Rinse aid
As soon as the rinse-aid refill indicator ` is lit on the fascia, there
is still a rinse-aid reserve of 1-2 rinsing processes. Refill with rinse aid.
The rinse aid is required for stain-free utensils and clear glasses. Use only rinse aid for domestic dishwashers.
Combined detergents with rinse-aid component may be used up to a water hardness of 21° dH (37° fH,
26° Clarke, 3.7 mmol/l) only. If
the water hardness is over 21° dH, rinse aid must be used.
1.Open the dispenser 1j by pressing and lifting the plate on the cover.
2.Carefully pour rinse aid up
to the max. mark in the filler opening.
PD[ |
Rinse aid |
en |
3.Close cover until it clicks shut.
4.To prevent excessive foam formation during the next rinse cycle, remove any rinse aid which has run over with a cloth.
Setting amount of rinse aid
The amount of rinse aid can be set from §:‹‹ to §:‹‡. Please set rinse aid on §:‹† to obtain very good drying results (§:‹† is already set in factory).
Change this setting, only if streaks (select lower setting) or water stains (select higher setting) are left on the utensils.
1.Close the door.
2.Switch on ON/OFF switch (.
3.Press and hold down the START button @.
4.Rotate programme selector 8 until §:‹... s indicated on the digital display H.
5.Release button.
The factory set value §:‹† is lit on the digital display H.
To change the setting:
1.Rotate programme selector 8 until
the required value is indicated on the digital display H.
2.Press START button @. The set value is saved.
Switching off rinse aid refill indicator
If the rinse-aid refill indicator ` is impaired (e.g. when using combined detergents containing rinse aid component), it can be switched off.
Proceed as described under “Setting
amount of rinse aid” and set the value to §:‹‹.
The rinse aid refill indicator ` is now switched off.
11

en Utensils
-Utensils
Not suitable
Cutlery and utensils made of wood.
Delicate decorative glasses, craft and antique utensils. These decors are not dishwasher-proof.
Plastic parts not resistant to heat.
Copper and tin utensils.
Utensils which are soiled with ash, wax, lubricating grease or ink.
Aluminium and silver parts have a tendency to discolour and fade during the wash cycle. Even some types of glass (e.g. crystal glass objects) may turn cloudy after many wash cycles.
Glass and utensil damage
Causes:
Glass type and glass production process.
Chemical composition of the detergent.
Water temperature of the wash programme.
Recommendation:
Use only glasses and porcelain which the manufacturer designates as dishwasher-proof.
Use a detergent which protects utensils.
Take glass and cutlery out of the dishwasher as soon as possible after the programme ends.
Loading the dishwasher
1.Remove large food remnants. It is not necessary to prerinse utensils under running water.
2.Place the utensils so that
–they are secure and cannot tip over.
–all utensils with their openings face down.
–parts with curves or indentations are at an angle, thereby allowing water to drain.
–does not obstruct rotation of the two spray arms 1: and 1B.
Very small utensils should not be washed in the machine, as they may fall out of the baskets.
Unloading the dishwasher
To prevent water from dripping off the upper basket onto the utensils in the lower basket, it is recommended
to empty the appliance from the bottom up.
Hot utensils are sensitive to shock! Therefore, when the programme ends, leave the utensils to cool down in the dishwasher until they can be handled.
Note
When the programme ends, water droplets can still be seen inside the appliance. This does not affect the drying of the utensils.
12
Loading...