


Dishwasher
292 116 (8712-1)
en Instructions for use
9000


en |
Index |
|
|
|
|
Safety instructions . . . . . . . |
4 |
IntensiveZone . . . . . . . . . . . . . . |
15 |
||
Delivery |
. . . . . . . . . . . . . . . . . . . . |
4 |
Extra drying . . . . . . . . . . . . . . . . |
15 |
|
Installation . . . . . . . . . . . . . . . . . |
4 |
Washing the dishes . . . . . . . |
15 |
||
In daily use . . . . . . . . . . . . . . . . . |
4 |
Programme data . . . . . . . . . . . . |
15 |
||
Children in the household . . . . |
4 |
Aqua sensor . . . . . . . . . . . . . . . . |
15 |
||
Childproof lock (door lock) . . . . |
4 |
Switching on the appliance . . . |
15 |
||
Childproof lock (button lock) . . |
5 |
Programme sequence indicator |
16 |
||
Damage . . . . . . . . . . . . . . . . . . . |
5 |
Remaining running time display |
16 |
||
Disposal . . . . . . . . . . . . . . . . . . . |
5 |
Timer programming . . . . . . . . . . |
16 |
||
Getting to know your appliance |
5 |
End of programme . . . . . . . . . . . |
16 |
||
Control panel . . . . . . . . . . . . . . . |
5 |
Switching off the appliance . . . |
16 |
||
Appliance interior . . . . . . . . . . . . |
5 |
Interrupting the programme . . . |
16 |
||
Water softening system . . . |
6 |
Terminating the programme (Reset) |
16 |
||
Set . . . . |
. . . . . . . . . . . . . . . . . . . . |
6 |
Changing the programme . . . . |
17 |
|
Salt . . . . |
. . . . . . . . . . . . . . . . . |
7 |
Intensive drying . . . . . . . . . . . . . |
17 |
|
Using salt . . . . . . . . . . . . . . . . . . |
7 |
Maintenance and care . . . . |
17 |
||
Switching off salt refill indicator/ |
|
Overall condition of the machine |
17 |
||
water softening system . . . . . . . |
7 |
Filters |
18 |
||
Rinse aid |
8 |
||||
Spray arms |
18 |
||||
Setting amount of rinse-aid . . . |
8 |
||||
Waste water pump |
19 |
||||
Switching off rinse-aid refill indicator |
8 |
||||
Troubleshooting |
19 |
||||
Utensils |
|
9 |
|||
. . . . . . . . . . . . . . . . . |
... when the appliance is switched on |
20 |
|||
Not suitable |
9 |
||||
... on the appliance |
20 |
||||
Glass and utensil damage |
9 |
||||
... changing settings |
20 |
||||
Loading the dishwasher |
9 |
||||
... during the wash cycle |
21 |
||||
Unloading the dishwasher |
9 |
||||
... on the utensils |
21 |
||||
Cups and glasses |
9 |
||||
Customer service |
22 |
||||
Pans |
|
10 |
|||
. . . . . . . . . . . . . . . . . . . . |
Installation |
22 |
|||
Cutlery basket |
10 |
||||
Safety instructions |
22 |
||||
Folding spikes |
10 |
||||
Delivery |
23 |
||||
Small accessories holder |
10 |
||||
Installation |
23 |
||||
Adjusting the height of the basket |
11 |
||||
Waste-water connection |
23 |
||||
Detergent |
12 |
||||
Fresh-water connection |
24 |
||||
Adding detergent |
12 |
||||
Electrical connection |
24 |
||||
Overview of programmes |
14 |
||||
Removing the appliance |
24 |
||||
Programme selection |
14 |
||||
Transportation |
24 |
||||
Information about comparability tests |
14 |
||||
Protection against frost |
25 |
||||
Additional options |
15 |
||||
Waste disposal |
25 |
||||
Saving time (VarioSpeed) |
15 |
||||
Packaging |
25 |
||||
Half load |
15 |
||||
Old appliances |
25 |
||||
Hygiene |
|
15 |
|||
. . . . . . . . . . . . . . . . . . . . |
|
|
|||
en
Safety instructions
Delivery
Check the packaging and dishwasher immediately for damage caused in transit. Do not switch on a damaged appliance, but contact your supplier. Please dispose of the packaging material in an environmentally friendly manner.
Do not let children play with packaging and its parts. There is a risk of suffocation from collapsible boxes and film.
Installation
Read the “Installation” chapter to learn how to install and connect the appliance correctly.
In daily use
Use the dishwasher only in the household and only for its designed purpose, i.e. for washing domestic dishes.
Do not lean or sit on the open door. The appliance could tip.
Please note that free-standing appliances may tip over if the baskets are overloaded.
Do not add any solvents to the washing chamber. Danger of explosion!
Open the door carefully when the programme is still running. There is a risk of hot water spraying out of the appliance.
To prevent injuries, e.g. caused by stumbling, open the dishwasher only briefly in order to load and unload the dishwasher.
Read and observe the safety information and instructions for use on the packaging for cleaning and rinsing agents.
Warning
Knives and other utensils with sharp points must be placed in the cutlery basket with the points downwards or horizontally on the knife shelf *.
* depending on model
Children in the household
If fitted, use the childproof lock. An exact description can be found in the back of the envelope.
Do not allow children to play with or operate the appliance.
Keep children away from detergents and rinse aid. These may cause chemical burns in the mouth, throat and eyes or asphyxiation.
Keep children away from open dishwasher. The water in the rinsing compartment is not drinking water and could contain detergent residue. Ensure that children do not place fingers in the tablet collecting tray 22 . Small fingers could become caught in the slots.
If the appliance is installed at eye-level, ensure when opening and closing the door that children are not caught or crushed between the appliance door and the cupboard door situated below.
Childproof lock (door lock)
The description of the childproof lock is at the back in the envelope.
4

Childproof lock (button lock)
You can secure your appliance to prevent unintentional cancellation of the programme (e.g. incorrect operation
by children).
Activating the button lock:
 Start the required programme.
Hold down the button B for
approx. 4 sec. until this  is indicated on the digital display.
If any button is pressed while the programme is running, this  is indicated on the digital display. It is not possible to end (reset) the programme.
Deactivating the button lock:
Hold down the button B for approx. 4 sec. until the display  goes out.
When the programme ends ( on the digital display), the button lock is cancelled. If there is a power failure, the button lock is retained. Whenever
a programme is restarted, the button lock must be reactivated.
Damage
The appliance may be repaired and opened up by a technician only. To do this, disconnect the appliance from the power supply. Pull out the mains plug or switch off the fuse. Turn off the tap.
Disposal
Make redundant appliances unusable to prevent subsequent accidents. Dispose of the appliance in an environmentally friendly manner.
Warning
Children could become locked in the appliance (risk of suffocation) or find themselves in other dangerous situations. Therefore: Pull out the mains plug, sever and dispose of the power cord. Destroy the door lock so that the door can no longer be closed.
en
Getting to know your appliance
Diagrams of the control panel and the interior of the appliance can be found in the envelope at the front.
Individual positions are referred to in the text.
Control panel
1ON/OFF switch
2Programme buttons **
3Display “Check water supply”
4Salt refill indicator
5Rinse-aid refill indicator
6Door Opener
7Timer programming *
8Additional options **
9START button
10Programme sequence indicator
11Digital display
*depending on model
**Number depending on model
Appliance interior
20Top basket
21Knife shelf *
22Tablet collecting tray
23Top spray arm
24Bottom spray arm
25Dispenser for salt
26Filters
27Cutlery basket
28Bottom basket
29Dispenser for rinse aid
30Detergent dispenser
31Lock for detergent dispenser
32Rating plate
*depending on model
5
en
Water softening system
To ensure good washing results, the dishwasher requires soft water, i.e. containing low amounts of lime, otherwise white limescale will be deposited on the utensils and inner container.
Tap water above 7_ dH (from set value
 ) must be softened.
The water is softened with salt (regeneration salt) in the water softening system of the dishwasher.
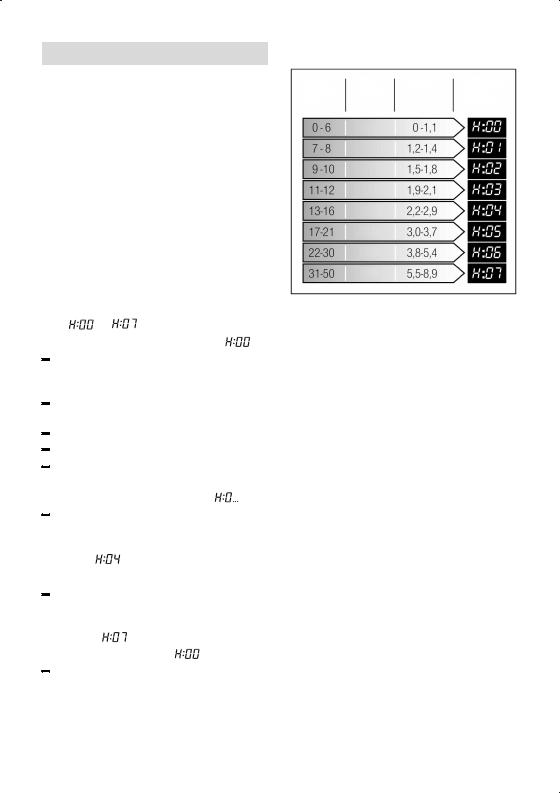
The setting and therefore the required amount of salt depends on the degree of hardness of your tap water (see table).
Set
The amount of salt dispensed can be set
from |
to |
. |
|
Sal is not required at the set value |
. |
||
Find out about the hardness value of your tap water. Your water supply company will assist you.
Set value can be found in the water hardness table.
Close the door. |
|
|
|
|
|
Switch on ON/OFF switch |
|
|
. |
|
|
1 |
|
||||
Hold down programme button |
|
|
|||
A |
|||||
and press START button |
|
|
|
until on |
|
|
9 |
|
|||
the digital display is indicated |
. |
||||
Release both buttons. |
|
|
|
|||
The LED for button |
A |
|
flashes and |
|||
the digital display displays the factory |
||||||
setting |
. |
|
|
|
|
|
To change the setting, |
|
|
|
|||
press programme button |
|
|
. |
|||
|
C |
|||||
Each time the button is pressed, the set value increases by one level; when the
value of |
has been reached, the |
|||
display jumps back to |
|
(off). |
||
Press START button |
|
|
. |
|
|
9 |
|||
The chosen setting has now been stored.
Water hardness table
Water |
Hardness |
mmol/l |
Set |
value on |
hardness |
range |
|
the |
machine |
value _dh |
|
|
|
|
|
soft |
|
|
|
|
soft |
|
|
|
|
medium |
|
|
|
|
medium |
|
|
|
|
medium |
|
|
|
|
hard |
|
|
|
|
hard |
|
|
|
|
hard |
|
|
|
6
Salt
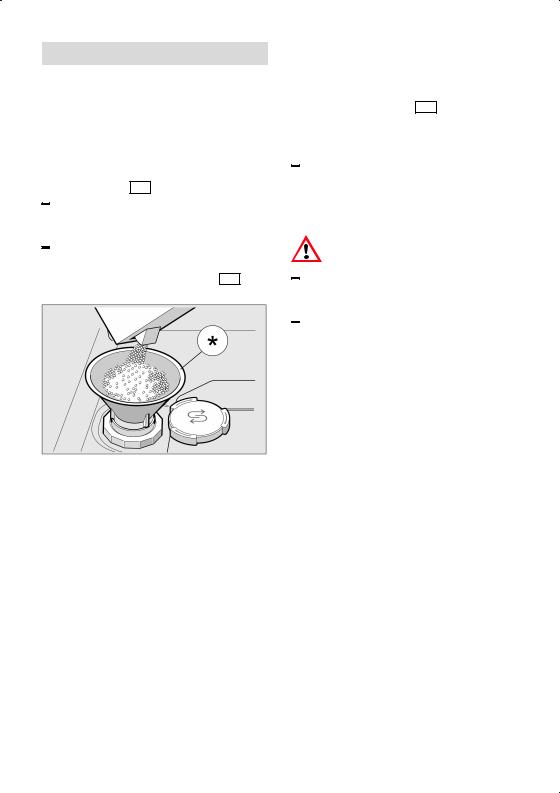
Using salt
Always refill with salt immediately before switching on the appliance. This ensures that overrun salt solution is immediately washed out and does not corrode the rinsing tank.
 Open the screw-type cap of the compartment 25 .
Fill the tank with water (only required when switching on the appliance for the first time).
Then add salt (not table salt).
The water is displaced and runs out. As soon as the salt refill indicator 4 on the fascia is lit, top up the salt.
* depending on model
Using detergents with salt component
If combined detergents with a salt component are used, salt can usually be omitted up to a water hardness of 21° dH (37° fH, 26° Clarke, 3.7 mmol/l). If the water hardness is over 21° dH, salt must be used.
en
Switching off salt refill indicator/water softening system
If the salt refill indicator 4 is impaired (e.g. when using combined detergents containing salt component), it can be switched off.
Proceed as described under “Setting water softening system” and set the value to  .
.
The water softening system and salt refill indicator are now switched off.
Warnings
Never fill the salt dispenser with detergent. You will destroy the water softening system.
To prevent corrosion, always refill with salt immediately before switching on the appliance.
7
en
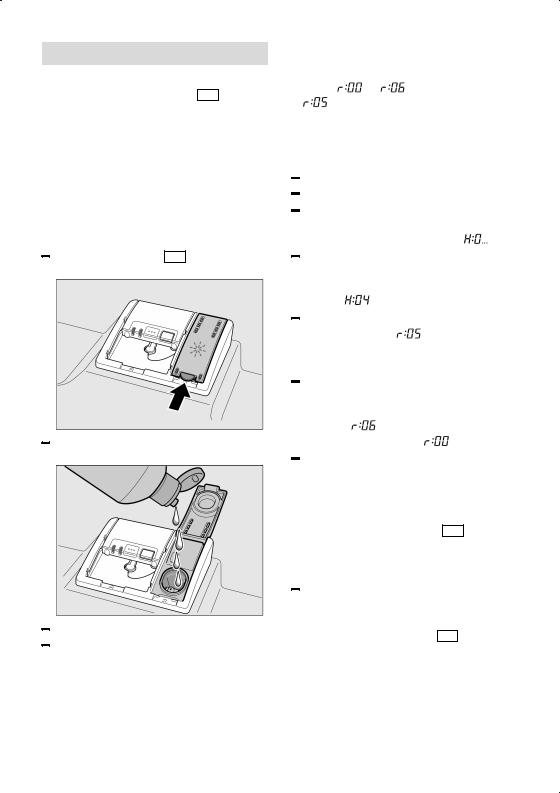
Rinse aid
As soon as the rinse-aid refill indicator lights up on the control panel 5 , refill with rinse aid.
The rinse aid is required for stain-free utensils and clear glasses.
Use only rinse aid for domestic dishwashers.
Combined detergents with rinse-aid component may be used up to a water hardness of 21_ dH (37_ fH, 26_ Clarke, 3,7 mmol/l) only. If the water hardness is over 21_ dH, rinse-aid must be used.
Open the dispenser 29 by lifting the plate on the cover.
Carefully pour in the rinse aid to just below the edge of the filler opening.
Close cover until it clicks shut.
To prevent excessive foam formation during the next rinse cycle, remove any rinse aid which has run over with a cloth.
Setting amount of rinse-aid
The amount of rinse-aid dispensed can be
set from |
to |
. The factory setting |
|
is |
. |
|
|
Do not change the amount of rinse-aid unless streaks (select lower setting) or water stains (select higher setting) are left on the utensils.
Close the door. |
|
|
|
|
|
|
|
|
|
|
|
||
Switch on ON/OFF switch |
|
|
. |
|
|||||||||
1 |
|
||||||||||||
Hold down programme button |
|
|
|||||||||||
A |
|||||||||||||
and press START button |
|
|
|
|
until on |
||||||||
|
|
9 |
|
||||||||||
the digital display is indicated |
. |
||||||||||||
Release both buttons. |
|
|
|
|
|||||||||
The LED for button |
|
|
|
flashes and |
|||||||||
|
A |
||||||||||||
the digital display displays the factory |
|||||||||||||
setting |
. |
|
|
|
|
|
|
|
|
|
|
|
|
Press programme button |
|
|
|
until the |
|||||||||
|
A |
||||||||||||
factory set value |
|
|
is indicated on |
||||||||||
the digital display |
|
|
. |
|
|
|
|
|
|
|
|
||
|
11 |
|
|
|
|
|
|
|
|
||||
To change the setting, |
|
|
|
|
|||||||||
press programme button |
|
|
. |
|
|
||||||||
|
C |
|
|
||||||||||
Each time the button is pressed, the set value increases by one level; when the
value of |
has been reached, the |
|||
display jumps back to |
|
(off). |
||
Press START button |
|
|
. |
|
|
9 |
|||
The set value is saved.
Switching off rinse-aid refill indicator
If the rinse-aid refill indicator 5 is
impaired (e.g. when using combined detergents containing rinse-aid component), it can be switched off.
Proceed as described under “Setting amount of rinse-aid” and set the value to  .
.
The rinse-aid refill indicator 5 is now switched off.
8
Utensils
Not suitable
 Cutlery and utensils made of wood.
Delicate decorative glasses, craft and antique utensils. These decors are not dishwasher-proof.
Plastic parts not resistant to heat.
Copper and tin utensils.
Utensils which are soiled with ash, wax, lubricating grease or ink.
Aluminium and silver parts have
a tendency to discolour and fade during the wash cycle. Even some types of glass (e.g. crystal glass objects) may turn cloudy after many wash cycles.
Glass and utensil damage
Causes:
Glass type and glass production process.
Chemical composition of the detergent. Water temperature of the wash programme.
Recommendation:
Use only glasses and porcelain which the manufacturer designates as dishwasher-proof.
Use a detergent which protects utensils.
Take glass and cutlery out of the dishwasher as soon as possible after the programme ends.
en
Loading the dishwasher
Remove large food remnants.
It is not necessary to prerinse utensils under running water.
Place the utensils so that
Dthey are secure and cannot tip over.
Dall utensils with their openings face down.
Dparts with curves or indentations are at an angle, thereby allowing water to drain.
Ddoes not obstruct rotation of the two spray arms 23 and 24 .
Very small utensils should not be washed in the machine, as they may fall out of the baskets.
Unloading the dishwasher
To prevent water from dripping off the upper basket onto the utensils in the lower basket, it is recommended to empty the appliance from the bottom up.
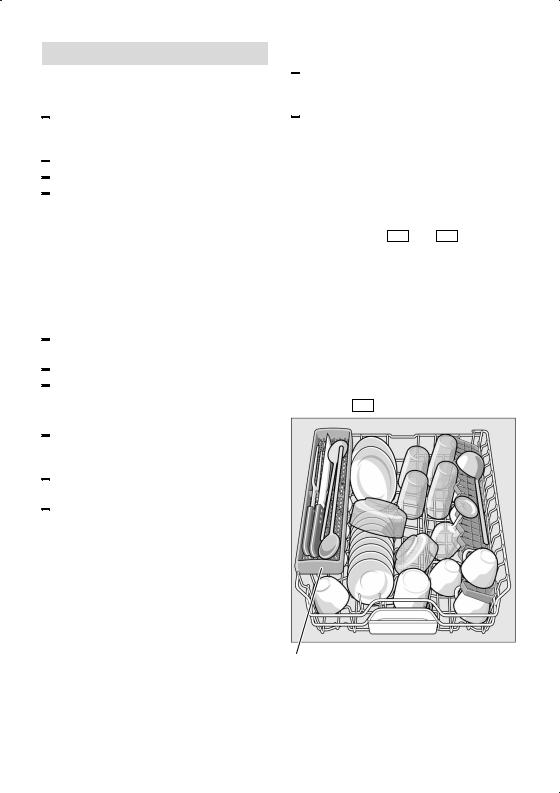
Cups and glasses
Top basket 20
* depending on model
9
 Loading...