


YOUR LIFE. OUR INSPIRATION.
DISHWASHER USE AND CARE MANUAL
GUIDE D’ENTRETIEN ET D’UTILISATION DU LAVE-VAISSELLE MANUAL DE USO Y CUIDADO PARA LAVADORA DE PLATOS
MODELS\MODÈLES\MODELOS : SHE44C, SHE46C, SHE56C
Installation Instructions located on reverse side
Tourner le guide pour les instructions d’installation
Voltee el manual para encontrar las instrucciones de instalación
9000060319 (8502)

Congratulations, and Thank You from Bosch!
Thank you for selecting a Bosch dishwasher. You have joined the many consumers who demand quiet and superior performance from their dishwashers.
This manual was written with your safety and convenience in mind, and the information contained herein is very important. We highly recommend that you read this manual before you use your dishwasher for the first time.
To learn even more about your dishwasher and available accessories, as well as many other topquality Bosch appliances, visit our website at www.boschappliances.com.
Please contact us if you have any questions or comments. You can call us at 1-800-944-2904, or you can write us at
BSH Home Appliances, Corp.
5551 McFadden Avenue
Huntington Beach, CA 92649
Enjoy!
TABLE OF CONTENTS |
|
IMPORTANT SAFETY INSTRUCTIONS ....................... |
2 |
Dishwasher Components, Features and Options............. |
3 |
Dishware Materials .......................................................... |
4 |
Preparing and Loading the Dishware ........................... |
4-9 |
Dishware Preparation ................................................ |
4 |
Loading the Dishwasher.......................................... |
4-9 |
Adding Detergent and Rinse Agent .......................... |
10-11 |
Operating the Dishwasher ........................................ |
12-13 |
Dishware Drying....................................................... |
13 |
Unloading the Dishwasher........................................ |
13 |
Care and Maintenance ............................................. |
14-16 |
Self Help ........................................................................ |
17 |
Wash Cycle Information/Sanitized .................................. |
18 |
Statement of Warranties ................................................ |
19 |
Customer Service .......................................................... |
20 |
1

 Important Safety Instructions
 WARNING
Misuse of the dishwasher can result
in serious injury or death. Do not use the dishwasher in any way not covered in this manual or for any purpose other than those explained on the following pages.
 WARNING
Severe product damage and/or injury could result from the use of unqualified service technicians or non-original replacement parts. All repairs must be performed by a qualified service technician using only original equipment factory replacement parts.
Never use steam cleaning product to clean your dishwasher. The manufacturer will not be liable for possible damages or consequences.
 CAUTION
Never use harsh chemicals to clean your dishwasher. Some chloride-containing cleaning products can damage your dishwasher and may present health hazards!
•Use this dishwasher only for its intended function, which is the washing of household dishware and kitchenware.
•This dishwasher is provided with a manual set which includes Installation Instructions and
Use and Care Manual. Read and understand all instructions before using the dishwasher.
•Use only detergents or wetting agents recommended for use in a dishwasher, and keep them out of the reach of childen.
•When loading items to be washed:
-Locate sharp items so that they are not likely to damage the door seal.
-Load knives and other sharp utensils with their HANDLES UP to reduce the risk of cut-type injuries.
•Do not wash plastic items unless they are marked “dishwasher safe” or the equivalent.
For plastic items not so marked, check the manufacturer’s recommendations.
•Do not operate your dishwasher unless all enclosure panels are in place.
•Do not tamper with or override controls and interlocks.
•Do not abuse, sit on, or stand on the door or dish racks of the dishwasher.
•To reduce the risk of injury, do not allow children to play in or on the dishwasher.
•Under certain conditions, hydrogen gas may be produced in a hot water system that has not been used for two weeks or more.
Hydrogen gas is explosive. Before using a dishwasher that is connected to a hot water system that has been unused for two weeks or longer, turn on all hot water faucets and let the water flow from each for several minutes. This will release any accumulated hydrogen gas. As the gas is explosive, do not smoke or use an open flame during this time.
•Remove the door to the washing compartment when removing an old dishwasher from service or discarding.
•To avoid floor damage and possible mold growth, do not allow wet areas to remain around or under the dishwasher.
•Protect your dishwasher from the elements. Protect against freezing to avoid possible damage to the fill valve. Damage caused by freezing is not covered by the warranty.
 WARNING
Electrical shock could result if the electrical supply for the dishwasher covered in this manual is incorrectly installed or if the dishwasher has been improperly grounded. Do not use the dishwasher covered in this manual if you are not certain the electrical supply has been correctly installed or the dishwasher has been properly grounded.
GROUNDING INSTRUCTIONS
This appliance must be grounded to a metal, permanent wiring system, or an equipment grounding conductor must be run with the circuit conductors and connected to the equipment grounding terminal or lead on the dishwasher. See the Installation Instructions included with this dishwasher for more information on electrical requirements.
SAVE THESE INSTRUCTIONS!
2

Dishwasher Components
Door Gasket |
Vent |
|
|
||
Top Rack |
|
|
Top Rack |
|
|
Spray Arm |
|
|
Bottom Rack |
Filter System |
|
Spray Arm |
||
(in dishwasher |
||
|
||
|
floor) |
|
Bottom Rack |
|
|
Detergent/ |
Silverware Basket |
|
|
||
Rinse Agent |
|
|
Dispenser |
|
|
|
Model/Serial Number Label |
Dishwasher Features
AVS™ Noise Reduction System: A two-pump motor system, the Suspension Motor™, and triple insulation make this dishwasher one of the quietest in North America.
Stainless Steel TALLTUB™: A rust-free, hygienic interior surface with a lifetime warranty.
Nylon Coated Racks: Eliminate cuts and nicks, and have a five-year warranty.
Height Adjustable Racks: Dishwasher features manual height adjustability.
Top Rack Flip Tines: Tines that fold down to allow loading versatility.
Bottom Rack Flip Tines (SHE46C/SHE56C only):
Tines that fold down to improve loading versatility.
OPTIDRY™: Senses when the unit is low on rinse agent and automatically adjusts the drying performance.
Flow-Through Heater™: Heats water to a temperature of up to 161°F.
Condensation Drying: A high temperature final rinse, a low temperature stainless steel tub, and the sheeting action of a rinse agent result in drying that is hygienic, energy efficient, and economical.
Additional Drying Heat: Raises rinse water temperature and increases drying time resulting in better drying.
SENSOTRONIC™: Checks water condition and decides whether a second fresh water fill is necessary.
Filter System: Three filters ensure distribution of clean water and protect the main pump and the drain pump from foreign material.
Digital Countdown Display: A digital readout that counts down the time remaining in the cycle.
Refill Rinse Agent Indicator Light: An LED indicator light will illuminate to alert you when more rinse agent is required.
Sanitized Indicator Light: An LED indicator light will illuminate to alert you that your dishes are sanitized to the standards of the National Sanitation Foundation.
Auto Wash: The sensors determine the soil load and automatically adjust the cycle to clean your dishes while conserving energy (not included on SHE44C).
Delay Start (SHE46C/SHE56C only): Allows you to delay the start of the dishwasher up to 19 hours.
“Top Rack Only™” Cycle (SHE46C only): Saves energy, water, and detergent by washing loads small enough to fill only the top rack.
Water Shut-Off: A safety feature that stops the flow of incoming water, if water is detected in the base of the dishwasher.
3
Dishware Materials
NOTE: Before using your dishwasher for the first time, check the information in this section. Some items are not dishwasher safe and should be hand-washed; others require special loading. Contact the item’s manufacturer if you are unsure about the item’s dishwasher suitability.
Recommended
Aluminum: Colored anodized aluminum may fade over time. Minerals in your water may cause the aluminum to darken or spot. This can usually be removed by using a soap-filled steel wool pad.
China, Crystal, Stoneware: Some hand-painted pieces may discolor, fade, or spot. Hand-wash these pieces. Position fragile glassware so that it will not topple over or
contact other pieces during the wash cycle.
Glass: Milk glass may yellow.
Non-Stick Coatings: Apply a light coating of vegetable oil to non-stick surfaces after drying.
Plastics: Make sure the piece is dishwasher safe.
Stainless Steel, Sterling Silver, and Silver Plate: Place these pieces so that they do not contact dissimilar metals.
Not Recommended
Acrylic: Crazing (small cracks throughout the acrylic) may occur.
Adhesive-Joined Pieces: Adhesives that join materials such as plastic, wood, bone, steel copper, tin, etc. may loosen.
Bone-Handled Utensils: Handles may separate.
Iron: Iron will rust. Hand-wash and dry immediately.
Non-Dishware Items: Your dishwasher is intended for use in cleaning ONLY standard household dishware and kitchenware.
Pewter, Brass, Bronze: Pewter will tarnish. Hand-wash and dry immediately.
Tin: Tin will rust. Hand-wash and dry immediately.
Wood: Wooden bowls, wooden utensils, and wood-handled utensils can crack, warp, and lose their finish.
Preparing and Loading
the Dishware
Dishware Preparation
Do not pre-wash items having loosely-attached soiling.
Remove large food particles, bones, seeds, toothpicks, and excessive grease.
Items having burned-on, baked-on or starchy soils may require pre-treatment.
Loading the Dishwasher
To avoid dishwasher damage, do not load the dishwasher with objects such as paper products, plastic bags, packing materials, or anything other than normal dishware and kitchenware. Do not load the dishwasher with anything other than dishwasher-safe dishware and kitchenware.
Check the Materials section of this manual if you are unsure about an item’s dishwasher suitability.
Load only dishwasher-safe items into the dishwasher.
Load dishes in the dishwasher racks so that the insides of bowls, pots, and pans are facing the spray arms. Avoid nesting and contact points between dishes.
Separate items of dissimilar metals.
4

Preparing and Loading the Dishware (continued)
Loading the Top Rack
Figures 1, 2, 3, 4 and 5 show typical mixed loads for the top rack.
Figure 1 |
Figure 4 |
12 place setting (SHE46C/SHE56C)
Figure 2
Figure 5
Figure 3
12 place setting (SHE44C)
5

Preparing and Loading the Dishware (continued)
Top Rack Accessories
Top Rack Flip Tines
Flip Tines fold down to make loading the racks easier in
some instances.
Grasp the tines as shown in Figure 6 and fold the tines downward.
When the top rack is loaded,
push it into the dishwasher.
NOTE: When pushing the top rack into the dishwasher, push it until it stops against the back of the tub so the top rack spray arm will connect to the water supply.
Top Rack Height Adjustment
Remove the empty upper rack by pulling it out of the dishwasher to the point that it can be lifted upward, as shown in Figure 7.
Pull the rack outward and up until the rollers are completely free of the roller guides.
Re-insert the rack with the other set of rollers on the roller guides, as shown in Figure 8.
Figure 7
Top Rack Only™ Cycle (SHE46C only)
This cycle allows you to save energy, water, and detergent by washing loads small enough to fill only the upper rack.
NOTE: The Top Rack Only™ cycle does not reduce wash time.
To use the Top Rack Only™ cycle:
1.Load the top rack.
2.Press the On/Off button.
3.Press the button for the desired wash cycle.
4.Press the Top Rack Only button.
Loading the Bottom Rack
Place large items in the bottom rack. Load pots and pans
upside-down. Figures 9, 10, 11, 12, and 13
show typical mixed loads for the bottom rack.
Figure 10
Figure 8
6

Preparing and Loading the Dishware (continued)
Figure 11
Figure 12
12 place setting (SHE46C/SHE56C)
Figure 13
12 place setting (SHE44C)
Bottom Rack Accessories
Flip Tines (SHE46C/SHE56C only)
Flip Tines fold down to make loading the racks easier in
some instances.
Grasp the tines as shown in Figure 14 and fold the tines downward.
When the bottom rack is loaded, push it into the dishwasher.
Loading Extra Tall Items
If an item is too tall to be placed into the bottom rack even with the top rack in the raised position, remove the empty top rack by pulling it out of the dishwasher until it stops rolling.
Pull the front of the rack upward and outward until the rollers
are completely free of the roller guides. Set the top rack aside.
Push the roller guides back into the dishwasher.
Insert the Extra Tall Item Sprinkler
into the top rack spray outlet and turn the sprinkler clockwise to lock it into position as shown in Figure 15.
NOTE: Keep the vent on the tub’s right side clear by placing tall items such as plastic cutting boards and tall baking sheets on the bottom rack's left side, center, or back.
7

Preparing and Loading the Dishware (continued)
Place your extra tall item(s) in the bottom rack as shown in Figure 16.
Do not block vent.
Figure 16
To avoid dishwasher damage, do not reinstall the top rack without removing the extra tall item sprinkler. Do not reinstall the top rack with the sprinkler installed.
To remove the sprinkler and return the dishwasher to its normal condition:
1.Turn the sprinkler counterclockwise and remove it.
2.Retrieve the top rack.
3.Tilt the top rack upwards and position the top rack rollers onto the roller guides.
4.Continue pushing the top rack until the rollers are on the guide.
5.Push the top rack into the dishwasher.
Loading the Silverware Basket
 CAUTION
The sharp points and edges of knives and other sharp utensils can cause serious injuries. Load knives and other sharp utensils with sharp points and edges down. Do not allow children to handle or play near knives and sharp utensils.
Keep children away from knives and other sharp utensils.
NOTE: The silverware basket tops can be folded up to accommodate large or oddly-shaped items.
With the silverware basket tops down, load the silverware basket following the patterns suggested in Figures 17 and 18 (depending on model). Place knives with their handles up, and forks and spoons with their handles down.
If large or oddly-shaped items are to be loaded into the silverware basket with the tops up, load the items so that they do not nest together. Load knives and sharp utensils with their handles up.
The Standard Silverware Basket (SHE44C02 only)
Figure 17 shows a typical 12 place setting load pattern for this basket.
Figure 17
4 |
4 |
4 |
4 |
4 |
4 |
5 |
|
3 |
3 |
|
2 |
5 |
3 |
3 |
3 |
3 |
2 |
5 |
1 |
1 |
|
|
2 |
5 |
1 |
1 |
|
|
2 |
5 |
|
1 |
|
|
2 |
5 |
|
1 |
|
|
2 |
2 |
|
|
1 |
1 |
5 |
2 |
|
|
1 |
1 |
5 |
2 |
|
|
1 |
|
5 |
2 |
|
|
1 |
|
5 |
2 |
|
3 |
|
3 |
5 |
2 |
3 |
3 |
3 |
3 |
5 |
4 |
4 |
4 |
4 |
4 |
4 |
12 place setting (SHE44C02)
8
Preparing and Loading the Dishware (continued)
The Flexible Silverware Basket (SHE46C/SHE56C only)
This basket is designed for maximum versatility. The basket splits along its length, resulting in two halves that may be placed in a variety of positions in the lower rack, greatly increasing the lower rack’s loading versatility.
To split the Flexible Silverware Basket:
1.Grasp the basket as shown in Figure 19A, and slide the two halves in opposite directions, as shown in Figure 19A.
2.Pull the two halves apart, as shown in Figure 19B.
Figure 18
1 |
2 |
3 |
4 |
5 |
6 |
7 |
5 |
4 |
3 |
2 |
1 |
1 |
2 |
3 |
4 |
5 |
|
5 |
4 |
3 |
2 |
1 |
1 |
2 |
3 |
4 |
5 |
|
2 |
1 |
1 |
2 |
|||||||
|
|
|
|
|
|
|||||
5 |
4 |
3 |
6 |
|
|
|
3 |
4 |
5 |
|
5 |
4 |
3 |
6 |
|
|
7 |
3 |
4 |
5 |
|
5 |
4 |
3 |
2 |
1 |
1 |
2 |
3 |
4 |
5 |
|
2 |
1 |
1 |
2 |
|||||||
|
|
|
|
|
|
|||||
5 |
4 |
3 |
2 |
1 |
1 |
2 |
3 |
4 |
5 |
Figure 19
A
Some suggestions for placing the two halves in the lower rack are shown in Figure 20.
Figure 20
B
9
Adding Detergent and Rinse Agent
Detergent
To avoid dishwasher damage, do not use hand dishwashing products in your dishwasher.
Use only detergent specifically designed for dishwashers. For best results, use fresh powdered dishwashing detergent.
This dishwasher uses less water so you need to use less detergent. With soft water, 1 tablespoon (15ml) of detergent will clean most loads. The detergent dispenser cup has lines that measure detergent to 1 tablespoon (15ml) and 1.75 tablespoons (25ml). 3.5 tablespoons (45ml) of detergent will completely fill the detergent dispenser cup.
To avoid dishware damage, do not use too much detergent if your water supply is soft. Using too much detergent in soft water may cause etching in glassware.
NOTE: If you do not know the hardness of your water supply, use 15ml of detergent. Increase the amount of detergent, if necessary, to the least amount required to get your dishware and kitchenware clean.
Use the measuring lines in the detergent dispenser cup as a guide to measure the amount of detergent recommended in Table 1.
Table 1 - Recommended Detergent Amount
|
|
|
Water Type |
|
|
|
|
|
|
|
|
Wash |
Unit |
Hard |
Medium |
|
Soft |
Cycle |
|
|
|
|
|
|
|
|
|
|
|
Power |
ml |
45 |
45 |
|
25-45 |
|
|
|
|
|
|
Scrub |
|
|
|
|
|
|
|
|
|
|
|
Plus |
Tbsp |
3.5 |
3.5 |
|
1.75 to 3.5 |
|
|
|
|
|
|
Regular |
ml |
25-45 |
25 |
|
15-25 |
|
|
|
|
|
|
Wash |
|
|
|
|
|
Tbsp |
1.75 to 3.5 |
1.75 |
|
1 to 1.75 |
|
|
|
||||
|
|
|
|
|
|
Delicate/ |
ml |
25 |
15-25 |
|
15 |
|
|
|
|
|
|
Econo |
|
|
|
|
|
Tbsp |
1.75 |
1 to 1.75 |
|
1 |
|
|
|
||||
|
|
|
|
|
|
Rinse |
|
None |
None |
|
None |
& |
|
|
|||
Hold |
|
|
|
|
|
|
|
|
|
|
|
Rinse Agents
To achieve proper drying, always use a liquid rinse agent, even if your detergent contains a rinse agent or drying additive.
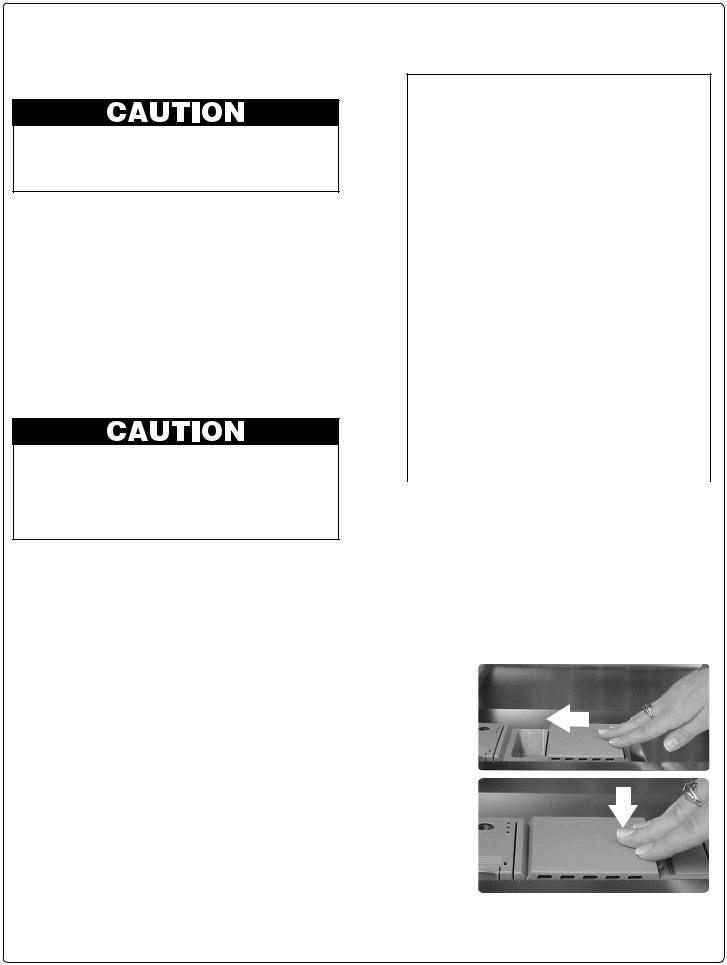
Filling the Detergent Dispenser
Fill the dispenser cup as recommend in Table 1. Slide the
detergent |
Figure 21 |
|
|
dispenser |
A |
cover in the |
|
direction |
|
shown in |
|
Figure 21A |
|
and press it |
|
down firmly |
|
as shown in |
B |
Figure 21B |
|
so that the |
|
cover |
|
snaps shut. |
|
10

Adding Detergent and Rinse Agent (continued)
Opening the Detergent Dispenser
Cover
NOTE: To open the detergent dispenser cover, press the blue release in the direction shown in Figure 22. Pressing down on the release tab will not open the cover.
Press
the blue |
Figure 22 |
release |
|
tab in |
|
the |
|
direction |
|
shown |
|
by the |
|
arrow in |
|
Figure |
|
22. |
|
The cover will slide open to the right.
Filling the Rinse Agent Dispenser
Return the rinse agent dispenser cover to its shut position and press it firmly so that the cover snaps shut.
NOTE: Figure 24B represents a completely empty rinse agent reservoir.
Refill the rinse agent dispenser when the rinse agent reservoir level indicator as shown in Figure 24B begins to show a silver background with black lines or when the Refill Rinse Agent indicator comes on.
NOTE: After filling the rinse agent dispenser, the Refill Rinse Agent Indicator will go out in a few minutes after the dishwasher door is shut.
Rinse Agent Dispenser Regulator
The amount of rinse agent dispensed can be regulated to control spotting and streaking. The Rinse Agent Dispenser Regulator as shown in Figure 25 leaves our factory set at 4.
Figure 25
Open the rinse agent dispenser by pressing the star on the cover with your index finger while lifting the tab with your thumb as shown in Figure 23.
Add liquid rinse agent to the dispenser as shown in Figure 24A until the rinse agent reservoir is full. Wipe up any excess rinse agent that puddles when the dispenser reservoir is full.
Figure 24
B
To adjust the amount of rinse agent dispensed:
1.Open the rinse agent dispenser cover.
2.If your dishes are streaked after washing, turn the regulator to a lower number.
3.If your dishes are spotted after washing, turn the regulator to a higher number.
11

Operating the Dishwasher
Selecting the Proper Wash Cycle
Items with baked-on or hard, dried-on soiling will require either Power Scrub Plus or possibly soaking and hand-scouring.
The Regular Wash cycle will thoroughly clean large loads having loosely attached normal soiling.
The Rinse and Hold cycle will allow you to keep a small load in your dishwasher until you have enough items for a full load.
To avoid damage to delicate or heirloom items do not wash them in your dishwasher.
For delicate or heirloom dishware and silverware, or other special items, select Delicate/Econo after referring to the Materials section of this manual. Hand-washing may be the best treatment of such items.
More information on dishwasher cycles is in the Wash Cycle Information section of this manual.
Starting the Dishwasher
Shut the dishwasher door.
Press the On/Off button.
Press the button for the desired wash cycle.
The dishwasher will start automatically and continue operating until the end of the selected cycle.
Once you start the dishwasher, leave the dishwasher door shut until it finishes the cycle.
Interrupting a Cycle
NOTE: Should you need to interrupt a cycle (to add or remove an item, to add detergent, etc.), it is best to do so within the first 30 minutes of the cycle.
Press the On/Off button.
 WARNING
You could be seriously scalded if you open the dishwasher door quickly during a wash or rinse cycle. Do not fully open the dishwasher door for at least 10 seconds or until water noises stop.
Wait at least ten seconds or until water noises stop before opening the dishwasher door.
To resume the cycle, press the On/Off button and shut the dishwasher door.
Canceling or Changing a Cycle
To cancel or change a cycle, press and hold for three seconds the two buttons labeled “Cancel Drain” as shown in Figure 26.
Figure 26

 Cancel Drain

Wait approximately one minute, then press the On/Off button.
You may now begin a new cycle.
12

Operating the Dishwasher
Dishware Drying
At the end of the cycle the dishwasher will stop and a period of condensation drying will follow. After 12 - 15 minutes of drying:
•the cycle countdown display will read “0”.
•the “Sanitized” light may appear (except in the Rinse and Hold cycle). See section on Sanitization for more information.
(continued)
“Sanitized” Light
When the “Sanitized” light appears, it means that the dishware and kitchenware that was just washed has been sanitized according to the requirements of the National Sanitation Foundation (NSF). For more information on NSF certification, go to the Wash Cycle Information section of this manual.
NOTE: If your household water supply is too hot, your dishwasher’s heating time may be reduced and the “Sanitized” light may not illuminate. Your Bosch Dishwasher Installation Manual has information on the recommended temperature for your household hot water supply.
NOTE: To accelerate and enhance drying, open the dishwasher door, pull the top rack a few inches out of the dishwasher, and prop the dishwasher door against the top rack.
Unloading the Dishwasher
Unload the bottom rack first.
Unload the silverware basket(s). They are easily removed for unloading.
Unload the top rack.
If the Extra Tall Item Sprinkler was installed, return the dishwasher to its normal condition (see the Loading Extra Tall Items instructions in the “Loading the Dishwasher” section of this manual).
OPTIDRY™
This feature senses when the unit is low on rinse agent and automatically adjusts the drying performance.
Additional Drying Heat
With this option you can raise the temperature of the rinse water and increase the drying time, which will result in improved drying.
Press and hold the left “Cancel Drain” button, then press and hold the On/Off button.
When the LED display shows a “0” or a “1”, release both buttons.
To enable the Additional Drying Heat, press the left “Cancel Drain” button until the LED display shows a “1”.
To disable the Additional Drying Heat, press the left “Cancel Drain” button until the LED display shows a “0”.
Press the On/Off button to save the setting.
13

Care and Maintenance
Maintenance Tasks
Certain areas of your Bosch dishwasher require occasional maintenance. The maintenance tasks are easy to do and will ensure continued superior performance from your Bosch dishwasher. These tasks are:
•Winterizing Your Bosch Dishwasher
•Wiping up Spills and Splash-out
•Clean the Stainless Steel Inner Door and Tub
•Check/Clean the Spray Arm Nozzles
•Check/Clean the Filter System
•Clean the Exterior Door Panel
•Clean the Door Gasket
Winterizing Your Bosch
Dishwasher
If your dishwasher will be unused for an extended period of time in a location that experiences freezing temperatures (e.g., in a holiday home or through a vacation period), have your dishwasher winterized by an authorized service center.
To avoid dishwasher damage, do not allow water to remain in your dishwasher systems through extended periods of freezing temperatures. Freezing temperatures can damage your dishwasher.
Wiping Up Spills and Splash-out
Water may occasionally splash out of your Bosch dishwasher, especially if you interrupt a cycle or open the dishwasher door during a cycle. To avoid floor damage and possible mold growth, do not allow wet areas to remain around or under the dishwasher.
Check/Clean the Stainless Steel Inner Door and Tub
Clean the outer edges of the inside door panel regularly to remove debris that might collect there from normal loading.
If spots begin to appear on the stainless steel tub or inner door, make sure the rinse agent reservoir is full.
Check/Clean the Spray Arm Nozzles
Occasionally check the spray arms to ensure that the spray arm nozzles (holes) are unobstructed. You must remove the spray arms to check them for obstruction.
To remove the top spray arm:
1. Remove the |
Figure 27 |
empty top |
A |
rack from |
|
the |
|
dishwasher. |
|
2.Turn the rack upside-
down. The |
|
top spray |
B |
arm is held |
|
in position |
|
by a locking |
|
nut as |
|
shown in |
|
Figure 27A. |
|
Turn the locking nut
counter-clockwise
1/8 turn and remove it, as shown in Figure 27B to release the spray arm.
3. Remove |
Figure 28 |
|
the spray |
||
|
||
arm as |
|
|
shown in |
|
|
Figure 28. |
|
4.Look for obstruction in the spray nozzles.
5.If the spray nozzles need cleaning, flush them under running water.
14

Care and Maintenance (continued)
To reinstall the top spray arm:
1.Return the top spray arm to its installed position.
2.Return the locking nut to its installed position and turn it 1/8 turn clockwise.
3.Return the top rack to the top rack roller guides.
To remove the bottom spray arm:
1.Remove the empty bottom rack from the dishwasher tub.
2.Grasp and lift the bottom spray arm as shown in Figure 29.
Figure 29
3.Look for obstruction in the spray nozzles.
4.If the spray nozzles need cleaning, flush them under running water.
To reinstall the bottom spray arm:
1.Return the bottom spray arm to its installed position and press it so that it snaps into place.
2.Return the bottom rack to its installed position.
Check/Clean the Filter System
Your Bosch dishwashers has a filter system that is made up of a Large Object Trap/Cylinder Filter assembly and a Fine Filter. The filter system is located on the dishwasher floor and is easily accessible.
During normal use the filter system is selfcleaning, but you should occasionally inspect it for foreign objects and clean it when necessary.
To remove the Large Object Trap/Cylinder Filter Assembly:
1.Remove the bottom rack.
2.Grasp the assembly as shown in Figure 30, and turn it counterclockwise 1/4 turn.
Figure 30
3.Lift out the assembly as shown in Figure 31.
Figure 31
Large
Object Trap
Cylinder
Filter
Assembly
To avoid injury, do not reach into the large object trap with your fingers. The large object trap could contain sharp objects.
4.Carefully examine the assembly. If you find debris in the Large Object Trap, turn it upside-down and gently tap it on a surface such as a countertop to dislodge and remove the debris. Flush the Cylinder Filter clean by holding it under running water.
15

Care and Maintenance (continued)
To Remove the Fine Filter:
Lift the Fine Filter from the dishwasher floor as shown in Figure 32 and flush it clean by holding it under running water.
Figure 32
Fine
Filter
To reinstall the filter system:
1.Return the Fine Filter to its installed position.
2.Place the Large Object Trap/Fine Filter Assembly into its installed position in the dishwasher floor.
3.Turn the ring handle clockwise 1/4 turn until it is locked. The arrow on the ring handle and the arrow on the Fine Filter should point to each other, as shown by the circle in Figure 33.
Figure 33
To avoid possible dishwasher damage, do not use harsh chemicals, abrasive cleaners, scouring pads (metal or plastic), or abrasive cloths/paper towels to clean your dishwasher’s exterior door panel. Your dishwasher’s exterior door panel can be damaged by doing so.
Clean the Exterior Door Panel
Colored Doors
Use only a soft cloth that is lightly dampened with soapy water.
Stainless Steel Doors
Use a soft cloth with a non-abrasive cleaner (preferably a liquid spray) made for cleaning stainless steel. For the best results, apply the stainless steel cleaner to the cloth, then wipe the surface.
Clean the Door Gasket
Regularly clean the door gasket with a damp cloth to remove food particles and other debris.
4.Gently pull the ring handle to ensure that the assembly is locked into place.
16

Self Help
Dishwashers may occasionally exhibit problems that are unrelated to a malfunction of the dishwasher itself. The following information may help you with a dishwasher problem without your having to call a repair person.
Dishes do not dry
The rinse agent dispenser may be empty. Check the rinse-aid dispenser and refill it if necessary. Dishware drying can be accelerated and enhanced by opening the dishwasher door slightly and propping it open with the top rack.
Indicator light(s) do not come on
A fuse may have blown or a circuit breaker tripped. Check the fuse or circuit breaker at your fuse box/breaker box and replace the fuse or reset the breaker if necessary.
Dishwasher does not start
The dishwasher door may not be properly shut. Make certain the dishwasher door is shut and latched.
Dishwasher runs a long time
If the dishwasher completes the cycle, but the run time seems exceptionally long, it may be due to cold incoming water. Before starting the dishwasher, open the hot water faucet at the sink nearest the dishwasher. Run the water until it runs hot, then turn off the water and start the dishwasher.
Machine cycle does not advance to rinse
NOTE: The Installation Manual that came with your Bosch dishwasher will help you with the following instructions. The water supply line may be shut off. Check the water supply valve and open it if it’s shut.
White spots left on dishes
More rinse agent is needed. Go to the Adding Detergent and Rinse Agent section of this manual for instructions on increasing the amount of rinse agent dispensed.
Water not pumped from dishwasher
Make certain the drain hose isn’t kinked, clogged, or improperly installed. Make certain a portion of the drain hose is at least 20 inches above the dishwasher’s enclosure floor (see the Installation Manual). Filters may be clogged. Make certain the filter system isn’t clogged (see the Care and Maintenance section of this manual). The kitchen sink drain may be clogged; you may need a plumber rather than a serviceman for the dishwasher. If an air gap is installed at sink, it may be clogged.
Detergent dispenser cover will not shut
You may not be correctly shutting the detergent dispenser cover, or a cycle was not finished and should be cancelled. Go to the Adding Detergent and Rinse Agent section of this manual for instructions on shutting the detergent dispenser cover. Go to the Operating the Dishwasher section of this manual for instructions on canceling a cycle.
Streaks on glassware
Too much rinse agent is being dispensed. Go to the Adding Detergent and Rinse Agent section of this manual for instructions on decreasing the amount of rinse agent dispensed.
Rattling noises
Utensils may not be properly arranged.
Suds in dishwasher
You may have used the wrong type of dishwashing detergent. Use only automatic dishwasher detergents.
Unsatisfactory washing results
•Incorrect amount of detergent.
•Utensils incorrectly arranged or rack overloaded.
•Spray arm rotation blocked by utensils.
•Spray arm nozzles need cleaning.
•Filters not properly fitted into position.
•Unsuitable cycle selected.
17

Wash Cycle Information
NOTE: Cycle duration and water consumption depend largely upon household water temperature and wash load, factors over which Bosch has no control. Therefore, the times and quantities in this charts are approximate.
*Not included on model SHE44C0. **Not included on model SHE46C0.
Note: If the unit is out of rinse agent the OPTIDRYTM feature will automatically extend the cycle time by approximately 10 minutes.
Note: If Additional Drying Heat is selected the cycle will be extended by approximately 20 minutes.
THE NSF SYMBOL
A dishwasher or a dishwasher cycle that has the NSF symbol has been certified by the NSF International to meet very strict requirements of wash time and water temperature to ensure dishware and kitchenware sanitization. These requirements are explained in the document NSF/ANSI 184, Residential Dishwashers. More information on NSF Certification is available at the NSF website, http://www.nsfconsumer.org/home/ appliances.asp.
Your Bosch dishwasher is NSF certified. The Bosch dishwasher cycles that are NSF certified are shown in the chart above. When these cycles are complete, the “Sanitized” indicator on your dishwasher control panel will illuminate.
NOTE: If your household water supply is too hot, your dishwasher’s heating time may be reduced and the “Sanitized” light or symbol may not illuminate. Your Bosch Dishwasher Installation Manual has information on the recommended temperature for your household hot water supply.
18
 Loading...