


en Instructions for Use
5600 049 803 (8205)
Internet:
http://www.
bosch–hausgeraete.de
en |
Index |
|
|
|
Safety instructions . . . . . . . . . |
4 |
Detergents . . . . . . . . . . . . . . . |
13 |
|
Getting to know your appliance |
6 |
Programme overview . . . . . . |
15 |
|
Water softener . . . . . . . . . . . . |
6 |
Washing dishes . . . . . . . . . . . |
16 |
|
Filling the special salt container |
7 |
Maintenance and care . . . . . . |
19 |
|
Filling the rinse-aid container |
8 |
Fault finding . . . . . . . . . . . . . . |
21 |
|
Unsuitable dishes . . . . . . . . . |
9 |
Customer Service . . . . . . . . . |
23 |
|
Arranging crockery, glasses, |
|
Information . . . . . . . . . . . . . . . |
24 |
|
etc. in the dishwasher . . . . . . |
10 |
Installation . . . . . . . . . . . . . . . . |
25 |
|

en
Safety instructions
Delivery
Immediately check the packaging and dishwasher for any damage which may have been caused in transit. Do not use a damaged appliance, but consult your supplier.
Please dispose of packaging material properly.
The corrugated cardboard consists mainly of waste paper.
The polystyrene moulded parts have been foamed without any CFCs. The polyethylene film (PE) consists partly of secondary raw material.
The wooden frames (if fitted) are made of residual wood and are untreated. The hoops (if fitted) consist of polypropylene (PP).
Installation
Install and connect the appliance according to the installation and assembly instructions.
The dishwasher must NOT be connected to the power supply during installation.
Ensure that the protective conductor system of the domestic electricity supply has been installed correctly. Electrical connection conditions must correspond with the specifications on the rating plate of the dishwasher. Built-under and built-in appliances should always be installed under a continuous work surface which is attached to the adjacent cupboards, in order to ensure that the appliance is entirely stable.
After the appliance has been installed, the mains plug should still be easily accessible.
Not on all models:
The plastic housing on the water input contains an electrically operated valve. The connecting wires are inside the inlet hose. Do not cut through this hose and do not immerse the plastic housing in water.
Warning
For safety reasons, if the appliance is not fitted in a recess, thereby making a side wall accessible, the door hinge area should be covered at the side.
(Risk of injury)
Covers are available as optional accessories from customer services or specialist stores.
4

During normal use
Warning
Knives and other utensils with sharp points must be loaded in the basket with their points down or in a horizontal position.
Use the dishwasher solely in a domestic environment and for its designated purpose: washing household tableware and other utensils. Do not place any heavy objects or stand on the door when it is open. The appliance could tip forward.
The water inside the dishwasher is not suitable for drinking.
Do not use solvents of any kind inside your dishwasher. They could cause an explosion.
Open the door very carefully if the dishwasher is operating. There is a risk of water squirting out.
If your family includes children
Do not permit small children to play with or operate the dishwasher.
Keep children away from detergents and rinse-aids.
Keep small children away from the open door of the dishwasher. There could still be some detergent left inside.
If a fault occurs
Repairs or other work on the dishwasher should only be carried out by a qualified specialist.
The dishwasher must be disconnected from the electricity supply before any repairs or other work are started. Pull the mains plug out of the wall socket or switch off at the fuse box. Grasp the plug to remove it from the socket; do not tug on the cable. Turn the water off at the tap.
en
When disposing of old appliances
Appliances that have reached the end of their service life should be rendered inoperable in order to exclude the possibility of subsequent accidents. Pull the mains plug out of the wall socket, cut through the connecting cable and disable the door lock.
Take the appliance to a designated waste disposal centre.
Warning
Children could get locked in the appliance (risk of suffocation) or get stuck in other positions.
Therefore: Remove the mains plug, cut the mains wire and set aside. Damage the door lock so that the door can no longer be closed.
5

en
Getting to know your appliance
Diagrams of the control panel and the interior of the appliance can be found in the envelope at the front.
Individual positions are referred to in the text.
Control panel
1Main switch
2Door opener
3Time delay
4Digital display/
Programme progress indicator
5Salt refill indicator
6Rinse-aid refill indicator
7Programme buttons
Appliance interior
20Upper basket with 2-tiered cup rack
21Additional cutlery basket for the top basket *
22Upper spray arm
23Lower spray arm
24Container for special salt with level indicator *
25Filters
26Cutlery basket
27Lower basket
28Locking mechanism
29Container for rinse-aid, with level indicator
30Detergent compartment
31Nameplate
*not on all models
You will need to purchase the following before using the dishwasher for the first time:
–special salt for use in dishwashers
–detergent
–rinse-aid
Only use products, which are suitable for dishwashers.
6
Water softener
In order to rinse dishes and glasses satisfactorily, the dishwasher requires soft water, i.e. containing little or no lime, otherwise water stains will be left behind on crockery and glasses, etc.
If the tap water exceeds a certain level of hardness, it must be softened, i.e. decalcified, so that it can be used in the dishwasher.
This is achieved by adding a special salt to the water softener inside the dishwasher.
The water softener, that is the required amount of salt, is set up according to how hard the tap water is.
Setting up the water softener
(see introduction)
Filling the special salt
container
How the salt works
While washing is taking place, salt is automatically rinsed out of the salt container into the water softener where it dissolves the lime in the water.
The dissolved lime is pumped out of the dishwasher. The water softening system is then ready for the next load.
This process of regeneration can only function when the salt is dissolved in water.
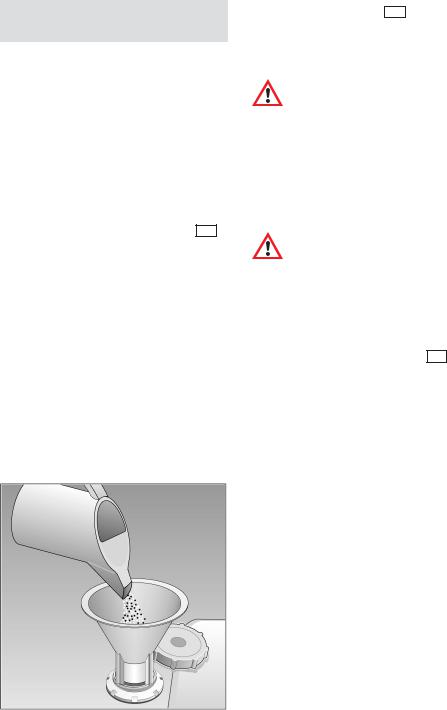
Unscrew the lid on the salt container 24 .
Before you use the dishwasher for the first time, pour approx. 1 litre of water into the salt container.
Use the enclosed salt filler.
Refill with salt (do not use edible salt) until the salt dispenser is full (max. 1.5 kg). When the salt dispenser is being refilled, water is displaced and drains away. Therefore always refill the salt dispenser immediately before switching on the dishwasher (to prevent corrosion). As a result, the overflowing salt solution will be immediately diluted and rinsed out. Then remove salt residue from the filler area and screw on the dispenser cover, ensuring that it is not fitted askew.
en
The LOW SALT indicator 5 on the front panel will light up initially but will extinguish again after a short period when the salt solution has become sufficiently concentrated.
Note
When the control is set to  , it is not necessary to fill up with salt as none will be consumed while the dishwasher is operating. The LOW SALT indicator is switched off. If the control is set between
  and
and  , then salt must be
added to the dispenser.
Do not pour detergent into the container for special salt. This would destroy the water softener.
Salt refill indicator
As soon as the salt refill indicator 5 is lit on the control panel, refill with salt immediately before the next rinse cycle.
7

en
Filling the rinse-aid
container
The purpose of a rinse-aid is to prevent the formation of water marks on tableware and utensils, and to ensure that glasses are clean and sparkling. The rinse-aid is consumed during the washing process.
Fold back the lid on the rinse-aid container 29 .
To open the lid, press the mark on the rinse-aid lid and simultaneously lift
the lid off the lug |
. |
Pour the rinse-aid into the filler hole until the level indicator turns dark. Close the lid, ensuring that you hear it snap closed.
Note |
Use only rinse aid for domestic dishwashers. Spilt rinse aid may result in excessive foam formation in the next rinse cycle. Therefore, remove any spilt rinse aid with a cloth.
Adjusting the amount of rinse-aid
The amount of rinse-aid added to the water can be varied by adjusting the stepless control. The rinse-aid control has been set to ”4” in the factory.
Do not alter the setting of the rinse-aid control unless streaks (turn knob towards ”–”) or water marks (turn knob towards ”+”) are left on the dishes.
29
rinse–aid control
Low rinse-aid indicator
As long as the rinse-aid refill indicator on the panel 6 (on applicable models) or dispenser 29 has not illuminated, there is sufficient rinse-aid in the dishwasher.
LOW RINSE-AID indicator
8

Unsuitable dishes
You should not clean the following items in your dishwasher:
Cutlery and dishes made of wood. They will leach out and become unsightly; the utilised adhesives are also not suitable for the dishwasher temperatures.
Delicate décor glasses, craft dishes and vases, special antique or irreplaceable dishes. These décor items are not dishwasher-safe.
Plastic parts, copper and tin dishes sensitive to hot water are not suitable either. Overglazed patterns, aluminium and silver parts tend to become discoloured and fade during the rinsing cycle. Even some types of glass (e.g. crystal glass objects) may become cloudy after many rinse cycles. Completely absorbent materials, such as sponges and cloths must not be cleaned in the dishwasher either.
Recommendation:
In future buy only dishes which are identified as dishwasher-safe.
Note
Dishes which are soiled with ash, wax, lubricating grease or ink must not be cleaned in the dishwasher.
en
Damage to glassware and other dishes
Possible causes:
type of glass or manufacturing process chemical composition of detergent water temperature and duration of dishwasher programme.
Suggested remedy:
Use glassware or porcelain dishes that have been marked ’dishwasher–proof’ by the manufacturer.
Use a mild detergent that is described as ’kind to dishes’. If necessary, seek further information from detergent manufacturers.
Select a programme with as low a temperature and as short a duration as possible.
To prevent damage, take glass and cutlery out of the dishwasher as soon as possible after the programme has ended.
9
en
Arranging crockery, glasses, etc. in the dishwasher
Loading the dishwasher
Scrape off any large amounts of left-over food. It is not necessary to rinse the dishes under running water.
Place objects in the dishwasher in such a way that
items such as cups, glasses, pots/pans, etc. are stood upside down,
curved items, or those with recesses, should be at a slant so that water can run off,
they are stacked securely and cannot tip over,
they do not prevent the spray arms from rotating while washing takes place.
Very small items should not be washed in the dishwasher as they could easily fall out of the baskets.
Removing the dishes
To prevent water dripping from the top basket onto the dishes in the lower basket, we recommend that you empty the lower basket first and then the top basket.
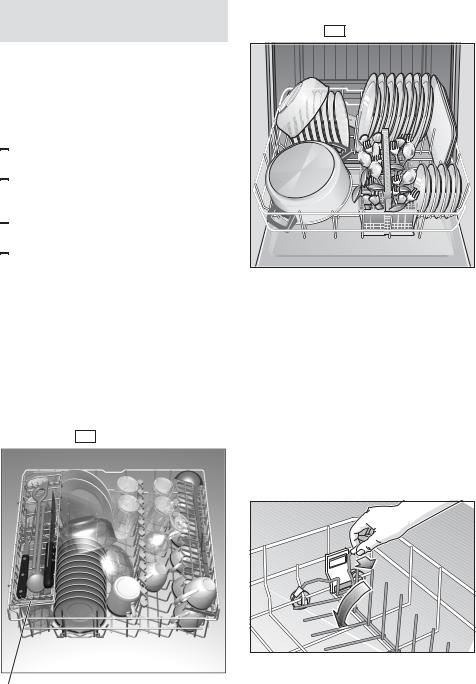
Cups and glasses
Upper basket 20
Pots and pans
Lower basket |
27 |
Cutlery |
|
Cutlery should always be inserted in random order with the handles pointing downwards (take care with knife blades!). This enables the jet of water to reach the individual items more easily.
To prevent the risk of injury, place long and pointed implements and knives on the shelf (some models) or knife shelf (available as an accessory).
Folding spikes *
* on applicable models
To improve stacking of pots and pans, the spikes can be folded down.
* on applicable models
10
 Loading...