


Rider’s Manual
R 1200 RT
BMW Motorrad

Welcome to BMW
We congratulate you on your choice of a motorcycle from BMW and welcome you to the community of BMW riders. Familiarise yourself with your new motorcycle so that you can ride it safely and confidently in all traffic situations. Please read this Rider’s Manual carefully before starting to use your new BMW motorcycle. It contains important information on how to operate the controls and how to make the best possible use of all your BMW’s technical features.
In addition, it contains information on maintenance and care to help you maintain your motorcycle’s reliability and safety, as well as its value.
If you have any questions concerning your motorcycle, your authorised BMW motorcycle dealer will gladly provide advice and assistance.
We hope you enjoy reading this Rider’s Manual and wish you many a pleasant, safe journey on your BMW motorcycle.
Best wishes,
BMW Motorrad
i
1 Introduction

i
2 Introduction
Table of contents
Use the index (b 159), to find a certain topic quickly.
Welcome to BMW ........... |
1 |
General information ......... |
4 |
Overview ........................ |
7 |
General view, left |
|
side ................................. |
9 |
General view, right |
|
side ............................... |
11 |
Underneath the seat ...... |
13 |
Handlebar fitting, |
|
left ................................. |
14 |
Handlebar fitting, |
|
right .............................. |
15 |
Instrument cluster ......... |
16 |
Headlight ....................... |
17 |
Status indicators .......... |
19 |
Multifunction display ...... |
20 |
Warning and telltale |
|
lights ............................. |
21 |
Warning indicators ........ |
21 |
ABS warnings ............. |
27 |
Operation ..................... |
33 |
Ignition switch and |
|
steering lock ................. |
34 |
Electronic immobiliser .. |
36 |
Hazard warning |
|
flashers ......................... |
37 |
Odometer and |
|
tripmeters ..................... |
37 |
Clock ............................ |
38 |
Display dimming ........... |
39 |
On-board |
|
computerOE .................. |
39 |
Cruise controlOE ........... |
42 |
Emergency off |
|
switch (kill switch) ......... |
45 |
Grip heatingOE .............. |
45 |
Seat heatingOE ............. |
46 |
Handlebar levers .......... |
47 |
Lights ........................... |
48 |
Turn indicators ............. |
50 |
Stowage |
|
compartment ................ |
51 |
Front and rear seats ..... |
52 |
Helmet holder ............... |
54 |
Mirrors .......................... |
55 |
Windscreen ................... |
55 |
Spring preload .............. |
55 |
Shock absorbers .......... |
56 |
Wheels .......................... |
57 |
Riding ........................... |
59 |
Safety instructions ........ |
60 |
Safety check ................. |
62 |
First time out ................. |
62 |
Before you start ............ |
63 |
Starting ......................... |
66 |
Riding ........................... |
69 |
Running in .................... |
69 |
Engine speed ................ |
70 |
Shifting gear ................. |
71 |
Placing motorcycle |
|
on its side stand ........... |
73 |
Removing motorcycle |
|
from side stand ............. |
75 |
Placing motorcycle on |
|
centre stand ................. |
77 |
Removing motorcycle |
|
from centre stand ......... |
79 |
Fuel ............................... |
79 |
Brake system ................ |
80 |

Accessories ................. |
85 |
General instructions |
..... 86 |
On-board sockets ........ |
86 |
Luggage system ........... |
89 |
Maintenance ................ |
95 |
Toolkit .......................... |
97 |
Engine oil ..................... |
98 |
Brakes .......................... |
99 |
Clutch ........................ |
103 |
Wheels ....................... |
103 |
Front-wheel stand ...... |
111 |
Bulbs .......................... |
112 |
Jump starting ............. |
118 |
Battery ....................... |
120 |
Splash guard .............. |
123 |
Care ............................ |
125 |
Cleaning and care |
.... 126 |
Laying up ................... |
128 |
Restoring to use ......... |
129 |
Technical data ............ |
131 |
Threaded fasteners ..... |
132 |
Tyre pressures .......... |
134 |
Engine ........................ |
135 |
Power transmission .... |
136 |
Frame and |
|
suspension ................. |
137 |
Wheels and tyres ........ |
139 |
Fuel and lubricants ..... |
140 |
Electrical system ......... |
143 |
Dimensions and |
|
weights ....................... |
145 |
Riding |
|
specifications ............. |
146 |
Service ........................ |
147 |
BMW Motorrad |
|
service ........................ |
148 |
Confirmation of |
|
maintenance work ...... |
151 |
Confirmations of |
|
service .......................... |
155 |
Index ........................... |
159 |
i
3 Introduction
i
4 Introduction
General information
About this Rider’s Manual
We have tried to make all the information in this Rider’s Manual easy to find. The quickest access to a particular topic or item is by consulting the detailed alphabetical index (b 159).
Chapter 1 of this Rider’s Manual will provide you with an initial overview of your motorcycle. When the time comes to sell your BMW, please remember to hand over this Rider’s Manual; it is an important part of your motorcycle.
Symbols and abbreviations
Indicates warnings that you must comply with for
reasons of your safety and the safety of others, and to protect your motorcycle against damage.
Special information on operating and inspecting
your motorcycle as well as maintenance and adjustment procedures.
cIndicates the end of an item of information.
•Instruction.
»Result of an activity.
(b 4) Reference to a page with more detailed information.
OE Optional extra
Your motorcycle was assembled complete with all the optional extras you ordered.
OA Optional accessory You can obtain optional accessories through your authorised BMW motorcycle dealer; optional accessories have to be retrofitted to the motorcycle.
EWS Electronic immobiliser
DWA Anti-theft alarm system
ABS Anti-lock braking system
Custom equipment
When you ordered your BMW motorcycle, you chose various items of custom equipment.
This Rider’s Manual describes optional extras (OE) offered by BMW and selected optional accessories (OA). This explains why the manual may also contain descriptions of equipment which you have not ordered. Please note, too, that your motorcycle might not be exactly as illustrated in this manual on account of countryspecific differences.
If your BMW was supplied with equipment not described in this Rider’s Manual, you will find these features described in separate manuals.
Technical data
All dimensions, weights and power ratings stated in the Rider’s Manual are quoted to the standards and comply with the tolerance requirements of the Deutsche Institut für Normung e. V. (DIN). Versions for individual countries may differ.
Currency
The high safety and quality standards of BMW motorcycles are maintained by constant development work on designs, equipment and accessories. Because of this, your motorcycle may differ from the information supplied in the Rider's Manual. Nor can errors and omissions be entirely ruled out. We hope you will appreciate that no
claims can be entertained on the basis of the data, illustrations or descriptions in this manual.
BMW Service
Advanced technology requires specially adapted methods of maintenance and repair.
If maintenance and repair work is performed inex-
pertly, it could result in consequential damage and thus constitute a safety risk. BMW recommends that you have the necessary work on your motorcycle performed either by an authorised BMW motorcycle dealer or by a workshop that operates to BMW specifications and employs suitably trained personnel.c
i
5 Introduction

i
6 Introduction
Your authorised BMW motorcycle dealer can provide information on the specified Service, Inspection and Annual Inspection work needed.
Have all maintenance and repair work carried out confirmed in the "Service" chapter (b 148) in this manual.
Authorised BMW motorcycle dealers are supplied with the latest technical information and have the necessary technical know-how. Consequently, we recommend that you contact your authorised BMW motorcycle dealer if you have any questions regarding your motorcycle.
Rider’s equipment
Do not ride without the correct clothing. Always wear:
–helmet
–motorcycling jacket and trousers
–gloves
–boots
This applies even to short journeys, and to every season of the year. Your authorised BMW motorcycle dealer will be glad to advise you on the correct clothing for every purpose.

General view, left side ................... |
9 |
General view, right side................ |
11 |
Underneath the seat .................... |
13 |
Handlebar fitting, left ................... |
14 |
Handlebar fitting, right ................. |
15 |
Instrument cluster ........................ |
16 |
Headlight ....................................... |
17 |
Overview |
|
1
7
Overview

1
8
Overview
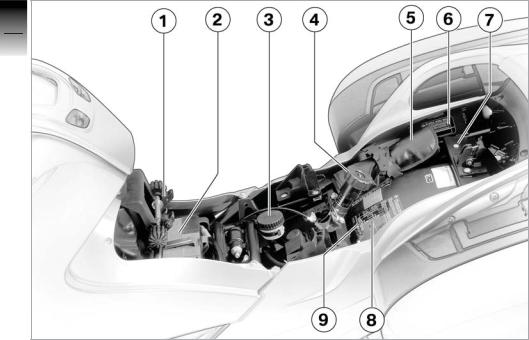
General view, left side
1 Adjuster for headlight beam throw underneath the instrument cluster (b 49)
2Brake-fluid reservoir (b 102)
3 Radio operating panelOE
4 On-board socket (b 86)
5 On-board socketOE/OA (b 86)
6 Adjuster, rear shock absorber (b 55)
7 Oil sight glass (b 98)
8Filler neck, engine oil (b 99)
1
9
Overview

1
10
Overview

General view, right side
1 Seat lock (b 52)
2 Switch, rear-seat heatingOE underneath the rear seat (b 47)
3Mount, tank rucksackOE (b 94)
4 Filler neck, fuel tank
5Brake-fluid reservoir, front (b 102)
6Electrically adjustable windscreen (b 55)
7Stowage or radio compartmentOE (b 51)
1
11
Overview
1
12
Overview

Underneath the seat
1 Height adjuster, front seat (b 53)
2 Battery (b 120)
3 Brake-fluid reservoir, rear (b 102)
4 Adjuster, spring preload, rear (b 55)
5 On-board toolkit (b 97)
6 Type plate
7 Helmet holder (b 54)
8 Table of tyre pressures
9 Label, payload
1
13
Overview
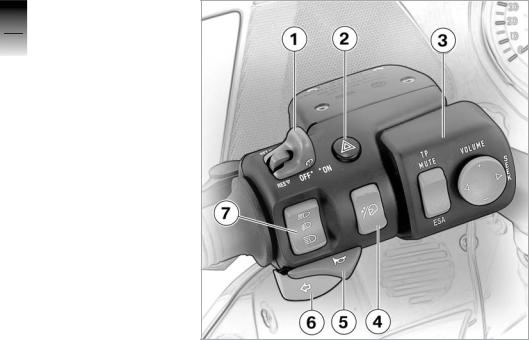
Handlebar fitting, left
11 Switch, cruise controlOE
14
Overview
(b 42)
2 Pushbutton, hazard warning flashers (b 37)
3 Radio operating panelOE
4 Pushbutton, windscreen adjustment (b 55)
5 Pushbutton, horn
6Pushbutton, left flashing turn indicators (b 50)
7Switch, high-beam headlight and headlight flasher (b 48)
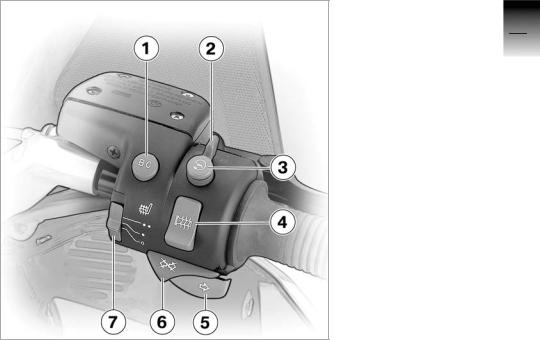
Handlebar fitting, right
1 Pushbutton, on-board computerOE (b 39)
2 Emergency off switch (kill switch) (b 45)
3 Pushbutton, starter
4Switch, grip heatingOE (b 45)
5Pushbutton, flashing turn indicators, right (b 50)
6Pushbutton, flashing turn indicators off (b 51)
7Switch, front-seat heatingOE (b 46)
1
15
Overview

Instrument cluster
11 Speedometer
162 Warning and telltale lights (b 21)
Overview
3 Multifunction display (b 20)
4 Rev. counter
5Telltale light, anti-theft alarmOE
6 Adjuster, clock (b 38)
7 Control, odometer (b 37)
8Sensor, lights for instrument cluster
The instrument-cluster lighting has automatic
day and night switchover. The brightness of the night setting is variable (b 39).c

Headlight
1 |
High-beam headlight |
1 |
2 |
Low-beam headlight |
17 |
3 |
Side light |
|
|
|
Overview |

1
18
Overview
Multifunction display .................... |
20 |
Warning and telltale lights ........... |
21 |
Warning indicators ....................... |
21 |
ABS warnings .............................. |
27 |
Status indicators |
|
2
19
Status indicators
2
20
Status indicators
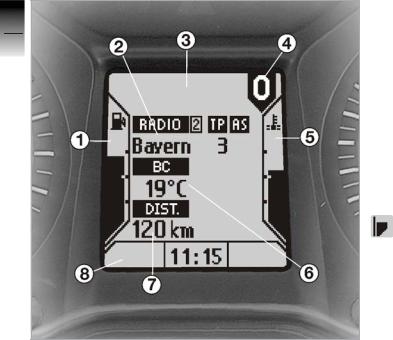
Multifunction display
1 Fuel gauge
2 Display, radioOE
3Display area for warning symbols
4 Gear indicator
5 Oil temperature gauge
6Display, on-board computerOE (b 39)
7 Odometer
8Display area for clock, seat heatingOE, display dimming.
Fuel capacity
The height of the bar indicates the level of fuel in
the fuel tank.
Gear indicator
The gear indicator shows which gear is selected. If
no gear is engaged, the gear indicator displays 0; the ’neutral’ telltale light also lights up.
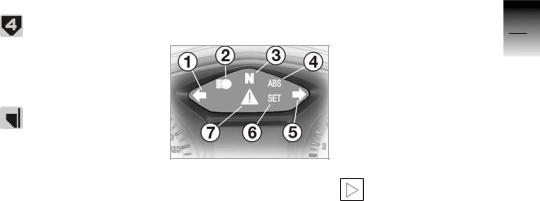
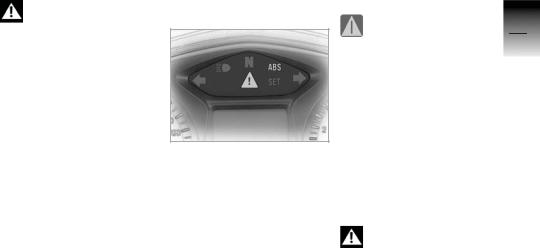
Warning and telltale lights
Oil temperature
The height of the bar indicates the oil temperature.
1 Telltale light, left turn indicator
2 Telltale light, high-beam headlight
3 Telltale light, neutral
4 ABS warning light (or n depending on national-market specification)
5 Telltale light, right turn indicator
6Telltale light, cruise-control system
7 Warning light, general
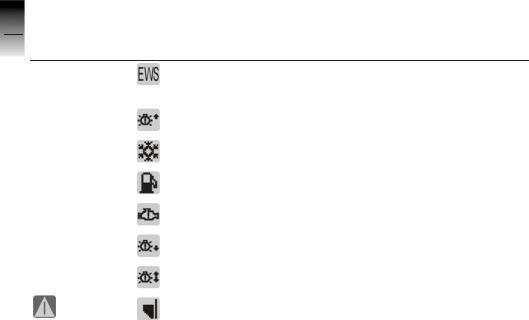
Warning indicators
Warnings are displayed by means of symbols in the multifunction display. In some cases, an additional general warning light lights up red or yellow. A number of warnings may be issued simultaneously.
Warning lights and symbols in the display appear
only when the emergency off switch (b 45) (kill switch) is in the ’run’ position.c
2
21
Status indicators
Overview
2The warnings are listed in the table below, along with the page numbers of the pages you can refer to for more information.
22 |
Light |
Symbol |
Meaning |
Explanations |
|
Status indicators
 yellow
 yellow
 yellow
 yellow
|
Ignition key not authorised. |
(b 36) |
|
Low-beam headlight, high-beam |
|
|
headlight, side-light or turn-indicator |
|
|
bulb defective. |
(b 26) |
|
Ambient temperature below 3 °C |
|
|
(on-board computerOE) |
(b 26) |
|
Fuel down to reserve |
(b 24) |
|
||
|
Fault in the engine electronics |
(b 24) |
|
||
|
Rear light or brake light bulb defec- |
|
|
tive |
(b 26) |
|
Front/rear bulbs defective |
(b 26) |
red |
Engine-oil temperature too high |
(b 24) |

Light |
Symbol |
Meaning |
Explanations |
|
|
|
|
red |
|
Engine-oil pressure too low |
(b 25) |
red |
|
Battery is no longer being charged |
(b 26) |
red |
|
Brake switch defective |
(b 27) |
|
1 flash per |
|
|
|
second |
ABS pull-away test not completed |
(b 28) |
|
4 flashes per |
|
|
|
second |
ABS self-diagnosis not completed |
(b 28) |
|
|
Relay for ABS warning lights |
|
red |
|
defective |
(b 28) |
|
1 flash per |
|
|
red |
second |
ABS function not available |
(b 29) |
|
4 flashes per |
|
|
red |
second |
ABS in residual braking mode |
(b 29) |
1 red flash |
1 flash per |
|
|
per second |
second |
Insufficient brake fluid |
(b 30) |
4 red flashes |
4 flashes per |
|
|
per second |
second |
Two or more ABS faults |
(b 31) |
2
23
Status indicators

2
24
Status indicators
Electronic immobiliser
Immobiliser symbol is displayed.
The key being used is not authorised for starting, or communication between key and engine electronics is disrupted.
•Remove all other vehicle keys located near the ignition key (b 34).
•Use the reserve key.
•Have the defective key replaced, preferably by an authorised BMW motorcycle dealer (b 36).
Fuel reserve
General warning light lights up yellow.
Fuel reserve symbol is displayed and flashes
10 times.
The fuel tank contains a fuel reserve of a maximum of
4 litres. The on-board computer shows the estimated residual operating range (b 39) .
Lack of fuel can result in the engine cutting out un-
expectedly and this could result in a hazardous situation. Do not run the fuel tank dry.c
Lack of fuel could result in misfiring and this in
turn could damage the catalytic converter.
Do not run the fuel tank dry.c
• Refuel.
Oil temperature
General warning light lights up red.
Oil temperature gauge flashes 10 times.
Oil temperature too high.
Continuing to ride with the engine overheated can
result in engine damage.c
•If possible, ride in the partload range to cool down the engine.
•Switch off the engine if you are caught in a traffic jam.
Engine electronics
General warning light lights up yellow.
Engine electronics symbol is displayed.
Fault in the engine electronics. In exceptional cases, the engine stops and can no longer be started. Otherwise, the engine runs in emergency operating mode.
You can continue to ride, but bear in mind that the usual engine output is not available.
The engine is running in emergency operating
mode. Engine power might be reduced and this can cause hazardous situations, particularly if you attempt to overtake other road users.
Adapt your style of riding to the reduced level of engine power.c
Engine oil pressure
General warning light lights up red.
Engine oil pressure symbol is displayed.
Insufficient engine oil pressure The "engine oil pressure" warning indicates that there is no oil pressure or that the oil
pressure in the lubricating oil circuit is too low; under no circumstances is it to be regarded as fulfilling the function of an oil gauge. The warning must disappear when oil pressure builds up 1 to 2 seconds after the engine starts.
If the "engine oil pressure" warning is displayed while the motorcycle is being ridden, take account of the traffic situation and:
•Disengage the gear.
•Operate the kill switch.
•Bring the motorcycle safely to a halt.
•Check the engine oil level.
There are other enginerelated problems besides
a low engine-oil level that can trigger the "engine-oil pressure" warning. Continuing to ride in these cases can cause engine damage.
If the "engine oil pressure" warning is issued, do not continue to ride if a check shows that the engine oil level is correct.c
•Have the fault rectified by a specialist workshop, preferably an authorised
BMW motorcycle dealer.
2
25
Status indicators
Battery charge current
2General warning light lights up red.
26Battery charge current symbol is displayed.
indicators |
The battery is no longer being |
|
charged. You can continue to |
||
|
||
|
ride only until the battery is |
|
|
discharged. |
|
Status |
A discharged battery can |
|
result in the engine cut- |
||
|
||
|
ting out unexpectedly, causing |
|
|
a hazardous situation. |
|
|
If possible, do not continue |
|
|
your journey.c |
|
|
• Have the fault rectified as |
|
|
soon as possible by a spe- |
|
|
cialist workshop, preferably |
|
|
an authorised |
|
|
BMW motorcycle dealer. |
Defective bulb
A defective bulb places your safety at risk be-
cause it is easier for other users to oversee you and your motorcycle.
Replace defective bulbs as soon as possible; always carry a complete set of spare bulbs if possible.c
General warning light lights up yellow. Defective bulb symbol with arrow pointing to the
rear is displayed.
Rear light or brake light bulb defective.
• Replace bulbs (b 116).
Defective bulb symbol with arrow pointing to the
front is displayed.
Low-beam headlight, highbeam headlight, side-light or turn-indicator bulb defective.
• Replace bulbs (b 112).
General warning light lights up yellow. Defective bulb symbol with two arrows is dis-
played.
A combination of the bulb defects described above has occurred.
• Replace bulbs (b 112).
Ice warning
Symbol for ice warning is displayed (motorcycle
with on-board computerOE only).
The air temperature measured at the motorcycle is lower than 3 °C: Risk of black ice.
The ice warning does not mean that there is no risk of black ice forming at meas-
ured temperatures above 3 °C. Always take extra care when temperatures are low and think well ahead; remember that the danger of black ice is particularly high on bridges and where the road is in the shade.c
ABS warnings
ABS warnings are indicated by a combination of the general warning light and the ABS warning light (or n depending on national-market specification). Both warning lights can light up continuously or flash at a rate of one or four flashes per second.
General warning light
General warning light red.
Brake switch defective or incorrectly adjusted. BMW Integral ABS detects the driver's braking request by the pressure build-up from the brake lever. There may be an unusual response from the brakes. You can continue to ride. However, bear in mind that the brakes may respond in a manner to which you are not accustomed.
There is a defect in the brake system that can
lead to abnormal braking. Think well ahead and brake carefully; avoid severe braking.c
2
27
Status indicators

• Have the fault rectified as
2soon as possible by a specialist workshop, preferably
28an authorised
BMW motorcycle dealer.
indicators |
ABS warning light |
|
ABS warning light flashes |
||
|
||
|
once per second. |
|
|
ABS function not available |
|
Status |
because pull-away test (b 69) |
|
not completed. |
||
|
||
|
You can continue to ride. To |
|
|
prevent the wheels from lock- |
|
|
ing: |
|
|
• Do not use emergency brak- |
|
|
ing until the pull-away test |
|
|
has been completed. |
|
|
Without the ABS func- |
|
|
tion, the wheels could |
|
|
lock under braking. |
Think well ahead and brake carefully; avoid severe braking.c
ABS warning light flashes four times per second.
Only residual braking function available in both brake circuits, because self-diagnosis (b 65) has not completed. You can continue to ride. However, bear in mind that until self-diagnosis has completed, neither the ABS function nor the brake booster is available.
Without the ABS function, the wheels could lock under braking; without
servo-assisted brakes, considerably greater force is required to brake.
Think well ahead and brake carefully; avoid severe braking.c
•If circumstances permit, do not apply the brakes until self-diagnosis has completed.
General warning light and ABS warning light
General warning light red.
 ABS warning light ON.
The controller of the ABS warnings is defective. ABS faults cannot be displayed. You can continue to ride, but bear in mind that you will not receive warning of ABS faults, if they occur.
 Loading...