

Page 1
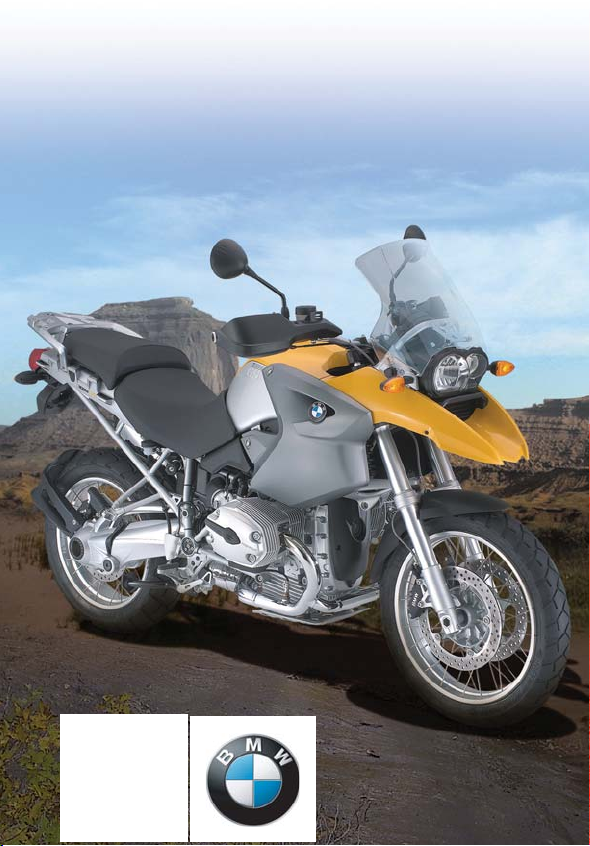
Rider’s Manual (US Model)
R 1200 GS
BMW Motorrad
Page 2

Page 3

Welcome to BMW
We congratulate you on your
choice of a motorcycle from
BMW and welcome you to the
community of BMW riders.
Familiarize yourself with your
new motorcycle, so that you
can ride it safely and confidently
in all traffic situations.
To make sure of this, please
read this Rider’s Manual carefully before starting to use your
new motorcycle. It contains
important information on how to
operate the controls and how to
make the best possible use of
all your BMW’s technical
features.
Welcome to BMW
In addition, it contains information on maintenance and care
to help you maintain your
motorcycle’s reliability and
safety, as well as its value. It
also offers useful hints and
information on the correct
equipment for machine and
rider, again geared toward maximizing reliability and safety.
If you have any questions concerning your motorcycle, your
authorized BMW Motorrad
retailer will gladly provide
advice and assistance.
We hope you enjoy reading this
Rider’s Manual and wish you
many a pleasant, safe journey
on your BMW motorcycle.
Best wishes,
BMW Motorrad
i
1
Introduction
Page 4

General information
i
2
Symbols and abbreviations
Introduction
About this Rider’s Manual
We have tried to make all the
information in this Rider’s
Manual easy to find.
The quickest access to a particular topic or item is by consulting the detailed alphabetical
index at the end. The first chapter of this Rider’s Manual will
provide you with an initial overview of your motorcycle.
When the time comes to sell
your BMW, please remember to
hand over this Rider’s Manual; it
is, by law, an important part of
the vehicle.
This symbol indicates precautions and measures which
are essential in protecting the
rider and other persons from
severe or fatal injury.
Instructions and precautions
specifically intended to prevent
damage to the motorcycle. Disregarding them may render the
warranty invalid.
Special information on operating and inspecting your motorcycle as well as maintenance
and adjustment procedures.
Page 5

X Tightening torque:
This symbol introduces values
for the various tightening
torques
• This symbol introduces a passage containing instructions
on how to perform a particular
operation
– This symbol draws your atten-
tion to the outcome of the
instructions on how to perform a particular operation
( ) Figure in parentheses
b page number with
explanations
General information
i
3
Introduction
OE Optional equipment
Your motorcycle was
assembled complete with
all the optional equipment
you ordered
OA Optional accessory
You can obtain optional
accessories only through
your authorized BMW
Motorrad retailer or specialized retail outlet;
optional accessories must
be retrofitted to the
motorcycle
EWS Electronic immobilizer
DWA Anti-theft alarm
Page 6

General information
i
4
Introduction
Custom equipment
When you ordered your BMW
motorcycle, you chose various
items of custom equipment.
This Rider’s Manual describes
all the optional equipment (OE)
and selected optional accessories (OA) that BMW offers for
this model series.
This explains why the manual
may also contain descriptions
of equipment which you have
not ordered.
If your BMW was supplied with
equipment not described in this
Rider’s Manual (such as a radio
or anti-theft alarm, for example),
you will find these features
described in separate manuals.
Technical specifications
All dimensions, weights and
power ratings stated in the
Rider’s Manual are quoted to
the standards and comply with
the tolerance requirements
of the Deutsche Institut für
Normung e. V. (DIN).
Configurations for individual
countries may differ.
Page 7

Safety information
For your own safety
i
5
Introduction
Currency
The high safety and quality
standards of BMW motorcycles
are maintained by unceasing
development work on designs,
equipment and accessories.
Because of this, your motorcycle may differ from the information supplied in the Rider’s
Manual. Nor can errors and
omissions be entirely ruled out.
We hope you will appreciate
that no legal claims can be
entertained on the basis of the
data, illustrations or descriptions in this manual.
Use only parts and accessories approved by BMW for
your motorcycle.
Parts and products approved
for your motorcycle by BMW
have been checked for safety,
function and suitability.
BMW accepts product liability
for these products. Conversely,
BMW is unable to accept any
liability whatsoever for parts
and accessories which it has
not approved.
Page 8

Safety information
i
6
Introduction
BMW cannot assess every
product of outside origin in
order to decide whether it can
be used on or with a BMW vehicle without constituting a safety
hazard.
Even approval by an official
inspection authority such as the
TÜV in Germany, or an official
permit (General Operating Permit) cannot always provide this
guarantee.
Genuine BMW parts and
accessories and other products
which BMW has approved can
be obtained from your authorized BMW Motorrad retailer,
together with expert advice on
their installation and use.
The right clothing
To reach your destination safely
every time, there's only one
choice:
•Helmet
• Suit
•Gloves
• Boots
It's foolish to ride without the
right clothing. This applies even
to short journeys, and to every
season of the year.
Your authorized BMW Motorrad
retailer will be happy to provide
advice and tell you about the
latest developments, and help
you select the right clothing for
your purpose.
Page 9

Safety information
i
7
Service
For safety reasons and to maintain the value of your motorcycle, regular maintenance
intervals have been laid down.
Always keep to the specified
maintenance intervals. This is
the only way to ensure that warranty claims are not invalidated.
Your authorized BMW Motorrad
retailer can provide information
on the currently specified Service, Inspection and Annual Inspection needed, or you can
fetch the information from the
Internet whenever you want by
visiting
“www.bmw-motorrad.com/
maintenance”.
Important:
BMW refuses to accept liability
for damage or consequential
damage due to repairs or
service work performed by
other than BMW-authorized
workshops.
Consequently, we advise you to
have service and inspection
work performed by your authorized BMW Motorrad retailer's
specially trained, expert personnel, and confirmed by an
entry in the “Service” section of
this Rider's Manual.
Authorized BMW Motorrad
retailers are supplied with the
latest technical information and
have the necessary technical
know-how and specially trained
staff.
Please do not hesitate to contact your authorized BMW
Motorrad retailer on all matters
concerning your motorcycle.
Authorized BMW Motorrad
retailers are fully informed about
all aspects of your motorcycle
and will gladly advise and assist
you.
Best wishes,
BMW Motorrad
Introduction
Page 10

Contents
Welcome to BMW ..................1
General information............ 2-4
Safety information .............. 5-7
Overview .............................11
i
General view, left side ..........12
General view, right side........13
8
Left handlebar fitting ............14
Right handlebar fitting ..........15
Cockpit ................................16
Status indicators ................17
Indicator and
warning lights.......................18
Introduction
Multifunction display.............19
Function indicators...............20
Warning indicators ......... 21-23
ABS warning lights......... 24-25
Operation............................27
Ignition switch and
steering lock .................. 28-29
Electronic immobilizer
EWS............................... 30-31
Hazard warning
flashers .......................... 32-33
Tripmaster...................... 34-35
Kill switch.............................36
Heated handlebar grips........37
Clock ...................................38
Windshield ..........................39
Handlebar levers ............ 40-41
Lights ............................. 42-45
Seat ............................... 46-48
Mirrors .................................49
Spring preload ............... 50-51
Willkommen bei BMW 1
Allgemeine Informationen 2
Allgemeine Informationen 3
Allgemeine Informationen 4
Sicherheitsinformationen 5
Sicherheitsinformationen 6
Sicherheitsinformationen 7
8
8
9
10
11
12
13
14
15
16
17
18
19
11
Gesamtansicht links 12
Gesamtansicht rechts 13
Lenkerarmatur links 14
Lenkerarmatur rechts 15
Cockpit 16
17
Shock-absorber
adjustment...........................52
Wheels.................................53
Loading.......................... 54-55
Shift lever.............................56
Riding .................................57
Safety instructions ......... 58-59
Checklist........................ 60-61
First time out.................. 62-63
Before you start ............. 64-66
Starting ................................ 67
Running in...................... 68-69
Gear shifts ..................... 70-71
Off-road riding................ 72-73
Parking .......................... 74-77
Refueling........................ 78-79
Brake system -
general........................... 80-81
Brake system - with
BMW Integral ABS ......... 82-89
Accessories........................ 91
General instructions.............92
12 V sockets.................. 93-94
Luggage system .......... 95-101
Arrive safely......................103
Reliable operation .............. 104
Service worldwide..............105
Training means
extra safety ........................106
Page 11

Contents
Maintenance .................... 107
Safety information.............. 108
Troubleshooting
chart........................... 109-110
Engine oil ...................111-112
Brake system -
general .......................113-114
Brake system ............. 115-116
Clutch ............................... 117
Wheels ....................... 118-129
Brake pads................. 130-131
Notes on
changing bulbs.................. 132
Bulbs.......................... 133-139
Air filter....................... 140-142
Jump starting .............143-145
Battery maintenance
instructions................. 146-148
Installing battery ......... 149-150
Care.................................. 151
Cleaning/care............. 152-155
Storing .............................. 156
Returning to use................ 157
Technical data ..................159
Engine................................160
Power train.........................161
Frame and
suspension................. 162-166
Fuel and lubricants..... 167-168
Electrical system ................169
Dimensions and weights ....170
Performance data...............171
Tightening torques .............172
Service..............................173
Maintenance ......................174
Confirmation of
maintenance .............. 174-180
Confirmation of
service ....................... 181-182
Concluding thoughts..........183
Index ......................... 185-192
i
9
Introduction
Page 12

Contents
i
10
Introduction
Page 13

General view, left side
General view, right side
Left handlebar fitting
Right handlebar fitting
111
11
Overview
Cockpit
Page 14
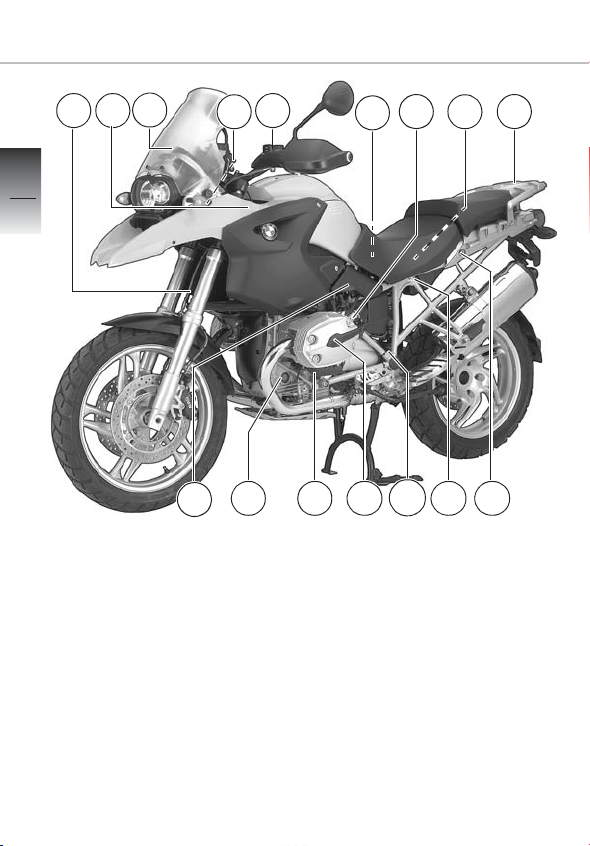
General view, left side
1 5
3
2
11
12
Overview
1 Spring-strut adjuster, front
b 50)
(
2 Power socket 12 V
3 Windshield, (
4 Headlight adjustment
b 45)
(
5 Reservoir for clutch
hydraulic fluid (b 117)
6 Helmet holder
7 Engine oil filler neck
b 111-112)
(
8 Seat adjustment (
9 Luggage rack (
16
b 39)
b 101)
4
OA
b 47)
(b 93)
7 9
6
1415
10 Seat lock (
11 On-board socket, 12 V
12 Rear suspension strut,
13 Primary spark plug
14 Secondary spark plug
15 Engine oil level display
16 Type plate
12
13 11
for connecting electrical
accessories (
shock-absorber adjuster
b 51-52)
(
b 112)
(
8
10
b 46-48)
b 93)
Page 15
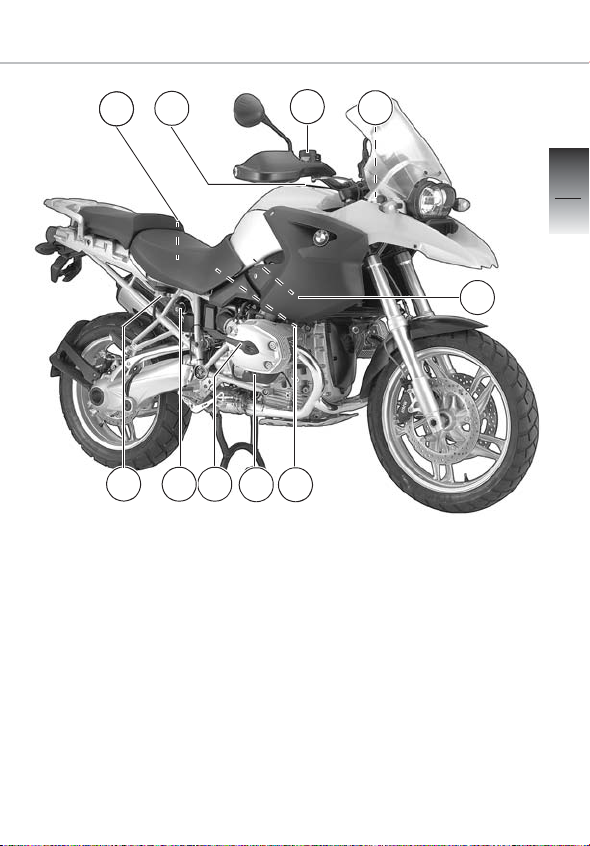
General view, right side
18
17
26
17 Toolkit storage
compartment
18 Fuel filler cap
b 78-79)
(
19 Brake-fluid reservoir for
front brake (
20 Vehicle identification
number
21 Air filter (
b 140-142)
24
25 22
b 115)
19
20
23
22 Helmet holder
23 Secondary spark plug
24 Primary spark plug
25 Spring-strut adjuster, rear
(b 51)
26 Brake-fluid reservoir for rear
brake (b 116)
111
13
21
Overview
Page 16
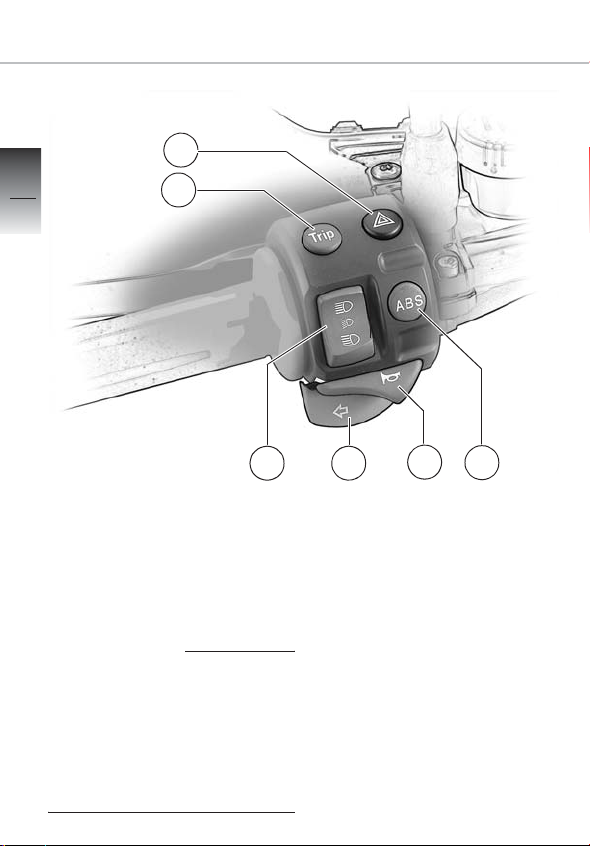
Left handlebar fitting
2
11
14
Overview
1
4
6
5
3
To prevent air from entering
the hydraulic circuit:
• Do not turn the fitting on the
handlebar.
• Do not turn the handlebars
in the clamping blocks.
OE
(b 88)
b 34)
1 Tripmaster button (
2 Hazard warning flasher
b 32)
switch (
3 ABS button
4 Horn switch
5 Left flashing turn indicator
switch
6 High/low beam switch
b 42-45)
(
Page 17
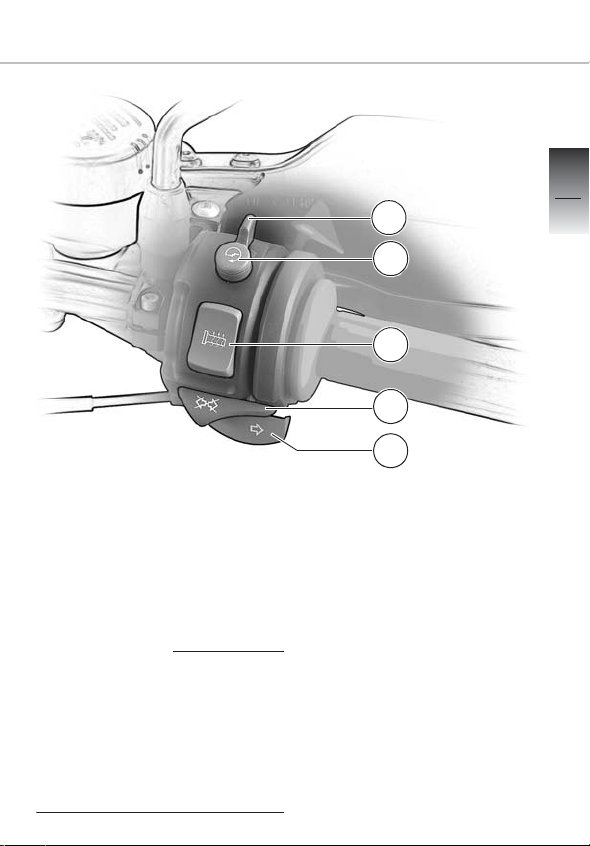
Right handlebar fitting
7
8
111
15
To prevent air from entering
the brake circuit:
• Do not turn the fitting on the
handlebar.
• Do not turn the handlebars
in the clamping blocks.
9
10
11
7 Emergency off (kill) switch
OE
b 65)
b 67)
(b 37)
for ignition (
8 Starter button (
9 Switch for heated handlebar
grips
10 Turn indicator cancel switch
11 Right flashing turn indicator
switch
Overview
Page 18
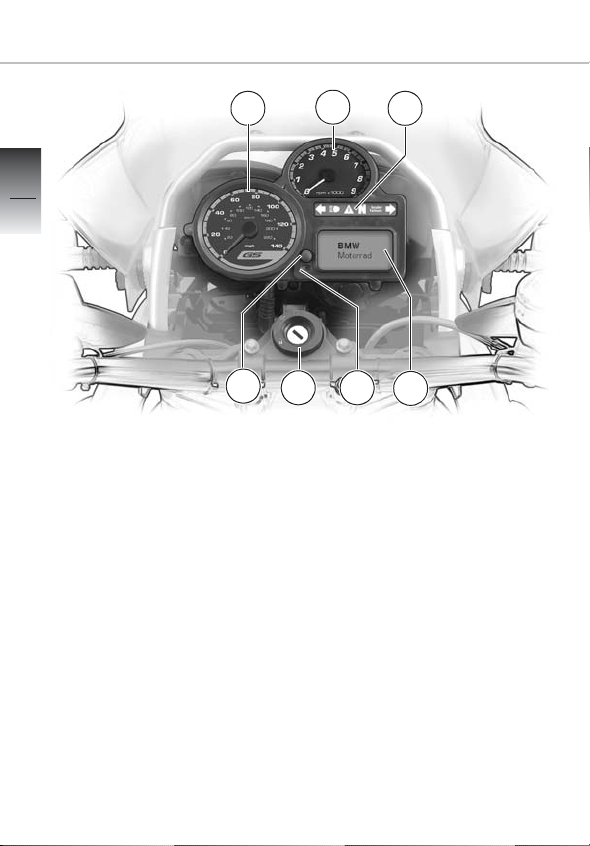
Cockpit
11
16
Overview
The cockpit lights have automatic brightness control for
daytime/night-time riding. The
sensor that controls the brightness of the cockpit lights is next
to the indicator light for the
anti-theft alarm
OE
.
1
7
2
1 Speedometer
2 Tachometer (
3 Indicator and warning lights
(
4 Multifunction display (
5 Indicator light for anti-theft
alarm
bright/dark
6 Ignition switch and steering
lock (
7 Knob for setting clock
(b 38)
3
56
4
b 18)
OE
/Lighting sensor
b 28)
b 68)
b 19)
Page 19

Indicator and warning lights
Multifunction display
Function indicators
Warning indicators
12
17
Status indicators
ABS
OE
warning lights
Page 20
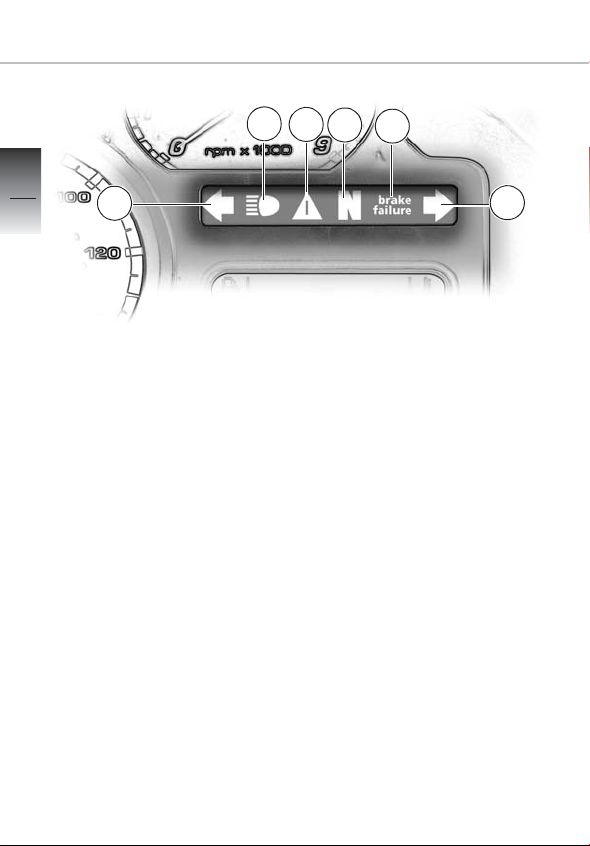
Indicator and warning lights
2
3
2
18
Status indicators
1
4
5
6
1 Left turn indicator light s
2 High beam indicator light
q
3 General warning light e
b 86)
(
4 Neutral indicator light
b 66)
(
k
5 ABS warning light l
(b 86)
6 Right turn indicator light
OE
t
Page 21
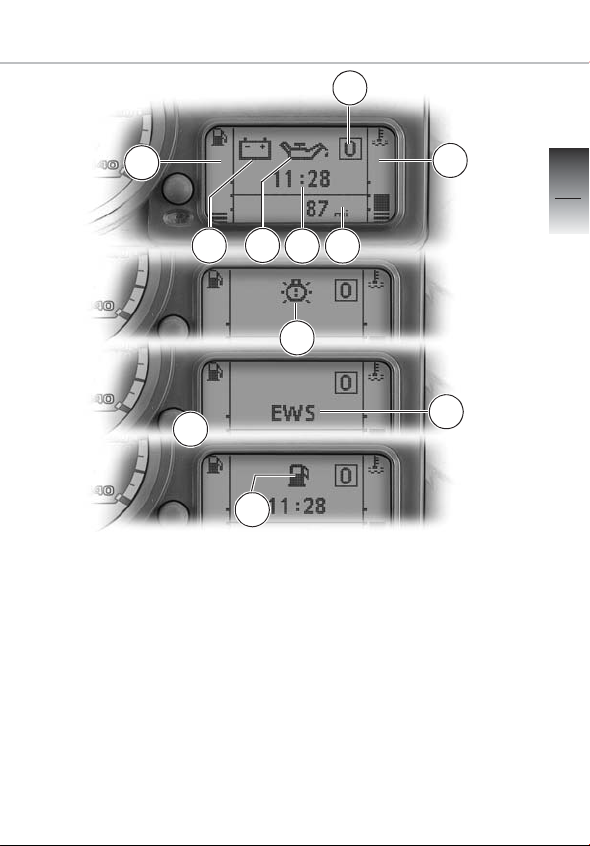
Multifunction display
8
7
13
16
17
7 Fuel level n
(b 20, 79)
8 Gear indicator (
9 Oil temperature
10 Tripmaster display panel
b 34, 35)
(
11 Clock display panel (
b 66)
j (b 20)
b 38)
12
11 10
14
Possible warnings
12 Oil pressure
13 Battery charge light
b 22)
(
14 Bulb failure
15 EWS active (b 30)
16 Fault in electronic engine
management system
b 21)
(
17 Fuel reserve indicator
(b 20, 79)
9
15
i (b 21)
r
7
12
19
Status indicators
5
n
Page 22
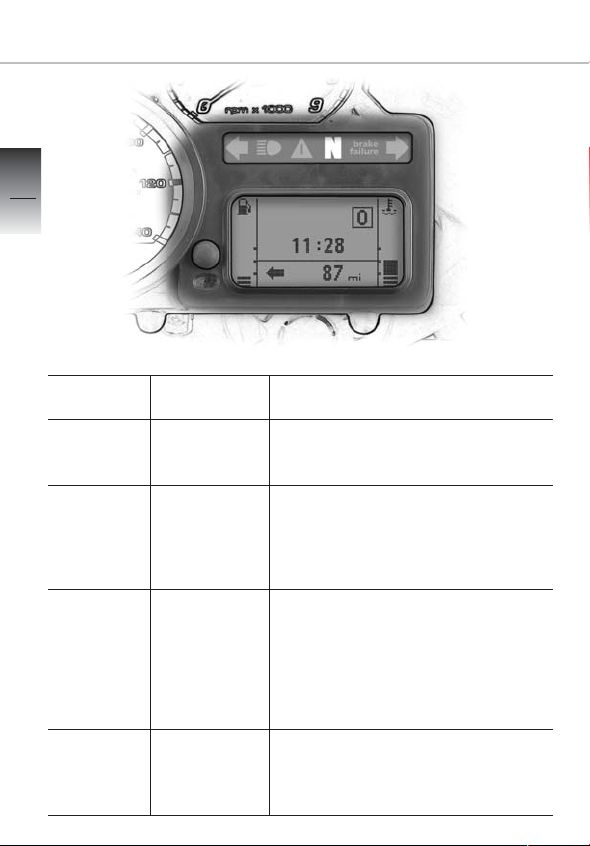
Function indicators
2
20
Indicator
light
Status indicators
N
e yellow
flashes
e red
ON
Multifunction
display
11 : 28
n
Meaning
Clock
Shows the time in
12-hour mode
Gear indicator
Indicator light k lights up when the
transmission is in neutral.
The display shows a number corresponding to the gear you have engaged
Fuel level
when the reserve range is reached, the
symbol
n appears and flashes, the gen-
eral warning symbol
The Tripmaster calculates the residual
operating range and shows this estimated figure on the display.
Engine temperature
The bar indicator flashes if the engine
overheats and
general warning light
e flashes.
e lights up.
Page 23
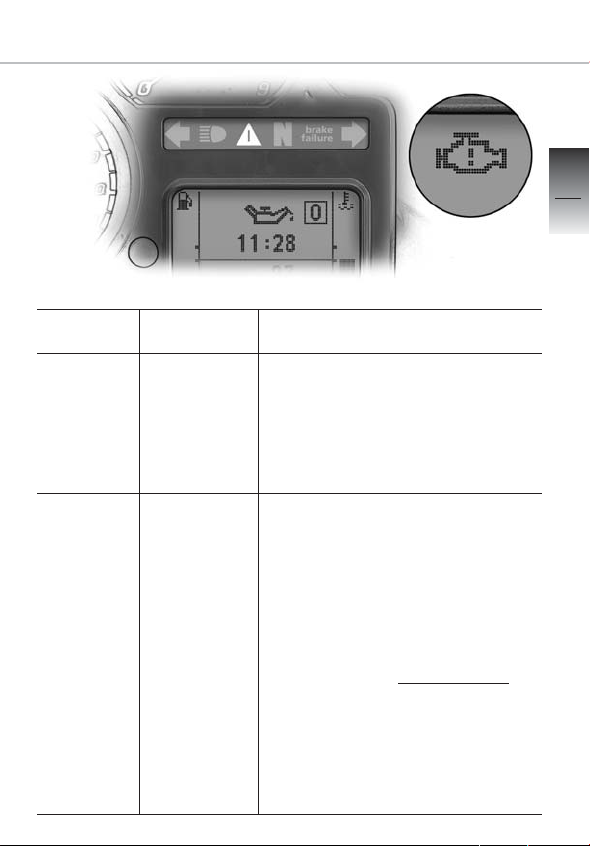
Warning indicators
12
21
Warning
light
e yellow
ON
e red
ON
Multifunction
display
5
i
Meaning/measure
Engine electronics
There is a fault in the electronic engine
management system.
Maintain a defensive riding style and
proceed immediately to a specialized
workshop, preferably an authorized
BMW Motorrad retailer.
Oil pressure
Insufficient engine oil pressure
(
b 111, 112)
Taking the traffic situation into account:
Disengage the clutch
Operate the emergency (kill) switch
Bring the motorcycle safely to a halt
Check the engine oil level
If the warning indicator lights up but the
oil level is correct, always consult a specialized workshop without
delay, preferably an authorized BMW
Motorrad retailer.
Status indicators
Page 24
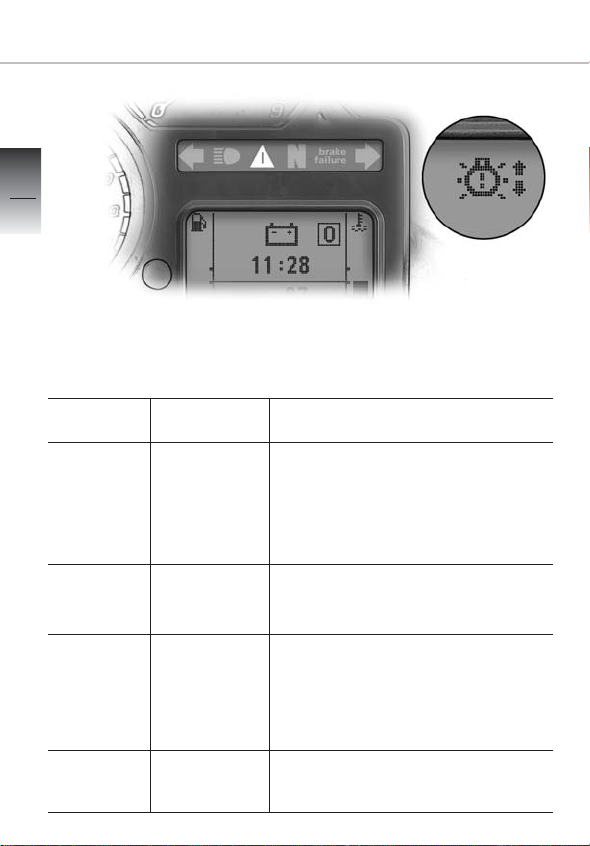
Warning indicators
2
22
Status indicators
Warning
light
e red
ON
e yellow
ON
e yellow
ON
Multifunction
display
3
8
6
7
7
Meaning/measure
Battery charge current
The battery is no longer charging,
generator fault.
Immediately consult a specialized workshop, preferably an authorized
BMW Motorrad retailer.
Bulb failure
8 Rear light or brake light defective
Replace bulbs (
Bulb failure
6 Front parking light, low-beam head-
light, high-beam headlight defective
b 133)
7 Double flashing frequency, turn
indicator flasher defective
Replace bulbs (
b 134-139)
7 Combination of light defects
described above
Replace bulbs (
b 134-139)
Page 25

Warning
light
e yellow
ON
Multifunction
display
EWS
Warning indicators
12
23
Status indicators
Meaning/measure
Electronic immobilizer
Key not recognized (b 30, 31).
Communication with engine electronics
defective
Various warnings may be issued simultaneously. Some
warnings combine
e red, in which case the
and
two are displayed alternately.
e yellow
Page 26
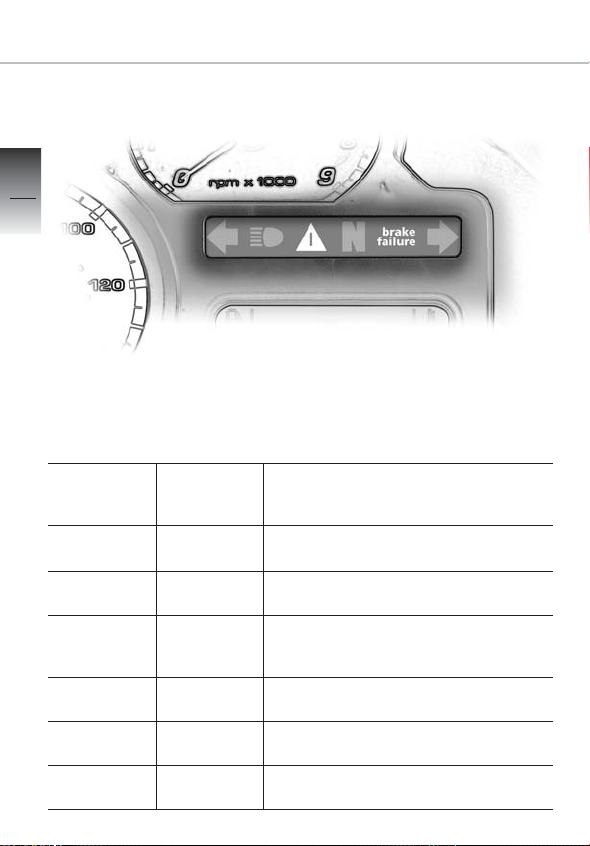
ABSOE warning lights
2
24
Status indicators
General
warning
light
e
OFF ON ABS function deactivated by the rider,
OFF Flashes at
OFF Flashes at
Red ON OFF Brake-light switch defective or not cor-
Red ON Flashes at
Red ON Flashes at
ABS warning
light
D
1 Hz
4 Hz
1 Hz
4 Hz
Malfunctions
integral braking system available (
ABS not available, because pull-away
test not completed (
Only RESIDUAL BRAKING FUNCTION
available in both circuits, (
self-diagnosis not completed (
rectly adjusted
ABS function unavailable in at least one
braking circuit
Only RESIDUAL BRAKING FUNCTION
available in at least one circuit (
b 86)
b 88)
b 85) because
b 86)
b 85)
Page 27

Warning light,
general
e
Red, alternate
flashing at
1 Hz
Red, alternate
flashing at
4 Hz
Warning light,
ABS
D
Alternate
flashing at
1 Hz
Alternate
flashing at
4 Hz
ABSOE warning lights
Malfunctions
Fluid level in BMW Integral ABS too low.
If the functions listed below are active,
maintain a defensive riding style and proceed immediately to the nearest specialized workshop, preferably an authorized
BMW Motorrad retailer.
– Ignition OFF, brake pressure OK at the
brake levers
–Brakes acting on both wheels
– Brake system leaktight, no signs of
brake fluid escaping
Otherwise the brake system is defective:
do not attempt to ride the motorcycle.
Fluid level in BMW Integral ABS insufficient, conduct checks listed above.
Only RESIDUAL BRAKING FUNCTION
available in at least one circuit (
b 85)
12
25
Status indicators
Do not ride the motorcycle if you
have any doubts about the safety
of the brake system.
Page 28

2
26
Status indicators
Page 29

Ignition switch and steering lock
Electronic immobilizer (EWS)
Hazard warning flashers
On-board computer
Kill switch
13
27
Operation
Heated handlebar grips
Setting the clock
Adjusting the windshield
Handlebar levers
Lights
Seat
Mirrors
Spring preload
OE
Page 30
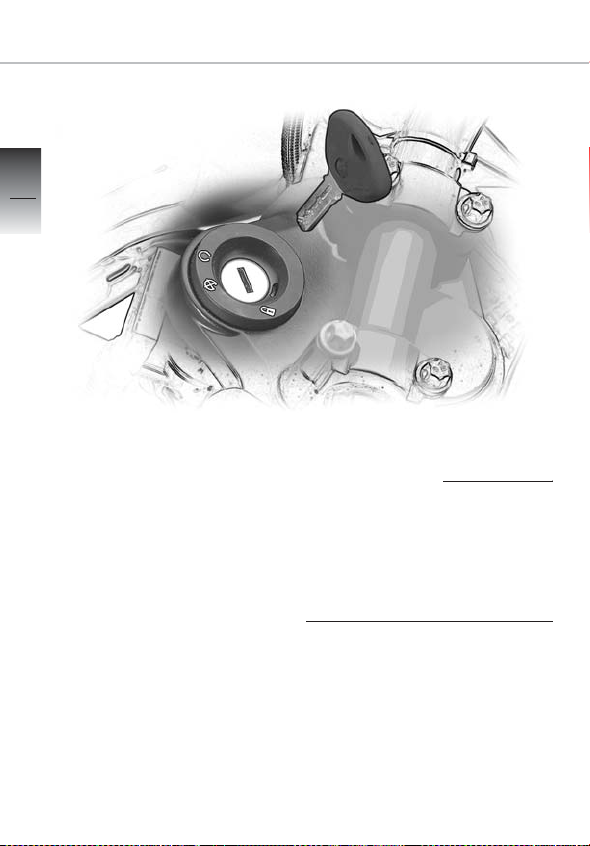
Ignition switch and steering lock
3
28
Operation
If the motorcycle is fitted with
BMW Integral ABS
RESIDUAL BRAKING FUNCTION is available when the ignition is switched off (b 85)
OE
, only
Keys
You will receive two master
keys and one spare key.
Ignition switch and steering
lock, tank lock and seat lock are
actuated with the same key. On
request, system cases
be arranged to lock with the
same key.
OA
can
Page 31
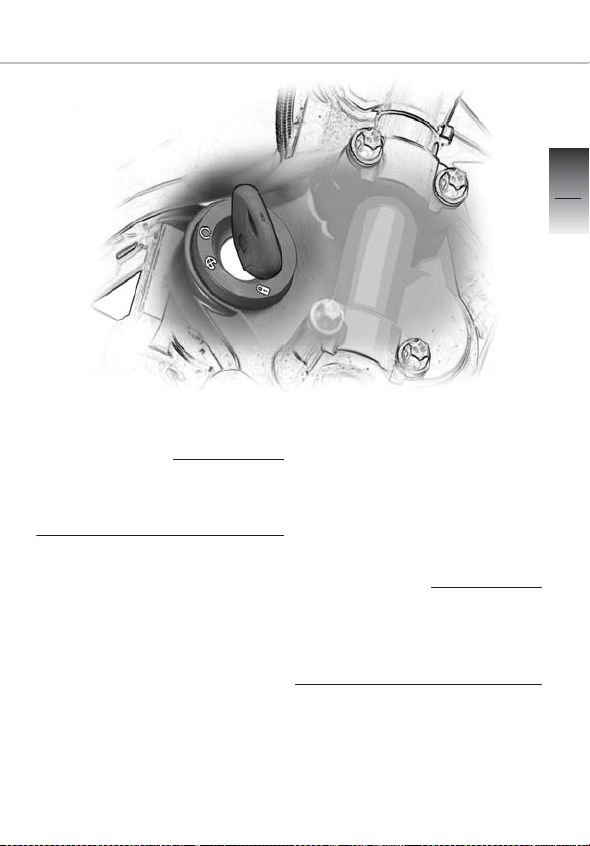
Ignition switch and steering lock
Key positions
Do not switch over to
1 position while driving!
U Operating position;
ignition, parking light and
all circuits switched on,
predrive check is
performed (
V * Ignition and lights off,
steering not locked
(handlebars can be turned
freely to left or right)
* The key can be removed in these
positions
b 64)
13
29
Operation
1*Ignition and lights off,
steering lock engaged.
Turn the handlebars all the way
to the left before engaging the
steering lock.
Switch the parking light on only
for limited periods. Note state of
battery charge.
Page 32
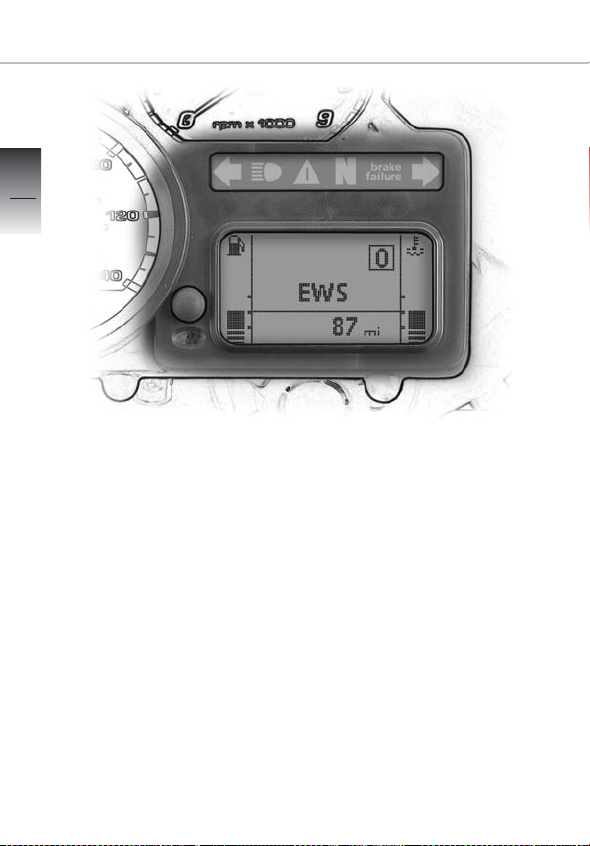
Electronic immobilizer (EWS)
3
30
Operation
In-key security
The electronic immobilizer
helps protect your BMW motorcycle from theft, and this
enhanced security is at your
disposal without any need for
you to set parameters or activate additional systems. The
engine of a motorcycle fitted
with this electronic immobilizer
can be started only with the
keys that belong to the vehicle.
You can also have your authorized BMW Motorrad retailer
bar individual keys, for example
if a particular key goes missing.
The engine cannot be started
with a key that has been barred.
Function
An electronic component is
integrated into each of your
keys.
The motorcycle’s electronics
exchange certain continuously
changing signals with the electronics in the key; these signals
are specific to your motorcycle
and they are transmitted by the
ignition switch. Ignition, fuel
supply and starter are not
enabled for starting until the key
has been recognized as “authorized” for your motorcycle.
Page 33

Electronic immobilizer (EWS)
13
31
Operation
A spare key attached to the
same ring as the ignition key
used to start the engine could
“irritate” the electronics, in
which case the enabling signal
for ignition, fuel supply and
starter is not issued. Under
these circumstances the motorcycle will refuse to start.
Consequently, always keep the
spare key or keys separate from
the ignition key.
Similarly, physical force could
damage the ignition key's integral electronics. If this happens,
you will not be able to start the
engine.
Spare/extra keys
You can obtain spare/extra
keys only through an authorized
BMW Motorrad retailer. The
keys are part of an integrated
security system, so the retailer
is under an obligation to check
the legitimacy of all applications
for spare/extra keys.
If you want to have a key
barred, you have to bring along
all the keys that belong to the
motorcycle.
A key that has been barred can
subsequently be cleared and
reactivated for use.
Page 34
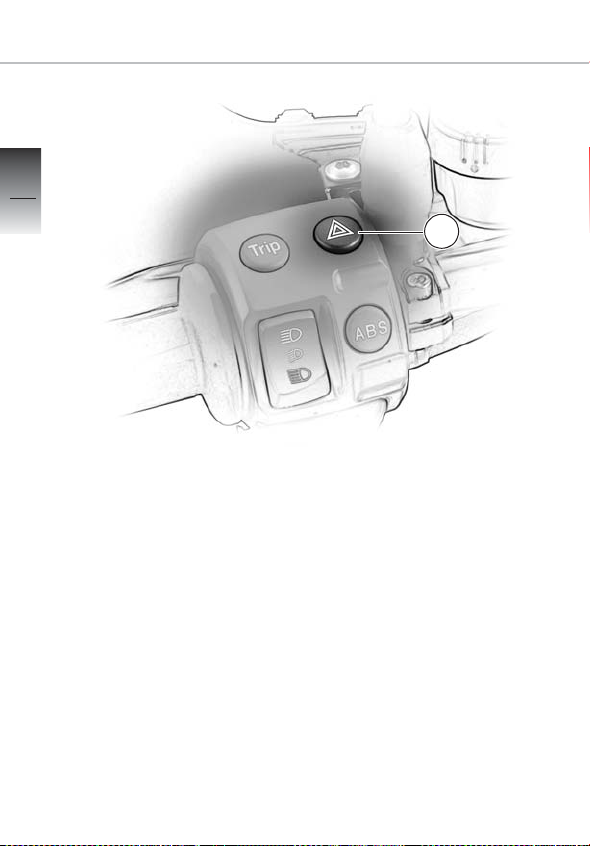
Hazard warning flashers
3
32
Operation
Hazard warning flashers
You cannot activate the hazard
warning flashers if the ignition is
switched off.
Do not use the hazard warning
flashers for longer than absolutely necessary.
Note state of battery charge.
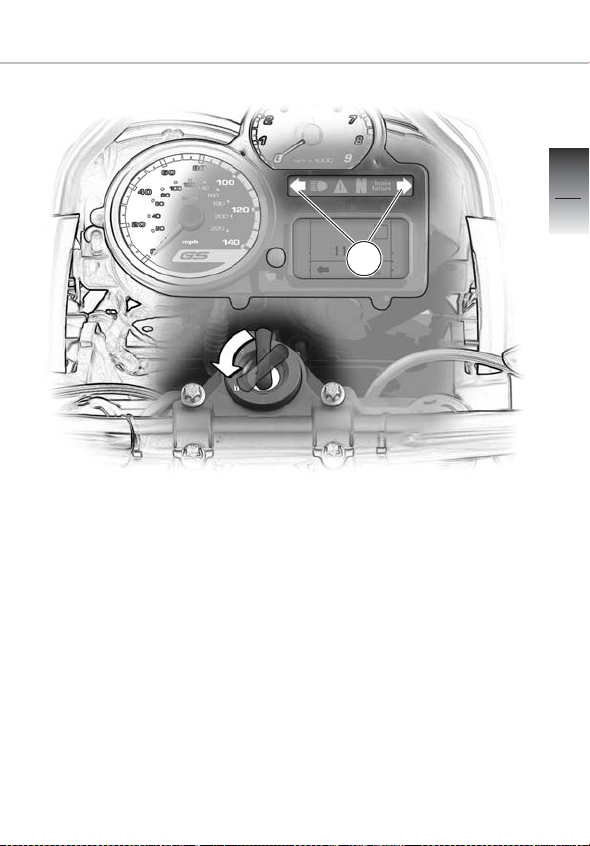
1
Switching on hazard warning flashers
• Switch on the ignition, ignition
key in the
– Hazard warning flasher
switch 1 lights up
• Operate hazard warning
flasher switch 1
– Hazard warning flashers in
operation
– Left/right flashing turn indica-
tor lights 2 in the indicator
light panel flash
U position
Page 35
Hazard warning flashers
• Switch off the ignition, and
with the ignition key in the
position, the hazard warning
flashers continue to flash
– Left/right turn indicator
lights 2 in indicator light panel
go out
• Turn the handlebars to the
position for locking the steering and lock the steering, turn
the ignition key to
– The hazard warning flashers
continue to operate
1
13
33
2
Operation
V
Switching off hazard warning flashers
• Actuate hazard warning
flasher switch 1 or switch on
ignition
– Hazard warning flashers
cease to operate
Page 36
Tripmaster
3
34
Operation
1
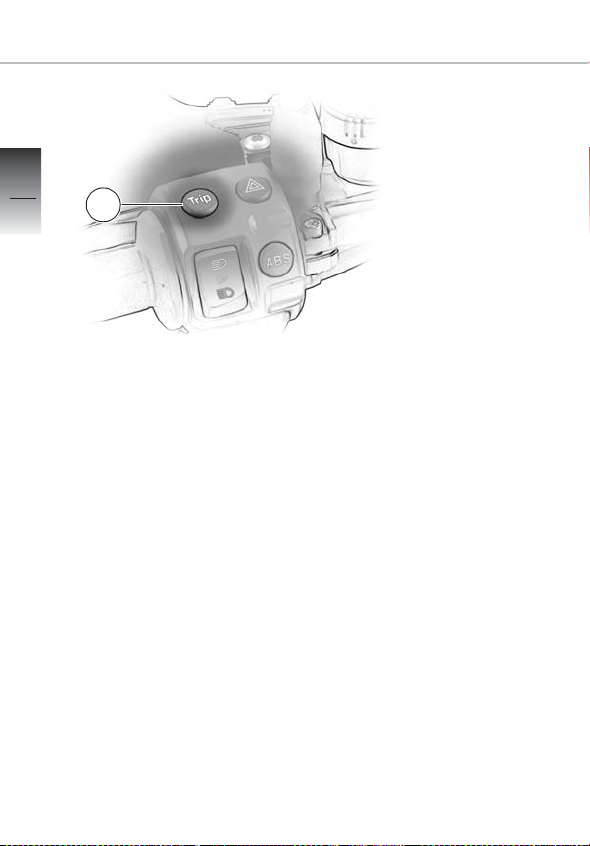
You can activate the Tripmaster
only when the ignition is
switched on, in other words
when the ignition key is in the
U position.
When you switch on the ignition,
the information shown by the
Tripmaster when the ignition was
switched off always reappears
on the multifunction display.
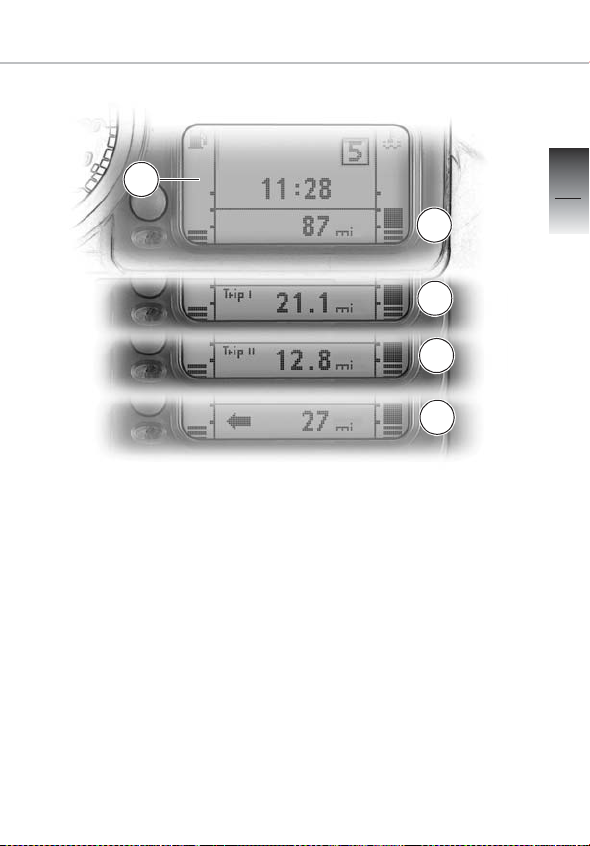
• Each time you briefly
press button 1 on the left han-
dlebar fitting, you step from
one function to the next in the
following sequence:
– A Total distance covered
– B Tripmeter reading 1
– C Tripmeter reading 2
– D Residual range
Residual range
This reading appears only when
the fuel level drops to reserve.
The range is estimated on the
basis of style of riding and taking
the remaining supply of available
fuel into account.
If the motorcycle is resting on its
side stand the level in the tank
cannot be measured correctly,
so this estimate of residual operating range will be inaccurate.
The display shows residual range
in km or miles (depending on the
national-market version). Also
observe the reading of fuel-level
gauge 2 (
The Tripmaster registers that you
have refueled when approximately 3.2 qt (3 liters) have been
added.
b 19, 79).
Page 37
Tripmaster
2
Resetting Tripmeter
– Only when the motorcycle is
at a standstill and the ignition
switched on, in other words
when the ignition key is in the
U position
• Repeatedly press button 1
(Trip) for less than 2 seconds
until
– B Tripmeter reading 1 Trip I
or
– C Tripmeter reading 2 Trip II
appears in the display
A
B
C
D
• Press button 1 (Trip) for longer
than 2 seconds
– Reading is reset to zero
13
35
Operation
Page 38
Kill switch
3
36
Operation
Operating the kill switch
1
B
A
B
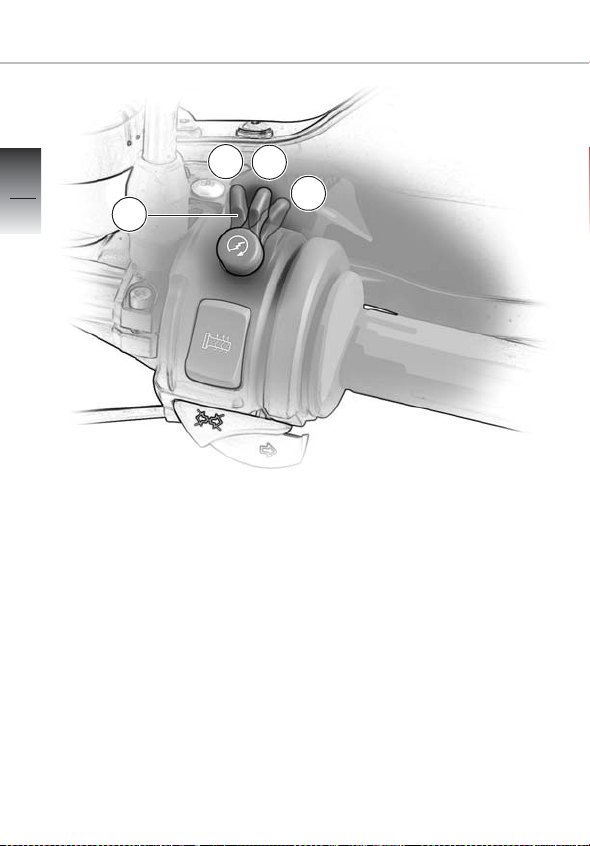
In an emergency only:
• Move switch 1 to the
B position
– The electrical circuits for the
electronic engine management system, instrument
panel, fuel pump and starter
motor are de-energized
If you move the kill switch to position B while the ignition is on
(switch in the U position), the
BMW Integral ABS
operational (
OE
b 82-89).
remains
Page 39
Heated handlebar grips
C
B
A
OE
13
37
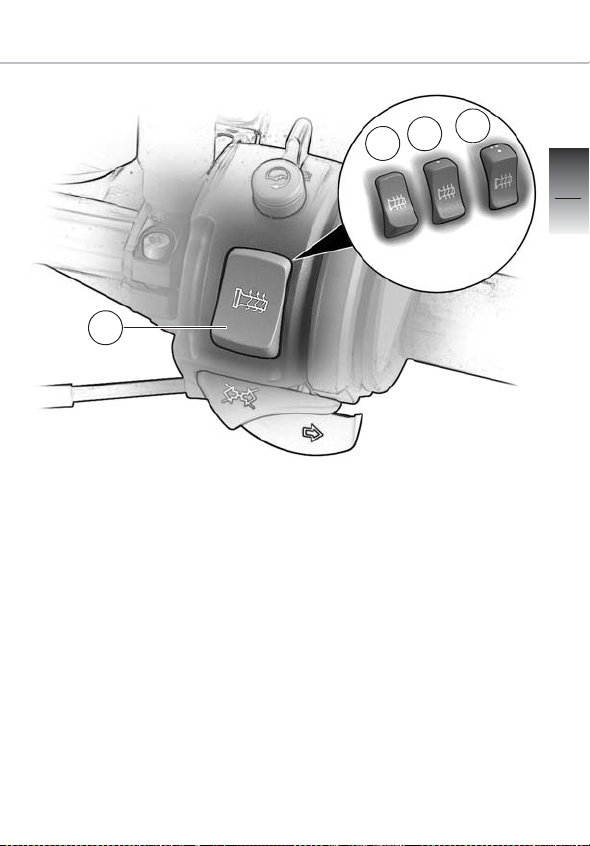
1
Actuating heated handlebar grips
The grip heating is only active
with the engine running. The increase in power consumption
can drain the battery if you are
riding at low engine speeds.
Operation
• Operate switch for heated
handlebar grips 1
A Heating function OFF
B 50% (center position)
C 100%
Page 40
Clock
1
3
38
Operation
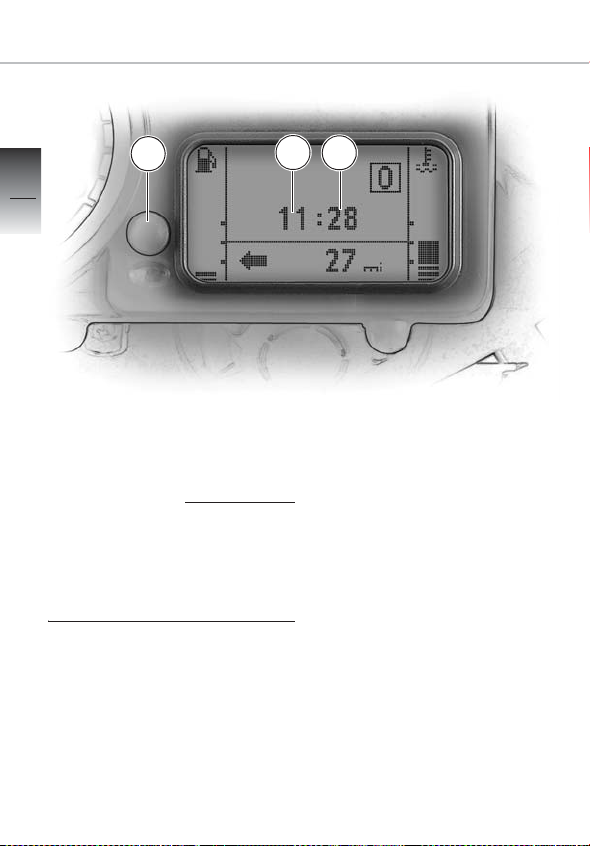
Setting clock
Do not attempt to set the
clock unless the motorcycle
is at a standstill
–Risk of accident
• Ignition switch in the
U position
• Press button 1 for longer than
2 seconds, until the clock
enters set mode
– Hours reading 2 starts flash-
ing: briefly press button 1 to
set
2
3
• Press button 1 again for
longer than 2 seconds
– Minutes reading 3 starts
flashing: briefly press button 1
to set
• Press button 1 again for
longer than 2 seconds to exit
set mode
Set mode is automatically
exited if 20 seconds elapse
without the button being
pressed.
Page 41
A
Windshield
1
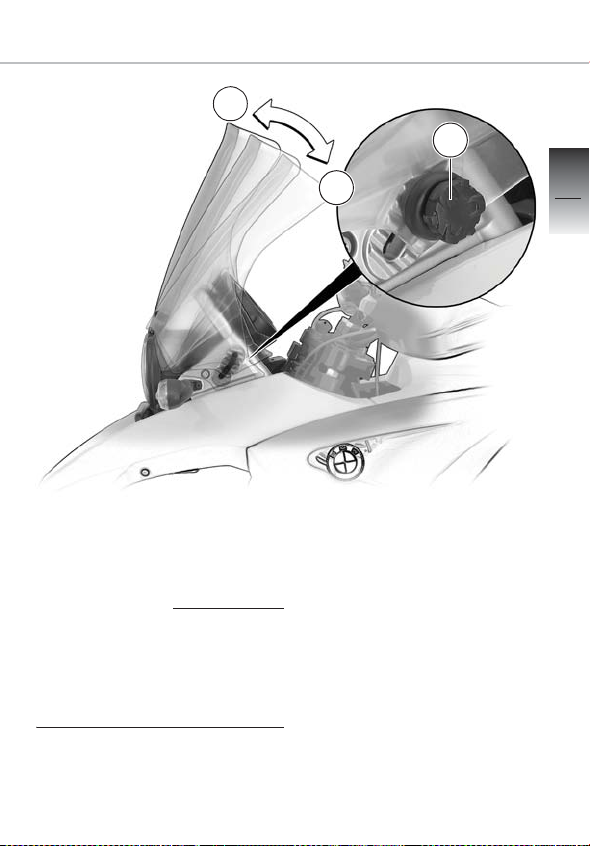
Adjusting windshield
Always be sure to adjust clamping screws 1 on left and right
symmetrically and hand-tighten
the screws.
• Slacking clamping screws 1
on left and right until the windshield can be adjusted
B
You can set the windshield to
any of six different positions.
• Move the windshield in the
A or B direction
• Carefully retighten clamping
screws 1 on left and right
13
39
Operation
Page 42
Handlebar levers
3
40
1
Operation
-
Clutch lever, adjusting
+
Sudden changes in the amount
of play at the lever or a spongy
feeling when it is applied may
indicate a fault in the hydraulic
system.
If you are doubtful about the reliability of the hydraulic clutch
operating system consult a
specialized workshop,
preferably an authorized BMW
Motorrad retailer.
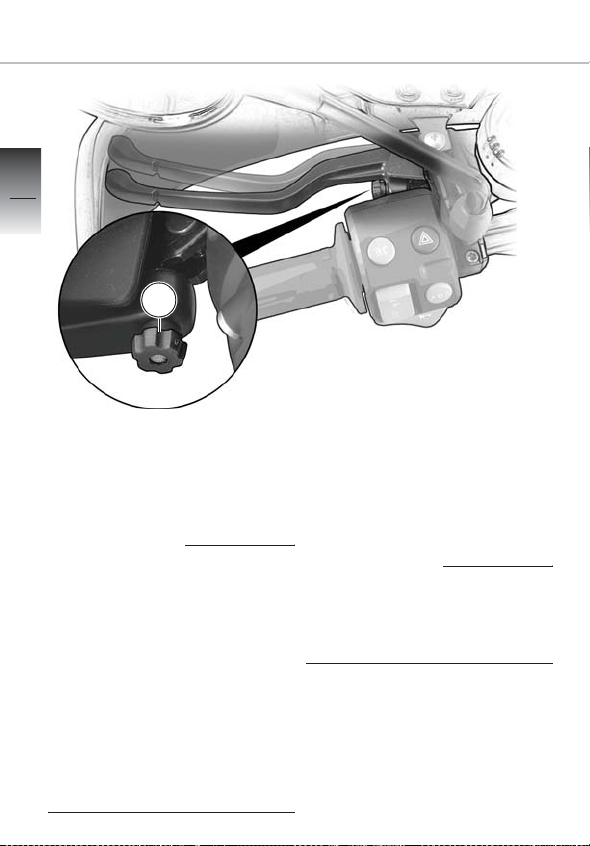
Do not attempt to turn adjusting screw 1 while riding the
motorcycle.
• Turn adjusting screw 1 to set
the most comfortable span:
– Turn clockwise: to increase
span
– Turn counter-clockwise:
to reduce span
Page 43
Handlebar levers
1
13
41
Operation
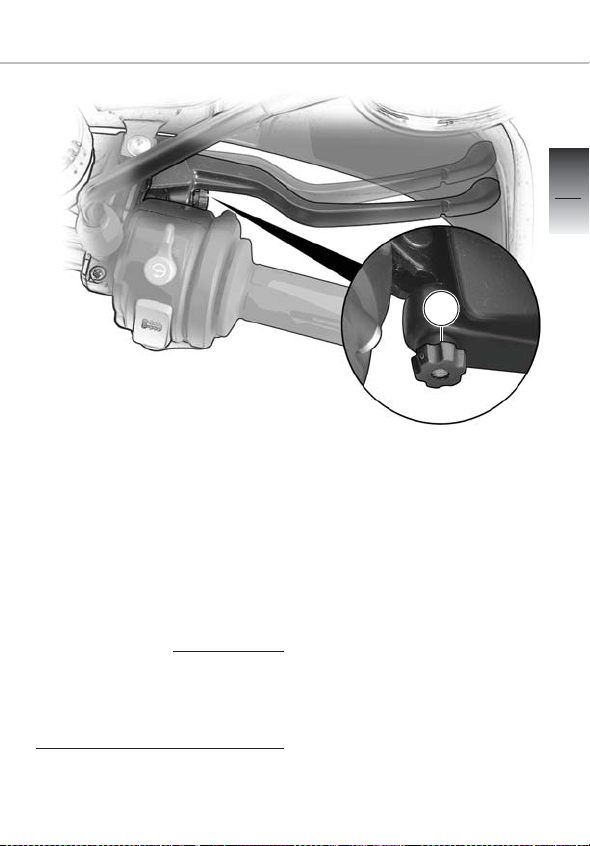
Adjusting handbrake lever
Do not attempt to turn adjusting screw 1 while riding the
motorcycle.
• Turn adjusting screw 1 to set
the most comfortable span:
-
– Turn clockwise: to increase
span
– Turn counter-clockwise: to
reduce span
+
Page 44
3
42
Operation
Lights
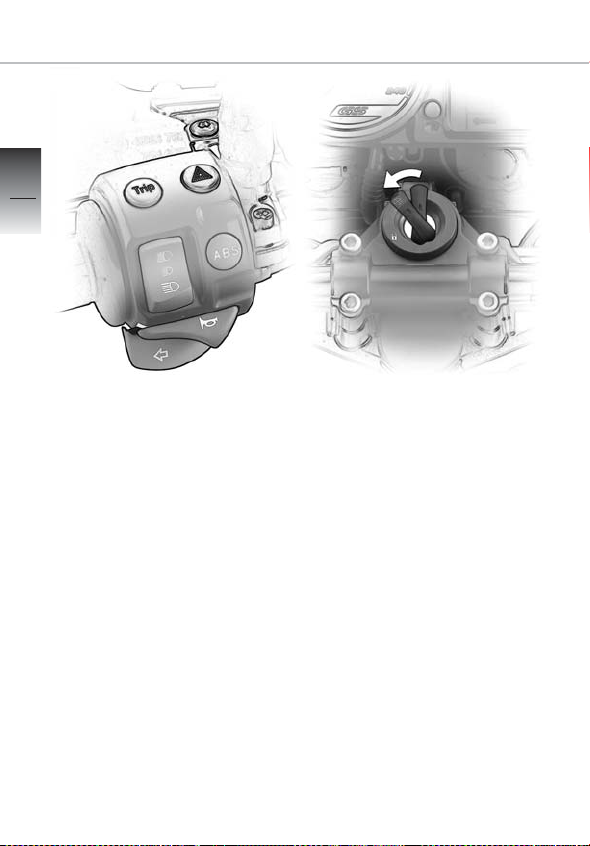
Switching on parking light
You can switch on the parking
light only immediately after
switching off the ignition, when
the ignition key is in the
V position.
Switching on low-beam head light
The low-beam head light
switches on automatically when
you start the engine.
• Switch off the ignition
• Press left turn indicator switch
– The parking light is on
Switching off the parking light
• Switch the ignition on and off
again
– The parking light is off
Page 45
Lights
1
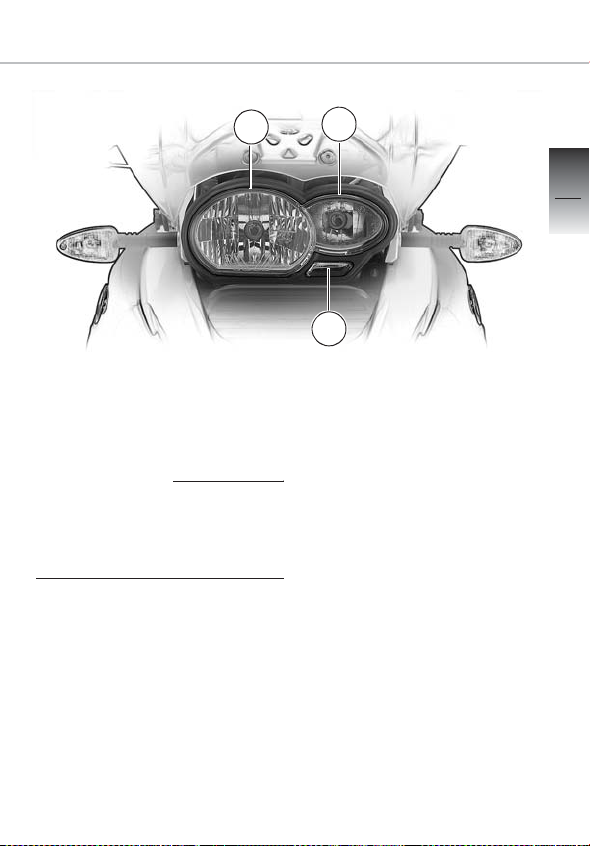
Checking lights
Always check that all lights are
in full working order before
riding off.
If turn indicator repeater flashes
at twice the usual speed:
Defective flasher bulb.
Similarly, general warning
e and warning indicator
light
7 in the multifunction dis-
play (
b 19) both light up notify
you if a bulb fails.
2
3
1 Low-beam head light
2 High-beam headlight
3 Parking light
For instructions on changing
bulbs for parking light, highbeam/low-beam head lights,
rear light, brake light and flashing turn indicators, (
b 133-139).
13
43
Operation
Page 46

Lights
3
44
Operation
Headlight setting RHD/ LHD traffic
If the motorcycle is ridden in a
country where the opposite rule
of the road applies, its asymmetric low beam will tend to
dazzle oncoming traffic.
Consult a specialized workshop, preferably an authorized
BMW motorcycle retailer, to
have the headlight adjusted to
suit whichever rule of the road
applies.
Adhesive films with unsuitable
adhesives can damage the
headlight lens.
Headlight beam throw adjustment
Headlight beam throw is kept
constant when spring preload is
adjusted to suit load.
For instructions on adjusting
spring-strut and shockabsorber settings to suit load,
b 50-52).
(
Consult a specialized workshop, preferably an authorized
BMW motorcycle retailer, if you
are unsure whether the headlight basic setting is correct.
Page 47
1
Lights
13
45
B
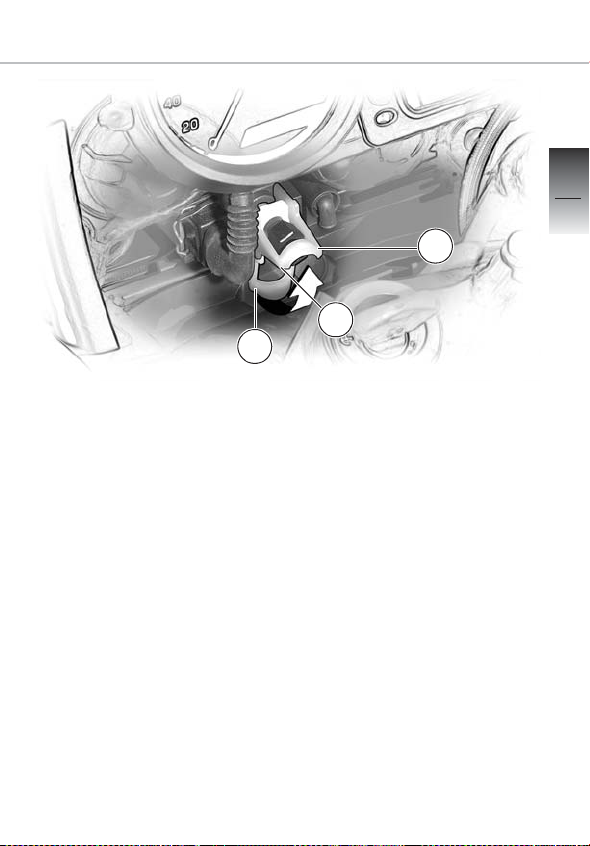
Headlight setting with motorcycle heavily loaded
Only if the load carried on the
motorcycle is very high, the
headlight beam can also be
lowered by moving pivot
lever 1. This shortens the beam
throw.
A
Operation
Pivot lever 1:
A = neutral position
B = high load
Page 48
3
46
Seat
B
A
Operation
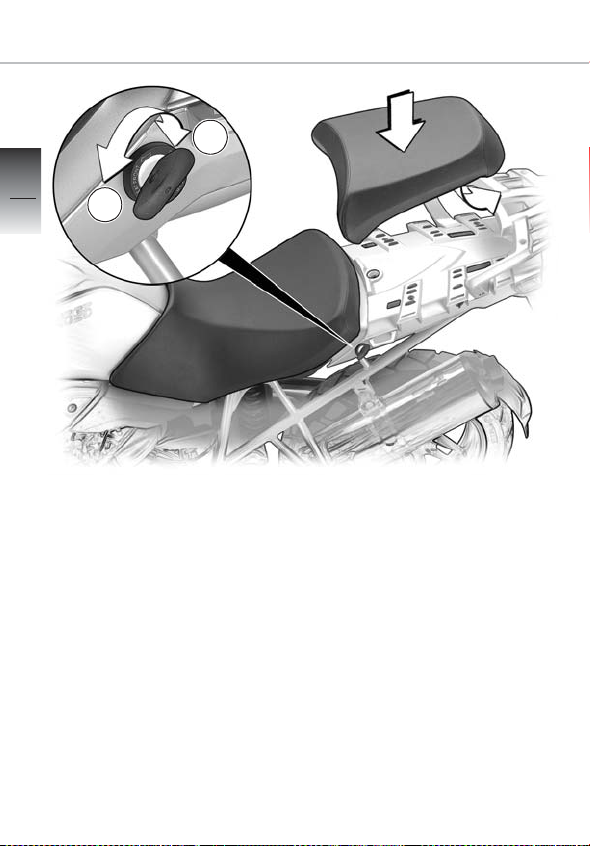
Removing seat
You must remove the rear seat
before the front seat can be
removed.
If it is difficult to turn the key in
direction A, apply firm pressure
on the driver’s seat for support.
• Turn the key in the seat lock
to position B
• Remove the rear seat
• Turn the key in the seat lock
to position A
• Pull front seat to the rear and
remove.
– Toolkit, Rider's Manual and
battery are accessible
Page 49
A
B
1
Adjusting seat
A
B
Seat
2
13
47
Operation
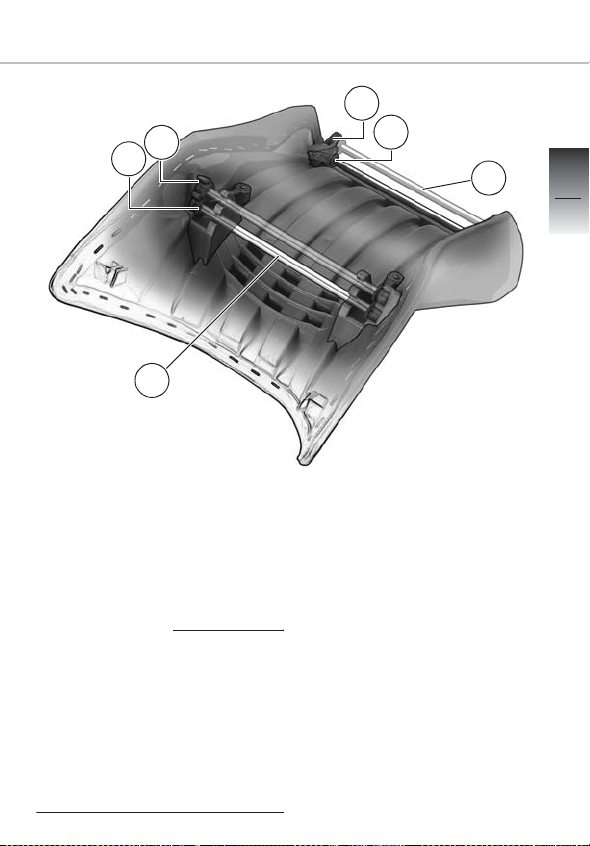
Front and rear retainers 1 and 2
for height adjustment must always both be set to the same
height. Never set retainer 1 to
the high position and retainer 2
to the low position, or vice
versa.
• Remove the rear seat
• Remove the front seat and
turn it upside down
The front seat can be set to
either of two positions by
means of retainers 1 and 2:
A = high
B = low
Page 50
Seat
3
48
Operation
Installing seat
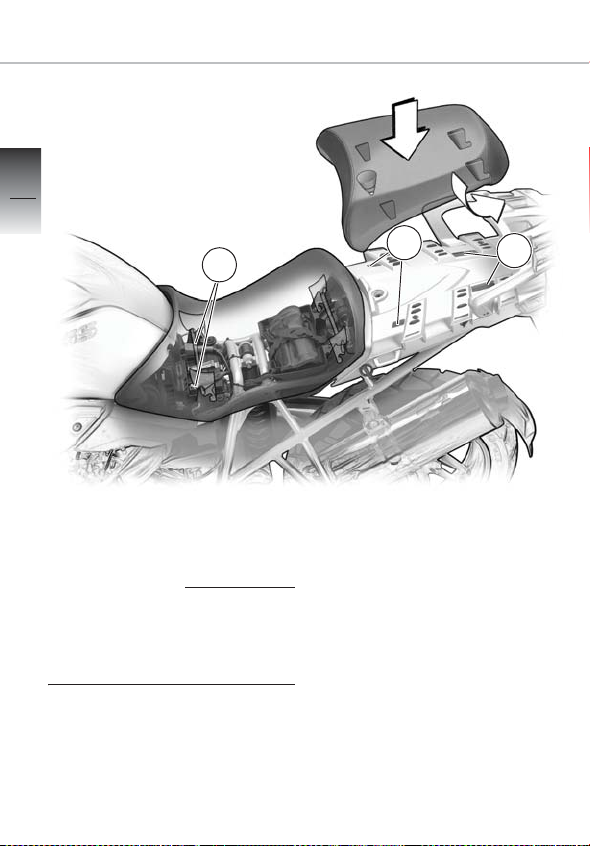
When installing, make sure
that front and rear seats are
firmly located.
2
1
3
Toolkit must be packed as flat
as possible.
• Set the front seat to the
desired height (
• Slide the front seat into front
lock 1 and press firmly on the
seat to secure it
b 47)
• Engage the rear seat in rear
retainers 3 first, and then in
front retainers 2
• Press firmly to engage the
seat
Page 51
Adjusting mirrors
Simply turn the mirrors to adjust
them:
• Grip the mirror by the edge of
the glass and
• turn it to the desired position
Mirrors
1
13
49
2
Operation
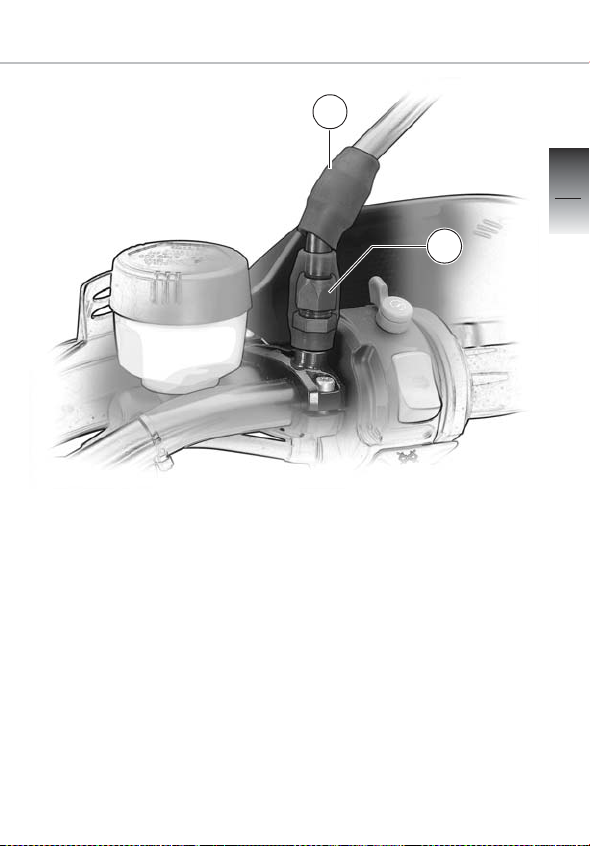
Adjusting mirror arms
In order to improve ergonomics
or if a mirror arm has worked
loose:
• Push back protective cap 1
on the threaded fastener of
the left or right mirror arm, as
applicable
• Loose union nut 2
• Turn the left or right mirror
arm to the desired position
• Retighten union nut 2
• Pull protective cap 1 back into
position concealing the
threaded fastener
Page 52
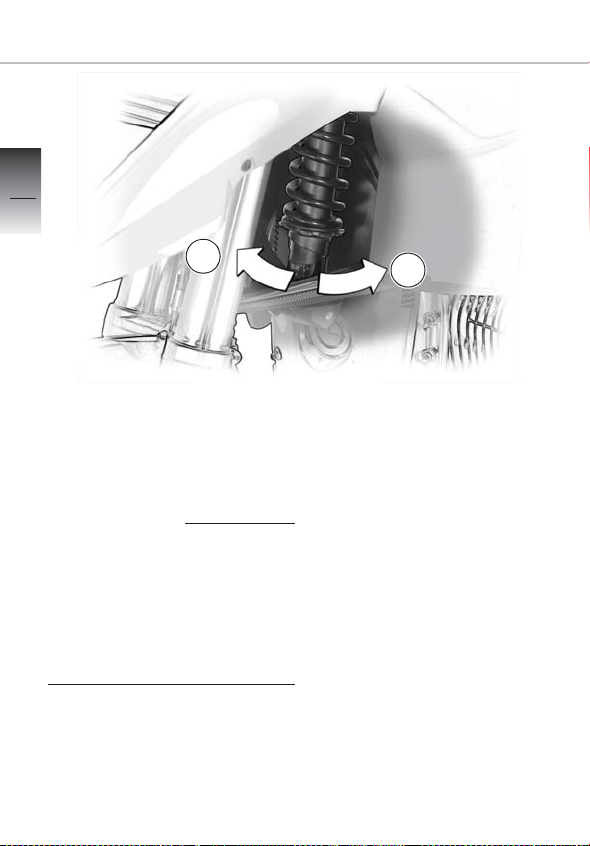
Spring preload
3
50
A
Operation
Before starting off, adjust
spring preload to suit the surface on which you intend
riding.
Check and correct the tire
pressures (b 53).
Adjusting spring preload of front wheel
• Make sure the ground is level
and firm and lift the motorcycle onto its main stand
B
• Adjust preload of spring to a
stage between 1 and 9:
3rd stage – paved road
5th stage – loose gravel or
similar
9th stage – off-road
Fine-tune the setting in accordance with your personal
preferences.
Stage 1:
Turn all the way in the direction
indicated by A
Stage 9:
Turn all the way in the direction
indicated by B
Page 53
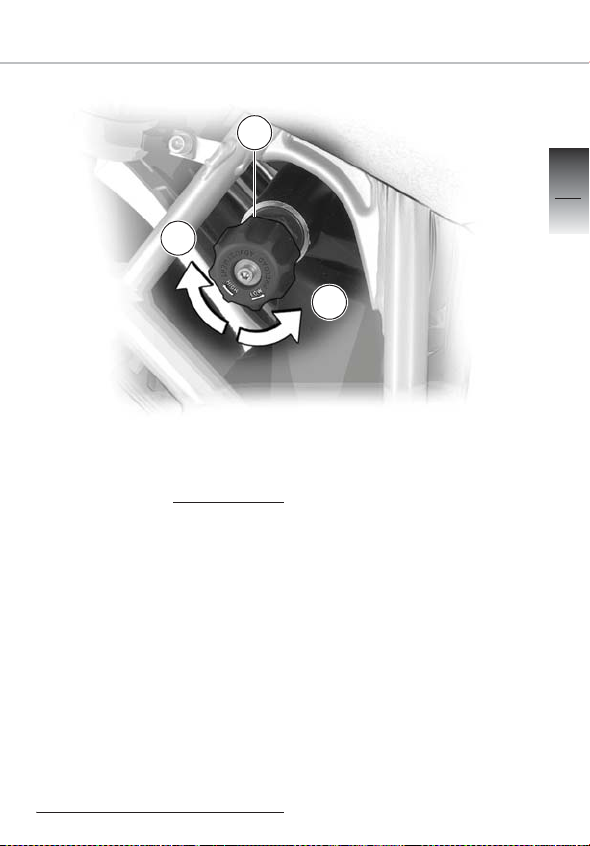
1
H
Before starting off, adjust
spring preload to suit the
gross weight of the motorcycle and the surface on which
you intend riding.
Check and correct the tire
pressures (
For safety reasons, never attempt to alter spring preload
while the motorcycle is being
ridden.
Always bring the motorcycle
to a stop before adjusting.
b 53).
Spring preload
13
51
L
Operation
Adjusting spring preload of rear wheel
LOW setting (one-up):
•Turn knob1 as far as it will go
counter-clockwise in LOW
direction (L) as indicated by
arrow.
• Then turn it ten clicks clockwise
HIGH setting (for off-road use,
or two-up with luggage)
•Turn knob1 as far as it will go
clockwise in HIGH direction
(H) as indicated by arrow.
Fine-tune the setting in accordance with your personal
preferences.
Page 54
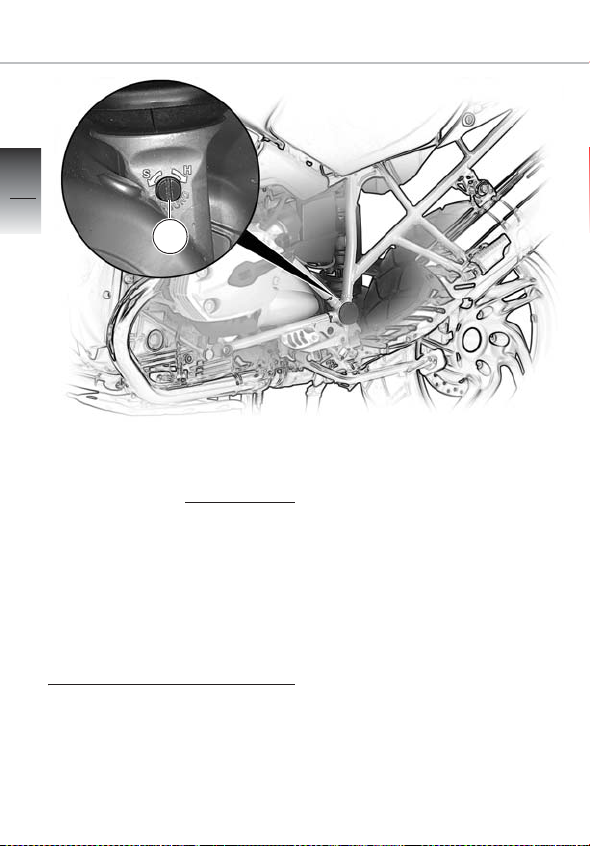
Shock-absorber adjustment
3
52
1
Operation
Basic setting (one-up):
• Turn adjusting screw 1 as far as
Before starting the journey,
adjust the shock absorber to
match total weight.
If spring preload is changed,
it is essential to adjust the
shock-absorber setting accordingly (and vice versa).
• Make sure the ground is level
and firm and lift the motorcycle onto its main stand
• Adjust the rear shock
absorber
• Turn adjusting screw 1 one
Hard setting “H”:
• Turn adjusting screw 1 as far
Soft setting “S”:
• Turn adjusting screw 1 as far
it will go clockwise in the direction indicated by the H arrow
and a half turns counterclockwise in the direction
indicated by the S arrow
as it will go clockwise in the
direction indicated by the
H arrow
as it will go counter-clockwise
in the direction indicated by
the S arrow
Page 55

Checking tire pressures
Incorrect tire pressures have
a considerable influence on
handling and on tire life.
Adjust tire pressures to suit
total weight. Never exceed either the motorcycle’s gross
weight or the individual wheel
load limits (b 55).
Tires cold:
• Unscrew and remove valve
cap
• Check/correct tire pressure
• Screw the valve caps back on
tightly
Wheels
Tire pressures for
road tires and massive-bar
tires:
front rear
One-up 31.9 psi 36.3 psi
(2.2 bar) (2.5 bar)
Two-up or
luggage 36.3 psi 42 psi
(2.5 bar) (2.9 bar)
passenger and
luggage 36.3 psi 42 psi
(2.5 bar) (2.9 bar)
Screw the valve caps back on tightly
At high road speeds, tire
valves have a tendency to
open as a result of centrifugal
force.
Use only metal valve caps
with rubber seals.
Valve caps that are screwed
on well prevent air from escaping suddenly.
13
53
Operation
Page 56
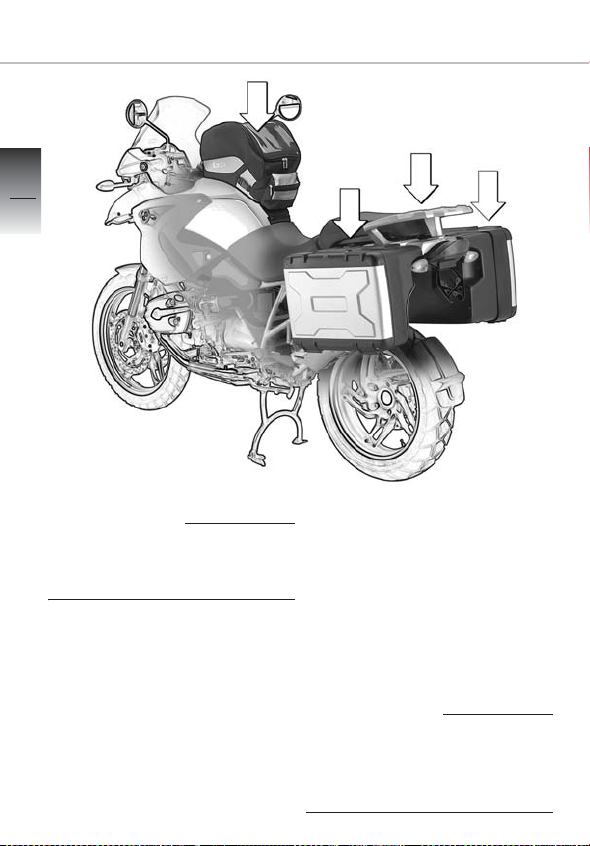
Loading
3
54
Operation
Correct loading
Overloading can impair the
handling of your motorcycle.
• Make sure that the weight is
uniformly distributed between
right and left
• Pack heavy items at the bottom and toward the inboard
side
• Maximum load in each case
left and right:
approx. 22 lbs (10 kg)
• Maximum load in tank-top
rucksack
max. approx. 11 lbs (5 kg)
each
• Check that fastenings are
correctly positioned and tight
OA
and topcase
OA
With cases installed, it is advisable not to exceed 80 mph
(130 km/h).
OA
Page 57

Do not exceed the gross weight
limit of 937 lbs (425 kg)
Do not exceed the wheel load
limits of 375 lbs (170 kg) at the
front and 617 lbs (280 kg) at the
rear.
Adjust shock absorbers front
and rear, rear-wheel spring and
tire pressures to suit total
weight (
The total weight is the sum of:
– motorcycle with full tank
–rider
–passenger
– luggage
b 50-, 53).
Loading
13
55
Operation
Page 58
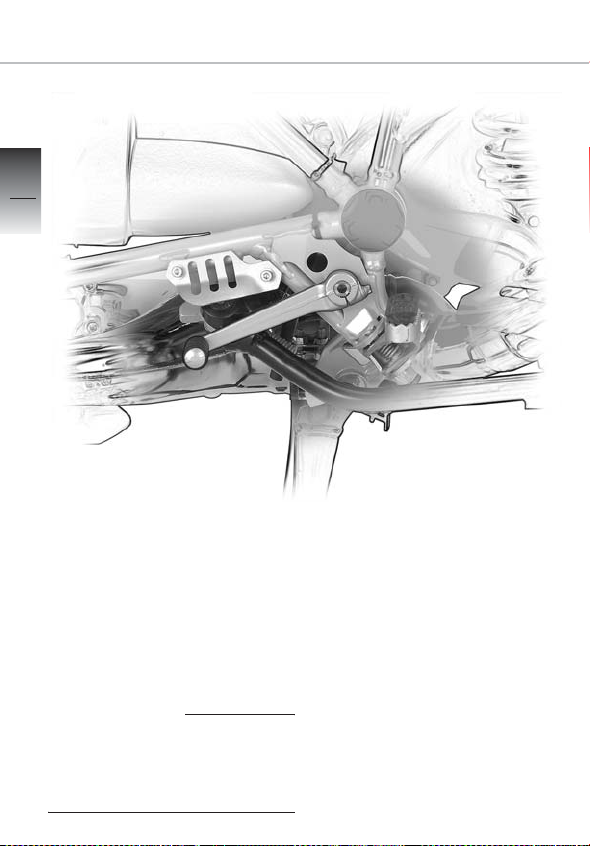
Shift lever
3
56
Operation
For safety reasons, do not attempt to change the position
of the shift lever.
If you would like settings
changed to suit your personal
preferences, please contact a
specialized workshop, preferably your authorized BMW
motorcycle retailer.
Page 59

Safety instructions
Checklist
First time out
Before you start
Starting
Running in
Shifting gear
Off-road riding
Parking
Refueling
4
57
Riding
Brake system - general
Page 60

Safety instructions
4
58
Riding
BMW Integral ABS
Motorcycle equipped with
BMW Integral ABS (
OE
b 82-89)
Risk of poisoning
Exhaust fumes contain carbon
monoxide, which is colorless
and odorless but highly toxic.
Inhaling exhaust fumes therefore represents a health hazard and can even cause loss
of consciousness with fatal
consequences.
Do not run the engine in an
enclosed space.
When the ignition is switched
off or if the BMW Integral ABS
fails, only a RESIDUAL BRAKING FUNCTION remains
available for slowing the
motorcycle (
Under these circumstances
you must apply CONSIDERABLY higher pressure to the
brake levers in order to apply
the brakes, and lever travel is
longer.
b 85).
Risk of fatal accident
Your motorcycle is equipped
with digital engine electronics
and a high-power ignition
system.
When the engine is running or
the ignition switched on, never touch electrically live parts
of the ignition system or the
digital engine electronics.
Page 61

Catalytic converter
Safety instructions
4
59
To avoid damage to the catalytic converter:
• Do not run the fuel tank dry
• Do not run the engine with a
spark-plug lead disconnected
• Do not exceed the enginespeed limits marked on the
tachometer
• Comply with all specified
maintenance intervals
• Stop the engine at once if it is
misfiring
• In the event of misfiring or a
severe drop in engine power,
consult a specialized workshop, preferably an authorized BMW Motorrad retailer.
If misfiring or malfunction of the
fuel-air mixture preparation system causes unburned fuel to
reach the catalytic converter,
there is a risk of it overheating
and being damaged.
Riding
Risk of fire
High temperatures occur at the
exhaust system, particularly if a
catalytic converter is installed.
Make sure that whether riding
or standing still or when the
motorcycle is parked, no easily flammable material
(for example hay, grass,
leaves, clothing or luggage
etc.) can come into contact
with the hot exhaust system.
Do not allow the engine to
idle unnecessarily or for prolonged periods of time
– risk of overheating or fire!
Ride away immediately after
starting the engine.
Page 62

Checklist
4
60
Riding
Use the safety checklist – before every journey
Please perform the safety
check accurately. If your motorcycle needs any routine maintenance, you may be able to
attend to it before the journey
starts, see the chapter entitled
Maintenance in this manual, or
you can have it performed by a
specialized workshop, preferably your authorized BMW
Motorrad retailer.
This is to ensure that your
motorcycle complies with roadvehicle use and safety laws.
Your vehicle must be in perfect
technical order: this is a basic
prerequisite for your safety and
the safety of other road users.
Page 63

Checklist
– Fuel level
– Positions of the handlebar
levers
–Brakes
– Brake fluid level
– Clutch fluid level
– Warning lights and indicator
lights
–Lights
– Shock-absorber setting and
spring preload
– Condition of wheels and tires,
tread depth and tire pressures
– Load, gross weight
– Check secure hold of luggage
system
Checklist
4
61
Riding
– Check regularly (every time
you stop for fuel):
– Engine oil level
(every second/third stop for
fuel):
– Brake pads
If you encounter any problems
or difficulties, it is always best to
contact your authorized BMW
motorcycle retailer. He will provide the necessary advice and
assistance.
Page 64

First time out
4
62
Riding
Handling your motorcycle safely
Each motorcycle has a character all its own. It is time now for
you to familiarize yourself with
the way your own motorcycle
behaves:
– acceleration
– roadholding
–cornering
–braking …
These are all things you need to
become familiar with.
Please remember too that if the
motorcycle has not yet covered
1,000 kilometers
(approx. 600 miles), the engine
is not yet fully run in.
BMW Integral ABSOE incorporates a brake booster, so braking efficiency is significantly
higher than with conventional
brake systems.
If you ride at high speed, always
bear in mind that various
boundary conditions such as
the spring preload setting and
the shock absorber setting, an
unbalanced luggage load,
loose clothing, low tire pressure, poor tire tread, and so on,
can affect the handling of your
motorcycle.
Page 65

First time out
4
63
Riding
Safe motorcycling doesn’t
depend on the motorcycle
alone.
Your own skill and commonsense are needed too.
The key to genuine safety on
the road is a sensible balance
between the motorcycle’s technical features and the rider’s
skill, so that together they form
a single efficient unit.
Riding safely in traffic and offroad calls for a sense of
responsibility to your passenger
and to other road users.
Do not ride the motorcycle after drinking alcoholic beverages. Even small amounts of
alcohol or drugs, particularly
if taken in conjunction with
medicines, will adversely affect your perception and your
ability to assess situations
and make decisions, and also
slow down your reflexes.
Take to the road now by all
means, but think carefully about
everything you do.
Page 66
Before you start
4
64
A
Riding
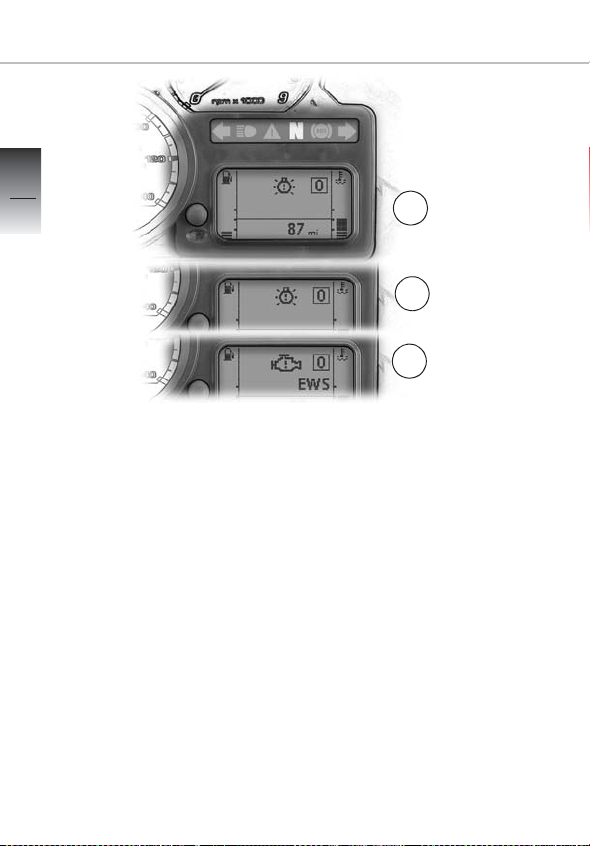
Predrive check
A predrive check is performed
when you switch on the ignition,
in other words when the ignition
switch is in the
the warning lights come on
briefly and then go out again.
The multifunction display
shows the following in the order
in which they are described
below:
–Phase1, A, with General
warning light
–Phase2, B, with General
warning light
–Phase3, C, without General
warning light e
U position. All
e red
e yellow and
B
C
Once the predrive check completes, the various gauges and
indicators in the instrument
panel show their current values.
The predrive check is aborted if
you start the engine before it
completes.
ABS self-diagnosis
If the motorcycle is fitted with
BMW Integral ABS
performs self-diagnosis (
OE
, the ABS
b 86).
Page 67
B
Before you start
A
1
Switching on the ignition
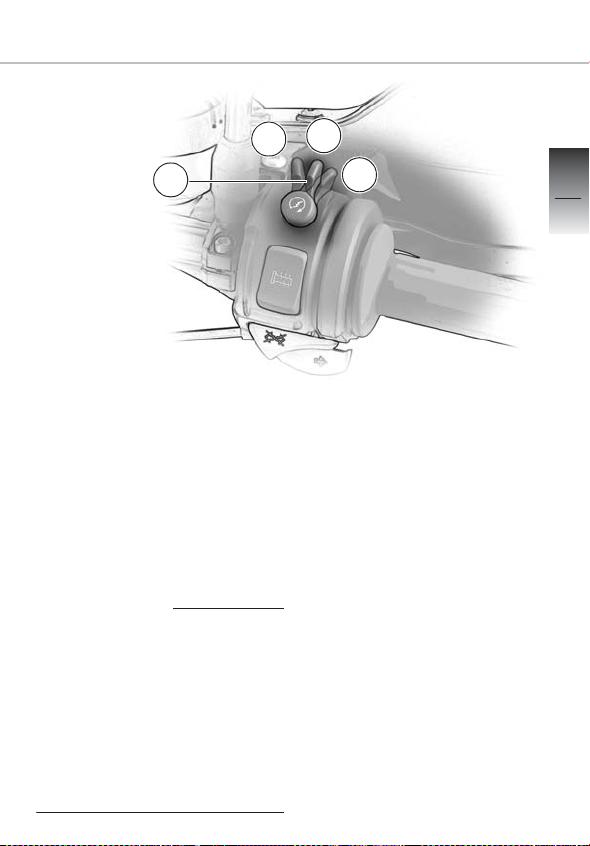
• See the notes on the electronic
immobilizer (EWS) (
– Move the kill switch 1 to the
run position A
• Ignition switch in the
b 30)
U position
– Predrive check is performed
– ABS self-diagnosis is
performed
OE
ABS
self-diagnosis is not
performed unless both brake
levers are in their fully released positions.
Only the RESIDUAL BRAKING
FUNCTION is available until
self-diagnosis is completed
(b 85).
B
Starting on gradients:
Always switch on the ignition
with gear engaged, clutch lever
released and both brake levers
released.
Self-diagnosis cannot be performed if you do not follow this
procedure.
When self-diagnosis completes, apply the brakes, disengage the clutch, and start the
engine.
4
65
Riding
Page 68
Before you start
4
66
Riding
1
2
Fully retract side stand
If the side stand is extended
and a gear engaged, you cannot start the motorcycle.
Selecting neutral
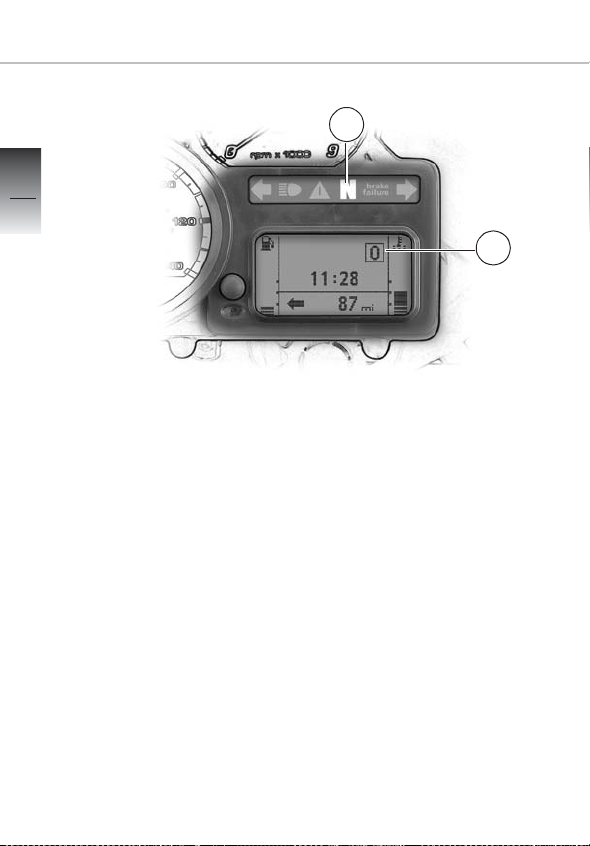
– Neutral indicator light 1
k lights up and gear
green
indicator 2 in the multifunction display shows 0.
Engine does not start:
– Move the gear lever to the
position or
– Do not pull the clutch lever
until after you switch on the
ignition
Engine stops when first gear is
engaged:
– Fully retract the side stand; if
necessary consult the trou-
bleshooting chart (
b 109)
k
Page 69
Starting
Starting
Do not allow the engine to idle
unnecessarily or for prolonged
periods of time
— risk of overheating or fire.
Ride away immediately after
starting the engine.
To avoid overheating the aircooled engine and possible
damage as a result, avoid even
short warming-up periods at a
standstill.
Avoid high engine speeds after
a cold start.
The start attempt is automatically interrupted if battery voltage is too low.
Before trying again: recharge
the battery.
1
Do not turn the throttle twistgrip
when starting the engine.
At ambient temperatures below
32 °F (0 °C), switch on the ignition and pull the lever to disengage the clutch when starting
the engine.
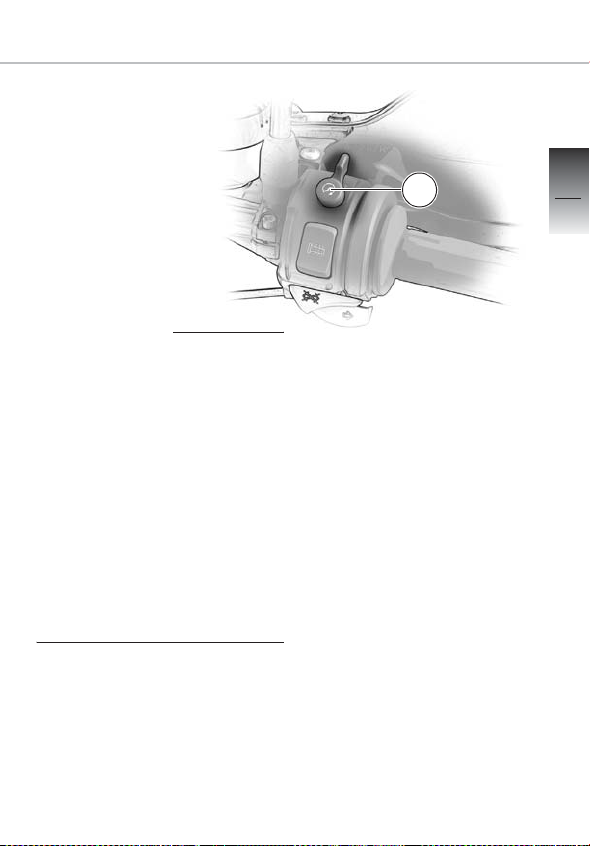
• Press starter pushbutton 1
– The engine will then start
• Observe instruments and display for warnings and information (
b 20-25)
4
67
Riding
Page 70
Running in
4
68
Riding
Exceeding the specified engine
speeds while running in will lead
to increased engine wear.
Running-in engine speeds
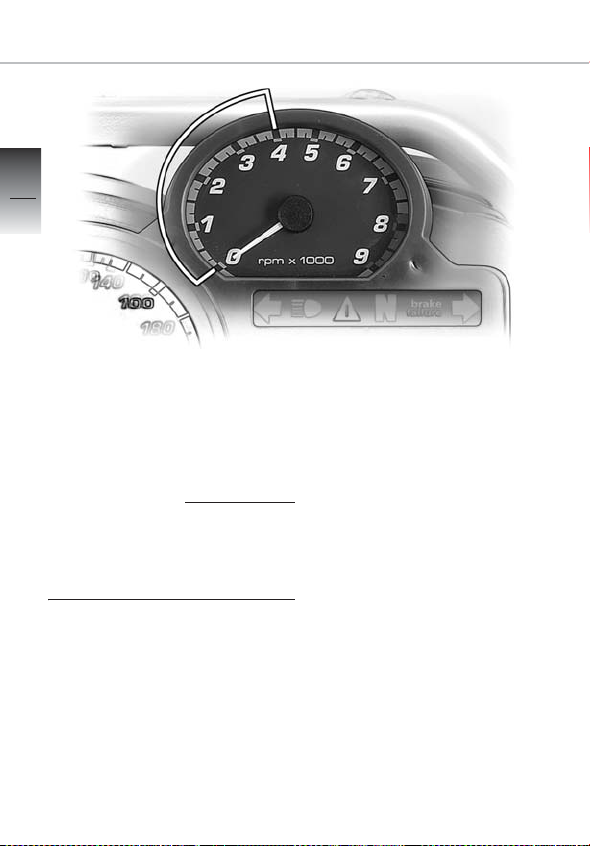
From 0 to 600 miles (1,000 km)
• Engine speed max. 4,000 rpm
and no full-load acceleration
• The first inspection should
always be performed after
approx. 300 to 700 miles (500
to 1,200 km).
Make an appointment with
your authorized BMW Motorrad retailer in good time, so
that the work can be performed punctually.
While running in the motorcycle,
vary the throttle opening and
engine-speed range frequently.
Try to do most of your riding during this initial period on twisting,
fairly hilly roads rather than highspeed main roads and highways.
From 600 to 1,200 miles
(1,000 to 2,000 km)
• Engine speeds can be gradually increased after 600 miles
(1,000 km)
• Avoid lengthy periods at full
load until approx. 1,200 miles
(2,000 km) have been
covered
Page 71

Brake pads: running in
New brake pads must “bed
down” and therefore do not
achieve their optimum friction
levels during the first
300 miles (500 km).
This slight initial reduction in
braking efficiency can be
compensated for by exerting
greater pressure on the lever.
Try to avoid all unnecessary
hard braking during this initial
period.
Comply with the notes on
BMW Integral ABS
(b 82-89).
OE
Running in
4
69
Riding
Tires: running in
New tires have a smooth surface. This must be roughened
by riding in a restrained manner at various heel angles
until the tires are run in.
This running in procedure is
essential if the tires are to
achieve maximum grip.
Page 72
Shifting gears
4
70
Riding
Load changes
Try not to open or close the
throttle abruptly, particularly
on wet or slippery roads.
1
Engine speed
Do not use the high end of the
engine-revolutions range in any
gear unless the engine is at
operating temperature
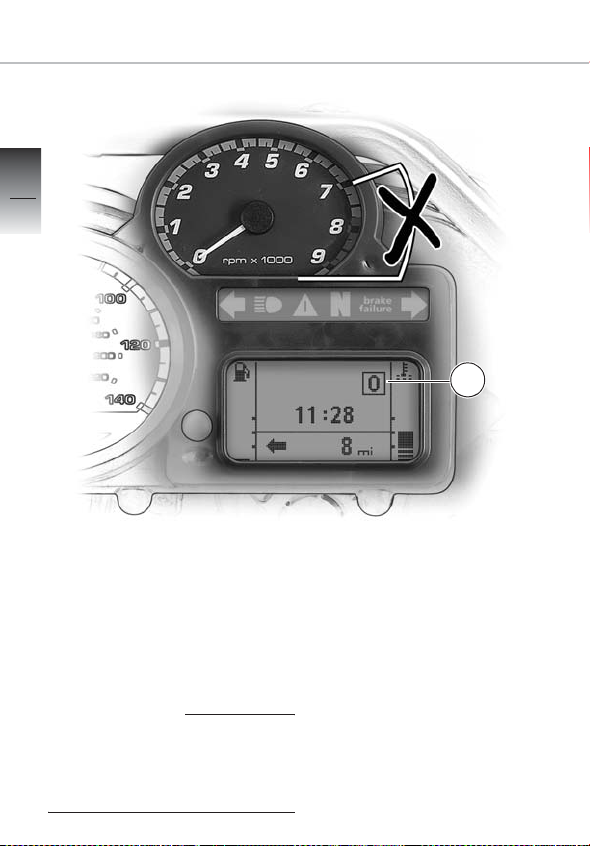
When the tachometer needle
enters the red zone on the dial,
the fuel supply is interrupted in
order to protect the engine
against over-revving.
The governor cuts in at
7,900 rpm.
Page 73
Shifting gears
4
71
Riding
Shifting gears
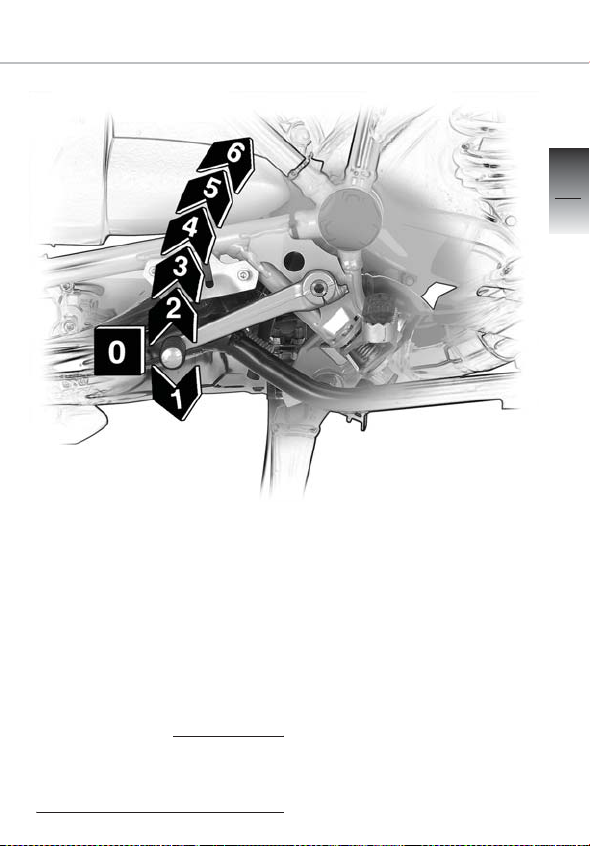
Always disengage the clutch in
order to shift gear.
Digital gear indicator 1 in the
multifunction display tells you
which gear is engaged.
Page 74

Off-road riding
4
72
Riding
Wheels and tires
If you lowered the pressure in
the tires for more traction
when riding off-road, remember that you must immediately reinflate the tires to the
correct pressures when you
return to paved roads (b 53).
This motorcycle is a touring Enduro machine, which means it
can also be used for light offroading on unsurfaced tracks. If
you are contemplating heavy
off-road usage or long trips that
will involve a lot of off-road
riding, it is advisable to fit crossspoked wheels
avoid damage to the cast-aluminum rims of the standard
wheels.
OE
in order to
Page 75

Dirt or mud on brakes
Dirt on the brake disks or
brake pads will increase the
braking distance.
The brakes must first be
applied until the disks and
pads are clean.
Dirt on the brakes increases
the rate of pad wear.
BMW Integral ABS
If you are riding off-road or on a
loose surface, you might prefer
to deactivate the ABS function.
b 88-89).
(
OE
Off-road riding
4
73
Riding
Spring preload
Adjust spring preload and the
shock-absorber settings before
you start off-roading.
Remember to reset spring preload and the shock absorbers
to the correct setting when
you return to paved roads
(b 50-52).
Page 76
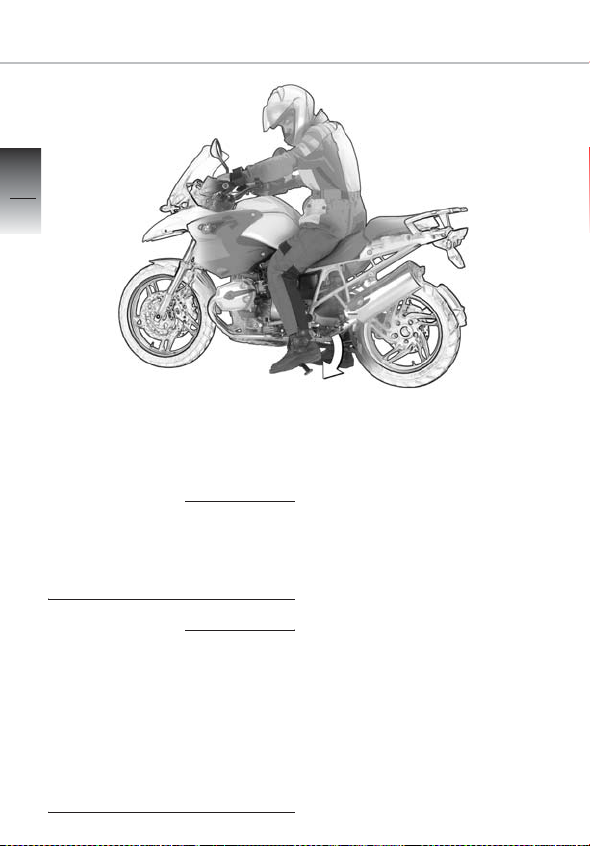
Parking
4
74
Riding
Placing motorcycle on side stand
For safety reasons, never sit
on the motorcycle with the
side stand extended.
Stop the engine before using
the side stand.
Make sure the surface under
the stand is firm.
On a grade, the motorcycle
should always face uphill;
select 1st gear.
• Switch off the ignition
• Pull the handbrake lever
• Hold the motorcycle upright
and balanced
• Use your left foot to extend
the side stand fully (arrow)
• Slowly lean the motorcycle to
the side until its weight is
taken by the stand and dismount from the motorcycle
• Turn the handlebars to full left
b 29)
lock (
• Check that the motorcycle is
firmly supported
Page 77
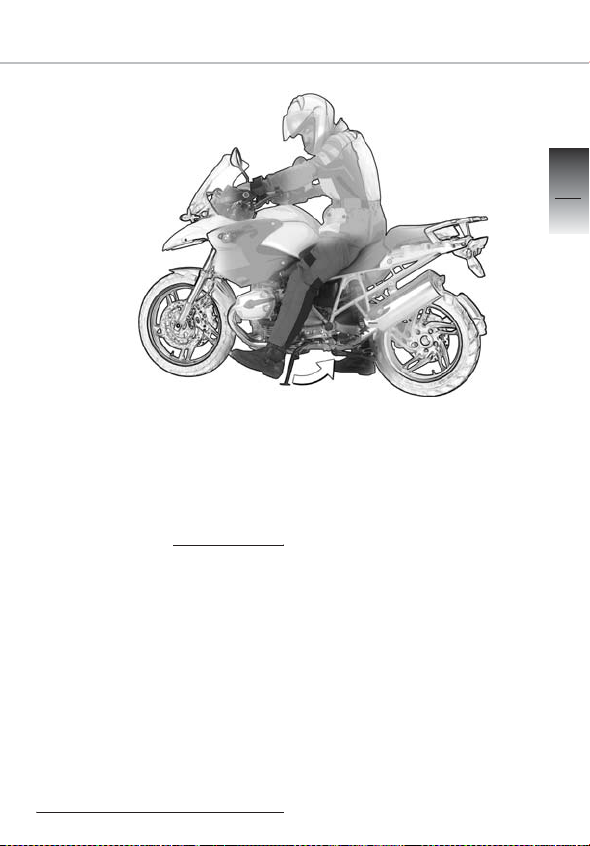
Removing motorcycle from side stand
Parking
4
75
Riding
If the motorcycle is equipped
with BMW Integral ABS
RESIDUAL BRAKING FUNCTION is available when the ignition is switched off (
Make sure the side stand is fully
retracted before you ride off.
– Allowing the motorcycle to
roll with the side stand
extended represents a
safety risk.
OE
b 85).
only a
• Ignition key in the
position
– Handlebars unlocked
• Both feet on the ground, no
weight on the motorcycle
• Pull the handbrake lever
• Slowly raise the motorcycle to
the upright position and keep
it balanced
• Sit on the motorcycle and use
your left foot to retract the
side stand
V or U
Page 78
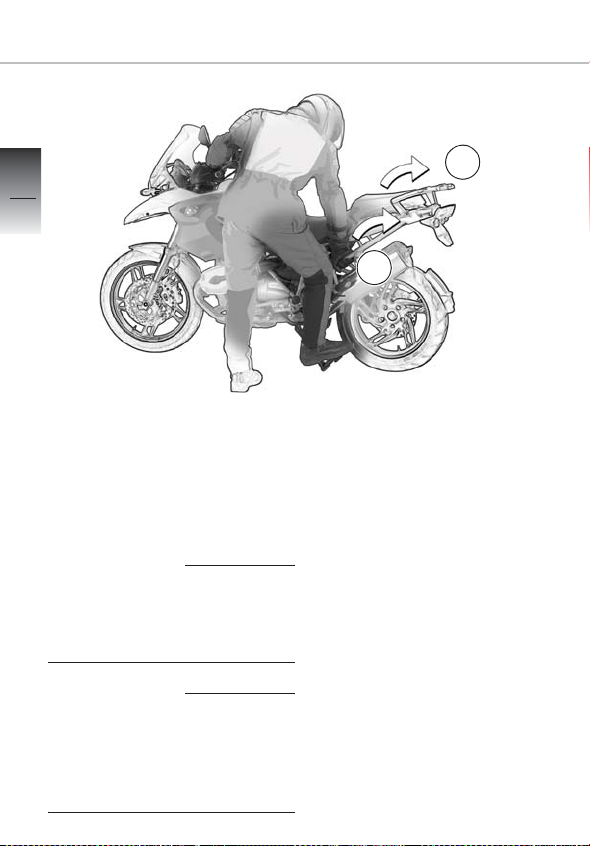
Parking
4
76
Riding
Placing motorcycle on main stand
For safety reasons, never sit
on the motorcycle with the
main stand extended.
Stop the engine before using
the main stand.
Make sure the surface under
the stand is firm.
A
B
• Switch off the ignition
• Hold the left handlebar grip
with your left hand
• Place your right hand on the
luggage rack A or on the rear
frame B
• Place your right foot on the
pin of the main stand, and
press the stand down until its
curved feet touch the ground
• Apply all your body weight to
the stand
• Pull the motorcycle to the rear
and upwards (arrow) until it
rests on the main stand
• Check that the motorcycle is
firmly supported
Page 79
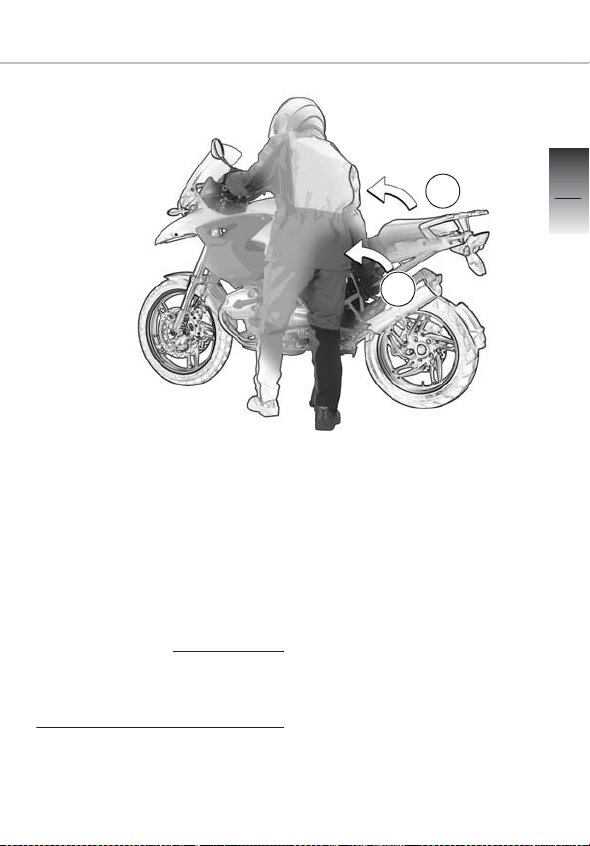
Parking
Removing motorcycle from main stand
Make sure the main stand is fully retracted before you ride off.
• Ignition key in the V or U
position
– Handlebars unlocked
A
B
• Hold the left handlebar grip
with your left hand
• Place your right hand on the
luggage rack A or on the rear
frame B
• Push the motorcycle forward
off the main stand
• Check that the main stand
has fully retracted
4
77
Riding
Page 80
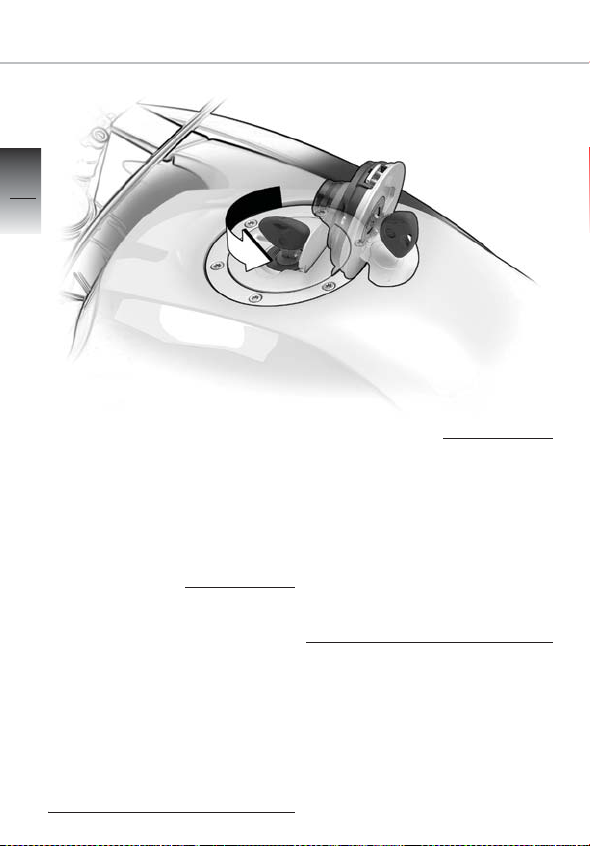
Refueling
4
78
Riding
Refueling
Fuel is flammable and explosive. Do not smoke. Never
bring a naked flame near the
fuel tank.
Fuel expands when hot (for
instance if the fuel tank is in
the sun). For this reason, only
fill as far as the lower edge of
the filler neck.
Leaded fuel will destroy the catalytic converter.
Do not run the fuel tank dry or
you may damage the engine or
catalytic converter.
Fuel can damage plastic parts,
so make sure they are not
brought into contact with fuel.
• Make sure the ground is level
and firm and lift the motorcycle onto its main stand
• Open the fuel filler cap
• Refuel with fuel of the
approved quality
• Close the fuel filler cap
Page 81
Fuel quality
The engine is designed for:
– Super unleaded gasoline
(95 RON) (AKI 90)
It is preferable to use this fuel
quality to comply with the nominal values for performance and
fuel consumption.
In addition, the following fuel
quality can also be used:
– Super Plus gasoline
(98 RON) (AKI 93)
The minimum quality is:
– Regular unleaded gasoline
(91 RON) (AKI 87)
It is recommended that gasoline with a fuel quality lower than
(91 RON) (AKI 87) not be used
Refueling
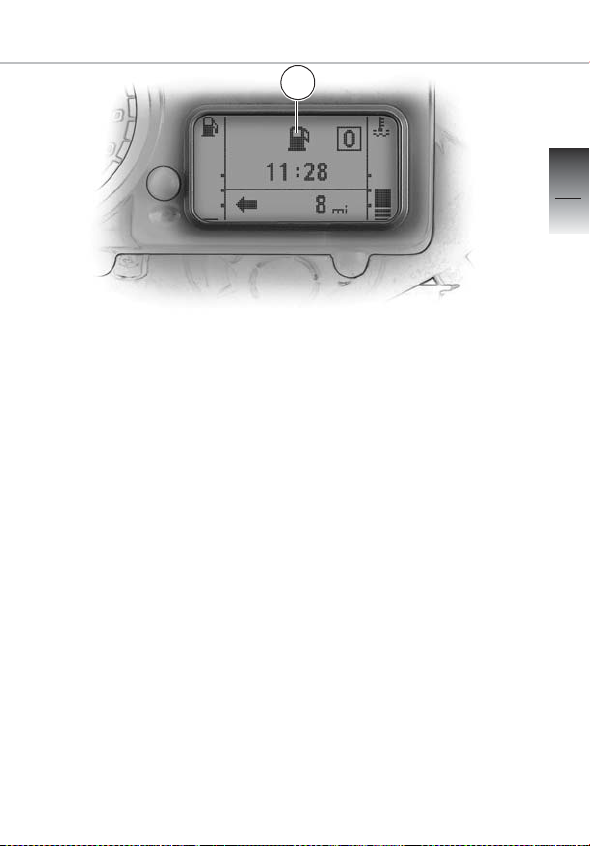
1
Capacity
The fuel gauge in the multifunction display works only when the
ignition is switched on, in other
words when the ignition key is in
U position.
the
– Usable tank capacity is 5.3
gal (20 liters), including a
reserve of approximately
1 gal (4 liters)
When the reserve area is reached,
the symbol 1 flashes and the
turns yellow. At this point there are
about 1 gal (4 liters) of fuel left in
the tank. The estimated residual
operating range appears on the
Tripmaster's display.
e
4
79
Riding
Page 82

Brake system - general
4
80
Riding
Descending mountain passes
There is a danger of the brakes
fading if you use only the rear
brakes when descending
mountain passes. Under extreme conditions, the brakes
could overheat and suffer severe damage.
Wet brakes
After the motorcycle has been
washed, ridden through water
or ridden in the rain, the brake
disks and pads may be wet (or
iced-over in winter), and may
not take effect immediately.
The brakes have to dry before they start to bite.
Salt on brakes
The brakes may fail to take
effect immediately if the motorcycle was ridden on salt-covered roads and the brakes were
not applied for some time.
The layer of salt on the brake
disks and pads must first be
worn away.
Page 83

Brake system - general
Oil and grease on brakes
Brake disks and pads must be
free from oil and grease.
Dirt or mud on brakes
When riding on loose surfaces
or muddy roads, the brakes
may fail to take effect immediately because of dirt or moisture on the disks or brake pads.
The brakes must first be
applied until the disks and
pads are clean.
Dirt on the brakes increases
the rate of pad wear.
4
81
Riding
If the brake lever can be moved
right to the limit of its travel, this
indicates a mechanical or hydraulic fault. The brake system is
defective.
Immediately consult a specialized workshop, preferably an
authorized BMW Motorrad
retailer.
Page 84
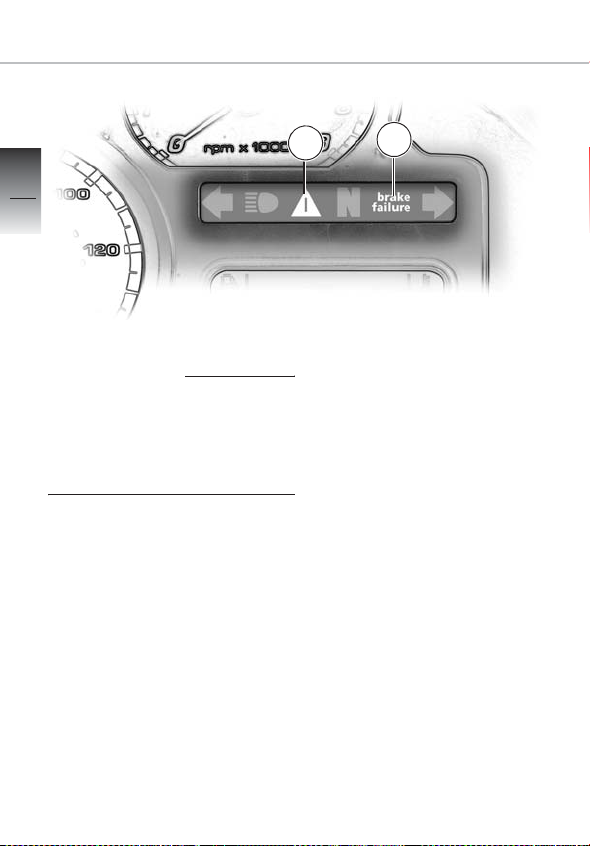
Brake system - with BMW Integral ABS
OE
4
82
Riding
If ABS indicator light 1 or 2
lights up, consult the
ABS troubleshooting table
(b 24-25).
Sensitive electronic control
It takes skill and sensitive control of the brakes to pull up
safely on a motorcycle. If the
front wheel brake locks and the
wheel skids, the necessary longitudinal and lateral stabilizing
forces are lost, and a fall can
result.
For this reason, the rider seldom makes full use of available
braking performance in an
emergency.
1
BMW Integral ABS is the latestgeneration BMW Motorrad ABS
development: by preventing
both wheels from locking and
optimizing braking-force distribution by means of the integral
function, it offers much
improved braking performance
b 84). Full use is made of tech-
(
nical braking capacity to minimize braking distances, even
when road conditions are poor.
When the motorcycle is ridden
in a straight line, the BMW Integral ABS is able to handle
emergency braking safely.
2
Page 85

Brake system - with BMW Integral ABS
Safety margin
But remember: the potentially
shorter braking distances
which BMW Integral ABS
mits must not be used as an
excuse for careless riding. ABS
is primarily a means of ensuring
a safety margin in genuine
emergencies.
– You have to familiarize your-
self with the new, electroni-
cally assisted braking. Try the
brakes several times when
you take your motorcycle out
for the first time. Find out for
yourself how the brakes feel.
per-
– Take care when cornering.
When you apply the brakes on
a corner, the motorcycle's
weight and momentum take
over and even BMW Integral
ABS is unable to counteract
their effects.
OE
4
83
Riding
Page 86

Brake system - with BMW Integral ABS
4
84
Riding
Partially integral brakes
The integral brake function
interlinks the front and rear
brakes, so both wheels are
braked when you operate the
brake lever.
The electronic controller in the
BMW Integral ABS computes
the braking-force distribution
between the front and rear
wheels, and applies the brakes
accordingly.
Braking-force distribution
depends on load and is recalculated every time the ABS
controller comes into action.
In this partially integral brake
configuration, the integral braking function is activated only
when you pull the handbrake
lever. The footbrake lever acts
only on the rear brake.
Brake booster
The hydraulic pump in the BMW
Integral ABS actively boosts the
braking force acting on the
wheel when the brakes are
applied.
By boosting the braking force in
this way, BMW Integral ABS
achieves higher braking efficiency than standard brake
systems.
ABS anti-lock brake system
ABS prevents the wheels locking under heavy braking, thus
contributing significantly to
road safety.
OE
Page 87

Brake system - with BMW Integral ABS
RESIDUAL BRAKING FUNCTION
If the BMW Integral ABS develops
a fault, only a RESIDUAL BRAKING FUNCTION is available in the
brake circuits in question.
The RESIDUAL BRAKING FUNCTION is the braking efficiency
without the hydraulic servo assistance of the BMW Integral ABS.
Under these circumstances,
therefore, you must apply CONSIDERABLY higher pressure to
the brake levers in question in
order to apply the brakes, and
lever travel is longer.
When the RESIDUAL BRAKING
FUNCTION is active, the ABS
function is unavailable in the
brake system in question.
When the RESIDUAL BRAKING
FUNCTION is active, the integral
braking function is partially or
entirely unavailable.
When the RESIDUAL BRAKING
FUNCTION is active at the front
wheel, it is advisable to set the
adjuster in such a way as to
permit maximum movement of
the handbrake lever (
The RESIDUAL BRAKING
FUNCTION is active under the
following circumstances:
– Ignition off
– Before and during
self-diagnosis (
– Fault in the BMW Integral ABS
b 24-25)
(
b 41).
b 86)
When the RESIDUAL BRAKING
FUNCTION is active, maintain a
defensive riding style and proceed immediately to the nearest specialized workshop,
preferably an authorized BMW
Motorrad retailer.
When the RESIDUAL BRAKING
FUNCTION is active for both
brake circuits, the noise of the
pump is no longer audible when
you operate the brake levers.
OE
4
85
Riding
Page 88
Brake system - with BMW Integral ABS
OE
4
86
Riding
Self-diagnosis with pull-away test
The BMW Integral ABS performs self-diagnosis and a
pull-away test to ensure its
operability.
Self-diagnosis is performed
automatically when you switch
on the ignition.
Self-diagnosis is not performed unless both brake levers are in their fully released
positions.
Only the RESIDUAL BRAKING
FUNCTION is available until
self-diagnosis is completed
(b 85).
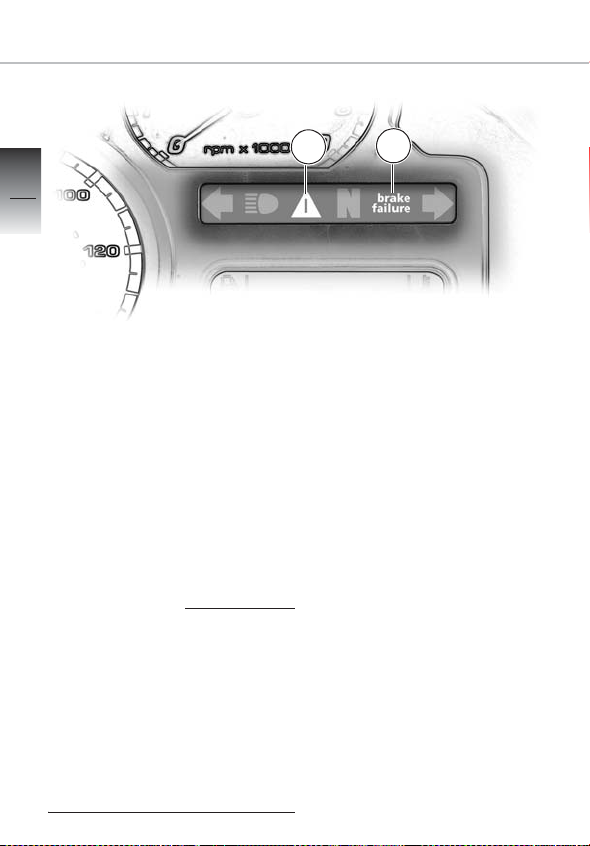
1
• Release the brake levers, if
necessary
• Switch on the ignition
Initially:
– ABS warning light 2:
flashes at 4 Hz
– General warning light 1:
ON
b Self-diagnosis is in
Then:
– ABS warning light 2:
flashes at 1 Hz
– General warning light 1:
OFF
b Self-diagnosis successfully
2
progress
completed
Page 89

Brake system - with BMW Integral ABS
•Start the engine.
• Move off
– ABS warning light 1:
OFF (as of approx. 3 mph
(5 km/h) road speed)
b Pull-away test successfully
completed
b BMW Integral ABS
is available
Flashing at 1 Hz = 1 flash per
second (slow flashing)
Flashing at 4 Hz = 4 flashes per
second (fast flashing)
Starting on gradients:
Always switch on the ignition
with gear engaged, clutch lever
released and both brake levers
released.
Self-diagnosis cannot be performed if you do not follow this
procedure.
When self-diagnosis completes, apply the brakes, disengage the clutch, and start the
engine.
OE
4
87
Riding
Page 90

Brake system - with BMW Integral ABS
4
88
Riding
Deactivating ABS
Never switch the ignition off
and on unless the motorcycle
is at a standstill.
Brake boost and the integral
function remain operational,
Off-road deactivation
In contrast to road riding, when
BMW Integral ABS should
always be active in order to prevent wheel lock and a resulting
accident, it may be desirable to
dispense with ABS when riding
off-road or on a loose surface.
This is the reason why the ABS
function of BMW Integral ABS
can be deactivated.
even if the ABS function is deactivated.
The ABS function is reactivated
once the self-diagnosis routine
has completed successfully after you switch off the ignition
and switch it on again with the
motorcycle at a standstill.
OE
Page 91
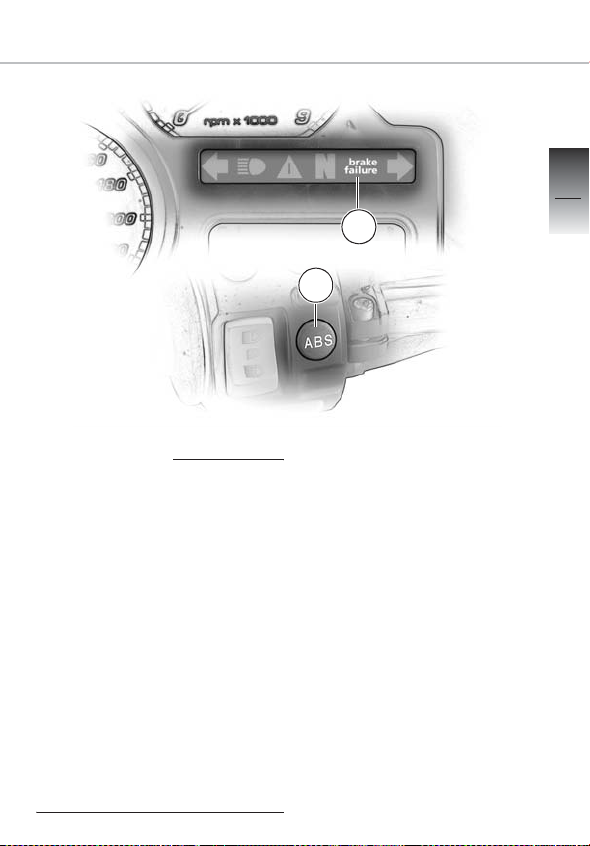
Brake system - with BMW Integral ABS
1
2
When the ABS function is
deactivated – as indicated by
the ABS warning light 1 – the
safety reserves normally
offered by the anti-lock braking system are not available
until the ABS function is
reactivated.
There is a risk of dropping the
motorcycle if the brakes are
applied too hard and the front
wheel locks or the rear wheel
lifts clear of the ground as a
result of a high level of front
tire adhesion.
– With the motorcycle at a
standstill, switch off the
ignition
• Press and hold down ABS
button 2
• Switch on the ignition
• Release ABS button 2
– ABS warning light 1 remains
ON
– The ABS function is
deactivated
– Warning light 1 remains per-
manently on to remind you
that ABS has been
deactivated
OE
4
89
Riding
Page 92

4
90
Riding
Page 93

General instructions
12 V sockets
15
91
Accessories
Luggage system
Page 94

General instructions
5
92
Accessories
BMW accessories and BMWapproved products can be
obtained from your authorized
BMW Motorrad retailer.
BMW cannot examine or test
each product of outside origin
on the accessories and tires
market to ensure that it can
be used on or in connection
with BMW motorcycles without constituting a safety hazard. Even approval by an
official inspection authority or
an official permit (General Operating Permit) cannot always
provide this guarantee. Tests
conducted by these instances cannot make provision for
all operating conditions experienced by BMW motorcycles
and consequently, they are
not sufficient in some
circumstances.
Page 95
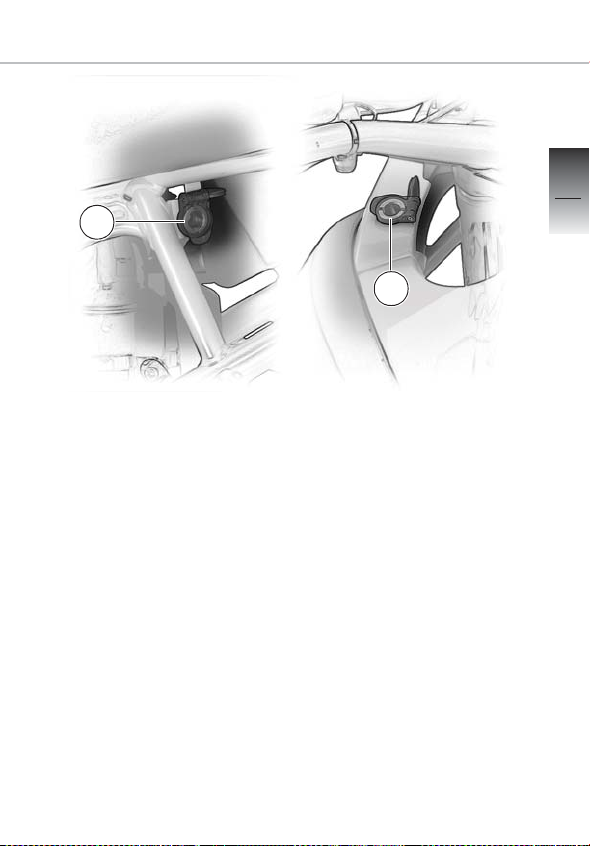
1
Sockets
The on-board sockets 1 and
OA
2
and the plug for optional
accessories have a combined
maximum rating of 5 A. Socket
OA
is intended solely for acces-
2
sories mounted in the cockpit
or secured to the handlebars,
for example GPS, Roadbook,
Tripmaster etc.
The supply to the sockets is
switched off automatically if
battery voltage is low or the
load exceeds the maximum
rating.
12 V sockets
2
Operating electrical accessories
You can start using electrical
accessories only when the ignition is switched on, in other
words when the ignition key is
U position. The acces-
in the
sory remains operational if the
ignition is subsequently
switched off.
Approx. 15 minutes after the
ignition is switched off and/or
during starting, the on-board
sockets are switched off to
reduce the load on the onboard electrical system.
15
93
Accessories
Page 96

12 V sockets
5
94
Accessories
Wiring
Have the wiring installed by a
specialized workshop, preferably an authorized
BMW Motorrad retailer.
The wiring must be installed
in such a way that the cable(s)
– do not impede the rider
– do not restrict or impede
movement of the handlebars and/or handling
– cannot be trapped
Page 97
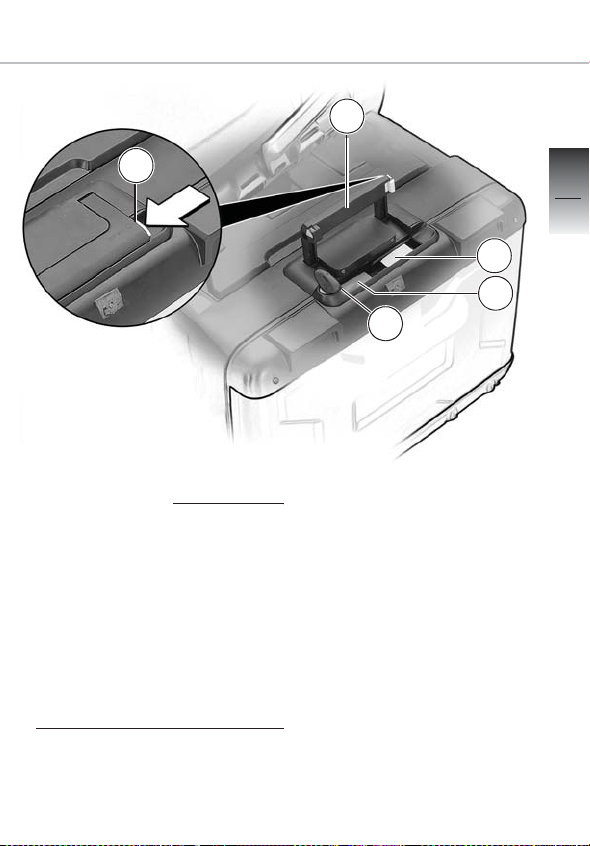
Luggage system
2
1
After an accident or if the
motorcycle has fallen over,
check the system cases for
firm seating.
Max. load per system case:
22 lbs (10 kg).
With system cases installed, it
is advisable not to exceed 80
mph (130 km/h).
Opening system cases
• Turn the key in the case lock
to position A
OA
15
95
3
4
A
Accessories
•Release latch1 by pressing in
the direction indicated by the
arrow
• Hold down latch 1 and pull up
carrying handle 2
– Yellow rocker switch 3 and
red lever 4 are accessible
• Press ribbed part of yellow
rocker switch 3
• Hold the rocker switch down
and open the lid of the case
Page 98
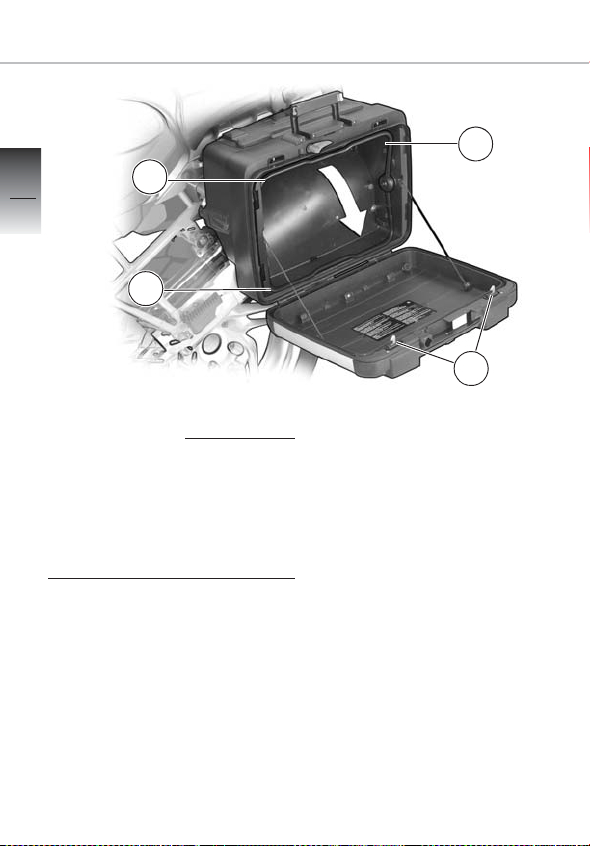
Luggage system
5
96
B
C
1
Accessories
Closing system case
Before closing the carrying handle, make sure that the case
lock is in position A.
Risk of breaking the locking
tongue.
• Turn the key in the case lock
to position A (
• Lift the lid and push it closed
until the two hooks 2 at the
sides engage with an audible
click.
• Fold down the carrying
handle
• Lock the case and remove the
key
b 97)
2
OA
Changing case volume
Pivot lever 1 enables you to
change the volume of the case.
• Open the system case
• Take everything out of the
system case
• Turn pivot lever 1 to change
the volume of the case
Turn pivot lever 1 into end
position B:
– Case set to low volume
Turn pivot lever 1 into end
position C:
– Case set to high volume
Page 99
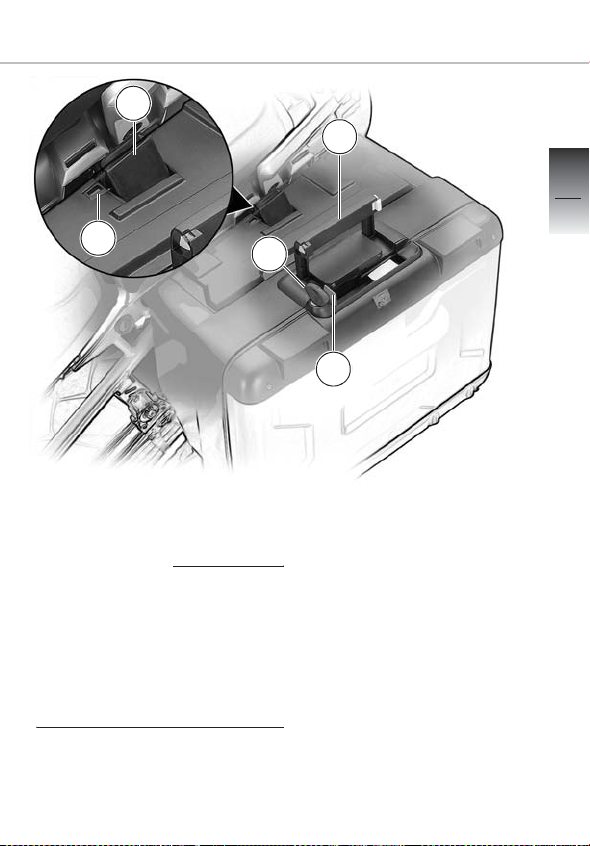
Luggage system
1
3
15
97
2
A
Installing system case
OA
When attaching, make sure
that the case is retained
securely.
An incorrectly secured case
could be lost and endanger
other road users.
• Fold up carrying handle 3
• Pull up red lever 4 to unlock
latching flap 1
4
• Pull latching flap 1 fully open
• Hold the case straight and
lower it into the two top
holders
• Push down latching flap 1
until window 2 turns black
Accessories
Page 100
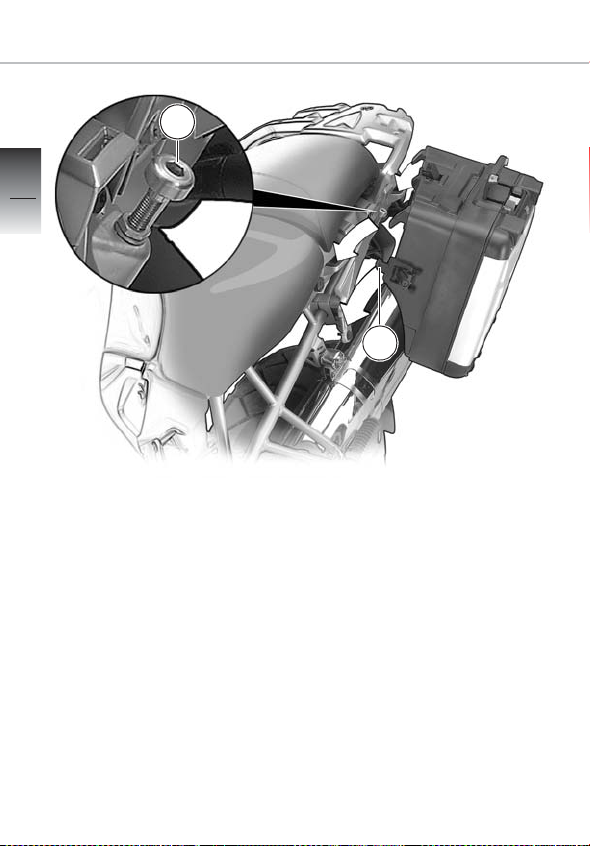
Luggage system
5
98
1
Accessories
Mushroom head 1 must be adjusted accordingly if the case
sits loose or refuses to latch.
2
•Turn red lever 7 (
while pressing on the latching
flap 3
– Latching flap 3
b 99) engages
(
• Engage locking lever 2 in the
holder and close it
• Check the security of the
case
• Fold carrying handle (
down
•Lock the case and remove the
key
b 99) down
b 99)
 Loading...