

Page 1
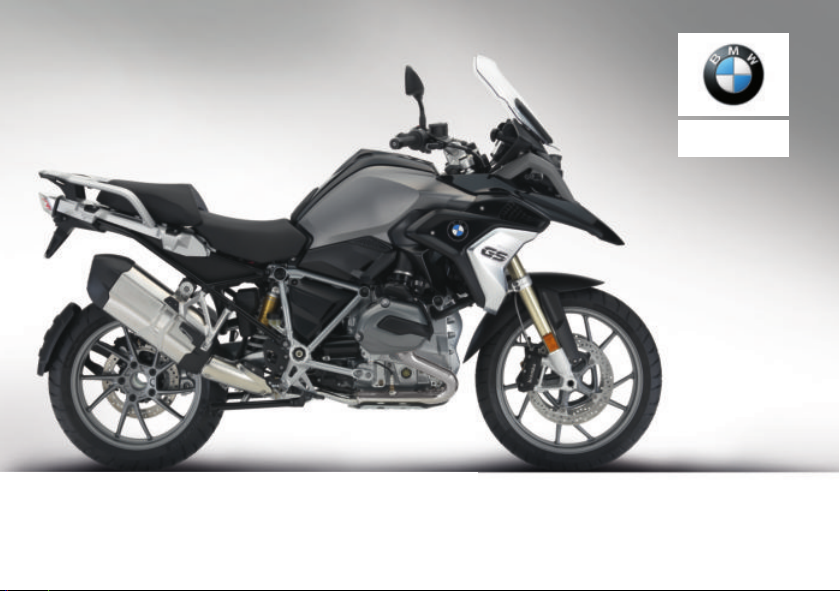
Rider's Manual (US Model)
R 1200 GS
BMW Motorrad
Page 2
Motorcycle/Retailer Data
Motorcycle Data
Model
Vehicle identification number
Color number
Initial registration
License plate
Retailer Data
Contact in Service
Ms./Mr.
Phone number
Retailer's address/phone number (company stamp)
Page 3

Welcome to BMW
Congratulations on choosing a
motorcycle from BMW Motorrad
and welcome to the community
of BMW motorcycle owners and
riders. Familiarize yourself with
your new motorcycle so that you
can ride it safely and confidently
in all highway traffic situations.
About this Rider's Manual
Please read this Rider's Manual
carefully before starting to use
your new BMW. It contains important information on how to
operate the controls and how to
get the most benefit from your
BMW's advanced technical features.
In addition, it contains information
on maintenance and care to help
you maintain your motorcycle's
reliability and safety, as well as its
value.
Documentation confirming performance of scheduled maintenance is a precondition for generous handling of out-of-warranty
claims and goodwill warranty
treatment.
Should you want to sell your
BMW one day, please also remember to turn over the Ride's
Manual to the new owner. it is
an important part of your motorcycle.
Suggestions and complaints
If you have any questions concerning your motorcycle, your authorized BMW Motorrad retailer
is always happy to provide advice
and assistance.
We wish you many miles of safe
and enjoyable riding on your
BMW
BMW Motorrad.
01 40 8 406 477
*01408406477*
Page 4

Table of Contents
1 General instructions . ... 5
Overview .. . . . . . . . . . . . . . . . . . . . 6
Abbreviations and
symbols .. . . . . . . . . . . . . . . . . . . . . 6
Equipment . . . . . . . . . . . . . . . . . . . 7
Technical data . . . . . . . . . . . . . . . 7
Notice concerning current sta-
tus . . . . . . . . . . . . . . . . . . . . . . . . . . . 7
2 Overviews . .. .. .. .. . ... .. . 9
General view, left side . . . . . . . 11
General view, right side . . . . . 13
Underneath seat . . . . . . . . . . . . 14
Multifunction switch, left . . . . 15
Multifunction switch,
right . . . . . . . . . . . . . . . . . . . . . . . . . 17
Instrument panel . . . . . . . . . . . . 18
3 Displays . . ... .. .. .. . ... .. 19
Indicator and warning
lights . . . . . . . . . . . . . . . . . . . . . . . . 20
Multifunction display . . . . . . . . 22
Warning symbols in the
display panel . . . . . . . . . . . . . . . . 23
Warning lights . . . . . . . . . . . . . . . 24
4 Operation ... .. .. .. .. .. .. . 49
Steering and ignition
lock . . . . . . . . . . . . . . . . . . . . . . . . . 50
Ignition with Key-
less Ride . . . . . . . . . . . . . . . . . . . . 52
Emergency on/off switch (kill
switch) . . . . . . . . . . . . . . . . . . . . . . 56
Lights . . . . . . . . . . . . . . . . . . . . . . . 56
Hazard warning lights sys-
tem . . . . . . . . . . . . . . . . . . . . . . . . . 58
Turn indicators . . . . . . . . . . . . . . 58
Multifunction display . . . . . . . . 59
Antilock Brake System
(ABS). . . . . . . . . . . . . . . . . . . . . . . . 66
Automatic Stability Control
(ASC) . . . . . . . . . . . . . . . . . . . . . . . 67
Dynamic Traction Control
(DTC) . . . . . . . . . . . . . . . . . . . . . . . 68
Electronic chassis and
suspension adjustment
(DESA) . . . . . . . . . . . . . . . . . . . . . 69
Riding mode . . . . . . . . . . . . . . . . 72
PRO riding mode . . . . . . . . . . . 74
Cruise control . . . . . . . . . . . . . . . 79
Hill Start Control . . . . . . . . . . . . 81
Anti-theft alarm (DWA) . . . . . . 82
Heated handlebar grips . . . . . 85
Rider and passenger
seats . . . . . . . . . . . . . . . . . . . . . . . . 86
5 Setting .. .. .. .. .. . ... .. .. . 89
Mirrors . . . . . . . . . . . . . . . . . . . . . . 90
Headlight . . . . . . . . . . . . . . . . . . . . 90
Wind shield . . . . . . . . . . . . . . . . . 91
Clutch . . . . . . . . . . . . . . . . . . . . . . . 91
Brakes . . . . . . . . . . . . . . . . . . . . . . 92
Handlebars . . . . . . . . . . . . . . . . . . 93
Spring preload . . . . . . . . . . . . . . 93
Damping . . . . . . . . . . . . . . . . . . . . 94
6 Riding .. .. .. .. .. . ... .. .. .. 97
Safety information . . . . . . . . . . . 98
Observe checklist . . . . . . . . . 100
Always before riding off . . . 100
At every third refueling
stop . . . . . . . . . . . . . . . . . . . . . . . 101
Starting. . . . . . . . . . . . . . . . . . . . 101
Running in . . . . . . . . . . . . . . . . 104
Page 5

Off-road riding . . . . . . . . . . . . 105
Shifting gears . . . . . . . . . . . . . 106
Brakes . . . . . . . . . . . . . . . . . . . . 107
Parking your motorcy-
cle. . . . . . . . . . . . . . . . . . . . . . . . . 109
Refueling . . . . . . . . . . . . . . . . . . 110
Securing motorcycle for
transport . . . . . . . . . . . . . . . . . . 114
7 Technology in de-
tail ... .. .. .. .. . ... .. .. .. . 117
General notes . . . . . . . . . . . . . 118
Antilock Brake System
(ABS). . . . . . . . . . . . . . . . . . . . . . 118
Automatic Stability Control
(ASC) . . . . . . . . . . . . . . . . . . . . . 121
Dynamic Traction Control
(DTC) . . . . . . . . . . . . . . . . . . . . . 122
Dynamic ESA . . . . . . . . . . . . . 123
Riding mode . . . . . . . . . . . . . . 124
Tire pressure control
(RDC/TPC) . . . . . . . . . . . . . . . . 126
Shift assistant . . . . . . . . . . . . . 128
Hill Start Control . . . . . . . . . . 129
8 Maintenance . ... .. .. .. 131
General instructions . . . . . . . 132
Tool kit . . . . . . . . . . . . . . . . . . . . 132
Service tool kit . . . . . . . . . . . . 132
Front wheel stand . . . . . . . . . 133
Engine oil . . . . . . . . . . . . . . . . . 134
Brake system . . . . . . . . . . . . . 135
Clutch . . . . . . . . . . . . . . . . . . . . . 139
Coolant. . . . . . . . . . . . . . . . . . . . 139
Tires . . . . . . . . . . . . . . . . . . . . . . 141
Rims and tires. . . . . . . . . . . . . 142
Wheels . . . . . . . . . . . . . . . . . . . . 143
Air filter. . . . . . . . . . . . . . . . . . . . 149
Light sources . . . . . . . . . . . . . 151
Jump-starting . . . . . . . . . . . . . 155
Battery . . . . . . . . . . . . . . . . . . . . 156
Fuses . . . . . . . . . . . . . . . . . . . . . 160
Data link connector . . . . . . . 162
9 Accessories . .. .. .. . ... 165
General notes . . . . . . . . . . . . . 166
Onboard power
sockets . . . . . . . . . . . . . . . . . . . . 166
Case . . . . . . . . . . . . . . . . . . . . . . 167
Topcase. . . . . . . . . . . . . . . . . . . 170
Navigation system. . . . . . . . . 176
10 Care . . ... .. .. .. .. . ... . 181
Care products . . . . . . . . . . . . . 182
Washing your motorcy-
cle. . . . . . . . . . . . . . . . . . . . . . . . . 182
Cleaning sensitive motorcy-
cle parts. . . . . . . . . . . . . . . . . . . 183
Paint care . . . . . . . . . . . . . . . . . 184
Protective wax coating . . . . 184
Store motorcycle . . . . . . . . . . 184
Return motorcycle to
use . . . . . . . . . . . . . . . . . . . . . . . . 185
11 Technical data . .. .. . 187
Troubleshooting chart . . . . . 188
Threaded fasteners . . . . . . . 189
Fuel . . . . . . . . . . . . . . . . . . . . . . . 191
Engine oil . . . . . . . . . . . . . . . . . 192
Engine . . . . . . . . . . . . . . . . . . . . 192
Clutch . . . . . . . . . . . . . . . . . . . . . 193
Transmission . . . . . . . . . . . . . . 194
Rear-wheel drive . . . . . . . . . . 195
Frame . . . . . . . . . . . . . . . . . . . . . 195
Suspension . . . . . . . . . . . . . . . 196
Brakes . . . . . . . . . . . . . . . . . . . . 198
Wheels and tires . . . . . . . . . . 199
Electrical system . . . . . . . . . . 200
Page 6

Alarm system . . . . . . . . . . . . . 201
Dimensions . . . . . . . . . . . . . . . 202
Weights . . . . . . . . . . . . . . . . . . . 205
Performance data . . . . . . . . . 205
12 Service . ... .. .. .. .. .. . 207
Reporting safety
defects . . . . . . . . . . . . . . . . . . . . 208
BMW Motorrad Service .. . 209
BMW Motorrad Mobility
Services . . . . . . . . . . . . . . . . . . . 209
Maintenance proce-
dures . . . . . . . . . . . . . . . . . . . . . . 209
BMW Service . . . . . . . . . . . . . 210
Maintenance schedule . . . . 213
Maintenance confirma-
tions. . . . . . . . . . . . . . . . . . . . . . . 214
Service confirmations . . . . . 228
13 Appendix .... .. .. .. . .. 231
Certificate for Electronic
Immobilizer . . . . . . . . . . . . . . . . 232
Certificate for Key-
less Ride . . . . . . . . . . . . . . . . . . 234
Certificate for Tire Pressure
Control . . . . . . . . . . . . . . . . . . . . 236
14 Index . .. .. .. .. .. .. .. .. 237
Page 7

General instructions
Overview . . . . . . . . . . . . . . . . . . . . . . . . . . . . 6
Abbreviations and symbols . . . . . . . . . . 6
Equipment . . . . . . . . . . . . . . . . . . . . . . . . . . . 7
Technical data . . . . . . . . . . . . . . . . . . . . . . . 7
Notice concerning current status . . . . 7
1
5
z
General instructions
Page 8
Overview
1
This Rider's Manual has been
designed to provide quick and ef-
6
ficient orientation. The quickest
way for you to find information
on specific topics is to consult
the comprehensive index at the
back of the manual. If you would
like to start with a quick overview
of your motorcycle, this information has been provided in chapter
2. All maintenance and repair
work carried out on your motorcycle will be documented in
Chapter 12. Documentation confirming performance of scheduled
maintenance is a precondition
z
General instructions
for generous handling of out-ofwarranty claims and goodwill warranty treatment.
When the time comes to sell
your BMW, remember to hand
over this Rider's Manual; it is an
important part of the motorcycle.
Abbreviations and symbols
CAUTION Hazard with
low risk. Failure to avoid
this hazard can result in minor or
moderate injury.
WARNING Hazard with
moderate risk. Failure to
avoid this hazard can result in
death or serious injury.
DANGER Hazard with high
risk. Failure to avoid this
hazard results in death or serious
injury.
ATTENTION Special in-
structions and precautionary measures. Non-compliance
can cause damage to the vehicle or accessories and warranty
claims may be denied as a result.
NOTICE Special informa-
tion on operating and inspecting your motorcycle as well
as maintenance and adjustment
procedures.
Indicates the end of an
item of information.
Instruction.
Result of an activity.
Reference to a page with
more detailed information.
Indicates the end of accessory or equipmentdependent information.
Tightening torque.
Technical data.
NV National-market version.
Page 9

OE Optional extra.
BMW Motorrad optional
extras are already completely installed during
motorcycle production.
OA Optional accessory.
BMW Motorrad optional accessories can
be purchased and installed at your authorized BMW Motorrad
retailer.
ABS Anti-Lock Brake System.
ASC Automatic Stability Con-
trol.
D-
Electronic chassis and
ESA
suspension adjustment.
DTC Dynamic Traction Con-
trol (optional equipment
only in combination with
Pro riding modes).
DWA
Anti-theft alarm.
Electronic immobilizer.
EWS
TPC Tire Pressure Control
(TPC).
Equipment
When you ordered your BMW
motorcycle, you chose various
items of custom equipment. This
Rider's Manual describes optional
equipment (OE) offered by BMW
and selected optional accessories
(OA). This explains why the manual may also contain descriptions
of equipment which you have not
ordered. Please note, too, that
your motorcycle might not be exactly as illustrated in this manual
on account of country-specific
differences.
If your motorcycle comes with
equipment not described here,
you can find the descriptions in a
separate manual.
Technical data
All dimensions, weights and outputs in the Rider's Manual relate
to the German DIN standards
and comply with their tolerance
specifications. Versions for individual countries may differ.
Notice concerning current status
The outstanding levels of safety
and quality furnished by every
BMW motorcycle are the result
of ongoing advanced development focusing on continuous
improvement in design and engineering as well as equipment
and accessories. For this reason,
some aspects of your motorcycle
may vary from the descriptions in
this Rider's Manual. In addition,
BMW Motorrad cannot guarantee
the total absence of errors. For
this reason BMW is unable to
recognize any claims stemming
1
7
z
General instructions
Page 10

from the information, illustrations
and descriptions in this manual.
1
8
z
General instructions
Page 11

Overviews
General view, left side. . . . . . . . . . . . . . . 11
General view, right side . . . . . . . . . . . . . 13
Underneath seat . . . . . . . . . . . . . . . . . . . . 14
Multifunction switch, left . . . . . . . . . . . . 15
Multifunction switch, right . . . . . . . . . . . 17
Instrument panel . . . . . . . . . . . . . . . . . . . . 18
2
9
z
Overviews
Page 12
2
10
z
Overviews
Page 13

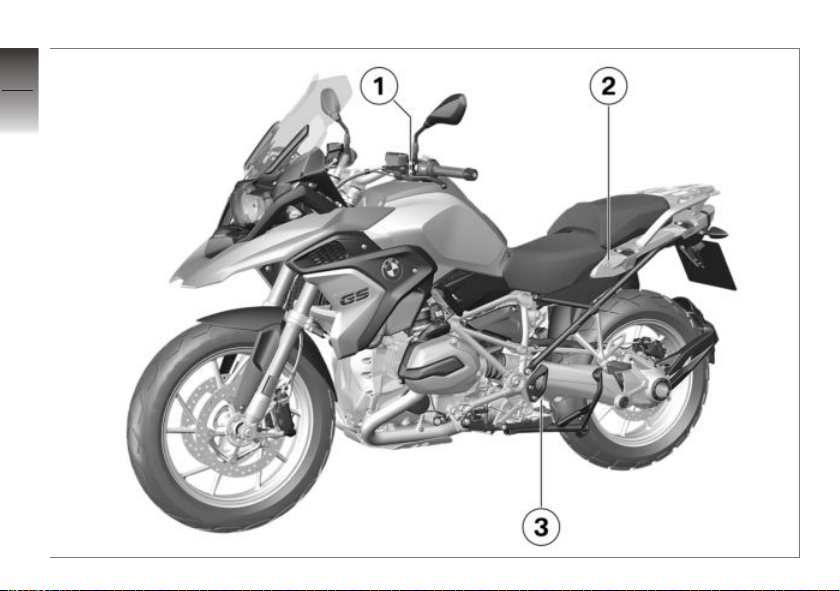
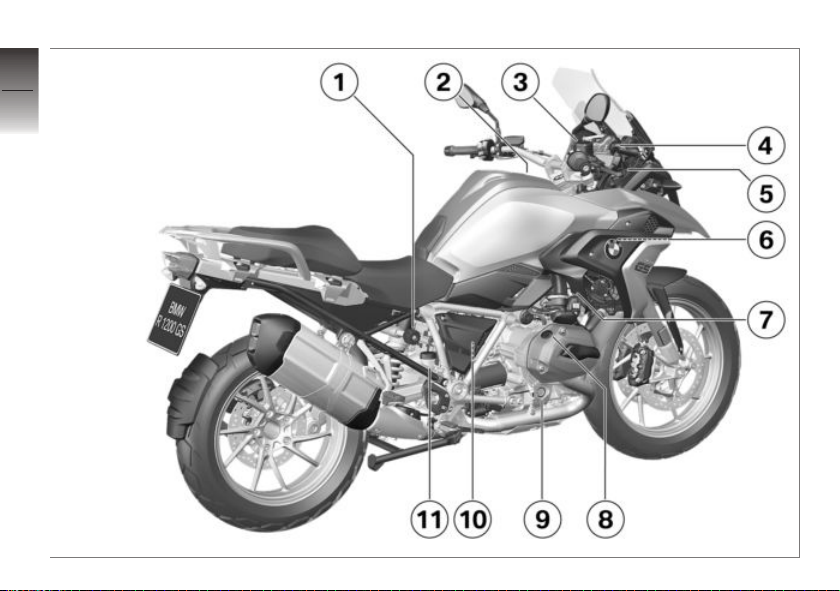
General view, left side
1 Fuel filler opening
( 111)
2 Seat lock ( 86)
3 Adjuster for rear damp-
ing (at the bottom on the
spring strut) ( 94)
2
11
z
Overviews
Page 14
2
12
z
Overviews
Page 15

General view, right side
1 without Dynamic ESA
Adjuster for spring preload,
rear ( 93).
2 Air cleaner (under center
fairing panel) ( 149)
3 Brake-fluid reservoir, front
( 137)
4 Height adjuster for wind-
shield ( 91)
5 Power socket ( 166)
6 Vehicle identification num-
ber (on the steering head)
Type plate (on frame at
front right)
7 Coolant level indicator
( 139)
Coolant tank ( 140)
8 Oil fill location ( 135)
9 Engine oil level indicator
( 134)
OE
10 Behind the side panel:
Battery ( 156)
Positive battery connection
point ( 155)
Diagnostic connector
( 162)
11 Brake-fluid reservoir, rear
( 138)
2
13
z
Overviews
Page 16
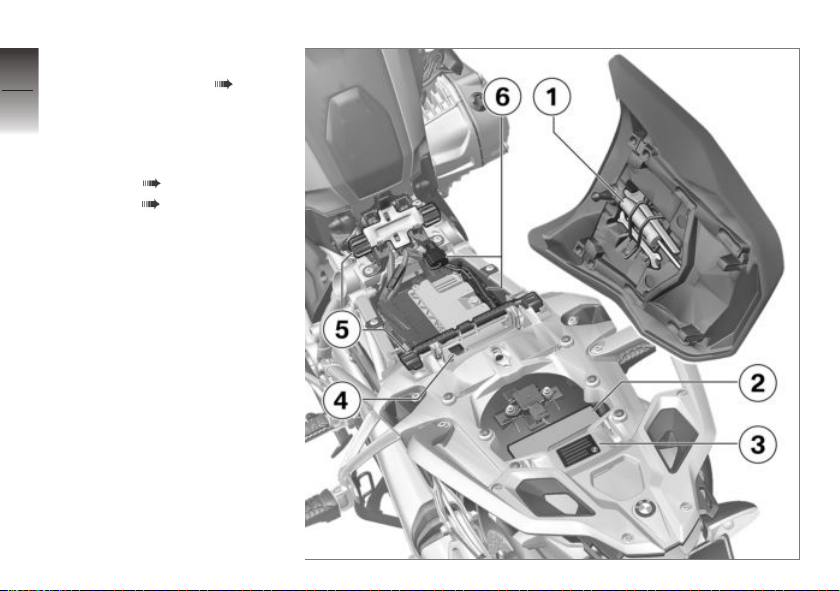
Underneath seat
2
1 Standard tool kit ( 132)
2 Rider's Manual (US Model)
14
3 Tire inflation pressure table
4 Load capacity table
5 Adjuster for the rider's seat
height ( 87)
6 Fuses ( 160)
z
Overviews
Page 17
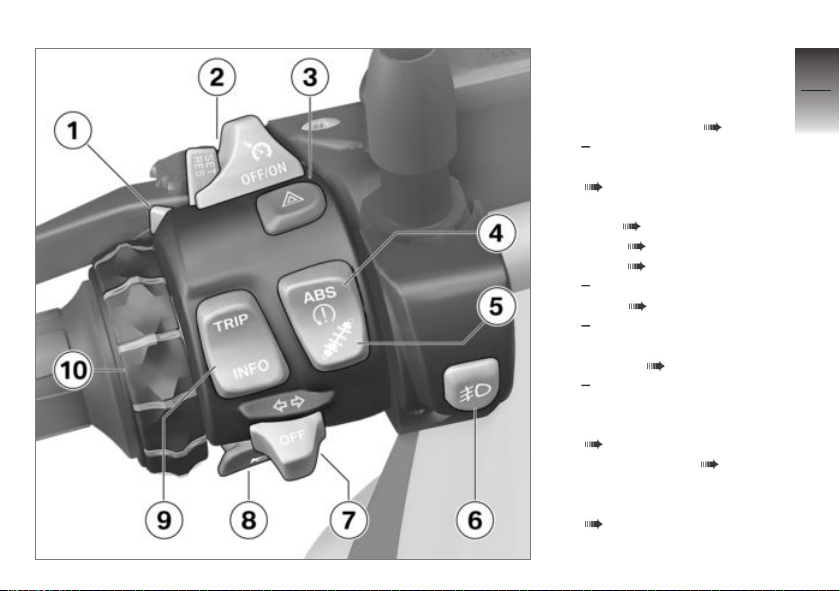
Multifunction switch, left
1 Headlight flasher and high-
beam headlight ( 56)
2 with cruise control
Cruise-control system
( 79).
3 Hazard warning lights sys-
tem ( 58)
4 ABS ( 66)
ASC ( 67)
with riding modes Pro
DTC ( 68)
5 with Dynamic ESA
Dynamic ESA adjustment
options ( 69)
6 with LED auxiliary head-
7 Turn indicators ( 58)
8 Horn
9 Multifunction display
OA
light
LED auxiliary driving lamp
( 57).
( 59)
OE
OE
OE
2
15
z
Overviews
Page 18

10 with preparation for navi-
2
16
z
Overviews
gation system
Operating the navigation
system ( 177)
Multi-Controller
OE
Page 19
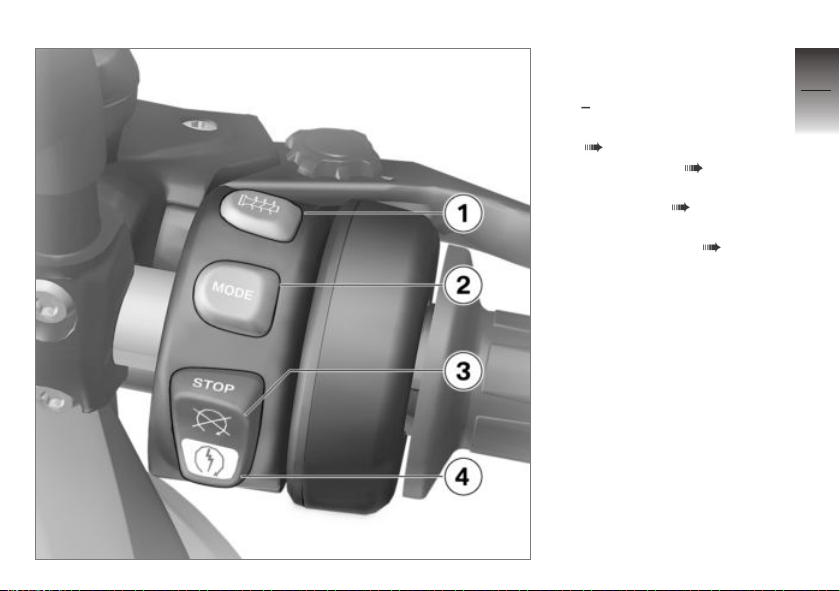
Multifunction switch, right
1 with heated grips
Heated handlebar grips
( 85).
2 Riding mode ( 72)
3 Emergency on/off switch
(kill switch) ( 56)
4 Starter button
Starting engine ( 101).
OE
2
17
z
Overviews
Page 20
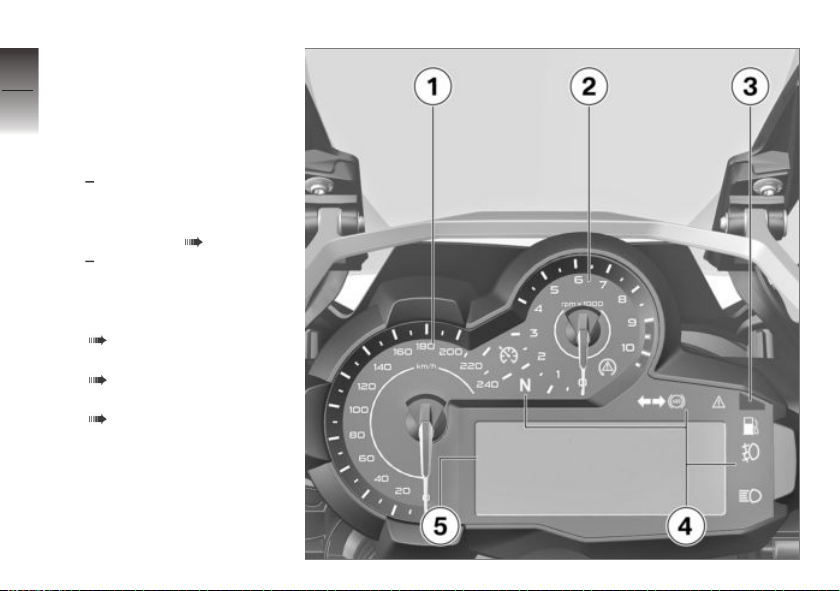
Instrument panel
2
1 Speedometer
2 Tachometer
18
3 Photosensor (for adjusting
brightness of instrument
lighting)
with anti-theft alarm sys-
tem (DWA)
Alarm system LED
Alarm signal ( 83)
with Keyless Ride
z
Overviews
Indicator light for radiooperated key
Ignition with Keyless Ride
( 53).
4 Indicator and warning lights
( 20)
5 Multifunction display
( 22)
OE
OE
Page 21

Displays
Indicator and warning lights . . . . . . . . . 20
Multifunction display . . . . . . . . . . . . . . . . 22
Warning symbols in the display
panel . . . . . . . . . . . . . . . . . . . . . . . . . . . . . . . 23
Warning lights . . . . . . . . . . . . . . . . . . . . . . 24
3
19
z
Displays
Page 22
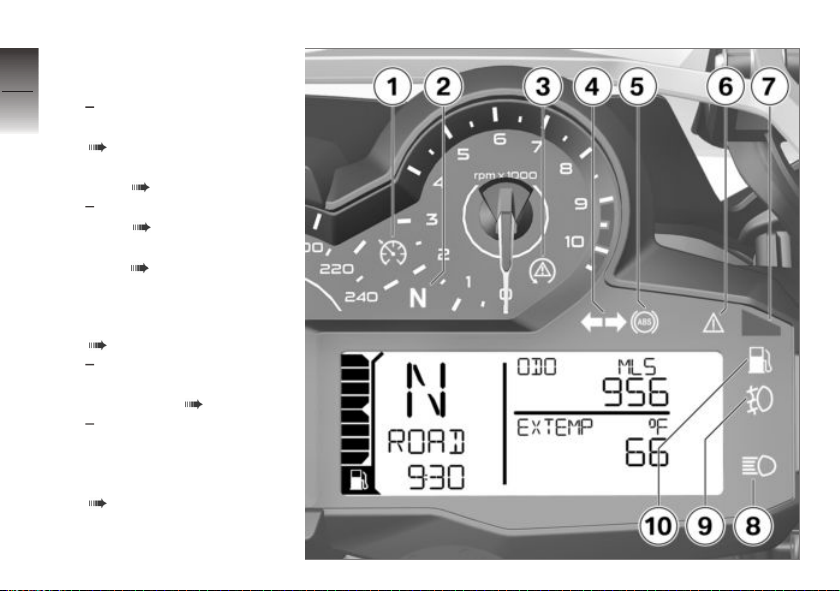
Indicator and warning
3
lights
20
1 with cruise control
Cruise-control system
( 79).
2 Neutral position (idling)
3 ASC ( 41)
with riding modes Pro
DTC ( 41)
4 Turn indicators
z
Displays
5 ABS ( 40)
6 General warning light, in
conjunction with warning symbols on display
( 24)
7 with anti-theft alarm sys-
tem (DWA)
Alarm signal ( 83)
with Keyless Ride
Indicator light for radiooperated key
Ignition with Keyless Ride
( 53).
OE
OE
OE
OE
Page 23

8 High-beam headlamp
( 56)
9 with LED auxiliary head-
10 Fuel reserve ( 44)
OA
light
LED auxiliary driving lamp
( 57).
3
21
z
Displays
Page 24
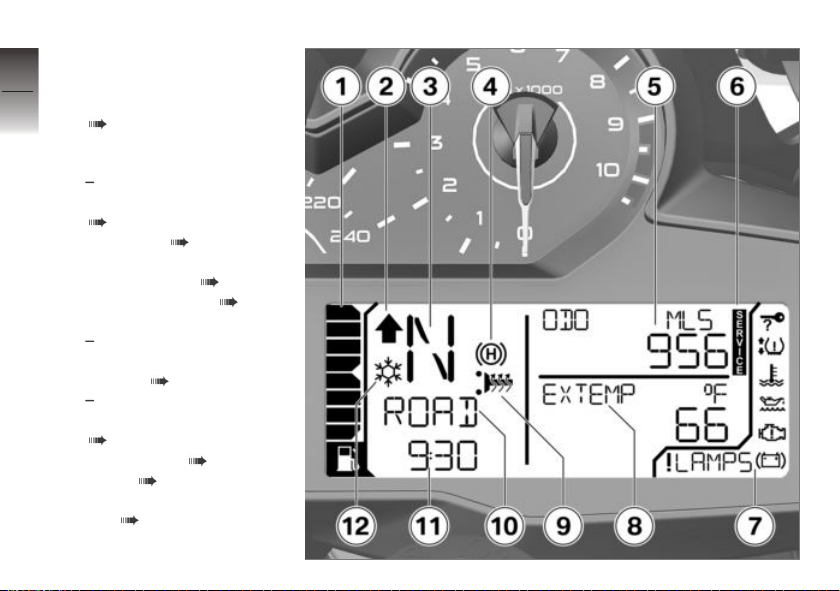
Multifunction display
3
1 Fuel fill level indicator
2 Upshift recommendation
22
z
Displays
( 45)
3 Gear indicator display, "N"
indicates "neutral".
4 with Hill Start Control
Using Hill Start Control
( 81).
5 Odometer ( 59)
6 Service display (mainte-
nance interval) ( 209)
7 Warning symbols ( 24)
8 Onboard computer
with Dynamic ESA
Dynamic ESA adjustment
options ( 69)
9 with heated grips
Heated handlebar grips
( 85).
10 Riding mode ( 72)
11 Clock ( 62)
12 Outside temperature warn-
ing ( 31)
OE
OE
OE
Page 25
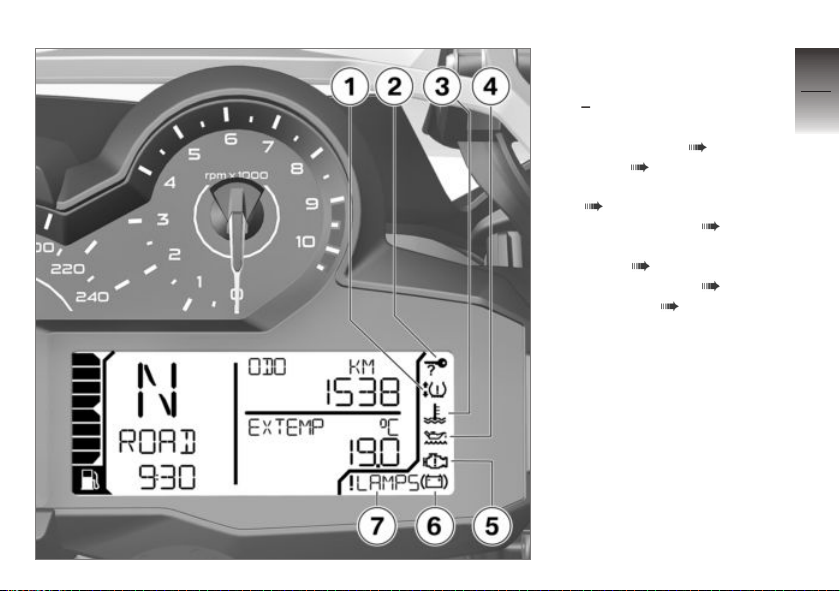
Warning symbols in the display panel
1 with Tire Pressure Moni-
tor (TPM)
Tire pressure ( 36)
2 EWS ( 31)
3 Coolant temperature
( 34)
4 Engine oil level ( 33)
5 Electronic engine manage-
ment ( 34)
6 Vehicle voltage ( 32)
7 Warnings ( 24)
OE
3
23
z
Displays
Page 26
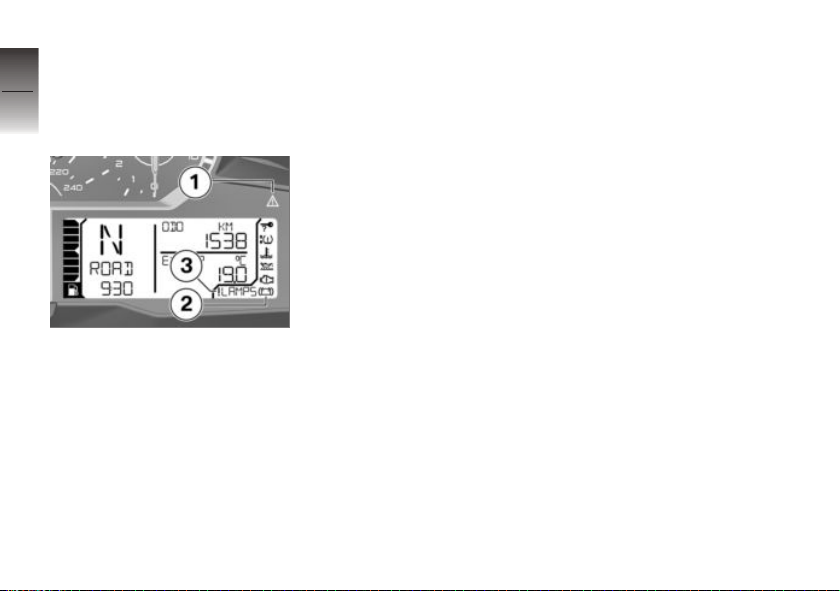
Warning lights
3
Displays
24
Warnings are displayed with appropriate warning lights.
z
Displays
Warnings for which no separate
warning light is provided are signaled by the general warning
light 1 and are accompanied by
a warning symbol in area 2 or by
a warning notice in area 3. The
universal warning light lights up in
either yellow or red depending on
the urgency of the warning.
The universal warning light lights
up for the most urgent warning.
You will find an overview of the
potential warnings on the following pages.
Page 27
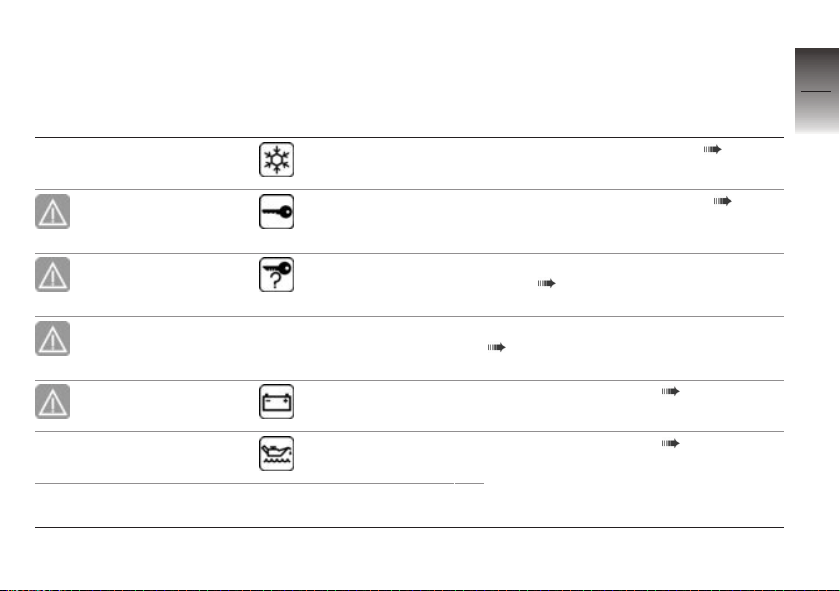
Overview of warning indicators
Indicator and warning
Display text Meaning
lights
General warning
light lights up yellow.
General warning
light lights up yellow.
General warning
light lights up yellow.
General warning
light shows red.
Ice crystal symbol
is displayed.
EWS warning symbol is displayed.
Key fob transmitter
warning symbol is
displayed.
!KEYLO is dis-
played.
Symbol for vehicle
voltage is displayed.
Oil can symbol is
displayed.
OILLVL CHECK
is displayed.
Outside temperature warning ( 31)
Electronic immobilizer is active ( 31)
Radio-operated key outside reception
range ( 32)
Replace battery of radio-operated key
( 32)
Vehicle voltage too low ( 32)
Engine oil level too low ( 33)
3
25
z
Displays
Page 28
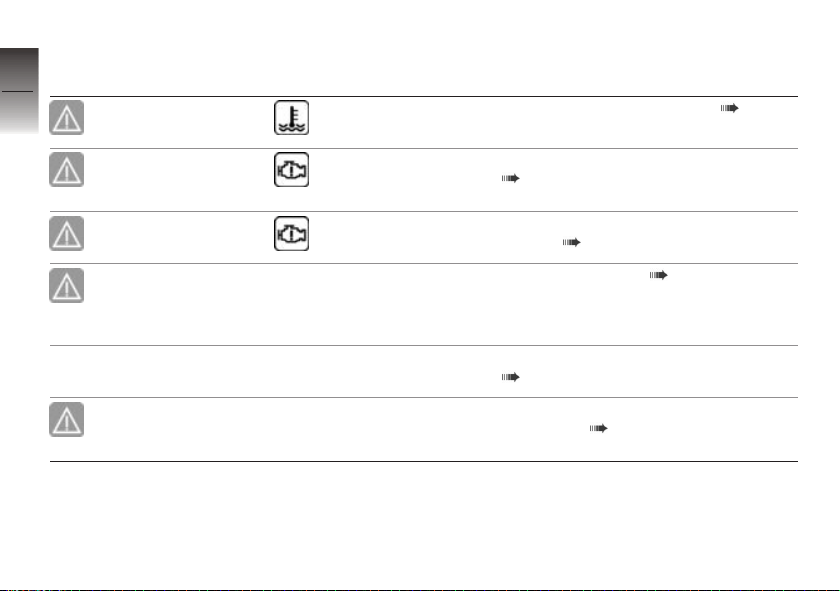
Indicator and warning
3
lights
26
z
Displays
General warning
light shows red.
General warning
light lights up yellow.
General warning
light flashes yellow.
General warning
light lights up yellow.
General warning
light lights up yellow.
Display text Meaning
Temperature symbol is displayed.
Engine symbol
appears on the
display.
Engine symbol
flashes.
!LAMPF,
Coolant temperature too high ( 34)
Engine in emergency-operation mode
( 34)
Severe fault in the engine management
system ( 35)
Light source defect ( 35)
!LAMPR or
!LAMPS is
displayed.
!DWALO is dis-
played.
!DWA is displayed.
Anti-theft alarm battery low charge
( 36)
Anti-theft alarm system battery
discharged ( 36)
Page 29
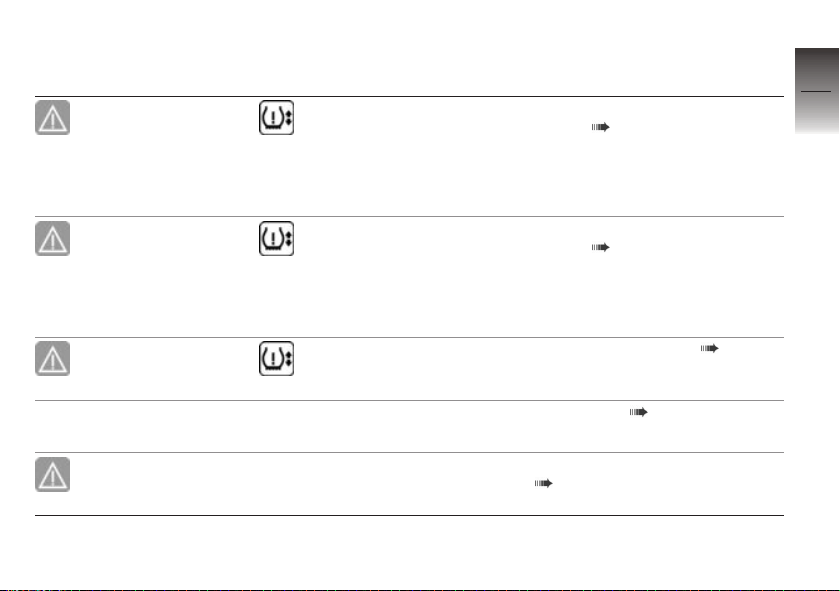
Indicator and warning
lights
General warning
light lights up yellow.
General warning
light flashes red.
General warning
light lights up yellow.
General warning
light lights up yellow.
Display text Meaning
Tire symbol with
one or two arrows
is displayed. The
critical tire-inflation pressure also
flashes.
Tire symbol with
one or two arrows
is displayed. The
critical tire-inflation pressure also
flashes.
The tire symbol
with one or two
arrows appears.
"--" or "-- --"
is indicated.
!RDC is displayed.
Tire inflation pressure is at limit of approved range ( 37)
Tire inflation pressure is outside approved range ( 38)
Sensor faulty or system fault ( 38)
Transmission error ( 39)
Battery of tire-inflation pressure sensor
weak ( 39)
3
27
z
Displays
Page 30
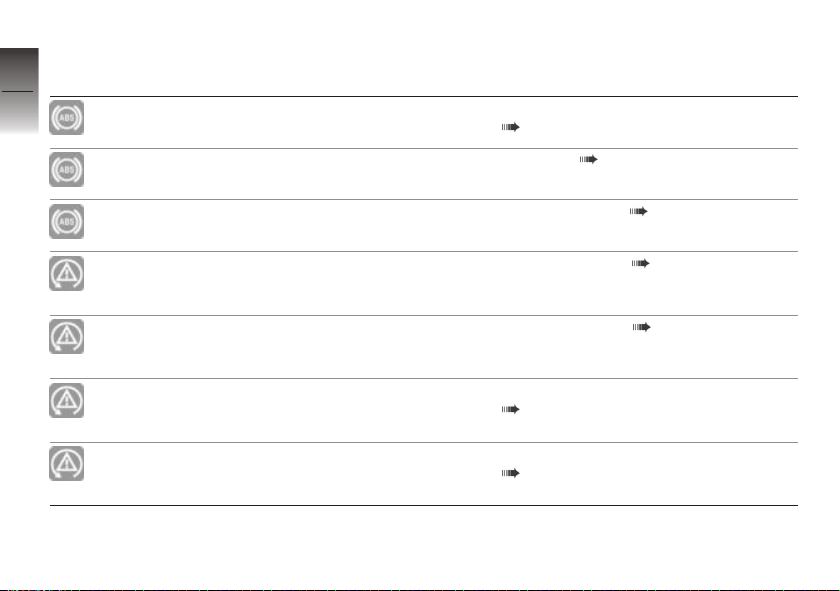
Indicator and warning
3
lights
28
z
Displays
ABS indicator light
flashes.
ABS indicator light
lights up.
ABS indicator light
lights up.
ASC indicator
and warning light
flashes rapidly.
DTC indicator
and warning light
flashes rapidly.
ASC indicator
and warning light
flashes slowly.
DTC indicator
and warning light
flashes slowly.
Display text Meaning
ABS self-diagnosis not completed
( 40)
ABS fault ( 40)
ABS deactivated ( 41)
ASC intervention ( 41)
DTC intervention ( 41)
ASC self-diagnosis not completed
( 41)
DTC self-diagnosis not completed
( 42)
Page 31
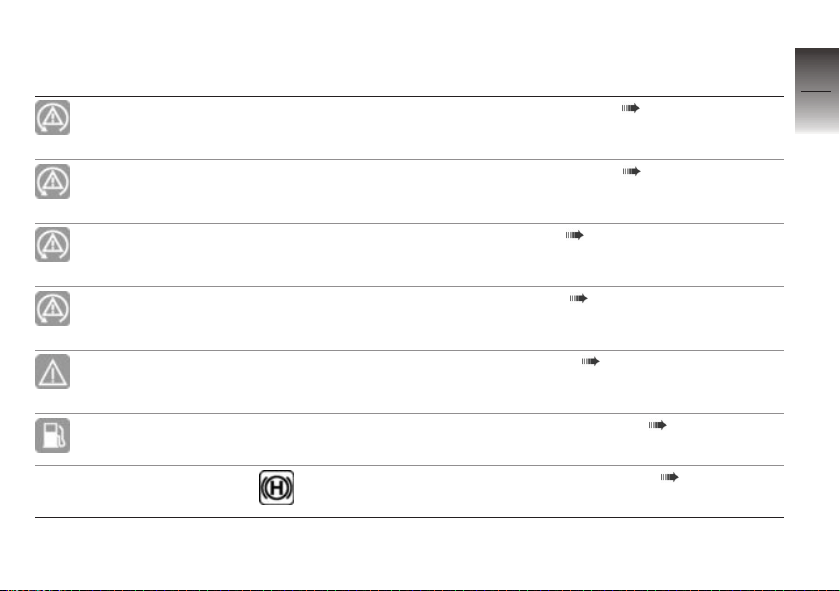
Indicator and warning
lights
ASC indicator and
warning light lights
up.
DTC indicator and
warning light lights
up.
ASC indicator and
warning light lights
up.
DTC indicator and
warning light lights
up.
General warning
light lights up yellow.
Low-fuel warning
light lights up.
Display text Meaning
ASC switched off ( 42)
DTC switched off ( 42)
ASC fault ( 42)
DTC error ( 43)
!D-ESA is dis-
played.
Stop symbol is displayed.
DESA fault ( 43)
Fuel down to reserve ( 43)
Hill Start Control active ( 44)
3
29
z
Displays
Page 32
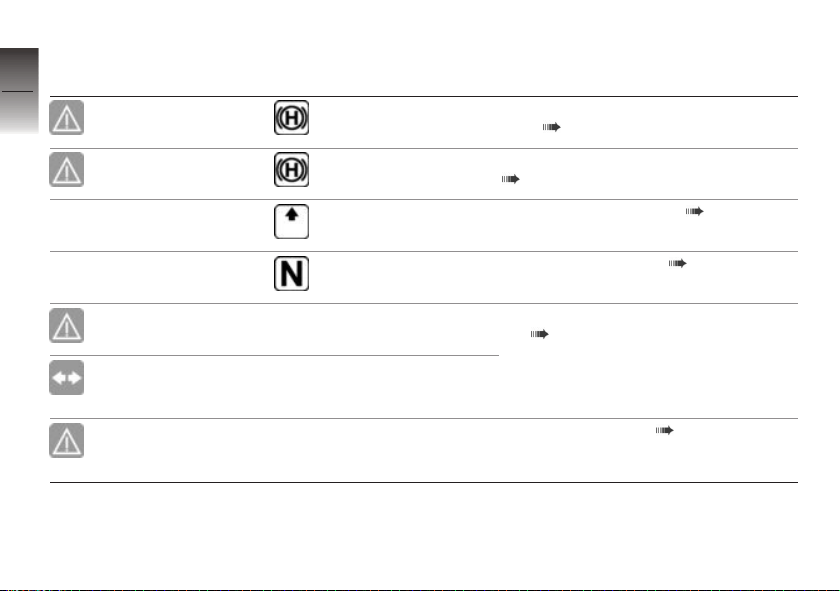
Indicator and warning
3
lights
30
z
Displays
General warning
light flashes yellow.
General warning
light flashes yellow.
General warning
light flashes red.
Turn signal indicator light flashes
green.
General warning
light lights up yellow.
Display text Meaning
Stop symbol
flashes briefly.
Stop symbol
flashes briefly.
Up arrow is displayed.
Gear indicator
flashes.
SERVICE is dis-
played continuously.
Hill Start Control deactivated automatically ( 44)
Hill Start Control can not be activated
( 44)
Upshift recommendation ( 45)
Gear not programmed ( 45)
Hazard warning lights system switched
on ( 46)
Service date missed ( 46)
Page 33
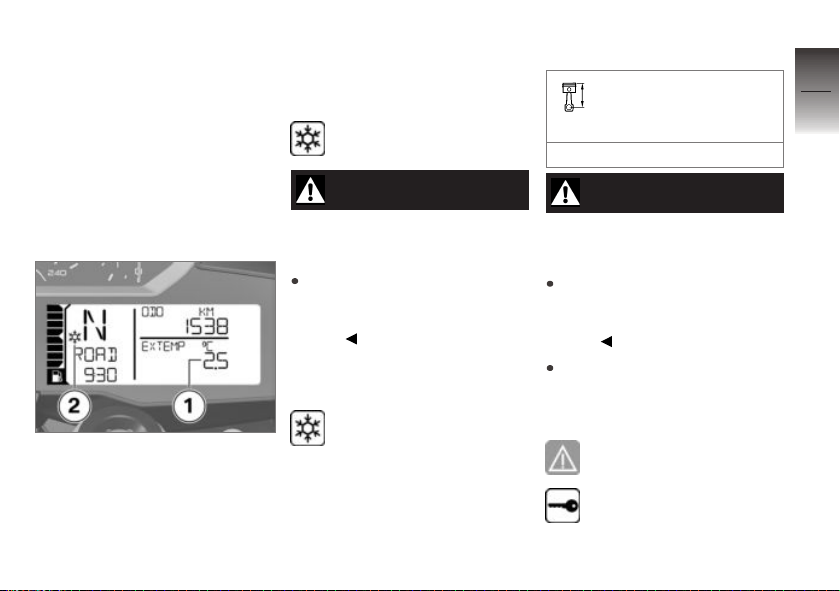
Outside temperature
Engine heat can lead to spurious readings of outside temperature when the motorcycle
is stationary. When the effects
of engine heat on the monitored
temperature become excessive
the display responds by temporarily reverting to "--" as the
display reading.
In the case of outside temperatures below 37 °F (3 °C), risk of
ice formation exists. The display
automatically switches from any
other mode to outside temperature reading 1, when the temper-
ature drops below this threshold
for the first time. The displayed
value flashes.
In addition, the ice crystal
symbol 2 is displayed.
WARNING
Risk of black ice, even above
37 °F (3 °C)
Accident hazard
At a low outside temperature,
icy conditions must expected
on bridges and in shady road
areas.
Outside temperature
warning
Ice crystal symbol is displayed.
Possible cause:
The outside temperature
measured on the motor-
cycle is less than:
Approx. 37 °F (Approx. 3 °C)
WARNING
Risk of black ice, even above
37 °F (3 °C)
Accident hazard
At a low outside temperature,
icy conditions must expected
on bridges and in shady road
areas.
Think well ahead when driving.
Electronic immobilizer is
active
General warning light lights
up yellow.
EWS warning symbol is
displayed.
3
31
z
Displays
Page 34
Possible cause:
3
The key being used is not authorized for starting, or communica-
32
tion between the key and engine
electronics is disrupted.
Remove other motorcycle keys
from the ignition key ring.
Using emergency key.
Have the defective key replaced, preferably by an authorized BMW Motorrad retailer.
z
Displays
Radio-operated key
outside reception range
with Keyless Ride
General warning light lights
up yellow.
Key fob transmitter warning
symbol is displayed.
Possible cause:
Communication between the
radio-operated key and the engine electronics is disrupted.
OE
Check battery in radio-operated
key.
with Keyless Ride
Replacing the battery of the
key fob transmitter ( 55).
Use reserve key for further
driving.
with Keyless Ride
Battery of the key fob transmitter is empty or the key fob
transmitter is lost ( 54).
Should the warning symbol appear while driving, keep calm.
Driving can be continued; the
engine will not switch off.
Have the defective radio-operated key replaced by an authorized BMW Motorrad retailer.
OE
OE
Replace battery of radiooperated key
General warning light lights
up yellow.
!KEYLO is displayed.
Possible cause:
with Keyless Ride
The battery for the key fob transmitter is no longer charged to full
capacity. Operation of the key
fob transmitter is only ensured
for a limited time.
Replacing the battery of the
key fob transmitter ( 55).
OE
Vehicle voltage too low
General warning light shows
red.
Symbol for vehicle voltage
is displayed.
WARNING
Discharged battery causes
various motorcycle systems
to fail, such as the lighting,
engine or ABS
Accident hazard
Do not continue riding.
Page 35
The battery is not being charged.
If the journey is continued, the
vehicle electronics will discharge
the battery.
NOTICE
If the 12 V battery is installed incorrectly, or if the terminals are
swapped (e.g. when jump-starting), the fuse for the alternator
regulator may blow.
Possible cause:
Alternator or alternator drive
faulty, battery faulty or fuse for
alternator regulator blown.
Have the malfunction corrected
as soon as possible at an
authorized service facility,
preferably an authorized
BMW Motorrad Retailer.
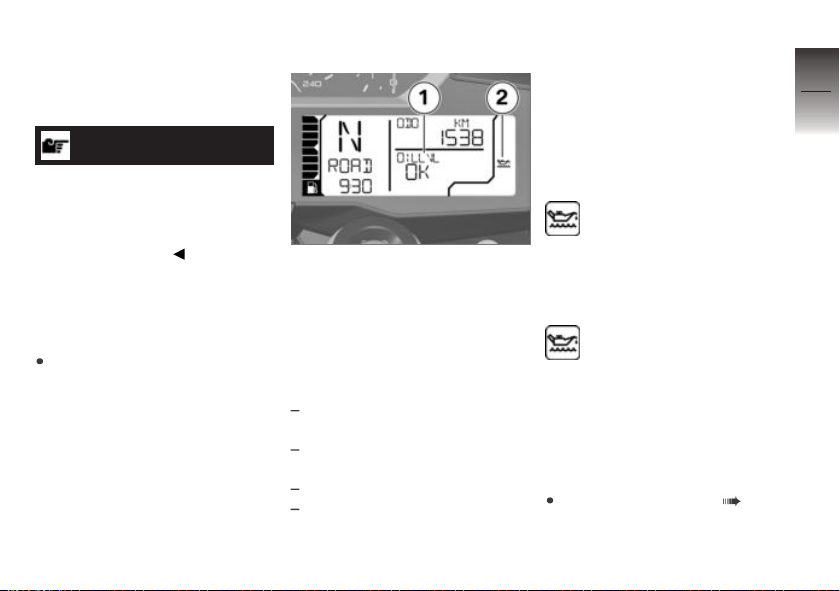
Oil level indicator
The oil level display 1 provides
information on the oil level in the
engine. This display can only
be activated when the vehicle is
stopped.
The conditions required for using
the oil level display are as follows:
Engine at normal operating
temperature.
Engine idling for at least ten
seconds.
Side stand retracted.
Motorcycle standing vertically
on level surface.
The readings mean:
OK: oil level correct.
CHECK: check oil level during
next refueling stop.
---: no measurement possible
(above-mentioned conditions not
met).
If the oil level must be
checked, symbol 2 is
displayed, until the oil level is
detected again as correct.
Engine oil level too low
Oil can symbol is displayed.
OILLVL CHECK is displayed.
Possible cause:
The electronic oil level sensor
has detected that the engine's oil
level is too low. At next refueling
stop:
Check engine oil level ( 134).
If oil level is too low:
3
33
z
Displays
Page 36
Topping up engine oil ( 135).
If the oil level is correct:
3
Contact an authorized work-
34
shop, preferably an authorized
BMW Motorrad retailer.
Coolant temperature too
high
General warning light shows
red.
z
Displays
Temperature symbol is displayed.
ATTENTION
Riding with overheated engine
Engine damage
Be sure to observe the measures listed below.
Possible cause:
Coolant level is too low.
Checking coolant level
( 139).
If coolant level is too low:
Allow the engine to cool down.
Topping up coolant ( 140).
Have the coolant system
checked at a specialist
workshop, preferably by an
authorized BMW Motorrad
retailer.
Possible cause:
The coolant temperature is too
high.
If possible, continue driving
in the part-load range to cool
down the engine.
If the coolant temperature is frequently too high:
Have the fault corrected as
soon as possible by a specialist
workshop, preferably an autho-
rized BMW Motorrad retailer.
Engine in emergencyoperation mode
General warning light lights
up yellow.
Engine symbol appears on
the display.
WARNING
Unusual handling when engine is in emergency operating mode
Accident hazard
Adapt riding style: Avoid rapid
acceleration and passing
maneuvers.
Possible cause:
The engine control unit has diag-
nosed a fault which impairs the
engine performance or throttle
response. The engine is running in the emergency-operation
mode. In exceptional cases, the
engine stops and can no longer
be started.
Have the malfunction corrected
as soon as possible at an
authorized service facility,
Page 37
preferably an authorized
BMW Motorrad Retailer.
It is possible to continue riding, however the engine performance and engine speed range
may be impaired and not function as normal.
Severe fault in the engine
management system
General warning light
flashes yellow.
Engine symbol flashes.
WARNING
Damage to the engine when
it is in the emergency operating mode
Accident hazard
Adapt riding style: Ride slowly,
avoid rapid acceleration and
passing maneuvers.
If possible, have the motorcycle
picked up and the malfunction
source eliminated by a specialized service facility, preferably
an authorized BMW Motorrad
Retailer.
Possible cause:
The engine control unit has di-
agnosed a fault, which can lead
to a severe secondary fault. The
engine is in the emergency-operation mode.
Continued driving is possible, however it is not recommended.
Avoid high load and engine
speed ranges if possible.
Have the malfunction corrected
as soon as possible at an
authorized service facility,
preferably an authorized
BMW Motorrad Retailer.
Light source defect
General warning light lights
up yellow.
!LAMP… is displayed:
!LAMPF: Low-beam head-
light, high-beam headlight,
parking lights or front turn indicator defective.
!LAMPF: Also: daytime light
defective.
!LAMPR: Brake light, taillight,
turn indicator or license plate
illumination defective.
!LAMPS: Several bulbs de-
fective.
WARNING
Overlooking the vehicle in
traffic due to a defective light
source on the vehicle
Safety risk
Replace defective bulbs as
soon as possible; it is best
always to carry a complete
set of spare bulbs on the
motorcycle.
3
35
z
Displays
Page 38
Possible cause:
3
One or more bulbs are defective.
Determine defective bulbs via
36
visual inspection.
Replacing low and high-beam
light sources in headlight
( 151).
Replacing light source for parking light ( 152).
Replacing front and rear turn
indicator light sources ( 153).
z
Displays
Have rear LED light replaced
( 155).
Anti-theft alarm battery
low charge
with anti-theft alarm system
OE
(DWA)
!DWALO is displayed.
NOTICE
This fault message is only shown
for a short time immediately following the Pre-Ride-Check.
Possible cause:
The anti-theft alarm battery no
longer has its full capacity. The
operation of the anti-theft alarm
system is only ensured for a limited time with the motorcycle
battery disconnected.
Contact an authorized service
facility, preferably an authorized
BMW Motorrad retailer.
Anti-theft alarm system
battery discharged
with anti-theft alarm system
OE
(DWA)
General warning light lights
up yellow.
!DWA is displayed.
NOTICE
This fault message is only shown
for a short time immediately following the Pre-Ride-Check.
Possible cause:
The anti-theft alarm system bat-
tery is completely discharged.
Operation of the anti-theft alarm
system is no longer ensured
when the motorcycle's battery
is disconnected.
Contact an authorized service
facility, preferably an authorized
BMW Motorrad retailer.
Tire pressure
with Tire Pressure Monitor
OE
(TPM)
Page 39
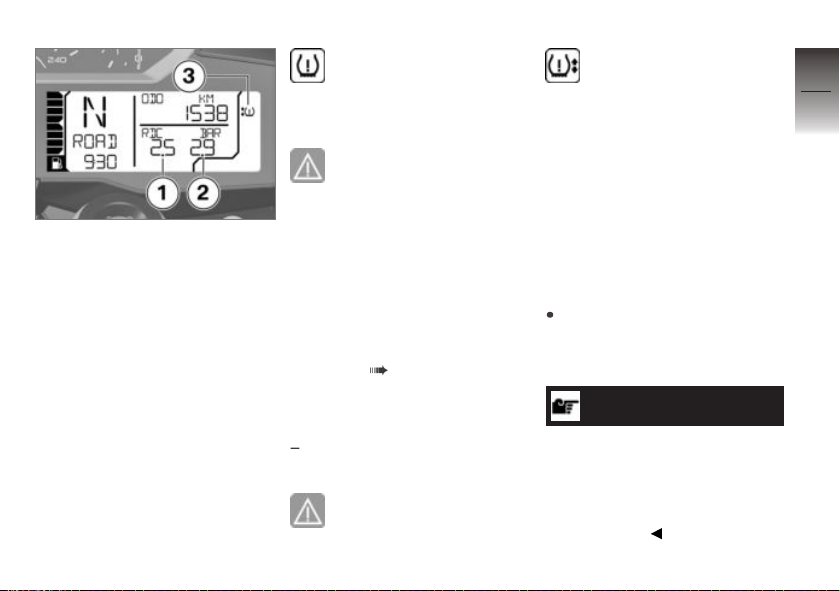
The figure on the left side 1 indicates the front tire's inflation
pressure, while the figure on the
right 2 shows the inflation pressure in the rear tire. Immediately
after switching on the ignition,
" " is displayed. The transfer of the tire pressure values
does not begin until a speed of
18 mph (30 km⁄h) is exceeded
for the first time. The displayed
tire inflation pressures refer to
a tire air temperature of 68 °F
(20 °C).
If the 3 symbol appears at
the same time, the display
is a warning. The critical tireinflation pressure flashes.
If the level concerned is
borderline in terms of the
permissible tolerance, the general warning light also shows yellow. If the monitored tire inflation
pressure is outside the specified
range the general warning light
will flash in red.
For more detailed information
about BMW Motorrad RDC/TPC,
see page ( 126).
Tire inflation pressure is
at limit of approved range
with Tire Pressure Monitor
OE
(TPM)
General warning light lights
up yellow.
Tire symbol with one or
two arrows is displayed.
The critical tire-inflation pressure
also flashes.
The up arrow indicates an inflation pressure problem on the
front wheel. The down arrow
indicates an inflation pressure
problem on the rear wheel.
Possible cause:
The measured tire inflation pressure is in the limit area of the
permissible tolerance.
Correct tire inflation pressure in
accordance with instructions on
back of cover of Rider's Manual.
NOTICE
Before adjusting the tire pressure, please observe the information about temperature compensation and adjusting the tire
pressure in the "Technology in
detail" chapter:
3
37
z
Displays
Page 40
Temperature compensation
( 127)
3
38
Tire inflation pressure is
outside approved range
with Tire Pressure Monitor
OE
(TPM)
General warning light
flashes red.
z
Displays
Tire symbol with one or
two arrows is displayed.
The critical tire-inflation pressure
also flashes.
WARNING
Tire inflation pressure is outside approved range.
Poorer handling characteristic of
the motorcycle.
Adapt your style of riding
accordingly.
The up arrow indicates an inflation pressure problem on the
front wheel. The down arrow
indicates an inflation pressure
problem on the rear wheel.
Possible cause:
The measured tire inflation pressure is outside the approved tolerance range.
Check tire for damage and
suitability for continued use.
If it is still possible to drive with
tire:
Correct tire inflation pressure at
the next opportunity.
NOTICE
The RDC/TPC warning message
can be deactivated in the offroad mode.
NOTICE
Before adjusting the tire pressure, please observe the information about temperature compensation and adjusting the tire
pressure in the "Technology in
detail" chapter:
Temperature compensation
( 127)
Have the tire checked for damage at an authorized service
facility, preferably an authorized
BMW Motorrad retailer.
If you are unsure about the tire's
suitability for continued riding:
Do not continue riding.
Contact roadside service.
Sensor faulty or system
fault
with Tire Pressure Monitor
OE
(TPM)
General warning light lights
up yellow.
The tire symbol with one or
two arrows appears.
Possible cause:
Wheels without installed TPC/
RDC sensors are mounted.
Page 41
Retrofit wheel set with TPC/
RDC sensors.
Possible cause:
1 or 2 TCP/RDC sensors have
failed or a system error has occurred.
Have fault eliminated at a specialist service facility, preferably
an authorized BMW Motorrad
retailer.
Transmission error
with Tire Pressure Monitor
OE
(TPM)
"--" or "-- --" is indicated.
Possible cause:
The vehicle has not reached the
minimum speed ( 126).
RDC/TPC sensor is not
active
min 19 mph (min 30 km/h)
(The RDC/TPC sensor does
not transmit a signal to the
motorcycle until this minimum
speed has been exceeded.)
Observe the TPM display at
higher speed.
Only when the general
warning light also lights up
is this a permanent fault.
In this case:
Have fault eliminated at a specialist service facility, preferably
an authorized BMW Motorrad
retailer.
Possible cause:
The radio link to the TPM sen-
sors is disrupted. There are radio systems in the surrounding
area that are causing interference
to the connection between the
TPM control unit and the sensors.
Observe the TPM display in
different surroundings.
Only when the general
warning light also lights up
is this a permanent fault.
In this case:
Have fault eliminated at a specialist service facility, preferably
an authorized BMW Motorrad
retailer.
Battery of tire-inflation
pressure sensor weak
with Tire Pressure Monitor
OE
(TPM)
General warning light lights
up yellow.
!RDC is displayed.
3
39
z
Displays
Page 42
3
40
z
Displays
NOTICE
This fault message is only shown
for a short time immediately following the Pre-Ride-Check.
Possible cause:
The battery of the tire inflation
pressure sensor no longer has
its full capacity. The operation of
the tire inflation pressure control
is only ensured for a limited time.
Contact an authorized workshop, preferably an authorized
BMW Motorrad retailer.
ABS self-diagnosis not
completed
ABS indicator light flashes.
Possible cause:
ABS self-diagnosis routine not completed
ABS is not available, as the
self-diagnosis routine was not
completed. (The motorcycle
must reach a specified minimum speed before the system
can check operation of the
wheel speed sensors: 3 mph
(5 km/h))
Ride off slowly. It must be
noted that the ABS function
is not available until the selfdiagnosis has been completed.
ABS fault
ABS indicator light lights
up.
Possible cause:
with riding modes Pro
Rotational speed sensor has
been damaged. The ABS Pro
function is not available.
ATTENTION
Damage to components
Damage to sensors, for example,
with the resultant malfunctions
Do not carry along any objects
under the rider's or passenger's seat.
Secure vehicle tools.
Do not damage the rotational
speed sensor.
Possible cause:
The ABS control unit has de-
tected an error. The ABS function is not available.
It remains possible to continue
riding. Observe additional information on special conditions
OE
Page 43
that can lead to an ABS error
message ( 119).
Have the malfunction corrected
as soon as possible at an authorized workshop, preferably
an authorized BMW Motorrad
retailer.
ABS deactivated
ABS indicator light lights
up.
Possible cause:
The ABS system was deacti-
vated by the rider.
Switch on ABS function
( 67).
ASC intervention
without riding modes Pro
ASC indicator and warning
light flashes rapidly.
ASC has detected instability at
the rear wheel and responded
by reducing the torque. The indicator and warning light flashes
OE
longer than the ASC intervention
lasts. This feature continues to
furnish the rider with visual feedback confirming that the system
has initiated active closed-loop
intervention even after the critical
situation has passed.
DTC intervention
with riding modes Pro
DTC indicator and warning
light flashes rapidly.
DTC has detected instability at
the rear wheel and responded
by reducing the torque. The indicator and warning light flashes
longer than the DTC intervention
lasts. This feature continues to
furnish the rider with visual feedback confirming that the system
has initiated active closed-loop
intervention even after the critical
situation has passed.
OE
ASC self-diagnosis not
completed
without riding modes Pro
ASC indicator and warning
light flashes slowly.
Possible cause:
ASC self-diagnosis routine not completed
ASC is not available because
the self-diagnosis routine was
not completed. (The motorcycle must reach a specified
minimum speed before the
system can check operation of
the wheel sensors: min 3 mph
(min 5 km/h))
Ride off slowly. The ASC indicator and warning light must go
out after several meters.
If the ASC indicator and warning
light continues to flash:
OE
3
41
z
Displays
Page 44
Contact an authorized workshop, preferably an authorized
3
BMW Motorrad retailer.
42
DTC self-diagnosis not
completed
with riding modes Pro
DTC indicator and warning
light flashes slowly.
Possible cause:
z
Displays
DTC self-diagnosis not
completed
The DTC function is not
available, as the self-diagnosis
function has not been
completed. (To check wheel
speed sensors, motorcycle
must reach a minimum speed
with engine running: min
3 mph (min 5 km/h))
Ride off slowly. It must be
noted that the DTC function
OE
is not available until the selfdiagnosis has been completed.
ASC switched off
without riding modes Pro
ASC indicator and warning
light lights up.
Possible cause:
The rider has switched off the
ASC system.
without riding modes Pro
Activating ASC function
( 68).
OE
OE
DTC switched off
with riding modes Pro
DTC indicator and warning
light lights up.
Possible cause:
The DTC system was deacti-
vated by the rider.
Switching on DTC ( 69).
OE
ASC fault
without riding modes Pro
ASC indicator and warning
light lights up.
Possible cause:
The ASC control unit has de-
tected a fault. The ASC function
is not available.
It remains possible to continue
riding. Please be aware that
ASC functionality is no longer
available. Observe the additional information on situations
that can lead to an ASC fault
( 122).
Have the malfunction corrected
as soon as possible at an
authorized service facility,
preferably an authorized
BMW Motorrad Retailer.
OE
Page 45
DTC error
with riding modes Pro
DTC indicator and warning
light lights up.
Possible cause:
The DTC control unit has de-
tected an error.
ATTENTION
Damage to components
Damage to sensors, for example,
with the resultant malfunctions
Do not carry along any objects
under the rider's or passenger's seat.
Secure vehicle tools.
Do not damage the rotational
speed sensor.
It must be noted that the DTC
function is not available at all or
is restricted.
It remains possible to continue
riding. You should also observe
the additional information on
OE
situations that can lead to a
DTC fault ( 122).
Have the malfunction corrected
as soon as possible at an
authorized service facility,
preferably an authorized
BMW Motorrad Retailer.
DESA fault
General warning light lights
up yellow.
!D-ESA is displayed.
Possible cause:
The DESA control unit has de-
tected a fault. Damping action
and/or the spring adjustment may
be the cause. In AUTO charging
mode, the cause may be a fault
in the function of the riding position compensation. In this state,
the motorcycle is probably heavily damped and is uncomfortable
to drive, especially on poor roadways. Alternatively, the spring
preload may be set incorrectly.
Have the malfunction corrected
as soon as possible at an
authorized service facility,
preferably an authorized
BMW Motorrad Retailer.
Fuel down to reserve
Low-fuel warning light lights
up.
WARNING
Rough engine running or
switching off of the engine
due to a fuel shortage
Accident hazard, damage to catalytic converter
Do not drive to the extent that
the fuel tank is completely
empty.
Possible cause:
At the most, the fuel tank still
contains the reserve fuel quantity.
3
43
z
Displays
Page 46
3
44
Reserve fuel quantity
Approx. 1.1 gal (Approx. 4 l)
Refueling procedure ( 111).
Fuel reserve
The fuel quantity in the fuel tank
when the low-fuel warning light
switches on depends on the driving dynamics. The more the fuel
z
Displays
moves around in the fuel tank
(due to frequent changes of the
banking angle, frequent braking
and acceleration), the harder it is
to accurately determine the fuel
reserve. For this reason, the fuel
reserve cannot be determined
precisely.
The remaining range is dis-
played after the low-fuel
warning light switches on.
The distance that can still be
traveled with the fuel reserve
depends on the riding style (on
the consumption) and on the fuel
quantity that was still available at
the time of switch-on.
The odometer for the fuel
reserve is reset when the fuel
quantity after refueling is greater
than the fuel reserve.
Hill Start Control active
with Hill Start Control
Stop symbol is displayed.
Possible cause:
The Hill Start Control ( 129)
was activated by the rider.
Switch off Hill Start Control.
Using Hill Start Control ( 81).
OE
Hill Start Control
deactivated automatically
with Hill Start Control
OE
General warning light
flashes yellow.
Stop symbol flashes briefly.
Possible cause:
The Hill Start Control was deacti-
vated automatically.
Side stand was folded out.
Hill Start Control is deactivated
if the side stand is folded out.
Engine was stopped.
Hill Start Control is deactivated
if the engine is stopped.
The rider has driven off with
Hill Start Control activated.
Using Hill Start Control ( 81).
Hill Start Control can not
be activated
with Hill Start Control
General warning light
flashes yellow.
OE
Page 47
Stop symbol flashes briefly.
Possible cause:
The Hill Start Control can not be
activated.
Fold in side stand.
Hill Start Control only functions
when the side stand is folded
in.
Start engine.
Hill Start Control only functions
with the engine running.
Upshift recommendation
The upshift recommendation
must be switched on in the
display settings ( 61).
Upshift recommendation 1 signals the economically best point
in time for upshifting.
Upshift recommendation
Up arrow is displayed.
Possible cause:
The speed for the next higher
gear was reached.
Upshift.
The arrow disappears.
Gear not programmed
with gearshift assistant Pro
The gear indicator flashes.
The gearshift assistant Pro
has no function.
Possible cause:
with gearshift assistant Pro
The transmission sensor has not
been programmed completely.
Shift to idle N and let engine
run at least 10 seconds while
the motorcycle is stationary so
that idle can be programmed
in.
Use clutch control to shift to
all gears and drive at least 10
seconds in each gear.
The gear indicator stops flashing when the transmission sensor has been programmed successfully.
If the transmission sensor has
been programmed completely,
the Pro gearshift assistant will
operate as described ( 128).
OE
OE
3
45
z
Displays
Page 48
If the programming procedure
is unsuccessful, have the fault
3
eliminated at a specialist work-
46
shop, preferably an authorized
BMW Motorrad retailer.
Hazard warning lights
system switched on
General warning light
flashes red.
z
Displays
Turn signal indicator light
flashes green.
Possible cause:
The hazard warning lights system
was switched on by the rider.
Switching off the hazard warning lights system ( 58).
Service display
If the time remaining until the
next service is less than a month,
or if the next service is due within
621 miles (1000 km), the service
date 1 and the remaining kilometers 2 appear for a short period
of time after the Pre-Ride-Check.
When a service date
elapses without service,
the general warning light
lights up in yellow, appearing
together with the date and
mileage (kilometerage) display.
The Service message is
displayed continuously.
NOTICE
If the service display appears
more than a month before the
service date, the stored date
must be adjusted in the instrument cluster. This situation can
occur if the battery has been disconnected for a longer time.
Consult a certified workshop,
preferably an authorized
BMW Motorrad retailer, for
setting of the date.
Service date missed
General warning light lights
up yellow.
SERVICE is displayed continu-
ously.
Possible cause:
Service is due because of the
driving performance or the date.
Have service performed regularly by a specialist work-
Page 49

shop, preferably an authorized
BMW Motorrad retailer.
The operating and road safety
of the vehicle remains unchanged.
The best-possible value retention of the vehicle is ensured.
3
47
z
Displays
Page 50

3
48
z
Displays
Page 51

Operation
Steering and ignition lock . . . . . . . . . . . 50
Ignition with Keyless Ride . . . . . . . . . . . 52
Emergency on/off switch (kill
switch) . . . . . . . . . . . . . . . . . . . . . . . . . . . . . . 56
Lights . . . . . . . . . . . . . . . . . . . . . . . . . . . . . . . 56
Hazard warning lights system . . . . . . . 58
Turn indicators . . . . . . . . . . . . . . . . . . . . . . 58
Multifunction display . . . . . . . . . . . . . . . . 59
Antilock Brake System (ABS) . . . . . . . 66
Automatic Stability Control
(ASC) . . . . . . . . . . . . . . . . . . . . . . . . . . . . . . . 67
Dynamic Traction Control (DTC) . . . . 68
Electronic chassis and suspension
adjustment (DESA) . . . . . . . . . . . . . . . . 69
Riding mode . . . . . . . . . . . . . . . . . . . . . . . . 72
PRO riding mode . . . . . . . . . . . . . . . . . . . 74
Cruise control . . . . . . . . . . . . . . . . . . . . . . . 79
Hill Start Control . . . . . . . . . . . . . . . . . . . . 81
Anti-theft alarm (DWA) . . . . . . . . . . . . . . 82
Heated handlebar grips . . . . . . . . . . . . . 85
Rider and passenger seats . . . . . . . . . . 86
4
49
z
Operation
Page 52
Steering and ignition
4
lock
50
Keys
You are provided with 2 ignition
keys.
Should you lose your keys, refer to the information regarding the electronic immobilizer
(EWS) ( 51).
A single key fits the steering and
ignition lock, the fuel filler cap
z
Operation
and the seat lock.
with case
with topcase
The cases and the topcase can
also be ordered with locks for
the same key on request. Please
contact an authorized workshop
for this purpose, preferably an
authorized BMW Motorrad retailer.
OA
OA
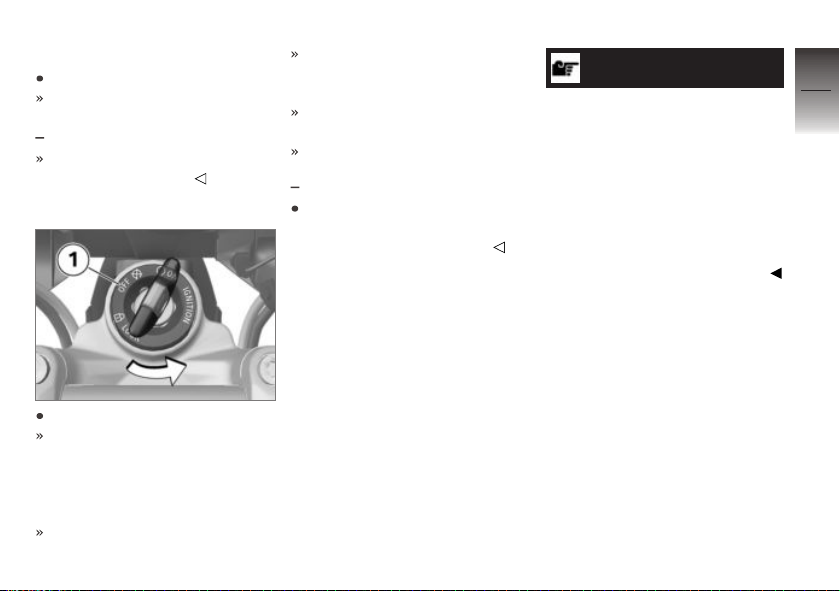
Locking handlebars
Turn handlebars to left.
Turn key to position 1 while
moving handlebars slightly.
Ignition, lights and all electrical
circuits switched off.
Handlebars are locked.
Key can now be removed.
Switching on ignition
Insert key into the steering and
ignition lock. Turn key to position 1.
Parking lights and all function
circuits are switched on.
Pre-Ride-Check is carried out.
( 102)
ABS self-diagnosis is
performed. ( 102)
without riding modes Pro
ASC self-diagnosis in progress.
( 103)
with riding modes Pro
DTC self-diagnosis is performed. ( 104)
OE
OE
Page 53
Welcome light
Switch on the ignition.
The parking lamp briefly lights
up.
with LED auxiliary headlight
The supplementary LED headlights briefly light up.
Switch off ignition
Turn key to position 1.
After the ignition is switched
off, the instrument cluster remains switched on for a short
period of time and indicates
possibly present fault codes.
Handlebars not locked.
Electrically powered accessories remain operational for
a limited period of time.
Battery can be recharged via
OA
onboard socket.
Key can now be removed.
with LED auxiliary headlight
The supplementary LED head-
lights switch off shortly after
the ignition is switched off.
EWS Electronic
immobilizer
The motorcycle's electronic
circuitry monitors the data stored
in the ignition key through
a ring antenna incorporated
in the steering and ignition
lock. The engine management
system does not enable engine
starting until this key has been
recognized as "authorized" for
your motorcycle.
NOTICE
A further key attached to the
same ring as the ignition key
used to start the engine could
"irritate" the electronics, in which
case the enabling signal for start-
OA
ing is not issued. The warning
with the key symbol appears in
the multifunction display.
Always store further vehicle keys
separately from the ignition key.
If you lose one of your motorcycle keys, you can have it disabled
by your authorized BMW motorcycle retailer.
When having a key disabled you
should also bring all of the motorcycle's remaining keys with
you. The engine can no longer
be started using a disabled key;
however, a disabled key can be
enabled again.
Emergency and spare keys are
only available through an autho-
4
51
z
Operation
Page 54
rized BMW Motorrad retailer.
The keys are part of an inte-
4
grated security system, so the
52
retailer is under an obligation to
check the legitimacy of all applications for replacement/extra
keys.
Ignition with Keyless Ride
with Keyless Ride
z
Operation
Keys
NOTICE
The indicator light for the radiooperated key flashes as long as
the radio-operated key is being
searched for.
If the radio-operated key or the
emergency key is detected, it
goes out.
If the radio-operated key or the
emergency key is not detected, it
lights up briefly.
OE
You are provided with one radiooperated key and one emergency
key. Should you lose your keys,
refer to the information regarding the electronic immobilizer
(EWS) ( 51).
The ignition, tank filler cap and
anti-theft alarm system are controlled with the radio-operated
key. The seat lock, Topcase and
case can be operated manually.
NOTICE
When the range of the radio-operated key is exceeded (e.g. in
case or Topcase), the motorcycle
cannot be started and the central
locking system cannot be locked/
unlocked.
If the range is exceeded, the ignition is switched off after approx.
1.5 minutes and the central locking system is not locked.
It is advisable to carry the radiooperated key directly on your
person (e.g. in a jacket pocket)
and to also carry the emergency
key as an alternative.
Range of Keyless Ride
radio-operated key
with Keyless Ride
Approx. 3.3 ft (Approx. 1 m)
OE
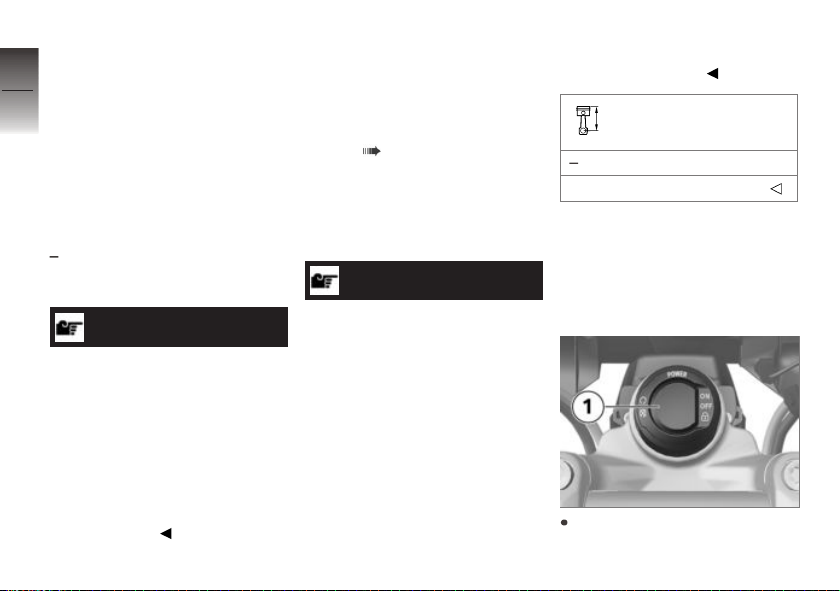
Locking handlebars
Requirement
Handlebars are turned to the left.
Radio-operated key is within reception range.
Press and hold button 1.
Page 55
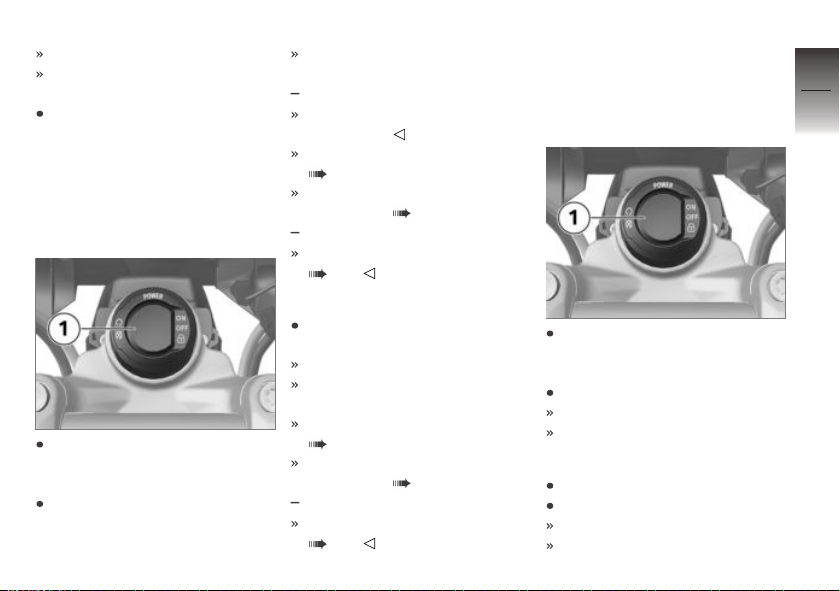
Steering lock audibly locks.
Ignition, lights and all electrical
circuits switched off.
To unlock the steering lock,
briefly press button 1.
Switching on ignition
Requirement
Radio-operated key is within reception range.
The ignition can be activated in
two ways.
Version 1:
Briefly press button 1.
Parking lights and all function
circuits are switched on.
with LED auxiliary headlight
LED additional headlights are
switched on.
Pre-Ride-Check is carried out.
( 102)
ABS self-diagnosis is
performed. ( 102)
without riding modes Pro
ASC self-diagnosis in progress.
( 103)
Version 2:
Steering lock is locked, press
and hold button 1.
Steering lock is unlocked.
Parking lights and all function
circuits switched on.
Pre-Ride-Check is carried out.
( 102)
ABS self-diagnosis is
performed. ( 102)
without riding modes Pro
ASC self-diagnosis in progress.
( 103)
OE
OE
Switch off ignition
Requirement
OA
Radio-operated key is within reception range.
The ignition can be deactivated
in two ways.
Version 1:
Briefly press button 1.
Light is switched off.
Handlebars are not locked.
Version 2:
Turn handlebars to left.
Press and hold button 1.
Light is switched off.
Steering lock is locked.
4
53
z
Operation
Page 56
EWS Electronic
4
immobilizer
The motorcycle's electronic cir-
54
cuitry monitors the data stored in
the radio-operated key through a
ring antenna incorporated in the
radio lock. The engine management system does not enable
engine starting until the radio-operated key has been recognized
as "authorized" for your motorcycle.
z
Operation
NOTICE
A further key attached to the
same ring as the radio-operated key used to start the engine
could "irritate" the electronics,
in which case the enabling signal for starting is not issued. The
warning with the key symbol appears in the multifunction display.
Always keep the other vehicle
key separate from the radio-operated key.
If you lose a radio-operated key,
you can have it disabled by your
authorized BMW Motorrad retailer. When having a key disabled you should also bring all of
the motorcycle's remaining keys
with you.
The engine can no longer be
started using a disabled radiooperated key; however, a disabled radio-operated key can be
enabled again.
Emergency and spare keys are
only available through an authorized BMW Motorrad retailer. As
the radio-operated keys are part
of an integrated security system,
the retailer is under an obligation
to check your legitimacy.
Battery of the key fob
transmitter is empty or
the key fob transmitter is
lost
Should you lose your keys, refer to the information regarding the electronic immobilizer
(EWS).
Should you loose the radiooperated key while driving, the
motorcycle can be started by
using the emergency key.
If the battery of the key fob
transmitter is empty, the vehicle can be started by touching
Page 57
the rear wheel cover with the
key fob transmitter.
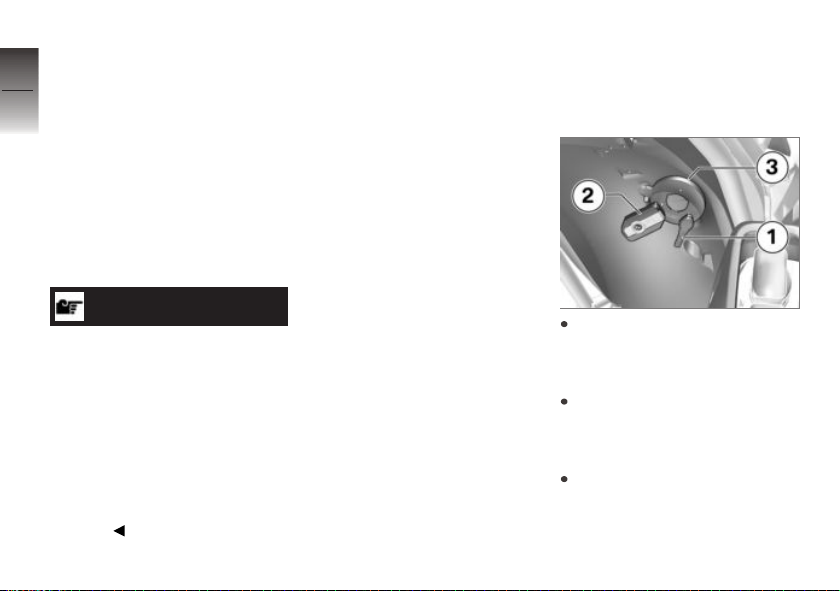
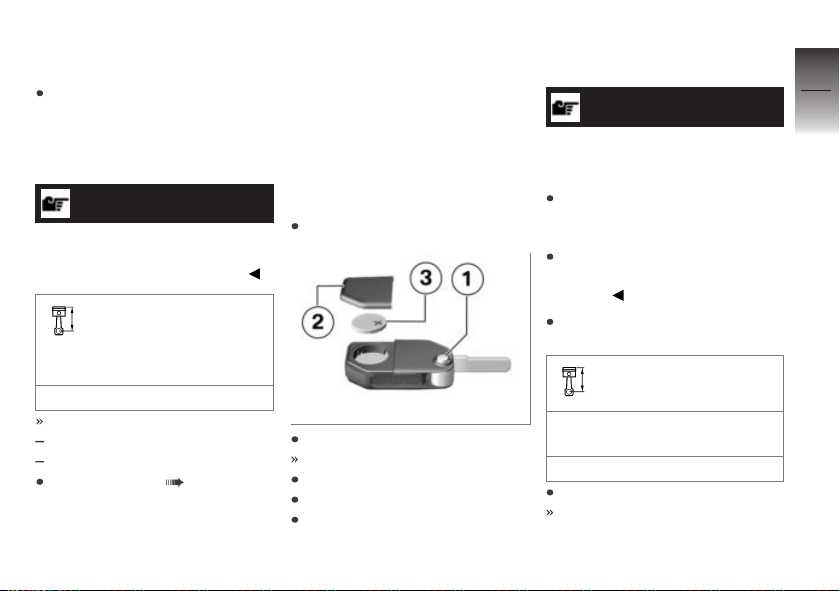
Hold the emergency key 1 or
the empty key fob transmitter 2 against the rear wheel
cover at the height of the antenna 3.
NOTICE
The emergency key or the
drained radio-operated key must
contact the rear wheel cover.
Period in which the en-
gine must be started.
Then unlocking must be repeated.
30 s
Pre-Ride-Check is carried out.
Key has been detected.
Engine can be started.
Starting engine ( 101).
Replacing the battery of
the key fob transmitter
Requirement
The key fob transmitter does
not react because the battery
is weak.
!KEYLO is displayed.
Replace battery.
Press button 1.
Key bit folds open.
Press battery cover 2 upward.
Remove battery 3.
Dispose of the old battery in
accordance with legal regula-
tions. Do not dispose of the
battery in the household waste.
ATTENTION
Unsuitable or improperly inserted batteries
Component damage
Use a battery compliant with
the manufacturer's specifications.
When inserting the battery,
make sure that the polarity is
correct.
Insert the new battery with the
positive terminal up.
Battery type
for Keyless Ride radio-operated key
CR 2032
Install battery cover 2.
Red LED in instrument panel
flashes.
4
55
z
Operation
Page 58
The key fob transmitter is
working again.
4
56
Emergency on/off switch (kill switch)
z
Operation
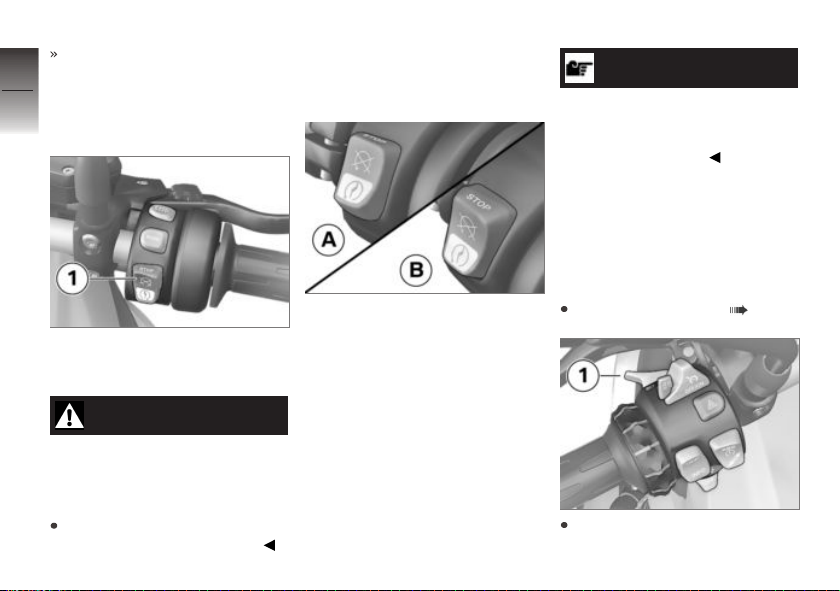
1 Emergency on/off switch
(kill switch)
WARNING
Operation of the emergency
ON/OFF switch when riding
Danger of falling due to blocking
of rear wheel
Do not operate the emergency
ON/OFF switch when riding.
The engine can be switched
off easily and quickly using the
emergency on/off switch.
A Engine switched off
B Operating position
Lights
Low-beam headlight and
parking lights
The parking lights come on automatically when the ignition is
switched on.
NOTICE
The parking lights are a strain
on the battery. Do not leave the
ignition switched on longer than
absolutely necessary.
The low-beam headlight switches
on automatically when the engine
is started.
High-beam headlight and
headlight flasher
Switching on ignition ( 50).
Press switch 1 toward front to
switch on high-beam headlight.
Page 59
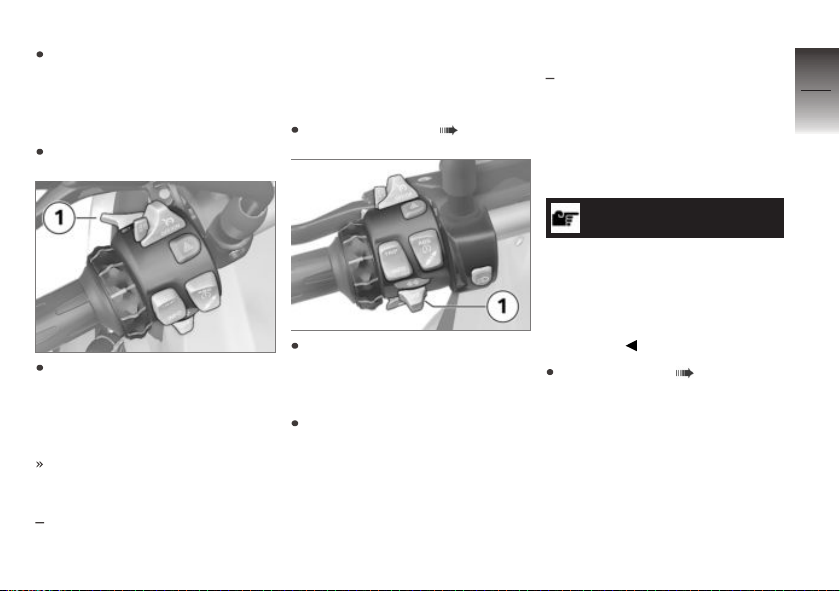
Pull switch 1 toward rear to
actuate headlight flasher.
Headlight courtesy delay
feature
Turn off ignition.
Immediately after switching off
the ignition, push the switch 1
back and hold it until the headlight courtesy delay feature
comes on.
The vehicle lights light up for
a minute and then switch off
again automatically.
This can be used after parking the vehicle in order to illu-
minate the path to the house
door, for instance.
Parking lights
Switch off ignition ( 51).
Immediately after switching off
the ignition press the 1 button
and maintain pressure until the
parking light come on.
Switch ignition on and then off
again to switch off parking light.
LED auxiliary driving lamp
with LED auxiliary headlight
Requirement
The LED auxiliary headlights are
only active when the low beam is
active.
NOTICE
The auxiliary headlights are
approved for use as fog lights
and may only be used in poor
weather conditions. Comply with
the country-specific road traffic
regulations.
Starting engine ( 101).
OA
4
57
z
Operation
Page 60
4
58
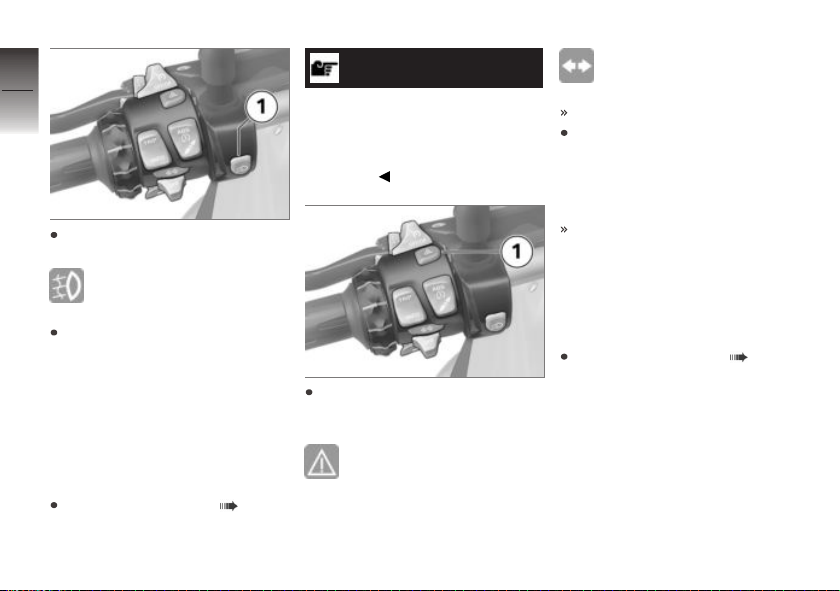
Press button 1 to switch on
the additional LED headlights.
z
Operation
The indicator light for the
LED auxiliary headlight
lights up.
Press button 1 again to switch
off the additional LED headlights.
Hazard warning lights system
Operating hazard warning
flashers
Switching on ignition ( 50).
NOTICE
The hazard warning flashers
place a strain on the battery.
Do not use the hazard warning
flashers for longer than absolutely
necessary.
Press button 1 to switch on
the hazard warning lights system.
General warning light
flashes red.
Turn signal indicator light
flashes green.
Ignition can be switched off.
To switch off the hazard warning lights system, switch on
the ignition if the engine is not
already running and press button 1 again.
The general warning light and
the turn signal indicator light go
out.
Turn indicators
Operating turn indicators
Switching on ignition ( 50).
Page 61
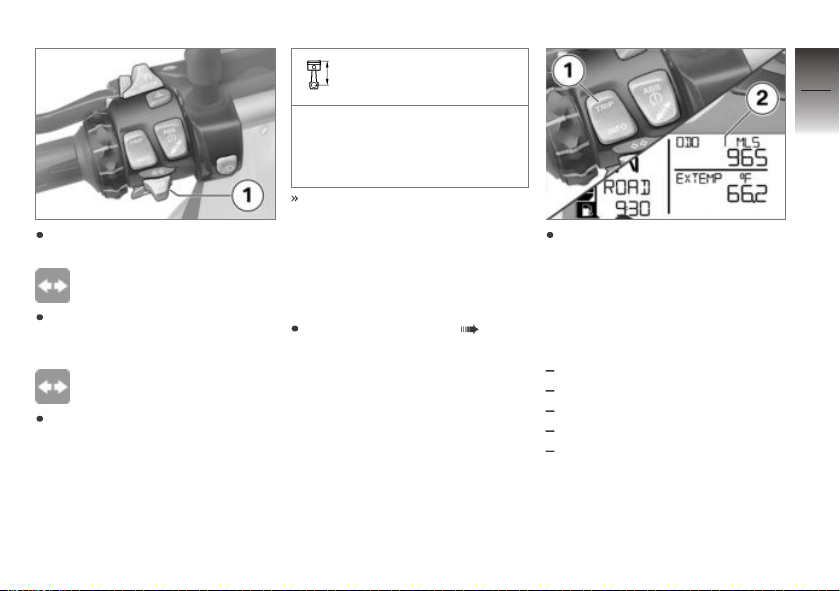
Press button 1 to left to switch
on left-side turn indicators.
Turn signal indicator light
flashes green.
Press button 1 to right to
switch on right-side turn
indicators.
Turn signal indicator light
flashes green.
Press button 1 into center position to switch off turn indicators.
Turn indicator cancellation
The turn indicators automatically switch off when the defined riding time and distance
have been reached.
The turn signal indicator light
goes out.
Multifunction display
Selecting display at the
top
Switching on ignition ( 50).
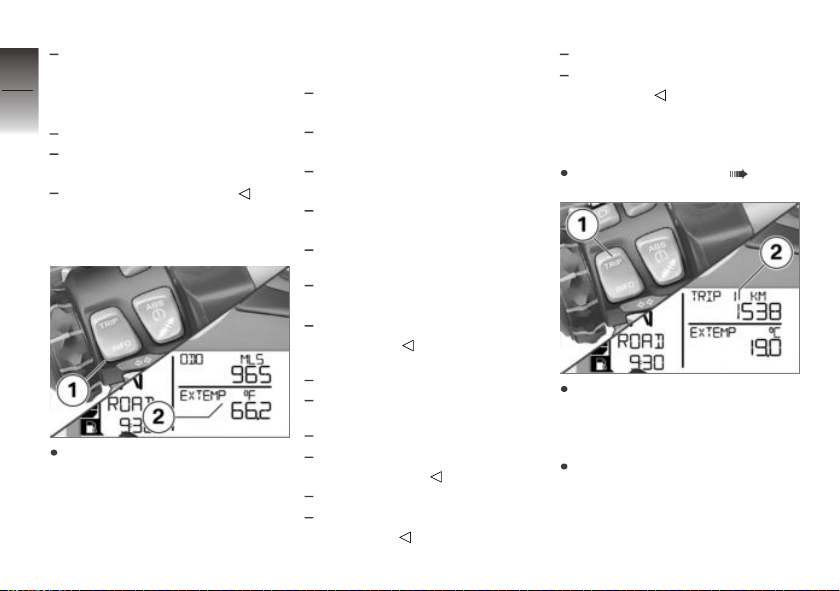
Press button 1 briefly to select
the display in the top line of
display 2.
In the case of standard equipment, the following values can be
displayed and selected per push
of a button:
Total mileage (ODO)
Trip distance 1 (TRIP 1)
Trip distance 2 (TRIP 2)
Range (RANGE)
SETUP menu (SETUP EN-
TER), ony while stationary
4
59
z
Operation
Page 62
with on-board computer Pro
The following information is ad-
4
ditionally displayed using the on-
60
board computer Pro:
Automatic odometer (TRIP A)
Current fuel consumption
(CONS C)
Current speed (SPEED)
Selecting display at the
bottom
z
Operation
OE
displayed and selected per push
of a button:
Outside temperature
(EXTEMP)
Engine temperature (EN-
GTMP)
Average consumption 1
(CONS 1)
Average consumption 2
(CONS 2)
Average speed (Ø SPEED)
with Tire Pressure Monitor
OE
(TPM)
Tire inflation pressures (option)
(TPM/RDC)
with on-board computer Pro
Stopwatch driving time
(RDTIME)
Resetting the trip
odometer
Switching on ignition ( 50).
OE
Press button 1 briefly to select
the display in the bottom line
of display 2.
In the case of standard equipment, the following values can be
Date (DATE)
Oil level indicator (OILLVL)
with on-board computer Pro
Onboard electrical system volt-
age (VOLTGE)
with on-board computer Pro
Stopwatch overall time
(ALTIME)
OE
OE
Repeat pressing button 1
briefly, until the odometer to be
reset is shown in the top line of
the display 2.
Press and hold button 1 until
displayed value has been reset.
Page 63
Resetting average data
Switching on ignition ( 50).
4
61
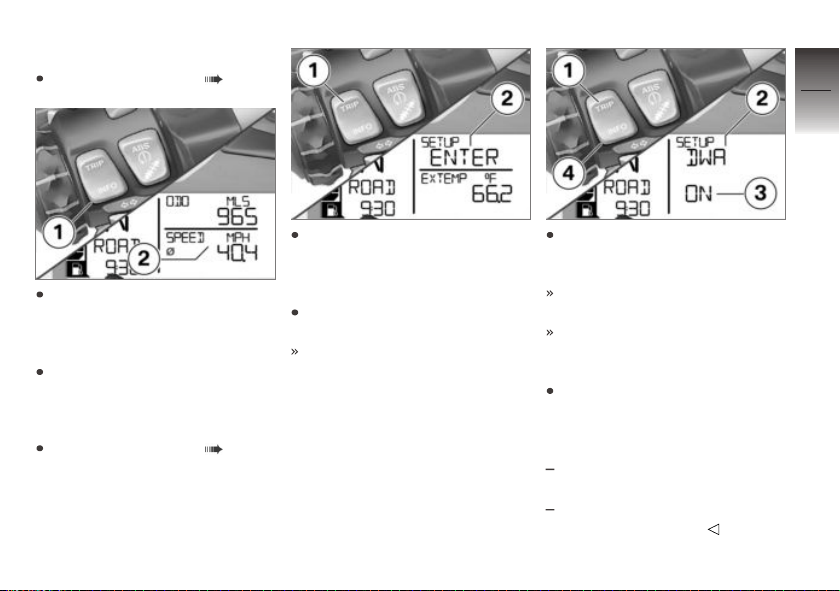
Repeat pressing button 1
briefly, until the average value
to be reset is shown in the
bottom line of the display 2.
Press and hold button 1 until
displayed value has been reset.
Configuring functions
Switching on ignition ( 50).
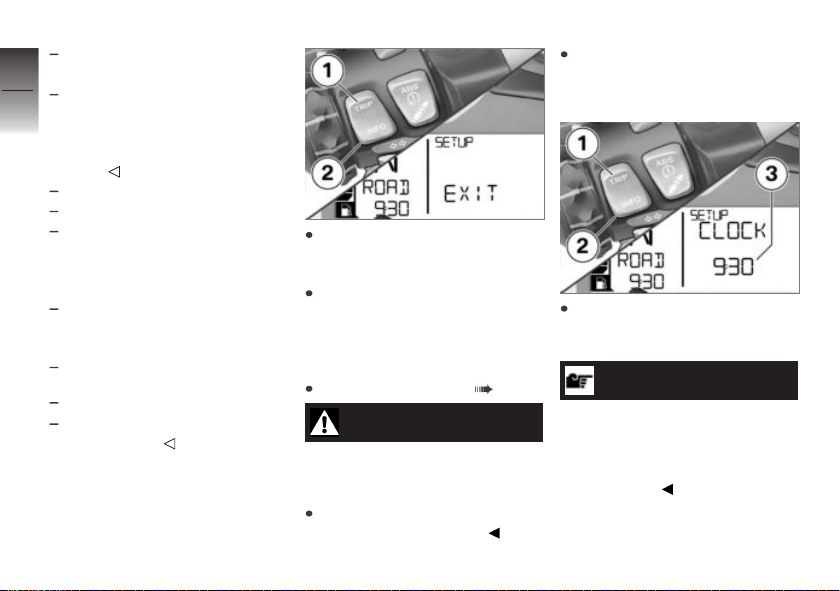
Briefly press button 1 repeatedly until SETUP ENTER is
shown in the upper lines of the
display 2.
Press and hold button 1 to
start the SETUP menu.
The following is indicated in
the display depending on the
equipment selected.
Press button 1 briefly to respectively switch to the next
menu item.
The menu item appears in the
top line of the display 2.
The adjusted value appears
in the bottom line of the
display 3.
Press button 4 briefly to
change the adjusted value.
The following menu items can be
selected:
with anti-theft alarm system
OE
(DWA)
DWA: Switches alarm system
on (ON) or off (OFF)
z
Operation
Page 64
with preparation for navigation
OE
system
4
GPS TM: If a navigation sys-
62
tem is installed: apply GPS
time and GPS date (ON) re-
spectively do not apply them
(OFF)
CLOCK: Setting the clock
DATE: Setting the date
ECOSFT: Show upshift rec-
ommendation in the display
(ON) respectively do not show
z
Operation
it (OFF)
BRIGHT: Adjust display
brightness from normal (0) to
bright (5)
EXIT: Exit SETUP menu
with on-board computer Pro
BC CUSTOM: Starts display
customization.
In order to exit the SETUP
menu, press and hold menu
item SETUP EXIT, button 1.
In order to exit the SETUP
menu at any time, press and
hold button 1.
Set clock
Switching on ignition ( 50).
OE
WARNING
Adjusting the clock while riding
Accident hazard
Adjust the clock only when the
motorcycle is stationary.
In the SETUP menu, select
the SETUP CLOCK menu
item.
Press and hold button 2, until
the hours flash in the bottom
line of display 3.
NOTICE
If "––:––" is indicated instead
of the time, the power supply to
the instrument cluster was in-
terrupted (e.g., the battery was
disconnected).
Page 65
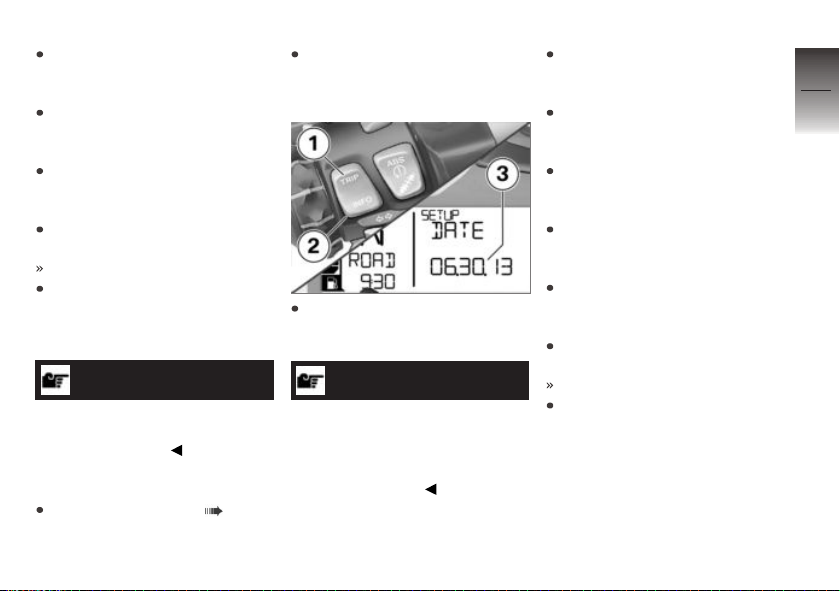
Increase the flashing value using button 1 respectively decrease it using button 2.
Press and hold button 2, until
the minutes flash in the bottom
line of display 3.
Increase the flashing value using button 1 respectively decrease it using button 2.
Press and hold button 2, until
the minutes stop flashing.
The adjustment is completed.
In order to cancel the adjustment at any time, press and
hold button 1, until the original
value is displayed again.
NOTICE
The adjustment is canceled, if
you ride off before the adjustment is completed.
Set date
Switching on ignition ( 50).
In the SETUP menu, select
the SETUP DATE menu
item.
Press and hold button 2, until
the month flashes in the bottom line of display 3.
NOTICE
If "––.––.––" is indicated
instead of the date, the power
supply to the instrument cluster
was interrupted (e.g., the battery
was disconnected).
Increase the flashing value us-
ing button 1 respectively de-
crease it using button 2.
Press and hold button 2, until
the day flashes in the bottom
line of display 3.
Increase the flashing value us-
ing button 1 respectively de-
crease it using button 2.
Press and hold button 2, until
the year flashes in the bottom
line of display 3.
Increase the flashing value us-
ing button 1 respectively de-
crease it using button 2.
Press and hold button 2, until
the year stops flashing.
The adjustment is completed.
In order to cancel the adjust-
ment at any time, press and
hold button 1, until the original
value is displayed again.
4
63
z
Operation
Page 66
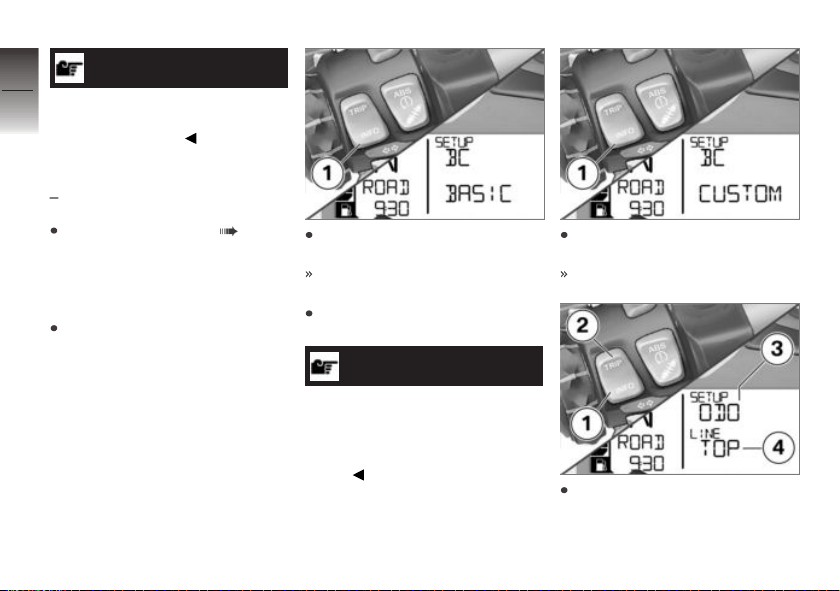
4
64
NOTICE
The adjustment is canceled, if
you ride off before the adjustment is completed.
Customize display
with on-board computer Pro
Switching on ignition ( 50).
In the individualization menu it is
possible to adjust, which infor-
z
Operation
mation should be shown in which
display line.
In the SETUP menu, select
the SETUP BC BASIC
menu item.
OE
Press button 1 briefly to start
the individualization menu.
SETUP BC CUSTOM is indi-
cated.
Press button 1 briefly again to
exit the individualization menu.
NOTICE
If SETUP BC BASIC is selected, the factory setting becomes active again. The CUS-
TOM individualization remains
stored.
Press and hold button 1 to
display the first menu item.
SETUP BC ODO is indicated.
Press button 2 briefly to respectively switch to the next
menu item.
Page 67
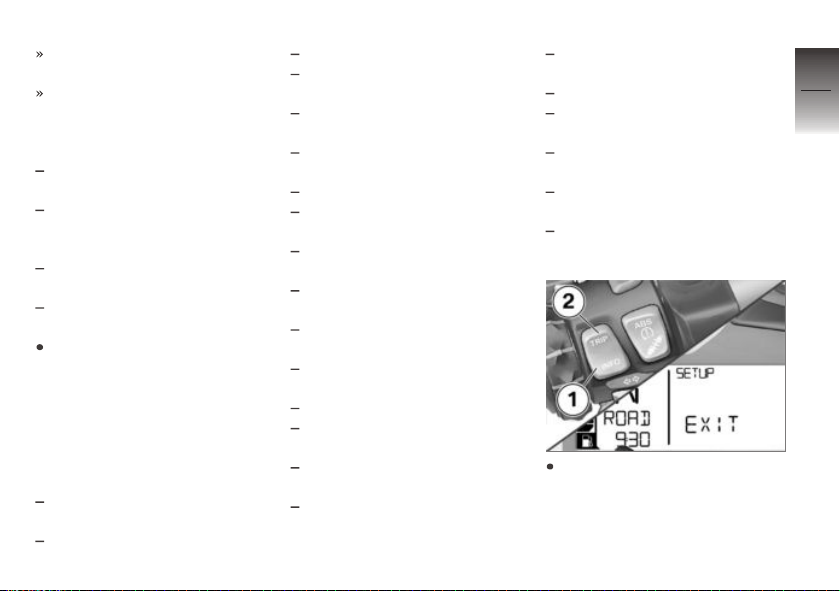
The menu item appears in the
top line of the display 3.
The adjusted value appears
in the bottom line of the
display 4. The following values
can be adjusted.
TOP: The value is indicated in
the top line of the display.
BELOW: The value is indi-
cated in the bottom line of the
display.
BOTH: The value is indicated
in both lines of the display.
OFF: The value is not indi-
cated.
Press button 1 briefly to
change the adjusted value.
The following menu items can be
selected. The factory setting is
indicated in parentheses. Some
menu items are displayed only,
if the respective optional equipment is installed.
ODO: Odometer (TOP, setting
OFF is not possible)
TRIP 1: Tripmeter 1 (TOP)
TRIP 2: Tripmeter 2 (TOP)
TRIP A: Automatic trip dis-
tance recorder (TOP)
EXTEMP: Outside tempera-
ture (BELOW)
ENGTMP: Engine temperature
(BELOW)
RANGE: Range (TOP)
CONS R: Average consump-
tion for range calculation (OFF)
CONS 1: Average consump-
tion 1 (BELOW)
CONS 2: Average consump-
tion 2 (BELOW)
CONS C: Current fuel con-
sumption (TOP)
ØSPEED: Average speed
(BELOW)
SPEED: Current speed (TOP)
RDC: Tye inflation pressures
(BELOW)
VOLTGE: Onboard electrical
system voltage (BELOW)
ALTIME: Stopwatch overall
time (BELOW)
RDTIME: Stopwatch driving
time (BELOW)
DATE: Date (BELOW)
SERV T: Date of next service
(OFF)
SERV D: Remaining mileage
until next service (OFF)
OILLVL: Oil level indicator
(BELOW)
EXIT: exit individualization
menu
In order to exit the individualization menu, press and hold
menu item SETUP EXIT,
button 1.
4
65
z
Operation
Page 68
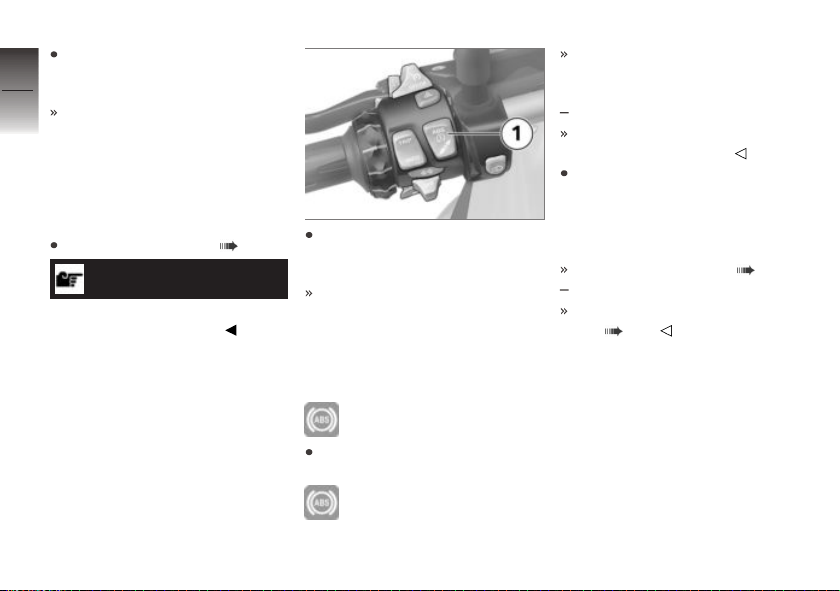
In order to exit the individualiza-
tion menu at any point in time,
4
press and hold button 2.
66
All adjustments applied until
then will be stored.
Antilock Brake System (ABS)
Deactivating ABS function
Switching on ignition ( 50).
z
Operation
NOTICE
The ABS function can also be
deactivated while driving.
Press and hold the 1 button
until the ABS indicator light
changes its display behavior.
The ASC symbol's status
changes first. Press and hold
the 1 button until the ABS
indicator light reacts. In this
case, the ASC setting does not
change.
ABS indicator light lights
up.
Release button 1 within two
seconds.
ABS indicator light continues to be lit up.
ABS function is deactivated,
integral function continues to
be active.
with Hill Start Control
The function of the Hill Start
Control remains active.
More detailed information
on the BMW Motorrad
Integral ABS brake systems
can be found in the
"Technology in detail" chapter:
Partially integral brake ( 118)
with Hill Start Control
Function of the Hill Start Control ( 129)
OE
OE
Page 69
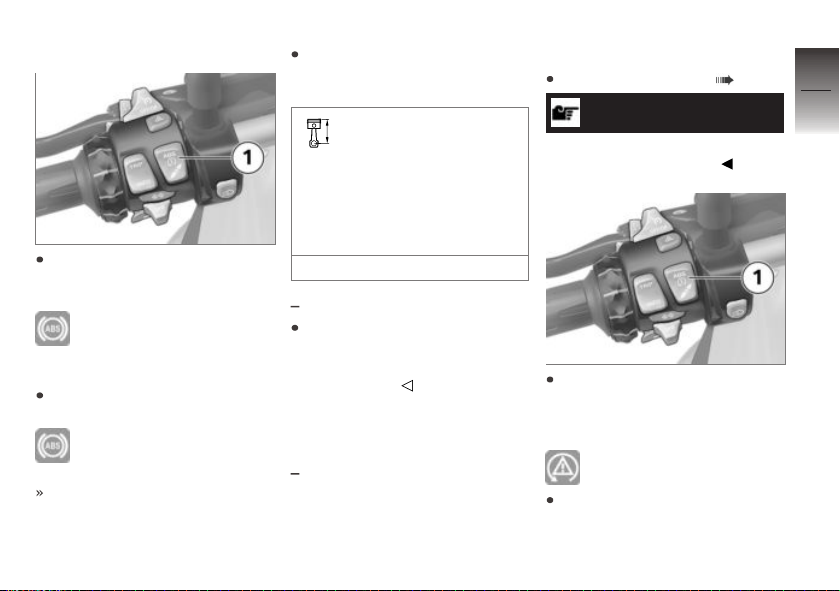
Switch on ABS function
Press and hold the 1 button
until the ABS indicator light
changes its display behavior.
ABS indicator light goes
out, and starts to flash if
self-diagnosis has not been completed.
Release button 1 within two
seconds.
ABS indicator light remains
off or continues to flash.
ABS function is now activated.
As an alternative, the ignition
can also be switched off and
then on again.
If the ABS indicator and
warning light lights up
after switching the ignition off
and on and then continuing
driving above the minimum
speed, an ABS fault has occurred.
min 6 mph (min 10 km/h)
with riding modes Pro
If the coding plug is not in-
stalled, the ignition can also be
turned off and then on again as
an alternative.
OE
Automatic Stability Control (ASC)
without riding modes Pro
OE
Deactivating ASC function
Switching on ignition ( 50).
NOTICE
The ASC function can also be
deactivated while driving.
Press and hold the 1 button
until the ASC indicator and
warning light changes its
display behavior.
ASC indicator and warning
light lights up.
Release button 1 within two
seconds.
4
67
z
Operation
Page 70
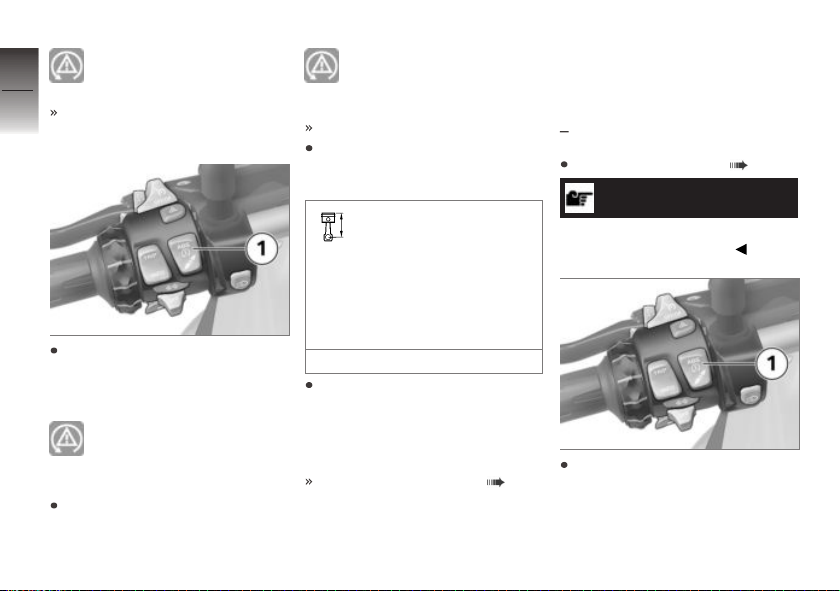
ASC indicator and warning
4
68
light continues to be lit up.
ASC function is deactivated.
Activating ASC function
z
Operation
Press and hold the 1 button
until the ASC indicator and
warning light changes its
display behavior.
ASC indicator and warning
light is no longer lit; if selfdiagnosis is incomplete, it begins
flashing.
Release button 1 within two
seconds.
ASC indicator and warning
light remains off or contin-
ues flashing.
ASC function is activated.
As an alternative, the ignition
can also be switched off and
then on again.
If the ASC indicator and
warning light lights up
after switching the ignition off
and on and then continuing to
ride at the following minimum
speed, an ASC fault has occurred.
min 6 mph (min 10 km/h)
More detailed information on
the BMW Motorrad Automatic
Stability Control (ASC) can be
found in the "Technology in
detail" chapter:
How does ASC work? ( 121)
Dynamic Traction Control (DTC)
Deactivating DTC
with riding modes Pro
Switching on ignition ( 50).
NOTICE
The DTC function can also be
deactivated while driving.
Press and hold the 1 button
until the DTC indicator and
warning light changes its
display behavior.
OE
Page 71
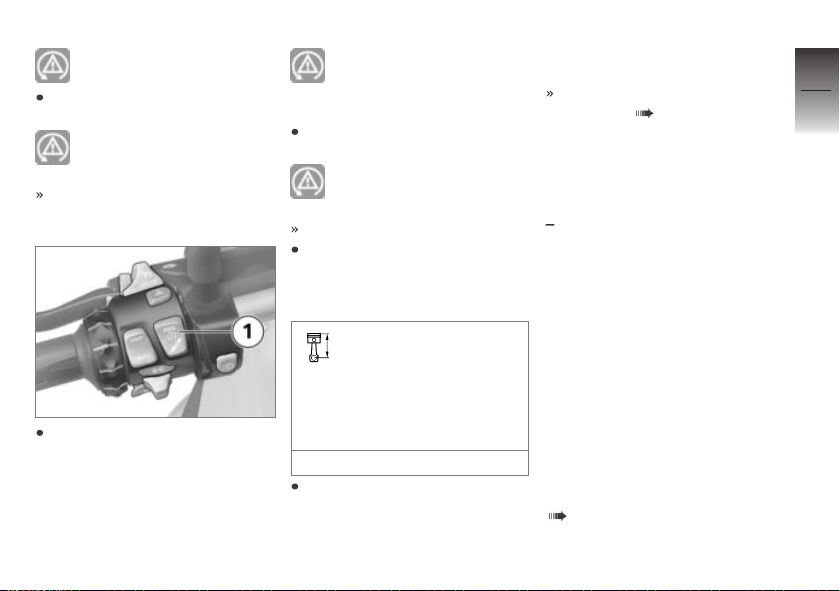
DTC indicator and warning
light lights up.
Release button 1 within two
seconds.
DTC indicator and warning
light remains on.
DTC is deactivated.
Switching on DTC
Press and hold button 1 until
the DTC indicator and warning
light changes its display behavior.
DTC indicator and warning
light goes out; if self-diagnosis has not been completed, it
begins to flash.
Release button 1 within two
seconds.
DTC indicator light remains
off or continues to flash.
DTC activated.
If the coding plug is not installed, the ignition can also be
turned off and then on again as
an alternative.
If the DTC indicator light
lights up after switching the ignition off and on and
then continuing to ride at the
following minimum speed, a
DTC fault has occurred.
min 6 mph (min 10 km/h)
More detailed information on
the BMW Motorrad Dynamic
Traction Control (DTC) can be
found in the "Technology in
detail" chapter:
How does Traction Control
function? ( 122)
Electronic chassis and
suspension adjustment
(DESA)
with Dynamic ESA
Dynamic ESA adjustment
options
The electronic chassis and
suspension adjustment
Dynamic ESA can automatically
adapt your motorcycle to the
load. If the spring preload is set
to AUTO, the rider does not
need to worry about the load
setting.
More detailed information on
Dynamic ESA can be found
in the "Technology in detail"
( 123) chapter.
OE
4
69
z
Operation
Page 72
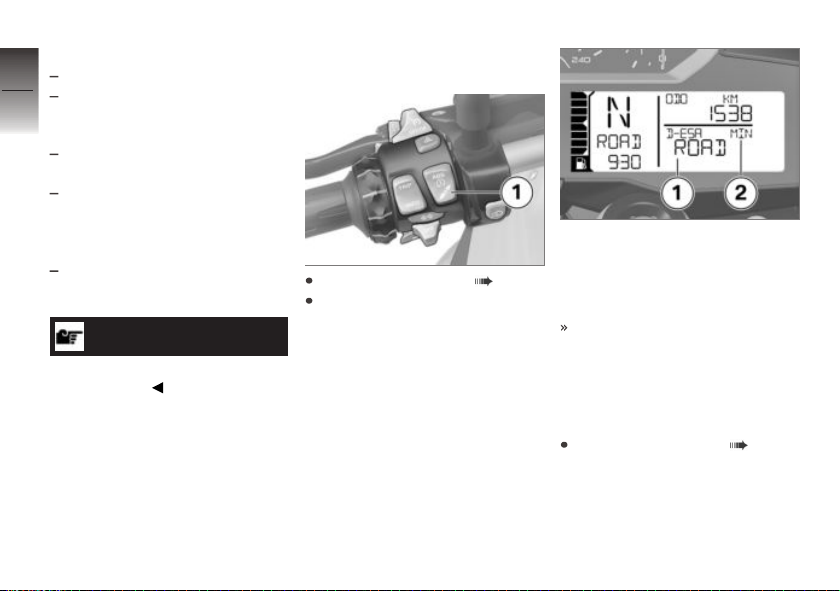
Available damping modes
4
For roads: ROAD and DYNA
For off-road: ENDURO
70
Available load settings
Fixed, minimum spring preload:
MIN
Active riding position compensation with automatic adjustment of the spring preload:
AUTO
Fixed, maximum spring preload:
z
Operation
MAX
NOTICE
Use the MAX setting only when
riding off-road.
Display suspension
setting
Switching on ignition ( 50).
Press button 1 briefly to
display current adjustment.
The damping is displayed in the
multifunction display in area 1,
and spring preload is indicated in
area 2.
The display automatically disappears again after a short
time.
Setting suspension
compliance
Switching on ignition ( 50).
Page 73
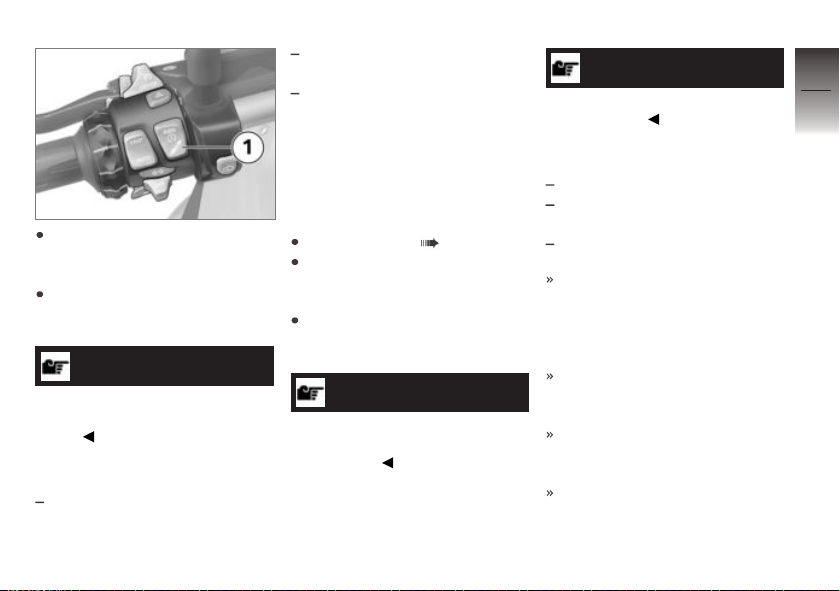
Press button 1 briefly to
display current setting.
To set the damping rate:
Repeatedly press button 1
briefly until the desired setting
is displayed.
NOTICE
The damping cannot be adjusted
while the motorcycle is being
ridden.
The following settings are available:
ROAD: damping for comfort-
able riding on roads
DYNA: damping for dynamic
riding on roads
ENDURO: damping for off-
road riding. Is only available in
the ENDURO or ENDURO
PRO riding modes and can not
be adjusted further in these
riding modes.
To set the spring preload:
Starting engine ( 101).
Press button 1 briefly to
display the current setting of
the chassis and suspension.
Repeatedly press and hold button 1 until the desired setting
is displayed.
NOTICE
The spring preload cannot be
adjusted while the motorcycle is
being ridden.
NOTICE
Use the MAX setting only when
riding off-road.
The following settings are available:
MIN: minimum spring preload
AUTO: automatic adjustment
of the spring preload
MAX: maximum spring preload
If button 1 is not pressed
for an extended period, the
damping action and the spring
preload will be adjusted to the
displayed settings.
The DESA display flashes during the adjustment to MIN or
MAX.
The D-ESA display disappears
once the setting procedure has
been completed.
In the loading mode AUTO,
the spring preload is only adjusted after driving off.
4
71
z
Operation
Page 74
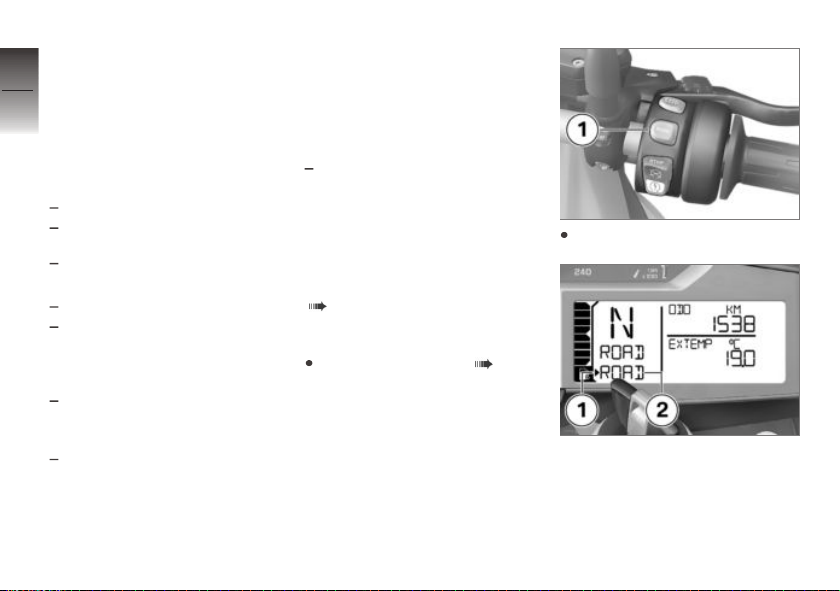
Riding mode
4
Use of the riding modes
72
BMW Motorrad has developed
riding scenarios for your motorcycle from which you can select
the one matching your situation:
Series
Riding on wet roads.
Riding on dry roads.
with riding modes Pro
z
Operation
With riding mode Pro
Brisk riding on dry roads.
Riding off-road with road tires.
With riding mode Pro and
installed coding plug
Dynamic riding on dry roads
taking into account settings
made by the rider.
Off-road riding with knobby offroad tires taking into account
settings made by the rider.
OE
For each of these scenarios, the
optimum interaction between
throttle response, ABS control
and ASC/DTC control is provided.
with Dynamic ESA
The chassis and suspension adjustments can also be adapted in
the selected scenario.
More detailed information about
the riding modes can be found
in the "Technology in detail"
( 124) chapter.
OE
Select riding mode
Switching on ignition ( 50).
Press button 1.
The selection arrow 1 and the
first selectable riding mode 2 are
displayed.
Page 75
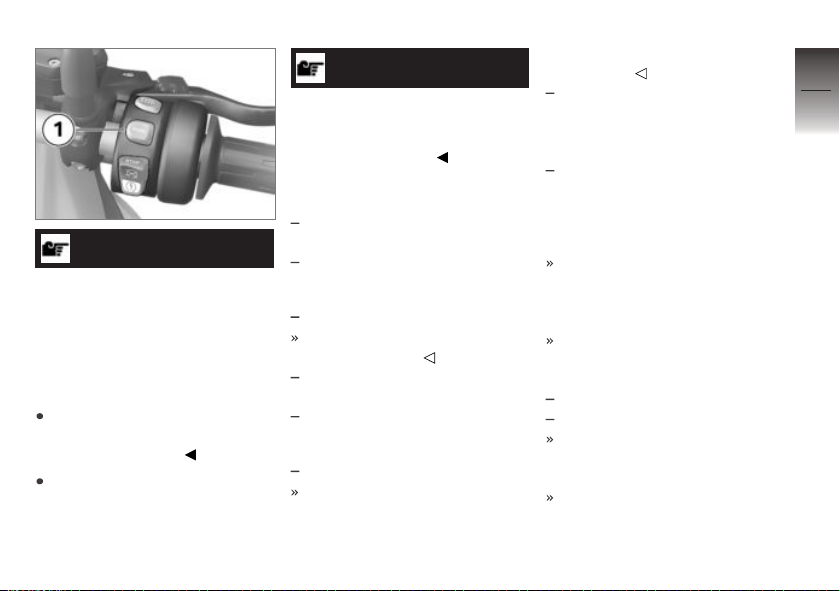
ATTENTION
Turning on off-road mode
(Enduro and Enduro Pro)
when in road mode
Risk of falling due to unstable
riding conditions when braking or
accelerating in the ABS or ASC/
DTC control range
Switch off-road mode (Enduro
and Enduro Pro) during offroad riding on only.
Press button 1 repeatedly until
the selection arrow is shown
next to the desired riding
mode.
NOTICE
When selecting the Enduro
PRO riding mode: keep in mind
that ABS control for the rear
wheel is deactivated.
The following riding modes can
be selected:
RAIN: when riding on wet
roads.
ROAD: When riding on dry
roads.
with riding modes Pro
The following riding modes can
also be selected:
OE
DYNA: For brisk riding on dry
roads.
Enduro: when riding off-
road with road tires.
with riding modes Pro
With the coding plug installed,
the riding modes DYNA PRO
and Enduro PRO replace
OE
the riding modes DYNA and
Enduro:
DYNA PRO: for dynamic rid-
ing on dry roads taking into
account settings made by the
rider.
Enduro PRO: off-road riding
with knobby off-road tires taking into account settings made
by the rider.
When the motorcycle is stationary, the selected riding
mode is activated after approx.
2 seconds.
The new riding mode is activated during operation under
the following conditions:
Throttle grip is in idle position.
Brake is not engaged.
After the new riding mode is
activated, the clock is displayed
again.
The values set in SETUP
MODE are not displayed con-
tinuously but rather are only
4
73
z
Operation
Page 76
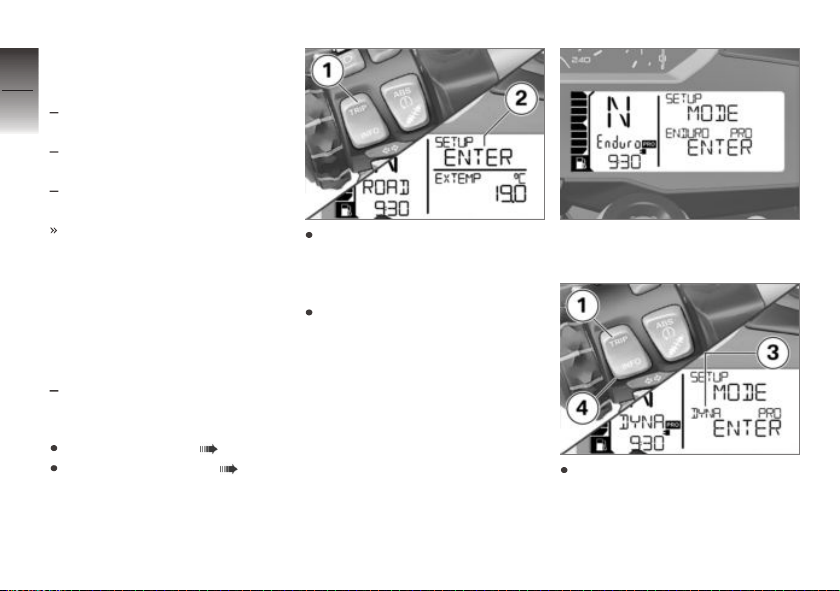
shown consecutively for a limited time after the following
4
events:
74
After every Pre-Ride-Check for
active PRO riding mode.
After changing to the
Enduro PRO riding mode.
After changing to the
DYNA PRO riding mode.
The riding mode selected and
its associated engine-characteristic, ABS, ASC/DTC and
z
Operation
Dynamic ESA settings are retained even after the ignition
has been switched off.
PRO riding mode
with riding modes Pro
Start SETUP MODE
Install coding plug ( 78).
Switching on ignition ( 50).
OE
Repeat pressing button 1
briefly, until in the top line of
the display 2 SETUP ENTER
is shown.
Press and hold button 1 to
start the SETUP menu.
SETUP MODE ENDURO PRO
ENTER is displayed.
Press button 4 briefly to switch
between the riding modes
PRO 3.
Page 77
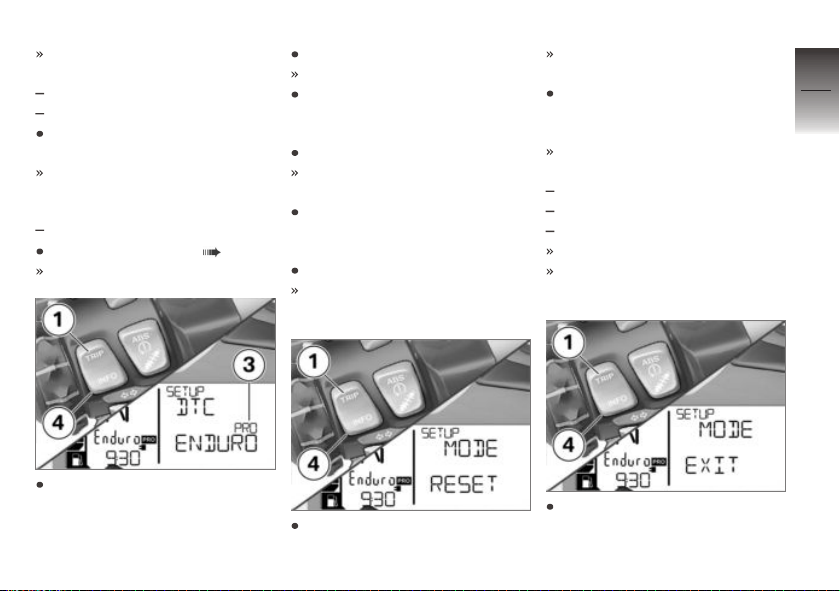
The following PRO riding
modes can be adapted:
ENDURO PRO
DYNA PRO
Press and hold button 4 to
start SETUP MODE.
SETUP DTC is displayed.
Adjusting Enduro PRO
with riding modes Pro
Start SETUP MODE ( 74).
OE
SETUP DTC is displayed.
Press button 4 briefly to
set DTC to ENDURO or
ENDURO PRO 3.
Press button 1 briefly.
SETUP ABS is displayed.
Pres button 4 briefly to
set ABS to ENDURO or
ENDURO PRO 3.
Press button 1 briefly.
SETUP ENGINE is dis-
played.
Press button 4 briefly to set
ENGINE to RAIN, ROAD or
DYNA.
Press button 1 briefly.
SETUP MODE RESET is
displayed.
Press button 1 briefly to keep
the settings.
SETUP MODE EXIT is dis-
played.
Alternatively, press and hold
button 4 to reset all parameters.
Factory setting for riding mode
Enduro PRO is adopted:
DTC: ENDURO PRO
ABS: ENDURO PRO
ENGINE: ROAD
RESET flashes 3 times.
SETUP MODE EXIT is dis-
played.
Press button 1 briefly to return
to the start of the settings.
4
75
z
Operation
Page 78
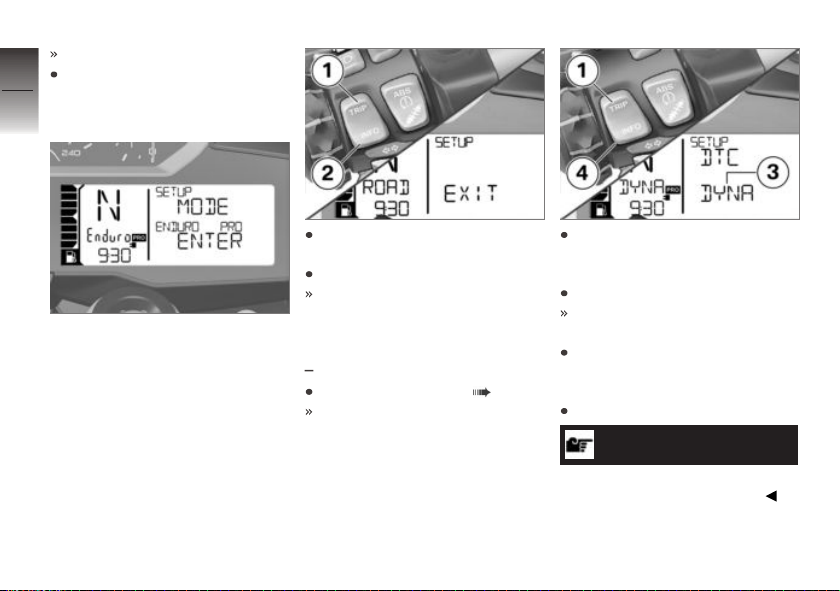
SETUP DTC is displayed.
Alternatively, press and hold
4
button 4 to exit SETUP
76
MODE.
z
Operation
SETUP MODE ENDURO PRO
ENTER is displayed.
Press button 1 repeatedly until
SETUP EXIT is displayed.
Press and hold button 1.
The onboard computer is displayed.
Adjusting DYNA PRO
with riding modes Pro
Start SETUP MODE ( 74).
OE
SETUP DTC is displayed.
Press button 4 briefly to set
DTC to RAIN, ROAD or
DYNA 3.
Press button 1 briefly.
SETUP ENGINE is dis-
played.
Press button 4 briefly to set
ENGINE to RAIN, ROAD or
DYNA.
Press button 1 briefly.
NOTICE
ABS can only be set in the
Enduro PRO riding mode.
Page 79
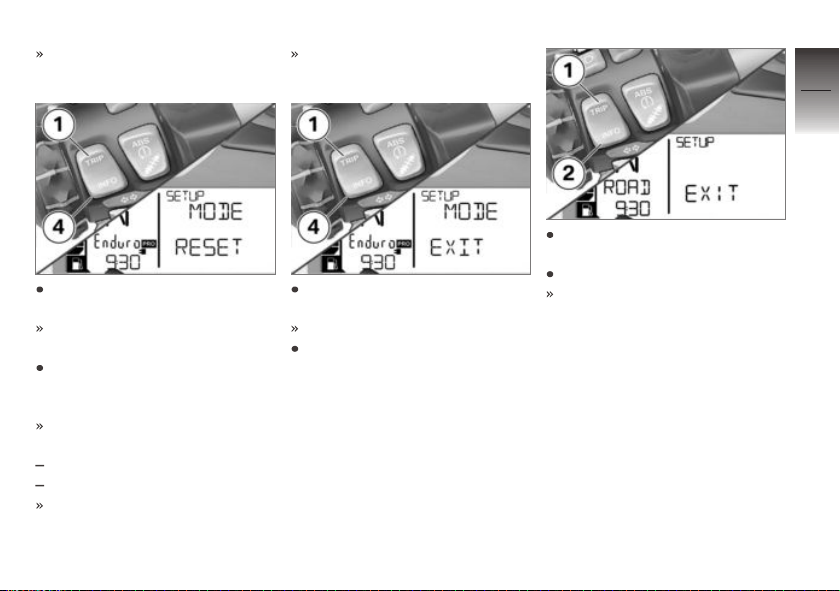
SETUP MODE RESET is
displayed.
Press button 1 briefly to keep
the settings.
SETUP MODE EXIT is dis-
played.
Alternatively, press and hold
button 4 to reset all parameters.
Factory setting for riding mode
DYNA PRO is adopted:
DTC: DYNA
ENGINE: DYNA
RESET flashes 3 times.
SETUP MODE EXIT is dis-
played.
Press button 1 briefly to return
to the start of the settings.
SETUP DTC is displayed.
Alternatively, press and hold
button 4 to exit SETUP
MODE.
SETUP MODE DYNA PRO
ENTER is displayed.
Press button 1 repeatedly until
SETUP EXIT is displayed.
Press and hold button 1.
The onboard computer is displayed.
Switching off TCP/RDC in
off-road mode
Requirement
Off-road riding should be done
with reduced tire pressure.
Requirement
One of the two riding modes
ENDURO or ENDURO PRO was
set in order to be able to switch
off RPA warning.
4
77
z
Operation
Page 80
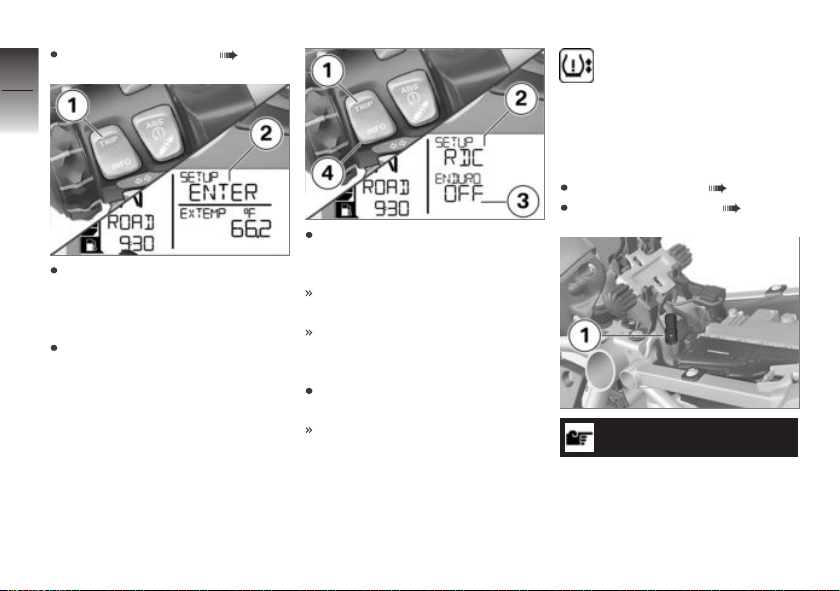
Switching on ignition ( 50).
4
78
Repeat pressing button 1
z
Operation
briefly, until in the top line of
the display 2 SETUP ENTER
is shown.
Press and hold button 1 to
start the SETUP menu.
Press button 1 briefly to
respectively select the
RDC/TPC menu item.
The top line of the display 2
shows RDC.
The adjusted value appears
in the bottom line of the
display 3.
Press button 4 briefly to
change the adjusted value.
The following settings for RDC
Enduro are possible:
ON: the TPC warning symbol is
no longer shown on the display.
Only the tire pressure outside of
the permitted tolerance is dis-
played.
OFF: the display warning
symbol for TPM is displayed; the tire pressure outside
of the permitted tolerance is also
displayed.
Install coding plug
Switch off ignition ( 51).
Remove rider's seat ( 87).
ATTENTION
Penetration of dirt and moisture in the open connector
Malfunctions
Page 81
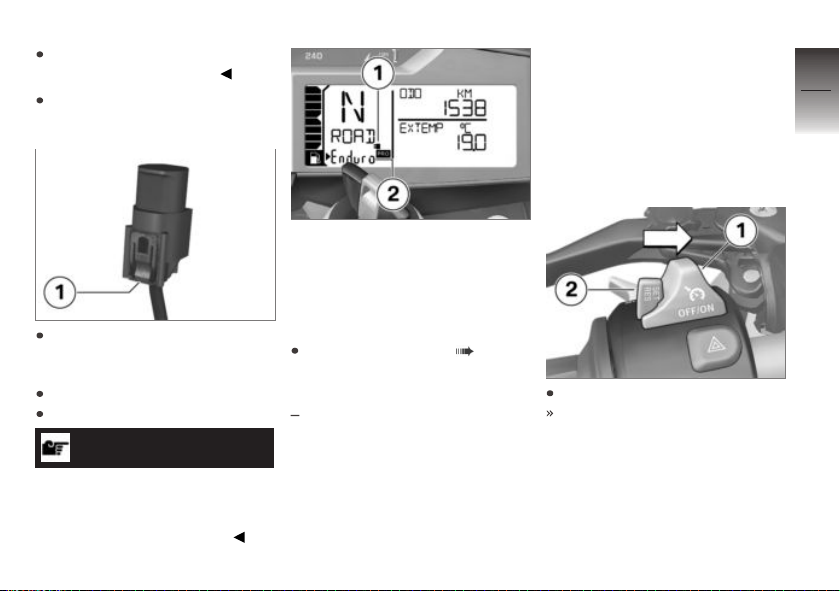
After removing the encoding
plug, refit the cover cap.
Remove cover cap of the plug
connection 1.
To do so, press in locking
mechanism 1 and pull off
protective cap.
Install coding plug.
Switch on the ignition.
NOTICE
If the coding plug is connected,
deactivated riding safety systems
remain deactivated even after the
ignition is turned off and on.
Symbol for the coding plug 1
appears on the display. Riding
modes 2 Enduro PRO and
DYNA PRO can be selected
and replace the riding modes
Enduro and DYNA.
Installing rider's seat ( 88).
Cruise control
with cruise control
OE
Switch on cruise-control
system
Requirement
Cruise control is not available
again until after the Enduro or
Enduro Pro riding mode has
been deactivated.
Push switch 1 to right.
Button 2 is operable.
4
79
z
Operation
Page 82
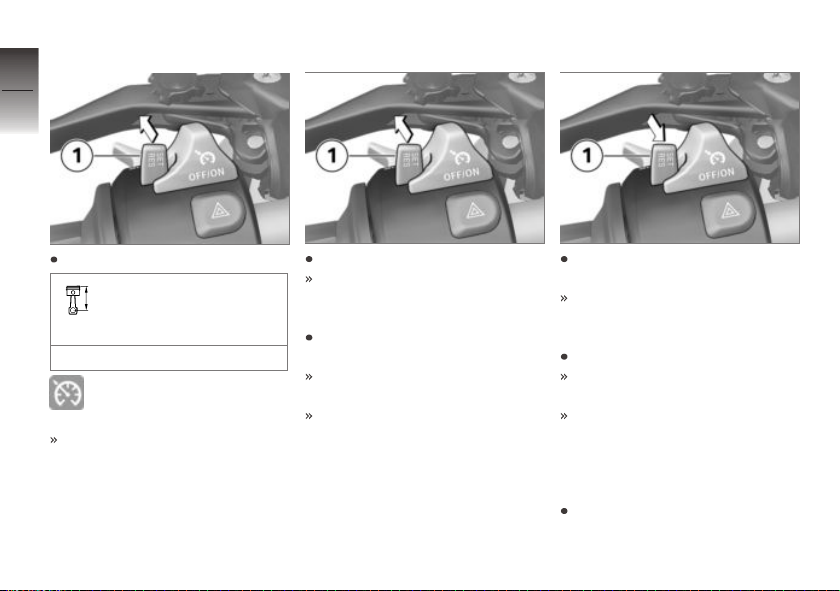
Store speed
4
80
Accelerating
Decreasing speed
Briefly press button 1 forward.
z
Operation
Adjustment range of the
cruise control (gear-de-
pendent)
12...130 mph (20...210 km/h)
Indicator lamp for cruise-
control system lights up.
The motorcycle maintains your
current cruising speed and the
setting is saved.
Briefly press button 1 forward.
Speed is increased by 1.2 mph
(2 km/h) each time the button
is pressed.
Press button 1 forward and
hold.
The motorcycle accelerates
steplessly.
If the button 1 is no longer
pressed, the speed achieved
is maintained and saved.
Briefly press button 1 backward.
Speed is reduced by 1.2 mph
(2 km/h) each time the button
is pressed.
Press button 1 back and hold.
The motorcycle decelerates
steplessly.
If the button 1 is no longer
pressed, the speed achieved
is maintained and saved.
Deactivate cruise control
Actuate brakes, clutch or throttle grip (take back throttle be-
Page 83
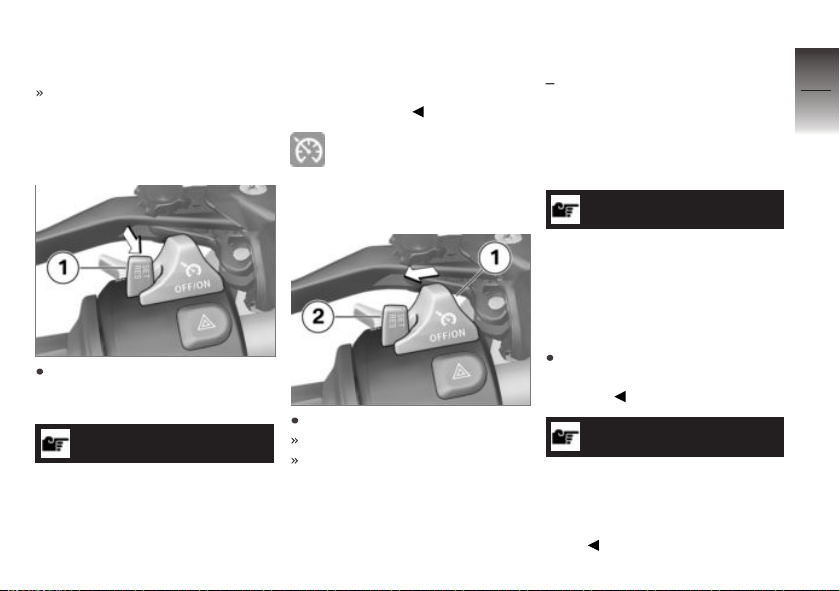
yond back position) to deactivate cruise-control system.
Cruise control indicator lamp
goes out.
Resume former cruising
speed
Briefly push button 1 back to
return to the speed saved beforehand.
NOTICE
Opening the throttle does not
deactivate the cruise-control system. If you release the throttle
grip, the motorcycle will decel-
erate only to the cruising speed
saved in memory, even though
you might have intended slowing
to a lower speed.
Indicator lamp for cruisecontrol system lights up.
Switch off cruise-control
system
Push switch 1 to left.
The system is deactivated.
Button 2 is locked.
Hill Start Control
with Hill Start Control
Using Hill Start Control
Requirement
The motorcycle is stopped.
ATTENTION
Switching off the engine or
ignition, folding out the side
stand, timeout (approx. 20
minutes) or in the event of a
fault
Hill Start Control brake failure
It is imperative to secure
the motorcycle by manual
braking.
NOTICE
Hill Start Control is only a convenience system for easier hillstarting and should, therefore,
not be confused with a parking
brake.
OE
4
81
z
Operation
Page 84
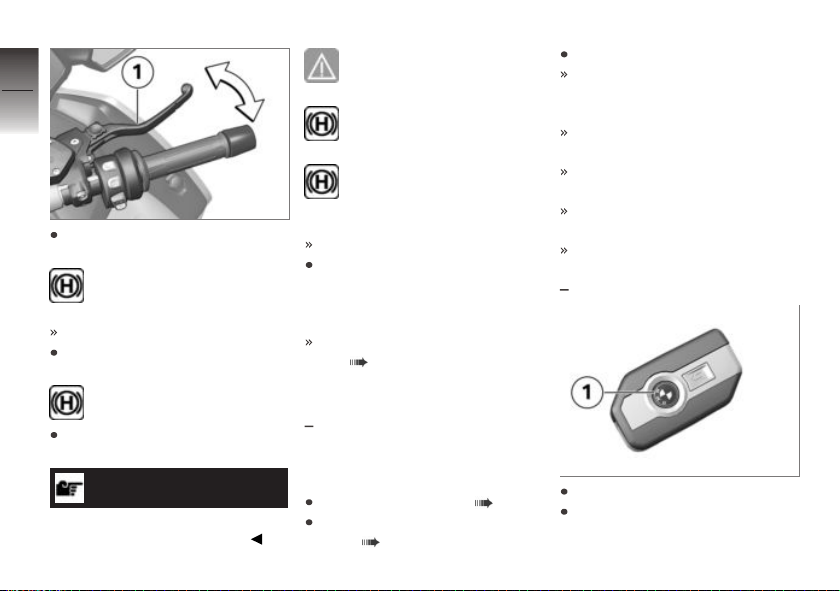
4
82
Apply brake lever 1 firmly and
then release.
z
Operation
Stop symbol is displayed.
Hill Start Control is activated.
To turn off Hill Start Control,
actuate brake lever 1 again.
Stop symbol disappears.
Alternatively, drive off in 1st or
2nd gear.
NOTICE
Hill Start Control is automatically
deactivated when driving off.
General warning light
flashes yellow.
Stop symbol flashes briefly.
The stop symbol disappears after the brakes have
been released completely.
Hill Start Control is turned off.
More detailed information on
Hill Start Control can be found
in the "Technology in detail"
chapter:
Function of the Hill Start Control ( 129)
Anti-theft alarm (DWA)
with anti-theft alarm system
OE
(DWA)
Activation
Switching on ignition ( 50).
Anti-theft alarm system settings ( 84).
Turn off ignition.
If DWA is activated, DWA is
automatically activated after the
ignition is switched off.
Activation takes approximately
30 seconds to complete.
Turn indicators are illuminated
twice.
Confirmation tone sounds
twice (if programmed).
The anti-theft alarm system is
active.
with Keyless Ride
Turn off ignition.
Press button 1 on the radiooperated key twice.
OE
Page 85
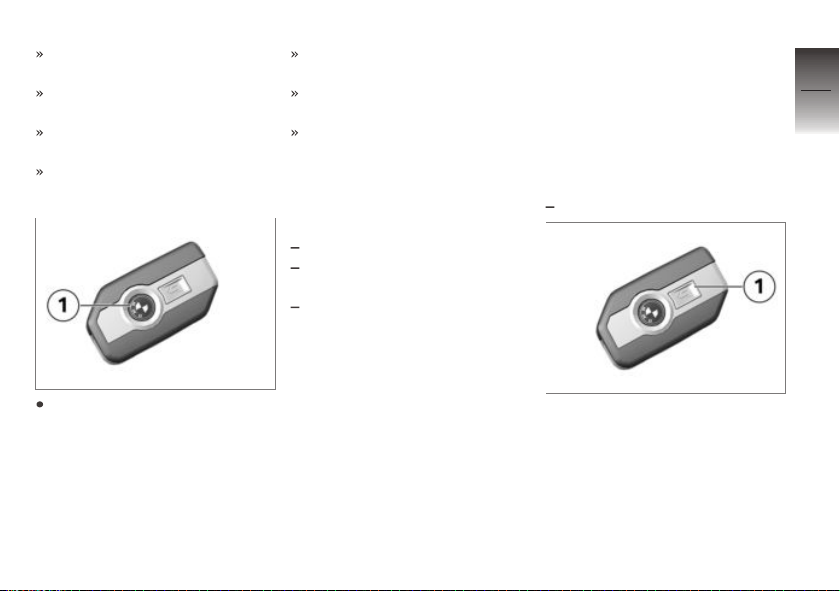
Activation takes approximately
30 seconds to complete.
Turn indicators are illuminated
twice.
Confirmation tone sounds
twice (if programmed).
The anti-theft alarm system is
active.
To deactivate the movement
sensor (for example if you are
about to transport the motorcycle on a train and the swaying
movement of the moving train
could trip the alarm), press button 1 on the radio-operated
key during the activation phase.
Turn signals are illuminated
three times.
Confirmation tone sounds three
times (if programmed).
Movement sensor is deactivated.
Alarm signal
The DWA alarm can be set off
by:
Motion sensor
Switching on ignition with an
unauthorized motorcycle key
Disconnecting the DWA from
the motorcycle battery (DWA
battery takes over the power
supply – alarm sound only, hazard warning lights do not flash)
If the DWA battery is discharged
all functions remain operational;
the only difference is that the
alarm cannot be set off if the
system is disconnected from the
motorcycle battery.
The duration of the alarm is approx. 26 seconds. During the
alarm, an alarm tone sounds and
the turn indicators flash. The
type of alarm sound can be set
by an authorized BMW Motorrad
retailer.
with Keyless Ride
A triggered alarm can be
canceled at any time by pressing
button 1 on the radio-operated
key without deactivating the
DWA.
OE
4
83
z
Operation
Page 86
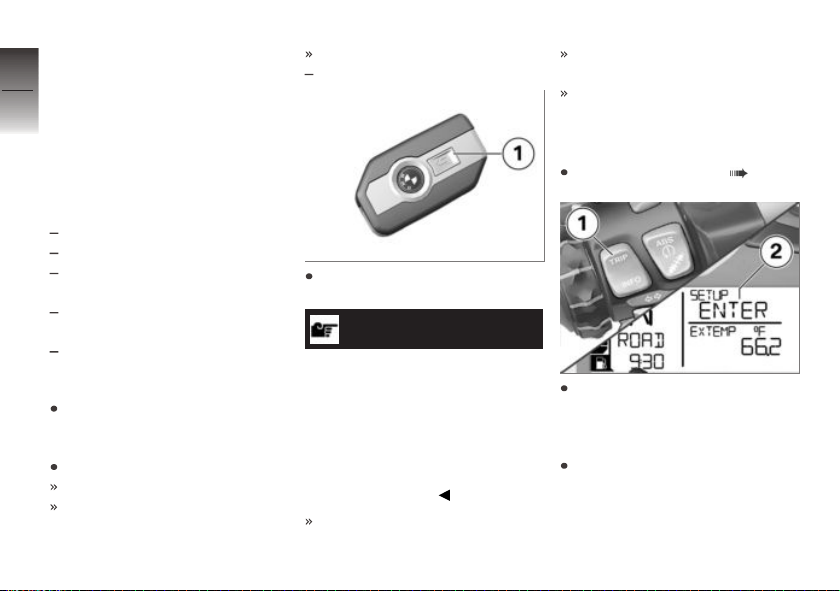
If an alarm was triggered while
the motorcycle was unattended,
4
the rider is notified accordingly
84
by an alarm tone sounding once
when the ignition is switched
on. The DWA LED then signals
the reason for the alarm for one
minute.
Light signals on DWA LED:
1 flash: motion sensor 1
2 flashes: motion sensor 2
3 flashes: ignition turned on
z
Operation
with unauthorized ignition key
4 flashes: alarm system disconnected from vehicle battery
5 flashes: motion sensor 3
Deactivation
Emergency on/off switch (kill
switch) in normal operating position.
Switch on the ignition.
Turn indicators light up once.
Confirmation tone sounds once
(if programmed).
DWA is switched off.
with Keyless Ride
Press button 1 on the radiooperated key once.
NOTICE
If the alarm function is
deactivated by means of the
remote control and the ignition
then not switched on, the
alarm function is automatically
reactivated after 30 seconds if
"Activation after ignition off" has
been programmed.
Turn indicators light up once.
OE
Confirmation tone sounds once
(if programmed).
DWA is switched off.
Anti-theft alarm system
settings
Switching on ignition ( 50).
Repeat pressing button 1
briefly, until in the top line of
the display 2 SETUP ENTER
is shown.
Press and hold button 1 to
start the SETUP menu.
Page 87
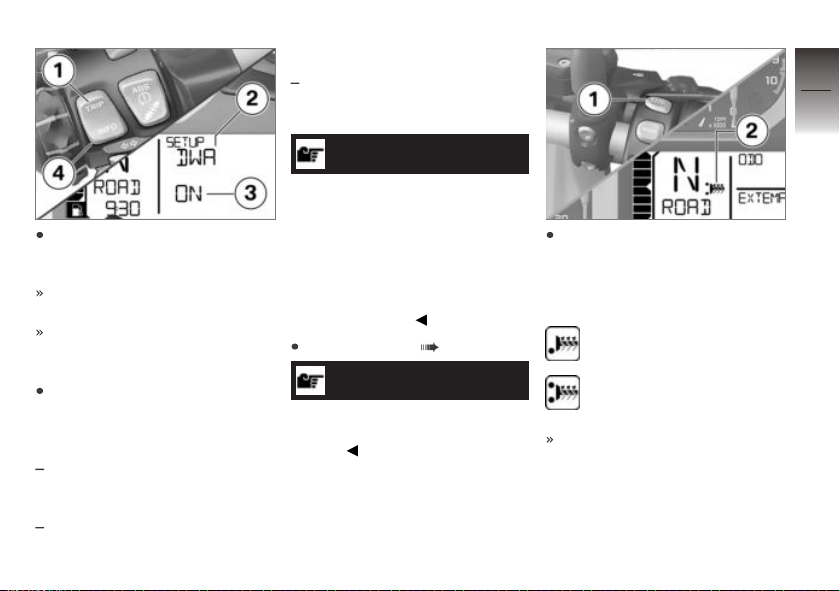
Press button 1 briefly to respectively select the DWA
menu item.
The top line of the display 2
shows DWA.
The adjusted value appears
in the bottom line of the
display 3.
Press button 4 briefly to
change the adjusted value.
The following settings are available:
ON: DWA is activated or will be
activated automatically after the
ignition is switched off.
OFF: DWA is deactivated.
Heated handlebar grips
with heated grips
Operating heated grips
NOTICE
The increase in power
consumption caused by the
heated grips can drain the
battery if you are riding at low
engine speeds. If the battery is
inadequately charged, the heated
grips are switched off to ensure
starting capability.
Starting engine ( 101).
NOTICE
The heated grips option can only
be activated when the engine is
running.
OE
Press button 1 repeatedly until desired heating level 2 is
shown.
The handlebar grips can be
heated at two different levels.
50 % heating output
100 % heating output
The 2nd heating level is used
for fast heat-up of the grips;
then the switch should be
switched back to the 1st level.
4
85
z
Operation
Page 88
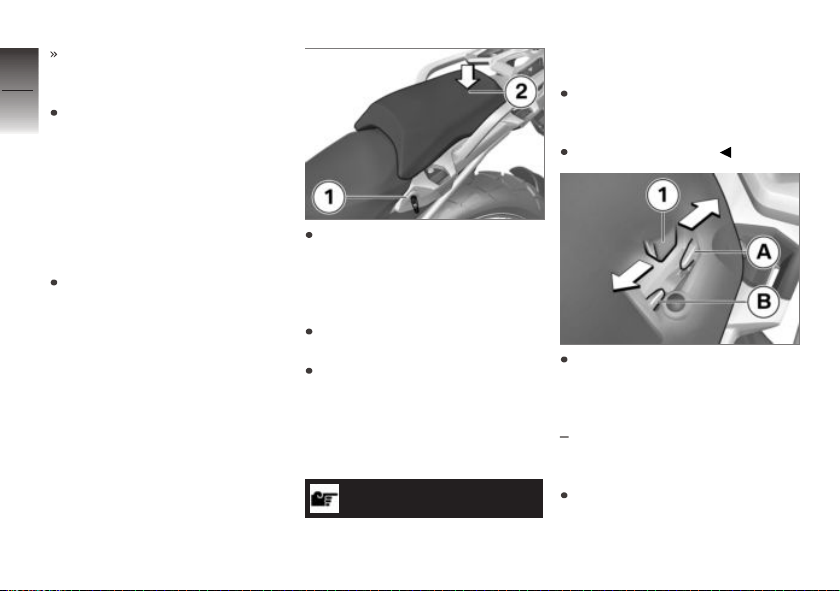
If no further changes are made
the selected heating level is
4
adopted as the setting.
86
To switch off heated grips,
press button 1 until heated grip
symbol 2 is no longer shown in
the display.
Rider and passenger seats
Remove passenger seat
z
Operation
Park motorcycle, ensuring that
support surface is firm and
level.
Turn seat lock 1 to the right
with ignition key and hold while
pressing passenger seat downward in rear area 2 to support
unlocking.
Lift passenger seat at front and
release key.
Take off passenger seat and
place on a clean surface with
upholstered side facing downward.
Install passenger seat
ATTENTION
Damage to components
Damage to sensors, for example,
with the resultant malfunctions
Do not carry along any objects
under the rider's or passenger's seat.
Secure vehicle tools.
Take adjustment direction of
passenger seat into account
depending on position of rider's
seat.
Passenger seat can be adjusted to 2 different seat positions.
Insert passenger seat in mount
with both lugs 1 centered.
Page 89
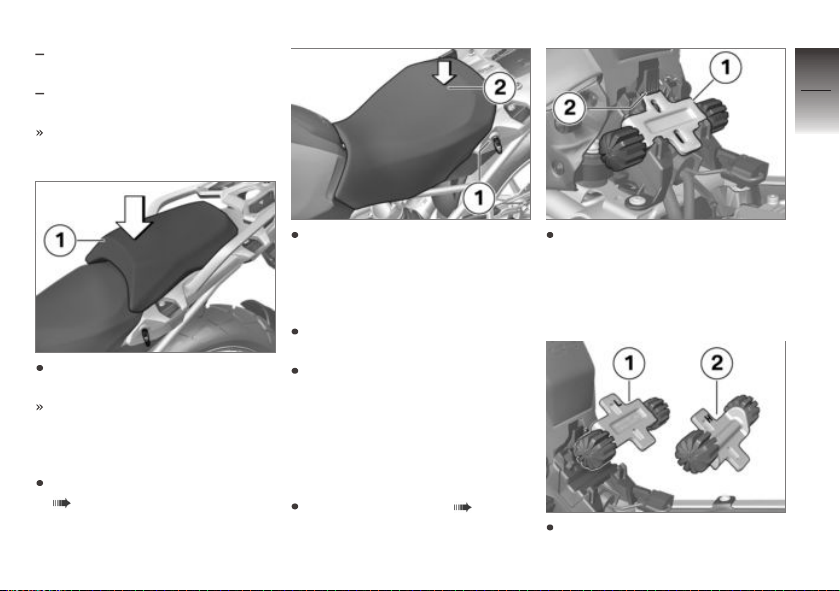
Rear seat position: push passenger seat toward rear A.
Front seat position: push passenger seat toward front B.
Lugs 1 of passenger seat are
correctly fixed in place.
4
87
Firmly press down passenger
seat 1 at front.
Passenger seat clicks audibly
into place.
Remove rider's seat
Remove passenger seat
( 86).
Turn seat lock 1 to the left
with ignition key and hold while
pushing rider's seat downward
in rear area 2 to support unlocking.
Lift the rider's seat and release
the key.
Take off the rider's seat and
place on a clean surface with
the upholstered side facing
down.
Adjusting the rider's seat
height and inclination
Remove rider's seat ( 87).
In order to remove the front
height adjustment 1, push
locking mechanism 2 forwards
to remove the height adjust-
ment upwards.
In order to adjust the low seat
position, install the front height
z
Operation
Page 90
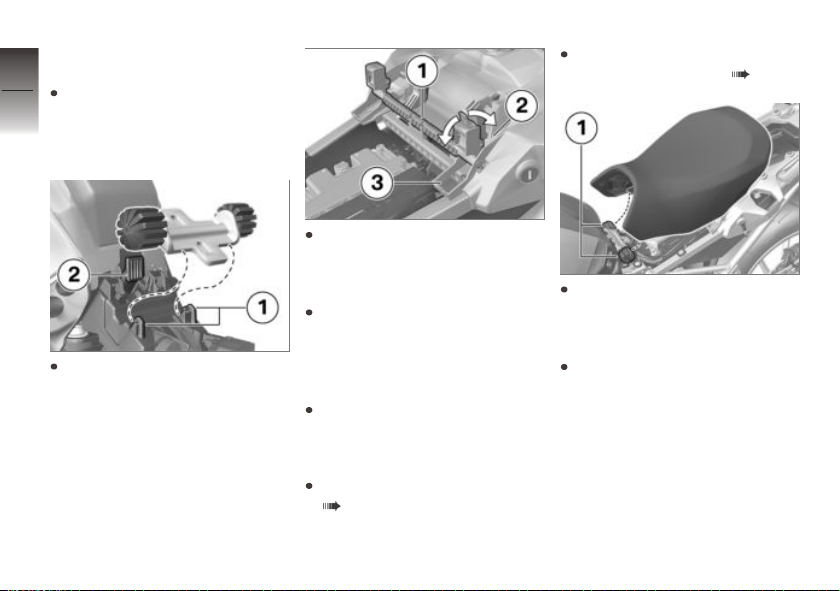
adjustment in orientation 1
(identification L).
4
In order to adjust the high seat
88
position, install the front height
adjustment in orientation 2
(identification H).
z
Operation
First, slide the front height
adjustment under mounts 1.
Then press locking mechanism 2, until it engages.
In order to adjust the low seat
position, swivel rear height
adjustment 1 into position 3
(identification L).
In order to adjust the high seat
position, swivel rear height
adjustment 1 into position 2
(identification H).
If seat tilt should be changed:
Position the front and rear
height adjustment differently.
Installing rider's seat
Remove passenger seat
( 86).
Adjusting the rider's seat
height and inclination ( 87).
Insert the rider's seat into the
fixtures 1 on the left and right
and place loosely on the motorcycle.
Press rider's seat forward
slightly in the rear area and
then press down firmly until the
locking mechanism engages.
Page 91

Setting
Mirrors . . . . . . . . . . . . . . . . . . . . . . . . . . . . . . 90
Headlight . . . . . . . . . . . . . . . . . . . . . . . . . . . 90
Wind shield . . . . . . . . . . . . . . . . . . . . . . . . . 91
Clutch . . . . . . . . . . . . . . . . . . . . . . . . . . . . . . 91
Brakes . . . . . . . . . . . . . . . . . . . . . . . . . . . . . . 92
Handlebars . . . . . . . . . . . . . . . . . . . . . . . . . 93
Spring preload . . . . . . . . . . . . . . . . . . . . . . 93
Damping . . . . . . . . . . . . . . . . . . . . . . . . . . . . 94
5
89
z
Setting
Page 92
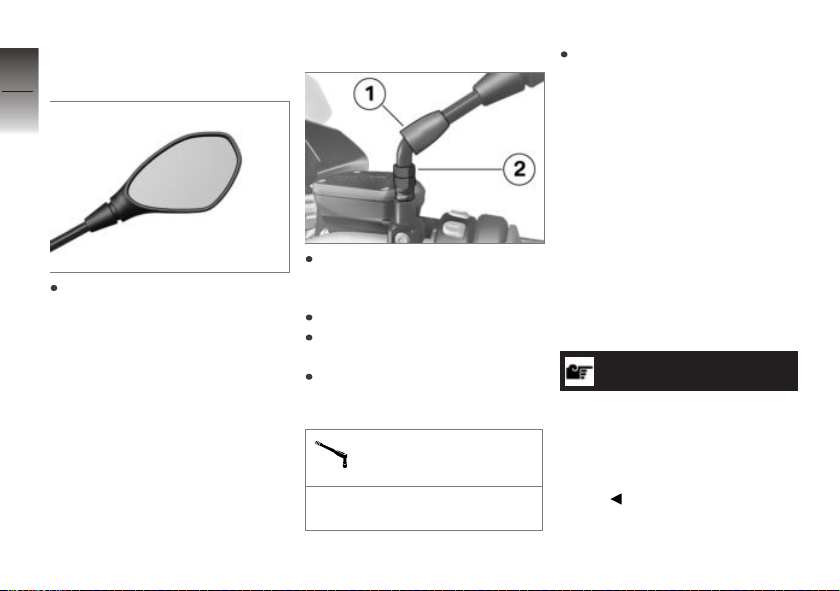
Mirrors
5
Adjusting mirrors
90
z
Setting
Move mirror into desired position by twisting.
Adjusting mirror arm
Slide protective cap 1 up over
screw connection on mirror
arm.
Loosen the nut 2.
Turn mirror arm into desired
position.
Tighten nut to specified torque
while holding mirror arm in
place.
Mirror (locknut) on
adapter
16 lb/ft (22 Nm) (Left-hand
thread)
Slide protective cap 1 over
screw fitting.
Headlight
Headlamp range and
spring preload
The headlamp range generally
remains constant due to the ad-
justment of the spring preload to
the loading state.
Spring preload adjustment may
only be insufficient when the mo-
torcycle is very heavily loaded.
In this case, the headlamp range
must be adjusted to the weight.
NOTICE
If there are doubts as to the cor-
rect headlight range, have the
adjustment checked by a spe-
cialized workshop, preferably by
an authorized BMW Motorrad
retailer.
Page 93
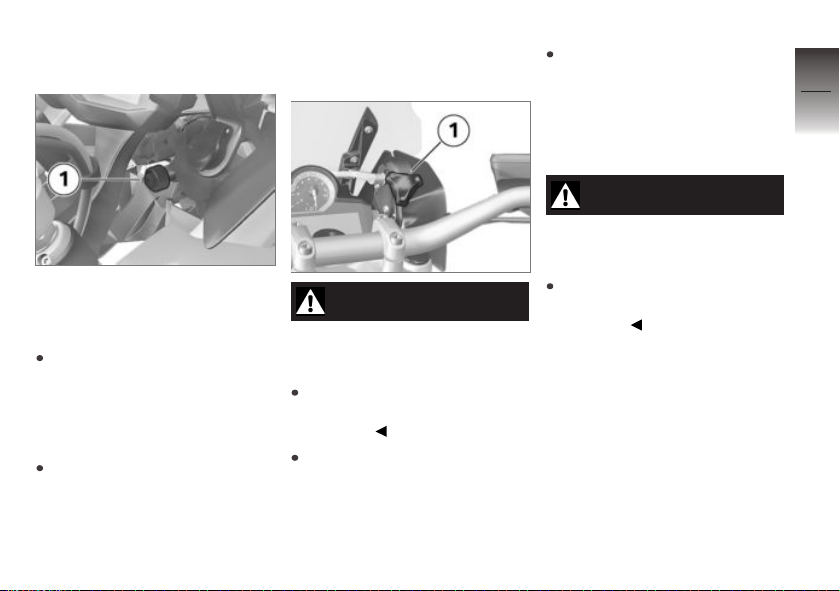
Headlight range
adjustment
In the case of high payload, if
the spring preload adjustment is
not sufficient anymore to avoid
blinding the oncoming traffic:
Turn adjustment wheel 1 counterclockwise to lower the headlight beam.
If the motorcycle is ridden again
with lower payload:
Have the headlight default setting readjusted by an authorized workshop, preferably an
authorized BMW Motorrad retailer.
Wind shield
Adjusting windshield
WARNING
Adjusting the windshield
while driving
Accident hazard
Only adjust the windshield
when the motorcycle is
stationary.
Turn adjustment wheel 1
clockwise to lower the
windshield.
Turn adjustment wheel 1 coun-
terclockwise to raise the wind-
shield.
Clutch
Adjusting clutch lever
WARNING
Adjusting the clutch lever
while driving
Accident hazard
Only adjust the clutch lever
when the motorcycle is
stationary.
5
91
z
Setting
Page 94
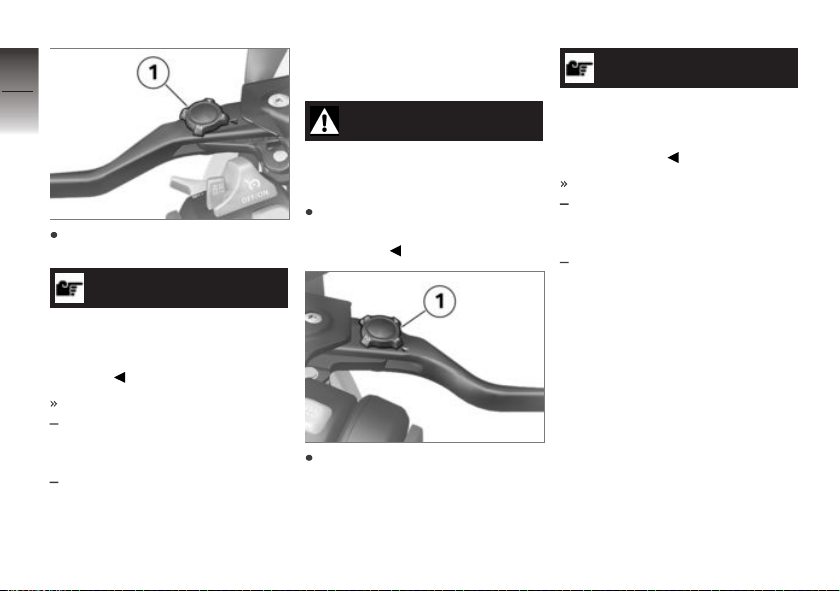
5
92
Turn adjusting wheel 1 into
z
Setting
desired position.
NOTICE
The adjustment wheel can be
turned more easily if you press
the clutch lever forward when
doing so.
Four settings are available:
Position 1: smallest distance
between handlebar grip and
clutch lever
Position 4: largest distance
between handlebar grip and
clutch lever
Brakes
Adjusting handbrake lever
WARNING
Adjusting the brake lever
while driving
Accident hazard
Only adjust the brake lever
when the motorcycle is
stationary.
Turn adjusting wheel 1 into
desired position.
NOTICE
The adjustment wheel can be
turned more easily if you press
the handbrake lever forward
when doing so.
Four settings are available:
Position 1: smallest distance
between handlebar grip and
brake lever
Position 4: largest distance
between handlebar grip and
brake lever
Page 95
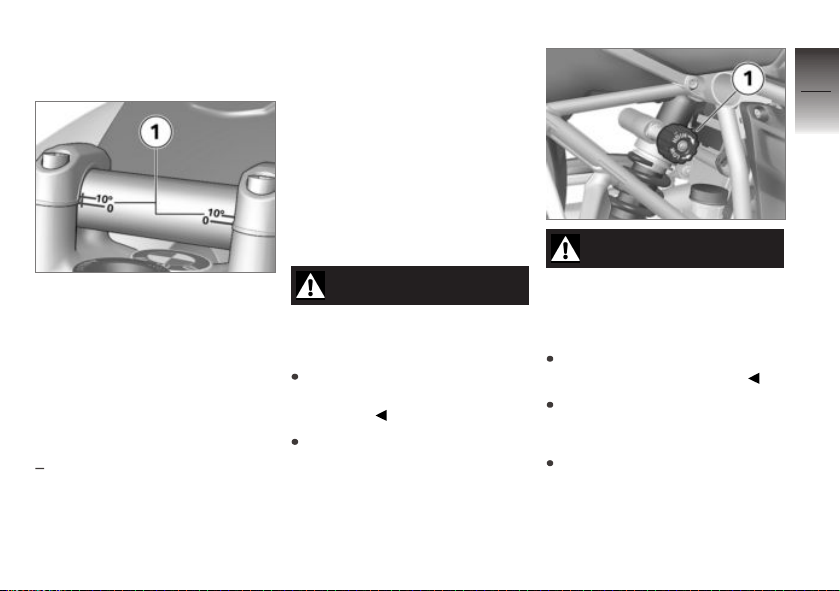
Handlebars
Adjustable handlebars
The handlebars inclination can
be adjusted in the areas of the
mark 1.
Have the handlebars adjusted by
a specialist workshop, preferably
an authorized BMW Motorrad
retailer.
Spring preload
without Dynamic ESA
OE
Setting
It is essential to set the spring
preload to suit the load carried by
the motorcycle. Increase spring
preload when the vehicle is heavily loaded and reduce spring
preload accordingly when the
vehicle is lightly loaded.
Adjusting spring preload
at rear wheel
WARNING
Adjusting the spring preload
while riding.
Accident hazard
Adjust the spring preload
only when the motorcycle is
stationary.
Park motorcycle, ensuring that
support surface is firm and
level.
WARNING
Uncoordinated settings of
spring preload and spring
strut damping.
Poorer handling.
Adjust damping characteristic
to changed spring preload.
To increase spring load, turn
the adjustment wheel 1 in di-
rection of arrow HIGH.
To decrease spring load, turn
the adjustment wheel 1 in di-
rection of arrow LOW.
5
93
z
Setting
Page 96
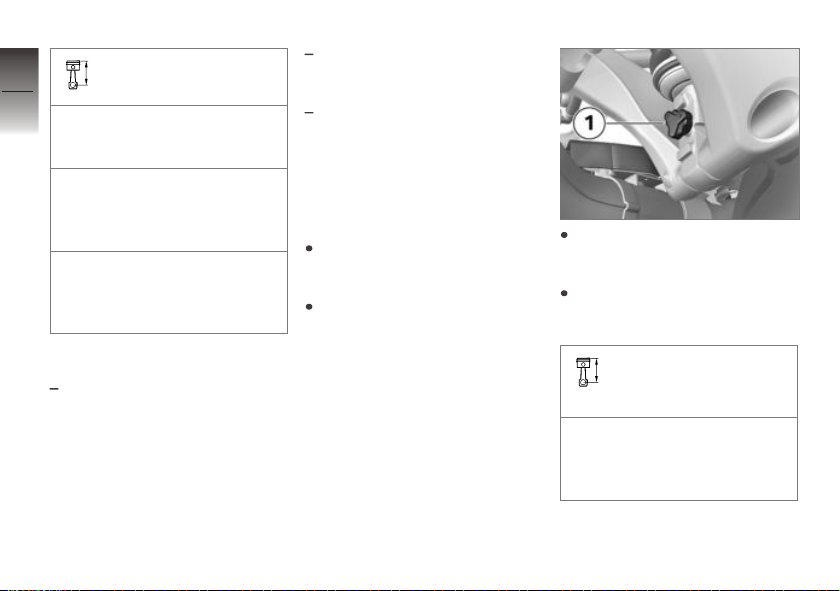
5
94
z
Setting
Basic setting of spring
preload, rear
Turn adjustment wheel as far
as possible into LOW direction. (One-up without load)
Turn adjuster wheel as far as
possible in LOW direction,
then rotate 15 turns in HIGH
direction. (One-up with load)
Turn adjuster wheel as far as
possible in LOW direction,
then rotate 30 turns in HIGH
direction. (Two-up and load)
Damping
without Dynamic ESA
Setting
The damping must be adjusted
to the road conditions and the
spring preload.
OE
A rough road surface requires
softer damping than a smooth
road surface.
An increase in spring preload
requires firmer damping, a reduction in spring preload requires softer damping.
Adjusting damping on rear
wheel
Park motorcycle, ensuring that
support surface is firm and
level.
Adjust damping from the left
side of the vehicle.
To increase damping, turn adjusting screw 1 in clockwise
direction.
To reduce damping, turn adjusting screw 1 in counterclockwise direction.
Basic setting of rear
wheel rear-wheel damp-
ing
Turn adjuster wheel as far as
possible clockwise, then 8
clicks counterclockwise (Oneup without load)
Page 97
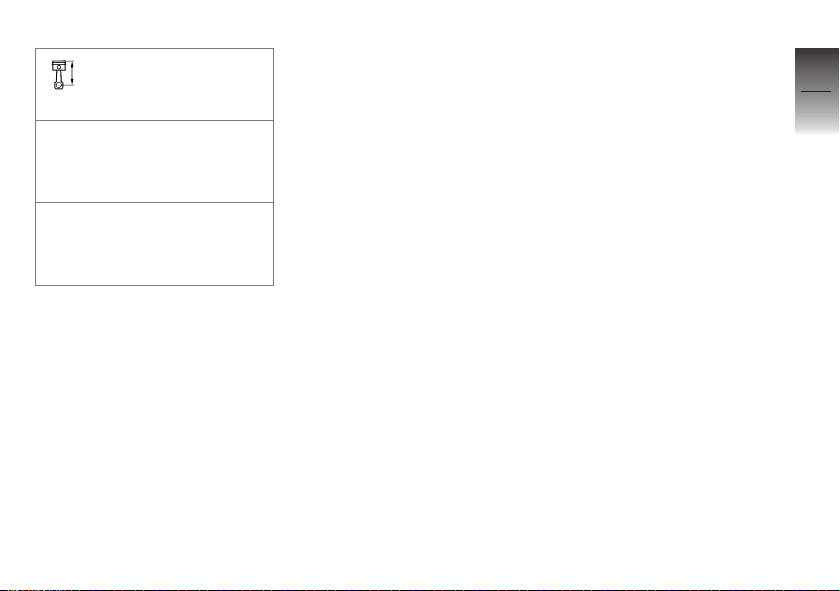
Basic setting of rear
wheel rear-wheel damp-
ing
Turn adjuster wheel as far as
possible clockwise, then 2
clicks counterclockwise (Oneup with load)
Turn adjuster wheel as far as
possible clockwise, then 2
clicks counterclockwise (Twoup with load)
5
95
z
Setting
Page 98

5
96
z
Setting
Page 99

Riding
Safety information . . . . . . . . . . . . . . . . . . 98
Observe checklist . . . . . . . . . . . . . . . . . . 100
Always before riding off . . . . . . . . . . . . 100
At every third refueling stop. . . . . . . . 101
Starting . . . . . . . . . . . . . . . . . . . . . . . . . . . . 101
Running in . . . . . . . . . . . . . . . . . . . . . . . . . 104
Off-road riding . . . . . . . . . . . . . . . . . . . . . 105
Shifting gears . . . . . . . . . . . . . . . . . . . . . . 106
Brakes . . . . . . . . . . . . . . . . . . . . . . . . . . . . . 107
Parking your motorcycle . . . . . . . . . . . 109
Refueling . . . . . . . . . . . . . . . . . . . . . . . . . . 110
Securing motorcycle for trans-
port . . . . . . . . . . . . . . . . . . . . . . . . . . . . . . . . 114
6
97
z
Riding
Page 100
Safety information
6
Rider's Equipment
98
Do not ride without the correct
clothing. Always wear:
Helmet
Rider's suit
Gloves
Boots
This applies even to short
z
Riding
journeys, and to every season
of the year. Your authorized
BMW Motorrad Dealer will be
happy to advise you and has
the correct clothing for every
purpose.
Reduced clearance in
inclined position
with low-slung
Motorcycles with lowered running
gear have less ground clearance
in all positions than motorcycles
with standard running gear.
OE
WARNING
When cornering with lowered motorcycles, motorcycle
parts can contact the road
surface sooner than normal.
Accident hazard
Carefully test the clearance of
the motorcycle in an inclined
position and adjust your riding
style accordingly.
Test the clearance of your motorcycle at an angle in safe situations. Remember to take the
limited ground clearance of your
motorcycle into account when
driving over curbs and similar obstacles.
The lowering of the motorcycle
shortens the spring travel (see
the chapter "Technical Data"). A
possible reduction in the accustomed driving comfort may result. Especially when riding with
a passenger, the spring preload
should be adjusted accordingly.
Load
WARNING
Reduced riding stability
caused by overloading and
uneven loading
Accident hazard
Do not exceed the gross
weight limit and observe the
loading information.
Adjust spring preload and
damping rate for the current
gross vehicle weight.
with case
Ensure that case volumes on
left and right are equal.
Make sure that weight is uniformly distributed between
right and left.
Pack heavy pieces of luggage
and cargo as low and as close
OA
 Loading...