


Radio/Navigation
TravelPilot
RNS 3
Operating instructions

170
1 |
2 |
3 |
4 |
5 |
6 |
7 |
8 |
9 |
17 |
16 |
15 |
14 |
13 |
12 |
11 |
10 |

Equipment illustration
1Open key, opens the operating panel.
2Rocker switch. The functions performed by the rocker switch depend on the menus or operating modes which are currently active.
3AUD key, activates the audio menu.
4TA key
5Dot-matrix display.
6DEL key, deletes entries in the edit menu.
7Info key.
If you press this button briefly during navigation: the current or next road is displayed fully and the last voice output is repeated. If you press this button longer during navigation: the active destination is displayed and the last voice output is repeated.
In lists, entries that are marked with ... are displayed fully.
8DSC (Direct Software Control) key to activate the DSC menu.
9ESC key, quits menus without saving any changes made.
:Key to activate a traffic congestion bypass during route guidance.
;Rotary/pushbutton, selects entries from or makes entries in lists and edit menus.
<NAV key, activates navigation.
=Softkeys 4 to 6. The functions performed by the softkeys depend on the contents of the menus.
>Softkeys 1 to 3. The functions performed by the softkeys depend on the contents of the menus.
?CD·C key, activates CD or CD changer operation.
@Rotary/pushbutton. Volume control and on/off switch.
ATU key, switches to radio operation mode.
171
|
|
|
|
SVENSKA |
DANSK |
|
ENGLISH |
|
|
|
|

Menu overview |
172 |
|
Tuner operation |
CD, CDC operation |
Navigation operation |
Main tuner menu |
Main CD menu |
Main navigation menu |
Tuner functions menu |
CD functions menu |
Route guidance menu |
Tuner DSC menu |
CD DSC menu |
Navigation DSC menu |

Safety information
The TravelPilot has been specifically designed for use in cars.
The special information required by navigation systems for lorries or busses, such as height restrictions or maximum permissible loads, is not included on the navigation CDs.
Load a CD into the CD drive.
•For safety’s sake, load or change a CD only when your vehicle is stationary.
•Do not open the operating panel unless you want to load a CD.
•Close the operating panel immediately after you have loaded a CD to ensure that the system is ready for operation when you resume your trip.
•When the operating panel is open, a red LED will flash as a warning. After 30 seconds you will hear a warning beep which indicates that you should close the operating panel.
Operating the system while driving
If you do not focus your full attention on the traffic situation at all times, you could cause serious accidents. To avoid being distracted by the TravelPilot, please observe the following information:
•Before you take your first trip using the TravelPilot, make yourself familiar with the system and its operation.
•Find a suitable area to temporarily park your vehicle if you want to re-program the TravelPilot.
•Do not make any adjustments to the TravelPilot while driving unless the traffic situation allows.
•Do not attempt to enter your destination unless the vehicle is stationary.
173
|
|
|
|
SVENSKA |
DANSK |
|
ENGLISH |
|
|
|
|

Table of contents |
|
Equipment illustration .............. |
171 |
Menu overview .......................... |
172 |
Safety information .................... |
173 |
Table of contents ...................... |
174 |
General operating instructions . 178 |
|
Switching the system on/off ........... |
178 |
Switching the system on/off |
|
with the vehicle ignition .............. |
178 |
Switching the unit on when the |
|
vehicle ignition is switched off ... |
178 |
Selecting the operating mode ........ |
179 |
Switching between the main |
|
and the functions menus ............ |
179 |
Switching between the main |
|
and the route guidance menus |
|
for navigation ................................ |
180 |
Activating the DSC menu ............ |
180 |
Adjusting the volume ...................... |
180 |
Automatic mute during |
|
telephone calls ............................. |
180 |
Display .............................................. |
181 |
Adjusting the tone and the |
|
balance/fader .................................... |
182 |
Switching on coded systems after |
|
they have been disconnected from |
|
the vehicle battery ........................... |
183 |
Radio operation ........................ |
184 |
Starting radio operation .................. |
184 |
Selecting the waveband or |
|
memory bank ................................... |
184 |
Switching RDS (Radio Data |
|
System) on/off .................................. |
184 |
Activating/deactivating RDS-REG . 185 |
|
Switching PTY (Program Type) |
|
on/off ................................................. |
186 |
PTY Alarm ..................................... |
186 |
Traffic information TA (Traffic |
|
Announcement) ............................... |
187 |
Activating/deactivating the TA |
|
function for radio operation ........ |
187 |
Interrupting traffic announce- |
|
ments ............................................. |
187 |
Selecting a station, FM ................... |
188 |
Automatic station seek tuning .... |
188 |
Paging through the broadcasting |
|
network (with RDS only) .............. |
188 |
Manual station tuning .................. |
189 |
Selecting radio stations, AM .......... |
189 |
Automatic station seek tuning .... |
189 |
Manual station tuning .................. |
190 |
Scan seek tuning ............................. |
190 |
Starting Scan seek tuning ........... |
190 |
Ending Scan seek tuning ............ |
190 |
174
Storing radio stations ..................... |
191 |
Storing stations manually ........... |
191 |
Storing stations automatically |
|
with “Travelstore” ........................ |
191 |
Starting Travelstore ..................... |
191 |
How to reduce interference in |
|
FM radio reception .......................... |
192 |
Activating/deactivating SHARX .. |
192 |
CD operation ............................. |
193 |
Starting CD playback ...................... |
193 |
Inserting a CD ............................... |
193 |
Starting CD playback for the |
|
integrated CD player (no CD |
|
changer connected) ..................... |
194 |
Starting CD playback for the inte- |
|
grated CD player (CD changer |
|
connected) .................................... |
194 |
Switching the playing time |
|
indicator on/off ................................ |
194 |
Traffic announcements during |
|
CD operation .................................... |
195 |
Selecting tracks ............................... |
195 |
Fast forward/reverse ....................... |
195 |
Random play (MIX) .......................... |
196 |
Scanning all of the tracks on a |
|
CD (SCAN) ........................................ |
196 |

Table of contents |
|
Repeating tracks (REPEAT) ........... |
196 |
Starting the Repeat function ....... |
196 |
Ending the Repeat function ........ |
196 |
Naming CDs ..................................... |
197 |
Entering the name ........................ |
197 |
Deleting characters ...................... |
198 |
Deleting the current name ........... |
198 |
Deleting all of the names ............. |
198 |
Track programming ......................... |
199 |
Creating the track program ......... |
199 |
Deleting tracks from the track |
|
program ......................................... |
199 |
Starting/stopping the track |
|
program ......................................... |
200 |
Deleting individual track |
|
programs ....................................... |
200 |
Deleting all of the track |
|
programs from the memory ........ |
200 |
Navigation .................................. |
201 |
How navigation works ..................... |
201 |
Starting navigation .......................... |
201 |
Destination entry ............................. |
201 |
Destinations .................................. |
202 |
Destination entry with the edit |
|
menu ................................................. |
202 |
Selecting letters ........................... |
203 |
Deleting letters ............................. |
203 |
Selecting entries from lists ......... |
204 |
Paging in lists ............................... |
204 |
Scrolling through lists page-by- |
|
page ............................................... |
204 |
Destination entry - Town ................ |
205 |
Destination entry - Street, intersec- |
|
tion and house number ................... |
206 |
Destination entry - House |
|
number .......................................... |
207 |
Destination entry - Intersection .. |
208 |
Destination entry - Town centre .... |
208 |
Special destinations in the destination |
|
town, surrounding the destination, |
|
surrounding your current position |
|
and supraregional destinations ..... |
209 |
Special destinations - In the |
|
destination town ........................... |
210 |
Special destinations - Supra- |
|
regional destinations ................... |
211 |
Special destinations - |
|
Surrounding the destination ....... |
211 |
Special destinations - |
|
Surrounding the current position . 212 |
|
Destination entry - From the |
|
destination memory ........................ |
213 |
Destination entry - For a position |
|
mark .................................................. |
214 |
Selecting a position mark as |
|
your destination ........................... |
214 |
Route guidance ................................ |
215 |
Starting route guidance ............... |
215 |
Switching the audio source ........ |
216 |
Cancelling route guidance .......... |
217 |
NO MAP route guidance ................. |
217 |
Travel guide ...................................... |
218 |
Displaying the route list .................. |
219 |
Locating mode ................................. |
219 |
Destination memory ........................ |
220 |
Storing a destination in the |
|
destination memory ..................... |
220 |
Entering and altering short |
|
names ............................................ |
220 |
Sorting destinations manually .... |
221 |
Deleting destinations from the |
|
destination memory ..................... |
221 |
Displaying GPS status and your |
|
position ............................................. |
222 |
175
|
|
|
|
SVENSKA |
DANSK |
|
ENGLISH |
|
|
|
|

Table of contents |
|
Bypassing traffic congestion |
|
during route guidance ..................... |
223 |
Entering a detour of traffic |
|
congestion .................................... |
223 |
Cancelling a detour of traffic |
|
congestion .................................... |
223 |
Selecting route options .................. |
224 |
Setting a position mark ................... |
225 |
Storing the position mark ........... |
225 |
Traffic announcements during |
|
route guidance ................................. |
226 |
Activating/deactivating voice |
|
output ................................................ |
226 |
Activating/deactivating the memory |
|
of the last 10 destinations |
|
(LAST 10) .......................................... |
226 |
Selecting time info ........................... |
227 |
Setting the position mark |
|
manually ............................................ |
227 |
Simulating route guidance ............. |
228 |
CD changer operation .............. |
229 |
Inserting CDs into the CD |
|
changer .......................................... |
229 |
Starting CD changer operation ...... |
229 |
Switching between the main |
|
menu and the functions menu .... |
230 |
Activating the DSC menu ............ |
230 |
Selecting CDs ................................... |
231 |
Selecting tracks ............................... |
231 |
Restarting tracks .......................... |
231 |
Fast forward/reverse ....................... |
231 |
Random play (MIX) .......................... |
232 |
Selecting random play MIX for |
|
one CD or all of the CDs in the |
|
magazine ....................................... |
232 |
Scanning tracks (SCAN) ................. |
233 |
Scanning the tracks on one CD .. |
233 |
Scanning the tracks on all of |
|
the CDs .......................................... |
233 |
Repeating tracks or CDs (REPEAT) . 234 |
|
Starting the Repeat function ....... |
234 |
Ending the Repeat function ........ |
234 |
Activating the Repeat function |
|
for one track .................................. |
234 |
Switching on the Repeat |
|
function for a CD .......................... |
234 |
176
Track programming ......................... |
235 |
Creating the track program ......... |
235 |
Deleting tracks from the track |
|
program ......................................... |
236 |
Starting/stopping the track |
|
program ......................................... |
236 |
Deleting individual track |
|
programs ....................................... |
236 |
Deleting all of the track |
|
programs from the memory ........ |
236 |
Naming CDs ..................................... |
237 |
Entering the name ........................ |
237 |
Deleting characters ...................... |
238 |
Deleting the current name ........... |
238 |
Deleting all of the names ............. |
238 |
Switching the playing time |
|
indicator on/off ................................ |
239 |
Activating/deactivating traffic |
|
announcements (CD changer) ....... |
239 |

Table of contents |
|
RC06 remote control unit ......... |
240 |
Selecting the audio source ............. |
240 |
Activating navigation ...................... |
240 |
Adjusting the volume ...................... |
240 |
Mute ................................................... |
240 |
Cancelling the mute function ...... |
240 |
Selecting the waveband or |
|
memory bank ................................... |
241 |
Selecting stored stations ................ |
241 |
Starting station seek tuning ........... |
241 |
Starting SCAN seek tuning, |
|
Radio operation ............................... |
241 |
Starting Travelstore ......................... |
241 |
Selecting tracks, CD-changer |
|
operation .......................................... |
242 |
Selecting tracks, CD operation ...... |
242 |
Fast forward/reverse, CD-changer |
|
operation .......................................... |
242 |
Fast forward/reverse, |
|
CD operation ..................................... |
242 |
Set-up/Basic settings ............... |
243 |
Activating the Set-up menu ........ |
243 |
Adjusting the day/night display, |
|
the viewing angle, contrast and |
|
brightness ........................................ |
244 |
Automatic switch to night |
|
display ........................................... |
244 |
Adjusting the viewing angle ....... |
244 |
Altering the display brightness .. |
245 |
Fade effect in the menus ............. |
245 |
Adjusting the power-on and |
|
announcement volume and |
|
GALA ................................................. |
245 |
Altering the time .............................. |
247 |
Selecting the time format ............ |
247 |
Selecting the time zone ............... |
247 |
Activating summer time .............. |
247 |
Selecting the language ................... |
248 |
Calibrating the system .................... |
248 |
Calibrating the system after its |
|
installation (New install) .............. |
248 |
Calibrating the system after a |
|
tyre change ................................... |
250 |
Calibrating the system |
|
manually ........................................ |
250 |
Performing a system test ............... |
251 |
Displaying the GPS status and |
|
your position .................................... |
251 |
Activating/deactivating the system |
|
coding ............................................... |
252 |
Activating/deactivating the |
|
coding ............................................ |
252 |
Reset to factory settings ................ |
252 |
Adjusting seek tuning sensitivity .. 253 |
|
177
|
|
|
|
SVENSKA |
DANSK |
|
ENGLISH |
|
|
|
|

General operating instructions |
178 |
|
|
Switching the system on/off |
|
To switch your TravelPilot on press the left-hand rotary/pushbutton @. |
|
The system will begin to play the audio source which was active last at the |
|
power-on volume level. Refer to the section on “Adjusting the power-on/traffic |
|
message volume and GALA” in the chapter on Set-up. |
|
Switching the system on/off with the vehicle ignition
If the system has been installed accordingly, you can switch it on and off with the vehicle ignition.
Switching the unit on when the vehicle ignition is switched off
If the TravelPilot has been installed accordingly, you can also operate it when the ignition is switched off.
Press the left-hand rotary/pushbutton @.
The TravelPilot will switch on. After the unit has played for an hour, it will switch off automatically to prevent the vehicle battery from running down.
Note:
To prevent the TravelPilot from being used after it has been disconnected from the vehicle battery, you can activate the security coding.
If the security coding has been activated, you will always be required to enter the code after the vehicle battery has been disconnected, after the system has been disconnected from its power supply (e.g. if stolen) and after a fuse has blown. For information on how to activate/deactivate the coding, please refer to the section on “Activating the equipment coding” in the chapter on Set-up.
General operating instructions
Selecting the operating mode
To select the operating mode, press:
TU A for radio operation,
CD·C ? to activate CD-player or CD-changer operation (optional) and
NAV < to activate navigation.
When you press one of these keys to switch between the audio sources, you will access the main menu for the audio source selected.
Each audio source (tuner, CD player and CD changer) has three menus which are used to make all of the setting adjustments:
-The main menu is used to make the most frequent adjustments, e.g. to select radio stations or CD tracks.
-The functions menu is used to select special functions such as Travelstore.
-DSC menu. Direct Software Control is used to adjust the options for the individual audio sources to suit your own personal preferences.
The following menus are available in navigation mode:
-The main menu to activate the main navigation functions,
-The route guidance menu with visual driving recommendations and
-The DSC menu to adjust the options for navigation to suit your own personal preferences.
Switching between the main and the functions menus
To switch between the main and the functions menus for an audio source,
Press the corresponding button TU A or CD·C ? again.
179
|
|
|
|
SVENSKA |
DANSK |
|
ENGLISH |
|
|
|
|

General operating instructions |
180 |
|
Switching between the main and the route guidance menus for navigation
If you want to switch between the main and the route guidance menus when route guidance is active,
Press NAV <.
Activating the DSC menu
To access the DSC menu in the individual operating modes press DSC 8once briefly.
Adjusting the volume
To increase the system volume,
Turn the left-hand rotary/pushbutton @ clockwise.
To decrease the system volume,
Turn the left-hand rotary/pushbutton @ counter-clockwise.
When you make these adjustments you will see symbols in the foreground of the display to indicate the setting you have selected.
Note: During a spoken driving recommendation for navigation you
can alter the volume without affecting the main volume for the au- Main tuner menu with the volume setting display dio source. The difference in volume will be stored automatically.
Automatic mute during telephone calls
If an in-car telephone has been connected to the system, the TravelPilot will switch to mute during a telephone call.
A telephone symbol will appear in the foreground of the display for the active audio source.
If you make or receive a telephone call during active route guidance PHONE will appear as the message in the display. The visual driving recommendations remain visible.

General operating instructions
Display
The TravelPilot display provides you with all of the information required for navigation, such as the visual driving recommendations and the menus and lists for the radio, CD-player and CD-changer audio sources.
If the system has been installed accordingly, it will automatically switch to night display when the vehicle headlights are switched on. This means that all of the dots are displayed in the opposite colour as for the day display. If you drive with the headlights on during the day, e.g. in Scandinavian countries, you can deactivate this automatic switch. Refer to the information in the chapter on Set-up - Display.
Main tuner menu
It is possible to adjust the viewing angle of the display in your vehicle to obtain optimum legibility. Refer to the information in the chapter on Set-up - Display.
Note: Always handle the screen with care. Never allow the display to come into contact with pointed objects as this will result in scratches and damage the screen. To clean the screen, use only a soft, lintfree cloth, moistened with a little rubbing alcohol if necessary. Do not use any solvents such as turpentine or petrol as they are very aggressive and will damage the screen.
181
|
|
|
|
SVENSKA |
DANSK |
|
ENGLISH |
|
|
|
|
General operating instructions |
182 |
|
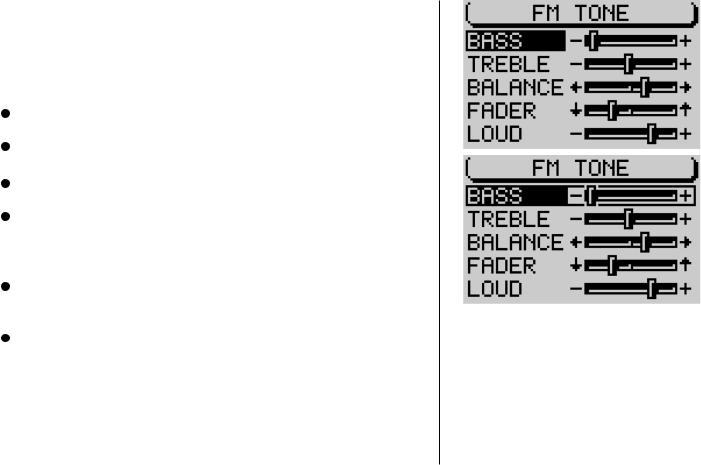
Adjusting the tone and the balance/fader
The TravelPilot allows you to make separate adjustments to the bass and treble for each audio source.
The settings selected for the balance, the fader and the Loudness are the same for all of the audio sources.
To adjust the audio settings,
Switch to the audio source (AM, FM, CD player or CD changer) for which you would like to make the adjustments.
Press AUD 3.
This activates the audio menu which is used to make the tone adjustments.
Use the right-hand rotary/pushbutton ; to move the selector bar to the menu item you would like to adjust, and
Press the right-hand rotary/pushbutton ;. The control lever will appear surrounded by a frame.
 Use the right-hand rotary/pushbutton ;to make the desired adjustment. If you would like to save the adjustments made,
Press the right-hand rotary/pushbutton ;.
If you do not want to save the new adjustments and would like to return to the previous settings,
Press ESC 9.
Note: If you do not press any of the keys, the system will automatically switch back to the original menu after 30 seconds (time out).
Audio menu for the FM radio audio source

General operating instructions |
|
|
Switching on coded systems after they have been discon- |
|
|
nected from the vehicle battery |
|
|
If you attempt to switch on a coded system after it has been disconnected from |
|
|
the vehicle battery, e.g. after a repair has been made to the vehicle, an code |
|
|
inquiry will appear in the display. |
|
|
Enter the code number as follows: |
|
|
Use the right-hand rotary/pushbutton ;to mark the first digit of the code |
|
|
number, |
|
|
Press the right-hand rotary/pushbutton ;. |
|
|
The cursor for the code input will move one position to the right. |
Code inquiry |
|
Now select the second digit of the code number and press the right-hand |
|
|
rotary/pushbutton ; to confirm your selection. |
|
|
Enter the remaining digits of the code number in the same way. |
|
|
If you enter an incorrect digit by mistake, |
|
|
Mark the |
symbol and |
|
Press the right-hand rotary/pushbutton ; or |
|
|
Press DEL 6. |
|
|
Once you have completed entering the code number, |
|
|
Mark the |
symbol and press the right-hand rotary/pushbutton ; to |
|
confirm your selection. |
|
|
The system will switch on. If you enter and confirm an incorrect code number by |
|
|
mistake, you can repeat your entry. To prevent thieves from discovering the |
|
|
code number by trial and error, the system will be blocked for one hour after an |
|
|
incorrect code is entered for the third time. The system must remain switched on |
|
|
for this time to count down. If the system is disconnected from the power supply |
|
|
during this waiting period, the time will be reset to one hour once again. |
|
|
183
|
|
|
|
SVENSKA |
DANSK |
|
ENGLISH |
|
|
|
|

Radio operation
Starting radio operation
Press TU A.
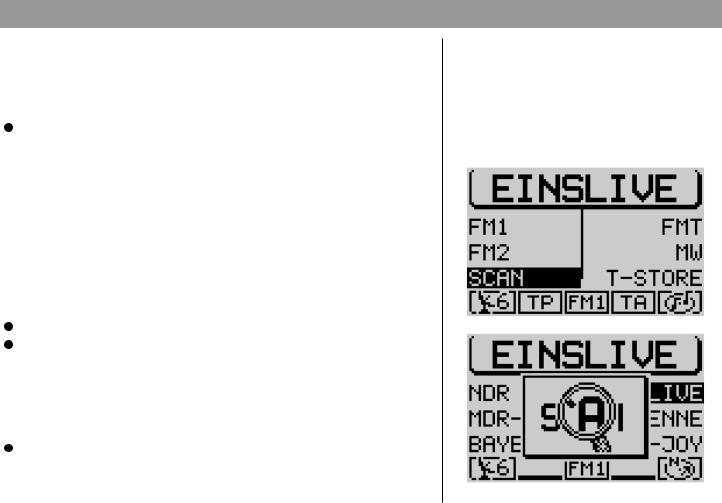
Radio operation will begin and the main menu will appear in the display. The station you last tuned into will begin to play. The six softkeys located at the sides of the display are used to recall the radio stations which have been stored and to store the radio stations.
Selecting the waveband or memory bank
The TravelPilot allows you to tune into FM radio stations and AM radio stations. To select the FM or AM waveband,
Start radio operation and
Press TU A again.
You will access the functions menu and can now use the corresponding softkeys to select one of the memory banks.
Switching RDS (Radio Data System) on/off
The Radio Data System is a service offered by radio stations which provides you with more enjoyment and convenience when listening to FM radio. In addition to their regular programming, the radio stations broadcast such signals as their station name, consisting of one to a maximum of eight characters and the traffic information status of the station. The station name will appear in the display as soon as the station is identified. The TravelPilot also automatically searches for the best frequency for the station selected.
To take full advantage of the RDS functions, you must activate this option for radio operation in the DSC menu.
Start radio operation.
Press DSC 8.
184
Main tuner menu
Tuner functions menu

Radio operation |
|
|
You will access the DSC menu for radio operation and find the menu item for |
|
|
RDS in the bottom line on the left. Here you can choose between the following |
|
|
options: VAR, FIX and OFF. VAR is the default setting. |
|
|
Press the softkey marked RDS repeatedly until the desired option is dis- |
|
|
played next to RDS. |
|
|
FIX: RDS radio operation is active. Because a number of radio stations trans- |
|
|
mit not only their station names, but advertising as well, you can use this |
|
|
setting to allow only the display of the station name. Alternating display |
|
|
contents, such as advertising, will not appear on the screen. |
|
|
VAR: The default setting, RDS radio operation is fully active. Alternating dis- |
Tuner DSC menu |
|
play contents will also appear on the screen. |
||
|
||
OFF: RDS radio operation is deactivated. The radio station selected is identi- |
|
|
fied in the display by its frequency. |
|
|
Activating/deactivating RDS-REG |
|
|
Another attractive RDS option is the “Alternate Frequency” function. The system |
|
|
constantly searches in the background for frequencies with better reception for |
|
|
the radio station selected and switches automatically to these frequencies. At |
|
|
certain times of the day, however, some radio station networks broadcast differ- |
|
|
ent programs to serve a particular region. If the alternate frequency option is |
|
|
activated, this might mean that the radio automatically switches to a stronger |
|
|
frequency for the same station which is currently broadcasting a different re- |
|
|
gional program. If you want to continue listening to a particular regional program |
|
|
and prevent the radio from automatically switching to a different frequency, switch |
|
|
the menu item REG in the DSC menu to ON. Then the radio will not switch |
|
|
frequencies unless reception deteriorates to the point that it is no longer possi- |
|
|
ble to pick up the frequency selected. |
|
185
|
|
|
|
SVENSKA |
DANSK |
|
ENGLISH |
|
|
|
|

Radio operation |
|
186 |
|
|
|
Press DSC 8 to access the tuner DSC menu. |
|
|
|
|
|
Press the softkey marked REG repeatedly until the desired option ap- |
|
|
pears next to REG. OFF is the default setting. |
|
|
Switching PTY (Program Type) on/off |
|
|
PTY is also an RDS service. With PTY, the radio stations indicate the contents |
|
|
of the program they are broadcasting. This allows you to select stations broad- |
|
|
casting the type of program you want to listen to more easily, e.g. POP or CLAS- |
|
|
SICAL. |
|
|
If you activate the PTY function in the DSC menu for radio operation, the pro- |
|
|
gram type will appear briefly in the display when you select the station by press- |
|
|
ing the station preset key, for example. If the station does not support the PTY |
|
|
function, there will be no indication in the display. |
|
|
Press DSC 8 to access the tuner DSC menu. |
Main tuner menu displaying the PTY symbol |
|
|
||
Press the softkey marked PTY repeatedly until the desired option, ON or |
|
|
OFF, appears. The default setting is ON. |
|
|
PTY Alarm |
|
|
The Alarm is a special program type. If the TravelPilot detects an alarm mes- |
|
|
sage, e.g. a disaster alert, a symbol will appear in the foreground of the display |
|
|
and the alarm message will be emitted at the volume selected for traffic informa- |
|
|
tion messages. The alarm message can be interrupted by pressing DSC 8, TU |
|
|
A, CD·C ? and by switching to a different radio station. |
|
|
|
|
|

Radio operation
Traffic information TA (Traffic Announcement)
Traffic information is a service provided by the radio station networks. They broadcast traffic announcements at regular intervals. Radio stations offering traffic information broadcast a special signal to indicate that this service is available. If the TravelPilot identifies this signal, a TP symbol (TP=Traffic Program) will appear in the status line in the main radio menu.
If the TravelPilot TA function is active, traffic announcements will be broadcast at the minimum volume selected in the Set-up Volume.
If the TA function is activated for the other sources, (CD player and CD changer as well as navigation), playback will be interrupted for an incoming traffic announcement and the message will be broadcast. When the traffic announcement is completed, playback will resume.
If the TA function is active and you select a radio station manually which does not support traffic information, you will hear a warning beep. In this case, the system will start an automatic search for a TP station after the warning beep has sounded.
Activating/deactivating the TA function for radio operation
Use TA 4 to activate or deactivate the TA function. A TA symbol in the status line indicates that the TA function is active.
Interrupting traffic announcements
To interrupt traffic announcements, press TA 4, DSC 8, AUD 3, TU A or
CD·C ? or select a different radio station.
187
|
|
|
|
SVENSKA |
DANSK |
|
ENGLISH |
|
|
|
|

Radio operation |
188 |
|
Selecting a station, FM
There are several ways in which you can select radio stations with the TravelPilot.
Automatic station seek tuning
To select radio stations automatically, the > symbol must appear beside the menu item SEARCH in the tuner DSC menu.
Press DSC 8 to access the tuner DSC menu.
Press the softkey marked SEARCH as often as necessary until the > symbol appears.
Tuner DSC menu
Now you can select the station in the main tuner menu.
Press >> on the rocker switch 2 to start station seek tuning upwards or
<< on the rocker switch 2 to start station seek tuning downwards.
If the TA function is active, the system will select only those stations which support traffic information (TP symbol in the display).
Paging through the broadcasting network (with RDS only)
One example of an RDS broadcasting network is the NDR, the North German
Radio Broadcasting Network with the following radio stations: NDR1, NDR2,
Radio3 NDR INFO and N-JOY.
You can select RDS stations within reception range directly. If it is possible to receive several stations which belong to the same broadcasting network, you can press << >> on the rocker switch 2 to page up or down through these stations.
Note: this function will not operate unless these stations have been picked up by the radio receiver at least once. You can, for example, start SCAN seek tuning or the Travelstore function. In addition to this, the automatic seek tuning function and the RDS function must be activated.
Radio operation
Manual station tuning
If you know a station’s frequency, you can also select it manually. This is useful if you would like to select a station which is not detected by automatic seek tuning. Important: the RDS function must be switched off in the DSC menu.
Note: the RDS function must be switched off in the DSC menu and the >> symbol must appear beside SEARCH.
Press DSC 8 to access the tuner DSC menu.
Press the softkey marked SEARCH as often as necessary until the >> symbol appears.
Tuner DSC menu
Press << or >> on the rocker switch 2 in the main tuner menu.
The frequency will move up or down the waveband in increments of 100 kHz.
Selecting radio stations, AM
In AM radio operation, you can select stations both automatically and manually.
Automatic station seek tuning
To select stations automatically, the > symbol must appear beside SEARCH in the tuner DSC menu,
Press DSC 8 to access the tuner DSC menu.
Press the softkey marked SEARCH as often as necessary until the > symbol appears.
Press << or >> on the rocker switch 2.
The system will tune into the next available station.
189
|
|
|
|
SVENSKA |
DANSK |
|
ENGLISH |
|
|
|
|
Radio operation
Manual station tuning
You can also select AM stations manually if you know their frequency. This is useful if you would like to select a station which is not detected by automatic seek tuning. For this to function properly, the >> symbol must appear beside SEARCH in the tuner DSC menu.
Press << or >> on the rocker switch 2.
The frequency will change in 9 kHz increments.
Scan seek tuning
With Scan seek tuning you can search the entire waveband for stations within your reception range. Each station detected will play for ten seconds. If you do not interrupt Scan seek tuning, it will end automatically once it has run through the waveband completely. Press note that, when the TA function is active, only those stations which support the traffic information function (TP symbol in the display) will be scanned.
Starting Scan seek tuning
To start Scan seek tuning,
Press TU A to access the functions menu for radio operation and
Press the softkey marked SCAN.
Scan seek tuning will begin. Symbols in the foreground of the display will indicate the progress of Scan seek tuning.
Ending Scan seek tuning
If you want to end Scan seek tuning or continue listening to the station currently being scanned,
Press ESC 9.
Scan seek tuning will end, the station selected last will continue to play.
190
Tuner functions menu
Main tuner menu, SCAN function active

Radio operation
Storing radio stations
The TravelPilot is able to store 18 FM stations in three memory banks and six AM stations in one memory bank.
Storing stations manually
To store stations manually,
Press TU A to access the functions menu for radio operation and
Select the desired FM memory bank: FM1, FM2 or FMT or the AM waveband.
The system will return to the main radio menu.
Select the radio station and
Press and hold down the softkey on which you want to store the station until the radio resumes play after muting briefly.
The station is now stored on the softkey selected. The station name or frequency will appear next to the softkey in the display.
Storing stations automatically with “Travelstore”
The system is able to store the six stations within reception range with the strongest reception signals in the FMT memory bank. This function is particularly useful on longer trips.
Note: Please note that all of the stations previously stored in the FMT memory bank will be replaced by the new stations.
Starting Travelstore
To use the Travelstore function,
Press TU Ato access the functions menu for radio operation mode and
Press the softkey marked T-STORE.
Symbols in the foreground of the display will indicate the progress of the Travelstore function. After the Travelstore function is completed, the first station stored in the FMT memory bank will begin to play.
Tuner functions menu
Tuner functions menu |
191 |
|
|
|
|
|
SVENSKA |
DANSK |
|
ENGLISH |
|
|
|
|

Radio operation |
|
192 |
|
|
|
How to reduce interference in FM radio reception |
|
|
|
|
|
When listening to FM radio stations, you will sometimes experience interference |
|
|
caused by neighbouring radio stations cutting in. This happens most often when |
|
|
a large number of stations are close to one another in frequency on the wave- |
|
|
band. The TravelPilot has been equipped with the SHARX function to allow you |
|
|
to virtually eliminate such interference. |
|
|
Activating/deactivating SHARX |
|
|
To activate or deactivate the TravelPilot’s SHARX function, |
|
|
Press DSC 8 to access the tuner DSC menu and |
|
|
Press the softkey marked SHARX repeatedly until the desired option ON |
Tuner DSC menu |
|
or OFF appears. ON is the default setting. |
|
|
|
|
|

CD operation
You can use the TravelPilot’s integrated CD drive to play audio CDs. When you play audio CDs, your access to navigation is limited to NO MAP route guidance.
Use only audio CDs bearing this label: 

 .
.
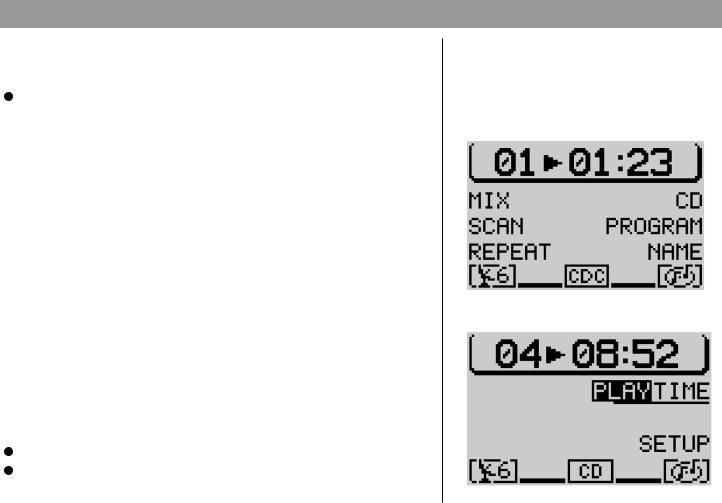
During CD playback, the display will indicate the track number and the playing time or only the track number in the top line of the main CD menu. All of the track numbers on the CD will appear in the functional display area. The track currently playing is marked. The functional display area also includes a symbol which indicates how much playing time has elapsed on the CD.
The status line also includes symbols to indicate the number of GPS satellites received, the CD function selected, the currently selected audio source, the status of the TA function and a symbol which indicates whether an audio CD is currently inserted in the CD drive.
Starting CD playback
CD playback will start automatically when you insert an audio CD.
Inserting a CD
Press the Open key 1 to open the operating panel.
Press the Eject button Bto eject any CD which might be in the CD drive.
Insert the CD with the label facing upwards gently into the CD slot. Press the CD inwards until you can feel resistance. At this point, the CD will be pulled into the CD slot automatically.
Note: If the operation panel remains open, a warning beep will sound after 30 seconds. Close the operating panel.
CD playback will start automatically after the CD has been checked. The main CD menu will appear in the display.
Main CD menu
18
193
|
|
|
|
SVENSKA |
DANSK |
|
ENGLISH |
|
|
|
|
CD operation
Starting CD playback for the integrated CD player (no CD changer connected)
If an audio CD has been inserted and there is no CD changer connected, Press CD·C ?.
The system will switch to the main CD menu and CD playback will begin. If there is no audio CD inserted, a corresponding message will appear in the display.
Starting CD playback for the integrated CD player (CD changer connected)
If there is a CD inserted in the integrated CD player and a CD changer is connected, the system will switch to the main CD menu when you press CD·C ?. The CD source which was active last will begin to play.
If the last CD was played in the CD changer, the main CD changer menu will appear.
If you want to activate the integrated CD player,  Press CD·C ? again.
The CD functions menu for CD changer operation will appear.  Press the softkey marked CD.
If you have not inserted an audio CD into the integrated CD player, a lock symbol will appear in front of the menu item CD and you will not be able to select this menu item.
Switching the playing time indicator on/off
During CD playback, either the track number and the playing time or only the track number will appear in the top line of the main CD menu. If you want to switch between the playing time indicator and the track number display,
Press DSC 8 to activate the DSC menu for CD operation and
Press the softkey marked TIME.
The playing time indicator will be switched on or off. The default setting is PLAY.
194
CD changer functions menu
CD DSC menu
 Loading...