


BLZH 5500
 NL
NL
Laatste
Eerste
PRODUCTINFORMATIEBLAD
Eerste-Laatste... steunhoogten
1.Het bedieningspaneel
2.Ventilator* (niet zichtbaar)
3.Verwarmingselement bovenwarmte (kan worden verlaagd)
4.Ovenlampje
5.Circulair verwarmingselement (niet zichtbaar)
6.Ventilator
7.Verwarmingselement onderwarmte (niet zichtbaar)
8.Standaardlampjes zijkant
9.Scharnieren ovendeur
10.Ovenkoeldeur
*N.B.: De ventilator schakelt alleen in wanneer de oven een bepaalde temperatuur heeft bereikt. Nadat de oven is uitgezet, kan de ventilator echter nog een bepaalde tijd blijven draaien, om voor goede koeling te zorgen.
ACCESSOIRES |
• |
Rooster |
• Vetfilter |
• |
Opvangbak |
|
|
|
• |
Bakplaat |
|
OVENFUNCTIETABEL |
|
|
|
Functie |
|
|
Vooraf ingesteld(e) |
Symbool |
Nr. |
Functie |
temperatuur/ |
|
niveau |
||
– |
– |
OVEN UIT |
- |
– |
– |
OVENLAMPJE |
- |
|
2 |
MLTF |
35C |
|
(Warm houden) |
||
|
|
|
|
|
3 |
STATISCH |
200C |
|
4 |
GEBAK |
175C |
|
(Statisch + Ventilator) |
||
|
|
|
|
|
5 |
VENTILATOR |
160C |
|
6 |
TURBOVENTILATOR |
160C |
|
7 |
GRILL |
3 |
|
8 |
TURBOGRILL |
3 |
|
(Grill + Ventilator) |
||
|
|
|
|
|
9 |
PROGRAMMA |
P1 |
Beschrijving van de functie (zie de details in de gebruikshandleiding)
-
Het ovenlampje inschakelen.
Om een constante temperatuur op 35°C of op 60°C te handhaven.
Om voedsel op één hoogte te bereiden. Voorverwarming.
Om op twee hoogten voedsel te bereiden, op dezelfde temperatuur.
Om voedsel op meer dan één hoogte te bereiden, op dezelfde temperatuur.
Voor bereiding van: grote vruchtencakes, gevulde groenten, pasteitjes, gevogelte.
Voor het grillen van kleine stukjes vlees, toast, enz.
Voor het grillen van grote stukken vlees.
Voor het bakken van pizza, brood, focaccia.
10 |
BOOSTER |
200C |
Voor het snel voorverwarmen van de oven. |
|
|
||||
|
|
|
|
|
|
|
|
|
|
|
|
|
|
|
|
|
|
|
|
1.Keuzeknop: om de ovenfuncties in te stellen.
2.Knop voor instelling van de klok, de bereidingstijd, de tijd waarop de bereiding moet eindigen, de temperatuur en de stroominstellingen (Functie P).
3.Knop voor keuze en bevestiging van de verschillende handelingen (steeds opnieuw indrukken).
4.Knop voor keuze van speciale functies: “Bruinen”  en “Warm houden”
  .
.
Push-pushknoppen
•Om dit soort knoppen te gebruiken, moet er in het midden op worden gedrukt.
•Draai de knop in de gewenste stand.
Draai de knop na de bereiding terug in de stand “0” en druk hem opnieuw in om de aanvankelijke instelling te herstellen.
DE OVEN AANZETTEN
Wanneer de oven voor het eerst wordt aangesloten op het elektriciteitsnet, of opnieuw wordt aangesloten na een stroomuitval, verschijnt ophet display “  ”.
”.
Om de oven aan te zetten:
•draaiknop 1met het wijzertje naar boven zoals in afbeelding 1 van het informatieblad van het programmeerapparaat.
•druk optoets 3. Op het display verschijnt “--:--”.
RAADPLEEG HET INFORMATIEBLAD VAN HET PROGRAMMEERAPPARAAT VOOR DE BESCHRIJVING VAN HET GEBRUIK VAN DE OVEN.
5019 410 54591

BEREIDINGSTABEL VOOR DE GRILLFUNCTIE
VOEDSEL |
Functie |
Voorverwarming |
Hoogte |
Niveau voor |
Bereidingstijd |
|
(5 min.) |
(vanaf de bodem) |
bruinen |
(minuten) |
|||
|
|
|||||
Lendestuk |
7 |
X |
4 |
5 |
35 - 45 |
|
Koteletten |
7 |
X |
4 |
5 |
30 - 40 |
|
Worstjes |
7 |
X |
4 |
5 |
30 - 40 |
|
Varkenskarbonade |
7 |
X |
4 |
5 |
25 - 35 |
|
Vis |
7 |
X |
4 |
5 |
30 - 40 |
|
Kippenpoten |
7 |
X |
4 |
5 |
35 - 40 |
|
Kebab |
7 |
X |
4 |
5 |
30 - 35 |
|
Magere varkensribbetjes |
7 |
X |
4 |
5 |
20 - 35 |
|
Halve kip |
7 |
X |
3 |
5 |
45 - 50 |
|
Halve kip |
8 |
- |
3 |
5 |
45 - 55 |
|
Hele kip |
8 |
- |
3 |
5 |
60 - 70 |
|
Braadstuk |
8 |
- |
3 |
5 |
75 - 90 |
|
(varkensvlees, rundvlees) |
||||||
|
|
|
|
|
||
Eend |
8 |
- |
2 |
5 |
80 - 90 |
|
Lamspoot |
8 |
- |
3 |
5 |
90 - 120 |
|
Rosbief |
8 |
- |
3 |
5 |
90 - 120 |
|
Gebakken aardappelen |
8 |
- |
3 |
5 |
40 - 50 |
|
Moten zwaardvis |
8 |
- |
3 |
5 |
35 - 45 |
|
|
|
|
|
|
|
BEREIDINGSTABELLEN
VOEDSEL
VLEES Lamsvlees, geitenvlees,
schapenvlees
Braadstuk (Lamsvlees, varkensvlees,
rundvlees) (1 kg)
Kip, konijn, eend
Kalkoen (6 kg) + niveau 3 bruinen
Gans (2 kg)
VIS (HELE) (1-2 kg)
Brasem, baars, tonijn, zalm, forel
VIS (MOTEN) (1 kg)
Zwaardvis, tonijn, zalm, kabeljauw
Functie |
Voorverwarming |
Hoogte |
Temperatuur |
Bereidingstijd |
||
(10 min.) |
(vanaf de bodem) |
(°C) |
(minuten) |
|||
|
||||||
3 |
X |
2 |
200 |
60 |
- 80 |
|
5 |
X |
2 |
190 |
70 |
- 90 |
|
4 |
X |
2 |
190 |
60 |
- 80 |
|
3 |
X |
2 |
200 |
70 |
- 90 |
|
5 |
- |
2 |
190 |
60 |
- 80 |
|
4 |
- |
2 |
190 |
60 |
- 80 |
|
3 |
X |
2 |
200 |
70 |
- 80 |
|
5 |
- |
2 |
190 |
60 |
- 70 |
|
4 |
- |
2 |
190 |
70 |
- 80 |
|
3 |
X |
1 |
200 |
160 |
- 180 |
|
5 |
X |
1 |
190 |
150 |
- 180 |
|
4 |
X |
1 |
190 |
150 |
- 180 |
|
3 |
X |
2 |
200 |
120 |
- 130 |
|
5 |
X |
2 |
190 |
100 |
- 120 |
|
4 |
X |
2 |
190 |
110 |
- 120 |
|
3 |
X |
2 |
200 |
60 |
- 70 |
|
5 |
- |
2 - 3 |
190 |
65 |
- 75 |
|
4 |
- |
2 - 3 |
190 |
60 |
- 70 |
|
3 |
X |
2 |
200 |
45 |
- 55 |
|
5 |
- |
3 |
190 |
50 |
- 55 |
|
4 |
X |
2 |
190 |
45 |
- 55 |
|
OPMERKING: bij het bereiden van vlees met ventilatieof statische functies, is het raadzaam ook de bruiningsfunctie te gebruiken (niveau 1 t/m 3).
|
|
VOEDSEL |
|
Functie |
|
Voorverwarming |
|
Hoogte |
|
Temperatuur |
|
Bereidingstijd |
|
|
|
|
|
|
|
||||||
|
|
|
|
|
|
|
||||||
|
|
|
||||||||||
|
|
|
|
(10 min.) |
|
(vanaf de bodem) |
|
(°C) |
|
(minuten) |
||
|
|
|
|
|
|
|
|
|
||||
|
|
|
|
6 |
|
X |
|
2 |
|
200 |
|
50 - 60 |
|
|
|
||||||||||
|
|
GROENTEN |
|
3 |
|
X |
|
2 |
|
190 |
|
35 - 45 |
|
|
|||||||||||
|
|
Gevulde paprika's |
|
5 |
|
- |
|
2 |
|
180 |
|
55 - 60 |
|
||||||||||||
|
|
|
|
4 |
|
- |
|
2 |
|
190 |
|
50 - 60 |
|
|
|
||||||||||
|
|
|
|
3 |
|
X |
|
2 |
|
200 |
|
50 - 55 |
|
|
|
||||||||||
|
|
Gevulde tomaten |
|
5 |
|
- |
|
2 |
|
180 |
|
50 - 60 |
|
||||||||||||
|
|
|
|
4 |
|
- |
|
2 |
|
190 |
|
35 - 45 |
|
|
|
||||||||||
|
|
|
|
3 |
|
X |
|
2 |
|
200 |
|
40 - 50 |
|
|
|
||||||||||
|
|
Gebakken aardappelen |
|
5 |
|
- |
|
2 |
|
190 |
|
45 - 50 |
|
||||||||||||
|
|
|
|
4 |
|
- |
|
2 |
|
190 |
|
45 - 50 |
|
|
|
|
|
|
|
|
|||||
|
|
Rauwe gegratineerde |
|
3 |
|
X |
|
2 |
|
200 |
|
35 - 45 |
|
|
|||||||||||
|
|
|
|
|
|
|
|
|
|
|
|
|
|
|
groenten (b.v. venkel, kool, |
|
5 |
|
- |
|
3 |
|
180 |
|
40 - 50 |
|
|
asperges, selderij) |
|
4 |
|
- |
|
2 |
|
190 |
|
40 - 50 |
|
|
|
|
|
|
|
|
|||||
|
|
|
|
|
|
|
|
|
|
|
|
|
|
VOEDSEL |
|
Functie |
|
Voorverwarming |
|
Hoogte |
|
Temperatuur |
|
Bereidingstijd |
|
|
|
|
|
|
|
|||||||
|
|
|
|
|
|
|||||||
|
|
|
(10 min.) |
|
(vanaf de bodem) |
|
(°C) |
|
(minuten) |
|||
|
|
|
|
|
|
|
|
|||||
|
DESSERTS, GEBAK, ENZ. |
|
3 |
|
X |
|
2 |
|
160 |
|
30 |
- 40 |
|
|
|
|
|
|
|||||||
|
|
5 |
|
- |
|
3 |
|
150 |
|
35 |
- 45 |
|
|
|
|
|
|
|
|||||||
|
Cakes (biscuitdeeg) |
|
|
|
|
|
||||||
|
|
4 |
|
- |
|
3 |
|
160 |
|
30 |
- 40 |
|
|
|
|
|
|
|
|
||||||
|
|
|
|
|
|
|
||||||
|
Gevulde pasteien |
|
3 |
|
- |
|
2 |
|
180 |
|
90 |
- 95 |
|
|
|
|
|
|
|||||||
|
|
5 |
|
- |
|
2 |
|
160 |
|
70 |
- 80 |
|
|
(met kaas) |
|
|
|
|
|
||||||
|
|
|
4 |
|
- |
|
2 |
|
170 |
|
90 |
- 95 |
|
|
|
3 |
|
X |
|
2 |
|
180 |
|
25 |
- 35 |
|
|
|
|
|
|
|
||||||
|
Taarten |
|
5 |
|
- |
|
3 |
|
180 |
|
45 |
- 50 |
|
|
|
|
|
|
|||||||
|
|
|
4 |
|
- |
|
2 |
|
180 |
|
30 |
- 40 |
|
|
|
|
|
|
|
||||||
|
|
|
3 |
|
X |
|
2 |
|
200 |
|
40 |
- 45 |
|
Appelstrudel |
|
5 |
|
X |
|
3 |
|
200 |
|
45 |
- 50 |
|
|
|
|
|
|
|||||||
|
|
|
4 |
|
- |
|
2 |
|
180 |
|
45 |
- 50 |
|
|
|
|
|
|
|
||||||
|
|
|
3 |
|
X |
|
2 |
|
180 |
|
20 |
- 30 |
|
|
|
|
|
|
|
||||||
|
Koekjes |
|
5 |
|
- |
|
1 - 3 |
|
160 |
|
30 |
- 40 |
|
|
|
4 |
|
- |
|
2 - 4 |
|
180 |
|
25 |
- 35 |
|
|
|
|
|
|
|
||||||
|
|
|
3 |
|
X |
|
2 - 4 |
|
190 |
|
25 |
- 35 |
|
|
|
|
|
|
|
||||||
|
Roomsoesjes |
|
5 |
|
X |
|
1 - 3 |
|
180 |
|
40 |
- 50 |
|
|
|
|
|
|
|||||||
|
|
|
4 |
|
X |
|
2 - 4 |
|
190 |
|
30 |
- 40 |
|
|
|
3 |
|
X |
|
2 |
|
200 |
|
50 |
- 55 |
|
|
|
|
|
|
|
||||||
|
Pastei |
|
5 |
|
X |
|
3 |
|
180 |
|
55 |
- 60 |
|
|
|
|
|
|
|||||||
|
|
|
4 |
|
X |
|
2 |
|
200 |
|
40 |
- 50 |
|
|
|
|
|
|
|
||||||
|
|
|
3 |
|
X |
|
2 |
|
200 |
|
45 |
- 55 |
|
Lasagne |
|
5 |
|
- |
|
2 |
|
190 |
|
45 |
- 55 |
|
|
|
|
|
|
|||||||
|
|
|
6 |
|
- |
|
2 |
|
190 |
|
45 |
- 55 |
|
|
|
|
|
|
|
||||||
|
Gevulde vruchtentaart |
|
3 |
|
X |
|
2 |
|
200 |
|
35 |
- 45 |
|
|
|
|
|
|
|||||||
|
|
5 |
|
- |
|
2 |
|
180 |
|
45 |
- 50 |
|
|
b.v. Ananas, perzik |
|
|
|
|
|
||||||
|
|
4 |
|
- |
|
2 |
|
180 |
|
40 |
- 50 |
|
|
|
|
|
|
|
|
||||||
|
|
|
3 |
|
X |
|
2 |
|
90 |
|
120 |
- 150 |
|
|
|
|
|
|
|
||||||
|
|
|
|
|
|
|
||||||
|
Schuimgebak |
|
5 |
|
- |
|
1 - 3 |
|
80 |
|
150 |
- 180 |
|
|
|
|
|
|
|||||||
|
|
|
4 |
|
- |
|
2 - 4 |
|
100 |
|
120 |
- 150 |
|
|
|
3 |
|
X |
|
2 |
|
200 |
|
15 |
- 25 |
|
|
|
|
|
|
|
||||||
|
Pasteitjes |
|
5 |
|
X |
|
1 - 3 |
|
190 |
|
25 |
- 30 |
|
|
|
|
|
|
|||||||
|
|
|
|
|
|
|||||||
|
|
|
4 |
|
X |
|
2 - 4 |
|
200 |
|
20 |
- 30 |
|
|
|
|
|
|
|
||||||
|
|
|
3 |
|
X |
|
2 |
|
190 |
|
30 |
- 40 |
|
Soufflé |
|
5 |
|
- |
|
2 |
|
180 |
|
55 |
- 65 |
|
|
|
|
|
|
|||||||
|
|
|
4 |
|
X |
|
2 |
|
190 |
|
40 |
- 50 |
|
|
|
|
|
|
|
||||||
|
|
|
|
|
|
|
|
|
|
|
|
|
|
|
|
|
|
|
|
|
|
|
|
|
|
|
|
|
|
|
|
|
|
|
|
|
|
|
|
|
|
|
|
|
|
|
|
|
|
|
|

48
4gb53101.fm5 Page 48 Thursday, April 4, 2002 6:21 PM
Instructions for use
General recommendations Installation
Electrical connection Oven accessories
Cleaning the oven and accessories Troubleshooting guide
After Sales-Service
48

4gb53101.fm5 Page 49 Thursday, April 4, 2002 6:21 PM
General recommendations
Before using the appliances
ïTo make the most of your new appliances read the users instructions carefully and keep them on hand for consultation in the future.
ïRemove the cardboard protections and the protective plastic film.
ïRemove the accessories from the oven and heat it at 200∞C for about an hour to eliminate the smell of protective grease and insulating materials. Keep the window open during this procedure.
The fan may continue to run for the time necessary to ensure sufficient cooling of the components and adjacent kitchen units after the appliances have been switched off.
Protecting the environment
1. Packing 
ïThe packaging material is
100% recyclable and it is marked with the recycle symbol .
2. Appliances
ïThe appliances are built from recyclable materials. If you decide to scrap the appliances please observe local waste disposal regulations. When you scrap them, cut off the power cords so that the appliances cannot be connected to the mains.
Declaration of conformity CE:
ïThese appliances are designed to come into contact with foodstuffs and they are constructed in compliance with Directive 89/109/EEC.
ïThey are designed solely for use as domestic cooking appliances. Any other use of the appliances (e.g. for room heating) is considered as improper use and potentially dangerous.
ïThese appliances are designed, built and sold in compliance with:
-the safety requirements of ìLow Voltageî Directive 73/23/EEC;
-the protection requirements of EMC Directive 89/336/EEC;
-the requirements of Directive 93/68/EEC.
49

4gb53101.fm5 Page 50 Thursday, April 4, 2002 6:21 PM
General recommendations
ïNever stand or sit on the oven open door. Never hang any weight at the handle of the oven door when open.
ïUse oven gloves to remove baking trays and accessories when the oven is hot.
ïDo not cover the bottom of the oven with aluminium foil.
ïDo not place inflammable material in the oven - risk of fire if the oven is inadvertently switched on.
Precautions and general recommendations
ïBefore any maintenance on the appliances disconnect them from the power supply.
ïKeep children away from the oven when it is in use and when its has just been switched off.
ïThe oven must be repaired or adjusted only by a qualified technician.
ïMake sure that the electrical wires of other electrical appliances near the oven do not come into contact with hot parts and do not become entrapped in the oven door.
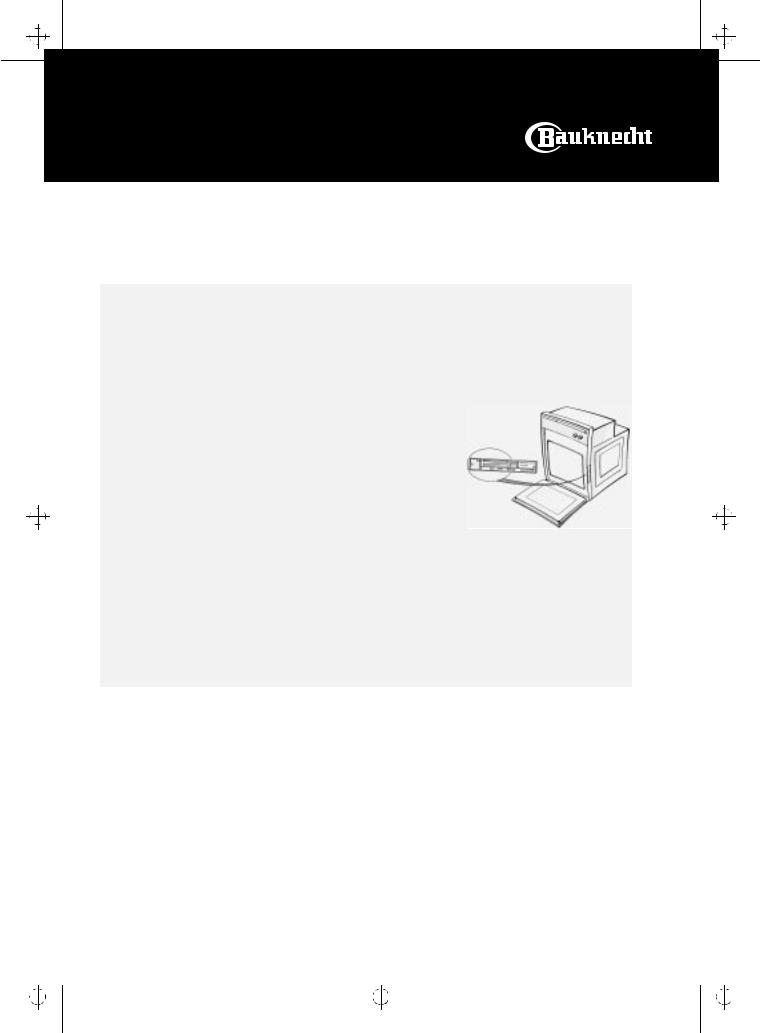
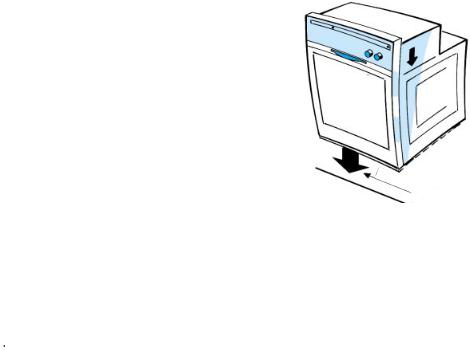
ïDuring the cooking process, water evaporates from food.
All ovens require this steam and other fumes to be vented from the oven cavity. For reasons of safety and aesthetics, we have determined that an opening at the bottom of the door is the optimum solution.
Consequently, vapour may be seen to be coming from this area on occasions (see picture).
ïThis is a normal occurrence and the bottom trim can be cleaned after removal of the door as described on ìCleaning the oven and its accessoriesî.
ïHeavy weights must not be placed on the open door as this may result in damage to the cavity and hinges.
Max weight: 7 kg (15lbs).
Fumes exhaust
50
4gb53101.fm5 Page 51 Thursday, April 4, 2002 6:21 PM
Installation
Technical information for the installer
Oven
ïAfter removing the oven from its packaging, before making the connections place it on the polystyrene foam base to protect it from damage.
ïDo not attempt to lift the oven by the handle.
ïLift at the sides as shown in the figure (see arrow).
ïCheck that the appliance has not been damaged in transit.
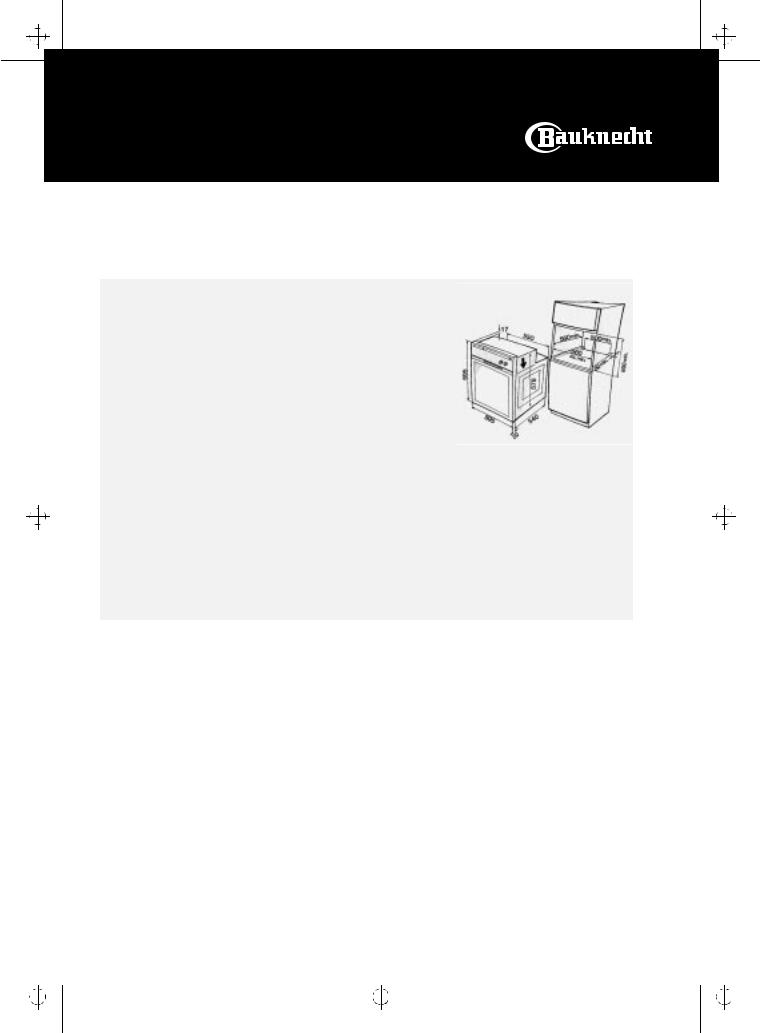
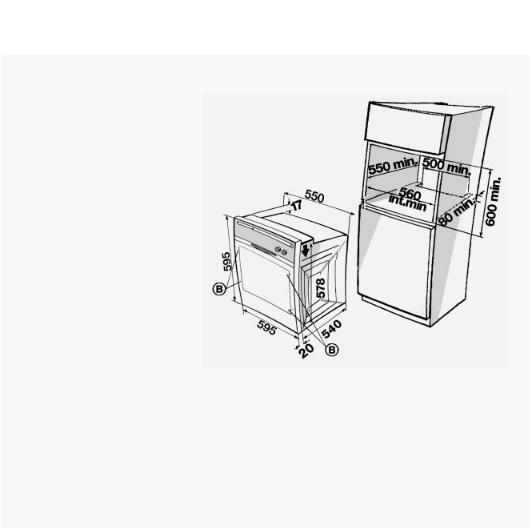
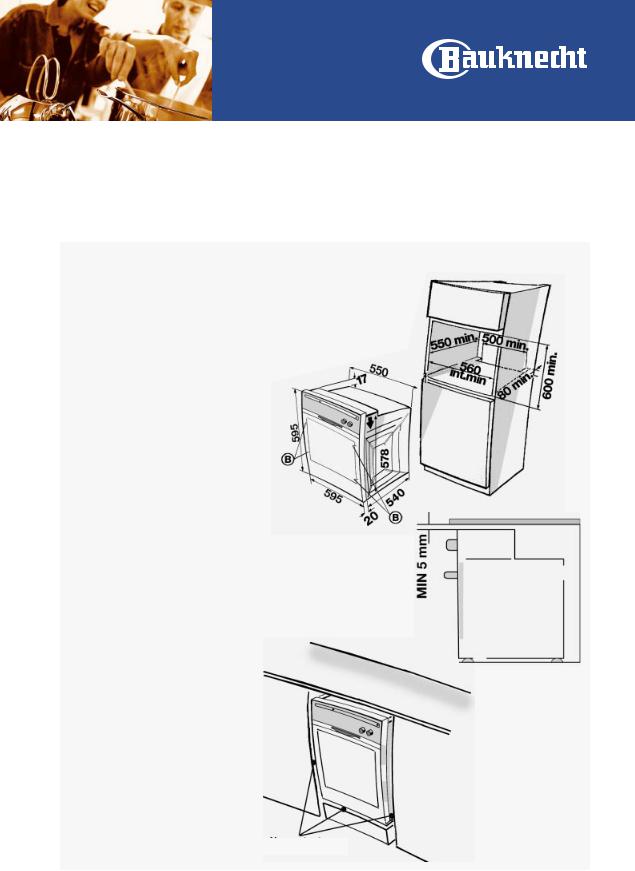
ïOven dimensions and kitchen unit dimensions are shown in the figure opposite.
ïKitchen units in contact with the oven must be heat resistant (80∞C).
ïIf plastic laminates or cement are not sufficiently heat-resistant, warping, bubbling or detachment of the finish may result.
ïInstall the oven in the housing, lifting it at the sides, taking care not to trap the wires of the electrical supply cable.
ïInstall the oven in the housing, lifting it at the sides, taking care not to trap the wires of the electrical supply cable.
51
4gb53101.fm5 Page 52 Thursday, April 4, 2002 6:21 PM
Installation
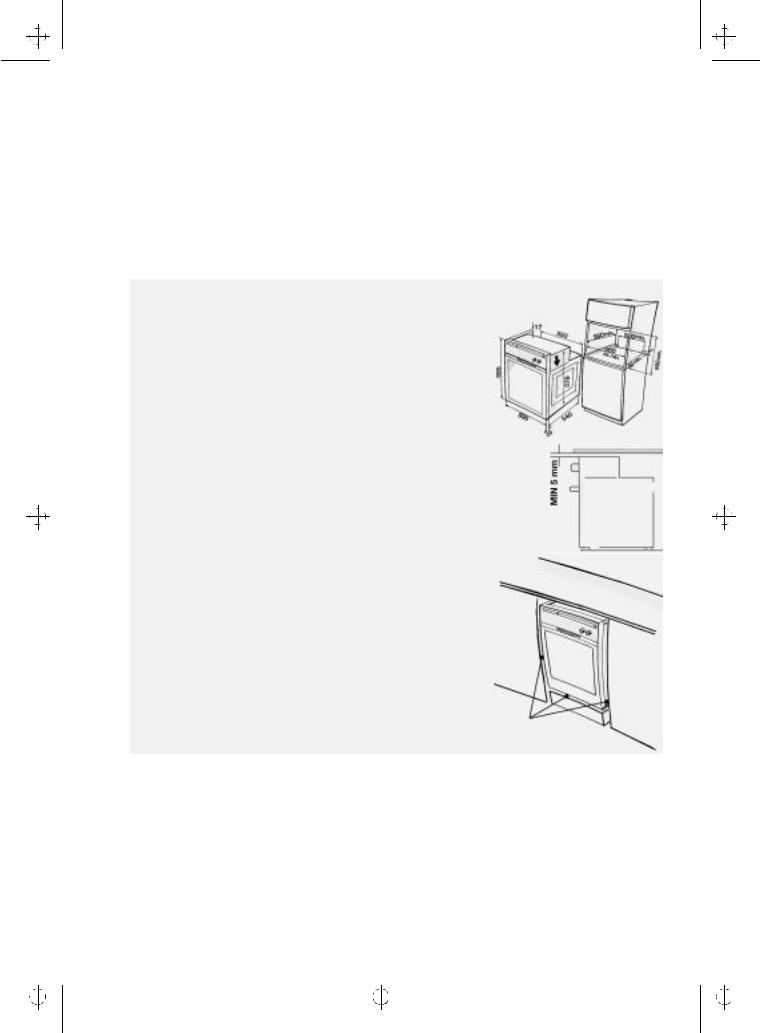
ïFor correct ventilation, follow the ventilation opening directions shown in the figure (500 x 80 mm min).
ïSecure the oven to the kitchen unit with screws
(B) as shown.
ïThe oven has also been designed for building-in under a cooktop.
NOTE: To allow for proper ventilation, we recommend that you leave an opening of at least 500x80 mm or an equivalent area in the lower section of the housing.
An additional opening of 5 mm is required between the oven top rim and the cooktop lower rim: this opening must not be closed by strips or housing crosspieces.
During oven installation, care must be taken to ensure that the sides are not touching the front edges of the housing or adjacent drawers and doors (see picture).
No Contacts
52
4gb53101.fm5 Page 53 Thursday, April 4, 2002 6:21 PM
Electrical connection
ïWarning: Do not connect to the power supply before you have finished connecting the oven.
ïMake sure the oven is installed and connected to the electricity supply by a qualified technician in accordance with the manufacturer's instructions and in compliance with local regulations.
ïThe installer is responsible for the correct electrical connection of the oven and the observance of the relative safety regulations.
ïThe oven must be connected to the electricity supply by means of an all-pole disconnect switch with minimum contact gap of 3 mm.
ïThe oven must be earthed by-law.
ïDo not use multiple plug adapters or extension leads.
ïAfter the oven has been installed, the electrical components must be inaccessible.
ïMake sure that the voltage shown on the rating plate is the same as the power supply voltage in your home.
The rating plate is on the front edge of the oven cavity (visible with oven door open).
53

4gb53101.fm5 Page 54 Thursday, April 4, 2002 6:21 PM
Oven accessories
Accessories supplied depend on the model
(refer to the Product Description Sheet supplied separately)
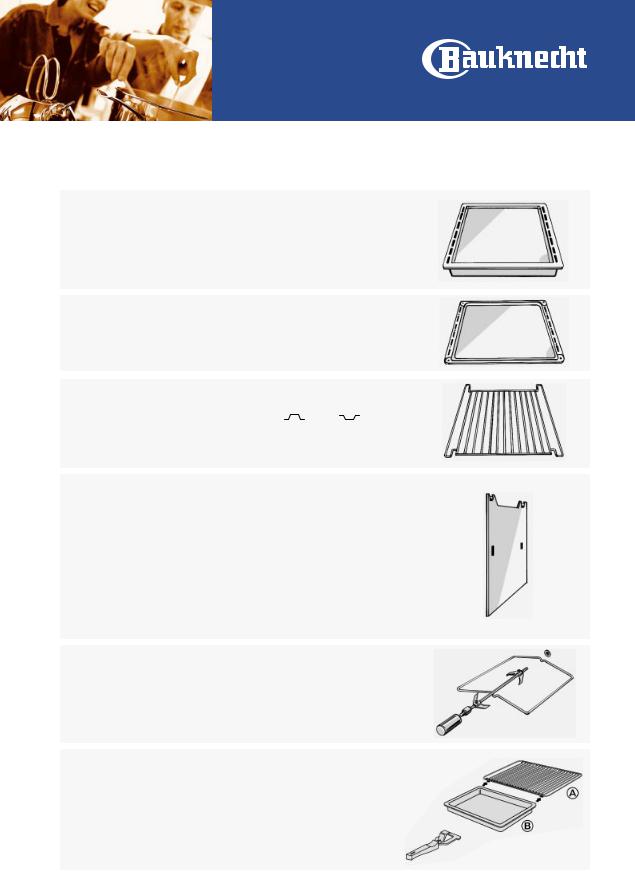
Drip tray
The drip tray is designed to collect fat and food particles when it is positioned under the grid; it can also be used as a griddle to cook meat, chicken and fish, with or without vegetables.
To avoid spatters of fat and smoke, pour a little water into the drip tray.
Baking tray
For cooking biscuits, meringues and pizzas.
Grid
The grid can be used to grill food or as a support for baking trays, cake tins and other cooking receptacles.
Catalytic panels
The catalytic panels have a microporous coating that absorbs fat spatters. We recommend an automatic cleaning cycle after cooking particularly fatty food.
1.To clean the oven heat it to 200∞C when empty and leave it switched on for about an hour.
It can be placed in two different ways (or) and on any of the runners in the oven.
2.At the end of the cycle, when the oven is cool, use a moist sponge to remove food residues.
Do not use detergent or cleaners - risk of damaging the catalytic enamel coating.
Spit
Use the spit as indicated in the relevant chapter in the Product Description Sheet supplied separately.
Pan Set Kit
The set comprises a grid, a drip tray and one or two tongs. This accessory must be set on the grid and used with the Grill function.
54

4gb53101.fm5 Page 55 Thursday, April 4, 2002 6:21 PM
Oven functions
Accessories supplied depend on the model
(refer to the Product Description Sheet supplied separately)
STATIC FUNCTION
This function is used to cook food on the same runner level.
The function allows temperature control; the temperature can be set in the range of 50∞ C to 250∞C.
The default setting is 200∞C.
ïPreheat the oven until the required temperature is reached and place the food into the oven when all the indicators on the scale ∞C__ are on.
ïWhen using this function, it is advisable to put the food in the middle of the oven.
GRILL FUNCTION
ïThis function is ideal to grill small pieces of meat (steaks, sausages) and for making toast.
ïThe function allows five settings, 1, 2, 3, 4, 5, each corresponding to an increased heating level of the heating element at the top.
ïThe default setting is 3.
ïDuring cooking, the oven door must be kept closed.
ïPreheat the oven for 3/5 minutes.
ïWhen cooking meat, to avoid spatters of fat and smoke, pour a little water into the drip tray.
ïTurn the food half-way through grilling time.
ïWhen this function is selected the spit (if supplied) is also activated.
ìMLTFî FUNCTION (Heat maintenance)
This function keeps one of two temperature levels of temperature (either 35∞C or 60∞C) inside the oven.
ïSetting the temperature at 35∞C is particularly useful to raise dough for bread and pizza.
ïThe default setting is
35∞C.
ïFor this function it is advisable to use the first shelf level.
ïUse the 60∞C temperature setting to keep the food warm once it is cooked.
FAN FUNCTION
This function is especially useful for simultaneously cooking different foods at more than one shelf level (for example: fish, vegetables, pasta).
This function allows temperature control; the temperature can be set in the range 50∞C to 250∞C.
The default setting is 160∞C.
ïIf possible choose dishes that require the same cooking temperature.
ïIt is not necessary to preheat the oven.
ïIf the dishes in the oven have different cooking times, remove completed dishes and leave remaining foods until cooked.
PASTRY FUNCTION (Static + Fan)
This function is useful when cooking at two levels and when baking cakes. The function allows temperature control; the temperature can be set in the range of 50∞C to
250∞C.
The default setting is 175∞C.
ïIt is not necessary to preheat the oven.
ïSwitch the position of the dishes inside the oven during cooking time.
ïIf the dishes in the oven have different cooking times, remove completed dishes and leave remaining foods until cooked.
TURBOGRILL FUNCTION (Grill + Fan)
This function is ideal to cook large chunks of meat (i.e. roast beef, roasts).
The function allows five settings, 1, 2, 3, 4, 5, each corresponding to an increasing heating level of the heating element at the top. The default setting is 3.
ïKeep the oven door closed while cooking.
ïLay the meat onto the grid and position the drip tray on the first shelf level. To avoid spatters of fat and smoke, pour a little water into the drip tray.
ïTurn over the meat halfway through cooking time.
55
4gb53101.fm5 Page 56 Thursday, April 4, 2002 6:21 PM
Oven functions
TURBOFAN FUNCTION
This function is useful when cooking at two runner levels; the temperature can be set in the range of 50∞C to 250∞C.
The default setting is 160∞C. This function is ideal for:
ïLarge fruitcakes
ïTimbales
ïStuffed vegetables
ïPoultry (weighing more than 3 kg)
It is not necessary to preheat the oven.
PROGRAMME FUNCTION
This function is useful to bake pizzas, bread and focaccia. The function provides 3 cooking programs
(P1, P2, P3) with preset initial temperatures that can be adjusted by the user.
The maximum temperature values that can be adjusted by the user are: 240∞C for P1, 200∞C for P2 and 190∞C for
P3 in order to obtain uniform cooking results.
Each program corresponds to a recipe for the preparation of the dish you want.
Programme P1 allows rapid preheating with an initial temperature of 300∞C and a cooking temperature of
240∞C.
To improve energy saving and avoid wasting electricity, there is no preheating if the oven is already warm, and the cooking temperature is set automatically (240∞C).
For programmes P2 and P3 the initial temperature is always 220∞C.
BOOSTER FUNCTION
This function allows fast preheating of the oven.
The function allows temperature control; the temperature can be set in the range of 50∞C to 250∞C.
The default setting is 200∞C. As the temperature in the oven increases, the indicators
-----∞C light up in sequence.
When the selected temperature is reached, an acoustic signal is emitted and the oven switches automatically to Static Function.
This function is ideal when cooking meat, fish and poultry.
56
4gb53101.fm5 Page 57 Thursday, April 4, 2002 6:21 PM
Cleaning the oven and accessories
ïWhen you finish cooking wait for the oven to cool and then clean it to prevent the build-up of baked-on residues.
ïIf the food residues are baked on, use a specific oven cleaner and follow the manufacturer's instructions.
ïClean the exterior of the oven with a sponge and warm water.
ïDo not use abrasive cleaners or pan scourers.
ïUse a liquid detergent to clean the oven door window.
ïWash the accessories in a dishwasher or in the sink, using an oven cleaner.
ïAfter the oven has been in prolonged use and when cooking on different levels (especially food with high water contents such as pizzas, stuffed vegetables, etc.) condensation may form on the inside of the door and of the door seal. When the oven is cool, dry any condensation with a cloth or a sponge.
Additional information for appliances which have an aluminium front:
The material has a sensitive surface. In order to avoid scratches, only use a soft sponge and liquid cleaner to clean the front of the appliance.
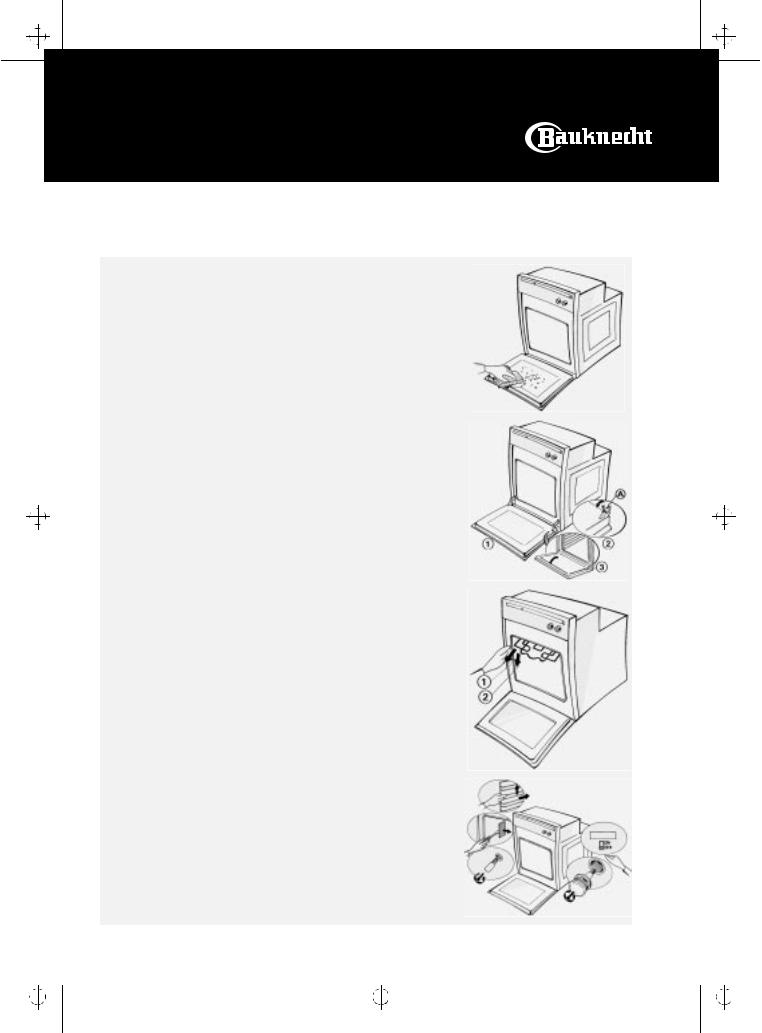
Removing the oven door (for cleaning)
1.Open the oven door.
2.Press hinge catches (A) forwards.
3.Lift the catches until they engage and then remove the door.
4.Warning: While you are cleaning the oven, ensure you do not disengage the hinge retainer catches.
5.Refit the oven door by following the above steps in reverse order.
Dropping the grill element to clean the oven roof (depending on model)
ïDo not attempt to clean the oven until it is cool.
1.To clean the oven roof, pull out the grill element and lower it as far as it will go.
2.Clean the oven roof and then return the grill element to its original position.
Changing the oven lamp
1.Disconnect the oven from the electrical supply.
2.Unscrew the lamp cover.
3.Change the lamp (see N.B.).
4.Refit the lamp cover.
5.Reconnect the electrical supply.
Changing the lateral lamp (depending on model)
1.Disconnect the oven from the electrical supply.
2.Remove the left hand side grid.
3.Use a screwdriver to prize off the lamp cover.
4.Change the lamp (see N.B).
5.Reposition the lamp cover and press it against the oven wall until it clicks into place.
6.Refit the side grid.
7.Reconnect the power supply.
N.B: Use exclusively 25 W 230 V lamps, type E-14, T300∞C, available from After-Sales Service.
57

4gb53101.fm5 Page 58 Thursday, April 4, 2002 6:21 PM
Troubleshooting guide
Oven not working
ïSwitch the oven off and then on again to see if the problem persists.
ïCheck for the presence of mains electrical power.
ïCheck that the oven selector is not on position
ì0î.
ïIf the electronic display presents the message ìSTOPî, press the button 2 to reset the oven and then set the clock (see the PROGRAMMER DESCRIPTION SHEET supplied separately).
After Sales-Service
Before contacting AfterSales Service:
1.Try to solve the problem (see ìTroubleshooting guideî).
2.Turn off the appliance and restart it to see if the fault is repeated.
If after the above checks the fault still occurs, get in touch with the nearest After-Sales Service.
Please give:
ïthe nature of the problem,
ïthe exact type and model,
ïthe service number
ï(number after the word Service on the rating plate), located under the cooktop or on the Product Description Sheet or, finally, on the right hand edge of the oven cavity (visible when the oven door is open).
The service number is also indicated on the guarantee booklet,
ïyour complete address (including postal code) and phone number.
ïIf the electronic display shows the message ìFxxî, contact the After-Sales Service, quoting the error code displayed.
If any repairs are required, please contact an authorised AFTER SALES SERVICE as indicated in the warranty.
In the unlikely event that an operation or repair is carried out by an unauthorised technician, always request a certification of the job carried out and insist on the use of original spare parts.
Failure to comply with these instructions may compromise the safety and quality of the product.
58
BLZH 5500
 DE
DE
 BE
BE
 NL
NL
Last
First
PRODUCT DESCRIPTION SHEET
First-Last... shelf positions
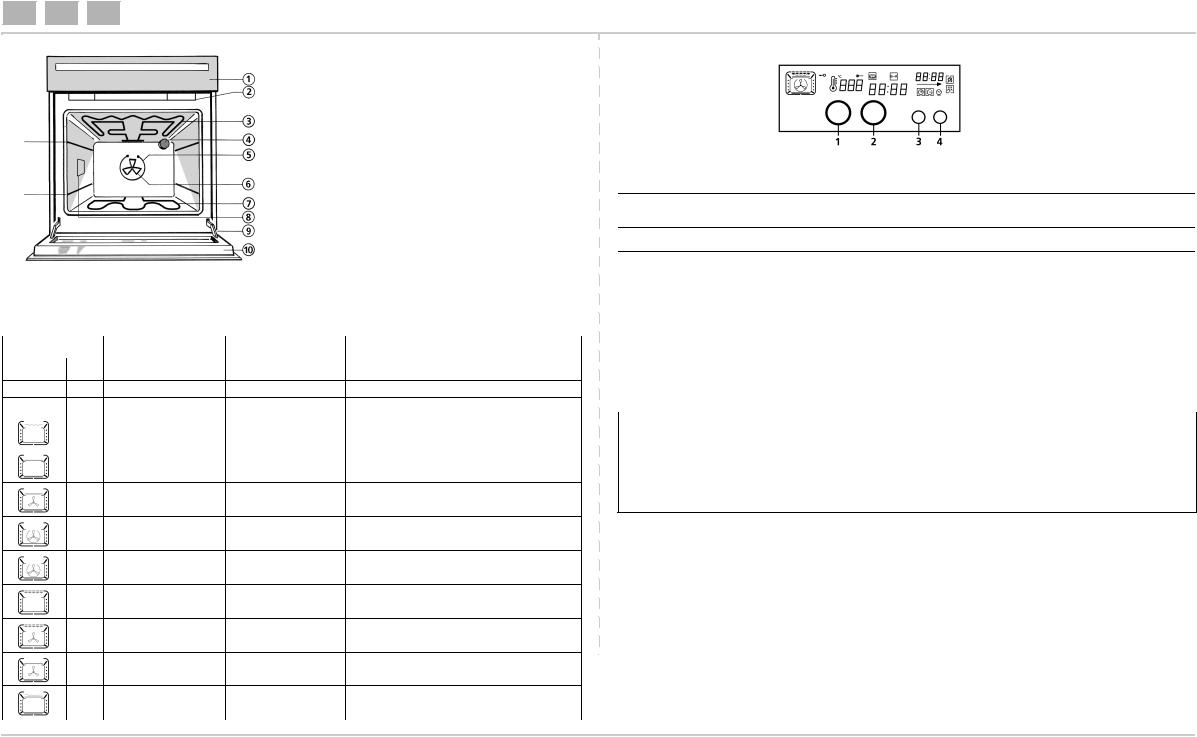
1.Control panel
2.Cooling fan* (not visible)
3.Top heating element (can be lowered)
4.Oven light
5.Round heating element (not visible)
6.Fan
7.Bottom heating element (not visible)
8.Lateral standard lamps
9.Oven door hinges
10.Oven cool door
*N.B.: The cooling fan switches on only when the oven has reached a certain temperature. After the oven switches off, the cooling fan may, however, continue to run for a certain time to ensure proper cooling.
ACCESSORIES |
• |
Grid |
• Grease filter |
• |
Drip tray |
|
|
|
• |
Baking tray |
|
OVEN FUNCTIONS TABLE
Function |
Function |
Preset |
||
|
|
|||
Symbol |
Nr. |
temperature/level |
||
|
||||
|
|
|||
– |
– |
OVEN OFF |
- |
|
– |
– |
OVEN LIGHT |
- |
|
|
2 |
MLTF |
35C |
|
|
(Heat Maintenance) |
|||
|
|
|
||
|
3 |
STATIC |
200C |
|
|
4 |
PASTRY |
175C |
|
|
(Static + Fan) |
|||
|
|
|
||
|
5 |
FAN |
160C |
|
|
6 |
TURBOFAN |
160C |
|
|
7 |
GRILL |
3 |
|
|
8 |
TURBOGRILL |
3 |
|
|
(Grill + Fan) |
|||
|
|
|
||
Function description
(see details in the user’s manual)
-
To switch on the oven light.
To keep a constant temperature, either 35°C or 60°C.
To cook food at one shelf level. Preheating.
To cook on two shelf levels, at the same temperature.
To cook on more than one shelf level, at the same temperature.
To cook: large fruitcakes, stuffed vegetables, timbales, poultry.
To grill small pieces of meat, toast, etc.
To grill large pieces of meat.
9 |
PROGRAMME |
P1 |
To bake pizza, bread, focaccia. |
|
|
||||
10 |
BOOSTER |
200C |
For fast preheating of the oven. |
|
|
||||
|
||||
|
||||
|
|
|
|
|
|
|
|
|
|
|
|
|
|
|
|
|
|
|
|
1.Selector knob: to choose the oven functions.
2.Knob to set time of day, cooking time, the time at which cooking should terminate, the temperatures and the power levels (Function P).
3.Button to select and confirm the different operations (operate by single presses only).
4.Button to select special functions: “Browning”  and “Heat Maintenance”
  .
.
Push-push knobs
•To use this type of knob, press it in the middle.
•Turn the knob to the desired position.
Once cooking is over, turn the knob back to the position marked by “0” and press it again to restore it to its initial setting.
STARTING THE OVEN
When the oven is connected to the power supply for the first time, or re-connected after a power failure, the display shows “  ”.
”.
To start the oven:
• turn knob 1with index at the top as in fig. 1 of programmer sheet.
•pressbutton 3. The display shows “--:--”.
FOR A DESCRIPTION ON HOW TO USE THE OVEN, PLEASE REFER TO THE PROGRAMMER DESCRIPTION SHEET.
5019 410 54591
COOKING TABLE FOR GRILL FUNCTION
|
|
|
|
|
Preheating |
|
Level |
Browning |
Cooking time |
|||
|
FOOD |
|
Function |
|
|
(from the |
||||||
|
|
|
(5 minutes) |
|
level |
(minutes) |
||||||
|
|
|
|
|
|
bottom) |
||||||
|
|
|
|
|
|
|
|
|
|
|
||
|
Sirloin steaks |
7 |
|
X |
|
4 |
|
5 |
|
35 - 45 |
||
|
Cutlets |
7 |
|
X |
|
4 |
|
5 |
|
30 - 40 |
||
|
Sausages |
7 |
|
X |
|
4 |
|
5 |
|
30 - 40 |
||
|
Pork chops |
7 |
|
X |
|
4 |
|
5 |
|
25 - 35 |
||
|
Fish |
7 |
|
X |
|
4 |
|
5 |
|
30 - 40 |
||
|
Chicken legs |
7 |
|
X |
|
4 |
|
5 |
|
35 - 40 |
||
|
Kebabs |
7 |
|
X |
|
4 |
|
5 |
|
30 - 35 |
||
|
Spare ribs |
7 |
|
X |
|
4 |
|
5 |
|
20 - 35 |
||
|
Chicken halves |
7 |
|
X |
|
3 |
|
5 |
|
45 - 50 |
||
|
Chicken halves |
8 |
- |
|
3 |
|
5 |
|
45 - 55 |
|||
|
Whole chicken |
8 |
- |
|
3 |
|
5 |
|
60 - 70 |
|||
|
Roast |
8 |
- |
|
3 |
|
5 |
|
75 - 90 |
|||
|
(pork, beef) |
|
|
|
||||||||
|
|
|
|
|
|
|
|
|
|
|
|
|
|
Duck |
8 |
- |
|
2 |
|
5 |
|
80 - 90 |
|||
|
Leg of lamb |
8 |
- |
|
3 |
|
5 |
|
90 - 120 |
|||
|
Roast beef |
8 |
- |
|
3 |
|
5 |
|
90 - 120 |
|||
|
Baked potatoes |
8 |
- |
|
3 |
|
5 |
|
40 - 50 |
|||
|
Swordfish cutlets |
8 |
- |
|
3 |
|
5 |
|
35 - 45 |
|||
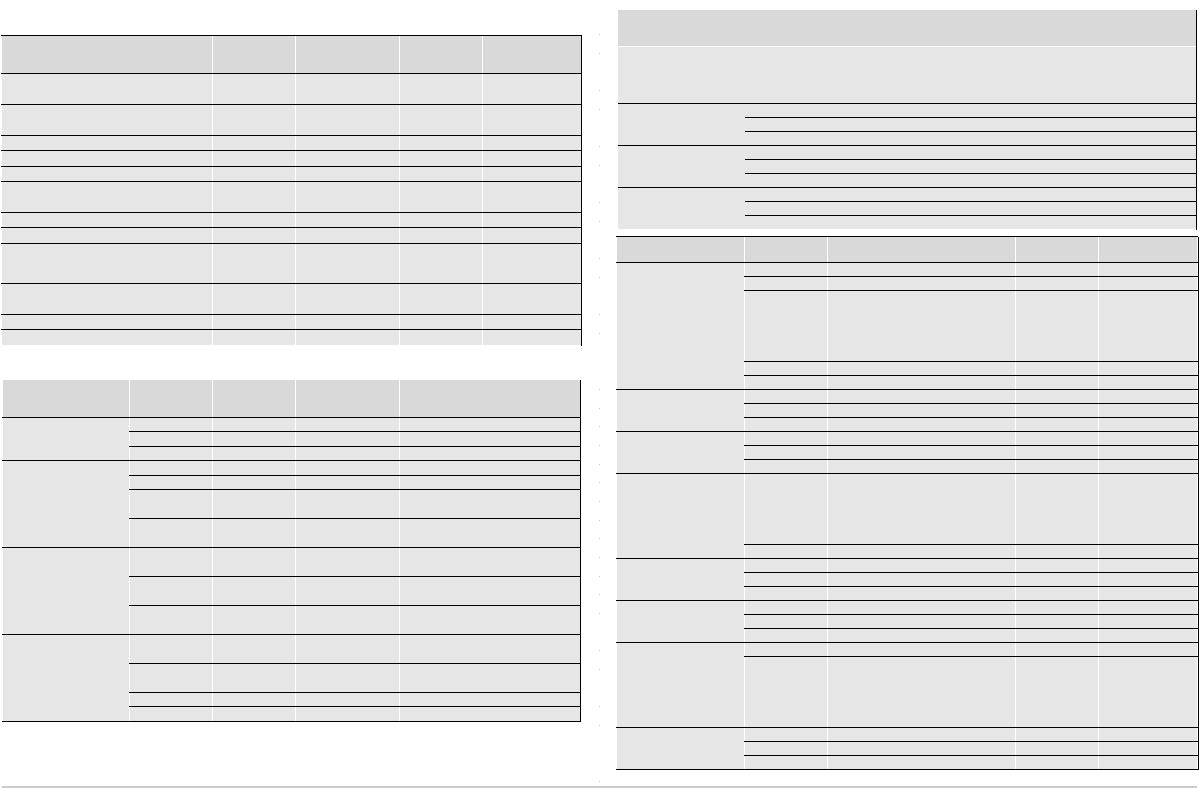
FOOD COOKING TABLES |
|
|
|
|
|
|
|
|||||
|
FOOD |
|
Function |
|
Preheating |
|
Level |
|
Temperature |
|
Cooking time |
|
|
|
|
|
|
|
|||||||
|
|
|
|
(from the |
|
|
||||||
|
|
|
(10 minutes) |
|
|
(°C) |
|
(minutes) |
||||
|
|
|
|
|
|
bottom) |
|
|
||||
|
|
|
|
|
|
|
|
|
|
|
|
|
|
|
|
3 |
|
X |
|
2 |
|
200 |
|
60 |
- 80 |
|
MEAT |
|
5 |
|
X |
|
2 |
|
190 |
|
70 |
- 90 |
|
Lamb, Kid, Mutton |
|
|
|
|
|
||||||
|
|
|
|
|
|
|
|
|
|
|
|
|
|
|
|
4 |
|
X |
|
2 |
|
190 |
|
60 |
- 80 |
|
Roast |
|
3 |
|
X |
|
2 |
|
200 |
|
70 |
- 90 |
|
|
|
|
|
|
|
|
|
|
|
|
|
|
(Veal, Pork, Beef) |
|
5 |
|
- |
|
2 |
|
190 |
|
60 |
- 80 |
|
(kg. 1) |
|
4 |
|
- |
|
2 |
|
190 |
|
60 |
- 80 |
|
|
|
|
|
|
|
||||||
|
|
|
3 |
|
X |
|
2 |
|
200 |
|
70 |
- 80 |
|
Chicken, Rabbit, |
|
5 |
|
- |
|
2 |
|
190 |
|
60 |
- 70 |
|
Duck |
|
|
|
|
|
||||||
|
|
|
|
|
|
|
|
|
|
|
|
|
|
|
|
4 |
|
- |
|
2 |
|
190 |
|
70 |
- 80 |
|
|
|
3 |
|
X |
|
1 |
|
200 |
|
160 |
- 180 |
|
Turkey (kg. 6) + level. 3 |
|
5 |
|
X |
|
1 |
|
190 |
|
150 |
- 180 |
|
browning |
|
|
|
|
|
||||||
|
|
|
|
|
|
|
|
|
|
|
|
|
|
|
|
4 |
|
X |
|
1 |
|
190 |
|
150 |
- 180 |
|
|
|
3 |
|
X |
|
2 |
|
200 |
|
120 |
- 130 |
|
Goose (2 Kg) |
|
5 |
|
X |
|
2 |
|
190 |
|
100 |
- 120 |
|
|
|
4 |
|
X |
|
2 |
|
190 |
|
110 |
- 120 |
|
FISH (WHOLE) |
|
3 |
|
X |
|
2 |
|
200 |
|
60 |
- 70 |
|
(1-2 kg) |
|
5 |
|
- |
|
2 - 3 |
|
190 |
|
65 |
- 75 |
|
Gilt-head, Bass, Tuna, |
|
|
|
|
|
||||||
|
|
|
|
|
|
|
|
|
|
|
|
|
|
Salmon, Trout |
|
4 |
|
- |
|
2 - 3 |
|
190 |
|
60 |
- 70 |
|
FISH (CUTLETS) |
|
3 |
|
X |
|
2 |
|
200 |
|
45 |
- 55 |
|
(1 kg.) |
|
5 |
|
- |
|
3 |
|
190 |
|
50 |
- 55 |
|
Sword Fish, Tuna, Salmon, |
|
|
|
|
|
||||||
|
|
|
|
|
|
|
|
|
|
|
|
|
|
Cod |
|
4 |
|
X |
|
2 |
|
190 |
|
45 |
- 55 |
NOTE: When cooking meat using fan-assisted and static functions, it is also advisable to use the Browning function (level 1 to 3).
|
|
FOOD |
|
Function |
|
Preheating |
|
Level |
|
Temperature |
|
|
Cooking time |
|||
|
|
|
|
|
|
|
|
|||||||||
|
|
|
|
|
|
|
|
|||||||||
|
|
|
|
|
|
|
||||||||||
|
|
|
|
|
(from the |
|
|
|
||||||||
|
|
|
|
(10 minutes) |
|
|
(°C) |
|
|
(minutes) |
||||||
|
|
|
|
|
|
|
|
|
bottom) |
|
|
|
||||
|
|
|
|
|
|
|
|
|
|
|
|
|
|
|
|
|
|
|
|
|
|
6 |
|
|
X |
|
2 |
200 |
|
50 - 60 |
|||
|
|
|
|
|||||||||||||
|
|
VEGETABLES |
|
3 |
|
|
X |
|
2 |
190 |
|
35 - 45 |
||||
|
|
|
|
|
|
|
||||||||||
|
|
Stuffed peppers |
|
5 |
|
|
- |
|
2 |
180 |
|
55 - 60 |
||||
|
||||||||||||||||
|
|
|
|
|
4 |
|
|
- |
|
2 |
190 |
|
50 - 60 |
|||
|
|
|
|
|
|
|
|
|
||||||||
|
|
|
|
|
3 |
|
|
X |
|
2 |
200 |
|
50 - 55 |
|||
|
|
|
|
|||||||||||||
|
|
Stuffed tomatoes |
|
5 |
|
|
- |
|
2 |
180 |
|
50 - 60 |
||||
|
|
|
|
|
4 |
|
|
- |
|
2 |
190 |
|
35 - 45 |
|||
|
|
|
|
|||||||||||||
|
|
|
|
|
3 |
|
|
X |
|
2 |
200 |
|
40 - 50 |
|||
|
|
|
|
|
|
|
|
|
||||||||
|
|
Baked potatoes |
|
5 |
|
|
- |
|
2 |
190 |
|
45 - 50 |
||||
|
||||||||||||||||
|
|
|
|
|
4 |
|
|
- |
|
2 |
190 |
|
45 - 50 |
|||
|
|
Raw vegetables au gratin |
|
3 |
|
|
X |
|
2 |
200 |
|
35 - 45 |
||||
|
|
|||||||||||||||
|
|
|
|
|
|
|
|
|
|
|
|
|
|
|
||
|
|
(e.g. Fennel, Cabbage, |
|
5 |
|
|
- |
|
3 |
180 |
|
40 - 50 |
||||
|
|
Asparagus, Celery) |
|
4 |
|
|
- |
|
2 |
190 |
|
40 - 50 |
||||
|
|
|
|
|
|
|
|
|
||||||||
|
|
FOOD |
|
|
Function |
|
|
Preheating |
|
Level |
|
Temperature |
|
|
Cooking time |
|
|
|
|
|
|
|
|
|
|
|
|||||||
|
|
|
|
|
||||||||||||
|
|
|
|
|
|
(10 minutes) |
|
(from the bottom) |
|
(°C) |
|
|
(minutes) |
|||
|
|
|
|
|
|
|
|
|
|
|
|
|||||
|
|
SWEETS, PASTRIES, ETC. |
|
3 |
|
|
X |
|
2 |
|
160 |
|
|
30 |
- 40 |
|
|
|
|
||||||||||||||
|
|
|
5 |
|
- |
|
3 |
|
150 |
|
|
35 |
- 45 |
|||
|
|
|
|
|
|
|||||||||||
|
|
Raising cakes (sponges) |
|
4 |
|
- |
|
3 |
|
160 |
|
|
30 |
- 40 |
||
|
|
|
|
|
|
|
|
|
||||||||
|
|
|
|
|||||||||||||
|
|
Filled pies |
|
3 |
|
- |
|
2 |
|
180 |
|
|
90 |
- 95 |
||
|
|
|
5 |
|
- |
|
2 |
|
160 |
|
|
70 |
- 80 |
|||
|
|
(with cheese) |
|
|
|
|
|
|
||||||||
|
|
|
4 |
|
- |
|
2 |
|
170 |
|
|
90 |
- 95 |
|||
|
|
|
|
|
|
|
|
|
||||||||
|
|
|
|
3 |
|
|
X |
|
2 |
|
180 |
|
|
25 |
- 35 |
|
|
|
|
|
|||||||||||||
|
|
Tarts |
|
5 |
|
- |
|
3 |
|
180 |
|
|
45 |
- 50 |
||
|
|
|
|
4 |
|
- |
|
2 |
|
180 |
|
|
30 |
- 40 |
||
|
|
|
|
|||||||||||||
|
|
|
|
3 |
|
|
X |
|
2 |
|
200 |
|
|
40 |
- 45 |
|
|
|
|
|
|
|
|
|
|
|
|||||||
|
|
|
|
|||||||||||||
|
|
Apple strudel |
|
5 |
|
|
X |
|
3 |
|
200 |
|
|
45 |
- 50 |
|
|
||||||||||||||||
|
|
|
|
4 |
|
- |
|
2 |
|
180 |
|
|
45 |
- 50 |
||
|
|
|
|
3 |
|
|
X |
|
2 |
|
180 |
|
|
20 |
- 30 |
|
|
|
|
|
|||||||||||||
|
|
Biscuits |
|
5 |
|
- |
|
1 - 3 |
|
160 |
|
|
30 |
- 40 |
||
|
||||||||||||||||
|
|
|
|
4 |
|
- |
|
2 - 4 |
|
180 |
|
|
25 |
- 35 |
||
|
|
|
|
|||||||||||||
|
|
|
|
3 |
|
|
X |
|
2 - 4 |
|
190 |
|
|
25 |
- 35 |
|
|
|
Cream puffs |
|
5 |
|
|
X |
|
1 - 3 |
|
180 |
|
|
40 |
- 50 |
|
|
||||||||||||||||
|
|
|
|
4 |
|
|
X |
|
2 - 4 |
|
190 |
|
|
30 |
- 40 |
|
|
|
|
|
|||||||||||||
|
|
|
|
3 |
|
|
X |
|
2 |
|
200 |
|
|
50 |
- 55 |
|
|
|
|
|
|||||||||||||
|
|
Savoury Pies |
|
5 |
|
|
X |
|
3 |
|
180 |
|
|
55 |
- 60 |
|
|
|
|
|
4 |
|
|
X |
|
2 |
|
200 |
|
|
40 |
- 50 |
|
|
|
|
|
|||||||||||||
|
|
|
|
3 |
|
|
X |
|
2 |
|
200 |
|
|
45 |
- 55 |
|
|
|
|
|
|||||||||||||
|
|
Lasagne |
|
5 |
|
- |
|
2 |
|
190 |
|
|
45 |
- 55 |
||
|
||||||||||||||||
|
|
|
|
6 |
|
- |
|
2 |
|
190 |
|
|
45 |
- 55 |
||
|
|
|
|
|||||||||||||
|
|
Filled fruit pies |
|
3 |
|
|
X |
|
2 |
|
200 |
|
|
35 |
- 45 |
|
|
|
|
||||||||||||||
|
|
|
5 |
|
- |
|
2 |
|
180 |
|
|
45 |
- 50 |
|||
|
|
e.g. Pineapple, Peach |
|
|
|
|
|
|
||||||||
|
|
|
4 |
|
- |
|
2 |
|
180 |
|
|
40 |
- 50 |
|||
|
|
|
|
|
|
|
|
|
||||||||
|
|
|
|
3 |
|
|
X |
|
2 |
|
90 |
|
|
120 |
- 150 |
|
|
|
|
|
|||||||||||||
|
|
Meringues |
|
5 |
|
- |
|
1 - 3 |
|
80 |
|
|
150 |
- 180 |
||
|
||||||||||||||||
|
|
|
|
4 |
|
- |
|
2 - 4 |
|
100 |
|
|
120 |
- 150 |
||
|
|
|
|
|||||||||||||
|
|
|
|
3 |
|
|
X |
|
2 |
|
200 |
|
|
15 |
- 25 |
|
|
|
|
|
|||||||||||||
|
|
Vol-au-vents |
|
5 |
|
|
X |
|
1 - 3 |
|
190 |
|
|
25 |
- 30 |
|
|
||||||||||||||||
|
|
|
|
4 |
|
|
X |
|
2 - 4 |
|
200 |
|
|
20 |
- 30 |
|
|
|
|
|
|||||||||||||
|
|
|
|
3 |
|
|
X |
|
2 |
|
190 |
|
|
30 |
- 40 |
|
|
|
|
|
|||||||||||||
|
|
Soufflés |
|
5 |
|
- |
|
2 |
|
180 |
|
|
55 |
- 65 |
||
|
|
|
|
|
|
|
|
|||||||||
|
|
|
|
4 |
|
|
X |
|
2 |
|
190 |
|
|
40 |
- 50 |
|
|
|
|
|
|||||||||||||
|
|
|
|
|
|
|
|
|
|
|
|
|
|
|
|
|
|
|
|
|
|
|
|
|
|
|
|
|
|
|
|
|
|

Gebrauchsanweisung
Vor der ersten Benutzung Installation
Elektrischer Anschluss
Hinweise zur Energieeinsparung Backofenzubehör
Reinigung des Backofens und der Zubehörteile Störung-was tun?
Kundendienst
Vor der ersten Benutzung
•Um Ihren Backofen optimal nutzen zu können, lesen Sie bitte die Bedienungsanleitung aufmerksam durch und bewahren Sie sie danach gut auf.
•Entfernen Sie die Schutzkartons und Plastikfolien vom Gerät.
•Nehmen Sie die Zubehörteile aus dem Backofen, heizen Sie das Gerät auf 200°C auf und lassen Sie es ca. eine Stunde eingeschaltet, um den Geruch von Isoliermaterial und Schutzfetten zu beseitigen. Bitte lassen Sie während dieser Zeit das Fenster geöffnet.
Das Kühlgebläse kann auch nach dem Ausschalten der Geräte so lange in Betrieb bleiben, bis die einzelnen Bauteile und die Möbel ausreichend abgekühlt sind.
Hinweise zum
Umweltschutz
1.Verpackung
•Das Verpackungsmaterial ist zu 100% wiederverwertbar
und trägt das RecyclingSymbol  .
.
2. Elektrohaushaltsgeräte
•Die Elektrohaushaltsgeräte wurden mit recylebaren Materialien hergestellt. Bei Verschrottung die geltenden örtlichen Umweltschutzvorschriften einhalten.
Bitte das Gerät unbrauchbar machen: Dazu das Stromkabel durchschneiden.
Hinweise und allgemeine Ratschläge
•Vor Wartungsarbeiten an den Geräten ist die Spannungsversorgung abzuschalten.
•Während des Betriebs der Geräte Kinder fernhalten.
•Eventuelle Reparaturen oder Eingriffe dürfen ausschließlich durch eine Fachkraft vorgenommen werden.
•Vergewissern Sie sich, dass die Stromkabel anderer in der Nähe des Herdes verwendeter Geräte keine heißen Teile berühren oder in der Tür des heißen Herdes eingeklemmt werden.
•Während des Garvorgangs verdampft das in den Speisen enthaltene Wasser. In allen Backöfen ist es erforderlich, diesen Dampf und sonstigen Rauch aus
dem Ofen ausströmen zu lassen. Aus sicherheitstechnischen und ästhetischen Gründen erwies sich eine Öffnung im unteren Teil der Backofentür als die ideale Lösung.
Aus diesem Ofenbereich kann daher von Zeit zu Zeit Dampf ausströmen (siehe Abbildung).
Dampfaustritt

Vor der ersten
Backofen
•Niemals auf der offenstehenden Ofentür stehen oder sitzen. Niemals etwas Schweres an den Türgriff der offenstehenden Ofentür hängen.
•Verwenden Sie stets Backofenhandschuhe, um heiße Gerichte oder Pfannen und Roste zu entnehmen.
•Decken Sie den Backofenboden nicht Aluminiumfolie ab.
•Stellen Sie kein brennbares Material in den Backofen. Falls der Backofen versehentlich eingeschaltet wird, kann dieses Feuer fangen.
Installation
Technische Informationen für den Installateur
Backofen
•Den Backofen nach Öffnen der Verpackung auf der Polystyrol-Unterlage stehen lassen und zuerst den elektrischen Anschluss durchführen. Wenn der Backofen direkt auf den Fußboden gestellt wird, kann die Leiste unterhalb der Backofentür beschädigt werden.
•Das Gerät nicht am Türgriff anheben, sondern die beigefügten Traggriffe gemäß Abbildung (A) benutzen.
•Überprüfen Sie das Gerät auf Transportschäden.
•Die Abmessungen des
Backofens und die |
• Sind Kunststofflaminate |
Einbaumaße können |
oder Kleber nicht |
nebenstehender Skizze |
ausreichend |
entnommen werden. |
widerstandsfähig gegen |
• Die an den Backofen |
Hitze, können |
angrenzenden Möbel |
Verformungen, Blasen |
müssen hitzebeständig |
oder Ablösungen der |
sein (80°C). |
Oberfläche auftreten. |
Installation
•Um eine korrekte Belüftung zu gewährleisten, berücksichtigen Sie bitte die in der Abbildung angegebenen Belüftungsöffnungen im Nischenboden (mindestens 500 x 80 mm).
•Den Backofen wie in nebenstehender Abbildung gezeigt mit den beigefügten Schrauben
am Möbelkörper befestigen.
•Der Backofen kann auch unter einer Arbeitsplatte eingebaut werden.
HINWEIS: Es ist jedoch auch in diesem Fall auf eine ausreichende Belüftung des Geräts zu achten (siehe nebenstehende Skizze; mindestens 500 x 80 mm Nischenboden).
•Zwischen der Oberseite Backofens und der Unterseite der Arbeitsplatte muss ein Spalt von mindestens 5 als Belüftungsöffnung freibleiben. Dieser Spalt darf auf keinen Fall durch Zieroder Verstärkungsleisten verschlossen werden.
Elektrischer Anschluss
• Achtung: |
• Die Erdung des |
• Prüfen Sie, ob die auf |
Spannungsversorgung |
Backofens ist gesetzlich |
dem Typenschild |
erst nach vollständigem |
vorgeschrieben. |
angegebene Spannung |
Anschluss des Ofens |
• Keine |
mit der verfügbaren |
einschalten. |
Vielfachsteckdosen oder |
Netzspannung |
• Der elektrische |
Verlängerungskabel |
übereinstimmt. Das |
Anschluss muß unter |
verwenden. |
Typenschild befindet |
Beachtung der |
• Nach der Installation |
sich an der Vorderkante |
Herstellervorschriften |
dürfen stromführende |
des Backofens (bei |
und Einhaltung der |
Teile nicht mehr |
offener Tür sichtbar). |
örtlichen Sicherheits- |
zugänglich sein. |
|
vorschriften von einer |
|
|
Fachkraft ausgeführt |
|
|
werden. |
|
|
•Der Installateur ist für den korrekten elektrischen Anschluss und die Einhaltung der entsprechenden Sicherheits-vorschriften verantwortlich.
•Bei der Installation muß eine Schaltmöglichkeit mit einer Kontaktöffnungsweite von mindestens 3 mm vorgesehen werden, mit der das Gerät spannungsfrei gemacht werden kann.
Backofenzubehör
Das Backofenzubehör ist
Fettpfanne
Dient zum Auffangen von Fett oder Speisestücken, wenn sie unter dem Rost benutzt wird, oder als Blech z.B. zum Garen von Fleisch,
Rost
Zum Grillen von Speisen
zum Abstellen von Schüsseln, Tortenblechen und
Selbstreinigende katalytische Seitenwände
Diese Seitenwände sind mit einer feinporigen Spezialemaille überzogen. Wir empfehlen, nach einem Garvorgang mit besonders fettigen Speisen Selbstreinigung durchzuführen Dabei ist wie folgt vorzugehen: 1. Gerät auf 200°C aufheizen

Backofenfunktionen
Die Backofenfunktionen sind je nach Modell unterschiedlich (siehe Produktbeschreibung).
OBERUND UNTERHITZE
Wählen Sie diese Funktion für alle Garvorgänge, die nur auf einer Ebene erfolgen.
Die Temperatureinstellung ist zwischen 50°C und 250°C möglich. Die vom Hersteller voreingestellte Temperatur beträgt 200°C.
•Heizen Sie den Backofen auf der gewünschten Temperaturstufe vor und schieben Sie das Gericht in den Backofen, sobald alle Anzeigen der Temperaturskala °C__ aufleuchten.
•Bei Wahl dieser Betriebsart empfiehlt es sich, das Gericht in der Mitte des Backofens einzuschieben.
GRILL
Diese Funktion ist ideal zum Grillen kleiner Fleischstücke (Steaks, Würstchen) und zum Rösten von Brot. Die Heizleistung des oberen Heizelements ist progressiv einstellbar (1, 2, 3, 4, 5). Vom Hersteller wurde die Temperaturstufe 3 voreingestellt.
•Während des Grillens muss die Tür geschlossen werden.
•Heizen Sie den Grill 3-5 Minuten vor.
•Beim Grillen von Fleisch, zur Vermeidung von Fettspritzern und Rauch empfehlen wir, etwas Wasser in die Fettpfanne zu geben.
•Wenden Sie das Fleischstück nach der Hälfte der Grillzeit.
Bei dieser Funktion wird gleichzeitig der Drehspieß in Betrieb gesetzt (bei Modellen, in denen dieser vorgesehen ist).
"MLTF"
(Warmhaltefunktion)
Diese Funktion ermöglicht den konstanten und präzisen Einsatz von zwei Temperaturstufen
(35°C oder 60°C) im Backofeninnern. HINWEIS: Bei einigen
Modellen wird bei dieser Funktion die Ofenbeleuchtung ausgeschaltet.
•Die Temperatur von 35°C eignet sich insbesondere für das Aufgehen von Pizzaund Brotteig.
•Die werkseitige Voreinstellung der Temperatur beträgt 35°C. Für diese Betriebsart vorzugsweise die erste Einschubebene verwenden.
•Die vom Hersteller voreingestellte Temperatur von 60°C empfiehlt sich für das Warmhalten von Speisen am Ende des Garvorgangs.
GEBLÄSE
Verwenden Sie diese Funktion, wenn Sie auf mehreren Ebenen garen möchten (z. B.: Fisch, Gemüse, Nudelgerichte).
Die Temperatureinstellung ist zwischen 50°C und 250°C möglich. Die vom Hersteller voreingestellte Temperatur beträgt 160°C.
•Wählen Sie stets Speisen, die dieselbe Gartemperatur benötigen.
•Das Vorheizen des Backofens ist nicht erforderlich.
•Entnehmen Sie das Gericht, das zuerst gar ist und lassen Sie das andere Gericht bis zum Ende der Garzeit im Backofen.
BACKWAREN (OberUnterhitze + Gebläse)
Diese Funktion ist für den Betrieb auf zwei unterschiedlichen Einschubebenen und besonders für Backwaren geeignet.
Die Temperatureinstellung ist zwischen 50°C und 250°C möglich. Die vom Hersteller voreingestellte Temperatur beträgt 175°C.
•Das Vorheizen des Backofens ist nicht erforderlich.
•Die Position der Speisen während des Backvorgangs vertauschen.
•Entnehmen Sie das Gericht, das zuerst gar ist und lassen Sie das andere Gericht bis zum Ende der Garzeit im Backofen.
 Loading...