


EN
THANK YOU FOR PURCHASING A BAUKNECHT PRODUCT.
To receive more comprehensive help and support, please register your product at:
www.bauknecht.eu/register
Before using the appliance carefully read Health and Safety guide. The control panel of this dishwasher activates pushing by ON/OFF button.
For energy saving the control panel deactivates automatically after 10 minutes if no cycle has started.
PRODUCT DESCRIPTION
1
8

 2
2
9

4
11 |
5 |
|
6 |
12 |
7 |
|
Service:
0000 000 00000
13
1.Upper rack
2.Cutlery rack
3.Foldable flaps
4.Upper rack height adjuster
5.Upper sprayer arm
6.Power Clean support
7.Lower rack
8.Lower sprayer arm
9.Filter Assembly
10.Salt reservoir
11.Detergent and Rinse Aid dispensers
12.Rating plate
13.Control panel
CONTROL PANEL
1 2 3 4 5 6 7 8 9 10
1. |
ON-OFF button |
|
|
|
|
|
DISPLAY - INDICATORS |
|
|||||
2. |
CYCLES 6 buttons for direct acces popular cycles |
|
||||
|
|
|
|
|||
3. |
EXTRA CYCLES button. Access to other cycles |
A |
B |
C |
A. START DELAY |
|
4. |
INFO button. Provide info for selected cycle |
|||||
B. ECO CYCLE |
||||||
5. |
DISPLAY - Indicators area |
|
|
D |
C. MULTIZONE - Cutlery rack |
|
6. |
DISPLAY - Information area |
|
|
|||
|
|
D. CLOSED WATER TAP |
||||
7. |
PREVIOUS button for options/settings |
|
|
E |
E. ADD SALT |
|
8. |
OK button. Select/change options and settings |
|
|
|||
|
|
|
F. MULTIZONE - Upper Rack |
|||
9. |
NEXT button for options/settings |
|
|
|
||
I |
H |
G F |
G. MULTIZONE - Lower Rack |
|||
10.START button |
||||||
H. ADD RINSE AID |
||||||
|
|
|
|
|
||
I. TABLET
1
EN
FIRST TIME USE
After connecting the appliance to the power supply for the first time, the display will guide you to set up the appliance for first use.
1. The language selection
|
To select preferred language please |
|
LANGUAGE: ENGLISH? |
||
<> = CHANGE |
OK = YES |
press button„<” or„>”. |
|
|
Confirm by pressing„OK” button. |
ENGLISH |
|
|
SELECTED |
|
|
|
|
|
After language confirmation, the appliance will go through the first time use configuration menu.
2. Setting the water hardness
|
The water hardness is by default |
|
WATER HARDNESS |
||
(1=MIN, 5=MAX) |
set to level 3. To change water |
|
|
|
hardness level press button„<” or„>” |
|
|
repeatedly. |
|
To confirm your choice press„OK” |
|
WATER HARDNESS = 3 |
||
<> = CHANGE |
OK = YES |
button. The level must be set |
|
|
according to the table below. |
To allow the water softener to work in a perfect way, it is essential that the water hardness setting is based on the actual water hardness in your house. This information can be obtained from your local water supplier.
Water Hardness Table
|
Level |
German |
French |
|
|
degrees °dH |
degrees °fH |
||
|
|
|||
|
|
|
|
|
1 |
Soft |
0 |
- 6 |
0 - 10 |
|
|
|
|
|
2 |
Medium |
7 - 11 |
11 - 20 |
|
3 |
Average |
12 |
- 17 |
21 - 30 |
4 |
Hard |
17 |
- 34 |
31 - 60 |
5 |
Very hard |
35 |
- 50 |
61 - 90 |
|
|
|
|
|
3. Filling the water softener
POUR WATER
OPERATION
INSERT 1,5 LITER OF OK = DONE
WATER IN THE
OK = DONE
WATER SOFTENER
OK = DONE
INSERT SALT
OPERATION
ADD 1KG OF SALT
OK = DONE
IN THE SALT DISPENSER OK = DONE
When water hardness is set, it is required to fill water softener with water and special regeneration salt.
Remove the lower rack and unscrew the reservoir cap (anticlockwise)
As a first step it is needed to fill reservoir with water ( ~1.5 litres).
Once done, proceed to the next step by pressing„OK” button.
Position the funnel (see figure) and fill the salt reservoir right up to its edge (approximately 1 kg); it is not unusual for some water will spill out.
Remove the funnel and wipe any salt residue away from the opening.
Make sure the cap is screwed on tightly, so that no detergent can get into the container during the wash program (this could damage the water softener beyond repair).
Once done, proceed to the next step by pressing„OK” button. Only use salt that has been specifically designed for dishwashers.
Whenever you need to add salt, we recommend carrying out the procedure just before the washing cycle is started.
Residual saline solution or grains of salt can lead to corrosion, irreparably damaging the stainless steel components.
The guarantee is not applicable if faults are caused by such circumstances.
If the salt container is not filled, the water softener and the heating element may be damaged as a result.
4. Setting the brightness level
|
The brightness level is by default set |
||
ADJUST BRIGHTNESS |
|||
(1=MIN, 5=MAX) |
to level 5. To change brightness level |
||
|
|
press button„<”or„>”repeatedly. |
|
BRIGHTNESS = 5 |
To confirm Uour choice press„OK” |
||
<> = CHANGE |
OK = YES |
||
button. |
|||
|
|
||
|
|
||
5. Detergent type operation
DETERGENT TYPE
OPERATION
DO YOU USE
<> = NO |
OK = YES |
|
|
|
|
“ALL IN ONE” |
|
<> = NO |
OK = YES |
|
|
|
|
DETERGENT? |
|
<> = NO |
OK = YES |
|
|
In this step it is very important to choose what type of detergent will be used (tablet/capsule or gel/powder).
If you prefer to use All-in-one detergent in tablet or capsule for washing - press„OK”, then go to step 7. Open tap operation on the next page.
The symbol  on display will be lit. If you prefer to use gel or powder detergent for washing, press„<” or „>”, then go to step 6.
Rinse aid operation.
6. Rinse aid operation*
*If All-in-one detergent was chosen in the previous step, this step will be skipped by the appliance.
RINSE AID
OPERATION
INSERT RINSE AID
OK = DONE
IN THE DISPENSER
OK = DONE
35
25
A |
X |
M |
B A
2

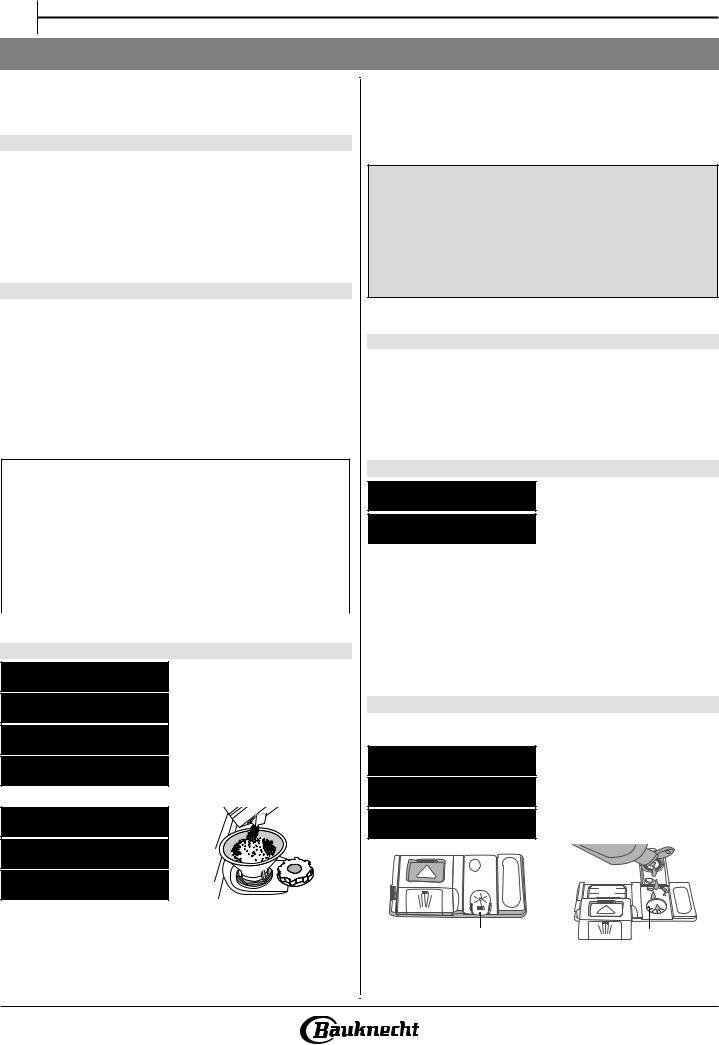
1.Open the dispenser B by pressing and pulling up the tab on the lid.
2.Carefully introduce the rinse aid as far as the maximum (110 ml) reference notch of the filling space A - avoid spilling it. If this happens, clean the spill immediately with a dry cloth.
3.Press the lid down until you hear a click to close it.
4.Confirm operation by pressing„OK” button.
NEVER pour the rinse aid directly into the tub.
Setting rinse aid level
(not necessary when using tablets/capsules)
The rinse aid dosage can be adjusted to the detergent used. The lower the setting, the less rinse aid is dispensed. The factory setting is for (4) level.
To change, follow instructions in section “SETTINGS / MENU”.
7. Open tap operation
OPEN TAP
OPERATION
OPEN THE
OK = DONE
WATER TAP
OK = DONE
Check water tap is open. If closed, open it then confirm by pressing „OK” button.
EN
8. First cycle operation
FIRST CYCLE
OPERATION
REMEMBER TO RUN THE OK = DONE
INTENSIVE CYCLE
OK = DONE
WITH EMPTY BASKETS OK = DONE
TO COMPLETE
OK = DONE
THE FIRST SET UP
OK = EXIT
Before normal use of appliance it is recommended to run Intensive cycle first, to calibrate the appliance.
Insert a detergent into dispenser chamber B (see below), then press „OK” button.
Intensive cycle will be selected automaticly. Press„START”  button and close the appliance door.
This first cycle can be up to 20 minutes longer as a result of the automatic calibration process.
After this process the appliance is ready for normal use.
ADDING A DETERGENT
Only use detergent which has been specifically designed for dishwashers.
To achieve the best washing and drying results, the combined use of detergent, rinse aid liquid and refined salt is required.
We recommend using detergents that do not contain phosphates or chlorine, as these products are harmful to the environment.
Good washing results also depend on the correct amount of detergent being used.
Exceeding the stated amount does not result in a more effective wash and increases environmental pollution.
The amount can be adjusted to the soil level. In the case of normally soiled items, use approximately either 35g (powder detergent) or 35ml (liquid detergent) and additional tea spoon of detergent directly inside the tub. If tablets are used, one tablet will be enough.
If the crockery is only lightly soiled or if it has been rinsed with water before being placed in the dishwasher, reduce the amount of detergent used accordingly (minimum 25 g/ml) e.g. skip the powder/gel putted inside the tub.
To open the detergent dispenser, press button A. Introduce the detergent into the dry dispenser B only. Place the amount of detergent for pre-washing directly inside the tub.
1. When measuring out the deter- |
A |
|
|
gent refer to the mentioned ear- |
|
|
|
lier information to add the proper |
|
|
|
quantity. Inside the dispenser B |
|
|
|
there are indications to help the |
|
|
|
detergent dosing. |
|
|
|
2.Remove detergent residues from the edges of the dispenser and close the cover until it clicks.
3.Close the lid of the detergent dispenser by pulling it up until the
closing device is secured in place.
The detergent dispenser automatically opens up at the right time according to the program.
If you are using a All-in-one detergents, we recommend that you add salt in any case, especially if the water is hard or very hard (follow the instructions given on the packaging).
3
EN
ADVICE AND TIPS
TIPS
Before loading the baskets, remove all food residues from the crockery and empty the glasses. You do not need to rinse beforehand under running water.
Arrange the crockery so that it is held in place firmly and does not tip over; and arrange the containers with the openings facing downwards and the concave/convex parts placed obliquely, thus allowing the water to reach every surface and flow freely.
Warning: lids, handles, trays and frying pans do not prevent the sprayer arms from rotating.
Place any small items in the cutlery basket.
Very soiled dishes and pans should be placed in the lower basket because in this sector the water sprays are stronger and allow a higher washing performance.
After loading the appliance, make sure that the sprayer arms can cotate freely.
HYGIENE
To avoid odour and sediment which can be accumulated in the dishwasher please run a high temperature program at least once a month. Use a tea spoon of detergent and run it without the loading to clean your appliance.
UNSUITABLE CROCKERY
•Wooden crockery and cutlery.
•Delicate decorated glasses, artistic handicraft and antique crockery. Their decorations are not resistant.
•Parts in synthetic material which do not withstand high temperatures.
•Copper and tin crockery.
•Crockery soiled with ash, wax, lubricating grease or ink.
The colours of glass decorations and aluminium/silver pieces can change and fade during the washing process. Some types of glass (e.g. crystal objects) can become opaque after a number of wash cycles too.
DAMAGE TO GLASS AND CROCKERY
•Only use glasses and porcelain guaranteed by the manufacturer as dishwasher safe.
•Use a delicate detergent suitable for crockery
•Collect glasses and cutlery from the dishwasher as soon as the wash cycle is over.
LOADING THE RACKS
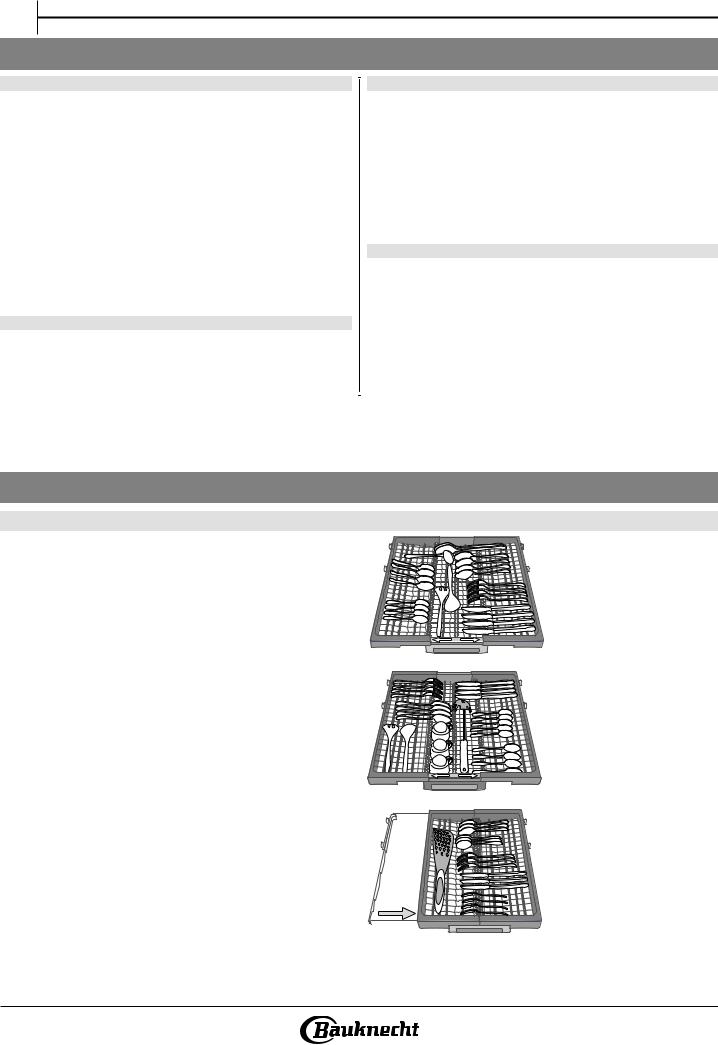
CUTLERY RACK
The third rack was designed tohouse the cutlery. Arrange the cutlery as shown in the figure.
A separate arrangement of the cutlery makes collection easier after washing and improves washing and drying performance.
Knives and other utensils with sharp edges must be positioned with the blades facing downwards.
The geometry of the rack makes it possible to place such small items as coffee cups in the area in the middle.
The cutlery basket is equipped with two sliding side trays to make the most of the height of the space below and enable the loading of high items into upper rack.
4
 Loading...