


SIM 7Q HB
SIM 7Q series
User Guide
R92112011
R92112012
R92112013
R92112021
R92112022
R92112023
R92112161
R92112162
R92112163
R9211222
R9211224
R59770066/11
07/10/2013

Factory: Barco nv Advanced Visualization Systems
Noordlaan 5, B-8520 Kuurne
Phone: +32 56.36.82.11
Fax: +32 56.36.84.86
Support: www.barco.com/esupport
Visit us at the web: www.barco.com
Printed in Belgium

Changes
Barco provides this manual ’as is’ without warranty of any kind, either expressed or implied, including but not limited to the implied warranties or merchantability and fitness for a particular purpose. Barco may make improvements and/or changes to the product(s) and/or the
program(s) described in this publication at any time without notice.
This publication could contain technical inaccuracies or typographical errors. Changes are periodically made to the information in this
publication; these changes are incorporated in new editions of this publication.
The latest edition of Barco manuals can be downloaded from the Barco web site w
h
ttps://my.barco.com.
ww.barco.com or from the secured Barco web site
Copyright ©
All rights reserved. No part of this document may be copied, reproduced or translated. It shall not otherwise be recorded, transmitted or
stored in a retrieval system without the prior written consent of Barco.
Federal Communications Commission (FCC Statement)
This equipment has been tested and found to comply with the limits for a class A digital device, pursuant to Part 15 of the FCC rules.
These limits are designed to provide reasonable protection against harmful interference when the equipment is operated in a commercial
environment. This equipment generates, uses, and can radiate radio frequency energy and, if not installed and used in accordance with
the instruction manual, may cause harmful interference to radio communications. Operation of this equipment in a residential area may
cause harmful interference, in which case the user will be responsible for correcting any interference at his own expense
EN55022/CISPR22 Class A ITE (Information Technology Equipment)
Class A ITE is a category of all other ITE which satisfies the class A ITE limits but not the class B ITE limits. Such equipment should not
be restricted in its sale but the following warning shall be included in the instructions for use:
Warning : This is a class A product. In a domestic environment this pr
required to take adequate measures.
oduct may cause radio interference in which case the user may be
Guarantee and Compensation
Barco provides a guarantee relating to perfect manufacturing as part of the legally stipulated terms of guarantee. On receipt, the purchaser
must immediately inspect all delivered goods for damage incurred during transport, as well as for material and manufacturing faults Barco
must be informed immediately in writing of any complaints.
The period of guarantee begins on the date of transfer of risks, in the case of special systems and software on the date of commissioning,
at latest 30 days after the transfer of risks. In the event of justified notice of complaint, Barco can repair the fault or provide a replacement
at its own discretion within an appropriate period. If this measure proves to be impossible or unsuccessful, the purchaser can demand a
reduction in the purchase price or cancellation of the contract. All other claims, in particular those relating to compensation for direct or
indirect damage, and also damage attributed to the operation of software as well as to other services provided by Barco, being a component
of the system or independent service, will be deemed invalid provided the damage is not proven to be attributed to the absence of properties
guaranteed in writing or due to the intent or gross negligence or part of Barco.
If the purchaser or a third party carries out modifications or repairs on goods delivered by Barco, or if the goods are handled incorrectly,
in particular if the systems are commissioned operated incorrectly or if, after the transfer of risks, the goods are subject to influences not
agreed upon in the contract, all guarantee claims of the purchaser will be rendered invalid. Not included in the guarantee coverage are
system failures which are attributed to programs or special electronic circuitry provided by the purchaser, e.g. interfaces. Normal wear as
well as normal maintenance are not subject to the guarantee provided by Barco either.
The environmental conditions as well a
the customer.
s the servicing and maintenance regulations specified in the this manual must be complied with by
Software License Agreement
You should carefully read the following terms and conditions before using this software. Your use of this software indicates your acceptance
of this license agreement and warranty.
Terms and Conditions:
1. No redistribution of the software is allowed.
2. Reverse-Engineering. You may not reverse engineer, decompile, disassemble or alter anyhow this software product.
Disclaimer of Warranty:
This software and the accompanying files are sold “as is” and without warranties as to performance or merchantability or any other warranties whether expressed or implied. In no event shall Barco be liable for damage of any kind, loss of data, loss of profits, business
interruption or other pecuniary loss arising directly or indirectly. Any liability of the seller will be exclusively limited to replacement of the
product or refund of purchase price.

GNU-GPL code
If you would like a copy of the GPL source code contained in this product shipped to you on CD, please contact Barco. The cost of preparing
and mailing a CD will be charged.
Trademarks
Brand and product names mentioned in this manual may be trademarks, registered trademarks or copyrights of their respective holders.
All brand and product names mentioned in this manual serve as comments or examples and are not to be understood as advertising for
the products or their manufacturers.
eCos
The software in this product uses eCos, the Embedded Configurable Operating System.
This is the license for eCos:
Copyright (C) 1998, 1999, 2000, 2001, 2002, 2003 Red Hat, Inc.
Copyright (C) 2002, 2003 John Dallaway
Copyright (C) 2002, 2003 Nick Garnett
Copyright (C) 2002, 2003 Jonathan Larmour
Copyright (C) 2002, 2003 Andrew Lunn
Copyright (C) 2002, 2003 Gary Thomas
Copyright (C) 2002, 2003 Bart Veer
eCos is free software; you can redistribute it and/or modify it under the terms of the GNU General Public License as published by the Free
Software Foundation; either version 2 or (at your option) any later version.
eCos is distributed in the hope that it will be useful, but WITHOUT ANY WARRANTY; without even the implied warranty of MERCHANTABILITY or FITNESS FOR A PARTICULAR PURPOSE. See the GNU General Public License for more details.
You should have received a copy of the GNU General Public License along with eCos; if not, write to the Free Software Foundation, Inc.,
59 Temple Place, Suite 330, Boston, MA 02111-1307 USA.
As a special exception, if other files instantiate templates or use macros or inlin
with other works to produce a work based on this file, this file does not by itself cause the resulting work to be covered by the GNU General
Public License. However the source code for this file must still be made available in accordance with section (3) of the GNU General Public
License.
This exception does not invalidate any other reasons why a work based on this file might be covered by the GNU General Public License.
The eCos source used to build the software used in the Barco iCon is available on request from Barco.
e functions from this file, or you compile this file and link it
JPEG
The software in this product is based in part on the work of the Independent JPEG Group.

Table of contents
TABLE OF CONTENTS
1. Introduction ......................................................................................................... 5
1.1 About theprojector................................................................................................................... 6
1.2 About the manual. . . .................................................................................................................. 7
2. Packaging............................................................................................................ 9
2.1 Unpacking .. .........................................................................................................................10
3. Installation guidelines ............................................................................................13
3.1 Safetywarnings......................................................................................................................14
3.2 Installation guidelines ...............................................................................................................15
4. Installation..........................................................................................................17
4.1 Dimensions ..........................................................................................................................18
4.2 Fixationpointsatthe bottomof the projector.......................................................................................19
4.3 Projectortilt ..........................................................................................................................20
4.4 RCUbattery installation.............................................................................................................21
4.5 Lens installation .....................................................................................................................22
4.5.1 Lens range . . .................................................................................................................. 23
4.5.2 Lens formulas .................................................................................................................24
4.5.3 Shift capabilities...............................................................................................................25
4.5.4 Installing the lens and adjusting the Scheimpflug ...........................................................................27
4.5.5 Connecting the lens. . .........................................................................................................31
4.5.6 Lens Data .....................................................................................................................32
4.6 Projector configuration ..............................................................................................................33
4.7 Connections . ........................................................................................................................34
4.7.1 Power connection .............................................................................................................35
4.7.2 Signal connections . . ..........................................................................................................36
4.7.2.1 Input section . .. .........................................................................................................37
4.7.2.2 Input specifications.....................................................................................................38
4.7.2.3 Connecting a DVI source ..............................................................................................39
4.7.2.4 Connecting an RGB source . . .........................................................................................41
4.7.3 Communication ...............................................................................................................42
4.7.3.1 Network connections . .................................................................................................. 43
4.7.3.2 Network settings........................................................................................................45
5. Setup ................................................................................................................47
5.1 Warranty: continuous mode / automatic shutdown mode ..........................................................................48
5.2 Powering theSIM7 projector .......................................................................................................49
5.3 Setting the RCU address. . . .........................................................................................................50
5.4 Starting theprojector ................................................................................................................51
5.5 Setting the projector address (only if necessary)...................................................................................52
5.6 Setting the orientation ...............................................................................................................53
5.7 Lens adjustments. . . .................................................................................................................54
5.7.1 Locking thelens holder (rugged option)......................................................................................55
5.7.2 Locking / unlocking the zoom ring and the focusring of the lens ...........................................................57
5.7.3 Back focal length adjustment .................................................................................................59
5.7.4 Adjusting the lens.............................................................................................................62
6. Gettingstarted ....................................................................................................65
6.1 Starting up theprojector.............................................................................................................66
6.2 Selecting a source...................................................................................................................67
6.3 Adjusting the image .................................................................................................................68
6.4 Switching the projector to standby ..................................................................................................69
7. Advanced...........................................................................................................71
7.1 Using theDialogboxes..............................................................................................................72
7.2 Sourceselection.....................................................................................................................73
7.2.1 Selecting a DVIsource .......................................................................................................74
7.2.2 Selecting an RGB source.....................................................................................................75
7.3 Image ................................................................................................................................76
7.3.1 Introduction. . . .................................................................................................................77
7.3.2 Imagesettings ................................................................................................................78
7.3.2.1 SettingtheContrast ...................................................................................................79
7.3.2.2 SettingtheBrightness..................................................................................................80
7.3.2.3 Gamma ................................................................................................................81
7.3.2.4 Phase (RGB signals only).............................................................................................. 82
7.3.3 Scaling ........................................................................................................................83
7.3.4 Timeof Day(TOD)............................................................................................................ 84
7.3.5 Input balance (RGB signals only) . .. . ........................................................................................86
7.4 Image files ...........................................................................................................................90
7.4.1 Load file.......................................................................................................................91
7.4.2 Auto Image ....................................................................................................................92
7.4.3 Edit file ........................................................................................................................93
R59770066 SIM 7Q SERIES 07/10/2013
1

Table of contents
7.4.4 Save as (create a custom file)................................................................................................95
7.4.5 Rename file ...................................................................................................................96
7.4.6 Copy........................................................................................................................... 97
7.4.7 Delete .........................................................................................................................98
7.4.8 Forced fileload................................................................................................................99
7.5 Geometry ...........................................................................................................................100
7.5.1 Introduction. . . ................................................................................................................101
7.5.2 Geometry files................................................................................................................102
7.5.3 Accessing the Geometry menu .............................................................................................103
7.5.4 Geometry distortions. ........................................................................................................104
7.5.5 Load . . . .......................................................................................................................107
7.5.6 Edit ...........................................................................................................................108
7.5.6.1 Accessing the Geometry Edit menu .................................................................................109
7.5.6.2 Geometry Edit wizard .................................................................................................110
7.5.6.3 Geometry Edit Modes .................................................................................................112
7.5.6.4 Editing a geometry file ................................................................................................114
7.5.6.5 Axis link................................................................................................................123
7.5.6.6 Shift Adjustment.......................................................................................................126
7.5.6.7 TransportDelay .......................................................................................................128
7.5.6.8 Sharpness .............................................................................................................130
7.5.6.9 Geometry Reset .......................................................................................................131
7.5.6.9.1 Resetall levels ..................................................................................................132
7.5.6.9.2 Restore to a level ...............................................................................................133
7.5.7 Rename a Geometry File .. . .................................................................................................135
7.5.8 Copy a Geometry File .......................................................................................................136
7.5.9 Delete a Geometry File ......................................................................................................137
7.6 Lamp................................................................................................................................138
7.6.1 Runtimes ................................................................................................................... .139
7.6.2 Lamp runtime warning .......................................................................................................140
7.6.3 History........................................................................................................................141
7.6.4 Resetlamp Runtime .........................................................................................................142
7.6.5 Lamp power mode (only for SIM 7Q& SIM 7Q HC)........................................................................143
7.6.6 CLO Mode....................................................................................................................144
7.6.6.1 Constant LightOutput(CLO) .........................................................................................145
7.6.6.2 CLO Target ............................................................................................................146
7.7 General .............................................................................................................................147
7.7.1 Pause.........................................................................................................................148
7.7.2 Freeze........................................................................................................................149
7.7.3 Identification..................................................................................................................150
7.8 Display setup .......................................................................................................................151
7.8.1 Textbox.......................................................................................................................152
7.8.2 Menu bar position............................................................................................................153
7.8.3 Slider box position ...........................................................................................................154
7.8.4 Sync variance limit...........................................................................................................155
7.8.5 Soft edge .....................................................................................................................157
7.8.5.1 Introduction ............................................................................................................158
7.8.5.2 Accessing the Softedge menu .......................................................................................160
7.8.5.3 Soft edge edit. . ........................................................................................................161
7.8.5.3.1 The soft edge edit wizard ......................................................................................162
7.8.5.3.2 The soft edge edit modes .......................................................................................163
7.8.5.3.3 Creating/editing a soft edge . ...................................................................................165
7.8.5.3.4 Alpha planes .. . .................................................................................................171
7.8.5.4 Black level.............................................................................................................173
7.8.5.4.1 Introduction ......................................................................................................174
7.8.5.4.2 Internal blacklevel ..............................................................................................175
7.8.5.4.3 Beta planes ......................................................................................................176
7.8.5.5 Blanking ...............................................................................................................177
7.8.6 Auto Image Setup............................................................................................................178
7.8.7 Smearing reduction (Optional)...............................................................................................179
7.8.7.1 Introduction ............................................................................................................180
7.8.7.2 Enabling Smearing reduction .. .......................................................................................181
7.8.7.3 Adjusting the phase ...................................................................................................182
7.8.8 True motion reproduction .. . .................................................................................................183
7.8.9 Colortemperature........................................................................................................... .184
7.8.10 Dynacolor ....................................................................................................................185
7.8.10.1 Introduction ............................................................................................................186
7.8.10.2 EnablingDynaColor...................................................................................................192
7.8.10.3 Dynacolor adjustment.................................................................................................193
7.8.10.3.1 Introduction ......................................................................................................194
7.8.10.3.2 Calibration (for multipleprojectors).............................................................................196
7.8.10.3.3 Common color values...........................................................................................199
7.8.10.3.4 Factory preset...................................................................................................200
7.8.10.4 Blackcolor matching ..................................................................................................201
7.8.10.4.1 Introduction ......................................................................................................202
7.8.10.4.2 BlackColor adjustment .........................................................................................203
7.8.10.5 CLO-TOD color tracking ..............................................................................................204
2
R59770066 SIM 7Q SERIES 07/10/2013

Table of contents
7.8.11 Gray Level Definition.........................................................................................................205
7.8.11.1 Description.............................................................................................................206
7.8.11.2 Illustrating the influence of GLD correction...........................................................................207
7.8.11.3 GLD correction ........................................................................................................209
7.8.11.3.1 Preparing the GLD correction...................................................................................210
7.8.11.3.2 Performing GLD correction .....................................................................................211
7.8.12 Convergence . ................................................................................................................214
7.9 Installation ..........................................................................................................................216
7.9.1 Lens adjustments ............................................................................................................217
7.9.2 Projector address ............................................................................................................218
7.9.3 Orientation ...................................................................................................................219
7.9.4 Network settings ............................................................................................................ .220
7.9.5 Automatic shutdown .........................................................................................................221
7.9.6 Internal Patterns .............................................................................................................222
7.9.7 Scaled Patterns ..............................................................................................................228
7.9.8 CombinerPatterns...........................................................................................................230
7.9.9 Driver Patterns ...............................................................................................................231
7.9.10 Change password............................................................................................................232
8. Maintenance...................................................................................................... 233
8.1 Cleaning the lens .. .................................................................................................................234
8.2 Cleaning the exterior of the projector ..............................................................................................235
8.3 Air filter replacement ...............................................................................................................236
8.3.1 Removing the x-cube filter...................................................................................................238
8.3.2 Installing the x-cube filter....................................................................................................239
8.3.3 Removing the electronics filter ..............................................................................................240
8.3.4 Installing the electronics filter................................................................................................242
8.4 Lamp replacement. .................................................................................................................244
8.4.1 Lamp removal................................................................................................................245
8.4.2 Lamp installation.............................................................................................................248
8.4.3 Resetting the lamp runtime ..................................................................................................252
9. Troubleshooting . . .. . .. . .. . . .. . .. . .. . . .. . .. . .. . . .. . .. . .. . . .. . .. . .. . . .. . .. . ... . .. . .. . ... . .. . ... ... . .. . ... ... . .. . .. 253
9.1 Diagnostic LEDs ....................................................................................................................254
9.2 Basic troubleshooting guide........................................................................................................255
10. Environmental information .................................................................................... 257
10.1 Disposal information................................................................................................................258
10.2 Rohs compliance ...................................................................................................................259
10.3 Hazards.............................................................................................................................261
10.4 Production address .................................................................................................................262
A. NVG option (forSIM 7Q)......................................................................................... 263
A.1 Description..........................................................................................................................264
A.2 Description ofa full dimming cycle.................................................................................................265
B. NVG option (forSIM 7Q HC) .................................................................................... 267
B.1 Description..........................................................................................................................268
B.2 Description ofa full dimming cycle.................................................................................................269
C. GLD alignment .................................................................................................... 271
C.1 Gamma values......................................................................................................................272
D. Image files ......................................................................................................... 273
D.1 Image files ..........................................................................................................................274
Glossary ............................................................................................................... 277
Index.................................................................................................................... 279
List of tables.......................................................................................................... 285
List of images......................................................................................................... 285
R59770066 SIM 7Q SERIES 07/10/2013 3

Table of contents
4 R59770066 SIM 7Q SERIES 07/10/2013

1. INTRODUCTION
Overview
• About the projector
• About the manual
1. Introduction
R59770066 SIM 7Q SERIES 07/10/2013
5
1. Introduction
1.1 About the projector
SIM 7Q series projectors
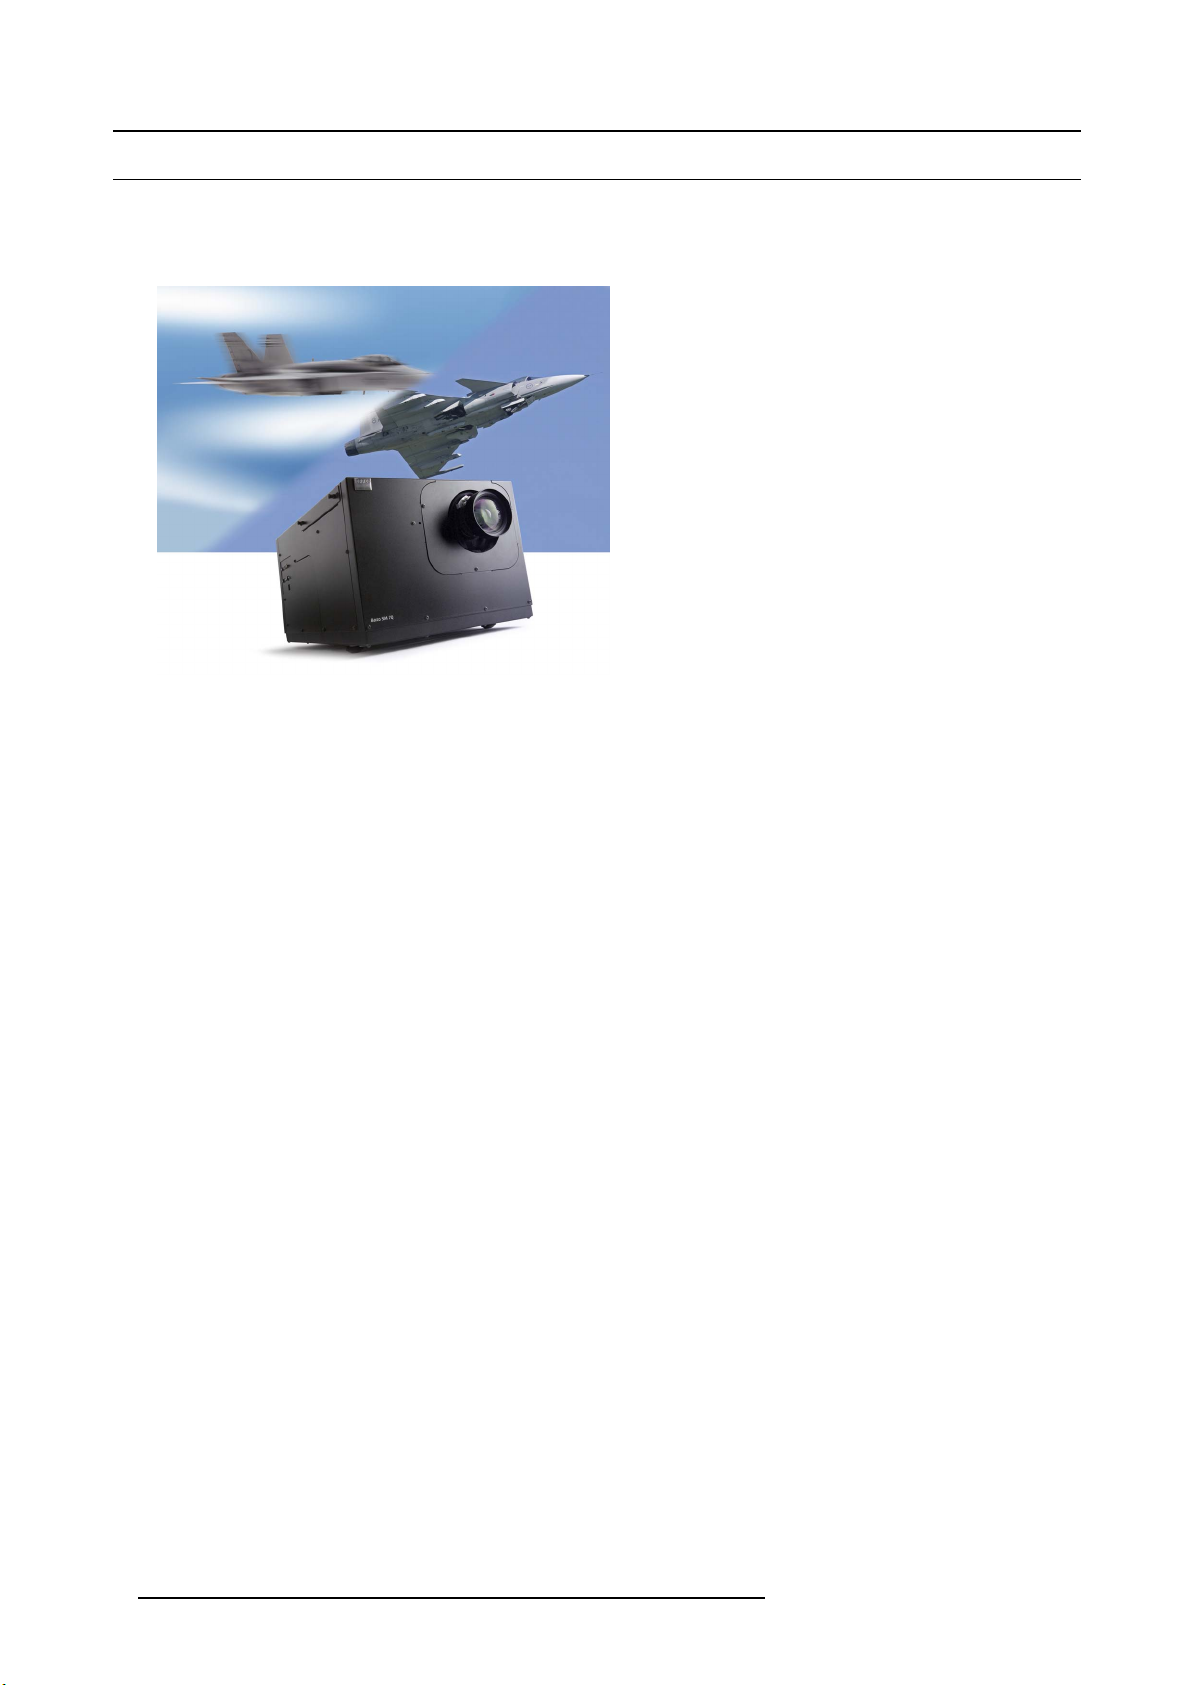
The SIM 7Q series projectors are LCoS (Liquid Crystal on Silicon) based high resolution projectors developed for high demanding
simulation applications.
Image 1-1
SIM 7Q series: smearing reduction and blur reduction
6 R59770066 SIM 7Q SERIES 07/10/2013
1. Introduction
1.2 About the manual
CAUTION: For the latest version of the product manuals, see http://www.barco.com.
Clarification of the term “SIM 7Q series” used in this document
When referring in this document to the term “SIM 7Q series” it is meant that the content is applicable for the following Barco products:
•SIM7Q
•SIM7QHB
•SIM7QHC
•SIM7QHB&C
Manual overview
This manual contains 6 main chapters :
1. Installation : the mechanical setup of the projector.
2. Setup : adjusting the projection parameters in order to get the best image reproduction.
3. Getting started : start the projector for daily use.
4. Advanced : advanced operation and setup settings using the remote control and the projector’s OSD.
5. Maintenance : projector’s maintenance operations
6. Service : basic service of the projector
Related documentation
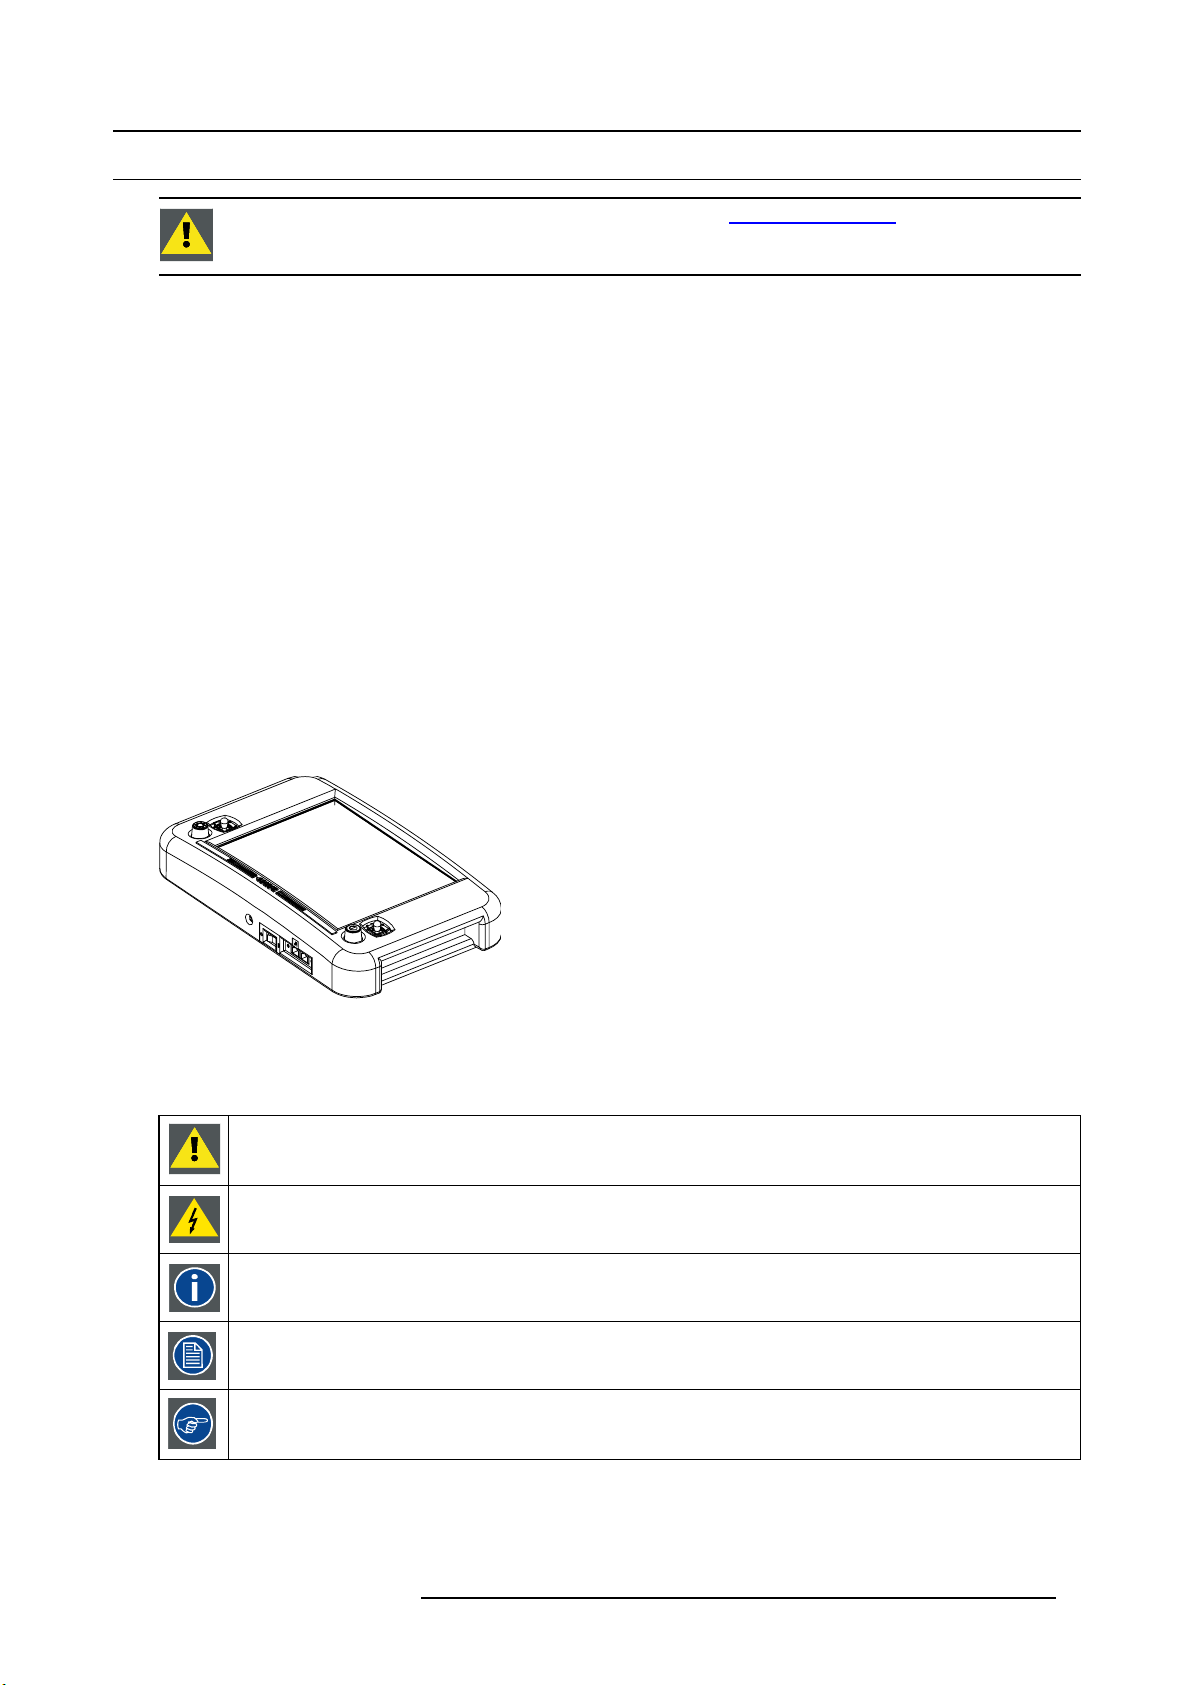
Several advanced adjustments can be set and controlled via the Barco hand held remote control unit xRACU and are covered in the
dedicated System manual.
Image 1-2
RACU hand held control unit
Symbol overview
The following icons are used in the manual :
Caution
Warning
Info, term definition. General info about the term.
Note, gives extra information about the described subject.
Tip, gives extra advice about the described subject.
R59770066 SIM 7Q SERIES 07/10/2013 7

1. Introduction
Font overview
• Buttons are indicated in bold, e.g. OK.
• Menu items are indicated in italic.
• Step related notes, tips, warnings or cautions are printed in italic.
• Procedure related notes, tips, warnings or cautions are printed in bold between 2 lines preceded by the corresponding icon.
8
R59770066 SIM 7Q SERIES 07/10/2013

2. PACKAGING
Overview
• Unpacking
2. Packaging
R59770066 SIM 7Q SERIES 07/10/2013
9

2. Packaging
2.1 Unpacking
CEE7/7
European power plug to connect the power cord to the wall outlet.
NEMA5
American power plug to connect the power cord to the wall outlet.
Content
Description Quantity
SIM 7 projector 1
Remote Control Unit (RCU) + batteries 1
Power cord CEE7 1
Power cord NEMA5 1
QSD projection lens 1
User Guide 1
Safety Manual 1
Silicagel (see image 2-1) 4
Silicagel
Four bags of silicagel are added to the packaging to keep it dry. Do not open these disposable bags
Image 2-1
Silicagel
Foam
The projector is packed in a cardboard box. To provide protection during transportation, the projector is surrounded with foam. The
package is secured with banding and fastening cli
ps.
Lens delivered
The projection lens delivered with the projector will vary depending on the product number ordered and is packed in a separate
cardboard box placed inside the main cardboard box.
Retain the original shipping cardboard boxes and packing material. It will be needed if you ever have to ship
the projection lens.
CAUTION: Never transport the projector with the lens mounted on it !
Always remove the lens before transporting the projector.
CAUTION: Make sure that the projection lens has the one-to-one match with the projector and please contact
Barco in case of replacement of the projection lens.
10 R59770066 SIM 7Q SERIES 07/10/2013
How to unpack the projector ?
N
1. Release the cord straps.
PULL
TO OPE
Image 2-2
2. Remove the assembly from the pallet
3. Open the outer cardboard box
4. Remove the two smaller box, which contains:
- User guide and Safety manual
- RCU + batteries
- power cords
- projection lens
5. Remove the foam parts
6. Open the inner cardboard box
7. Remove the foam parts
8. Lift the projector out of the inner cardboard box
2. Packaging
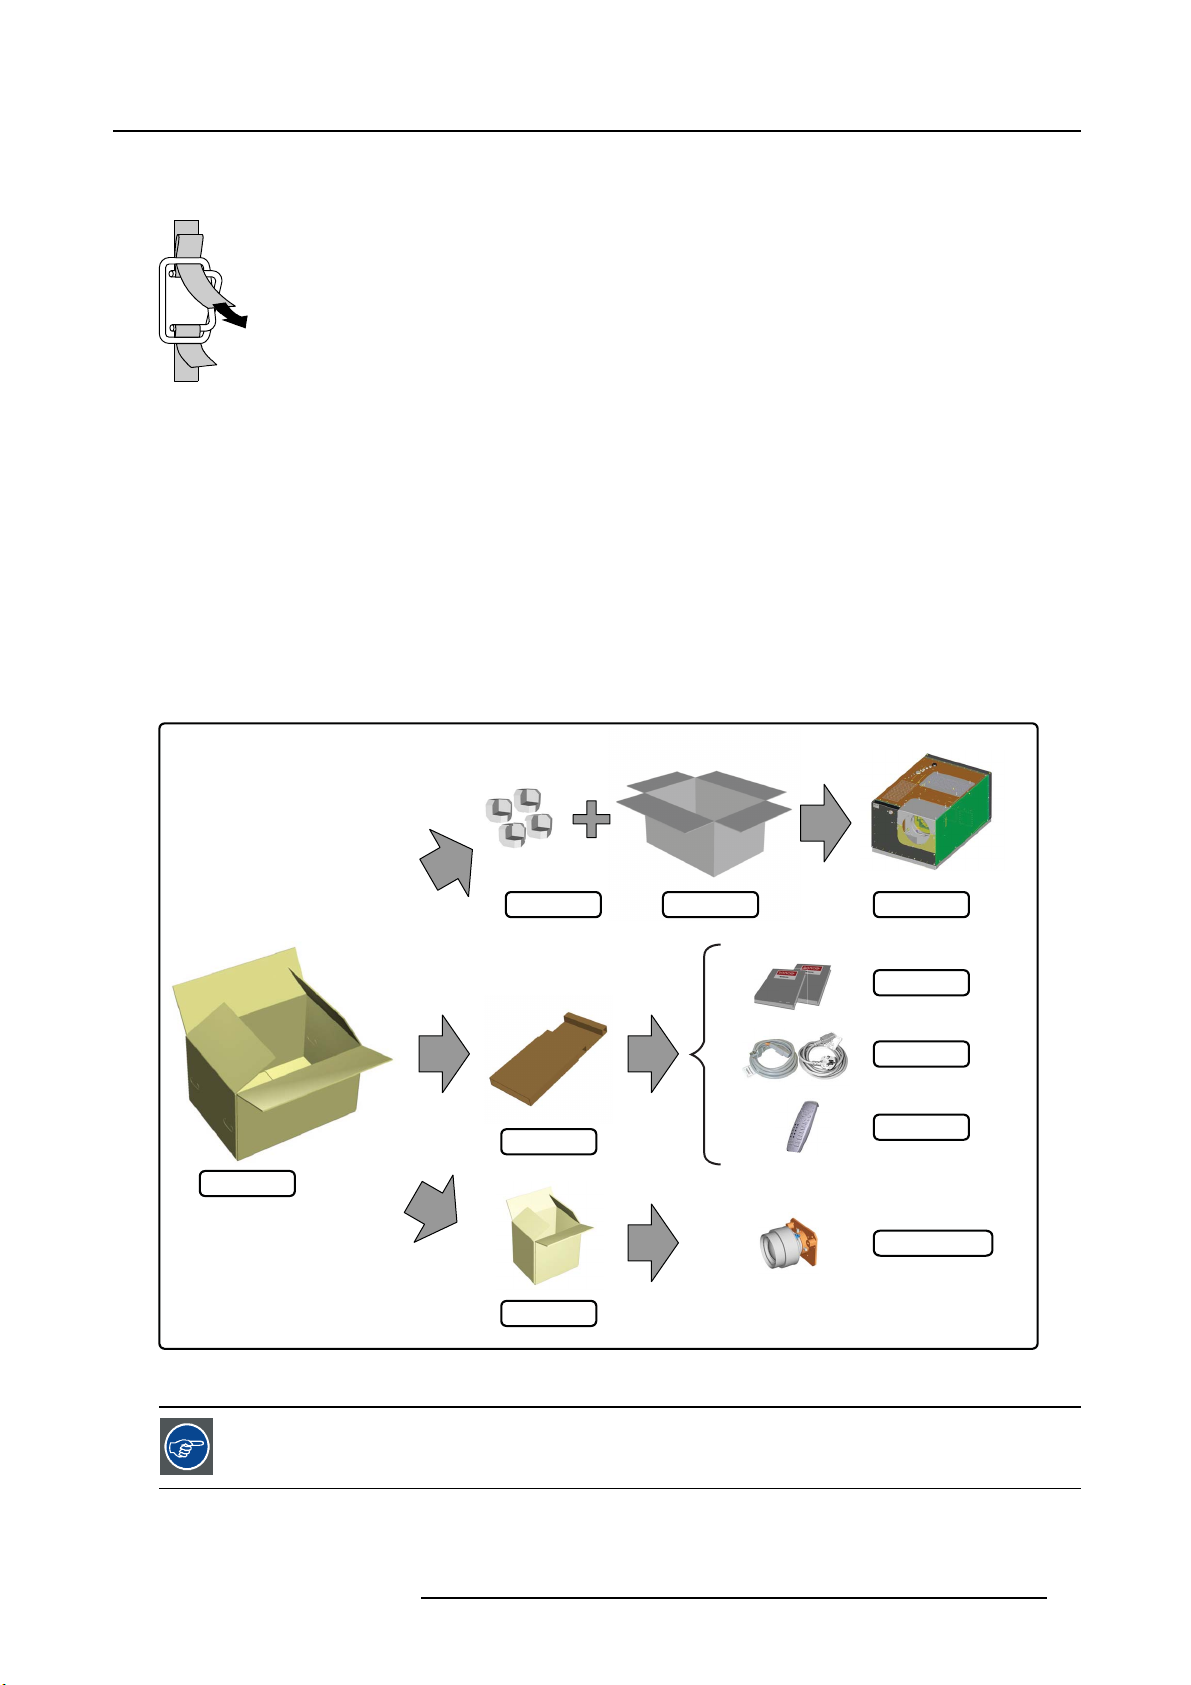
outer box
Image 2-3
Unpacking the cardboard box: exploded view
Retain the original shipping cardboard boxes and packing material. It will be needed if you ever have to ship
the projector. For maximum protection, repack your projector as it was packed at the factory.
foam parts projectorinner box
small box
small box
manuals
power cords
RCU
projection lens
R59770066 SIM 7Q SERIES 07/10/2013 11

2. Packaging
12 R59770066 SIM 7Q SERIES 07/10/2013

3. INSTALLATION GUIDELINES
Overview
• Safety warnings
• Installation guidelines
3. Installation guidelines
R59770066 SIM 7Q SERIES 07/10/2013
13

3. Installation guidelines
3.1 Safety warnings
WARNING: Before installing the projector, first read the safety instructions in the safety manual (R5975258)
delivered with the projector.
Insure that the room can be easily evacuated in case of a lamp explosion.
Mercury vapor warnings
Keep the following warnings in mind when using the projector. The lamp used in the projector contains mercury. In case of a lamp
rupture or lamp explosion there will be a mercury vapor emission. In order to minimize the potential risk of inhaling mercury vapors:
• Insure the projector is installed in ventilated rooms only.
• Replace the lamp module before the end of its operational life.
• Promptly ventilate the room after a lamp rupture or lamp explosion has occurred and evacuate the room (particularly in case of
a pregnant woman).
• Seek medical attention if unusual health conditions occur after a lamp rupture or lamp explosion, such as headache, fatigue,
shortness of breath, chest-tightening coughing or nausea.
14
R59770066 SIM 7Q SERIES 07/10/2013

3. Installation guidelines
3.2 Installation guidelines
General conditions
Careful consideration of things such as image size, ambient light level, projector placement and type of screen to use are critical to
the optimum use of the projection system.
Temperature conditions
Temperature range during operation
• Min. ambient temperature : 0 °C or 32 °F
• Max. ambient temperature : 40 °C or 104 °F
The projector will not operate if ambient air temperature falls outside this range (0°C- 40°C or 32°F-10
Temperature range in non-operation condition
• Min. ambient temperature : -10 °C or 14 °F
• Max. ambient temperature : 60 °C or 140 °F
4°F).
Humidity conditions
Operation: 0 to 90 % RH non-condensing
Storage: 0 to 90 % RH non-condensing. Recommended RH = 50%
Environment
Do not install the projection system in a site near heat sources such as radiators or air ducts, or in a place subject to direct sunlight,
excessive dust or humidity. Be aware that room heat rises to the ceiling; check that temperature near the installation site is not
excessive.
Environment condition check
A projector must always be mounted in a manner which ensures the free flow of clean air into the projectors ventilation inlets as well
as free flow at the ventilation outlets. The installation must also allow easy access to the consumable parts (dust filters, lamps, etc.)
For installations in environments where the projector is subject to airborne contaminants such as that produced by smoke machines
or similar (these deposit a thin layer of greasy residue upon the projectors internal optics and imaging electronic surfaces, degrading
performance), then it is highly advisable and desirable to have this contamination removed prior to it reaching the projectors clean
air supply. Devices or structures to extract or shield contaminated air well away from the projector are a prerequisite, if this is not
a feasible solution then measures to relocate the projector to a clean air environment should be considered. Make sure that the
projector never runs with dirty dust filters as this will dramatically reduce the lifetime of the consumables. It is advised to replace
the air filters at any lamp change. Barco reserves itself the right to refuse warranty replacement of consumables if they have been
used in a projector with dirty air filters. Only use the manufactures recommended cleaning kit which has been specifically designed
for cleaning optical parts, never use industrial strength cleaners on a projectors optics as these will degrade optical coatings and
damage sensitive optoelectronics .
Failure to take suitable precautions to prote
nate in extensive and irreversible ingrained optical damage. At this stage cleaning of the internal optical units will be non-effective
and impracticable. Damage of this nature is under no circumstances covered under the manufactures warranty and may deem the
warranty null and void. In such a case the cl
clients responsibility to ensure at all times that the projector is protected from the harmful effects of hostile airborne particles in the
environment of the projector. The manufacture reserves the right to refuse warranty repair if a projector has been subject to wantful
neglect, abandon or improper use.
ct the projector from the effects of persistent and prolonged air contaminants will culmi-
ient shall be held solely responsible for all costs incurred during any repair. It is the
What about ambient light ?
In simulation applications, the effect of any ambient light or indirect lighting will influence the contrast and brightness level of the
image. Due to this the quality of the perception of the projected scene can decrease. Therefor it is most important to avoid any
unwanted light or reflection. Some rules can be useful:
• switch off any light source during projection
•reflection should be avoided, e.g. by using dark wall, ceiling and floor color
• windows must be fully darkened
• only aimed spotlight should be used to illuminate small areas if really needed
It is important to carefully consider lighting conditions. Dedicated engineers or scientists can point out the necessary conditions for
a good simulation system environment and should be consulted before equipping the room.
R59770066 SIM 7Q SERIES 07/10/2013
15

3. Installation guidelines
Which screen type ?
There are two major categories of screens used for projection equipment. Those used for front projected images and those for rear
projection applications. Screens are rated by how much light they reflect (or transmit in the case of rear projection systems) given a
determined amount of light projected toward them. The ‘GAIN’ of a screen is the term used. Front and rear screens are both rated
in terms of gain. The gain of screens range from a white matte screen with a gain of 1 (x1) to a brushed aluminized screen with a
gain of 10 (x10) or more. The choice between higher and lower gain screens is largely a matter of personal preference and another
consideration called the Viewing angle. In considering the type of screen to choose, determine where the viewers will be located
and go for the highest gain screen possible. A high gain screen will provide a brighter picture but reduce the viewing angle. For
more information about screens, contact your local screen supplier.
Image size
The projector is designed for projecting an image size with a screen width from 1.00 m (3.3 ft) to 6 m (19.7 ft) with an aspect ratio of
4to3.
Image retention
Image retention can affect LCOS projectors, in extreme cases, permanent “burn” can occur i
screen for long periods of time. Such damage to the panels is NOT covered by warranty.
Please ensure that the following precautions are taken to avoid this phenomenon :
1. Use a screensaver (that moves)
2. Periodically change/alter any background images
3. Turn off the projector when not in use
f still/repetitive images are left on the
Running cycle
To come to an acceptable lifetime for both lamps and panels it is necessary to turn off the projector once a day for at least one hour.
In doing so the lifetime will increase considerably. However, the more time the projector is powered down each day, the better the
panels can recover and the longer they will last.
16
R59770066 SIM 7Q SERIES 07/10/2013

4. INSTALLATION
Overview
• Dimensions
• Fixation points at the bottom of the projector
• Projector tilt
• RCU battery installation
• Lens installation
• Projector configuration
• Connections
4. Installation
R59770066 SIM 7Q SERIES 07/10/2013
17
4. Installation
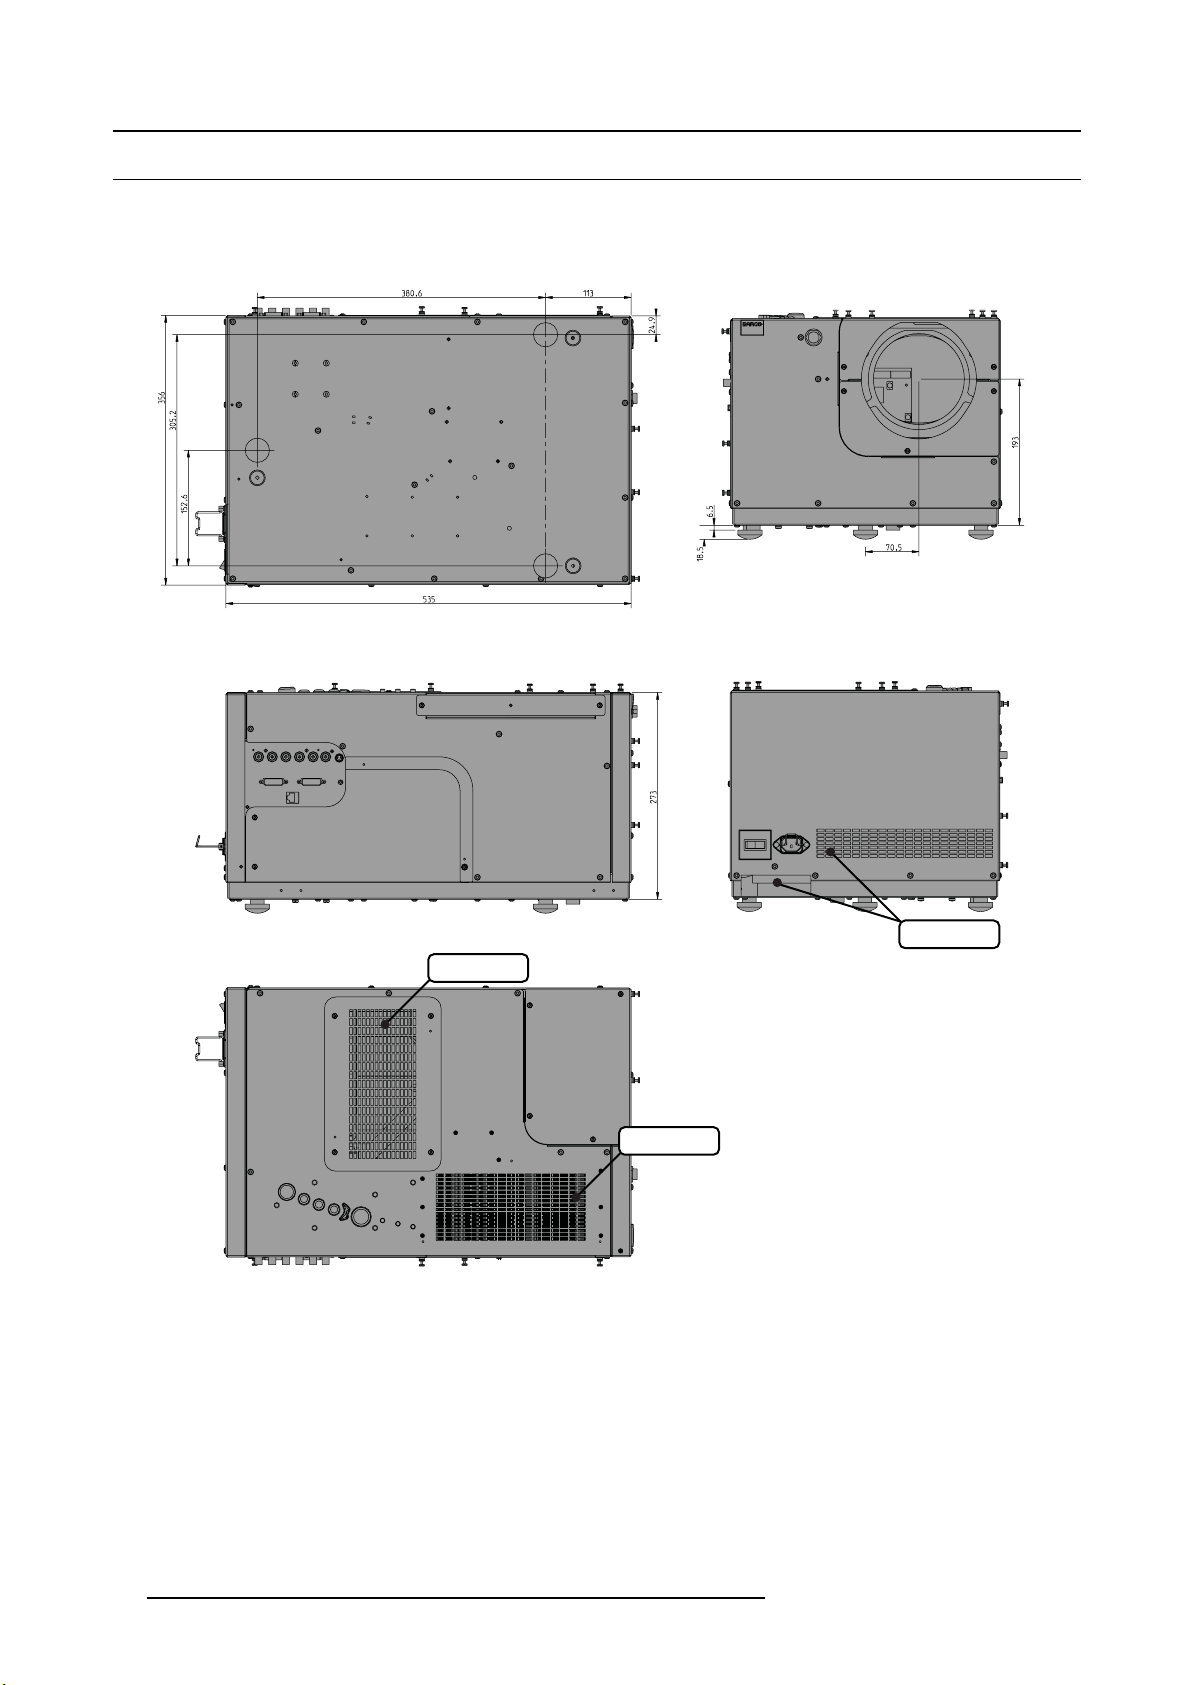
4.1 Dimensions
Projector dimensions and weight
Dimensions are given in mm and inch (1inch = 25.4 mm)
Weight (without lens) : approx. 27 kg (59.5 lbs)
BOTTOM VIEW
FRONT VIEW
Image 4-1
Dimensions
LEFT SIDE VIEW
air filter
TOP VIEW
air filter
BACK VIEW
air exhaust
18 R59770066 SIM 7Q SERIES 07/10/2013
4. Installation
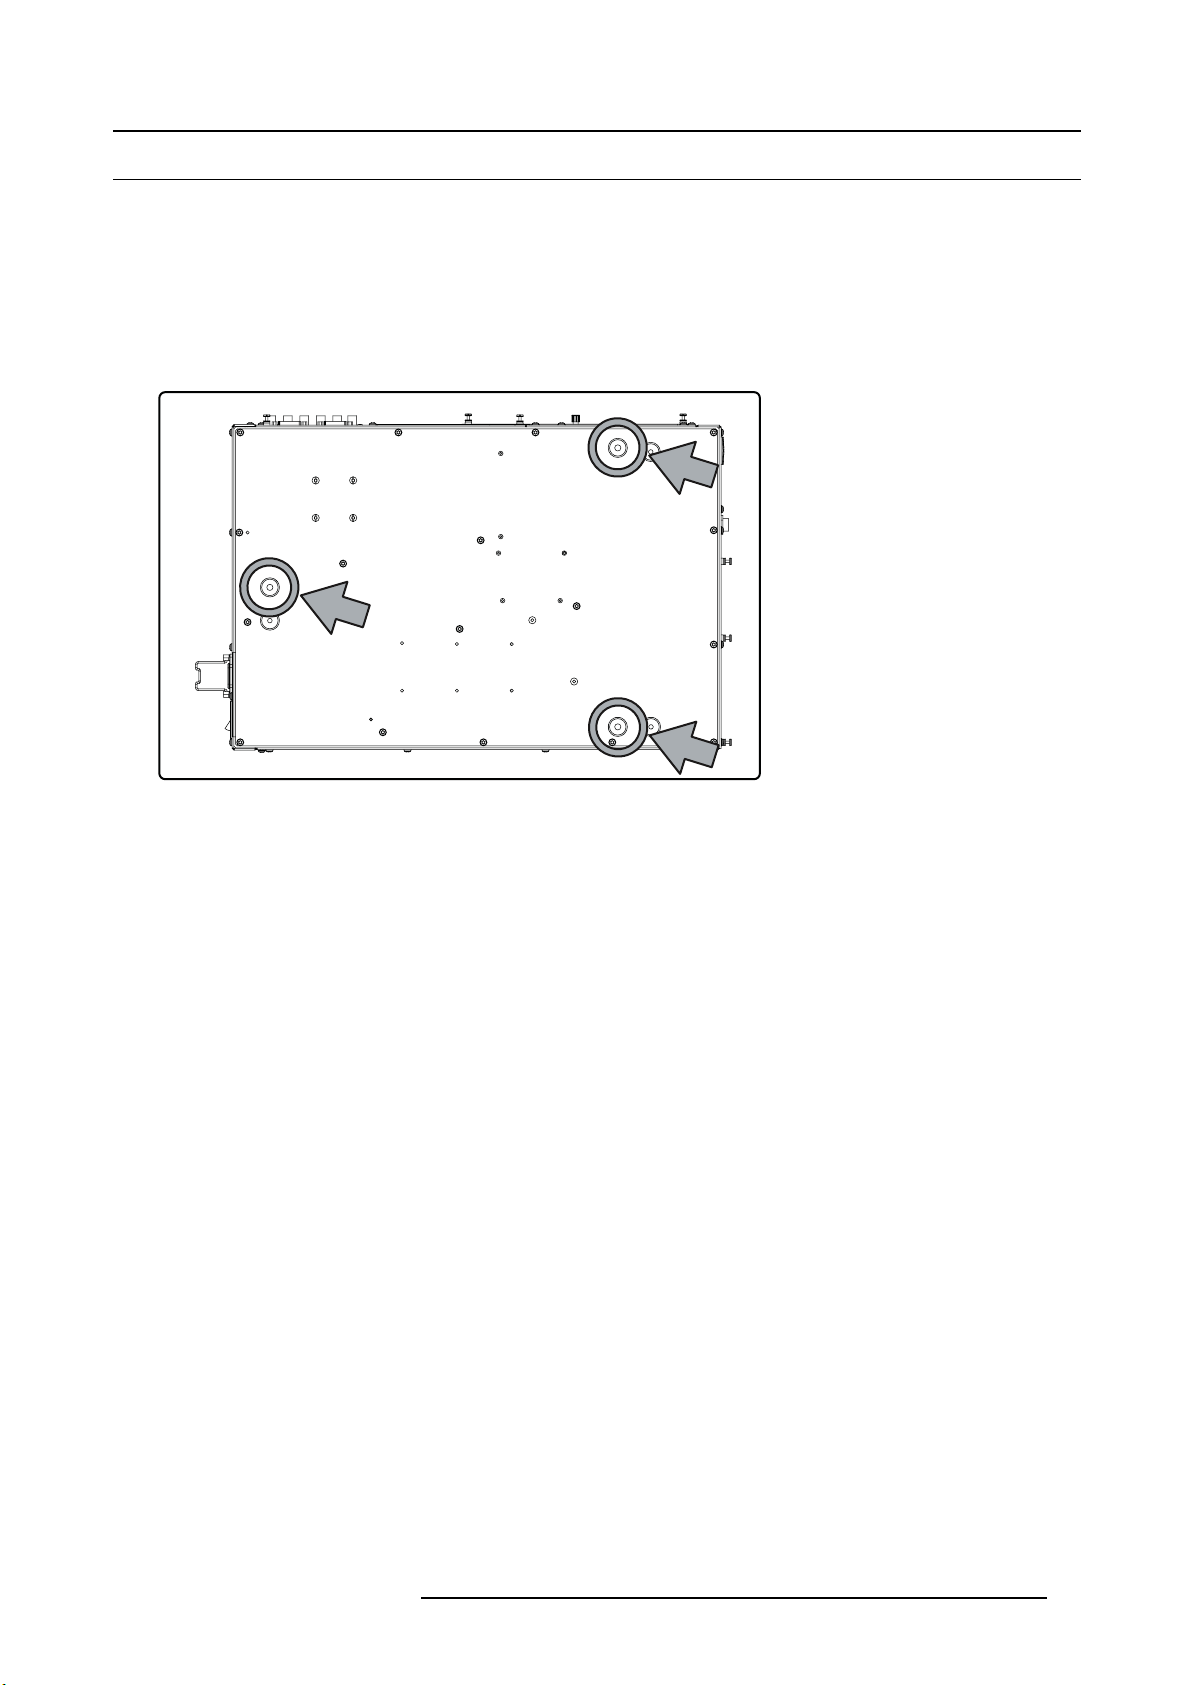
4.2 Fixation points at the bottom of the projector
Describing the fixation points
To fi x the projector to its support, three bolts can be screwed into the threaded holes at the bottom of the projector. The bolts must
meet the following specifications:
• bolt type: M8x1.25
• strength class: 8.8 or higher
• preferred bolt length (bolt head not included): 25 mm < bolt length < 30 mm
• mounting torque range: 20 Nm (177 lbf.in) < torque < 23 Nm (205 lbf.in)
Image 4-2
Fixation points
R59770066 SIM 7Q SERIES 07/10/2013 19
4. Installation
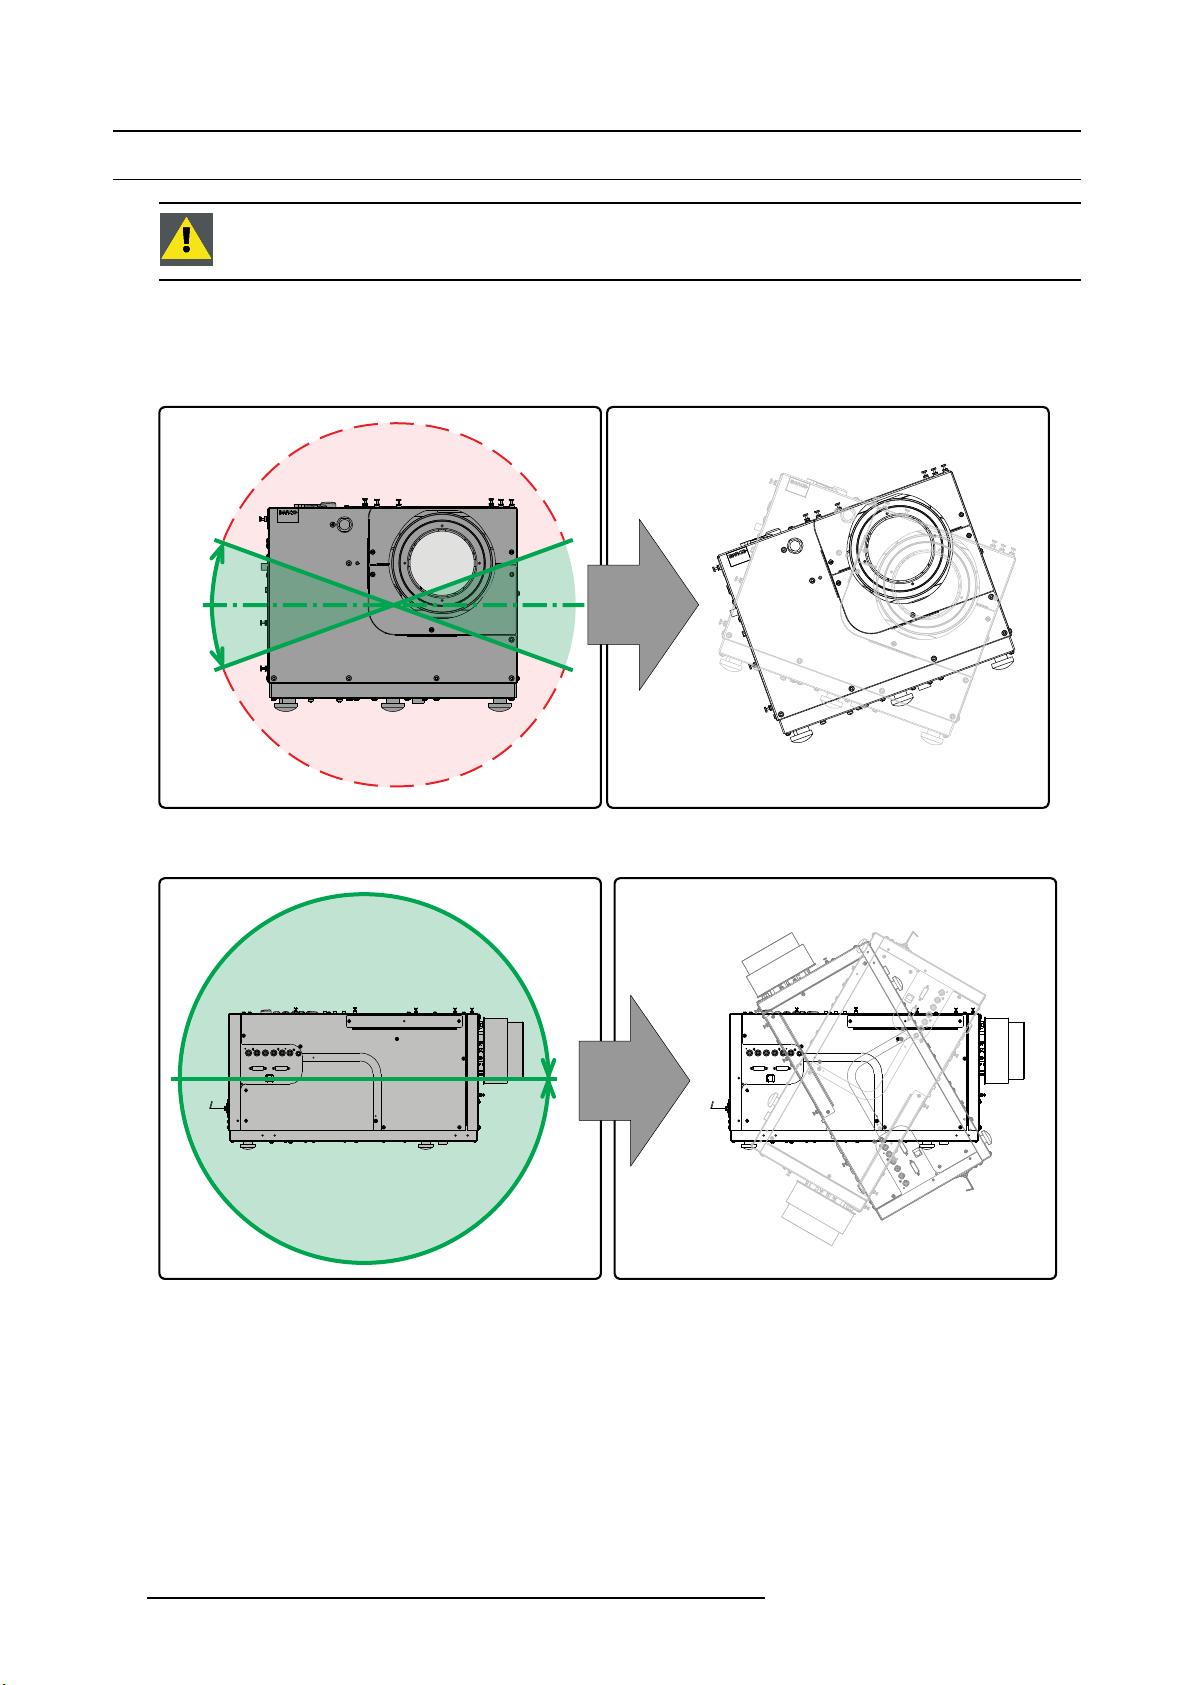
4.3 Projector tilt
CAUTION: Not respecting the projector tilt range will cause lamp flicker or even lamp explosion.
Tilt range
The tilt range of the projector is restricted by the tilt range of the lamp. The drawings below show the maximal tilt range in both
senses.
+20°
-20°
Image 4-3
Projector tilt range
Image 4-4
Projector tilt range
360°
20 R59770066 SIM 7Q SERIES 07/10/2013

4. Installation
4.4 RCU battery installation
Where to find the batteries for the remote control ?
The batteries are not placed in the remote control unit to avoid control operation in its package, resulting in a shorter battery life
time. At delivery the batteries can be found in a separated bag attached to the remote control unit. Before using your remote control,
install the batteries first.
How to install the batteries in the remote control ?
1. Push the battery cover tab with the fingernail a little backwards (1) and pull, at the same time, the cover upwards (2).
1
Image 4-5
2. Insert the two AA size batteries, making sure the polarities match the + and - marks inside the battery compartment.
+
-
Image 4-6
3. Insert (1) the lower tab of the battery cover in the gap at the bottom of the remote control, and press (2) the cover until it clicks
in place.
+
-
2
2
+
+
Image 4-7
CAUTION: Replace with the correct battery type. Use two AA size batteries. There is a risk of explosion if the
battery is replaced with an incorrect type.
CAUTION: Replace the battery as explained above. There is a risk of explosion if the battery is incorrectly
installed.
R59770066 SIM 7Q SERIES 07/10/2013 21
1
-

4. Installation
4.5 Lens installation
Overview
• Lens range
• Lens formulas
• Shift capabilities
• Installing the lens and adjusting the Scheimpflug
• Connecting the lens
• Lens Data
22
R59770066 SIM 7Q SERIES 07/10/2013

4.5.1 Lens range
Overview table
Lens
QSD (0.8:1)
QSD (1.0–1.4:1)
QSD (1.4–2.0:1)
See the Maintenance appendix for more information about lens cleaning.
4. Installation
R59770066 SIM 7Q SERIES 07/10/2013 23
4. Installation
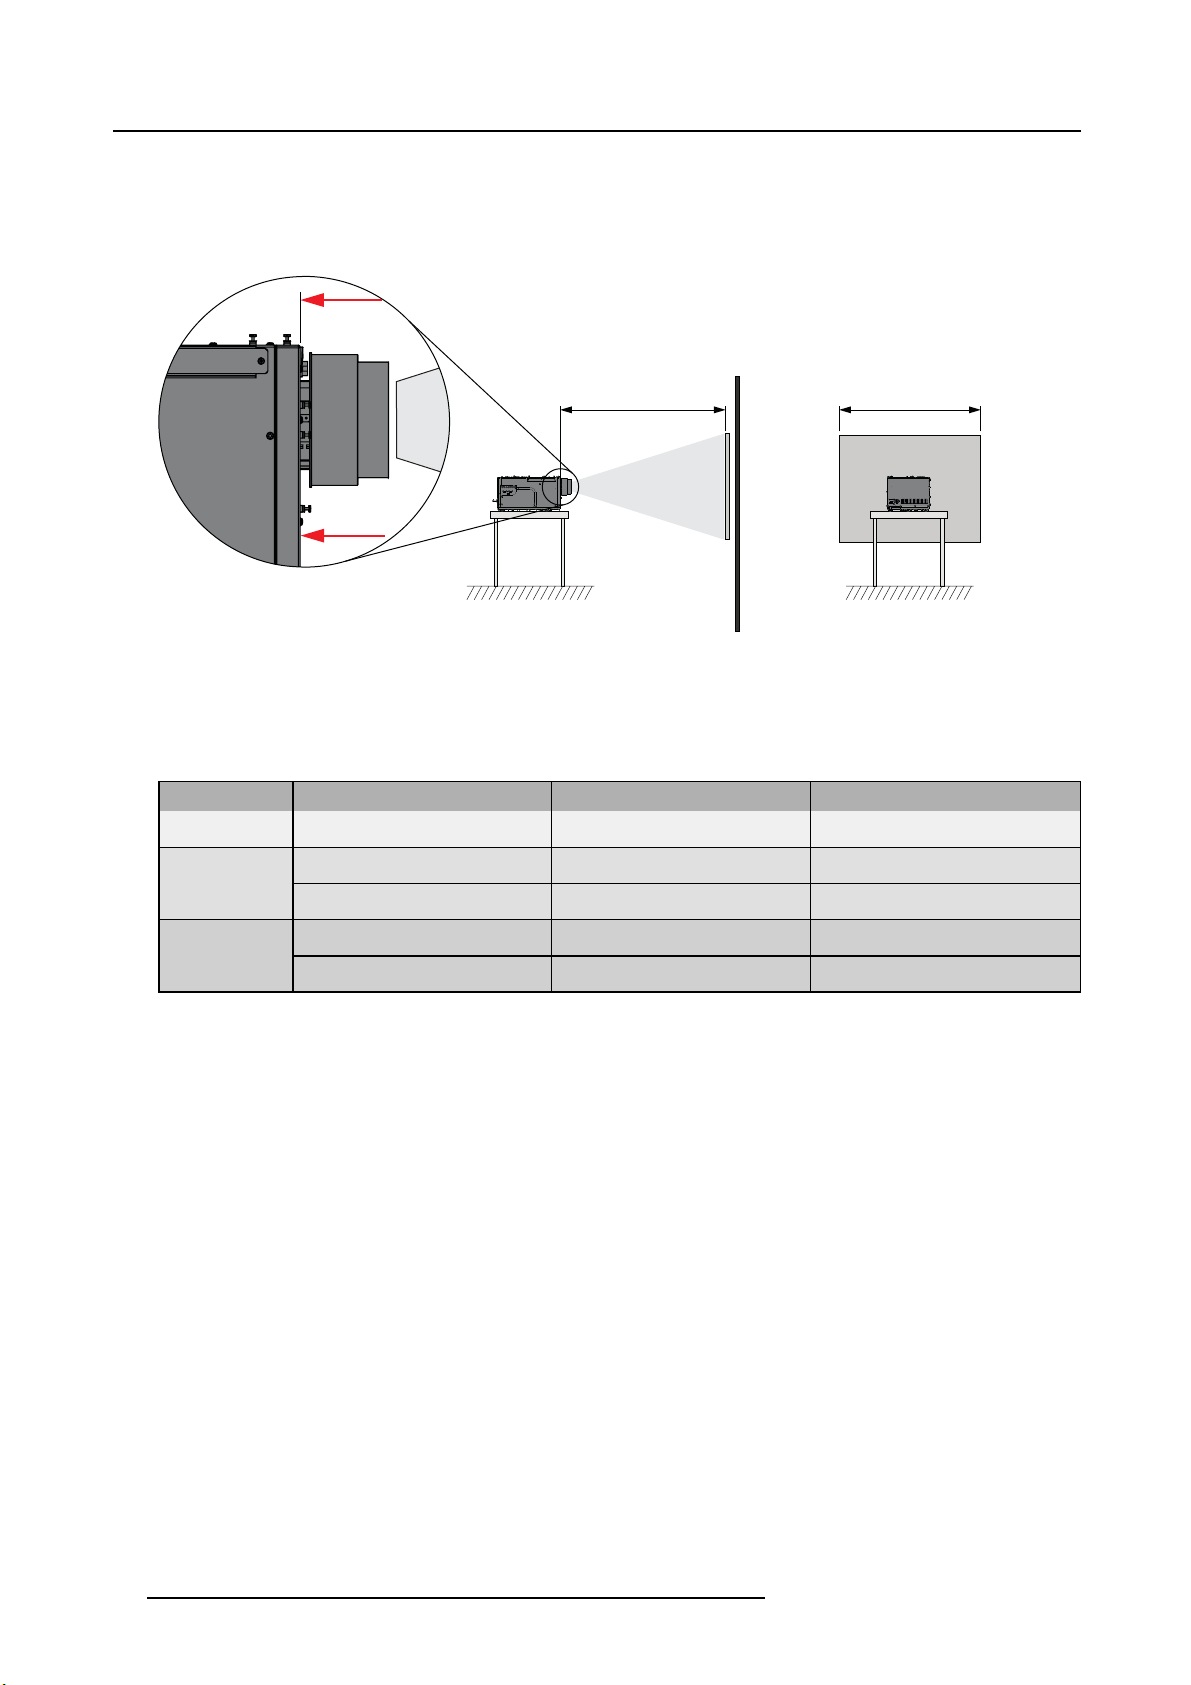
4.5.2 Lens formulas
Projection Distance
The Projection Distance or PD is the perpendicular distance between the screen and the reference point on the projector, expressed
inmeterorinch.
PD sw
Ref.
Image 4-8
Projection Distance (PD) and Screen Width (SW)
Screen width
The Screen Width or SW is the total width of the image as it is projected on the screen, expressed in meter or inch.
Formulas
Lens Zoom status
QSD (0.8:1)
QSD (1.0–1.4:1)
-
WA (Wide Angle) PD
TP (Telephoto) PD
QSD (1.4–2.0:1)
WA (Wide Angle) PD
TP (Telephoto) PD
Metric formulas (meter) Inch formulas (inch)
PD = 0.0679 + 0.803 x SW -
0.0121/SW
= 0.0299 + 1.026 x SW +
min
0.0047/SW
= 0.0341 + 1.434 x SW +
max
0.0030/SW
= -0.0858 + 1.471 x SW +
min
0.0077/SW
= -0.0013 + 2.031 x SW -
max
0.0606/SW
PD = 2.673228 + 0.803 x SW -
18.755/SW
PD
= 1.177165 + 1.026 x SW +
min
7.285015/SW
PD
= 1.34252 + 1.434 x SW +
max
4.650009/SW
PD
= -3.37795 + 1.471 x SW +
min
11.93502/SW
PD
= -0.05118 + 2.031 x SW -
max
93.9302/SW
24 R59770066 SIM 7Q SERIES 07/10/2013
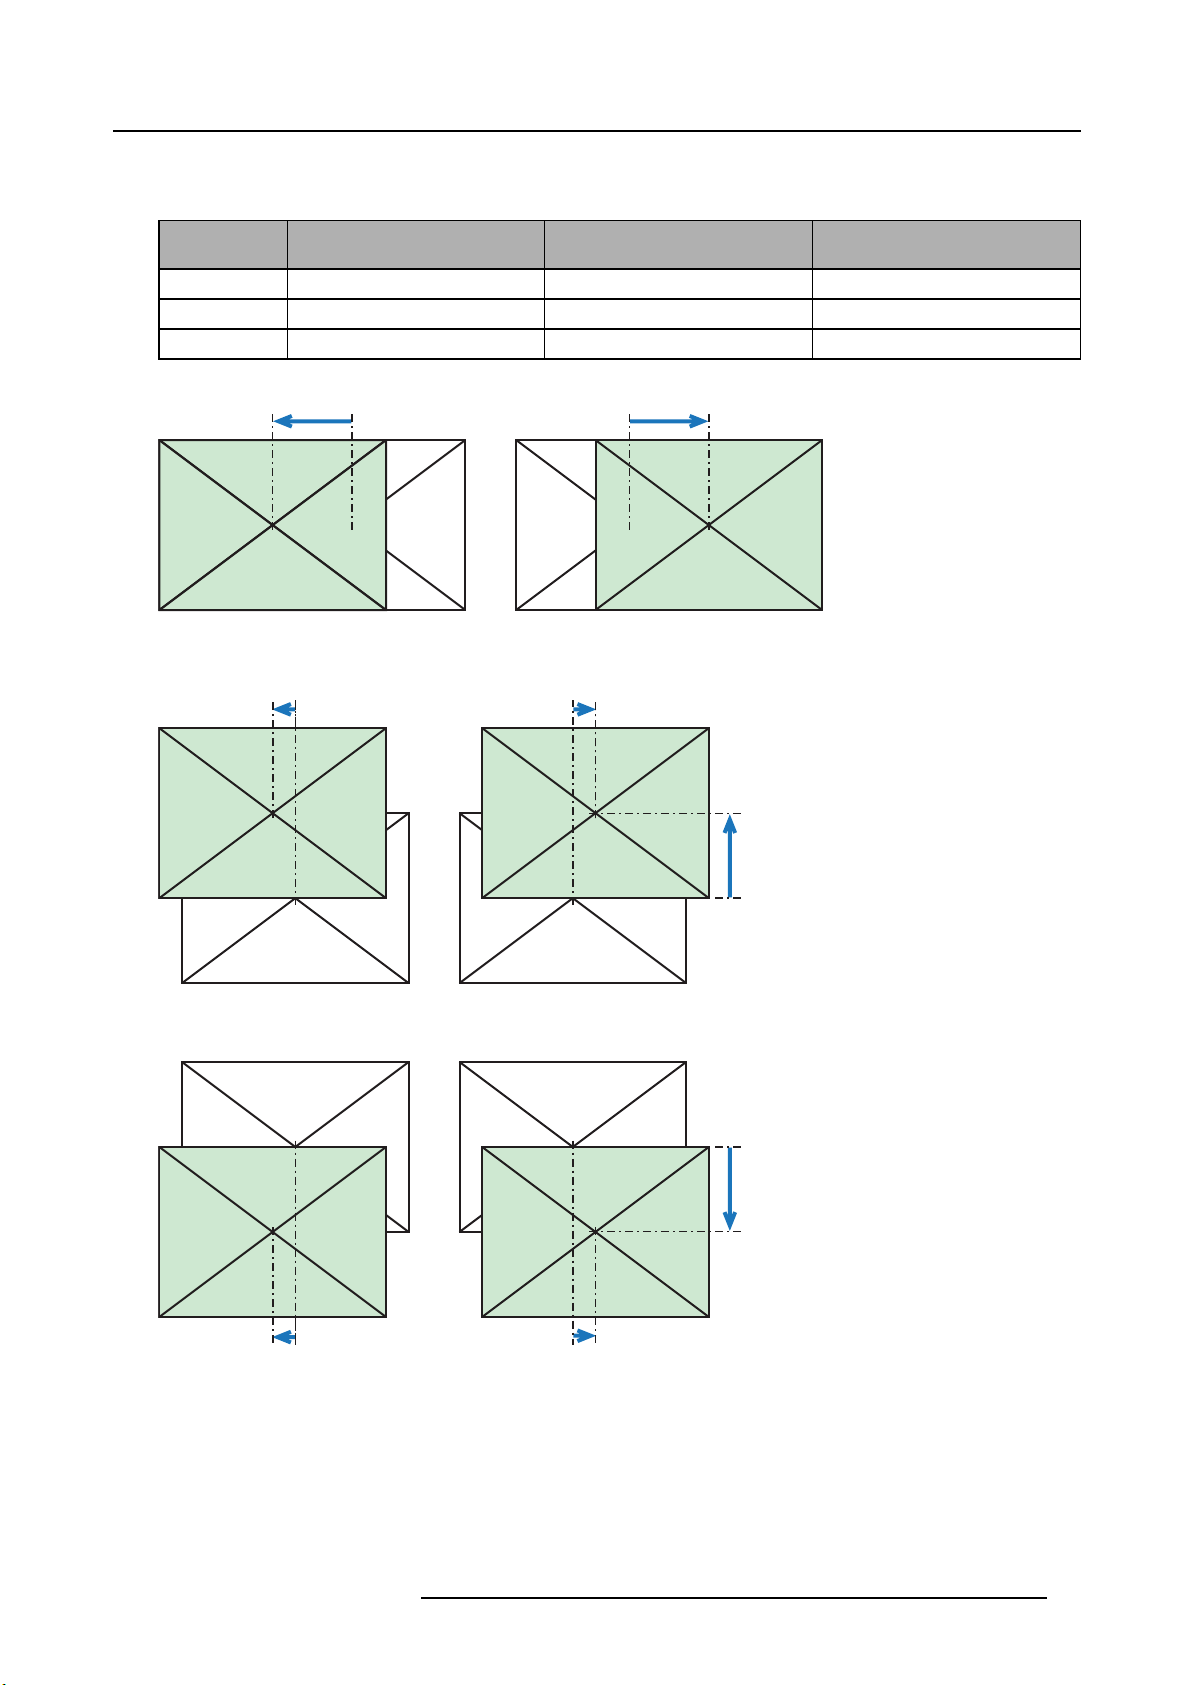
4.5.3 Shift capabilities
Overview
Lens
QSD (0.8:1) up/down : 12.8%
QSD (1.0–1.4:1) up/down : 100% left/right : 70% left/right : 20%
QSD (1.4–2.0:1) up/down : 100% left/right : 70% left/right : 20%
Vertical shift Horizontal shift
(if vertical shift is 0%)
--
-70% +70%
-70%
Image 4-9
Lens shift: maximum horizontal shift (vertical shift = 0)
4. Installation
Horizontal shift
(if vertical shift is 100%)
-20%
+20%
+100%
-100%
Image 4-10
-20%
Lens shift: maximum horizontal shift (vertical shift = maximum = 100%)
R59770066 SIM 7Q SERIES 07/10/2013 25
+20%
4. Installation
-20%
+20%
+100%
-70%
+70%
-100%
+20%
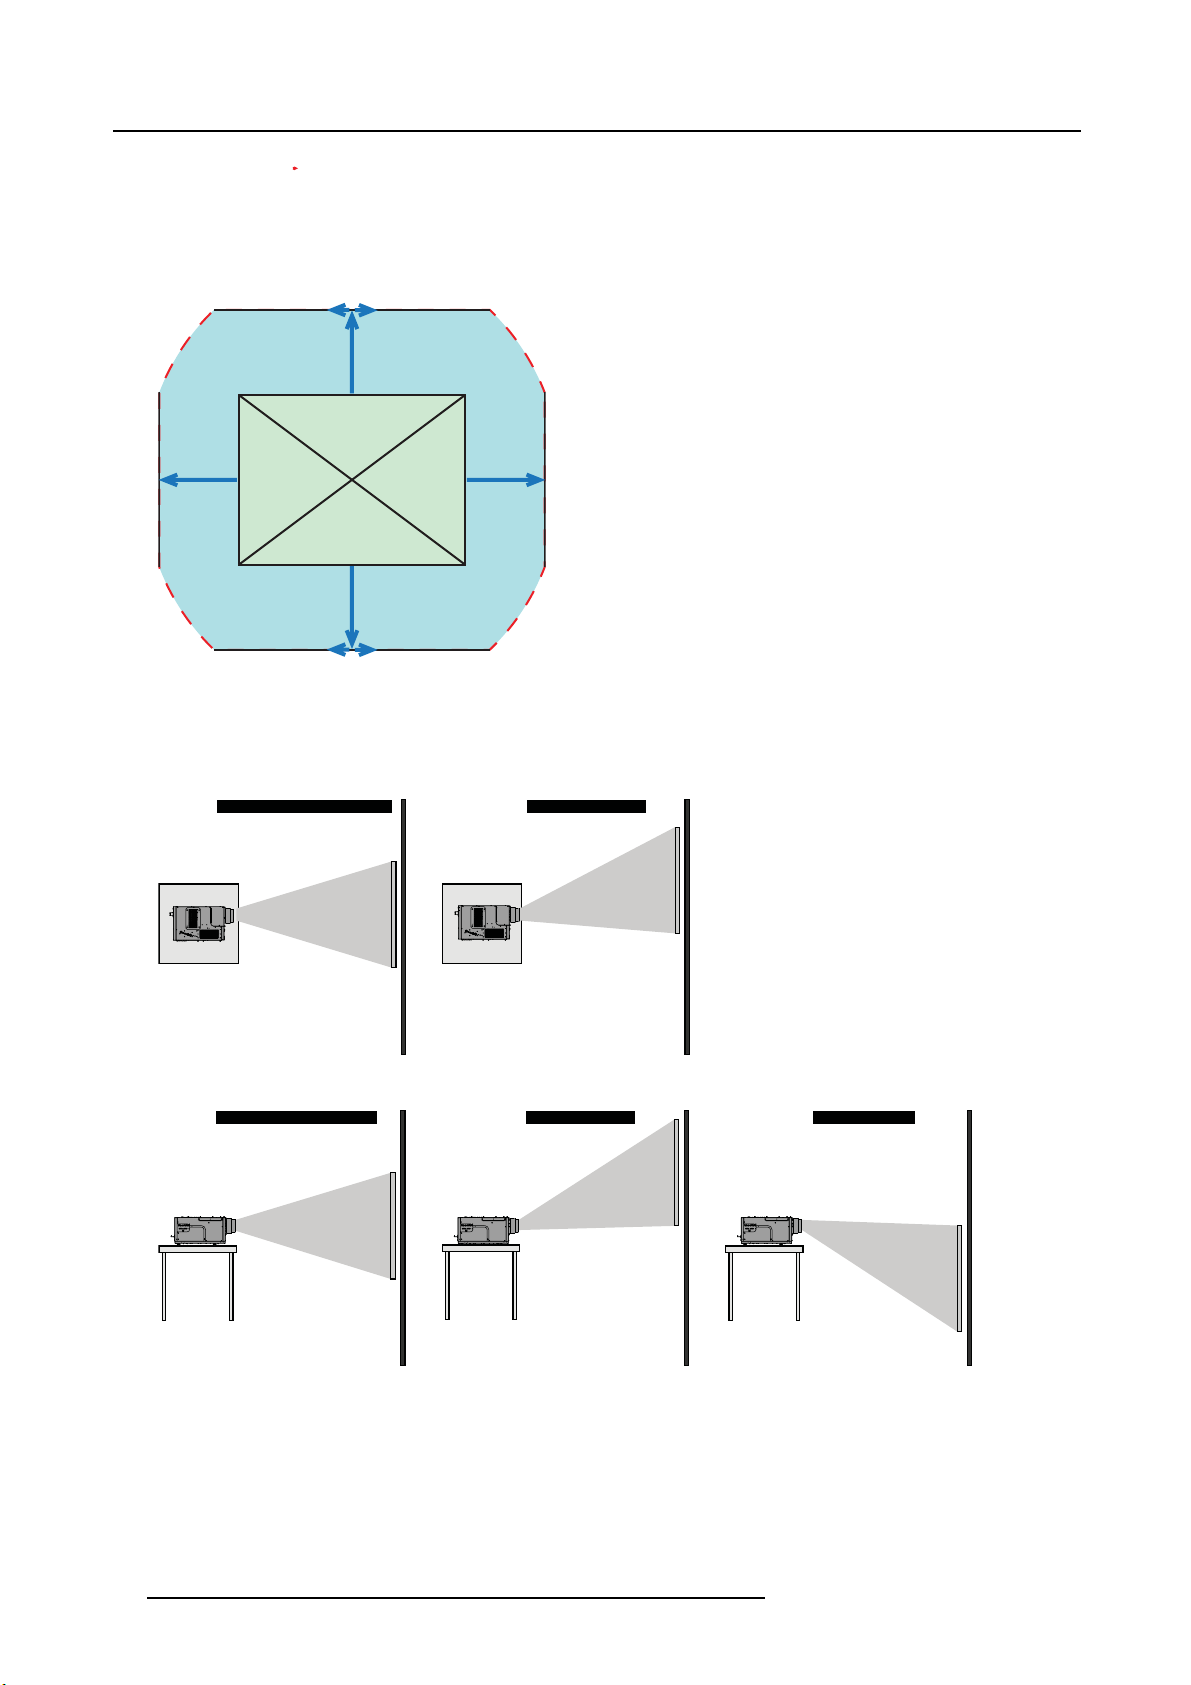
Image 4-11
Lens shift: range
The best image quality is obtained in nominal lens position (i.e. 0% shift). Shifting the image to the limit of its range starts introducing
some falloff. The exact range in the area indicated by the red dashed line depends on lens type and application.
Horizontal shift in nominal position Horizontal shift : -70%
Projector
-20%
Projector
Screen
Screen
Image 4-12
Vertical shift in nominal position
Projector Projector
Screen
Image 4-13
Vertical shift : +100% Vertical shift : -100 %
Projector
Screen
Screen
26 R59770066 SIM 7Q SERIES 07/10/2013
 Loading...