


F90-series Quick Start Guide
Projector Main Components and interface
1 |
2 |
3 |
2 |
5 |
4 |
1LED status light
2Adjustable feet.
3Projector lens.
4Lens holder.
5IR receiver: For receiving remote control signals
6LCD touchscreen panel.
7Keypad: Used for local operations on the projector.
8Connector panel: Control and communication interfaces for the projector.
9Front USB and Triggerboard.
Printed on FSC certi ed paper (www.fsc.org) |
601-0383-02 |
General
5 |
8 |
7
6 |
2 |
9 |
WARNING!
Class 1 Laser RG2 Product.
For North America, Class 3R up to TR 2.33 This Projector may become RG3.
Refer to user manual before operating Do not stare into beam. This projector has class 4 laser cluster. Do not attempt to disassemble or modify this projector.
LED Status Light
1 |
Red light indicates a failure.
Contact service representative.
1
F90-series Quick Start Guide
General
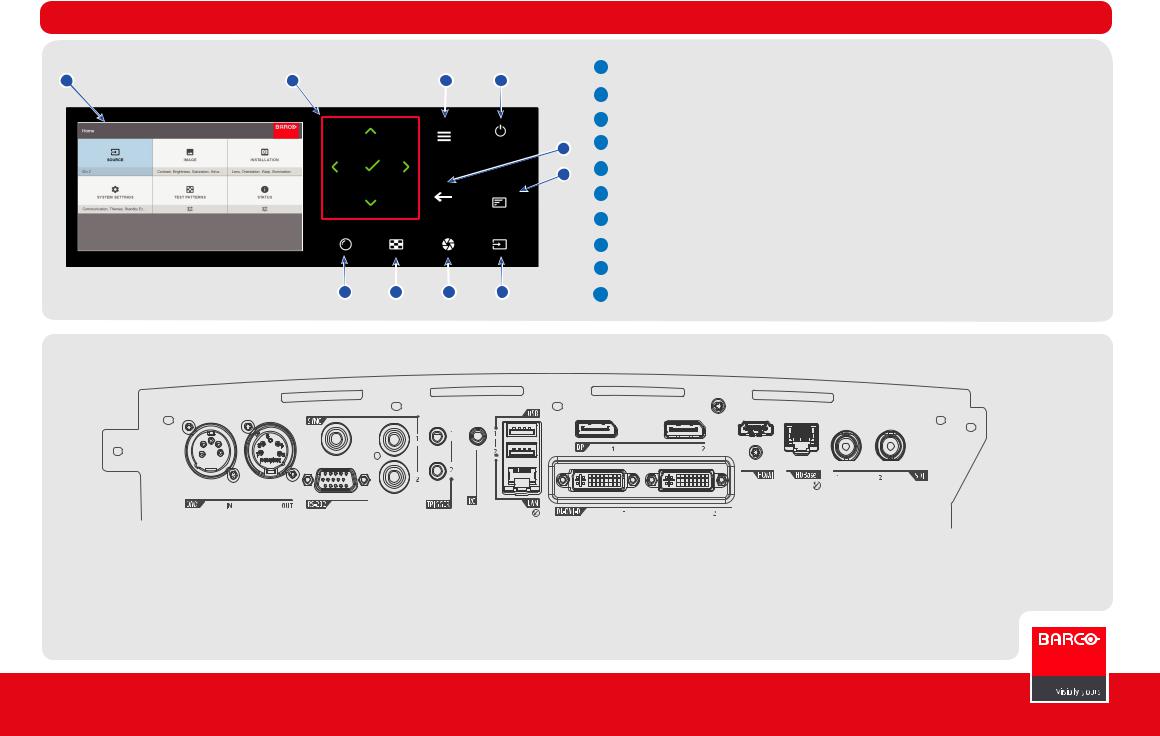
Keypad
1
1 |
2 |
3 |
4 |
2
3
5 4
6 5
6
7
8
9
10 |
9 |
8 |
7 |
10 |
LCD Screen. Displays the current projector status and source connections.
Navigation Panel. Navigation arrows (up, down, left, right). Confirm selection. (  )
)
Turn On Screen Display (OSD) menu ON / OFF. Power On/Standby
Undo action / Back to previous screen
Deactivate the OSD. Only critical warnings will be displayed.
Select input source. Menu appear on OSD or in LCD display. Use Navigation Panel to select and confirm Open / Close lens shutter.
Activate test pattern. Menu appear on OSD or in LCD display. Use Navigation Panel to select and confirm. Activate Lens Function. Use navigation keys to manage and confirm actions.
Control & communication connections
DMX: DMX512 Input |
RC: XLR connector for wired remote |
RS-232: 9- pin DB9 Connector |
USB: Usb 2.0 type A, 4 pin |
Sync: BNC Sync Port IN/OUT; Bidir mini-DIN |
LAN: Standard RJ45 connector |
Trigger: 12VDC - 0,5A (6W) |
DP: Standard Display port |
DL-DVI-D: Dual DVI-I 1.0 (DVI_D Functionallity) HDMI: Standard HDMI 2.0
HDBaseT: Standard RJ45 8P8C Connector SDI: SDI connector with Barcolink Support
2
 Loading...