

Page 1

1
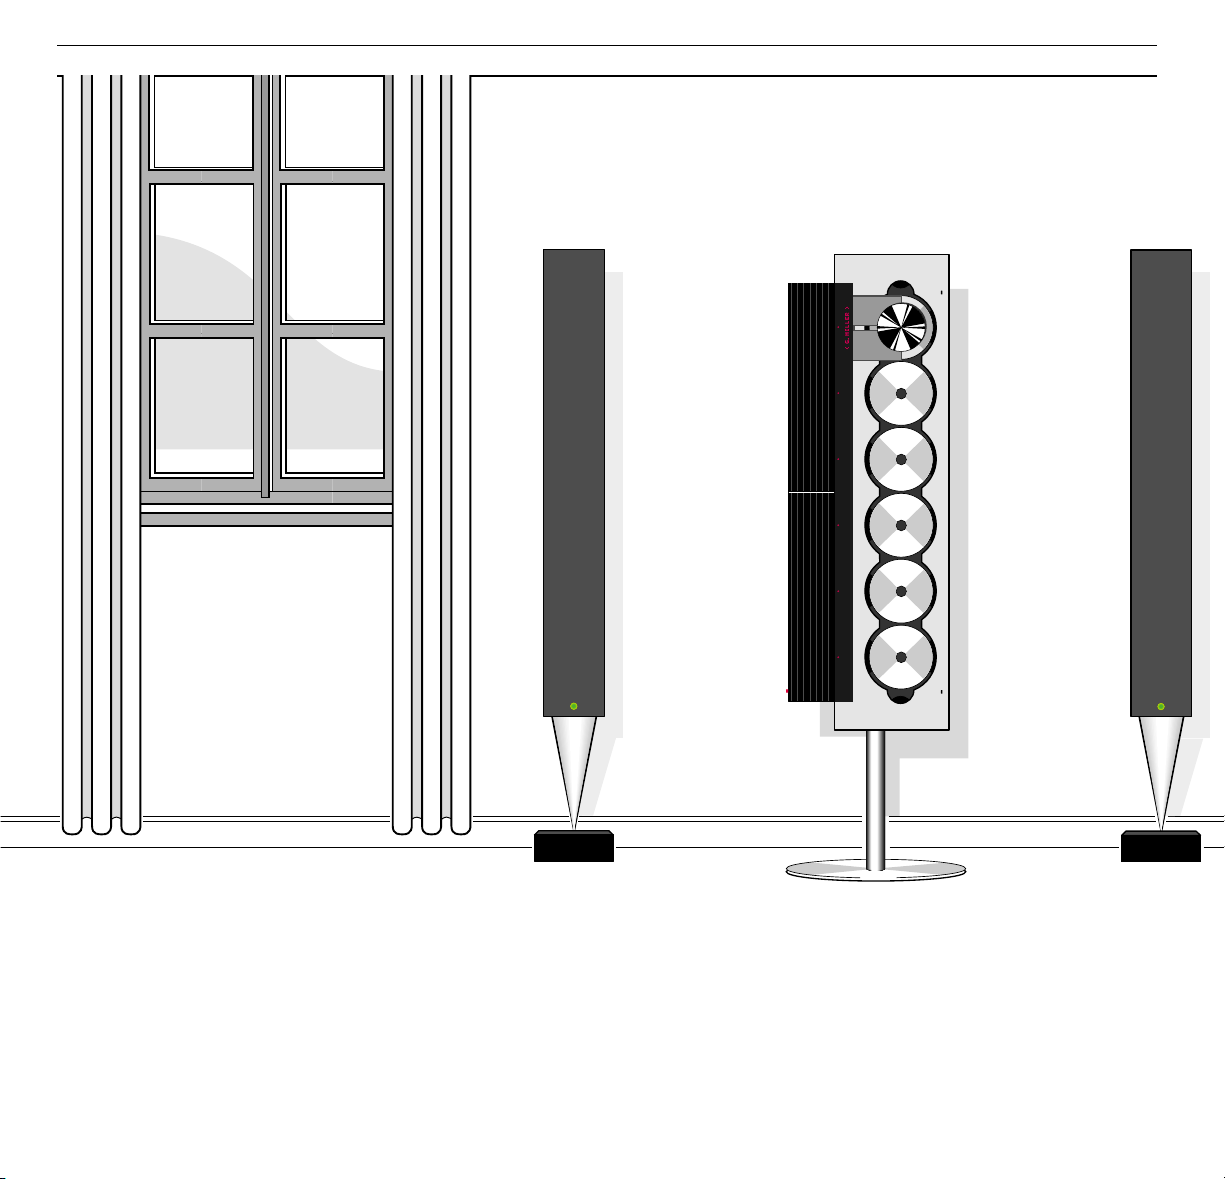
The BeoSound 9000 is the ultimate
music entertainment centre, an
impressive CD player with a built-in
radio. A technological revelation, a
masterpiece of craftsmanship as well
as a decorative piece of art.
The system can be placed anywhere
you want music – in traditional
placements; on a table or hanging on
a wall, or in a novel, original
placement; on the specially designed,
vertical stand. All in all, the choice is
entirely up to you.
The BeoSound 9000 represents a new
and visual way of experiencing music.
Please refer to the quick guide on
pages 8-9 to experience ‘what you see
is what you hear’…
User’s guide
BEOSOUND 9000
Page 2

2
This User’s guide describes the operation of the
BeoSound 9000. Each function described in this
guide is accompanied by a set of buttons, situated
either to the far left or right of the page, which
refer to the buttons on the BeoSound 9000 closeup operation panel.
For most functions, inserts with step-by-step
guidance to the Beo4 remote control are also
included. These sets of buttons will guide you
through the operations step-by-step.
The BeoSound 9000 may be used with various
types of active Bang & Olufsen loudspeakers, or it
may be used as a music centre in a Bang & Olufsen
AV system. This guide applies to both situations.
Note:
Complete setting-up and maintenance
instructions are found in the Setting-up guide,
which is also enclosed with the BeoSound 9000.
Be sure to keep the Setting-up guide. You will
need it for cleaning and maintenance instructions,
and when you move or rearrange your BeoSound
9000 setup in the future.
Page 3

CONTENTS
3
Complete list of contents and page references
4 What you see is what you hear...
6 Principles of operation
7 Close-up operation panel
8 Quick guide to daily operations
10 Beo4 remote control
11 Using the Compact Disc player
12 Loading CDs
13 Positioning CDs
14 CD playback
16 Switching displays
17 Choosing a sequence of discs
18 Playing CDs and tracks in random
order
19 Programming a series of tracks for
one CD
20 Playing edited CDs
21 Naming CDs
22 Listing CDs
23 Using the radio
24 Presetting radio stations
25 Clearing presets
25 Radio program list
26 Fine tuning a radio station
26 Mono/stereo reception
27 Naming radio programs
28 Playing radio programs
29 Switching displays
31 Using the Timer
32 Programming Timers
34 Checking or clearing Timers
35 Switching the Timer function to
on or off
36 Setting and using the built-in
clock
37 Nice to know about Timers
39 Nice to know
40 Adjusting sound
42 Playing auxiliary sources
43 Music throughout the house
44 From audio to video – or vice versa
Page 4

WHAT YOU SEE IS WHAT YOU HEAR…
4
Your BeoSound 9000 is versatile,
beautiful, and responsive...
BeoSound 9000 can be compared to a
piece of art and will light up any living
room. – Its principle is ”What you see is
what you hear…” – It mirrors your
personal musical and artistic taste.
BeoSound 9000 conveys a strong visual
expression design-wise and represents
an original statement.
BeoSound 9000 gives you perfect
sound reproduction and changes tracks
and CDs at an unbelievable pace. You
will experience 6 Compact Discs as one
piece of music – virtually one CD.
Your BeoSound 9000 is designed for
both remote control operation via
Beo4 and close-up operation via the
BeoSound 9000 operation panel.
Page 5
5
Page 6
6
PRINCIPLES OF OPERATION
TREBLE RESET
BASS MUTE
BALANCE VOL
LOUDNESS VOL
OK
TIMER ON/OFF
CHECK
CLOCK CLEAR
OK
RANDOM CD
EDIT PAUSE
SELECT EDITING
NAMING CLEAR
OK
TUNE RADIO
AM/FM
P. NO.
NAMING CLEAR
OK
A. AUX
•
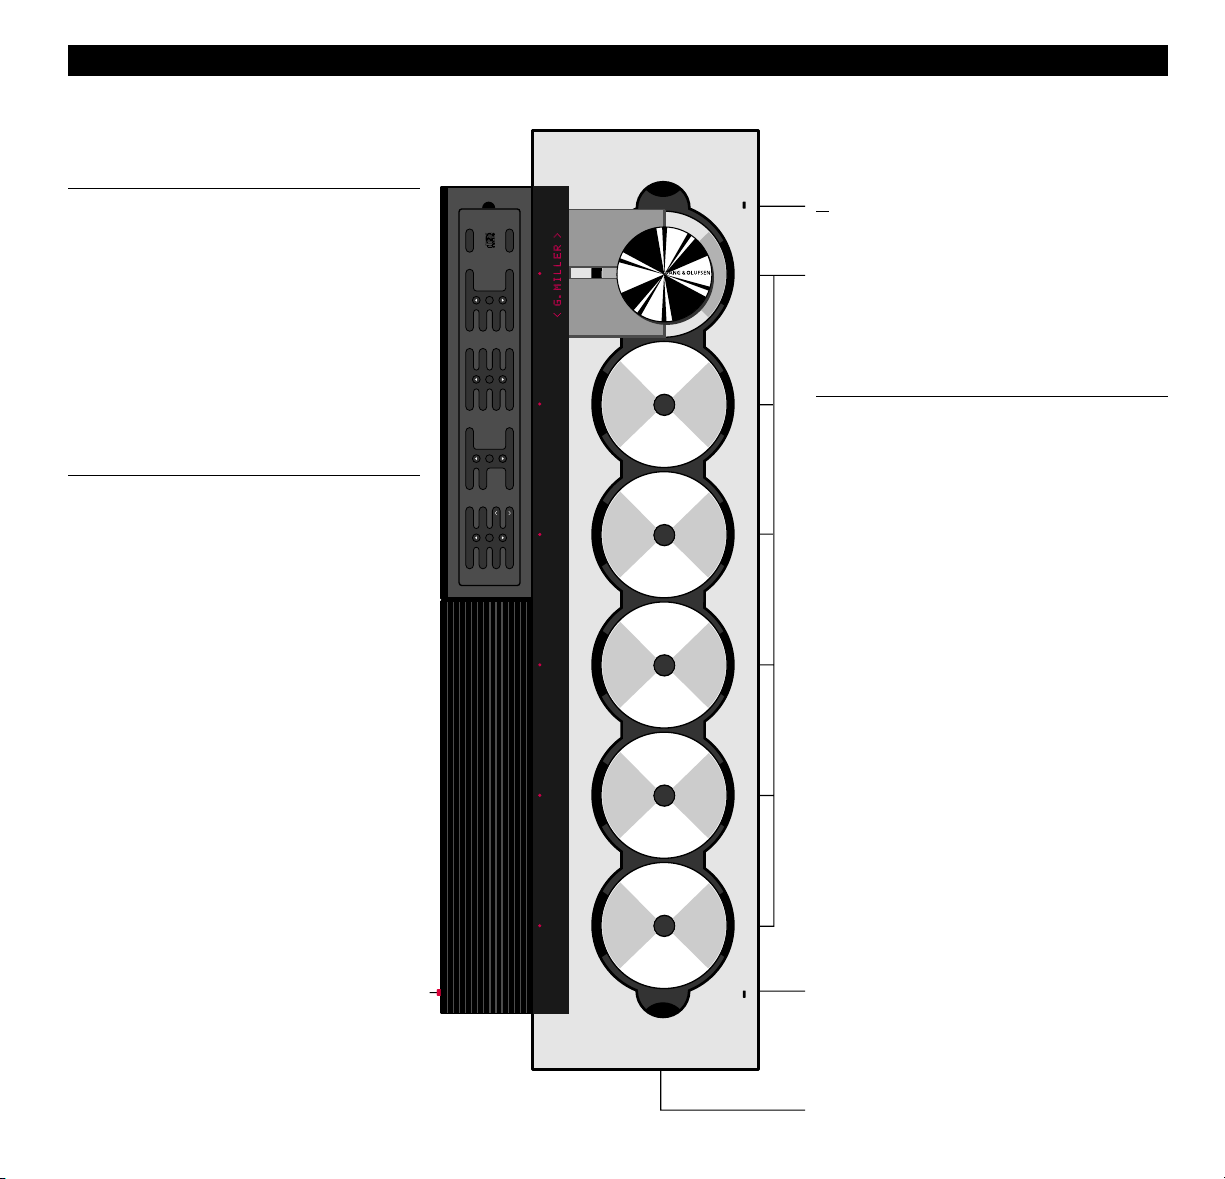
Operation Panel
Whether you place BeoSound 9000 on a table,
vertically or horizontally on the wall or on the
specially designed BeoSound 9000 stand, you can
adjust the position of the operation panel in
order to facilitate your operation of the
BeoSound 9000.
Please refer to the setting-up guide for
instructions of how to remove and replace the
operation panel.
Radio
The BeoSound 9000 radio only becomes visible
when it is being used. The display then lights up
with radio program information.
▲
Load button
The LOAD button is situated in a low position on
the BeoSound 9000.
Direct CD selection button
A selection button is situated next to all 6
Compact Disc compartments in a low position on
the BeoSound 9000. Press this button to play the
CD in the compartment.
Compact Disc player
The BeoSound 9000 contains 6 Compact Disc
compartments and a carriage moves between
compartments and enables CD playback. You
move the carriage by pressing the direct CD
selection button next to the CD compartment.
When you switch the BeoSound 9000 to stand-by,
the carriage will always situate itself next to
the operation panel and the CD compartment
number 1.
If you choose to place the BeoSound 9000
vertically, the carriage will move to the top end of
BeoSound 9000. If you choose to place the
BeoSound 9000 horizontally, the carriage will
situate itself next to the operation panel.
• Stand-by button
The STAND-BY button is situated in a low position
on the BeoSound 9000.
Mains switch
Socket for headphones
Page 7
7
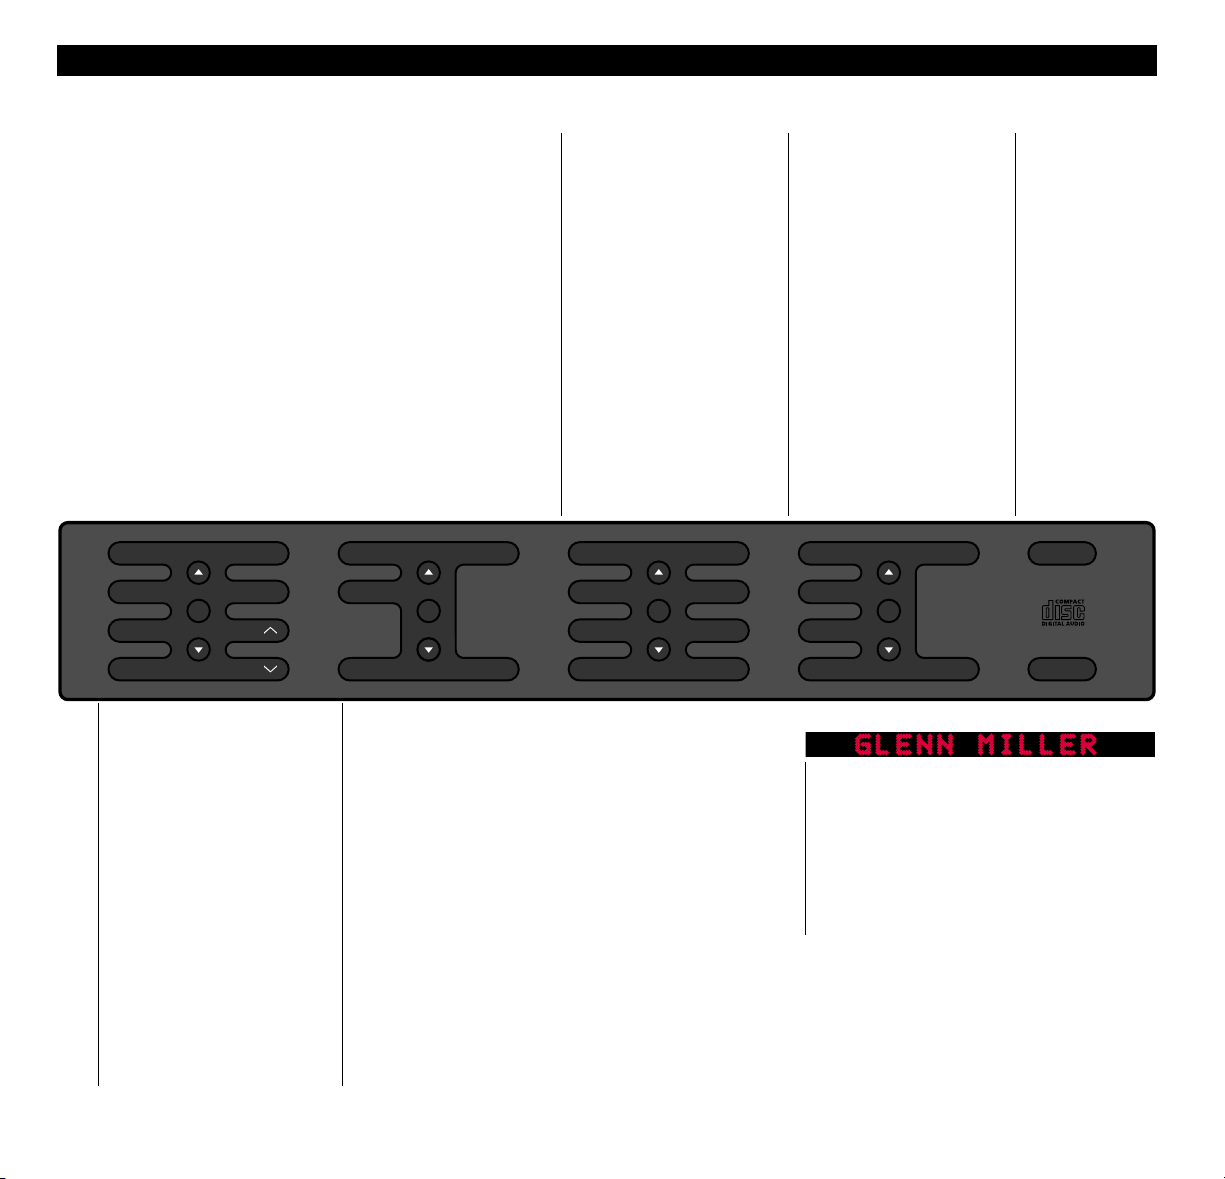
CLOSE-UP OPERATION PANEL
TREBLE RESET
BASS MUTE
BALANCE VOL
LOUDNESS VOL
OK
TIMER ON/OFF
CHECK
CLOCK CLEAR
OK
RANDOM CD
EDIT PAUSE
SELECT EDITING
NAMING CLEAR
OK
TUNE RADIO
AM/FM
P. NO.
NAMING CLEAR
OK
A. AUX
•
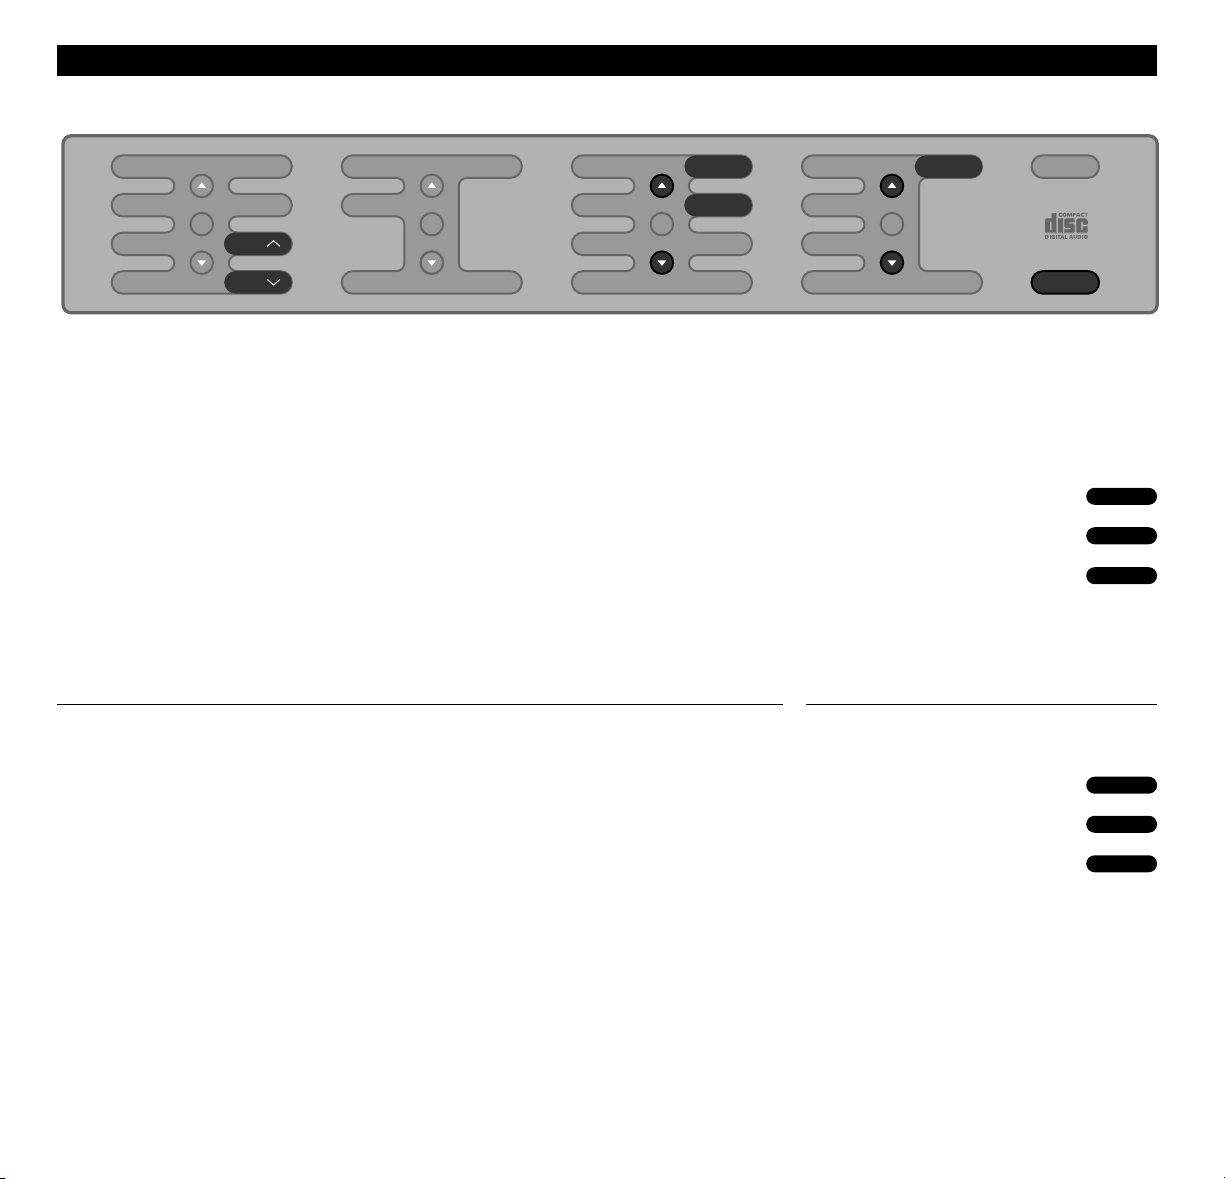
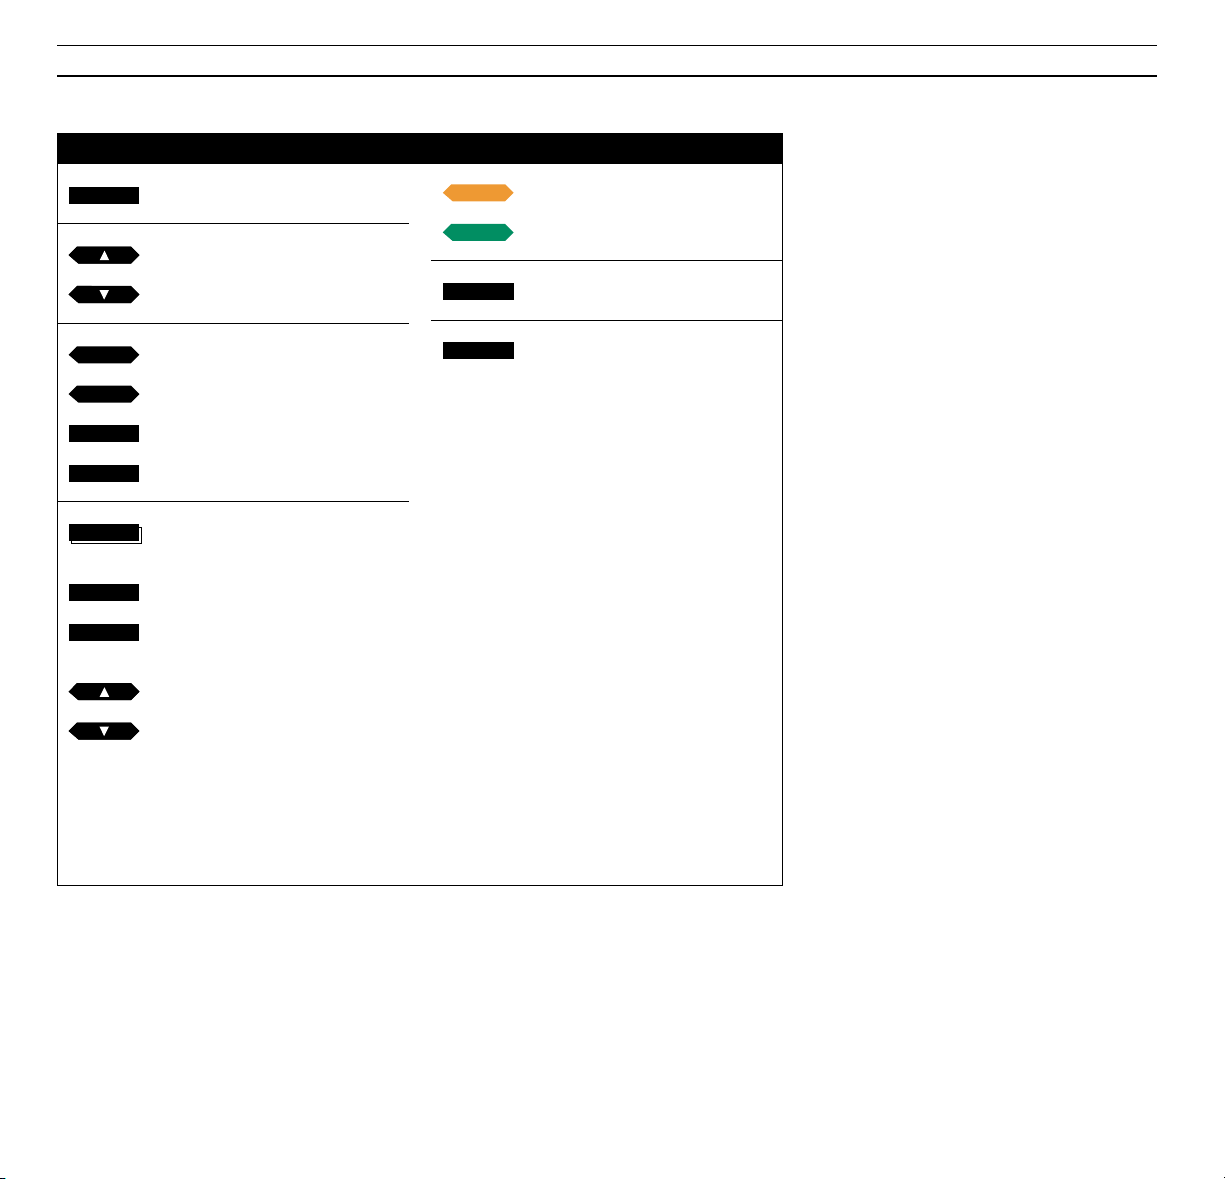
General functions for close-up operation
The buttons OK and
▲ and ▼ are included in all
the sections of buttons which are illustrated
below. These buttons are used together with
primary and secondary functions for radio, CD,
timer and sound:
OK: Accepts and stores operations and outcomes
STEP BUTTONS
▲ and ▼: Change programs and
change or identify values for radio tuning,
program numbering, CD, timer and sound
adjustment functions.
Primary and secondary CD
functions
The buttons give access to CD
functions:
CD: Plays the CDs.
PAUSE: Pauses playback.
SELECT and EDITING:
Programming sequences of
discs and tracks.
RANDOM and EDIT: Operate
special random and edited
play functions for the CDs.
NAMING: Names discs and
sequences.
CLEAR: Clears programmed
values.
Primary and secondary
radio functions
The buttons give access to
radio functions:
RADIO: Plays the radio.
TUNE, AM/FM and P.NO.: Tune
in to stations and number
them.
NAMING: Names stations.
CLEAR: Clears stations.
Stand-by function
The button switches
the BeoSound 9000
to stand-by.
A.AUX function
The button enables
you to switch on
extra audio
equipment.
Sound adjustment functions
The buttons give access to sound
adjustment functions:
VOL
∧ and VOL∨: Raise and
lower the volume level.
MUTE: Mutes or activates the
loudspeakers.
TREBLE, BASS, BALANCE and
LOUDNESS: Regulate the sound
from the loudspeakers.
RESET: Resets the settings for
sound to their default settings.
Timer functions
The buttons give access to
timer functions:
TIMER: Sets timers for when
the BeoSound 9000 should
begin to play or switch off.
ON/OFF: On or off decides
where a timer will be heard or
executed.
CHECK: Checks your timers.
CLEAR: Clears your timers.
CLOCK: Sets or displays the
inbuilt clock.
Status display
The display keeps you informed about
what the BeoSound 9000 is doing and
ongoing operations. E.g. playing a CD
sequence named GLENN MILLER (see
above display).
Page 8
8
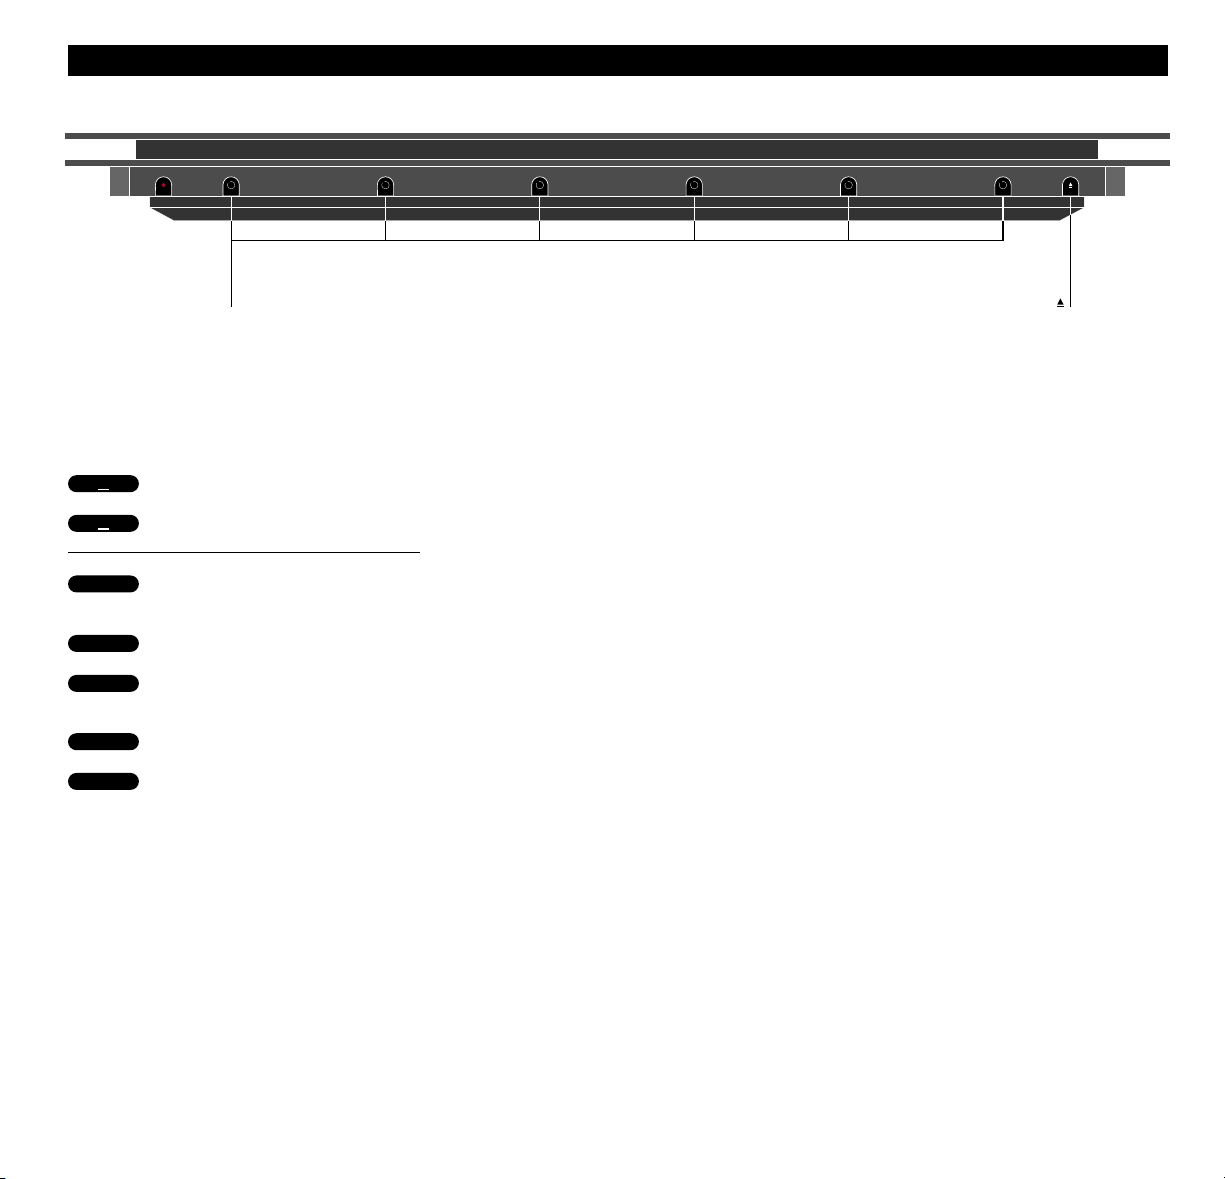
QUICK GUIDE TO…
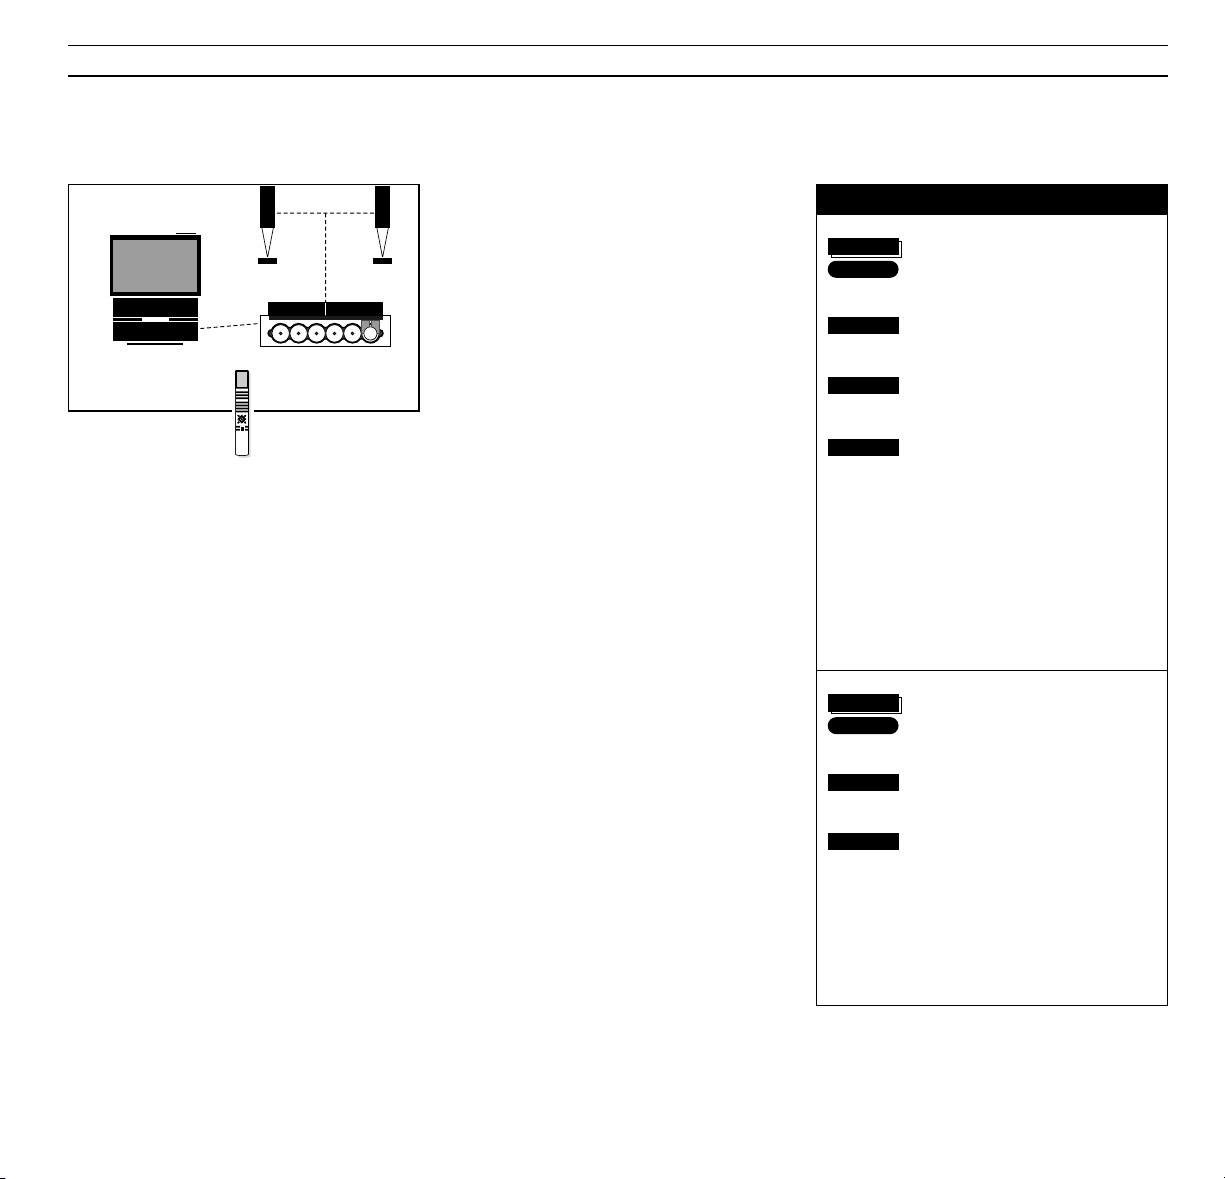
Loading and playing CDs
You press the LOAD button to raise the
glass door and you will now be able to
load your CDs.
If the carriage is situated over the CD
compartment where you want to load
a new CD, simply press the direct
selection button next to another CD
compartment to make the carriage
move to this compartment.
Press the appropriate buttons as shown
to the left to start playback and step
through the tracks on the CD where
the carriage is situated.
If you wish to step through the tracks
on another CD, you can either step
through all the tracks on the current
CD and then continue to press the
▲
button, the carriage will then move to
the next CD compartment or you can
press the direct selection button next
to the CD you want to hear.
See page 12 for further information
about loading CDs and pages 20-23 for
further information about CD
playback…
Press to raise the glass door
Press again to lower the glass door
Press to play a CD
Press to step through CD tracks
Press to pause playback
Press to resume playback
Direct CD selection buttons Load button
PAUSE
CD
CD
or
▲
▲
▲
▼
Page 9
9
… DAILY OPERATIONS
Volume adjustments and switching off
The volume level can be turned up or
down at any time by pressing the
VOL
∧ or VOL∨ volume buttons.
To switch off the BeoSound 9000, press
the red stand-by button on the
operation panel.
Press to raise the volume
Press to lower the volume
Press to switch to stand-by
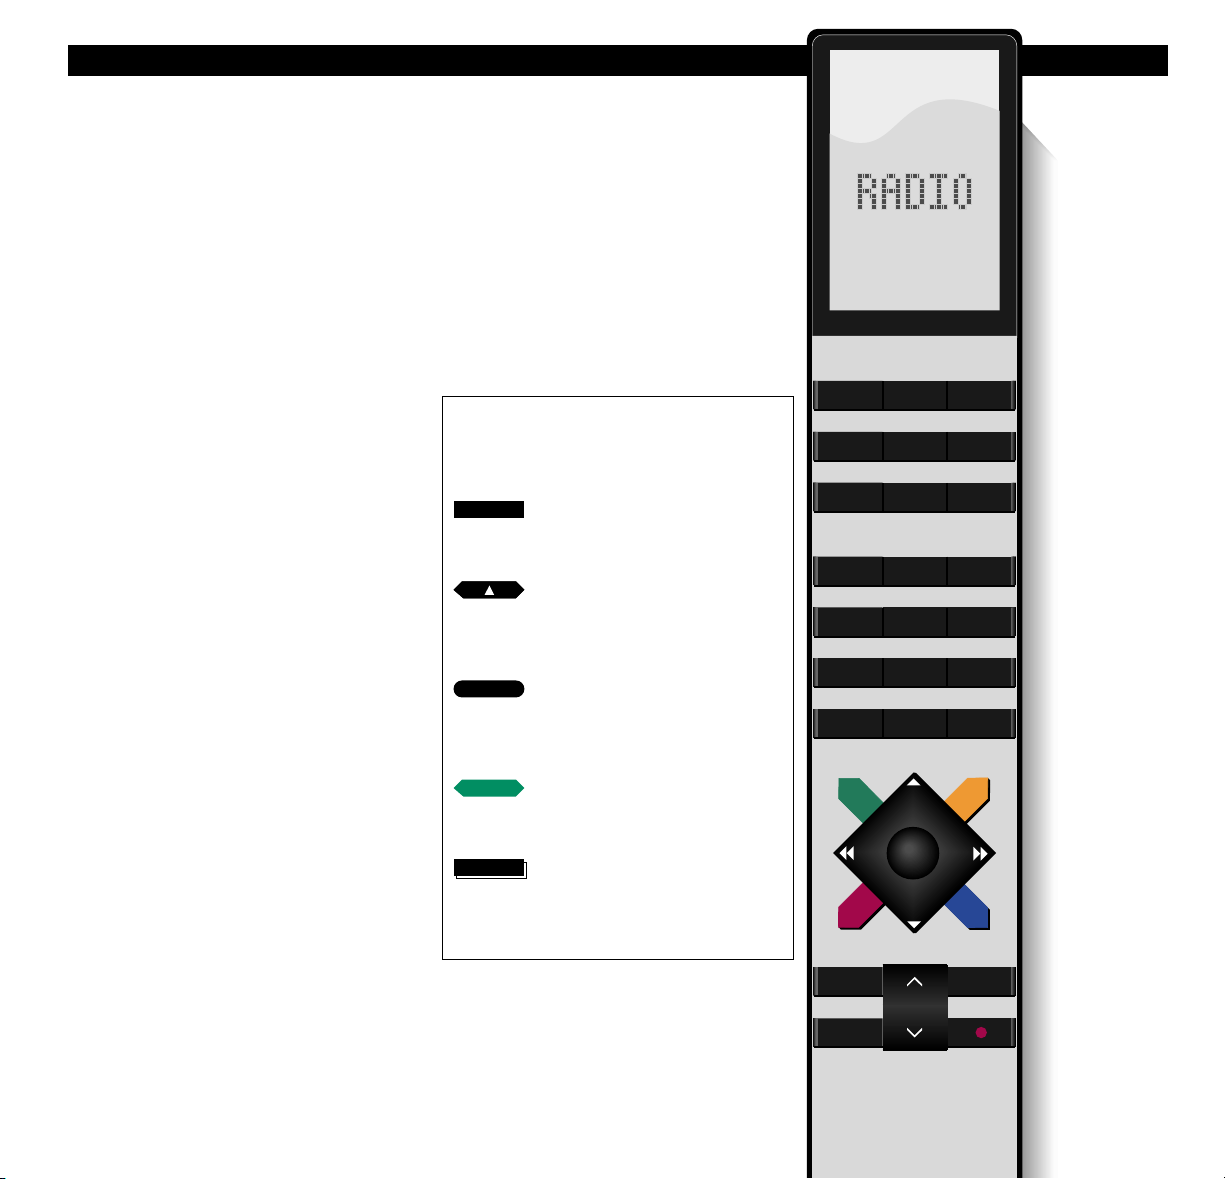
Switching on and playing the radio
To switch on and play the radio, simply
press the buttons shown to the right.
You can step through your radio
programs and on the display you will
be able to see which radio station you
have selected.
On the display you will see the indication RADIO followed by a program
number or a program name if you have
named the particular program.
See pages 16-17 for further
information…
Press to turn on the radio
Press to step through radio
programs
TREBLE RESET
BASS MUTE
BALANCE
LOUDNESS
OK
TIMER
CHECK
CLOCK
OK
RANDOM
EDIT
SELECT EDITING
NAMING CLEAR
OK
TUNE
AM/FM
P. NO.
NAMING CLEAR
OK
A. AUX
•
RADIOCD
PAUSE
ON/OFF
CLEARVOL
VOL
Close-up of the BeoSound 9000 operation
panel…
The buttons used for your daily operations are
highlighted on the panel.
RADIO
•
or
▲
▼
VOL
∧
VOL
∨
Page 10
10
BEO4 REMOTE CONTROL
TV LIGHT RADIO
SAT DVD CD
V TAPE RECORD A TAPE
789
456
TEXT
0
MENU
123
LIST EXIT
STOP
GO
Using the Beo4
The BeoSound 9000 CD-player is
operated from a distance via the Beo4
remote control. The Beo4 step-by-step
operating sequences are shown as
inserts framed in boxes throughout this
user’s guide.
The Beo4 remote control operates all
the primary functions in the BeoSound
9000 such as switching on the radio or
the CD player, changing radio
programs, CD tracks or CDs. It also
selects programs or CDs to be played,
adjusts sound functions, pauses
playback and finally switches to
stand-by.
The Beo4 remote control also enables
you to select specific tracks on CDs,
select sequences of specific discs to be
played, search forward and backward
on CDs, switch on the random order
playback and edited order playback
functions as well as select auxiliary
equipment.
Note: Please refer to the Beo4 User’s guide for
further information about the Beo4 principles of
operation.
In order to perform certain functions
with Beo4, you have to add to the
Beo4 list of functions. Throughout this
user’s guide you will be informed when
such an addition is called for. Please
refer to your Beo4 User’s guide and the
chapter Customizing your Beo4 for
further instruction.
Nice to know…
In the step-by-step operating sequences, the
buttons on the Beo4 and cues in the display
will be illustrated like this:
The Beo4 remote control is not a standard
component of the BeoSound 9000. Beo4 is
available as an optional extra from your Bang &
Olufsen dealer.
Rectangular buttons for e.g.
sources, numbers, and volume
regulation
Buttons incorporated in the large
star-shaped button for stepping up
or down and forwarding and
rewinding
A small, round GO button incorporated in the large star-shaped
button which stores, accepts and
executes control operations
Coloured buttons incorporated in
the star-shaped button for special
functions
The double-button means ‘press
repeatedly’ on LIST
CD
GO
LIST
RANDOM Cues in the Beo4 display
Page 11

11
USING THE COMPACT DISC PLAYER
12 Loading CDs
13 Positioning CDs
14 CD playback
16 Switching displays
17 Choosing a sequence of discs
18 Playing CDs and tracks in random
order
19 Programming a series of tracks for
one CD
20 Playing edited CDs
21 Naming CDs
22 Listing CDs
Page 12
USING THE COMPACT DISC PLAYER
12
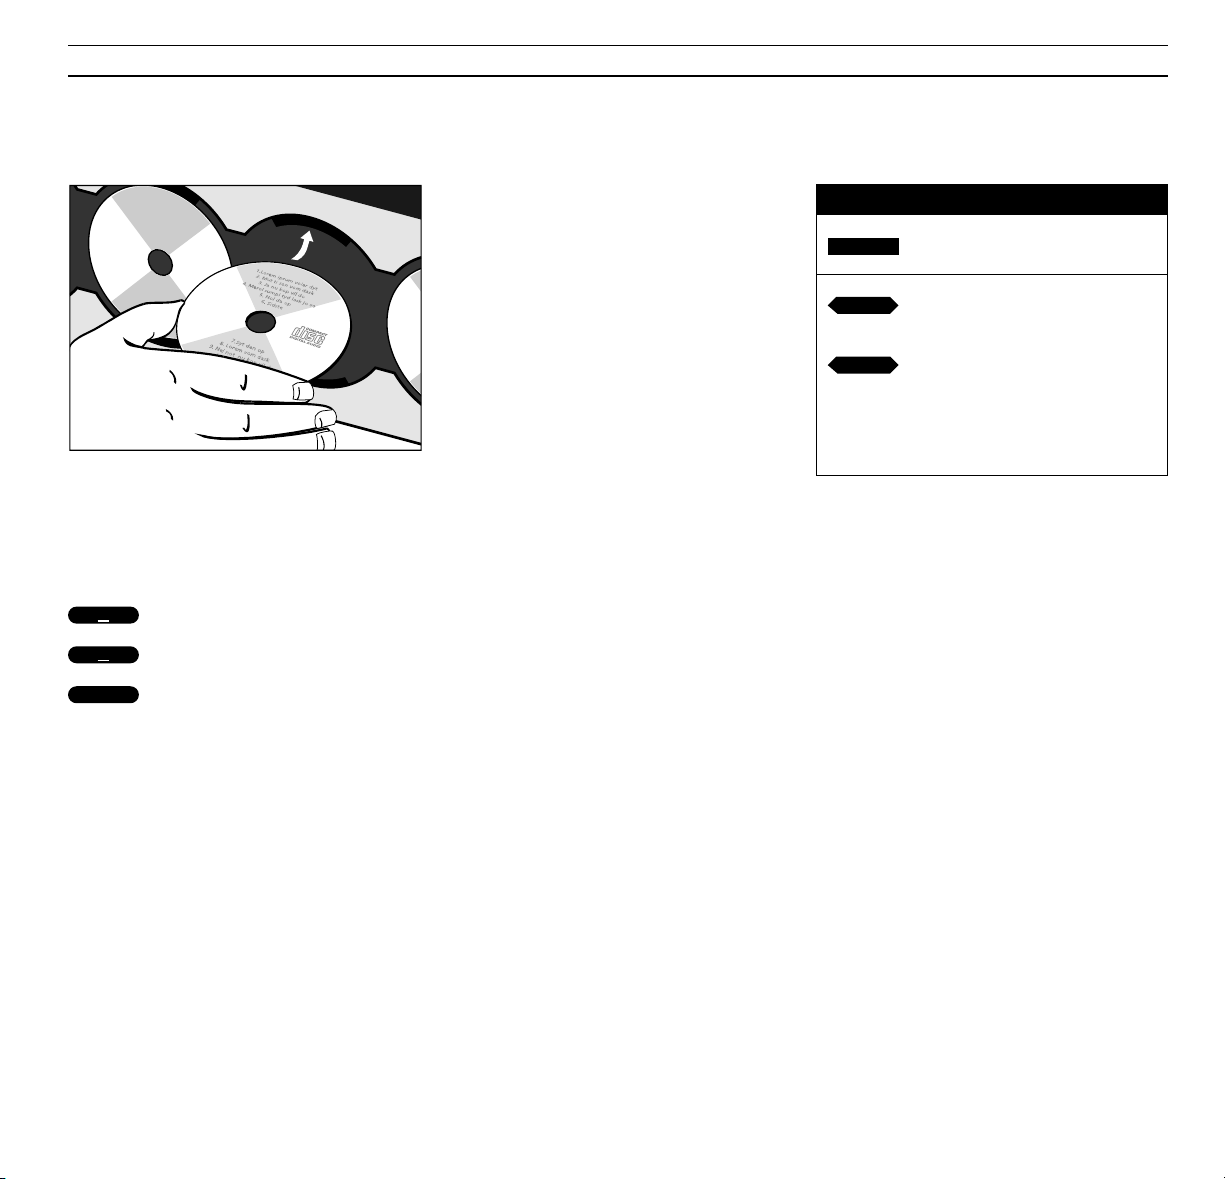
Loading CDs
Pressing the load button raises the
glass door. You can then remove the
CDs from their compartments and load
the CDs you want to play. Always load
the CD with the text side facing you
and then push the CD into place!
Press the load button again to lower
the glass door. You can also press the
CD button to lower the door and the
CD where the carriage is situated will
start playing at once.
The carriage will situate itself in
various positions depending on the
placement you have chosen for your
BeoSound 9000. Please refer to the
Setting-up guide for further
information concerning placement.
If the glass door is open and the
carriage is placed over a CD you want
to remove, simply move the carriage to
another position by pressing the direct
CD selection button next to a
compartment.
Nice to know…
• The carriage registers whether the CD
compartments you ask for are empty or not, and
until the glass door is opened again, it will
remember the state of the compartments.
• If you leave the glass door open, it will close
automatically after 5 minutes.
• If BeoSound 9000 is left paused or stopped for
more than 30 minutes, it automatically switches
to stand-by.
The CD must be loaded with the text side facing
you. Hold the CD by its edges and insert the CD
(top section). To unload the CD, hold it by its
edges and push the CD a little forward to release
it.
BEO4
Press to play a CD
Press
tt to move the carriage up
or to the right
Press
ss to move the carriage
down or to the left
Alternatively, key in the CD compartment
number you want the carriage to move to.
Press to raise the glass door
Press to lower the glass door
Press to lower the door and start
playing
or
CD
CD
or
tt
ss
▲
▲
Page 13
13
Positioning CDs
If you store a position for each CD, the
BeoSound 9000 will now remember
these positions. No matter how many
times you remove and reload the CDs,
the individual CDs will be returned to
these positions every time they stop
turning*.
If you wish to change or cancel the
positions of your CDs while still in the
positioning function, you press the
CLEAR button instead of OK to cancel
the position you have already chosen.
*Note: Some particular CDs do not contain the
information which is required by the BeoSound
9000 in order to store positions for CDs. Therefore
you may experience that the position you have
attempted to store for a CD is not adhered to by
the BeoSound 9000. You will of course still be
able to play the CD in question.
By positioning your individual CDs, you
create your own design with a
particular collection of CDs on
BeoSound 9000. When you load CDs on
the BeoSound 9000, you can adjust
their positions manually so that for
example the graphical design and the
text on the actual CD present
themselves to your satisfaction.
When you have loaded a CD and
pushed it in place in a CD compartment, you adjust the position of the CD
manually. Then you move the carriage
to this particular CD and access the
positioning function for CDs in order to
store the position you have chosen.
Please refer to the procedure to the
right of this page.
Load and adjust a CD manually…
Then press the direct CD selection
button next to this CD to move the
carriage to the CD…
then
Press to save the position for the
CD while it is playing
Press to store the position you
chose for the CD when it was loaded
Repeat this procedure for all the CDs
you have loaded…
If you want to clear the position for
a CD, move the carriage to the
CD in question…
Press to access the positioning
function to clear the position
Press to clear the position
then
SELECT
SELECT
then
SELECT
SELECT
then
OK
then
CLEAR
Page 14
> Using the Compact Disc player
14
CD playback
When you press the CD button on the
operation panel, the CD where the
carriage is situated starts to play. You
can also start playback by pressing the
OK button in the CD section of
buttons.
If you want to play a specific CD, simply
press the direct CD selection button
placed next to the CD compartment.
The carriage then moves to the CD you
have chosen, and playback starts.
While a CD is playing, you can step
through the tracks by pressing the step
buttons
▲ or ▼. When you have
stepped through the tracks of one CD,
pressing the step button
▲ will start
playback of the first track on the next
CD. You can now step through the
tracks of this CD.
When your first CD has finished
playing, the carriage automatically
moves to the next CD you have loaded
and starts playing this new CD.
After 12 hours of uninterrupted
playing, the BeoSound 9000 stops. If
you choose to hear another source, the
CD player switches off automatically.
Nice to know…
When you play your BeoSound 9000 CD player, a
tiny red indicator is lit beside all the CD
compartments where you have loaded a CD.
If you for example choose a sequence of discs to
be played, only the indicators next to the CDs you
have chosen will be lit even though you have
loaded six CDs.
Press to play a CD
Press to play the next track on a CD
Press to play the same track again
or press twice to play the previous
track
Press to pause playback
Press to resume playing
Press to raise the volume
Press to lower the volume
Press to silence the speakers
Press again to recall the sound
Press to switch to stand-by
CD
PAUSE
CD
MUTE
or
VOL
∧
VOL
∨
•
or
▲
▼
Page 15
15
BEO4
Press to start playback of a CD
Press to change tracks on a CD
Press to change to the next or
previous disc
Press to choose a disc number
directly
Press list to display TRACK* to
choose a specific track
Press to choose a track number
Press to choose a track directly
*Note: In order to display TRACK on Beo4, you
have to add this function to its list of functions,
please refer to your Beo4 user’s guide and the
chapter Customizing your Beo4 for further
instruction.
CD
STOP
or
Press to search forward on a disc
Press to search backward
Press to pause playback
Press to switch to stand-by
or
or
or
tt
ss
1
6
through
1
9
through
then
LIST
or
•
Page 16

> Using the Compact Disc player
16
Switching displays
Press to play a CD
Press repeatedly to change the CD
display indication
The display can give you three
different types of information about
the CD being played:
• Name*
• Number of CD and track
• Number of CD and elapsed track time
To switch from one display to the
other, you must press the OK button
repeatedly while the CD is playing.
Your chosen display indication for the
CD player will remain on the display
panel and only disappear temporarily
when you undertake another
operation on the BeoSound 9000
operation panel. Then the information
which accompanies this operation will
appear on the display for a short
period of time.
*Note: You have to name the CD before a name
appears on the display, please refer to page 21 for
further information about naming.
Name of CD
Number of CD and track
Number of CD and elapsed time of the current
track in minutes and seconds
CD
OK
Page 17

17
Choosing a sequence of discs
You can make BeoSound 9000 play
your favourite CDs in a particular
sequence. Every time a CD is included
in the sequence, the red indicator next
to the CD compartment lights up.
The CDs you have chosen will start
playing in numerical order. The CD
sequence will be played continuously
for up to 12 hours unless you switch
BeoSound 9000 to stand-by.
If you want to, you can override the
chosen disc sequence and listen to a CD
not included in the sequence. Simply
press the direct CD selection button
next to the CD you want to hear, and
playback will start immediately.
You can also choose to leave out a CD
which has already been included in the
sequence but only if you are still in the
SELECT option*. You press the direct
CD selection button again next to a CD
you have already included.
*Note: The SELECT option lasts for 25 seconds
from when you pressed SELECT. If you press a
direct selection button after the SELECT option
has ended, the disc you chose will start playback
immediately and override your sequence. When it
has finished playing, BeoSound 9000 will continue
playing the sequence you chose before.
Press to start playback of a CD
Press SELECT and SELECT DISC will
appear on the display
Press the direct CD selection buttons
next to the CDs you want to
include…
Press SELECT to start clearing a
sequence and play all six CDs
Press to clear the sequence
BEO4
Press LIST to display SELECT*
Key in the disc numbers you want
to include
Press LIST to display SELECT to
start clearing a disc sequence and
play all six CDs
Press 0 ( nil ) to clear the
sequence
*Note: In order to display SELECT on Beo4, you
have to add this function to the Beo4 list of
functions, please refer to your Beo4 user’s guide
and the chapter Customizing your Beo4 for
further instruction.
LIST
LIST
1
6
through
then
0
then
CD
SELECT
SELECT
CLEAR
then
Page 18

> Using the Compact Disc player
18
Press to start playing CD
Press to display RANDOM ON and cut
in the random play function
Press twice to display RANDOM OFF
and cancel the random play function
Playing CDs and tracks in random order
The random play function plays CDs
and tracks on individual CDs in a
random order. Also chosen CDs and
track series can be played in random
order.
If you continue playing the same CDs
or track series, you will find that the
tracks are played in a different order
each time the CDs or track series are
played.
You can choose to combine the
RANDOM function with the EDIT
function and play your favourite tracks
in a random order. You have to
activate the functions one after the
other. You can also combine these two
functions with SELECT and thus choose
to play only your favourite tracks from
for instance two CDs in random order.
Please refer to the chapters
Programming a series of tracks for
one CD and Playing edited CDs on
pages 19 - 20 with respect to further
details of the EDIT function. With
respect to choosing CDs, please refer to
the chapter Choosing a sequence of
discs on page 17.
Note: If you cancel the random play function
while a CD is playing, all the tracks beyond the
current track number will be played in
chronological order, even if they have already
been played while the random play function was
cut in. The function remains ON until you cancel it
– even in stand-by.
CD
RANDOM
RANDOM
then
BEO4
Press LIST to display RANDOM
Press to start random order
playback immediately
LIST
then
GO
Press LIST until RANDOM is
displayed
Press
▼ to cancel random order
playback
LIST
then
Page 19

19
Programming a series of tracks for one CD
You can program your BeoSound 9000
to play your favourite tracks on a CD.
First you scan the CD you want to edit.
The first 15 seconds of each track on
this CD will be played. On the display
the track number you are currently
playing will appear.
During this 15-second playback, you
must then include the particular track
in the series by pressing the
▲ button
or exclude the track by pressing the
▼
button. As soon as you press either the
▲ or the ▼ button, the next track on
the CD starts playing*.
Repeat this procedure until you have
chosen your favourite tracks and your
track series is complete. You have now
composed your own personal track
series on one CD…
*Note: If you do not choose whether you want to
include or exclude a track within the 15 second
playback, the CD player will include the track
automatically. If you choose to leave EDITING
before you have scanned, accepted or excluded all
the tracks on the CD, the remaining tracks will be
regarded as excluded from the track series.
The BeoSound 9000 memorizes the
specific track series you have chosen,
but if you want to hear it again the
next time you load this particular CD,
you must use the edit function which
allows you to play your edited track
series. If you do not choose the edit
function, the CD will be played in full.
See the chapter on Playing edited
CDs on the following page for further
details.
If you happen to make a mistake or
change your mind while you are
choosing your tracks, just press the
EDITING button again – and start over.
Nice to know…
If you have named CDs and named a large number
of track series for individual CDs which, in all,
include 200 CDs, the display will read CD LIST FULL
and you will have to clear some of your entries
on the list to program new ones, see how to on
page 22.
Press to play CD
Press to scan the CD
EDITING? appears on the display
Press to start scanning the tracks
Press to include a track number in
the series
Press to exclude a track number
from the series
EDITING OK appears on the display
when you have included or excluded
the last track…
Press to accept the track series
To clear a track series…
Choose the CD whose track series
you want to clear
then
Press to access the programming
option
then
Press to clear the track series
altogether
CD
EDITING
OK
then
OK
EDITING
CLEAR
then
or
▲
▼
Page 20

> Using the Compact Disc player
20
Press to start playback of a CD
Press to display EDIT ON and start
edited playback
Press twice to play a CD in full and
cancel EDIT – EDIT OFF appears on
the display
Please refer to the chapter on Playing
CDs and tracks in random order for
further instructions of how to combine
EDIT and RANDOM on page 18.
Nice to know…
If you cancel the edited playback function while
an edited CD is playing, all tracks beyond the
current programmed track number will be played.
The EDIT function remains ON until you cancel it –
even in stand-by.
Playing edited CDs
BEO4
Press LIST to display EDIT*
Press to start edited playback
LIST
then
GO
*Note: In order to display EDIT on Beo4, you
have to add the function to the Beo4 list of
functions, please refer to the Beo4 user’s guide
and the chapter Customizing your Beo4.
CD
EDIT
EDIT
then
The edit function enables you to play
the track series you have chosen from
individual CDs, that is your edited CD.
BeoSound 9000 memorizes the series
you chose, so that you can hear them
again and again.
Just press EDIT when you have loaded
the CDs, you have chosen tracks for,
and you will be able to enjoy your
favourite tracks from these CDs.
You can also combine your edited
playback with the RANDOM function
and play your favourite tracks in a
random order.
Press LIST until EDIT is displayed
Press
▼ to cancel edited playback
LIST
then
Page 21

21
You can give a short name of your own
choice to the CDs in your private CD
collection and name the track series
you have programmed on individual
CDs.
You can name the individual CDs when
you start playback. If you have already
entered a name, this name will appear
on the BeoSound 9000 display panel.
You ”write” the name of your CD or
CD track series by pressing the
▲ or ▼
buttons and the OK button. Follow this
procedure until you have chosen your
last character and then you must store
the name.
Note: If you make a mistake or change your mind
while you are naming your CD or track series, just
press the NAMING button again – and start over
or press CLEAR to clear what has been keyed in.
Press to play CD
Press to access the naming function
Press to reveal the characters or
numbers one by one
Press to move to next character
position
Press to store the name
Press while you are naming CDs or
track series in order to automatically
store the name and exit the naming
function
Press to access the naming function
Press to clear the name
Then,
Press to return to normal source
operation
Naming CDs
or
The name can consist of up to 12 characters,
including numbers. If you have not given a name
to the CD, the track number, track time or elapsed
time will appear on the display instead. BeoSound
9000 allows you to store 200 entries which include
names and/or track series for CDs.
CD
NAMING
OK
To clear a name, follow this procedure…
then
then
NAMING
CLEAR
CD
then
or
then
OK
CD
then
▲
▼
Page 22

> Using the Compact Disc player
22
Listing CDs
All the CDs you have named or
programmed track series on can be
displayed one by one without you even
having to load these CDs.
The list is useful if you want to quickly
leaf through all the CDs which are
included on the CD list.
If a CD has not been named but a track
series has been programmed on it, it
will appear on the CD list as e.g. DISC 3
indicating the number it has been
assigned on the list. However, a CD can
of course both have a name and a
programmed track series attached in
which case only the name will appear.
You can clear an entry on the CD list
while you are leafing through the list.
If you choose to clear a CD entry, you
will clear the name you may have given
the particular CD and the track series
you may have programmed as well as
the position you may have
programmed for the CD.
Press to play CD
Press to access the naming list
CD LIST appears briefly, then the
name of the current CD appears
Press to list the names one by one
and return to names further up the
list
Press to clear a name while the
appropriate name is displayed
Press to return to normal source
operation
CD
NAMING
NAMING
then
or
▲
▼
CLEAR
CD
If you attempt to name or program track series
for more than 200 CDs the display will read
CD LIST FULL
, and you will have to clear an entry
before you can add another.
Note: If the carriage is situated on a CD which has
been given a name or the CD has been edited, the
name or number of this CD will appear on the
display when you access the list. If the CD under
the carriage is unknown, the CD list will appear
on the display and you have to press the
▲ or ▼
buttons to get a name or number displayed.
Page 23

23
24 Presetting radio stations
25 Clearing presets
25 Radio program list
26 Fine tuning a radio station
26 Mono/stereo reception
27 Naming radio programs
28 Playing your radio programs
29 Switching displays
USING THE RADIO
Note: Proper FM and AM aerial connections must
be made to the BeoSound 9000 in order for the
radio to pick up the stations available in your
area. Please refer to the Setting-up guide for
details about aerial connections.
Page 24

USING THE RADIO
24
Presetting radio stations
To be able to use the radio, you must
first tune in to the radio stations you
want to store and then store them on
program numbers of their own*.
You can store up to 60 radio stations
and if you like, you can give them a
short name which you choose yourself.
You press the TUNE button to start
presetting your radio stations. Once
you have pressed TUNE, presetting a
radio station is like having a conversation with the BeoSound 9000 display.
The display will prompt you to take
action. In order to reveal options other
than those already on the display, press
the
▲ or ▼ buttons. Pressing the OK
button accepts any information that is
currently shown on the display.
All in all, the tuning procedure takes
you through five stages (see further
explanation on the right of this page)...
*Note: You can change the program number of
your radio program any time also without being
in the process of tuning. Simply press P.NO. to
change a current number and follow the
procedure to the left of this page. Similarly, you
can also name a radio station with a short name
of your own choice, please refer to page 27 for
further instruction.
1. Press TUNE to start the tuning function
2. Select the band where you want to search for
radio stations – AM or FM.
3. Search for a radio station by pressing
▲ or ▼.
The searching stops at the first station which
produces an acceptable signal. If this is not the
station you want, just press
▲ or ▼ again to
continue searching.
4. When you have found a station, store it on a
program number of its own. The display
automatically offers you a vacant program
number, but you may select another one if you
like. If the station you have found has been
stored already, the program number where the
station has been stored appears on the display.
5. Finally, you must store your new radio program
along with the information you have given to
it.
Note: If a station needs fine tuning, or you wish to
switch between mono and stereo sound on radio
programs, please refer to page 26.
Press to turn on the radio
Press to start the tuning function
Press to select AM or FM, switches
from one to the other, check display
for an indication of which one you
have chosen
Press to search for a radio station up
or down the frequency band
Press to accept the station you have
found
Press to change the displayed
program number
Press to select a program number –
up or down
Press to store your new radio
program – STORED appears on the
display
RADIO
TUNE
AM/FM
OK
P.NO.
or
then
OK
then
then
▲
▼
or
then
▲
▼
Page 25

25
Clearing presets...
If you want to cancel one of your radio
presets, you can do so via the CLEAR
button. See how to clear a program to
the right...
When the program number has been
cleared, CLEARED will appear on the
display.
Press to turn on the radio
Press to search for program number
Press to clear the program
Press to confirm the clearing of the
radio program
RADIO
or
▲
▼
CLEAR
OK
then
Document your radio presets here:
1
2
3
4
5
6
7
8
9
10
11
12
13
14
15
16
17
18
19
20
21
22
23
24
25
26
27
28
29
30
31
32
33
34
35
36
37
38
39
40
41
42
43
44
45
46
47
48
49
50
51
52
53
54
55
56
57
58
59
60
Page 26

> Using the radio
26
Press to turn on the radio program
you want to fine tune
Press to start the fine tuning
function
Press to fine tune your program
towards a higher or lower frequency
Press to accept your fine tuned
program
Press again to store program and
program number
Fine tuning a radio station
If the radio station is not tuned in
clearly enough, it may be because the
station needs to be fine tuned.
The fine tuning function enables you
to move slowly through the
frequencies, or to detune a station
slightly because of noisy reception.
Just follow the instructions to the left,
and listen carefully as you proceed...
Once you have fine tuned your
program, you can choose a different
program number for your radio
program if you like before you store it.
Please refer to Presetting radio
stations on page 24 for further
information.
Press to turn on the relevant radio
program
Press to choose MONO or STEREO
Press to switch from stereo to mono
Press to store your new tuning on
the program number
Mono/stereo reception
If you have tuned in to an FM station
broadcasting a stereo signal, this signal
will be stored along with the radio
program.
Your BeoSound 9000 automatically
switches to mono if the stereo signal is
not strong enough to produce an
acceptable stereo sound.
However, you can overrule this
automatic function if you wish and
select mono manually. See how to do it
on the left of this page.
The choices for the settings are indicated on the
displays – stereo or mono sound
RADIO
TUNE
TUNE
then
TUNE
TUNE
then
TUNE
then
OK
then
OK
RADIO
OK
then
or
▲
▼
or
then
▲
▼
Page 27

27
You can name all the radio programs
you have stored. Choosing a name is
completely up to you.
This may help you remember a
program not only by its program
number but by a particular name.
When you are listening to a radio
program, its name will appear on the
display.
Once you have completed ”writing”
your name, you store the name and it
will then appear every time you choose
this program again.
If you happen to make a mistake or
change your mind while you are
naming a radio station, just press the
NAMING button again – and start over.
If you want to clear the name after you
have keyed it in, press CLEAR instead
of OK and the name you have keyed in
will be erased.
Naming radio programs
Press to turn on the radio program
you want to name
Press to start the naming function
The first of the twelve character
positions blinks, indicating that you
can start ”writing” a name
Press to reveal the characters one
by one
Press to reveal previously shown
characters
Press to move to the next character
position
Press to store the name of the
radio station
NAMING OK will appear on the
display
or
Press to store the name and exit the
naming function
You can press RADIO at any time to
store and exit the naming function
To clear a name…
Press to access the naming function
Press to clear the name
If you have left the naming function
and want to clear the name, just press
NAMING again and then CLEAR to
clear the name in question. Press
RADIO to leave the naming function
and the name will be cleared.
If you do not name your programs, the
station’s own name may appear
instead, provided such a name is being
transmitted by the radio station itself*.
*Note: Such a name can only be transmitted if
your BeoSound 9000 is equipped with the RDS
facility.
The name may contain up to 12 characters,
including numbers
RADIO
NAMING
or
▲
then
▼
OK
then
OK
then
RADIO
NAMING
CLEAR
Page 28

> Using the radio
28
Playing your radio programs
Press to turn on the radio
Press to step through your radio
programs
Press to switch to stand-by
In order to turn on the radio simply
press the RADIO button. The program
you were listening to last starts playing
and it will be indicated on the display
which radio program is playing.
If you have given a name to the radio
program, the display will read out that
name.
To switch between programs, you use
the step buttons
▲ or ▼. If you keep
either the step
▲ button or the step ▼
button pressed down, you will step
through your programs quickly and
continuously.
If you select another source, the radio
switches off automatically. To switch
off the entire system, press the standby button.
BEO4
Press to turn on the radio
Press to step through your radio
programs
Key in the program number you
want to hear
Press to switch to stand-by
RADIO
or
1
9
through
•
RADIO
or
▲
▼
•
Page 29

29
Switching displays
The display can give you four different
types of information about the radio
program you are listening to:
• Program name or RDS*
• Radio text information*
• Program number
• Radio frequency
To switch from one display to the
other, you press the OK button
repeatedly while the radio program in
question is playing.
The information you have chosen to
display will remain on the BeoSound
9000 display until you choose another
one of the displays illustrated to the
right on this page. The display e.g.
program name will of course disappear
temporarily if you choose to e.g. step
through your other radio programs
then the appropriate information will
appear on the display.
Radio text switches back and forth
between program name and radio text
information.
Press to turn on the radio
Press repeatedly to change the radio
display indication
*Note: RDS is a facility which enables a radio
station to transmit either the name of the radio
program you are listening to or other radio text
information. Please refer to page 27 for further
information about RDS.
Program name indication
Program number indication
Radio frequency indication
RADIO
OK
Radio text information
Page 30

NOTES
30
Page 31

31
USING THE TIMER
32 Programming Timers
34 Checking or clearing Timers
35 Switching the Timer function to
on or off
36 Setting and using the built-in
clock
Page 32

USING THE TIMER
32
Programming Timers
You can program your BeoSound 9000
to start or stop playing at an appointed
time throughout your day and week
without you even having to be there to
control the process.
• The Timer Play function can, for
example, wake you up in the
morning to the sound from either
your favourite CD or radio program*.
• The Timer Stand-by function enables
you to program the BeoSound 9000
to switch off automatically – for
example after you leave for work in
the morning.
Once you have pressed the TIMER
button to get started, programming a
new Timer is just like having a
conversation with the display…
The BeoSound 9000 memorizes up to
15 such programming entries and you
can program timers which are carried
out once or timers which are carried
out throughout the week, please refer
to the next page for information about
‘How often ?’.
*Note: When you program a Timer on RADIO, TV
or SAT, you will have to choose the program
where you want to program a timer play. You can
only choose already stored RADIO programs.
When you choose a program for RADIO, the
program you listened to last will appear. For TV
and SAT program 1 will appear as your first
option.
If you happen to change your mind
while you are programming, just press
a source button, CD or radio, to exit
the timer programming function.
While you are programming a Timer,
pressing the CHECK button will take
you back one step in the programming
sequence.
Note: When TIMER STORED is displayed you cannot
step back, pressing CHECK will start the checking
function, see page 34 if you want to check or clear
a Timer.
Nice to know…
• The BeoSound 9000 has a built-in 24-hour
clock. This means that the display reads, for
example, 14:45 for a quarter to three. In
order for the Timers to be executed
correctly, the clock must be set to the
correct time – (see page 36).
• For a Timer Stand-by programming all the
BeoSound 9000 needs to know, is at what
time you want it to stop playing, and how
often, SINGLE DATE or DAYS. As soon as you
choose a stand-by timer, you will jump
straight to the display which prompts you
to choose when the Timer should stop.
Press to start programming timers
Press to choose a source for your
Timer or choose a Timer standby
Press to accept the Timer
Then program when you want the
Timer to start and stop…
Press repeatedly until you have
found the exact time for starting a
Timer play
Press to accept start
Repeat the procedure with the
▲
and ▼ buttons and OK to program
the exact time for stopping a Timer
To program a SINGLE DATE Timer...
Press to display the date you want to
program a Timer for
Press to accept the selection
Press to store your Timer
programming and return to normal
source operations
Please refer to the following page to
program a DAYS Timer…
TIMER
OK
or
then
OK
then
then
▲
▼
OK
or
then
OK
then
▲
▼
or
▲
▼
Page 33

33
How often?...
The BeoSound 9000 can be programmed to carry
out a Timer once on a specific date SINGLE DATE,
or on forthcoming, selected weekdays DAYS.
If you choose SINGLE DATE, the cue DATE and
today’s date in the display prompts you to choose
a date within the next year (1-31). Please refer
to the sequence of buttons on p.32 and the
displays on the far left of this page for further
guidance (1). For an explanation of the
abbreviations of months please refer to page 36.
If you choose DAYS, the display will prompt you to
fill in the weekdays on which you want the system
to carry out the Timer:
MON for Monday
TUE for Tuesday
WED for Wednesday
THU for Thursday
FRI for Friday
SAT for Saturday
SUN for Sunday
Press the
▲ button to include the particular day
on the display in your timer programming or
exclude the day by pressing the
▼ button. As soon
as you have pressed either the
▲ or ▼ button, the
next day will be displayed. Then repeat the
process of including or excluding all the days of
the week. You can also choose to include e.g.
MON and TUE and then press OK to store your
timer without considering the remaining days.
Finally, when you have pressed OK to accept your
choice of days, OK appears on the display with the
first letters of the days you accepted
(M,T,W,T,F,S,S,) and underscores ( _ ) for the days
you did not choose. Please refer to the displays to
the left of this page for further guidance (2).
If you only want to program a timer play or standby once, choose this option...
When you want to program a weekly timer as a
timer play or timer stand-by, choose this option...
Display the date when you want to program your
timer...
Fill in the days when you want to program the
timer. If you do not choose any days, the option
to choose Monday, MON ?, will appear again.
When you press OK and this cue appears on the
display, you can press OK to store the timer or you
can change the display by pressing the
▲ or ▼
buttons to display TIMER EXIT? and exit the timer
programming function without storing it. Press
OK to accept exit.
When you have considered Sunday or press OK
before you have included or excluded all the days
of the week, this display will prompt you to store
your timer programming. If you do not want to
store the Timer, press another source button to
exit the function or press the
▲ or ▼ buttons to
display TIMER EXIT and then press OK to exit the
timer programming function without storing your
Timer.
Store your timer by pressing OK and you will no
longer be able to change or use the CHECK
function to step back in your programming
sequence. See page 34 if you want to clear it...
Press OK to store your weekly timer programming
and you will now no longer be able to change it
or step back in the programming sequence. See
page 34 if you want to clear it...
12
Page 34

34
Checking or clearing Timers
You can look up each Timer
programming entry to check its
contents or cancel it completely.
On the displays (as illustrated to the
right) the following information will
appear:
• The timer’s number on the list of
timers together with source and
program number
• Times for starting and stopping
• Date for the timer or days it is
programmed to perform a timer play
or timer stand-by
When you have displayed all the
details of a particular Timer
programming, you can choose to see
the next Timer programming to check
or clear it. Press the
▲ or ▼ buttons to
reveal the display NEXT and press OK to
accept it.
You can choose to clear a timer by
pressing CLEAR when you are
displaying and checking the details of
it. If you press CLEAR to clear a timer,
the display will briefly read CLEARED
and the Timer will be cancelled.
Press to check your timers
Press to see timer programming
number, source and program
number of individual timer entries
Press repeatedly to display the
details of a particular programming
When the display reads OK ?
Press to display NEXT ? to see your
next timer programming entry
Press to see your next entry
– If there are no more entries,
NO MORE, will appear on the display
Press clear while information
regarding a timer programming is
displayed on the display –
CLEARED will appear on the display
after pressing CLEAR
> Using the timer
Display of timer programming entries in
numerical order with source and program
number, clearing is possible...
Display of times for starting and stopping,
clearing is possible...
Display of days which the timer is programmed
for. If it is a one-off timer programming, the date
of the timer will be displayed. Clearing is
possible…
CHECK
OK
OK
CLEAR
or
then
▲
▼
or
then
then
▲
▼
Page 35

35
Switching the Timer function to on or off
The timers you have programmed into
the BeoSound 9000 can all be executed
with or without activating the loudspeakers which are either directly
connected to the BeoSound 9000 or are
connected to it via BeoLink*.
The timer ON/OFF function decides
whether a Timer play can be heard on
the loudspeakers.
In order to hear your Timer Play
programming entries you must activate
the loudspeakers in the room or rooms
where you want music by switching the
timer function to ON. If you set the
timer function to OFF, the speakers will
be muted.
*Please refer to page 43 for information about
BeoLink.
So if you choose to set the speakers
next to your BeoSound 9000 to OFF,
but set your extra speakers in your
bedroom to ON, the Timer Play will be
carried out and you will hear it
through your extra speakers in your
bedroom.
However, if all timer functions on the
speakers next to the BeoSound 9000 as
well as on all your BeoLink connected
systems are set to OFF, a timer will not
be activated.
Press to cut in or press again to
cut out the loudspeakers –
When you first press ON/OFF
TIMER ON or TIMER OFF will appear on
the display according to the setting
you have previously made
ON/OFF
Page 36

36
Setting and using the built-in clock
> Using the timer
Press to call up the built-in clock
Press to set time, date/month or
year…
Press to accept the changes and
reveal the next display – Repeat this
setting procedure for date/month
and year…
When you have set or changed
the year, the display now reads
CLOCK OK?
Press to store your new setting of
the clock
Press to show the clock
Press to see the date and year
To display the clock permanently…
Press when Date and Year is
displayed and change the display to
time and ON e.g. 14:40 ON – press
again to cancel the permanent
showing of the clock e.g. 14:41 OFF.
If you want to make use of the Timer
function, you must first make sure that
the built-in clock in the BeoSound 9000
has been set to the correct time, date
and year.
You can check the clock on the display
to ensure that it is set correctly. If this
is not the case you can change the
setting in the process. See how to the
left on this page...
You can also set the BeoSound 9000 to
show the clock permanently even when
the system is in stand-by. The display of
the clock will of course be interrupted
by the messages which follow other
functions or operations but it will
return to displaying the clock.
Note: If you happen to make a mistake or change
your mind while you are setting the clock, just
press CHECK – and start over.
Nice to know…
If you choose to display the clock permanently,
the time and ON appears on the display e.g.
12:30 ON. After a short while ON will disappear
and the time remains on the display – You can
press CLOCK again to display Date and Year.
When setting the clock, the display shows the
time,…
…the date,…
…and the year
Note: The display writes 14:45 for a quarter to
three pm. – and it writes…
JAN for January
FEB for February
MAR for March
APR for April
MAY for May
JUN for June
JUL for July
AUG for August
SEP for September
OCT for October
NOV for November
DEC for December
CLOCK
or
then
then
▲
▼
OK
then
OK
CLOCK
CLOCK
CLOCK
Note: When radio text information is displayed, it
is not possible to display the clock.
Page 37

37
BEO4
Press LIST to display CLOCK on
Beo4
Press to see the time
Press again to see the date and
year
LIST
GO
then
GO
then
Nice to know about timers…
• When you have programmed a Timer, make
sure that the timer indication is on which
will indicate that the loudspeakers will be
activated. If this is not the case, your Timer
will not be carried out. Please refer to page
35 for further information.
• If you use the BeoSound 9000 in a fully
integrated Bang & Olufsen AV system (see
pages 44-45), you have to set the Timer function to ON or OFF via the TV. The display on
the BeoSound 9000 will read TV OPERATED.
• If BeoSound 9000 is connected with
BeoVision Avant, you must set e.g. timer play
via the TV. If you press TIMER or CHECK on
the BeoSound 9000, the display will inform
you that the function is TV OPERATED and you
must program or check the function via the
TV. If your BeoSound 9000 is connected with
a BeoVision Avant in a fully integrated
system, TREBLE, BASS, BALANC E and
LOUDNESS are TV OPERATED. Please refer to
your TV user’s guide for further information.
• If your BeoSound 9000 is BeoLink connected
with a BeoVision TV set other than BeoVision
Avant, you can program timer play or
stand-by on BeoSound 9000 for CD, RADIO,
TV, SAT, V.TAPE.
Page 38

38
NOTES
Page 39

39
40 Adjusting sound
42 Playing auxiliary sources
43 Music throughout the house
44 From audio to video – or vice versa
NICE TO KNOW
Page 40

NICE TO KNOW
40
Adjusting sound
Press to access the treble adjustment
function
Press to access the bass adjustment
function
Press to access the balance
adjustment
Press to raise or lower the treble or
bass levels; or adjust the balance
between the left and the right
speaker
Press to see the status of the
loudness adjustment function
– LOUDNESS ON or LOUDNESS OFF.
Press LOUDNESS again to change the
setting
Press to accept all sound levels –
SOUND OK? appears on the display
Press to store all sound levels
If you have not stored your sound
adjustments...
Press to reset the sound levels to
their previously stored settings
You can adjust the sound to suit your
personal taste and you can store the
adjustment as a permanent setting if
you like.
All you have to do is press the relevant
buttons on the panel and use the
▲ or
▼ buttons to adjust the sound.
The treble and bass levels can be raised
or lowered as you like and you can
alter the balance, that is, the distribution of sound emerging from the
loudspeakers to suit your listening
position.
The BeoSound 9000 also features a
loudness function which you can cut in
or out as you like, please refer to the
following page for further information
about loudness.
You can press RESET any time to reset
the sound levels to their original
settings.
However, if you want to turn your
adjustment into a permanent setting
of the BeoSound 9000, just press OK,
and the display reads SOUND OK?. Then
press OK one last time to store your
new sound setting.
BEO4
Press to raise or lower the
volume
Press volume up and down at the
same time to mute speakers,
press again to activate speakers
Press to display A.SETUP* to adjust
sound
Press to reveal BASS, TREBLE or
LOUDNSS
Press to adjust the treble or bass
levels or set loudness to on or off
Press to display S.STORE to store
your adjustments
Press to reveal SPEAKER and
adjust balance
Press to adjust the balance
between the left and the right
speaker
To store your balance adjustment…
Press LIST repeatedly to display A.SETUP*,
then press GO, now press LIST to display
S.STORE and press GO to store your
adjustment.
*Note: In order to display A.SETUP on
Beo4, you have to add this function to the
Beo4 list of functions, please refer to the
Beo4 User’s guide and the chapter
Customizing your Beo4 for further
instruction.
LIST
LIST
LIST
or
and
GO
then
then
or
then
or
then
tt
ss
TREBLE
BASS
BALANCE
or
▲
▼
LOUDNESS
OK
OK
then
RESET
LIST
GO
then
Page 41

41
The display shows the current volume level.
Volume can be adjusted in steps of two within a
range of 00 to 72.
The display shows the current treble level, here
neutral. Treble can be adjusted within a range of
-4 to +4.
The display shows the current bass level. Bass can
be adjusted within a range of -4 to +4.
The display shows the current balance setting,
here neutral. Balance can be adjusted within a
range of 8 to either side.
The display shows the current loudness setting –
ON if loudness is switched on and OFF if loudness
is switched off.
The display prompts you to store the current
sound setting. Press OK if you do.
Nice to know...
• When the BeoSound 9000 leaves the factory, all
these sound levels are set to neutral values
which will suit the majority of situations.
• All the current sound levels will be stored
simultaneously when you accept SOUND OK?.
• If you change your mind when SOUND OK? is
displayed and do not wish to store your
adjustments, simply press a source button on the
BeoSound 9000 control panel.
• To adjust volume, you just press the volume
buttons VOL
∧ or VOL∨; or press MUTE to
silence the speakers completely. To regain sound
press MUTE again or VOL
∧.
• The loudness function is used to compensate for
the human ear’s lack of sensitivity to high and
low frequencies when listening to low volume
levels. It ”boosts” the low and high frequencies
so that the music becomes more dynamic.
• When the BeoSound 9000 is used in a fully
integrated system (see page 45), sound must be
adjusted as described in the guide for your video
system unless Headphones are connected to the
BeoSound 9000 (see page 42).
• If your BeoSound 9000 is connected with e.g.
BeoVision Avant in a fully integrated system,
TREBLE, BASS, BALANCE and LOUDNESS on your
BeoSound 9000 are TV OPERATED.
Page 42

> Nice to know
42
Press to select extra equipment
Press to raise the volume
Press to lower the volume
Press to silence the speakers
immediately – Press again to recall
the sound
Nice to know:
• Extra equipment must be connected to the AUXsocket on the back of the BeoSound 9000. For
further information, please refer to the Setting-
up guide which is also enclosed with the
BeoSound 9000.
• If you are recording from the BeoSound 9000
onto Audio tape, you will not be able to listen
to another source, CD or radio, other than the
one you are recording. If you change source
while recording, you will then record this new
source onto your Audio tape.
• You will be able to record digital signals from
the BeoSound 9000 to a Digital Audio Recorder
via the digital output socket. Please refer to the
Setting-up guide for further information.
A.AUX
VOL
∧
VOL
∨
MUTE
Playing auxiliary sources
The A.AUX button selects extra Bang &
Olufsen equipment, you connect to the
BeoSound 9000.
You will then hear the sound from the
extra source through the speakers of
your BeoSound 9000 but all control
operations must be carried out on the
extra equipment you connect.
While the source is playing, you can,
though, use the functions which relate
to sound as shown to the left on the
page and the special sound adjustment
functions, please refer to the chapter
on sound adjustment on pages 40-41.
You can record the source, CD or radio,
you are playing on the BeoSound 9000
via the AUX-socket onto Audio tape.
The recording function must be carried
out via the Audio tape recorder’s own
controls.
Headphones…
when you are using BeoSound 9000 as
a stand-alone audio system or when it
is used in a fully integrated system, you
will be able to connect Bang & Olufsen
or non-Bang & Olufsen headphones to
the BeoSound 9000 to the headphones
socket.
Note: Please contact your Bang & Olufsen dealer
for complete information about which Bang &
Olufsen or non-Bang & Olufsen products can be
used with the BeoSound 9000.
The socket for headphones is situated in a low
position on the side of the BeoSound 9000 cabinet
BEO4
A TAPE
LIST
GO
then
Press to select AUDIO TAPE
Press LIST to display PHONO or
A.AUX according to the equipment
you connect
Press GO to select the sources
Page 43

43
For the BeoLink system to work, a BeoLink
installation is required from your BeoSound 9000
(or your AV system) to the room where you want
sound and pictures – or sound alone.
Different configurations are available. Your Bang
& Olufsen dealer will assist you with further
information.
Music throughout the house
The Bang & Olufsen BeoLink system
enables you to ”take your system with
you”.
As you move through your house, you
can communicate with your BeoSound
9000 in any room in which you have
installed BeoLink equipment.
You can play any program or music
source you like on the BeoSound 9000
and hear it in the room with your extra
speakers or your extra TV.
The basic functions offered by the
BeoSound 9000 can even be operated
via your BeoLink products – just as if
you were operating the radio or the CD
player directly, using your remote
control.
Please refer to the User’s guides for
your BeoLink products for operating
instructions.
Page 44
> Nice to know
44
From audio to video – or vice versa
You can operate the BeoSound 9000 in
conjunction with a Bang & Olufsen
video system*, and hear any source you
like in the loudspeakers of either
system.
You can, for example, hear a music
video through the BeoSound 9000
speakers, or listen-in while the TV news
is playing; or you can use the system
the other way around, and listen to the
radio or a CD on the TV speakers.
To operate these audio/video
functions, you must use the AV button
on the Beo4 remote control.
Audio/Video recording
The sound from the BeoSound 9000 you hear in
the TV speakers can be recorded on the video
tape recorder – please refer to the User’s guide
for your video system to see how.
A special recording lock function ensures that you
cannot switch to another program or source while
such a recording is in progress.
*Note: Not all types of Bang & Olufsen video
systems support audio/video integration with the
BeoSound 9000. Please contact your Bang &
Olufsen dealer for further information.
All that is required for the audio/video integration
to work is that your Bang & Olufsen video system
and the BeoSound 9000 are interconnected by a
special link cable.
If the BeoSound 9000 is connected with a
BeoVision Avant, the functions related to Timer
programming are carried out via the TV.
In a fully integrated system with a BeoVision
Avant, TREBLE, BASS, BALANCE and LOUDNESS
are TV OPERATED.
If on the other hand BeoSound 9000 is connected
with for example AV 9000 only the setting of the
clock must be carried out via the TV menu.
The special link cable is available at your Bang &
Olufsen dealer, who will also assist you with
further information about audio/video
integration.
Note: The operations described on this page do
not apply to a fully integrated AV system as
described on page 45.
BEO4
Press LIST undtil AV* is displayed
Press GO to activate the audio/
video function
Press to play TV sound on the
BeoSound 9000 speakers*
Press to play video tape sound on
the BeoSound 9000 speakers
Press to play satellite TV/radio on
the BeoSound 9000 speakers
Press LIST undtil AV* is displayed
Press GO to activate the audio/
video function
Press to play radio on the TV
speakers
Press to play CD on the TV speakers
If you want pictures on the TV screen while
listening to sound on the BeoSound speakers,
just press, for example: TV then LIST until AV*
is displayed, then TV…
*Note: It will be possible to adjust volume and
standby via the BeoSound 9000 operation
panel.
To regain full control of any source, press a
source button first, for example TV or RADIO.
Note: In order to display AV on Beo4, you must
add the function to Beo4. Please refer to Beo4’s
own User’s guide for further instruction.
TV
V TAPE
then
or
SAT
or
GO
RADIO
CD
then
or
GO
LIST
LIST
Page 45

45
BeoSound 9000 without speakers – AV system…
Beo4 remote control and AV system…
In a fully integrated Bang & Olufsen AV system,
the AV* LIST button on the Beo4 remote control
gives access to an extra function:
• Simulcast radio/TV transmissions…
To watch a TV program while listening to the
sound from a radio program at the same time,
press TV then LIST until AV* is displayed then
RADIO on the Beo4 remote control. (Simulcast
radio/TV transmissions can be recorded on the
video tape recorder.)
If BeoSound 9000 is in a fully integrated system
with BeoVision Avant, you can record sound from
TV, Satellite or Video tape onto an Audio tape
recorder connected to the BeoSound 9000 AUXsocket:
• Recording in fully integrated system…
Prepare your tape recorder for recording, then
press e.g. TV, then LIST until AV* is displayed,
then RECORD on Beo4, and make sure you start
your recording on your tape recorder. In order
to stop or control your recording, use the
control panel on your connected tape recorder,
this is not possible via Beo4.
If you change source, however, while you are
recording, the recording will be spoiled and the
tape recorder will start recording this new source.
There is no record lock when you are recording
via the BeoSound 9000 AUX-socket.
Recording onto Audio tape recorder is not
possible if the BeoSound 9000 is used in a fully
integrated system with BeoSystem AV9000.
*Note: In order to display AV on Beo4, you must
add the function. Please refer to Beo4’s own
User’s guide for further instruction.
When BeoSound 9000 is used in a fully integrated
Bang & Olufsen AV system, the video system takes
over some of the functions mentioned in this
guide.
If BeoSound 9000 is connected with BeoVision
Avant, the functions related to timer play and
adjustment of sound levels are carried out via the
TV, but volume regulation is possible on the
BeoSound 9000.
In an AV system, the loudspeakers (two or four)
are connected to the video system.
Furthermore, in an AV system all remote control
operations (audio and video) must be directed to
the video system.
The BeoSound 9000 CD-player can also
be used in a Bang & Olufsen fully
integrated AV system*.
In an AV system, you have direct access
to all your audio and video sources –
and they are all heard through the
same set or sets of loudspeakers.
To play a source in the AV system, all
you have to do is press a single button
– either directly on the systems (audio
or video) or on the remote control.
The Beo4 remote control integrates
remote operation of all the sources in
the AV system.
If the BeoSound 9000 is used in a fully
integrated system and you are
recording an audio source on Video
tape, you will not be able to perform
any control functions on this source.
*Note: Only certain types of Bang & Olufsen video
systems are equipped to master fully integrated
AV systems – operated with the Beo4 remote
control. Please contact your Bang & Olufsen
dealer for further information concerning
appropriate video systems.
Page 46

46
SURVEY OF STATUS DISPLAYS
Below and on the next page you will
find some examples of the cues you are
most likely to meet in the BeoSound
9000 status display…
You have pressed the AM/FM button to choose
the band where you want to search for a radio
station.
The FM band has been chosen.
You have tuned into a radio station and the
BeoSound 9000 has found a station.
The radio frequency is shown on the display and
an empty program number is offered to store it
on.
You have pressed P.NO. to be able to change the
program number of a radio station.
The display shows that you have now stored your
radio station.
You have pressed CLEAR to clear a radio
program.
You have pressed NAMING to be able to name an
entry e.g. name a radio program.
The display shows the letters you have chosen for
the first two positions and underscores for the
ones you have not chosen any for yet.
You have now finished ”writing” the name of e.g.
your radio program and you have pressed OK to
store the name.
You can, though, choose to change or cancel the
name instead of storing it.
The display tells you that you have placed the
carriage over an empty CD compartment and
you must load a CD.
You have pressed SELECT twice to save the
position of a CD.
You have pressed the PAUSE button and the CD
number 3 have paused but the multi CD player is
not switched off.
Page 47

47
The display shows that you have pressed SELECT in
order to choose which discs to play.
The display shows that the random order playback
function for the multi CD player is cut in.
RANDOM OFF
will indicate that the random order
playback is cancelled.
The display shows that the edited playback
function for the multi CD player is cut in.
EDIT OFF
will indicate that the edited playback is
cancelled.
You have pressed EDITING and the display shows
that track no 10 on the chosen CD is now being
scanned or played for 15 seconds and can be
included or excluded from a sequence.
The display shows that the CD list is empty and
that no names or sequences have been chosen.
The display shows that, because your BeoSound is
connected to a TV e.g. BeoVision Avant, you must
program Timers and check Timers via the TV
menus.
In a fully integrated system with a BeoVision
Avant, TREBLE, BASS, BALANCE and LOUDNESS
are TV OPERATED.
You have pressed TIMER to program a Timer and
the display prompts you to choose when you want
your timer to start.
The current time will appear automatically.
The display prompts you to choose when you
want the timer to stop. A stopping time will
appear automatically on the display.
It is set to 1 hour after the starting time you have
chosen.
If you have programmed 15 Timers already and
attempt to program a new Timer, you will see this
cue appear on the display.
You have to clear some of your timers to program
new ones.
The display shows that the TIMER function is on
and that the system or loudspeakers will be cut in
when a Timer is carried out.
TIMER OFF
will indicate that the system will not be
cut in even though a Timer is being executed.
Page 48

NOTES
48
Date purchased
Contact person
Dealer
Telephone
Address
Record your serial numbers here:
BeoSound 9000
3508085 0997
Printed in Denmark by
Bogtrykkergården a-s, Struer
Dear Customer,
Your needs as the user of our products are always given careful
consideration during the design and development process, and we strive to
make our products easy and comfortable to operate.
We therefore hope that you will take time to drop us a line, telling us about
your experiences with your Bang & Olufsen system. Anything which you
consider important – positive or negative – may help us in our constant
efforts to refine our products.
Thank you!
Please write
to:
Customer information dept. 7240
Bang & Olufsen a/s
DK-7600 Struer
Denmark
 Loading...