


RADIO-CONTROLLED
WEATHER STATION
Operation and Safety Notes
STACJA METEO STEROWANA RADIOWO
Wskazówki dotyczące obsługi i bezpieczeństwa
RÁDIÓVEZÉRELT
IDŐJÁRÁSÁLLOMÁS
Kezelési és biztonsági utalások
DALJINSKA-VREMENSKA POSTAJA
Navodila za upravljanje in varnostna opozorila
BEZDRÁTOVÁ METEOROLOGICKÁ STANICE
Pokyny pro obsluhu a bezpečnostní pokyny
METEOSTANICA
Pokyny pre obsluhu a bezpečnostné pokyny
FUNK-WETTERSTATION
Bedienungsund Sicherheitshinweise
Z31055A Z31055B 4
|
|
|
|
|
|
|
|
|
|
|
|
|
|
|
|
|
|
|
|
|
|
|
|
|
|
|
|
|
|
|
|
|
|
|
|
|
|
|
|
|
|
|
|
|
|
|
|
|
|
|
|
|
|
|
|
|
|
|
|
|
|
|
|
|
|
|
|
|
|
|
|
|
|
|
|
|
|
|
|
|
|
|
|
|
|
|
|
|
|
|
|
|
|
|
|
|
|
|
|
|
|
|
|
|
|
|
|
|
|
GB |
Operation and Safety Notes |
Page |
6 |
|
|
|
|
|
|
|
|
|
||||||||||||
|
|
|
|
|
|
|
|
|
|
|
||||||||||||||||
|
|
|
|
|
|
|
|
|
|
|
||||||||||||||||
|
|
|
|
|
|
|
|
|
|
|
||||||||||||||||
|
|
|
|
|
|
|
|
|
|
|
||||||||||||||||
|
|
PL |
Wskazówki dotyczące obsługi |
|
|
|
|
|
|
|
|
|
|
|
|
|||||||||||
|
|
|
|
|
i bezpieczeństwa |
Strona |
25 |
|
|
|
|
|
|
|
|
|
||||||||||
|
|
HU |
Kezelési és biztonsági utalások |
Oldal |
46 |
|
|
|
|
|
|
|
|
|
||||||||||||
|
|
|
|
|
|
|
|
|
|
|
|
|
|
|
|
|
|
|
|
|
|
|
|
|
|
|
|
|
SI |
Navodila za upravljanje in |
|
|
|
|
|
|
|
|
|
|
|
|
|||||||||||
|
|
|
|
|
varnostna opozorila |
Stran |
66 |
|
|
|
|
|
|
|
|
|
||||||||||
|
|
|
|
|
|
|
|
|
|
|
|
|
|
|
|
|
|
|
|
|
|
|
|
|
|
|
|
|
CZ |
Pokyny pro obsluhu a |
|
|
|
|
|
|
|
|
|
|
|
|
|||||||||||
|
|
|
|
|
bezpečnostní pokyny |
Strana |
86 |
|
|
|
|
|
|
|
|
|
||||||||||
|
|
SK |
Pokyny pre obsluhu a |
|
|
|
|
|
|
|
|
|
|
|
|
|||||||||||
|
|
|
|
|
bezpečnostné pokyny |
Strana 104 |
|
|
|
|
|
|
|
|
|
|||||||||||
|
|
DE / AT / CH |
Bedienungsund |
|
|
|
|
|
|
|
|
|
|
|
|
|||||||||||
|
|
|
|
|
Sicherheitshinweise |
Seite |
123 |
|
|
|
|
|
|
|
|
|
||||||||||
|
|
|
|
|
|
|
|
|
|
|
|
|
|
|
|
|
|
|
|
|
|
|
|
|
|
|
|
|
|
|
|
|
|
|
|
|
|
|
|
|
|
|
|
|
|
|
|
|
|
|
|
|
|
|
|
|
|
|
|
|
|
|
|
|
|
|
|
|
|
|
|
|
|
|
|
|
|
|
|
|
|
|
|
|
|
|
|
|
|
|
|
|
|
|
|
|
|
|
|
|
|
|
|
|
|
|
|
|
|
|
|
|
|
|
|
|
|
|
|
|
|
|
|
|
|
|
|
|
|
|
|
|
|
|
|
|
|
|
|
|
|
|
|
|
|
|
|
|
|
|
|
|
|
|
|
|
|
|
|
|
|

A |
|
|
17 |
|
1 |
|
2 |
|
3 |
|
4 |
|
5 |
|
6 |
|
7 |
|
8 |
16 |
9 |
|
|
15 |
10 |
14 |
11 |
|
|
13 |
12 |
|
3 |
B |
|
|
|
|
ZZ/REGISTER |
18 |
|
22 |
CLOCK |
SELECT |
19 |
21 |
ALARM |
SET/RESET |
20 |
|
|
||
|
|
|
x 1 |
C |
|
|
23 |
|
|
|
|
|
|
|
24 |
|
|
|
25 |
|
27 |
|
26 |
|
x 1 |
|
x 1 |
4
D |
|
|
WIRELESS SENSOR |
|
|
|
|
28 |
|
|
x 1 |
AA |
1.5 V |
x 4 |
E |
|
|
|
|
29 |
|
|
30 |
32 |
|
31 |
x 1 |
x 1 |
|
|
|
5 |
Introduction |
|
|
Proper use ...................................................... |
Page |
7 |
Description of parts and features ................. |
Page |
7 |
Technical data ............................................... |
Page |
9 |
Safety............................................................ |
Page |
9 |
General safety information ........................... |
Page |
10 |
Safety instructions for batteries ..................... |
Page |
11 |
Before initial use |
|
|
General information ...................................... |
Page |
12 |
Preparing to use the outdoor sensor ............ |
Page |
13 |
Preparing the weather station for use .......... |
Page |
13 |
Weather station ............................................. |
Page |
15 |
External sensor............................................... |
Page |
15 |
Setting the language / time zone / time / |
|
|
date manually ................................................ |
Page |
16 |
Displaying summer time ................................ |
Page |
18 |
Calling up the 2nd time zone ......................... |
Page |
18 |
Setting the alarm time.................................... |
Page |
18 |
Calling up the alarm times ............................ |
Page |
19 |
Switching the alarm on / off .......................... |
Page |
19 |
Using the snooze button ............................... |
Page |
20 |
Displaying temperature ................................. |
Page |
20 |
Calling up the minimum / maximum values ... |
Page |
20 |
Displaying temperature trends...................... |
Page |
21 |
Battery state display ...................................... |
Page |
21 |
Replacing the batteries.................................. |
Page |
22 |
Troubleshooting................................... |
Page |
22 |
Cleaning and maintenance........ |
Page |
22 |
Disposal....................................................... |
Page |
23 |
Declaration of conformity........... |
Page |
24 |
6 GB
Radio-controlled weather station
Introduction
Keep these instructions in a safe place. If you pass the product on to anyone

 else, please ensure that you also pass on all the documentation.
Proper use
The weather station displays the indoor and outdoor temperatures in Celsius (°C) or Fahrenheit (°F) and their maximum and minimum values. The weather station also displays the time in 12 / 24hour clock modes and the date. In addition, the weather station has an alarm function. The device is not intended for commercial use.
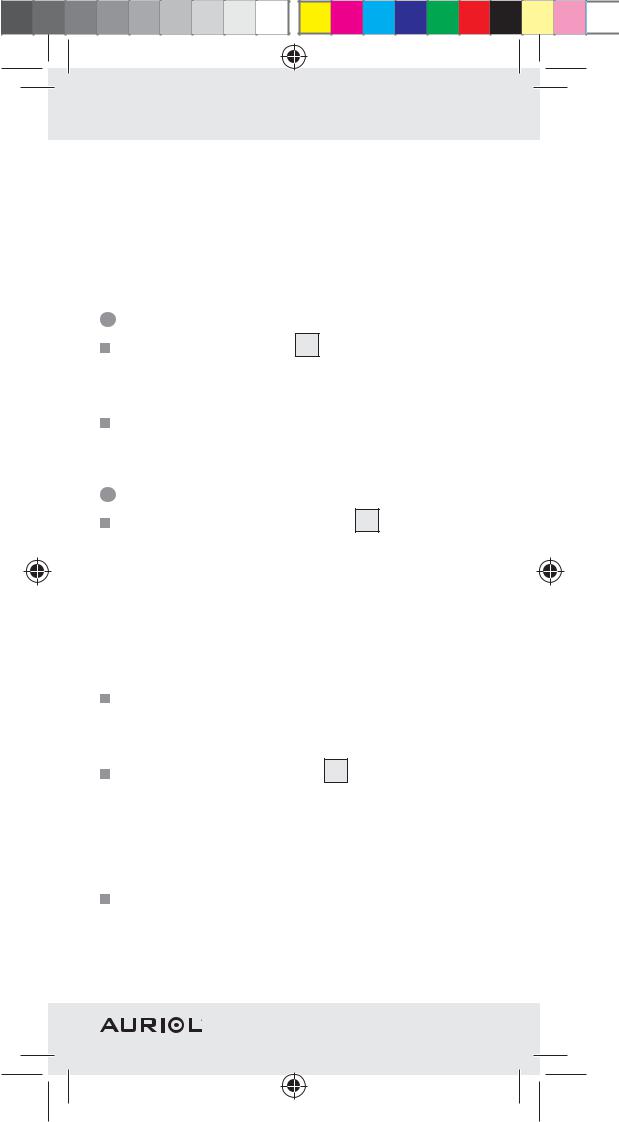
|
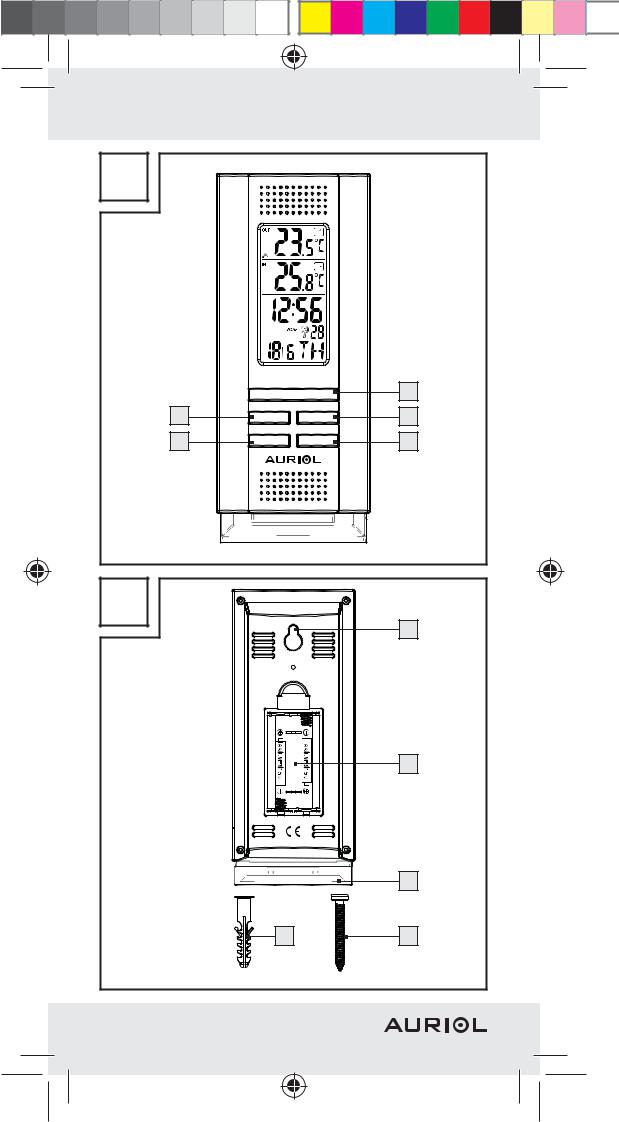
Description of parts |
|
and features |
LC display |
|
1 |
Temperature trend (outdoor temperature) |
|
Outdoor temperature |
2 |
|
|
symbol (outdoor sensor) |
3 |
|
|
MAX- / MIN display for indoor temperature |
4 |
|
|
Temperature trend (indoor temperature) |
5 |
|
|
Indoor temperature |
6 |
|
|
symbol (weather station) |
7 |
|
|
Time |
8 |
|
|
ZZ symbol (snooze function) |
9 |
|
|
Seconds display |
10 |
|
GB 7
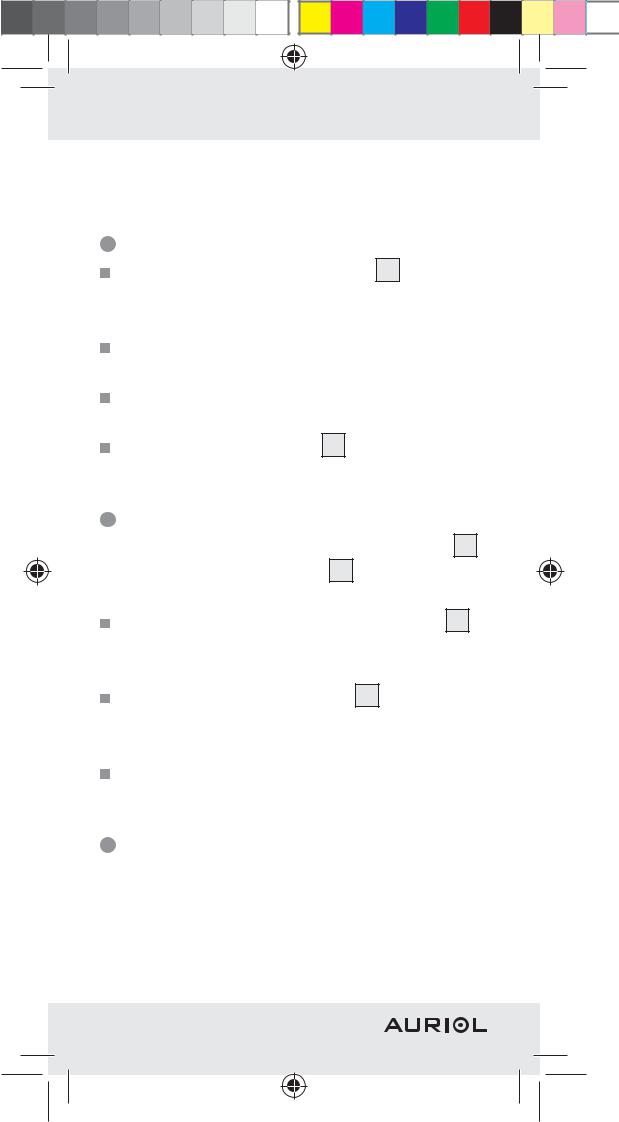
11 
 symbol
12Day of the week display
13Date display (day / year)
14DST display (summer time)
15
 /
/ symbol (Alarm 1 / Alarm 2)
162nd time zone (ZONE)
17MAX- / MIN display (outdoor temperature)
Weather station
18ZZ / REGISTER button (snooze function / REGISTER)
19SELECT button
20SET / RESET button
21ALARM button
22CLOCK button
23Hanging slot
24Battery compartment
25Stand
26Screw (ø 4.5 mm)
27Dowel (ø 7 mm)
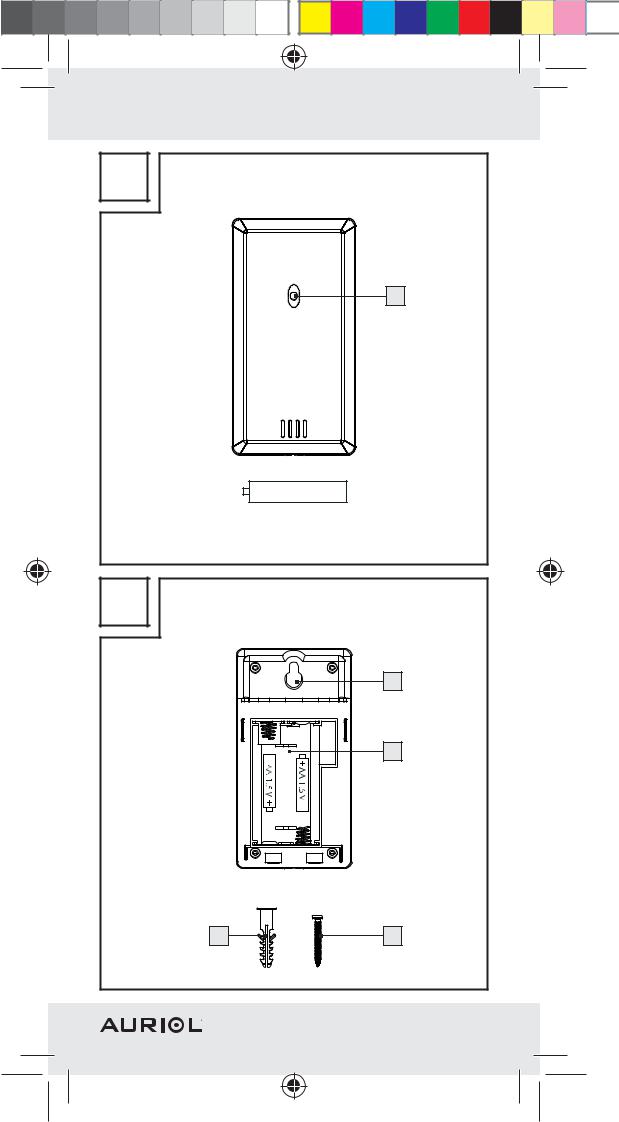
Outdoor sensor
28Control LED
29Hanging slot
30Battery compartment
31Screw (ø 3 mm)
32Dowel (ø 6 mm)
8GB
Technical data
0 – + 50 °C
+32 – +122 °F Note: If the temperature is ≤ 0 °C (32 °F), the LCD display shows “LL.L”. If the temperature is
≥ 50 °C (122 °F), the LCD display shows “HH.H”.
Temperature interval: |
0.1 °C |
Radio signal: |
DCF |
Batteries: |
2 x AA 1.5 V |
|
(included) |
–20 °C – +60 °C –4 °F – +140 °F
Note: If the temperature is ≤ –20 °C (–4 °F), the LCD display shows “LL.L”. If the temperature is ≥ 60 °C (140 °F), the LCD display shows “HH.H”. HF transmission signal: 433 MHz
HF transmission range: max. 30 metres over
|
open ground |
Batteries: |
2 x AA 1.5 V |
|
(included) |
Safety
YOU SHOULD STORE ALL SAFETY INFORMATION AND INSTRUCTIONS IN A SAFE PLACE IN CASE YOU NEED TO REFER TO THEM AGAIN IN THE FUTURE!
GB 9
General safety information

 DANGER TO
LIFE AND ACCIDENT HAZARD FOR TODDLERS AND
SMALL CHILDREN! Never allow children to play unsupervised with the packaging material. There is a danger of su ocation from the packaging material.

 DANGER TO LIFE! Batteries can be swallowed, which may represent a danger to life. If a battery has been swallowed, medical help is required immediately.
Children or persons who lack the knowledge or experience to use the device or whose physical, sensory or intellectual capacities are limited must never be allowed to use the device without supervision or instruction by a person responsible for their safety. Children must never be allowed to play with the device. This is not a toy.
Do not use the device in hospitals or medical facilities, as otherwise this may result in malfunctions of life-support systems.
Do not expose the device to an extremely high electromagnetic field. This may impair the correct functioning of the device.
Please note that the guarantee does not cover damage caused by incorrect handling, non-compliance with the operating instruc-
10 GB
tions or interference with the device by unauthorised individuals.
Safety instructions for batteries
Remove the batteries from the device if they are not going to be used for a prolonged period.
CAUTION! DANGER OF EXPLOSION! Never recharge batteries which are not rechargeable.
When inserting the batteries, ensure the correct polarity! This is shown in the battery compartments.
Remove spent batteries immediately from the device. There is an increased danger of leaks! Keep batteries away from children; do not throw the batteries in the fire, short-circuit them or take them apart.
Always replace all the batteries at once. Use batteries of the same type only. Otherwise there is a risk of an explosion.
If the batteries have leaked inside your device, you should remove them immediately in order to prevent damage to the device! Avoid contact with the skin, eyes and mucous membranes. Any parts of the body coming into contact with battery acid should be rinsed o with copious amounts of water and / or a doctor contacted if necessary!
GB 11
Before initial use
General information
 CAUTION! When choosing where to position the weather station, make sure that it is not exposed to direct sunlight, vibrations, dust, heat, cold or moisture. Do not place the weather station or external sensor near to heat sources, e.g. radiators, as this may result in damage to the instruments.
Place the weather station on the accompanying stand 25 .
Do not place the devices near sources of interference such as television sets, computers, thick walls, thermopane windows etc. Otherwise the transmission of radio waves between the devices may be impaired.
Please ensure that neighbouring devices are not operated at the same frequency of
433 MHz. Such devices may cause interference to the radio connection.
Do not place the devices next to or on metal plates. Otherwise the quality of radio wave transmission may be reduced.
Radio signal (DCF):
The DCF signal (time signal transmitter) is made up of time pulses transmitted from one of the highest precision clocks in the world close to Frankfurt / Main in Germany – it varies by 1 second in 1 million years.
In ideal conditions, your weather station can pick up this signal over a distance of up to approx. 1,500 km around Frankfurt / Main.
12 GB

Preparing to use the outdoor sensor
Inserting the batteries:
Remove the battery compartment cover from the back of the outdoor sensor.
Insert two 1.5 V 

 batteries (AA) (included) into the battery compartment 30 .
Note: Make sure you fit the batteries the right way round (polarity). This is shown in the battery compartment.
The outdoor sensor is now ready for use and the control LED 28 illuminates briefly.
Close the battery compartment cover.
Preparing the weather station for use
Inserting the batteries:
Open the battery compartment 24 on the back of the weather station.
Insert two 1.5 V 

 batteries (AA) (included) into the battery compartment.
Note: Make sure you fit the batteries the right way round (polarity). This is shown on the battery compartment (see Figs. C + E). Close the battery compartment cover.
Connecting the weather station with the outdoor sensor and the DCF radio signal:
After the batteries have been inserted, the weather station attempts to establish a connection with the outdoor sensor. This process can take a few minutes. The  symbol flashes. Once the
GB 13

device has successfully connected to the external sensor, the  symbol stops flashing and the temperature is shown in the LC display.
Note: If the weather station does not receive the signal from the outdoor sensor within 3 minutes, the weather station automatically starts with the reception of the radio time signal.
After successful reception of the outdoor sensor signal or after 3 minutes, the weather station starts with the reception of the radio time signal. This process can take up to 5 minutes and is indicated in the LC display by the flashing  symbol 11 .
After successful reception of the DCF radio signal, the  symbol is displayed continuously in the
LC display.
Note: Do not move the weather station while it is receiving the signal. Otherwise this could interfere with reception.
If synchronisation is not possible when the weather station is being first set up, try changing the location (e.g. place the weather station near to a window).
If this does not work, carry out a restart, if necessary. To do this, press and keep pressed the ZZ / REGISTER button 18 .
Reception may be considerably reduced by obstructions (e.g. concrete walls) or sources of interference (e.g. other electrical devices).
14 GB
If the reception of the radio signal continues to be interrupted, you can set the time and date manually (see “Setting the language / time zone / time / date manually”).
Mounting the weather station and / or the outdoor sensor on a wall:
Note: You will require an electric drill and a crosshead screwdriver for this step.
 CAUTION! DANGER TO LIFE, RISK OF INJURY AND MATERIAL DAMAGE! Read the operating and safety instructions for your drill carefully.

 DANGER TO LIFE! Take care that you do not hit electricity, gas or water lines when you drill into the wall. If necessary, check with a pipe and cable detector before drilling.
Weather station
Mark the position of the hole (ø approx. 7 mm) on the wall.
Drill the hole with an electric drill.
Insert the dowel 27 into the drilled hole.
Using a crosshead screwdriver, screw the screw 26 into the dowel.
Hang the weather station by placing the hanger 23 on the screw.
External sensor
Mark the position of the hole (ø approx. 6 mm) on the wall.
Drill the hole with an electric drill.
Insert the dowel 32 into the drilled hole.
GB 15

Using a crosshead screwdriver, screw the screw 31 into the dowel.
Hang the external sensor by placing the hanger 29 on the screw.
Note: Choose a sheltered position for the external sensor, not directly near the weather station (e.g. separated by a wall). Ensure that the external sensor does not come into contact with water or direct sunlight. Electronic devices may adversely a ect the wireless signal reception.
Setting the language / time zone / time / date manually
The reception of DCF radio signal where the weather station has been positioned may become degraded or interrupted. If this happens you can set the device manually.
1. Press and hold down the CLOCK button 22 for about 3 seconds.
2. Press the SET / RESET button 20 to switch between the 12and 24-hour clock display modes. Tip: If you press and hold down the SET / RESET button, you accelerate the process and reach the desired value more quickly. This quicker method can also be used for making the following settings. If during a period of 30 seconds no buttons are pressed, the LC display returns automatically to the default display.
16 GB
3. Press the CLOCK button to confirm your settings. The day of the week display 12 flashes.
4. Press the SET / RESET button to set the desired language: GE = German, FR = French,
SP = Spanish, IT = Italian, EN = English). 5. Press the CLOCK button to confirm your set-
tings. The time zone display flashes.
6. Press the SET / RESET button to set the desired time zone for time zone 2 (–12 hours to
+12 hours).
Note: Should you be in a country in which the DCF signal can be received but the time is di erent to your current local time, you can use the time zone setting to have the clock display your current local time. If you find yourself in a country in which, for example, the local time is an hour ahead of Central European Time (CET), you set the time zone to +01. The clock is now still controlled by DCF but shows the time as one hour ahead of CET. If you wish to know what the time is in the USA for example, then simply by setting the time zone value to e.g. –10 you will obtain the current local time in Los Angeles etc.
7. Press the CLOCK button to confirm your settings. The hour display flashes.
8. Press the SET / RESET button to set the desired value.
9. Press the CLOCK button to confirm your settings.
10.Repeat steps 6 and 7 to set the values for, minutes, seconds 10 , year and date 13 (month/ day).
GB 17
Note: The seconds display can only be reset to 00.
11.After this, the LC display returns to the default display.
Displaying summer time
Summer time is indicated by the DST symbol 14 in the LC display. The weather station automatically detects from the DCF radio signal whether it is summer time or not.
Calling up the 2nd time zone
The default display shows the time zone according to the information provided by the DCF signal.
Press the CLOCK button 22 . The 2nd time zone 16 appears in the LC display.
Press the CLOCK button again to return to the default display.
Setting the alarm time
You can set two di erent alarm times.
1. Press and hold down the ALARM button 21 for about 3 seconds.
Note: If an alarm time has been set before, then that previously set alarm time appears in the LC display. If not, then the display shows
0:00 or 12:00.
2. The hour display flashes. Press the SET / RESET button 20 to set the desired value.
3. Press the ALARM button to confirm your settings. The minute display flashes.
18 GB
4. Press the SET / RESET button to set the desired value.
5. Press the ALARM button to confirm your settings.
6. Repeat steps 2 to 5 to set the time for Alarm 2.
Calling up the alarm times
Press ALARM button 21 once or twice to call up the set time for Alarm 1 or Alarm 2 respectively.
Press the ALARM button again to return to the default display.
Switching the alarm on / o
Press the SET / RESET button 20 once to activate Alarm 1. Press the SET / RESET button twice to activate Alarm 2. Press the SET / RESET button three times to activate Alarm 1 and Alarm 2.
Note: The symbol  or
or  appears in the LC display.
The alarm signal sounds as soon as the set alarm time is reached. The alarm signal ceases automatically after a period of 2 minutes. Press the ALARM button 21 to switch o the alarm signal before it switches o automatically.
Note: The alarm signal sounds every day at the set time.
Press the SET / RESET button three times to deactivate Alarm 1. Press the SET / RESET button twice to deactivate Alarm 2. Press the
GB 19
SET / RESET button once to deactivate Alarm 1 and Alarm 2.
Using the snooze button
Press the ZZ / REGISTER button 18 while the alarm signal is sounding to activate the snooze function.
The alarm signal is silenced and the displays  or
or  and ZZ flash.
The alarm signal sounds again after approx. 5 minutes.
Press the SELECT button 19 to deactivate the snooze function.
Displaying temperature
The LC display shows the indoor temperature 6 and the outdoor temperature 2 .
Press and hold down the SELECT button 19 for approx. 3 seconds. The °C display flashes.
Press the SET / RESET button 20 to switch between the °C (Celsius) and °F (Fahrenheit) temperature scales.
Press the SELECT button to confirm your settings.
Calling up the minimum / maximum values
The weather station stores the maximum and minimum values of the outdoor sensor and of the weather station itself.
20 GB
Press the SELECT button 19 to display the maximum values of the indoor 4 and outdoor temperature 17 .
Press the SELECT button again to display the minimum values of the indoor and outdoor temperature.
Press the SET / RESET button 20 while the maximum and minimum values, are being displayed to reset the values.
Press the SELECT button, to return to the default display.
Displaying temperature trends
After successfully connecting with the outdoor sensor, the weather station can display the temperature trend (outdoor) 1 and the temperature trend (indoor) 5 .
You may see the following displays:
= The temperature is rising.
 = The temperature is constant. = The temperature is falling.
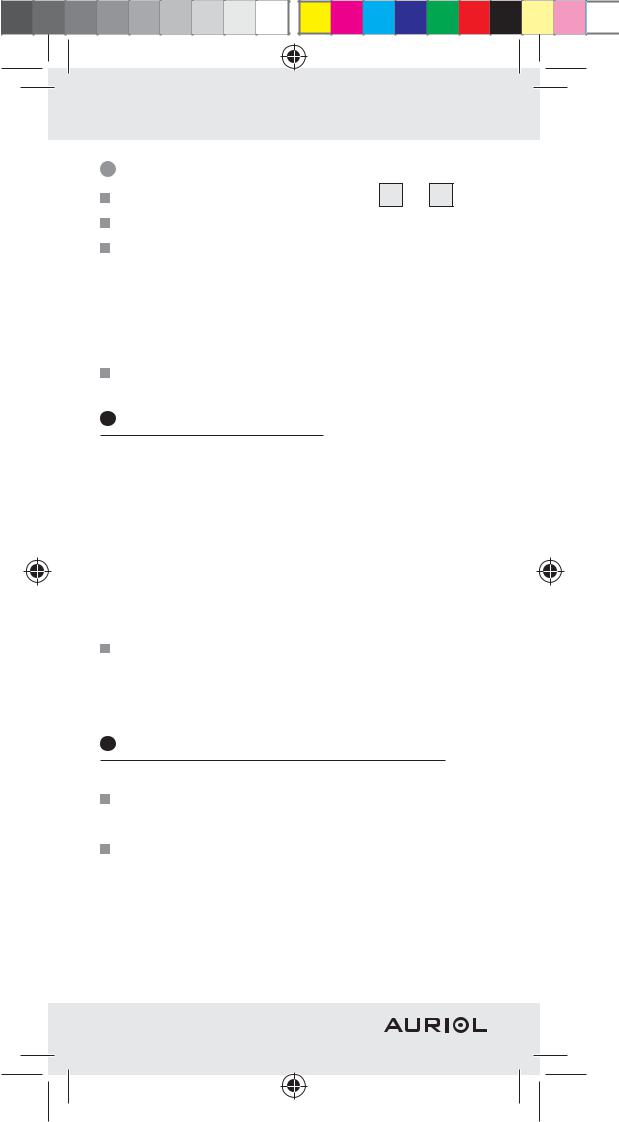
Battery state display
The |
3 |
and |
7 |
symbols appear in the |
weather station’s LC display if the batteries in the outdoor sensor or the weather station are weak. Make sure you replace the batteries at the earliest opportunity (see “Replacing the batteries”).
GB 21
Replacing the batteries
Open the battery compartment 24 or 30 . Remove the exhausted batteries.
Insert two new 1.5 V 

 batteries (AA) into the battery compartments.
Note: Make sure you fit the batteries the right way round (polarity). This is shown in the battery compartments (see Figs. C + E). Close the battery compartments.
Troubleshooting
Note: This appliance has delicate electronic components. This means that if it is placed near an object that transmits radio signals, it could cause interference. This could be, for example, mobile telephones, walkie talkies, CB radios, remote controls and microwaves.
If the display indicates a problem, move such objects away from it or remove the batteries for a short while and then replace them.
Cleaning and maintenance
The device should only be cleaned on the outside with a soft dry cloth.
Under no circumstances should you spray the outdoor sensor, e.g. with a garden hose. The outdoor sensor is only protected against rain from above.
22 GB
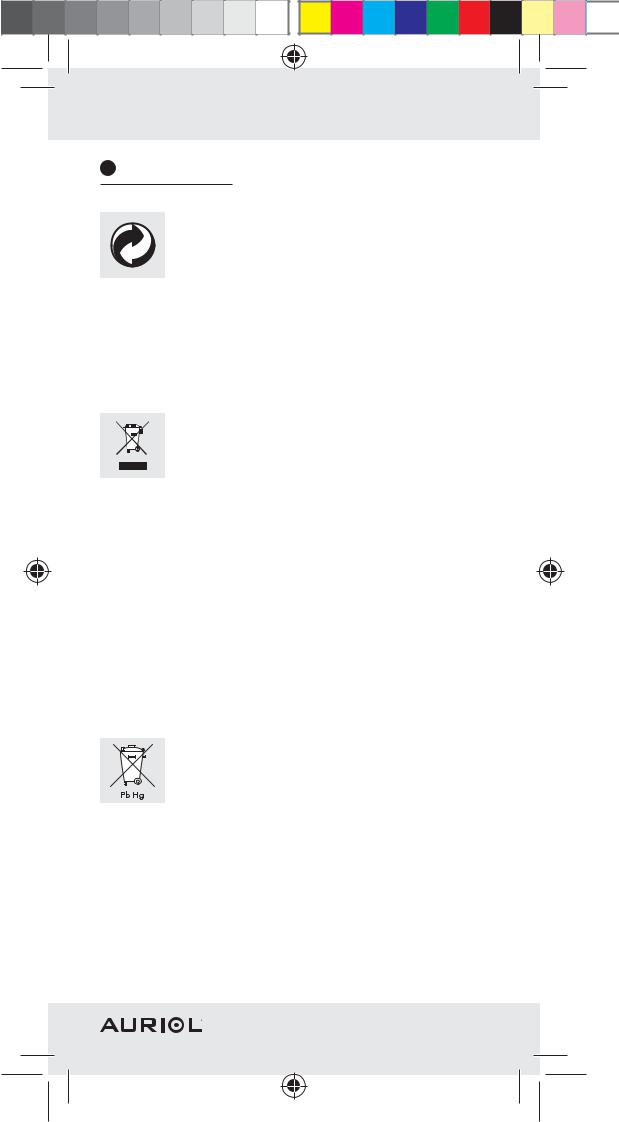
Disposal
The packaging is made entirely of recyclable materials, which you may dispose of at local recycling facilities.
Contact your local refuse disposal authority for more details of how to dispose of your worn-out product.
To help protect the environment, please dispose of the product properly when it has reached the end of its useful life and not in the household waste. Information on collection points and their opening hours can be obtained from your local authority.
Faulty or used batteries must be recycled in accordance with Directive 2006 / 66 / EC. Please return the batteries and / or the device to the available ollection points.
Environmental damage through incorrect disposal of the batteries!
Batteries may not be disposed of with the usual domestic waste. They may contain toxic heavy metals and are subject to hazardous waste treatment rules and regulations. The chemical symbols for heavy metals are as follows: Cd = cadmium,
GB 23
Hg = mercury, Pb = lead. That is why you should dispose of used batteries at a local collection point.
Declaration of conformity
We, Milomex Ltd., c / o Milomex Services, Hilltop Cottage, Barton Road, Pulloxhill, Bedfordshire, MK45 5HP, UK, hereby declare under our sole responsibility that the product: Radio-controlled weather station, model no.: Z31055A / Z31055B, Version:10 / 2011, to which this declaration refers, complies with the standards / normative documents of 1999 / 5 / EC.
The complete declaration of conformity can be viewed at: www.milomex.com
EMC 

24 GB
Wstęp |
|
|
Zastosowanie zgodne z przeznaczeniem.. |
Strona |
26 |
Opis elementów ........................................ |
Strona |
26 |
Dane techniczne ........................................ |
Strona |
28 |
Bezpieczeństwo |
|
|
Ogólne wskazówki dotyczące |
|
|
bezpieczeństwa......................................... |
Strona |
29 |
Wskazówki dotyczące |
|
|
bezpieczeństwa związane z bateriami ... |
Strona |
30 |
Przed uruchomieniem |
|
|
Wskazówki ogólne ................................... |
Strona |
31 |
Uruchomienie czujnika zewnętrznego ..... |
Strona |
32 |
Uruchomienie stacji pogodowej............... |
Strona |
33 |
Stacja pogodowa...................................... |
Strona |
35 |
Czujnik zewnętrzny ................................... |
Strona |
35 |
Ręczne ustawianie języka / strefy |
|
|
czasowej/godziny/daty .............................. |
Strona |
36 |
Wskazywanie czasu letniego................... |
Strona |
38 |
Wyświetlanie czasu strefy czasowej........ |
Strona |
38 |
Ustawianie czasu alarmu.......................... |
Strona |
39 |
Wyświetlanie czasόw alarmu................... |
Strona |
39 |
Włączanie/wyłączanie alarmu ................... |
Strona |
40 |
Używanie funkcji drzemki ......................... |
Strona |
40 |
Wyświetlanie temperatury ........................ |
Strona |
41 |
Wyświetlanie wartości |
|
|
minimalnych / maksymalnych ................... |
Strona |
41 |
Wskazywanie tendencji temperatury....... |
Strona |
42 |
Wskaźnik baterii........................................ |
Strona |
42 |
Wymiana baterii........................................ |
Strona |
42 |
Usuwanie usterek.......................... |
Strona |
43 |
Czyszczenie i konserwacja.... |
Strona |
43 |
Utylizacja............................................... |
Strona |
43 |
Deklaracja zgodności |
|
|
z normami............................................. |
Strona |
45 |
|
PL |
25 |
Stacja meteo sterowana radiowo
Wstęp
Niniejsza instrukcja powinna być starannie przechowywana. Przekazując

 urządzenie innej osobie należy również przekazać całą dokumentację.
Zastosowanie zgodne z przeznaczeniem
Stacja pogodowa wskazuje temperatury: wnętrza oraz panującą na zewnątrz, wyrażone w stopniach Celsjusza (°C) lub Fahrenheita (°F), jak rόwnież ich wartości maksymalne oraz minimalne. Stacja pogodowa wskazuje rόwnież czas w formacie 12 - / 24godzinnym oraz datę. Oprόcz tego stacja pogodowa posiada funkcję alarmu. Urządzenie nie jest przeznaczone do użytku komercyjnego.
Opis elementów
Wyświetlacz ciekłokrystaliczny
1Tendencja temperatury (temperatura zewnętrzna)
2 Temperatura zewnętrzna
3 Symbol  (czujnik zewnętrzny)
4Wskaźnik MAX- / MIN dla temperatury wewnętrznej
5Tendencja temperatury (temperatura wewnętrzna)
6 Temperatura wewnętrzna
26 PL
|
|
|
|
|
|
|
|
|
|
|
|
|
|
|
|
|
|
|
|
|
|
|
|
|
|
|
|
|
|
|
|
|
|
|
|
|
|
|
|
|
|
|
|
|
|
|
|
|
|
|
|
|
|
|
|
|
|
|
|
|
|
|
|
|
|
|
|
|
|
|
|
|
|
|
|
|
|
|
|
|
|
|
|
|
|
|
|
|
|
|
|
|
|
|
|
|
|
|
|
|
|
|
|
|
|
|
|
|
|
|
|
|
|
|
|
|
|
|
|
|
|
|
|
|
|
|
|
|
|
|
|
|
|
|
|
|
|
|
|
|
|
|
|
|
|
|
|
|
|
|
|
|
|
|
|
|
|
|
|
|
|
|
|
|
|
|
|
|
|
|
|
|
|
|
|
|
|
|
|
|
|
|
|
|
|
|
|
|
|
|
|
|
|
|
Symbol |
(stacja pogodowa) |
|
|
|
|
||||||||||||||||
|
|
|
|
|
|
7 |
|
|
|
|
|
|||||||||||||||||||
|
|
|
|
|
|
|
|
Godzina |
|
|
|
|
|
|
|
|
|
|
|
|
|
|
|
|
|
|
|
|||
|
|
|
|
|
|
8 |
|
|
|
|
|
|
|
|
|
|
|
|
|
|
|
|
|
|
|
|||||
|
|
|
|
|
|
|
|
Symbol ZZ (funkcja drzemki) |
|
|
|
|
||||||||||||||||||
|
|
|
|
|
|
9 |
|
|
|
|
||||||||||||||||||||
10Sekundnik
11Symbol 
12Dzień tygodnia
13Data (dzień / rok)
14Wskaźnik DST (czas letni)
15Symbol  /
/ (Alarm 1 / Alarm 2)
16Strefa czasowa 2 (ZONE)
17Wskaźnik MAX- / MIN (temperatura zewnętrzna)
Stacja meteorologiczna
18Przycisk ZZ / REGISTER (funkcja drzemki / REGISTER)
19Przycisk SELECT („wybierz“)
20Przycisk SET / RESET („nastaw“ / „resetuj“)
21Przycisk ALARM
22Przycisk CLOCK (godzina)
23Otwór umożliwiający montaż na ścianie
24Komora baterii
25Podstawka
26Śruba (ø 4,5 mm)
27Kołek (ø 7 mm)
Czujnik zewnętrzny
28Lampka kontrolna LED
29Otwór umożliwiający montaż na ścianie
30Komora baterii
31Śruba (ø 3 mm)
32Kołek (ø 6 mm)
PL 27
Dane techniczne
Stacja pogodowa:
Zakres pomiaru temperatury: 0 – +50 °C +32 – +122 °F
Wskazówka: Jeżeli wartość temperatury jest niższa niż 0 °C (32 °F), wyświetlane są litery „LL.L”. Jeżeli wartość temperatury jest wyższa niż 50 °C (122 °F), wyświetlane są litery „HH.H”. Dokładność pomiaru
temperatury: Sygnał radiowy: Baterie:
Czujnik zewnętrzny:
Zakres pomiaru temperatury: –20 °C – +60 °C –4 °F – +140 °F
Wskazówka: Jeżeli wartość temperatury jest niższa niż –20 °C (4 °F), wyświetlane są litery „LL.L”. Jeżeli wartość temperatury jest wyższa niż 60 °C (140 °F), wyświetlane są litery „HH.H”.
Częstotliwość sygnału |
|
|
|
|
|
|
|
|
transmisji HF: |
433 MHz |
|||||||
Zasięg transmisji HF: |
maks. 30 metrόw |
|||||||
|
na otwartej prze- |
|||||||
|
strzeni |
|||||||
Baterie: |
2 x AA 1,5 V |
|
|
|
|
|
|
|
|
|
|
|
|
||||
|
|
|
|
|
|
|
||
|
(w zestawie) |
|||||||
28 PL
Bezpieczeństwo
NALEŻY ZACHOWAĆ WSZYSTKIE WSKAZÓWKI DOTYCZĄCE BEZPIECZEŃSTWA ORAZ INSTRUKCJE!
Ogólne wskazówki dotyczące bezpieczeństwa

 NIEBEZ-
PIECZEŃSTWO UTRATY ŻYCIA LUB ODNIESIENIA
OBRAŻEŃ PRZEZ DZIECI! Nigdy nie należy pozostawiać dzieci z materiałem opakowaniowym bez nadzoru. Istnieje niebezpieczeństwo uduszenia materiałem opakowaniowym.

 NIEBEZPIECZEŃSTWO UTRATY ŻYCIA! Baterie mogą zostać połknięte, co może stworzyć zagrożenie dla życia. W razie połknięcia baterii natychmiast skorzystać z pomocy medycznej. Niedozwolone jest używanie urządzenia przez osoby nieposiadające odpowiedniej wiedzy i doświadczenia, przez dzieci i osoby o ograniczonej sprawności fizycznej, sensorycznej bądź umysłowej, chyba że odbywać się to będzie pod nadzorem osoby odpowiedzialnej za ich bezpieczeństwo. Dzieci muszą być nadzorowane, aby nie bawiły się urządzeniem. Produkt nie jest zabawką.
PL 29

Nie należy używać urządzenia w szpitalach i placówkach medycznych. W takich miejscach urządzenie może powodować zakłócenia w działaniu systemów podtrzymywania życia.
Nie należy narażać urządzenia na działanie pola elektromagnetycznego o skrajnie wysokiej częstotliwości. Może ono negatywnie wpłynąć na działanie urządzenia.
Należy pamiętać, że uszkodzenia spowodowane niewłaściwym posługiwaniem się urządzeniem, nieprzestrzeganiem instrukcji obsługi lub ingerencją w urządzenie osób nieautoryzowanych są wyłączone z gwarancji.
Wskazówki dotyczące bezpieczeństwa związane z bateriami
Jeżeli baterie nie były używane przez dłuższy czas, należy je wyjąć z urządzenia.
OSTROŻNIE! NIEBEZPIECZEŃSTWO EKSPLOZJI! Baterii
jednorazowego użytku nie wolno ładować ponownie.
Podczas wkładania baterii do urządzenia należy zwrócić uwagę na prawidłowe ułożenie biegunów! Jest ono oznakowane w komorze baterii.
Zużyte baterie należy niezwłocznie wyjąć z urządzenia. Występuje podwyższone niebezpieczeństwo wycieku!
30 PL
 Loading...