


OWIM GmbH & Co. KG
Stiftsbergstraße 1
D-74167 Neckarsulm
Model No.: 103806-14-01/ 103806-14-02/ 103806-14-03/ 103806-14-04/ 103806-14-05/ 103806-14-06
Version: 10/2014
|
|
3 |
|
|
|
|
IAN 103806 |
|
|
|
|
|
|
|
|
||
|
|
|
|
|
|
|
|
|
|
103806_15_Auriol_BE_IE_NL_03.indb 1 |
8/26/14 6:02 PM |
||
WRISTWATCH
Operation and safety notes
RANNEKELLO
Käyttöja turvaohjeet
ARMBANDSUR
Bruksanvisning och säkerhetsanvisningar
ARMBÅNDSUR
Brugsog sikkerhedsanvisninger
MONTRE
Instructions d‘utilisation et consignes de sécurité
HORLOGE
Bedieningsen veiligheidsinstructies
ARMBANDUHR
Bedienungsund Sicherheitshinweise
IAN 103806
|
|
|
|
103806_15_Auriol_BE_IE_NL_03.indb 2 |
8/26/14 6:02 PM |
||

GB/IE |
Page |
5 |
|
|
|
FI |
Sivu |
16 |
|
|
|
SE |
Sidan |
26 |
|
|
|
DK |
Side |
36 |
|
|
|
FR/BE |
Page |
46 |
|
|
|
NL/BE |
Pagina |
57 |
|
|
|
DE/AT/CH |
Seite |
68 |
|
|
|
|
|
|
|
103806_15_Auriol_BE_IE_NL_03.indb 3 |
8/26/14 6:02 PM |
||
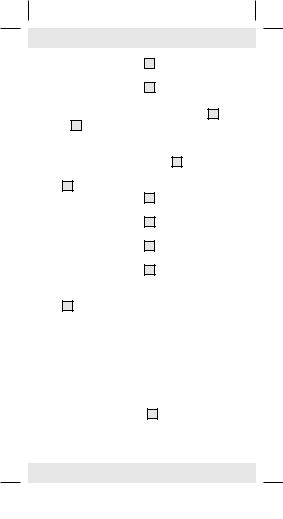
103806-14-01 |
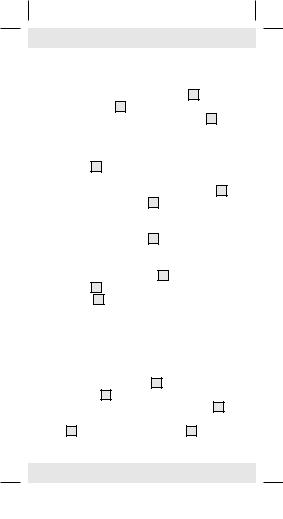
103806-14-02/04 |
3
|
|
|
|
103806_15_Auriol_BE_IE_NL_03.indb 3 |
8/26/14 6:02 PM |
||

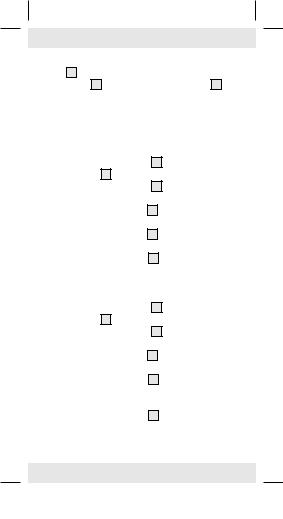
103806-14-03 |
|
|
103806-14-05/06 |
|
|
4 |
|
|
103806_15_Auriol_BE_IE_NL_03.indb 4 |
8/26/14 |
6:02 PM |

WRISTWATCH
Proper use
The wrist watch displays the time and date. It also has an alarm and can be used as a stopwatch. The product is not intended for commercial use.
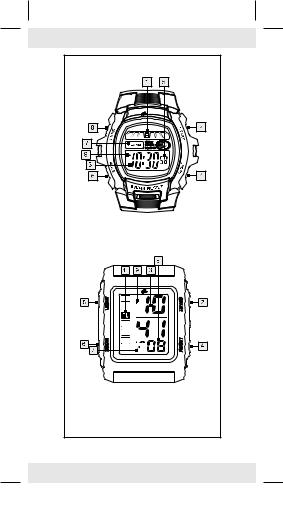
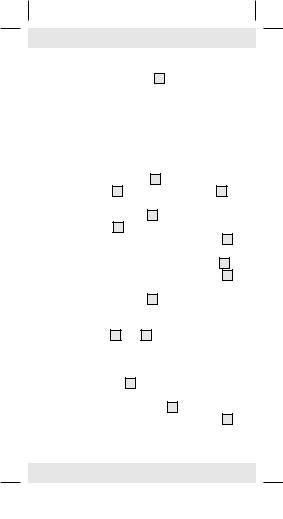
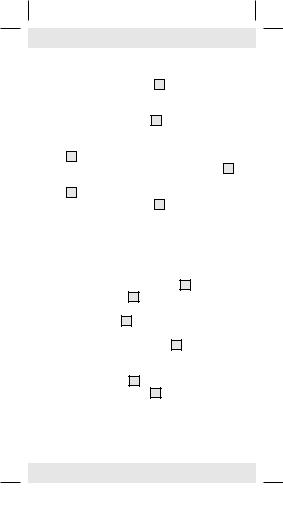
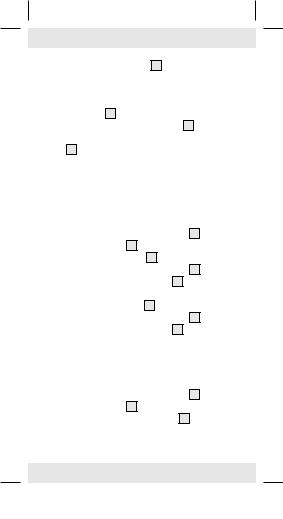
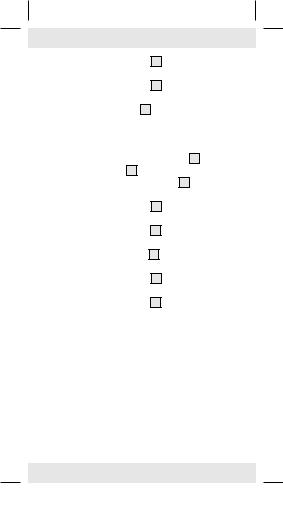
Description of parts
1Day of the week display field
2START button
3Time field
4RESET button
5Second field / “H” indicator
6MODE button
7Alarm symbol
8LIGHT button
9“A” / “P” indicator
General Safety
Instructions
KEEP ALL THE SAFETY ADVICE AND INSTRUCTIONS IN A SAFE PLACE FOR FUTURE REFERENCE!
GB/IE 5
|
|
|
|
103806_15_Auriol_BE_IE_NL_03.indb 5 |
8/26/14 6:02 PM |
||

 WARNING! DANGER
TO LIFE AND RISK OF ACCIDENTS FOR INFANTS AND CHILDREN! Never leave children unattended with the
packaging material. Packaging material can cause suffocation.
 WARNING! DANGER TO LIFE! Batteries can be swallowed, which can prove fatal. Consult a doctor immediately if anyone swallows a battery.
Never take the product apart on any account. Improper repairs could cause considerable danger for the user. Only let qualified people carry out any repairs.
Battery Safety
Instructions
CAUTION! RISK OF EXPLOSION! Never recharge the batteries.
Have a spent battery removed from the instrument immediately. There is an increased risk of leakage.
Batteries must not be disposed of in household waste.
Consumers are under a legal obligation to dispose of batteries in the proper way.
6GB/IE
|
|
|
|
103806_15_Auriol_BE_IE_NL_03.indb 6 |
8/26/14 6:02 PM |
||
Keep the battery out of the reach of children, do not dispose of the battery in fire, do not short-circuit it, and do not take it apart. Failure to observe these instructions may result in the battery discharging beyond its end voltage, which poses a risk of leakage. If the battery in your instrument has leaked, have it
removed immediately to prevent damage to the instrument.
Avoid contact with skin, eyes and mucous membrane. In the event of contact with battery acid, rinse the affected area with plenty of water and /or consult a doctor.
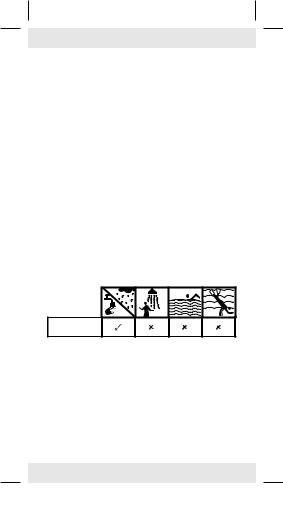
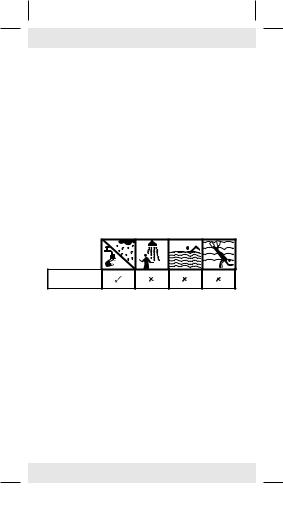
§§ Water resistance
This watch is water-resistant up to 3 bar in accordance with DIN 8310.
3 bar water resistant
Do not press any buttons if the watch comes into contact with water.
GB/IE 7
|
|
|
|
103806_15_Auriol_BE_IE_NL_03.indb 7 |
8/26/14 6:02 PM |
||
§§ Replacing the battery
Note: Have batteries changed in a specialist shop.
Have any repairs or battery replacements carried out by a suitably experienced specialist in order to avoid damaging the insides of the watch.
Dispose of used batteries in an environmentally compatible manner.
Do not dispose of the watch with the household rubbish.
§§ Operation
Press the MODE button 6 to set the desired mode: Time mode > Stop watch > Alarm > Setting the time > Time mode.
Setting the time and date
1.Press the MODE button 6 three times. The second field 5 and the day of the week field
1flash in the display.
2.Press the START button 2 to set the second field
5to 0.
3.Press the RESET button 4 to confirm your setting. The minute field flashes in the display.
4.Press the START button 2 to set the desired minute value.
8GB/IE
|
|
|
|
103806_15_Auriol_BE_IE_NL_03.indb 8 |
8/26/14 6:02 PM |
||
5.Press the RESET button 4 to confirm your setting. The hour field flashes in the display.
6.Press the START button 2 to set the desired hour value.
Note: Pay attention to the symbols A, P 9 and H 5 in the display when setting the hour value. A and P (A = a.m. / P = p.m.) are used for the 12-hour time format. H is used for the 24-hour format. Press the START button 2 to set the desired value and format. Press the RESET button
4to confirm your setting.
7.Press the RESET button 4 to confirm your setting. The date field flashes in the display.
8.Press the START button 2 to set the desired date value.
9.Press the RESET button 4 to confirm your setting. The month field flashes in the display.
10.Press the START button 2 to set the desired month value.
11.Repeat steps 8 and 9 to set the day of the week
1field. The names of the days of the week are shortened as follows:
MO = Monday TU = Tuesday WE = Wednesday TH = Thursday
FR = Friday SA = Saturday SU = Sunday
12. Press the MODE button 6 to enter the default display.
GB/IE 9
|
|
|
|
103806_15_Auriol_BE_IE_NL_03.indb 9 |
8/26/14 6:02 PM |
||
Lighting the display
Press and keep pressed the LIGHT button 8 to switch on the light.
Release the LIGHT button 8 and the light will switch off after approx. 3 seconds.
Displaying the date
Press the START button 2 while the watch is in time mode. The date appears on the display. Release the START button 2 to return to time mode.
Setting the alarm
Press the MODE button 6 twice to enter the alarm mode. The hour field of the alarm time flashes in the display.
Press the START button 2 to set the desired hour value.
Press the RESET button 4 to confirm your setting. The minute field flashes in the display. Press the START button 2 to set the desired minute value.
Press the RESET button 4 to confirm your setting.
Press the MODE button 6 to enter the time mode.
10 GB/IE
|
|
|
|
103806_15_Auriol_BE_IE_NL_03.indb 10 |
8/26/14 6:02 PM |
||
Switching the alarm on / off
Switch the alarm on or off by pressing and keeping pressed the START button 2 and the RESET button 4 while in time mode. If the alarm is switched on, the alarm symbol 7 appears in the display.
When the alarm sounds, you can activate the Snooze function by pressing the START button 2 . The alarm sounds again after 4 to
5 minutes. The alarm will keep on sounding as many times as you press the START button 2 . Press the RESET button 4 to stop the alarm.
The alarm will keep on sounding for approx. 1 minute if you don’t press any button.
Press the RESET button 4 when the watch is in time mode to display the alarm time.
If the watch is in time mode, press and keep pressed the RESET button 4 . Press the START button 2 to switch off the alarm. The alarm symbol 7 disappears.
Activating / deactivating the acoustic signal
Note: An acoustic signal will sound every hour on the hour.
Press the MODE button 6 repeatedly until the time field 3 appears in the display.
Press and keep pressed the RESET button 4 and while doing this, press the MODE button 6 . All the day of the week fields 1 appear. The audible signal function is activated.
GB/IE 11
|
|
|
|
103806_15_Auriol_BE_IE_NL_03.indb 11 |
8/26/14 6:02 PM |
||
Press and keep pressed the RESET button 4 and while doing this, press the MODE button 6 . All the day of the week fields 1 disappear. The audible signal function is deactivated.
Using the stopwatch
Press the MODE button 6 repeatedly until the time field 3 appears in the display.
Press the MODE button 6 once to enter the stopwatch mode.
Press the START button 2 to start the stopwatch.
Press the START button 2 again to stop the stopwatch.
Press the RESET button 4 to set the stopwatch to 0.
Measuring an intermediate time:
Press the MODE button 6 repeatedly until the time field 3 appears in the display.
Press the MODE button 6 once to enter the stopwatch mode.
Press the START button 2 to start the stopwatch.
Press the RESET button 4 to display the intermediate time. The stopwatch continues to run in the background.
Press the RESET button 4 to return to the stopwatch time.
12 GB/IE
|
|
|
|
103806_15_Auriol_BE_IE_NL_03.indb 12 |
8/26/14 6:02 PM |
||
Press the START button 2 to stop the stopwatch.
Press the RESET button 4 to set the stopwatch to 0.
§§ Cleaning and care
Clean the product with a dry, fluff-free cloth. A spectacles cloth is ideal.
§§ Disposal
The packaging is made entirely of recyclable materials, which you may dispose of at local recycling facilities.
Contact your local refuse disposal authority for more details of how to dispose of your worn-out product.
To help protect the environment, please dispose of the product properly when it has reached the end of its useful
life and not in the household waste. Information on collection points and their opening hours can be obtained from your local authority.
Faulty or used batteries must be recycled in accordance with Directive 2006 / 66 / EC. Please return the batteries and / or the device to the available collection points.
GB/IE 13
|
|
|
|
103806_15_Auriol_BE_IE_NL_03.indb 13 |
8/26/14 6:02 PM |
||
Environmental damage through
incorrect disposal of the batteries!
Batteries may not be disposed of with the usual domestic waste. They may contain toxic heavy metals and are subject to hazardous waste treatment rules and regulations. The chemical symbols for heavy metals are as follows: Cd = cadmium, Hg= mercury, Pb = lead. That is why you should dispose of used batteries at a local collection point.
§§ WARRANTY
The device has been manufactured to strict quality guidelines and meticulously examined before delivery. In the event of product defects you have legal rights against the retailer of this product. Your legal rights are not limited in any way by our warranty detailed below.
The warranty for this device is 3 years from the date of purchase. Should this device show any fault in materials or manufacture within three years from the date of purchase, we will repair or replace it - at our choice - free of charge to you.
The warranty period begins on the date of purchase. Please keep the original sales receipt in a safe location. This document is required as your proof
of purchase. This warranty becomes void if the device has been damaged or improperly used or maintained.
14 GB/IE
|
|
|
|
103806_15_Auriol_BE_IE_NL_03.indb 14 |
8/26/14 6:02 PM |
||
The warranty applies to faults in material or manufacture. This warranty does not cover product parts subject to normal wear, thus possibly considered consumables (e.g. batteries) or for
damage to fragile parts, e.g. switches, rechargeable batteries or glass parts.
The warranty further excludes a reduction in water tightness. The state of water tightness is not a permanent property and should therefore be regularly maintained. Please note, opening and repairs performed by unauthorized individuals will void any warranty.
GB/IE 15
|
|
|
|
103806_15_Auriol_BE_IE_NL_03.indb 15 |
8/26/14 6:02 PM |
||
RANNEKELLO
Määräystenmukainen käyttö
Rannekello näyttää ajan ja päivämäärän ja siinä on herätysja ajanottotoiminto. Tuote ei ole tarkoitettu ammattimaiseen käyttöön.
Osien kuvaus
1Viikonpäivien näyttö
2Viikonpäivien näyttö
3Kellonajan näyttö
4RESET-näppäin
5Sekuntinäyttö / “H“-näyttö
6MODE-näppäin
7Herätyssymbol
8LIGHT-näppäin
9A“ / “P“ -näyttö
Turvallisuusohjeita
SÄILYTÄ KAIKKI TURVAJA MUUT OHJEET TULEVAA TARVETTA VARTEN!
16 FI
|
|
|
|
103806_15_Auriol_BE_IE_NL_03.indb 16 |
8/26/14 6:02 PM |
||
 VAROLTUS!
HENGENVAARA JA TAPATURMAVAARA PIKKULAPSILLE JA LAPSILLE!
Älä koskaan jätä lapsia pakkausmateriaalien läheis yyteen ilman valvontaa. Tukehtumisvaara.
 VAROLTUS! HENGENVAARA! Paris-tojen nieleminen voi olla hengenvaarallista. Pariston nielleen henkilön on välittömästi mentävä lääkärille.
Älä pura laitetta osiin. Asiaankuulumattomat korjaukset voivat aiheuttaa käyttäjälle huomattavan vaaran. Anna ainoastaan asiantuntijan suorittaa korjaukset.
Paristojen turvaohjeet
VAROITUS! RÄJÄHDYSVAARA! Paristoja ei saa koskaan ladata uudelleen!
Anna välittömästi poistaa loppuunkuluneet paristot kellosta. On olemassa vuotovaara! Paristot eivät kuulu tavallisiin talousjätteisiin! Jokainen käyttäjä on laillisesti velvollinen hävittämään paristot säädösten mukaisesti! Paristoja ei saa antaa lasten käsiin, heittää tuleen, oikosulkea eikä purkaa.
FI 17
|
|
|
|
103806_15_Auriol_BE_IE_NL_03.indb 17 |
8/26/14 6:02 PM |
||
Virheellinen käyttö saattaa johtaa pariston purkautumiseen sen loppujännitteen ylitse. Silloin on olemassa vuotovaara. Jos laitteen paristo on vuotanut, poista se heti välttääksesi tuotteen vahingoittumista!
Vältä kosketusta ihoon, silmiin ja limakalvoihin. Paristohappo on huuhdeltava altistuneelta alueelta heti pois runsaalla vedellä ja / tai on otettava yhteys lääkäriin!
§§ Vesitiiviys
Tämä kello on vedenpitävä 3 bariin asti DIN 8310 mukaisesti.
3 bar in vedenpitävyys
Älä paina mitään näppäintä, jos kello joutuu kosketuksiin veden kanssa.
§§ Pariston vaihtaminen
Huomio: Vaihdatuta paristot erikoisliikkeessä. Anna vain ammattihenkilön suorittaa paristojen vaihto ja korjaukset, jotta välttäisit kellokoneiston vaurioitumisen.
Hävitä käytetyt paristot ympäristöystävällisesti. Älä heitä kelloa talousjätteisiin.
18 FI
|
|
|
|
103806_15_Auriol_BE_IE_NL_03.indb 18 |
8/26/14 6:02 PM |
||
§§ Käyttö
Paina MODE-näppäintä 6 , kun haluat asettaa halutun toiminnon: aikamoodi > ajanottokello > hälytys > ajan asetus > aikamoodi.
Kellonajan ja päivämäärän asetus
1.Paina MODE-näppäintä 6 kolme kertaa. Sekuntinäyttö 5 sekä viikonpäivien näyttö 1 vilkkuvat näyttöruudussa.
2.Paina START-näppäintä 2 nollataksesi sekuntinäytön 5 .
3.Vahvista syöttö painamalla RESET-näppäintä 4 . Minuuttinäyttö vilkkuu näyttöruudussa.
4.Aseta minuutit painamalla START-näppäintä 2 .
5.Vahvista syöttö painamalla RESET-näppäintä 4 . Tuntinäyttö vilkkuu näyttöruudussa.
6.Paina START-näppäintä 2 , kun haluat asettaa tunnit.
Huomautus: Huomioi tunteja asettaessasi symbolit A, P 9 ja H 5 , jotka tulevat näyttöruutuun. A ja P (A = aamupäivä / P = iltapäivä) tarkoittavat 12-tunnin näyttömuotoa. H tarkoittaa 24-tunnin näyttömuotoa. Paina START-näppäintä 2 , kun haluat asettaa halutun arvon ja halutun näyttömuodon. Vahvista syöttö painamalla RESET-näppäintä 4 .
7.Vahvista syöttö painamalla RESET-näppäintä 4 . Päivämäärän näyttö vilkkuu näyttöruudussa.
FI 19
|
|
|
|
103806_15_Auriol_BE_IE_NL_03.indb 19 |
8/26/14 6:02 PM |
||
8.Paina START-näppäintä 2 , kun haluat asettaa päivämäärän.
9.Vahvista syöttö painamalla RESET-näppäintä 4 . Kuukausinäyttö vilkkuu näyttöruudussa.
10.Aseta kuukausi START-näppäintä 2 painamalla.
11.Toista askeleet 8. ja 9. viikonpäivän 1 asettamiseksi. Viikonpäivät on lyhennetty seuraavasti:
MO = maanantai, TU = tiistai,
WE = keskiviikko, TH = torstai,
FR = perjantai, SA = lauantai, SU = sunnuntai
12.Paina MODE-näppäintä 6 päästäksesi vakionäyttöön.
Valaistuksen käyttö
Paina LIGHT-näppäintä 8 , kun haluat sytyttää valon.
Päästä LIGHT-näppäin 8 taas irti ja valo sammuu noin 3 sekunnin kuluttua.
Päivämäärän näyttö
Paina START-näppäintä 2 , kun kello on aikamoodissa. Näyttöruutuun tulee päivämäärä.
Päästä START-näppäin 2 irti päästäksesi takaisin aikamoodiin.
20 FI
|
|
|
|
103806_15_Auriol_BE_IE_NL_03.indb 20 |
8/26/14 6:02 PM |
||
Herätyksen asetus
Paina MODE-näppäintä 6 kaksi kertaa päästäksesi herätystoimintoon. Herätysajan tuntinäyttö vilkkuu näyttöruudussa.
Paina START-näppäintä 2 , kun haluat asettaa tunnit.
Vahvista syöttö painamalla RESET-näppäintä 4 . Minuuttinäyttö vilkkuu näyttöruudussa.
Aseta minuutit painamalla START-näppäintä 2 . Vahvista syöttö painamalla RESETnäppäintä
4 .
Paina MODE-näppäintä 6 päästäksesi aikamoodiin.
Herätyksen kytkeminen päälle / pois
Kytke herätys päälle ja pois painamalla aikamoodissa START-näppäintä 2 ja RESET-näppäintä 4 ja pidä painettuna. Kun herätys on kytketty päälle, näyttöruutuun tulee herätyssymboli 7 .
Kun herätys kuuluu, käynnistä Snooze-toiminto painamalla START-näppäintä 2 . Herätys kuuluu uudelleen 4 - 5 minuutin kuluttua. Herätys kuuluu uudelleen niin kauan, kun painat START-näppäintä 2 .
Paina RESET-näppäintä 4 pysäyttääksesi herätyksen. Ellet paina mitään näppäintä, herätys kuuluu noin minuutin.
FI 21
|
|
|
|
103806_15_Auriol_BE_IE_NL_03.indb 21 |
8/26/14 6:02 PM |
||
Paina START-näppäintä 4 , kun kello on aikamoodissa näyttääksesi asetetun herätysajan.
Kun kello on aikamoodissa, paina RESETnäppäintä 4 ja pidä se painettuna. Paina tämän jälkeen STARTnäppäintä 2 , kun haluat katkaista herätyksen. Herätyssymboli
7sammuu.
Herätysäänen käynnistys / pysäytys
Huomautus: Jokaisena täytenä tuntina kuuluu lyhyt herätysääni.
Paina niin usein MODE-näppäintä 6 , kunnes kellonaikanäyttö 6 tulee näyttöruutuun. Pidä RESET-näppäintä 4 painettuna ja paina samanaikaisesti MODE-näppäintä 6 . Kaikki paivät viikonpäivien näytössä 1 syttyvät. Herätysääni on käynnistetty.
Pidä RESET-näppäintä 4 painettuna ja paina samanaikaisesti MODE-näppäintä 6 . Kaikki päivät viikonpäivien näytossä 1 sammuvat. Herätysääni on pysäytetty.
Ajanottokellon käyttö
Paina niin usein MODE-näppäintä 6 , kunnes kellonaikanäyttö 3 tulee näyttöruutuun. Paina kerran MODE-näppäintä 6 päästäksesi ajanottotoimintoon.
22 FI
|
|
|
|
103806_15_Auriol_BE_IE_NL_03.indb 22 |
8/26/14 6:02 PM |
||
Paina START-näppäintä 2 käynnistääksesi ajanottokellon.
Paina START-näppäintä 2 uudelleen pysäyttääksesi ajanottokellon.
na RESET-näppäintä 4 nollataksesi ajanottokellon.
Väliajan mittaaminen:
Paina niin usein MODE-näppäintä 6 , kunnes kellonaikanäyttö 3 tulee näyttöruutuun. Paina kerran MODE-näppäintä 6 päästäksesi ajanottokellon toimintoon.
Paina START-näppäintä 2 käynnistääksesi ajanottokellon.
Paina RESET-näppäintä 4 saadaksesi väliajan näyttöön. Ajanottokello käy taustalla edelleen. Paina RESET-painiketta 4 uudelleen palataksesi ajanottoaikaan.
Paina START-näppäintä 2 pysäyttääksesi ajanottokellon.
Paina RESET-näppäintä 4 nollataksesi ajanottokellon.
§§ Puhdistus ja hoito
Puhdista tuote kuivalla liinalla, joka ei nukkaannu. Silmälasien puhdistusliina on ihanteellinen tähän tarkoitukseen.
FI 23
|
|
|
|
103806_15_Auriol_BE_IE_NL_03.indb 23 |
8/26/14 6:02 PM |
||
 Loading...