


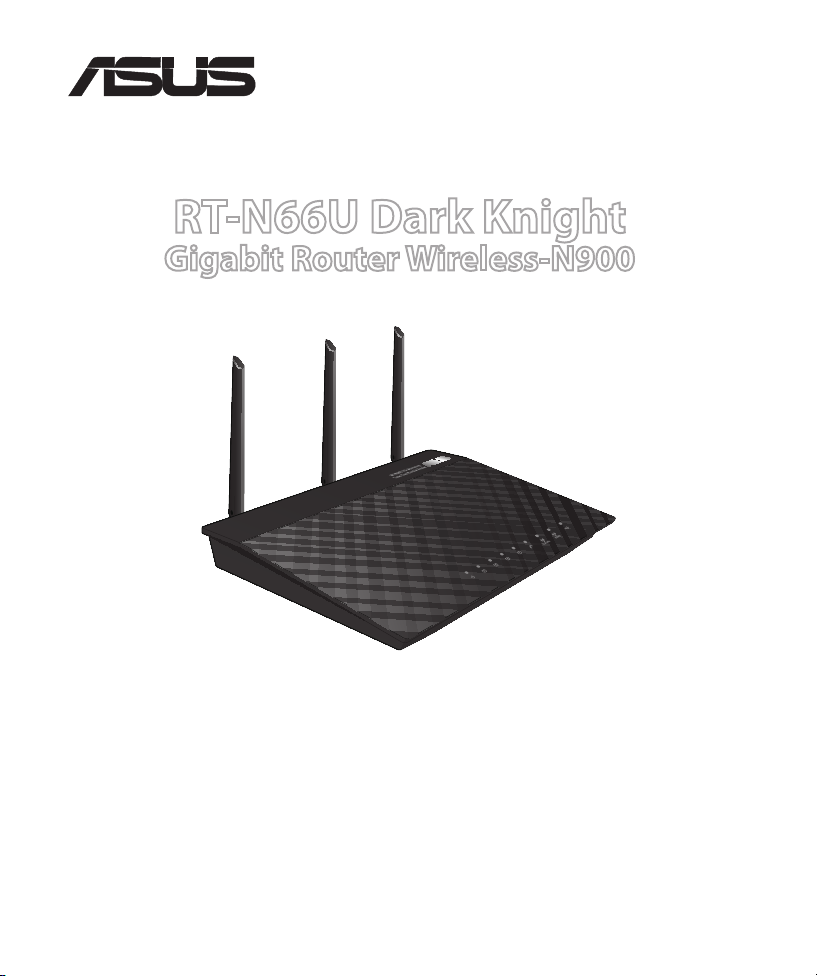
RT-N66U
Quick Start Guide
RT-N66U Dark Knight
Gigabit Router Wireless-N900
®
WEU6842 / Second Edition / November 2011

EC Declaration of Conformity
We, the undersigned,
Manufacturer:
ASUSTek COMPUTER INC.
Address, City:
No. 150, LI-TE RD., PEITOU, TAIPEI 112, TAIWAN R.O.C.
Country:
TAIWAN
Authorized representative in Europe:
ASUS COMPUTER GmbH
Address, City: HARKORT STR. 21-23, 40880 RATINGEN
Country:
GERMANY
declare the following apparatus:
Product name : Dark Knight Double 450Mbps Dual N Band Router
Model name : RT-N66U
conform with the essential requirements of the following directives:
2004/108/EC-EMC Directive
EN 55022:2006+A1:2007 Class B
EN 61000-3-2:2006+A2:2009 Class A
EN 55024:1998+A1:2001+A2:2003
EN 61000-3-3:2008
1999/5/EC-R &TTE Directive
EN 300 328 V1.7.1(2006-10)
EN 301 893 V1.5.1(2008-12)
EN 62311:2008
EN 301 489-1 V1.8.1(2008-04)
EN 301 489-17 V2.1.1(2009-05)
2006/95/EC-LVD Directive
EN 60950-1:2006
EN 60950-1:2006+A11:2009
EN 60065:2002+A1:2006+A11:2008
2009/125/EC-ErP Directive
Regulation (EC) No. 1275/2008
EN 62301:2005
Regulation (EC) No. 642/2009
EN 62301:2005
Regulation (EC) No. 278/2009
EN 62301:2005
Ver. 110101
CE marking
Declaration Date: Nov. 30, 2011
Year to begin affixing CE marking:2011
Position : CEO
Name : Jerry Shen
Signature : __________
(
E
C co
nf
o
rmit
y
m
a
rkin
g)
English .............................................................................................6
Nederlands
....................................................................................19
Suomi
...............................................................................................32
Français
...........................................................................................45
Deutsch
........................................................................................... 58
Norsk
................................................................................................71
Dansk
...............................................................................................83
Svenska
...........................................................................................97
Ελληνικά
..........................................................................................110
Italiano
............................................................................................123
Português
.......................................................................................136
Español
............................................................................................149
Русский
...........................................................................................162
Table of contents
NOTE
•
For more details, refer to the user manual included in the support
CD.
• Für weitere Details beziehen Sie sich auf das Handbuch auf derFür weitere Details beziehen Sie sich auf das Handbuch auf der
Support-CD.
• Katso lisätietoja tuki-CD-levyllä olevasta käyttöoppaasta.
• Pour plus de détails, consultez le manuel de l'utilisateur contenuPour plus de détails, consultez le manuel de l'utilisateur contenu
dans le CD de support.
• Für weitere Details beziehen Sie sich auf das Handbuch auf der
Support-CD.
• For mer detaljert informasjon, se brukerveiledningen som fulgte
med på støtte CD-en.
• For yderligere oplysninger herom, bedes du venligst se i
brugervejledningen på den medfulgte cd.

• För ytterligare detaljer, se bruksanvisningen på support-CD:
n.
• Για περισσότερε λεπτοέρειε, ανατρέξτε στο εγχειρίδιο
χρήστη που περιλαβάνεται στο CD υποστήριξη.
• Per approfondimenti. consultare il manuale utente nel CD
di supporto.
• Para mais detalhes, consulte o manual do utilizador
incluído no CD de suporte.
• Para obtener más detalles, consulte el manual del usuario
incluido en el CD de soporte.
•
Для получения подробной информации. обратитесь к
руководству пользователя на компакт-диске.
6
English
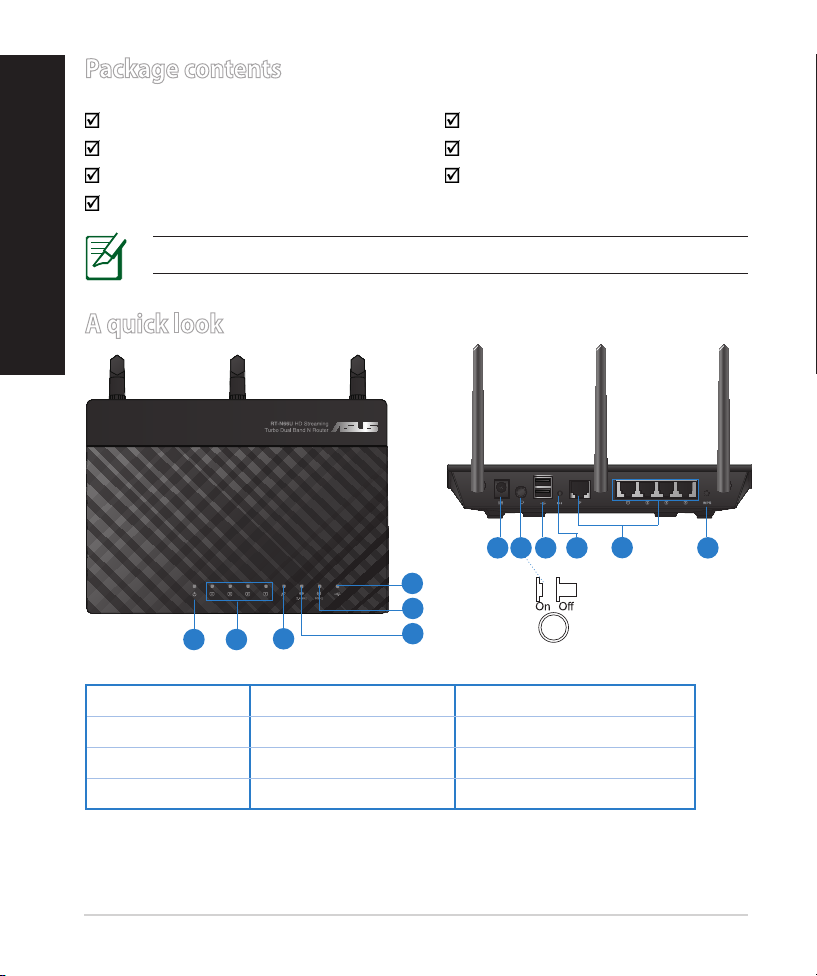
Package contents
RT-N66U AC adapter
Network cable Quick Start Guide
Support CD (User Manual/utilities) Warranty card
Stand
A quick look
1) Power LED 5) 5GHz LED 9) USB 2.0 ports
2) LAN LED 6) USB 2.0 LED 10) Reset button
3) WAN LED 7) Power (DC-In) port 11) Internet & LAN ports
4) 2.4GHz LED 8) Power switch 12) WPS button
NOTE: If any of the items is damaged or missing, contact your retailer.
7 9 10 12
11
8
1 2
3
5
6
4

7
English
NOTES:
• USB External HDD/Flash disk:
• The wireless router works with most USB HDDs/Flash disks up to
2TB and supports read-write access for FAT16, FAT32, EXT2, EXT3,
and NTFS.
• To safely remove the USB disk, launch the web GUI
(http://192.168.1.1), then in the Network Map page's upper right
corner, click the USB icon and click Eject USB 1.
• Incorrect removal of the USB disk may cause data corruption.
• For the list of le system and hard disk partitions that the
wireless router supports, visit http://event.asus.com/networks/
disksupport
• For the list of printers that the wireless router supports, visit
http://event.asus.com/networks/printersupport
8
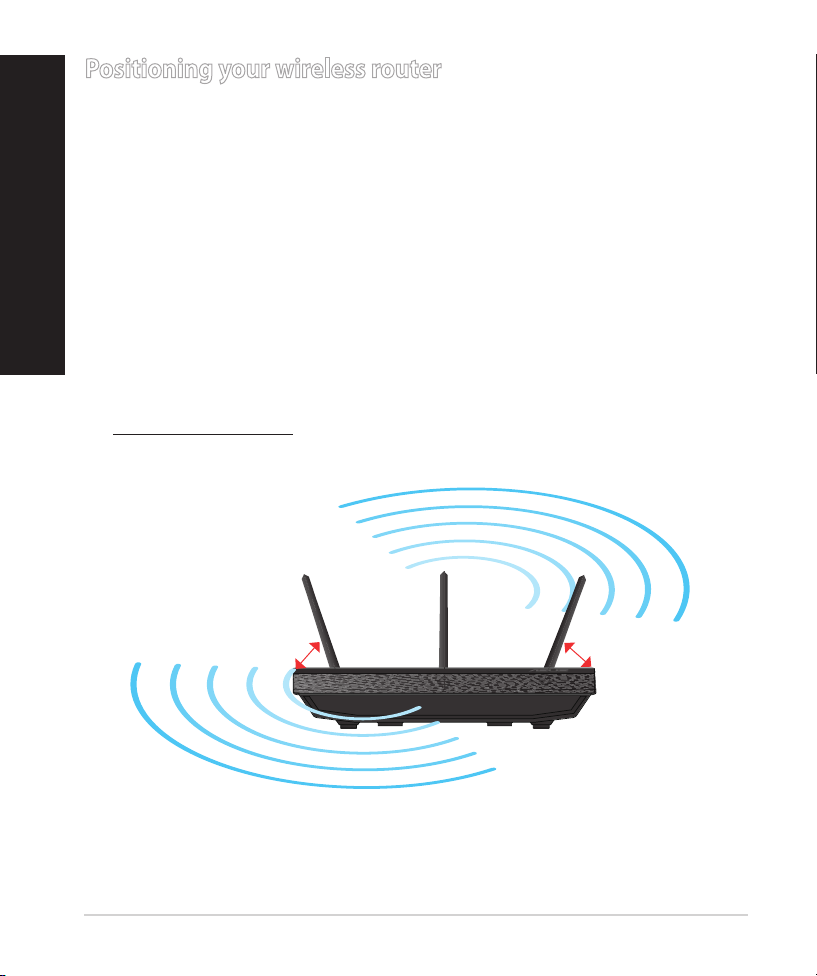
Positioning your wireless router
For the best wireless signal transmission between the wireless router and the
network devices connected to it, ensure that you:
• Place the wireless router in a centralized area for a maximum wireless coverage
for the network devices.
• Keep the device away from metal obstructions and away from direct sunlight.
• Keep the device away from 802.11g or 20MHz only Wi-Fi devices, 2.4GHz
computer peripherals, Bluetooth devices, cordless phones, transformers,
heavy-duty motors, uorescent lights, microwave ovens, refrigerators, and other
industrial equipment to prevent signal interference or loss.
• To ensure the best wireless signal, orient the three detachable antennas as
shown in the drawing below.
• For optimum performance, adjust the internal cooling system. Refer to the user
manual for details.
• Always update to the latest rmware. Visit the ASUS website at
http://www.asus.com to get the latest rmware updates.
45
0
45
0
90
0
English
9
Mounting to the stand
• Align and insert the stand’s mounting hooks
to the wireless router’s mounting holes.
Before you proceed
1. Unplug and disconnect the wires/cables from your existing modem setup
and release your computer’s outmoded IP address.
a:
Unplug the AC adapter from the power outlet and disconnect it from your
cable/ADSL modem.
b: Disconnect the network cable from your cable/ADSL modem.
c: Reboot your computer (recommended).
Modem
OFF!
a
b
c
English
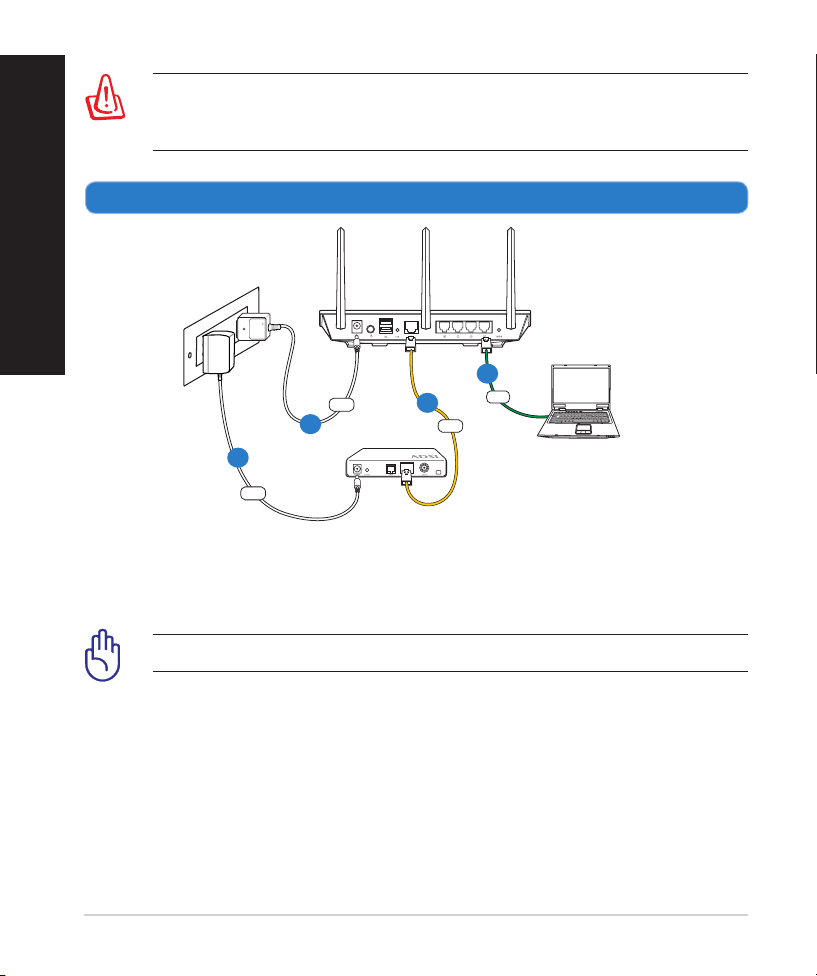
10
WARNING! Before disconnecting the wires/cables, ensure that your
cable/ADSL modem has been turned o for at least two minutes. If your
modem has a backup battery, remove it as well.
2. Set up your wireless environment.
RT-N66U
Computer
Modem
LAN
Power
Wall Power Outlet
Power
WAN
a
b
c
d
a: Insert your wireless router’s AC adapter to the DC-In port and plug it to a
power outlet.
b: Using the bundled network cable, connect your computer to your wireless
router’s LAN port.
IMPORTANT! Ensure that the WAN and LAN LEDs are blinking.
c:
Using another network cable, connect your modem to your wireless router’s
WAN port.
d: Insert your modem’s AC adapter to the DC-In port and plug it to a power
outlet.
English
11
3. Disable some settings on your computer.
A. Disable the proxy server, if enabled.
B. Set the TCP/IP settings to automatically obtain an IP address.
C. Disable the dial-up connection, if enabled.
NOTE: For more details on disabling your computer settings, refer to
Frequently Asked Questions (FAQs).
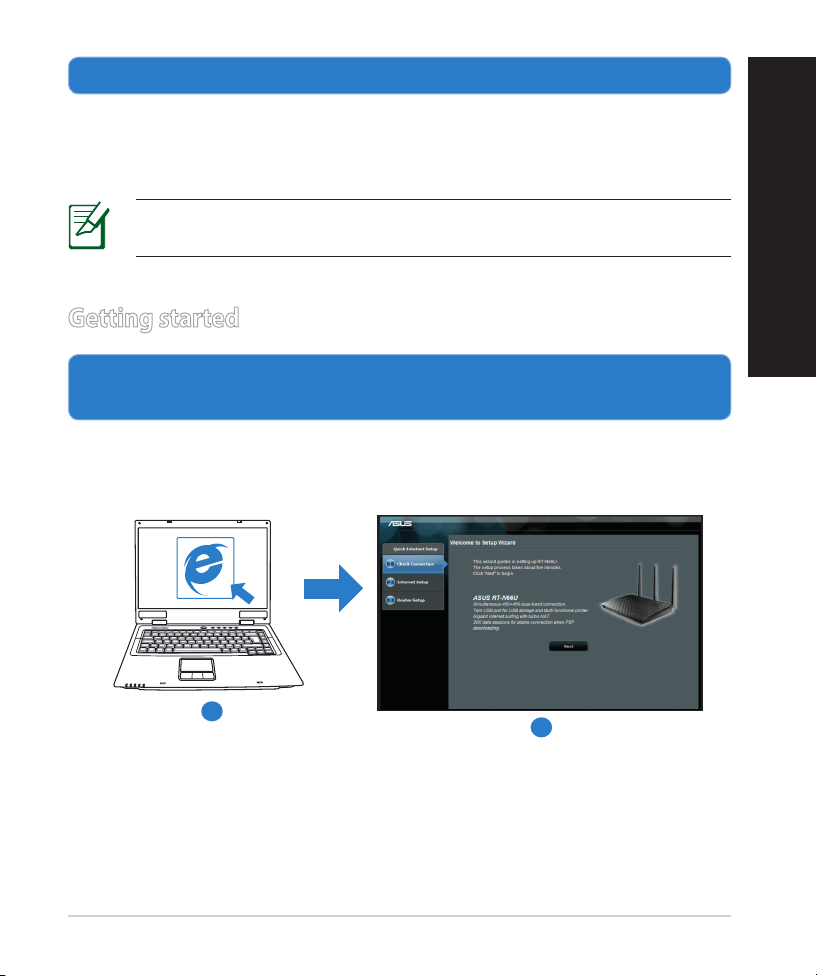
1. Congure your wireless settings via the wireless router’s web graphics
user interface (web GUI).
a: Launch your web browser such as Internet Explorer, Firefox, Google Chrome,
or Safari.
Getting started
b
a
English
12
NOTE: If QIS does not launch automatically, follow these steps to
manually launch QIS:
• On your web browser, key in http://192.168.1.1 and run the Quick
Internet Setup (QIS) Wizard again.
• Disable the proxy settings, dial-up connection, and set your TCP/IP
settings to automatically obtain an IP address. For more details, refer
to the FAQs section or use the Setup Wizard in the support CD for
auto-diagnosis.
b: The wireless router’s Quick Internet Setup (QIS) feature automatically detects
if your ISP connection type is Dynamic IP, PPPoE, PPTP, L2TP, and Static IP.
Key in the necessary information for your connection type.
IMPORTANT! Obtain the necessary information about your Internet
connection type from your Internet Service Provider (ISP).
NOTE: The auto-detection of your ISP connection type takes place
when you congure the wireless router for the rst time or when your
wireless router is reset to its default settings.
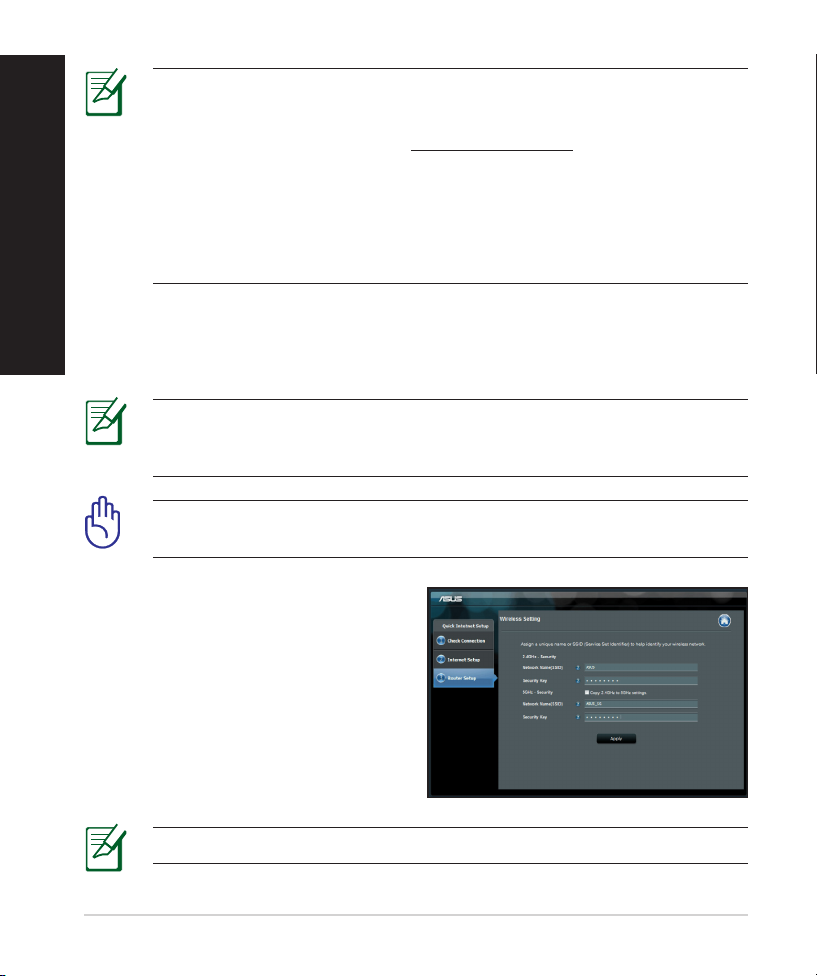
NOTE: You can assign a network name with up to 32 characters.
c: Assign the network name (SSID) and
security key for your 2.4GHz and
5GHz wireless connection. Click Ap-
ply when done.
d: Your Internet and wireless settings
are displayed. Click Next to con-
tinue.
e: Read the wireless network con-
nection tutorial. When done, click
Finish.
English
13
Frequently Asked Questions (FAQs)
After following the steps, I still cannot access the wireless router’s web
graphics user interface (web GUI) to congure the wireless router settings.
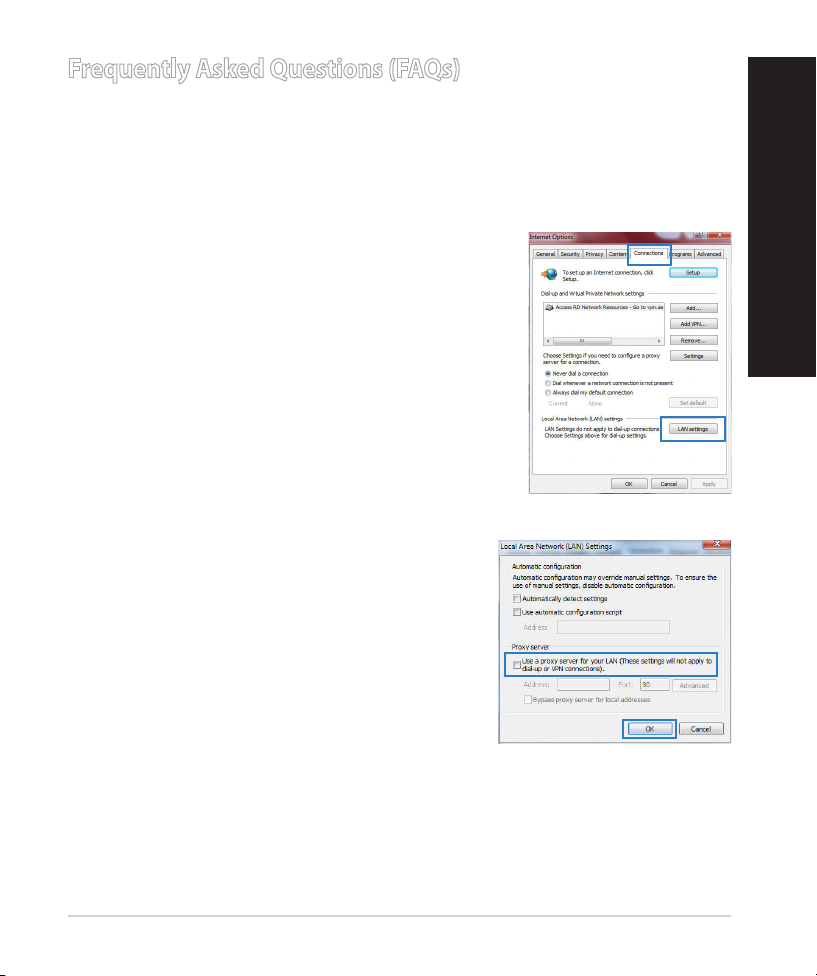
A. Disable the proxy server, if enabled.
Windows® 7
1. Click Start > Internet Explorer to launch the web
browser.
2. Click Tools > Internet options > Connections tab
> LAN settings.
3. From the Local Area Network (LAN) Settings
screen, untick Use a proxy server for your
LAN.
4. Click OK when done.
English
14
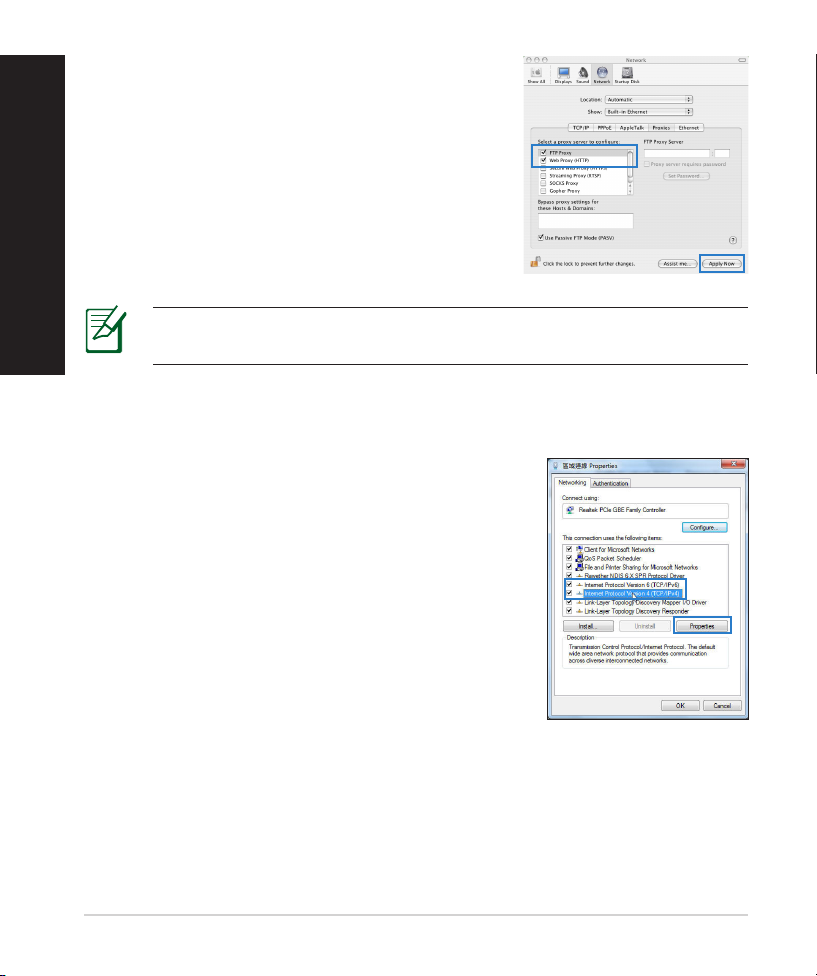
MAC OS
1. From your Safari browser, click Safari > Prefer-
ences > Advanced > Change Settings...
2. From the Network screen, deselect FTP Proxy
and Web Proxy (HTTP).
3. Cllick Apply Now when done.
NOTE: Refer to your browser's help feature for details on disabling the
proxy server.
B. Set the TCP/IP settings to automatically obtain an IP address.
Windows® 7
1. Click Start > Control Panel > Network and
Internet > Network and Sharing Center >
Manage network connections.
2. Select Internet Protocol Version 4 (TCP/IPv4),
then click Properties.
English
15
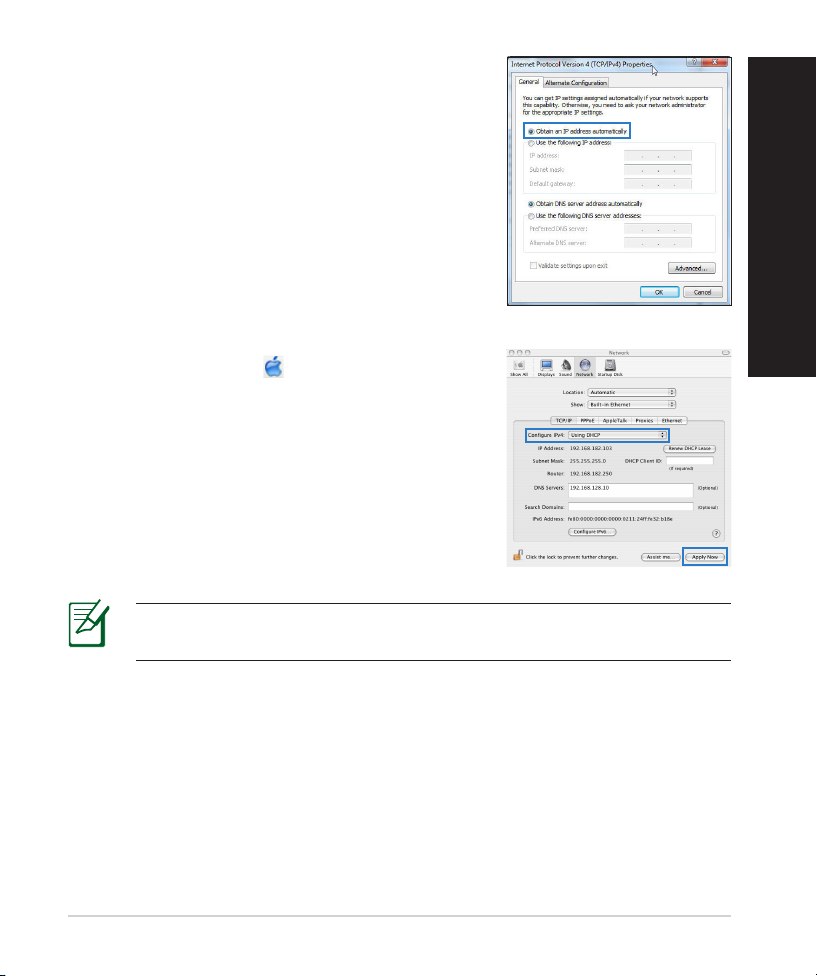
3. To obtain the iPv4 IP settings automatically, tick
Obtain an IP address automatically.
4. Click OK when done.
MAC OS
1. Click the Apple icon located on the top left of
your screen.
2. Click System Preferences > Network >
Congure...
3. From the TCP/IP tab, select Using DHCP in the
Congure IPv4 dropdown list.
4. Cllick Apply Now when done.
NOTE: Refer to your operating system’s help and support feature for
details on conguring your computer’s TCP/IP settings.
English
16
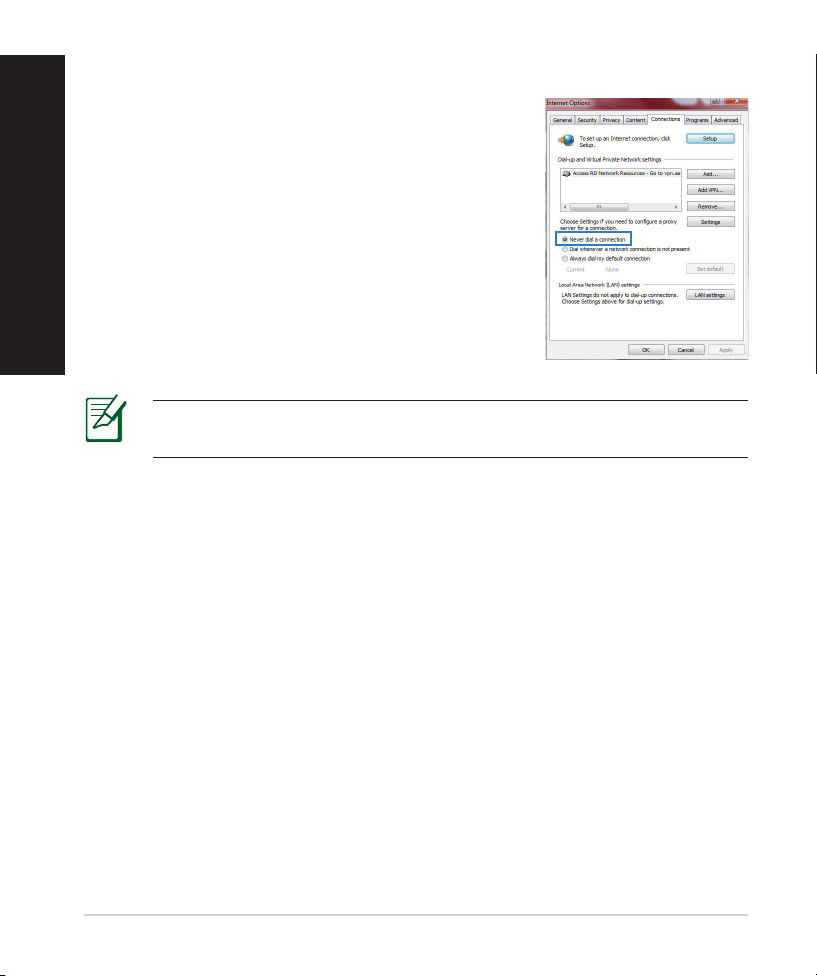
C. Disable the dial-up connection, if enabled.
D. Close all running web browsers.
NOTE: Refer to your browser's help feature for details on disabling
the dial-up connection settings.
Windows® 7
1. Click Start > Internet Explorer to launch the
browser.
2. Click Tools > Internet options > Connections tab.
3. Tick Never dial a connection.
4. Click OK when done.
The client cannot establish a wireless connection with the router.
Out of Range:
• Put the router closer to the wireless client.
• Try to change the channel settings.
Authentication:
• Use wired connection to connect to the router.
• Check the wireless security settings.
• Press the Reset button at the rear panel for more than ve seconds.
English

17
Cannot nd the router:
• Press the Reset button at the rear panel for more than ve seconds.
• Check the setting in the wireless adapter such as SSID and encryption
settings.
Cannot access the Internet via wireless LAN adapter.
• Move the router closer to the wireless client.
• Check whether the wireless adapter is connected to the correct wireless
router.
• Check whether the wireless channel in use conforms to the channels avail-
able in your country/area.
• Check the encryption settings.
• Check if the ADSL or Cable connection is correct.
• Retry using another Ethernet cable.
If the ADSL “LINK” light blinks continuously or stays o, Internet access is
not possible - the Router is unable to establish a connection with the ADSL
network.
• Ensure that all your cables are all properly connected .
• Disconnect the power cord from the ADSL or cable modem, wait a few min-
utes, then reconnect the cord.
• If the ADSL light continues to blink or stays OFF, contact your ADSL service
provider.
Network name or encryption keys are forgotten.
• Try setting up the wired connection and conguring the wireless encryption
again.
• Press the Reset button of the wireless router for more than ve seconds.
• Factory default settings:
User name / Password:
admin / admin
IP address:
192.168.1.1
SSID: ASUS
English
18
Where can I nd more information about the wireless router?
• User Manual in the support CD
• Online FAQ site: http://support.asus.com/faq
• Technical Support site: http://support.asus.com/techserv
• Customer Hotline: Refer to the Support Hotline in this Quick Start Guide
SUPPORT HOTLINE
Area Hotline Number Support
Languages
Availability
USA/
Canada
1-812-282-2787 English Mon. to Fri.
8:30-12:00am EST
(5:30am-9:00pm PST)
Sat. to Sun.
9:00am-6:00pm EST
(6:00am-3:00pm PST)
Brazil 4003 0988 (Capital) Português
Mon. to Fri.
9:00am-
18:00
0800 880 0988
(demais localidades)
English
19
Inhoud verpakking
RT-N66U Wisselstroomadapter
Netwerkkabel Beknopte handleiding
Ondersteuningscd (handleiding, hulpprogramma's)
Garantiekaart Voetstuk
Een snel overzicht
1) Voedings-LED 5) 5GHz LED 9) USB 2.0-poorten
2) LAN-LED 6) USB 2.0 LED 10) Reset-knop
3) WAN-LED
7) Voedingsaansluit-
ing (DC-In)
11) Internet- & LAN-
poorten
4) 2.4GHz LED 8) uit-schakelaar 12) WPS-knop
OPMERKING: als een van de items beschadigd is of ontbreekt, moet u contact
opnemen met uw leverancier.
7 9 10 12
11
8
1 2
3
5
6
4
Nederlands

20
OPMERKINGEN:
• Extere USB-HDD/Flashdisk:
• De draadloze router werkt met de meeste USB-HDD’s/Flashdisks
tot 2TB en ondersteunt lees-schrijftoegang voor FAT16, FAT32,
EXT2, EXT3 en NTFS.
• Om de USB-disk veilig te verwijderen, start u de grasche
webinterface (http://192.168.1.1). Klik vervolgens in de
rechterbovenhoek van de pagina Network Map (Netwerkkaart)
op het USB-pictogram en klik daarna op Eject USB 1 (USB 1
uitwerpen).
• Wanneer u de USB-schijf op de verkeerde manier verwijdert, kan
dit uw gegevens beschadigen.
• De lijst van bestandssystemen en harde schijfpartities die de
draadloze router ondersteunt, vindt u op http://event.asus.com/
networks/disksupport
• De lijst van printers die de draadloze router ondersteunen, vindt u op
http://event.asus.com/networks/printersupport
Nederlands
21
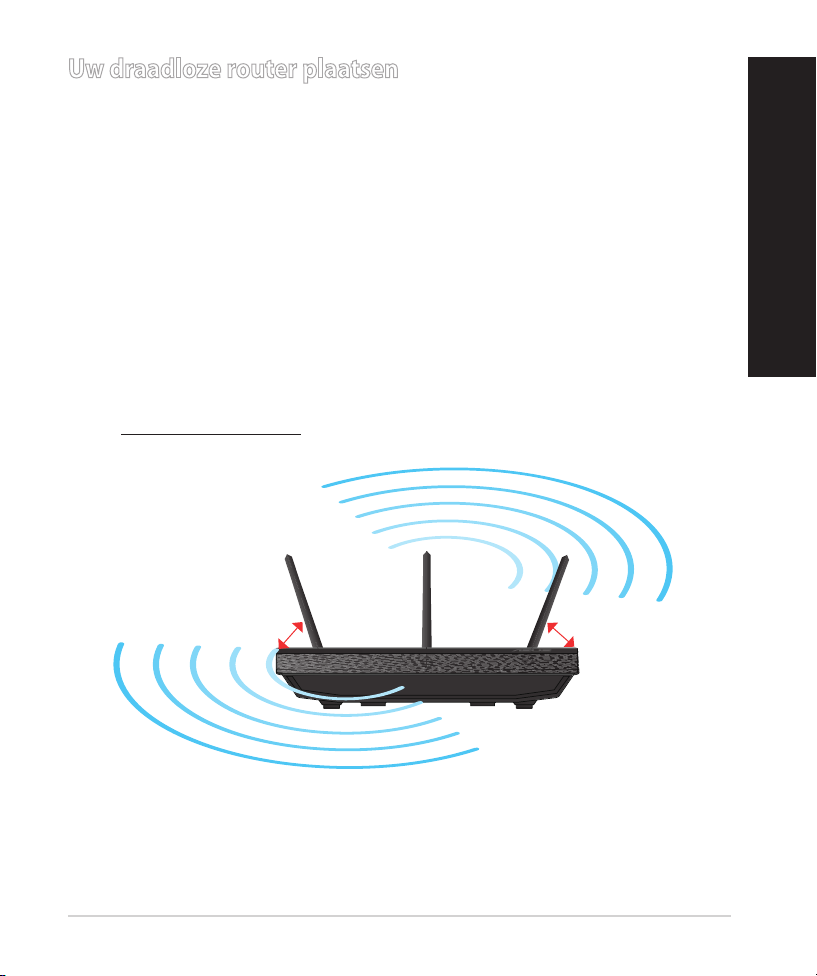
Uw draadloze router plaatsen
Voor de beste draadloze signaaltransmissie tussen de draadloze router en de
netwerkapparaten die erop zijn aangesloten, moet u het volgende doen:
• Plaats de draadloze router in een centraal gebied voor een maximaal draadloos
bereik voor de netwerkapparaten.
• Houd het apparaat uit de buurt van metalen obstakels en uit direct zonlicht.
• Houd het apparaat uit de buurt van 802.11g of 20MHz WiFi-apparaten alleen,
2.4GHz computerrandapparatuur, Bluetooth-apparten, draadloze telefoons,
transformators, zware motoren, TL-lampen, magnetrons, koelkasten en andere
industriële apparatuur om signaalverlies te voorkomen.
• Voor het beste draadloze signaal, moet u de drie afneembare antennes richten
zoals weergegeven in de onderstaande afbeelding.
• Pas het interne koelsysteem aan voor optimale prestaties. Raadpleeg de
handleiding voor details.
• Voer altijd een update uit naar de nieuwste rmware. Bezoek de ASUS-website
op http://www.asus.com voor de nieuwst rmware-updates.
45
0
45
0
90
0
Nederlands
22
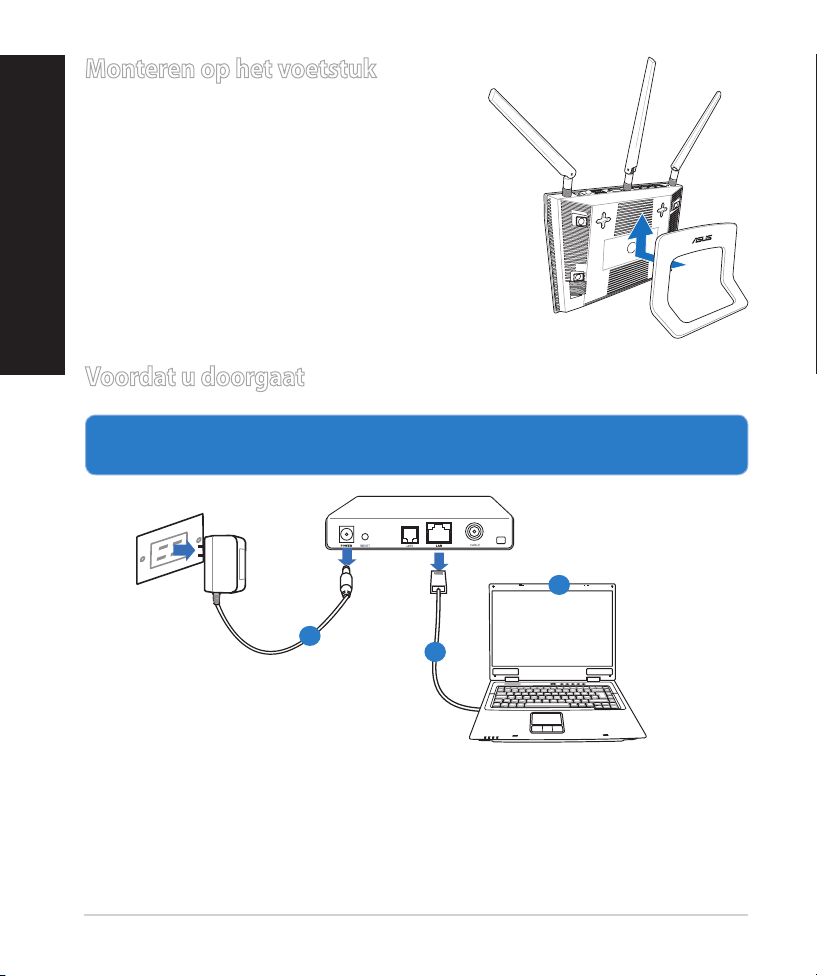
Monteren op het voetstuk
•
Lijn de montagehaken van het voetstuk
uit op de montagegaten van de draadloze
router en stop de haken in de gaten
.
Voordat u doorgaat
1. Koppel de draden/kabels los van uw bestaande modeminstallatie en
geeft het verouderde IP-adres van uw computer vrij.
a: Koppel de wisselstroomadapter los van de voeding en an de kabel/ADSL-
modem.
b:
Koppel de netwerkkabel los van uw kabel/ADSL-modem.
c: Start uw computer opnieuw op (aanbevolen).
Modem
OFF!
a
b
c
Nederlands
23
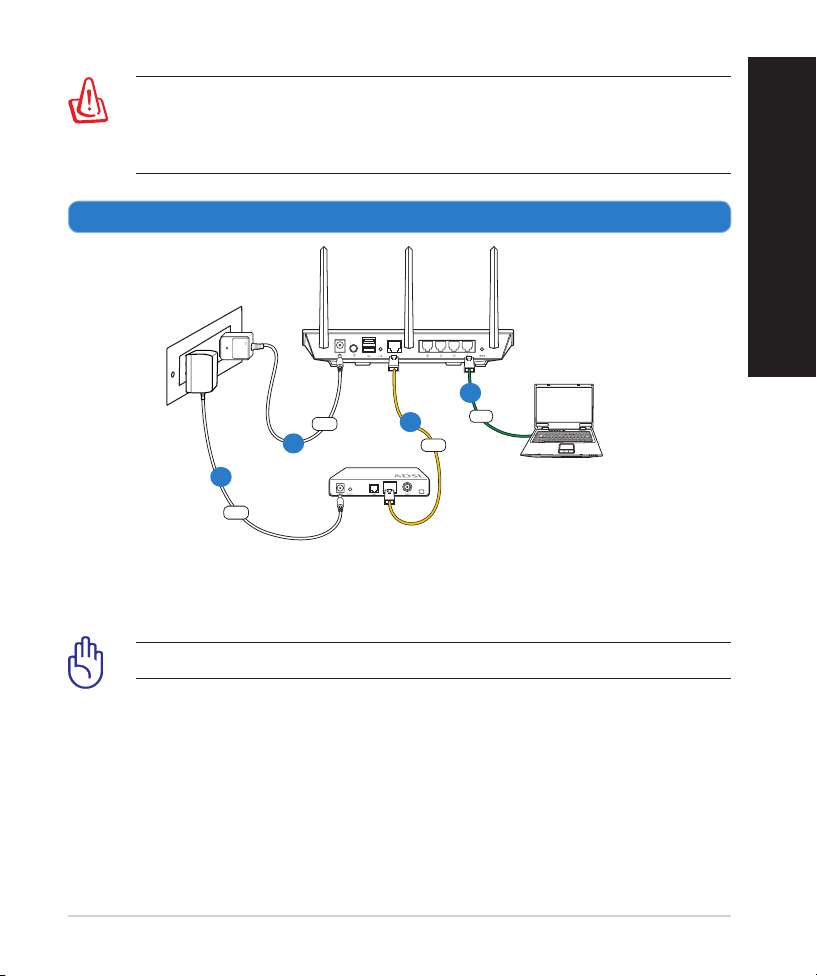
WAARSCHUWING! Zorg ervoor dat uw kabel/ADSL-modus
minstens twee minuten is uitgeschakeld voordat u de draden/
kabels loskoppelt. Als uw modem een reservebatterij heeft, moet u
deze ook verwijderen.
2. Uw draadloze omgeving instellen.
RT-N66U
Computer
Modem
LAN
Power
Wall Power Outlet
Power
WAN
a
b
c
d
a: Stop de wisselstroomadapter van uw draadloze router in de gelijkstroomin-
gang en sluit deze aan op een stopcontact.
b: Sluit uw computer met de netwerkkabel aan op de LAN-poort van uw draad-
loze router.
BELANGRIJK! Controleer of de WAN- en LAN-LED's knipperen.
c: Sluit uw modem met een andere netwerkkabel aan op de WAN-poort van
uw draadloze router.
d: Stop de wisselstroomadapter van uw modem in de gelijkstroomingang en
sluit deze aan op een stopcontact.
Nederlands
24
3. Schakel enkele instellingen op uw computer uit.
A. Schakel de proxyserver uit indien deze is ingeschakeld.
B. De TCP/IP-instellingen instellen om automatisch een IP-adres te verkrijgen.
C. Schakel de inbelverbinding uit indien deze is ingeschakeld.
OPMERKING: Raadpleeg Veelgestelde vragen (FAQ’s) voor meer de-
tails over het uitschakelen van uw computerinstellingen.
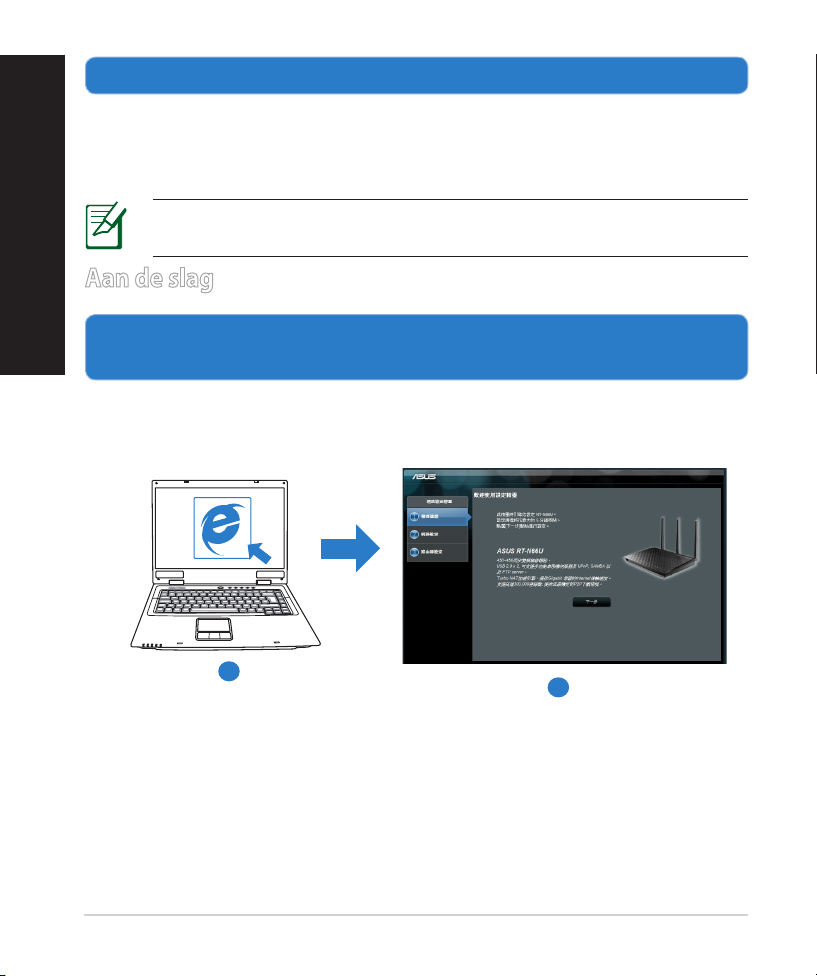
1. Congureer uw draadloze instellingen via de grasche
webgebruikersinterface (web GUI).
a: Start uw webbrowser, zoals Internet Explorer,Firefox, Google Chrome of
Safari
Aan de slag
b
a
Nederlands
25
OPMERKING: Als QIS niet automatisch wordt gestart, moet u deze
stappen volgen om QIS handmatig te starten:
• Voer http://192.168.1.1 in uw webbrowser in en start de QIS-wizard
(Quick Internet Setup) opnieuw op.
• Schakel de proxy-instellingen en de inbelverbinding uit enSchakel de proxy-instellingen en de inbelverbinding uit en
stel uw TCP/IP-instellingen in om automatisch een IP-adres te
verkrijgen. Raadpleeg de sectie Veelgestelde vragen of gebruik de
installatiewizard op de ondersteunings-cd voor een autodiagnose.
b: De QIS-functie (Quick Internet Setup) detecteert automatisch of uw ISP-
verbindingstype Dynamic IP (Dynamisch IP), PPPoE, PPTP, L2TP en Static
IP (Statisch IP) is. Voer de benodigde informatie in voor uw verbinding-
stype.
BELANGRIJK! Vraag uw Internet-provider (ISP) naar de
benodigde informatie over uw internetverbindingstype.
OPMERKING: De automatische detectie van uw ISP-verbindingstype
vindt plaats wanneer u de draadloze router voor de eerste keer congu-
reert of wanneer uw draadloze router opnieuw wordt ingesteld naar de
standaardinstellingen.
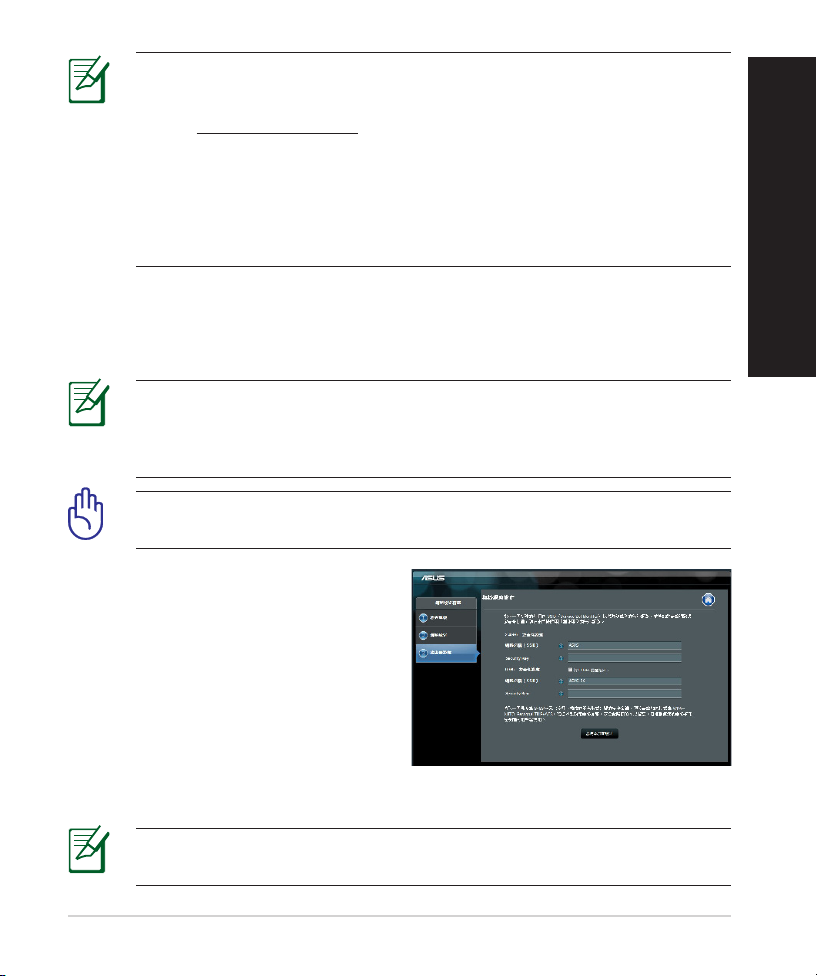
OPMERKING: U kunt een netwerknaam van maximaal 32 tekens
toewijzen.
c: Wijs de netwerknaam (SSID) en
de beveiligingscode toe voor uw
2.4GHz en 5GHz draadloze verbind-
ing. Klik op Apply (Toepassen)
wanneer u klaar bent.
d: Uw internet- en draadloze instellin-
gen worden
weergegeven. Klik op Next (Vol-
gende) om door te gaan.
e: Toont de zelfstudie voor de draad-
loze netwerkverbinding. Klik op
Finish (Voltooien) wanneer u klaar bent.
Nederlands
26
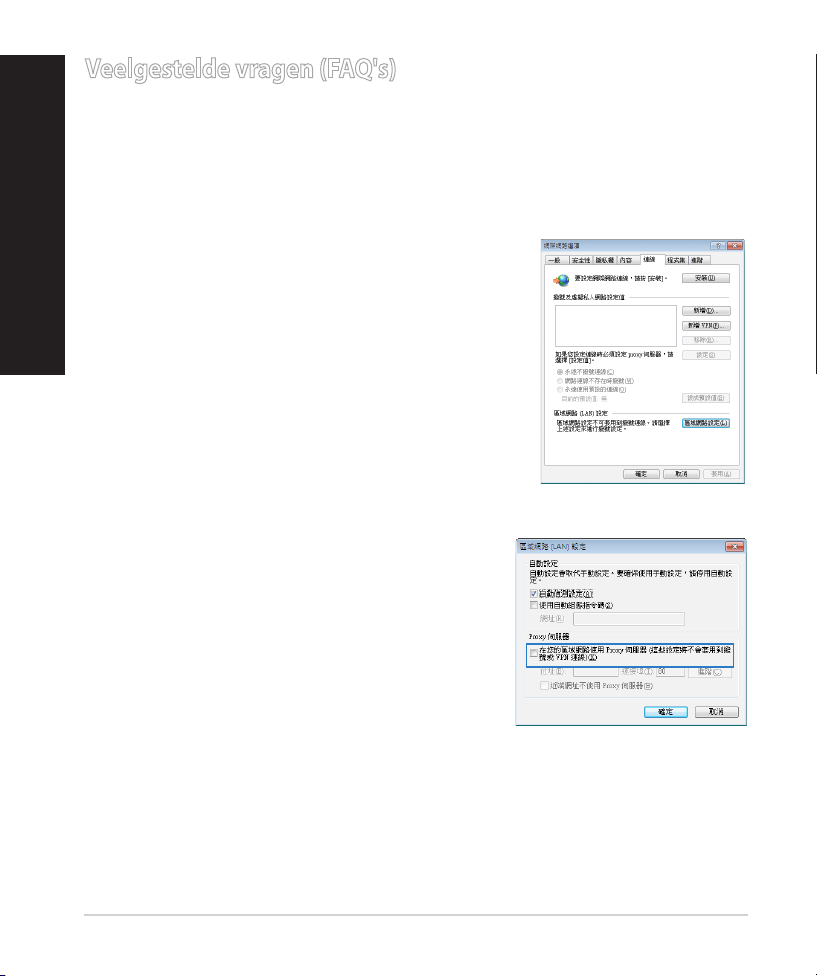
Veelgestelde vragen (FAQ's)
Nadat ik de stappen heb gevolgd, krijg ik nog steeds geen toegang tot de
grasche webinterface (Web GUI) van de draadloze router om deze in te
stellen.
A.
Schakel de proxyserver uit indien deze is ingeschakeld.
Windows® 7
1. Klik op Start > Internet Explorer om de web-
browser te starten.
2. Klik op Tools (Extra) > Internet options (Inter-
netopties) >tabblad Connections (Verbindin-
gen) > LAN settings (LAN-instellingen).
3. Schakel in het scherm LAN-instellingen het
selectievakje Use a proxy server for your LAN
(Een proxyserver voor het LAN-netwerk
gebruiken) uit.
4. Klik op OK wanneer u klaar bent.
Nederlands
27
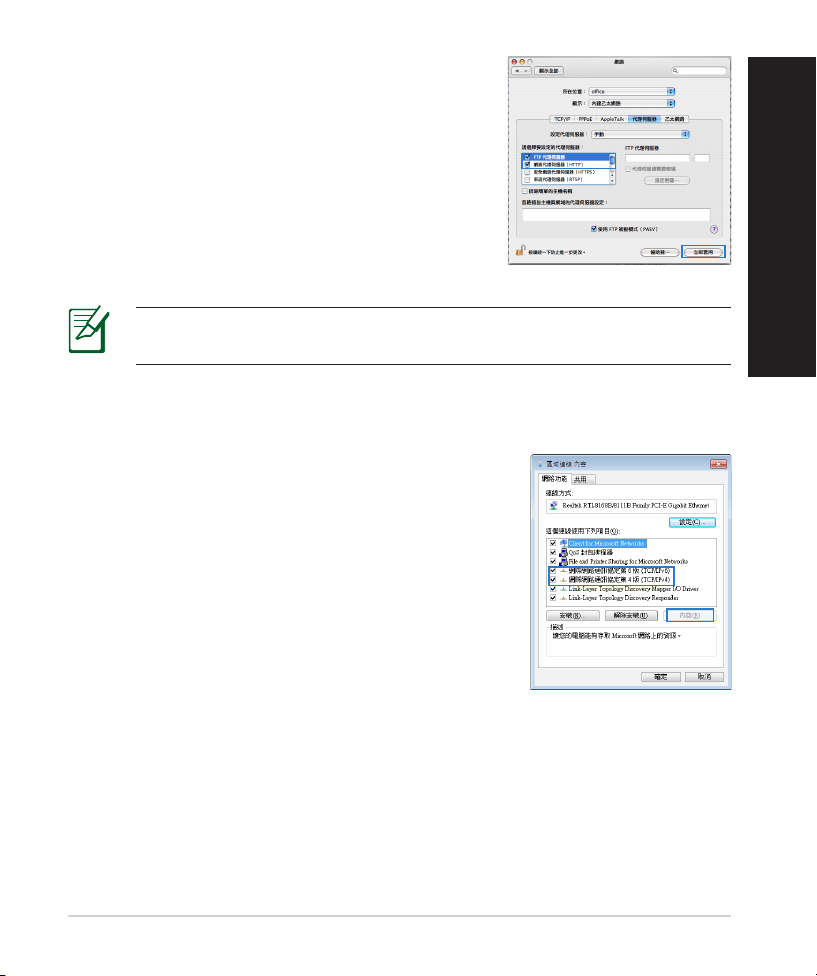
MAC OS
1. Klik in de menubalk op Safari > Preferences...
(Systeemvoorkeuren...) > tabblad Advanced
(Geavanceerd)> Change Settings...(Wijzig
instellingen...)
2. Schakel in de lijst van protocollen FTP Proxy
(FTP-proxy) en Web Proxy (HTTPS) (Webproxy
(HTTPS)) uit.
3. Klik op Apply Now (Schrijf nu in) wanneer u
klaar bent.
OPMERKING: Raadpleeg de Help-functie van uw browser voor meer
informatie over het uitschakelen van de proxyserver.
B. De TCP/IP-instellingen instellen om automatisch een IP-adres te verkrijgen.
Windows® 7
1. Klik op Start > Control Panel (Congurati-
escherm) > Network and Internet (Netwerk
en internet) > Network and Sharing Center
(Netwerkcentrum) > Manage network connec-
tions (Netwerkverbindingen beheren).
2. Selecteer Internet Protocol Version 4 (TCP/IPv4)
(Internet Protocol Versie 4 (TCP/IPv4)) en klik
vervolgens op Properties (Eigenschappen).
Nederlands
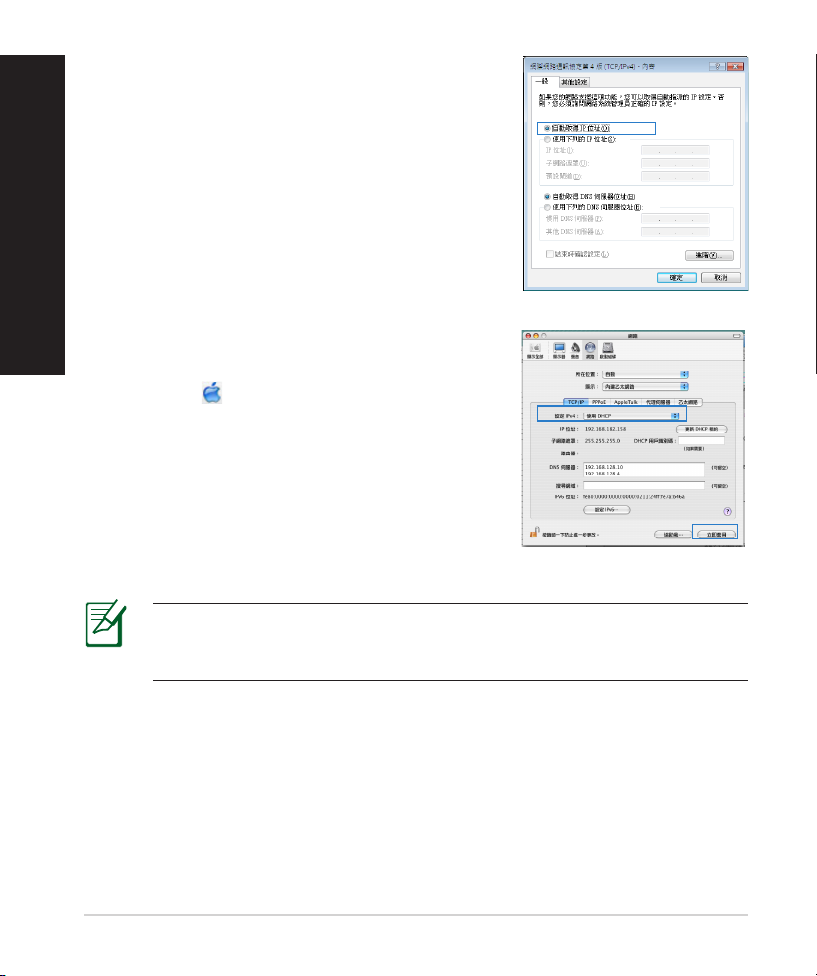
28
3. Om de iPv4 IP-instellingen automatiscch te
verkrijgen, schakelt u het selectievakje Obtain
an IP address automatically (Automatisch een
IP-adres verkrijgen) in.
4. Klik op OK wanneer u klaar bent.
MAC OS
1. Klik bovenaan links op het scherm op het Apple-
pictogram .
2. Klik opSystem Preferences (Systeemvoorkeur-
en) > Network (Netwerk) > Congure ... (Con-
gureer ...)
3. Selecteer op het tabblad TCP/IP de optie Using
DHCP (DHCP gebruiken) in het veld Congure
IPv4 (Congureer IPv4).
4. Klik op Apply Now (Schrijf nu in) wanneer u
klaar bent.
OPMERKING: Raadpleeg de help- en ondersteuningsfunctie van uw
besturingssysteem voor details over het congureren van de TCP/IP-in-
stellingen van uw computer.
Nederlands
29
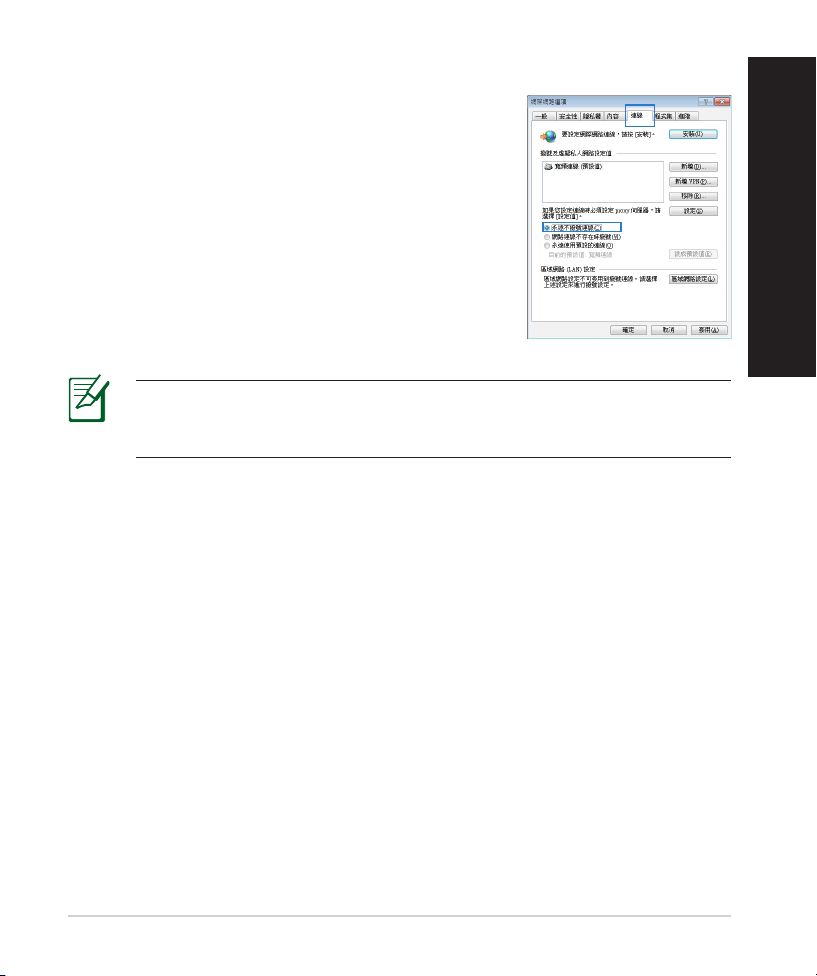
C. Schakel de inbelverbinding uit indien deze is ingeschakeld.
D. Sluit alle actieve webbrowsers.
OPMERKING: Raadpleeg de Help-functie van uw browser voor
meer informatie over het uitschakelen van de instellingen voor de
inbelverbinding.
Windows® 7
1. Klik op Start > Internet Explorer om de web-
browser te starten.
2. Klik op Tools (Extra) > Internet options (Inter-
netopties) > tabblad Connections (Verbindin-
gen).
3. Tik op Never dial a connection (Nooit een
verbinding kiezen).
4. Klik op OK wanneer u klaar bent.
De client kan geen draadloze verbinding maken met de router.
Buiten bereik:
• Plaats de router dichter bij de draadloze client.
• Probeer de kanaalinstellingen te wijzigen.
Vericatie:
• Gebruik een bekabelde verbinding om de router te verbinden.
• Controleer de draadloze beveiligingsinstellingen.
• Houd de Reset-knop op het achterpaneel langer dan vijf seconden inge-
drukt.
Nederlands

30
Kan de router niet vinden:
•Houd de Reset-knop op het achterpaneel langer dan vijf seconden inge-
drukt.
• Controleer de instelling van de draadloze adapter, zoals de
SSID- en coderingsinstellingen.
Kan geen toegang krijgen tot het internet via de draadloze
LAN-adapter.
• Plaats de router dichter bij de draadloze client.
• Controleer of de draadloze adapter verbonden is met de correcte draadloze
router.
• Controleer of het draadloze kanaal dat wordt gebruikt, overeenstemt met de
kanalen die beschikbaar zijn in uw land/regio.
• Controleer de codeerinstellingen.
• Controleer of de ADSL- of kabelverbinding correct is.
• Probeer het opnieuw met een andere ethernetkabel.
Als het "LINK"-lampje van de ADSL blijft knipperen of uit blijft, is er geen
internettoegang mogelijk. De router kan geen verbinding maken met het
ADSL-netwerk.
• Controleer of al uw kabels correct zijn aangesloten.
• Koppel de voedingskabel van de ADSL- of kabelmodem los, wacht enkele
minuten en sluit de kabel vervolgens opnieuw aan.
• Als het ADSL-lampje blijft knipperen of UIT blijft, moet u contact
opnemen met uw ADSL-serviceprovider.
Ik ben mijn netwerknaam of beveiligingssleutels vergeten.
• Probeer de bekabelde verbinding tot stand te brengen en congureer de
coderingsinstellingen opnieuw.
• Houd de Reset-knop gedurende meer dan vijf seconden ingedrukt om het
systeem opnieuw in te stellen of terug te zetten naar de standaard
•fabriekswaarden.
• Standaard fabrieksinstellingen:
Nederlands
 Loading...