


English
Digital HOME |
Asus Asteio
Media Center PC
User Manual
Model D22/ D20

English
Service and Support
Visit our multi-language web site at http://www.asus.com

Preface
Congratulations on your purchase of the Asus Asteio Media Center PC. Read this manual carefully and keep it in a safe place for future reference.
About this manual
Every effort has been made to ensure that the contents on this manual are correct and up to date. However, no guarantee is made regarding the accuracy of its contents, and the manufacturer reserves the right to make changes without prior notice.
Copyright information
No part of this manual, including the products and software described in it, may be reproduced, transmitted, transcribed, stored in a retrieval system, or translated into any language in any form or by any means, except documentation kept by the purchaser for backup purposes, without the express written permission of the manufacturer.
Products and corporate names appearing in this manual may or may not be registered trademarks or copyrights of their respective companies, and are used only for identification or explanation and to the owner’s benefit, without intent to infringe. All trademarks are the property of their respective owners.
Copyright © 2006. All rights reserved.
Note to CATV System Installer
This reminder is provided to call the CATV systems installer’s attention to section 820-93 of the National Electric Code which provide guidelines for proper grounding and in particular, specify that the Coaxial cable shield shall be connected grounding system of the building, as close to the point of cable entry as practical.
English
Asus Media Center PC

English
Safety information
Your Asus Asteio Media Center PC is designed and tested to meet the latest standards of safety for information technology equipment. However, to ensure safe use of this product, it is important that the safety instructions stated in this documentation are observed.
Setting up your system
•Read and follow all instructions in the documentation before you operation your Asteio Media Center PC.
•Do not use this product near water or a heated source such as a radiator.
•Set up the system on a stable work surface.
•Openings in the computer case are provided for ventilation. Do not block or cover these openings. Make sure you provide adequate space, at least 15 cm (6 inches), around the system for ventilation when you set up your work area. Never insert objects of any kind into the computer ventilation openings.
•If you use an extension cord with your Media Center PC, make sure that the total ampere rating on the products plugged into the extension cord does not exceed its ampere rating.
•Since your Media Center PC is fitted with a TV tuner, cable or satellite receiver, make sure that the antenna or cable system is electrically grounded to provide some protection against voltage surges and build-up of static charges.
Care during use
•Do not walk on the power cord or allow anything to rest on it.
•Do not spill water or any other liquids on your Media Center PC.
•When the Media Center PC is turned off, a small amount of electrical current still flows through the computer. Always unplug all power cables and modem cables from the power outlets before cleaning the system.
•Unplug the system from the power outlet and refer servicing to qualified personnel if:
-The power cord or plug is damaged.
-Liquid has been spilled into the system.
-The system does not operate properly when the operating instructions are followed.
-The system was dropped or the cabinet is damaged.
-The system performance changes.
ii Asus Media Center PC

Table of Contents |
|
Preface..................................................................................... |
i |
About this manual........................................................................................ |
i |
Copyright information................................................................................... |
i |
Safety information....................................................................................... |
ii |
Setting up your system.................................................................................... |
ii |
Care during use.............................................................................................. |
ii |
Overview................................................................................. |
1 |
Features..................................................................................................... |
1 |
Setting up your Media Center PC............................................ |
2 |
Planning your Media Center PC setup........................................................... |
2 |
Checking out your Media center PC.............................................................. |
3 |
Front View..................................................................................................... |
3 |
Rear View...................................................................................................... |
4 |
Making connections..................................................................................... |
8 |
Connecting the TV signal source..................................................................... |
8 |
Connecting the TV signal source to an existing setup....................................... |
10 |
Using the TV as a Monitor......................................................................... |
12 |
Cables for connecting to a TV........................................................................ |
12 |
Connecting to a TV ...................................................................................... |
12 |
Connecting Infrared Receiver to external device.......................................... |
16 |
Installing the wireless LAN antenna........................................................... |
16 |
Installing the digital TV/ FM antenna.......................................................... |
17 |
Connecting to a digital video camera ......................................................... |
17 |
Connecting to other devices....................................................................... |
18 |
Configuring Speaker and Sound Options.............................. |
19 |
Speaker configurations.............................................................................. |
20 |
Connecting audio speakers........................................................................ |
21 |
Connecting your Media Center PC to a home audio system.......................... |
22 |
Configuring audio output settings............................................................... |
23 |
Configuring audio output with SoundMax Audio Wizard.................................... |
23 |
Configuring audio output with Windows XP Media Center ................................ |
24 |
Using the PC hardware......................................................... |
25 |
Using the wireless keyboard...................................................................... |
25 |
Using the special keyboard buttons................................................................ |
25 |
English
Asus Media Center PC iii

English
Inserting keyboard batteries.......................................................................... |
27 |
Using the remote control........................................................................... |
28 |
Inserting remote control batteries.................................................................. |
30 |
Using the memory card reader .................................................................. |
31 |
Memory card insertion guide.......................................................................... |
31 |
Starting the Windows XP Media Center................................ |
33 |
Using My TV............................................................................................. |
33 |
Watching a TV program................................................................................. |
33 |
Recording TV programs................................................................................. |
33 |
Playing TV recordings.................................................................................... |
33 |
Using My Music......................................................................................... |
34 |
Adding music CDs to the Media Library........................................................... |
34 |
Playing Music................................................................................................ |
34 |
Using My Pictures..................................................................................... |
34 |
Viewing pictures............................................................................................ |
34 |
Using My Videos....................................................................................... |
35 |
Viewing videos.............................................................................................. |
35 |
Specifications........................................................................ |
35 |
iv Asus Media Center PC

Overview
The Asus Asteio Media Center PC features powerful computing and rich entertainment capabilities. You can run the Windows XP Media Center while using other programs or just enjoy the Windows XP Media center in full-screen mode without using other programs. Use the Media Center remote the same way you use remote controls for other home entertainment systems.You can use the remote and Media Center to watch and record TV programs, play videos and music, and view pictures.
Use the wireless keyboard and mouse to run the Windows XP Media Center and other programs.
Features
•AV Entertainment
-Watching and recording live TV programs
-Playing DVDs and home videos
-Listening to music files
-Viewing and editing pictures
•Connectivity
-Connecting using wireless devices
-Video conferencing and conference call feature (A webcam and Skype software are required for this feature.)
-Data streaming to share different channels
•Supports long range remote control for wireless keyboard (30 feet)
•Features 13-in-1 card reader (MD, CF type I & II, MS, MS-Pro, MS-Duo, MSPro Duo, SD, Mini SD, MMC, MMC4.x, RS MMC, RSMMC4.x) for data transfer
English
Asus Media Center PC

English
Setting up your Media Center PC
Planning your Media Center PC setup
Before you start setting up your Media Center PC, take a few minutes to make sure that all of these connections are available in the location you have selected.
• Internet connection
Your computer needs an Internet connection to update the EPG (Electronic Program Guide) and to access the Internet. Make sure that you have access to a dial-up or broadband Internet connection before starting your Windows XP Media Center software setup. Contact your Internet service provider for more information about setting up your Internet connection.
• Video source
Make sure that you have access to a video source before starting your Media Center PC setup. Your Media Center PC receives video input from a coaxial or S-video cable.The video source usually come from an antenna, a direct cable TV connection, a cable box, or a satellite receiver. Cable boxes and satellite receivers are also known as set-top boxes.
Asus Media Center PC
Checking out your Media center PC
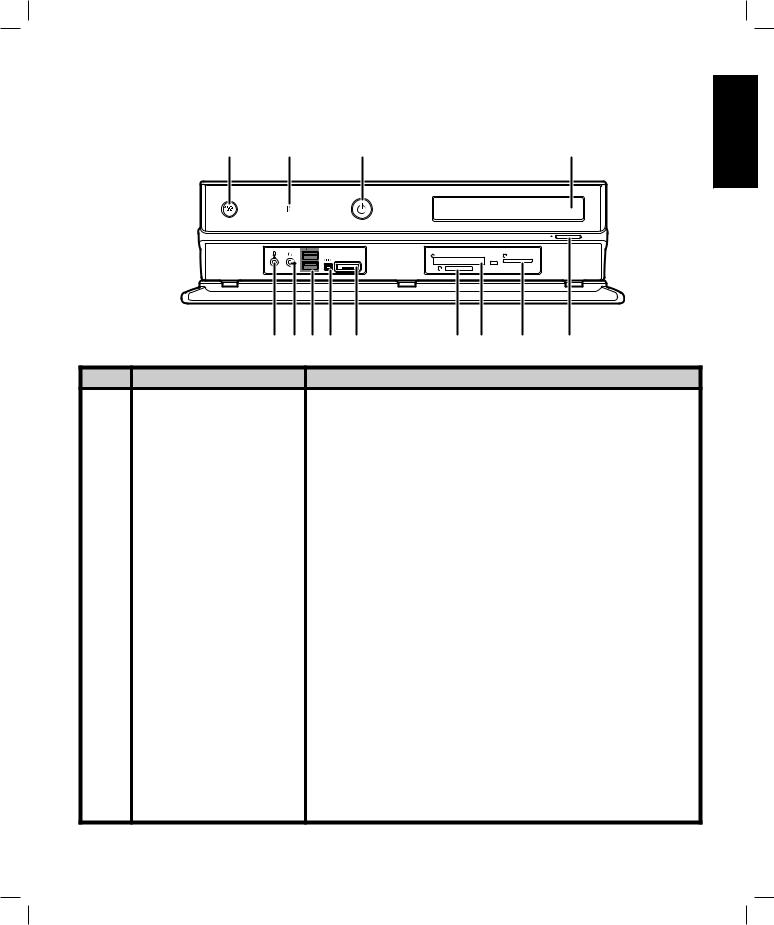
Front View
1 |
2 |
3 |
4 |
English
|
|
2.0 |
|
|
|
|
|
|
|
|
C F |
|
|
3M SD MS/PRO |
|
|
|
|
E - S ATA |
|
|
W/R |
|
|
|
|
|
M S |
|
|
|
|
|
13121110 |
9 |
8 |
7 |
6 |
5 |
Item |
Component |
Description |
|
|
|
|
|
1 |
ID Link receiver |
Use for wireless keyboard ID Link setting. |
2 |
Infrared receiver |
Receives Infrared (IR) signals from the remote control. |
|
|
|
3 |
Power button |
Press to turn your PC on or off. |
|
|
|
4 |
Recordable CD-ROM/DVD |
Use this drive to listen to audio CDs, install games and |
|
drive |
programs, watch DVDs, and store large files onto recordable |
|
|
CDs and DVDs. |
5 |
CD/DVD drive eject button |
Press to open the CD/DVD tray. |
|
|
|
6 |
SD/MMC Pro card reader |
Transfer files from a digital device to your Media Center PC |
|
|
through the removable memory card drive. |
7 |
CompactFlash / |
Transfer files from a digital device to your Media Center PC |
|
MicroDrive card reader |
through the removable memory card drive. |
8 |
MS card reader |
Transfer files from a digital device to your Media Center PC |
|
|
through the removable memory card drive. |
9 |
E-SATA port |
Plug an external drive into this port. |
|
|
|
10 |
IEEE 1394 port |
Plug an IEEE 1394 device, such as a digital camrecorder into |
|
|
this 6-pin IEEE 1394 port. |
11 |
USB port * 2 |
Plug USB devices (such as a USB printer, camera, scanner, or |
|
|
keyboard) into these ports. |
12 |
Headphone jack |
Plug amplified speakers or headphones into this jack. |
|
|
|
13 |
Microphone jack |
Plug an external microphone into this jack to record or |
|
|
transmit voice files. |
Asus Media Center PC
English
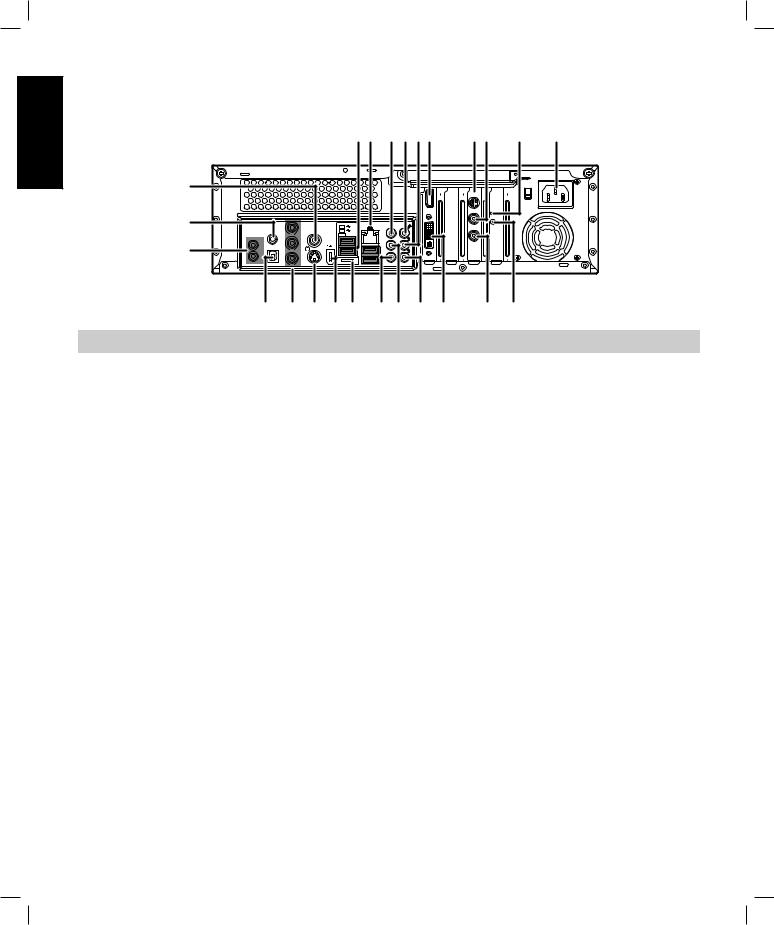
Rear View
Asteio D22
24
23
22
1 2 |
3 4 56 |
7 8 |
9 |
10 |
15
|
|
|
|
|
VIDEO-IN |
|
|
|
|
HDMI |
TV1 |
|
|
|
2.0 |
CENTER |
TV2 |
|
S / P D IF |
VIDEO OUT |
2.0 |
|
|
|
Y |
|
E-SATA |
|
|
I R 1 |
|
|
|
REAR |
|
|
S/PDIF |
s |
|
|
|
I R 2 |
P b |
|
|
SIDE |
|
|
|
|
|
2.0 |
|
|
P r |
|
|
|
|
|
21 |
20 19 1817 |
1615 14 13 |
12 |
11 |
|
|
|
|
|
|
|
|
Item |
Component |
|
Description |
|
|
|
1. |
USB ports x 4 |
|
Plug USB devices (such as a USB printer, camera, scanner, |
|||
|
|
|
or keyboard) into these ports. |
|||
2. |
Ethernet jack |
|
Plug 10/100/1000 Ethernet network cable into this jack. |
|||
3. |
Center Analog Audio Out jack |
Plug powered, center/subwoofer speakers or an external |
||||
|
(Line Out) |
|
audio amplifier into this jack. |
|||
4. |
Microphone jack |
|
Plug an external microphone into this jack to record or |
|||
|
|
|
transmit voice files. |
|
|
|
5. |
Audio Out jack |
|
Line Out for front speakers. |
|||
6. |
HDMI |
|
Plug an HDMI (High Definition Multimedia Interface) |
|||
|
|
|
device into this port. |
|
|
|
7. |
Video In |
|
Plug a coaxial cable from a video source into this jack. |
|||
8. |
TV 1 |
|
Plug a signal cable into this port. (User definable) |
|||
9. |
LED indicator |
|
Indicates that the wireless LAN card is running. |
|||
10. |
Power In jack |
|
Plug the power cord into this port. |
|||
11. |
WIFI Antenna connector |
|
Plug an wireless LAN antenna into this port. |
|||
12. |
TV 2 |
|
Plug a signal cable into this port. (User definable) |
|||
13. |
DVI port |
|
Plug a digital video output connector for TV/Monitor. |
|||
14. |
Audio In jack |
|
Plug to an analog audio device such as a CD player into |
|||
|
|
|
this jack for input into PC. |
|
||
15. |
Rear speaker jack |
|
Plug rear speakers in a multichannel audio configuration. |
|||
16. |
Side speaker connector |
|
Plug side speakers in an eight-speaker system. |
|||
17. |
E-SATA port |
|
Plug an external drive to your Media Center PC. |
|||
18. |
IEEE 1394 port |
|
Plug an IEEE 1394 device, such as a digital camrecorder |
|||
|
|
|
into this 6-pin IEEE 1394 port. |
|||
Asus Media Center PC
Item |
Component |
Description |
19. |
S-video Out port |
Plug in an S-video cable to this port to connect to a TV set. |
20. |
Component video ports |
Plug in a component video cable to connect to a TV set. |
21. |
S/PDIF port (optical) |
Plug an optical (Toslink) digital audio cable into this jack |
|
|
for digital audio transfer. |
22. |
IR ports x 2 |
Plug the IR control cables in this port to send input from |
|
|
the remote control to a set-top box to change channels. |
23. |
S/PDIF port (RCA) |
Plug an RCA cable into this jack for digital audio transfer. |
24. |
Video Out port |
Plug an RCA cable into this jack to connect to a TV set. |
Note:
Use the TVConfig software to select the input signal for TV1 and TV2.
Configure the TV settings using the Asus TVConfig feature on your Media Center PC. Open the Asus TVConfig program by clicking the shortcut icon on the desktop or from Programs in the Start menu. Select the device from the drop-down menu and check settings for Analog TV, FM, and DVDT channels respectively.
Note:
The TVConfig function is available on D22 only.
English
Asus Media Center PC

English
Asteio D20
|
|
|
|
|
1 2 |
3 4 56 |
7 |
8 |
9 |
23 |
|
|
|
|
|
|
|
|
15 |
22 |
|
|
|
|
|
HDMI |
|
TV2 |
|
|
|
|
22 |
.0 |
CENTER |
|
VIDEO-IN |
|
|
|
S / P D I F |
VIDEO OUT |
.0 |
|
|
|
|||
|
|
Y |
|
E-SATA |
|
|
|
|
|
21 |
I R 1 |
|
|
|
|
REAR |
|
|
|
|
S/PDIF |
s |
|
|
|
|
|
|
|
|
I R 2 |
P b |
|
|
|
SIDE |
|
|
|
2.0 |
P r
|
20 19 18 17 16 |
151413 12 |
11 10 |
|
|||||
|
|
|
|
1 2 |
3 4 56 |
7 |
8 |
9 |
|
23 |
|
|
|
|
|
|
|
|
15 |
|
|
|
|
|
|
HDMI |
|
TV2 |
|
22 |
|
|
|
|
|
|
|
|
|
|
|
|
|
2.0 |
|
CENTER |
|
VIDEO-IN |
|
|
|
S/PDIF |
VIDEO OUT |
2.0 |
|
|
|
|
|
|
|
Y |
|
E-SATA |
|
|
|
|
|
21 |
IR 1 |
|
|
|
|
REAR |
|
|
|
|
S/PDIF |
s |
|
|
|
|
|
|
|
|
IR 2 |
Pb |
|
|
|
SIDE |
|
|
|
2.0 |
Pr
|
20 19 18 17 16 |
151413 12 |
11 10 |
|
|
|
|
|
|
Item |
Component |
Description |
|
|
1. |
USB ports x 4 |
Plug USB devices (such as a USB printer, camera, scanner, |
||
|
|
or keyboard) into these ports. |
||
2. |
Ethernet jack |
Plug 10/100/1000 Ethernet network cable into this jack. |
||
3. |
Center Analog Audio Out jack |
Plug powered, center/subwoofer speakers or an external |
||
|
(Line Out) |
audio amplifier into this jack. |
||
4. |
Microphone jack |
Plug an external microphone into this jack to record or |
||
|
|
transmit voice files. |
|
|
5. |
Audio Out jack |
Line Out for front speakers. |
||
6. |
HDMI |
Plug an HDMI (High Definition Multimedia Interface) |
||
|
|
device into this port. |
|
|
7. |
LED indicator |
Indicates that the wireless LAN card is running. |
||
8. |
TV |
Plug a TV signal cable into this port. |
||
9. |
Power In jack |
Plug the power cord into this port. |
||
10. |
Video In |
Plug a coaxial cable from a video source into this jack. |
||
Asus Media Center PC
Item |
Component |
Description |
11. |
WIFI Antenna connector |
Plug an wireless LAN antenna into this port. |
12. |
VGA port/ |
Plug a digital video output connector for TV/Monitor. |
|
DVI port |
Plug a digital video output connector for TV/Monitor. |
13. |
Audio In jack |
Plug to an analog audio device such as a CD player into |
|
|
this jack for input into PC. |
14. |
Rear speaker jack |
Plug rear speakers in a multichannel audio configuration. |
15. |
Side speaker connector |
Plug side speakers in an eight-speaker system. |
16. |
E-SATA port |
Plug an external drive to your Media Center PC. |
17. |
IEEE 1394 port |
Plug an IEEE 1394 device, such as a digital camrecorder |
|
|
into this 6-pin IEEE 1394 port. |
18. |
S-video Out port |
Plug in an S-video cable to this port to connect to a TV set. |
19. |
Component video ports |
Plug in a component video cable to connect to a TV set. |
20. |
S/PDIF port (optical) |
Plug an optical (Toslink) digital audio cable into this jack |
|
|
for digital audio transfer. |
21. |
IR ports x 2 |
Plug the IR control cables in this port to send input from |
|
|
the keyboard or remote a set-top box to change channels. |
22. |
S/PDIF port (RCA) |
Plug an RCA cable into this jack for digital audio transfer. |
23. |
Video Out port |
Plug an RCA cable into this jack to connect to a TV set. |
English
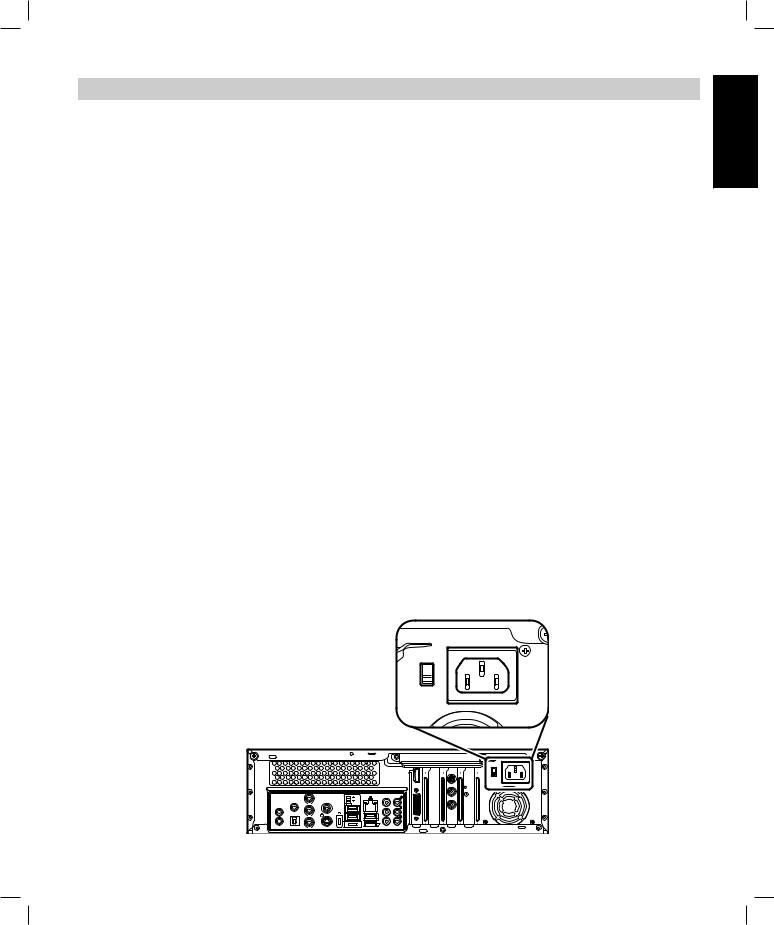
Notes:
•The connectors may vary depending on the model you purcahse.
•Ensure you use the correct voltage as recommended by the manufacturer before turning on your Media Center PC. Check the voltage label located on the left of the Power In jack.
15
15
|
|
|
|
|
VIDEO-IN |
|
|
|
|
HDMI |
TV1 |
|
|
|
2.0 |
CENTER |
TV2 |
|
S/ PDIF |
VIDEO OUT |
2.0 |
|
|
|
Y |
|
E-SATA |
|
|
IR 1 |
|
|
|
REAR |
|
|
S/PDIF |
s |
|
|
|
IR 2 |
Pb |
|
|
SIDE |
|
|
|
|
|
2.0 |
|
|
Pr |
|
|
|
|
Asus Media Center PC

English
Making connections
Connecting the TV signal source
Your Media Center PC has connectors for Video-In or coaxial (TV) input. Select the connector that your video source supports:
• Video-In
The video signal that provides the highest quality video for your Media Center PC. If you use Video-In, you also need to connect the audio source using RCA stereo plugs.
• Coaxial (TV)
The video and audio signals are both carried on one cable.The coaxial cable is the easiest way to connect a direct cable or an antenna video source to your Media Center PC.
Note:
In a MCE environment, if the device is set to receive digital TV signals, the analog TV and FM radio functions will be disabled and vice versa.
Connecting to the TV signal using S-video
1.Connect the Video-In cable provided from a video source such as a cable set-top box, a satellite settop box, or other video source device, to the Video In adapter cable provided. Next, connect it to the Video-In port on the back of your Media Center PC.
2.Connect an RCA cable from the Audio Out jacks on the video device to the Line In (red) jack on the back of your Media Center PC.
15
|
|
|
|
|
VIDEO-IN |
|
|
|
|
HDMI |
TV1 |
|
|
|
2.0 |
CENTER |
TV2 |
|
S / P D I F |
VIDEO OUT |
2.0 |
|
|
|
Y |
|
E-SATA |
|
|
I R 1 |
|
|
|
REAR |
|
|
S/PDIF |
s |
|
|
|
I R 2 |
Pb |
|
|
SIDE |
|
|
|
|
|
2.0 |
|
|
P r |
|
|
|
|
VIDEO-IN
Note:
You need to use the RCA adapter cable to connect to the RCA cables.
Asus Media Center PC
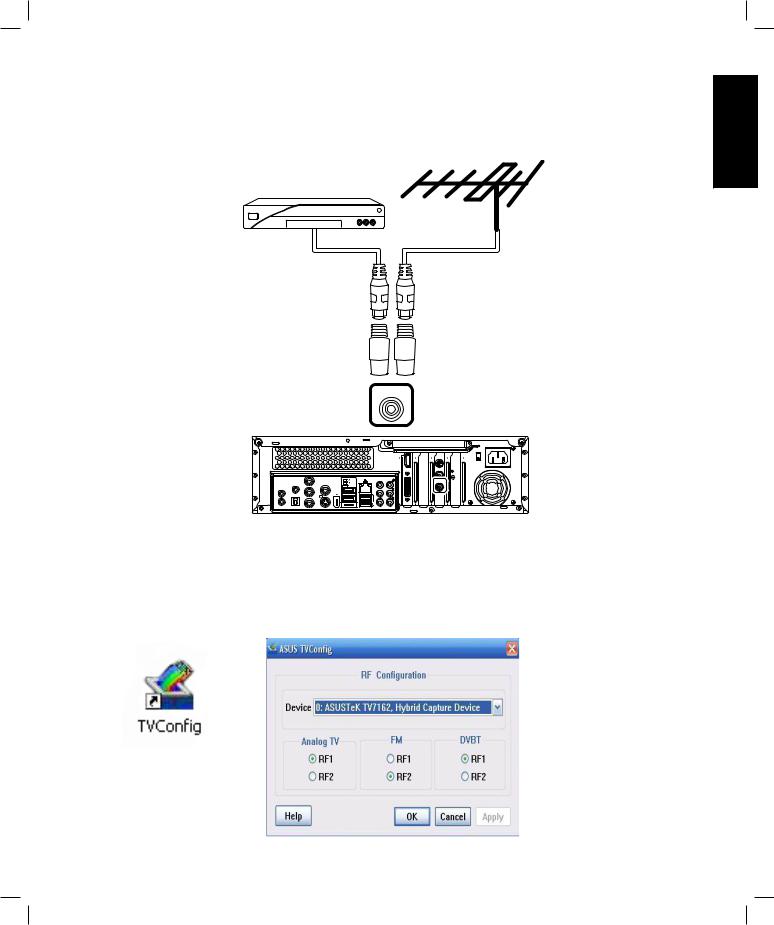
Connecting to the TV signal / Coaxial TV
Connect a coaxial cable (not included) from a video device, such as a direct cable connection, a cable set-top box, a satellite set-top box, or an antenna, to the TV2 jack on the back of your Media Center PC.
English
TV
15
|
|
|
|
|
VIDEO-IN |
|
|
|
|
HDMI |
TV1 |
|
|
|
2.0 |
CENTER |
TV2 |
|
S / P D IF |
VIDEO OUT |
2.0 |
|
|
|
Y |
|
E-SATA |
|
|
I R 1 |
|
|
|
REAR |
|
|
S/PDIF |
s |
|
|
|
I R 2 |
P b |
|
|
SIDE |
|
|
|
|
|
2.0 |
|
|
P r |
|
|
|
|
Configure the TV settings using the Asus TVConfig feature on your Media Center PC. Open the Asus TVConfig program by clicking the shortcut icon on the desktop or from Programs in the Start menu. Select the device from the drop-down menu and check settings for Analog TV, FM, and DVDT channels respectively.
Note:
The TVConfig function is available on D22 only.
Asus Media Center PC
English
Connecting the TV signal source to an existing setup
This section describes how to connect the Media Center PC to an existing setup for your TV signal source.
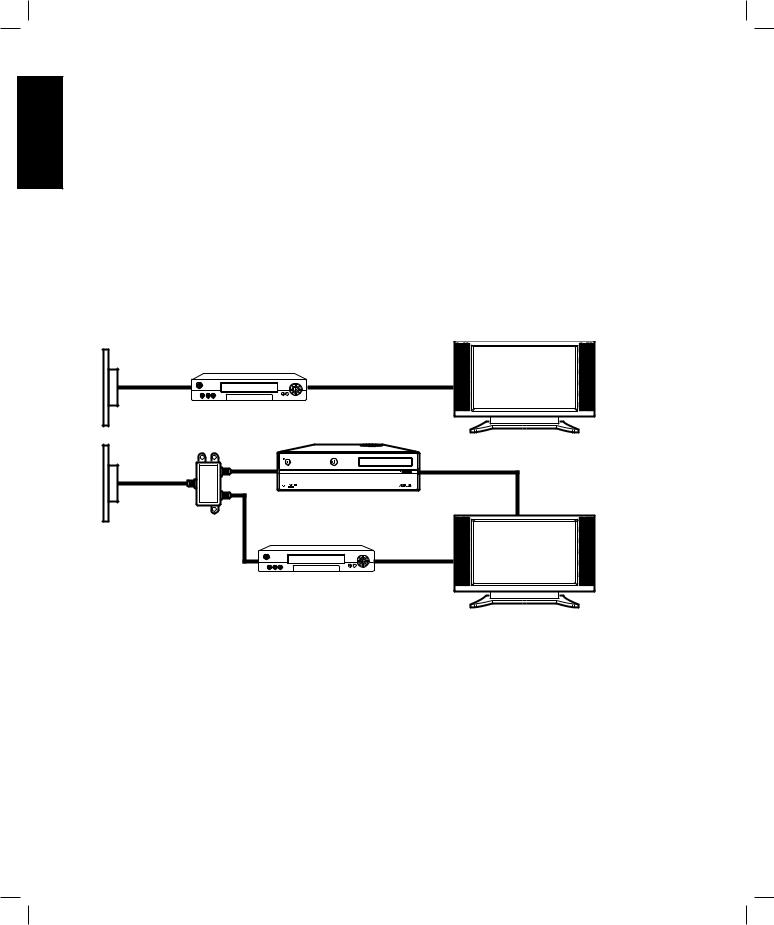
Wall to VCR to TV using coaxial cable
Remove the coaxial cable at the input to the VCR, and connect it to the input of a coaxial cable signal splitter ( not included). Connect two coaxial cables to the splitter outputs.
Connect one of these cables to the input of the VCR and the other to the TV connector on the back of the Media Center PC.
Existing setup
|
C |
|
C |
A |
|
E |
|
B |
D |
F |
Connect to PC
|
|
C |
|
|
C |
H I |
|
A |
|
|
|
|
|
|
|
B |
|
G |
|
|
|
H |
|
|
|
C |
|
|
|
D |
C |
|
|
E |
F |
AWall
BCable outlet
CCoaxial cable
DVCR In
EVCR Out
FTV In
GSplitter In
HSplitter Out
ITV In jack on the back of the Media Center PC
Note:
Splitters are not included.
10 Asus Media Center PC
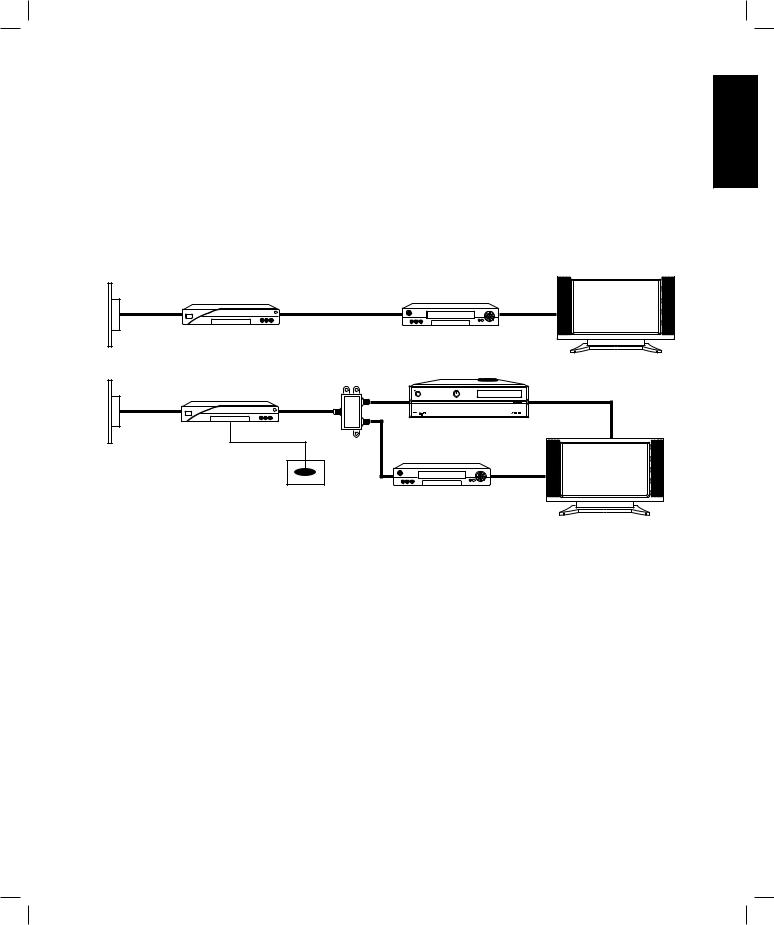
Wall to cable TV set-top box, or satellite box to VCR to TV using coaxial cable
Remove the coaxial cable at the input to the VCR, and connect it to the input of a coaxial cable signal splitter ( not included). Connect two coaxial cables to the splitter outputs.
Connect one of these cables to the input of the VCR and the other to the TV connector on the back of the Media Center PC.
Note:
Connect your set-top box to the VCR using the coaxial cable.
Existing setup
|
C |
|
C |
|
C |
A |
|
E |
|
G |
H |
B |
D |
F |
Connect to PC
|
|
|
|
|
C |
|
|
C |
|
C |
J |
K |
|
A |
|
|
|
|
||
|
|
|
|
|
|
|
B |
D |
E |
I |
|
|
|
|
|
L |
|
J |
|
|
|
|
|
|
|
|
|
|
|
|
M |
C |
|
|
|
|
|
|
|
|
|
|
|
|
|
|
F |
C |
|
|
|
|
|
G |
H |
English
AWall
BCable outlet
CCoaxial cable
DSet-top box/Satellite In
ESet-top box/Satellite Out
FVCR In
GVCR Out
HTV In
ISplitter In
JSplitter Out
KTV In jack on the back of the Media Center PC
LRemote control sensor cable
MRemote control sensor
Note:
Splitters are not included.
Asus Media Center PC 11
English
Using the TV as a Monitor
The TV-out capability of your PC enables you to connect it to a TV to view the image from your PC on a TV screen.With the TV-out feature, you can view the PC image, watch DVD movies, or play games on your TV.
Cables for connecting to a TV
To connect your Media Center PC to a TV, you will need to use a video cable and an audio cable.The type of video cable you need depends on your TV model.
You can also connect your Media Center PC to your TV with one of the following ways:
•S-video with stereo audio
•Component video (YPbPr) with stereo audio
•Video with stereo audio
•DVI with stereo audio
•HDMI
•SCART
•DVI to VGA converter with stereo audio
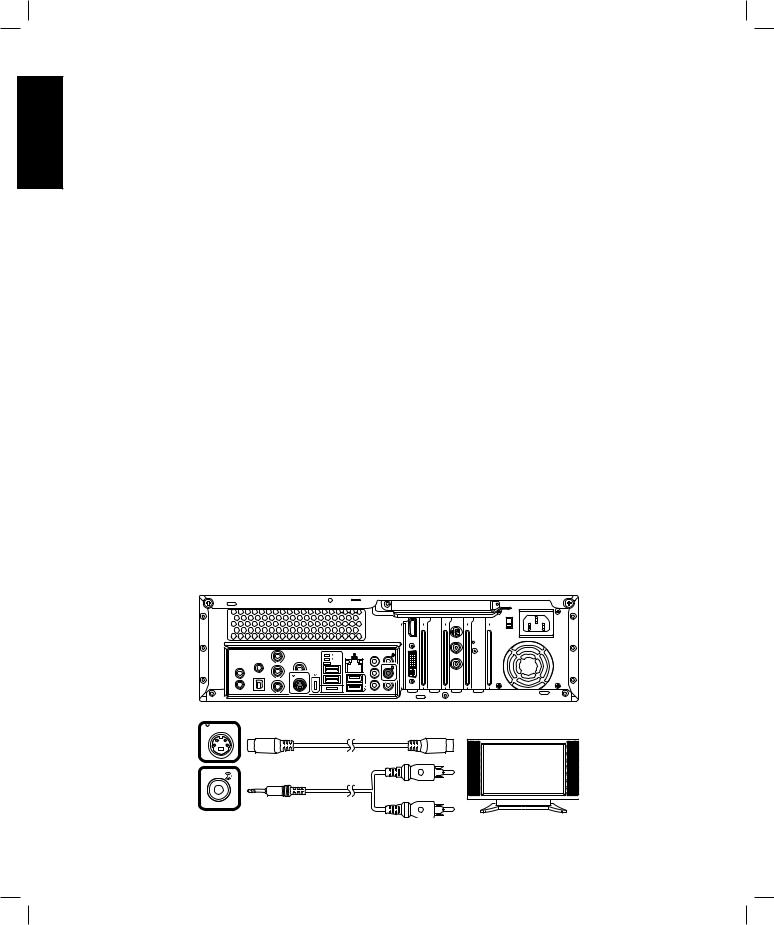
Connecting to a TV
1.Turn off your Media Center PC.
2.Connect the TV cable using one of the following arrangements, depending on the connection jacks on your TV.
If your TV has an S-video jack, connect an S-video cable from the S-video In jack on the TV to the S-video Out jack on the back of your Media Center PC.
15
|
|
|
|
|
VIDEO-IN |
|
|
|
|
HDMI |
TV1 |
|
|
|
2.0 |
CENTER |
TV2 |
|
S /P D I F |
VIDEO OUT |
2.0 |
|
|
|
Y |
|
E-SATA |
|
|
I R 1 |
|
|
|
REAR |
|
|
S/PDIF |
s |
|
|
|
I R 2 |
P b |
|
|
SIDE |
|
|
|
|
|
2.0 |
|
|
Pr |
|
|
|
|
 s
s
12 Asus Media Center PC

If your TV has a component video input jack, connect a component video cable to the Component Video jack on the TV and to the component video out jack on the back of your Media Center PC.
15
|
|
|
|
|
VIDEO-IN |
|
|
|
|
HDMI |
TV1 |
|
|
|
2.0 |
CENTER |
TV2 |
|
S / PD I F |
VIDEO OUT |
2.0 |
|
|
|
Y |
|
E-SATA |
|
|
I R 1 |
|
|
|
REAR |
|
|
S/PDIF |
s |
|
|
|
I R 2 |
Pb |
|
|
SIDE |
|
|
|
|
|
2.0 |
|
|
Pr |
|
|
|
|
English
Y
P b
P r
If your TV has a video input jack, connect a video cable to the Video
In jack on the TV and to the Video Out jack on the back of your Media Center PC.
|
|
|
|
15 |
|
|
|
|
VIDEO-IN |
|
|
|
HDMI |
TV1 |
|
|
2.0 |
CENTER |
TV2 |
S/PDIF |
VIDEO OUT |
2.0 |
|
|
|
Y |
E-SATA |
|
|
IR 1 |
|
|
REAR |
|
S/PDIF |
|
|
|
|
IR 2 |
Pb |
|
SIDE |
|
|
|
|
2.0 |
|
|
Pr |
|
|
|
VIDEO OUT |
|
|
|
|
Asus Media Center PC 13
English
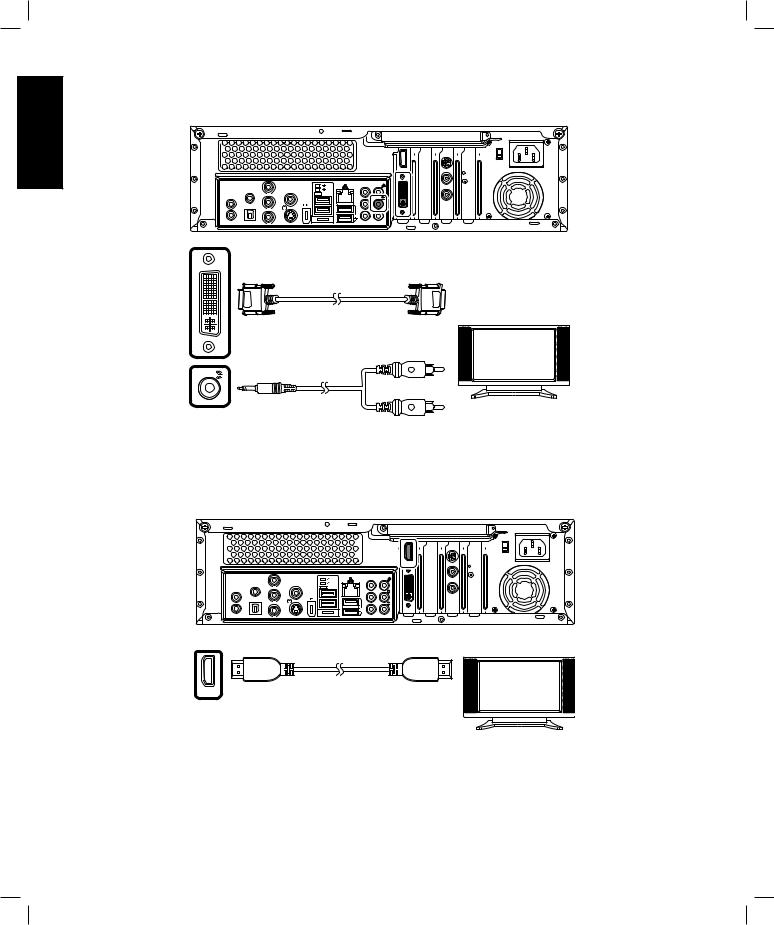
If your TV has a DVI connector, connect a DVI cable to the DVI connector on the TV and to the DVI connector on the back of your Media Center PC.
15
|
|
|
|
|
VIDEO-IN |
|
|
|
|
HDMI |
TV1 |
|
|
|
2.0 |
CENTER |
TV2 |
|
S/ PD IF |
VIDEO OUT |
2.0 |
|
|
|
Y |
|
E-SATA |
|
|
IR 1 |
|
|
|
REAR |
|
|
S/PDIF |
s |
|
|
|
IR 2 |
P b |
|
|
SIDE |
|
|
|
|
|
2.0 |
|
|
P r |
|
|
|
|
If your TV has a HDMI connector, connect a HDMI cable to the HDMI connector on the TV and to the HDMI connector on the back of your Media Center PC.
15
|
|
|
|
|
VIDEO-IN |
|
|
|
|
HDMI |
TV1 |
|
|
|
2.0 |
CENTER |
TV2 |
|
S/PDIF |
VIDEO OUT |
2.0 |
|
|
|
Y |
|
E-SATA |
|
|
I R 1 |
|
|
|
REAR |
|
|
S/PDIF |
s |
|
|
|
I R 2 |
Pb |
|
|
SIDE |
|
|
|
|
|
2.0 |
|
|
Pr |
|
|
|
|
HDMI
14 Asus Media Center PC
If your TV has a SCART connector, connect a SCART/composite video cable to the SCART connector on the TV and to the Video Out and Line Out (lime green) connectors on the back of your Media Center PC. You can also connect your Media Center PC to a TV using a SCART/ component video cable as shown below.
|
|
|
|
VIDEO-IN |
|
|
|
HDMI |
TV1 |
|
|
2.0 |
CENTER |
TV2 |
S / P DIF |
VIDEO OUT |
2.0 |
|
|
|
Y |
E-SATA |
|
|
IR 1 |
|
|
REAR |
|
S/PDIF |
|
|
|
|
IR 2 |
Pb |
|
SIDE |
|
|
|
|
2.0 |
|
|
Pr |
|
|
|
|
Notes: |
15 |
The cables shown are |
|
for illustrative purposes |
|
only. Packaged cables |
|
may vary. |
VIDEO OUT
Y
P b
P r
English
If your TV has a VGA connector, first plug a VGA converter to the DVI connector on the back of your Media Center PC (for Asteio D22 only), and then connect your PC to the TV using a VGA cable.
15
|
|
|
|
|
VIDEO-IN |
|
|
|
|
|
TV1 |
|
|
|
2.0 |
CENTER |
TV2 |
|
S/PDIF |
VIDEO OUT |
2.0 |
|
|
|
Y |
|
E-SATA |
|
|
I R 1 |
|
|
|
REAR |
|
|
S/PDIF |
s |
|
|
|
I R 2 |
Pb |
|
|
SIDE |
|
|
|
|
|
2.0 |
|
|
Pr |
|
|
|
|
3. Turn on the TV and select the TV In video source or PC source according to your TV model.
Note:
Openings in the computer case are provided for ventilation. Do not block or cover these openings.
Asus Media Center PC 15
English
Connecting Infrared Receiver to external device
To connect an external device such as a set-top box or or a monitor, do the following:
1.Connect one end of the IR cable to the IR port on the back of your Media Center PC.
2.Connect the other end of the IR cable to the set-top box as shown.
15
|
|
|
|
VIDEO-IN |
|
|
|
HDMI |
TV1 |
|
|
2.0 |
CENTER |
TV2 |
S / P D I F |
VIDEO OUT |
2.0 |
|
|
Y |
|
E-SATA |
|
|
I R 1 |
|
|
REAR |
|
S/PDIF |
s |
|
|
|
P b |
|
|
SIDE |
|
|
|
|
2.0 |
|
P r |
|
|
|
|
IR1
Note:
There are two IR ports available for connection.
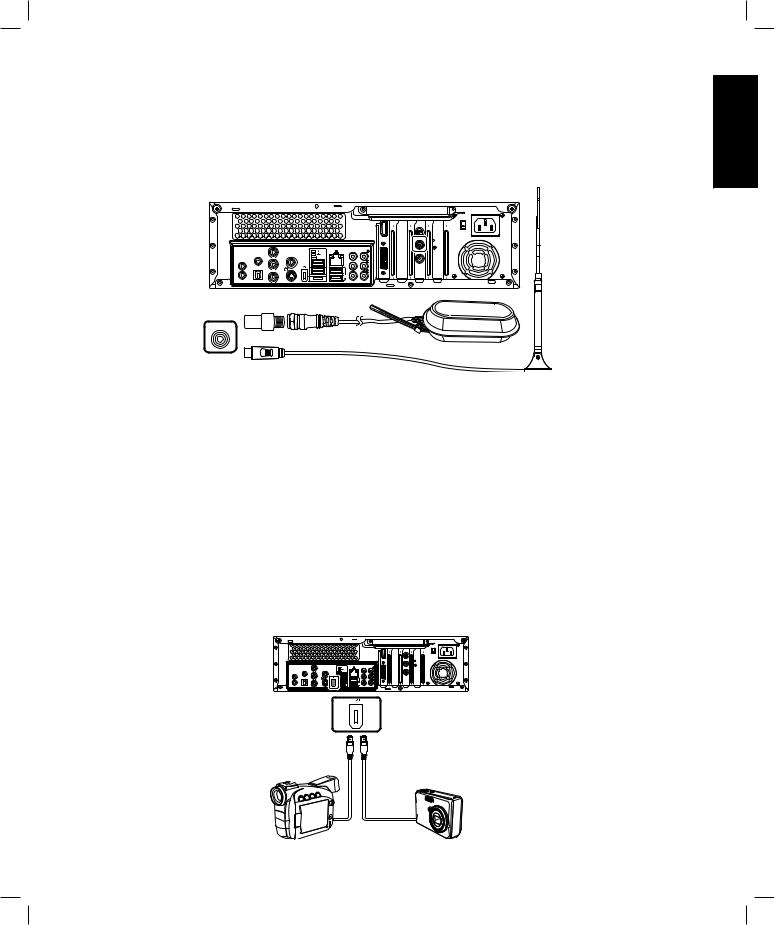
Installing the wireless LAN antenna
To connect an external antenna to the wireless LAN card, do the following:
1.Fasten the external antenna provided to the wireless LAN connector on the back of your Media Center PC until tight.
2.The LED indicator starts flashing indicating the reception of WLAN signals.
15
|
|
|
|
|
VIDEO-IN |
|
|
|
|
HDMI |
TV1 |
|
|
|
2.0 |
CENTER |
TV2 |
|
S / P D IF |
VIDEO OUT |
2.0 |
|
|
|
Y |
|
E-SATA |
|
|
IR 1 |
|
|
|
REAR |
|
|
S/PDIF |
s |
|
|
|
IR 2 |
Pb |
|
|
SIDE |
|
|
|
|
|
2.0 |
|
|
P r |
|
|
|
|
16 Asus Media Center PC
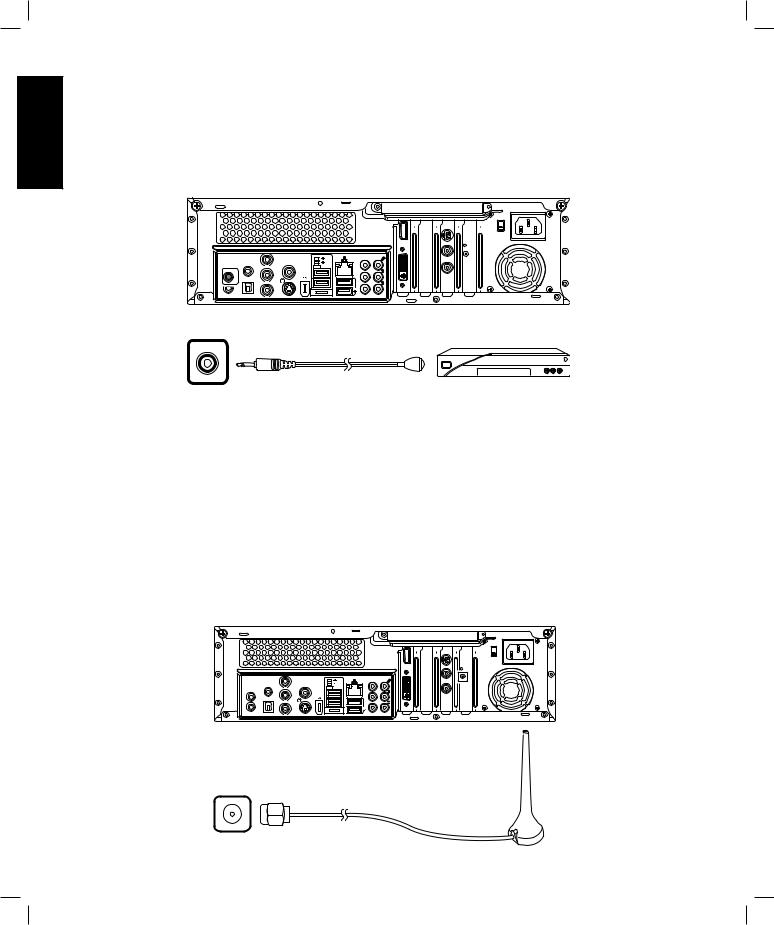
Installing the digital TV/ FM antenna
To connect the digital TV /FM antenna, do the following:
1.Fasten the NTSC to PAL converter to the digital TV /FM antenna provided.
2.Connect the digital TV /FM antenna to TV jack on the back of your Media Center PC.
English
15
|
|
|
|
|
VIDEO-IN |
|
|
|
|
HDMI |
TV1 |
|
|
|
2.0 |
CENTER |
TV2 |
|
S/ P D I F |
VIDEO OUT |
2.0 |
|
|
|
Y |
|
E-SATA |
|
|
I R 1 |
|
|
|
REAR |
|
|
S/PDIF |
s |
|
|
|
I R 2 |
P b |
|
|
SIDE |
|
|
|
|
|
2.0 |
|
|
P r |
|
|
|
|
TV1
Notes:
Digital TV/FM
Antennas
•The antennas shown are for illustrative purposes only. Packaged antenna may vary.
•The reception signal and quality of the Digital TV/FM antennas may vary in different regions.
Connecting to a digital video camera
To connect a digital camera or a digital video camera, do the following:
1.Turn on your Media Center PC, and wait for Windows XP to start.
2.Connect the video camera transfer cable into the camera and then into a free USB port or an IEEE 1394 (FireWire) port on your Media Center PC.
3.A Found New Hardware message appears. Follow the on-screen instructions to make necessary settings for the new found device. When installation is complete, a message appears telling you the camera is ready to use.
15
|
VIDEO-IN |
HDMI |
TV1 |
|
TV2 |
Asus Media Center PC 17

English
Connecting to other devices
Other peripheral devices such as a printer, scanner, card reader, and PDA can also be connected to your Media Center PC.
15
|
|
VIDEO-IN |
|
HDMI |
TV1 |
2.0 |
CENTER |
TV2 |
S / P D IF |
|
VIDEO OUT |
2.0 |
|
Y |
|
|
I R 1 |
|
|
|
S/PDIF |
P b |
s |
|
I R 2 |
|
|
|
|
|
|
2.0 |
|
Pr |
|
|
Scanner
MOLEX |
MOLEX |
PDA
MOLEX |
MOLEX |
Card reader
Printer
18 Asus Media Center PC

Configuring Speaker and Sound Options
Asus Media Center PC supports many different audio options, sound connections, and speaker configurations.You may set up your PC to use two stereo speakers or a multi-channel audio speaker system. Connect your speaker system to the PC, and then configure the audio software for sound output.
Asus Media Center PC includes six sound connectors on the back of your PC.You can connect up to a 7.1 audio systems to the PC.
Sound connector |
Description |
|
SIDE |
Line SIDE (grey) connects to side speakers in an eight-speaker system. |
|
(7.1) |
||
|
Line CENTER (orange) connects to center/subwoofer speakers in a multi-
CENTER
channel audio configuration.
Line REAR (black) connects to rear speakers in a multi-channel audio
REAR
configuration.
Line Out (lime green) connects to front speakers.
Line In (red) connects to an analog audio device such as a CD player for input into PC.
Mic (light blue) connects to a microphone.
English
Asus Media Center PC 19

English
Speaker configurations
You may set up your Media Center PC for the following supported configurations:
Name |
Speaker System |
Headphones |
None. |
|
|
2 (stereo) |
Left speaker, right speaker. |
|
|
2.1 |
Left speaker, right speaker, and a subwoofer. |
|
|
4.1 |
Two front speakers, two rear speakers, and a subwoofer. |
|
|
6/ 5.1 |
Two front speakers, two rear speakers, a center speaker, and a subwoofer. |
|
|
8/ 7.1 |
Two front speakers, two rear speakers, two side speakers, a center speaker, and |
|
a subwoofer. |
|
|
Home audio |
Home stereo or home theater audio system with passive speakers. |
system |
|
|
|
Speaker types
Your PC supports only an active (powered) speaker system. An active speaker system must have its own power source. A home audio system does not require active speakers because the receiver provides amplification.
A stereo speaker set is a left-right, two channel speaker system. A multi-channel audio speaker has a left-right front and left-right rear channel, and it may include a subwoofer and a center speaker. Side speakers are included in more advanced systems. A subwoofer provides enhanced bass sounds.
“.1” indicates a subwoofer. For instance, 7.1 channels refers to an eight-speaker mode and uses two front speakers (left-right), two side speakers (left-right), a center speaker, and a subwoofer.
20 Asus Media Center PC

Connecting audio speakers
Refer to the illustrations below to connect audio speakers to your Media Center PC according to your speaker system. After connecting the speakers to the PC, configure the audio settings for sound output for your Media Center PC.
English
2 Speakers |
4 Speakers |
|
REAR |
5 Speakers and a subwoofer |
7 Speakers and a subwoofer |
Asus Media Center PC 21

English
Connecting your Media Center PC to a home audio system
You can connect your Media Center PC to your home stereo or home theater multi-channel audio receiver/amplifiers using your existing speakers.
Most home receiver/amplifiers have RCA-type input connectors.You may require Y adapter cables to connect the receiver/amplifiers to your Media Center PC (optional).
Center |
Front |
Rear speakers |
|
Subwoofer speakers |
speakers |
||
|
Receiver/ Amplifier
REAR
15
VIDEO-IN
HDMI RF-IN
2.0 |
FM-IN |
|
S / P D IF |
VIDEO OUT |
2.0 |
|
Y |
|
E-SATA |
I R 1 |
|
|
REAR |
|
S/PDIF |
s |
|
I R 2 |
P b |
|
|
P r
22 Asus Media Center PC
Configuring audio output settings
You can configure your speaker’s audio output with the SoundMax software or the Media Center software installed on your Media Center PC.
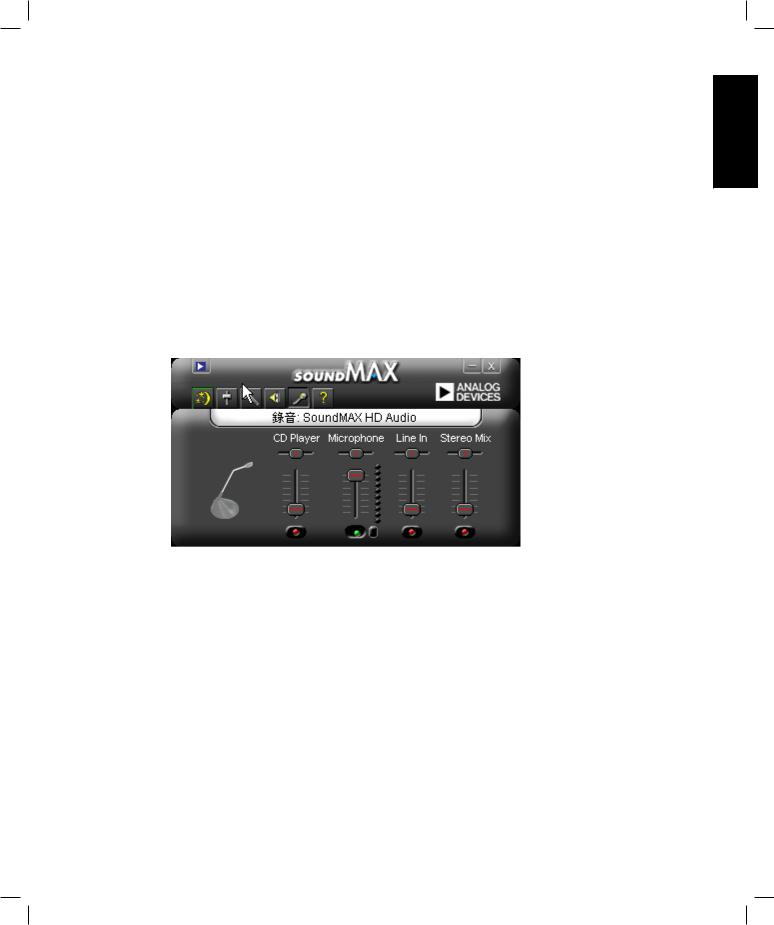
Configuring audio output with SoundMax Audio Wizard
After installing the speakers to your Media Center PC, follow the steps below to configure audio settings:
1.Click Start on the taskbar to launch the Windows Start menu.
2.Click All Programs.
3.Select SoundMax to open the program. The SoundMax window opens with the one of the control screens.
4.Click the Audio Wizard  icon on the taskbar to configure audio output settings for your speaker system.
5.Select the option describing the number of speakers in your system from the drop-down box.
6.The Volume Adjustment window appears. Adjust volume for each speaker by moving the volume bars or adjust the volume for all speakers simultaneously with the main volume control in the middle of the screen.
7.Click Next.The microphone volume adjustment screen appears. Click Microphone Test to test the microphone and click Next to proceed.
8.Click Finish to exit the SoundMax Audio Wizard.
English
Asus Media Center PC 23

English
Using the SoundMax taskbar
The SoundMax window consists of the following functions:
1. Audio Wizard: Click to open the Audio Wizard screen and configure audio out settings.
2. Default settings: Click to restore all settings to factory defaults.
3. Preference settings: Click to open the preference settings window and adjust settings to suit your needs.
4. Volume control: Click to show/hide the volume control screen.
5. Record setting: Click to show/hide the record settings screen.
6. Help: Click to display the Help window.
Configuring audio output with Windows XP Media Center
1.Click Start on the taskbar to launch the Windows Start menu.
2.Click All Programs.
3.Select Windows XP Media Center to open the program. The Windows XP Media Center window opens on the screens.
4.Choose Settings from the main menu.
5.Choose Speaker Configuration and click Next.
6.Select the number of speakers in your system and click Next.
7.Test your speakers’ audio output. Select the test outcome and click Next to proceed.
8.Click Finish to exit.
24 Asus Media Center PC
 Loading...