


 Loading...
LSI Software RAID
Configuration Utility

E8581
First Edition
August 2013
Copyright © 2013ASUSTeK COMPUTER INC.All Rights Reserved.
No part of this manual, including the products and software described in it, may be reproduced, transmitted, transcribed, stored in a retrieval system, or translated into any language in any form or by any means, except documentation kept by the purchaser for backup purposes, without the express written permission ofASUSTeK COMPUTER INC. (“ASUS”).
Product warranty or service will not be extended if: (1) the product is repaired, modified or altered, unless such repair, modification of alteration is authorized in writing byASUS; or (2) the serial number of the product is defaced or missing.
ASUS PROVIDES THIS MANUAL “AS IS” WITHOUT WARRANTY OFANY KIND, EITHER EXPRESS OR IMPLIED, INCLUDING BUT NOT LIMITED TO THE IMPLIED WARRANTIES OR CONDITIONS OF MERCHANTABILITY OR FITNESS FORAPARTICULAR PURPOSE. IN NO EVENT SHALLASUS, ITS DIRECTORS, OFFICERS, EMPLOYEES ORAGENTS BE LIABLE FORANY INDIRECT, SPECIAL, INCIDENTAL, OR CONSEQUENTIAL DAMAGES (INCLUDING DAMAGES FOR LOSS OF PROFITS, LOSS OF BUSINESS, LOSS OF USE OR DATA, INTERRUPTION OF BUSINESSAND THE LIKE), EVEN IFASUS HAS BEENADVISED OF THE POSSIBILITY OF SUCH DAMAGESARISING FROMANY DEFECT OR ERROR IN THIS MANUAL OR PRODUCT.
SPECIFICATIONSAND INFORMATION CONTAINED IN THIS MANUALARE FURNISHED FOR INFORMATIONAL USE ONLY,ANDARE SUBJECT TO CHANGEATANY TIME WITHOUT NOTICE, AND SHOULD NOT BE CONSTRUEDASACOMMITMENT BYASUS.ASUSASSUMES NO RESPONSIBILITY OR LIABILITY FORANY ERRORS OR INACCURACIES THAT MAYAPPEAR IN THIS MANUAL, INCLUDING THE PRODUCTSAND SOFTWARE DESCRIBED IN IT.
Products and corporate names appearing in this manual may or may not be registered trademarks or copyrights of their respective companies, and are used only for identification or explanation and to the owners’ benefit, without intent to infringe.
LSI Software RAID Configuration Utility

Content
This document provides instructions in setting up, creating, and configuring RAID sets using the LSI Software RAID Configuration Utility. It also shows the installation of the RAID
controller drivers after creating the RAID sets. This document contains the following sections:
I. |
Revision history............................................................................................. |
3 |
|
II. |
Using the LSI Software RAID Configuration Utility.................................... |
4 |
|
|
1. |
Before you start.............................................................................. |
4 |
|
2. |
Launching the LSI Software RAID Configuration Utility.................. |
5 |
|
3. |
Creating a RAID set........................................................................ |
7 |
|
4. |
Adding or viewing a RAID configuration....................................... |
17 |
|
5. |
Initializing the virtual drives........................................................... |
22 |
|
6. |
Rebuilding failed drives................................................................. |
26 |
|
7. |
Checking the drives for data consistency..................................... |
28 |
|
8. |
Deleting a RAID configuration...................................................... |
31 |
|
9. |
Selecting the boot drive from a RAID set...................................... |
32 |
|
10. |
Enabling the Disk Write Cache (DWC)......................................... |
33 |
III. |
RAID driver installation............................................................................... |
35 |
|
|
1. |
Red Hat® Enterprise Linux OS 5.x................................................ |
35 |
|
2. |
Red Hat® Enterprise Linux OS 6.x................................................ |
37 |
|
3. |
Installing SUSE 11 Linux OS........................................................ |
40 |
I.Revision history
|
Revision |
Revision history |
Date |
|
|
V1 |
First release |
August 2013 |
|
|
|
|
|
|
|
|
|
|
|
II.Using the LSI Software RAID Configuration Utility
TheLSI Software RAID Configuration Utility allowsyoutocreateRAID 0, RAID1, or RAID 10set(s)fromSATAharddiskdrivesconnectedtotheSATAconnectorssupportedbythe motherboard.
1.Before you start
Before you proceed, ensure that you have installed the SerialATAhard disk drives, set the
correct jumper settings of the motherboard, and have set the correct SATAmode in the BIOS setup. You can refer to following sections for the instructions in Installing hard disk drives,
Setting Jumpers, and Setting the RAID mode in BIOS.
A.Installing hard disk drives
The motherboard supports SerialATAfor RAID set configuration. For optimal performance, install identical drives of the same model and capacity when creating a disk array.
To install the SATAhard disks for RAID configuration:
1.Install the SATA hard disks into the drive bays following the instructions in the system user guide.
2.Connect a SATAsignal cable to the signal connector at the back of each drive and to the SATAconnector on the motherboard.
3.Connect a SATApower cable to the power connector on each drive.
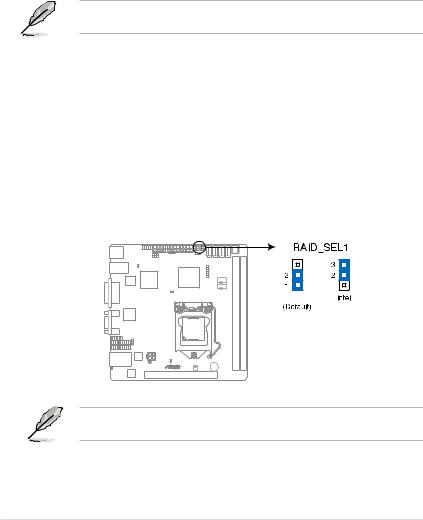
B.Setting Jumpers
You must set the jumper settings of your motherboard to activate the LSI Software RAID
Configuration Utility.
To set the jumper settings, set the 3-pin RAID_SEL1 jumper to pins 1-2.
LSI
The motherboard illustration is for reference only. Visit www.asus.com for the complete list of supported motherboards,
LSI Software RAID Configuration Utility

C.Setting the RAID mode in BIOS
You must set the RAID mode in the BIOS Setup to be able to launch the RAID utilities before you can create a RAID set from the SATA hard disk drives attached to the SATA connectors supported by Intel® C22x chipset.
To do this:
1.Enter the BIOS Setup during POST.
2.Go to the Advanced Menu > SATA Configuration, then press <Enter>.
3.Set SATA Mode to [RAID].
4.Press <F10> to save your changes and exit the BIOS Setup.
2.Launching the LSI Software RAID Configuration Utility
To launch the LSI Software RAID Configuration Utility:
1.Turn on the system.
2.During POST, the LSI Software RAID Configuration Utility automatically detects the installed SATAhard disk drives and displays any existing RAID set(s). Press <Ctrl>+<M> to enter the utility.
LSI MegaRAID Software RAID BIOS Version A.11 02090932R |
||
LSI SATA RAID Found at PCI Bus No:00 Dev No:1F |
152114MB |
|
Device present at Port 0 |
ST3160812AS |
|
Device present at Port 1 |
ST3160812AS |
152114MB |
Device present at Port 2 |
ST3160812AS |
152114MB |
Device present at Port 3 |
ST3160812AS |
152114MB |
Press Ctrl-M or Enter to run LSI Software RAID Setup Utility.
• The LSI Software RAID Configuration Utility automatically configures to RAID 1 when the SATAto RAID Mode is enabled.
• The RAID setup screens shown in this section are for reference only and may not exactly match the items on your screen due to the controller version difference.
•When you create RAID sets with the LSI Software RAID Configuration Utility , the boot priority of the SATAoptical drive has to be manually adjusted. Otherwise, the system will not boot from the connected SATAODD.
3.From the LSI Software RAID Configuration Utility Management menu, use the arrow keys to select an option then press <Enter>. Refer to Table 1. Management Menu descriptions below for more information.
At the bottom of the screen is the legend box. The keys on the legend box allow you to navigate through the setup menu options or execute commands. The keys on the legend box vary according to the menu level.
LSI Software RAID Configuration Utility Ver C.05 Oct 26, 2011
BIOS Version A.11.02090932R
Management Menu
Configure
Initialize
Objects
Rebuild
Check Consistency
Configure VD(s)
Use Cursor Keys to Navigate Between Items And Press Enter To Select An Option
Table 1. Management Menu descriptions
Menu |
Description |
|
|
Allows you to create RAID 0, RAID 1 or RAID 10 set using the Easy |
|
Configure |
Configuration or the New Configuration command. This menu also |
|
allows you to view, add, or clear RAID configurations or select the |
||
|
||
|
boot drive. |
|
Initialize |
Allows you to initialize the virtual drives of a created RAID set. |
|
Objects |
Allows you to initialize virtual drives or change the virtual drive |
|
parameters. |
||
|
||
Rebuild |
Allows you to rebuild failed drives. |
|
Check Consistency |
Allows you to check the data consistency of the virtual drives of a |
|
created RAID set. |
LSI Software RAID Configuration Utility
3.Creating a RAID set
The LSI Software RAID Configuration Utility allows you to create a RAID 0, RAID 1, or RAID 10 set using two types of configurations: Easy and New.
In Easy Configuration, the virtual drive parameters are set automatically. In New Configuration, you can manually set the virtual drive parameters.
Using Easy Configuration
To create a RAID set using the Easy Configuration option:
1.From the Management Menu, select Configure > Easy Configuration then press <Enter>.
LSI Software RAID Configuration Utility Ver C.05 Oct 26, 2011
BIOS Version A.11.02090932R
Configuration Menu
Easy Configuration
ManagementNewMenuConfiguration
Configure View/Add Configuration
InitializeClear Configuration
Objects Select Boot Drive
Rebuild
Check Consistency
Defines Physical Arrays. An Array Will Automatically Become A VD
Use Cursor Keys to Navigate Between Items And Press Enter To Select An Option
2.The ARRAY SELECTION MENU displays the available drives connected to the SATA ports. Use the up/down arrow keys to select the drives you want to include in the RAID set then press <Space>. When selected, the drive indicator changes from READY to ONLIN A[X]-[Y], where X is the array number, and Y is the drive number.
LSI Software RAID Configuration Utility Ver C.05 Oct 26,2011
BIOS Version A.11.02090932R
Management |
|
Easy Configuration - ARRAY SELECTION MENU |
|
|||||
Menu |
|
|||||||
Configure |
|
|
|
PORT # |
|
|
||
Initialize |
|
|
0 |
ONLIN A00-00 |
|
|
|
|
Objects |
|
|
|
|
|
|
|
|
Rebuild |
|
|
1 |
ONLIN A00-01 |
|
|
|
|
Check Consistency |
2 |
READY |
|
|
|
|
||
|
|
|
3 |
READY |
|
|
|
|
|
|
|
|
|
|
|
|
|
|
|
|
|
|
|
|
|
|
|
|
|
|
|
|
|
|
|
|
|
|
|
|
|
|
|
|
Port # 2 DISK 74.74GB HDS728080PLA380 |
05.01C05 |
SPACE-Sel,ENTER-EndArray,F10-Configure,F2-Drive Info,F3-Virtual Drives,F4-HSP
•The information of the selected hard disk drive displays at the bottom of the screen.
•YouneedatleasttwoidenticalharddiskdriveswhencreatingaRAID1set.
•You need at least four identical hard disk drives when creating a RAID 10 set.
3.Select all the drives required for the RAID set then press <F10> to configure the array setting.
4.Press <Space> to select the configurable array.
LSI Software RAID Configuration Utility Ver C.05 Oct 26,2011
BIOS Version A.11.02090932R
Management |
|
|
Easy |
Configuration - ARRAY SELECTION MENU |
|
|
|
||||||||||
Menu |
|
||||||||||||||||
Configure |
|
|
|
|
|
|
|
|
|
SelectPORTConfigurable# |
Array(s) |
|
|
|
|
||
Initialize |
|
|
|
|
|
|
|
|
0 |
ONLIN A00-00 |
|
|
|
|
|
||
|
|
|
|
|
A-0 |
|
|
|
|
|
|
|
|||||
Objects |
|
|
|
|
|
SPAN-1 |
|
|
|
|
|
|
|
|
|
|
|
Rebuild |
|
|
|
|
|
|
|
1 |
ONLIN A00-01 |
|
|
|
|
|
|||
Check Consistency |
|
|
|
|
|
|
|
|
|
|
|
|
|
|
|||
|
|
|
|
|
2 |
READY |
|
|
|
|
|
|
|
||||
|
|
|
|
|
|
|
|
|
|
|
|
|
|
|
|||
|
|
|
|
|
|
|
|
|
3 |
READY |
|
|
|
|
|
||
|
|
|
|
|
|
|
|
|
|
|
|
|
|
|
|
|
|
|
|
|
|
|
|
|
|
|
|
|
|
|
|
|
|
|
|
|
|
|
|
|
|
|
|
|
|
|
|
|
|
|
|
|
|
|
|
|
|
|
|
|
|
|
|
|
|
|
|
|
|
|
|
|
|
|
|
|
|
|
|
|
|
|
|
|
|
|
|
|
|
Cursor Keys, SPACE-(De)Select F2-Chidinfo F3-SlotInfo F10-Configure Esc-Quit
LSI Software RAID Configuration Utility

5.Press <F10> to begin the configuration.
The virtual drive information appears including a Virtual Drive menu that allows you to change the virtual drive parameters.
LSI Software RAID Configuration Utility Ver C.05 Oct 26,2011
BIOS Version A.11.02090932R
|
|
|
|
|
|
|
|
|
|
|
|
|
|
|
|
||||||
|
|
|
|
|
|
|
|
Virtual Drive(s) Configured |
|
|
|
|
|||||||||
|
LD |
EasyRAID ConfSigurationze |
-#StripesARRAY SELECTIONStripSzMENU |
Status |
|
||||||||||||||||
Management Menu |
|
1 |
|
|
|
148.580GB PORT #2 |
64KB |
ONLINE |
|
||||||||||||
Configure0 |
|
|
|
|
|
||||||||||||||||
Initialize |
|
|
|
|
|
0 |
ONLIN A00-00 |
|
|
|
|
|
|||||||||
Objects |
|
|
|
|
|
1 |
ONLIN A00-01 |
|
|
|
|
|
|||||||||
Rebuild |
|
|
|
|
|
|
|
|
|
|
|||||||||||
Check |
Consistency |
|
|
|
|
2 |
|
|
|
|
|
|
|
|
|
|
|
||||
|
|
|
|
0 |
READY |
|
|
|
|
|
|
|
|
|
|||||||
|
|
|
|
Virtual Drive |
|
|
|
|
|
|
|
|
|
|
|||||||
|
|
|
RAID = |
1 |
|
3 |
READY |
|
|
|
|
|
|
|
|
|
|||||
|
|
|
Units= |
MB |
|
|
|
|
|
|
|
|
|
||||||||
|
|
|
Size = |
152146MB |
|
|
|
|
|
|
|
|
|
|
|
||||||
|
|
|
DWC |
= |
OFF |
|
|
|
|
|
|
|
|
|
|
|
|
|
|
||
|
|
|
RA |
= On |
|
|
|
|
|
|
|
|
|
|
|
|
|
|
|||
|
|
|
Accept |
|
|
|
|
|
|
|
|
|
|
|
|
|
|
|
|
||
|
|
|
SPAN = NO |
|
|
|
|
|
|
|
|
|
|
|
|
|
|
||||
|
|
|
|
|
|
|
|
|
|
|
|
|
|
||||||||
Choose RAID Level For This VD
Use Cursor Keys To Navigate Between Items And Press Enter To Select An Option
6.Select RAID from the Virtual Drive sub-menu then press <Enter>.
7.Select the RAID type from the RAID Level sub-menu then press <Enter>.
LSI Software RAID Configuration Utility Ver C.05 Oct 26,2011
BIOS Version A.11.02090932R
|
|
|
|
|
|
|
|
|
|
|
|
|
|
|
|
|||||
|
|
|
|
|
|
Virtual Drive(s) Configured |
|
|
|
|
|
|||||||||
|
LD |
EasyRAID ConfSigurationze |
-#StripesARRAY SELECTIONStripSzMENU |
Status |
|
|||||||||||||||
Management Menu |
|
1 |
|
|
|
148.580GB PORT #2 |
64KB |
ONLINE |
|
|||||||||||
Configure0 |
|
|
|
|
|
|||||||||||||||
Initialize |
|
|
|
|
|
0 |
ONLIN A00-00 |
|
|
|
|
|
|
|
||||||
Objects |
|
|
|
|
|
1 |
ONLIN A00-01 |
|
|
|
|
|
|
|
||||||
Rebuild |
|
|
|
|
|
|
|
|
|
|
|
|
||||||||
Check |
Consistency |
|
|
|
|
2 |
|
|
|
|
|
|
|
|
|
|
|
|
||
|
|
|
|
READY |
|
RAID |
Level |
|
|
|
|
|
|
|||||||
|
|
Virtual Drive |
0 |
|
|
|
|
|
|
|||||||||||
|
|
RAID = |
1 |
|
3 |
READY |
RAID |
0 |
|
|
|
|
|
|
|
|||||
|
|
Units= |
MB |
RAID 1 |
|
|
|
|
|
|
|
|||||||||
|
|
Size = |
152146MB |
|
|
|
|
|
|
|
|
|
|
|
|
|||||
|
|
DWC |
= |
OFF |
|
|
|
|
|
|
|
|
|
|
|
|
|
|
|
|
|
|
|
|
|
|
|
|
|
|
|
|
|
|
|
||||||
|
|
RA |
= On |
|
|
|
|
|
|
|
|
|
|
|
|
|
|
|
||
|
|
Accept |
|
|
|
|
|
|
|
|
|
|
|
|
|
|
|
|
|
|
|
|
SPAN = NO |
|
|
|
|
|
|
|
|
|
|
|
|
|
|
|
|||
|
|
|
|
|
|
|
|
|
|
|
|
|
|
|
||||||
Choose RAID Level For This VD
Use Cursor Keys To Navigate Between Items And Press Enter To Select An Option

8.Select Units from the Virtual Drive sub-menu then press <Enter>.
9.Select the units for the virtual drive size from the Select Units For VD Size submenu then press <Enter>. The virtual drive size is automatically allocated and not configurable.
LSI Software RAID Configuration Utility Ver C.05 Oct 26,2011
BIOS Version A.11.02090932R
|
|
|
|
|
|
|
|
|
|
|
|
|
|
|
|
|||||
|
|
|
|
|
|
Virtual Drive(s) Configured |
|
|
|
|
|
|||||||||
|
LD |
EasyRAID ConfSigurationze |
-#StripesARRAY SELECTIONStripSzMENU |
Status |
|
|||||||||||||||
Management Menu |
|
1 |
|
|
|
148.580GB PORT #2 |
64KB |
ONLINE |
|
|||||||||||
Configure0 |
|
|
|
|
|
|||||||||||||||
Initialize |
|
|
|
|
|
0 |
ONLIN A00-00 |
|
|
|
|
|
|
|||||||
Objects |
|
|
|
|
|
|
|
|
|
Select |
Units For VD Size |
|
|
|||||||
Rebuild |
|
|
|
|
|
1 |
ONLIN A00 |
- |
01 |
|
|
|
|
|
|
|||||
Check |
Consistency |
|
|
|
|
2 |
|
|
|
MB |
|
|
|
|
|
|
||||
|
|
|
|
READY |
|
|
GB |
|
|
|
|
|
|
|
|
|||||
|
|
|
|
|
|
|
|
|
|
|
|
|
|
|
|
|||||
|
|
Virtual Drive |
0 |
|
|
|
|
|
|
|
|
|
|
|
||||||
|
|
RAID = |
1 |
|
3 |
READY |
|
|
TB |
|
|
|
|
|
|
|
|
|||
|
|
Units= |
MB |
|
|
|
|
|
|
|
|
|
|
|
||||||
|
|
Size |
= |
152146MB |
|
|
|
|
|
|
|
|
|
|
|
|
||||
|
|
DWC |
= |
OFF |
|
|
|
|
|
|
|
|
|
|
|
|
|
|
|
|
|
|
RA |
= |
On |
|
|
|
|
|
|
|
|
|
|
|
|
|
|
|
|
|
|
Accept |
|
|
|
|
|
|
|
|
|
|
|
|
|
|
|
|
|
|
|
|
SPAN = |
NO |
|
|
|
|
|
|
|
|
|
|
|
|
|
|
|
||
|
|
|
|
|
|
|
|
|
|
|
|
|
|
|
||||||
Select Units For VD Size
Use Cursor Keys To Navigate Between Items And Press Enter To Select An Option
When creating a RAID 0 set, proceed to step 12.
10.When creating a RAID 1 or a RAID 10 set, select DWC from the Virtual Drive menu, then press <Enter>.
11.Select On to enable the Disk Write Cache (DWC) setting then press <Enter>.
LSI Software RAID Configuration Utility Ver C.05 Oct 26,2011
BIOS Version A.11.02090932R
|
|
|
|
|
|
|
|
|
|
|
|
|
|
|
|
|
|
||||||
|
|
|
|
|
|
|
Virtual Drive(s) Configured |
|
|
|
|
|
|
|
|||||||||
|
|
LD |
EasyRAID ConfSigurationze |
-#StripesARRAY SELECTIONStripSzMENU |
Status |
|
|||||||||||||||||
Management Menu |
|
1 |
|
|
|
148.580GB PORT #2 |
64KB |
ONLINE |
|
||||||||||||||
Configure0 |
|
|
|
|
|
||||||||||||||||||
Initialize |
|
|
|
|
|
0 |
ONLIN A00-00 |
|
|
|
|
|
|
|
|
||||||||
Objects |
|
|
|
|
|
|
|
|
|
|
|
|
|
|
|
|
|
|
|
|
|||
Rebuild |
|
|
|
|
|
1 |
ONLIN A00-01 |
|
|
|
|
|
|
|
|
||||||||
Check Consistency |
|
|
|
|
|
|
|
|
Change |
DWC |
|
|
|
|
|
|
|||||||
|
|
|
|
|
0 |
|
Off |
|
|
|
|
|
|
|
|
|
|
||||||
|
|
|
Virtual Drive |
|
On |
|
|
|
|
|
|
|
|
|
|||||||||
|
|
|
RAID = |
1 |
|
2 |
READY |
|
|
|
|
|
|
|
|
|
|
|
|
|
|||
|
|
|
Units= |
MB |
3 |
READY |
|
|
|
|
|
|
|
|
|
|
|
|
|
||||
|
|
|
|
|
|
|
|
|
|
|
|
|
|
|
|
||||||||
|
|
|
Size |
= |
152146MB |
|
|
|
|
|
|
|
|
|
|
|
|
|
|
||||
|
|
|
DWC |
= |
OFF |
|
|
|
|
|
|
|
|
|
|
|
|
|
|
|
|
|
|
|
|
|
|
|
|
|
|
|
|
|
|
|
|
|
|
|
|||||||
|
|
|
RA |
= |
On |
|
|
|
|
|
|
|
|
|
|
|
|
|
|
|
|
|
|
|
|
|
Accept |
|
|
|
|
|
|
|
|
|
|
|
|
|
|
|
|
|
|
|
|
|
|
|
SPAN = |
NO |
|
|
|
|
|
|
|
|
|
|
|
|
|
|
|
|
|
||
|
|
|
|
|
|
|
|
|
|
|
|
|
|
|
|
|
|||||||
Disk Write Cache Setting of VD
Use Cursor Keys To Navigate Between Items And Press Enter To Select An Option
Enabling DWC can improve the performance, but with the risk of data loss.
10 |
LSI Software RAID Configuration Utility |
12.After setting the values of the selected virtual drives, select Accept from the menu then press <Enter>.
LSI Software RAID Configuration Utility Ver C.05 Oct 26,2011
BIOS Version A.11.02090932R
|
|
|
|
|
|
|
|
|
|
|
|
|
|
|
|
|
|
||||
|
|
|
|
|
|
|
|
|
Virtual Drive(s) Configured |
|
|
|
|
||||||||
|
LD |
|
EasyRAID ConfSigurationze |
-#StripesARRAY SELECTIONStripSzMENU |
Status |
|
|||||||||||||||
Management Menu |
|
1 |
|
|
|
148.580GB PORT #2 |
64KB |
ONLINE |
|
||||||||||||
Configure0 |
|
|
|
|
|
|
|||||||||||||||
Initialize |
|
|
|
|
|
|
0 |
|
ONLIN A00-00 |
|
|
|
|
|
|||||||
Objects |
|
|
|
|
|
|
|
|
|
|
|
|
|
|
|
|
|
||||
Rebuild |
|
|
|
|
|
|
1 |
|
ONLIN A00-01 |
|
|
|
|
|
|||||||
Check |
Consistency |
|
|
|
|
2 |
|
READY |
|
|
|
|
|
|
|
|
|||||
|
|
|
|
|
Virtual Drive 0 |
|
|
|
|
|
|
|
|
|
|||||||
|
|
|
RAID = |
1 |
|
3 |
|
READY |
|
|
|
|
|
|
|
|
|||||
|
|
|
Units= |
MB |
|
|
|
|
|
|
|
|
|
||||||||
|
|
|
Size = |
152146MB |
|
|
|
|
|
|
|
|
|
||||||||
|
|
|
DWC |
= |
OFF |
|
|
|
|
|
|
|
|
|
|
|
|
|
|||
|
|
|
RA |
|
= On |
|
|
|
|
|
|
|
|
|
|
|
|
|
|||
|
|
|
Accept |
|
|
|
|
|
|
|
|
|
|
|
|
|
|
|
|||
|
|
|
SPAN = NO |
|
|
|
|
|
|
|
|
|
|
|
|
|
|||||
|
|
|
|
|
|
|
|
|
|
|
|
|
|||||||||
Accept This VD Configuration And Go To Next VD
Cursor Keys, SPACE-(De) Select F2-ChIdInfo F3-SlotInfo F10-Configure Esc-Quit
13.TheARRAY SELECTION MENU displays the configured virtual drives. Repeat steps 2 to 10 to configure the remaining available virtual drives or press <Esc> to finish the RAID configuration.
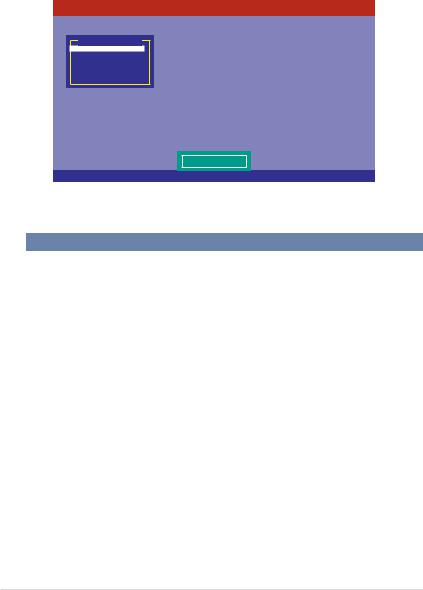
14.Select Yes then press <Enter> to save the configuration.
LSI Software RAID Configuration Utility Ver C.05 Oct 26,2011
BIOS Version A.11.02090932R
|
|
|
|
Configuration Menu |
|
|
|
|
|
|
|
||
|
|
|
|
Easy Configuration |
|
|
Save Configuration? |
|
|||||
Management Menu |
|
New Configuration |
|
|
Yes |
|
|
|
|||||
Configure |
|
|
View/Add Configuration |
|
No |
|
|
|
|||||
Initialize |
|
|
Clear Configuration |
|
|
|
|
|
|
|
|||
Objects |
|
|
Select Boot Drive |
|
|
|
|
|
|
|
|||
Rebuild |
|
|
|
|
Virtual Drive(s) Configured |
|
|
|
|
||||
Check |
Consistency |
|
Size |
#Stripes |
StripSz |
Status |
|
|
|||||
|
LD |
RAID |
|
|
|||||||||
|
0 |
1 |
|
|
148.580GB |
2 |
|
64KB |
ONLINE |
|
|||
|
|
|
|
|
|
|
|
|
|
|
|
|
|
Select Yes Or No
Use Cursor Keys To Navigate Between Items And Press Enter To Select An Option
11

Using New Configuration
When a RAID set already exists, using the New Configuration command erases the
existing RAID configuration data. If you do not want to delete the existing RAID set, use the View/Add Configuration command to view or create another RAID configuration.
To create a RAID set using the New Configuration option:
1.From the Management Menu, select Configure > New Configuration then press <Enter>.
LSI Software RAID Configuration Utility Ver C.05 Oct 26,2011
BIOS Version A.11.02090932R
Configuration Menu
Easy Configuration
Management MenuNew Configuration
Configure View/Add Configuration
Initialize Clear Configuration
Objects Select Boot Drive
Rebuild
Check Consistency
Clear Existing Configuration And Start A New Configuration
Use Cursor Keys To Navigate Between Items And Press Enter To Select An Option
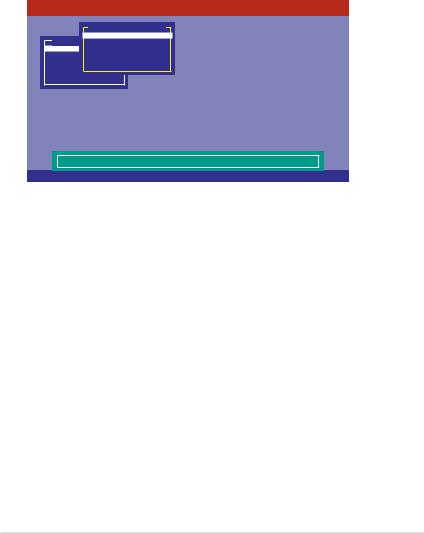
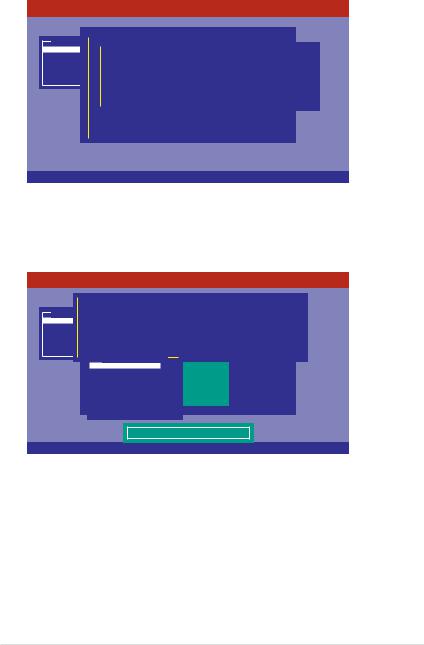
2.Select Yes then press <Enter> to proceed with the configuration.
3.Select all the drives required for the RAID set then press <F10> to configure array setting.
LSI Software RAID Configuration Utility Ver C.05 Oct 26,2011
BIOS Version A.11.02090932R
Management |
|
Easy Configuration - ARRAY SELECTION MENU |
|
|||||
Menu |
|
|||||||
Configure |
|
|
|
PORT # |
|
|
||
Initialize |
|
|
0 |
ONLIN A00-00 |
|
|
|
|
Objects |
|
|
|
|
|
|
|
|
Rebuild |
|
|
1 |
ONLIN A00-01 |
|
|
|
|
Check Consistency |
2 |
READY |
|
|
|
|
||
|
|
|
3 |
READY |
|
|
|
|
|
|
|
|
|
|
|
|
|
|
|
|
|
|
|
|
|
|
|
|
|
|
|
|
|
|
|
|
|
|
|
|
|
|
|
|
Port # 2 DISK 74.74GB HDS728080PLA380 |
05.01C05 |
SPACE-Sel,ENTER-EndArray,F10-Configure,F2-Drive Info,F3-Virtual Drives,F4-HSP
12 |
LSI Software RAID Configuration Utility |
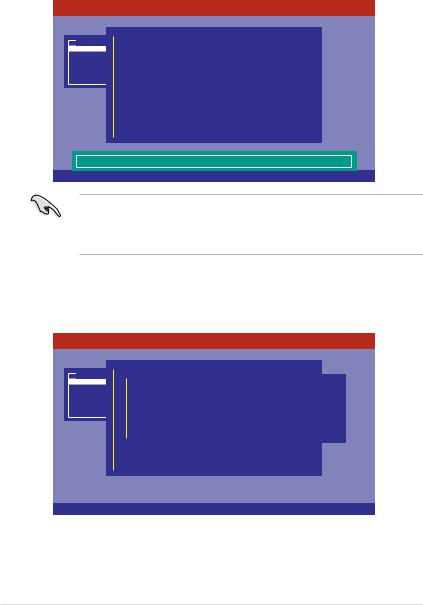
4.Press <Space> to select the configurable array.
LSI Software RAID Configuration Utility Ver C.05 Oct 26,2011
BIOS Version A.11.02090932R
Management |
|
|
Easy |
Configuration - ARRAY SELECTION MENU |
|
|
|
||||||||||
Menu |
|
||||||||||||||||
Configure |
|
|
|
|
|
|
|
|
|
SelectPORTConfigurable# |
Array(s) |
|
|
|
|
||
Initialize |
|
|
|
|
|
|
|
|
0 |
ONLIN A00-00 |
|
|
|
|
|
||
|
|
|
|
|
A-0 |
|
|
|
|
|
|
|
|||||
Objects |
|
|
|
|
|
SPAN-1 |
|
|
|
|
|
|
|
|
|
|
|
Rebuild |
|
|
|
|
|
|
|
1 |
ONLIN A00-01 |
|
|
|
|
|
|||
Check Consistency |
|
|
|
|
|
|
|
|
|
|
|
|
|
|
|||
|
|
|
|
|
2 |
READY |
|
|
|
|
|
|
|
||||
|
|
|
|
|
|
|
|
|
|
|
|
|
|
|
|||
|
|
|
|
|
|
|
|
|
3 |
READY |
|
|
|
|
|
||
|
|
|
|
|
|
|
|
|
|
|
|
|
|
|
|
|
|
|
|
|
|
|
|
|
|
|
|
|
|
|
|
|
|
|
|
|
|
|
|
|
|
|
|
|
|
|
|
|
|
|
|
|
|
|
|
|
|
|
|
|
|
|
|
|
|
|
|
|
|
|
|
|
|
|
|
|
|
|
|
|
|
|
|
|
|
|
|
|
|
Cursor Keys, SPACE-(De)Select F2-Chidinfo F3-SlotInfo F10-Configure Esc-Quit
5.Press <F10> to begin the configuration.
The virtual drive information appears including a Virtual Drive menu that allows you to change the virtual drive parameters.
LSI Software RAID Configuration Utility Ver C.05 Oct 26,2011
BIOS Version A.11.02090932R
|
|
|
|
|
|
|
|
|
|
|
|
|
|
|
|
||||||
|
|
|
|
|
|
|
|
Virtual Drive(s) Configured |
|
|
|
|
|||||||||
|
LD |
EasyRAID ConfSigurationze |
-#StripesARRAY SELECTIONStripSzMENU |
Status |
|
||||||||||||||||
Management Menu |
|
1 |
|
|
|
148.580GB PORT #2 |
64KB |
ONLINE |
|
||||||||||||
Configure0 |
|
|
|
|
|
||||||||||||||||
Initialize |
|
|
|
|
|
0 |
ONLIN A00-00 |
|
|
|
|
|
|||||||||
Objects |
|
|
|
|
|
1 |
ONLIN A00-01 |
|
|
|
|
|
|||||||||
Rebuild |
|
|
|
|
|
|
|
|
|
|
|||||||||||
Check |
Consistency |
|
|
|
|
2 |
|
|
|
|
|
|
|
|
|
|
|
||||
|
|
|
|
0 |
READY |
|
|
|
|
|
|
|
|
|
|||||||
|
|
|
|
Virtual Drive |
|
|
|
|
|
|
|
|
|
|
|||||||
|
|
|
RAID = |
1 |
|
3 |
READY |
|
|
|
|
|
|
|
|
|
|||||
|
|
|
Units= |
MB |
|
|
|
|
|
|
|
|
|
||||||||
|
|
|
Size = |
152146MB |
|
|
|
|
|
|
|
|
|
|
|
||||||
|
|
|
DWC |
= |
OFF |
|
|
|
|
|
|
|
|
|
|
|
|
|
|
||
|
|
|
|
|
|
|
|
|
|
|
|
|
|
||||||||
|
|
|
RA |
= On |
|
|
|
|
|
|
|
|
|
|
|
|
|
|
|||
|
|
|
Accept |
|
|
|
|
|
|
|
|
|
|
|
|
|
|
|
|
||
|
|
|
SPAN = NO |
|
|
|
|
|
|
|
|
|
|
|
|
|
|
||||
|
|
|
|
|
|
|
|
|
|
|
|
|
|
||||||||
Choose RAID Level For This VD
Use Cursor Keys To Navigate Between Items And Press Enter To Select An Option
13
Loading...