


 ®
®
HZ-1 USB 3.0 Docking Station
English
User Guide
Q6871 / October 2011

English
Table of contents |
|
English...................................................................................................................... |
1 |
Français.................................................................................................................. |
18 |
Deutsch................................................................................................................... |
29 |
Português............................................................................................................... |
40 |
Español................................................................................................................... |
51 |
Italiano..................................................................................................................... |
62 |
Українська.............................................................................................................. |
73 |
Русский................................................................................................................... |
84 |
Türkçe..................................................................................................................... |
95 |
............................................................................................................................................................. |
106 |
.............................................................................................................................................................. |
117 |
Polski..................................................................................................................... |
128 |
Čeština.................................................................................................................. |
139 |
Magyar................................................................................................................... |
150 |
Slovensky............................................................................................................. |
161 |
Slovenščina.......................................................................................................... |
172 |
Română................................................................................................................. |
183 |

ASUS contact information
ASUSTeK Computer Inc. |
15 Li-Te Road, Peitou, Taipei, Taiwan 11259 |
Address |
|
Telephone |
+886-2-2894-3447 |
Fax |
+886-2-2890-7798 |
info@asus.com.tw |
|
Web site |
www.asus.com.tw |
Technical Support |
+86-21-38429911 |
Telephone |
|
Online support |
support.asus.com |
ASUS Computer International (America) |
|
Address |
800 Corporate Way, Fremont, CA 94539, USA |
Telephone |
+1-510-739-3777 |
Fax |
+1-510-608-4555 |
Web site |
usa.asus.com |
Technical Support |
+1-812-282-2787 |
Telephone |
|
Support fax |
+1-812-284-0883 |
Online support |
support.asus.com |
ASUS Computer GmbH (Germany and Austria) |
|
Address |
Harkort Str. 21-23, D-40880 Ratingen, Germany |
Fax |
+49-2102-959911 |
Web site |
www.asus.de |
Online contact |
www.asus.de/sales |
Technical Support |
+49-1805-010923* |
Telephone (Component) |
|
Telephone (System/Notebook/Eee/LCD) |
+49-1805-010920* |
Support Fax |
+49-2102-9599-11 |
Online support |
support.asus.com |
* EUR 0.14/minute from a German fixed landline; EUR 0.42/minute from a mobile phone.
English

English
Conventions used in this guide
To ensure that you perform certain tasks properly, take note of the following symbols used throughout this manual.
DANGER/WARNING: Information to prevent injury to yourself when trying to complete a task.
CAUTION: Information to prevent damage to the components when trying to
complete a task.
IMPORTANT: Instructions that you MUST follow to complete a task.
NOTE: Tips and additional information to help you complete a task.
Where to find more information
Refer to the following sources for additional information and for product and software updates.
ASUS websites
The ASUS website provides updated information on ASUS hardware and software products. Refer to the ASUS website www.asus.com.
ASUS Local Technical Support
Visit ASUS website at http://support.asus.com/contact for the contact information of local Technical Support Engineer.
|
|
|
Manufacturer: |
ASUSTeK Computer Inc. |
|
|
Tel: |
+886-2-2894-3447 |
|
Address: No. 150, LI-TE RD., PEITOU, TAIPEI |
|
|
|
112, TAIWAN |
Authorised representative |
ASUS Computer GmbH |
|
in Europe: |
Address: HARKORT STR. 21-23, 40880 |
|
|
|
RATINGEN, GERMANY |
Authorised distributors |
BOGAZICI BIL GISAYAR SAN. VE TIC. A.S. |
|
in Turkey: |
Tel: |
+90 212 3311000 |
|
||
|
Address: AYAZAGA MAH. KEMERBURGAZ |
|
|
|
CAD. NO.10 AYAZAGA/ISTANBUL |
|
CIZGI Elektronik San. Tic. Ltd. Sti. |
|
|
Tel: |
0090 2123567070 |
|
Address: CEMAL SURURI CD. HALIM MERIC |
|
|
|
IS MERKEZI No:15/C D: 5-6 34394 |
|
|
MECIDIYEKOY/ISTANBUL |

Notices
Federal Communications Commission Interference Statement
This equipment has been tested and found to comply with the limits for a Class B digital device, pursuant to Part 15 of the FCC Rules.
These limits are designed to provide reasonable protection against harmful interference in a residential installation.
This equipment generates, uses, and can radiate radio frequency energy and, if not installed and used in accordance with the instructions, may cause harmful interference to radio communications.
However, there is no guarantee that interference will not occur in a particular installation.
If this equipment does cause harmful interference to radio or television reception, which can be determined by turning the equipment off and on, the user is encouraged to try to connect the interference by one or more of the following measures:
•Reorient or relocate the receiving antenna.
•Increase the separation between the equipment and the receiver.
•Connect the equipment to an outlet on a circuit different from that to which the receiver is connected.
•Consult the dealer or an experienced radio/TV technician for help.
 CE Mark Warning
This is a Class B product, in a domestic environment, this product may cause radio interference, in which case the user may be required to take adequate measures.
Safety Certifications
C-Tick Mark: N13219 |
BSMI Certification |
污染或對人身、財產造成嚴重損害的期限。
English
English
REACH
Complying with the REACH (Registration, Evaluation, Authorisation, and Restriction of Chemicals) regulatory framework, we published the chemical substances in our products at ASUS REACH website at http://green.asus.com/english/REACH.htm.
CAUTION: Do not throw this product in municipal waste. This product has been designed to enable proper reuse of parts and recycling. This symbol of the crossed out wheeled bin indicates that the product (electrical and electronic equipment) should not be placed in municipal waste. Check local regulations for disposal of electronic products.
CAUTION: Do not throw the battery in municipal waste. This symbol of the crossed out wheeled bin indicates that the battery should not be placed in municipal waste.
ASUS Recycling/Takeback Services
ASUS recycling and takeback programs come from our commitment to the highest standards for protecting our environment. We believe in providing solutions for you to be able to responsibly recycle our products, batteries, other components as well as the packaging materials. Please go to http://csr.asus.com/english/Tackback.htm for the detailed recycling information in different regions.
HZ-1 USB 3.0 Docking Station User Guide
Knowing your HZ-1 USB 3.0 docking station
Package contents
•ASUS Docking Station x1
•Power adapter x1
•Driver CD x1
•USB 3.0 cable x1
•User Guide x1
If any of the items is damaged or missing, contact your retailer.
Specifications summary
|
USB 3.0 downstream port for a USB 3.0 device |
|
|
(Type A receptacle) x3 |
|
|
Microphone port x1 |
|
|
Headphone port x1 |
|
|
10/100/1000Mbps LAN (RJ-45) port x1 |
|
Ports |
DVI-D (Single Link) port x1 |
|
|
VGA port x1 |
|
|
HDMI port x1 |
|
|
DC IN port x1 |
|
|
USB 3.0 upstream port for a notebook/desktop computer |
|
|
(Type B receptacle) x1 |
|
Security solution |
Security lock hole x2 |
|
Power adapter |
Input: AC 100-240V |
|
Output: DC 5V/4A |
||
|
||
Physical dimensions |
264 x 87 x 29 mm (L x W x H) |
|
Weight |
299.5g |
|
OS Support |
Windows® XP (SP3) / Windows® Vista (32 bit/64 bit) / |
|
Windows® 7 (32 bit/64 bit) |
||
CPU Requirement |
Intel® based PCs (Atom N270, Single / Dual / Quad Core, |
|
i3 / i5 / i7 / Core CPUs) |
||
|
•Specifications are subject to change without prior notice.
•The software's performance depends on the processing power's availability, as well as the operating system in use. More system capability provides better performance.
English
English
HZ-1 USB 3.0 Docking Station User Guide
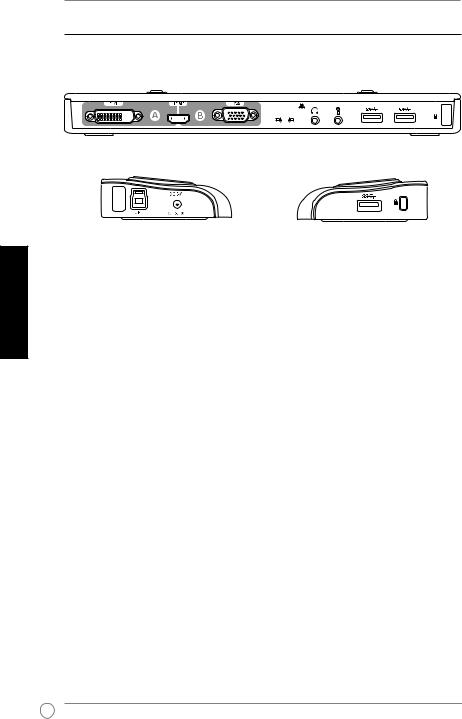
Hardware features
1 |
|
|
2 |
3 |
4 |
|
|
|
5 |
6 |
7 |
8 |
|||||||||||||||||||||
|
|
|
|
|
|
|
|
|
|
|
|
|
|
|
|
|
|
|
|
|
|
|
|
|
|
|
|
|
|
|
|
|
|
|
|
|
|
|
|
|
|
|
|
|
|
|
|
|
|
|
|
|
|
|
|
|
|
|
|
|
|
|
|
|
|
|
|
|
|
|
|
|
|
|
|
|
|
|
|
|
|
|
|
|
|
|
|
|
|
|
|
|
|
|
|
|
|
|
|
|
|
|
|
|
|
|
|
|
|
|
|
|
|
|
|
|
|
|
|
|
|
|
|
|
|
|
|
|
|
|
|
|
|
|
|
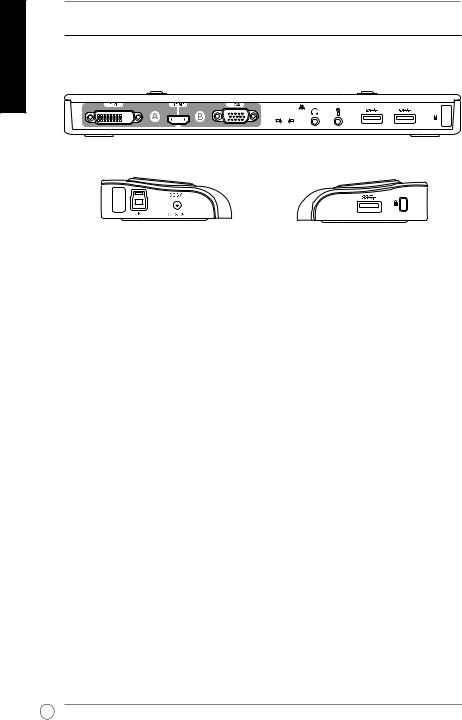
Back view
|
|
|
|
|
|
|
|
|
|
|
|
|
|
|
|
|
|
|
|
|
|
|
|
|
|
|
|
|
|
|
|
|
|
|
|
|
|
|
|
|
|
|
|
|
|
|
|
|
|
|
|
|
|
|
|
|
|
|
|
|
|
|
|
|
|
|
|
|
|
|
|
|
|
|
|
|
|
|
|||||
|
7 |
|
|
8 |
|
|
|
|
|||||||||||||||||||
|
8 |
9 |
|
|
|
10 |
|
||||||||||||||||||||
|
|
|
|
|
|
Left side view |
Right side view |
|
|
|
|
|
|
||||||||||||||
|
|
|
|
|
|
|
|
|
|
|
|
|
|
|
|
|
|
|
|
|
|
|
|
|
|
|
|
1 |
|
DVI-D (Single Link) port |
|
|
|
|
|
|
|
|
|
|
|
|
|||||||||||||
|
|
Connects to a DVI-D monitor or other DVI-D compatible devices. |
|
|
|
|
|
|
|||||||||||||||||||
2 |
|
HDMI port |
|
|
|
|
|
|
|
|
|
|
|
|
|
|
|
|
|||||||||
|
|
Connects to an HDMI monitor or other HDMI compatible devices. |
|
|
|
|
|
|
|||||||||||||||||||
3 |
|
VGA port |
|
|
|
|
|
|
|
|
|
|
|
|
|
|
|
|
|||||||||
|
|
Connects to a VGA monitor or other VGA compatible devices. |
|
|
|
|
|
|
|||||||||||||||||||
4 |
|
10/100/1000Mbps LAN (RJ-45) port |
|
|
|
|
|
|
|
|
|
|
|
|
|||||||||||||
|
|
Connects to a cable/DSL modem or a local area network (LAN). |
|
|
|
|
|
|
|||||||||||||||||||
5 |
|
Headphone port |
|
|
|
|
|
|
|
|
|
|
|
|
|
|
|
|
|||||||||
|
|
Connects to a pair of headphones or a speaker. |
|
|
|
|
|
|
|
|
|
|
|
|
|||||||||||||
6 |
|
Microphone port |
|
|
|
|
|
|
|
|
|
|
|
|
|||||||||||||
|
|
Connects to a microphone. |
|
|
|
|
|
|
|
|
|
|
|
|
|||||||||||||
7 |
|
Standard USB 3.0 downstream port |
|
|
|
|
|
|
|
|
|
|
|
|
|||||||||||||
|
|
Connects to a USB 3.0 device such as a mouse and joystick. |
|
|
|
|
|
|
|||||||||||||||||||
8 |
|
Security lock hole |
|
|
|
|
|
|
|
|
|
|
|
|
|||||||||||||
|
|
Secure your docking station to an immovable object using a security lock. |
|||||||||||||||||||||||||
9 |
|
USB 3.0 upstream port |
|
|
|
|
|
|
|
|
|
|
|
|
|||||||||||||
|
|
Connects and passes data to your computer. |
|
|
|
|
|
|
|
|
|
|
|
|
|||||||||||||
10 |
|
DC IN port |
|
|
|
|
|
|
|
|
|
|
|
|
|
|
|
|
|||||||||
|
|
Insert the power adapter into this port to supply power to your docking station and |
|||||||||||||||||||||||||
|
|
the devices connected to it. |
|
|
|
|
|
|
|
|
|
|
|
|
|||||||||||||

HZ-1 USB 3.0 Docking Station User Guide
Installing your HZ-1 USB 3.0 docking station
Installing the drivers
1.Place the Driver CD into your computer's optical drive.
2.Click Setup.exe.
3.Select your language and click I Accept.
4.Wait until the drivers are installed successfully in your computer.
• It is normal if your computer screen goes black or flashes temporarily during the driver installation process.
• Ensure that you install the driver before connecting the docking station to your computer.
Setting up your docking station
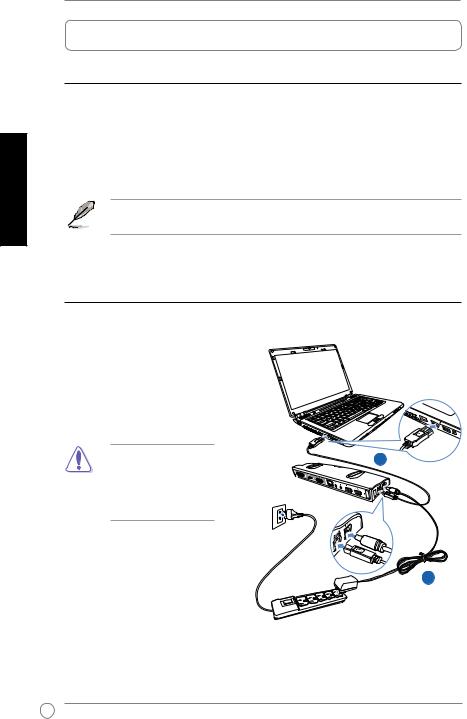
To set up your docking station:
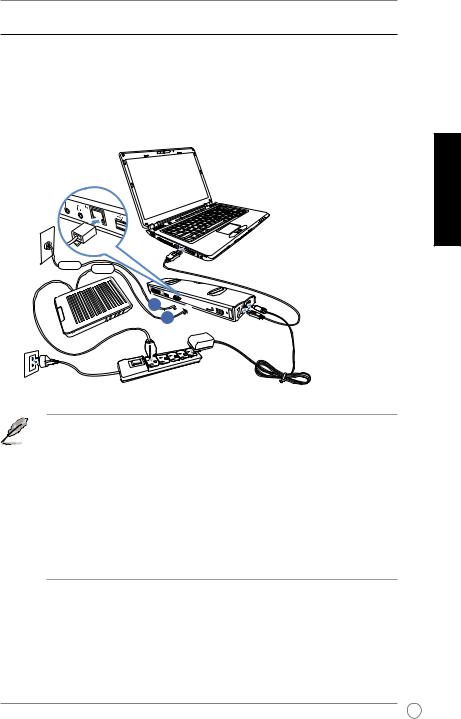
1. Connect one end of the bundled power adapter to the DC IN port on your docking station and the other end to a 100-240V AC power outlet.
Use only the bundled power |
2 |
adapter. Using other power adapters may damage your device.
2. Connect the square end of the bundled |
|
USB 3.0 cable to the USB 3.0 upstream |
|
port on your docking station and the |
1 |
other end to your computer's USB 3.0 |
|
port.
English

English
HZ-1 USB 3.0 Docking Station User Guide
Using your HZ-1 USB 3.0 docking station
While using your docking station, keep it connected to a power outlet. Otherwise, the devices connected to it will not function properly.
Connecting an external monitor
Use a VGA, an HDMI, or a DVI-D cable to connect an external monitor to your docking station.
To connect external monitor to your docking station, specify the dual output connection mode:
•VGA + HDMI
•HDMI + DVI-D
• The VGA / HDMI / DVI-D cable and HDMI-to-DVI converter are purchased separately.
• Do not connect the monitors to the VGA, HDMI, and DVI-D ports simultaneously. It may cause unexpected error in your monitor configuration.
•Refer to Release Note.txt in the Driver CD for more information on the video feature of your docking station.
•Use an HDMI-to-DVI converter in connecting two DVI interface monitors.
•Use an HDMI-to-DVI converter in connecting one VGA and one DVI interface monitors.
10
HZ-1 USB 3.0 Docking Station User Guide
The following table shows the HZ-1 USB 3.0 Docking Station’s connection:
External |
|
|
|
Docking Video Output |
|
|
||
Monitor Cable |
|
Video Output Section A |
|
Video Output Section B |
||||
Connection |
|
|
||||||
Type |
|
DVI |
|
HDMI |
|
VGA |
|
HDMI |
VGA |
|
|
|
|
|
|
|
|
|
|
|
|
|||||
DVI-D |
|
|
|
█ |
|
|
|
█ |
DVI-I |
|
█ |
|
█ |
|
█ |
|
█ |
HDMI |
|
█ |
|
|
|
|
|
|
Connection output types:
: direct connection
: different connection interface
█: need to use converter
English
11
English
HZ-1 USB 3.0 Docking Station User Guide
Controlling the display
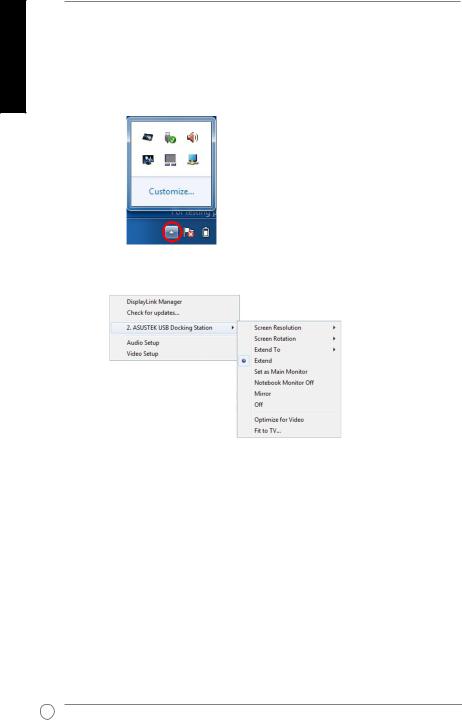
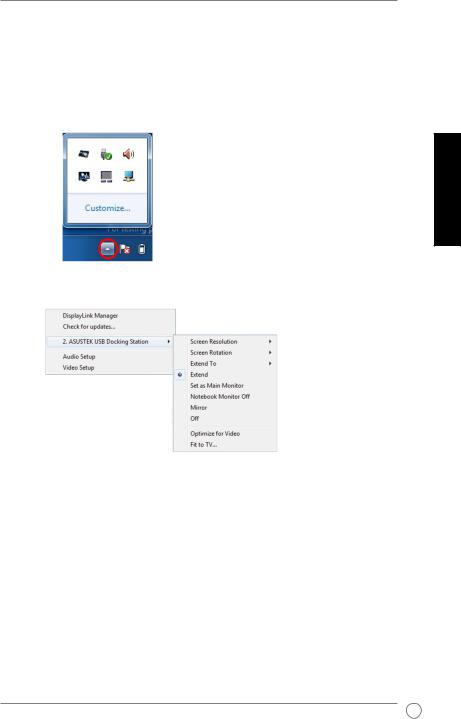
When the devices are attached, an icon appears in the taskbar. This gives you access to the DisplayLink manager menu.
1.From the taskbar, click the Show hidden icons arrow.
2.Click the  to show the docking station’s menu list.
12
|
|
HZ-1 USB 3.0 Docking Station User Guide |
Docking station's functions |
||
Menu |
Function |
|
DisplayLink Manager |
Click to open and manage your displays using the Windows utility. |
|
Check for updates |
Click to check and download the latest driver version from the update server. |
|
ASUSTEK USB |
Click to view and use a list of submenus to enhance the settings of your |
|
Docking Station |
docking station: |
|
|
• |
Screen Resolution: Click to select the screen resolution. |
|
|
You can set the screen resolution only for the main monitor. |
|
• |
Screen Rotation: Click to select the rotation setting for the extended |
|
|
monitor. |
|
• |
Extend to: Click to extend your Windows desktop to your extended |
|
|
monitors depending on their positions: Left, Right, Up, or Down. |
|
• |
Extend: Click to extend your Windows desktop to the extended monitor. |
|
• |
Set as Main Monitor: Click to set the screen as the main display |
|
• |
Notebook Monitor Off: Click to switch off the notebook's display and |
|
|
makes the extended monitor as the main display. |
|
|
This option only appears when one extended monitor is connected |
|
|
to your docking station. This option will only appear in laptop |
|
|
computers. |
|
• |
Mirror: Click to reproduce an exact replica of your main display to your |
|
|
extended monitor. |
|
|
The main display's resolution is the same as the extended |
|
|
monitor's resolution. |
|
• |
Off: Switches off the display |
|
• |
Optimize for Video: Select this option to enable a better movie playback |
|
|
performance. |
Only select this option when playing the video content. Texts may appear less clear when enabled.
•Fit to TV: Click to adjust the size of the desktop on the connected TV screen.
• This option only works in extended mode.
•This option is not designed to work on multiple screens.
•Fit to TV does not support rotated modes.
Audio Setup |
Click to open the WindowsAudio Configuration window. |
Video Setup |
Click to open the Windows Screen Resolution window. |
English
13
English
HZ-1 USB 3.0 Docking Station User Guide
Extending your desktop to an external monitor
Use an external monitor to extend your desktop and have an additional workspace. This allows you to:
•Display one document or application across your computer monitor and external monitor.
•Use each monitor to display a different document or application.
It is normal for your computer screen to go black or flashes temporarily after you change the display mode of your external monitor.
To extend your desktop to an external monitor:
Each time you connect an external monitor to the docking station, a DisplayLink software
icon is shown in the Windows® notification area. The DisplayLink software allows you to connect and manage an external display.
1.Right-click in the notification area to open the DisplayLink menu.
2.Click ASUSTEK USB Docking Station.
3.Click Extend.
• In Extend mode, the external monitor cannot be set as the main monitor.
• From the ASUSTEK USB Docking Station menu:
-Click Extend To to specify the position for the display on your external monitor.
-Click Screen Resolution and Screen Rotation to adjust the properties for your external monitor.
-Click Off to disable the display on your external monitor. Click Set as Main Monitor to enable it.
•Click DisplayLink Manager to manage your displays using the Windows® utility.
14

HZ-1 USB 3.0 Docking Station User Guide
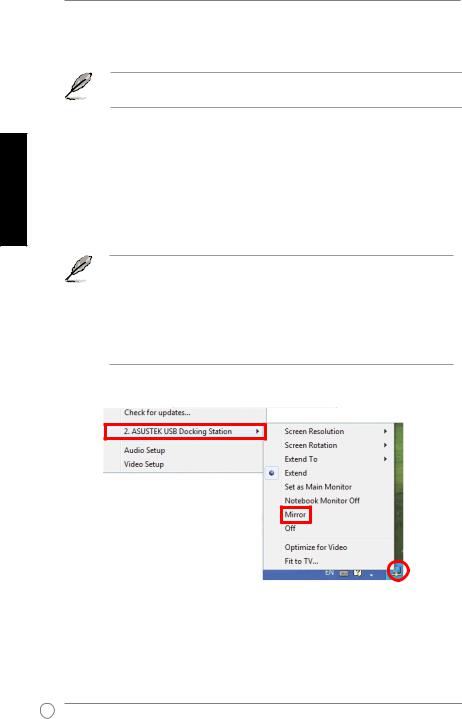
Mirroring your desktop to an external monitor
Use an external monitor to duplicate your desktop area.
NOTE: It is normal if your computer screen goes black or flashes temporarily after you change the display mode of your external monitor.
To mirror your desktop to an external monitor:
1.Right-click in the notification area to open the DisplayLink menu.
2.Click ASUSTEK USB Docking Station.
3.Click Mirror.
• In Mirror mode, the screen resolution and color quality for your external monitor are not user-configurable. The docking station automatically adjusts the settings.
•From the ASUSTEK USB Docking Station menu:
-Click Off to disable the display on your external monitor. Click Set as Main Monitor to enable it.
-Click DisplayLink Manager to manage your displays using the Windows® utility.
English
15
English
HZ-1 USB 3.0 Docking Station User Guide
Connecting to the Internet
Use an RJ-45 cable to connect your docking station to a local area network (LAN) (A) or a DSL/cable modem (B).
The yellow LED on the LAN port lights up when there is an Internet connection. The green LED lights up when there is Internet activity.
LAN
RJ-45 RJ-45
A 


Modem B
•If you fail to connect to the Internet using the docking station at your office, check with the network administrator if the MAC address of the docking station is blocked by your company's firewall.
•Check the bottom of your docking station for its MAC address. You may also obtain the MAC address through the following ways:
1.From the Windows® desktop, click Start > All Programs > Accessories > Command prompt.
2.At the command prompt, key in ipconfig -all and then Press <Enter>.
3.Locate HighSpeed USB-Ethernet Adapter.
•The RJ-45 cable is purchased separately.
16

HZ-1 USB 3.0 Docking Station User Guide
Disconnecting your HZ-1 USB 3.0 docking station
You can connect and disconnect the docking station while your computer is running.
•DO NOT disconnect the docking station while data is being transferred between your computer and the docking station. Wait until data transfer has completed.
•DO NOT disconnect the docking station while you are connecting to the Internet via its
LAN port. Disconnect the Internet connection first.
To disconnect your USB 3.0 docking station:
•Use the Safely remove hardware feature from the notification area to eject the USB-Ethernet adapter and the connected devices such as a USB flash drive and
USB hard disk drive.
•Unplug the docking station from your computer and the power outlet.
English
17

Français
Guide de l'utilisateur pour station d'accueil USB 3.0 HZ-1
Présentation de votre station d’accueil USB 3.0 HZ-1
Contenu de l'emballage
•Station d’accueil ASUS x 1
•Adaptateur secteur x 1
•CD de pilotes x 1
•Câble USB 3.0 x 1
•Guide de l’utilisateur x 1
Si un de ces éléments est endommagé ou manquant, contactez votre revendeur.
Résumé des caractéristiques
|
Port de liaison descendante USB 3.0 pour un périphérique |
|
|
USB 3.0 (réceptacle de type A) x 3 |
|
|
Port microphone x1 |
|
|
Port pour casque audio x 1 |
|
|
Port LAN 10/100/1000Mbps (RJ-45) x 1 |
|
Ports |
Port DVI-D (Liaison unique) x1 |
|
Port VGA x 1 |
||
|
||
|
Port HDMI x1 |
|
|
Port DC IN x 1 |
|
|
Port de liaison ascendante USB 3.0 pour connecter un PC |
|
|
portable ou PC de bureau |
|
|
(réceptacle de type B) x 1 |
|
Sécurité |
Verrou de sécurité x 2 |
|
Adaptateur secteur |
Entrée : AC 100 à 240 V |
|
Sortie : DC 5 V/4 A |
||
|
||
Dimensions |
264 x 87 x 29 mm (L x l x H) |
|
Poids |
299.5g |
|
Systèmes d’exploitation |
Windows® XP (SP3) / Windows® Vista (32 bits/64 bits) / |
|
supportés |
Windows® 7 (32 bits/64 bits) |
|
Processeur requis |
PC de base Intel® (Processeurs Atom N270, Cœur unique / |
|
double / quadruple, i3 / i5 / i7 / Core) |
||
|
• les caractéristiques sont sujettes à modifications sans avertissement préalable.
• Les performances logicielles varient selon la capacité de traitement de disponible, ainsi que selon le système d’exploitation utilisé. Plus les capacités du système sont
importantes, meilleures seront les performances.
18
Guide de l'utilisateur pour station d'accueil USB 3.0 HZ-1
Caractéristiques matérielles
1 |
|
|
2 |
3 |
4 |
|
|
|
5 |
6 |
7 |
8 |
|||||||||||||||||||||
|
|
|
|
|
|
|
|
|
|
|
|
|
|
|
|
|
|
|
|
|
|
|
|
|
|
|
|
|
|
|
|
|
|
|
|
|
|
|
|
|
|
|
|
|
|
|
|
|
|
|
|
|
|
|
|
|
|
|
|
|
|
|
|
|
|
|
|
|
|
|
|
|
|
|
|
|
|
|
|
|
|
|
|
|
|
|
|
|
|
|
|
|
|
|
|
|
|
|
|
|
|
|
|
|
|
|
|
|
|
|
|
|
|
|
|
|
|
|
|
|
|
|
|
|
|
|
|
|
|
|
|
|
|
|
|
Vue de dos
Français
|
8 |
9 |
10 |
7 |
8 |
|
|
Vue de gauche |
Vue de droite |
|
|
|
|
|
|
||
1 |
Port DVI-D (Liaison unique) |
|
|
||
|
Permet de connecter un moniteur DVI-D ou toute autre périphérique compatible |
||||
|
DVI-D. |
|
|
|
|
2 |
Port HDMI |
|
|
|
|
|
Permet de connecter un moniteur HDMI ou tout autre périphérique compatible |
||||
|
HDMI. |
|
|
|
|
3 |
Port VGA |
|
|
|
|
|
Permet de connecter un moniteur VGA ou un autre périphérique compatible VGA. |
||||
4 |
Port LAN (RJ-45) 10/100/1000Mbps |
|
|
||
|
Permet de connecter un modem câblé / DSL ou de se connecter à un réseau local |
||||
|
(LAN). |
|
|
|
|
5 |
Port pour casque audio |
|
|
||
|
Permet de connecter un casque audio ou un système d’enceintes. |
|
|||
6 |
Port Microphone |
|
|
||
|
Permet de connecter un microphone. |
|
|
||
7 |
Port standard de liaison descendante USB 3.0 |
|
|
||
|
Permet de connecter un périphérique USB 3.0 tel qu’une souris ou un joystick. |
||||
8 |
Verrou de sécurité |
|
|
||
|
Fixez votre station à un objet fixe à l’aide du verrou de sécurité. |
|
|||
9 |
Port de liaison ascendante USB 3.0 |
|
|
||
|
Se connecte et transfère des données vers votre ordinateur. |
|
|||
10 |
Port DC IN |
|
|
|
|
|
Connectez l’adaptateur secteur sur ce port pour alimenter station d’accueil et les |
||||
|
périphériques connectés. |
|
|
||
19
Français
Guide de l'utilisateur pour station d'accueil USB 3.0 HZ-1
Installation de votre station d’accueil USB 3.0 HZ-1
Installer les pilotes
1.Placez le CD de pilotes dans le lecteur optique de votre ordinateur.
2.Cliquez sur Setup.exe.
3.Sélectionnez la langue puis cliquez sur I Accept.
4.Patientez durant l'installation des pilotes sur votre ordinateur.
• Il est normal que l'écran devienne noir ou clignote durant l'installation des pilotes.
• Veillez bien à installer le pilote avant de connecter votre ordinateur à la station d’accueil.
Configurer votre station d'accueil
Pour configurer votre station d'accueil :
1. Connectez une des extrêmités du câble d'alimentation au port DC IN de votre station d'accueil et l'autre extrêmité à une prise de courant de CA de 100-240 V.
Utilisez l'adaptateur |
2 |
secteur fourni. Utiliser un |
|
adaptateur secteur différent |
|
peut endommager votre |
|
station d'accueil. |
|
2. Connectez l'extrêmité carrée du câble |
|
USB 3.0 au port de liaison montante |
|
USB 3.0 de votre station d'accueil et |
1 |
l'autre extrémité à un port USB 3.0 de |
|
votre ordinateur.
20
Guide de l'utilisateur pour station d'accueil USB 3.0 HZ-1
Utilisation de votre station d’accueil USB 3.0 HZ-1
Lorsque vous utilisez votre station d'accueil, gardez celle-ci connectée à une prise de courant. Sinon, les périphériques connectés ne fonctionneront pas correctement.
Connecter un moniteur externe
Utilisez un câble VGA,un HDMI ou DVI-I pour connecter un moniteur externe à votre station d'accueil.
Pour connecter le moniteur externe à votre station d’accueil, spécifiez le mode de connexion double sortie:
•VGA + HDMI
•HDMI + DVI-D
• Le câble VGA / HDMI/ DVI-D et le convertisseur HDMI/DVI sont à acheter séparément.
• Ne pas connecter des moniteurs en même temps sur les ports VGA, HDMI et DVI-D. Cela risque de causer une erreur dans la configuration de votre moniteur.
•Référez-vous au fichier Release Note.txt situé dans le CD de pilotes pour plus d'informations sur les capacités vidéo de votre station d'accuei.
•Utilisez un convertisseur HDMI/DVI pour connecter deux moniteurs à interface DVI.
•Utilisez un convertisseur HDMI/DVI pour connecter un moniteur à interface VGA et un à interface DVI.
Français
21

Français
Guide de l'utilisateur pour station d'accueil USB 3.0 HZ-1
Le tableau qui suit montre la connexion de la station d’accueil USB 3.0 HZ-1 :
Type de |
|
|
Sortie vidéo accueil |
|
|
|
|
connexion |
Section A de la sortie |
Section B de la sortie |
|||||
par câble |
|||||||
de moniteur |
DVI |
vidéo |
VGA |
vidéo |
|||
externe |
|
HDMI |
|
HDMI |
|||
VGA |
|
|
|
|
|
|
|
DVI-D |
|
|
█ |
|
|
█ |
|
DVI-I |
█ |
|
█ |
█ |
|
█ |
|
HDMI |
█ |
|
|
|
|
|
|
Types de sorties pour la connexion:
: connexion directe
: interface de connexion différente
█: il faut utiliser un convertisseur
22
Guide de l'utilisateur pour station d'accueil USB 3.0 HZ-1
Contrôle de l’écran
Lorsque les périphériques sont branchés, une icône s’affiche sur la barre des tâches. Elle vous permet d’accéder au menu du gestionnaire DisplayLink.
1.À partir de la barre des tâches, cliquez sur la flèche Show hidden icon (Afficher les icônes cachées).
Français
2.Cliquez sur  pour afficher la liste de menus de la station d’accueil.
23
Français
Guide de l'utilisateur pour station d'accueil USB 3.0 HZ-1
Fonctions de la station d’accueil
Menu |
Fonction |
|
|
Gestionnaire |
Cliquez ici pour ouvrir et gérer vos écrans à l’aide de l’utilitaire Windows. |
||
DisplayLink |
|
|
|
Chercher des mises à |
Cliquez ici pour chercher et télécharger la dernière version du pilote à partir du |
||
jour |
serveur de mise à jour. |
||
Station d’accueil USB |
Cliquez ici pour visualiser et utiliser une liste de sous-menus pour modifier les |
||
ASUSTEK |
paramètres de votre station d’accueil : |
||
|
• |
Résolution d’écran : Cliquez ici pour sélectionner la résolution de l’ |
|
|
|
écran. |
|
|
|
Vous ne pouvez régler la résolution d’écran que pour le moniteur |
|
|
|
principal. |
|
|
• |
Rotation de l’écran : Cliquez ici pour sélectionner le réglage de rotation |
|
|
|
pour le moniteur étendu. |
|
|
• |
Étendre à : Cliquez ici pour étendre votre bureau Windows sur vos |
|
|
|
moniteurs étendus en fonction de leurs positions : Gauche, Droite, Haut |
|
|
|
ou Bas. |
|
|
• |
Étendre : Cliquez ici pour étendre votre bureau Windows sur le moniteur |
|
|
|
étendu. |
|
|
• |
Configurer comme moniteur principal : Cliquez ici pour configurer l’ |
|
|
|
écran comme moniteur principal. |
|
|
• |
Arrêt moniteur notebook : CLiquez ici pour éteindre le moniteur du |
|
|
|
notebook et faire du moniteur étendu l’écran principal. |
|
|
|
Cette option ne s’affiche que lorsqu’un moniteur étendu est |
|
|
|
connecté à votre station d’accueil. Cette option ne s’affiche que |
|
|
|
sur les ordinateurs portables. |
|
|
• |
Miroir : |
Cliquez ici pour reproduire une réplique exacte de votre écran |
|
|
principal sur votre moniteur étendu. |
|
|
|
La résolution de l’écran principal est la même que celle du |
|
|
|
moniteur étendu. |
|
|
• |
Arrêt : Pour éteindre l’écran |
|
|
• |
Optimiser pour la vidéo : Sélectionnez cette option pour un meilleur |
|
|
|
résultat lors de l’affichage des films. |
|
|
|
Sélectionnez uniquement cette option lorsque vous affichez |
|
|
|
du contenu vidéo. Lorsque cette option est activée, les textes |
|
|
|
s’affichent moins clairement. |
|
|
• |
Ajuster au téléviseur : Cliquez ici pour ajuster la taille du bureau sur un |
|
|
|
écran de télévision connecté. |
|
|
|
• |
Cette option ne fonctionne qu’en mode étendu. |
|
|
• |
Cette option n’est pas conçue pour fonctionner sur plusieurs |
|
|
|
écrans. |
|
|
• |
Ajuster au téléviseur ne prend pas en charge les modes avec |
|
|
|
rotation. |
Configuration audio |
Cliquez ici pour ouvrir la fenêtre Configuration audio de Windows. |
||
Configuration vidéo |
Cliquez ici pour ouvrir la fenêtre Résolution d’écran de Windows. |
||
24

Guide de l'utilisateur pour station d'accueil USB 3.0 HZ-1
Etendre l'affichage de votre ordinateur vers un moniteur externe
Utilisez un moniteur externe pour étendre l'affichage de votre ordinateur pour obtenir un espace de travail supplémentaire. Ceci vous permet :
•D’afficher un document sur les deux écrans;
•D’utiliser chaque écran pour afficher un document différent.
Il est normal que l'écran devienne noir ou clignote lorsque vous modifiez le mode d'affichage de votre moniteur externe.
Pour étendre l'affichage de votre ordinateur vers un moniteur externe :
à chaque fois que vous connectez un moniteur externe à la station d'accueil, une icône du logiciel DisplayLink  apparaît dans la zone de notification de Windows®. Le logiciel DisplayLink vous permet de connecter et de gérer votre moniteur externe.
1.Faites un clic droit sur l'icône de la zone de notification pour ouvrir le menu
DisplayLink.
2.Cliquez sur ASUSTEK USB Docking Station (Station d’accueil USB ASUSTEK).
3.Cliquez sur Extend.
• En mode Extend, le moniteur externe ne peut pas être configuré comme affichage principal.
• Dans le menu ASUSTEK USB Docking Station (Station d’accueil USB ASUSTEK):
-Cliquez sur Extend pour spécifier la position du moniteur externe.
-Cliquez sur Screen Resolution (Résolution d'écran), et Screen Rotation (Rotation de l'écran) pour ajuster les propriétés de votre moniteur externe.
-Cliquez sur Off pour désactiver l'affichage sur votre moniteur externe. Cliquez sur Set as Main Monitor pour activer l'affichage.
•Cliquez sur DisplayLink Manager Gestionnaire DisplayLink) pour gérer vos écrans avec l’utilitaire Windows®.
Français
25
Français
Guide de l'utilisateur pour station d'accueil USB 3.0 HZ-1
Obtenir un double affichage de votre écran sur un moniteur externe
Uilisez un moniteur externe pour obtenir un double affichage sur deux écrans.
NOTE : Il est normal que l'écran devienne noir ou clignote lorsque vous modifiez le mode d'affichage de votre moniteur externe.
Pour obtenir un double de l'affichage de votre écran sur un moniteur externe :
1.Faites un clic droit sur l'icône de la zone de notification pour ouvrir le menu
DisplayLink.
2.Cliquez sur ASUSTEK USB Docking Station (Station d’accueil USB ASUSTEK).
3.Cliquez sur Mirror.
• En mode Miroir, la résolution de l'écran et la qualité des couleurs ne sont pas configurables. La station d'accueil règle automatiquement les paramètres.
•Dans le menu ASUSTEK USB Docking Station (Station d’accueil USB ASUSTEK) :
-Cliquez sur Off pour désactiver l'affichage sur votre moniteur externe. Cliquez sur Set as Main Monitor pour activer l'affichage.
-Cliquez sur DisplayLink Manager Gestionnaire DisplayLink) pour gérer vos écrans à l'aide de l'utilitaire Windows®.
26
Guide de l'utilisateur pour station d'accueil USB 3.0 HZ-1
Se connecter à Internet
Utilisez un câble RJ-45 pour connecter votre station d’accueil à un LAN (réseau local) (A) ou à un modem DSL/câble (B).
La LED jaune du port LAN s'allume lorsqu'une connexion à Internet est établie. LA LED verte s'allume en cas d'activité sur Internet.
LAN
RJ-45 RJ-45
A 


Modem B
Français
•Si vous n'arrivez pas à vous connecter à Internet au bureau avec votre station d'accueil, vérifiez avec votre administrateur réseau que l'adresse MAC de votre station d'accueil ne soit pas bloquée par le pare-feu de votre entreprise.
•Vous trouverez l'adresse MAC de votre station d'accueil sur le dessous de celle-ci. Vous pouvez également obtenir l'adresse MAC de la manière suivante :
1.Depuis le bureau de Windows®, cliquez sur Démarrer > Tous les programmes >
Accessoires > Invite de commandes.
2.Sur l'écran qui apparaît, saisissez ipconfig -all puis appuyez sur <Entrée>.
3.Localisez l'élément HighSpeed USB-Ethernet Adapter.
•Le câble RJ-45 n'est pas fourni.
27
Français
Guide de l'utilisateur pour station d'accueil USB 3.0 HZ-1
Déconnecter votre station d’accueil USB 3.0 HZ-1
Vous pouvez connecter ou déconnecter la station d'accueil lorsque votre ordinateur est allumé.
• NE DECONNECTEZ PAS la station d'accueil lorsque des données sont en cours de transfert entre votre ordinateur et la station d'accueil. Veuillez patienter le temps que le transfert des données soit terminé.
•NE DECONNECTEZ PAS la station d'accueil lorsque vous êtes connecté à Internet via le port LAN. Déconnectez-vous d'Internet en premier.
Pour déconnecter votre station d'accueil USB 3.0 :
•Utilisez la fonction "Retirer le périphérique en toute sécurité" à partir de la barre des tâches pour éjecter l'adaptateur Ethernet USB et les périphériques connectés tels qu'une clé USB ou un disque dur USB.
•Débranchez la station d'accueil de votre ordinateur et de la prise de courant.
28
HZ-1 USB 3.0 Docking Station Benutzerhandbuch
Kennenlernen Ihrer HZ-1 USB 3.0 Docking Station
Packungsinhalt
•1x ASUS Docking Station
•1x Netzteil
•1x Treiber-CD
•1x USB 3.0-Kabel
•1x Benutzerhandbuch
Wenn ein Teil fehlt oder beschädigt ist, kontaktieren Sie bitte umgehend Ihren Händler.
Spezifikationsübersicht
|
|
|
3x |
USB 3.0 Downstream-Anschluss für USB 3.0-Gerät |
|
||
|
|
|
|
||||
|
|
|
1x |
(Type A-Anschluss) |
Français |
|
|
|
|
|
Mikrofonanschluss |
|
|||
|
|
|
1x |
Kopfhöreranschluss |
|
||
|
|
|
|
|
|||
|
|
|
1x |
10/100/1000Mbps LAN (RJ-45) -Anschluss |
|
||
Anschlüsse |
|
1x |
DVI-D (Single Link) -Anschluss |
|
|
||
|
|
|
1x |
VGA-Anschluss |
|
|
|
|
|
|
1x |
HDMI-Anschluss |
|
|
|
|
|
|
1x |
Stromeingang |
|
|
|
|
|
|
1x |
USB 3.0 Upstream-Anschluss für einen Notebook-/ |
|||
|
|
|
|
Desktop-Computer (Type B-Anschluss) |
|
|
|
Sicherungslösung |
2x Sicherheitsschloss-Anschluss |
|
|
||||
Netzteil |
|
Eingang: 100-240V Wechselspannung |
|
|
|||
|
Ausgang: 5V/4A Gleichspannung |
|
|
||||
|
|
|
|
|
|||
Abmessungen |
264 x 87 x 29 mm (L x B x H) |
|
|
||||
Gewicht |
|
299.5g |
|
|
|||
Unterstützte |
|
Windows® XP (SP3) / Windows® Vista (32 bit/64 bit) / |
|||||
Betriebssysteme |
Windows® 7 (32 bit/64 bit) |
|
|
||||
CPU-Anforderungen |
Intel® basieende PCs (Atom N270, Single / Dual / Quad |
||||||
Core, i3 / i5 / i7 / Core CPUs) |
|
|
|||||
|
|
|
|
|
|||
|
|
|
|
|
|||
|
• |
Die Spezifikationen können ohne vorherige Benachrichtigung geändert werden. |
|||||
|
• |
Die Leistung der Software hängt von der Rechenleistung und den Betriebssystem ab. |
|||||
|
|
Mehr Systemleistung bietet bessere Leistung der Software. |
|
|
|||
|
|
|
|
|
|
|
|
Deutsch
29
Deutsch
HZ-1 USB 3.0 Docking Station Benutzerhandbuch
Hardware-Funktionen
1 |
|
|
2 |
3 |
4 |
|
|
|
5 |
6 |
7 |
8 |
|||||||||||||||||||||
|
|
|
|
|
|
|
|
|
|
|
|
|
|
|
|
|
|
|
|
|
|
|
|
|
|
|
|
|
|
|
|
|
|
|
|
|
|
|
|
|
|
|
|
|
|
|
|
|
|
|
|
|
|
|
|
|
|
|
|
|
|
|
|
|
|
|
|
|
|
|
|
|
|
|
|
|
|
|
|
|
|
|
|
|
|
|
|
|
|
|
|
|
|
|
|
|
|
|
|
|
|
|
|
|
|
|
|
|
|
|
|
|
|
|
|
|
|
|
|
|
|
|
|
|
|
|
|
|
|
|
|
|
|
|
|
Rückseitenansicht
|
|
|
|
|
|
|
|
|
|
|
|
|
|
|
|
|
|
|
|
|
|
|
|
|
|
|
|
|
|
|
|
|
|
|
|
|
|
|
|
|
|
|
|
|
|
|
|
|
|
|
|
|
|
|
|
|
|
|
|
|
|
|
|
|
|
|
|
|
|
|
|
|
|
|
|
|||||
|
7 |
|
8 |
|
|
|
|
|||||||||||||||||||
|
8 |
9 |
|
|
|
10 |
|
|||||||||||||||||||
|
|
|
|
Linke Seitenansicht |
Rechte Seitenansicht |
|||||||||||||||||||||
|
|
|
|
|
|
|
|
|
|
|
|
|
|
|
|
|
|
|
|
|
|
|
|
|
|
|
1 |
|
DVI-D (Single Link) -Anschluss |
|
|
|
|
|
|
|
|
|
|
|
|||||||||||||
|
|
Anschluss für einen DVI-I-Monitor oder andere DVI-I-Geräte. |
|
|
|
|
|
|
||||||||||||||||||
2 |
|
HDMI-Anschluss |
|
|
|
|
|
|
|
|
|
|
|
|||||||||||||
|
|
Anschluss für einen HDMI-Monitor oder andere HDMI-Geräte. |
|
|
|
|
|
|
||||||||||||||||||
3 |
|
VGA-Anschluss |
|
|
|
|
|
|
|
|
|
|
|
|
|
|
|
|||||||||
|
|
Anschluss für einen VGA-Monitor oder andere VGA-Geräte. |
|
|
|
|
|
|
||||||||||||||||||
4 |
|
10/100/1000Mbps LAN (RJ-45) -Anschluss |
|
|
|
|
|
|
|
|
|
|
|
|||||||||||||
|
|
Verbindung zu einen Kabel-/DSL-Modem oder einen lokalen Netzwerk (LAN). |
||||||||||||||||||||||||
5 |
|
Kopfhöreranschluss |
|
|
|
|
|
|
|
|
|
|
|
|||||||||||||
|
|
Anschluss für einen Kopfhörer oder ein Lautsprecher-Set. |
|
|
|
|
|
|
||||||||||||||||||
6 |
|
Mikrofonanschluss |
|
|
|
|
|
|
|
|
|
|
|
|||||||||||||
|
|
Anschluss für ein Mikrofon. |
|
|
|
|
|
|
|
|
|
|
|
|||||||||||||
7 |
|
USB 3.0 Downstream-Standardanschluss |
|
|
|
|
|
|
|
|
|
|
|
|||||||||||||
|
|
Anschluss für ein USB 2.0-Gerät, z.B- Maus, Joystick. |
|
|
|
|
|
|
||||||||||||||||||
8 |
|
Sicherheitsschloss-Anschluss |
|
|
|
|
|
|
|
|
|
|
|
|||||||||||||
|
|
Anschluss zum Sichern Ihrer Docking Station mittels eines Schlosses an einen |
||||||||||||||||||||||||
|
|
festen Objekt. |
|
|
|
|
|
|
|
|
|
|
|
|
|
|
|
|||||||||
9 |
|
USB 2.0 Upstream-Anschluss |
|
|
|
|
|
|
|
|
|
|
|
|||||||||||||
|
|
Anschluss zur Übertragung der Daten zu Ihren Computer. |
|
|
|
|
|
|
||||||||||||||||||
10 |
|
Stromeingang |
|
|
|
|
|
|
|
|
|
|
|
|
|
|
|
|||||||||
|
|
Anschluss für den Stromausgang des Netzteils, um Ihre Docking Station und die |
||||||||||||||||||||||||
|
|
daran angeschlossenen Geräte mit Strom zu versorgen. |
|
|
|
|
|
|
||||||||||||||||||
30
 Loading...