


K005

E8124
tablet
user manual
Charging your batteries
Ensure to fully charge your battery pack before using your
ASUS Tablet in battery mode for extended periods. Remember
that the power adapter charges the battery pack as long as it is
plugged into an AC power source. Be aware that it takes much
longer to charge the battery pack when the ASUS Tablet is in
use.
IMPORTANT! Do not leave the ASUS Tablet connected to
the power supply once it is fully charged. ASUS Tablet is not
designed to be left connected to the power supply for extended
periods of time.
Airplane precautions
Contact your airline provider to learn about related inight
services that can be used and restrictions that must be followed
when using your ASUS Tablet in-ight.
IMPORTANT! You can send your ASUS Tablet through x-ray
machines (used on items placed on conveyor belts), but do not
expose them from magnetic detectors and wands.
Safety precautions
This ASUS Tablet should only be used in enviroments with
ambient temperatures between 0°C (32°F) and 35°C (95°F).
Long time exposure to extremely high or low temperature
may quickly deplete and shorten the battery life. To ensure the
battery’s optimal performance, ensure that it is exposed within
the recommended environment temperature.
ASUS Tablet
3
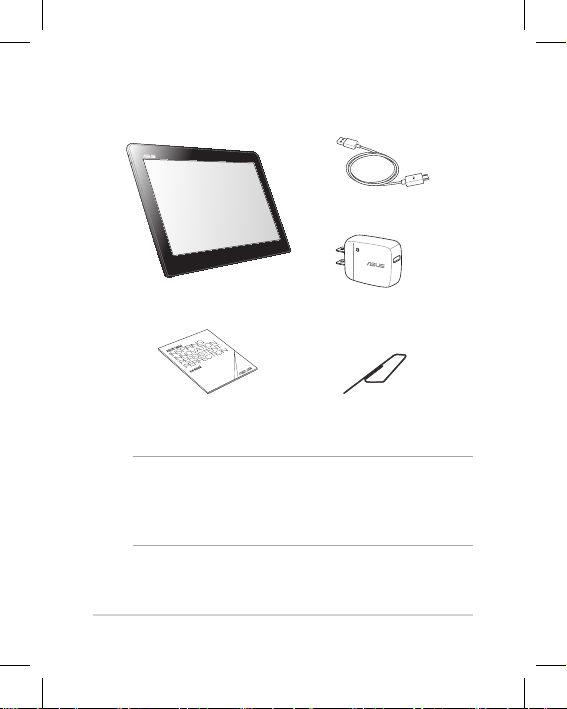
Package contents
NOTES:
• If any of the items is damaged or missing, contact your
retailer.
• The bundled power adapter varies with country or region.
Micro USB cable
ASUS Tablet Power adapter
Technical documentations
and warranty card
Micro SIM card tray
eject pin
ASUS Tablet
4
Your ASUS Tablet
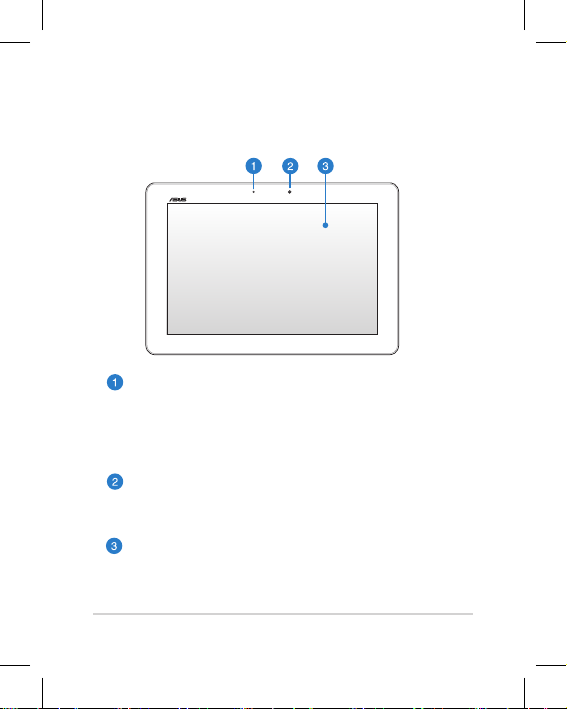
Front view
Ambient light sensor
The ambient light sensor detects the amount of
ambient light in your environment. It allows the
system to automatically adjust the brightness of the
display depending on the ambient light condition.
Front camera
This built-in 1.2-megapixel camera allows you to take
pictures or record videos using your ASUS Tablet.
Touch screen panel
The touch screen panel allows you to operate your
ASUS Tablet using touch gestures or a stylus pen.
ASUS Tablet
5
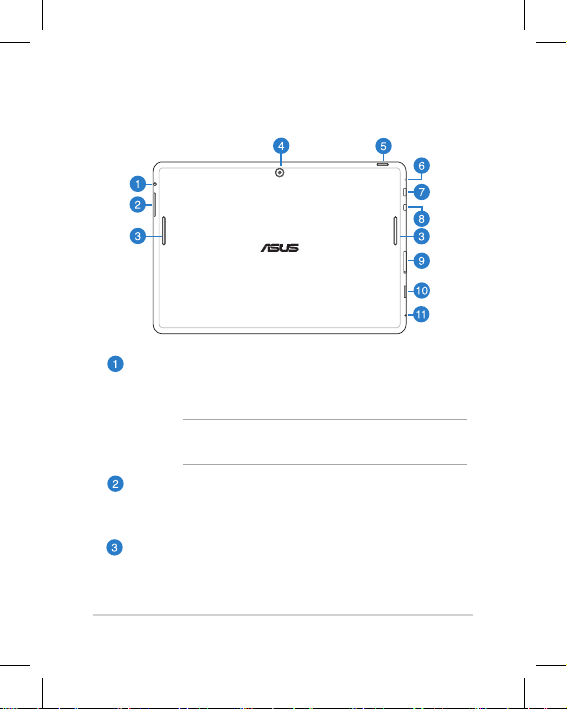
Rear view
Speaker/Headset port
This port allows you to connect your ASUS Tablet to
amplied speakers or a headset.
IMPORTANT! This port does not support an external
microphone.
Volume button
The volume button allows you to increase or decrease
the volume level of your ASUS Tablet.
Audio speakers
Your ASUS Tablet allows you to hear audios straight
from your ASUS Tablet. Audio features are software
controlled.

ASUS Tablet
6
Rear camera
This built-in 5-megapixel camera allows you to take
pictures or record videos using your ASUS Tablet.
Power button
Press the power button for about two (2) seconds to
turn your ASUS Tablet on or wake it up from standby
mode.
To turn your ASUS Tablet o, press the power button
for about two (2) seconds and when prompted, tap
Power O then tap OK.
To lock your ASUS Tablet or to put it to standby mode,
press and quickly release the power button.
In the event that your ASUS Tablet becomes
unresponsive, press and hold the power button for
about ten (10) seconds to force it to shut down.
IMPORTANT!
• When your ASUS Tablet is inactive for one (1)
minute, it will automatically go to standby mode.
• Forcing the system to restart may result to data
loss. We strongly recommend that you back up
your data regularly.

ASUS Tablet
7
Microphone
The built-in microphone can be used for video
conferencing, voice narrations or simple audio
recordings.
Micro USB 2.0 port
Use the micro USB (Universal Serial Bus) 2.0 to charge
the battery pack or supply power to your ASUS Tablet.
This port also allows you to transfer data from your
computer to your ASUS Tablet and vice versa.
NOTE: When you connect your ASUS Tablet to the
USB port on your computer, your ASUS Tablet will be
charged only when it is in sleep mode (screen o) or
turned o.
Micro HDMI port
This port is for a micro HDMI (High-Denition
Multimedia Interface) connector and is HDCP
compliant for HD DVD, Blu-ray and other protected
content playback.
ASUS Tablet
8
Micro SIM card slot
The ASUS Tablet comes with a built-in micro SIM
(Subscriber Identity Module) card slot that supports
GSM, WCDMA, and LTE network bands.
NOTE: Refer to section Installing a micro SIM card
for more details.
Micro SIM card tray eject hole
Insert the bundled micro SIM card tray eject pin
into this hole to eject the micro SIM card tray.
MicroSD card slot
The ASUS Tablet comes with an additional built-in
memory card reader slot that supports microSD and
microSDHC card formats.
Manual reset hole
If your system becomes unresponsive, push inside the
manual reset hole using a straightened paper clip to
force-restart your ASUS Tablet.
IMPORTANT! Forcing the system to restart may
result to data loss. We strongly recommend that you
back up your data regularly.
 Loading...