


User Manual


This Manual applies to the following VGAs:
 HD485PG3 (PCI Express)
 XHD485XPG3 (PCI Express)
 HD487XTG5 (PCI Express)
 HD4870X2 (PCI Express)
 HD4870XG5 (PCI Express)
 HD 4800 Series (CrossFire Edition)

Table of Contents
CHAPTER |
1 INTRODUCTION............................................. |
1 |
1.1 |
System Requirements ................................................. |
3 |
1.2 |
Performance............................................................... |
5 |
1.3 |
Software Compatibility............................................... |
5 |
1.4 |
Monitor Compatibility................................................ |
6 |
CHAPTER |
2 HARDWARE INSTALLATION........................... |
7 |
2.1 |
What’s Included in the Package ................................ |
7 |
2.2 |
Installing the Card...................................................... |
7 |
2.3 |
Board Layout.............................................................. |
9 |
2.4 |
Power Supply Requirements .................................... |
15 |
|
2.4.1 Additional Power Connection Requirements .... |
16 |
2.5 |
Multiple Monitors .................................................... |
20 |
2.6 |
ATI Radeon™ HD 4800 Display Configurations........ |
22 |
CHAPTER |
3 SOFTWARE INSTALLATION .......................... |
23 |
|
3.1 |
Uninstall Old Graphics Drivers ................................ |
24 |
|
3.2 |
Installing on Windows XP ........................................ |
25 |
|
3.3 |
Installing on Windows Vista..................................... |
27 |
|
3.4 |
Displays Manager .................................................... |
32 |
|
3.5 |
Displays Manager Standard View............................. |
33 |
|
3.6 |
Displays Manager Advanced View........................... |
35 |
|
|
3.6.1 |
Enable Clone Mode......................................... |
35 |
|
3.6.2 Enable Stretch Main Vertically ........................ |
36 |
|
|
3.6.3 Enable Stretch Main Horizontally....................... |
36 |
|
|
3.6.4 Swap displays in Extended Mode .................... |
37 |
|
|
3.6.5 |
Change desktop size........................................ |
38 |
|
3.6.6 |
Change Color quality ...................................... |
38 |
|
3.6.7 Change display refresh Rate ............................ |
38 |
|
|
3.6.8 Force changes to a specific display setting....... |
39 |
|
|
3.6.9 |
Detect a newly connected display device........ |
39 |
|
|
|
|

3.7 |
Display Options....................................................... |
41 |
|
3.8 Using the CRT/TV Features ...................................... |
44 |
||
3.8.1 How to use TV-out cables correctly................. |
44 |
||
3.8.2 How to change the TV settings ........................ |
45 |
||
3.8.3 |
TV Properties........................................................ |
47 |
|
3.8.4 |
TV Adjustments.................................................... |
48 |
|
3.8.5 To select your TV format by country.................. |
49 |
||
3.8.6 To set your TV output to PAL .......................... |
50 |
||
3.9 Using the HDTV Features ........................................ |
51 |
||
3.9.1 Installing your ATI HDTV video cable ............. |
51 |
||
3.9.2 Using your ATI HDTV video cable .................. |
51 |
||
3.9.3 |
HDTV Support ..................................................... |
52 |
|
3.9.4 Add an HDTV format .......................................... |
53 |
||
3.10 Color Desktop.......................................................... |
56 |
||
3.11 ATI Overdrive (optional) .......................................... |
58 |
||
3.12 HDMI Video and Audio (optional) ........................... |
61 |
||
APPENDIX |
A |
SPECIFICATIONS ........................................ |
62 |
A.1 |
Hardware Specifications .......................................... |
62 |
|
A.2 |
Programming Information ........................................ |
63 |
|
A.3 |
Resolution Table...................................................... |
63 |
|
Radeon™ HD 4800 CrossFire™ Edition .................................... |
69 |
||
|
|
|
|

Chapter 1: Introduction
CHAPTER 1
INTRODUCTION
The ATI Radeon™ HD 4800 Series of GPUs allow you to experience the power of HD with graphics processing designed for how you work and play. Advance to the next generation of HD game performance and lifelike realism thanks to DirectX® 10.1 capabilities and plug-and-play ATI CrossFireX™ multi-GPU upgradeability. Watch the latest Blu-ray and HD-DVD videos in full 1080p HD – and upscale beyond - without placing huge demands on your CPU. Enjoy break-through efficiency with more processing performance per watt and energy-saving features to help save you money.
Features
•ATI Radeon™ HD 4850 / HD 4870
•GDDR3/GDDR5 memory
•256-bit memory interface
•DirectX® 10.1
•24x custom filter anti-aliasing (CFAA) and high performance anisotropic filtering
•ATI CrossFireX™ multi-GPU support for highly scalable performance
•PCI Express® 2.0 support
•Dynamic geometry acceleration
•Game physics processing capability
•ATI Avivo™HD video and display technology Unified Video Decoder 2 (UVD) for Blu-ray™ and HD Video Built-in HDMI with 7.1 surround sound support On-chip HDCP
•Native HDCP (High-bandwidth Digital Content Protection)
DVI-to-HDMI dongle (optional)
Flex cable for ATI Radeon™ HD 4800 Series (optional)
1

ATI Radeon™ HD 4800 Series User Manual
Unified Video Decoder 2
Unified Video Decoder 2 frees up your CPU for other tasks so you get The Ultimate Visual Experience™ for even the most processingintensive content, including VC-1, H.264 and now MPEG-2. Also, take full advantage of Blu-ray functionality with dual-stream, picture in picture (PIP) capabilities.
Upscale Beyond 1080p
Watch the hottest Blu-ray movies or other HD content at full 1080p display resolution and beyond.
On-chip HDCP
On-chip HDCP (High-Bandwidth Digital Content Protection) makes life easier by allowing you to playback HDCP protected content.
HDMI
Enjoy the latest audio technologies using HDMI with 7.1 digital surround sound support. Also, xvYCC support allows the user to enjoy a wider range of color when connected to a capable HDTV.
ATI CrossFireX™ Multi-GPU Technology
•Scale up rendering performance and image quality with two, three, or four GPUs
•Integrated compositing engine
•High performance dual channel bridge interconnect
2

Chapter 1: Introduction
1.1System Requirements
Hardware |
• Intel® Pentium® 4 or AMD Athlon®. |
|
• 1GB of system memory |
|
• Optical drive for installation software (CD-ROM or |
|
DVD-ROM drive). |
|
• A 600 Watt or better power supply with two 2x3-pin |
|
PCIe™ power connectors. For optimal performance, |
|
we recommend requires one 2x3-pin and one 2x4-pin |
|
PCIe™ power connector. |
Operating |
• Windows® XP with Service Pack 2 (SP2). |
System |
• Windows® XP Professional x64 Edition. |
|
• Windows® Vista Ready. |
Monitor |
• High-resolution MultiSync or multi-frequency |
|
monitors or any other type of VGA monitor. |
|
• Digital flat-panel (DFP) displays or digital CRT |
|
display. |
ATI |
To implement an ATI CrossFireX™ configuration |
CrossFire™ |
using the ATI Radeon™ HD 4800 Series, requires: |
Requirements |
• An ATI CrossFireX™ certified motherboard with |
|
two (2) PCI Express® x16 slots and correct PCIe™ |
|
chipset driver. |
|
• A second ATI Radeon™ HD 4800 Series graphics |
|
card. |
|
• One ATI CrossFireX™ internal bridge interconnects. |
|
• A specialized PCI Express® 900 watt or greater |
|
power supply with two 2x4-pin and two 2x3-pin |
|
PCIe™ power connector is recommended. Consult |
|
your computer system manual to ensure the power |
|
supply is designed to accommodate a high-end |
|
graphics card with a peak dissipation above 150 |
|
watts. |
3
ATI Radeon™ HD 4800 Series User Manual
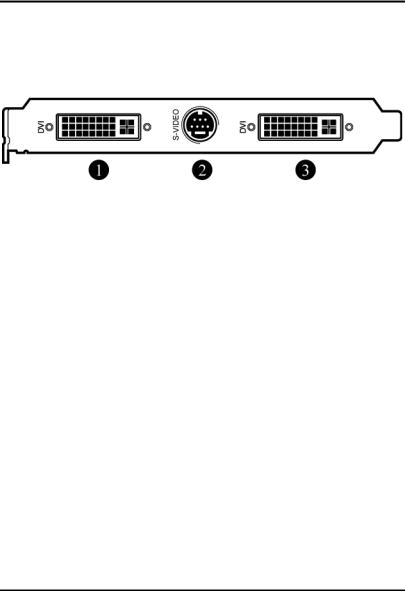
Connections
The following illustrates the connections on the ATI Radeon™ HD 4800 Series graphics card.
ATI Radeon™ HD 4800 Series Connections
1.DVI-I Dual Link
2.S-Video Connection
3.DVI-I Dual Link (HDMI™-compatible)
4
Chapter 1: Introduction
1.2Performance
The ATI Radeon™ HD 4800 series is a graphics accelerator card. Computer functions like disk access and numerical calculation are not accelerated by the ATI Radeon™ HD 4800 series. It is not unusual to obtain an overall system speed increase of 2 times for graphics-heavy applications after installing the ATI Radeon™ HD 4800 series. The speed of pure graphics operations, like dragging objects with a mouse, scrolling, and resizing, will be remarkably improved.
1.3Software Compatibility
The key function of the ATI Radeon™ HD 4800 series is its VGA compatibility. Unlike coprocessor-based, or IBM® 8514A-type display cards, the ATI Radeon™ HD 4800 series is 100% compatible with your DOS computer. This means that all DOS software will run correctly with the ATI Radeon™ HD 4800 series VGA without modification.
The VGA compatibility includes backward compatibility with the EGA, CGA and MDA standards. All DOS software will include drivers for at least one of these display types and will be fully compatible with the ATI Radeon™ HD 4800 series. The ATI Radeon™ HD 4800 series is also fully compatible with VESA BIOS extensions for resolutions higher than 640x480.
When the ATI Radeon™ HD 4800 series is used in VGA, backward compatibility, the graphics engine of the ATI Radeon™ HD 4800 series card is not used. The speed in these modes will be comparable to the fastest type of standard VGA card.
5

ATI Radeon™ HD 4800 Series User Manual
1.4Monitor Compatibility
The ATI Radeon™ HD 4800 series will work with any VGA, Super VGA or Multisync monitor.
Super VGA monitors can support IBM® standard VGA plus the 800x600 extended mode used by most VGA cards, and the 1024x768 interlaced mode used by most VGA cards and the IBM® 8514A.
Multisync monitors are more expensive and will work at all Super VGA resolutions plus additional higher resolutions or refresh rates. The most useful multisync monitor specification for determining maximum resolution and refresh capability is the horizontal frequency range. For PC use, the lower limit of the range must be no less than 30KHz. The upper limit is usually 48K Hz, 57K Hz or 64K Hz. These correspond to a maximum resolution of 1024 x 768, 60 Hz refresh, 1024 x768, 72 Hz refresh rate; and 1280x1024, 60 Hz refresh rate, respectively.
By default, the ATI Radeon™ HD 4800 series will drive your monitor at a screen refresh rate of 60 Hz. In other words, it repaints the screen 60 times per second. If the screen is not displayed properly when you boot your system, your monitor may not support the refresh rate for the resolution chosen. In this case, you must either lower the resolution to one that can be supported at 60Hz or lower the refresh rate. The maximum refresh rate supported by your monitor is specified with the Refresh Rate utility.
Refer to your manual for information on the monitor’s capabilities. If you are not sure what refresh rate is supported, you can always try a higher rate. If the screen looks good, the rate is supported (and will be easier on your eyes).
6

Chapter 2: Hardware Installation
CHAPTER 2
HARDWARE INSTALLATION
2.1What’s Included in the Package
The VGA card package includes the following:
1.VGA Card
2.Software CD which contains the necessary files
3.This User manual
2.2Installing the Card
1. Unplug the computer and remove the cover.
Shut down the computer, then turn off the power supply and any attached equipment (such as a monitor or printer).
Unplug the power cord. Remove the cover.
2. Remove the current graphics card.
If there is a graphics card currently in the computer, use the following guidelines to remove it:
Detach any cables which are attached to the current graphics card and remove the bracket screw locking the card down.
Check and release any PCI Express retainer mechanism before removing the display adapter card.
Grasp the card by the edges and pull it straight out of the motherboard slot. If the card sticks in the slot, rock it gently from end to end to dislodge it. Remember to save the screw.
7

ATI Radeon™ HD 4800 Series User Manual
Note: If the computer has a graphics chip soldered down on the motherboard, refer to the manual for the system or motherboard for information on how to disable it.
3. Insert the Graphics Accelerator card.
Locate the empty PCI Express socket on the motherboard and use the following instructions to insert the ATI Radeon™ HD 4800 Graphics Accelerator card into that socket:
Grasp the ATI Radeon™ HD 4800
Graphics Accelerator card by its edges.
Align it with the empty PCI Express
socket on the motherboard, and gently insert it into place.
Make sure that the card is pressed evenly and completely into the socket. Fasten the card with the bracket screw.
Note: Use the figure above to help locate the PCI Express (PCIe) socket on your motherboard. The exact configuration of the components on your motherboard may differ from the figure. Look for a single, smaller socket between the set of PCI sockets and the processor.
4.Reconnect all cables and replace the cover.
Plug the cable from your computer monitor into the back of the ATI Radeon™ HD 4800 Graphics Accelerator card. Make sure it is securely fastened.
Carefully replace the computer cover and plug the power cord back in.
8
Chapter 2: Hardware Installation
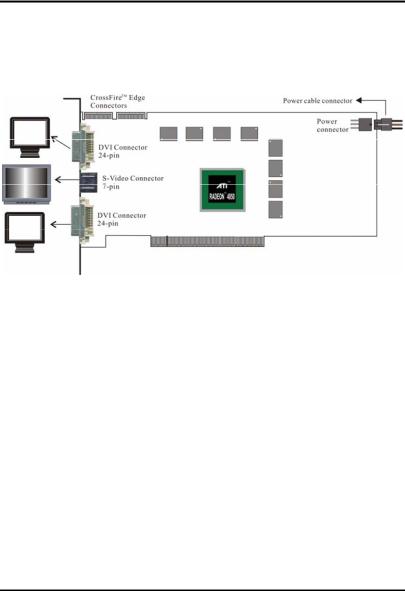
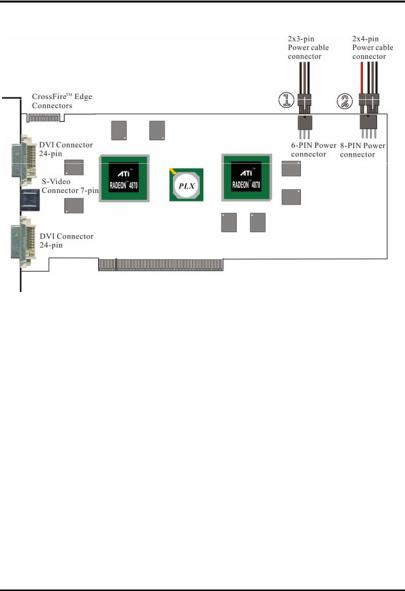
2.3Board Layout
HD485PG3
Note:
•Specialized PCI Express® 500 watt or greater power supply recommended.
•A 550 watt or greater power supply is required for CrossFire™.
•Use power supply 6-pin cable (note, power supply cable is 6- wire, not 3-wire).
9
ATI Radeon™ HD 4800 Series User Manual
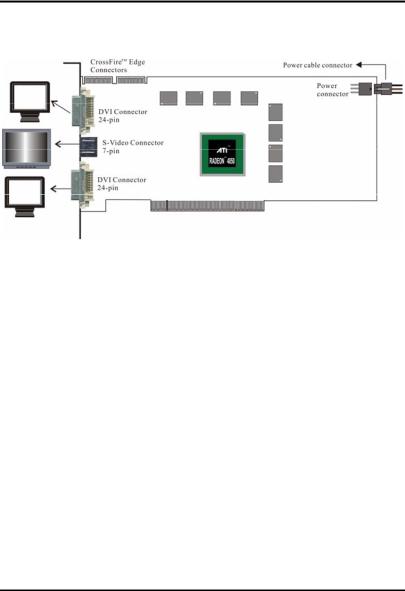
XHD485XPG3
Note:
•Specialized PCI Express® 500 watt or greater power supply recommended.
•A 550 watt or greater power supply is required for CrossFire™.
•Use power supply 6-pin cable (note, power supply cable is 6- wire, not 3-wire).
10

Chapter 2: Hardware Installation
HD487XTG5
Note:
•Power connector 1 and connector 2 should be connected to power supply unit simultaneously.
•Specialized PCI Express® 550 watt or greater power supply recommended.
•A 600 watt or greater power supply is required for CrossFire™.
•Use power supply 6-pin cable (note, power supply cable is 6- wire, not 3-wire).
11
ATI Radeon™ HD 4800 Series User Manual
HD4870X2
System Requirements
CrossFire™ technology works on AMD 790FX, AMD 790X, Intel 975X, P965, P35 , X38 and X48 motherboard.
Note:
•Power connector 1 and connector 2 should be connected to power supply unit simultaneously.
•Specialized PCI Express® 600 watt or greater power supply recommended.
•A 900 watt or greater power supply is required for CrossFire™.
•Use power supply 6-pin cable (note, power supply cable is 6- wire, not 3-wire).
12
Chapter 2: Hardware Installation
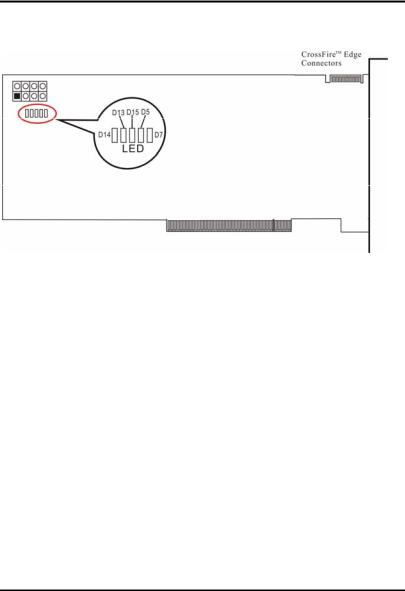
HD4870X2
D13 and D14: Identify the EXT_12V connector for inserting Power cable. D15: Identify the thermal /FAN failure.
D5 and D7: VDDC of GPU 1 and GPU 2 core voltage failure.
When the graphic card works normally the five LED don’t light up.
13

ATI Radeon™ HD 4800 Series User Manual
HD4870XG5
Note:
•Power connector 1 and connector 2 should be connected to power supply unit simultaneously.
•Specialized PCI Express® 550 watt or greater power supply recommended.
•A 600 watt or greater power supply is required for CrossFire™.
•Use power supply 6-pin cable (note, power supply cable is 6- wire, not 3-wire).
14
Chapter 2: Hardware Installation
2.4Power Supply Requirements
¾ HD4850
Power supplies with 500-Watt capacity and 30A current on 12V rail is recommended for single ATI Radeon™ HD 4850 series product.
ATI Radeon™ HD 4850 CrossFire configurations (dual graphics card system) requires 550-Watt capacity power supply, with 38A on 12V rail. CrossFire™ requires a power supply with two 6-pin Express® power connectors.
¾ HD4870
Power supplies with 550-Watt capacity, 30A current on 12V rail and two 6-pin PCI Express® power connectors is recommended for single ATI Radeon™ HD 4870 series product.
ATI Radeon™ HD 4870 series CrossFire configuration (dual graphics card system) requires 600-Watt capacity power supply with 38A on 12V rail. CrossFire™ requires a power supply with four 6-pin PCI Express® power connectors.
¾ HD4870X2
Power supplies with 600-Watt capacity, 30A current on 12V rail and one 6-pin and one 8-pin PCI Express® power connectors is recommended for single ATI Radeon™ HD 4870X2 Series product.
ATI Radeon™ HD 4870X2 series CrossFire configuration (dual graphics card system) requires 900-Watt capacity power supply with 38A on 12V rail. CrossFire™ requires a power supply with two 6-pin and two 8-pin PCI Express® power connectors.
15
ATI Radeon™ HD 4800 Series User Manual
Please consult your power supply vendor specifications to ensure your system meets the recommended functionality. CrossFire™ configurations require a CrossFire™ compliant motherboard, which includes two physical x16 PCI Express® slot interfaces.
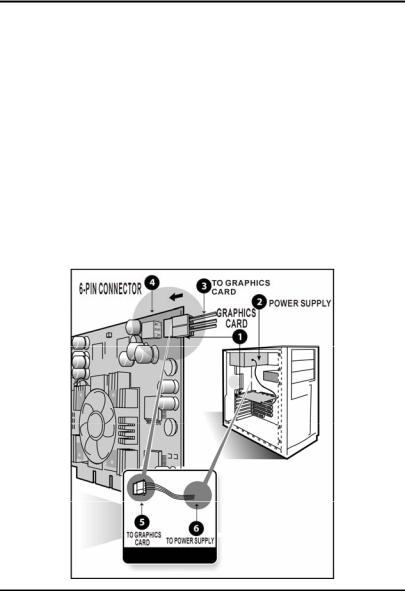
2.4.1Additional Power Connection Requirements
Note:
•use power supply 6-pin cable (note, power supply cable is 6-wire, not 3-wire)
1.The ATI Radeon™ HD 4800 series must be connected to the computer’s power supply.
16

Chapter 2: Hardware Installation
2.Remove the power cable from the hard drive
3.Connect p of the power extension cable to the graphics card power connector as shown.
4.Connect s to the power supply connector
5.After locating the PCI Express slot, and if necessary, removing the metal cover:
Align your ATI Graphics Accelerator card with the PCI Express slot
Press it in firmly until the card is fully seated.
6.Replace the screw to fasten the card in place, and replace the computer cover
7.Plug the monitor cable into your card
8.Turn on the computer and monitor
17
ATI Radeon™ HD 4800 Series User Manual
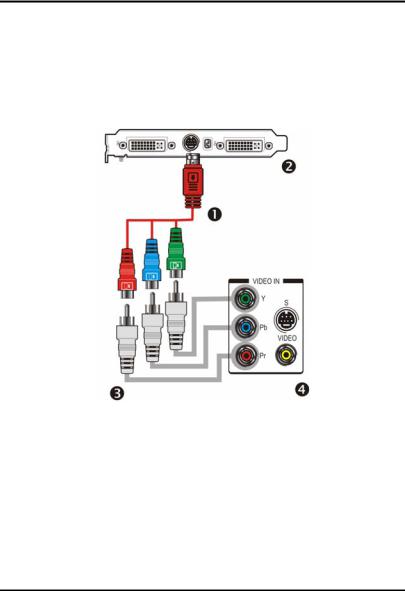
HDTV uses YPbPr connector to receive input. YPbPr stands for the following:
•Y= Green
•Pb= Blue
•Pr=Red
ATI HDTV Cable (Optional)
n ATI HDTV Video Output Cable
o Backplate of the ATI Graphics Card
p Male RCA Patch Cable – available from consumer electronics dealer q Typical HDTV Video Input Connections
Note: Input and output cables lengths should not exceed 50 feet (15m).
18
Chapter 2: Hardware Installation
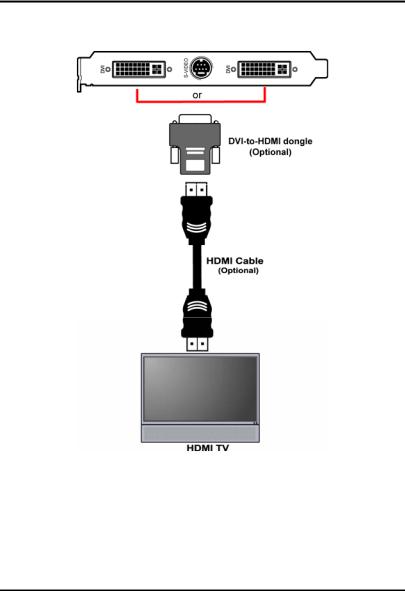
Connecting your DVI-to-HDMI dongle (optional)
19

ATI Radeon™ HD 4800 Series User Manual
2.5Multiple Monitors
Your ATI Radeon™ HD 4800 series provides dual display functionality and TV Out from a single video card. This new technology changes the way you view your PC, TV, and video graphics.
The ATI Radeon™ HD 4800 series uses HydraVision™ software to create a seamless multiple display desktop. Multiple monitor display works as one large work area. A single application can span all monitors, or many applications can occupy their own specific monitor. This feature will take your PC’s graphics and video capabilities to the next level.
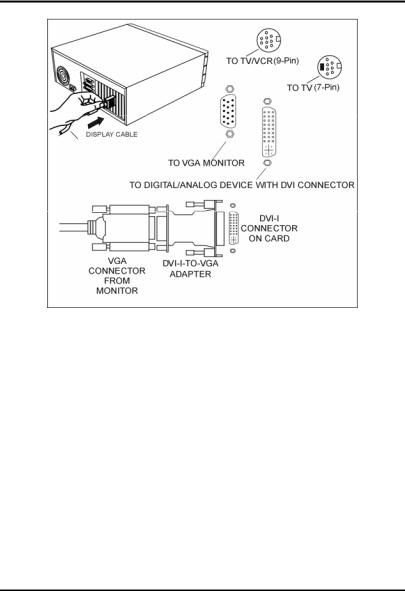
Connecting your ATI Radeon™ HD 4800 to your monitors
The ATI Radeon™ HD 4800 series provides support for two DVI-I monitors or two VGA monitors using the supplied DVI-I-to-VGA adapter. A television can also be used to expand your desktop by using the S-Video connector.
Plug the monitor cable into your card (if you are running multiple monitors, connect their cables to the appropriate connectors), then turn on the computer and monitor(s).
To connect a flat panel to the ATI Radeon™ HD 4800 series use the DVI-I connector as shown on the following page. To connect a VGA monitor to the DVI-I connector, plug the supplied DVI-I-to-VGA adapter into the DVI-I connector, then plug your monitor cable into the adapter.
When you use multiple monitors with your ATI Radeon™ HD 4800 series, one monitor will always be primary. Any additional monitor(s) will be designated as secondary.
20
Chapter 2: Hardware Installation
21

ATI Radeon™ HD 4800 Series User Manual
2.6ATI Radeon™ HD 4800 Display Configurations
The following table lists the different ways you can connect displays to your card.
Display |
Connector(s) Used |
Comments |
Configuration |
|
|
Single CRT display |
DVI-I connector with DVI- |
CRT-Cathode ray tube analog |
|
I-to-VGA adapter |
display. |
Single DFP display |
DVI-I connector |
DFPdigital flat panel display. |
Single TV |
S-Video out |
The S-Video out can also support |
|
|
a composite connection via the S- |
|
|
Video-to-Composite adapter. |
Single HDTV |
S-Video out to HDTV |
HDTV - High Definition |
display |
(YPrPb) cable |
Television |
Single HDTV |
DVI-to-HDMI™ |
The ATI Radeon™ HD 4800 |
HDMI™ display |
connector and HDMI cable |
Series supplies both audio and |
|
|
video signals to the bottom port |
|
|
on the HDMI™ DTV. |
CRT display + |
DVI-I connector with DVI- |
|
HDTV |
I to VGA adapter + S- |
|
|
Video out to HDTV |
|
|
(YPrPb) cable |
|
DFP display + TV |
DVI-I connector + S-Video |
|
|
out cable |
|
DFP display + |
DVI-I connector + S-Video |
|
HDTV |
Out to HDTV (YPrPb) |
|
|
cable |
|
CRT display + DFP |
DVI-I connector with DVI- |
|
display |
I to VGA adapter + DVI-I |
|
|
connector |
|
CRT display + CRT |
DVI-I connector with DVI- |
The TV display will “clone” the |
display |
I to VGA adapter + DVI-I |
image of one of the other two |
|
connector + S-Video Out |
displays |
|
cable |
|
CRT display + DFP |
DVI-I connector with DVI- |
|
display + HDTV |
I to VGA adapter + DVI-I |
|
|
connector + S-Video Out |
|
|
to HDTV (YPrPb) cable |
|
Note:*Both DVI ports support dual-link DVI output compatible with single-link DVI flat panel displays as well as ultra-high resolution dual-link DVI flat panel displays.
22

Chapter 3: Software Installation
CHAPTER 3
SOFTWARE INSTALLATION
The ATI Radeon™ HD 4800 series is 100% VGA compatible and as such needs no special display drivers to run application software correctly at standard VGA resolutions and color depths. However, enhanced display drivers are supplied with the VGA card because they provide accelerated performance, higher color depths and higher resolutions for software applications. The card supports resolutions up to 2048x1536, and color depths of up to 32 bits per pixel. Higher graphics resolutions and higher color depths provide greater clarity and detail when using the supplied drivers for graphics programs.
Notes:
¾Please uninstall any existing video drivers that could possibly create a conflict before attempting to install this display card.
¾Please install the driver provided by the motherboard company before you install the display driver.
¾For software MPEG support Windows XP, you must install DirectX® 9.0C (or later version) first.
23
 Loading...