


 Loading...
User Guide
A4321 / A6421 Series
E13087
Revised Edition V2
June 2017
COPYRIGHT INFORMATION
No part of this manual, including the products and software described in it, may be reproduced, transmitted, transcribed, stored in a retrieval system, or translated into any language in any form or by any means, except documentation kept by the purchaser for backup purposes, without the express written permission of ASUSTeK COMPUTER INC. (“ASUS”).
ASUS PROVIDES THIS MANUAL “AS IS”WITHOUT WARRANTY OF ANY KIND, EITHER EXPRESS OR IMPLIED, INCLUDING BUT NOT LIMITED TO THE IMPLIED WARRANTIES OR CONDITIONS OF MERCHANTABILITY OR FITNESS FOR A PARTICULAR PURPOSE. IN NO EVENT SHALL ASUS, ITS DIRECTORS, OFFICERS, EMPLOYEES OR AGENTS BE LIABLE FOR ANY INDIRECT, SPECIAL, INCIDENTAL, OR CONSEQUENTIAL DAMAGES (INCLUDING DAMAGES FOR LOSS OF PROFITS, LOSS OF BUSINESS, LOSS OF USE OR DATA, INTERRUPTION OF BUSINESS AND THE LIKE), EVEN IF ASUS HAS BEEN ADVISED OF THE POSSIBILITY OF SUCH DAMAGES ARISING FROM ANY DEFECT OR ERROR IN THIS MANUAL OR PRODUCT.
Products and corporate names appearing in this manual may or may not be registered trademarks or copyrights of their respective companies, and are used only for identification or explanation and to the owners’ benefit, without intent to infringe.
SPECIFICATIONS AND INFORMATION CONTAINED IN THIS MANUAL ARE FURNISHED FOR INFORMATIONAL USE ONLY, AND ARE SUBJECT TO CHANGE AT ANY TIME WITHOUT NOTICE, AND SHOULD NOT BE CONSTRUED AS A COMMITMENT BY ASUS. ASUS ASSUMES NO RESPONSIBILITY OR LIABILITY FOR ANY ERRORS OR INACCURACIES THAT MAY APPEAR IN THIS MANUAL, INCLUDING THE PRODUCTS AND SOFTWARE DESCRIBED IN IT.
Copyright © 2017 ASUSTeK COMPUTER INC. All Rights Reserved.
LIMITATION OF LIABILITY
Circumstances may arise where because of a default on ASUS’ part or other liability, you are entitled to recover damages from ASUS. In each such instance, regardless of the basis on which you are entitled to claim damages from ASUS, ASUS is liable for no more than damages for bodily injury (including death) and damage to real property and tangible personal property; or any other actual and direct damages resulted from omission or failure of performing legal duties under this Warranty Statement, up to the listed contract price of each product.
ASUS will only be responsible for or indemnify you for loss, damages or claims based in contract, tort or infringement under this Warranty Statement.
This limit also applies to ASUS’ suppliers and its reseller. It is the maximum for which ASUS, its suppliers, and your reseller are collectively responsible.
UNDER NO CIRCUMSTANCES IS ASUS LIABLE FOR ANY OF THE FOLLOWING: (1) THIRD-PARTY CLAIMS AGAINST YOU FOR DAMAGES; (2) LOSS OF, OR DAMAGE TO, YOUR RECORDS OR DATA; OR (3) SPECIAL, INCIDENTAL, OR INDIRECT DAMAGES OR FOR ANY ECONOMIC CONSEQUENTIAL DAMAGES (INCLUDING LOST PROFITS OR SAVINGS), EVEN IF ASUS, ITS SUPPLIERS OR YOUR RESELLER IS INFORMED OF THEIR POSSIBILITY.
SERVICE AND SUPPORT
Visit our multi-language web site at https://www.asus.com/support/
|
|
|
2 |
ASUS All-in-One PC |
|
Contents |
|
About this manual..................................................................................................... |
6 |
Conventions used in this manual......................................................................... |
7 |
Typography....................................................................................................................... |
7 |
Icons..................................................................................................................................... |
8 |
Safety information..................................................................................................... |
9 |
Setting up your system................................................................................................. |
9 |
Care during use................................................................................................................ |
9 |
Sound Pressure Warning.............................................................................................. |
11 |
DC Fan Warning............................................................................................................... |
11 |
Package contents....................................................................................................... |
12 |
Chapter 1: Hardware Setup |
|
Getting to know your ASUS All-in-One PC........................................................ |
13 |
Front view.......................................................................................................................... |
13 |
Side views..................................................................................................................... |
16 |
Left side view.................................................................................................................... |
16 |
Right side view................................................................................................................. |
16 |
Rear view....................................................................................................................... |
18 |
Chapter 2: Using your ASUS All-in-One PC |
|
Placing on the desktop............................................................................................ |
21 |
Setting up your ASUS All-in-One PC.................................................................... |
22 |
Connecting the wired keyboard and mouse........................................................ |
22 |
Connecting the wireless keyboard and mouse (optional)............................... |
23 |
Powering on the system............................................................................................... |
24 |
Using the touch screen............................................................................................ |
26 |
Gestures for the touch screen panel................................................................... |
27 |
Using touch screen panel gestures on Windows® 10........................................ |
27 |
ASUS All-in-One PC |
3 |
Chapter 3: Working with Windows® 10 |
|
Starting for the first time......................................................................................... |
31 |
Start menu.................................................................................................................... |
32 |
Launching the Start menu........................................................................................... |
33 |
Opening programs from the Start menu............................................................... |
33 |
Windows® apps............................................................................................................ |
34 |
Working with Windows® apps.................................................................................... |
35 |
Customizing Windows® apps..................................................................................... |
35 |
Task view....................................................................................................................... |
38 |
Snap feature................................................................................................................. |
39 |
Snap hotspots.................................................................................................................. |
39 |
Action Center............................................................................................................... |
41 |
Other keyboard shortcuts....................................................................................... |
42 |
Connecting to wireless networks......................................................................... |
44 |
Wi-Fi..................................................................................................................................... |
44 |
Bluetooth .......................................................................................................................... |
45 |
Connecting to wired networks.............................................................................. |
46 |
Configuring a dynamic IP/PPPoE network connection..................................... |
46 |
Configuring a static IP network connection.......................................................... |
47 |
Turning your ASUS All-in-One PC off.................................................................. |
48 |
Putting your ASUS All-in-One PC to sleep......................................................... |
49 |
Chapter 4: Recovering your system |
|
Entering the BIOS Setup.......................................................................................... |
51 |
Quickly enter the BIOS.................................................................................................. |
51 |
Recovering your system........................................................................................... |
52 |
Performing a recovery option.................................................................................... |
53 |
Chapter 5: Repairing or Modifying your ASUS All-in-One PC |
|
Installing a RAM module......................................................................................... |
55 |
Removing and replacing the Hard Disk Drive (HDD) ................................... |
59 |
|
|
|
4 |
ASUS All-in-One PC |
|
Appendices |
|
Notices........................................................................................................................... |
63 |
Federal Communication Commission Interference Statement...................... |
63 |
RF exposure warning..................................................................................................... |
64 |
Canadian Department of Communications Statement.................................... |
65 |
IC Radiation Exposure Statement for Canada....................................................... |
65 |
Canada, Industry Canada (IC) Notices...................................................................... |
65 |
Radio Frequency (RF) Exposure Information........................................................ |
66 |
Canada, avis d’Industry Canada (IC) ........................................................................ |
66 |
Déclaration d’exposition aux radiations................................................................. |
66 |
Wireless Operation Channel for Different Domains........................................... |
67 |
IC........................................................................................................................................... |
67 |
CE Mark Warning............................................................................................................. |
67 |
REACH.................................................................................................................................. |
69 |
Global Environmental Regulation Compliance and Declaration................... |
69 |
ASUS Recycling/Takeback Services.......................................................................... |
69 |
Coating Notice................................................................................................................. |
70 |
Rechargeable Battery Recycling Service in North America............................. |
70 |
Prevention of Hearing Loss ......................................................................................... |
70 |
ENERGY STAR complied product............................................................................... |
71 |
TCO Certification (for A6421 only)............................................................................ |
72 |
ASUS All-in-One PC |
5 |
About this manual
This manual provides information about the hardware and software features of your ASUS All-in-One PC, organized through the following chapters:
Chapter 1: Hardware Setup
This chapter details the hardware components of your ASUS All- in-One PC.
Chapter 2: Using your ASUS All-in-One PC
This chapter provides you with information on using your ASUS All-in-One PC.
Chapter 3: Working with Windows® 10
This chapter provides an overview of using Windows® 10 in your ASUS All-in-One PC.
Chapter 4: Recovering your system
This chapter provides recovery options for your ASUS All-in-One PC.
Chapter 5: Repairing or Modifying your ASUS All-in-One PC
This chapter guides you through the process of repairing and modifying parts of your All-in-One PC.
Appendices
This section includes notices and safety statements for your ASUS
All-in-One PC.
|
|
|
6 |
ASUS All-in-One PC |
|

Conventions used in this manual
To highlight key information in this manual, some texts are presented as follows:
IMPORTANT! This message contains vital information that must be followed to complete a task.
NOTE: This message contains additional information and tips that can help complete tasks.
WARNING! This message contains important information that must be followed to keep you safe while performing tasks and prevent damage to your device’s data and components.
Typography
Bold =This indicates a menu or an item that must be selected.
Italic = This indicates sections that you can refer to in this manual.
ASUS All-in-One PC |
7 |

Icons
The icons below indicate the devices you can use for completing a series of tasks or procedures on your ASUS All-in-One PC.
= (optional) Use the touch screen panel.
= (optional) Use the wireless mouse.
= (optional) Use the wireless keyboard.
All illustrations and screenshots in this manual are for reference only. Actual product specifications and software screen images may vary with territories. Visit the ASUS website at www.asus.com for the latest information.
|
|
|
8 |
ASUS All-in-One PC |
|
Safety information
Your ASUS All-in-One PC is designed and tested to meet the latest standards of safety for information technology equipment. However, to ensure your safety, it is important that you read the following safety instructions.
Setting up your system
•Read and follow all instructions in the documentation before you operate your system.
•Do not use this product near water or a heated source such as a radiator.
•Set up the system on a stable surface.
•Openings on the chassis are for ventilation. Do not block or cover these openings. Ensure that you leave plenty of space around the system for ventilation. Never insert objects of any kind into the ventilation openings.
•Use this product in environments with ambient temperatures between 0°C and 40°C.
•If you use an extension cord, ensure that the total ampere rating of the devices plugged into the extension cord does not exceed its ampere rating.
Care during use
•Do not walk on the power cord or allow anything to rest on it.
•Do not spill water or any other liquids on your system.
•When the system is turned off, a small amount of electrical current still remains in the product. Always unplug all power, modem, and network cables from the power outlets before cleaning the system.
ASUS All-in-One PC |
9 |
•The touch screen requires periodic cleaning to perform at optimal touch sensitivity. Keep the screen clean from foreign objects or excessive dust accumulation. To clean the screen:
-Turn off the system and disconnect the power cord from the wall.
-Spray a small amount of household glass cleaner on the supplied cleaning cloth and gently wipe the surface of the screen.
-Do not spray the cleaner directly on the screen.
•Do not use an abrasive cleaner or a coarse cloth when cleaning the screen.
•If you encounter the following technical problems with the product, unplug the power cord and contact a qualified service technician or your retailer.
-The power cord or plug is damaged.
-Liquid has been spilled into the system.
-The system does not function properly even if you follow the operating instructions.
-The system was dropped or the cabinet is damaged.
-The system performance changes.
|
|
|
10 |
ASUS All-in-One PC |
|
Sound Pressure Warning
Excessive sound pressure from earphones or headphones can cause hearing loss or permanent damage to hearing. Increasing the volume and equalizer beyond default levels increases the output voltage and sound pressure produced by the earphones or headphones.
DC Fan Warning
Please note that the DC fan is a moving part and can cause harm when used improperly. Keep away from the fan when using the product.
ASUS All-in-One PC |
11 |
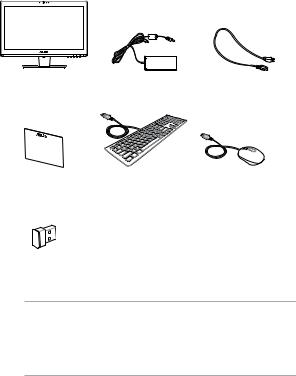
Package contents
ASUS All-in-One PC |
AC adapter |
Power cord |
Warranty card |
Keyboard (optional) |
Mouse (optional) |
KBM USB receiver dongle (optional)
NOTE:
•If any of the items is damaged or missing, contact your retailer.
•The keyboard, mouse, and power supply illustrations are for reference only. Actual product specifications may vary with territories.
|
|
|
12 |
ASUS All-in-One PC |
|
Chapter 1: Hardware Setup
Getting to know your ASUS All-in- One PC
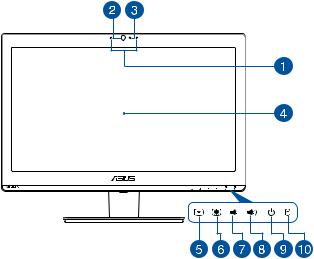
Front view
ASUS All-in-One PC |
13 |
Microphone
This built-in microphone can be used for video conferencing, voice narration, audio recording, and multimedia applications.
NOTE: The function of the left microphone is available on selected models.
Camera
The built-in camera allows you to take pictures or record videos using your ASUS All-in-One PC.
Webcam LED
Indicates that the built-in webcam is enabled.
LCD display panel
The LCD display panel provides excellent viewing features for photos, videos, and other multimedia files.
On selected models, multi-touch is supported. You can operate your ASUS All-in-One PC using touch gestures.
Brightness down button
Press this button to decrease the brightness of your ASUS All-in-One PC.
Brightness up button
Press this button to increase the brightness of your ASUS All-in-One PC.
Volume decrease button
Press to decrease the volume.
Volume increase button
Press to increase the volume.
|
|
|
14 |
ASUS All-in-One PC |
|

Power button
Press this button to turn on your ASUS All-in-One PC.
Drive activity indicator
This indicator lights up when your ASUS All-in-One PC is accessing the internal storage drives.
ASUS All-in-One PC |
15 |
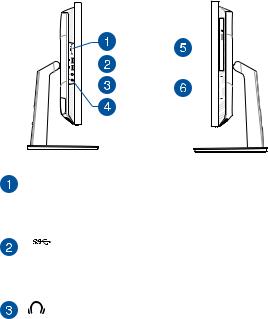
Side views
Refer to the following diagrams to identify the components on both sides of the system.
Left side view |
Right side view |
||||||||||||
|
|
|
|
|
|
|
|
|
|
|
|
|
|
|
|
|
|
|
|
|
|
|
|
|
|
|
|
|
|
|
|
|
|
|
|
|
|
|
|
|
|
|
|
|
|
|
|
|
|
|
|
|
|
|
|
|
|
|
|
|
|
|
|
|
|
|
|
|
|
|
|
|
|
|
|
|
|
|
|
|
|
|
|
|
|
|
|
|
|
|
|
|
|
|
|
|
|
|
|
|
|
|
|
|
|
|
|
|
|
|
|
|
|
|
|
|
|
|
|
|
|
|
|
|
|
|
|
|
|
|
|
|
|
|
|
|
|
|
|
 Memory card reader
This ASUS All-in-One PC has a built-in memory card reader slot that supports MMC, SD, SDHC, SDXC, MS and MS PRO cards.
USB 3.1 Gen1 port
This USB 3.1 Gen1 (Universal Serial Bus) port provides a transfer rate of up to 5 Gbit/s and is backward compatible to USB 2.0.
Headphone jack
This port allows you to connect amplified speakers or headphones.
|
|
|
16 |
ASUS All-in-One PC |
|

Microphone jack
The microphone jack is designed to connect to a microphone used for video conferencing, voice narrations, or simple audio recordings.
Optical Drive (optional)
This support compact discs (CD), digital video discs (DVD), and/or Blu-ray discs (BD), and recordable (R) or rewritable (RW) discs. Consult product specifications for details on included optical drive.
Smart Card Slot (optional)
This ASUS All-in-One PC has a built-in smart card reader that can conveniently read data from and write data to a smart card.
ASUS All-in-One PC |
17 |

Rear view
Refer to the following diagram to identify the components on this side of the system.

 Power input
The bundled power adapter converts AC power to DC power for use with this jack. Power supplied through this jack supplies power to the ASUS All-in-One PC. To prevent damage to the ASUS All-in-One PC, always use the bundled power adapter.
WARNING! The power adapter may become warm or hot when in use. Do not cover the adapter and keep it away from your body.
|
|
|
18 |
ASUS All-in-One PC |
|

LAN port
The eight-pin RJ-45 LAN port supports a standard Ethernet cable for connection to a local network
Serial port (COM port)
The 9-pin serial (COM) connector allows you to connect devices that have serial ports such as mouse, modem, or printers.
VGA port
This port allows you to connect your ASUS All-in-One PC to an external display.


 HDMI output port
This port allows you to connect your ASUS All-in-One PC to another HDMI-compatible device for file sharing or extending your display monitor.
USB 3.1 Gen1 port
This USB 3.1 Gen1 (Universal Serial Bus) port provides a transfer rate of up to 5 Gbit/s and is backward compatible to USB 2.0.
USB 2.0 port
This USB (Universal Serial Bus) port is compatible with USB 2.0 or USB 1.1 devices such as keyboards, pointing devices, flash disk drives, external HDDs, speakers, cameras and printers.
ASUS All-in-One PC |
19 |

Air vents
The air vents allow cool air to enter and warm air to exit the ASUS All-in-One PC.
WARNING! Ensure that paper, books, clothing, cables, or other objects do not block any of the air vents or else overheating may occur.
Cable holder
Use this cable holder to organize your cables behind the All-in-One PC.
Kensington® security slot
The Kensington® security slot allows you to secure your ASUS All-in-One PC using Kensington® compatible security products.
Manual back cover lock
The manual back cover lock is used to keep the back cover secured. This lock should be manually moved to an unlocked position to remove the back cover.
|
|
|
20 |
ASUS All-in-One PC |
|
Chapter 2: Using your ASUS All- in-One PC
Placing on the desktop
Place your ASUS All-in-One PC on a flat surface such as a table or desk, and pull the stand open until it snaps in place. Then, tilt the display panel to an angle of between -5 and 30 degrees from an upright position.
-5O
30O
ASUS All-in-One PC |
21 |
Setting up your ASUS All-in-One PC
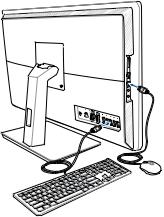
Connecting the wired keyboard and mouse
Connect the keyboard and mouse to the USB ports on the rear panel. You may also connect the keyboard and mouse to the USB port on the side panel if the keyboard and mouse cable is not long enough.
|
|
|
22 |
ASUS All-in-One PC |
|
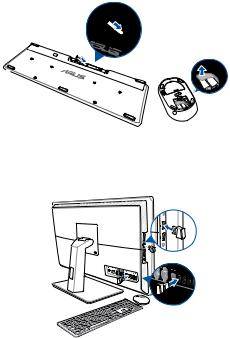
Connecting the wireless keyboard and mouse (optional)
1.Install batteries into the wireless keyboard and mouse.
2.Connect the wireless dongle for keyboard and mouse to the USB port.
3.You can begin using the wireless keyboard and mouse.
ASUS All-in-One PC |
23 |
Loading...