

Page 1
INSTRUCTIONS FOR THE DEALER INSTRUCTIONS FOR THE DEALER
RST Futura
RST Futura
RST FuturaRST Futura
8
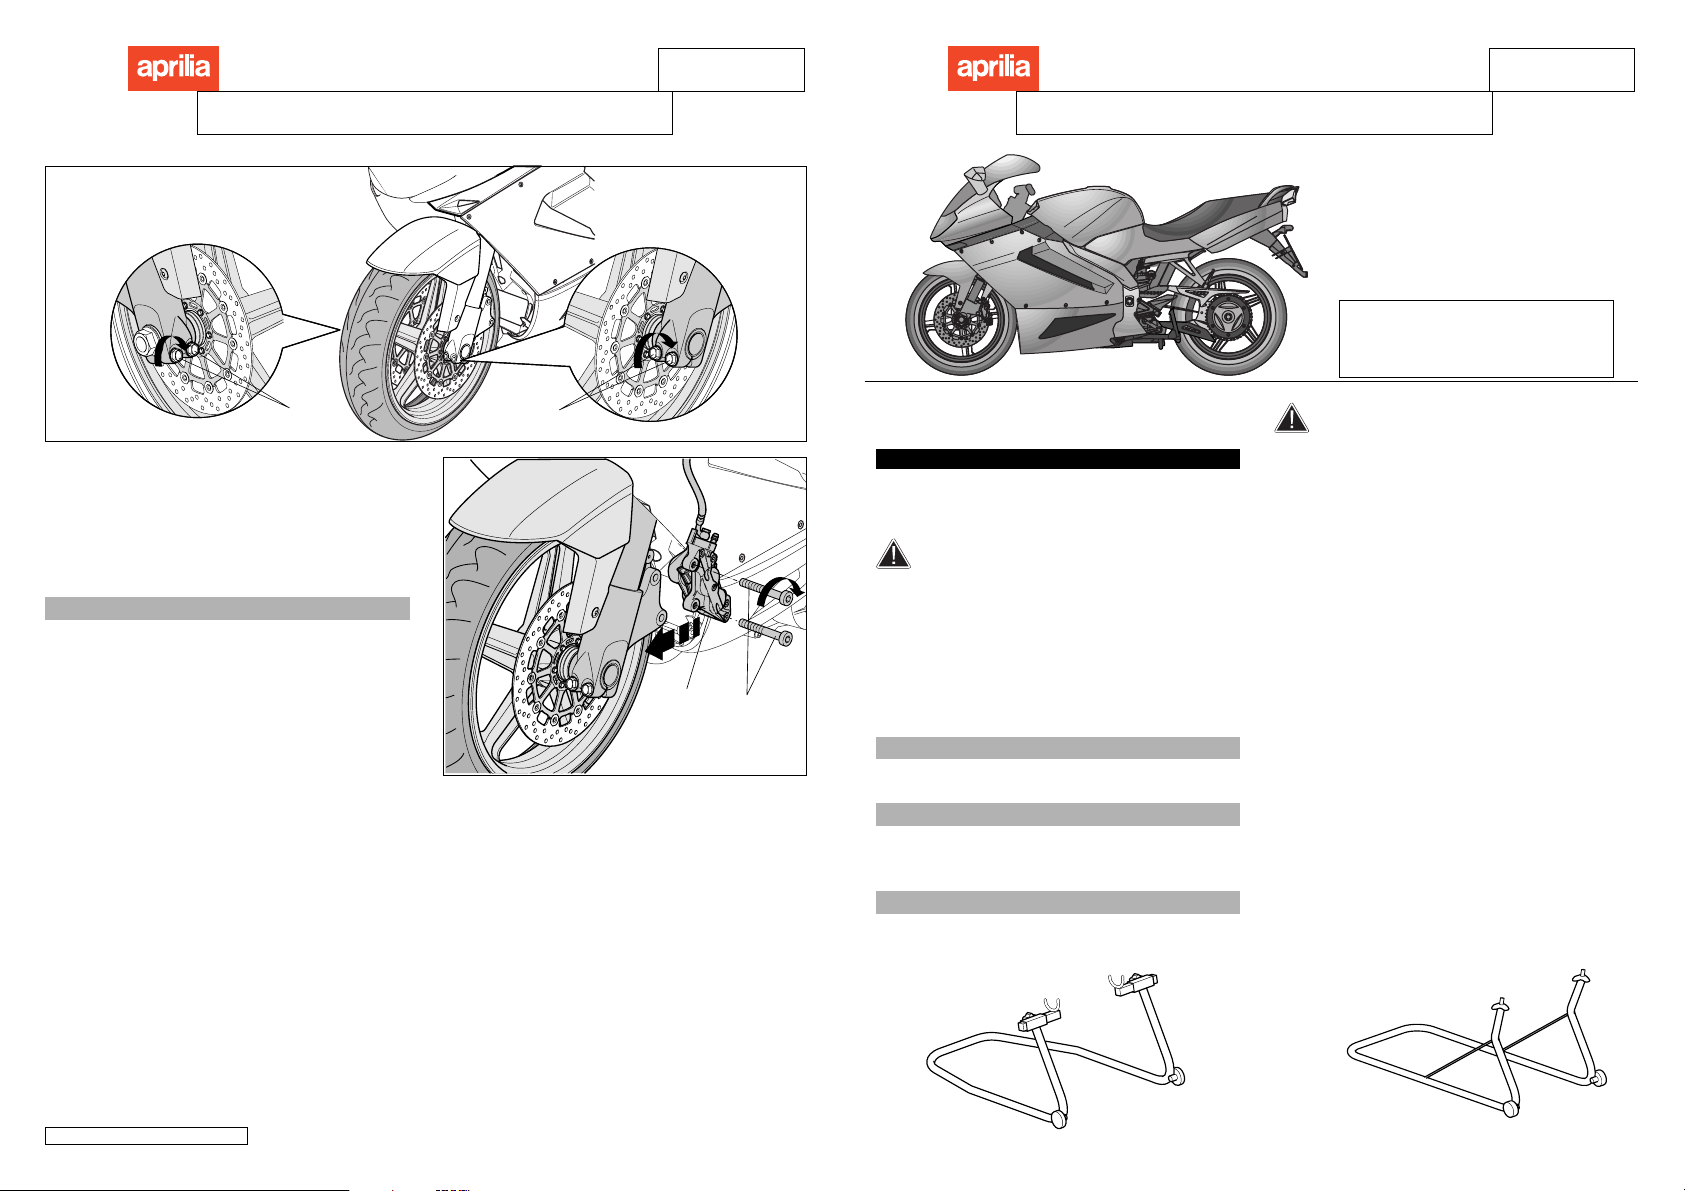
• Loosen the left-hand terminal screws. Reset the
motor cycle by dry running the suspension two or three
times to line up the rods.
• Secure the screws (5) and (8) in the left-hand and
right-hand terminals.
Screw (5 - 8) tightening torque: 16,22 ftlb (22 Nm).
CAUTION
The screws in the terminals are elastic: tighten one
then the other, then re-tighten the first.
5
9
10
• Fit the left-hand brake gripper (9) securing the
screws (10).
Repeat for the right-hand brake gripper.
Screw (10) tightening torque: 36,87 ftlb (50 Nm).
• Reset the brake grippers, pulling the brake lever on
the handlebar twice.
INSTRUCTIONS FOR REMOVING
MOTORCYCLE FROM CRATE
SAFETY MESSAGES
The following warning messages are used on all the
instruction sheets to draw your attention to the situations
described below.
Safety warning symbol. When you see this
symbol on the motorcycle or instruction sheets,
beware of potential injury hazards.
Failure to observe the instructions following these
symbols may affect your safety, the safety of
others and that of the motor cycle!
Risk of serious injury or death.
Possible risk of slight injury or damage
to motor cycle.
DANGER
Risk of serious injury or death.
CAUTION
Possible risk of slight injury or damage to motor
cycle.
IMPORT ANT
The word “IMPORT ANT”is written before any important
information on the instruction sheet.
For the sake of safety, before starting the
vehicle, carry out a thorough preliminary check.
See the PRELIMINARY CHECK LIST IN THE
VEHICLE OPERATION AND MAINTENANCE
HANDBOOK.
Failure to carry out these checks may lead to
serious injury or damage to the vehicle.
Very little time is required, and the benefits in terms
of safety are enormous.
The components in this handbook are supplied
disassembled, and have to be fitted to the motor cycle.
These instruction sheets for dealers describe the
correct fitting procedures.
Read the instructions in the sheets to avoid
breakages or incorrect assembly.
Remove the bag containing the mirrors and other loose
parts (i.e. not fitted to the motor cycle body) from the
crate.
After removing the nailed-on supports and crosspieces
from the crate (used for transport purposes), push the
motor cycle off the bottom of the crate and position it
on the stand.
Y ou can now proceed with the operations
described below.
aprilia part #8104327 - 04/01 - USA
Pag. 4
Pag. 1
Page 2

INSTRUCTIONS FOR THE DEALER INSTRUCTIONS FOR THE DEALER
RST FuturaRST Futura
1
BATTERY
DANGER
Battery electrolyte is toxic, caustic and the contact
with the skin may cause serious burns, since it
contains sulfuric acid. Wear protective clothing, a
face shield and/or tight fitting goggles when
working around the battery. In case of cont act with
the skin, flush immediately with plenty of water.
In case of contact with the eyes, flush with plenty
of water for at least 15 minutes. Immediately
consult an optician.
If the electrolyte is accidentally swallowed, drink
large quantities of water or milk, and then milk of
magnesia or vegetable oil. Immediately consult a
health professional. The battery gives off noxious
and explosive gases; keep it away from cigarettes,
flames, sparks and any other source of heat.
During the recharging or the use, make sure that
the room is properly ventilated and avoid inhaling
the gases released during the recharging. KEEP
AW A Y FROM CHILDREN. Do not tip the vehicle too
much, or tip the battery too much, to avoid
electrolyte leaking out.
CAUTION
The battery liquid is corrosive. Do not pour or
sprinkle it, particularly on plastic parts. When the
battery has been removed it must be placed in a
safe place out of the reach of children. The battery
is very dangerous and may cause serious injury
or death.
2
3
2
5
4
INITIAL BATTERY CHARGING
CAUTION
• Remove the saddle from its housing turning the key
(1) clockwise.
• Remove the two screws (2) TBEI M 5x16 from the
battery compartment cover (3) and remove the
battery.
• Detach the battery recharge container (5) from the
license plate holder and remove the plug (4).
• Fit the battery container as shown in the drawing.
• Use the same plug (4) to close up battery holes.
4
FITTING THE BATTERY
CAUTION
• Make sure the ignition
key is in the “ “ position.
• Place the battery into its housing.
• First connect the positive cable (+ red) then the ne-
gative (- blue).
• Make sure the two attachments (6) of the positive
and negative poles are fitted towards the outside of
the battery as shown in the diagram.
• Cover the terminals and lead ends with neutral grease
or vaseline.
• Fit the battery cover and secure with the screws (2)
TBEI M 5x16. Fit the saddle.
Screw (2) tightening torque: 1,47 ftlb (0,2 Nm)
6
RED
BLUE
7
6
4
3
5
2
1
FITTING THE FRONT WHEEL
DANGER
Before carrying out any maintenance operation or
inspection of the front wheel, if possible hoist the
vehicle onto a solid and level surface with suitable
equipment.
When disassembling and reassembling the front
wheel, take extra care not to damage the brake
lines, discs or pads.
IMPORT ANT
IMPORTANT T o fit the front wheel, you may require a
helper.
• Fit the front stand (1) sliding it onto the rod hubs.
CAUTION
Make sure the right-hand spacer (4) and the lefthand spacer (3) are properly positioned in their
housings.
Check the direction the wheel rotates in (see
arrows).
• Fit the wheel and pin (2).
• Fit the screws (5) of the left-hand rod terminal to
prevent the pin rotating.
• Fit the washer (6) and secure the nut (7).
Screw (7) tightening torque: 59,0 ftlb (80 Nm).
• Remove the stand.
Pag. 2 Pag. 3
 Loading...