

Page 1
safe drive
Page 2
"!3)#3!&%4925,%3
The instructions given below cover normal
operation of your vehicle and must be
carefully observed. By following these
rules you will enhanc e your ow n safet y and
the safety of those around you. You will
also maximize the life and utility of your vehicle.
Two wheeled vehicles obvio usly do not
provide some of the protection provided by
automobiles, therefore it is essential that
you wear appropriate protective clothing.
Especially, never operate yo ur vehicle
without wearing your helmet, gloves, eye
protection, a he avy j ac ke t, s tu rdy footwear,
and sturdy full length pants.
However, do n ot assume that even t he
best clothing and helmet will protect you in
the event of an upset or a cr ash with anoth er vehicle. At best, this gear provides
some protection from scrapes and scratches, but very little, if any, impact protection.
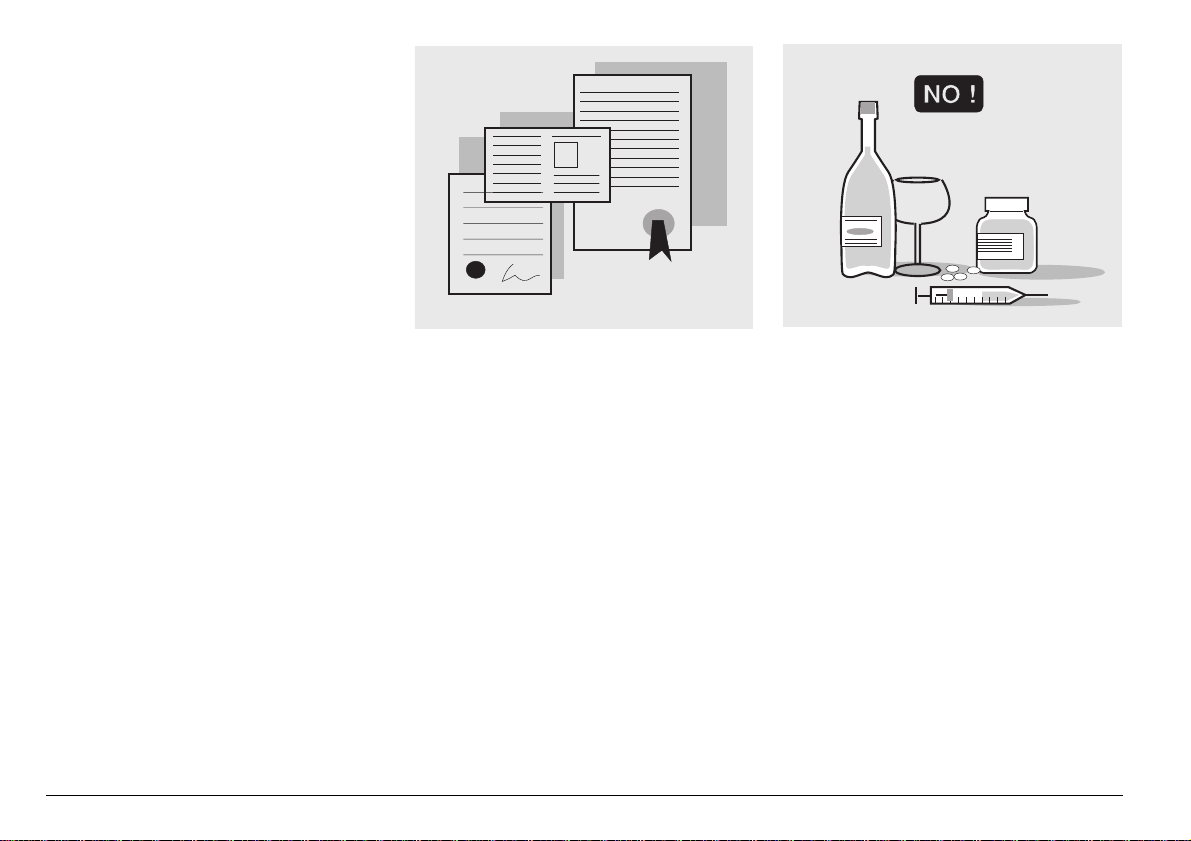
Be sure that you meet all the requirements
prescribed by local law, including driver’s license, minimum age , training, insura nce,
taxes, vehi cle registr ation, license plat e,
etc.
When you first receive your vehicle, practice by riding in areas where there is little
traffic. Do not attempt to ride in heavy traffic until you are thoroughly experienced
and riding your vehicle has become second nature to you.
Although this vehicle is legal for operation
on freeways and expressways, it is advis-
use and maintenance Pegaso 650
18
-
able to not ride on these high speed highways until you are thoroughly familiar with
your vehicle, and have attained a high degree of skill in its operation.
A new vehicle must be car efully broken in,
see p. 56 (RUNNING-IN).
Before starting the engine, make sure that
the brakes, clutch, transmission and throttle controls fu nction properl y and that the
fuel and oil supply is adequate.
The exhaust system, brakes, and some
other parts of the vehicle become very hot
during operation. Do not to uch any of
these part s.
Some medicines or drugs, illega l or prescription, and alcohol significantly increase
the risk of accidents. Do no t rid e whi le y ou
are under the influen ce of a lco ho l or drug s,
be they illicit or prescription. Make sure
you are in good physical condition and not
ill before ri ding your vehicl e. Do not ride
your vehicle when you are particularly tired
or fatigued. Alcohol, drugs and fatigue are
leading causes of vehicle accidents.
Many accidents are caused by the rider’ s
inexperience and lack of training. Do not
ride your vehicle until you have received
training from a recognized training organization such as the Motorcycle Safety
Foundation. Remember that riding a two
wheeled vehicle, though easy and fun, is
quite different from driving a car. Do not
assume that you can operate your vehicle
safely just because you are a competent
automobile driver.
Never lend your vehicle to others unless
you are sure that they are competent and
properly licensed vehicle operators.
Page 3
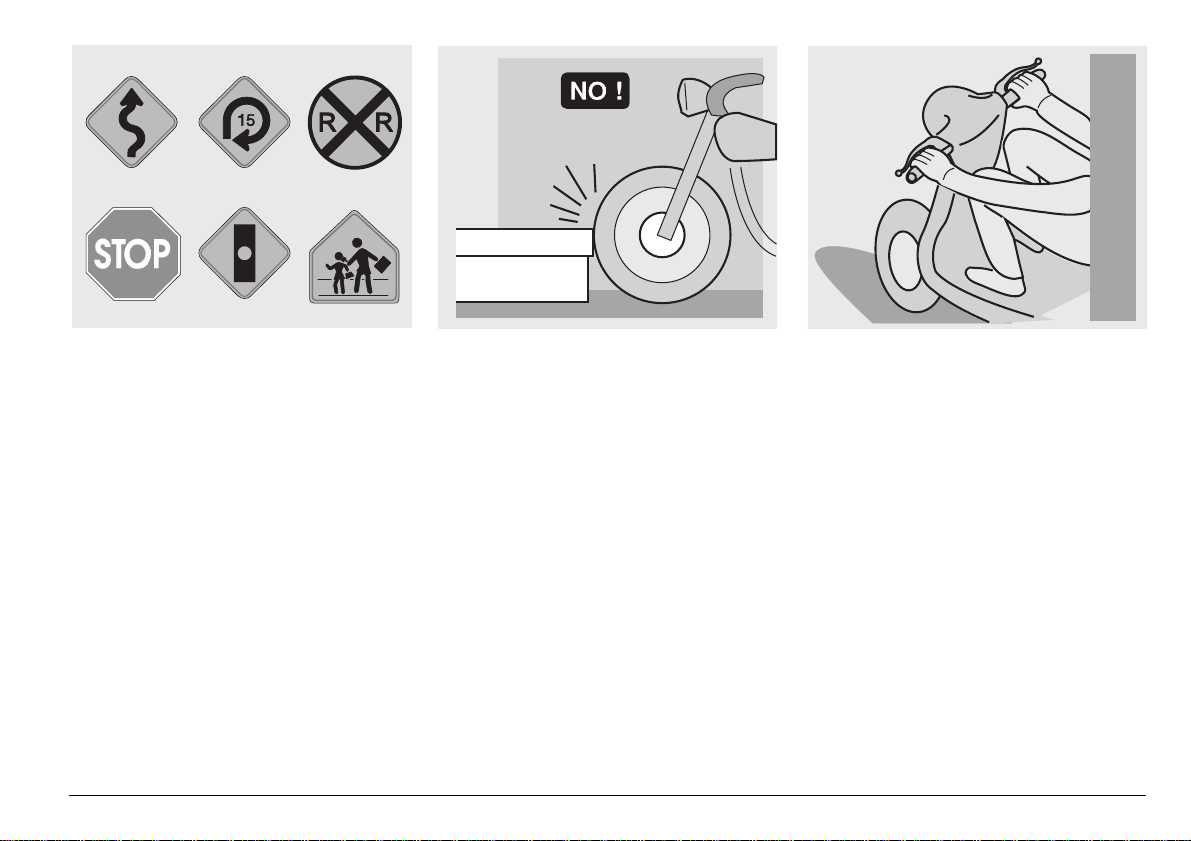
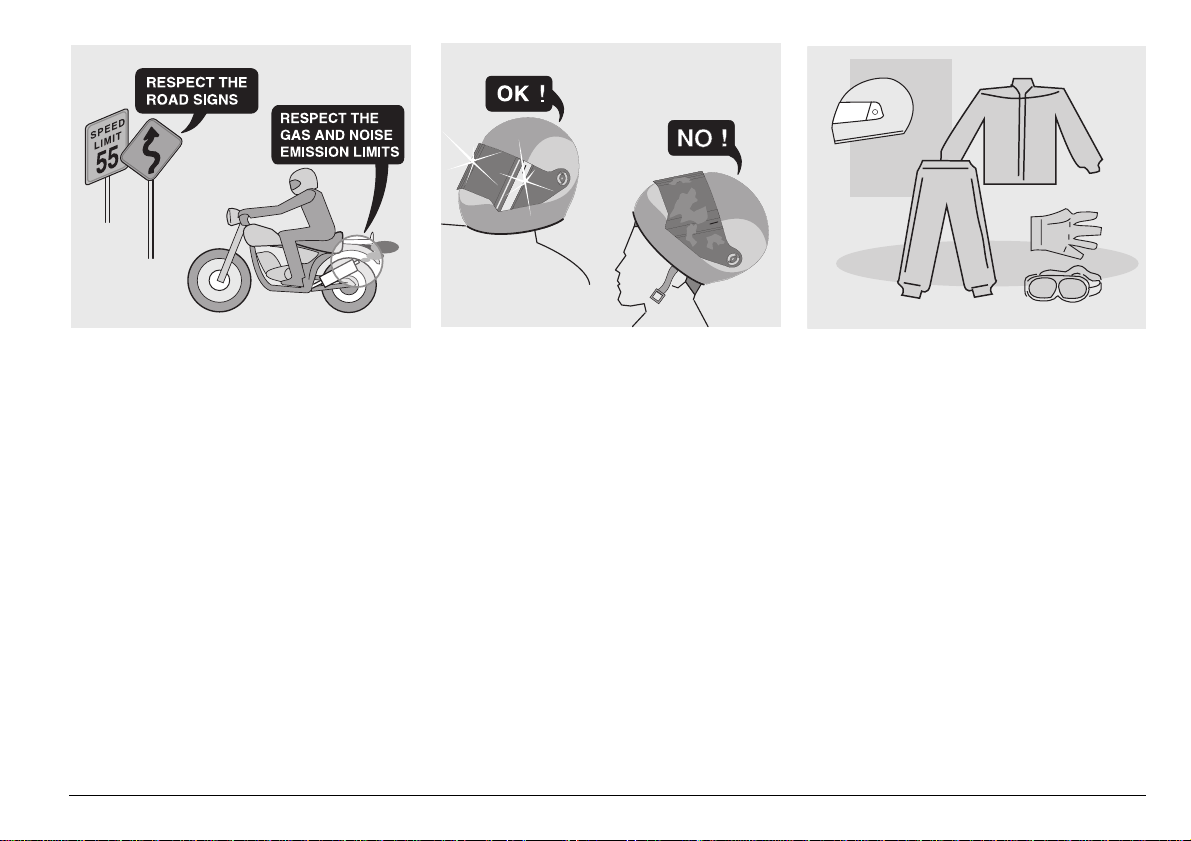
Observe all rules of the road. Particularly
pay attention to all warning, regulatory and
informational signs.
Avoid showing off (i.e., popping wheelies).
Especially observ e sp eed l im its , rem ember
that road conditions change with the
weather and wet and icy p avements are
particularly dangerous for vehicles, especially if you are riding too fast. Remember
that automobile drivers have a hard time
seeing two wheeled vehicles, so always
give the automobil e the right o f way, even if
it is legally yours.
Before changing lane, look over your
shoulder to make sure that the way is
clear. Do not rely exclusively on the rearview mirror: you may miscalculate the distance and speed of a vehicle, or you may
even not see it at all.
Avoid obstacles that could damage the vehicle or make you lose control.
Do not tailgate, do not attempt to incre ase
your gas mileage by following in the slip
stream of cars or trucks in front of you.
In case of accident motorcycles, scooters
and mopeds do not provide the same degree of protection ensu red by auto mo bil es .
The legs, in part icula r, are ex pose d the ri sk
of being injured. However, the additional
installation of leg guards may actually increase the risk of injuries and thei r seriousness in case of accident.
Do not install leg gu ards available on the
market of spare parts an d accessories.
Non-compliance with these instructions
may result in serious inju ries or even
death.
Always ride with both hands on the handlebars and feet o n the footrests.
Never shift gear without using the clutch, if
the vehicle is so equipped. Do not operate
the shift lever or the other controls suddenly or abruptly. Such misuse can damage
the internal components of the vehicle and
consequently cause seizure, loss of control, accidents and serious injuries or even
death.
Remain in the seat when you are riding.
Do not stand up or attempt to stretch while
you are riding your vehicle. If you need to
rest, pull over to the side of the road when
it can be safely done.
use and maintenance Pegaso 650
-
19
Page 4

OIL
COOLER
It is very important to your safety that you
give full attention to the riding task. Watch
what you are doin g, do not al low your self to
be distracted by other cars, people or
things on the roadside, etc. Never smoke,
eat, drink, read, etc. while riding your vehicle. If you must consult a map, pull over
when it can be done safely.
Use only the vehicle’s specific fuels and lubricants indicated in the “LUBRICANT
CHART”; check the oil, fuel and coolant
levels regularly.
If the throttle sticks open, it may cause a
collision with another vehicle, or an upset.
If the throttle sticks, kill the engine with the
engine stop switch located on the right
handlebar.
Do not attempt to restart the engine until
the throttle has been repaired and works
perfectly. Failure to obey this warning can
use and maintenance Pegaso 650
20
-
lead to a runaway with seriously injuries or
even death.
Your vehicle is equipped with a double cable throttle. One cable opens the throttle
when you rotate the throttle grip toward
you; the other closes the throttle when you
rotate th e gr ip aw ay from y ou. I t i s es sen tial, when you release the throttle grip, that
it automatically return to the idle position.
This double cable arrangement enhances
safety by providing for positive closing of
the throttle.
aWAR NING
In the event of a throttle sticking emergency, always kill the engine using the
engine stop switch loc ated near the
throttle grip on the right handlebar. Never use your vehicle if the throttle does
not automatically fully return to the idle
position when the throttle grip is re-
leased. Contact your Local APRILIA Deal-
er for repairs. Failure to heed this warning can lead to a serious accident and
subsequent injury or even death.
If you and your vehicle are involved in an
accident, insure that there has been no
damage to the control levers, tubes, wires,
braking system and other vital parts. If
your vehicle is in volved i n an accid ent, take
it immediately to your Local aprilia Dealer
who has the equipment and knowledge to
check for accidental da mage which may
compromise your safety.
Your aprilia dealer is ready and able to
help you with any safety problems that you
might have, but of course it is necessary
for you to report any malfunctions to your
mechanic in order for him to help you.
Do not use your vehicle if it is damaged. A
damaged vehicle may become unstable or
Page 5
ONLY ORIGINALS
A12
345
present other proble ms w hich can i ncreas e
the risk of accident, and theref ore of serious injury or even death.
Do not attempt to modify the position, angle or color of your license p late. Do not
cover it with even a clear plastic covering.
Do not modify any of the safety equipment
of your vehicle, especially such saf ety related items as directional indicators, rear
view mirrors, lights or horns.
Any modification to your vehicle will invalidate the warranty.
Do not modify your engine in an attempt to
increase the horsepower. This can result
in irreparable damage to the engine, as
well as degradation of the performance
and handling of the vehicle which could
lead to an upset, and seriou s inju ry or even
death.
Have your vehicle repaired only with or igi nal parts, and us e only original aprilia or
aprilia approved accessorie s. Th e u se o f
aftermarket accessories and parts can seriously compromise the safety of your vehicle as well as its performance and serviceability. Any modification which affects
performance or safety voids your warranty
completely.
Tampering with the emissions or noise
control systems on your vehicle is against
the law, and can be punished by large
fines.
In some jurisdictions, it can even lead to
the confiscation of your vehicle.
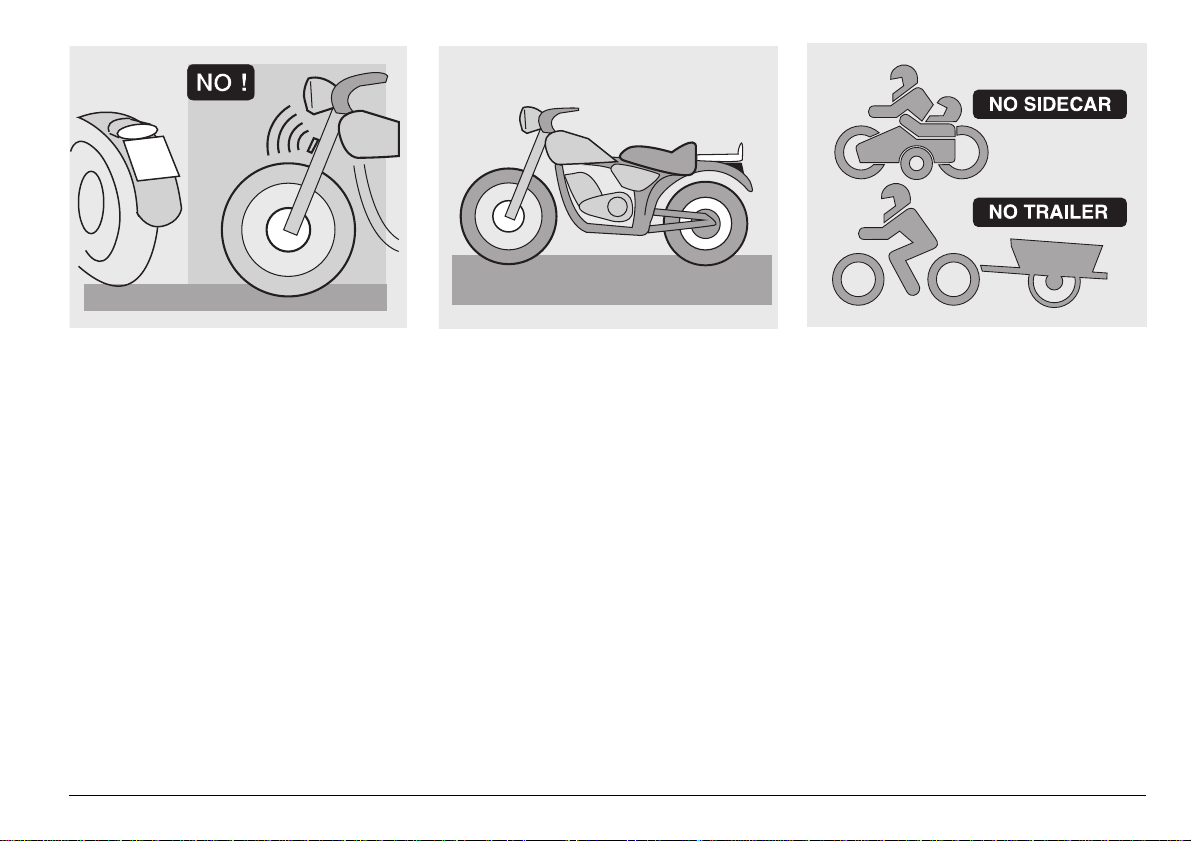
This vehicle wa s not designed to be
equipped with a sidecar or to be used to
tow trailers or other vehicles.
aprilia does not manufacture sidecars or
trailers and therefore cannot predict the effects of such accessories on the manoeuvrability or stability of the vehicle: it can
only warn that such effects may be negative and that any damage to the vehicle
components caused by the use of such accessories will not be covered by the warranty.
use and maintenance Pegaso 650
-
21
Page 6

Never race other vehicles with your vehicle.
Brake with both the front and rear brakes.
The use of one brake only for sudd en brak ing may cause the vehicle to skid or make
the rider lose control of the vehicle itself.
When ridin g down a st eep hi ll, us e the engine as a brake by selecting the same
gear, or a lower gear, than you would use
to climb the hill. Use front and rear brakes
sparingly.
Always ride at the appropria te speed and
avoid unnecessary hard acceleration.
This not only is safer, but also reduces
fuel consumption and increases the life of
the vehicle.
If you must ride your vehicle in r ainy
weather, or on loose sur faces, remember
that traction is greatly reduced. Under
these conditions, all handling of the vehicle must be done gradually and smoothly.
Sudden acceleration, braking or turning
may make you lose control of your vehicle.
When traction is reduced, accele rate and
slow using your vehicle’s engine braking
insofar as possible. Avoid rapid, harsh
application of the brakes.
Gradually open and close the throttle, to
avoid spinning or skidding the rear wheel.
On rough road surface s, slow down and
ride with particular care.
Try to avoid wide open throttle accelerations, unless they are nece ssary for such
things as passing.
Don’t allow your engine to “lug,” that is,
run at too low an rpm. Shift down to a lower gear. Also, don’t over-rev the engine.
Observe the redline on the tachometer.
Remember that excessive ly aggressive
cornering can cause your vehicle’s tires to
lose sideways traction, which can result in
an upset and serious injury or even death.
use and maintenance Pegaso 650
22
-
Page 7
Always observe posted and statutory
speed limits, but do not assume that you
can ride as fast as the speed limit under
all road conditions. Slowing down a little
can greatly increase your safet y under all
road conditions.
Do not ride your vehicle off road.
Do not tamper with the muf fler system or
the emissions control system of your vehicle. This is not only bad for the environment, it can subject you to serious pen alties.
#,/4().'
Before riding your vehicle, ensure that
your riding gear is in good condition. To
be effective, your helmet must fit properl y,
and the visor or other eye pro tection must
be clean.
Both research and experience have
shown that drivers of other vehicles often
do not see vehicles or riders. In order to
make yourself more conspicuous to these
drivers, wear bright reflective clothing,
such as a reflective vest, or clothing with
reflective sections sewn into the jacket,
pants and gloves. B e particular aware o f
approaching automobiles and trucks that
might be trying to turn left i n front of you.
Many vehicle accidents are caused by an
opposing automobile driver making a left
turn without warning in front of the vehicle.
Inevitably, the driver wil l look right at you,
and yet swea r that they did not see you
before they turne d directly into y our path.
Ride alert!
Wear protective clothing, preferably in light
and/or reflecting colours. In this way you
will make yourself more visible to the other
drivers, thus notably reducin g the risk of
being knocked down, and you will be more
protected in case of fall.
Always wear your crash helmet. Many accidents are fatal because of injuries to the
head.
This clothing should be very tight-fitting
and fastened at the wrists and ankles.
Strings, belts and ties should not be hanging loose; prevent these and other objects
from interfering with driving by getting entangled with moving parts or driving mechanisms.
use and maintenance Pegaso 650
-
23
Page 8
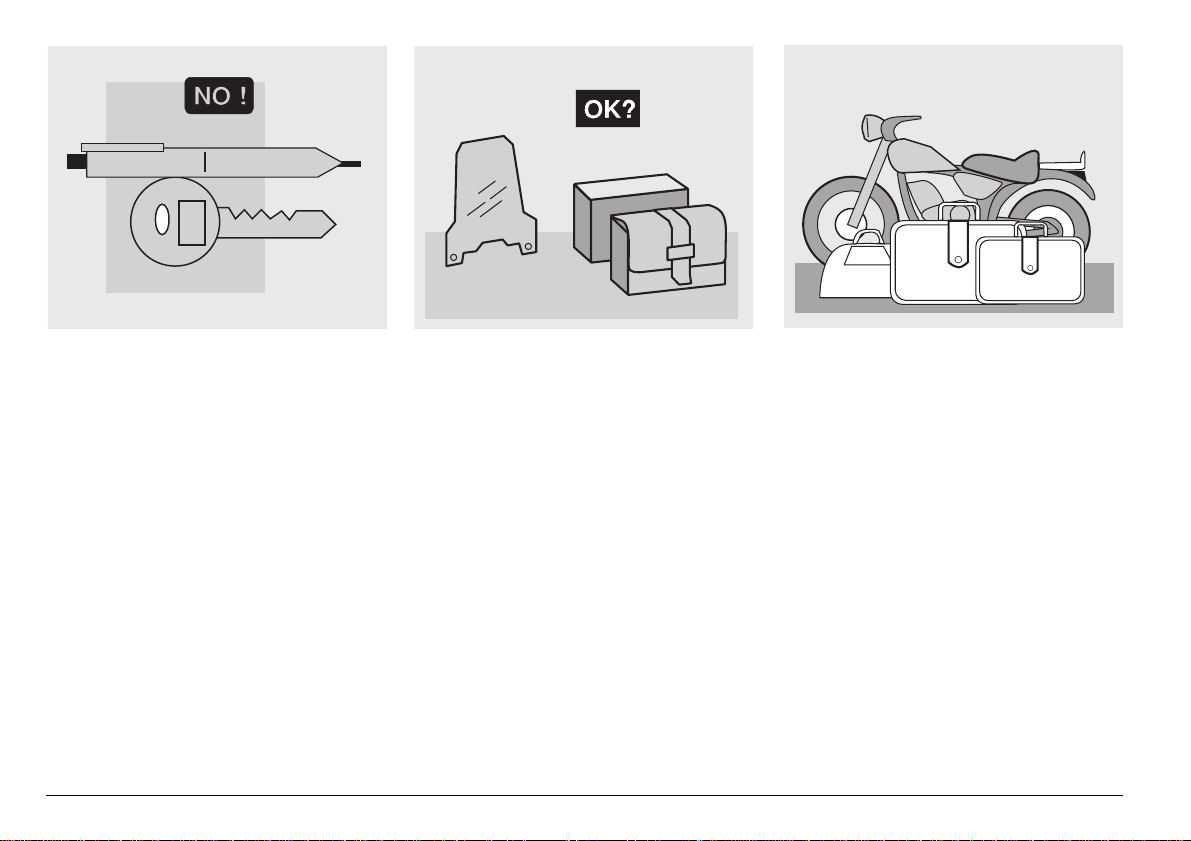
Do not carry sharp objects in your pockets
that could be dangerou s in case o f an upset, for example, pens or mechanical pencils, etc. Also, make sure that your passengers follow this recommendation.
!##%33/2)%3
The owner of the vehicle is responsible for
the choice, installation and use of any accessory.
The installation of inappropriate acc essories
or the overloading of the vehicl e may result
in the instability of the vehicle itself and
cause accidents with consequent risk of serious injuries or even death. Windshields
could be particularly dangerous, as they can
break and injure or cut the rider in case of
accident. In case of doubts with regard to
any accessory you would like to install or
use and maintenance Pegaso 650
24
-
any load you would like to carry, previously
consult your Local aprilia Dealer.
Avoid installing accessories that cover
horns or lights or that could impair their
functions, limit the suspension stroke and
the steering ang le, h amper the o peratio n of
the controls and reduce the distance from
the ground and the angle of inclination in
turns.
Avoid using accessories that hamper access to the co n tro l s, sinc e t h is can pr ol on g
reaction times during an emergency.
Fairings and windshields installed on the
vehicle may produce aerodynamic forces
that will affect the st ability of the vehicle
during use, especially at high speeds.
Make sure that anything y ou carry on yo ur
vehicle is securely attached, and cannot
come lose and jam the wheels, forks, etc.
Do not install any electr ical accessories,
and do not modify the electrical system of
your vehicle. Anything that could cause an
electrical overload or other fault could cause
the vehi cle to s uddenly stop, the lights to
dim or quit, or the horn and other safety accessories not to work. Use only aprilia genuine accessories.
,/!$
Do not overload your vehicle. Attach luggage or packages as close as possible to
the center of your vehicl e and distrib ute th e
load from side to side as evenly as possible, to keep imbalance to a minimum. Remember that loads tend to loosen with
riding, so frequently che ck the security of
your load.
Page 9
KG!
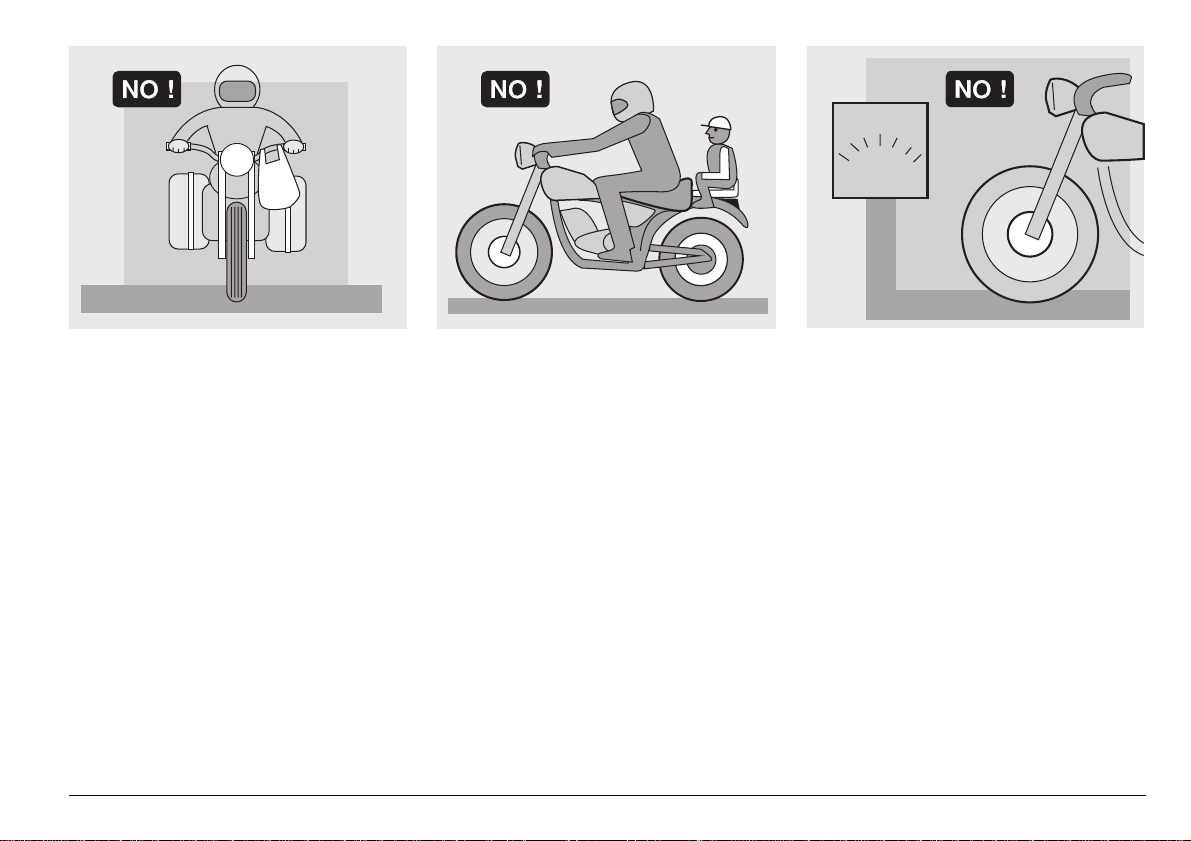
Do not hang anything from your vehicle
handlebars, fenders, or forks, because this
will upset the handling of your vehicle, and
could prevent you from avoiding an accident. Failure to heed t his warn ing ca n le ad
to an upset with subsequent serious injury
or even death.
Do not ride with your crash helmet hung
from the strap because it could easily foul
the wheels, fenders, or forks, causing an
upset and subsequent serious injury or
even death.
Carry a passenger only if your vehicle is
equipped with passenger footr ests, handgrips for the passenger to hold on to, and a
passenger seat.
When carrying a passenger, remember
that your vehicle’s handling is degraded,
that the brakes ar e less efficient, and t he
center of gravit y is higher and further t o the
rear.
This makes it more likely that the front
wheel will come up off the ground, especially on acceleration. Therefore, you
should avoid hard acceleratio n and hard
braking. Many ac ci de nts are cau se d by inexperienced ride rs carrying passeng ers.
Remember that allow ance must be made
for the extra weight of the passen ger for al l
driving maneuvers.
Avoid abrupt and excessive acceleration.
Always slow down in time and calculate
longer stopping and manoeuvring distances. Non-complianc e w ith th es e ins tru cti ons
may lead to the overturning of the vehicle
or to other accidents with consequent serious injuries or even death.
Never carry loosely packaged items,
make sure that everything that you carry
on your vehicle is carefully secured.
Do not carry packages wh ich protrude
from the luggage rack or which cover an y
of the signal lights, the headlight, or the
horn.
Never carry animals or children on the
glove compartment or on the luggage
rack.
Never exceed the labeled maximum load
for each saddlebag.
Overloading your vehicle seriously reduces its stability and maneuverability and
can lead to an upset with subsequent serious injury or death .
use and maintenance Pegaso 650
-
25
Page 10
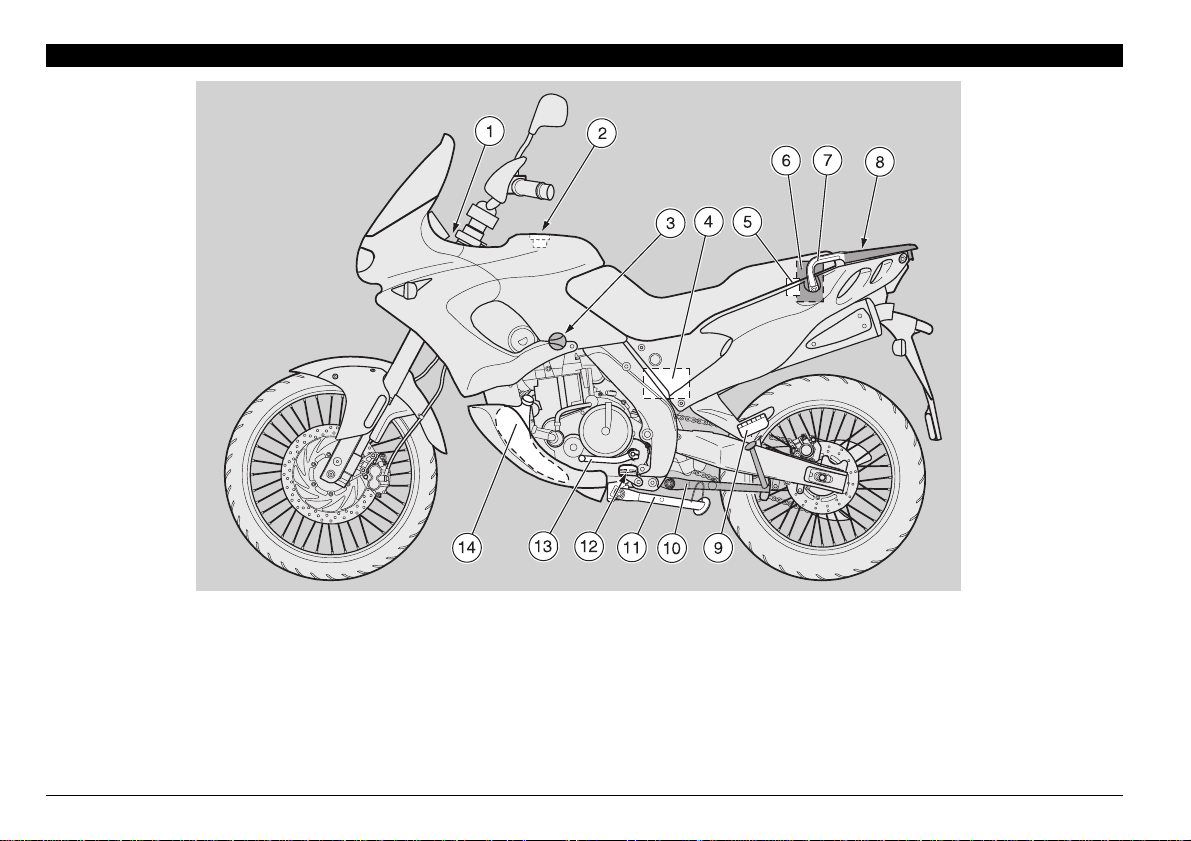
!22!.'%-%.4/& 4(% -!).%,%-%.43
+%9
1) Ignition switch/steering lock/parking lights
2) Fuel filler cap
3) Fuel valve
4) Battery
5) Fuses
6) Glove/tool kit compartm ent
7) Passenger grab rail
8) Rear luggage rack
9) Passenger left footrest (snapping, closed / open)
10) Center stand
11) Side stand
12) Rider left footrest (with spring, always open)
13) Shift lever
14) Expansion tank
use and maintenance Pegaso 650
26
-
Page 11
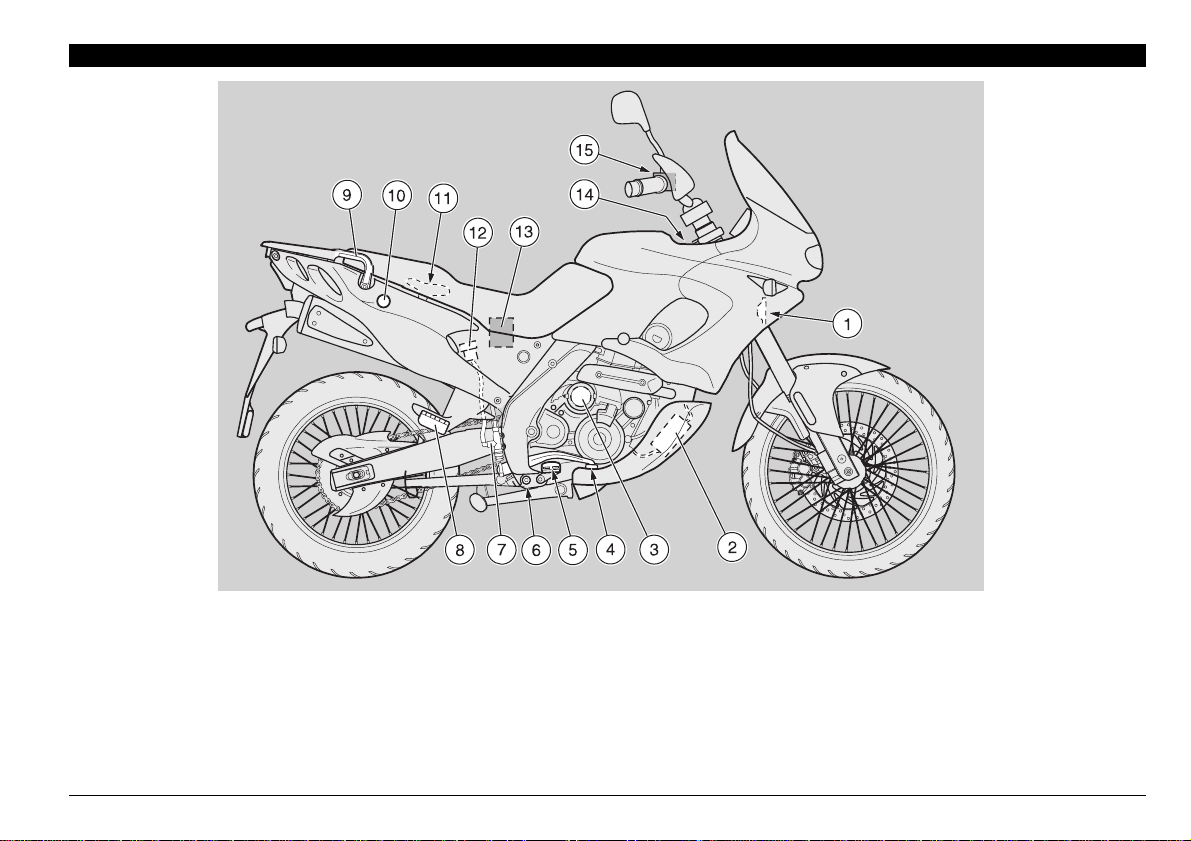
+%9
1) Horn
2) Carbon canister
3) Engine oil filter
4) Rear brake pedal
5) Rider right footrest (with spring, alway s open )
6) Anti-theft hook
(for the aprilia “Body-Guard” armored cable
7) Rear brake master cylinder
&)
8) Passenger right footrest (snapping, closed / open)
9) Passenger grab rail
10) Saddle lock
11) Crash helmet hook
12) Rear br ake reservoir
13) Air cleaner
14) Engine oil level plug-dipstick
15) Front brake reservoir
use and maintenance Pegaso 650
-
27
Page 12
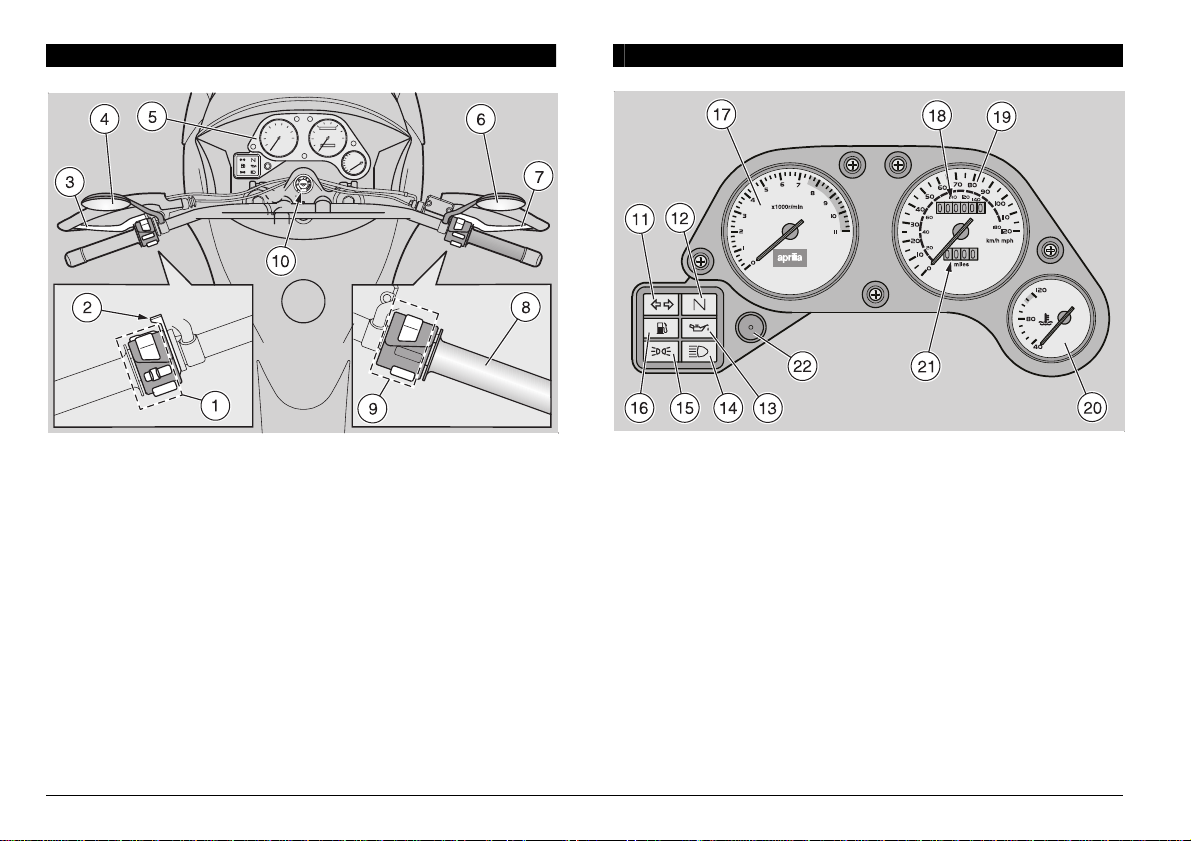
!22!.'%-%.4/&4(%).3425-%.43#/.42/,3
).3425-%.43!.$ ).$)#!4/23
+%9
1) Electrical controls on the left side of the handlebar
2) Cold start lever (e)
3) Clutch lever
4) Left rear-view mirror
5) Instruments and indicators
6) Right rear-view mirror
7) Front brake lever
8) Throttle grip
9) Electrical controls on the right side of the handlebar
10) Ignition switch/steering lock/parking lights (
use and maintenance Pegaso 650
28
-
n - m - s - Y)
11) Green direction indicator warning light (
12) Green neutral indicator warning light (q)
13) Red engine oil pressure warning light (
14) Blue high beam warning light (
15) Green low beam and parking light warning light (p)
16) Amber low fuel warning light (
17) Tachometer
18) Total miles odometer
19) Speedometer
20) Coolant temperature indicator (
21) Trip odometer
22) Odometer reset
a)
g)
h) in °C (Celsius degree)
c)
j)
Page 13
).3425-%.43!.$).$)#!4/234!",%
Description Function
Directional indicator
High beam indicator a Comes on when the headlight is in “high beam” position or when the high beam signalling is operated.
Parking light
and low beam warning light
Coolant temperat ure indicator
in °C (Celsius degree)
Engine oil pressure
warning light
Low fuel warning light
Neutral indicator warning light
Tachometer rpm
Trip odometer Indicates the number of miles covered in a trip. To reset to zero, press the odometer control button.
Odometer Indicates the total number of miles that the vehicle has traveled since new.
Speedometer Indicates road speed.
Odometer reset Press it to reset to zero the trip odometer.
c Blinks when the right (or the le ft) direction indicator is on.
It comes on when the i gnit i on switch is turned to “n” (ON) or “Y” (PARKING) po si t ion and automaticaly the lights are on.
p
It indicat es the approxim ate temperature of the coolant in the engi ne.
When the pointer starts moving beyond the “40” (40 °C) leve l, the temp erat ure is suffi cien t for driving
the vehicle.
The normal running tem pe rature range is indicated by the central area of the scale.
If the pointer reac hes the red area, st op the engine and ch eck the coolan t level, see p. 44 (C OOL-
h
ANT).
aWARNING
set and serious injury or even death.
It comes on whenever the ignition switch is turned to position “n” (ON) and the engi ne is not running,
thus testing the cor rect oper ation of th e lamp. I f during this phas e the lam p does no t turn on, it must
be replaced. The engine oil pressure warning light “
aWARNING
j
gine, this means that the oil system is not develo ping suffi cient press ure. In this case, imme diately stop the engine and contact your Local
lead to engine seizure, upset, and serious injury or even death.
It comes on when the quantity of fuel left in the tank is about 1.59 US gal (6 L ) [electrical reserve].
In this case m ove the fuel valve leve r to the “RES” position and top up as soon possib le, see p. 35
g
(FUEL).
Do not operate the vehicle if the maximum temperature is exceeded. Serious engine damage or even seizure may result which can cause an up-
j” must go off when the engi ne is running.
If the engine oil pressure warning light “j” remains on (when the engine is running), or if it comes on during the normal running of the en -
APRILIA
Dealer. Failure to heed this warning can
q Comes on when th e gear is in neutral.
It indicates the number of revolutions of the engine per minute.
aWARNING
Never exceed the engine max. speed rate, see p. 56 (RUNNING-IN).
use and maintenance Pegaso 650
-
29
Page 14

#/.42/,3
NOTE The electrical components function only when the igni-
tion switch (A) is in the “n” (ON) position.
The parking lights are illuminated besides when the ignition
switch (A) is in the “
#/.42/,3!44(%,%&4(!.$'2)0
1) HORN PUSH BUTTON (f )
The horn is activated when the push button is pressed.
Y” (PARKING) position.
use and maintenance Pegaso 650
30
-
2) DIRECTION INDICATOR SWITCH (
To indicate the turn to the left, move the switch to the left; to
indicate the turn to the right, move the switch to the right.
To turn off the direction indicator, press the switch.
3) DIMMER SWITCH (
When the lever is in the po sition indicated by t he “
parking lights, dashboard light and low beam are on.
When the lever is mo ved to the “
nated, the dashboard and parking lights remain on.
4) HIGH BEAM SIGNALING PUSH BUTTON (
Depress the button momentarily to flash the high beam for
signaling when passing, etc. and in the event you need
someone’s attention in an emergency.
5) COLD START LEVER (
Operate the cold start (choke ) by rotating the lever downwards.
To disengage the cold sta rt, return the lev er upwards to its initial position.
b - a )
e)
c )
b”, the
a” , the high beam is i ll umi -
a )
Page 15
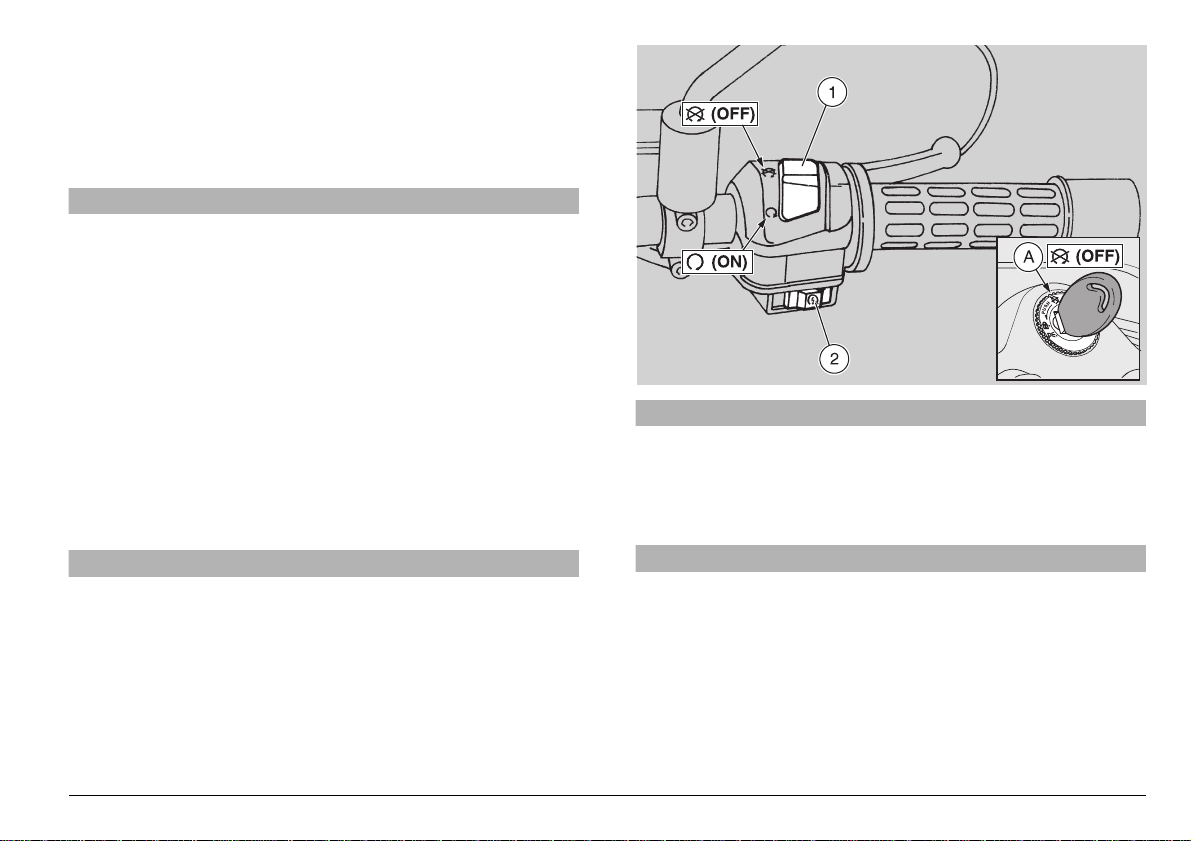
#/.42/,3!44(%2)'(4(!.$'2)0
1) ENGINE STOP SWITCH (
Use the engine stop switch to stop the engine. It is essential
that you be very fami lia r with thi s c on trol so tha t yo u wi ll a uto matically stop the engine i n the even t of a stu ck throttl e or other engine runaway.
n - m)
aWARNING
If the throttle sticks open, it may cause a collision with another vehicle, or an upset.
If the throt tle sticks, ki ll the engine with the engi ne stop
switch located on the right handlebar.
Do not attempt to restart the engine until the throttle has
been repaired and works perf ectly. Failure to obey this
warning can lead to a runawa y with seriously injuries or
even death.
Your vehicle is equ ipped with a double c abl e throttle. One cable opens the throttle when you rotate the throttle grip toward
you; the other closes the throttle w hen you rotate the grip
away from you. It is essential, when you release the throttle
grip, that it automatically return to the idle position.
This double cable arrangement enhances safety by providing
for positive closing of the throttle.
aWARNING
In the event of a throttle sticking emergency, always kill the
engine using the engine stop switch located near the throttle grip on the right handlebar. Never use your vehicle if the
throttle does not automatically fully return to the idle position when the throttle grip is released. Contact your Local
APRILIA Dealer for repairs. Failure to heed this warning can
lead to a serious accident and subsequent injury or even
death.
aWARNING
Do not use the engine stop switch to stop the engine while
the vehicle is moving.
With the switch (1) in the “
start the engine. The engine can be stopped by moving the
switch (1) to the “
m” (OFF) position.
n” (ON) position it is possible to
aCAUTION
Do not leave the ignition on if you have stopped the engine
by moving the engine stop switch to the “
as this will discharge the battery.
When the vehicle has com e to rest afte r stopping th e engine
with the engine stop switch, turn the ignition switch (A) to
the “
m” (OFF) position.
2) STARTER SWITCH (
When the starter switch is depressed, the starter is engaged
and the engine will start. For starting, see p. 50 (STARTING).
r)
m” (OFF) position
use and maintenance Pegaso 650
-
31
Page 16
◆
Turn the key (2) to position “Y” (PARKING); automatically the parking lights
stay on.
◆
Extract the key (2).
aCAUTION
Do not leave the ignition switch (1) in the
Y” (PARKING) position for extended
“
periods of time, as this will cause the
battery to become completely run down.
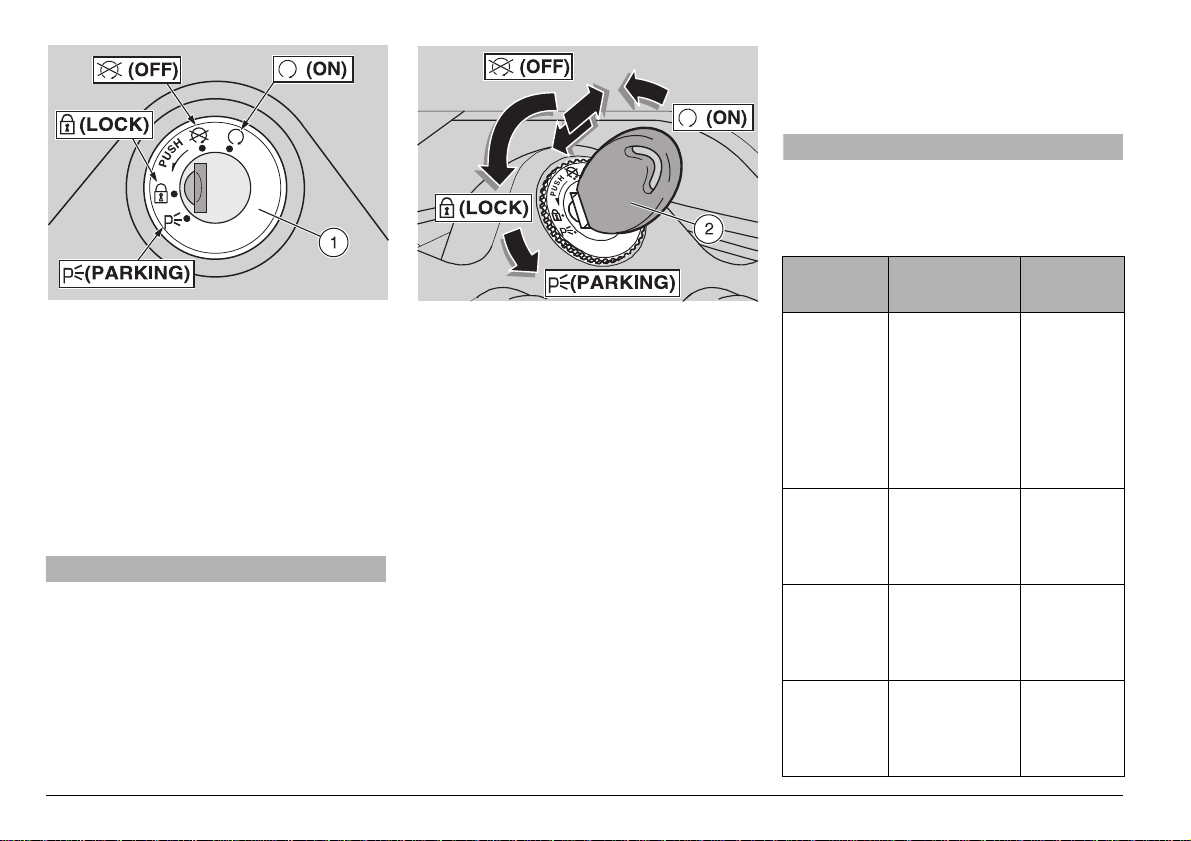
)'.)4)/.37)4#(
The ignition switch (1) is located on the
upper plate of the steering head.
NOTE The key operates t he ignition
switch/steering lock, the saddle lock and
the fuel tank lock.
Two keys are supplied t ogether with the
vehicle (one spare key).
34%%2).',/#+
aWARNING
Never attempt to place the ignition
switch in the locked “s” (LOCK) position while the vehicle is moving. This
will cause loss of control of the vehicle
with possible subsequent accident, serious injury or even death.
OPERATION
To lock the steering:
use and maintenance Pegaso 650
32
-
◆
Place the vehicle on the stand.
◆
Turn the handleba r com ple tel y le ftw ard s.
◆
Turn the key (2) to position “m” (OFF)
and press it.
◆
Release the key (2).
NOTE Turn the key (2) and steer the
handlebar at the same time.
◆
Rotate the key (2) counterclo ckwise (l eftwards), steer the ha ndlebar slowly until
the key (2) reaches position “
◆
Extract the key (2).
0!2+).',)'(43
When you park the vehicle in a dark area,
or in a blady lit area (parking-lot or street) it
is possible, and usefu l, may leav e the parking lights on, so the vehicle will be easily
visible.
For leave t he parking lights on:
◆
Lock the steering, see beside (STEERING LOCK) without extract the key (2).
s” (LOCK).
Position Function
The steering is
locked.
s
(LOCK)
Steering
lock
m
(OFF)
n
(ON)
Y
(PARKING)
It is neither
possible to
start the
engine, nor to
switch on the
lights.
Neither the
engine, nor the
lights can be
switched on.
The engine
and the lights
can be
switched on.
The parking
lights are
illuminated.
Key
removal
It is
possible to
remove the
key.
It is
possible to
remove the
key.
It is not
possible to
remove the
key.
It is
possible to
remove the
key.
Page 17
!58),)!29%15)0-%.4
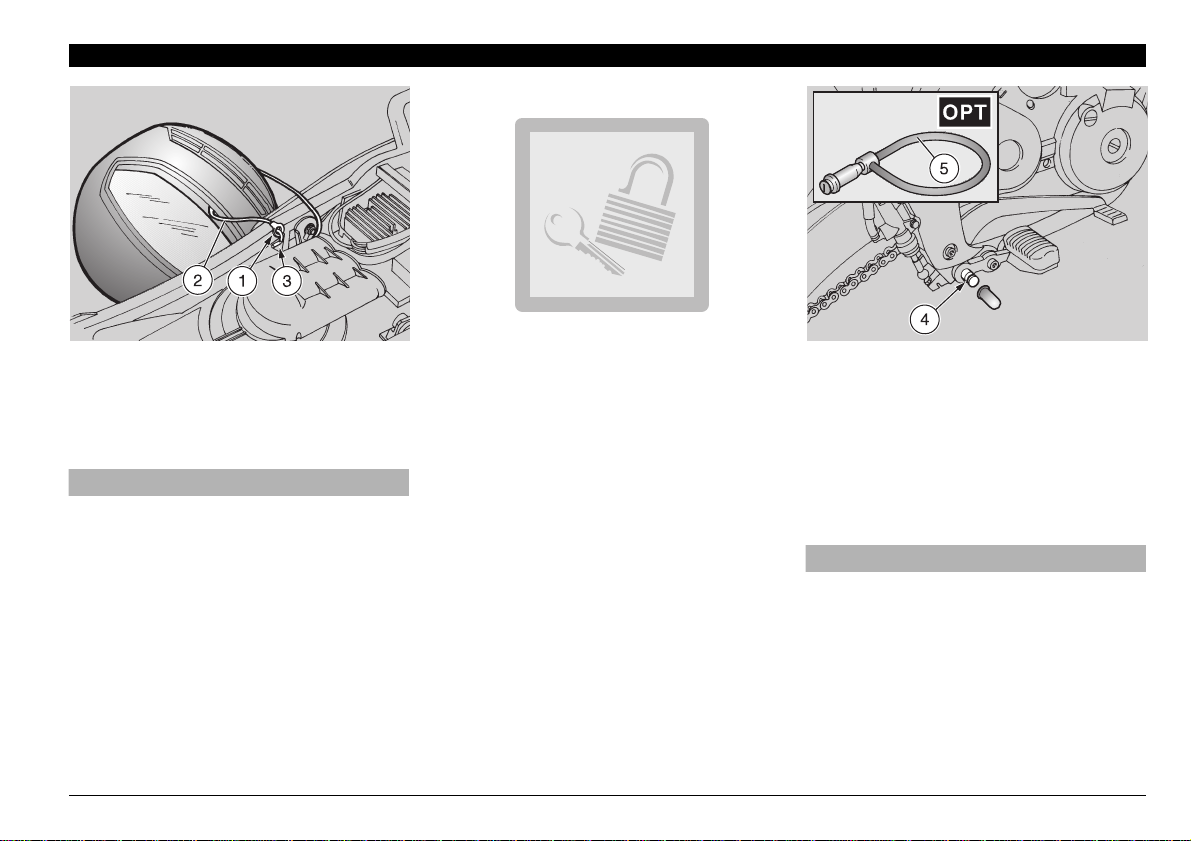
#2!3((%,-%4(//+
Thanks to the crash helm et hook, you no
longer have to carry the crash helmet with
you every time you park the vehicle.
aWARNING
Do not ride with the crash helm et hanging from the hook. This may cause an
upset with subsequent serious injury or
death.
To secure your crash helmet:
◆
Remove the sa dd l e, s ee p . 81 (REMOVING THE SADDLE).
◆
Withdraw t he eyelet (1) of the cable (2)
from the hook (3).
◆
Pass the cable (2) through the visor
opening or through the apposite loop on
the crash helmet.
◆
Insert the eyelet (1) completely in the
hook (3).
NOTE Before lowering and locking the
saddle, make sure that you have not left
the key in the under saddle area.
◆
Replace the saddle, see p. 81 (REMOVING THE SADDLE).
!.4)4(%&4(//+
The anti-theft hook (4) is positioned on the
right side of the vehicle, near the rider’s
footboard.
To prevent the vehicle from being stolen, it
is advisable to secure it with the aprilia
“Body-Guard” armored cable
able at any Local aprilia Dealer.
(5), avail-
&
aWARNING
Do not use the hook to li ft the ve hicl e o r
for any purpose other than securing the
vehicle once it has been parked.
use and maintenance Pegaso 650
-
33
Page 18
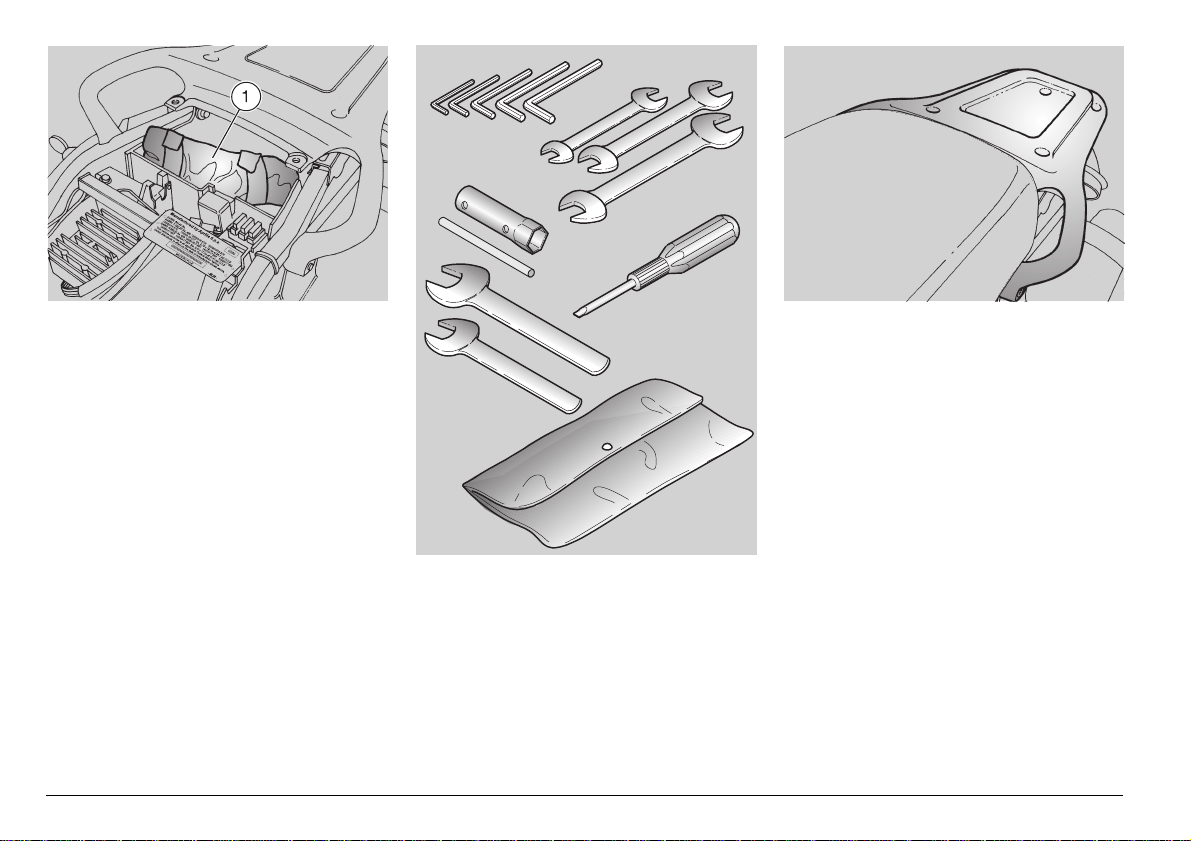
',/6%4//,+)4#/-0!24-%.4
The glove/tool kit compartment is positioned under the rear part of the saddle; to
reach it:
◆
Remove the saddle, see p. 81 (REMOVING THE SADDLE).
The tool kit (1) includes:
– 3 mm, 4 mm, 5 mm, 6 mm, and 8 mm
Allen wrenches;
– a 5.5 and 7 mm open end wrench;
– an 8 and 11 mm open end wrench;
– a 10 and 13 mm open end wrench;
– a 19 mm open end wrench;
– a 24 mm open end wrench;
– an 18 mm spark plug socket wrench;
– a double ended slot/Phillips screwdriver;
– a lever for the spark plug wrench;
– tool pouch.
Max. allowed weight: 3.31 lb (1.5 kg).
2%!2,5''!'%2!#+
Max. allowed weight: 20 lb (9 kg).
use and maintenance Pegaso 650
34
-
Page 19

-!).#/-0/.%.43
&5%,
aWARNING
Gasoline is extremely flammable and in
some conditions can become exp losive.
Therefore, it is necessary to refuel and
carry out maintenance operations involving the fuel s ystem in a well- ventilated area with the engine off.
Do not refuel or do any maintenance on
the fuel system with the e ngine running.
Do not smoke while refueling or near
fuel vapors.
Never allow any portion of the fuel system to come in contact with naked
flames, sparks or other heat sources.
Be careful to avoid spilling fuel when
you are refueling. Spilled fuel could ignite when it contacts hot engine or exhaust system surfaces. If you accidentally spill some fuel, make sure that it is
wiped up or completely evaporated before starting the vehicle.
Since gasoline expands in the fuel tank
when the vehic le is sitting i n the open
sun, never fill the tank c omp lete ly to the
brim. Leave at least one inch of expansion space.
Avoid any contact of the fuel with your
skin, and avo id inhalation o f fuel vapors. Do not ever attempt to siphon fuel
from one container to another using
your mouth as suction for a siphon
hose.
aWARNING
Gasoline is poisonous and carcinogenic and contains chemical substances
that cause birth defects and other reproductive problems. If gasoline shoul d
be accidentally spil t on the skin or
clothes, immediately wash it off with
soap and water and change clothes.
Should you accidentally spill gasoline
in your eyes, flush with a large quantity
of water and immediately contac t a
health professional. Should you accidentally get gasoline into your mouth,
do not induce vomiting. Drink a large
quantity of milk or clear water and immediately contact a health profession al.
Never try to siphon gasoline by sucking
it with your mouth. Use a manual pump
or a similar system.
If your vehicle overturns, it will leak
gasoline which is ext remely f lammabl e.
Flames or sparks may ignite this which
will not only destroy the vehicle but
also could do serio us prop erty dam age
to surrounding property and ca use se rious injuries or even death.
ALWAYS KEEP GASOLINE AWAY
FROM CHILDREN.
DISPOSE OF UNWANTED GASOLINE
PROPERLY, DO NOT DUMP IT INTO
STORM SEWERS OR INTO A SINK OR
TOILET.
Use only unleaded petrol minimum octane
rating (R+M)/2 method 90.
FUEL TANK CAPACITY
(reserve included): 5.81 US gal (22
TANK RESERVE: 1.32 US gal (5
chanical reserve], 1.59 US gal (6
trical reserve].
REFUEL
To refuel, proceed as follows:
◆
Place the vehicle on the center stand,
see p. 59 (POSITIONING THE VEHICLE
ON THE STAND).
L ).
L )[me-
L ) [elec-
aCAUTION
If necessary, clean the fuel filler cap and
the part around it with a clean cloth. Prevent any foreign material from getting
into the fuel tank, this could lead to serious engine damage.
use and maintenance Pegaso 650
-
35
Page 20

When you finish the refueling operation:
,5"2)#!.43
◆
Lift the little cover (1).
◆
Insert the key (2) in the cap lock (3).
◆
Turn the key (2) clockwise, pull it and
open the fuel filler cap (4).
aCAUTION
If to use any container or funnel for refueling, make sure that it is perfectly
clean.
Any foreign matter getting into the fuel
tank may lead to severe damage.
aWARNING
Do not add any additives or other substances to the gasoline.
aWARNING
Do not refuel the tank completely; the
fuel should never be touching the rim of
filler cap seat hole.
◆
Refuel.
aWARNING
After refueling, replace the fuel filler cap
(4) in the correct position.
NOTE It is impossible closed the fuel fill-
er cap without the key.
◆
With the key (2) insert in the lock (3)
close the fuel fill er cap (4) r otat e counterclockwise the key and push it.
◆
Release the key (2), at this point the fuel
filler cap (4) is closed.
aWARNING
Make sure that the fuel filler cap (4) is
properly closed.
◆
Extract the key (2).
◆
Replace the little cover (1).
After refueling, before riding away, ensure
that the fuel valve lever (5) is to “ON” position.
aWARNING
Proper vehicle lubrication is critical to
safe operation.
Failure to maintain proper lubricant levels or to use the proper type of clean,
new lubricant, can lead to an engine or
transmission seizure with subsequent
accident, serious injury or death.
aWARNING
Use latex gloves for the maintenance operations that require contact with used
oil. Used engine oil may cause skin cancer if repeatedly left in contact with the
skin for prolonged periods. Although
this is unlikely unless you handle used
oil on a daily basis, it is advisable to
thoroughly wash your hands with soap
and water after handling used oil.
KEEP OIL AWAY FROM CHILDREN.
DISPOSE OF OIL PROPERLY.
aCAUTION
Be very careful when putting oil in your
vehicle not to spill oil.
Clean up any oil spilled immediately because oil can damage the finish of your
vehicle. Also, oil on the tires cr ea tes a n
extremely slippe ry and therefore dan gerous situation.
aCAUTION
In case of oil leakage do not ride your
vehicle. Before using the vehicle, have
it repaired by your Local APRILIA Dealer.
use and maintenance Pegaso 650
36
-
Page 21

ENGINE OIL
aWARNING
If the engine oil pressure warning light
j” r emains on (when the engine is
“
running), or if it comes on during the
normal running of the engine, this
means that the oil system is not developing sufficient pressure. In this case, immediately stop the engine and contact
your Local APRILIA Dealer. Failure to
heed this warning can lead to engine seizure, upset, and serious injury or even
death.
aCAUTION
Perform these maintenance operations
at one-half of he specified intervals, if
your vehicle is often used in rainy or
very dusty condit ions, or on unpaved
roads.
Check the engine oil level every 312 mi
(500 km), see p. 66 (CHECKING THE ENGINE OIL LEVEL AND TOPPING UP).
aCAUTION
Have your Local APRILIA Dealer change
the engine oil after the first 625 mi
(1,000 km), and thereaft er every 3,750
mi (6,000 km).
NOTE Use high-quality 5W-40 oil, see
p. 104 (LUBRICANT CHART).
"2!+%3
aWARNING
Do not ride your ve hicle with worn or
malfunctioning brakes! The brakes are
the most important safety system of
your vehicle, and using the bike with
brakes that are anything less than perfect is very likely to lead to a colli sion or
upset, with conse quent risk of seri ous
injury or death.
Check the brake pad wear, as shown on
p. 69 (CHECKING THE BRAKE PAD
WEAR). Have your brakes serviced by
your Local APRILIA Dealer.
aWARNING
Wet conditions seriously degrade the
performance of your brakes. When the
road is wet fro m rain, you should plan
to use double the normal stopping distances since both the brakes themselves and the traction of the tires on
the road are reduced by the presence of
water.
Water on the brakes from washing your
vehicle, or sp las hed u p from we t roa ds,
or crossing puddles or ditches, can wet
the brakes sufficiently to greatly reduce
their effectiveness. Failure to heed
these warnings may lead t o a serious
accident with consequent risk of seri ous injury or even death.
NOTE This vehicle is equipped with
front and rear disc brakes with separ ate
hydraulic systems.
The following information may ref er to just
one braking system but should be observed with regard to both brakes.
aWARNING
The brakes are extremely important for
your safety. Do not use the vehicle if the
brakes do not work perfectly. Always
check the brake efficienc y before rid ing.
aWARNING
If the “feel” or position of the brake lever changes, t his may be due to so me
problem in the hydraulic brake system.
If you have any doubt regardin g the perfect functioning of your brake system,
or if the normal pre-ride c hec ks indicate
any discrepancy, contact your Local
APRILIA Dealer before riding.
aWARNING
Pay special attention to the brake disc
and friction material, making sure that
they are neither dirty nor oily, especially
after maintenance operations or insp ections.
Check the brake line, make sure th at it
is not twisted or kinked, nor leaking.
KEEP AWAY FROM CHILDREN.
DISPOSE OF USED BRAKE FLUID
PROPERLY. SEE THE GENERAL
WARNINGS AT p. 4 (BRAKE FLUID).
use and maintenance Pegaso 650
-
37
Page 22

$)3#"2!+%3
aWARNING
As mentioned above, the brakes are the
most important safety system on your
vehicle. For your safety, they must be
in perfect repair, so they should be
checked every time you ride your vehicle.
Oil or other fluid on a disc will contaminate the brake pads. Dirty pads m ust be
discarded and replaced, a dirty or oily
disc must be cleane d with a hi gh q uality
degreaser.
Have your Local APRILIA Dealer check
the levels of the brake fluid in the reservoirs after the first 625 mi (1,000 km).
Arrange with your Local APRILIA Dealer
to flush the s ystems and ch ange all of
the brake fluid once every two years.
NOTE This vehicle is provid ed with
front and rear disc brakes with separ ate
hydraulic systems.
When the pads wear out the brake fluid
level in the reservoir decreases to automatically compensate for their wear.
The front brake fl uid reservo ir (1) is l ocated on the right end of the handlebar near
the front brake lever.
The rear brake fluid reservoir ( 2) is under
the upper part of the fairing on the right
side of the v ehicle.
Check the levels of the brake fluid in the
reservoirs, see below (FRONT BRAKE),
p. 40 (REAR BRAKE), and the wear of the
pads, see p. 69 (CHECKING THE BRAKE
PAD WEAR), every 3,750 mi (6,000 km).
aWARNING
Never use your vehicle if any portion of
either brake system is leaking.
&2/.4"2!+%
CHECKING THE SYSTEM
NOTE Carry out these checks only on a
firm, flat surface such as a co ncrete gara ge
floor.
◆
Place the vehicle on the center stand, see
p. 59 (POSITIONING TH E VEHICL E ON
THE STAND).
MIN = minimum level.
◆
Rotate the handlebar, so that the fluid
contained in the brake reservoir (1) is
parallel to the “MIN” mark stamped on
the glass gauge (3).
◆
Ensure that the fluid contained in the reservoir exceeds the “MIN” mark stamped on
the glass gauge (3).
If the fluid does not reach the “MIN” mark:
aCAUTION
When the disc pads wear out, the level
of the fluid decreases progres sively to
compensate for their wear.
◆
Check the front brake pad wear, p. 69
(CHECKING THE BRAKE PAD WEAR)
and the front disc wear.
If the pads and/or the disc do not need replacing:
◆
Top up the reservoir, see p. 39 (TOPPING UP) .
use and maintenance Pegaso 650
38
-
Page 23

aWARNING
Use only DOT 5 or 4 fluid taken from a
clean, sealed container. Never reuse
used brake fluid.
◆
Top up the reservoir with brake fluid, until the fluid co vers the glass gauge (3)
completely.
◆
Replace the gasket (6) in it s seat correctly.
◆
Replace the cover (5).
◆
Screw and tighten the two screws (4).
TOPPING UP
aCAUTION
Do not operate the front brake le ver
with the screws (4) or the cover (5) removed. This will cause brake fluid to
squirt out and spill.
◆
Unscrew the two screws (4).
◆
Remove the cover (5).
aWAR NING
Avoid any prolonged exposure of the
brake fluid to the air.
The brake fluid is hygroscopic and
when in contact with the air it absorbs
its humidity.
Leave the brake fluid reservoir open
ONLY for the time necessary for topping up.
NOTE In order not to spill the brake fluid
while topping up, keep the fluid in the reservoir parallel to the reservoir rim.
◆
Remove the gasket (6).
NOTE In order to reach the “MAX” level,
top up until covering the glass (3) completely, but leave a space of 0.20 – 0.23 in
(5–6 mm) from the brake fluid reservoir rim.
aCAU TION
When topping up, never exceed the
“MAX” level.
Top up to “MAX” only when new pads
are installed.
aCAU TION
Do not fill the reservoir to “MAX” with
worn pads; this will cause fluid to overflow the reservoir when the pads are renewed.
aCAUTION
After servicing the brakes, always
check them for function. If th e s troke of
the lever is excessive, or if you detect
that the effectiveness of the brakes is
reduced in any way, hav e your vehicle
serviced by your Local APRILIA Dealer.
It may be necessary to have your dealer
bleed the system, or ther e m ay b e so me
other problem with the brake system.
Never ride your vehicle in traffic immediately after servicing the brakes.
Always apply the brake l ever several
times before riding your vehicle. Then,
try your vehicle in a parking lot or other
safe area with little traffic to ensure that
the brakes are working properly. Failure to observe this warning can lead to
a serious accident with subsequent serious injury or death.
use and maintenance Pegaso 650
-
39
Page 24

2%!2"2!+%
CHECKING THE SYSTEM
NOTE Carr y ou t th es e ch ec ks o nly on a
firm, flat surface su ch as a concre te garage
floor.
◆
Place the vehicle on the center stand,
see p. 59 (POSITIONING THE VEHICLE
ON THE STAND).
MIN = minimum level.
MAX = maximum level .
◆
Make sure that the fluid level contained
in the brake reservoir (1) is above the
“MIN” mark.
If the fluid does not reach the “MIN” mark:
aCAUTION
When the disc pads wear out, the level
of the fluid decreases progres sively to
compensate for their wear.
◆
Check the rear brake pad wear, p. 69
(CHECKING THE BRAKE PAD WEAR)
and the re ar disc wear.
If the pads and/or the disc do not need replacing:
◆
Top up the reservoir, see below (TOPPING UP) .
TOPPING UP
aCAUTION
Do not operate the rear brake pedal with
the reservoir filler cap (2) removed. This
will cause brake fluid to squirt out and
spill.
◆
Unscrew and remove the reservoir filler
cap (2).
aWARNING
Avoid any prolonged exposure of the
brake fluid to the air.
The brake fluid i s hygroscopic and
when in contact with the air it absorbs
its humidity.
Leave the brake fluid reservoir open
ONLY for the time necessary for topping up.
NOTE In order not to spill the brake fluid
while topping up, keep the fluid in the reservoir parallel to the reservoir rim.
◆
Remove the gasket (3).
use and maintenance Pegaso 650
40
-
Page 25

aCAUTION
When topping up, never exceed the
“MAX” level.
Top up to “MAX” only when new pads
are installed.
aCAUTION
Do not fill the reservoir to “MAX” with
worn pads; this will cause fluid to overflow the reservoir when the pads are renewed.
NOTE In order to fill the reservoir to the
“MAX” level, top u p un til the “MAX” mark is
parallel with the brake flu id reservoir top
parallel to the ground.
aWARNING
Use only DOT 5 or 4 fluid taken fr om a
clean, sealed container. Never reuse
used brake fluid.
◆
Top up the reservoir with brake fluid, until the fluid reaches the “MAX” mark.
◆
Replace the gasket (3) i n its seat correc tly.
◆
Replace and tighten the reservoir filler
cap (2).
aCAUTION
After servicing the brakes, always
check them for function. If th e s troke of
the pedal is excessive, or if you detect
that the effectiveness of the brakes is
reduced in any way, hav e your vehicle
serviced by your Local APRILIA Dealer.
It may be necessary to have your dealer
bleed the system, or ther e m ay b e so me
other problem with the brake system.
Never ride your vehicle in traffic immediately after servicing the brakes. Always apply the brake pedal several
times before riding your vehicle. Then,
try your vehicle in a parking lot or other
safe area with little traffic to ensure that
the brakes are working properly. Failure to observe this warning can lead to
a serious accident with subsequent serious injury or death.
use and maintenance Pegaso 650
-
41
Page 26

!$*534).'4(%2%!2"2!+%
The brake pedal (1) is adjust ed to fi t most
riders during manufactur e. If you wish to
adjust the brake pedal:
◆
Loosen the lock nut (2).
◆
Screw the brake adjuster bolt (3) completely.
◆
Loosen the lock nut (4) on the master
cylinder push rod (5) and run it as far towards the master cylinder as far as it will
go on the threads of the push rod.
◆
Screw the push rod (5 ) complete ly into the
clevis, then unscrew it three to four turns.
◆
Adjust the brake adjuster bolt ( 3) until the
brake pedal (1) is positioned as you like it.
◆
Screw down and tighten the lock nut (2)
on the brake adjuster bolt (3).
◆
Screw the master cylinder push rod (5)
out of the clevis until it just contacts the
master cylinder piston.
◆
Then, screw the push rod into the clevis
to obtain a minimum clearance of 0.02 –
0.04 in (0.5 – 1 mm) between the master
cylinder push rod and the master cyl inder piston.
◆
Lock the push rod in position with the
lock nut (4).
aCAUTION
Be sure there is the specified clearance
between the master cylinder push rod
and the maste r cylinder pist on. If this
caution is not ob served, the brak e will
remain slightly applied, with subsequent brake overheating and wear of
pads and discs.
Clearance between the push rod and
the piston 0.02 – 0.04 in (0.5 – 1 mm).
aWARNING
After making any brake adjustment apply the brakes repeatedly. Try the
brakes in a parking lot or other area
where there is little traffic. After you
have completed the adjustment, lift the
wheel free of the ground and ensure
that it rotates freely when the brake is
released.
use and maintenance Pegaso 650
42
-
Page 27

!$*534).'4(%#,54#(
Adjust the clutch if the clutch drags or slips
during operation.
A limited range of adjustment of the clutch
can be accomplished using the adjuster
(1) located at the left handlebar:
◆
Pull back the rubber boot (2).
◆
Loosen the lock nut (3).
◆
Rotate the ad jus ter (1) un til the f ree pl ay
at the end of the clutch lever is between
0.39 in (10 mm) (see figure).
◆
Tighten the lock nut (3) to lock the adjuster in place.
◆
Recheck the free play.
◆
Reposition the rubber boot (2).
◆
Start the engine, see p. 50 (STARTING).
◆
Pull in the clutch lever (4) c ompletely an d
put the shift lever (5) in the 1st gear.
Make sure that the engin e does not stop,
that the vehicle doe s not tend to adva nce
or that the clutch does not slip during the
acceleration phas e or while the vehic le is
running.
aWARNING
If it is not possible to properly adjust
the clutch this way, see your Local
APRILIA Dealer.
NOTE Inspect the clutch cable to make
sure that it is not damaged. The inner cable must have no broken strands, and the
outer cable must not be kinked or bent.
◆
Periodically lubricate the clutch cable
with a sui tab le l ubri can t, s ee p. 104 (LUBRICANT CHART). This will protect it
from excessive wear and corrosion.
use and maintenance Pegaso 650
-
43
Page 28

#//,!.4
aCAUTION
Do not use the vehicle if the coolant is
below the minimum prescribed level.
Check the coolant level every 625 mi
(1,000 km) and after long trips; have the
coolant changed by your Local apr ilia
Dealer every 2 years.
aWARNING
Coolant is poisonous! Do not ingest
coolant under any circumstance.
Should you get coolant in your mouth,
rinse with cool water and immediately
seek medical attention. Coolant is also
very dangerous to your skin and eyes.
Should you accidentally get coolant on
your clothing o r skin, change clothes
immediately. Wash coolant from your
skin with hot water and soap. Should
you get coolant in your eyes, flush with
plenty of cool water and seek professional medical h elp at once. Should
someone swallow coolant accidentally,
induce vomiting, rinse mouth with water, and immediately see k professional
medical attention.
use and maintenance Pegaso 650
44
-
aWARNING
DISPOSE OF THE COOLANT PROP ERLY.
BE SURE TO KEEP THE DRAINED
COOLANT AWAY FROM CHILDREN
AND PETS. IT IS SWEET TASTING, AS
WELL AS EXTREMELY POISO NOUS,
AND IS VERY A TTRACTIVE TO CHILDREN AND PETS.
Use extra caution not to spill the coolant on any hot parts of the engine. It is
flammable, and can emit invisible, noxious fumes.
Always wear rubber or latex gloves
when servicing the cooling system.
Have the coolant change d by your Lo cal
APRILIA Dealer.
The coola nt is m ade up of 50% wa ter an d
50% antifreeze.
This mixture is ideal for most running temperatures and ensures good protection
against corrosion.
It is advisable to keep the same mixture also
in the hot season, since in this way losses
due to evaporation are reduced and it is not
necessary to top up very frequently.
The mineral salt deposits left in the radiator
by evaporated water are thus reduced and
the efficiency of the cooling system remains unchanged.
If the outdoor temperature is below 0°C,
check the cool ing circuit fr equently and if
necessary increase the antifreeze concentration (up to maximum 60%).
aCAUTION
Use only distilled water when to pping
off the cooling system. This will reduce
damage to the engine.
aWARNING
The coolant is very hot.
Do not remove the filler cap (1) when
the engine is hot since the c oolant is
under pressure and it will splash out violently.
If it gets in contact with the skin or with
your clothing, it may cause severe
burns.
Page 29

CHECKING AND TOPPING UP
aWAR NING
Be aware of the ri sk of burns from th e
coolant.
Check the coolant level and top up the
expansion tank onl y after the engine
has thoroughly cooled.
NOTE Positi on the vehicle on firm a nd
flat ground.
◆
Place the vehicle on the center stand,
see p. 59 (POSITIONING THE VEHICLE
ON THE STAND).
NOTE If it is nece ssary, cl ean the part of
the “MIN” and “MAX” marks with a cloth.
◆
Make sure that the level of the fluid contained in the expan sion tank (2 ) is in cluded between the “MIN” and “MAX” marks.
MIN = minimum level.
MAX= maximum level.
If not, proceed as follows:
NOTE The expansion ta nk is equipped
with a breather tube (3). Do not disconn ect
the breather tube (3).
◆
Loosen the filler cap (1) (by giving it half
counterclockwise turn), without removing it.
◆
Wait a few seconds in order to release
any residual pressure that may be
present in the circuit.
◆
Unscrew and remove the filler cap (1).
aWARNING
Coolant is poisonous! Do not ingest
coolant under any circumstance.
Should you get coolant in your mouth,
rinse with cool water and immediately
seek medical attention. Coolant is also
very dangerous to your skin and eyes.
Should you accidentally get coolant on
your clothing o r skin, change clothes
immediately. Wash coolant from your
skin with hot wat er and soap. Sho uld
you get coolant in your eyes, flush with
plenty of cool water and seek professional medical help at once. Should
someone swallow coolant accidentally,
induce vomi ting, rinse mouth with wa ter, and immediately seek profession al
medical attention.
aWAR NING
Do not use your fingers or any other object to check if there is enough coolant.
◆
Top up wit h cool ant, se e p. 104 (L UBRICANT CHART) until the coolant level
reaches approximative the “MAX” notch.
Do not exceed this level, otherwise the
coolant will flow ou t while the engine is
running.
◆
Replace the filler cap (1).
aCAUTION
Have any damage or discrepancy repaired by your Local APRILIA Dealer. Do
not attempt to repair the cooling sys tem
yourself.
use and maintenance Pegaso 650
-
45
Page 30

4)2%3
This vehicle is equipped with inner tube
tires.
aWARNING
Check the tire inflation at room temperature at least once a week, see p. 100
(TECHNICAL DATA).
Pressure measurement must always be
carried out when the tires are cold, as
when the tires are warmed up, pressure
will increase, and if they are checked at
this time erroneous readings will be
seen.
If the tire is inflated to too high a pressure, an uncomfortably harsh ride will
result, and ri ding comfort will be compromised. Also, road holding, especially during turns and in wet conditions,
will likewise be compromised.
If the tire is underinflated (pressure is
too low), the tire may slip on the rim
with consequent loss of control. Again,
road holding and handling characteristics will be degraded, and brake performance will be reduced.
When the tire is w orn to a point where
any tread is less than 0.12 in (3 mm)
deep, the tire is worn out, and must be
replaced. Also, if a tire suffers a puncture that is larger than 0.20 in (5 mm) in
its longest dimension, the tire must not
be repaired, but should be replaced.
use and maintenance Pegaso 650
46
-
After a tire is repaired, b alance the
wheels. Use only tires that are listed,
see p. 100 (TECHNICAL DATA).
Insure that all tir es are equipped with
properly installed valve caps.
aWARNING
Do not ride the vehicle if the tire we ar indicators show that the tire is worn out.
Failure to heed this warning can lead to
an accident with subsequent serious injury or even death.
Some types of tires homol ogated for
this vehicle are provided with wear indicators.
There are several kinds of wear indicators.
For more infor mation on ho w to check
the wear, contact your Dealer.
Visually check if the tires are worn and
in this case have them changed.
If a tire should go flat while you are
riding the vehicle, do not attempt to
continue ridi ng. Avoid abrupt bra king
and steering inputs, and avoid shutting
the trottle quickly. Slowly decrease the
throttle setting, moving to the side of
the road, using the engine compression
to slow you to a st op. Non-compliance
with these instructions may cause accidents with consequent risk of injuries
or even death.
If the tires are old, even if not completely worn out, they may become hard and
may not ensure good road holding.
In this case, have the tires changed.
Have the tire changed when it is worn
out or in case of puncture on the tread
side, if the puncture is larger than 0.20
in (5 mm).
After repairing a tire, ha ve the wheels
balanced.
Use only tires in the size suggested by
APRILIA, see p. 1 00 (TECHNICAL DATA).
Do not install tires with air tube on rims
for tubeless tires and viceversa.
Make sure that the tires always have
their valve seali ng caps on, to pre vent
them from suddenly going flat.
Repair, maintenance, changing and balancing of tires are very important to
your safety, and should only be performed by qualified mechanics using
the appropriate tools.
For this reason, we suggest that you
have your tires serviced by your Local
APRILIA Dealer.
aWARNING
New tires ar e often cove red with a sli ppery mold release compound. Scrub the
tires in by riding slowly and making numerous turns for the first few miles. Do
not use any kind of tire dressing or other
liquid on your tires. Especially do not
permit any petroleum products, such as
oil, gasoline or brake fluid to come in
contact with the tires. If you do, wipe it
immediately, then s crub the tire with
soap and water and a stiff brush. Do not
use a tire that is worn out.
Page 31

Minimum tread depth is measured as
shown above. The minimum tread
depth (1) for both the front and the rear
tires is 0.12 in (3 mm).
!54/-!4)#,)'(43/.
Your vehicle is equippe d with lights t hat
come on automatically as soon as the ignition switch (2) is turned to position “
(ON) (low beam lights “
a”) position “Y” (PARKING) (only
lights “
parking lights “p”).
For this reason, there is no light switch on
your vehicle.
The lights can be switched off only by
turning the ignition switch (2) to position
“m” (OFF).
Before starting the vehicle, make sure that
the dimmer switch (3) is in the low beam
b” position.
lights “
b” or high be am
n”
#!4!,94)##/.6%24%2
aWARNING
The exhaust system of this vehicle is
equipped with a catalytic converter. It
becomes extremely hot, and ca use se rious burns and forest fires. Do not touch
it! Keep flammable materials away.
aWARNING
If your vehicle is equipped with a catalytic converter, do not pa rk it near dry
brush, wood, or in places easily accessible to children, as the catalytic converter
becomes extreme ly hot durin g use. Be
careful to avoi d any kind of co ntact before it has completely cooled down.
The catalytic converter, if used, is a metal
“platinum-rhodium bivalent” type.
This device provides for the ox idation of
the CO (carbon monoxide) and of the HC
(unburned hydrocarbons) co ntai ned in t he
exhaust gases, changing them into carbon
dioxide and steam, respectively.
aCAUTION
Do not use leaded petrol, since it causes
the destruction of the catalytic converter.
%8(!5343),%.#%2
aWARNING
Tampering with the exhaust system is
prohibited. It is against the law for you
to alter the exhaust system in a manner
that increases the noise, carefully read
p. 5 (WARNINGS - PRECAUTIONS GENERAL ADVICE).
Periodically inspect the entire exhaust system, including the exhaust pipe and silencer, to make sure that no holes have rusted
through. Using a wire or small pick, make
sure that the drain hole in the bottom of the
muffler is open. If the no is e of y ou r veh ic le
has increased significantly, replace the defective exhaust system components. See
your Local aprilia Dealer. Tampering with
the exhaust system not only makes your
vehicle lo ud, it will r educe its p erformanc e
and shorten its life.
30!2+!22%34%2
aWARNING
If the bike is to be used off-road, on public land, it is the owner’s responsibility to
install a spark arrester approved by the
US Forest Service for thi s engine displacement or larger.
use and maintenance Pegaso 650
-
47
Page 32

).3425#4)/.3&/2 53%
aWARNING
Before you ride away, always do a pre
ride check to make sure th at all system s
are working properly and safe, see p. 49
(PRELIMINARY CHECKING OPERATIONS). Failure to follow this warning
can lead to engine seizure, handling instabilities or other problems which can
result in an upset and subsequent serious injury or even death.
Do not hesitate to consult your Local
APRILIA Dealer in case there is something you do not understand about the
functioning of some controls or in case
you suspect or discover so me irregul arities.
It does not take long to carry out a
check-up and t his operation ensures
you much more safety.
use and maintenance Pegaso 650
48
-
Failure to perform the checks descri bed
above may cause accide nts or make the
vehicle overturn, with consequent serious injuries or even death.
aWARNING
These hand-guards (1) do not provide
crash protection but just protect your
hands from branches and flying debris.
Always wear appropriate riding gloves.
aWARNING
If the throttle sticks open, it may cause
a collision with another vehicle, or an
upset.
If the throttle sticks, kill the engine with
the engine stop switch located on the
right handlebar.
Do not attempt to restart the engine un-
til the throttle has been repaired and
works perfectly. Failure to obey this
warning can lead to a runaway with se riously injuries or even death.
Your vehicle is equipped with a double cable throttle. One cable opens the throttle
when you rotate the throttle grip toward
you; the other closes the throttle when you
rotate the grip away from you. It is essential, when you release the throttle grip, that
it automatically return to the idle position.
This double cable arrangement enhances
safety by pro viding for po sitive clos ing of
the throttle.
aWARNING
In the event of a throttle sticking emergency, always kill the engine using the
engine stop switc h located near the
throttle grip on the right handlebar.
Never use your vehicle if the throttle
does not automatically fully return to
the idle position whe n the throttle gr ip
is released. Contact your Local APRILIA
Dealer for repairs. Failure to heed this
warning can lead to a serious accident
and subsequent injury or even death.
If any fastener is loose, th e rider may
lose control of the vehicle and risk an
accident.
Both situat i on s ma y ca u se se ri ou s in juries or even death.
Page 33

02%,)-).!29#(%#+).'/0%2!4)/.3
Component Check Page
Front and rear disc brakes Check brake operation, lever and pedal play, fluid levels. Check the pads for excessive
Throttle Make sure that it works smoothly and that it is possible to open and close it completely, in
Engine oil Check and/or top up if necessary. 36, 37, 66, 67
Wheel/
tires
Brake lever and pedal Make sure they work smoothly and are properly lubrica t ed. 42
Steering Make sure that the fork head rotates through its entire range without fouling of any kind.
Clutch Check the play of the clutch lever. Ensure that the clutch operates without jerking or slip-
Side stand and center stand Make sure that it works smoothly and that the spring tension brin gs it back to its normal
Component nuts,
bolts and other fasteners
Drive chain Check the slack and the conditions of the chain at both sprockets. 78, 79
Fuel tank Check the fuel level and top up if necessary.
Coolant With the engine cold, check the coolant level. Make sur e th at it is at the pre sc ri be d level. 44, 45
Engine stop switch (
Lights, warning lights
and electrical devices
n - m) Make sure that it functions correctly. 31
wear, check the discs for condition. If the discs are unduly scored or show signs of heat
discoloration, do not ride the vehicle. Check both brake systems for evidence of leaks. If
there are leaks, do not ride the
all steering positions. If ne cessary, adjust and/or lubricate it.
Check the tire surface, the i nf l at ion pr essure, wear and tear and any damage.
Inspect the rims, spoke s and hu bs for cr acks, lo osenes s or da mage . Do no t ride the vehi cle if there is even the slightest defect in either of the wheels.
Make sure that the fork stops touch the frame at full left and fu ll right fork lock.
ping.
position.
If necessary, lubricate joints and hinges.
Make sure that the safet y sw it ch on the side stand operates correctly.
Check that all fasteners are tight and properly torqued.
Make sure that there are no fu el lea ks .
Make sure that the filler cap is properly closed.
Check the proper functi on in g of al l the lights and the horn.
Do not ride if any of these are not fu nctioning properly.
vehicle.
36 – 42,
69
84
46
68
43
70
61
35, 80, 97
87 – 96
use and maintenance Pegaso 650
-
49
Page 34

34!24).'
aWARNING
Exhaust gases con tain carbon monoxide, which is extremely poisonous if inhaled.
Avoid starting the engine in closed or
badly-ventilated rooms.
The non-observance of this warning
may cause loss of consc iousness or
even lead to death by asphyxia.
NOTE When the side stand is extended
the engine will not start unless the transmission is in neutral. Note also that if you
attempt to shift into gear with the side
stand down, the engine will stop.
With the side stand retracted, the engine
may be started with the gear selector in
neutral without pulling in the clutch lever.
The engine may be started while the transmission is in gear only if the clutch lever is
pulled in.
use and maintenance Pegaso 650
50
-
aWARNING
Be careful not to drop the vehicle when
you first sit on it.
◆
Retract the center stand or the side stand.
aWARNING
Ensure that the center stand and the
side stand are completely up.
◆
Sit astride the vehicle.
◆
Move the fuel valve lever (1) to the “ON”
position.
◆
Make sure the dimm er sw itch (2 ) is i n the
low beam “b” position.
◆
Rotate the ignition key (3) to the “n” (ON)
position.
At this point the engine oil pressure warning light “
(Engine oil pressure warning light j).
If the low fuel warning light “
on, move the fuel valve lever (1) to the
“RES” position.
Top up as soon possible, see p. 35 (FUEL).
j” (4) must come on, see p. 29
g” (5) comes
◆
Hold the vehicle in place by applying at
least one brake (6).
◆
Pull in the clutch lever (7) c ompletely an d
put the shift lever (8) in neutral so that
the green warning light “
◆
Move the engine st op switch (10) to the
“
n” (ON) position.
q” (9) is on.
NOTE After a long period of inactiv ity,
carry out the operations described at p. 52
(STARTING AFTER A LONG PERIOD OF
INACTIVITY).
NOTE To avoid discharging the battery,
and possibly damaging the starter, do not
keep the starter button depressed for more
than 5 seconds. If the engine does not
start in this time, wait for 10 seconds and
try again.
aCAUTION
Do not depress the starter button “r”
(11) when the engine is running. This
will damage the starter and other im portant engine components.
Page 35

or if the warning light comes on while
the engine is running, this means that
the oil system is not developing sufficient pressure. In this case, sto p the engine immediately and contact an Local
APRILIA Dealer.
Failure to heed this warning can lead to
engine seizure, upset, and serious injury or even death.
◆
Press the starter button “r” (11) to start
the engine. Leave the throttle (12) in the
idle posit ion (Pos. A). Release the button as soon as the engine catches.
aWAR NING
If the throttle sticks open, it may cause
a collision with another vehicle, or an
upset.
If the throttle sticks, kill the engine with
the engine stop switch located on the
right handlebar.
Do not attempt to restart the engine until the throttl e has been repaired and
works perfectly. Failure to obey this
warning can lead to a runaway with seriously injuries or even death.
Your vehicle is equipped with a double cable throttle. One cable opens the throttle
when you rotate the throttle grip toward
you; the other closes the throttle when you
rotate th e gr ip aw ay from y ou. I t i s es sen -
tial, when you release the throttle grip, that
it automatically return to the idle position.
This double cable arrangement enhances
safety by pro viding for po sitive clos ing of
the throttle.
aWARNING
In the event of a throttle sticking emergency, always kill the engine using the
engine stop switch located near the
throttle grip on the right handlebar. Never use your vehicl e if the throttl e does
not automatically fully return to the id le
position when the throttle grip is released. Contact your Local APRILIA Deal-
er for repairs. Failure to heed this warning can lead to a serious accident and
subsequent injury or even death.
aWARNING
As soon as the engine has started, the
engine oil pressure warning light “
(4) must go out. If this does not occur,
j”
aCAUTION
Never ride off briskly with a cold engine.
Allow the engine to warm up by riding
slowly for the first few miles.
Starting a warm engine:
◆
Before attempting to start the motor, ensure that the cold start lever “
not engaged, see p. 52 (STARTING AT
VERY COLD AMBIENT TEMPERATURES).
STARTING WITH A FLOODED ENGINE
If for some reason the e ngine fails t o start
after several attempts, it is possible that
the engine may be flooded. That is, th ere
may be too much gasoline in the inlet
manifolds and the carburetors.
To purge the flooding:
◆
Rotate the cold start lever “e” (13) upwards.
◆
Depress the starter button “r” (11) for a
few seconds (lettin g the engine spin
over) while holding the throttle (12) in a
completely open positi on (Pos. B).
use and maintenance Pegaso 650
M
e” (13) is
-
51
Page 36

STARTING AT VERY COLD AMBIENT
TEMPERATURES
When the ambient temperature is very
cold (less than 0°C) it may be difficult to
start the engine on the first try.
If this occurs:
◆
Rotate the cold start lever “e” (13)
downwards.
◆
Depress the starter button “r” (11), at
the same time, open the throttle (12)
slightly.
If the engine starts:
◆
Release the throttle grip (12).
◆
After letting the engine run for a few seconds, rotate the cold start lever "e" (13)
upwards.
◆
If idle is uneven, open the throttle (12)
slightly.
If the engine does not start:
Wait for a few seconds and repeat the
above starting procedure.
◆
If necessary, remove the spar k plug, see
p. 86 (SPARK PLUG) and make sure
that it is not wet.
◆
If the spark plug is wet, clean and dry it.
Before reinstalling it:
NOTE Put a clean cloth on the cylinder,
near the spark plug seat , in orde r to pr otect
it from oil sprays.
◆
Press the starter button “r” (11) and let
the starter run for about five seco nds
without accelerating.
STARTING AFTER A LONG PERIOD
OF INACTIVITY
If the vehicle has not been used for se veral
weeks, it may not start imme diately. This
may be because the fuel in the carbu retors
float bowl has evaporated.
In this case:
◆
Press the starter button “r” (11) for
about five seconds. This will fill the float
chambers.
2)$).'
aWARNING
Do not place anything inside the front
part of the fai ring between t he handlebar and the dashboard. Any object
placed in this area could jam the forks,
and also could restrict visibility of the
dashboard.
NOTE Before riding away, carefully read
the “safe drive” chapter, see p. 17 (SAFE
DRIVE).
If the low fuel warning light “
or the engine should die while you are riding
because of fuel exhaustion, move the fuel
valve lever (1) to the reserve position “RES”.
Top up as soon possible, see p. 35 (FUEL).
FUEL RESERVE: 1.32 US gal (5
chanical reserve], 1.59 US gal (6 L ) [ electrical reserve].
g” (5) comes on
L ) [me-
use and maintenance Pegaso 650
52
-
Page 37

aWARNING
If you are riding solo, without a passenger, make sure the passenger foot rests
are folded up.
Never take your hands off the hand
grips nor your feet off the foot rests
while you are riding.
If you carry a pas senger, instruct
him/her not to move around unduly, and
to keep his/her body aligned with yours
during turns. Failure to do this could
upset the stability of the vehicle.
Before riding away, ensur e that the c enter stand and the side stand is completely up.
If the throttle sticks open, it may cause
a collision with another vehicle, or an
upset.
If the throttle sticks, kill the engine with
the engine stop switch located on the
right handlebar.
Do not attempt to restart the engine until the throttl e has been repaired and
works perfectly. Failure to obey this
warning can lead to a runaway with seriously injuries or even death.
Your vehicle is equipped with a double cable throttle. One cable opens the throttle
when you rotate the throttle grip toward
you; the other closes the throttle when you
rotate th e gr ip aw ay from y ou. I t i s es sen tial, when you release the throttle grip, that
it automatically return to the idle position.
This double cable arrangement enhances
safety by providing for positive closing of
the throttle.
aWARNING
In the event of a throttle sticking emergency, always kill the engine using the
engine stop switch located near the
throttle grip on the right handlebar. Never use your vehicl e if the throttl e does
not automatically fully return to the id le
position when the throttle grip is released. Contact your Local APRILIA Deal-
er for repairs. Failure to heed this warning can lead to a serious accident and
subsequent injury or even death.
◆
Before riding away, be sure that the rear
view mirrors are correctly adjusted.
aCAUTION
When the vehicle is new to y ou, practice
looking in the rear view mirrors.
Only experience will allow you to cor rectly determine how far beh ind you following vehicles are.
◆
Ride at reduced speed for the first few
miles in order to warm the engine up.
◆
With the throttle grip (12) in the idle position (Pos. A), and the engine idling, pull
in the clutch lever (7) completely.
◆
Engage first gear by pressing downwards on the shift lever (8).
◆
Release the brakes.
aWARNING
Do not release t he clutch too abrup tly,
or the vehicle will rear in the air (do a
wheely) or je rk forwards. Never acc elerate abruptly or excessively when releasing the clutch lever in order to prevent the clutch from slipping and
overheating (slow release) o r the front
wheel from lifting (w heely) (quick release).
Failure to observe these instructions
can lead to a serious accident with subsequent injury or even death.
use and maintenance Pegaso 650
-
53
Page 38

◆
Slowly but steadily release the clutch lever (7) and, at the same time, open the
throttle by rotating the throttle grip (12)
slightly co unterc lockwise (Pos. B). This
will start the vehicle moving.
◆
Increase the speed by gradually rotating
the throttle grip (12 ) (Pos. C). Do not ex ceed the recommended rpm, see p. 56
(RUNNING-IN).
To engage second gear:
aCAUTION
Shift gears fairly quickly but without
great force. Dev elop a “feel” for shifting with your left toe. Never lug the engine, that is, running it at too low an rpm
which can damage the vehicle’s engine,
and causes rough and juddering acceleration.
◆
Rotate the throttle grip (12) clockwise
(Pos. A), pull in the clutch lever (7) and
lift the shift lever (8) straigh t up. Rele ase
use and maintenance Pegaso 650
54
-
the clutch lever (7) gently, and rotate the
throttle counterclockwise to accelerate.
◆
Repeat the last two operations to shift
from second, to third, to fourth, to fifth.
aWARNING
If the engine oil pressure warning light
j” (4) comes on during the normal
“
running of the engine, this means that
the oil system is not developing sufficient pressure. In this case, immediately stop the engine and contact your Local APRILIA Dealer. Failure to heed this
warning can lead to engine seizure, upset, and serious injury or even death.
aWARNING
If the pointer (14) of the coolant temperature indicator reaches t he red area
(15), stop the engine and check the
coolant level, see p. 44 (COOLANT).
Do not operate the vehicle if the m aximum temperature is exceeded. Serious
engine damage or even seizure may result which can cause an upset and serious injury or even death.
Shifting from higher to lower gears, that is,
downshifting, is accomplished as follows:
◆
Rotate the throttle grip (12) clockwise
(Pos. A), slow the bike with the brakes,
pull in the clutch lever (7), depress the
shift lever (8) with your toe, release the
clutch.
aWARNING
Shift gears one by one. Simultaneously
downshifting more than one gear may
cause the engine to exceed its maxi mum rated rpm (red lin e). This can seriously damage the engine.
Before and during downshift, rotate the
throttle clockwise to decelerate in order
to avoid overspeeding the engine.
Page 39

Downshifting s hould be carried ou t in the
following situations:
◆
When riding downhill or when braking, in
order to increase the braking action by
using the compression of the engine.
◆
When riding uphill if the engine lugs
down (rpm decreases).
aWARNING
Avoid opening and clo sing the throttle
repeatedly and continuously. Failure to
head this warning can cause you to accidentally lose control of your vehicle.
When you hav e to brake, close th e
throttle and apply both brakes simultaneously in order to obtain the best
brake performance.
By applying only the front br ake or only
the rear brake, you re duce the braking
performance considerably and run the
risk of locking up one wheel which can
cause an upset and subsequent serious
injury or even death.
If you stop on an up hill, us e brakes only
to slow the vehicle and to keep it in
place. Slipping the clutch to keep the
vehicle in one place on an uphill grade
will very quickly ruin the clutch and
overheat the engine.
aWARNING
Before ente ring a turn, slo w down, using the brakes and the engine, to a constant speed and then acceler ate slightl y
through the turn. Av oid braking at the
last moment. Thi s can cause you to
lose control of your vehicle.
If the brakes are operated continuously
on downhill grades, the discs and pads
will overheat, reducing the braking efficiency. Use engine compre ssion and
downshift to retard your vehicle while
going downhill. Use the brakes as little
as possible to maintain a safe speed.
Never coast downhill with the e ngine off
and/or the clutch disengag ed or the
transmission in neutral.
On roads that are wet or covered with
snow, ice or mud, ride very slowly,
avoiding braking or accelerating or maneuvering quickly. Hold the handlebars
firmly.
Failure to heed these warnings can
cause an upset with su bsequent serious injury or death.
aWARNING
Pay very close attention to any obstacles or variations of the road surface.
Uneven roads, rails, manhole covers,
painted traffic stripes, traffic dots a ll become slippery when wet. Avoid particularly steel plates which are sometimes
used during road maintenance. They
become more slippery than ice once
they are wet by rain. If you must ride on
such surfaces, decrease your speed
and operate the throttle, brakes and
steering very gently.
Always use the turn signals any time
you intend to change lanes or change
direction, and avoid sudden or abrupt
turning.
Switch off the direction indicators as
soon as you have changed direction.
Overtake and pass on ly wi th care , es pecially in rainy weather when a water
cloud created by larger vehicles reduces visibility and the slip stream coul d
cause you to lose control of your vehicle.
use and maintenance Pegaso 650
-
55
Page 40

25..).').
The internal parts of the engine and transmission must be properly run-in to ensur e
their long life and dependable operation.
If possible, while breaki ng in your vehicle,
ride on hilly roads and /or r oads with many
curves so that the engine and transmission undergo lots of spe ed changes. It is
also important that, during the run-in p eriod, the suspension and brakes b e treated
gently to allow the mat ing parts to bed.
Therefore, avoid hard braking, high
speeds or very bumpy roads during the
break in period.
During break in, obey the following rules:
◆
Do not open the throttle abruptly or fully
at low engine speed. This rule applies
even after break in has been completed.
◆
During the first 62 mi (100 km), apply the
brakes with caution, avoid sudden and
prolonged braking. This ensures correct
bedding in of the pads on the discs.
◆
During the first 312 mi (500 km), never
exceed 4,000 rpm.
◆
Between 312 mi (500 km) and 625 mi
(1,000 km), never exceed 5,000 rpm.
aWARNING
After the vehicle has been operated for
625 mi (1,000 km) perform the “checking
operations” shown in column “After running-in” of the REGULAR SERVICE INTERVALS CHART, see p. 62. Rectify any
faults found. Failure to heed th is warning could lead to damage to your vehicle
or engine seizure or other malfunction
which could cause an upset and lead to
serious injury or even death.
◆
Between the first 625 mi (1,000 km) and
1,250 mi (2,000 km) drive more briskly,
changing speed and using maximum acceleration for only a few seconds. Never
exceed 5,500 rpm.
◆
After the first 1,250 mi (2,000 km) if you
have followed the above break in schedule, the engine should be fully broken in,
and will deliver maxi mum performance.
However, never exceed the maximum
rpm (6,250 rpm).
Engine maximum rpm
for the running-in
Mileage mi (km) Max. rpm
0-312 (0-500) 4,000
312-625 (500-1,000) 5,000
625-1,250
(1,000-2,000)
5,500
over 1,250 (2,000) 6,250
use and maintenance Pegaso 650
56
-
Page 41

34/00).'
aWARNING
If possible, avoid stopping abruptly,
slowing down suddenly and braking at
the last moment.
Non-compliance with these instructions
may cause accidents with consequent
risk of serious injuries or even death.
◆
Release the throttle grip (1) (Pos. A),
gradually put on the brakes and at the
same time shift down in or der to decrease the speed, see p. 52 (RIDING).
Once the speed has decrea sed, before
stopping the vehicle:
◆
Pull in the clutch lever (2) (Pos. B) in or-
der to prevent the engine dying.
When the vehicle has come to rest:
◆
Position the shift lever (3) in neutral
(green warning light “
◆
Release the clutch lever (2) (Pos. C).
◆
If you are stopping just briefly and not
q” (4) on).
shutting down the engine, keep one
brake applied.
use and maintenance Pegaso 650
-
57
Page 42

0!2+).'
aWARNING
Park the vehicle only on firm flat
ground, otherwise it could fall over.
Do not lean the vehicle agains t walls, d o
not lay it on the ground.
Park your vehicle away from children
and pedestrians, so that they will not
come in contact with hot parts.
Do not leave you r vehicle unat tended
with the engine running or with the key
in the ignition switch.
Do not sit o n the ve hicle wh en the s ide
stand is down.
If the vehicle falls over, it will leak gasoline which is extremely flammable.
Flames or sparks could cause a fire
which could destroy not only your vehicle but also buildings arou nd it and
cause injury or even death to people as
well.
◆
Stop the vehicle, see p . 57 (STOPPING).
◆
Move the engine stop switch (1) to the
m” (OFF) position.
“
aCAUTION
Do not leave the ignition on if you have
stopped the engine by moving the engine stop switch to the “
tion as this will discharge the battery.
When the vehicle has come to rest after
stopping the engine with the engine
stop switch, turn the ignition switch (3)
to the “
m” (OFF) position.
◆
Rotate the key (2) and move the ignition
switch (3) to the “
◆
Move the fuel valve leve r (4) to the “OFF”
position.
◆
Position your vehicle on the stand, see
p. 59 (POSITIONING THE VEHICLE ON
THE STAND).
m” (OFF) posi-
m” (OFF) position.
use and maintenance Pegaso 650
58
-
Page 43

NOTE Neve r leave th e key in the igniti on
switch.
◆
Lock the steering, see p. 32 (STEERING
LOCK) and extract the key.
When you park the vehicle in a dark area,
or in a blady lit, area (parking-lot or street)
it is possible, and useful, may leave the
parking lights on, s o the ve hicle wi ll be easily visible.
For leave the parking lights on: see p. 32
(PARKING LIGHTS).
0/3)4)/.).'4(%6%()#,%
/.4(%34!.$
aWARNING
Position the vehicle on firm and flat
ground.
CENTER STAND
◆
Seize the left handle grip (5) and the left
passenger grab rail (6).
◆
Put the stand lever (7) down.
aWARNING
Make sure the vehicle is stable when
parked. If it falls down, it will certainly
be damaged and could injure others as
well.
SIDE STAND
◆
Grab the left handle grip (5) and the left
passenger grab rail (6).
◆
Put the side stand (8) down with your
right foot. Make sure it i s exte nded completely and all the way forward.
◆
Lean the vehicle to th e left u ntil the stand
rests firmly on the ground.
◆
Turn the handlebars completely against
the left stop.
aWARNING
Make sure the vehicle is stable when
parked. If it falls down, it will certainly
be damaged and could injure others as
well.
use and maintenance Pegaso 650
-
59
Page 44

35''%34)/.3
4/02%6%.44(%&4
NEVER leave the key (1) in the ignition
switch (2), always use the steering lock “
(LOCK).
Try to park your ve hicle in a safe place, if
at all possible, in a garage or other pro tected place.
Lock your vehicle up using a chain and
padlock around the rear wheel. Chain the
rear wheel to the swinging arm.
If possible, use the appropriate aprilia
s”
“Body-Guard” armored cable
ditional anti-theft device.
Make sure that all l ega l re qui rem en t s: registration, license plates, insu rance, etc. are
in order.
&
, or an ad-
Write down your name, address and tele phone number and the vehicle identification number in the space below, to facilitate finding the owner in case your vehicle
is recovered after theft.
SURNAME: ...............................................
NAME: .......................................................
ADDRESS: ................................................
...................................................................
TELEPHONE NO.: ....................................
NOTE Very often stolen vehicles are
identified thanks to the data written in the
use/maintenance manual.
use and maintenance Pegaso 650
60
-
Page 45

-!).4%.!.#%
Carefully read p. 2 (FOREWORD) and
(INTRODUCTION), p. 3 (SAFETY WARNINGS) and (GENERAL SAFETY RULES),
p. 5 (WARNINGS - PRECAUTIONS GENERAL ADVICE).
aWARNING
Risk of fire.
Keep fuel and o ther flammable sub-
stances away from the electrical components.
Before beginning any maintenance operation or any inspection of the vehicle,
stop the engine, remove the key (1)
from the ignition lock (2), wait until the
engine and t he exhaust syst em have
cooled down and if possible lift the vehicle by mean s of the proper e quipment, on firm and flat ground.
Before proceed ing, make sure that th e
room in which you are working is properly ventilated.
Be careful to avoid hot parts of the engine and exhaust system. They are hot
enough to cause serious burns.
Avoid the temptation to hold any part of
the vehicle in your mo uth. The coating s
and platings used are, in some cases,
toxic.
aCAUTION
In general, reassembly is per formed in
the reverse order of the disassembly instructions given here.
For some mainten ance operati ons, especially those in which your hands are
likely to come in contact with coolant,
or engine oil, or gasoline, o r brake fluid ,
it is advisable to use thin disposable
gloves, such as those made of latex,
rubber or nitrile.
The routine maintenance ope rations described in this manual can usually be performed by the user. However, in some
cases, specific tool s and technical expertise may be required.
Do not hesitate to contact your Local aprilia
Dealer who has all the latest factory information and tools to properly service your
vehicle.
Remember that man y ser vice operati ons, i f
done improperly, can be very hazardous.
If you have any ques tions abo ut your ability
to carry out the operations described here,
see your Loc al aprilia Dealer.
In all cases, personally carry out the “pre-
liminary checking operations” after any
maintenance, see p. 49 (PRELIMINARY
CHECKING OPERATIONS).
aWARNING
Remember that tightening torque of all
fasteners on the wheels, brakes, axles,
suspension are extremely important to
ensure safety, and must be maintained
at the prescribed values.
Check the tightening torques of the fasteners regularly, and always use a
torque wrench when installing them.
Failure to adhere to this warning could
cause the loosening and sub sequent
loss of critical fastener s, which could
cause a wheel to lock or cause other
handling problems with consequent
overturning, and the risk of serious injury or even death.
aWARNING
Fasteners must be neither overtightened or undertightened. If they are
overtightened, the threads may be damaged and the fasteners will be destroyed, whereas if they are undertightened, they can vibrate and become lost.
Obviously, under these circumstances,
a serious accident with resultant serious injury or death could ensue.
use and maintenance Pegaso 650
-
61
Page 46

2%'5,!23%26)#%).4%26!,3#(!24
THESE OPERATIONS MAY BE CARRIED OUT BY YOUR Local APRILIA Dealer, OR BY THE OWNER OF THE VEHICLE
Component
Battery / electrolyte level C C
Spark plug CS
Drive chain, tension and lubrication every 312 mi (500 km): C
Steering bearings and steering C C
Air cleaner CS
Fork C
Clutch clearance R R
Light operation / direction C
Light system C C
Safety switches C C
Brake fluid C
Coolant every 625 mi (1,000 km): C
Engine oil every 312 mi (500 km): C
Tires C every 625 mi (1,000 km): C
Tire pressure every month: R
Engine idling rpm R R
Engine oil pressure warning light “
Spoke tension C C
Front and rear brake pad wear C
Swinging arm pivot C
C = check and clean, adjust, lubricate or change, if necessary; P = clean; S = change; R = adjust.
Perform these maintenance ope ration s at one-half of he specified inter vals, if your vehicle is often used in rai ny or very dusty
conditions, or on unpaved roads.
use and maintenance Pegaso 650
62
j” at every start: C
-
After running-in
[625 mi (1,000 km)]
Every 3,750 mi
(6,000 km) or 8 months
before every trip and
every 3,750 mi (6,000
km): C
Every 7,500 mi
(12,000 km) or 16
months
Page 47

THESE MAINTENANCE OPERATIONS SHOULD ONLY BE PERFORMED OUT BY Local APRILIA Dealer.
Component
Carburetors C P
Accelerator cables (adjustment) C
Timing chain C
Wheel bearings C
Engine oil S S
Engine oil filter S S
Engine oil filter (on the frame) P
Tappet clearance C C
Braking systems C C
Cooling system C C
Brake fluid C
Brake pads if worn: S
Coolant every 2 years: S
Fork oil S
Fuel valve C C
Wheels / tires C
Nut, bolt, screw tightening C C
Suspensions and attitude C C
Brake fluid bleeding C
Fuel pipes C every 4 years: S
C = check and clean, adjust, lubricate or change, if necessary; P = clean; S = change; R = adjust.
Perform these maintenance operati ons at on e-half of he sp ecified inte rvals, if you r ve hicle is often use d in rainy or very dusty
conditions, or on unpaved roads.
After running-in
[625 mi (1,000 km)]
Every 3,750 mi
(6,000 km) or 8 months
every 2 years: S
Every 7,500 mi
(12,000 km) or 16
months
use and maintenance Pegaso 650
-
63
Page 48

)$%.4)&)#!4)/.$!4!
It is a good idea to write down the frame
and engine numbers in th e space provided below. Use the frame number (VIN) to
identify your vehicle when ordering sp are
parts.
aWARNING
In all states and countries, it is against
the law to alter the Vehicle Identification
Number (VIN). You ca n incur severe
penalties by doing this. Also, this will
immediately invalidate your warranty.
FRAME NUMBER
The frame number is stamped on the right
side of the fork head.
Frame no.
ENGINE NUMBER
The engine number is stamped on the rear
part of the left engine crankcase.
Engine no.
!)2#,%!.%2
Carefully read p. 61 (MAINTENANCE).
aWARNING
Do not use gasoline or flammable solvents to wash the air cleaner, in order to
avoid fire or explosion.
Inspect the air cleaner to ensure that it has
not become clogged every 3,75 0 mi (6,00 0
km) or 8 months of use. Renew the air
cleaner every 7,500 mi (12,000 km).
The air cle aner must be inspected mo re
frequently, cleaned if necessary, and replaced more fre quently if the vehi cle is
used on dusty or wet roads.
More frequent cleaning of the air cleaner is
suggested, especially if yo ur bike is used
under very dusty conditions.
use and maintenance Pegaso 650
64
-
Page 49

aCAUTION
The air cleaner must not be use d for
more than 7,500 mi (12,000 km) regardless of how many times it has been
cleaned in the interval. Under very
dusty or dirty conditions, it is advisable
to replace the air filter more often.
Before the cleaning operation, it is necessary to remove the air cleaner from the vehicle.
REMOVAL
◆
Remove the sa dd l e, s ee p . 81 (REMOVING THE SADDLE).
◆
Rotate the inlet duct (1) clockwise, pull it
up, and remove it.
◆
Extract the air cleaner (2).
aCAUTION
Plug the opening with a clean cloth to
prevent any f oreign matte r from entering the air tubes.
CLEANING
aCAUTION
Take great care not to deform the perforated metal outside screen. It is very
fragile and can be easily damaged. Never use a screwdriver or other sharp hard
tool to remove the air cleaner itself.
aWARNING
During this operation, always wear goggles which provide your eyes with 360°
protection. Be very careful using compressed air jets, they can cause serious
personal injury if directed towards your
body.
◆
Grasp the air cleaner vert icall y and st rike
it repeatedly on a clean hard horizontal
surface.
◆
If available, clean the air cleaner with a
compressed air jet, directing it from the
inside of the filter towards the outside.
◆
Clean the outer part of the air cleaner
with a cloth.
CHANGING
◆
Replace the air cleaner with a new one
of the same type.
◆
Make sure that the gasket (3) is intact; if
it is damaged, change it.
◆
Every 3,750 mi (6,000 km) remove the
plug (4) so that any dirt that may have
accumulated inside the filter case can be
removed.
use and maintenance Pegaso 650
-
65
Page 50

#(%#+).'4(%%.').%/),,%6%,
!.$4/00).'50
Carefully read p. 36 (LUBRICANTS),
p. 61 (MAINTENANCE) and p. 104 (LUBRICANT CHART) .
aWARNING
It is critical to the safe operation of your
vehicle that the proper lubricants, mai ntained at the proper levels, are used.
Failure to heed this warning can lead to
an engine seizure wit h subseq uent accident, serious injury or death.
aWARNING
Remember that the tightening torque of
all fasteners on the wheels, brakes, axles, and other components of the suspension system is very important to ensure the safety of the vehicle, and must
be kept at the prescribed values.
Check the tightening torque of the fasteners regularly, and always use a
torque wrench when reinstalling them.
Failure to comply with this warning
could allow one of these compone nts to
be lost which coul d lock a wheel or
cause other handling problems with
consequent overturning and risk of serious injury or even death.
CHECKING
NOTE P osition the vehicle on firm and
flat ground.
◆
Stop the engine and let it cool down for
at least ten minutes, in order to allow the
oil to flow back to the oil pan and to cool
down.
aWARNING
Exhaust gases contain carbon monoxide, which is extremely poisonous if inhaled.
Do not start the engine in c losed or badly-ventilated rooms.
Failure to observe this warning may
cause loss of consciousness or even
lead to death by asphyxia.
use and maintenance Pegaso 650
66
-
Page 51

◆
Start the engine, see p. 50 (STARTING)
and let it idle for about one minute, in order to ensure that any oil which remained in th e su mp is r etu rned to t he oi l
tank.
◆
Stop the engine.
aWARNING
Should your vehicle o vertu rn, it will le ak
gasoline, which is extremel y flammab le.
Flames or sparks may cause a fire,
which could destro y not only the vehicle, but also the bui lding in which it is
located, and cause serious injuries or
even death.
◆
Place the vehicle on the center stand
see p. 59 (POSITIONING THE VEHICLE
ON THE STAND).
NOTE If y ou attempt to check th e oil wi th
the vehicle leaned in either direction from
the vertical, your measurement will be inaccurate.
aCAU TION
Before unscrew and remove the plug /
dipstick (1), clean it and the part around
it with a clean cloth. Any foreign matter
getting into the eng ine oil system may
lead to severe damage.
◆
Unscrew and extract the plug/dipstick (1).
◆
Clean the part in contact with the oil with
a clean cloth.
aCAU TION
To check the oil level, the plug/dipstick
(1) must neither be screwed nor tightened in the filler neck (2).
◆
Insert the plug/dipstick (1) completely in
the filler neck (2), without screwing or
tightening it (3).
◆
Withdraw the plug/dipstick (1) again and
read the oil level on the graduated marking:
MAX = maximum level
MIN = minimum le vel
The difference between “MAX” and
“MIN” is about 0.32 US qt (300 cm#).
◆
The level is correct if the oil reaches approx the “MAX” mark on the dipstick.
aWARNING
Never exceed the “MAX” mark, nor
leave the oil below the “MIN” mark, in
order to avoid serious damage to the
engine.
◆
If necessary, top up the engine oil tank
through the filler neck (2), after ex tracting
the plug/dipstick (1).
aWARNING
Tighten the plug / dipstick (1) snugly to
insure no oil leak.
Never ride the vehicle with low engine
oil or with contaminated or unapproved
lubricants. Th is will greatly ac celerate
the wear of moving parts and cause irreparable failure.
use and maintenance Pegaso 650
-
67
Page 52

#(%#+).'4(%34%%2).'
Carefully read p. 61 (MAINTENANCE).
◆
Place the vehicle on the center stand,
see p. 59 (POSITIONING THE VEHICLE
ON THE STAND).
aWARNING
Before carrying out the following ope rations, let the engine and the exhaust silencer cool down until they reach room
temperature, in order to avoid burns.
Check the slack in the fork head after the
first 625 mi (1,000 km) an d thereafter ev ery
3,750 mi (6,000 km).
To check fork head slack:
◆
Remove the oil pan guard (1), seep. 82
(REMOVING THE OIL PAN GUARD).
NOTE Prepare a 12.60 in (320 mm) high
support, the base of which must measure
7.87 x 7.87 in (200 x 200 mm).
◆
Place the support (2) under the vehicle
and a soft cloth (3) between them, so
use and maintenance Pegaso 650
68
-
that the front wheel can move freely and
the vehicle cannot fall down.
aWARNING
Make sure that the vehicle is stable.
If it falls over, it may cause injury to bystanders and other property, as well as
being damaged itself.
◆
Shake the fork in the direction of travel.
NOTE Carry out this oper ation with
care. Do not pull the fork back and forth
too vigorously, or you may observe play in
the center stand, which would give you a
false indication of fork head slack.
Repeat this operation several times un til
you are confident you have accurately assessed the fork head slack.
◆
There should be no fore and aft slack. If
you detect any slack, arrange to have
your vehicle repai red by yo ur Local april-
ia Dealer.
#(%#+).'4(%37).').'!2-
&5,#25-3(!&4
Carefully read p. 61 (MAINTENANCE).
Every 7,500 mi (12,000 km) check the
swinging arm fulcrum shaft and needle
bearings for slacks.
To perform this check:
◆
Place the vehicle on the center stand,
see p. 59 (POSITIONING THE VEHICLE
ON THE STAND).
aWARNING
Before caryring out the following ope rations, let the engine and the exhaust silencer cool down until they reach room
temperature, in order to avoid burns.
◆
Attempt to move the swinging arm vertically and laterally, as shown in the illustration above.
◆
There should be no ve rtic al ly and laterally slack. If yo u detect any slack , arran ge
to have your vehicle repaired by your Local aprilia Dealer.
Page 53

#(%#+).'4(%"2!+%0!$7%!2
Carefully read p. 37 (BRAKES), p. 38
(DISC BRAKES) and p. 61 (MAINTENANCE).
The following information refers to a
single braking system, but is valid for
both.
Check the brake pad wear after the firs t
625 mi (1,000 km), before every trip and
thereafter every 3,750 mi (6,000 km).
The amount of wear that the brake pads
experience depends o n how t he vehicle is
used, how aggressively it is driven, and
the condition of the roads upon which it is
operated. Wear will be faster than no rmal
when the vehicle is driven aggressively, or
on dusty or wet roads.
aWARNING
Check the wear of the brak e pads before every trip.
CHECKING WEAR OF THE BRAKE
PADS
◆
Place the vehicle on the center stand,
see p. 59 (POSITIONING THE VEHICLE
ON THE STAND).
◆
Perform a visual check of the friction material thickness. Use a flashlight. See
the arrows (1) and (2) above.
If the friction material on one pad of a pair,
front (3) or rear (4), is worn to 0.06 in (1.5
mm) or less, replace both pads.
aWAR NING
Excessive wear of the friction material
would cause the contact of the pad metal support with the disc, with consequent metallic noise and production of
sparks from the caliper; bra king efficiency and safety wi ll be se r ious ly c ompromised. This could lead to a crash,
with subsequent serious injury or
death.
aWAR NING
Have the pads changed by your Local
APRILIA Dealer.
use and maintenance Pegaso 650
-
69
Page 54

#(%#+).'4(%34!.$
Carefully read p. 61 (MAINTENANCE)
and p. 71 (CHECKING THE SWITCHES).
NOTE The following information may re-
fer to just one stand but should be observed with regard to both stands.
The stand (A) must rotate about its pivot
smoothly and easily.
Perform the following checks:
◆
The springs (1) must be free from damage, wear, or rust, and must fully and
firmly retract the side st and when the
weight of the vehicle is lifted off of it.
◆
The stand (A) must rotate freely abo ut its
pivot. If necessary, lubricate the pivot,
see p. 104 (LUBRICANT CHART).
use and maintenance Pegaso 650
70
-
#(%#+).'4(%&5.#4)/.).'
/&4(%3!&%4937)4#(
/.4(%3)$%34!.$
The side stand (2) is equipped with a safety system, operated by safety switch (3).
This system prevents the motor from being
started while the stand is extended unless
the transmission is in neutral. It also kills
the engine if the stand is extended while
the engine is running, unless the transmission is in neutral. To check the proper
functioning of the safety switch (3):
◆
Sit on the vehicle in the normal ridi ng position.
◆
Retract the side stand (2).
aWAR NING
Exhaust gases co ntain carbon monoxide, which is extremely poisonous if inhaled.
Do not start the engine in closed or badly-ventilated rooms.
Failure to observe this warning may
cause loss of consciousness or even
lead to death by asphyxia.
◆
Start the engine, see p. 50 (STARTING).
◆
Release the throttle grip (4) (Pos. A).
With the engine idling, pull in the clutch
lever (5) completely.
◆
Engage first gear, pushing the shift lever
(6) downwards.
◆
Extend the side stand (2).
NOTE Extending the side stand must kill
the engine. If the engine continues to run:
◆
Check the s afety switch (3) o n the side
stand (2), see p. 71 (CHECKING THE
SWITCHES). Perform t he necessary
cleaning or repairs.
◆
Repeat the check.
aWARNING
If the engine does not stop when the
side stand is extended, do not ride your
vehicle. Contact your Local APRILIA
Dealer.
Page 55

#(%#+).'4(%37)4#(%3
Carefully read p. 61 (MAINTENANCE).
Check the switches after the first 625 mi
(1,000 km) and thereafter every 3,750 mi
(6,000 km).
The vehicle is equipped with four switches:
– stoplight switch on the rear brake pedal
(1);
– stoplight switch on the front brake lever
(2);
NOTE To be able to check the stoplight
switch on the front b rake le ver (2) i s nece ssary remove the right hand-guard, see
p. 82 (REMOVING THE HAND-GUARDS).
– safety switch on the side stand (3);
– clutch lever switch (4).
NOTE To be able to check the clutch le-
ver switch (4) is necessary remove the left
hand-guard, see p. 82 (R EMOVING THE
HAND-GUARDS).
◆
Make sure that there is no dirt or mud on
the switch. The switch pin must move
freely and without interference, returning
automatically to its unapplied position.
◆
Check the spring (5) ; it must not be damaged, worn or stretched.
use and maintenance Pegaso 650
-
71
Page 56

).30%#4).'4(%&2/.4
!.$2%!23530%.3)/.3
aCAU TION
The front fork oil change operation
should be entrusted to your L ocal APRIL
IA Dealer.
Carefully read p. 61 (MAINTENANCE).
Have the front fork oil chan ged after the
7,500 mi (12,000 km).
Every 7,500 mi (12,000 km), carry out the
following checking operations:
◆
Apply the front brake lever and push up
and down on the ha ndlebar repeate dly,
pushing the fork up and down.
The fork must move smoothl y and easily,
there must be no trace of oil on the fork
tubes.
◆
Check the t orque of all th e fasteners on
the front fork and inspect the entire front
fork to make sure that it is in good condition without leaks or dam age. Repeat for
the rear suspension and swinging arm.
aCAUTION
Do not ride your vehicl e if either suspension is damaged in any way, see
your Local APRILIA Dealer.
2%!23530%.3)/.
The rear suspension consists of a springshock absorber unit, fixed to the frame by
means of silent-blocks.
To set the vehicle attitude, the rear shock
absorber is pro vid ed wi th an a djus ting ri ng
nut (1), a locking ring nut (2) and a screw
(3) for the adjustment of the damping on
extension.
The standard adjus tment, set by t he manu facturer, is suitable for a d river weighing
about 70 kg.
If your weight and needs are different, for
example in case of ride with passenger and
full load, contact your Local aprilia Dealer.
aWARNING
Adjust the hydraulic damping with the
shock absorber extended, according to
the conditions of use of the vehicle.
aWARNING
If the vehicle attitude has been set for
full load, do not turn the screw (3) fully
to the left (counterclockwise).
Otherwise, the dampi ng will be insufficient to prevent a jerky ride.
If necessary, contact your Local APRILIA
Dealer.
use and maintenance Pegaso 650
72
-
Page 57

ADJUSTING THE PRELOAD OF THE
SPRING AND OF THE HYDRAULIC
BRAKING WITH EXTENDED SHOCK
ABSORBER
Soft adju stm ent - for light load (for exam-
ple, solo rider).
Spring:
◆
Rotate the handwheel (4) completely
leftwards (counterclockwise).
Shock absorber:
◆
Rotate the adjusting screw (5) completely leftwards (counterclockwise).
&
The hydraulic damping may be adjusted to
suit the conditions of use of the vehi cle. To
adjust the damping, sc rew the dampin g adjustment screw (3) in or out, per the following instructions:
Unsurfaced roads or roads with irregular pavement - more damping:
◆
Rotate the screw (3) to the right (clockwise).
Normal or smooth road surfaces - sof t
damping:
◆
Rotate the screw (3) to the left (counterclockwise).
2%!23530%.3)/.
7)4((9$2!5,)#02%,/!$
!$*534-%.4
This optional type of suspension makes it
possible to adjust the preload of the spring
and the damping of the shock absorber.
&
NOTE Adjust the preload of the spring
and of the hydraulic damping with the
shock absorber fully extended, to suit the
conditions o f us e o f t he v eh i cl e. Wh en t he
spring preload is increased, it is necessary
to also increase the hydr aulic damping in
order to avoid a jerky ride.
Intermediate adjustment - fo r normal lo ad
(for example, rider and passenger).
Spring:
◆
Starting from the soft adjustment position, rotate the handwheel (4) rightwards
(clockwise) , giving it 25 clicks.
Shock absorber:
◆
Starting from the soft adjustment position, rotate the adjusting screw (5) rightwards (clockwise), giving it a full turn (9
clicks).
Hard adjustment - for heavy load (for example, rider, passenger and luggage).
Spring:
◆
Rotate the handwheel (4) completely
rightwards (clockwise).
Shock absorber:
◆
Rotate the adjusting screw (5) completely rightwards (clockwise).
use and maintenance Pegaso 650
-
73
Page 58

&2/.47(%%,
aWARNING
The disassembly and reassembly of the
front wheel can be diffic ult for t hose u nfamiliar with vehicle maintenance. You
may wish to have your Local APRILIA
Dealer car ry out these operations.
If you wish to perform these operations
yourself, caref ully read p. 61 (MA INTENANCE).
While disassembling and reassembling
the wheel, pay extra care not to damage
the brake lines, discs or pads.
Before carring out the following operations, let the engine and the exhaust silencer cool down until they reach room
temperature, in order to avoid burns.
DISASSEMBLY
◆
Place the vehicle on the center stand,
see p. 59 (POSITIONING THE VEHICLE
ON THE STAND).
◆
Remove the oil pan guard (1), see p. 82
(REMOVING THE OIL PAN GUARD).
NOTE Prepare a 12.60 in (32 0 m m) hi gh
support (2), the base o f which must measure 7.87 x 7.87 in (200 x 200 mm).
◆
Place the support (2) under the vehicle
and a soft cloth (3) between them, so
that the front wheel can move freely and
the vehicle cannot fall down.
◆
Place a support (4) under the tire, in
such a way as to keep the wheel in its
position after loosening it.
aWAR NING
Make sure that the vehicle is stable.
If it falls, it may cause damage to bystanders and other property, as well as
being damaged itself.
◆
Have a helper steady the handlebar in
the straight ahead position.
Screw (5) tightening torque:
7.23 ftlb (10 Nm).
◆
Loosen the two axle clamp screws (5),
using the appropriate Allen wrench.
◆
Unscrew and remove the two screw s (6).
◆
Move the mudguard support (7) only as
much as necessary to unscrew the axle (8).
◆
Unscrew the axle (8) completely with the
appropriate Allen wrench .
Axle (8) tightening torque:
57.86 ftlb (80 Nm).
NOTE Observe the arrangement of the
speedometer drive (10) and of the spacer
ring (9), in order to be able to reassemble
them correctly.
NOTE To facilitate t he extraction of the
axle (8), slightly lift the wheel.
use and maintenance Pegaso 650
74
-
Page 59

◆
Support the front wheel and remove the
axle (8) manually.
◆
Remove the spacer ring (9).
◆
Disconnect and remove the speedometer drive (10) from the wheel seat.
aCAUTION
Never touch th e front brake lever after
removing the front wheel. If you do, the
caliper pistons may be pushed out of
their seats, and brake fluid will be
spilled. Should you accidentally do this,
take your vehicle to your Local APRILIA
Dealer who will know how to repair this
damage.
◆
Move the front wheel forward until you
can withdraw the di sc from the b rake c aliper (11).
◆
Remove the wheel completely by pulling
it forward.
REASSEMBLY
◆
Apply a thin film of lubricating grease,
see p. 104 (LUBRICANT CHART) to the:
– inside of the speedometer drive (10);
– outer seats of the wheel hub;
– front axle (8).
◆
Position the wheel on the support between the fork legs.
◆
Position the spacer ring (9) in its seat on
the wheel (left side of the vehicle).
◆
Position the boss of the speedometer
drive (10) in the appropriate seat on the
wheel hub.
◆
Correctly position the speedometer drive
seat in correspondence with the special
antirotation pin (12).
aCAU TION
While reassembling the wheel, be careful not to damage the brake line, the
disc and the pads.
◆
Insert the wheel between the fork legs,
carefully introducing the disc into the
brake caliper.
aWARNING
The front wheel is heavy and can easily
crush your fingers should you get them
between any part of the wheel and the
front fork. Do not attempt to line up the
wheel and the axle clamps with y our fingers. Failure to heed this warning can
lead to serious personal injury.
◆
Move the wheel around until the axle
hole and the axle clamps are aligned.
◆
Shift the mudguard support (7) only as
much as necessary to inse rt the axle (8 )
partially (from the right side of the vehicle).
◆
Push in the axle (8) completely (fitting
the spacer ring (9)) and tighten it to its
appropriate tightening torque .
Axle (8) tightening torque:
57.86 ftlb (80 Nm).
◆
Correctly position the mudguard support
(7).
◆
Remove the support (4) from under the
tire.
◆
Remove the support (2) from under the
vehicle.
◆
Correctly replace the oil pan guard (1),
see p. 82 (REMOVING THE OIL PA N
GUARD) .
◆
Retract the center stand, see p. 59 (POSITIONING THE VEHICLE ON THE
STAND).
◆
Apply the front brake lever, and then
push down on the handlebars, compressing the fork springs several times.
This will align the fork tubes.
◆
Place the vehicle on the center stand,
see p. 59 (POSITIONING THE VEHICLE
ON THE STAND).
◆
Screw and tighten the two screws (6).
◆
Tighten the two axle clamp screws (5).
Screw tightening torque:
7.23 ftlb (10 Nm).
aWARNING
After servicing the brakes, always
check them for function. If th e s troke of
the lever is excessive, or if you detect
that the effectiveness of the brakes is
reduced in any way, hav e your vehicle
serviced by your Local APRILIA Dealer.
It may be necessary to have your dealer
bleed the system, or ther e m ay b e so me
other problem with the brake system.
Never ride your vehicle in traffic immediately after servicing the brakes. Always apply the brake lever several
times before riding your vehicle. Then,
try your vehicle in a parking lot or other
safe area with little traffic to ensure that
the brakes are working properly. Failure to observe this warning can lead to
a serious accident with subsequent serious injury or death.
use and maintenance Pegaso 650
-
75
Page 60

2%!27(%%,
aWARNING
The disassembly and reassembly of the
rear wheel can be difficult for those unfamiliar with vehicle maintenance. You
may wish to have your Local APRILIA
Dealer carry out these operations.
If you wish to perform these operations
yourself, caref ully read p. 61 (MA INTENANCE).
While disassembling and reassembling
the wheel, pay extra care not to damage
the brake lines, discs or pads.
Before carring out the following operations, let the engine and the exhaust silencer cool down until they reach room
temperature, in order to avoid burns.
use and maintenance Pegaso 650
76
-
DISASSEMBLY
◆
Place the vehicle on the center stand,
see p. 59 (POSITIONING THE VEHICLE
ON THE STAND).
aWAR NING
Make sure that the vehicle is stable.
If it falls over, it may cause injury to bystanders and other property, as well as
being damaged itself.
◆
Place a support (1) under the tire, in
such a way as to keep the wheel in its
position after loosening it.
◆
Hold the axle (2) from rotating with the
appropriate Allen wrench.
Wheel nut (3) tightening torque:
72.33 ftlb (100 Nm).
◆
Remove the nut (3) and washer (4).
NOTE To facilitate the extraction of the
axle (2), slightly raise the wheel.
◆
Remove the axle (2) from the right side,
and recover the washer (5).
aWARNING
Keep your fingers well away from the
chain and sprocket. You coul d easily
lose a finger if it becomes pinched between these two parts. Use heavy work
gloves while installing the rear wheel.
Never attempt to line the rear wheel up
using your fingers. Failure to heed this
warning can result in serious personal injury.
◆
Remove the drive chain (6) from the rear
sprocket (7) and lay it down outside of
the rear sprocket.
NOTE Place the drive chain (6) outside
of the rear sprocket (7).
◆
Move the wheel forward and pull the
drive chain (6) away from the rear
sprocket (7).
◆
Pull the wheel backwards, removing it
from the swing arm from behind, carefully
removing the disc from the brake caliper.
 Loading...