

Page 1

What is Compressor?
Compressor is an application that transcodes media files into a
variety of formats. You can use Compressor to create files for
many uses, including:
Viewing on Apple devices such as Apple TV, iPad, iPhone,
iPod, or iTunes using high-definition (HD) or standard-definition
(SD) formats (including H.264)
Publishing to video-sharing websites including Facebook,
Vimeo, and YouTube using QuickTime
Burning to DVD or Blu-ray disc using H.264, MPEG-2 for DVD,
and Dolby Digital formats
Podcasting using H.264, AAC, and MP3 formats
Creating a package of media for submitting to the iTunes store
Compressor comes with built-in settings that you can use to
transcode files into the most common media formats. Compressor
also provides preconfigured destinations that transcode files and
then perform actions on the transcoded files. For example, if you
transcode a source file using the built-in “Publish to Vimeo”
destination, the destination outputs a high-quality QuickTime
movie file, and then automatically publishes the movie file to your
Vimeo account.
In addition to transcoding source files, you can use Compressor
Compressor basics
Page 2

to:
Create custom settings and destinations: You can use a
variety of formats to build custom settings and destinations
tailored to your unique transcoding workflows. For example,
you can create a custom setting with specific frame
dimensions or with video and audio filters applied. And when
you create a destination, you can apply a job action that is
performed after the file is transcoded—such as sending an
email message or running an .
Create settings to transcode Final Cut Pro X and Motion
projects: You can create a custom setting in Compressor and
then use it to transcode Final Cut Pro or Motion projects. For
example, you can create a setting that outputs a file with the
bit rate of your choice.
Transcode files using a network of shared computers: If you
need more processing power and shorter transcoding times,
you can create a group of shared computers to distribute and
speed the transcoding process.
Create Compressor droplets: If you need to provide a very
simple workflow for yourself or other users, you can
, a standalone application that lets you
transcode media files in the Finder, by dragging and dropping.
Compressor workflow
The basic process of transcoding files in Compressor is described
below.
Automator workflow
create a
Compressor droplet
Page 3

Import your media into Compressor
The first step in the transcoding process is to add one or more
media source files to Compressor. You can add media files from
your computer or a connected hard disk. Each media source file
in Compressor is called a job. Each transcoding session,
containing one or more jobs, is called a batch.
Apply transcoding instructions
After you add a source file, apply one or more transcoding
instructions to it. Compressor provides a variety of preconfigured
transcoding instructions called settings, which you can use to
convert files to the most common media formats. If you want, you
can modify the setting’s properties to meet your requirements.
Compressor also provides a number of preconfigured
destinations, which combine settings and a post-transcoding
action, such as uploading your file to YouTube or burning a Bluray disc.
Choose an output location
Designate a location on your computer or on a connected storage
device where you want to save the transcoded media file. You
can choose any of several preconfigured locations, including your
computer desktop, your Movies folder, or the source folder of the
original media. You can also choose a custom location.
Submit your media for transcoding
Page 4

After you assign settings or a destination and specify an output
location, click the Start Batch button to begin the transcoding
process. You can monitor the progress of the transcoding in the
Active view. After transcoding is complete, you can see
information about the settings or destinations you used in the
Completed view.
See to view a list of detailed instructions.
Interface overview
The Compressor window has three views: Current, Active, and
Completed. You can switch between these views by clicking a
view button at the top of the window.
Current view
Current view is the default view in Compressor, where you
prepare transcoding jobs and then submit your batch. When you
open Compressor for the first time, Current view displays two
basic areas:
Transcode files
Page 5
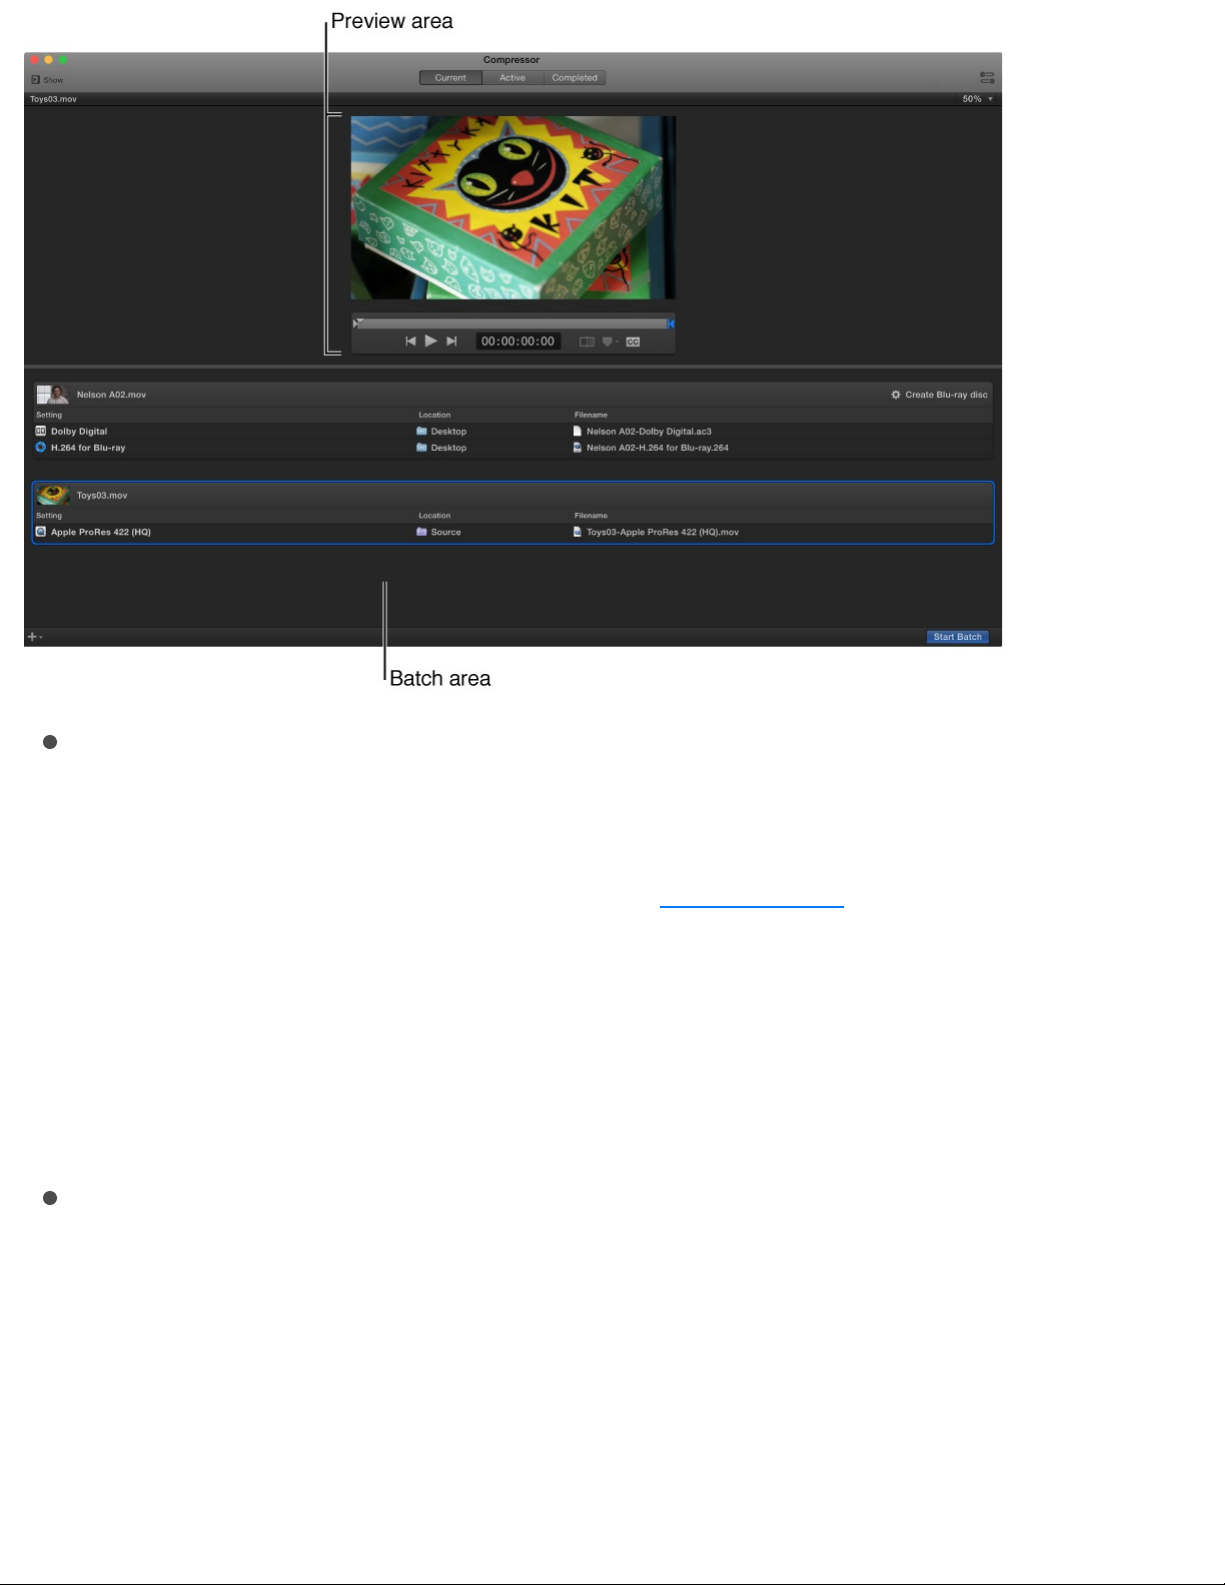
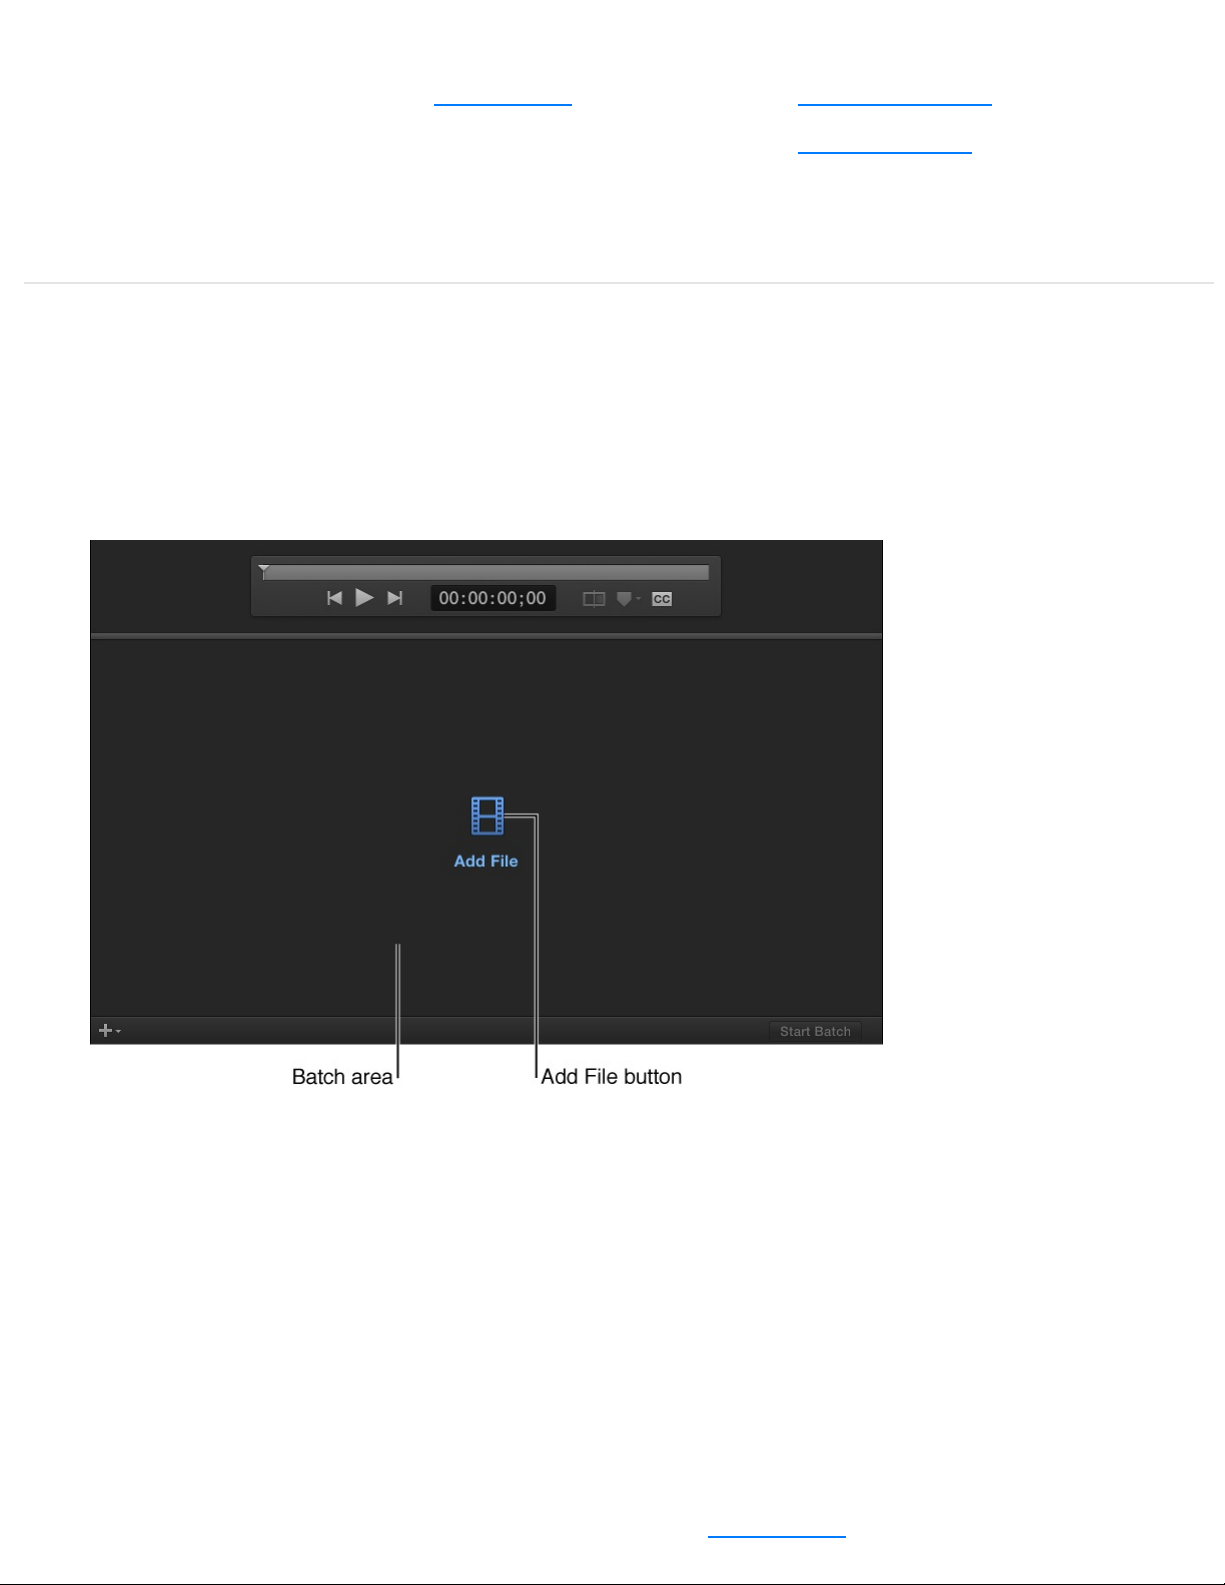
Batch area: The lower half of the main window displays
transcoding batches that you add to Compressor. A batch is
one or more transcoding jobs to be processed in a given
Compressor session. A job is a to which you apply
transcoding instructions. Each job in the batch area displays
information about the source file, the job’s transcoding
instructions (setting, output location, and output filename), and
any post-transcoding actions that have been added (or that
are part of the destination assigned to the job).
Preview area: Above the batch area, the preview area shows
how your media file will look and sound after transcoding.
Here you can also add metadata and markers to be included
in the transcoded file.
You can expand the Current view to display additional areas:
source file
Page 6
Settings and Locations pane: Click the Settings & Locations
button at the top-left corner of the Compressor window to
expand this area, then click Settings or Locations to display
the individual panes. The Settings pane provides quick access
to all the built-in destinations and settings, as well as to any
custom destinations or settings that you created. Likewise, the
Locations pane provides quick access to all the built-in save
locations, and to any custom save locations that you created.
You apply settings, destinations, and locations to a job by
dragging an item from these panes to the job in the batch
area.
Inspector pane: Click the Inspector button in the upper-right
corner of the Compressor window to expand this area. The
inspector pane has several views that change, depending on
the item that is selected. When you select a batch (by clicking
the background of the batch area), the Batch inspector
appears, displaying basic information about the current batch.
When you select a job in the batch area, the Job inspector
Page 7
appears, displaying a summary of the job’s transcoding
instructions as well as controls for adding metadata and
modifying job actions. When you select a specific transcoding
instruction in the batch area (one of the rows under the job),
the General, Video, and Audio inspectors appear. These three
panes contain adjustable properties that you can use to
customize the or .
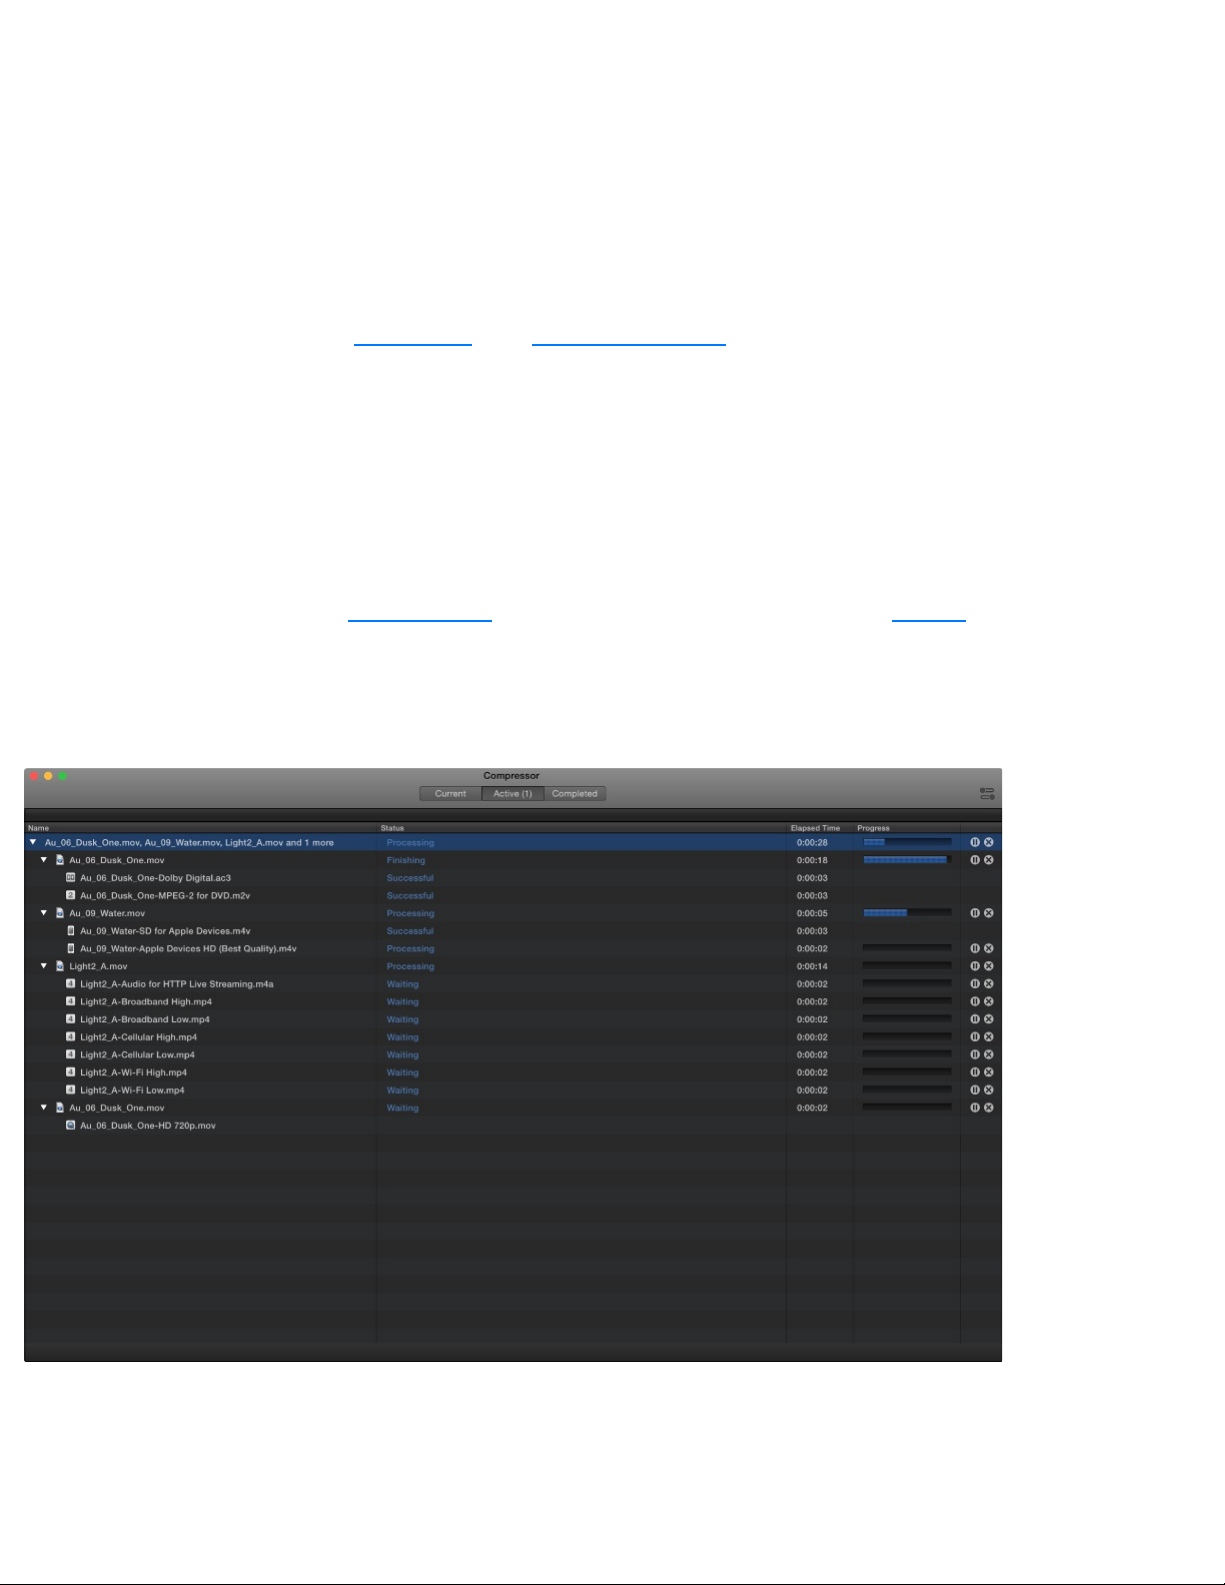
Active view
In Active view, the Compressor window displays status
information about (and their constituent ) currently
being transcoded. In this view, you can monitor progress bars as
well as pause or cancel the transcoding process.
Completed view
setting destination
batches jobs
Page 8
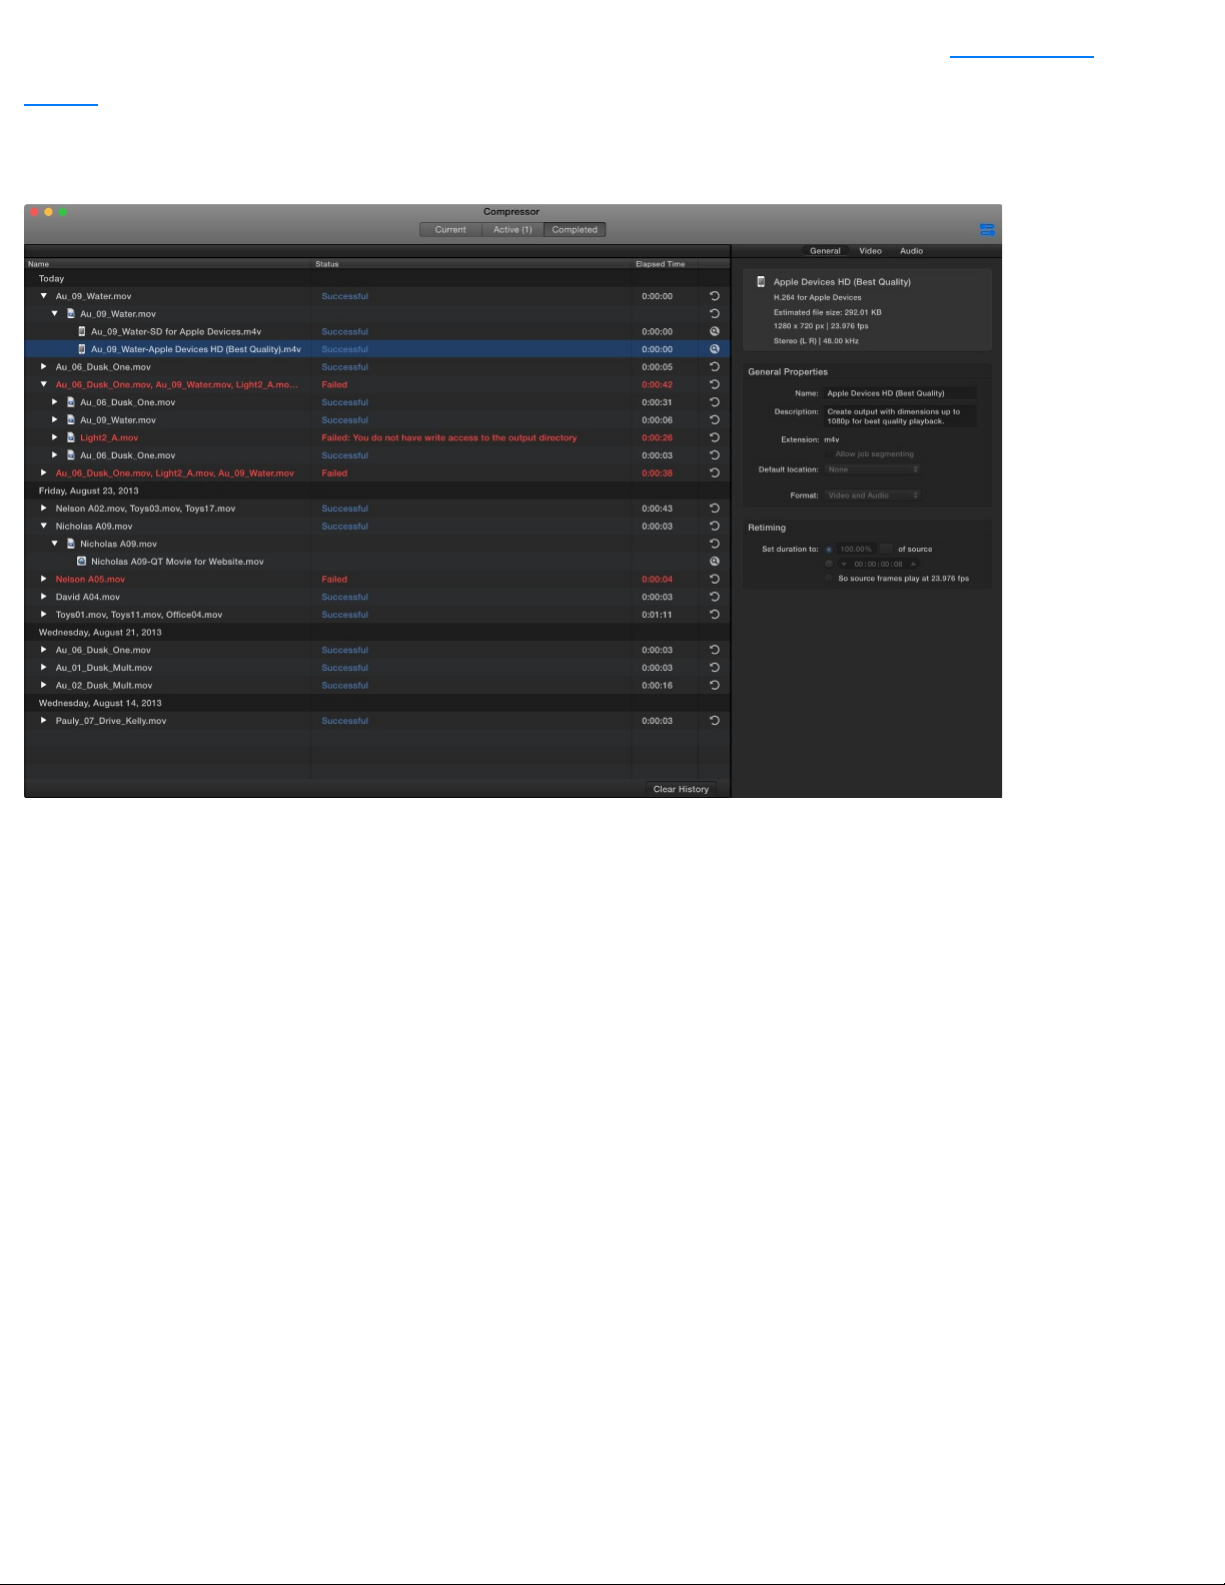
In Completed view, you can view information about and
that have been successfully transcoded, as well as
information about items that failed to transcode.
A list of batches is shown on the left side of the window. Click a
disclosure triangle beside a batch to see its constituent jobs and
output files. Select a batch, job, or output file in the list to see
additional information in the inspector pane (on the right).
batches
jobs
Page 9

Simple transcoding overview
When you add a source file to Compressor and apply output
instructions (all done in ), you create a transcoding
job. You can submit a single job for transcoding, or add more
source files (and output instructions), then submit a batch of jobs
for transcoding.
Each job in a batch has several parts:
Source file: The media file that you want to transcode.
Setting: The transcoding instructions that specify how the file
will be processed. Compressor provides a variety of built-in
settings that you can use to output files in common media
formats. Additionally, Compressor provides a number of
preconfigured destinations—one or more settings combined
with an automated job action that’s performed after
transcoding. For example, if you use the Publish to Facebook
destination to transcode a source file, Compressor outputs a
high-quality QuickTime movie file, then applies the
destination’s job action to upload the transcoded file to your
Facebook account.
Location: The place on your computer or a connected device
where the transcoded file will be saved. You can use one of
the built-in locations, or specify a new location.
Simple transcoding
Current view
Page 10
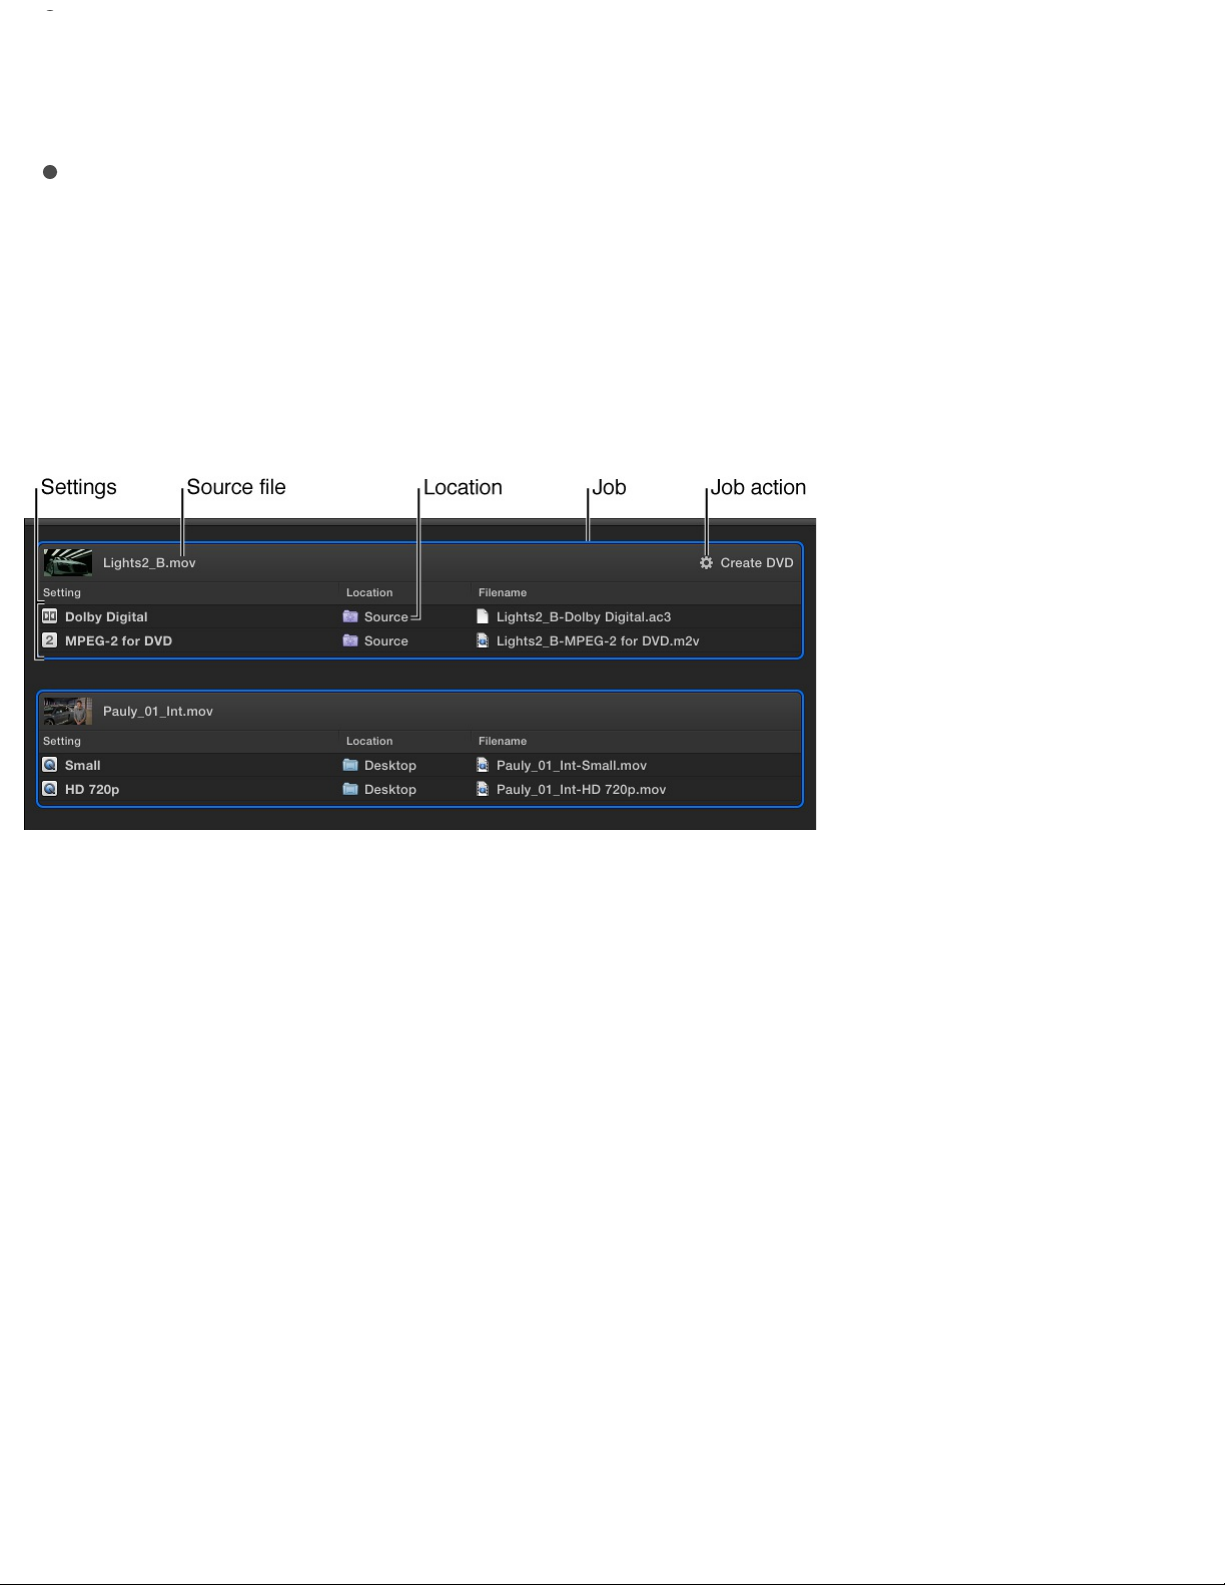
Filename: The title of the transcoded file. You can use the
default filename (the name of the source file) or type a custom
filename.
Job action: Optionally, you can add a post-transcoding action
to a job, such as burning a DVD, uploading to Vimeo or
YouTube, and so on. Each of the built-in destinations already
contains a job action.
In the example below, two jobs make up the batch:
The first job uses the built-in Create DVD destination to output a
Dolby Digital audio file and an MPEG-2 video file. The transcoded
files will be saved to the source folder (the folder where the
source media is stored), and after the files are transcoded, they’ll
be burned to a DVD (using the Create DVD job action).
The second job uses two built-in settings (Small and HD 720p) to
create a small QuickTime file and a high-definition (HD) QuickTime
file. The transcoded files will be saved to the desktop. Because
there’s no job action, the user will have to manually move or
otherwise distribute each file.
Transcode files
Page 11
The easiest way to transcode media files in Compressor is to use
or one or more built-in or a built-in (settings
that are combined with a post-transcoding , such as
uploading to Facebook or burning a Blu-ray disc).
Set up the first transcoding job in a batch
1. Click the Add File button in the batch area.
2. In the file window that appears, select a media file, then click
Add.
3. In the Settings window that appears, do the following:
a. Select one or more transcode settings or a destination
from the list.
The settings list contains basic , as well as
settings destination
job action
settings
Page 12

, grouped by category. To choose a specific
setting, click the disclosure triangle beside a destination or
a setting group (Podcasting, for example), then select one
or more settings.
Important: For destinations, always select the destination
name. If you select a setting that’s in the destination, the
destination’s will not be used when processing
the job.
b. Choose a save location from the pop-up menu.
4. When you’re satisfied with your setting and location choices,
click OK.
The new job is displayed in the batch area. The job includes a
thumbnail of the source file and the transcoding output
instructions (setting, location, and filename). If you chose
multiple settings, or a destination with multiple outputs, each
output appears in a separate row. If you chose a destination,
its job action appears in the upper-right corner of the job area.
To learn more about the built-in destinations and settings, see
and .
The job also appears in the preview area (above the batch
area), where you can see the video you’re transcoding, as well
as perform a number of other tasks. See .
destinations
job action
Built-in settings Built-in destinations
Preview jobs
Page 13
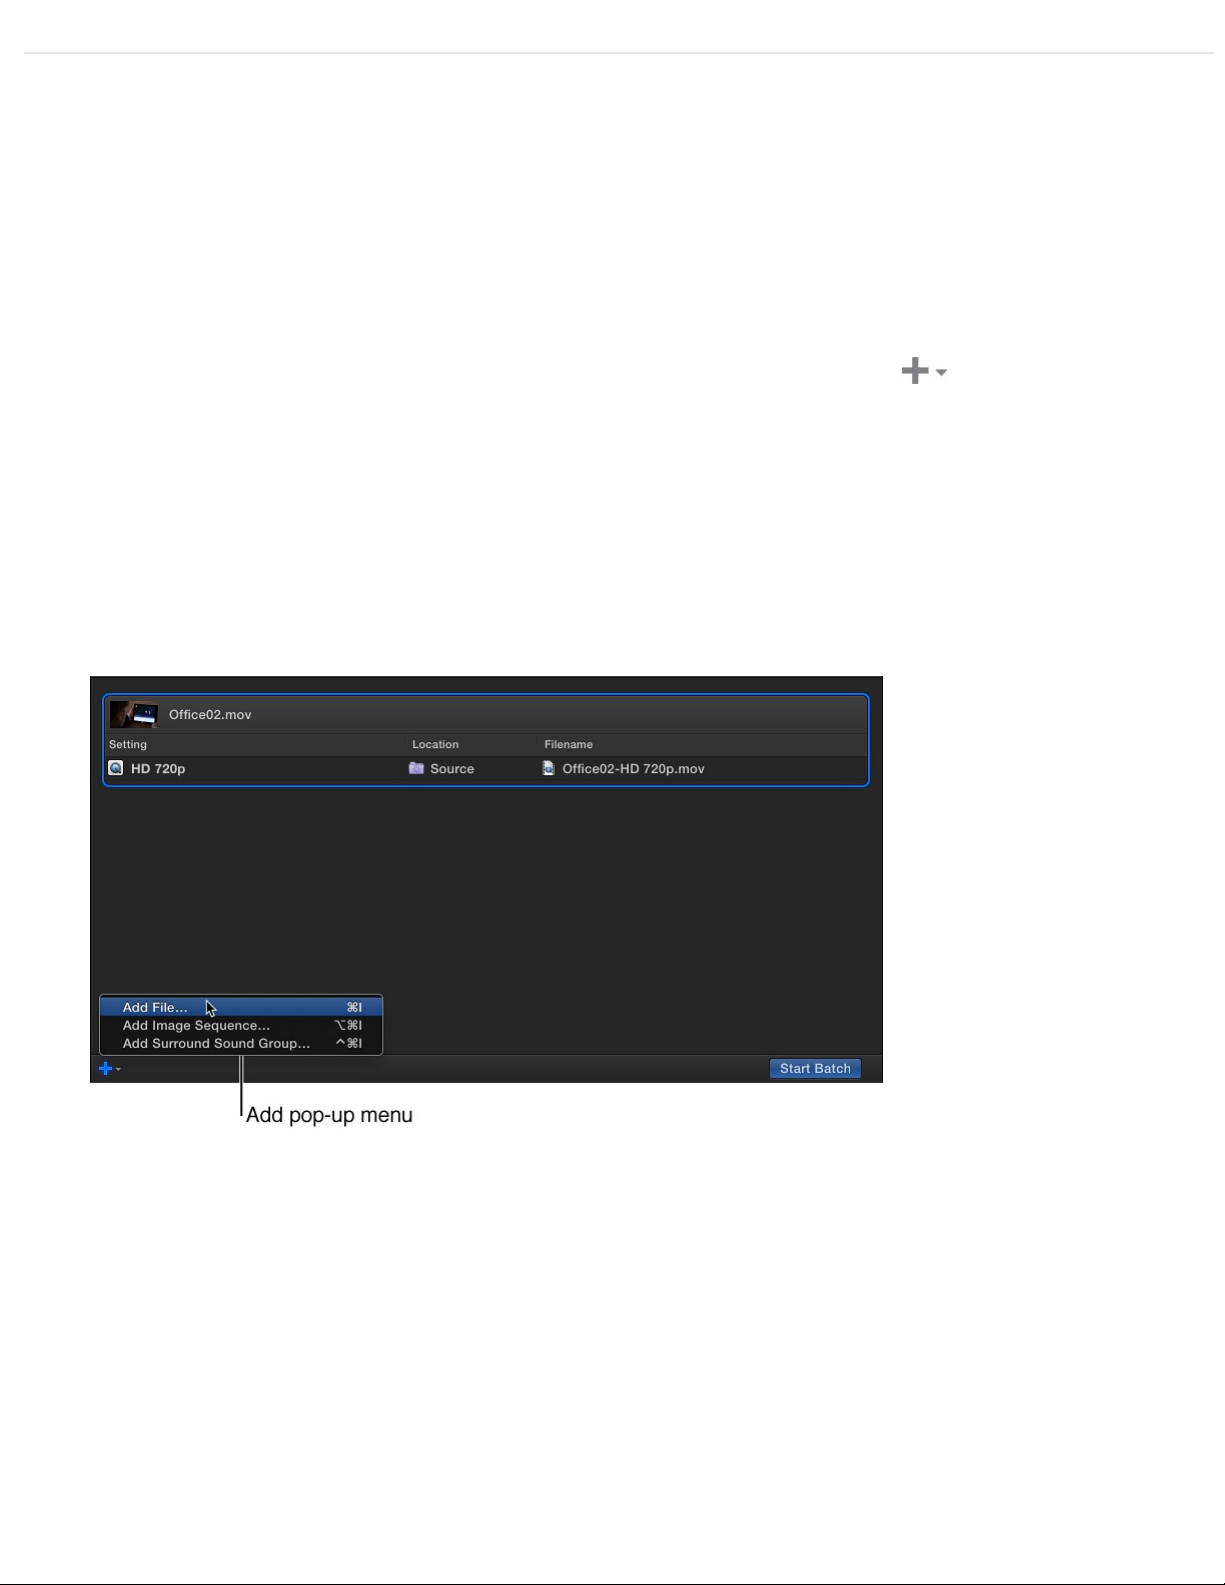
Add additional jobs to a batch
Optionally, you can add additional source files (and transcode
instructions) to a batch.
1. Choose Add File from the Add pop-up menu under the
batch area.
You can also add a set of image sequence files or surround
sound files. For more information, see
and .
2. In the file window that appears, select one or more media
files, then click Add.
Shift-click to select consecutive files; Command-click to select
nonconsecutive files.
The batch area displays a new job for each source file you
add.
sequence files Import and modify surround sound files
Work with image
Page 14
3. To add transcode settings, click the Add Outputs button inside
each job in the batch area.
4. In the Settings window that appears, select one or more
settings or destinations, choose a save location, then click OK.
Tip: Shift-click to select consecutive settings; Command-click
to select nonconsecutive settings.
The output instructions that you specified appear in the job. If
you chose multiple settings or a destination with multiple
outputs, each output appears in a separate row. If you chose
a destination, its job action appears in the upper-right corner
of the job area.
5. To change the name of a file to be output, double-click its
name in the Filename column, then enter a new name.
The default name assigned to each transcoded file is the
source filename appended with the extension of the format
used during transcoding (.mov or .mp4, for example).
Note: If you see an alert icon to the left of the filename, the
filename assigned to that output row has already been used.
6. To view the properties of a setting, select an output row, then
Page 15
open the inspector by clicking the Inspector button in the
upper-right corner of the Compressor window.
Depending on the setting you’re viewing, general, video, and
audio properties are displayed in the inspector. For
information about modifying these properties, see
.
Add and remove job outputs
You can add additional transcoding instructions to a job by adding
one or more . You can also remove output rows.
Do one of the following:
Add an output row: Position the cursor over an output row in
the job, click the Add button that appears at the end of the
View and
modify setting properties
output rows
Page 16

row, then, in the window that appears, select one or more
settings, choose a location, and click OK.
Remove an output row: Position the cursor over the output
row that you want to remove, then click the Remove button
that appears at the end of the row.
Transcode a batch
After you’ve configured the jobs in your batch using the tasks
above, you can transcode the batch.
Click the Start Batch button in the lower-right corner of the
batch area and, if necessary, follow the instructions to
complete the transcoding process.
The Compressor window switches to , where you can
monitor the transcoding process.
View information about completed jobs
In Completed view, you can see how a file was transcoded.
1. Click the Completed button at the top of the Compressor
window.
Active view
Page 17
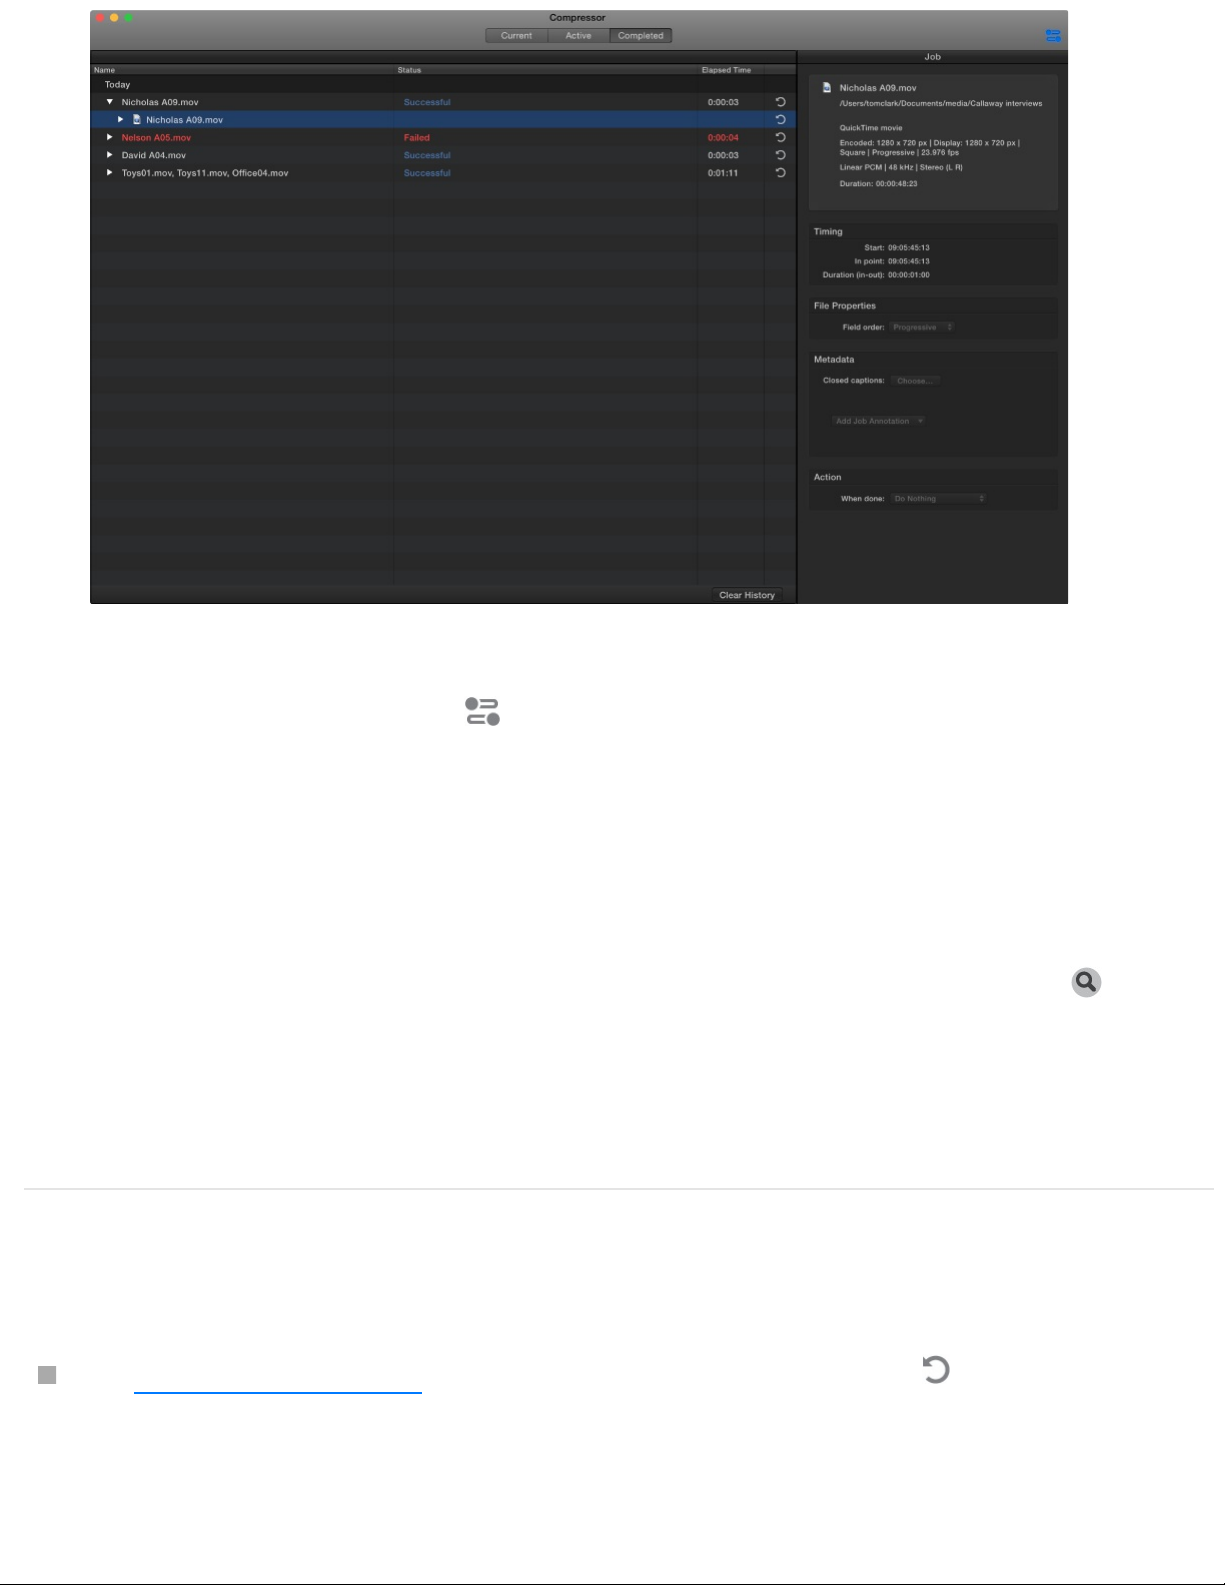
2. Select a batch, job, or transcoded file and, if necessary, click
the Inspector button .
In the inspector (on the right), you can view information about
the batch or job, or view the general, video, or audio
properties for the setting used to transcode the file.
3. To view the output file, click the Show in Finder button .
If the Show in Finder button is not visible, click the disclosure
triangles on the left side of the Completed view window.
Create a new job from a completed job
In , click a job’s Reuse button .
All of the job’s information is copied to Current view, where
you can modify the job’s setting properties and other
Completed view
Page 18

information as necessary, then transcode the new job.
Preview jobs
You can preview what your transcoded files will look like before
you process a job. The of the Compressor window
has a number of tools to help you previsualize how your final
output will appear.
Note: Retiming and interlacing property adjustments (that you
make in the Video pane of the inspector) are not displayed in the
transcoding preview.
Preview how a transcoded file will look and
sound
preview area
Page 19

1. In a job in the batch area, select the that includes
the setting you want to preview.
2. If the Comparison button in the preview area isn’t already
selected (highlighted blue), click it to turn on comparison
previewing.
3. Click the Play button .
The source file video plays on the left side of the preview area,
and a preview of the transcoded file plays on the right side.
The transcoded audio plays through your computer speakers
(or through connected speakers).
Zoom in or out in the preview area
Do one of the following:
Pinch open or closed on a trackpad.
Double-tap on a trackpad to toggle the zoom level between
100% and “Fit.”
Click the Zoom pop-up menu (in the upper-right corner of the
preview area), then choose a zoom level.
Press Shift-Z to resize the preview area to fit the current
available window space.
Tip: To increase the available preview area space, resize the
Compressor window, or drag the divider bar between the
preview area and the batch area down.
output row
Page 20

View different areas of a zoomed-in preview
area
When the preview area is zoomed in to a level greater than 100%,
you cannot view the entire image at once. However, you can scroll
the preview area to see more of the image.
Do one of the following:
Swipe the trackpad using two fingers.
Drag the inner box of the navigation control (in the upper-right
corner of the zoomed-in preview area).
View closed-caption or subtitle text in the
preview area
If your job includes subtitles or , you can view
that text in the preview area.
1. In the batch area, select the output row for the job containing
the subtitle or closed-caption data.
2. If there is more than one subtitle or closed-caption file, select
the row for the text you want to view.
3. In the preview area click the Closed Caption button .
Note: Subtitles can only be added to .
For more information about adding closed-caption data to a job,
closed-caption data
iTunes Store packages
Page 21

see .
In the preview area, you can also ,
, or .
Built-in settings
Use the built-in settings, grouped by category in the Settings
pane, to convert any file from its source format to other commonly
used formats.
Built-in setting
group
Contains Use to
Apple Devices Apple
Devices HD
(Best Quality)
Apple
Devices HD
(Most
Compatible)
SD for Apple
Devices
Create iTunescompliant H.264
files for
distribution,
including files
that can be used
for streaming
high-definition
(HD) video and
standarddefinition (SD)
video.
Add metadata
add markers set a poster
frame identify a portion of the source file to transcode
Page 22

Audio Formats AAC File
AC3 File
AIFF File
CAF File
EC3 File
MP3 File
WAVE File
Create audio
files in the most
commonly used
formats.
Motion Graphics Open EXR
Image
Sequence
QuickTime
Animation
QuickTime
ProRes with
Alpha
TIFF Image
Sequence
Create files for
use with motion
graphics
applications.
MPEG Files MPEG-2 422
Program
stream, 15
Mbps
MPEG-2
Create
broadcastquality, highresolution, high
bit rate video
Page 23

Program
stream, 15
Mbps
MPEG-2
Transport
stream, 15
Mbps
files.
Podcasting AAC for
Audio
Podcasting
H.264 for
Video
Podcasting
MP3 for
Audio
Podcasting
Create files for
audio and video
podcasting.
ProRes Apple ProRe
s 4444 XQ
Apple ProRe
s 4444
Apple ProRe
s 422 HQ
Apple ProRe
Create highquality, highperformance
files for use with
Final Cut Pro
and postproduction
workflows.
Page 24

s 422
Apple ProRe
s 422 LT
Apple ProRe
s 422 Proxy
Uncompressed Uncompress
ed 10bit 4:2:2
Uncompress
ed 8-bit 4:2:2
Create
uncompressed
10-bit and 8-bit
4:2:2 QuickTime
movies.
Video Sharing
Services
4K
HD 1080p
HD 720p
Large 540p
SD 480p
Small
Create
QuickTime files
for publishing to
video-sharing
websites like
YouTube and
Vimeo. Includes
large and small
HD and SD
settings.
You can also customize a built-in setting or create your own
custom setting from scratch. For example, you can create a
Page 25

custom setting to convert progressive video to interlaced video, or
to convert 29.97-fps video to 23.98 fps video. Before you create a
custom setting, view the related built-in settings to see if any of
those meet your needs. If one does, or if it comes close, duplicate
that setting, then modify any properties that you need to change.
The advantage of duplicating a setting, rather than creating a new
setting from scratch, is that many of the properties are already
configured, and thus, you’ll need to make fewer adjustments to
the setting. For more information, see
.
Built-in destinations
Destinations, available in the Settings pane, combine one or more
settings and a post-encode , which automates tasks
such as emailing, copying, and moving transcoded files.
Built-in
destination
Contains Use to
Add to iTunes
Library
Setting: Apple
Devices HD
(Best Quality)
Job action: Add
to iTunes Library
Create an Apple
devicecompatible
H.264 file, then
automatically
add the file to
your iTunes
library.
Create and work with
custom settings
job action
Page 26

Create Blu-ray Settings:
Dolby Digital
H.264 for
Blu-ray
Job action:
Create Blu-ray
disc
Create an H.264
elementary
stream and a
Dolby Digital
audio file, then
automatically
burn the files to
a Blu-ray disc.
Create DVD Settings:
Dolby Digital
MPEG-2 for
DVD
Job action:
Create DVD
Create an
MPEG-2
elementary
stream and a
Dolby Digital
audio file, then
automatically
burn the files to
a DVD.
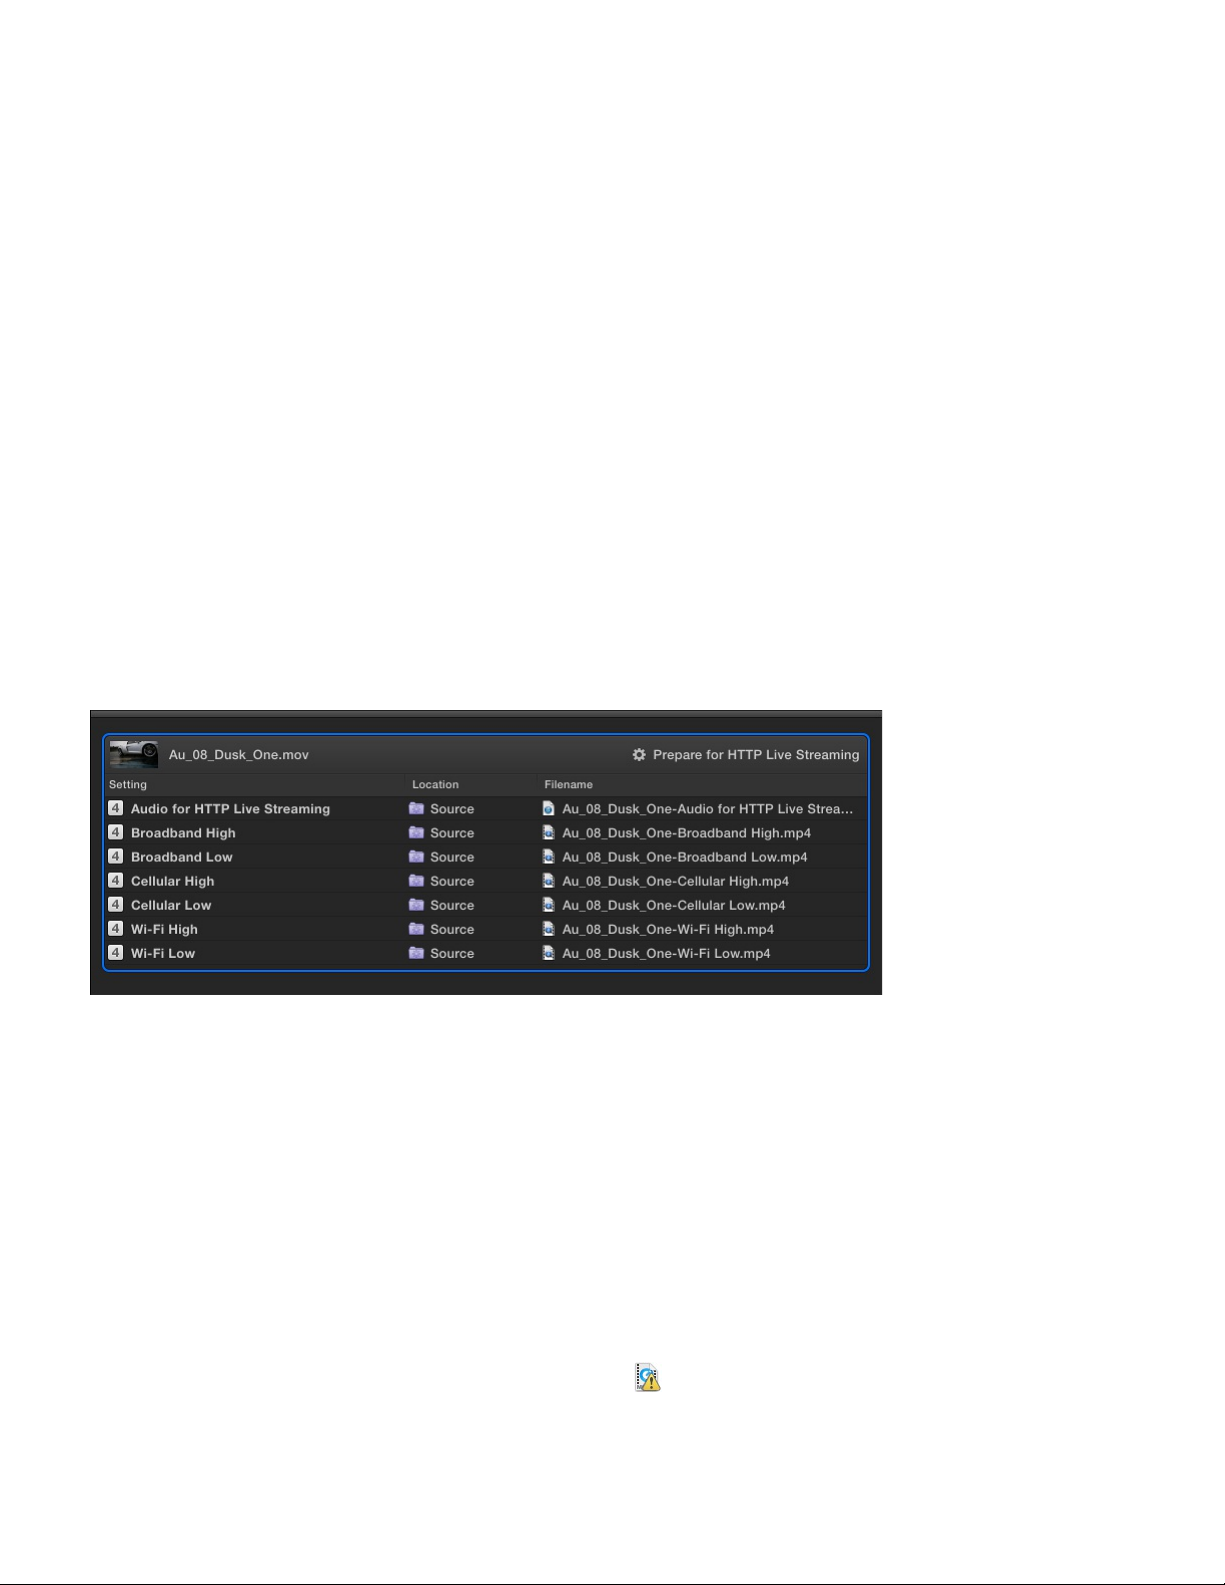
Prepare for
HTTP Live
Streaming
Settings:
Audio for
HTTP Live
Streaming
Broadband
High
Create a set of
MPEG-4 files,
then process
your transcoded
files and upload
them to the
server you
Page 27

Broadband
Low
Cellular High
Cellular Low
Wi-Fi High
Wi-Fi Low
Job action:
Prepare for
HTTP Live
Streaming
specify. The files
are compatible
with a variety of
devices, such as
smartphones
and media
players.
Publish to
Facebook
Setting: HD
720p
Job action:
Publishing to
Facebook
Create an H.264
file, then
automatically
publish it to your
Facebook
account.
Publish to Vimeo Setting: Up to
4K
Job action:
Publishing to
Vimeo
Create an H.264
file, then
automatically
publish it to your
Vimeo account.
Page 28

Publish to
YouTube
Setting: Up to
4K
Job action:
Publishing to
YouTube
Create an H.264
file, then
automatically
publish it to your
YouTube
account.
You can also create a custom destination either by duplicating an
existing destination or creating a new destination. For example,
you can modify the built-in Publish to Vimeo destination to output
a larger or smaller frame size. For more information, see
.
Built-in locations
Use the following built-in locations, available in the Locations
pane, to specify the save location of a transcoded file.
Built-in location Use to
Desktop Save the transcoded file to
the user’s desktop.
Movies Save the transcoded file to
the user’s Movies folder.
Create
and work with custom destinations
Page 29

Source Save the transcoded file to
the same location as the
source media file.
You can also create a custom location, either by duplicating an
existing location or by creating a new location. When you create a
custom location, you can also specify a filename format for
transcoded files. For more information, see .Work with locations
Page 30

Advanced adjustments overview
For basic transcoding jobs, you can use the built-in and
that come with Compressor. However, if you have
complex or custom transcoding specifications, you can make
adjustments to the built-in settings and destinations in a number
of ways:
For a custom transcoding job that you will use only once,
apply a built-in setting or destination and then modify its
properties in the inspector. See
and .
For a custom transcoding job that you will use more than
once, create a custom setting or destination (by duplicating
and modifying a built-in setting or destination). See
and
.
You can also customize the various other components of a
Compressor batch, including save locations, job properties, job
actions, and batch properties. See ,
, and .
Work with settings
Advanced adjustments
settings
destinations
View and modify setting
properties View and modify destination properties
Create and
work with custom settings Create and work with custom
destinations
Work with locations View and
modify job properties Work with batches
Page 31

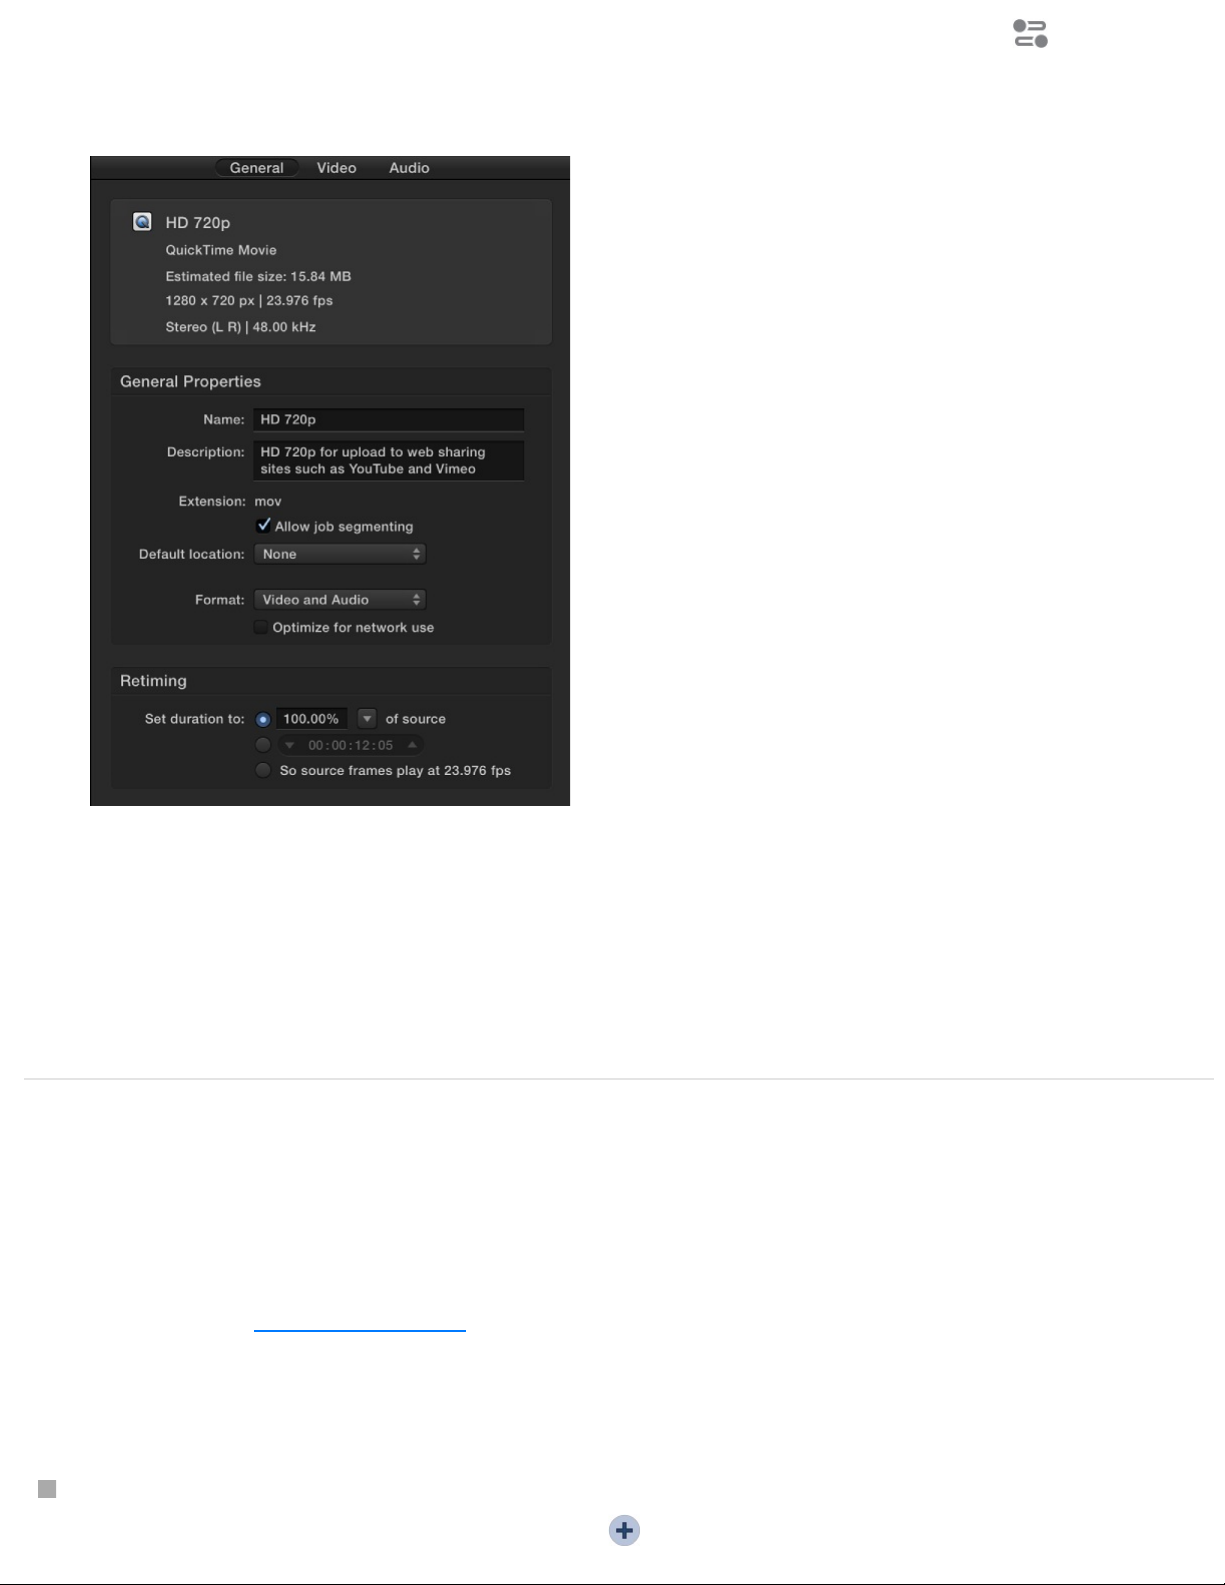
View and modify setting properties
A setting is a group of preconfigured transcoding instructions that
you apply to a source media file. When you select a built-in setting
in the Settings pane, or an applied setting in the batch area, its
properties are shown in the inspector. General properties are
displayed in the General inspector, and video and audio
properties are displayed in the Video inspector and the Audio
inspector.
View a setting’s general, video, and audio
properties
1. Select a setting by doing one of the following:
For a setting that has not been applied, click a built-in
setting in the Settings pane. (If the Settings pane is hidden,
click the Settings & Locations button in the upper-left
corner of the Compressor window, then click Settings at
the top of the pane.)
Page 32

For a setting that has already been applied to a source file,
select the output row of a job in the batch area.
2. If necessary, click the Inspector button in the upper-right
corner of the Compressor window to reveal the inspector
pane.
The inspector pane is divided into three subpanes: General,
Video, and Audio. At the top of each subpane is a summary of
the transcoding instructions of the selected setting, including
the name of the setting, the transcoding format, and the
estimated size of the output file.
Page 33

3. To view general, video, or audio properties of the selected
setting, click General, Video, or Audio at the top of the
inspector pane.
Every setting has a General inspector that displays basic
properties, including setting name, description, output
extension, and so on. Video settings have a Video inspector
and, if the transcoding format encodes audio, an Audio
inspector. Audio settings have an Audio inspector, but no
Video inspector.
To learn more about a setting’s properties, see
.
Modify an applied setting’s properties
After you apply a setting to a source file, you can modify its
properties in the inspector.
1. Select the output row of a job in the batch area.
The properties of the selected setting are displayed in the
inspector.
About formats
and settings
Page 34

2. To view general, video, or audio properties, click General,
Video, or Audio in the inspector.
If the inspector is not visible, click the Inspector button in
the upper-right corner of the Compressor window
3. To modify a property, adjust its control in the inspector.
To learn more about a setting’s properties, see
.
The type of setting you modify determines whether or not the
setting will be saved:
If you modify the properties of a custom setting, the changes
are saved automatically.
If you modify the properties of a built-in setting, the changes
are not saved.
In this case, if you want to save your changes, you can create
a custom setting. For more information, see
.
Create and work with custom settings
You can create your own custom settings, either based on an
existing built-in or custom setting, or from scratch. You can also
create groups of settings, rename a custom setting, or delete a
custom setting.
About formats
and settings
with custom settings
Create and work
Page 35

Create a custom setting by duplicating an
existing setting
To save a modified setting for future use, you must create a
custom setting. The easiest way to do this is to duplicate a built-in
setting and then modify its properties in the inspector.
1. In the Settings pane (press Shift-Command-1 if it’s hidden),
select the setting that you want to duplicate.
To reveal individual settings in a setting category, click the
disclosure triangle next to the category name.
2. Choose Duplicate from the Action pop-up menu at the
bottom of the pane.
A copy of the setting (appended with the word, “copy”)
appears in the Custom area of the Settings pane.
3. To modify the properties of your new custom setting, adjust
the controls in the General, Video, and Audio inspectors.
If the inspector is hidden, click the Inspector button in the
upper-right corner of the Compressor window.
For example, you can or
to the output file. To learn more a
setting’s properties, see .
Create a custom setting from scratch
change a setting’s frame controls
add a video or audio effect
About formats and settings
Page 36

You can also create a custom setting without duplicating a built-in
setting. Because it’s easy to accidentally introduce transcoding
errors, this method is recommended for advanced users only.
1. In the Settings pane (press Shift-Command-1 if it’s hidden),
choose New Setting from the Add pop-up menu .
2. In the dialog that appears, choose a from
the pop-up menu, enter a name and description for the
setting, then click OK.
The new setting appears in the Custom area of the Settings
pane.
3. To modify the properties of your new custom setting, adjust
the controls in the General, Video, and Audio inspectors.
If the inspector is hidden, click the Inspector button in the
upper-right corner of the Compressor window. For example,
you can or
to the output file.
To learn more about setting properties, see
.
Create a group of custom settings
If you want to organize your custom settings, you can create a
setting group. For example, if you want to quickly add several
settings at the same time, you can apply a setting group to a job.
1. In the Settings pane (press Shift-Command-1 if it’s hidden),
transcoding format
change a setting’s frame controls add a video or
audio effect
About formats and
settings
Page 37

choose New Group from the Add pop-up menu .
2. In the dialog that appears, type a name for the group and click
OK.
The group appears in the Custom area of the Settings pane
and is selected by default.
3. Drag custom settings from the Custom area of the Settings
pane into your new group.
You can add only custom settings to a custom group. If you
want to add a built-in setting to the group, you must duplicate
the setting (as described in “Create a custom setting by
duplicating an existing setting” above), then add the
duplicated setting to your group.
Rename a custom setting
Although you cannot rename a built-in setting, you can rename a
custom setting.
Do one of the following:
In the Settings pane, double-click a custom setting, type a
new name, then press Return.
Select a custom setting in the Settings pane, then, in the
General inspector, type a new name in the Name field. (If the
inspector is hidden, press Command-4.)
Page 38

Delete a custom setting
Select a custom setting in the Settings pane, then press
Delete.
About formats and settings
Compressor provides a variety of transcoding formats to create
files playable on a variety of media platforms—Apple devices ,
Blu-ray discs, websites, and so on. Each of the built-in settings in
the Settings pane uses a specific transcoding format compatible
with industry-standard platforms.
You can see which format a setting is based on by looking at the
summary information at the top of the inspector.
Platform or use Use video
settings based
on these
formats
Use audio
settings based
on these
formats
Apple TV, iPad, AAC (seeH.264 for Apple
Page 39

iPhone, iPod
touch, and the
iTunes app
)
WAVE (see
)
Web delivery,
including
YouTube,
Facebook, and
Vimeo
Blu-ray discs AC-3 (see
)
High-definition
(HD) DVD
AC-3 (see
)
Standarddefinition (SD)
DVD
AC-3 (see
)
Audio CDs AIFF (see
Devices MPEG-4
Common
Audio
Formats
QuickTime
Movie
QuickTime
Movie
H.264 for Bluray
Dolby
Digital
MPEG-2 Dolby
Digital
MPEG-2 Dolby
Digital
Common
Page 40

)
WAVE (see
)
HTTP Live
Streaming
Motion graphics
applications
Setting properties
Common Audio Formats
The built-in AIFF File, CAF File, and WAVE File settings use the
Common Audio Formats transcoding format. This format encodes
AIFF (Audio Interchange File Format), CAF (Apple Core Audio
Format), or WAVE (Waveform Audio File Format) files. You can
also create custom settings that use the Common Audio Formats
transcoding format.
Audio
Formats
MP3
Common
Audio
Formats
MPEG-4
QuickTime
Movie
Image
Sequence
Page 41

The properties of built-in and custom settings that use this
transcoding format are located in the General inspector and Audio
inspector. These properties are described below.
Important: When you add a setting (or a destination that includes
settings) to a job, Compressor analyzes the source media and
then automatically assigns the most appropriate setting properties
(based on the setting’s transcoding format and the characteristics
of your source media file). It’s recommended that you use the
automatically assigned setting properties.
Setting summary
Displays the setting name and transcoding format, as well as an
estimated output file size. When you add a setting to a job or
change the setting’s properties, this summary automatically
updates.
General properties
Name: Displays the name of the setting.
Description: Displays the description of the setting.
Extension: Displays the extension of the output file.
Tip: To output a file with a different extension, change the
value in the “File type” pop-up menu, described below.
Allow job segmenting: This checkbox is dimmed because job
segmenting is not available for settings that output only an
audio file.
Default location: Choose an item from the pop-up menu to set
Page 42

Default location: Choose an item from the pop-up menu to set
the default save location for transcoded files.
File type: Choose a file type from the pop-up menu—AIFF,
CAF, or WAVE.
Retiming
This section contains one property:
Set duration to: Sets the processing algorithm used to adjust
the frame rate during transcoding. Select either of the
following options:
[Percentage] of source: Modifies the output clip’s speed by
a percentage of the source clip’s speed. Enter a value in
the percentage field or choose a preset value from the
adjacent pop-up menu (with a downward arrow).
[Total duration]: Sets the duration of the clip. Enter a
timecode duration in the field or click the arrows to
increase or decrease the time.
For more information, see .
Audio properties
Channel layout: Use this pop-up menu to manually set the
type of . For more information about
audio channel layouts, including the surround sound channel
layout, see .
Sample rate: Use this pop-up menu to set the number of times
per second that music waveforms (samples) are captured
digitally. The higher the sample rate, the higher the audio
Retime video and audio
audio channel layout
About audio channels
Page 43

quality and the larger the file size.
Sample size: Use this pop-up menu to manually set the
of the audio signal.
Audio effects
For a list of available audio effects and instructions on how to add
an audio effect to a setting, see .
Dolby Digital
The built-in Dolby Digital settings (in the Create Blu-ray and Create
DVD destinations, as well as in the built-in AC-3 and EC-3 audio
settings) use the Dolby Digital transcoding format. This format
encodes Dolby Digital (AC-3) and Dolby Digital Plus (EC-3) audio
files that contain multiple audio channels, including 5.1 surround
sound. You can also create custom settings that use the Dolby
Digital transcoding format.
The properties of built-in and custom settings that use this
transcoding format are located in the General inspector and Audio
inspector. These properties are described below.
Important: When you add a setting (or a destination that includes
settings) to a job, Compressor analyzes the source media and
then automatically assigns the most appropriate setting properties
(based on the setting’s transcoding format and the characteristics
of your source media file). It’s recommended that you use the
automatically assigned setting properties.
sample size
Add and remove effects
Page 44

Setting summary
Displays the setting name and transcoding format, as well as an
estimated output file size. When you add a setting to a job or
change the setting’s properties, this summary automatically
updates.
General properties
Name: Displays the name of the setting.
Description: Displays the description of the setting.
Extension: Displays the extension of the output file.
Allow job segmenting: This checkbox is dimmed because job
segmenting is not available for settings that output only an
audio file.
Default location: Choose an item from the pop-up menu to set
the default save location for transcoded files.
File type: Choose a file type from the pop-up menu—Dolby
Digital or Dolby Digital Plus, an enhanced version of the Dolby
Digital audio compression technology.
Retiming
This section contains one property:
Set duration to: Sets the processing algorithm used to adjust
the frame rate during transcoding. Select either of the
following options:
Page 45

[Percentage] of source: Modifies the output clip’s speed by
a percentage of the source clip’s speed. Enter a value in
the percentage field or choose a preset value from the
adjacent pop-up menu (with a downward arrow).
[Total duration]: Sets the duration of the clip. Enter a
timecode duration in the field or click the arrows to
increase or decrease the time.
For more information, see .
Audio properties
Channel layout: Use this pop-up menu to manually set the
type of . For more information about
audio channel layouts, including the surround sound channel
layout, see .
Sample rate: Use this pop-up menu to set the number of times
per second that music waveforms (samples) are captured
digitally. The higher the sample rate, the higher the audio
quality and the larger the file size.
Note: All files intended for video and audio DVD authoring
must have a 48 kHz sample rate as required by the DVD
specification.
Target system: Use this pop-up menu to identify the system
on which you are going to play the output file. Compressor
limits options in other related properties to those appropriate
for the target system.
DVD Video: Choose this option if you’re encoding for use in
a DVD video authoring application.
DVD Audio: Choose this option if you’re encoding for use in
Retime video and audio
audio channel layout
About audio channels
Page 46

a DVD audio authoring application.
Generic AC-3: Choose this option to remove the target
system setting limit (the most generic choice).
Data rate: Use this pop-up menu to set the number of kilobits
per second (kbps) required to deliver your audio file. Using a
higher rate produces a higher-quality audio file.
Tip: For stereo encoding, rates of 192 kbps and 224 kbps are
typical and will produce good results. For Dolby Digital 5.1
encoding, a rate of 384 kbps is recommended. For 5.1 Dolby
Digital Plus encoding, a rate of 192 kbps is recommended.
Bit stream mode: Use this pop-up menu to define the audio
service contained within the Dolby Digital or Dolby Digital Plus
bitstream.
Surround mode: When using a Mono or Stereo (L R) channel
layout, this property tells the playback device whether the
two‐channel encoded bitstream contains a Dolby Surround
(Lt/Rt) program that requires Dolby Pro Logic decoding.
Choose an option from the pop-up menu:
Not Indicated: Does not send the playback device
information about whether the bitstream was encoded in
Dolby Surround.
Not Encoded: Tells the playback device that the bitstream
contains information not encoded in Dolby Surround.
Surround Encoded: Tells the playback device that the
bitstream contains information encoded in Dolby Surround.
Surround EX Mode: When using a 5.1 (L R C LFE Ls Rs), 5.0
(L R C Ls Rs), 4.1 (L R LFE Ls Rs), or 4.0 (L R Ls Rs) layout,
this property tells the playback device whether the audio has
Page 47

been encoded in Dolby Digital Surround EX. Choose an option
from the pop-up menu:
Not Indicated: Does not send the playback device
information about whether the bitstream was encoded in
Dolby Digital Surround EX.
Not Encoded: Tells the playback device that the bitstream
was not encoded in Dolby Digital Surround EX.
Surround Encoded: Tells the playback device that the
bitstream was encoded in Dolby Digital Surround EX.
Stereo downmix: Use this pop-up menu to set how to
a surround signal to a stereo signal. For more
information, see .
Important: The LFE signal may be discarded by the Dolby
Digital downmix process.
Lo/Ro center, Lo/Ro surround, Lt/Rt center, Lt/Rt surround
(for surround sound output): Use these pop-up menus to set
the decibel level at which the surround and center channels
are . Properties are enabled or disabled based on
the channel layout you choose.
DRC line mode: Use this pop-up menu to set the
compression-processing mode. The default setting, Film
Standard, is recommended for all use cases.
DRC RF mode: Use this pop-up menu to set the dynamic
range compression-processing mode for RF devices (TV sets,
cable set top boxes, or other devices that have RF
connections).
LFE low-pass filter: Select this checkbox to apply a 120 Hz
low-pass filter to the low-frequency effects (LFE) channel
downmix
About audio channels
downmixed
dynamic
range
Page 48

during output.
DC filter: Select this checkbox to apply a DC (direct current)
high-pass filter to all input channels. Although this filter
provides a simple way to remove DC offsets, note that most
mixed audio material is already free of DC offsets.
Surround channels: 90 phase-shift: This checkbox, which
applies a 90-degree phase shift to the surround channels, is
selected by default. The shift in phase decorrelates the front
and back channels and prevents the L and Ls signals from
canceling each other out if a surround-compatible downmix is
later applied to the decoded signal.
Surround channels: 3dB attenuation: Select this checkbox to
apply a 3 dB cut to the surround channels during output. This
option is intended for multichannel output (like a film
soundtrack) that is being transferred to a consumer home
theater format. Cinema surround channels are mixed 3 dB
“hot” (higher) relative to the front channels to account for
cinema amplifier gains.
Dialog normalization: Enter a value in the field to set the
loudness of the program in your sound files relative to full
modulation. The playback device uses this information to
maintain similar loudness among different AC-3 streams. The
goal is to give all AC-3–encoded audio files the same listening
level, regardless of the source file.
Audio effects
For a list of available audio effects and instructions on how to add
an audio effect to a setting, see .Add and remove effects
Page 49

H.264 for Apple Devices
The built-in Apple Devices settings use the H.264 for Apple
Devices transcoding format. You can also create custom settings
that use the H.264 for Apple Devices transcoding format.
The properties of built-in and custom settings that use this
transcoding format are located in the General, Video, and Audio
inspectors. These properties are described below.
Important: When you add a setting (or a destination that includes
settings) to a job, Compressor analyzes the source media and
then automatically assigns the most appropriate setting properties
(based on the setting’s transcoding format and the characteristics
of your source media file). It’s recommended that you use the
automatically assigned setting properties.
Setting summary
Displays the setting name and transcoding format, as well as an
estimated output file size. When you add a setting to a job or
change the setting’s properties, this summary automatically
updates.
General properties
Name: Displays the name of the setting.
Description: Displays the description of the setting.
Extension: Displays the extension of the output file (.m4v).
Page 50

Allow job segmenting: If you’ve set up distributed processing,
select this checkbox to have Compressor process the output
file using your shared computer group. For more information,
see .
Default location: Choose an item from the pop-up menu to set
the default save location for transcoded files.
Format: Use this pop-up menu to set whether the output
includes video and audio, or video only.
Optimize for network use: Select this checkbox to create a file
that will start playing after only a small portion of the file has
been downloaded from the network.
Retiming
This section contains one property:
Set duration to: Sets the processing algorithm used to adjust
the frame rate during transcoding. Select one of the following
options:
[Percentage] of source: Modifies the output clip’s speed by
a percentage of the source clip’s speed. Enter a value in
the percentage field or choose a preset value from the
adjacent pop-up menu (with a downward arrow).
[Total duration]: Sets the duration of the clip. Enter a
timecode duration in the field or click the arrows to
increase or decrease the time.
So source frames play at [frame rate] fps: Nondestructively
changes the playback speed of the clip, without discarding
frames or creating new frames. This setting has no effect
unless the “Frame rate” value in the Video inspector is
Transcode batches with multiple computers
Page 51

different than the source file’s frame rate. For example, if
you add a 10-second source file with a frame rate of 24
fps to Compressor, set the “Frame rate” property in the
Video inspector to 25 fps, then select “So source frames
play at 25 fps” in the General inspector, the duration of the
transcoded clip (at 25 fps) is 9 seconds and 15 frames.
For more information, see .
Video properties
Frame size: Use the pop-up menu to set an automatically
calculated frame size ( ) range for the output file. For
more information, see .
Pixel aspect ratio: For settings that use the H.264 format, the
pixel aspect ratio is set to Square.
Frame rate: Use this pop-up menu to set the playback rate
(the number of images displayed per second) for the output
file. For more information, see .
Field order: For settings that use the H.264 format, the field
order is set to Progressive (complete frames are scanned).
Multi-pass: Select this checkbox to turn on multi-pass
encoding that uses additional analysis of video frames to
produce a high-quality output file. For faster (single-pass)
transcoding, turn this feature off by deselecting the checkbox.
Bit rate: Select the Automatic checkbox to have Compressor
calculate the appropriate for the output file, based on
the frame size of the source file and device compatibility. If
the checkbox is not selected, you can set the bit rate by
dragging the slider or entering a value in the text field.
Retime video and audio
resolution
Modify frame size overview
Frame rate options overview
bit rate
Page 52

Frame sync: Select the Automatic checkbox to have
Compressor calculate the key frame interval rate.
Note: When Frame sync is turned on, the value in the
seconds field is zero (.0). However, the actual value is
determined during the encoding process.
If the checkbox is not selected, you can drag the slider or
enter a value in the text field to set the
(number of frames) at which you want key frames created in
your output file.
Encode for: Select a button to have Compressor transcode
the output file at either the best quality (so that the file will play
back on newer devices) or at a lesser quality (so that as many
devices as possible will play the file).
Compatible with: This list shows devices that will play the
transcoded file (compatible device types are marked with a
green circle that contains a checkmark ). When you change
the setting’s properties (frame size, frame rate, and so on), the
compatibility list automatically updates.
Cropping and padding
Customize the final cropping, sizing, and using the
Cropping & Padding properties. Cropping removes video content
from an image. Padding scales the image to a smaller size while
retaining the output image’s frame size. For more information
about these properties, see .
Cropping: Use this pop-up menu to set the dimension of the
output image. The custom option allows you to enter your own
image dimensions in the fields; other options use
key frame interval
aspect ratio
Modify frame size overview
Page 53

predetermined sizes. The Letterbox Area of Source menu item
detects image edges and automatically enters crop values to
match them. This is useful if you want to crop out the letterbox
area (the black bars above and below a widescreen image) of
a source media file.
Padding: Use this pop-up menu to set the scaling of the
output image while retaining the output image’s frame size.
The custom option allows you to enter your own scaling
dimensions in the fields; other options use predetermined
dimensions.
Quality
The following properties provide instructions for image analysis,
including frame resizing, clip retiming, and deinterlacing.
Resize filter: This pop-up menu sets the resizing method.
There are three options:
Fast (Nearest Pixel): Provides the fastest processing time.
Better (Linear Filter): Provides a medium trade-off between
processing time and output quality.
Best (Statistical Prediction): Provides the highest output
quality, but takes longer.
Retiming Quality: This pop-up menu sets the retiming method.
There are four options:
Fast (Nearest Frame): Uses a copy of the nearest available
frame to fill the new in-between frames.
Better (Motion Adaptive): Uses on areas ofdeinterlacing
Page 54

the source file that contain movement to produce goodquality output.
Best (Motion Compensated): Uses deinterlacing on areas
of the source file that contain movement to produce highquality output.
Reverse Telecine: Removes the extra fields added during
the telecine process to convert the film’s 24 fps to NTSC’s
29.97 fps. Choosing this item disables all the other Quality
controls. For more information, see .
Adaptive details: Select this checkbox to use advanced image
analysis to distinguish between noise and edge areas during
output.
Anti-aliasing level: Sets the softness level in the output image.
Double-click the value and then manually enter a new value or
drag the slider to the right to increase softness. This property
improves the quality of conversions when you’re scaling media
up. For example, when transcoding SD video to HD, antialiasing smooths jagged edges that might appear in the image.
Details level: Sets the amount of detail in the output image.
Double-click the value and then manually enter a new value or
drag the slider to set the value. This sharpening control lets
you add detail back to an image being enlarged. Unlike other
sharpening operations, the “Details level” property
distinguishes between noise and feature details, and generally
doesn’t increase unwanted grain. Increasing this value may
introduce jagged edges, however, which can be eliminated by
increasing the “Anti-aliasing level” slider.
About reverse telecine
Page 55

Video effects
For a list of available video effects and instructions on how to add
a video effect to a setting, see .
Audio properties
Channel layout: Use the pop-up menu to set the
.
Sample rate: Use this pop-up menu to set the number of times
per second that music waveforms (samples) are captured
digitally. The higher the sample rate, the higher the audio
quality and the larger the file size.
Bit rate: Use the pop-up menu to set the to use for the
output audio.
Include Dolby 5.1 Audio Track: Select the checkbox to add
surround sound as a Dolby Digital audio track for playback on
Apple TV.
Audio effects
For a list of available audio effects and instructions on how to add
an audio effect to a setting, see .
H.264 for Blu-ray
The built-in H.264 for Blu-ray setting (in the Create Blu-ray
destination) uses the H.264 for Blu-ray transcoding format. This
format encodes H.264 elementary stream files for Blu-ray and
AVCHD DVD authoring. You can also create custom settings that
Add and remove effects
audio channel
layout
bit rate
Add and remove effects
Page 56

use the H.264 for Blu-ray transcoding format.
Note: This setting encodes only a video file. Dolby Digital is the
recommended audio setting. For more information, see
.
The properties of built-in and custom settings that use this
transcoding format are located in the General inspector and Video
inspector. These properties are described below.
Important: When you add a setting (or a destination that includes
settings) to a job, Compressor analyzes the source media and
then automatically assigns the most appropriate setting properties
(based on the setting’s transcoding format and the characteristics
of your source media file). It’s recommended that you use the
automatically assigned setting properties.
Setting summary
Displays the setting name and transcoding format, as well as an
estimated output file size. When you add a setting to a job or
change the setting’s properties, this summary automatically
updates.
General properties
Name: Displays the name of the setting.
Description: Displays the description of the setting.
Extension: Displays the extension of the output file (.264).
Allow job segmenting: This checkbox is dimmed because job
Dolby
Digital
Page 57

segmenting is not available for this setting.
Default location: Select an item from the pop-up menu to set
the default save location for transcoded files.
Stream Usage: Use the pop-up menu to set whether the
output file is transcoded for Blu-ray Disc or AVCHD.
Retiming
This section contains one property:
Set duration to: Sets the processing algorithm used to adjust
the frame rate during transcoding. Select one of the following
options:
[Percentage] of source: Modifies the output clip’s speed by
a percentage of the source clip’s speed. Enter a value in
the percentage field or choose a preset value from the
adjacent pop-up menu (with a downward arrow).
[Total duration]: Sets the duration of the clip. Enter a
timecode duration in the field or click the arrows to
increase or decrease the time.
So source frames play at [frame rate] fps: Nondestructively
changes the playback speed of the clip, without discarding
frames or creating new frames. This setting has no effect
unless the “Frame rate” value in the Video inspector is
different than the source file’s frame rate. For example, if
you add a 10-second source file with a frame rate of 24
fps to Compressor, set the “Frame rate” property in the
Video inspector to 25 fps, then select “So source frames
play at 25 fps” in the General inspector, the duration of the
Page 58

transcoded clip (at 25 fps) is 9 seconds and 15 frames.
For more information, see .
Video properties
Frame size: Use the pop-up menu to set the frame size
( ) for the output file. For more information, see
.
Pixel aspect ratio: For settings that use the H.264 format, the
pixel aspect ratio is set to Square.
Frame rate: Use this pop-up menu to set the playback rate
(the number of images displayed per second) for the output
file. For more information, see .
Field order: For settings that use the H.264 format, the field
order is set to Progressive (complete frames are scanned).
Automatically select bit-rate: Select this checkbox to have
Compressor automatically compute the best for the
output file, based on the duration of the source file. If the
checkbox is not selected, you can set the average and
maximum bit rates by dragging the “Average bit rate” and
“Maximum bit rate” sliders or entering values in the text fields.
Multi-pass: Select this checkbox to turn on multi-pass
encoding that uses additional analysis of video frames to
produce a high-quality output file. For faster (single-pass)
transcoding, turn this feature off by deselecting the checkbox.
Cropping and padding
Retime video and audio
resolution
Modify frame size overview
Frame rate options overview
bit rate
Page 59

Customize the final cropping, sizing, and using the
Cropping & Padding properties. Cropping removes video content
from an image. Padding scales the image to a smaller size while
retaining the output image’s frame size. For more information
about these properties, see .
Cropping: This pop-up menu sets the dimension of the output
image. The custom option allows you to enter your own image
dimensions in the fields; other options use predetermined
sizes. The Letterbox Area of Source option detects image
edges and automatically enters crop values to match them.
This is useful if you want to crop out the letterbox area (the
black bars above and below a widescreen image) of a source
media file.
Padding: This pop-up menu sets the scaling of the output
image while retaining the output image’s frame size. The
custom option allows you to enter your own scaling
dimensions in the fields; other options use predetermined
dimensions.
Quality
The following properties set the processing algorithm used during
the transcoding process. For more information about using these
controls, see and
.
Resize filter: This pop-up menu sets the resizing method.
There are three options:
Fast (Nearest Pixel): Provides the fastest processing time.
Better (Linear Filter): Provides a medium trade-off between
aspect ratio
Modify frame size overview
Retime video and audio Modify timing and
frame rate
Page 60

processing time and output quality.
Best (Statistical Prediction): Provides the highest output
quality, but takes longer.
Retiming Quality: This pop-up menu sets the retiming method.
There are four options:
Fast (Nearest Frame): Uses a copy of the nearest available
frame to fill the new in-between frames.
Better (Motion Adaptive): Uses on areas of
the source file that contain movement to produce goodquality output.
Best (Motion Compensated): Uses deinterlacing on areas
of the source file that contain movement to produce highquality output.
Reverse Telecine: Removes the extra fields added during
the telecine process to convert the film’s 24 fps to NTSC’s
29.97 fps. Choosing this item disables all the other Quality
controls. For more information, see .
Adaptive details: Select this checkbox to use advanced image
analysis to distinguish between noise and edge areas during
output.
Anti-aliasing level: Sets the softness level in the output image.
Double-click the value and then manually enter a new value or
drag the slider to the right to increase softness. This property
improves the quality of conversions when you’re scaling media
up. For example, when transcoding SD video to HD, antialiasing smooths jagged edges that might appear in the image.
Details level: Sets the amount of detail in the output image.
Double-click the value and then manually enter a new value or
deinterlacing
About reverse telecine
Page 61

drag the slider to set the value. This sharpening control lets
you add detail back to an image being enlarged. Unlike other
sharpening operations, the “Details level” property
distinguishes between noise and feature details, and generally
doesn’t increase unwanted grain. Increasing this value may
introduce jagged edges, however, which can be eliminated by
increasing the “Anti-aliasing level” slider.
Video effects
For a list of available video effects and instructions on how to add
a video effect to a setting, see .
Image Sequence
The built-in OpenEXR Image Sequence and TIFF Image Sequence
settings use the Image Sequence transcoding format. This format
encodes a variety of image sequence file types used in motion
graphics, including TIFF, OpenEXR, JPEG, PNG, and more. You
can also create custom settings that use the Image Sequence
transcoding format.
The properties of built-in and custom settings that use this
transcoding format are located in the General inspector and Video
inspector. These properties are described below.
Important: When you add a setting (or a destination that includes
settings) to a job, Compressor analyzes the source media and
then automatically assigns the most appropriate setting properties
(based on the setting’s transcoding format and the characteristics
of your source media file). It’s recommended that you use the
Add and remove effects
Page 62

automatically assigned setting properties.
Setting summary
Displays the setting name and transcoding format, as well as an
estimated output file size. When you add a setting to a job or
change the setting’s properties, this summary automatically
updates.
General properties
Name: Displays the name of the setting.
Description: Displays the description of the setting.
Extension: Displays the extension of the output file.
Tip: To output a file with a different extension, choose a
different file type from the “Image type” pop-up menu.
Allow job segmenting: If you’ve set up distributed processing,
select this checkbox to have Compressor process the output
file using your shared computer group. For more information,
see .
Default location: Choose an item from the pop-up menu to set
the default save location for transcoded files.
Image type: Choose an image type from the pop-up menu to
set an image type for the transcoded files:
TIFF (Tagged Image File Format)
TARGA (Truevision Advanced Raster Graphics Adapter),
also referred to as TGA
Transcode batches with multiple computers
Page 63

DPX
JPEG
OpenEXR
PSD (Adobe Photoshop)
PNG (Portable Network Graphics)
Create unique output directory: Select this checkbox to create
a folder to hold the output files. When you choose this option,
the files saved to the folder will be named “frame-0,” “frame1,” “frame-2,” and so on.
Add leading zeros to frame numbers: Select this checkbox to
have Compressor add leading zeros to output filenames
(“filename-000000,” “filename-000001,” “filename-000002,”
and so on).
Retiming
This section contains one property:
Set duration to: Sets the processing algorithm used to adjust
the frame rate during transcoding. Select one of the following
options:
[Percentage] of source: Modifies the output clip’s speed by
a percentage of the source clip’s speed. Enter a value in
the percentage field or choose a preset value from the
adjacent pop-up menu (with a downward arrow).
[Total duration]: Sets the duration of the clip. Enter a
timecode duration in the field or click the arrows to
increase or decrease the time.
Page 64

So source frames play at [frame rate] fps: Nondestructively
changes the playback speed of the clip, without discarding
frames or creating new frames. This setting has no effect
unless the “Frame rate” value in the Video inspector is
different than the source file’s frame rate. For example, if
you add a 10-second source file with a frame rate of 24
fps to Compressor, set the “Frame rate” property in the
Video inspector to 25 fps, then select “So source frames
play at 25 fps” in the General inspector, the duration of the
transcoded clip (at 25 fps) is 9 seconds and 15 frames.
For more information, see .
Video properties
Frame size: Use the pop-up menu to set the frame size
( ) for the output file.
Pixel aspect ratio: Use this pop-up menu to set the pixel
aspect ratio (the ratio between the image frame width and
height). You can also modify the aspect ratio of the output file
using cropping and padding properties. For more information,
see .
Frame rate: Use this pop-up menu to set the playback rate
(the number of images displayed per second) for the output
file. For more information, see .
Field order: Use the pop-up menu to set the output scanning
method (either the field dominance or a conversion to
progressive scanning). There are four options:
Same as Source: Maintains the same scanning method
used by the source media file.
Retime video and audio
resolution
Modify frame size overview
Frame rate options overview
Page 65

Progressive: Scans complete frames (not frames divided
into interlaced fields).
Top First: Scans interlaced fields, giving dominance (field
order) to the top field, also known as field two, the upper
field, or the odd field.
Bottom First: Scans interlaced fields, giving dominance
(field order) to the bottom field, also known as field one,
the lower field, or the even field.
Scale image to preserve aspect ratio: Select this checkbox to
scale the output files to use square pixels and maintain the
original aspect ratio (which results in an increase or decrease
in the number of horizontal and vertical pixels).
Cropping and padding
Customize the final cropping, sizing, and using the
Cropping & Padding properties. Cropping removes video content
from an image. Padding scales the image to a smaller size while
retaining the output image’s frame size. For more information
about these properties, see .
Cropping: This pop-up menu sets the dimension of the output
image. The custom option allows you to enter your own image
dimensions in the fields; other options use predetermined
sizes. The Letterbox Area of Source option detects image
edges and automatically enters crop values to match them.
This is useful if you want to crop out the letterbox area (the
black bars above and below a widescreen image) of a source
media file.
aspect ratio
Modify frame size overview
Page 66

Padding: This pop-up menu sets the scaling of the output
image while retaining the output image’s frame size. The
custom option allows you to enter your own scaling
dimensions in the fields; other options use predetermined
dimensions.
Quality
The following properties determine how the video will be resized,
retimed, and otherwise adjusted when transcoded.
Resize filter: This pop-up menu sets the resizing method.
There are three options:
Fast (Nearest Pixel): Provides the fastest processing time.
Better (Linear Filter): Provides a medium trade-off between
processing time and output quality.
Best (Statistical Prediction): Provides the highest output
quality, but takes longer.
Retiming Quality: This pop-up menu sets the retiming method.
There are four options:
Fast (Nearest Frame): Uses a copy of the nearest available
frame to fill the new in-between frames.
Better (Motion Adaptive): Uses on areas of
the source file that contain movement to produce goodquality output.
Best (Motion Compensated): Uses deinterlacing on areas
of the source file that contain movement to produce highquality output.
Reverse Telecine: Removes the extra fields added during
deinterlacing
Page 67

the telecine process to convert the film’s 24 fps to NTSC’s
29.97 fps. Choosing this item disables all the other Quality
controls. For more information, see .
Adaptive details: Select this checkbox to use advanced image
analysis to distinguish between noise and edge areas during
output.
Anti-aliasing level: Sets the softness level in the output image.
Double-click the value and then manually enter a new value or
drag the slider to the right to increase softness. This property
improves the quality of conversions when you’re scaling media
up. For example, when transcoding SD video to HD, antialiasing smooths jagged edges that might appear in the image.
Details level: Sets the amount of detail in the output image.
Double-click the value and then manually enter a new value or
drag the slider to set the value. This sharpening control lets
you add detail back to an image being enlarged. Unlike other
sharpening operations, the “Details level” property
distinguishes between noise and feature details, and generally
doesn’t increase unwanted grain. Increasing this value may
introduce jagged edges, however, which can be eliminated by
increasing the “Anti-aliasing level” slider.
Video effects
For a list of available video effects and instructions on how to add
a video effect to a setting, see .
MP3
About reverse telecine
Add and remove effects
Page 68

The built-in MP3 File and MP3 for Audio Podcasting settings use
the MP3 transcoding format. This format encodes MP3 files,
which are often used for digital audio players. You can also create
custom settings that use the MP3 transcoding format.
The properties of built-in and custom settings that use this
transcoding format are located in the General inspector and Audio
inspector. These properties are described below.
Important: When you add a setting (or a destination that includes
settings) to a job, Compressor analyzes the source media and
then automatically assigns the most appropriate setting properties
(based on the setting’s transcoding format and the characteristics
of your source media file). It’s recommended that you use the
automatically assigned setting properties.
Setting summary
Displays the setting name and transcoding format, as well as an
estimated output file size. When you add a setting to a job or
change the setting’s properties, this summary automatically
updates.
General properties
Name: Displays the name of the setting.
Description: Displays the description of the setting.
Extension: Displays the extension of the output file (.mp3).
Allow job segmenting: This checkbox is dimmed because job
segmenting is not available for settings that output only an
Page 69

audio file.
Default location: Select an item from the pop-up menu to set
the default save location for transcoded files.
Retiming
This section contains one property:
Set duration to: Sets the processing algorithm used to adjust
the frame rate during transcoding. Select either of the
following options:
[Percentage] of source: Modifies the output clip’s speed by
a percentage of the source clip’s speed. Enter a value in
the percentage field or choose a preset value from the
adjacent pop-up menu (with a downward arrow).
[Total duration]: Sets the duration of the clip. Enter a
timecode duration in the field or click the arrows to
increase or decrease the time.
For more information, see .
Audio properties
Channel layout: Use the pop-up menu to set the
. For more information, see .
Sample rate: Use this pop-up menu to set the number of times
per second that music waveforms (samples) are captured
digitally. The higher the sample rate, the higher the audio
quality and the larger the file size.
Retime video and audio
audio channel
layout About audio channels
Page 70

Data rate: Use the slider to set the number of kilobits per
second (kbps) required to deliver your audio file. Using a
higher rate will produce a higher-quality audio file.
Use variable bit rate encoding: Select the checkbox to vary the
number of bits used to store the music depending on the
complexity of the music. Variable bit rate encoding can reduce
the size of the output file.
Joint stereo: Select the checkbox to have one channel carry
the information that’s identical on both channels, and another
channel carry unique information. At bit rates of 160 kbps and
below, this setting can improve the sound quality of your
converted audio.
Smart encoding adjustments: Select the checkbox to have
Compressor analyze the source file and the setting’s encoding
properties to maximize the quality of the output file.
Filter frequencies below 10 Hz: Select the checkbox to have
Compressor remove inaudible frequencies from the source file
and output a smaller and more efficient file without perceptible
loss of quality.
Audio effects
For a list of available audio effects and instructions on how to add
an audio effect to a setting, see .
MPEG-2
The built-in MPEG Files settings (including the built-in MPEG-2 for
DVD setting) use the MPEG-2 transcoding format. This format
encodes MPEG-2 stream files for SD DVD and Blu-ray authoring.
Add and remove effects
Page 71

Note: This setting encodes only a video file. Dolby Digital is the
recommended audio setting. For more information, see
.
You can also create custom settings that use the MPEG-2
transcoding format.
The properties of built-in and custom settings that use this
transcoding format are located in the General, Video, and Audio
inspectors. These properties are described below.
Important: When you add a setting (or a destination that includes
settings) to a job, Compressor analyzes the source media and
then automatically assigns the most appropriate setting properties
(based on the setting’s transcoding format and the characteristics
of your source media file). It’s recommended that you use the
automatically assigned setting properties.
Setting summary
Displays the setting name and transcoding format, as well as an
estimated output file size. When you add a setting to a job or
change the setting’s properties, this summary automatically
updates.
General properties
Name: Displays the name of the setting.
Description: Displays the description of the setting.
Extension: Displays the extension of the output file.
Dolby
Digital
Page 72

Allow job segmenting: If you’ve set up distributed processing,
select this checkbox to have Compressor process the output
file using your shared computer group. For more information,
see .
Default location: Select an item from the pop-up menu to set
the default save location for transcoded files.
Format: Use the pop-up menu to set the stream type for the
output file. There are three options:
Program Stream: This stream type contains only one
MPEG-2 content channel and its associated audio.
Program streams require an error-free delivery method
and are primarily used for storage or processing within a
computer.
Elementary Stream: This stream type contains only one
MPEG-2 content channel and no audio. When you select
this option, you should also set the “Stream usage”
property.
Transport Stream: This stream type can contain several
MPEG-2 content channels and associated audio. All the
channels are multiplexed together, allowing the receiver to
choose which to play back. Compressor supports creating
single-channel transport streams that can also include
associated audio. Transport streams can also recover from
interruptions during playback, making them ideally suited
for broadcast and streaming applications where noise or
network congestion can lead to interruptions.
Stream usage: Use this pop-up menu to specify the MPEG-2
transcoding output. Compressor modifies the available
properties based on the option you choose:
Transcode batches with multiple computers
Page 73

Generic: This option allows you complete access to all the
MPEG-2 properties. This is the only option that supports
the MPEG-2 640 x 480 video format in addition to the
standard-definition (SD) and high-definition (HD) video
formats. It’s also the only option that supports creating
transport and program streams. It supports the complete
bit rate range of 2.0 Mbps to 40.0 Mbps.
DVD: This option restricts the encoding properties to those
allowed by the SD DVD specification. These include the
NTSC and PAL video formats and a bit rate range of 2.0
Mbps to 9.0 Mbps.
Blu-ray: This option restricts the encoding properties to
those allowed by Blu-ray video discs. These include the
SD and HD video formats and a bit rate range of 10.0
Mbps to 40.0 Mbps.
Add Apple metadata: Select this checkbox to have
Compressor parse specific MPEG-2 authoring information
during the transcoding process and provide it in the output
file. The resulting file will be read faster by other applications.
Include chapter markers only: Select this checkbox to include
chapter markers, but not unnamed compression markers, in
MPEG-2 output. When this checkbox is deselected, all
markers are included in the output file. For more information
about chapter markers, see .
Retiming
This section contains one property:
Set duration to: Sets the processing algorithm used to adjust
Add markers
Page 74

the frame rate during transcoding. Select one of the following
options:
[Percentage] of source: Modifies the output clip’s speed by
a percentage of the source clip’s speed. Enter a value in
the percentage field or choose a preset value from the
adjacent pop-up menu (with a downward arrow).
[Total duration]: Sets the duration of the clip. Enter a
timecode duration in the field or click the arrows to
increase or decrease the time.
So source frames play at [frame rate] fps: Nondestructively
changes the playback speed of the clip, without discarding
frames or creating new frames. This setting has no effect
unless the “Frame rate” value in the Video inspector is
different than the source file’s frame rate. For example, if
you add a 10-second source file with a frame rate of 24
fps to Compressor, set the “Frame rate” property in the
Video inspector to 25 fps, then select “So source frames
play at 25 fps” in the General inspector, the duration of the
transcoded clip (at 25 fps) is 9 seconds and 15 frames.
For more information, see .
Video properties
Frame size: Use the pop-up menu to set the frame size
( ) for the output file.
Pixel aspect ratio: Use the pop-up menu to set the pixel
aspect ratio (the ratio between the image frame width and
height). You can also modify the aspect ratio of the output file
using cropping and padding properties. For more information,
Retime video and audio
resolution
Page 75

see .
Frame rate: Use this pop-up menu to set the playback rate
(the number of images displayed per second) for the output
file. For more information, see .
Field order: Use the pop-up menu to set the output scanning
method (either the field dominance or a conversion to
progressive scanning). There are four options:
Same as Source: Maintains the same scanning method
used by the source media file.
Progressive: Scans complete frames (not frames divided
into interlaced fields).
Top First: Scans interlaced fields, giving dominance (field
order) to the top field, also known as field two, the upper
field, or the odd field.
Bottom First: Scans interlaced fields, giving dominance
(field order) to the bottom field, also known as field one,
the lower field, or the even field.
Anamorphic: This setting applies only to standard-definition
video. If the source video’s doesn’t
match its , you can correct the image so
the output does not appear squeezed or stretched. Choose
Automatic to have Compressor scale the image based on the
frame size, or choose 16:9 or 4:3 to scale the image to a
specific aspect ratio.
Encoding mode: Choose an option from the pop-up menu to
set how Compressor encodes the output file: either faster and
lower quality, or slower and better quality. Options include:
Single Pass CBR: This is the fastest MPEG-2 encoding
Modify frame size overview
Frame rate options overview
storage aspect ratio
display aspect ratio
Page 76

mode. It provides good quality, especially at bit rates
between 5 and 9 Mbps.
Single Pass VBR: This mode aims to maintain constant
quality (at the expense of constant bit rate) for the
transcoded video file. For most standard-definition (SD)
media files at bit rates of 3.5 Mbps and above, this mode
provides good to excellent quality and transcodes quickly.
Single Pass VBR (Best): This mode provides the best
possible quality output for SD video at bit rates of 3 to 3.5
Mbps and above.
Two Pass VBR: This mode uses two passes—one pass to
analyze the entire source video stream, and a second
pass to compress the file. This mode takes longer and
provides a better-quality file than the one-pass modes,
and is recommended for source media files with a
substantial difference between the most and the least
complex scenes.
Two Pass VBR (Best): This mode provides the best
possible quality output, and outstanding quality at bit rates
of 3 to 3.5 Mbps and above for HD and SD video.
Motion estimation: This pop-up menu sets the amount of
motion processing that will be performed on the file. There are
three options:
Good: The fastest processing setting. Use this setting
when there is relatively low motion between frames. In
general, use Good with the one-pass encoding modes.
Better: Provides very good results even in the presence of
complex interlaced motion. In general, use Better with
Single Pass VBR (Best) and Two Pass VBR (Best).
Page 77

Best: The slowest processing setting. Use for the most
complex motion and for interlaced source files. In general,
use the Best mode to maximize quality when using Single
Pass VBR (Best) or Two Pass VBR (Best).
GOP structure: This property is available only when the
“Frame rate” property is set manually (does not use
Automatic).
Compressor provides three methods of grouping frames, or
“pictures,” in encoded video: as I-frames (intra-frames), Pframes (predictive frames), and B-frames (bidirectional
predictive frames). These are collectively called a Group of
Pictures (GOP). The “GOP structure” pop-up menu includes
several methods of arranging frames:
IP: Use IP only if your media contains fast motion that isn’t
encoded with sufficient quality using an IBBP or IBP
structure.
IBP: Use IBP only if your media contains fast motion that
isn’t encoded with sufficient quality using an IBBP
structure.
IBBP: Recommended for the majority of MPEG-2 encoding
situations.
Note: For most MPEG-2 encoding situations intended for use
on a DVD, choose IBBP as the GOP structure setting, and a
GOP size of 15 for NTSC, or 12 for PAL.
GOP size: This property is available when the “Frame rate”
property is set manually (does not use Automatic).
This slider specifies how many frames are contained within a
. The values available in the slider areGOP (group of pictures)
Page 78

determined by the GOP structure property (described above).
The maximum GOP size you can choose within Compressor is
15 frames (NTSC) or 12 frames (PAL and 720p). The minimum
GOP size for all video formats is 6 frames (closed GOP) or 7
frames (open GOP).
Automatically select bit rate: Select this checkbox to have
Compressor automatically compute the best for the
output file, based on the duration of the source file. To
manually adjust the bit rate, deselect the checkbox and drag
the “Average bit rate” and “Maximum bit rate” sliders (or enter
values in the adjacent fields).
YUV 422 color encoding: This property appears in most builtin settings that output MPEG-2 files. Select this checkbox to
use YUV 422 color encoding for superior chroma quality.
Cropping and padding
Customize the final cropping, sizing, and using the
Cropping & Padding properties. Cropping removes video content
from an image. Padding scales the image to a smaller size while
retaining the output image’s frame size. For more information
about these properties, see .
Cropping: This pop-up menu sets the dimension of the output
image. The custom option allows you to enter your own image
dimensions in the fields; other options use predetermined
sizes. The Letterbox Area of Source option detects image
edges and automatically enters crop values to match them.
This is useful if you want to crop out the letterbox area (the
black bars above and below a widescreen image) of a source
media file.
bit rate
aspect ratio
Modify frame size overview
Page 79

Padding: This pop-up menu sets the scaling of the output
image while retaining the output image’s frame size. The
custom option allows you to enter your own scaling
dimensions in the fields; other options use predetermined
dimensions.
Quality
The following properties determine how the video will be resized,
retimed, and otherwise adjusted when transcoded.
Resize filter: This pop-up menu sets the resizing method.
There are three options:
Fast (Nearest Pixel): Provides the fastest processing time.
Better (Linear Filter): Provides a medium trade-off between
processing time and output quality.
Best (Statistical Prediction): Provides the highest output
quality, but takes longer.
Retiming Quality: This pop-up menu sets the retiming method.
There are four options:
Fast (Nearest Frame): Uses a copy of the nearest available
frame to fill the new in-between frames.
Better (Motion Adaptive): Uses on areas of
the source file that contain movement to produce goodquality output.
Best (Motion Compensated): Uses deinterlacing on areas
of the source file that contain movement to produce highquality output.
deinterlacing
Page 80

Reverse Telecine: Removes the extra fields added during
the telecine process to convert the film’s 24 fps to NTSC’s
29.97 fps. Choosing this item disables all the other Quality
controls. For more information, see .
Adaptive details: Select this checkbox to use advanced image
analysis to distinguish between noise and edge areas during
output.
Anti-aliasing level: Sets the softness level in the output image.
Double-click the value and then manually enter a new value or
drag the slider to the right to increase softness. This property
improves the quality of conversions when you’re scaling media
up. For example, when transcoding SD video to HD, antialiasing smooths jagged edges that might appear in the image.
Details level: Sets the amount of detail in the output image.
Double-click the value and then manually enter a new value or
drag the slider to set the value. This sharpening control lets
you add detail back to an image being enlarged. Unlike other
sharpening operations, the “Details level” property
distinguishes between noise and feature details, and generally
doesn’t increase unwanted grain. Increasing this value may
introduce jagged edges, however, which can be eliminated by
increasing the “Anti-aliasing level” slider.
Video effects
For a list of available video effects and instructions on how to add
a video effect to a setting, see .
MPEG-4
About reverse telecine
Add and remove effects
Page 81

The built-in settings included in the Prepare for HTTP Live
Streaming destination and the built-in AAC setting (for audio
output) use the MPEG-4 transcoding format, which encodes files
using an H.264 encoder. This format encodes files for HTTP live
streaming and for AAC audio files used in audio podcasting and
digital music playback. To learn more about HTTP Live Streaming,
see the and other related
documents available in the .
You can also create custom settings that use the MPEG-4
transcoding format.
The properties of built-in and custom settings that use the MPEG4 transcoding format are listed below. The list includes properties
in the General, Video, and Audio inspectors.
Important: When you add a setting (or a destination that includes
settings) to a job, Compressor analyzes the source media and
then automatically assigns the most appropriate setting properties
(based on the setting’s transcoding format and the characteristics
of your source media file). It’s recommended that you use the
automatically assigned setting properties.
Setting summary
Displays the setting name and transcoding format, as well as an
estimated output file size. When you add a setting to a job or
change the setting’s properties, this summary automatically
updates.
HTTP Live Streaming Overview
Mac Developer Library
Page 82

General properties
Name: Displays the name of the setting.
Description: Displays the description of the setting.
Extension: Displays the extension of the output file (.mp4 or
.m4a).
Allow job segmenting: If you’ve set up distributed processing,
select this checkbox to have Compressor process the output
file using your shared computer group. For more information,
see .
Note: Job segmenting is not available when outputting an
MPEG-4 audio file or when the Multi-pass checkbox is
selected in the Video inspector.
Default location: Choose an item from the pop-up menu to set
the default save location for transcoded files.
Format: Use this pop-up menu to set whether the output
includes video and audio, video only, or audio only.
Optimize for network use: Select this checkbox to create a file
that will start playing after only a small portion of the file has
been downloaded from the network.
Enhanced podcast: Select this checkbox to have Compressor
embed podcasting information (annotations, markers, and
artwork) into the output media file. For more information about
annotations, see . For more information about
chapter markers, see .
Retiming
Transcode batches with multiple computers
Add metadata
Add markers
Page 83

This section contains one property:
Set duration to: Sets the processing algorithm used to adjust
the frame rate during transcoding. Select one of the following
options:
[Percentage] of source: Modifies the output clip’s speed by
a percentage of the source clip’s speed. Enter a value in
the percentage field or choose a preset value from the
adjacent pop-up menu (with a downward arrow).
[Total duration]: Sets the duration of the clip. Enter a
timecode duration in the field or click the arrows to
increase or decrease the time.
So source frames play at [frame rate] fps: Nondestructively
changes the playback speed of the clip, without discarding
frames or creating new frames. This setting has no effect
unless the “Frame rate” value in the Video inspector is
different than the source file’s frame rate. For example, if
you add a 10-second source file with a frame rate of 24
fps to Compressor, set the “Frame rate” property in the
Video inspector to 25 fps, then select “So source frames
play at 25 fps” in the General inspector, the duration of the
transcoded clip (at 25 fps) is 9 seconds and 15 frames.
Note: This option is not available when outputting an
MPEG-4 audio file.
For more information, see .
Video properties
Frame size: Use the pop-up menu to set the frame size
Retime video and audio
Page 84

( ) for the output file.
Pixel aspect ratio: Use the pop-up menu to set the pixel
aspect ratio (the ratio between the image frame width and
height). You can also modify the aspect ratio of the output file
using cropping and padding properties. For more information,
see .
Frame rate: Use this pop-up menu to set the playback rate
(the number of images displayed per second) for the output
file. For more information, see .
Field order: Use the pop-up menu to set the output scanning
method (either the field dominance or a conversion to
progressive scanning). There are four options:
Same as Source: Maintains the same scanning method
used by the source media file.
Progressive: Scans complete frames (not frames divided
into interlaced fields).
Top First: Scans interlaced fields, giving dominance (field
order) to the top field, also known as field two, the upper
field, or the odd field.
Bottom First: Scans interlaced fields, giving dominance
(field order) to the bottom field, also known as field one,
the lower field, or the even field.
H.264 profile: Use the pop-up menu to set the video
compression for the output file. There are three options:
High: Provides high quality output.
Note: This setting is not compatible with older H.264
playback devices.
resolution
Modify frame size overview
Frame rate options overview
Page 85

Main: Similar to the Baseline profile, with additional support
for standard-definition (SD) video requirements.
Baseline: Primarily for video conferencing and mobile
applications.
Entropy mode: Use the pop-up menu to set the entropy mode
to CABAC, which provides higher-quality output, or CAVLC,
which is faster.
Key frame interval: Enter a value in the text field to set the
(number of frames) at which you want key
frames created in your output file. Alternatively, you can select
Automatic to have Compressor choose the key frame interval
rate (the displayed value is 0 with Automatic on; the actual
value is determined during the encoding process).
Data rate: This pop-up menu allows you to choose a data rate
for your video based on any of three options:
Custom: Enables a slider to set the number of kilobytes
per second (kbps) to which you want to limit your video
signal. Higher rates allow higher-quality video, but generate
larger files that are slower to download or transmit.
Computer playback: Creates a larger file with higher
quality.
Web publishing: Creates a smaller file (of lower quality)
suitable for hosting on a website.
Important: When you set a data rate, you override other
codec-quality properties because the codec compresses the
file as much as it needs to based on its data-rate limit.
Multi-pass: Select this checkbox to turn on multi-pass
encoding that uses additional analysis of video frames to
key
frame interval
Page 86

produce a high-quality output file. For faster (single-pass)
transcoding, turn this feature off by deselecting the checkbox.
Allow frame reordering: Select this checkbox to potentially
provide a better-quality output file by allowing Compressor to
reorder video frames during transcoding.
Cropping and padding
Customize the final cropping, sizing, and using the
Cropping & Padding properties. Cropping removes video content
from an image. Padding scales the image to a smaller size while
retaining the output image’s frame size. For more information
about these properties, see .
Cropping: This pop-up menu sets the dimension of the output
image. The custom option allows you to enter your own image
dimensions in the fields; other options use predetermined
sizes. The Letterbox Area of Source option detects image
edges and automatically enters crop values to match them.
This is useful if you want to crop out the letterbox area (the
black bars above and below a widescreen image) of a source
media file.
Padding: This pop-up menu sets the scaling of the output
image while retaining the output image’s frame size. The
custom option allows you to enter your own scaling
dimensions in the fields; other options use predetermined
dimensions.
Quality
aspect ratio
Modify frame size overview
Page 87

The following properties determine how the video will be resized,
retimed, and otherwise adjusted when transcoded.
Resize filter: This pop-up menu sets the resizing method.
There are three options:
Fast (Nearest Pixel): Provides the fastest processing time.
Better (Linear Filter): Provides a medium trade-off between
processing time and output quality.
Best (Statistical Prediction): Provides the highest output
quality, but takes longer.
Retiming Quality: This pop-up menu sets the retiming method.
There are four options:
Fast (Nearest Frame): Uses a copy of the nearest available
frame to fill the new in-between frames.
Better (Motion Adaptive): Uses on areas of
the source file that contain movement to produce goodquality output.
Best (Motion Compensated): Uses deinterlacing on areas
of the source file that contain movement to produce highquality output.
Reverse Telecine: Removes the extra fields added during
the telecine process to convert the film’s 24 fps to NTSC’s
29.97 fps. Choosing this item disables all the other Quality
controls. For more information, see .
Adaptive details: Select this checkbox to use advanced image
analysis to distinguish between noise and edge areas during
output.
deinterlacing
About reverse telecine
Page 88

Anti-aliasing level: Sets the softness level in the output image.
Double-click the value and then manually enter a new value or
drag the slider to the right to increase softness. This property
improves the quality of conversions when you’re scaling media
up. For example, when transcoding SD video to HD, antialiasing smooths jagged edges that might appear in the image.
Details level: Sets the amount of detail in the output image.
Double-click the value and then manually enter a new value or
drag the slider to set the value. This sharpening control lets
you add detail back to an image being enlarged. Unlike other
sharpening operations, the “Details level” property
distinguishes between noise and feature details, and generally
doesn’t increase unwanted grain. Increasing this value may
introduce jagged edges, however, which can be eliminated by
increasing the “Anti-aliasing level” slider.
Video effects
For a list of available video effects and instructions on how to add
a video effect to a setting, see .
Audio properties
Channel layout: Use the pop-up menu to set the
.
Sample rate: Use this pop-up menu to set the number of times
per second that music waveforms (samples) are captured
digitally. The higher the sample rate, the higher the audio
quality and the larger the file size.
Add and remove effects
audio channel
layout
Page 89

Data rate: Use the slider to set the number of kilobits per
second (kbps) required to deliver your audio file. Using a
higher rate will produce a higher-quality audio file.
Audio effects
For a list of available audio effects and instructions on how to add
an audio effect to a setting, see .
QuickTime Export Components
You can use the QuickTime Export Components transcoding
format to output files for a variety of additional formats that can
play on third-party devices and operating systems, such as
mobile phones. You can transcode files for 3G, AVI, and Apple
iPod, or transcode using third-party plug-ins that you’ve installed
on your system.
The properties of custom settings that use this transcoding format
are located in the General inspector and Video inspector. These
properties are described below.
Important: When you add a setting (or a destination that includes
settings) to a job, Compressor analyzes the source media and
then automatically assigns the most appropriate setting properties
(based on the setting’s transcoding format and the characteristics
of your source media file). It’s recommended that you use the
automatically assigned setting properties.
Setting summary
Add and remove effects
Page 90

Displays the setting name and transcoding format, as well as an
estimated output file size. When you add a setting to a job or
change the setting’s properties, this summary automatically
updates.
General properties
Name: Displays the name of the setting.
Description: Displays the description of the setting.
Extension: Displays the extension of the output file, based on
the setting chosen in the “Encoder type” pop-up menu,
described below.
Allow job segmenting: This option is not available for the
default encoder types that are included with Compressor. It
may be available for other encoders.
Default location: Select an item from the pop-up menu to set
the default save location for transcoded files.
Encoder type: Use this pop-up menu to choose from the
available export component output formats (plug-ins). For
some encoder types, you can customize the plug-in via the
Settings property, described below.
Settings: You can modify the export component output format
that you selected in the Encoder type pop-up menu by
clicking the Configure button and adjusting the format’s
properties in the window that appears.
Important: Use the third-party export module user interface
to explicitly enter the image size and frame rate for the output
file. Do not leave the Image Size and Frame Rate settings in
Page 91

the third-party user interface at their default values.
Video properties
The properties in this section are set based on the file format
assigned to the setting. You can change the file format in the
General pane of the inspector; for more information, see the
Settings property in the “General properties” section, above.
Frame size: For settings that use the QuickTime Export
Component format, this property is set to Automatic.
Pixel aspect ratio: For settings that use the QuickTime Export
Component format, this property is set to Square. You can
also modify the aspect ratio of the output file using cropping
and padding properties; for more information, see
.
Frame rate: Use this pop-up menu to set the playback rate
(the number of images displayed per second) for the output
file. For more information, see .
Field order: For settings that use the QuickTime Export
Component format, the field order is set automatically.
Cropping and Padding
Customize the final cropping, sizing, and using the
Cropping & Padding properties. Cropping removes video content
from an image. Padding scales the image to a smaller size while
retaining the output image’s frame size. For more information
about these properties, see .
Modify
frame size overview
Frame rate options overview
aspect ratio
Modify frame size overview
Page 92

Cropping: This pop-up menu sets the dimension of the output
image. The custom option allows you to enter your own image
dimensions in the fields; other options use predetermined
sizes. The Letterbox Area of Source option detects image
edges and automatically enters crop values to match them.
This is useful if you want to crop out the letterbox area (the
black bars above and below a widescreen image) of a source
media file.
Padding: For settings that use the QuickTime Export
Component format, the Padding property is not available.
Video effects
For a list of available video effects and instructions on how to add
a video effect to a setting, see .
QuickTime Movie
Many of the built-in settings in the Settings pane use the
QuickTime Movie format. This format encodes video files for many
uses. You can also create custom settings that use the QuickTime
Movie transcoding format.
The properties of built-in and custom settings that use this format
are located in the General, Video, and Audio inspectors. These
properties are described below.
Important: When you add a setting (or a destination that includes
settings) to a job, Compressor analyzes the source media and
then automatically assigns the most appropriate setting properties
(based on the setting’s transcoding format and the characteristics
Add and remove effects
Page 93

of your source media file). It’s recommended that you use the
automatically assigned setting properties.
Setting summary
Displays the setting name and transcoding format, as well as an
estimated output file size. When you add a setting to a job or
change the setting’s properties, this summary automatically
updates.
General properties
Name: Displays the name of the setting.
Description: Displays the description of the setting.
Extension: Displays the extension of the output file (.mov).
Allow job segmenting: If you’ve set up distributed processing,
select this checkbox to have Compressor process the output
file using your shared computer group. For more information,
see .
Default location: Select an item from the pop-up menu to set
the default save location for transcoded files.
Format: Use the pop-up menu to set whether the output
includes video and audio, video only, or audio only.
Optimize for network use: Select this checkbox to create a file
that will start playing after only a small portion of the file has
been downloaded from the network.
Transcode batches with multiple computers
Page 94

Retiming
This section contains one property:
Set duration to: Sets the processing algorithm used to adjust
the frame rate during transcoding. Select one of the following
options:
[Percentage] of source: Modifies the output clip’s speed by
a percentage of the source clip’s speed. Enter a value in
the percentage field or choose a preset value from the
adjacent pop-up menu (with a downward arrow).
[Total duration]: Sets the duration of the clip. Enter a
timecode duration in the field or click the arrows to
increase or decrease the time.
So source frames play at [frame rate] fps: Nondestructively
changes the playback speed of the clip, without discarding
frames or creating new frames. This setting has no effect
unless the “Frame rate” value in the Video inspector is
different than the source file’s frame rate. For example, if
you add a 10-second source file with a frame rate of 24
fps to Compressor, set the “Frame rate” property in the
Video inspector to 25 fps, then select “So source frames
play at 25 fps” in the General inspector, the duration of the
transcoded clip (at 25 fps) is 9 seconds and 15 frames.
For more information, see .
Video properties
Frame size: Use the pop-up menu to set the frame size
( ) for the output file. For more information, see
.
Retime video and audio
resolution
Modify frame size overview
Page 95

Pixel aspect ratio: Use this pop-up menu to set the pixel
aspect ratio (the ratio between the image frame width and
height). You can also modify the aspect ratio of the output file
using cropping and padding properties; for more information,
see .
Note: This property can be set when the frame size property
uses a specific frame size (for example, 720 x 480).
Frame rate: Use this pop-up menu to set the playback rate
(the number of images displayed per second) for the output
file. For more information, see .
Field order: Use the pop-up menu to set the output scanning
method (either the field dominance or a conversion to
progressive scanning). There are four options:
Same as Source: Maintains the same scanning method
used by the source media file.
Progressive: Scans complete frames (not frames divided
into interlaced fields).
Top First: Scans interlaced fields, giving dominance (field
order) to the top field.
Bottom First: Scans interlaced fields, giving dominance
(field order) to the bottom field.
Note: If you use a QuickTime movie preset based on the
H.264 format (such as any of the presets in the Video Sharing
Services settings), the “Field order” pop-up menu is
automatically set to Progressive, and the other options are
disabled. To set the field order to an interlaced option, click
the Change button in the “QuickTime settings” area of the
Video inspector, then click the Encoding pop-up menu and
Modify frame size overview
Frame rate options overview
Page 96

choose “Faster encode (Single-pass).” Click OK, then click the
“Field order” pop-up menu and choose an interlace option
(Top First or Bottom First).
Add clean aperture information: Select this checkbox to define
clean picture edges in the output file. To do this, information is
added to the output file to define how many pixels to hide,
ensuring that no artifacts appear along the edges. When you
play the output file in QuickTime Player, the pixel aspect ratio
will be slightly altered; however, note that this process does
not affect the actual number of pixels in the output file—it only
controls whether information is added to the file that a player
can use to hide the edges of the picture.
QuickTime settings: You can change the type of video
compression by clicking the Change button and using the
controls in the Standard Video Compression Settings window
to modify the compression as appropriate. After you click OK
and close the window, the setting’s video properties update to
show your changes.
When QuickTime settings are set to H.264, a few additional
controls appear:
Data rate: This pop-up menu allows you to choose a data rate
for your video based on any of four options:
Custom: Enables a value field to set the number of
kilobytes per second (kbps) to which you want to limit your
video signal. Higher rates allow higher-quality video, but
generate larger files that are slower to download or
transmit.
Computer playback: Creates a larger file with higher
quality.
Page 97

Web publishing: Creates a smaller file (of lower quality)
suitable for hosting on a website.
Automatic: Attempts to identify and apply the lowest
possible data rate while maintaining maximum visual
quality.
Important: When you set a data rate, you override other
codec quality properties because the codec compresses the
file as much as it needs to based on its data-rate limit.
H.264 profile: Use the pop-up menu to set the video
compression for the output file. There are three options:
High: Provides high quality output.
Note: This setting is not compatible with older H.264
playback devices.
Main: Similar to the Baseline profile, with additional support
for standard-definition (SD) video requirements.
Baseline: Primarily for video conferencing and mobile
applications.
Entropy mode: Use the pop-up menu to set the entropy mode
to CABAC, which provides higher-quality output, or CAVLC,
which is faster.
Cropping and Padding
Customize the final cropping, sizing, and using the
Cropping & Padding properties. Cropping removes video content
from an image. Padding scales the image to a smaller size while
retaining the output image’s frame size. For more information
aspect ratio
Page 98

about these properties, see .
Cropping: This pop-up menu sets the dimension of the output
image. The custom option allows you to enter your own image
dimensions in the fields; other options use predetermined
sizes. The Letterbox Area of Source option detects image
edges and automatically enters crop values to match them.
This is useful if you want to crop out the letterbox area (the
black bars above and below a widescreen image) of a source
media file.
Padding: This pop-up menu sets the scaling of the output
image while retaining the output image’s frame size. The
custom option allows you to enter your own scaling
dimensions in the fields; other options use predetermined
dimensions.
Quality
The following properties determine how the video will be resized,
retimed, and otherwise adjusted when transcoded.
Resize filter: This pop-up menu sets the resizing method.
There are three options:
Fast (Nearest Pixel): Provides the fastest processing time
and with lower-quality output.
Better (Linear Filter): Provides a medium trade-off between
processing time and output quality.
Best (Statistical Prediction): Provides the highest output
quality, but takes longer.
Modify frame size overview
Page 99

Retiming Quality: This pop-up menu sets the retiming method.
There are four options:
Fast (Nearest Frame): Uses a copy of the nearest available
frame to fill the new in-between frames.
Better (Motion Adaptive): Uses on areas of
the source file that contain movement to produce goodquality output.
Best (Motion Compensated): Uses deinterlacing on areas
of the source file that contain movement to produce highquality output.
Reverse Telecine: Removes the extra fields added during
the telecine process to convert the film’s 24 fps to NTSC’s
29.97 fps. Choosing this item disables all the other Quality
controls. For more information, see .
Adaptive details: Select this checkbox to use advanced image
analysis to distinguish between noise and edge areas during
output.
Anti-aliasing level: Sets the softness level in the output image.
Double-click the value and then manually enter a new value or
drag the slider to the right to increase softness. This property
improves the quality of conversions when you’re scaling media
up. For example, when transcoding SD video to HD, antialiasing smooths jagged edges that might appear in the image.
Details level: Sets the amount of detail in the output image.
Double-click the value and then manually enter a new value or
drag the slider to set the value. This sharpening control lets
you add detail back to an image being enlarged. Unlike other
sharpening operations, the “Details level” property
distinguishes between noise and feature details, and generally
deinterlacing
About reverse telecine
Page 100

doesn’t increase unwanted grain. Increasing this value may
introduce jagged edges, however, which can be eliminated by
increasing the “Anti-aliasing level” slider.
Video effects
For a list of available video effects and instructions on how to add
a video effect to a setting, see .
Audio properties
Channel layout: Use the pop-up menu to set the
. For more information, see .
Sample rate: Use this pop-up menu to set the number of times
per second that music waveforms (samples) are captured
digitally. The higher the sample rate, the higher the audio
quality and the larger the file size.
Sample size: Use the pop-up menu to manually set the
of the audio signal.
Copy audio tracks from source: Select the checkbox to copy
the audio files from the source file (instead of re-encoding
them during the transcoding process).
QuickTime settings: You can add an audio codec that you’ve
installed on your system to customize the Compressor setting.
To change the codec used in your setting, or to modify the
codec’s properties, click the Change button and use the
controls in the Sound Settings window to modify the codec as
appropriate. After you click OK and close the window, the
setting’s audio properties update to show your changes.
Add and remove effects
audio channel
layout About audio channels
sample size
 Loading...